VeryKool USA S732 Mobile Phone User Manual X3508VK
VeryKool USA Inc Mobile Phone X3508VK
Contents
- 1. User manual
- 2. user manual
User manual
User Manual
Battery
Mobile phone when charging, never remove the battery, as this can lead
to cell phone damage. In addition, please do not attempt to disassemble
the phone (or the warranty might fail). Only use package which includes
charger and USB cable to charge the battery.
Select the appropriate tariff plan
Based on your usage, cell phones may use a lot of network traffic in a
short time. It is strongly recommended that you first consult the
operators charge scheme, and then start using the phone. Understand the
Privacy Act for recording phone calls and time in some countries have
established strict regulations. It is recommended that you start using
the phone's voice recording before you understand the laws of the country
where; this will be a good move.
First open mobile phone, in the settings-add a company account in the
accounts and sync, synchronization of mail, calendar, and contacts. Be
sure to log in to your Google account and you can use Gmail on mobile
for Android Market and other Google applications.
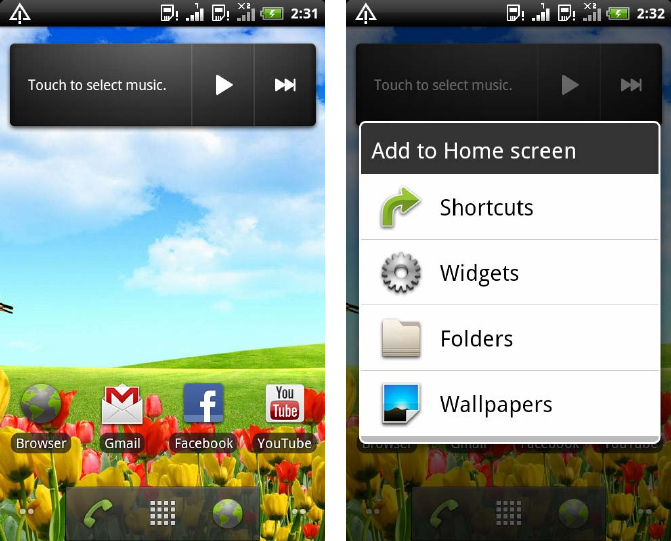
Main screen
You can easily replace the wallpaper on the main screen for phones. It
will be easy to use small tools and shortcuts for such applications. On
the main screen just long press with your finger you can add options window
appears.
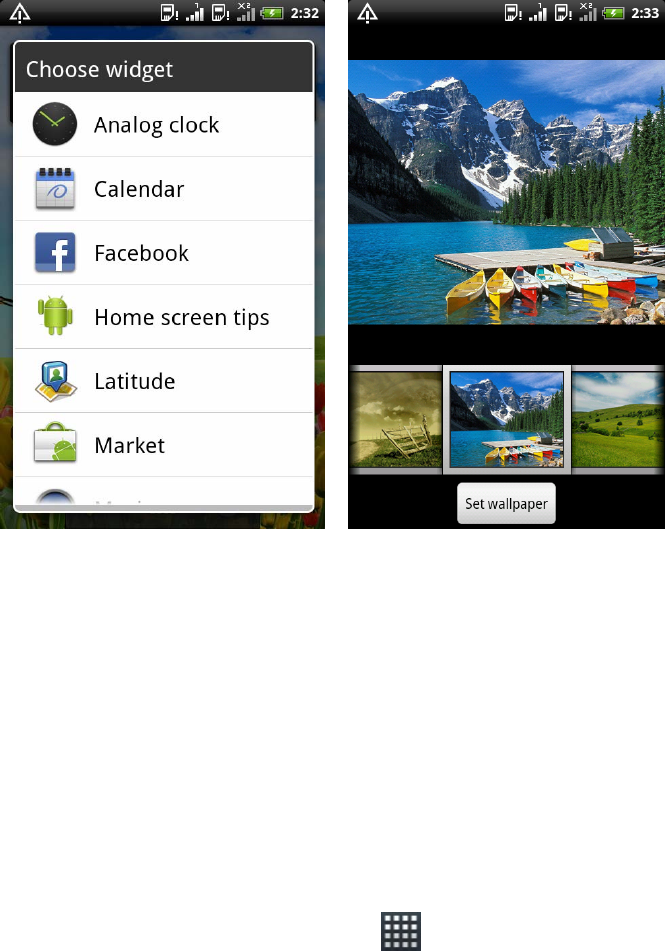
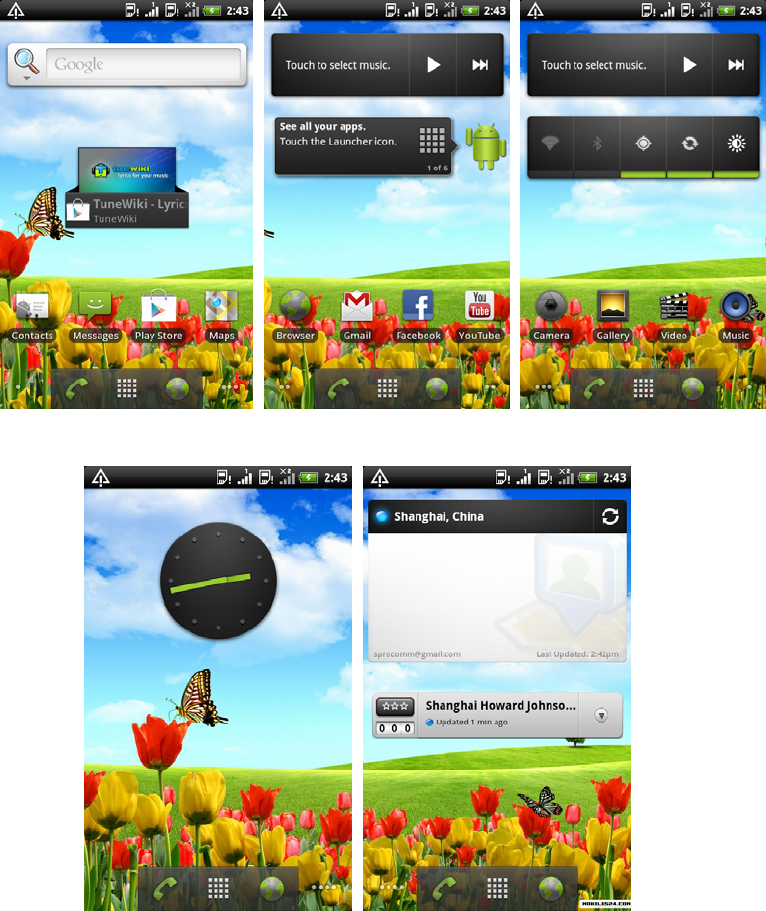
Personal
Home screen has five panels on the main screen which allows you
to customize the applications. By sliding fingers around it you can switch
between the five screens. Long press the icon on the main screen with
to show all five panels and click one of them to switch to the desired
screen. Director of master with your finger on the screen in blank, and
bring up add a personalized widget.
Connect to the Internet
You can use the data connection or Wi-Fi connection on the
network.
Using the data connection
When you first turn on the phone (we need to insert SIM card into the
SIM card slot), data services of the operator on the mobile phone will
automatically connect. If you insert two SIM cards, the default data
connection in SIM card 1.
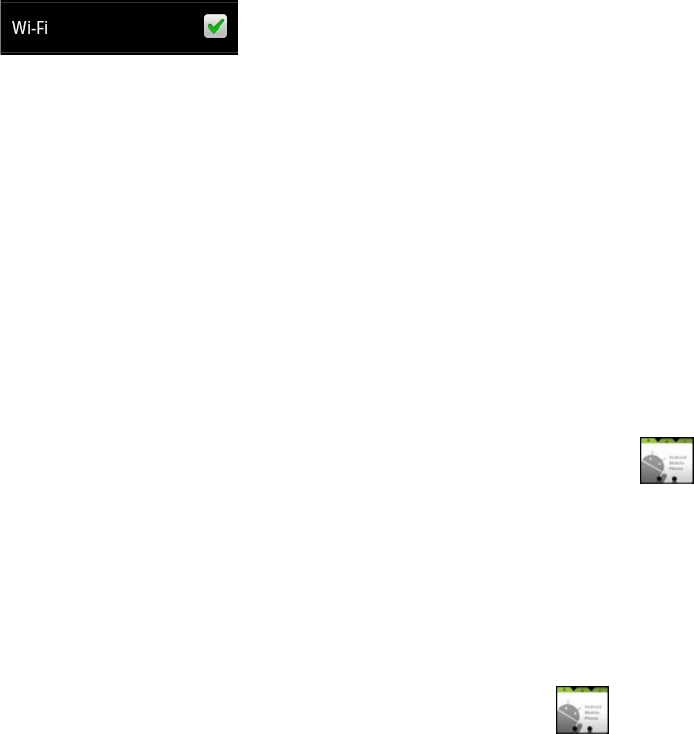
Using the Wi-Fi
1. in the home screen, click on the lower left of the screen the menu
key.
2. Select Settings > Wireless & networks.
3. Select the Wi-Fi option, to turn on Wi-Fi.
4. Click on the Wi-Fi settings and then select a Wi-Fi network to connect.
Free to contact
If you have added and login account on the mobile phone,
‘Contacts’ application will also display contacts in your accounts.
Even if the SIM card has a lot of contacts, you only need one step to
import all contacts phone.
1. in the list of programs, click on the Address book .
2. press the menu key, and then click more > import/export > import from
SIM card. If your mobile phone has landed in Exchange accounts, select
the account which you want to import.
3. press the menu key, and then click Import all.
Also can add contacts:
1. in the list of programs, click address book .
2. press the menu key, and then click new contact, and then enter
information for a contact in the relevant input field.
3. Enter contact information completely & click Finish. Thus you can save
contact.

E-mail landing
If you have Google account, you can send and receive Gmail messages
directly. In the list of programs, click on Gmail icon . You can also
use your email application to set and manage your other e-mail accounts
including POP3, IMAP or Exchange account.
1. in the list of programs, click on send e-mail .
2. After entering, type the email address and password, click on the
settings manually, click the type of e-mail account you want to set. If
this screen does not appear, press the menu key > account, press the menu
key again > add account, then you can enter the e-mail address and password
and choose the e-mail account type.
3. Follow the instructions on the screen and complete the email account
settings.
Mail application so that you can
view all email accounts from the
same location, no longer have to
switch between different accounts.
You only need to select the Inbox
to merge. E-mail information is
displayed in different color lines
so that you can distinguish the
emails easily.
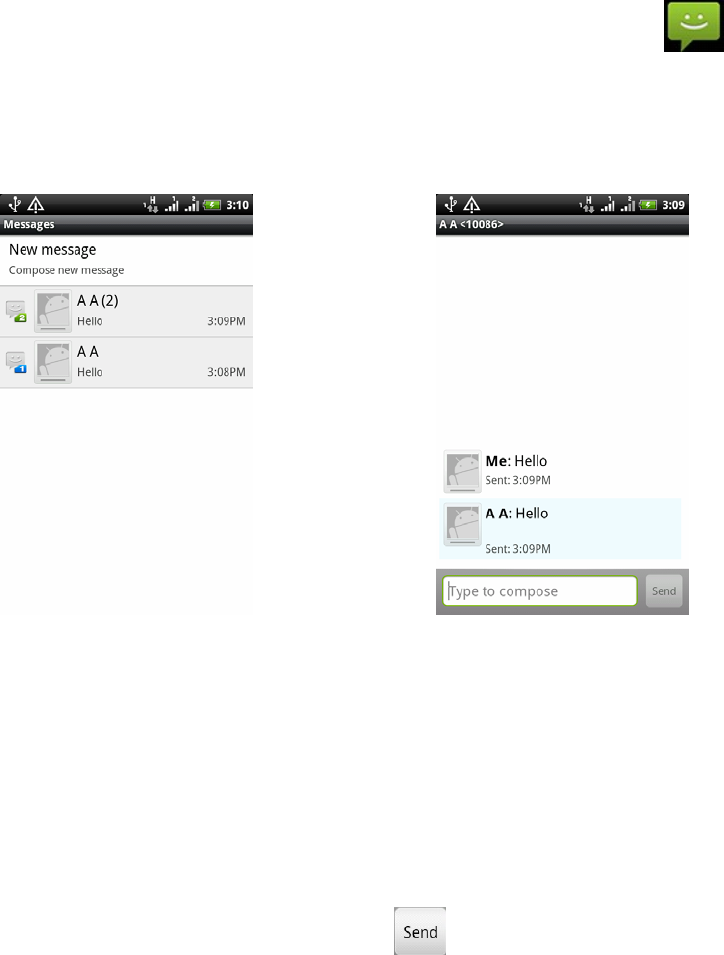
Messages
Keep in touch with important people in your life. You can use Messages
application to write and send text messages (SMS) and multimedia messages
(MMS). In the list of programs, click the Messages icon then all
the information in the opening screen, different SIM cards of all sent
and received messages, according to the classification of contact name
or phone number in order to dialogue are displayed.
contacts classified interface
messages reciprocation interface
Slide on the screen with your finger, to scroll dialog list up or down.
Click the contact name or phone number to view information.
Dialog interface in the entry bar to enter the information you want to
send, and then click on send icon to send information on the right
side out.

Mobile phone dialing
In addition to make a call from the telephone dial-up interface,
you can also select text message or in an e-mail message for the number
to make outgoing calls; or from the point after the selected contacts
in address book, click the dial button . Most SIM cards are built by
the operator in the set PIN code (personal identification number). When
asked to enter a PIN code, enter the PIN code and then click OK. If you
incorrectly enter the PIN code three times in succession, the SIM card
will be locked immediately. But don't worry about it! You only need to
ask the operator and find out your PUK code (PIN code unlock).
Call from the dial-up interface
1. Click telephone in the main interface; enter the dial-up interface.
2. the first few numbers on the dial keypad to enter the phone number,
dial-up interface starts to show, as well as the number of contact list.
If you enter the wrong number, please click to delete it. To delete the
content of the total input, press and hold on the input and choose delete.
3. to call, do one of the following steps:
· click on list of key phone numbers or contact in the rear
· After you enter the number, click the button below .During a call
or dial, in the notification bar indicates the call State .
video call
Through the video phone you can face to face communication with friends
If you want to use this function, you need to be in a support video call
sim card, and the other side of the phone also support video calling
function
If you want to make a video call, do one of the following steps:
1.Input the phone numbers ,click the button below

2.click on list of key phone numbers,Click on the phone in the details
Successfully established a video call, you can see on the screen each
other's picture, face to face communication.
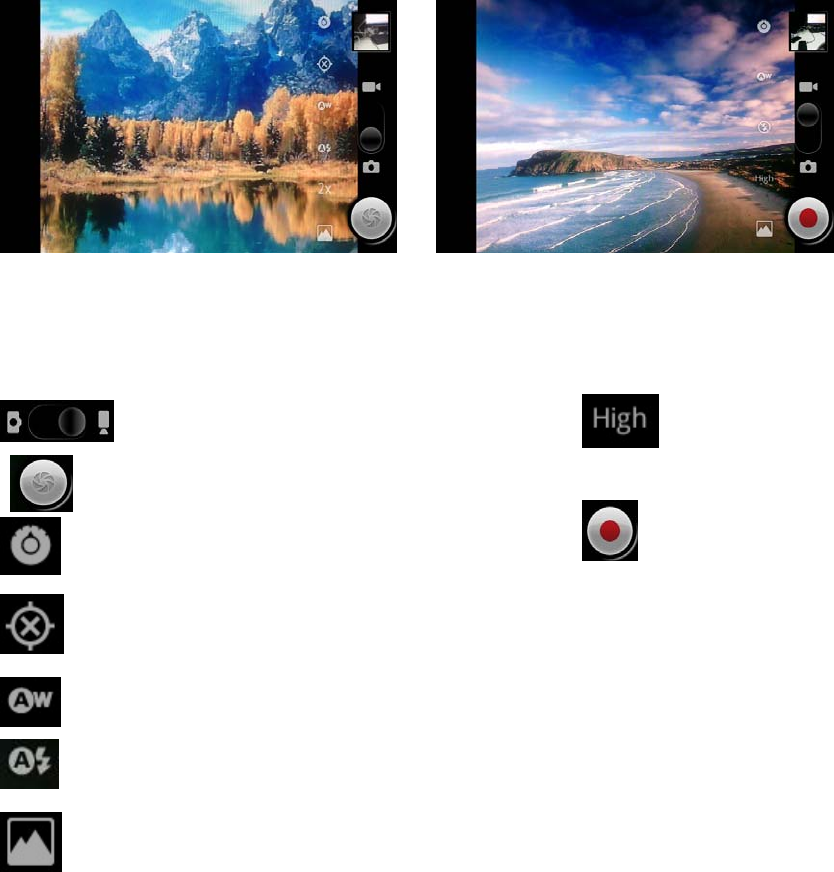
Camera
Whether it is a business trip or travelling, you can use the camera to
take photos and videos, record journey. Note: before you start using,
first, confirm that you have inserted the memory card, because the camera
shooting the pictures and videos which are saved to the memory card.
View interface provides the
following screens:
Photo shoot interface
Video capture interface
Switch shooting and video
Shooting
Exposure, color, shot quality setting options
Storage location of the switch button
Provides white balance adjustment
Flash light on/off
Switch front/rear camera
Video capture
quality options
Video capture
button
Take a picture
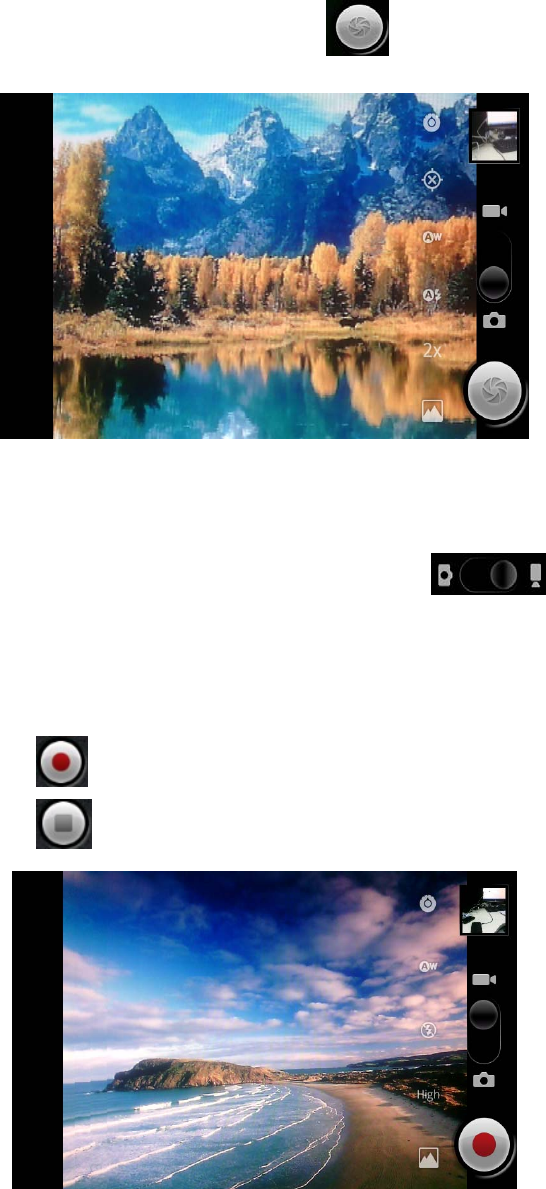
1. Enter the camera view finder interface.
2. Set the photo size & quality you want
3. Set the white balance.
4. Aim the camera, click photos.
Shooting videos
1. In the picture framing interface, click switch to the video
interface.。
2. Set the video quality and other settings you want, white balance, color
effects, and more.
3. View finder screen at your subject。
4. click start,show the time at the left corner of the screen。
5. Click end.
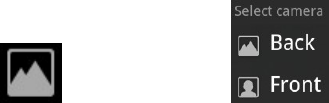
Switch front or rear camera
click button,option switch front or rear camera.
You can easily use the self-timer or use the video call front camera
features.
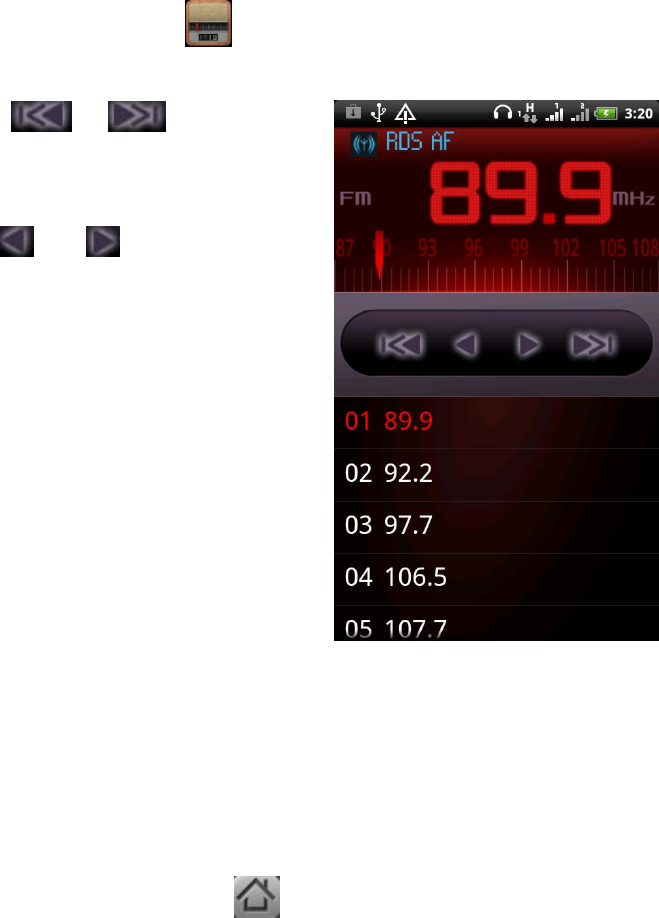
FM
FM radio features can help you anytime, anywhere to listen to your
favorite radio program.
Before you can enable the radio, please insert the wired headset. Radio
needs a wired headset as antenna
1.inserted with phone
complimentary wired headphones, in
the program list select into
the radio
2. click and button to
automatically search forward or
backward to the next station.
3. click and fine tune your
current frequency, amplitude is
0.1Mhz
4. Number click the lower half of
the screen, you can save the
current frequency.
5. Click the saved radio stations
to immediately switch to that radio
station.
6. FM interface click the menu
button > settings, you can set
audio mode: stereo or Mono; you can
also choose to use speakers or
headphones sound
7. side rectangular volume, press
the phone button, you can adjust
the volume on the radio
8. exit FM by pressing the return
key below the screen.
9. FM interface pressing the three
buttons below the middle key ,
you can return to the main screen
and on the radio program playing in
the background.

Bluetooth
Turn on and turn off the Bluetooth function
1. On the main screen, press the menu key > Settings > Wireless &
network.
2. Select or clear the Bluetooth option
¾ To more easily switch Bluetooth, is by pulling down the notification
bar, click on Bluetooth shortcut buttons.。
Change the device name:
Device name identification can let other Bluetooth devices on your phone.
1. On the home screen, press the menu key > Settings > Wireless &
networks.
2. Click Bluetooth settings (please turn on the Bluetooth function).
3. Click the device name.
4. Input box, enter the device name you want to display, and then click
OK.
Connect Bluetooth headset
You can listen to music and make calls through Bluetooth earphone.
¾ Your Bluetooth earphone has to support A2DP when listen to music and
make calls.
¾ You have to make your Bluetooth earphone discoverable before connects
it. So that your phone can search the earphone. Please reference
earphone user manual to learn about how to set.
1. Access Settings by entering to the main menu>settings>Wireless &
networks.
2. Select Bluetooth settings(Please turn on Bluetooth)
3. Ensure to make device discoverable.
4. Click Scan for devices, your phone will start scanning Bluetooth
devices in available range.
5. Select your earphone name when it display, then your phone will try
to match your earphone.
6. If match failed, please input match password.
¾ When Bluetooth earphone connected to your phone, the icon will
be displayed on status bar. Now you can listen to music and make calls
with your Bluetooth earphone.
Send documents through Bluetooth
You can send data to other phones or devices which have Bluetooth function.
1. You can send the following types of data:
·images and videos
·music
·contacts
2. Steps to send data:
·Photos: after capturing pictures, click when preview,Choose
Bluetooth.
·Pictures or videos:1. In the library , choose the folder.
2. Long press photos image you want to send,
click on the share
3. Choose Bluetooth.
· Music : In the music player is on the interface , select
menu> >Bluetooth
·Contact:1. Long press the contact in Contacts interface you want
to send,select share
2. In Contacts interface, select menu>More>Bluetooth,
Choose the Contacts you want to send
3. When system advises you to turn on Bluetooth, please turn on it with
instructions.
4. If you did not match receiving device, please select Scan for devises.
5. Select receiving device name.
6. Accept match application between sending device and receiving device
when pop-up instruction.
7. Receiving documents in receiving device there has to be a memory card
in receiving device.

Map and Location
Location set:
On the phone looking for location, you must first enable unknown sources.
1. On the home screen, press the menu key > Settings > Location and
security settings.
2. Select one or both of the following options: Use wireless networks:
you can find a likely location using Wi-Fi or mobile network.
Use GPS satellites: find the exact GPS location. However, it must
be used only under clear atmospheric conditions, and consumes more power.
Google Map:
Google maps lets you track the current location, view real-time traffic
conditions, and receive detailed direction of the destination.
¾ Your mobile data connection or Wi-Fi connections must be enabled
in order to use Google maps.
¾ To use the Google map to find a location, you must first enable
GPS location.
¾ Google Maps application does not cover all the countries or
cities.
Open Google maps, selected ,displays the current location. Show blue
markers on the map ,that is your location.
Settings:
You can set the option to customize various settings of the phone. On
the home screen, press the menu key > Settings.
¾ Wireless and networking: Sets the phone's data connection Wi-Fi, and
Bluetooth wireless network connection. Toggle flight mode and switch
two cards, and so on.
¾ Call settings: Set the dialing, call forwarding
¾ Sound: Select the call and notification ring tones, adjust the volume,
and so on.
¾ Display: Sets the display, Auto-rotate, brightness, screen timeout,
screen.
¾ Location and security: GPS feature set, screen lock and PIN code
settings.
¾ Application: manage your applications, stop, uninstall, etc.
¾ Accounts and sync: log in to your Google account, Exchange account.
Manages the synchronization and the other set of accounts.
¾ Privacy: Selects backup phone settings; use the restore factory
settings function.
¾ Store:checkinternalstoragespaceandfreespaceonthestoragecard.Toremovethe
memorycardfromthephone,besuretouninstallthisscreenmemorycard.
¾ Language and keyboard: setting system of the language, as well as
manage your installed input method.
¾ Voice input and output: speech input language setting. If you turn
text speech application is installed, you can use this option to set
text to speech.
¾ Accessibility: this setting works only after you have installed the
application of accessibility.
¾ Date and time: sets date, time, time zone, and date or time format.
¾ About Phone: Views the phone various information such as type, version,
battery, etc.
FCCStatement
1.ThisdevicecomplieswithPart15oftheFCCRules.Operationissubjecttothefollowingtwo
conditions:
(1)Thisdevicemaynotcauseharmfulinterference.
(2)Thisdevicemustacceptanyinterferencereceived,includinginterferencethatmaycauseundesired
operation.
2.Changesormodificationsnotexpresslyapprovedbythepartyresponsibleforcompliancecould
voidtheuser'sauthoritytooperatetheequipment.
NOTE:
ThisequipmenthasbeentestedandfoundtocomplywiththelimitsforaClassBdigitaldevice,
pursuanttoPart15oftheFCCRules.Theselimitsaredesignedtoprovidereasonableprotection
againstharmfulinterferenceinaresidentialinstallation.
Thisequipmentgeneratesusesandcanradiateradiofrequencyenergyand,ifnotinstalledandusedin
accordancewiththeinstructions,maycauseharmfulinterferencetoradiocommunications.However,
thereisnoguaranteethatinterferencewillnotoccurinaparticularinstallation.Ifthisequipment
doescauseharmfulinterferencetoradioortelevisionreception,whichcanbedeterminedbyturning
theequipmentoffandon,theuserisencouragedtotrytocorrecttheinterferencebyoneormoreof
thefollowingmeasures:
Reorientorrelocatethereceivingantenna.
Increasetheseparationbetweentheequipmentandreceiver.
Connecttheequipmentintoanoutletonacircuitdifferentfromthattowhichthereceiveris
connected.
Consultthedealeroranexperiencedradio/TVtechnicianforhelp.
SARInformationStatement
Yourwirelessphoneisaradiotransmitterandreceiver.Itisdesignedandmanufacturednottoexceed
theemissionlimitsforexposuretoradiofrequency(RF)energysetbytheFederalCommunications
CommissionoftheU.S.Government.Theselimitsarepartofcomprehensiveguidelinesandestablish
permittedlevelsofRFenergyforthegeneralpopulation.Theguidelinesarebasedonstandardsthat
weredevelopedbyindependentscientificorganizationsthroughperiodicandthoroughevaluationof
scientificstudies.Thestandardsincludeasubstantialsafetymargindesignedtoassurethesafetyofall
persons,regardlessofageandhealth.Theexposurestandardforwirelessmobilephonesemploysa
unitofmeasurementknownastheSpecificAbsorptionRate,orSAR.TheSARlimitsetbytheFCCis
1.6W/kg.*TestsforSARareconductedwiththephonetransmittingatitshighestcertifiedpower
levelinalltestedfrequencybands.AlthoughtheSARisdeterminedatthehighestcertifiedpowerlevel,
theactualSARlevelofthephonewhileoperatingcanbewellbelowthemaximumvalue.Thisis
becausethephoneisdesignedtooperateatmultiplepowerlevelssoastouseonlythepower
requiredtoreachthenetwork.Ingeneral,thecloseryouaretoawirelessbasestationantenna,the
lowerthepoweroutput.Beforeaphonemodelisavailableforsaletothepublic,itmustbetestedand
certifiedtotheFCCthatitdoesnotexceedthelimitestablishedbythegovernmentadopted
requirementforsafeexposure.Thetestsareperformedinpositionsandlocations(e.g.,attheearand
wornonthebody)asrequiredbytheFCCforeachmodel.ThehighestSARvalueforthismodelphone
whentestedforuseattheearis0.683W/Kgandwhenwornonthebody,asdescribedinthisuser
guide,is1.17W/Kg(Body‐wornmeasurementsdifferamongphonemodels,dependinguponavailable
accessoriesandFCCrequirements).WhiletheremaybedifferencesbetweentheSARlevelsofvarious
phonesandatvariouspositions,theyallmeetthegovernmentrequirementforsafeexposure.The
FCChasgrantedanEquipmentAuthorizationforthismodelphonewithallreportedSARlevels
evaluatedasincompliancewiththeFCCRFexposureguidelines.SARinformationonthismodelphone
isonfilewiththeFCCandcanbefoundundertheDisplayGrantsectionofhttp://www.fcc.gov/
oet/fccidaftersearchingon
FCCID:WA6S732AdditionalinformationonSpecificAbsorptionRates(SAR)canbefoundonthe
CellularTelecommunicationsIndustryAsso‐ciation(CTIA)web‐siteathttp://www.wow‐com.com.*In
theUnitedStatesandCanada,theSARlimitformobilephonesusedbythepublicis1.6watts/kg
(W/kg)averagedoveronegramoftissue.Thestandardincorporatesasub‐stantialmarginofsafetyto
giveadditionalprotectionforthepublicandtoaccountforanyvariationsinmeasurements.
Body‐wornOperation
Thisdevicewastestedfortypicalbody‐wornoperations.TocomplywithRFexposurerequirements,
aminimumseparationdistanceof15mmmustbemaintainedbetweentheuser’sbodyandthe
handset,includingtheantenna.Third‐partybelt‐clips,holsters,andsimilaraccessoriesusedbythis
deviceshouldnotcontainanymetalliccomponents.Body‐wornaccessoriesthatdonotmeetthese
requirementsmaynotcomplywithRFexposurerequirementsandshouldbeavoided.Useonlythe
suppliedoranapprovedantenna.