VeryKool USA S810 MOBILE PHONE User Manual ZTE 902
VeryKool USA Inc MOBILE PHONE ZTE 902
Users Manual

S810
User Manual
Thank you for purchasing the S810 mobile phone

Introduction
Thank you for choosing the S810 mobile phone. This user manual will
guide you through the explicit and User friendly feature-sets of the 3G
HSDPA Full QWERTY Multimedia Messaging phone in detail. Please
take full advantage of the User Manual to make the best use out of your
new S810.
The content of this manual is correct at the time of issuance. However,
Verykool USA, Inc. reserves the right to amend technology
specifications without any prior notification.
Some descriptions in this manual may be different from the actual
mobile phone, depending on differences in software and network
suppliers.
Reading Statement for the Manual
In the manual, different typesetting styles are used to show different
operations, the specific typesettings are as follows:
Operation
Description of Contents
Example
Showing
contents
Show with normal characters
0-9
General
key
All the keys except functional keys are
shown by normal characters with frames
0-9
Functional
key
Functional key is shown with bold and
frame
OK
Menu item
Show in bold italics
Hold
CONTENT_Toc268794756
1 START USING .............................................................................. 1
1.1 BATTERY ................................................................................................... 1
1.1.1 Uninstallation and installation of battery ......................................... 1
1.1.2 Charging the battery......................................................................... 2
1.1.3 Use of battery ................................................................................... 2
1.2 SIM CARD ................................................................................................. 2
1.2.1 Inserting the SIM card ...................................................................... 3
1.2.2 Unlock the SIM card ......................................................................... 3
1.3 PLUG AND UNPLUG THE MEMORY CARD .................................................... 3
1.4 PLUG AND UNPLUG THE HEADSET ............................................................. 4
1.5 STATUS BAR AND CONTENT ....................................................................... 4
1.5.1 Keys .................................................................................................. 5
2 DIAL AND ANSWER THE CALL ................................................. 7
2.1 MAKING A CALL ........................................................................................ 7
2.2 ANSWERING A CALL .................................................................................. 8
2.2.1 Answering new voice call ................................................................. 8
2.2.2 Connecting two calls at the same time ............................................. 8
2.2.3 Conference call ................................................................................. 9
2.2.4 Answering a video call ..................................................................... 9
2.3 EMERGENCY CALL .................................................................................... 9
3 STANDBY MODE AND MAIN MENU ........................................ 10
4 MY FILES ................................................................................... 10
4.1 PICTURES ................................................................................................ 10
4.2 SOUND .................................................................................................... 11
4.3 VIDEOS .................................................................................................... 11
4.4 DOCUMENTS ........................................................................................... 12
4.5 JAVA FILES .............................................................................................. 12
4.6 OTHERS ................................................................................................... 12
4.7 MANAGEMENT ........................................................................................ 12
4.8 T-FLASH .................................................................................................. 12
5 PHONE BOOK ........................................................................... 12
6 LOG ............................................................................................ 13
7 ENTERTAINMENT ..................................................................... 13
7.1 MUSIC PLAYER ........................................................................................ 13
7.2 VIDEO PLAYER ........................................................................................ 14
7.3 VOICE RECORDER .................................................................................... 14
7.4 GAMES .................................................................................................... 14
7.5 JAVA BOX ................................................................................................ 14
7.6 FM RADIO ............................................................................................... 14
8 MESSAGE .................................................................................. 15
8.1 SMS ........................................................................................................ 15
8.2 MMS ...................................................................................................... 15
8.3 E-MAIL .................................................................................................... 16
8.4 PUSH MESSAGES ...................................................................................... 16
9 VIDEOPHONE ............................................................................ 16
10 CAMERA .................................................................................... 16
11 TOOLS ........................................................................................ 17
11.1 ALARM CLOCK ........................................................................................ 17
11.2 SCHEDULE ............................................................................................... 17
11.3 CALCULATOR .......................................................................................... 17
11.4 DOC. EDITOR ........................................................................................... 18
11.5 NOTES ..................................................................................................... 18
11.6 TO-DO ..................................................................................................... 18
11.7 WORLD CLOCK ........................................................................................ 18
11.8 STOPWATCH ............................................................................................ 18
11.9 COUNTDOWN TIMER ................................................................................ 18
11.10 CURRENCY EXCHANGE ............................................................................ 18
12 SETTINGS .................................................................................. 18
12.1 PHONE ..................................................................................................... 18
12.2 PHONE PROFILES ..................................................................................... 19
12.3 DISPLAY .................................................................................................. 19
12.4 CALLS ..................................................................................................... 20
12.5 SECURITY ................................................................................................ 21
12.6 NETWORK ............................................................................................... 21
12.7 VIDEOPHONE ........................................................................................... 22
12.8 DATA PROFILES ....................................................................................... 22
12.8.1 Internet profile ................................................................................ 22
12.8.2 Data profile .................................................................................... 22
12.9 RESTORE FACTORY SETTIGS .................................................................... 22
12.10 CLEAR ALL .............................................................................................. 22
13 CONNECTIVITY ......................................................................... 22
13.1 BLUETOOTH ............................................................................................ 22
13.2 PACKET DATA CONNECTION .................................................................... 23
13.3 PC SYNCHRONIZATION ............................................................................ 23
13.4 BACKUP TO T-FLASH .............................................................................. 23
13.5 RESTORE FROM T-FLASH ........................................................................ 23
14 INTERNET .................................................................................. 23
15 SIM TOOKIT ............................................................................... 24
16 FREQUENTLY ASKED QUESTIONS ....................................... 24

Health and safety
Batteries
Never use a charger or battery that is damaged in any way.
Properly use the battery. Do not short-circuit the battery, which may
damage the battery, cause heat or cause fire.
Do not dispose of batteries in high temperature of in a fire as they may
explode.
Return the waste battery to the dealer or designated recycling center.
Do not dispose as household waste.
Battery charging time depends on the remaining battery charge, the
type of battery and the charger used. The battery can be charged and
discharged hundreds of times, but it will gradually wear out. When your
phone’s operating time is noticeably shorter than normal, it is time to
buy a new battery.
Use only original or approved chargers and batteries.
Unplug the charger from the electrical plug and the device when not in
use.
Do not overcharge, which will damage the battery and shorten its life.
Leaving the battery in extremely hot or cold places will reduce the
capacity of the battery. Cool down or heat up the temperature to normal
level (Li-ion batteries are particularly affected by temperatures below 0℃
(32°F)).
Road safety
Your wireless phone gives you the powerful ability to communicate by
voice, almost anywhere, anytime. Therefore, you must uphold some
important responsibility.
When you are driving, driving is your first responsibility. When using
your wireless phone while driving, be more alert and follow local
regulations.
Understand the wireless phone and features, such as speed dial and
redial which can help you make a call more conveniently without
disturbing your driving.
Use a hands-free set if possible. Hands-free accessories may promote
the convenience and safety of using your wireless phone.
Place your phone where is easy to access and does not require you to
move your eyesight. If receiving a call at an inconvenient moment, let
your voicemail answer for you.

When on the phone, tell your conversation partner that you are driving.
Hang up in traffic jams or bad weather. Rain, rain with snow, snow, ice
and traffic may be dangerous.
Air bags, brakes, speed control systems and fuel injection should not be
influenced by radio transmission. If you have these problems, contact
your car dealer immediately.
Switch off your mobile phone when fueling or anywhere two-way radio
equipment usage is prohibited. Do not put your phone near flammable
and explosive substances. Internal spark may cause fire or explosion.
Switch off the mobile phone prior to airplane take-off. To prevent
interference to communication systems in the plane, never use a phone
during flight. Using a phone before the plane takes off may be allowed
by the crew in accordance with safety regulations.
During flight, make sure that your phone will not be automatically
switched on by an alarm you have set.
Operating environment
Remember to follow any special regulations in force in your area and
always switch off your phone whenever it is forbidden to use it, or it may
cause danger.
When connecting the phone or any accessory to another device, read
its user’s guide for detailed safety instructions. Do not connect
incompatible products.
It is recommended that the equipment only be used in the normal
operating position (held to your ear with the antenna pointing over your
shoulder) for your satisfactory operation of the equipment and for the
safety of personnel.
Do not expose the equipment to temperature below -10℃ (14°F) or
above 50℃ (122°F).
Electronic devices
Most electronic equipment is shielded from radio frequency signals.
Consult the manufacturer for relevant information.
Pacemakers: Maintain a minimum distance of 6 inches (15cm) between
a wireless phone and a pacemaker; do not put your phone in a pocket
near the chest; use your ear furthest from the pacemaker to reduce
possible interference. If you have any reason to suspect that
interference is taking place, switch off your phone immediately.

Hearing aids: Some digital wireless phones may interfere with some
hearing aids. In the event of such interference, you may consult your
hearing aid manufacturer.
Other medical devices: If you use any other personal medical devices,
consult the manufacturer of your device to determine if it is adequately
shielded from external RF energy. Your physician may be able to assist
you in obtaining this information. Switch off your phone in health care
facilities when regulations posted in these areas instruct you to do so.
Vehicles: RF signals may affect improperly installed or inadequately
shielded electronic systems in motor vehicles. Check with the
manufacturer.
Emergency calls
This phone, like any wireless phone, operates using radio signals,
which cannot guarantee connection in all conditions. Therefore, you
should never rely solely on any wireless phone for essential
communications like medical emergencies.
To make or receive calls, the phone must be switched on and in a
service area with adequate signal strength.
To make an emergency call, enter the local emergency number in
standby mode and press <Send> to call.
Other important safety information
Use original or approved accessories. Any unapproved accessory
may affect the performance of your phone, damage your phone or
even cause personnel injury.
Your wireless phone sends out an electromagnetic field. Do not put
the phone near magnetic storage media such as computer disks.
Neighboring electric appliances such as TVs, phones, radio
receivers and PCs may affect the use of your phone and its
performance.
Do not connect the phone to an incompatible device.
Only qualified personnel should service the phone or install the
phone in a vehicle.
Care and maintenance
Your phone is a product of superior design and craftsmanship and
should be treated with care. The suggestions below will allow you to
enjoy this product for many years.
Keep your phone out of the hands of small children and pets. They
may accidentally damage the phone or choke on small parts.
Keep the phone dry and avoid liquids that corrode the phone.
Do not use the phone with a wet hand, which may cause an electric
shock.
Do not store the phone in hot areas, which can shorten the life of
electronic devices, damage batteries or melt accessories.
Do not store the phone in cold areas. When the phone warms up to
its normal operating temperature, moisture can form inside the
phone, which may damage the phone’s electronic circuit boards.
Do not expose your phone to hot sun which may overheat your
phone.
Do not place your phone near flammable liquids, gases or
explosive substances.
Do not drop or knock the phone. Rough handling can break internal
circuit boards.
When cleaning your phone, use a slightly damp or anti-static cloth.
Do not use a dry or static cloth. Do not use chemicals such as
cleaning solvents to clean the surface. Switch off the phone first
and then do the cleaning.
Do not paint the phone. Paint can prevent proper operation.
If your phone has a flash, do not use it too close to the eyes. This
may cause damage to eyes.
If the phone or battery gets wet and the label in the phone is
damaged, phone repairs are no longer guaranteed by the
manufacturer’s warranty, even if the warranty for your phone has
not expired.
Improper use will invalidate the warranty! These safety instructions also
apply to original accessories.
1
1 Start Using
1.1 Battery
Before using your phone for the first time, please follow the instructions
below to charge your battery completely. Do not overcharge, which will
damage the battery and shorten its life. When not in use, unplug the
charger from both your phone and the electrical outlet.
Battery charging time depends on the remaining battery charge, the
type of battery, and the charger used. The battery can be charged and
discharged hundreds of times, but it will gradually wear out. When the
operation time is noticeably shorter than normal, it is time to buy a new
battery.
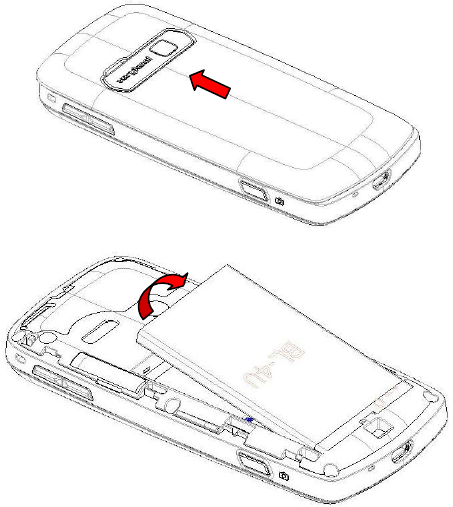
1.1.1 Uninstallation and installation of battery
Push the back cover of the phone upward as shown below and
remove.
Pull out the top of the battery and remove.
When installing the battery, insert the metal contact at the bottom of
the battery into the corresponding slot of the mobile phone, and then
press the battery down to install it in place. The battery must be
2
ensured to be installed before power on.
Finally install the back cover of the mobile phone.
1.1.2 Charging the battery
When the power of the battery is lower than usual, the phone will
prompt battery low. Please charge the battery, otherwise you will lose
unsaved files. If you don’t charge for a long time, the phone will be
powered off automatically.
When charging, the battery icon at the upper corner of the screen will
appear in a charging state. During the charge, the phone and charger
may heat up a little bit, which is considered a normal phenomenon.
Warning:
The stated charging temperature ranges from 0℃ to 40℃. Please
do not use charging equipment if the temperature exceeds the
range. Please only use the charger provided by the supplier.
Application of unauthorized charger may trigger danger and
breach the mobile phone maintenance warranty.
1.1.3 Use of battery
In actual use, the standby time and talk time of the mobile phone varies
with the network status, working conditions and different usage
behaviors.
SIM card
Your network operator will provide you a SIM card which is the key for
your access to the digital GSM/3G network. Prior to using the phone,
you need to insert an activated SIM card in the mobile phone.
All relevant information concerning network connection will be recorded
in the SIM card. SIM card can be removed from your mobile phone and
be used in any other GSM mobile phones (new mobile phone
automatically reads the SIM).
In order to prevent loss and damage to the information in the card, you
should avoid touching the metal area and keep it away from electric and
magnetic places. SIM card once being damaged, you will not be
registered to the GSM network.
Warning:
You must power off the mobile phone before removing the SIM
card. Inserting or removing the SIM card is absolutely prohibited
when the external power supply is connected, otherwise the SIM
card and mobile phone may be damaged.
3
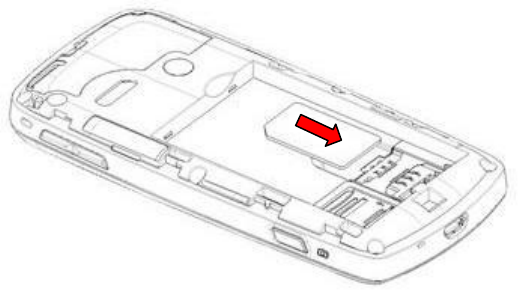
1.1.4 Inserting the SIM card
Power off the mobile phone, remove the back cover and battery.
Insert the SIM card correctly in the card slot; finally install the back
cover and battery of the mobile phone.
1.1.5 Unlock the SIM card
In order to prevent illegal use, SIM card adopts PIN code (personal
identification code) encryption protection.
If this function is selected, PIN code should be inputted correctly each
time when you power on the mobile phone, thus to unlock the SIM card
for normal use. Users can disarm the SIM card protection but illegal use
of the SIM card cannot be prevented.
If the PIN code input is incorrect for three consecutive times, your SIM
card will be locked by the network. The mobile phone will enquire the
PUK code which will be provided by your network operator. If the PUK
code input is wrong for 10 times, the SIM card will be permanently
barred.
Note:
Your network operator will set a standard PIN code (4 to 8
numbers) for you and you should change it to private password as
soon as possible.
Plug and unplug the memory card
Power off the mobile phone, remove the rear cover and battery.
The memory card slot at the side of SIM card slot. You should push the
memory card slot according to the indication marked in the slot to open
it, firstly.
Insert the memory card to the slot according to the figure below.
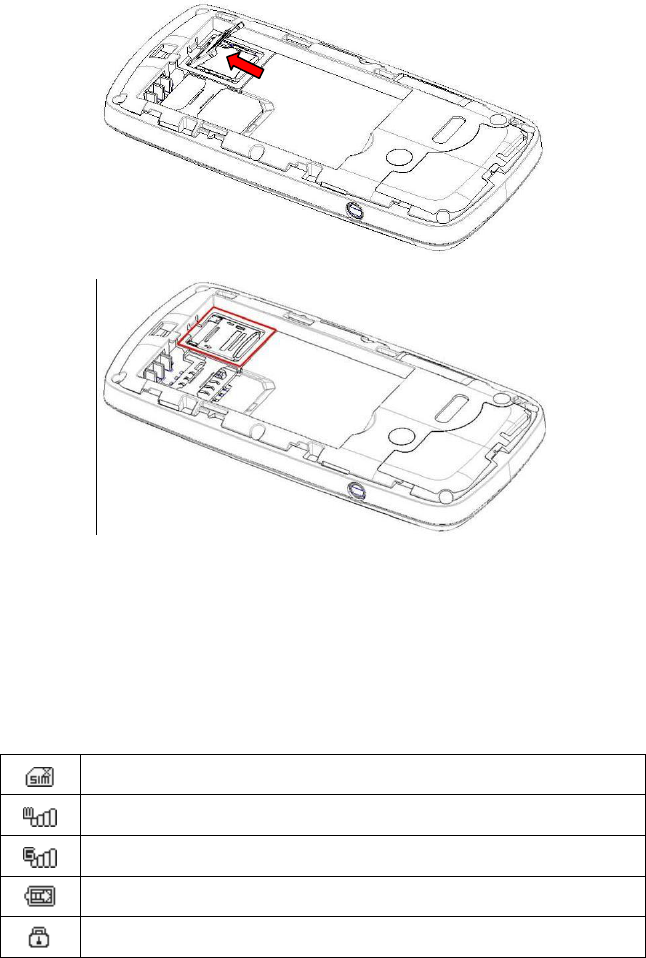
4
Then pull the memory card slot to close it.
Finally, install the battery and cover the back cover of the mobile
phone. Please keep your memory card safe.
Plug and unplug the headset
Insert the connector of the headset to the headset jack at the left side of
the mobile phone. Gently pull out the headset to remove it.
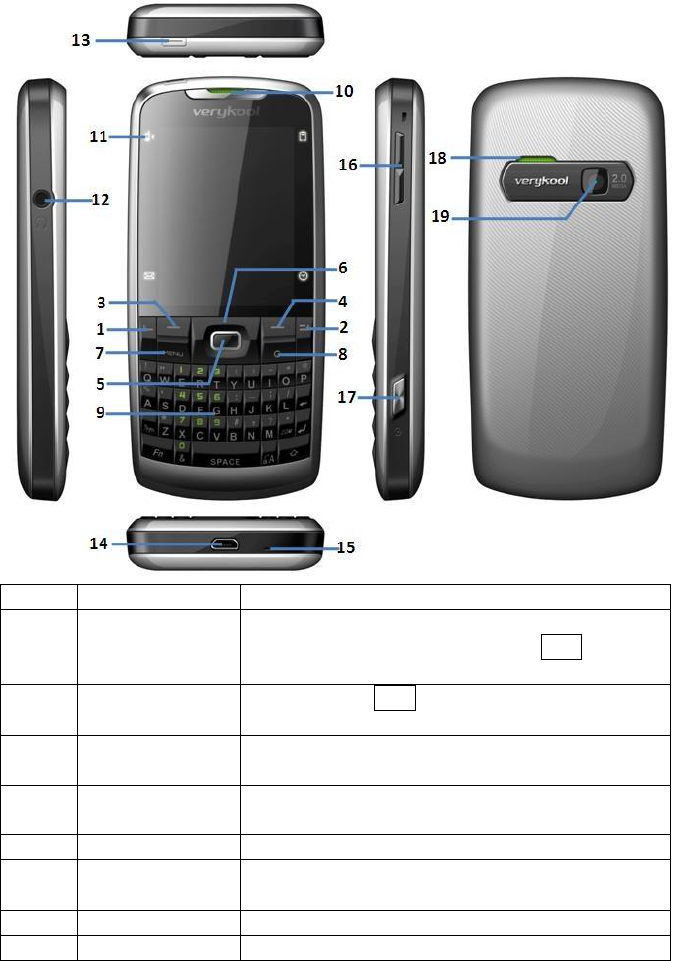
Status bar and content
In standby interface you can get the information that you need from the
indication icons on the screen.
No service or No SIM card inserted in slot
Signal strength of WCDMA network
Signal strength of GSM network
Internet connected, but no data transfer
The keypad of mobile phone is locked

5
Packet data connected
Roaming
Unread SMS
Unsent SMS
Unread MMS
USB cable connected
Music playing in background
FM radio playing background
Unread push message
The current phone profile is meeting mode
The current phone profile is outdoor mode
The current phone profile is driver mode
All incoming calls are diverted to a defined number
Headset has been inserted
Bluetooth power on
Bluetooth headset connected
Indicating current battery capacity
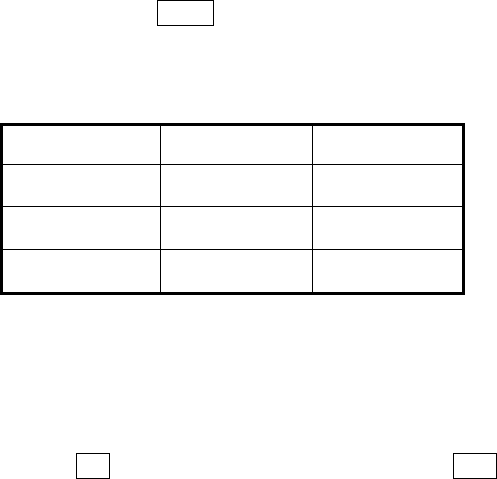
1.1.6 Keys
Functions of the keys are described as following:
6
Sn
Keys
Function description
1
Send key
(Snd)
Making a call; answering a call; on the
standby interface press the Snd key to
enter the Log.
2
End key
(End)
Short press End key to hang up the call
and back to the standby interface.
3
Left soft key
(LSK)
Pop up menu; enter the corresponding
function in standby screen.
4
Right soft key
(RSK)
Back; enter the corresponding function in
standby screen.
5
OK key
Select; enter main menu in standby screen.
6
Navigation key
Move the cursor to left, right, upward or
downward.
7
Menu key
Short press to enter main menu screen.
8
Clear key (C)
Clear the item before the cursor in editor.
7
9
Keyboard
Input number, letter, symbol and character.
10
Receiver
Listen to the voice of the other side when
calling.
11
LED
Indicate the event of missed call, unread
message, charging and alarm.
12
Headset jack
Insert the headset to answer calls and to
listen to the music, and so on.
13
Power
key(Pwr)
Long press the key to power on/off the
phone.
14
USB port
Connecting USB cable or charger.
15
Microphone
During the calling process, please do not
cover the microphone with hand.
16
Volume key
Short press to adjust volume when calling
or on standby interface.
17
Camera key
Press to launch the camera; in preview
screen press camera key to take a picture.
18
Speaker
For activating the speaker, you can listen
audio or calls in hands-free mode.
19
Camera lens
For finding a view with the camera and
taking picture or video.
When you have a missed call and unread SMS, the standby interface
will display relevant icon (s), press navigation key to switch the item that
you want to view; then press OK key to view the selected content.
Note:
In the manual “short press X key” refers to loose the key at once
after pressing; “long press X key” refers to loose the X key after
pressing it for over one second.
2 Dial and answer the call
Making a call
When the network operator’s name appears on the screen, the mobile
phone enters into the normal standby state in which you can dial or
answer a call. The network signal strength indicator at the top of the
screen will show the network signal strength. The call quality has a
relatively high impacted from obstacles. Therefore, movement in a small
range can effectively improve the signal strength.
In the standby interface, input the call numbers, press Snd key to make
the voice call, active LSK and select Video call to make the video call.
Making domestic call

8
In the standby interface, input the call numbers (please add the area
code for domestic long-distance calls), then press Snd key to make the
call.
Calling extension of fixed number
When calling the extension number of a fixed number, you need to dial
the host number and then dial the extension number according to the
corresponding voice hints. If you insert “p” between the host number
and extension number, the mobile phone will automatically dial the
extension number for you.
Making an international call
To make an international call, you simply need to input the symbol “+”,
then input the country code and complete phone number that you want
to dial.
Answering a call
2.1.1 Answering new voice call
If there is a new incoming call during a call in progress, the mobile
phone will pop up caller interface (call waiting is activated) and give a
short prompt to tell you that you have a new call. At this time, you can
press Snd key or activate LSK to select Answer incoming to answer
the new call. When you answer a new call, the original call will enter
holding status. At this time, you can activate LSK to select Switch to
the original call, and the new call will enter into holding status.
Note:
When you are in call progress, the new call to another SIM card
can’t be dialed in.
2.1.2 Connecting two calls at the same time
When two telephone numbers are connected, activate LSK, and you
can operate as follows:
Switch: switch call.End active End hold End all, SMS, Phone Book,
Mute, Create conference, Enable Bluetooth
End active: hang up the current call.
End all: hang up all the calls.
SMS: edit the SMS and send it.
Phone Book: enter the phone book interface.
Mute: select Mute to turn off the microphone. In this mode, the other
party will not hear you but you can still hear the other party. You can
select Unmute to turn the microphone back on and the other party can
hear you again.

9
Create conference: when making conference call, you can have a talk
separately with designated conference participants.
Enable Bluetooth: select Bluetooth to turn on Bluetooth and the icon
will display on the screen.
2.1.3 Conference call
During the conference call, activate LSK, and you also can operate as
follows:
Hold: hold the conference call then others can not hear your voice; and
the option of Hold changed to Active, select it and you can go back to
the conference call mode.
New call: enter the dialing interface. Press Snd key to make the call
after inputting the number.
Conference list: display the members that in conference call..
2.1.4 Answering a video call
During the video call, activate LSK; you can also operate as follows:
Screen mode: select the display mode of video call, such as: minimize
myself, maximize myself, display other person only, display myself only.
Video settings: you can send live video, an image or a video clip to the
other party via selecting a live video, substituted picture or substituted
video.
Image quality: you can adjust the image quality of the caller and the
calling party.
Emergency call
In any country using the digital GSM network, if you are in the network
coverage area (you can check the network signal strength at the top of
mobile phone screen), even without the SIM card, you also are able to
make an emergency call.
Inputting the PIN code or the phone unlocking interface, input
emergency number then press SOS and you can make an emergency
call.
Note:
The emergency call numbers vary in different countries or regions.
Please refer to the local information for specific emergency
service numbers.
10
3 Standby mode and main menu
In standby mode, the screen displays lots of useful information, such as
missed calls, new messages. You can press navigation keys to select
the corresponding items.
In standby interface, press Menu key to enter the main menu and use
the navigation keys to switch the icons and access the functions directly.
The following table shows the twelve functions of the Main Menu where
icons appear in the same order on the screen (Sequence of the menus
may vary depending on network operators).
My Files
Phone Book
Log
Entertainment
Message
Videophone
Camera
Tools
Settings
Connectivity
Internet
SIM Toolkit
4 My Files
In my files, you can manage files such as pictures, sound, videos and
others applications stored in the phone or memory card.
Pictures
All photos and images are stored in this folder including Images/Preset
wallpapers. Press OK key to preview pictures and press LSK for the
menuto manage your picture files (for preset pictures, some options
below may not be operable):
Delete: delete the current files.
Send: send the selected file via MMS, E-mail or Bluetooth.
Copy: copy the file to destination folder.
Move: move the file to destination folder.
Rename: rename for the picture.
New folder: create a new folder.
Open in sequence: display all file automatically in full screen status
orderly.
Use image: use image to relevant applications.
Type of view: arrange the selection according to titles or thumbnails.
Sort: arrange the files according to name, size, date and type.
Mark/ Mark all: mark selected pictures to perform options on multiple
pictures.

11
Getting certificate: get the certificate for the current picture.
Property: display current file details including: Format, Date and time,
Size, etc.
Sound
All music and sound files are stored in this folder. Press OK key to play
files and press LSK for the menu to manage your files:
Delete: delete the current files.
Send: send the selected file via MMS, E-mail or Bluetooth.
Copy: copy the file to destination folder.
Move: move the file to destination folder.
Rename: rename for the music.
New folder: create a new folder.
Set as ring tone: set the current audio file as voice call ring, video call
ring or message ring.
Add to playlist: add the audio file to playlist.
Type of view: arrange the selection according to titles or thumbnails.
Sort: arrange the files according to name, size, date and type.
Mark/ Mark all: mark selected files to perform options on multiple
selections.
Getting certificate: get the certificate for the current file.
Property: display current file details including: Format, Date and time,
Size, etc.
Videos
All video clips are stored in this folder. Press OK key to play/ pause the
file or press LSK for the menu to manage your videos:
Delete: delete the current files.
Send: send the selected file via MMS, E-mail or Bluetooth.
Copy: copy the file to destination folder.
Move: move the file to destination folder.
Rename: rename for the video.
New folder: create a new folder.
Open in sequence: orderly play all the videos automatically.
Add to playlist: add the video file to playlist.
Type of view: arrange the selection according to titles or thumbnails.
Sort: arrange the files according to name, size, date and type.
Mark/ Mark all: mark selected video to perform options on multiple
videos.
Getting certificate: get the certificate for the current file.

12
Property: display current file details including: Format, Date and time,
Size, etc.
Documents
You can view the documents that stored in your phone.
Java files
All the java files are stored in this folder. You can install and enjoy java
applications with this function.
Others
Other unrecognized files are stored in this folder.
Management
Enter management; you can do the operations below:
Storage type: set the storage position as phone or T-flash.
Format T-flash: clear all the data in the T-flash card.
Memory status: displays the available storage in phone and T-flash.
T-flash
T-flash is the memory card used for storing your data. In my file, use
left/right navigation key switch to T-flash to view all the files stored in
the memory card. Press LSK for the menu to manage the files.
5 Phone Book
Enter the phone book interface, input the first letter of the name, you
can search relevant records. Activate LSK to conduct the following
operations:
New contact: create a new contact.
Edit contact: edit the current contact.
Delete: delete the information of current contact.
Find: search the the contact by name, number or group.
Send message: send message to current contact.
Send vCard: send the information of current contact as vCard mode.
IP dial: add IP number and call the current contact.
Video call: call the current contact in video call mode.
Copy: copy the contact to designated place.
Move: move the contact to designated place.
Mark/Mark all: mark selected contact to perform options on multiple
contacts.
Advanced: you can view the member of group, set the position to view
contacts from, view my number from other numbers and check the

13
memory status of SIM card or Phone.
6 Log
Enter log interface, there displays the records of missed calls. You can
press left/right navigation key to switch to other tabs, such as received
calls, dialed calls and all calls.
In every sheet, activate LSK, you can operate as follows:
Save: save the current number as new contact or replace the existing
contact.
IP dial: add IP number and call the current number.
Voice call/Video call: call the current number in voice call or video call.
Send SMS/MMS: send SMS or MMS to the current number.
Edit before call: edit the number before making the call.
Add to blacklist: add the current number to blacklist.
Call duration: you can check the duration time of the last call, received
calls, dialed calls and total.
Packet data counter: you can view the count of all sent and received.
Delete/Delete all: delete the current number/ all the numbers.
7 Entertainment
Music player
With the music player you can play audio files stored in the phone or
memory card. In music player, press LSK to select from the following
options:
Play via Bluetooth: switch the sound from phone to Bluetooth headset
when the Bluetooth headset has been matched.
Playlist: open to view all audio files in current playlists.
My playlist: from here you can add, rename and delete playlists as
needed.
All music: list the entire audio files.
Play mode: set the play mode to Once, Repeat track, Original play,
Repeat all and Random.
Equalizer: set the equalizer to Normal, Pop, Rock, Jazz, Classic,
Define1, Define2 or Define3 play modes. The Define1, Define2 and
Define3 can be edited.
Visual effects: set the visual effects to none (standard), Spectrum
analysis or Night vision
Minimize: hide the Entertainment but will continue playing in the
background while other applications are running.

14
Set as ring tone: set the playing audio file as ringtone for voice call ring,
video call ring or message ring.
Send: send the selected audio file via MMS/E-mail/Bluetooth.
Property: open to view the property of music file being played.
Video player
With the video player you can play video files stored in the phone or
memory card. In video player, press LSK to select from the following
options:
Play via Bluetooth: switch the playing sound from phone to Bluetooth
headset when the Bluetooth headset has been matched.
Playlist: open to view all video files in current playlists.
My play list: from here you can add, rename and delete playlists as
needed.
All video: list the entire video files.
Full screen: playing the video in full screen mode.
Play mode: set the play mode to Once, Repeat track, Original play,
Repeat all and Random.
Mute audio: set Mute/Unmute audio. When the status is Mute audio, it
should display Unmute audio.
Send: send the selected video file via MMS/E-mail/Bluetooth.
Property: open to view the property of the file being played.
Voice recorder
Select voice recorder press LSK to select from the following options:
Record time: set recording time, when recording is over or when OK
key is pressed to stop, the recording will save automatically.
My recordings: open the recordings folder to view recordings.
Games
To add richness to your entertainment life, the phone provides some fun
games. Please get more information in the instructions of the phone.
Java box
The Java box feature enables you to install a Java application to your
phone, view the Java applications currently installed on the phone or
remove Java applications which you no longer want.
FM radio
To listen to the FM radio, you must plug in the headset first. In the FM
radio screen, press left/right navigation key to change stations in
sequential order; press up navigation key to enter my favorite list; press

15
down navigation key to switch and select the search mode from Manual,
Favorite or Automatic. By using the LSK you can do the operation as
follows:
Save: save the current channel to my favorite list.
My favorite: view the saved channels in the list. You also can edit or
add new channels.
Search Mode: set the search mode as Manual, Favorite or Automatic.
Shortcut key setting: assign a key to a designated channel and press
the shortcut key to play the predefined channel.
Minimize: exit the FM radio screen and the FM radio continues playing
in the background.
8 Message
SMS
New: create a new SMS message and send or save it.
Inbox: you can view the received SMS messages.
Drafts: store incomplete SMS messages that you can finish later.
Outbox: store the SMS messages that are pending to be sent.
Sent: store the SMS message that sent successfully according to the
settings.
SMS templates: you can create a new template; you also can edit or
delete existing templates.
Voice mail: receive voice messages when you are unable to answer.
Please contact your service provider to get the voice mail box number.
Settings: set the correlative parameter for SMS message, such as
service center, date of expiry, delivery reports, broadcast and so on.
SMS counter: note the counter of total sent and total received.
Memory status: view the memory status of the SIM and Phone.
MMS
New: create a new MMS message and send or save it.
Inbox: you can view the received MMS messages.
Drafts: store the incomplete MMS messages that you can finish later.
Outbox: store the MMS messages that are pending to be sent.
Sent: store the MMS message that sent successfully according to the
settings.
Folders: store the MMS message that moved to the created folder.
MMS templates: you can create a new template; you also can edit or
delete existing templates.
Settings: set the correlative parameter for MMS message, such as

16
profile, send, receive, edit and view mode.
E-mail
New: create a new E-mail and send or save it.
Inbox: you can view received E-mails.
Drafts: store incomplete E-mails that you can finish later.
Outbox: store the E-mail messages that are pending to be sent.
Sent: store the E-mail that sent successfully according to the settings.
Settings: you can edit, rename, delete and create account. Set the
correlative parameter for E-mail, such as user information, connection,
and message preference.
Accounts: several accounts can be stored and you can select one as
the default.
Push messages
In push messages, you can view or delete saved push messages.
9 Videophone
Video call: input number and press LSK can dial out video call.
Screen mode: select the display mode of video call, such as: minimize
myself, maximize myself, display other person only, display myself only.
Video settings: you can send live video, an image or a video clip to the
other party via selecting live video, substituted picture or substituted
video.
Image quality: you can adjust the image quality of the caller and the
calling party.
Color mode: you can adjust the color of the image or video from
Default, Sepia, or Black&white.
Video settings: you can send your live video, substituted picture or
substituted video to the remote party.
Voice auto switch: set the function of voice auto switch on/off.
10 Camera
By using the LSK and the navigation key you can view the following
options:
Switch camera: you can use navigation key to switch between photo
and video modes to take pictures and videos.
Image size/Video size: set the size of the image/video that will be
captured.
Quality: set the quality of the photo/ video.
White balance: set the white balance state.

17
Effects: put effects in the pictures taken.
Night mode: set night mode on/off.
Shutter sound: set shutter sound on/off.
Shooting mode: set normal, continuous or self-timer as the shooting
mode.
Screen direction: set the display mode of screen.
My photos/My videos: enter pictures or videos in my files to view the
photo or video.
11 Tools
Alarm Clock
There are 3 alarms in your phone. The functions and using methods are
completely the same. You can set to turn on/off respectively.
Set alarm
Select an alarm, enter the settings interface of this alarm, you can start
or stop this alarm, and set the time, repeat frequency of the alarm, at
the same time, and more.
Alarm remind
When the alarming sets off, there is an alarm notice in the handset
(refer to alarm settings).
If the mobile phone is in power off state, after the alarm sets off, bring
up the power on confirmation interface, and you can select power on or
not.
Schedule
Enter schedule interface, the current month calendar is displayed and
the current date has a frame around the number with special mark.
Activate LSK, and you can operate as follows:
New: create a new calendar entry.
Select date: switch the date that needs to be changed (in a valid period
of time), the selected date will be displayed.
List: display a list of appointments and events.
Memory status: display the number of used and free storage for
schedule entries.
Calculator
The calculator performs four operations as addition, subtraction,
multiplication and division. Enter the calculator interface, you can input
numbers directly and press the navigation key to switch between the
operations needed, and then start calculation.
18
When the calculation of dividing 0 overflows, the result is larger than
999999999 or less than -999999999, the mobile phone will display the
error message as “E”.
Doc. Editor
View the document file that stored in Phone and T-flash card.
Notes
You can make and save notes on your phone.
To-Do
This function is used for adding and viewing task items. You also can
edit or delete the existing tasks from the list.
World clock
Enter world clock interface, you can switch the city by using the
navigation key, you also can use the LSK to select your home city.
In the city list, you can quick search the city by inputting the first letter of
the city.
Stopwatch
Enter stopwatch, press the OK key to begin timekeeping, and press
OK key each time to split records. Press RSK to stop the recording,
press LSK to reset the record. Maximum number of records is nine.
Countdown timer
Enter countdown timer then press Numeric keys to set times, then
press OK key to edit fields, and the countdown begins. When the set
time is up you will hear bell sounds. Countdown can run in background.
Currency exchange
Enter currency exchange, set the base currency in the From field then
set the other currency in the To field. Input the exchange rate in the
Rate field; Input the amount to be converted. Press OK key to get the
result of the conversion.
12 Settings
Phone
Time and date: you can modify the local time, date, time format, date
format, activate/deactivate the DST (Daylight Saving Time), you also
can set hide or show local time and date and destination time and date.
Language: you can set the language of the phone.

19
Shortcut key: separately assign an application to the left selection key
and right selection key.
Automatic keylock: when the phone is in standby status not operated
for a certain period of time (preset), the keypad will be locked
automatically after the set time. Then the standby interface will show
keypad locked icon. At the right bottom corner of the screen, the word
Unlock will appear. If you need to unlock the keypad, you only need to
press LSK, and operate according to relevant interface prompts.
Schedule Power On/Off: after setting and activating this function, the
mobile phone will be automatically powered on/off on the set time.
Memory status: shows the information of used and free space in the
phone and T-flash card.
Phone profiles
Phone Profiles are a group of preset sound settings. You can also
change and save other settings in the profiles according to your own
preference. The phone provides a set of default profiles including
Normal mode, Meeting mode, Outdoor mode, Driver mode, Flight mode.
The default profile is Normal mode. If you opt to use a different profile, a
corresponding icon will be displayed at the top of the idle mode screen.
Select the phone profile that you wanted, press OK key to activate it.
You also can press LSK to do the operation as following:
Edit phone profiles: set the parameters under different profiles, such
as ring volume, message volume, ring tone, ring type, keypad volume,
low battery tone, vibration pattern and ring/vibration.
Timed: mark the profiles effectively in a particular time, you can set the
time (within 24 hours), when the set period is over, the profile will return
to the current profile.
Display
Enter the display interface, you can operate as follows:
Greeting: you can set a text or animation to be displayed when you
power on your phone. Select Animation to use the default animation,
Text to write a welcome note, or No greeting to disable this feature.
Wallpaper: you can choose an image from the My Files pictures folder
to set as wallpaper in the standby mode.
Themes: you can select theme 1 or 2 as the theme for the phone.
Main menu style: set the style of the main menu as list or matrix mode.
Active standby apps.: connect the applications to certain shortcut
keys to be used in standby mode.

20
Power saving: set the brightness and timer for backlight.
Font size: set the font size of the phone.
Calls
Enter the calls interface, you can operate as follows:
Call divert: you can set voice call divert, video call divert, fax call divert
separately, and you also can set all call types divert to divert all calls.
Note:
If the transfer call you set up is a fixed phone, please include the
area code of the fixed phone.
Call waiting: you can set the function on/off and can query status of the
call waiting. After the function is set on, if you have a new incoming call
while in calling process, your phone will prompt the calling interface,
and the call can be received normally. If the function is set off, new
incoming calls can not be displayed.
Call barring: you can set barring voice call or video call. This function
needs network support. Please contact your network provider to open
this feature. Network provider will provide the corresponding network
password for you to activate the call barring service.
Caller ID: this network service allows you to select whether your phone
number should be displayed or hidden from the person who you are
calling.
Any key answer: set the function on to enable you to answer the
incoming call by pressing any key, except the RSK, End key, Pwr key,
OK key.
Auto redial: turn on/off auto redial function. If the function is set on,
when the phone makes an outgoing call and the other side is unable to
answer, then the phone will auto redial the number for a maximum of
seven times. You can cancel dialing the current numberwhen calling.
Headset auto answer: set the function on to enable your phone to
answer the incoming call automatically after five seconds when you are
using a headset.
IP number setting: you can create a list of prefix name and prefix
numbers that are used for IP dial.
Alert tone: you can set the tone of connection or minute alert on/off.
Firewall: you can view, edit, add from phone book, delete, delete all the
record in blacklist/whitelist; you also can set select blacklist, whitelist,
unknown incoming call barring from Mode. If set the blacklist mode on,
the number in the list is blocked; if set the whitelist mode on, only the
number in the list is allowed to dial in; if set to unknown incoming call
21
barring on, the number that is not stored in the phone book is blocked;
set to off to remove the Firewall.
Security
Enter the security interface, you can operate as follows:
PIN activate: the function can prevent others from using your SIM card
without your permission. After the SIM card PIN code is activated,
correct PIN code must be inputted every time when the mobile phone is
powered on; otherwise you can only make emergency calls.
Note:
PIN code is the operating password giving access to the SIM card.
The SIM card will be locked, if incorrect PIN code is entered for 3
consecutive times. When locked, you will need the PUK code to
unlock the SIM card. The PUK code may be provided for you
together with the PIN code and the SIM card. If not, please contact
your network provider.
Change PINs: if the PIN/PIN2 is activated, you can change the current
PIN and PIN2 through the system prompts.
Power on lock: set the function on and input the security code correctly,
correct security code must be inputted every time when the phone is
powered on.
Phone lock: input the correct security code to lock the phone to stop
others from using it or to prevent keys from being pressed accidentally.
Change security code: you can change the security code through the
system prompts.
Fixed numbers: set the function on, the phone with the current SIM
card is only allowed to be used to dial the telephone numbers existing in
the list. To turn on the function, you need to input your PIN2 code.
Please consult with your network service provider for more details.
Privacy guard: if activated, the phone will ask for a security code
before you can access the applications that you set to be privacy
guarded.
Network
Enter the network interface, you can operate as follows:
Search type: you can select automatic or manual type for searching.
New search: re-search for an available network and manually select
the network you want to use.
Preferred network: the list of networks in your SIM card defines the
order of preference in which your phone will select a network in
22
automatic mode. Enter the individual networks in your own preferred
order and store them in your SIM card.
Network mode: you can set the network mode as automatic, WCDMA
only or GSM only.
Videophone
See chapter 9 of the Manual.
Data profiles
12.1.1 Internet profile
Enter the internet profile, you can operate as follows:
Web Browser profile: you can select the correct profile for web
browser.
MMS profile: you can select the correct profile for MMS.
12.1.2 Data profile
Enter the data profile, you can operate as follows:
Edit data profile: you can select and edit the name and APN for the
corresponding profile that you selected in the profile list.
Select data profile: you can select the corresponding profile for MMS,
Java box, Internet, E-mail and Streaming.
Restore factory settigs
Select this function to restore your phone’s settings to factory settings.
Clear all
Select this function to delete all data and cancel all settings previously
made on your phone. It is important to backup your data to the memory
card or your computer if clear all has to be performed.
13 Connectivity
Bluetooth
Enter into Bluetooth menu interface, you can operate as follows:
Bluetooth status: turn on/off the Bluetooth function. When Bluetooth
function is turned off, all Bluetooth connections are suspended, you can
not transmit and receive data by using Bluetooth. Please turn off the
Bluetooth function when your phone is used for other operations,
because Bluetooth connection will consume the battery power.
Paired devices: select Search for device to find the device that is in
range and in visiable status. When you pair your phone with other
device in the list, you agree on a shared password for both devices to
be used.
23
Active device info: displays the information of the connected device,
such as: device name, bluetooth address, device type and so on.
My phone’s visibility: you can set the status for your phone as shown
to all or hidden.
Own device info: show the related service information of the Bluetooth
device, including: device name, Bluetooth address and so on.
Packet data connection
You can select the packet data connection mode as When needed or
Always online.
PC synchronization
You can use the PC Suite/Tools to connect your phone with the PC and
perform the following:
Contact: synchronize your phone's contacts by importing or exporting
contacts to/from your PC.
Calendar: synchronize your phone’s calendar by importing or exporting
the calendar to/from your PC.
Ringer: import or export the music file between PC and phone.
Picture: import or export the picture between PC and phone.
Movie: import or export the movie between PC and phone.
File: import or export the file between PC and phone.
SMS: import the sms from phone or create new sms in PC.
Internet: access the internet by snapdialer.
Before connecting to your PC, you should install the PC Suite/Tools.
Please follow the on-screen guide on your PC when installing the PC
Suite/Tools. Before running the PC Suite/Tools, your phone must enter
the PC synchronization mode and stay “Waiting for connection with
PC…” screen (except the dialing-up to internet function), the PC
Suite/Tools software can run normally.
Backup to T-Flash
Backup user data to T-flash card, including contacts, SMS, MMS, Email,
gallery, etc.
Restore from T-Flash
Restore the backup data from T-flash card to the phone.
14 Internet
Prior to using the Internet, the following settings must be carried out first:

24
Apply for WAP services; contact your network service provider for
specifics of WAP services. Make necessary WAP settings on your
mobile phone by referring to the data and proxy settings.
Enter internet interface, you can operate as follows:
Enter Address: input the website that you want to access.
Search Google: use the google as the engine for searching according
to the settings.
Home Page: you can access the internet of an assigned URL set as
home page in the browser profile.
My Bookmark: my bookmark is used to save the websites that you set
as favorites.
History: display the address list of websites recently browsed.
Saved Pages: shows the list of pages you have selected to be saved.
When highlighting home page, my bookmark or history, use the LSK
enter the settings screen, you can select search engine or delete
temporary files, you also can set the parameters of load content, look
and feel, security, browser profile.
15 SIM Tookit
This function is provided by the network operator. According to the
services provided by the SIM card, there will be different options
appearing in this directory. The name and content of the menu are
based entirely on the services provided by the network operator. For
more information, please contact your network operator.
16 Frequently Asked Questions
The mobile phone can not be powered on
The mobile phone can not be powered on since the battery voltage
is too low. Please recharge the battery.
Unable to make calls
Call barring has been set and barred utilization of the mobile phone.
Please check and cancel call barring.
Other person is answering my call
The mobile phone has been set into divert your calls to another
phone number. Please check and cancel call divert.
The mobile phone can not connect to the network
The mobile phone is outside of the network coverage area (or there
are physical obstacles between the mobile phone and the transmitter),
and calls can not be made or answered. If you are in one room, please
move closer to the window.
25
In the operation process, the mobile phone may display the following
operating tips:
“Emergency”
You must insert the SIM card before using the mobile phone. If the
SIM card has been inserted, please take it out and wipe clean with a dry
cloth on the gold metal part, and then insert the SIM card. Or you are
outside the network coverage area of the service provider. But another
network found will allow you to make emergency calls with sufficient
signal strength.
“Invalid SIM”
The SIM card of the mobile phone is locked and the inserted SIM
card is unable to be accepted. Please insert the correct SIM card or
contact your network provider.
“Please Enter PUK”
The SIM card has been locked since the wrong PIN code has been
inputted three consecutive times. You must consult your network
provider for special PUK code with eight numbers to unlock the SIM
card (The PUK code may have been provided with your PIN code at the
same time).
Warning:
The SIM card will be permanently locked if you input the wrong
PUK code for ten consecutive times then you must apply for a new
SIM card from your network provider.
RF Exposure Information and Statement
The SAR limit of USA (FCC) is 1.6 W/kg averaged over one gram of tissue. This model (FCC
ID: WA6S810) has also been tested against this SAR limit. The highest SAR value reported under
this standard during product certification for use at the ear is 0.699 W/kg and when properly worn
on the body is 1.173 W/kg. This device was tested for typical body-worn operations with the back
of the handset kept 1.5cm from the body. To maintain compliance with FCC RF exposure
requirements, use accessories that maintain a 1.5cm separation distance between the user's body
and the back of the handset. The use of belt clips, holsters and similar accessories should not
contain metallic components in its assembly. The use of accessories that do not satisfy these
requirements may not comply with FCC RF exposure requirements, and should be avoided.
This device complies with the FCC HAC requirements has also been tested E-Field, H-Field and
T-Coil, the worst test result of M rating is M3, the T rating is T3.
This device complies with part 15 of the FCC rules. Operation is subject to the following two
conditions: (1) this device may not cause harmful interference, and (2) this device must accept any
interference received, including interference that may cause undesired operation.
NOTE: The manufacturer is not responsible for any radio or TV interference caused by
unauthorized modifications to this equipment. Such modifications could void the user’s authority
to operate the equipment.
NOTE: This equipment has been tested and found to comply with the limits for a Class B digital
device, pursuant to part 15 of the FCC Rules. These limits are designed to provide reasonable
protection against harmful interference in a residential installation. This equipment generates
uses and can radiate radio frequency energy and, if not installed and used in accordance with the
instructions, may cause harmful interference to radio communications. However, there is no
guarantee that interference will not occur in a particular installation. If this equipment does
cause harmful interference to radio or television reception, which can be determined by turning
the equipment off and on, the user is encouraged to try to correct the interference by one or more
of the following measures:
- Reorient or relocate the receiving antenna.
- Increase the separation between the equipment and receiver.
-Connect the equipment into an outlet on a circuit different from that to which the receiver is
connected.
-Consult the dealer or an experienced radio/TV technician for help