Via One Networks 1000 Tri-Band Mobile Phone w/ Bluetooth Transmitter User Manual CERTIFICATE OF COMPLIANCE
Via One Networks LLC Tri-Band Mobile Phone w/ Bluetooth Transmitter CERTIFICATE OF COMPLIANCE
UserManual.wiki
>
Via One Networks
>
1000 User Manual
manual
Navigation menu
Upload a User Manual
Namespaces
Wiki Guide
HTML
PDF
Info
Views
User Manual
Discussion / Help
Navigation

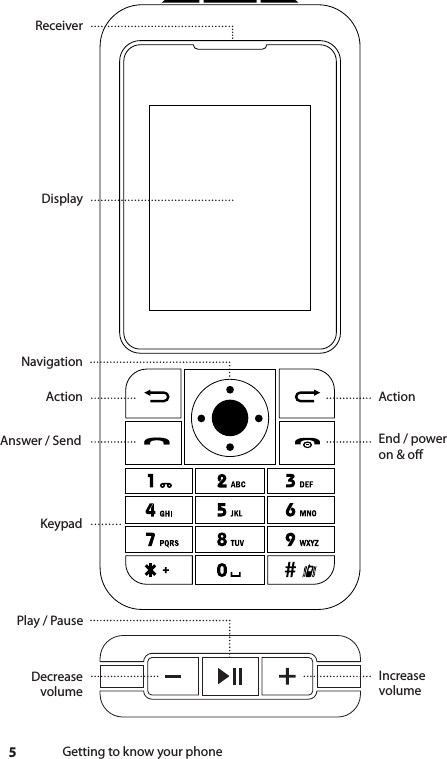
![4Getting to know your phone2. Getting to Know Your PhoneUsing This Manual This user manual applies to the GSM Flyer mobile phone. But before you get started, keep a few helpful hints in mind: ìWhere you see words in quotation (for example, “Wrong PIN”), the words are actual words displayed in the phone, such as prompts or names of menus. ìWhere you see bold words in square brackets (for example, [Ok]), you have to press the corresponding action keys or under which the bold words appear.The most common symbols and their function meanings are as follows: Signal strength Keypad locked Alarm activated Phone call(s) missed New SMS or SMS full Battery status RingVibration onlyVibration and ringVibration then ringBluetooth is enabledHandset is roaming](https://usermanual.wiki/Via-One-Networks/1000/User-Guide-1186317-Page-8.png)
![9The battery indicator bar on the phone starts scrolling, and the green light on the prong adapter is lit. You may have to wait several minutes before you see the battery indicator bar appear on the screen.When the battery is fully charged, the bar stops scrolling. To stop charging the phone, disconnect the charger from the phone and then from the wall outlet or computer.Charge the battery for at least 12 hours for rst time usage.Switching the Phone On/OTo power your phone on/o, follow these steps:1. Press and hold .A greeting message is displayed, and you may be asked to enter a PIN Code.2. Use the keypad to enter your PIN, and then press [Ok].The Pin Code can be found on the SIM card holder (see page 7). A “PIN Accepted” message is displayed when you have entered the correct PIN. A “Wrong PIN” message is displayed when you have entered the wrong PIN . If the latter is the case, you are prompted to re-enter the correct PIN. 3. If you have mistakenly entered a wrong number, press [Clear] to delete the number and re-enter the correct PIN.4. To switch the phone o, press and hold .You have three attempts at entering the correct PIN before the SIM card is locked. You will need a PUK Code to unlock the SIM. You can obtain this code by calling Customer Care at 1-888-882-0978 . You have ten attempts at entering the correct PUK Code; after which, the SIM card will be permanently locked, and you will be required you to purchase a new SIM card by calling Customer Care.Getting started](https://usermanual.wiki/Via-One-Networks/1000/User-Guide-1186317-Page-13.png)
![13Making an Emergency CallYou can make an emergency call even when a subscribed network is unavailable. To make an emergency call, follow these steps:1. Switch on the phone.2. Press to select SOS.3. Enter the emergency number using keypad and press . Please conrm the local emergency number to dial in the country you are calling from. For example 911, 999, 112, and so on.4. Follow the instructions of the emergency operator.Receiving a CallWhen you receive a call, the phone rings or vibrates depending on your User Prole settings. The contact name and number is displayed if the information has been stored in your phone book. To receive a call, follow these steps:1. Press to answer a received call or press and select [Answer].2. Press to reject a received call or press and select [Deect]. 3. If a missed call notication appears on the screen, press to read the missed call details or press to return to idle screen.When you choose to reject a call, the rejected call becomes a missed call.Making and receiving calls](https://usermanual.wiki/Via-One-Networks/1000/User-Guide-1186317-Page-17.png)
![14Making and receiving callsKnowing Your Options During a CallPress to view active call options. Scroll to selected option then press [Ok]. To return to the previous screen, press [Back].The following options are oered during a call: ìHold: To put an active call on hold ìEnd: To end the active call ìNew Call: To make a new call during an active call ìPhone Book: To browse the phone book during a call ìSMS: To send out a SMS during a callWhere service is not available, this is indicated by the notication “None.” ìMute: To mute the volume during a call ìDTMF: To select on/o functionTo activate hands-free calling during an active call, press to select the hands-free option. Hands-Free is a preset user prole. Note: Go to User Prole to view hands-free setup.Dialing a Missed CallWhen you miss a call, you will see a notication of a missed call on your screen immediately. Press to read the missed call details or press twice to return to the idle screen. Returning to the idle screen does not delete the missed call details from your phone. You will see an icon on the top panel of your display in the idle screen to indicate a missed call.](https://usermanual.wiki/Via-One-Networks/1000/User-Guide-1186317-Page-18.png)
![15To dial the missed call:1. Press to display missed calls and select [Option] followed by [Dial]. Selecting [Option] in the same screen allows you to view the missed call options. 2. Scroll to selected option and then press [Ok]. 3. To return to previous menu, press [Back].The following options are available to you when you have missed a call: ìDelete: To delete missed call number from your phone book ìSave to Phone Book: To store missed call number in your phone book ìDial: To dial the missed call ìEdit: To edit missed call number in your phone bookRedialing and ReplyingYour phone stores a record of the last ten numbers you have dialed. To redial your last outgoing number:1. Press to display Dialed Calls.2. Use the navigation keys to scroll to your desired number and press to dial.Making and receiving calls](https://usermanual.wiki/Via-One-Networks/1000/User-Guide-1186317-Page-19.png)
![16Making and receiving callsUsing the Phone BookYou can store phone numbers and their corresponding contact names in the phone book. To use the phone book, press to access phone book entries from the idle screen. For more phone book options, press followed by or select [Ok] to go to phone book menu. The Phone Book menu oers the following options: ìQuick Search Entry: To enter a contact’s name or rst letter and a list of matching contacts will appear ìAdd New Entry: To add a new contact ìCopy All: To copy all phone book entries stored in SIM to phone storage or vice versa ìDelete: To delete phone book entries from the SIM or Phone ìCaller Group: To access/edit specic groups entries in the phone book ìMy vCard: To edit Owner/Service Dial/SOS phone number ìSetting: To edit/access Memory Status/Preferred Storage SIM/Phone Book elds and My vCard information ìCaller Picture: To associate a picture to a contact ìCaller Ring Tone: To attach a specic ringer when called from the contactThe phone can store up to 250 entries and the SIM card can store an additional 500 entries.](https://usermanual.wiki/Via-One-Networks/1000/User-Guide-1186317-Page-20.png)
![17Finding a contact with Quick SearchUse the keypad to nd a contact by entering the rst letter of the contact’s name. For example, if you want to search for the contact “Heidi,” press twice to go to “H.” Then use the navigation keys to scroll to the name “Heidi.”Entry OptionAfter you choose a contact, select [Option]. Scroll through the list and press [Ok] to select. Press [Back] to return to the phone book listing.Phone book menu options include ìDial: To make a call ìSMS: To write an SMS ìView: To view contact details ìEdit: To edit contact details ìDelete: To delete a contact from the phone book listing ìCopy: To copy a contact from the SIM to the phone or vice versa ìMove: To move a contact from the SIM to the phone or vice versa ìDuplicate: To duplicate entryCreating an EntryTo create a new entry, follow these steps:1. From the phone book menu, highlight Add New Entry and press [Ok].2. Enter your preferred location.Making and receiving calls](https://usermanual.wiki/Via-One-Networks/1000/User-Guide-1186317-Page-21.png)
![18Making and receiving callsThe phone will prompt you to choose your preferred storage location either on the SIM card or phone. Saving to the SIM card allows you to enter only the name and number. Saving to the phone allows you to save more: ìName ìMobile Number ìHome Number ìE-mail Address ìOce Number ìFax Number ìBirthday ìAssociate Picture (Add a custom picture to a contact) ìAssociate Sound (Add a custom ringer to a contact) ìCaller Group (Add a contact to a group: Friends, Business, and so on)3. Select Name and press [Edit] and use the keypad to enter a name; then select [Option] and [Done].4. Use the navigation key to scroll down to Mobile Number and press [Edit] and use keypad to enter the number. 5. Select [Option] and [Done].6. Press [Ok] and then select [Yes] to save new entry.](https://usermanual.wiki/Via-One-Networks/1000/User-Guide-1186317-Page-22.png)
![19MessagingThe Messages menu allows you to manage the messages received, sent, and to be sent.Press followed by to access the Messages Menu. The following options are available: ìInbox: Contains message received ìOutbox: Contains messages sent ìWrite: Creates message to be send ìTemplate: Creates and saves messages frequently used, for quick texting. For example “Where are you?” ìMessage Settings: Message reports, memory managementWrite SMSTo write an SMS, follow these steps:1. From the Messages menu, scroll down to Write Message and press [Ok].2. Type the message using the keypad and press to change the preferred input method and access pre-saved template messages. 3. Press [Clear] to delete the text. 4. When the message has been completed, press [Option] then [Ok] when done.Input methods allow you to switch between languages, capitalize letters, and predict text. When the predictive text is selected, the phone determines the word you are trying to type.Messaging](https://usermanual.wiki/Via-One-Networks/1000/User-Guide-1186317-Page-23.png)
![20MessagingSending SMSAfter you have entered the text message and selected [Done], the following Send options are available: ìSave and Send: Save a copy of the message and send the SMS ìSend Only: Send the SMS ìSave: Save the SMS and do not send ìSend to Many: Send the SMS to multiple recipients ìSend By Group: Send the SMS to pre-dened groupsTo send one SMS message:1. Select [Send Only] and enter contact number or select [Search] to select a contact from the Phone Book. 2. Use the navigation keys to scroll through Phone Book entries and press [Ok] to select a contact.3. Press [Ok] to send message to the contact.4. Press [Abort] to cancel and/or stop the message from being sent.To send a text to multiple recipients:1. Select [Send to Many] option when you want to send an SMS to more than one recipient.2. Select [Edit List] and press to enter the phone number or select [Search] to scroll through the Phone Book entries and choose the recipient(s).3. Press [Back] to return to previous screen and select [Send Now] to send SMS.To send SMS by group:1. Select [Send By Group] option when you want to send an SMS to a predened group.](https://usermanual.wiki/Via-One-Networks/1000/User-Guide-1186317-Page-24.png)
![212. Select Friends/Family/VIP/Business/Others.3. Press [Ok] to select group.4. Press [Back] to return to previous screen and select[Send Now] to send SMS.Unsent SMS MessagesUnsent SMS messages are saved in the Outbox. To view these messages, scroll to [Outbox] to view unsent messages. Select a message and press [Ok] to read the message. Press [Option] for outbox options. The following outbox options are available: ìSend: To send an SMS message stored in the Outbox ìEdit: To edit a message stored in the Outbox ìDelete: To delete message stored in the Outbox ìDelete All: To delete all messages stored in the Outbox ìUse Number: To save the number from message with option; to dial or save the number to the phone bookReading SMSWhen you receive an SMS message, you will see a notication on your idle screen and a message icon at the top panel of your idle screen.To read an SMS:1. When a new SMS notication is displayed, press to display the SMS message. Sender information is shown at the beginning of the SMS message.2. Read an SMS message from the Messages menu. Scroll to [Inbox] and press [Ok]. Use the navigation keys Messaging](https://usermanual.wiki/Via-One-Networks/1000/User-Guide-1186317-Page-25.png)
![22Messagingto scroll to the SMS message to be read, and press [Ok] to display message. The most recent SMS messages are displayed rst.3. Press [Back] to return to Messages menu or press to return to idle screen.Press [Option] and scroll to select read options. Press [Ok] to select an option or [Back] to return to Messages menu. The following options are available when you read an SMS message: ìReply: To reply to the sender of the SMS message ìForward: To forward the SMS message to another recipient ìEdit: To edit the SMS message ìDelete: To delete the SMS message ìDelete All: To delete all SMS messages received ìUse Number: To extract a number from a message with further options to dial or to save number to phone bookUsing Message TemplatesMessage templates are pre-set messages that you can use instead of having to enter the entire message using the keypad. To view the templates, scroll to [Template] from the Messages menu. Select a template and press [Option] to view it. The following template options are available: ìEdit: To edit a message Template ìErase: To erase a message Template ìWrite Message: To use Template in a message](https://usermanual.wiki/Via-One-Networks/1000/User-Guide-1186317-Page-26.png)
![23Viewing Call HistoryThe phone stores the last ten call records for missed calls, incoming calls, and outgoing calls. From the idle screen, press followed by to go to Call History menu.Missed CallsWhen you have a missed call, you will see a notication on your idle screen and a on the top panel of your idle screen. Press to display missed call details. You may also view missed call details from the main menu. Go to [Call History] and press [Ok]. Then select [Missed Calls] and press [Ok] to display missed call information. The number of missed calls on record is displayed. Use the navigation keys to scroll and view other missed calls if you have more than one missed call on record.To dial a missed call, please refer to the “Dialing a Missed Call” section under “Making and Receiving Calls.” Dialed CallsPress or scroll to Dialed Calls to view a list of your outgoing calls. Use the navigation keys to scroll through the list and press [Option] to select an entry. When you select to view a dialed call, the following information is displayed: ìDate ìTime ìContact Name (if in Phone Book) ìPhone Number ìNumber of Times DialedViewing call history](https://usermanual.wiki/Via-One-Networks/1000/User-Guide-1186317-Page-27.png)
![24Viewing call historySelect [Back] to return to the Dialed Calls list or select [Option] to access the following options: ìDelete: To delete the dialed call entry ìSave: To save the dialed number in the SIM or phone ìDial: To dial the number in dialed calls record ìEdit: To enable changes to be made to the number in dialed call record ìSend SMS: To write an SMS to the dialed numberReceived CallsScroll to [Received Calls] to view a list of your incoming calls. Use the navigation keys to scroll through the list and press [Ok] to select an entry. The following information is displayed when you select to view a received call: ìDate ìTime ìContact Name (if in Phone Book) ìPhone Number ìNumber of calls received ìDurationSelect [Back] to return to the Received Calls list or select [Option] to access the following options: ìDelete: To delete the received call entry ìSave: To save the received call number in the SIM or phone ìDial: To dial the number in received calls record ìEdit: To enable changes to be made to the number in received call record ìSend SMS: To write an SMS to the dialed number](https://usermanual.wiki/Via-One-Networks/1000/User-Guide-1186317-Page-28.png)
![25Deleting Call LogsScroll to [Delete Call Logs] and press [Ok] to access delete call log options, which are as follows: ìMissed Calls: To delete only missed call entries in the call logs ìDialed Calls: To delete only dialed call entries in the call logs ìReceived Calls: To delete only received call entries in the call logs ìDelete All: To delete all entries in the call logs ìCall Time: To view phone usage reports ìSMS Counter: To view number of messages sent and receivedViewing call history](https://usermanual.wiki/Via-One-Networks/1000/User-Guide-1186317-Page-29.png)
![26Customizing your phoneCustomizing Your PhoneThe Settings menu allows you to customize your phone. The Settings menu oers options to change the phone language; set the preferred alert mode; setup ring tone, key sound, warning tones; display preferences, DTMF, greetings; and view phone information. Press followed by to go to Settings menu. Use navigation keys to scroll to the sub-menus and press [Ok] to access selected sub-menus. The Settings menu comprises the following sub-menus: ìPhone Setup: To customize the setup of your phone ìCall Setup: To set up your call preferences ìNetwork Setup: To set up your network preferences ìSecurity Setup: To set up your preferred security settings ìRestore Factory Settings: To restore factory settings; enter the reset PIN: 0000 ìUser Proles: To select call alert settings ìBluetooth: To pair your phone with a Bluetooth device](https://usermanual.wiki/Via-One-Networks/1000/User-Guide-1186317-Page-30.png)
![27 Customizing your phonePhone SetupThe Phone Setup sub-menu contains options that allow you to change the phone’s time and date, the display language, your preferred text input method, and display characteristics. It also allows you to set the display contrast, your preferred greeting text, speed dial function, preferred shortcuts to functions you frequently use, dedicated keys for frequently used options, and enables the auto update of the date and time.To access these options, scroll to Phone setup and press [Ok]. Then use the navigation keys to scroll to an option and press [Ok] to access the selected option: ìTime and Date: To set the phone’s internal clock. First set your home city. • Select [Set Home City] and use the navigation keys to scroll to your home city. Next set the time and date. • Select [Change]. Use navigation keys to scroll to time then use keypad to enter the time. Next, scroll to date and use keypad to enter the date.• Select [Done] and [Yes] to save your settings. • Press [Back] to return to Phone Setup. ìSchedule Power: To schedule your phone to automatically power on and o. Use the navigation keys to select schedule power and press [Ok]. ìLanguage: To specify your preferred language for the phone. Use the navigation keys to select between English, French, Spanish, and Arabic and press [Ok]. ìPreferred Input Method: To specify your preferred input method. Use the navigation keys to select an input method and press [Ok].](https://usermanual.wiki/Via-One-Networks/1000/User-Guide-1186317-Page-31.png)
![28Customizing your phone ìDisplay characteristics: To setup your display preferences. • Select [Wallpaper] to change wallpapers.• Select [Screen saver] to change screen saver. • Select [Power On Display] to change power on display. • Select [Power O Display] to change power o display. • Select [Show Date and Time] and [On] or [O] to enable or disable display of date and time on idle screen. • Select [Show Owner Number] and [On] or [O] to enable or disable display of your own number on idle screen. • Press [Back] to return to Phone Setup. ìGreeting Text: To customize the greeting text displayed whenever the phone is powered on or o. Scroll to [Status], use navigation keys to select [On] to activate greeting text or [O] to deactivate it. Next scroll to Greeting Text. “Welcome” is the default greeting text. To change this, select [Edit] to change the message. Select [Ok] and [Yes] to save the new settings. ìSpeed Dial: To enable Speed Dial and set speed dial numbers. ìDedicated key: To dene the functions of the navigation keys in idle screen. ìAuto update Date and Time: Select this option to auto update date and time. Select [On] to activate auto update and [O] to deactivate it. ìFlight Mode: To set the phone in Flight or Normal mode or Query on Power On. ìMisc Setting: To set LED On/O and LCD backlight On/O.](https://usermanual.wiki/Via-One-Networks/1000/User-Guide-1186317-Page-32.png)
![29 Customizing your phoneCall Setup Select this option if you want to access Call Setup options. Scroll to Call Setup and press [Ok]. The options include ìCall Waiting: To activate and deactivate call waiting ìCall Time Display: To turn on and o call duration time to be displayedNetwork SetupSelect this option if you want to congure the network, scroll to Network Setup and press [Ok]. Network setup options include ìNetwork Selection: Set Network Selection to automatic or manual to select a network. We strongly recommend you leave this as automatic. ìPreferred Networks: Add preferred cellular networks you want to connect to. We strongly recommend you do not delete the entries in the Preferred Network options. Your phone service may be adversely aected.Security SetupSecurity Setup sub-menu contains options, which allow you to customize the security preferences for your phone. To access these options, scroll to Security setup and press [Ok]. Then use the navigation keys to scroll to an option and press [Ok] to access the selected option: ìSIM Lock: Select this option to lock the SIM card and](https://usermanual.wiki/Via-One-Networks/1000/User-Guide-1186317-Page-33.png)
![30Customizing your phoneprevent its use on another phone unless the correct PIN is provided. This function is PIN protected. Select [On] to lock the SIM card or [O] to unlock the SIM card. ìAuto Key Lock: Select this option to lock the keypad automatically after the expiry of a set period. Use the navigation keys to select the period after which the keypad will be locked automatically. Select [None] to deactivate this function. After the keypad is locked, a lock icon appears at the top panel of your idle screen. To unlock the keypad, press followed by . ìChange Password: Select this option to change the following passwords: PIN1, PIN2. To change the passwords, you need to enter the current password rst then enter the new password. The phone will prompt you to reenter the new password for conrmation.Passwords and PINs are the same. PIN1 is the 4-digit PIN printed on the SIM Card Holder. PIN2 can be acquired by contacting Customer Care at 1-888-882-0978.Restoring Factory SettingsSelect this option to restore all settings to original factory settings. This function is password-protected, and the phone will prompt you to enter a password. The default password is 0000.User ProlesThe User Proles Menu allows you to customize for tone setup, volume, alert type, ring type, extra tone, LCD backlight, and font size. The phone is preset with ve user proles: General,](https://usermanual.wiki/Via-One-Networks/1000/User-Guide-1186317-Page-34.png)
![31 Customizing your phoneMeeting, Outdoor, Indoor, and Headset. Each user prole is customized to suit dierent environments. Press to go to the User Proles Menu.To activate a user prole, scroll to the preferred user prole and press [Ok]. Select [Activate] to activate user prole.To customize a user prole, scroll to the user prole and press [Ok]. Select [Customize] and press [Ok]. You will see a list of the following features in user prole, which you can choose to customize: ìTone Setup ìVolume ìAlert Type ìRing Type ìExtra Tone ìAnswer ModeTo customize any particular feature, scroll to the feature and press [Ok]. Use the navigation keys to scroll through the list of options. Press [Ok] to select option. Press [Back] to return to User Prole menu.BluetoothThis handset oers Bluetooth, which allows this handset to connect to other Bluetooth enabled devices within a range of 10 meters. A Bluetooth connection can be used to send or receive text les, images, videos, music les, and vCards. Bluetooth devices do not need line of sight to communicate because they use radio waves; however, please check with](https://usermanual.wiki/Via-One-Networks/1000/User-Guide-1186317-Page-35.png)
![32Customizing your phoneyour service provider or local authority to see if any restrictions apply in some locations. Please check the manufacturers for other devices to determine compatibility with this device. To access the Bluetooth menu from the idle screen, press followed by and scroll down using the navigation key to Bluetooth and press [Ok]. The rst time you access the Bluetooth Menu you will be asked to Power on Bluetooth; press [Ok] to turn on Bluetooth.The Bluetooth Menu allows you to ìSet visibility of your handset to On or O: When set to On, your handset will be visible to other Bluetooth devices for pairing. ìChange the name of your handset: This name will be the name other Bluetooth devices will see when pairing to your device. ìAuthentication On/O: When set to O, any Bluetooth enabled device can talk to your handset. Set to On to require PIN authentication before pairing with another device. ìAudio path: Choose between headset or phone to access audio les.Using Bluetooth increases demand on battery power and reduces battery life.](https://usermanual.wiki/Via-One-Networks/1000/User-Guide-1186317-Page-36.png)
![33 CameraCameraThe GSM Flyer has a built-in 0.3 mega pixel CMOS camera, which supports photographing and video shooting functions. The Camera menu consists of the Camera functions, Image viewer, Video Recorder, and Video Player.Taking PicturesIf you choose to take a picture, follow these steps:1. Press to activate the camera. 2. Alternatively, to access the Camera Menu press followed by from the idle screen.3. Press to capture an image.4. Select [Save] to save the captured image.The camera is preset with default factory settings. To change the camera settings, press to activate the camera and select [Option], [Camera Setting]. Below are the settings that can be changed: ìSelect [Shutter Sound] to set the camera shutter sound to on or o. ìSelect [EV] to set the camera EV from -4 to +4. ìSelect [Banding] to set the band to 50Hz or 60Hz.](https://usermanual.wiki/Via-One-Networks/1000/User-Guide-1186317-Page-37.png)
![34Camera ìSelect [Delay Timer] to set the delay time when capturing photos. ìSelect [Cont Shot] to set the number of continuous pictures to captures.To specify the image size of photos captured using the phone camera, select [Option] and scroll down to [Image Setting] and press [Ok]. You can choose from the following image sizes: ì320x240 ì640x480 ì128x160 ì160x120After you select the Image Size, press [Ok] to save and return to the Camera [Options] menu. To change the image quality select [Image Quality] from the Camera [Options] menu. You can choose from the following image sizes: ìLow ìNormal ìHighAdditional Camera options include the following: ìWhite Balance: To adjust the white balance to auto, daylight, and more. Select according to dierent lighting conditions and preferences. ìScene Mode: To adjust the camera lighting to night mode or auto.](https://usermanual.wiki/Via-One-Networks/1000/User-Guide-1186317-Page-38.png)
![35 Camera ìEect Setting: To set the image eects to normal, grayscale, sepia, and more when capturing photos. ìAdd Frame: To add frames to the photos. Ten dierent frames available. ìStorage: To set default storage location for pictures; Phone or Memory Card. ìRestore Default: To restore default factory settings for the camera.Frames are only applicable to images of size 128x160. Image ViewerTo view pictures taken, select [Image Viewer] from the Camera Menu. The image viewer has a number of options: ìBrowse Style: To select List Style or Matrix Style for browsing images ìForward: To set an image as wallpaper, as a screen saver, or to send the image to the phone book contact ìRename: To rename the image le ìDelete: To delete the image le ìDelete All: To delete all image les ìSort: To arrange and list image les by name, type, time, or size ìStorage: To specify the preferred storage location for image les](https://usermanual.wiki/Via-One-Networks/1000/User-Guide-1186317-Page-39.png)
![36CameraVideo RecorderTo record video using the video recorder, follow these steps:1. From the idle screen, press followed by to access the Camera Menu and scroll to select [Video Recorder].2. To begin or to stop recording, press . 3. When nished, select [Stop] and [Yes] to save or [No] to discard the recording.Video PlayerTo play a video, select Video Player from the Camera Menu and press [Play] from the menu options.Additional Video Player options include ìPlay: To play the selected video le ìRename: To rename the video le ìDelete: To delete the video le ìDelete All: To delete all video les ìSort: To arrange and list the video les by name, type, time, or size. ìBluetooth Settings: To pair the handset to a Bluetooth audio device ìStorage: To specify your preferred storage location for the recorded video les](https://usermanual.wiki/Via-One-Networks/1000/User-Guide-1186317-Page-40.png)
![37 AudioAudioThe Audio menu consists of the Audio Player, Sound Recorder, and FM Radio.Audio PlayerTo play an audio le follow these steps:1. Press and then press to get to the Audio Menu.2. Select [Audio Player] to play an audio le or Press when the phone is in idle mode to play immediately. 3. From the Audio Player, press to play the audio le.4. Press [Ok] to view the play list.When you select an audio le from the play list, you can press [Options] to get the following options: ìAdd to Rings: To use the audio le as the phone ringing tone ìRefresh List: To update the play list ìSettings: To edit the audio player settingsThe audio player only supports .WAV and .AMR le formats.](https://usermanual.wiki/Via-One-Networks/1000/User-Guide-1186317-Page-41.png)
![38AudioSound RecorderTo record an audio le: 1. Press and then press to get to the Audio Menu.2. Select [Sound Recorder] and then [Option].3. To begin recording, select [Option] and then [Record].4. To stop recording, select [Stop].The phone automatically assigns a lename to the recording. You can edit the default lename. Select [Option] and then [Save] to save the sound le.You have several options for the sound recorder: ìAppend: To attach a sound clip to the recording ìRename: To rename the sound le ìDelete: To delete the sound le ìDelete All: To delete all sound les ìSettings: To specify a preferred storage location and le format for recorded sound les ìForward: To send the sound le to User prole](https://usermanual.wiki/Via-One-Networks/1000/User-Guide-1186317-Page-42.png)

![41 HelpHelpFrom the Idle screen, press and then press to get to the Help Menu.Scroll up and down the list using the navigation key and press [Ok] to select an option. VoicemailDial 121 and press to access Voicemail. You can also dial directly from the Short Code menu. Scroll to Voicemail and press [Ok] then press to call.Voicemail GreetingDial 732 and press to change Voicemail Greeting. You can also dial directly from the Short Code menu. Scroll to Voicemail Greeting and press [Ok] then press to call.Customer CareDial 154 and press to call Customer Care. You can also dial directly from the Short Code menu. Scroll to Customer Care and press [Ok] then press to call.BalanceDial 187 and press to check account Balance. You can also dial directly from the Short Code menu. Scroll to Balance and press [Ok] then press to call.Check NumberDial 966 and press to get your World Phone For Dummies number.](https://usermanual.wiki/Via-One-Networks/1000/User-Guide-1186317-Page-45.png)
![42HelpPurchase AirtimeDial 191 and press to buy airtime. You can also dial directly from the Short Code menu. Scroll to Purchase Airtime and press [Ok] then press to call. See the Service Guide for complete instructions.Call CostDial 000 + country code + city code + destination number and then press to see the cost per minute for the call.Call ForwardingDial 600 and enter the phone number of the phone you want your calls forwarded to and press .Cancel Call forwardingDial 141 and press to cancel call forwarding.Call Forward StatusDial 151 and press to check call forwarding status.The above shortcuts are only available from the World Phone For Dummies.](https://usermanual.wiki/Via-One-Networks/1000/User-Guide-1186317-Page-46.png)
![43Transferring FilesTransfer Files by USBTo transfer sound and image les between the phone and a computer, follow these steps:1. Connect the USB cable from the phone charger socket to the computer’s USB port. Use only the USB cable that is approved for this phone model.2. Select [Mass Storage]. When Mass Storage mode is selected, the phone is automatically switched o to function as a USB mass storage device. Your computer will detect that the phone has been connected.3. Browse your computer to open the phone folder. The phone memory is preset with six folders: ìAudio: Stores audio and sound les ìMy Music: Stores audio les ìVideo: Stores MP4 video les ìImages: Stores pictures and images ìPhotos: Stores photos that are captured using the phone ìReceived: Stores all received les from other devices4. Browse the relevant folders to select the les that you want to transfer.Transferring les](https://usermanual.wiki/Via-One-Networks/1000/User-Guide-1186317-Page-47.png)