ViewSonic MW251V150 802.11/b Wireless Monitor-Airpanel V150 User Manual APV110 UG
ViewSonic Corporation 802.11/b Wireless Monitor-Airpanel V150 APV110 UG
Contents
- 1. User Manual 1 of 2
- 2. User Manual 2 of 2
User Manual 1 of 2
ViewSonic®
User Guide
Guide de l’utilisateur
Bedienungsanleitung
Wireless Monitor
V150
2 ViewSonic air
panel
V150
8-30-02 ViewSonic air
panel
V110 i
Contents
Introduction
Your airpanel V150 Wireless Monitor ..................................... 2
Precautions ............................................................................ 2
airpanel V150 Features .......................................................... 3
Front Control Buttons and Features ................................... 3
Rear Connection Ports & Panels ....................................... 4
Battery & Power Properties .................................................... 5
Battery Power Status .......................................................... 5
Changing the Battery ....................................................... 6
Antenna Signal Properties ...................................................... 6
Wireless Connection Signal Status ..................................... 6
Basic Setup
Charging the Battery .............................................................. 7
Using the AC/DC Power Converter ..................................... 7
Setting Up Software ............................................................... 8
BEFORE YOU BEGIN ........................................................ 8
Accessing Information from your Home PC ........................ 12
Using the airpanel V150
The Buttons ............................................................................ 13
Using the Stylus ..................................................................... 14
Moving Windows ................................................................. 14
Operating System not Responding ..................................... 15
Calibrating the Touch Screen .............................................. 15
Adjusting Stylus Double-tap Rate ....................................... 15
Resetting your airpanel .......................................................... 16
Soft Reset ........................................................................... 16
Hard Reset .......................................................................... 16
PCMCIA Cards ....................................................................... 17
Using a PCMCIA Card ....................................................... 17
airpanel Settings ..................................................................... 18
Device Settings ................................................................... 18
Optional Accessories
The ViewSonic airpanel V150 Dock .......................................24
Commercially Available Options ............................................. 25
ii ViewSonic air
panel
V150
External USB Keyboard ...................................................... 25
External USB Mouse ........................................................... 25
External Headphone Set ..................................................... 25
External Microphone ........................................................... 25
Appendix
airpanel V150 Specifications .................................................. 26
Customer Support .................................................................. 28
Cleaning and Maintenance .................................................... 29
Limited Warranty .................................................................... 30
Safety Guidelines ................................................................... 31
Compliance and Safety Notices ............................................. 32
Radio Frequency Interference (RFI) Compliance ............... 32
Safety Notices ..................................................................... 34

ViewSonic air
panel
V150 1
airpanel V150 Copyright © ViewSonic Corporation, 2002. All rights reserved.
airpanel is a trademark of ViewSonic Corporation. ViewSonic, and the three birds logo are
registered trademarks of ViewSonic Corporation.
Microsoft, Windows, Windows CE, Windows CE Inbox, Explorer and Internet Explorer, Pocket
Word, Microsoft Word, Active Sync, MSN, Excel, Windows RDP and the Windows logo are
trademarks of Microsoft Corporation in the United States and other countries.
Citrix, WindView, and ICA are registered trademarks of Citrix Systems, Inc. MetaFrame
is a
trademark of Citrix Systems, Inc.
Intel and X-Scale are registered trademarks of Intel Corporation.
VESA is a registered trademark of the Video Electronics Standards Association.
CompactFlash is a trademark of the CompactFlash Association.
ENERGY STAR® is a registered trademark of the U.S. Environmental Protection Agency (EPA).
As an ENERGY STAR® partner, ViewSonic Corporation has determined that this product meets the
ENERGY STAR® guidelines for energy efficiency.
Disclaimer: ViewSonic Corporation shall not be liable for technical or editorial errors or omissions
contained herein; nor for incidental or consequential damages resulting from furnishing this
material, or the performance or use of this product.
In the interest of continuing product improvement, ViewSonic Corporation reserves the right to
change product specifications without notice. Information in this document may change without
notice.
No part of this document may be copied, reproduced, or transmitted by any means, for any purpose
without prior written permission from ViewSonic Corporation.
Product Registration
To meet your future needs, and to receive any additional product information as it becomes
available, please register your product on the Internet at: www.viewsonic.com. The airpanel V150
Utility CD-ROM also provides an opportunity for you to print the registration form, which you may
mail or fax to ViewSonic.
Product disposal at end of product life
ViewSonic is concerned about the preservation of our environment. Please dispose of this product
properly at the end of its useful life. Your local waste disposal company may provide information
about proper disposal.
For Your Records
Product Name:
Model Number:
Document Number:
Serial Number:
Purchase Date:
air
panel V150
VSMW24688
A-CD-airpanel_V150-1
_______________
_______________

2 ViewSonic air
panel
V150
Introduction
Your
air
panel V150 Wireless Monitor
Congratulations on your purchase of a ViewSonic® airpanelTM V150 Wireless
Monitor. With your airpanel V150 you will be able to access files, e-mail,
applications, surf the web and data located on your Microsoft Windows XP
Professional PC remotely.
This user guide will help you set-up your airpanel V150 and introduce you to
its many features.
Important! Save the original box and all packing material for future shipping
needs.
Your airpanel V150 package contents include:
•ViewSonic airpanel V150
• Quick Start Guide
• airpanel V150 battery
• AC/DC power adapter with Power cord
• USB Setup Cable (airpanel to PC)
•Stylus (2)
• Stylus Tether
• airpanel V150 Utility CD-ROM which includes the User Guide
documentation and the wireless monitor installation software
Precautions
• For best viewing conditions view the
screen from a distance of 15" to 18".
• DON’T TOUCH THE SCREEN WITH
YOUR FINGERS. Oils from the skin are
difficult to remove.
• NEVER REMOVE THE REAR
COVER. Your airpanel V150 contains
high voltage parts. You may suffer
serious injury if you touch these parts.
• Avoid exposing the screen to direct
sunlight or another heat source. The
screen should be facing away from direct
sunlight to reduce glare.
• Always handle your airpanel V150 with
care; dropping your airpanel V150
could void the warranty.
• Do not operate your airpanel V150
outside in a wet, damp or extremely cold
environment.
• Do not place heavy objects on the
screen, video cable, or power cord.
• If smoke, abnormal noise, or strange
odor is present, immediately switch the
airpanel V150 off and call your dealer
or ViewSonic.
• Use only the AC/DC power adapter
supplied with your airpanel V150.
ViewSonic air
panel
V150 3
air
panel V110 Features
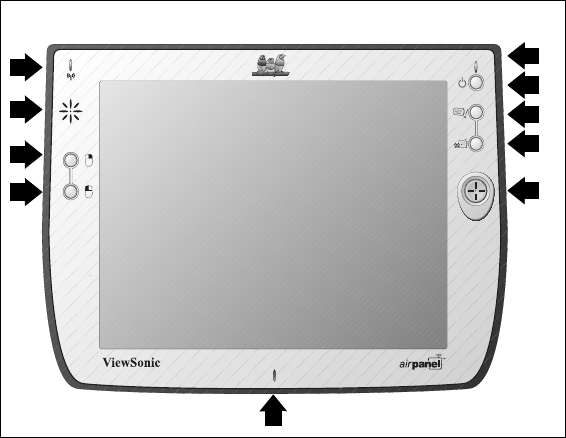
Front Control Buttons and Features
Features, Lights, and Buttons
1. Antenna Activity Indicator Light
2. Speaker
3. Mouse Button - Right
4. Mouse Button - Left
5. Power On/Off Indicator Light
6. On/Off Toggle Switch
7. Virtual Keyboard On/Off Toggle Switch
8. Log On/Off to Host PC & airpanel Settings
9. Cursor Navigation Button
10. Microphone
Figure 1: Front of
air
panel V150
1
2
3
4
5
6
7
8
9
10
4 ViewSonic air
panel
V150
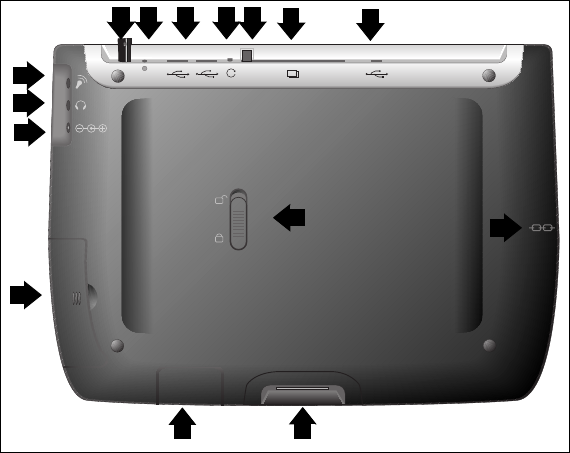
Rear Connection Ports & Panels
Ports, Buttons, Slots, Jacks, & Switches
1. Microphone Port
2. Headphone Port
3. DC Power Port
4. Main Battery Port
5. Stylus in Storage Slot
6. Stylus Tether Port
7. USB Ports (Two)
8. Reset Port
9. PCMCIA Eject Button
10. PCMCIA Card Slot
11. USB Port (Mini-B)
12. Kensington Security Lock Port
13. Docking Port
14. Auxiliary Battery Port
15. Main Battery Latch
Figure 2: Back of
air
panel V150
1
2
3
4
13
5 6 7 8 9 10
15
14
12
11

ViewSonic air
panel
V150 5
Action Item 1:
Hal - See David for security port “legalese.”
Battery & Power Properties
CAUTION: Replace only with airpanel V150 battery (MW-BAT-003).
Your airpanel V150 has two power sources, AC (using the AC/DC converter)
or battery. To run your airpanel V150 from an AC outlet, use the supplied
AC/DC adapter cable.
It takes the airpanel V150 approximately two (2) hours to charge while not in
use and four (4) hours while in use. In normal operation (when not connected
to an AC outlet), the airpanel V110 operates on battery power alone. A fully
charged battery can last up to four (4) hours depending on power consumption
factors such as the screen’s brightness setting. The use of optional PCMCIA
card accessories will also affect battery life.
Battery Power Status
The Power Level Icon
To determine the battery’s current charge level, check the battery charge icon
on the airpanel desktop screen.
The Power Status LED
The Power Status LED at the upper right corner of the airpanel also displays
useful information in the battery’s current status and charge level.
In normal battery powered operation:
• Off - the device is powered off
• Solid Green - power level OK
• Solid Yellow - power level low
• Blinking Yellow - power level critically low
When using the AC Power Adapter:
• Solid Green - AC powered, battery charged
• Solid Yellow - AC powered, battery charging
When using the optional airpanel V150 Dock (described later in the manual):
• Solid Green - AC powered, battery charged
• Blinking Green - AC powered, battery charging
100% 0% 50%
6 ViewSonic air
panel
V150
Changing the Battery
Antenna Signal Properties
Your airpanel V150 and home PC use a wireless radio signal standard called
Wi-Fi (802.11b) to communicate with one another. For the best possible
connection signal, locate the AirSync wireless adapter at an adequate height
above floor level.
The quality of your radio connection signal can be weakened by excessive
distance and by intervening materials such as walls and furnishings. On
occasion, you may want to check the quality of your wireless connection.
Wireless Connection Signal Status
The Network Icon
To check the quality of the wireless signal connection between your airpanel
and your home PC, view the network icon on the airpanel desktop screen.
The Antenna Status LED
The Antenna Status LED at the upper left corner of the airpanel also displays
useful information on the wireless signal connection:
• Off - no signal, no connection
• Solid Green - good signal level
• Solid Yellow - poor signal level
1Slide the Battery
Latch upward into
the unlock position.
2Slide out the old
battery.
3Slide in the new
battery.
4Slide the Battery
Latch downward
into the locked
position.
Figure 3: Battery Removal and Insertion
3
2
1
4
Excellent Good Very Low
ViewSonic air
panel
V150 7
Basic Setup
Your airpanelTM V150 Wireless Monitor features powerful software and
hardware allowing you to connect to your home PC in order to view and edit
files, wirelessly send/receive e-mail, and explore the World Wide Web.
This section explains the ports, cables, connections and hardware used to get
you started. More details and connection options are explained in the next
section, Using the airpanelTM V150.
Charging the Battery
Using the AC/DC Power Converter
Before using the airpanel V150 Wireless Monitor for the first time, charge the
battery for at least 3 hours. You may charge, recharge, and/or operate your
airpanel V150 with available AC power using the AC/DC power converter.
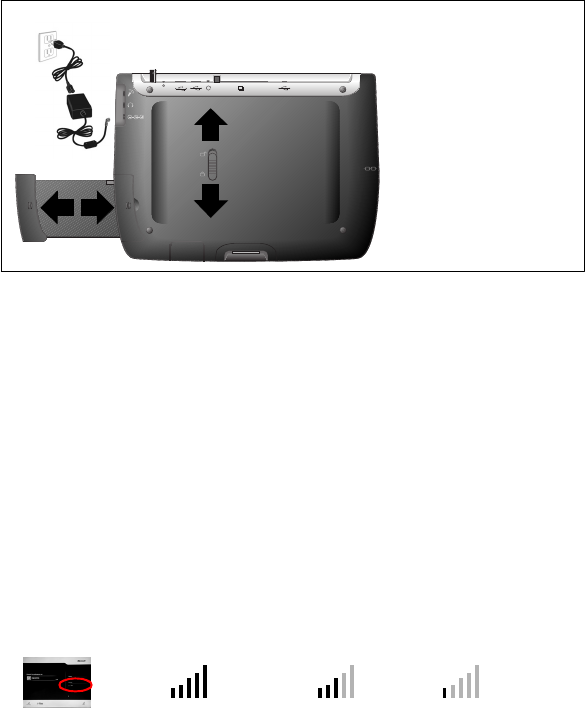
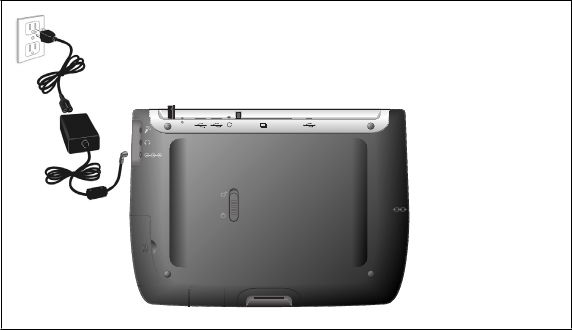
Use the AC/DC power converter as shown in the figure below.
Caution: Use only the power converter supplied with your airpanel V150.
An optional airpanel docking station, described later in this manual, may also
be used to charge, recharge, and/or operate your airpanel.
For additional information on battery charging and operation, please review
the Battery Power & Properties section presented earlier in this chapter.
1Plug the AC/
DC cable into
the airpanel.
2Connect the
power cord to
the AC/DC
adapter.
3Plug the power
cord into an
AC outlet.
Figure 4: Using the AC/DC Power Converter
8 ViewSonic air
panel
V150
Setting Up Software
The airpanel V150 Wireless Monitor is intended for use as a Microsoft
Windows for Smart Display device. The Smart Display capability allows the
airpanel remote access to a home computer running the Windows XP
Professional operating system.
BEFORE YOU BEGIN
To use your airpanel V150 as a Microsoft® Windows for Smart Display
device, you must have the following:
• Another personal computer running Windows XPTM professional
• Windows XP Professional Service Pack 1 or higher. (Included on the
airpanel V150 Utility CD)
Action Item 2:
Hal - MS software availability to be decided. Follow up.
• A USB WI-FI (802.11b) wireless access adapter or a wireless
network access point.
HARDWARE / SOFTWARE SETUP
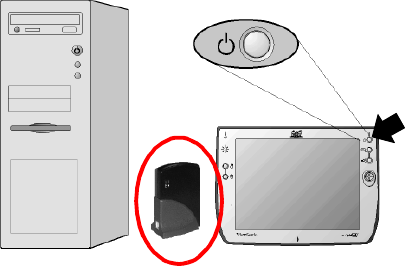
STEP 1 Turn on the airpanel V150
Action Item 3:
Hal - Standby to redo all graphics w/ Adapter
ViewSonic air
panel
V150 9
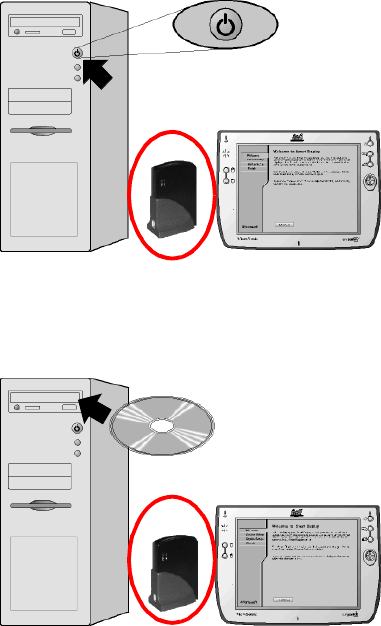
STEP 2 Turn on the your Home PC
STEP 3 Insert the airpanel V150 Utility CD
The airpanel utility contains the Microsoft® Windows for Smart Displays
installation software.
If the Setup application does not start up automatically, you can start it
manually by opening Setup.exe on the CD. To open the CD, chose the Start
menu then select My Computer.
10 ViewSonic air
panel
V150
STEP 4 Follow the Setup Instructions
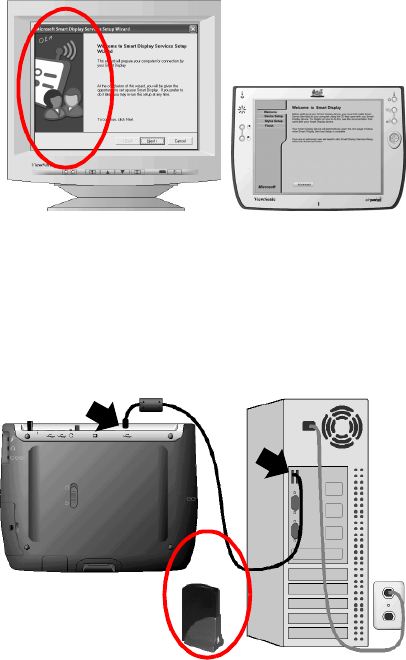
The instructions to be followed are the ones on your Home PC monitor, not
the ones on the airpanel’s Welcome screen
Action Item 4:
Hal - Expect change in graphic on future build.
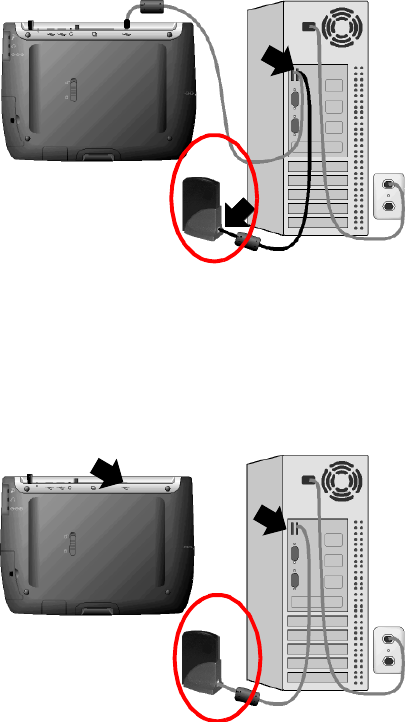
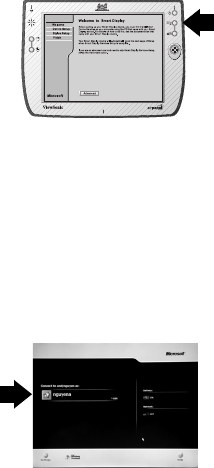
STEP 5 Connect the USB Setup Cable
When prompted, connect the airpanel V150 and host PC to one another using
the USB Setup Cable (USB Mini-B to Type A) to down load OS to V150
The Home PC Screen The
air
panel Welcome Scree
n
ViewSonic air
panel
V150 11
STEP 6 Remove the USB Setup Cable
When the setup application is finished,disconnect the host PC and the
airpanel V150 from one another by removing the USB Setup Cable
The quality of your radio connection signal can be weakened by excessive distance and by
intervening materials such as walls and furnishings. For the best possible radio connection,
locate the AirSync wireless ad apter at an adequate height above floor level.
STEP 7 Connect the Adapter Cable
Plug the ViewSonic AirSync Wi-Fi Wireless Access Adapter to your home PC.
The table PC can use wireless function to communication with home PC.
For those users intending to use a wireless access point, please refer to the
Microsoft Windows XP Help files for additional information.
Action Item 5: Group - Develop a wireless access point plan.
12 ViewSonic air
panel
V150
Accessing Information from your Home PC
You are now ready to use the airpanel V150 Wireless Monitor to access
information from your home computer.
Opening the air
panel
Link to your Home PC
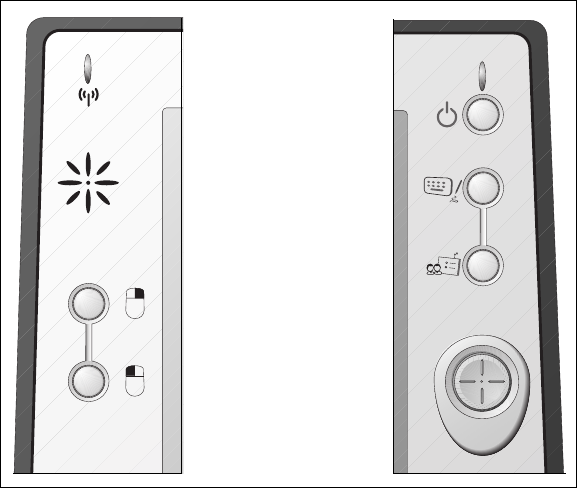
To establish initial access to your Home PC, you begin at the airpanel default
Welcome screen. Once the initial connection has been established, the
device’s default screen becomes the Dashboard screen. For all future sessions
you will simply tap your account button on the Dashboard to establish your
connection.
Figure 5: The
air
panel Welcome Screen
Starting from the airpanel Welc ome screen :
1Tap the Advanced Button - the Calibration screen will open.
2Follow the Calibration Instructions - the Alignment Successful screen then
will open.
3Tap Next on the Alignment Screen - the Mira Input Panel will open.
4Tap Next on the Mira Input Panel - the Setup Complete screen will open
5Tap the Finished Button on the Setup Complete Screen - the Dashboard
screen will open.
Figure 6: The
air
panel Dashboard Screen
6Click your User Account Button on the Dashboard - the Password prompt
will open.
7Press the Virtual Keyboard Button on the Unit - the Virtual Keyboard will
open.
8Enter your Password then Click OK- your Home PC’s monitor will go
dark. The Home PC’s desktop will then appear on your airpanel device.
You can now operate your Home PC remotely from your airpanel Wireless
Monitor just as if you were at your Home PC itself.
Virtual Keyboard Button
User Account Button
ViewSonic air
panel
V150 13
Using the
air
panel V150
The Buttons
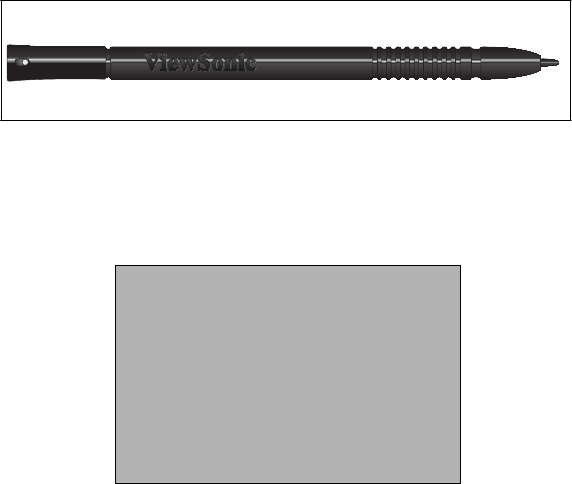
The buttons on the right and left side of the airpanel V150 Wireless Monitor
screen give you quick access to utilities and provide navigational control.
Figure 7: The
air
panel Buttons
A. Right Mouse Button - Right functions
B. Left Mouse Button - Left functions
C. Power Button - Allows you to toggle the unit On and Off.
D. Virtual Keyboard Button - Allows you to toggle the Virtual Keyboard On
and Off. The Virtual Keyboard enables you to input data using the stylus.
E. Connection Button - Allows you to connect and disconnect the airpanel
to and from your Home PC.
F. Cursor Button - Allows you to control the cursor without having to use the
stylus or a mouse.
FRONT BUTTONS
Power C.
Virtual Keyboard D.
Connection E.
A. Mouse Right
B. Mouse Left Cursor F.
14 ViewSonic air
panel
V150
Using the Stylus
Use the stylus to “tap” or “double-tap” on an application icon and to select
items on the menu. The stylus is also used to “type” on the Virtual Keyboard
and to write notes when in handwriting recognition mode. The two styli that
are supplied with your airpanelTM V110 are designed for your screen. Use of
other pointers could damage your screen.
When not in use, you can conveniently place your stylus in the storage slot
located on the top edge of your airpanel V150 Wireless Monitor. A Stylus
Tether has been provided to allow you to attach the stylus to the airpanel so it
will not become lost or misplaced.
Figure 9: Stylus with Tether
Action Item 6:
Hal - Show tether attached.
Moving Windows
1To move a window on the screen, press on the title-bar gently with the
stylus.
2Move the window slowly to a new location.
Figure 8: Stylus
ViewSonic air
panel
V150 15
Operating System not Responding
If your operating system is not responding to your stylus, try double-tapping
on the screen. Also, try solid taps in the center of the icon. If you still have
problems, you may need to recalibrate your screen.
Calibrating the Touch Screen
If your touch screen is not responding accurately to taps with the stylus, you
may need to recalibrate the screen. To do so:
1Tap on the desktop Settings button - the Settings window will open
2Tap on the General Tab
3Tap on the Realign Button in the Stylus section
4Follow the on-screen instructions
5When finished, tap the screen - the recalibration is complete
The instructions will ask you to place the stylus on a series of cross-hair target
symbols. When doing so, rather than just tapping the screen, hold the stylus in
place for a second or two as directed until the program responds.
Adjusting Stylus Double-tap Rate
The double-tap rate can be set in the Settings window:
1
Tap on the desktop Settings button - the Settings window will open
2Tap on the General Tab
3Double-tap on the checkerboard graphic to set your double tap rate
4Close the Settings window
16 ViewSonic air
panel
V150
Resetting your
air
panel
Soft Reset
Should your airpanelTM V150 fail to respond, it may be restarted without
turning off the power.
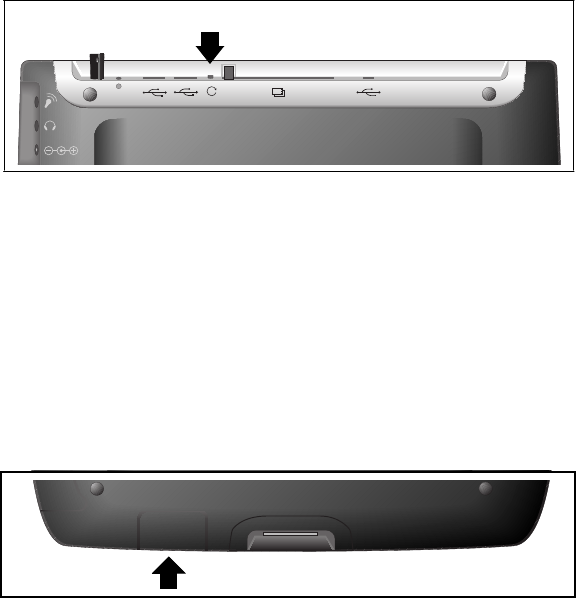
1Locate the reset button on the top of your airpanel.
2Use the tip of your stylus to press the reset button to restart your airpanel.
NOTE: A Soft Reset will disable the wireless connection to your home
computer. You must re-establish the connection to your home computer by
going through the log-on process.
Hard Reset
A hard reset may be required on rare occasions if your airpanel V150
completely locks up and the soft reset described above does not help.
You can perform a hard reset by detaching the main battery while the device is
On. You can also:
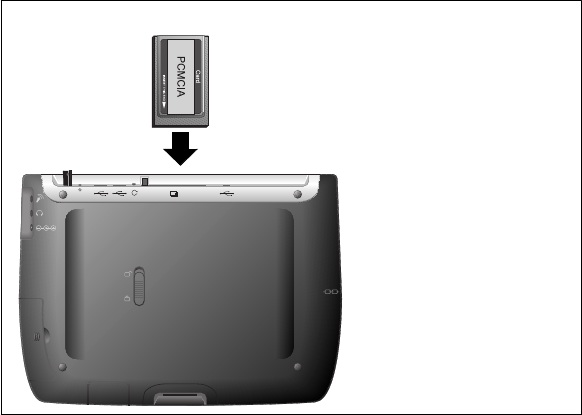
1Remove the auxiliary battery’s cover panel.
2Remove then replace the auxiliary battery and cover panel.
Figure 11: The Auxiliary Battery Port
NOTE: A Hard Reset will restore the airpanel V150 to its factory default
settings and will also delete the contents of internal memory (RAM). You will
need to re-install your PC settings in order to use the airpanel. See the
airpanel software setup section for complete instructions.
Figure 10: The Reset Button
ViewSonic air
panel
V150 17
PCMCIA Cards
A PCMCIA card can extend the functionality of your airpanel V150 Wireless
Monitor by providing added features such as extra storage.
Using a PCMCIA Card
For a list of supported PCMCIA cards, see our web site www.viewsonic.com.
1Insert PCMCIA card
carefully into the slot
on the top side of the
airpanel until it snaps
into place.
2Push the release button
before removing.
CAUTION: Make sure
the card is oriented
correctly before inserting.
Do not force the card in
or out. It should be easy
to insert or remove.
Figure 12: PCMCIA Card