ViewSonic VS14145 Tablet PC User Manual Compliance Information
ViewSonic Corporation Tablet PC Compliance Information
User Manual

Compliance Information
Notice for the USA
Federal Communication Commission (FCC) Radiation Exposure Statement
This device complies with part 15 of FCC Rules. Operation is subject to the following two
conditions: (1) this device may not cause harmful interference, and (2) this device must accept
any interference received, including interference that may cause undesired operation.
This equipment has been tested and found to comply with the limits for a Class B digital device,
pursuant to part 15 of the FCC Rules. These limits are designed to provide reasonable protection
against harmful interference in a residential installation. This equipment generates, uses, and
can radiate radio frequency energy, and if not installed and used in accordance with the
instructions, may cause harmful interference to radio communications. However, there is no
guarantee that interference will not occur in a particular installation. If this equipment does cause
harmful interference to radio or television reception, which can be determined by turning the
equipment off and on, the user is encouraged to try to correct the interference by one or more of
the following measures:
Reorient or relocate the receiving antenna.
Increase the separation between the equipment and receiver.
Connect the equipment into an outlet on a circuit different from that to which the receiver is
connected.
Consult the dealer or an experienced radio/TV technician for help.
Warning: You are cautioned that changes or modifications not expressly approved by the party
responsible for compliance could void your authority to operate the equipment.
For Canada
This Class B digital apparatus complies with Canadian ICES-003.
Cet appareil numérique de la classe B est conforme à la norme NMB-003 du Canada.
This equipment complies with FCC radiation exposure limits set forth for an uncontrolled
environment. This transmitter must not be co-located or operating in conjunction with any other
antenna or transmitter.
For body operation, ViewBook 730 (FCC ID: GSS-VS14145) has been tested and meets the
FCC RF exposure guidelines when used directly against the body.
Specific Absorption Rate, or SAR is a measurement of radio frequency energy. The FCC permits
a maximum SAR value of 1.6 mW/g. The highest SAR value for this product when used on the
body, as described in this user's guide, is 1.070W/1KG
Industry Canada Notice
This wireless module device complies with Canadian RSS-210.To prevent radio interference to
the licensed service, this device is intended to be operated indoors and away from windows to
provide maximum shielding. Equipment (or its transmitting antenna) that is installed outdoors is
subject to licensing. The installer of this radio equipment must ensure that the antenna is located
1

or pointed such that it does not emit RF field in excess of Health Canada limits for the general
population; consult Safety Code 6, obtainable from Health Canada’s web site
www.hc-sc.gc.ca/rpb.
2
For European Countries
The device complies with the EMC Directive 2004/108/EC and Low Voltage Directive
2006/95/EC.
Following information is only for EU-member states:
The mark shown to the right is in compliance with the Waste Electrical and Electronic
Equipment Directive 2002/96/EC (WEEE).
The mark indicates the requirement NOT to dispose the equipment as unsorted
municipal waste, but use the return and collection systems according to local law.
If the batteries, accumulators and button cells included with this equipment, display
the chemical symbol Hg, Cd, or Pb, then it means that the battery has a heavy metal
content of more than 0.0005% Mercury or more than, 0.002% Cadmium, or more than
0.004% Lead.
R&TTE Compliance Statement
This wireless module device complies with the Essential Requirements of the R&TTE Directive
of the European Union (1999/5/EC). This equipment meets the following conformance
standards:
ETSI EN 300 328
EN 301 489-01
EN 301 489-17
EN 62311
EMI/EMC :
ETSI EN 301 489-1 V1.8.1:2008
ETSI EN 301 489-17 V2.1.1:2009
EN 55022:2006+A1:2007
EN 55024:1998+A1:2001+A2:2003
EN 61000-3-2:2006+A1:2009+A2:2009
EN 61000-3-3:2008
Safety :
EN 60950-1:2006+A11:2009(EN 50332-2:2003)
Bluetooth:
ETSI EN300 328 V1.7.1:2006
3

Wireless LAN
ETSI EN300 328 V1.7.1:2006
SAR :
EN 50360: 2001
EN 50361: 2001
EN 62209-1: 2006
Earphones
When a conductive apparatus such as earphones, is used in close proximity with a CRT
television or CRT monitor, the latter may emit an electrostatic discharge. This electrostatic
discharge can be felt as a static shock. While this static shock is usually harmless, it is
good practice to avoid close contact with CRT devices when using earphones.
Do not listen to audio on your ear buds or headphones at high volume for prolonged
periods of time as hearing loss may result..
Do not listen to your audio device at high volume when driving, cycling or crossing the
road, especially in heavy traffic, or in any other traffic condition where such use will hinder
safe travel on the roads. We recommend that consumers be extremely cautious when
using this device on the road.
Embedded Battery
Do not attempt to remove the embedded battery.
The product must be disposed of according to local environmental regulations. To replace
the battery, return your product to your regional support office.
Do not expose to excessive heat such as sunlight, fire or the like.
CAUTION: Risk of explosion if battery is replaced by incorrect types.
Wireless LAN Device
Switch off the device where it is prohibited, or when its use may cause danger or
interference, such as when inside an aircraft, in hospitals, or near refueling stations.
Bluetooth Product
4

The short wave radio frequency signals of a Bluetooth device may impair the operation of
other electronic and medical devices.
Switch off the device where it is prohibited. Do not use the device in medical facilities,
aircraft, refueling points, close to automatic doors, automatic fire alarms or other
automatically controlled devices.
Keep this device at least 20 cm from pacemakers and other medical devices. Radio waves may
impair the operation of pacemakers and other medical devices.
5

Notified Countries: Bulgaria, Cyprus, Romania, Germany, UK, Netherlands, Belgium, Sweden,
Denmark, Finland, France, Italy, Spain, Austria, Ireland, Portugal, Greece, Luxembourg, Estonia,
Latvia, Lithuania, Czech Republic, Slovakia, Slovenia, Hungary, Poland and Malta.
6

Important Safety Instructions
1. Read these instructions completely before using the equipment.
2. Keep these instructions in a safe place.
3. Heed all warnings.
4. Follow all instructions.
5. Do not use this equipment near water. Warning: To reduce the risk of fire or electric shock,
do not expose this apparatus to rain or moisture.
6. Clean with a soft, dry cloth.
7. Do not block any ventilation openings. Install the equipment in accordance with the
manufacturer’s instructions.
8. Do not install near any heat sources such as radiators, heat registers, stoves, or other
devices (including amplifiers) that produce heat.
9. Do not attempt to circumvent the safety provisions of the polarized or grounding type plug. A
polarized plug has two blades with one wider than the other. A grounding type plug has two
blades and a third grounding prong. The wide blade and the third prong are provided for
your safety. If the plug does not fit into your outlet, consult an electrician for replacement of
the outlet.
10. Protect the power cord from being tread upon or pinched, particularly at the plug, and the
point where if emerges from the equipment. Be sure that the power outlet is located near the
equipment so that it is easily accessible.
11. Only use attachments/accessories specified by the manufacturer.
12. Use only with the cart, stand, tripod, bracket, or table specified by the
manufacturer, or sold with the equipment. When a cart is used, use caution when
moving the cart/equipment combination to avoid injury from tipping over.
13. Unplug this equipment when it will be unused for long periods of time.
14. Refer all servicing to qualified service personnel. Service is required when the unit has been
damaged in any way, such as: if the power-supply cord or plug is damaged, if liquid is spilled
onto or objects fall into the unit, if the unit is exposed to rain or moisture, or if the unit does
not operate normally or has been dropped.
15. Do not expose your product to temperatures outside the range of 0°C to 45°C (32°F to 113°
F).
16. The operating temperature range of the power adapter is 0°C to 40 0°C.
7
Declaration of RoHS Compliance
This product has been designed and manufactured in compliance with Directive 2002/95/EC of
the European Parliament and the Council on restriction of the use of certain hazardous
substances in electrical and electronic equipment (RoHS Directive) and is deemed to comply
with the maximum concentration values issued by the European Technical Adaptation
Committee (TAC) as shown below:
Substance Proposed Maximum Concentration Actual Concentration
Lead (Pb) 0.1% < 0.1%
Mercury (Hg) 0.1% < 0.1%
Cadmium (Cd) 0.01% < 0.01%
Hexavalent Chromium (Cr6+) 0.1% < 0.1%
Polybrominated biphenyls (PBB) 0.1% < 0.1%
Polybrominated diphenyl ethers (PBDE) 0.1% < 0.1%
Certain components of products as stated above are exempted under the Annex of the RoHS
Directives as noted below:
Examples of exempted components are:
1. Mercury in compact fluorescent lamps not exceeding 5 mg per lamp and in other lamps not
specifically mentioned in the Annex of RoHS Directive.
2. Lead in glass of cathode ray tubes, electronic components, fluorescent tubes, and electronic
ceramic parts (e.g. piezoelectronic devices).
3. Lead in high temperature type solders (i.e. lead-based alloys containing 85% by weight or
more lead).
4. Lead as an allotting element in steel containing up to 0.35% lead by weight, aluminium
containing up to 0.4% lead by weight and as a cooper alloy containing up to 4% lead by
weight.
8

Copyright Information
Copyright © ViewSonic® Corporation, 2011. All rights reserved.
ViewSonic®, the three birds logo, OnView®, ViewMatch™, and ViewMeter® are registered
trademarks of ViewSonic® Corporation.
The Bluetooth word mark and logo are owned by Bluetooth SIG, Inc.
Android and the Android Robot is a trademark of Google Inc.
ZiiExplorer, ZiiMicrophone, ZiiMusic, ZiiPhoto, ZiiStore and ZiiVideo are powered by ZiiLab.
All other trademarks are the property of their respective owners.
All specifications are subject to change without notice. Actual product may differ slightly from
images shown.
Disclaimer: ViewSonic® Corporation shall not be liable for technical or editorial errors or
omissions contained herein; nor for incidental or consequential damages resulting from
furnishing this material, or the performance or use of this product.
In the interest of continuing product improvement, ViewSonic® Corporation reserves the right to
change product specifications without notice. Information in this document may be changed
without notice.
No part of this document may be copied, reproduced, or transmitted by any means, for any
purpose without prior written permission from ViewSonic® Corporation.
9

Product Registration
To meet your future needs, and to receive any additional product information as it becomes
available, please register your product on the Internet at: www.viewsonic.com.
The ViewSonic® Wizard CD-ROM also provides an opportunity for you to print the registration
form, which you may mail or fax to ViewSonic®.
For Your Records
Product Name:
Model Number:
Document Number:
Serial Number:
Purchase Date:
VB730
ViewSonic E-Book Display
VS14145
VB730_UG_ENG Rev. 1A 03-07-11
_______________________________________
_______________________________________
Product disposal at end of product life
ViewSonic respects the environment and is committed to working and living green. Thank you for
being part of Smarter, Greener Computing. Please visit ViewSonic website to learn more.
USA & Canada: http://www.viewsonic.com/company/green/recycle-program/
Europe: http://www.viewsoniceurope.com/uk/support/recycling-information/
Taiwan: http://recycle.epa.gov.tw/recycle/index2.aspx
10

Contents
Compliance Information..........................................................................................................................1
Important Safety Instructions................................................................................................................7
Declaration of RoHS Compliance.........................................................................................................8
Copyright Information .............................................................................................................................9
Product Registration..............................................................................................................................10
Contents....................................................................................................................................................11
Introduction..............................................................................................................................................13
Getting Started ........................................................................................................................................13
Charging............................................................................................................................................14
Turning On/Off, Unlocking ...........................................................................................................16
Setting to Sleep and Waking Up.................................................................................................17
Inserting and Removing a microSD Card.................................................................................17
Connecting to a Computer...........................................................................................................18
Navigating your Device.........................................................................................................................18
Screen Gestures..............................................................................................................................18
About the Screen Layers and Panels........................................................................................19
About the Application Screen .....................................................................................................20
Function Buttons ............................................................................................................................21
Icons on the Status Bar.................................................................................................................21
Notification Panel............................................................................................................................22
Entering Text....................................................................................................................................23
Context Menus.................................................................................................................................23
Customizing the Panels ........................................................................................................................24
Changing the Wallpaper................................................................................................................24
Adding an Item ................................................................................................................................24
Moving an Item ................................................................................................................................24
Removing an Item...........................................................................................................................25
Customizing the Quick Launch Bar...........................................................................................25
Using ZiiAcademy...........................................................................................................................26
Importing E-Books From Your Computer ................................................................................26
Deleting an E-Book.........................................................................................................................28
Browsing the Internet ............................................................................................................................28
Connecting to a Wi-Fi Network ...................................................................................................28
Using the Browser..........................................................................................................................29
Videos, Music, and Photos...................................................................................................................29
Transferring Files from Your Computer ...................................................................................29
Viewing Videos, Photos, and Listening to Music...................................................................29
Deleting Media Files from ViewBook 730.................................................................................30
11

Exploring ViewBook 730's Contents .................................................................................................30
Installing More Applications................................................................................................................30
Settings......................................................................................................................................................31
Accessing the Settings Screen...................................................................................................31
Changing the Screen and Keyboard Language......................................................................31
Setting the Screen Brightness, Timeout, and Orientation...................................................31
Customizing the Sounds ..............................................................................................................32
Setting the Date and Time ............................................................................................................32
Turning On/Off Bluetooth.............................................................................................................32
Calibrating the Screen...................................................................................................................32
More About Your Device...............................................................................................................32
Customer Support ..................................................................................................................................33
Limited Warranty.....................................................................................................................................34
Mexico Limited Warranty......................................................................................................................36
12
Introduction
ViewBook 730 is a portable entertainment center with: Internet access, a game station, an
e-book reader, and much more. This versatile touch screen tablet runs the Android™ operating
system, enabling you to easily install thousands of cool applications from the Web.
Getting Started
Your Device at a Glance
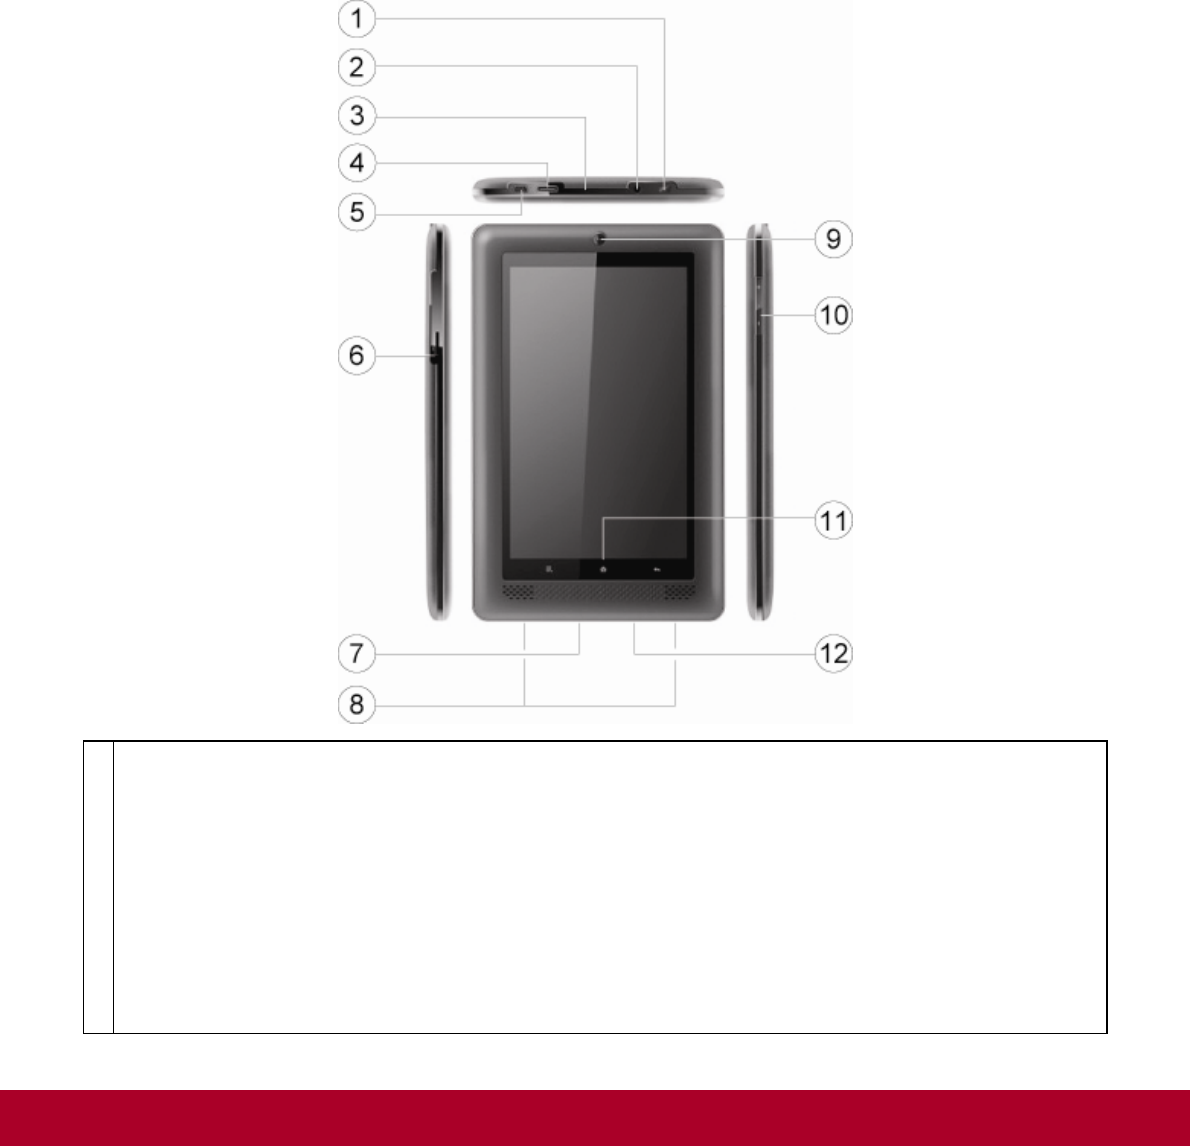
1
Power On/Off
Press to turn on for 3 secs.
Press and hold to turn off.
Sleep/Wake Up
Press to wake up or set to sleep.
Reset
If your ViewBook 730 tablet stops responding, press and hold for approximately 10 seconds
until the screen turns off.
13
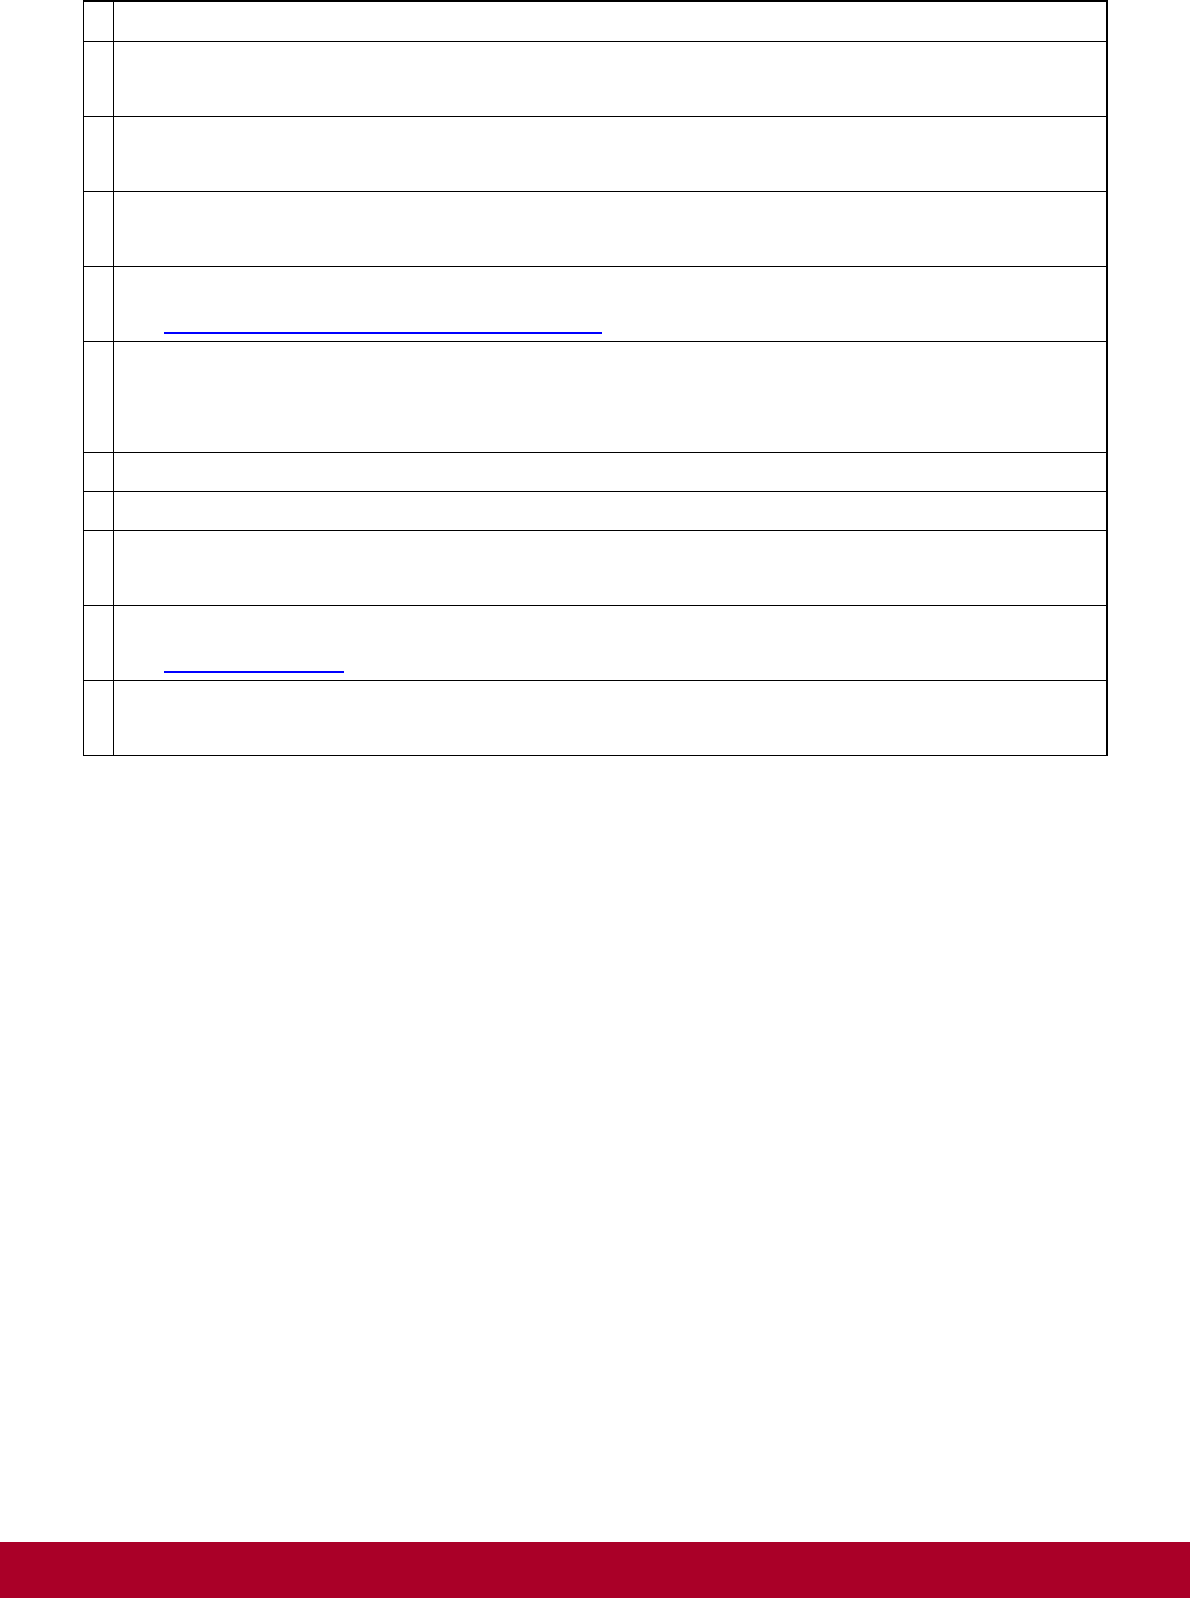
2 Earphone Jack
3 Microphone
When recording audio, keep this close to the source.
4 HDMI Port
Connects to a HDMI-supported TV or monitor.
5 USB Port
Connects your device to a computer.
6 microSD Card Slot
See Inserting and Removing a microSD Card.
7
LED
Turns on when charging.
Turns off when fully charged.
9 Stereo Speakers
9 Camera
10 Volume
Press + or – to adjust the volume.
11 Function Buttons
See Function Buttons.
12 Power Adapter Jack
Connects to a power outlet for charging.
Charging
Before you turn on your device for the first time, charge it via wall socket with the included power
adapter. Initial charging may take up to 6 hours. The LED is turned on while your device is
charging. When the battery is full, the LED turns off.
Note:
It is normal for your ViewBook 730 tablet to become warm while charging.
14
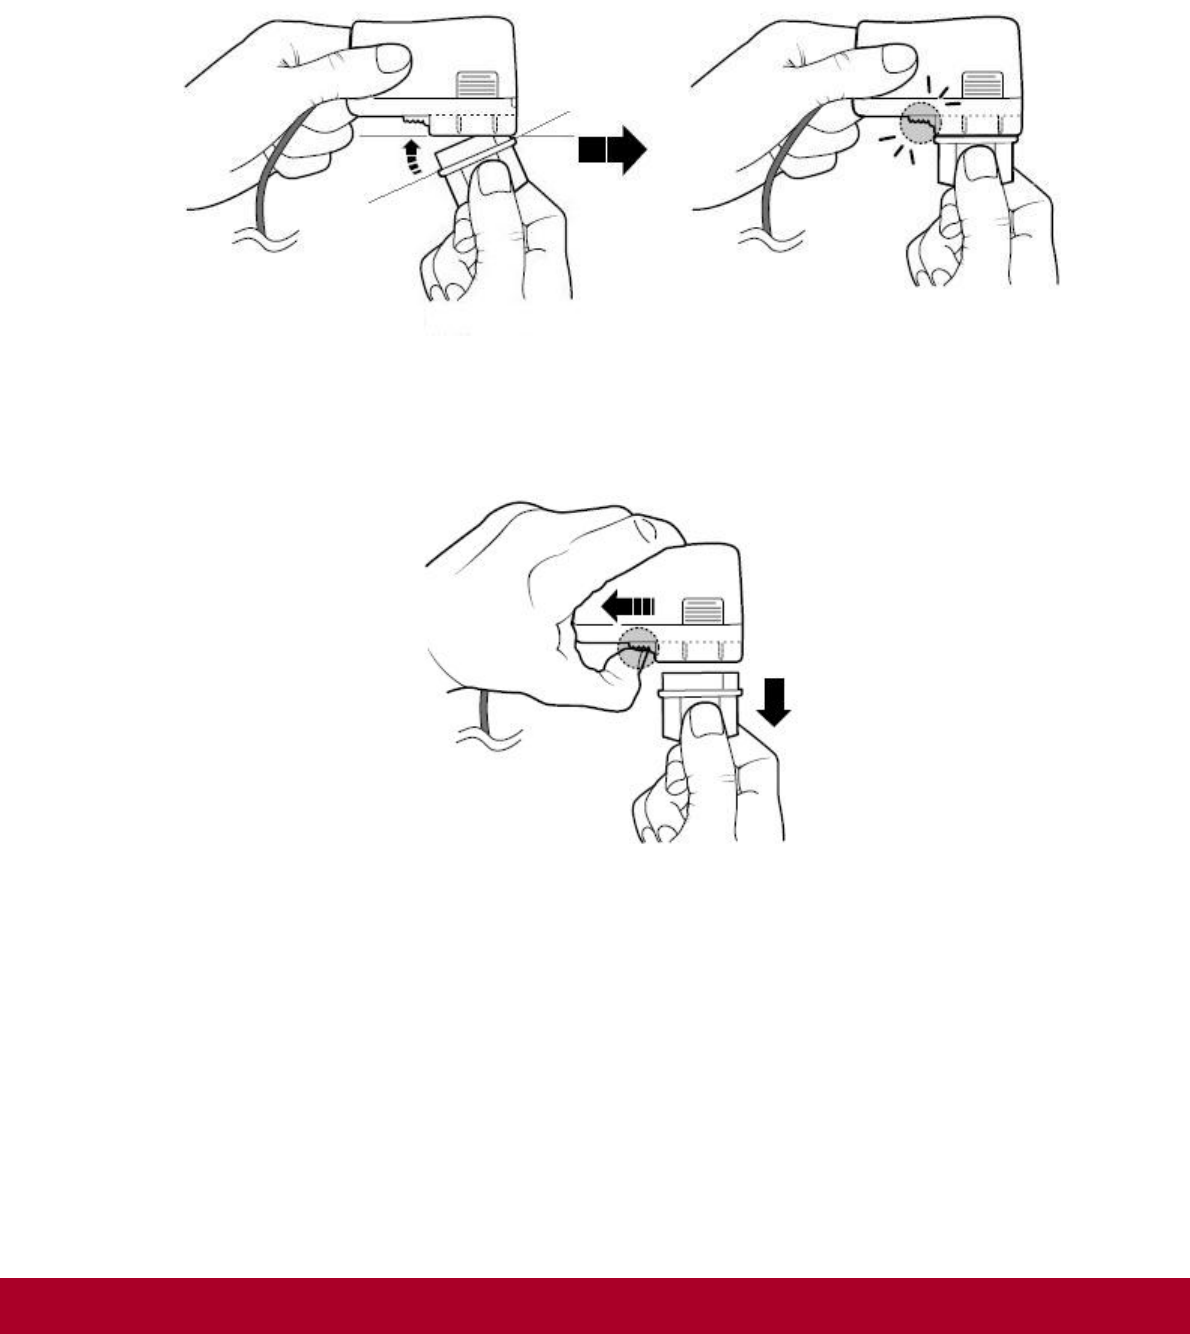
Assembling the Power Adapter
If there are several plug heads available, select one that matches your wall socket. Mount the
plug head onto the power adapter base until it locks in place. Note that the plug head must be
inserted approximately at the same angle as shown in the figure below. After locking, make sure
that it is firmly secured.
If you need to remove the plug head from the power adapter base, pull the latch to release the
plug head, and gently remove it from the base.
15
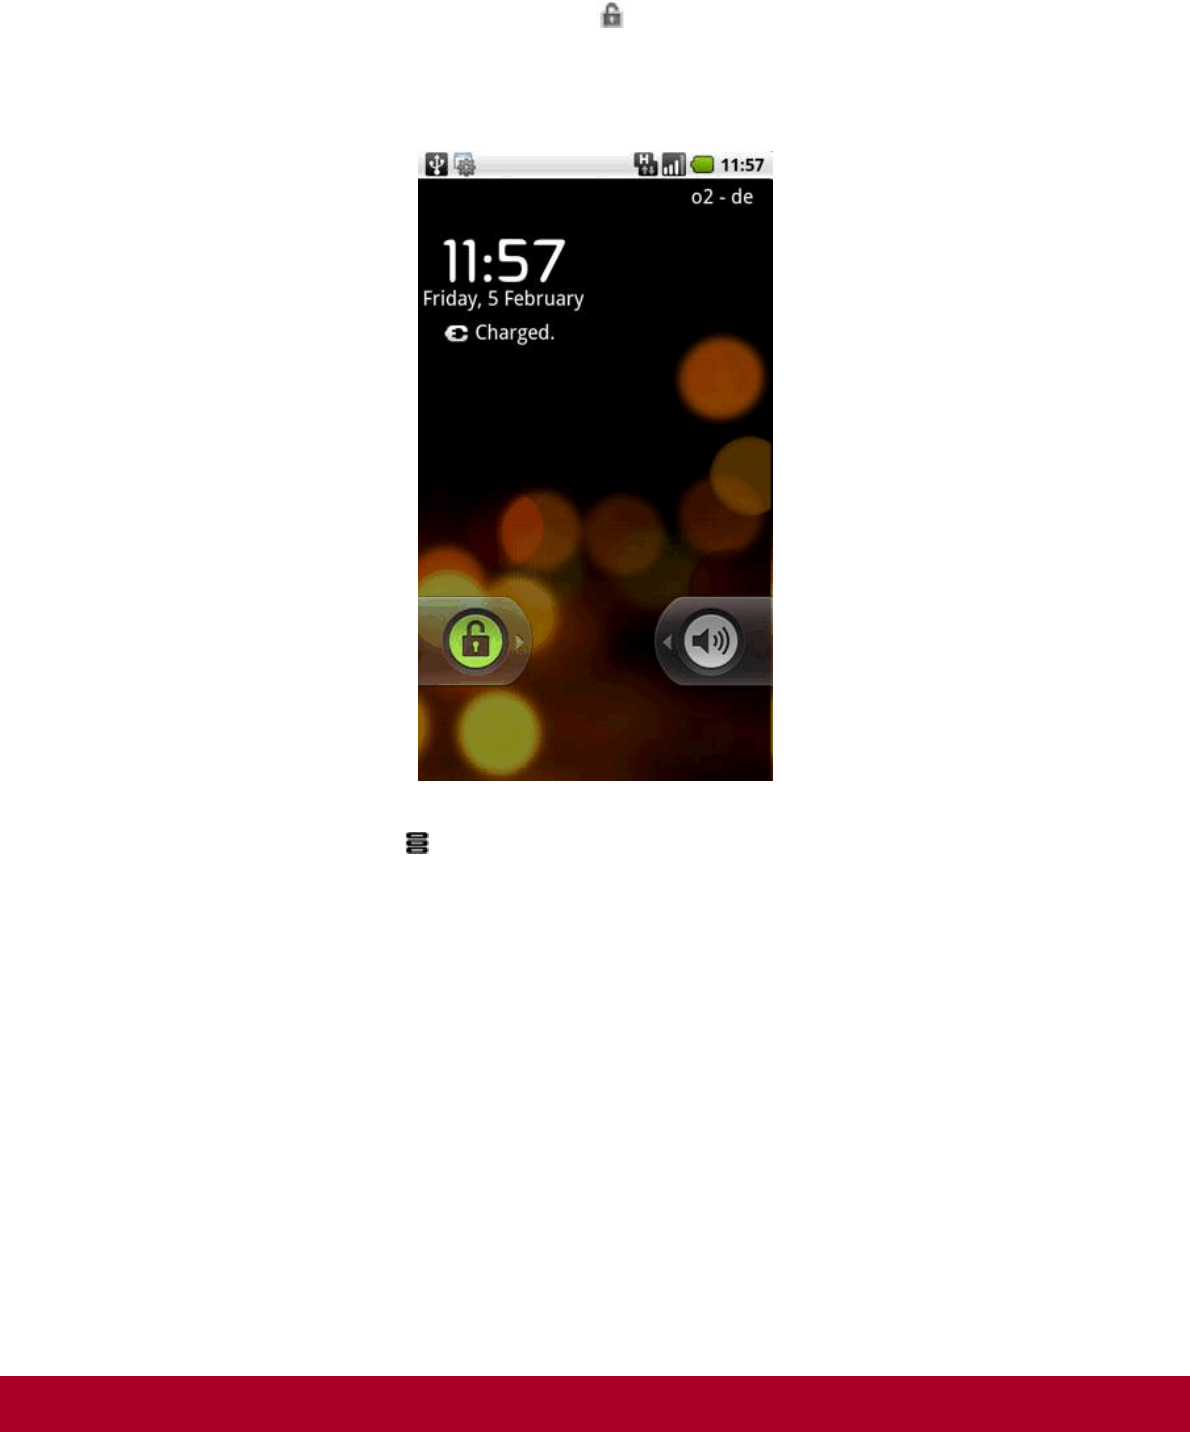
Turning On/Off, Unlocking
To turn on, press the Power button. Notice that the screen is locked every time your ViewBook
730 tablet turns on, as denoted by the Lock icon .
To unlock, touch and drag the Lock icon towards the Unlock icon.
To turn off your device, press , and touch Shutdown > Power off > OK. Alternatively, you can
press and hold the Power button, and tap Power off > OK.
16
Setting to Sleep and Waking Up
To let ViewBook 730 sleep, press the Power button. The screen goes black as your device goes
into Sleep mode.
Note:
To conserve battery power, your device automatically goes into Sleep mode after a certain
preset period of inactivity. To set the time duration before your device automatically sleeps, see
Setting the Screen Brightness, Timeout, and Orientation.
To wake your device up, press the Power button. Note that the screen is locked every time your
device wakes up. To unlock the screen, touch and drag the Lock icon .
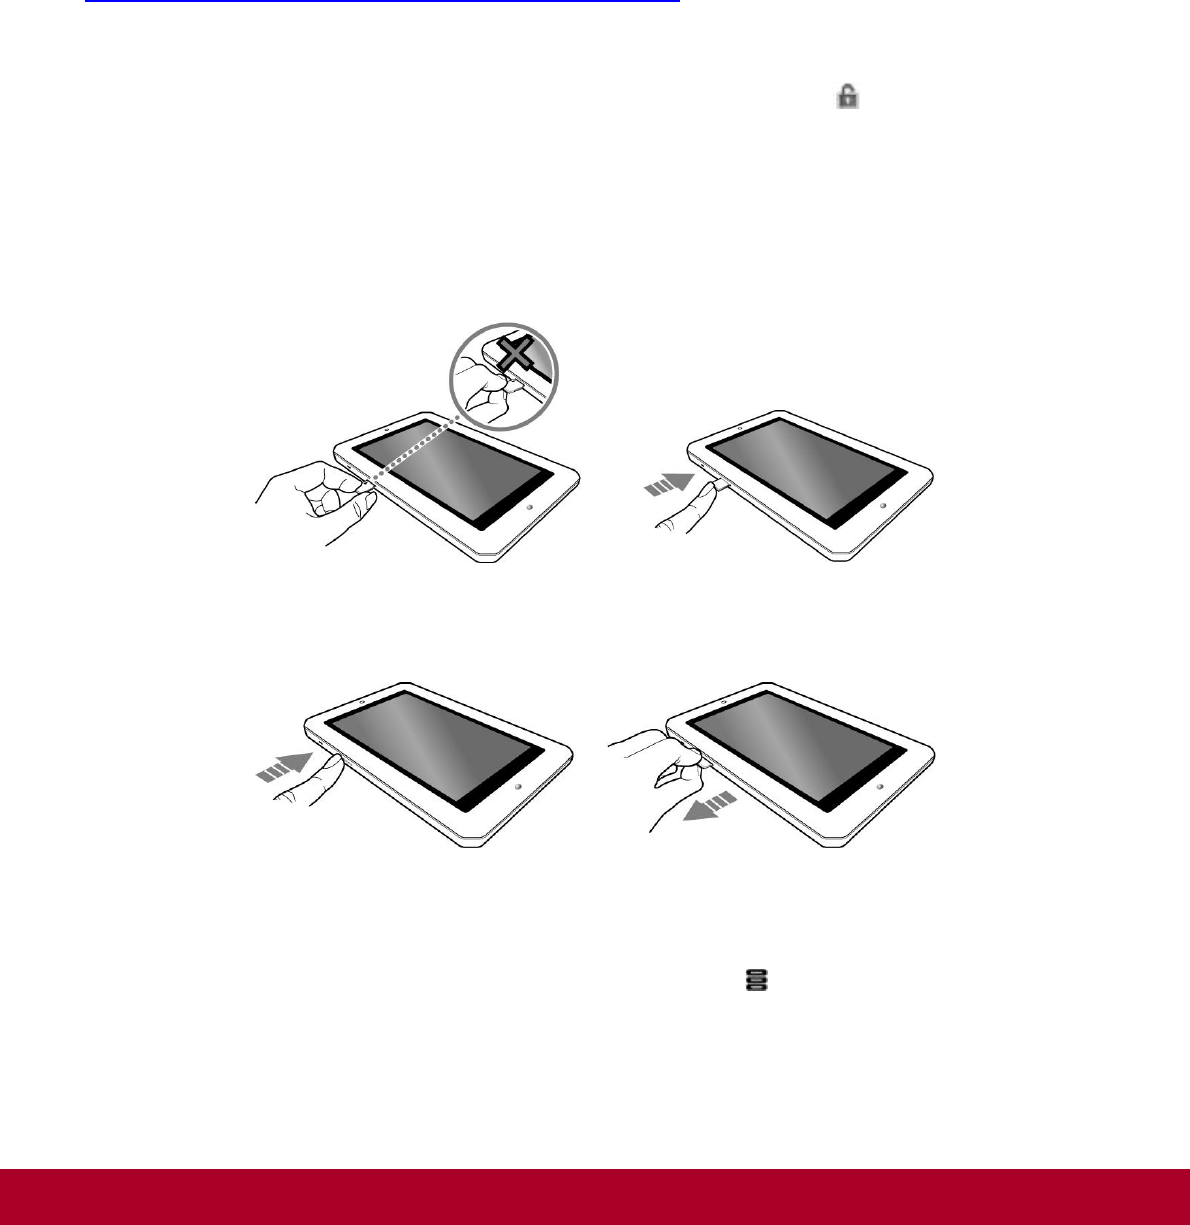
Inserting and Removing a microSD Card
Inserting a Memory Card
Ejecting a Memory Card
Important:
If your device is on, before you eject the microSD card, press , touch Settings > SD card &
local storage > Unmount external SD card.
17
Connecting to a Computer
1. Connect to your computer with the use of the included USB cable.
2. On the device, touch Mount on the popup box that appears.
Your device will appear as a removable disk drive on your computer. If a microSD card is
inserted on the device, this will appear as another disk drive.
Navigating your Device
Screen Gestures
Gesture What it does
Tap/Touch
Select an item
Start an application
Enter characters using the onscreen keyboard.
Touch and
hold
"Lift" an item from the screen panels so that you can drag it somewhere
else.
Shows the context menu for certain items.
Shows the context menu when you touch and hold an empty space on the
panels.
Drag
Slowly pan through a photo that is larger than the screen.
Slowly scroll through a list.
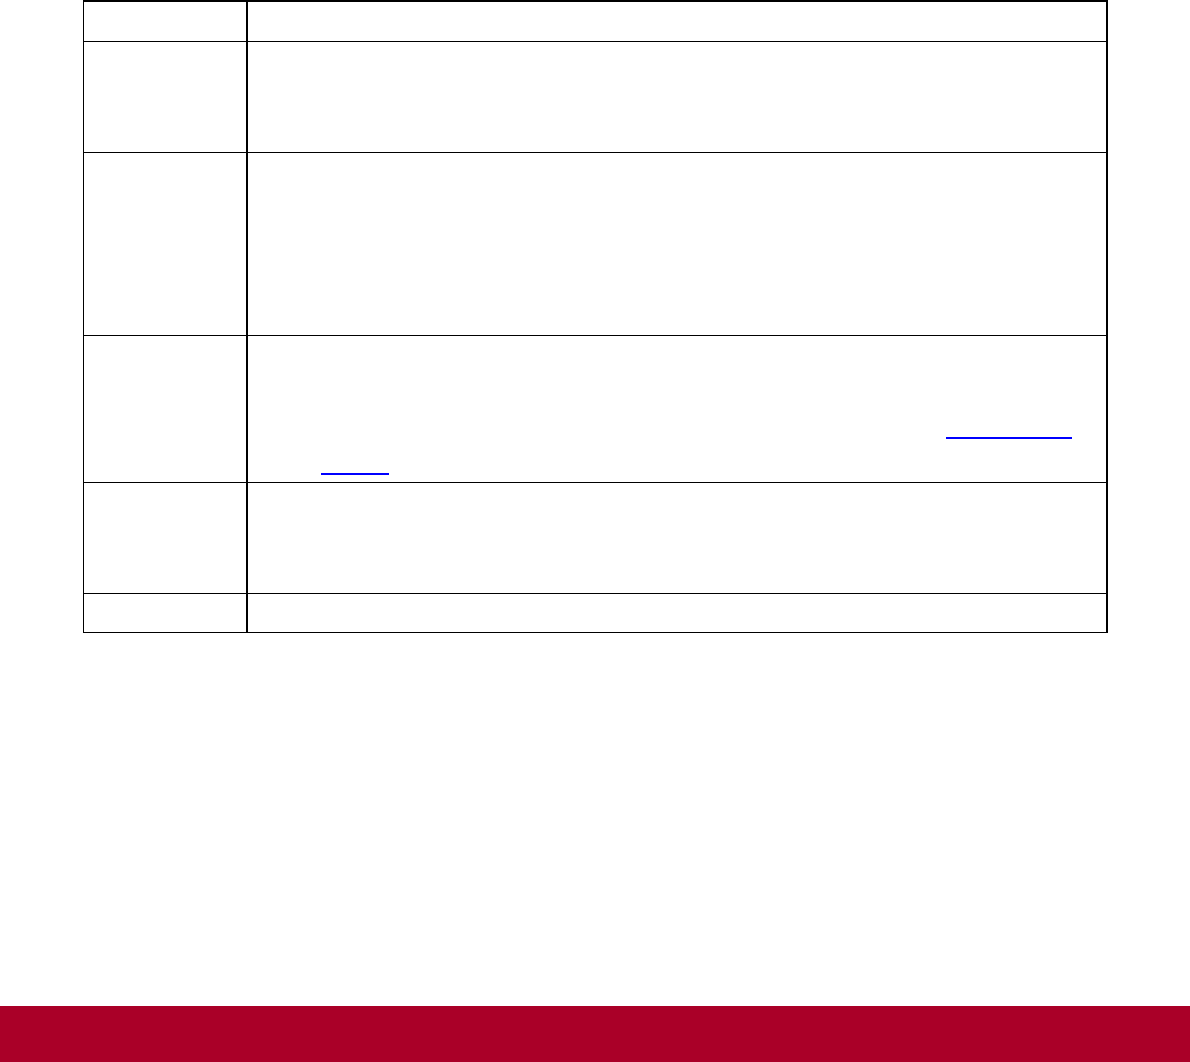
Pull down the Status bar to see the Notification panel. See Notification
Panel.
Swipe
Pan through a photo or webpage.
Move from one panel to the next.
Scroll through a list.
Double-tap Zoom into or out of a photo or Webpage.
18
About the Screen Layers and Panels
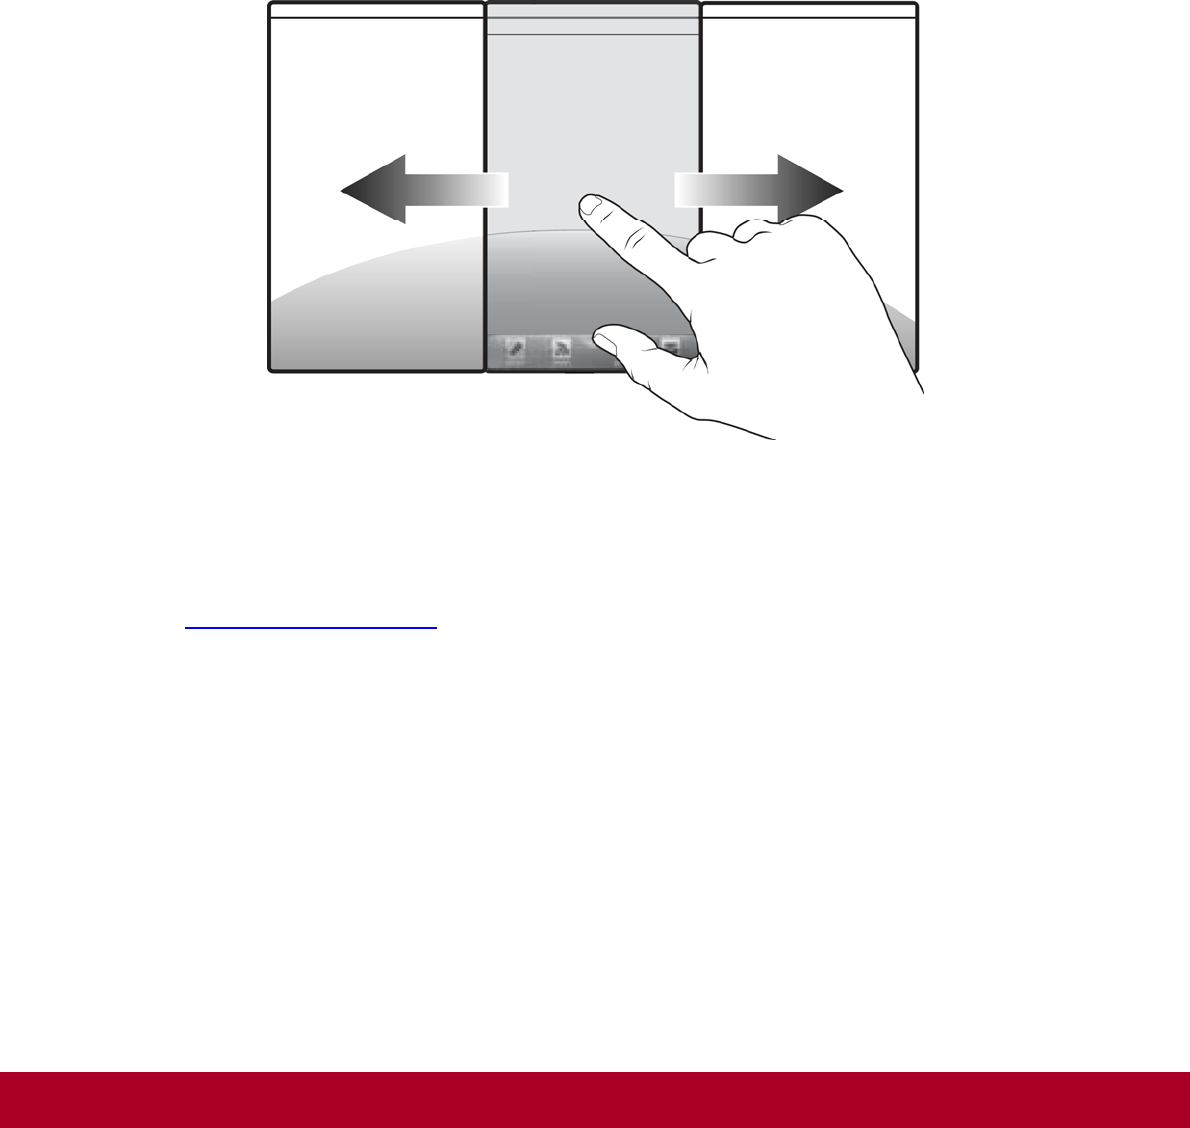
The entire screen consists of 1 layer with 3 panels each.
To see the next panel, slide the screen to the left or right.
To bring up the second panel, slide your finger to the right.
To return to the first panel, slide to the left.
The panels are “customizable,” so you can choose which application icons, widgets, and other
items to add.
See also Customizing the Panels.
Note: On the Home screen, you can also comfortably drag the desired icon to the most left or
right edge.
19
About the Application Screen
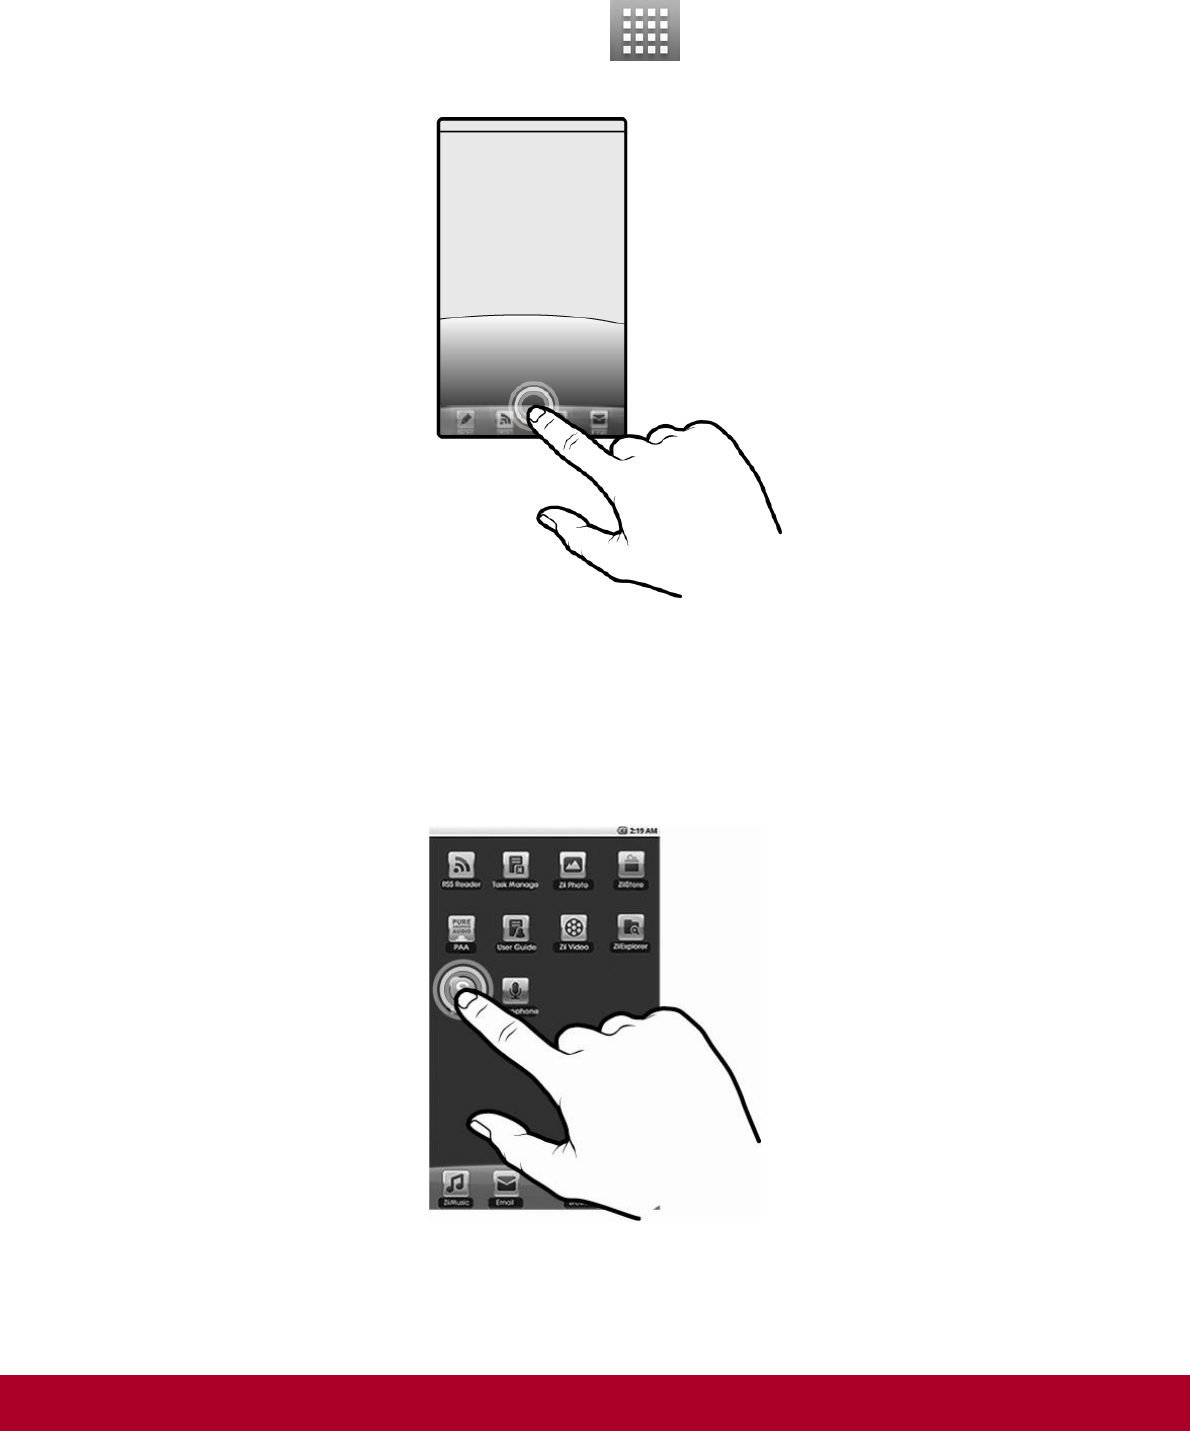
The Application screen contains all the applications that are currently installed on your ViewBook
730. To show or hide the Application screen, tap .
To start an application, tap the application's icon.
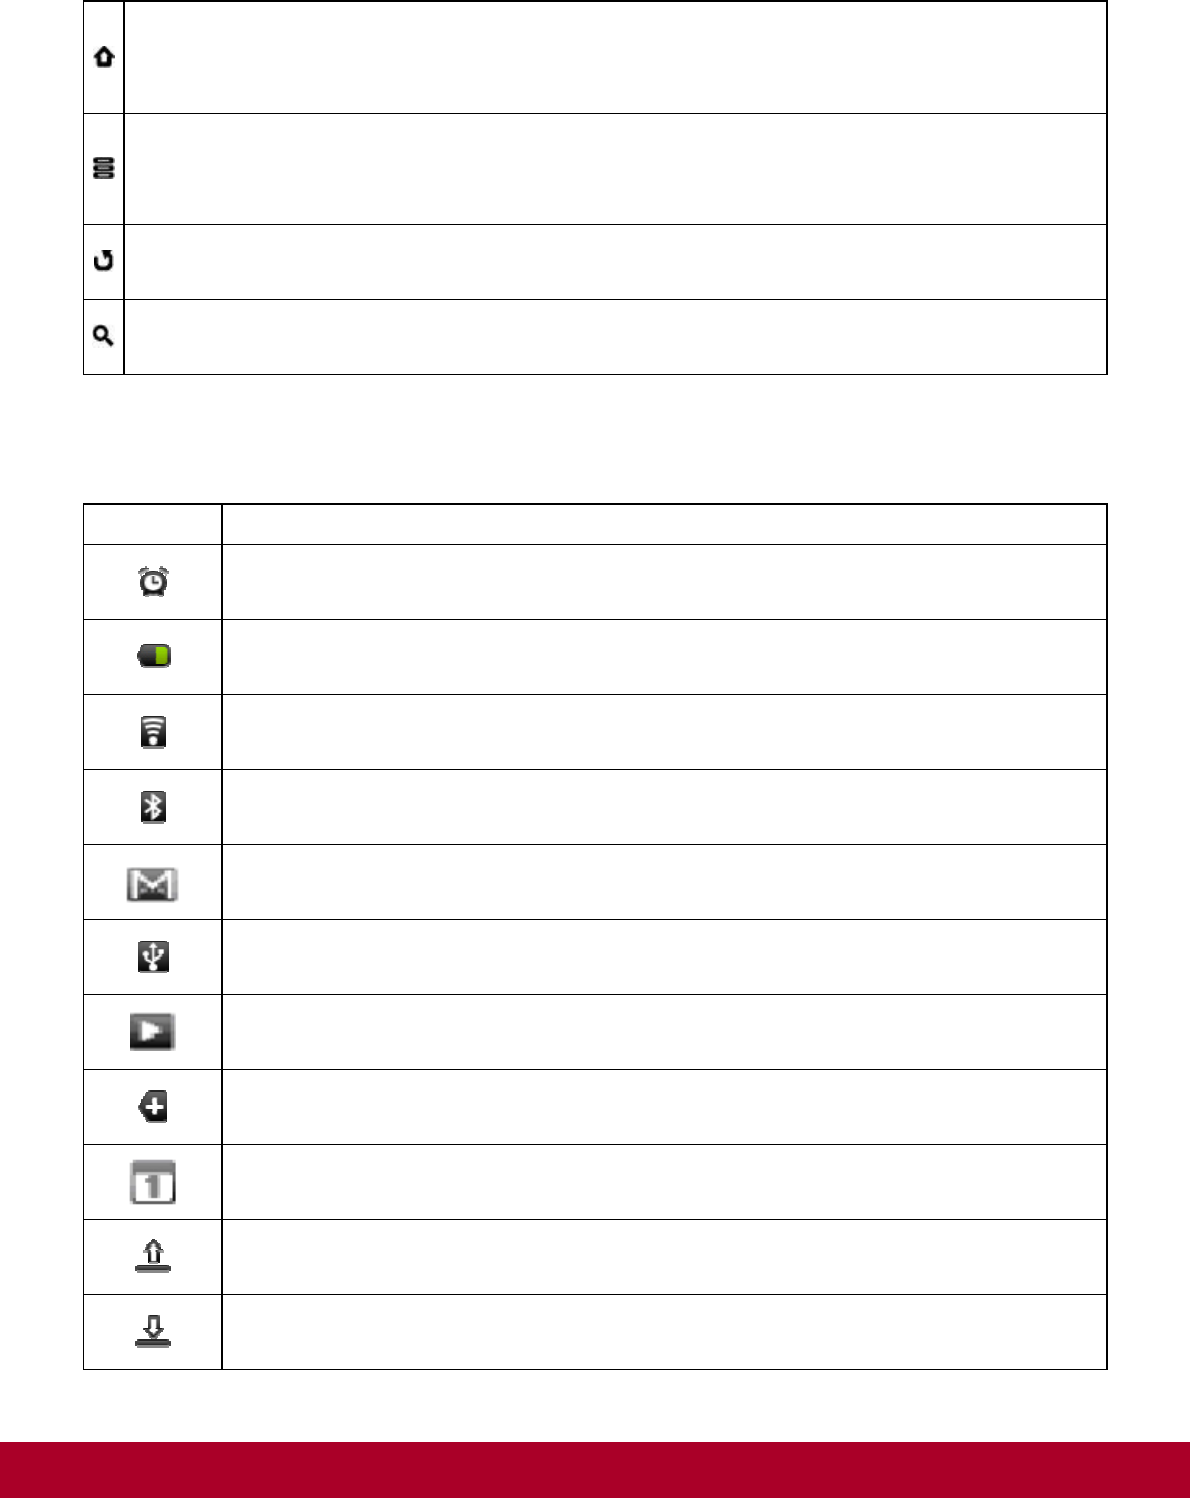
Note: To remove a shortcut:
1. Tap and hold the desired shortcut icon. The icon enlarges.
2. The trash bin icon appears on the middle of Home screen.
3. Drag the icon to trash bin icon to delete. The shortcut icon is then removed.
20
Function Buttons
Home
Press to return to the Home panel at any time.
Press and hold to display recently opened applications.
Menu
Press to display the available menu for the current screen.
Press and hold to show the on-screen keyboard.
Back
Press to return to the previous screen.
Search
Press to search for items on your device or the Web.
Icons on the Status Bar
Icon Meaning
Alarm On
Battery Status
Wi-Fi On
Bluetooth On
New E-mail Message
Connected via USB Cable
Music is Playing
More Notifications Not Displayed
Upcoming Event
Uploading Data
Downloading Data
21
22
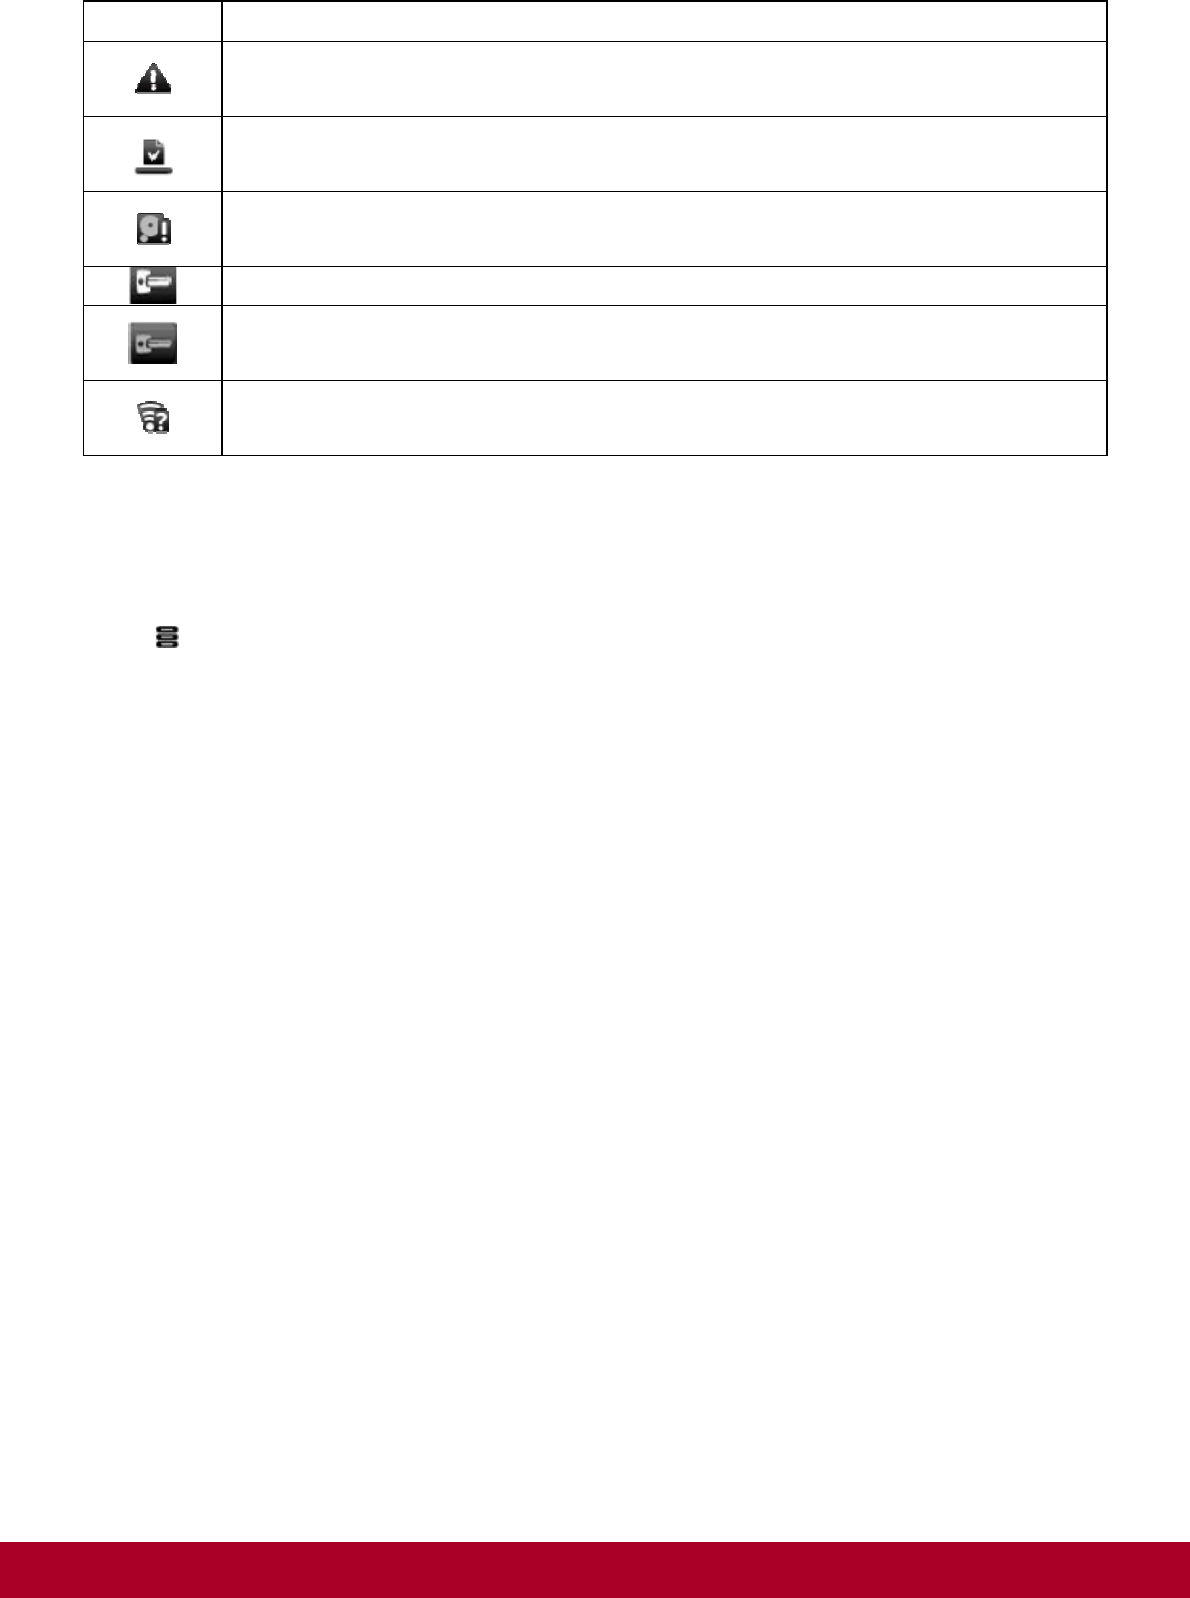
Icon Meaning
New Notifications
Download Finished
microSD Card is Full
Connected to VPN
Disconnected from VPN
An Open Wi-Fi Network is Available
Notification Panel
The Notification panel contains a list of your current notifications. To view the notification panel,
press and tap Notifications.
Alternatively, you can tap and hold the Status bar, and then drag it down to show the Notification
panel
Entering Text
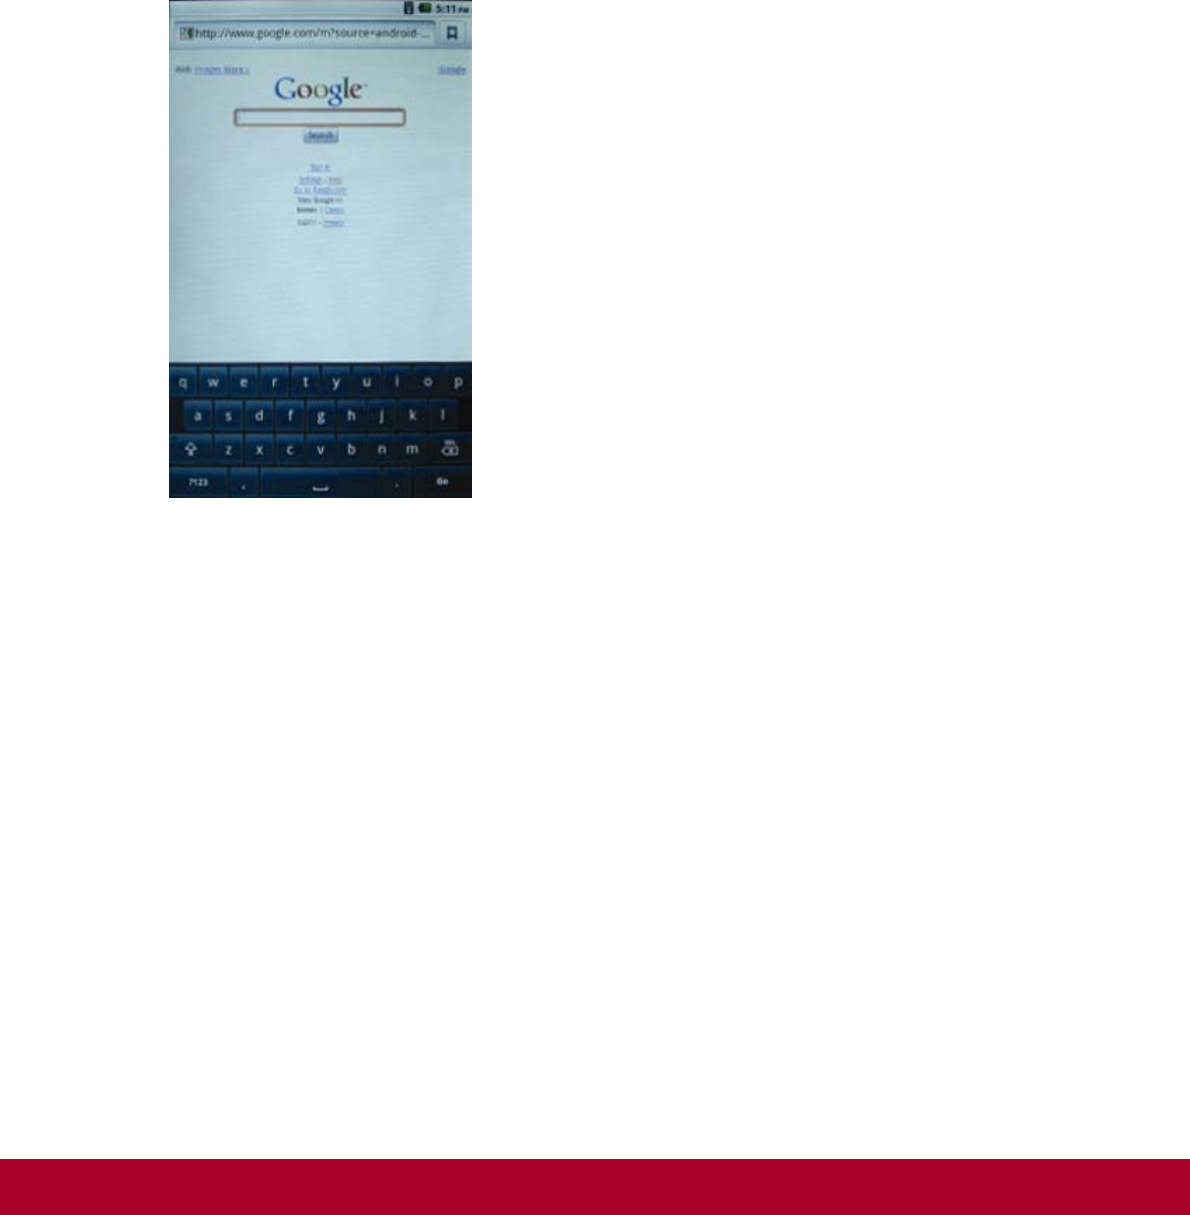
When you need to enter text, such as a password or a URL (on the Browser), simply touch the
text box. This brings up the onscreen keyboard.
If you want to select another keyboard language, tap and hold the text box.
Note: Using the Onscreen keyboard
1. Tap the screen to display onscreen keyboard as below.
2. Tap keys to enter characters.
3. To toggle between upper and lower case letter display, tap
4. To display the numeric and symbols, tap the numeric keys.
Context Menus
The context menu contains tools and options that apply to certain items on the screen. For
example, touch and hold an empty area on the panels, and a context menu pops up.
Note that not all items have context menus.
23

Customizing the Panels
Changing the Wallpaper
1. Press to make sure you are on the Home panel.
2. Press .
3. Tap Wallpaper and select the wallpaper location.
4. Tap a wallpaper of your choice.
When selecting from your own set of image files, you can still set the coverage of the
wallpaper. Notice that the selected image has initial borders that show the coverage area.
Touch and drag the border lines to increase the area. To drag the box to a specified
location without increasing the coverage, touch and hold the at the center of the box.
Adding an Item
You can fill the different panels (for both top and bottom layers) with your choice of icons,
widgets, and other items.
1. Press to make sure you are on the Home panel.
2. Slide to the panel where you want to add an item.
3. Press .
4. Touch Add.
5. From the popup box, select the item type, followed by the item to be added on the screen.
Moving an Item
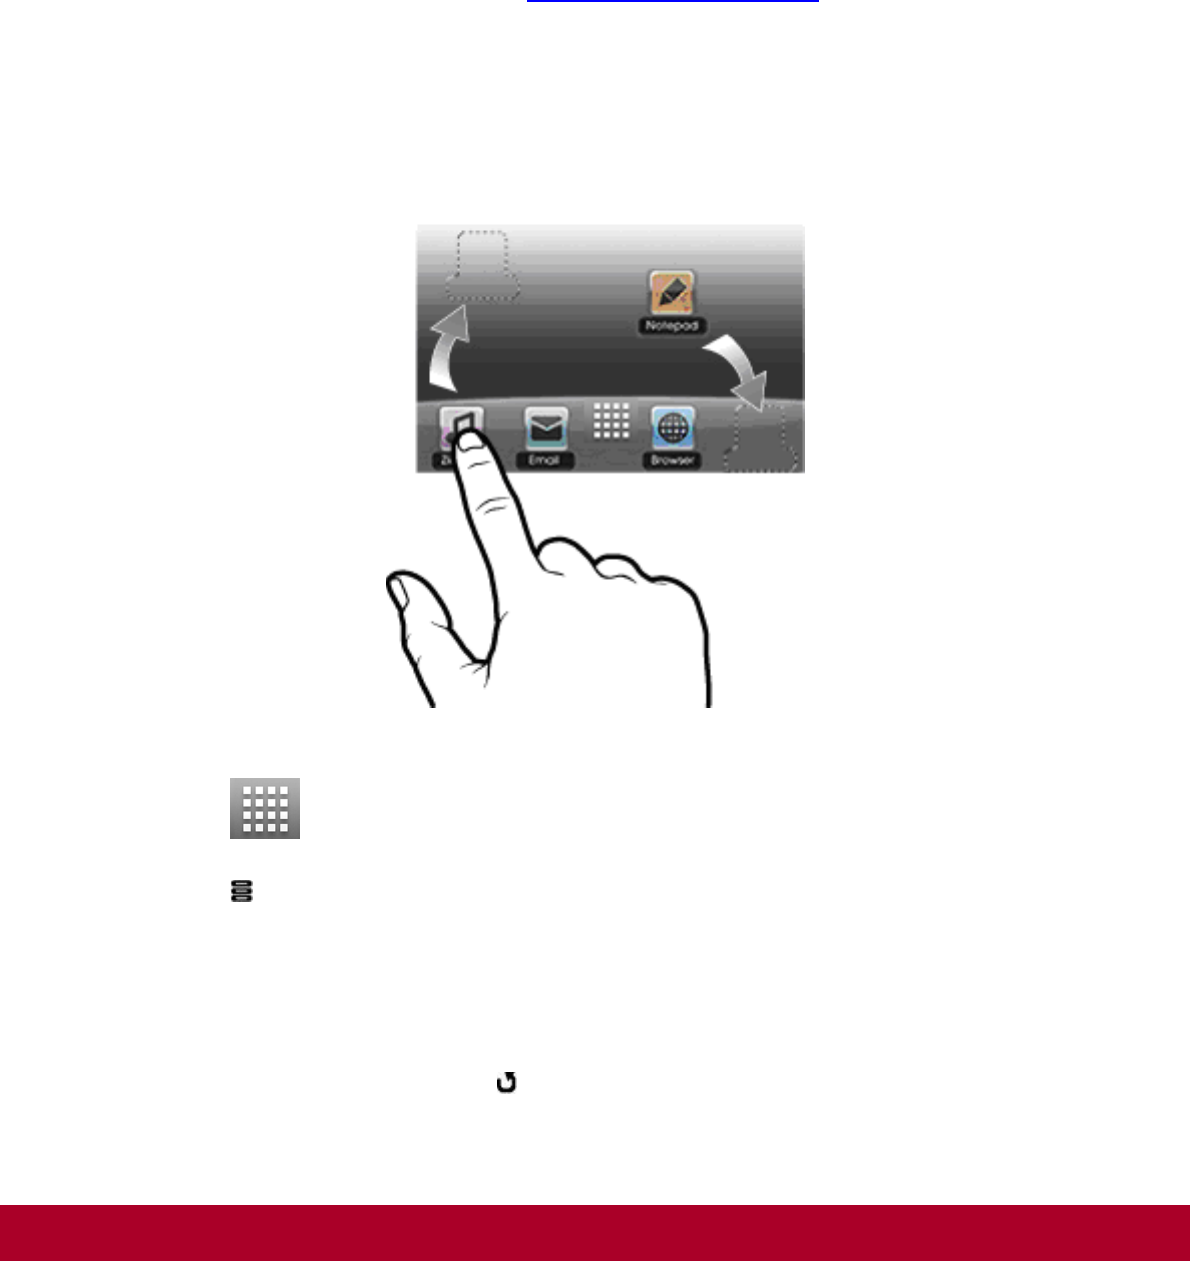
Touch and hold an item until it appears to vibrate. Drag and drop it into an empty part of the
screen.
24
Removing an Item
Touch and hold an item until it appears to vibrate, and drag it into the trash bin icon that appears
at the bottom of the screen.
Note:
This procedure refers to removing items from the customizable panels only. To uninstall an
application from your ViewBook 730, see Installing More Applications .
Customizing the Quick Launch Bar
You can customize the Quick Launch bar so that it contains your 4 favorite applications.
1. Press to show the Application screen.
2. Press .
3. Tap Edit.
4. Freely drag icons to and from the Quick Launch bar and the Application screen.
5. When you have finished, press .
25
E-Books
Using ZiiAcademy
ZiiAcademy is an e-book solution that comes with ViewBook 730. It enables you to read,
download, and manage your e-books all at the same time.
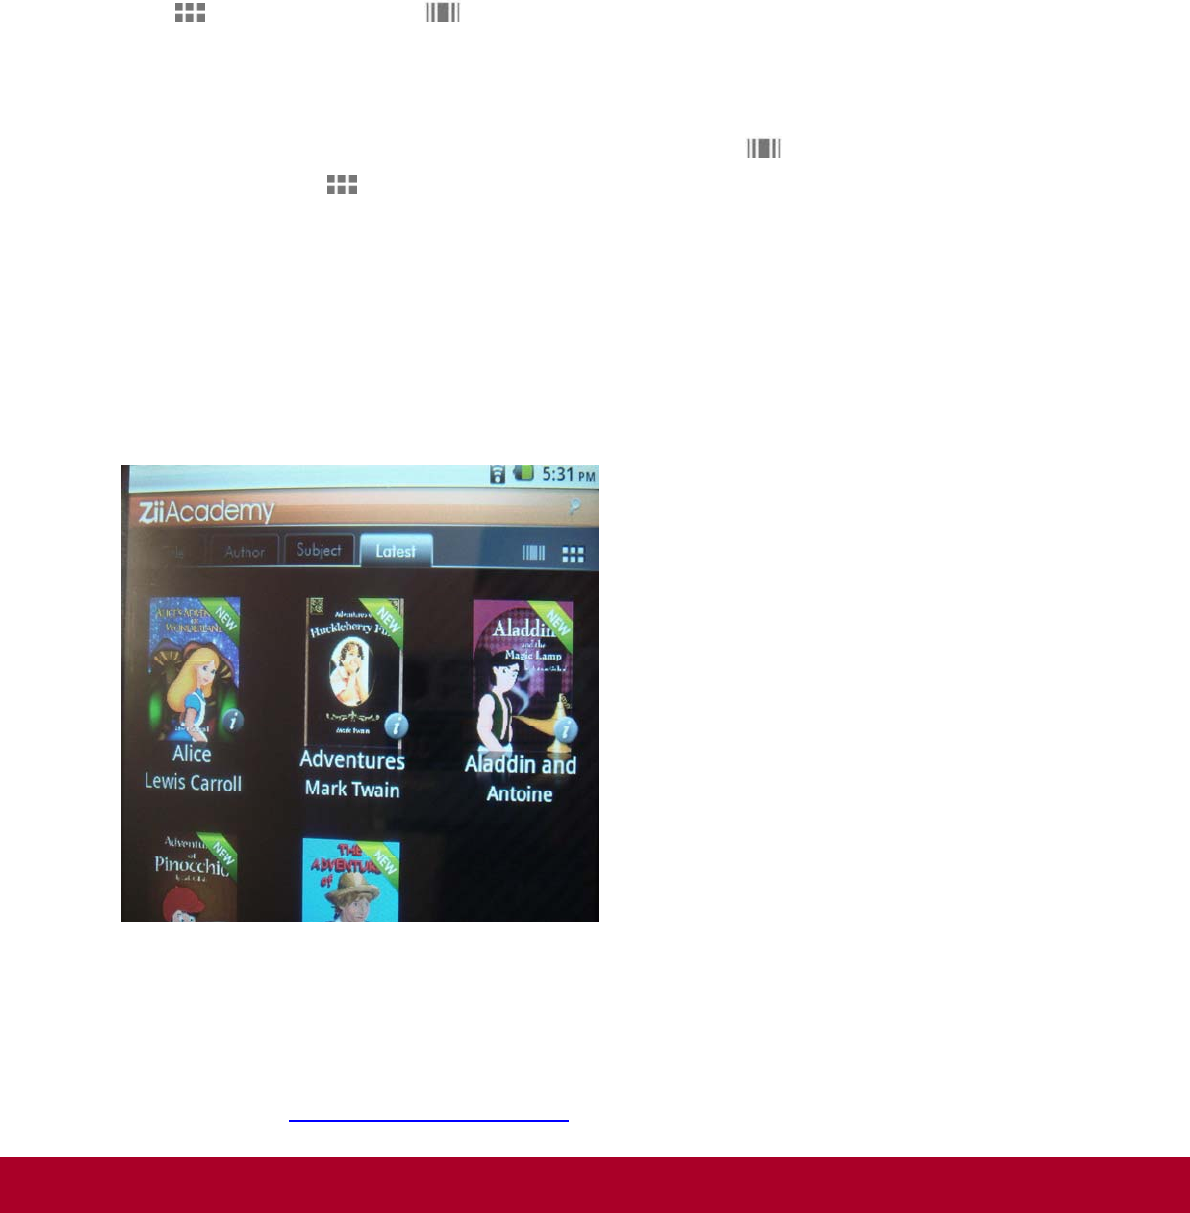
To start ZiiAcademy, tap its icon on the Application screen. Notice that the e-book covers are
initially displayed on the screen. You can switch between a thumbnail or cover flow view by
tapping (for 2D viewing) or (for 3D viewing).
Note: Browsing history can be stored while running in 2D mode.
To browse through the covers when in cover flow view , swipe to the left or right. In
thumbnail view , swipe up or down.
To open a book, tap the cover.
To flip through the pages, swipe your finger across the page.
You can also tap the left or right edge of the page to flip to the previous or next page.
To view more options, tap twice on the center of a page.
Importing E-Books From Your Computer
1. Connect ViewBook 730 to your computer.
Refer to the Connecting to a Computer instructions.
26

2. From your computer, copy e-book files to your device – into the location
/ziiacademy/import.
3. Tap Notifications > Turn off USB storage > Turn off.
4. On your computer, click the Safely Remove Hardware icon on the Notifications area, and
then proceed to safely disconnect the ViewBook 730 disk drive.
5. Disconnect ViewBook 730 from the USB port.
6. On ViewBook 730, start ZiiAcademy.
7. Tap followed by Import Books.
8. The newly copied books are then added to ZiiAcademy's library.
27
Deleting an E-Book
1. Go to ZiiAcademy’s main window.
2. If you are in the cover flow view , make sure the book you want to delete has its cover
on display.
If you are in the thumbnail view , tap on the cover.
3. Tap Delete, and select Delete Book to confirm.
Browsing the Internet
Connecting to a Wi-Fi Network
1. Press , followed by .
2. Tap Settings > Wireless & networks > Wi-Fi settings.
3. Tap Wi-Fi to turn it on.
Your device automatically scans for Wi-Fi networks within range.
The icon on the Status bar indicates that the Wi-Fi feature is on.
4. Tap the Wi-Fi network that you want to join.
If you are prompted for the password, tap the text input box to bring up the keyboard, and
type the password, and tap Connect.
If you need further assistance, contact your network administrator.
28
Using the Browser
1. Tap the Browser icon.
2. Tap the URL bar to bring up the onscreen keyboard.
3. Enter the URL of the webpage you want, and tap Go.
Tip:
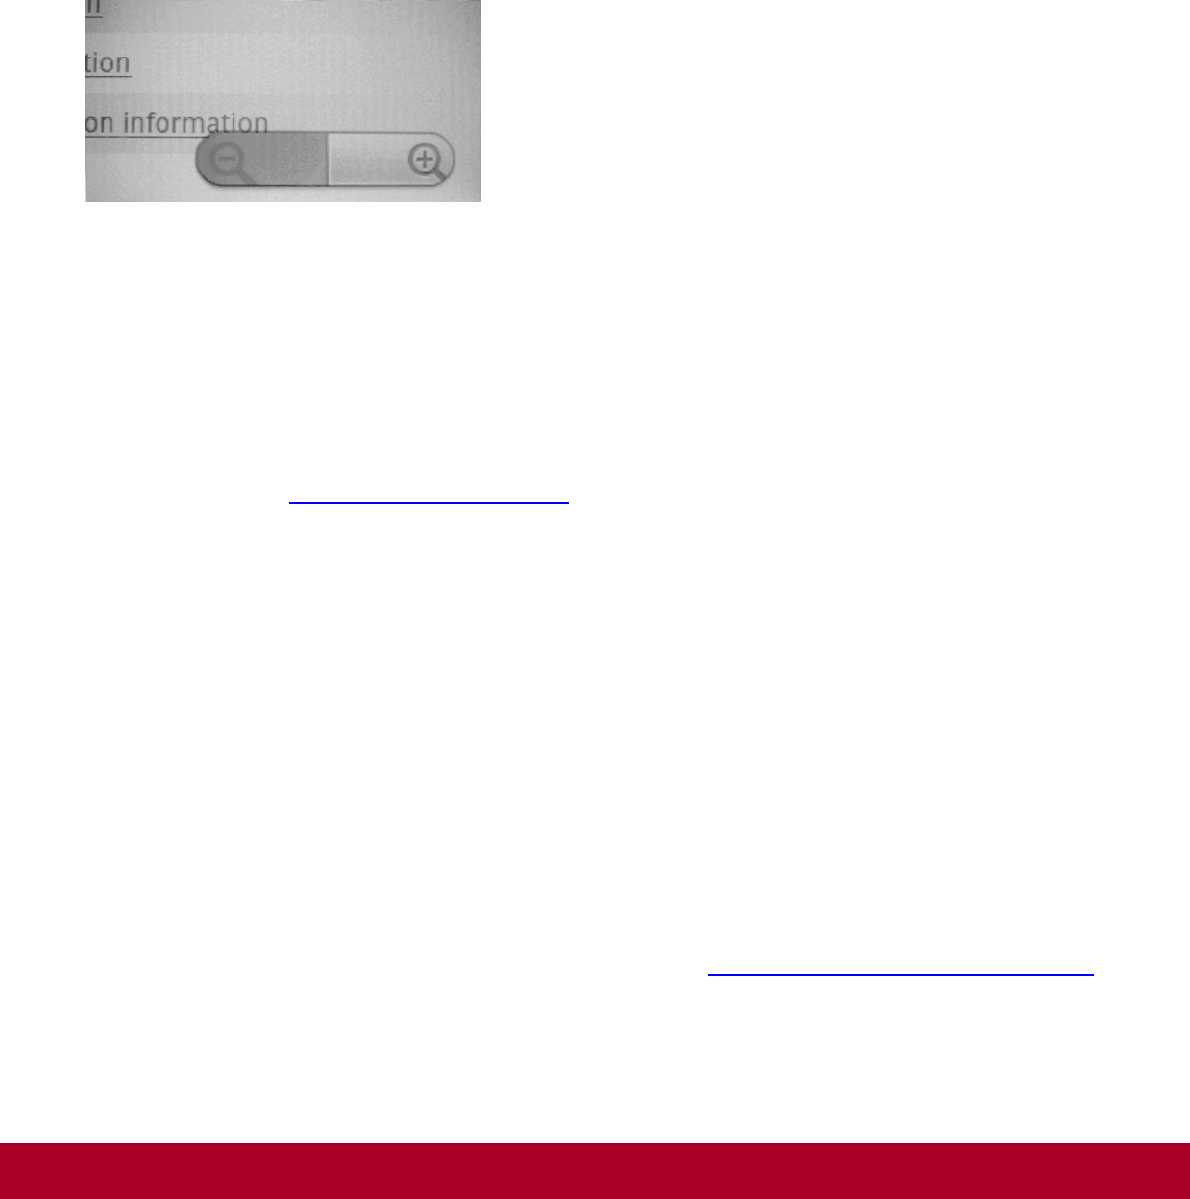
To zoom in or out of a Web page, double-tap the Zoom In/Out quick launch bar as below.
Videos, Music, and Photos
Transferring Files from Your Computer
1. Connect your device to your computer.
Refer to the Connecting to a Computer instructions
2. Select media files from your computer, and copy the files to the ViewBook 730's internal
memory or microSD card.
You can organize your media files in any folder that you prefer.
3. When you are done, click the Safely Remove Hardware icon on your computer to
disconnect ViewBook 730 properly.
Viewing Videos, Photos, and Listening to Music
To watch videos, view photos, or listen to music, start the ZiiVideo, ZiiPhoto, and ZiiMusic
applications respectively. Alternatively, you can use ZiiExplorer to navigate to the folder
containing the media file, and then open it from there. See Exploring ViewBook 730's Contents.
29

Deleting Media Files from ViewBook 730
You can delete media files with the use of the ZiiExplorer application. See Exploring ViewBook
730's Contents.
Exploring ViewBook 730's Contents
Tap ZiiExplorer icon to start the application. You can explore the contents of your device in a
similar manner as you would do on a computer. Among other tasks, you can copy, move, or
delete files.
Installing More Applications
Aside from applications that were preinstalled on your device, you can download and install more
applications and games that are specifically developed for Android devices. Installers are usually
in APK (.apk) format.
To install
1. Download or copy the APK (.apk) file into your ViewBook 730’s microSD memory card or
internal memory.
2. With the use of ZiiExplorer, navigate to the folder where you copied the file.
3. Tap the APK file to automatically start installation.
An icon for the newly installed application is added on the Application screen.
To uninstall
1. Press , followed by .
2. Touch Settings > Applications > Manage applications.
3. Touch the application you want to remove.
4. Touch Uninstall, and touch OK to confirm.
30

Settings
Accessing the Settings Screen
You can enable/disable features and personalize your ViewBook 730 from the Settings screen,
which contains several menu items that are mostly typical of Android.
A)
1. Press , followed by .
2. Tap Settings.
B)
1. Tap on the device to bring up Settings.
2. Tap Settings.
Changing the Screen and Keyboard Language
1. Press , followed by .
2. Tap Settings > Language & keyboard.
3. Select your locale and keyboard.
Note:
The language settings apply only to certain applications.
Setting the Screen Brightness, Timeout, and Orientation
1. Press , followed by .
2. Tap Settings > Sound & display.
3. Under the Display settings section, select the options and settings that you prefer.
31
Customizing the Sounds
1. Press , followed by .
2. Tap Settings > Sound & display.
3. Under the Sound settings section, select the options and settings that you prefer.
Setting the Date and Time
1. Press , followed by .
2. Tap Settings > Date & time.
3. Set the date and time, including other settings that you prefer.
Turning On/Off Bluetooth
1. Press , followed by .
2. Tap Settings > Wireless & networks > Bluetooth settings.
3. Tap Bluetooth to turn on/off the Bluetooth feature.
You will see on the Status bar when this feature is on.
Calibrating the Screen
1. Press , followed by .
2. Tap Settings > Display > Touch screen calibration.
3. Tap the 3 continuous calibration points as shown..You will see a Calibration Done
window pop up accordingly.
Back to top
More About Your Device
1. Press , followed by .
2. Tap Settings > About.
32
33
Customer Support
For technical support or product service, see the table below or contact your reseller.
NOTE: You will need the product serial number.
Country/Region Website T = Telephone F = FAX Email
Australia/New Zealand www.viewsonic.com.au AUS= 1800 880 818
NZ= 0800 008 822 service@au.viewsonic.com
Canada www.viewsonic.com T (Toll-Free)= 1-866-463-4775
T (Toll)= 1-424-233-2533
F= 1-909-468-3757
service.ca@viewsonic.com
Europe www.viewsoniceurope.com www.viewsoniceurope.com/uk/support/call-desk/
Hong Kong www.hk.viewsonic.com T= 852 3102 2900 service@hk.viewsonic.com
India www.in.viewsonic.com T= 1800 11 9999 service@in.viewsonic.com
Ireland (Eire) www.viewsoniceurope.com/
uk/ www.viewsoniceurope.com/uk/support/call-d
esk/ service_ie@viewsoniceurope.co
m
Korea www.kr.viewsonic.com T= 080 333 2131 service@kr.viewsonic.com
Latin America (Argentina) www.viewsonic.com/la/ T= 0800-4441185 soporte@viewsonic.com
Latin America (Chile) www.viewsonic.com/la/ T= 1230-020-7975 soporte@viewsonic.com
Latin America (Columbia) www.viewsonic.com/la/ T= 01800-9-157235 soporte@viewsonic.com
Latin America (Mexico) www.viewsonic.com/la/ T= 001-8882328722 soporte@viewsonic.com
Renta y Datos, 29 SUR 721, COL. LA PAZ, 72160 PUEBLA, PUE. Tel: 01.222.891.55.77 CON 10 LINEAS
Electroser, Av Reforma No. 403Gx39 y 41, 97000 Mérida, Yucatán. Tel: 01.999.925.19.16
Other places please refer to http://www.viewsonic.com/la/soporte/index.htm#Mexico
Latin America (Peru) www.viewsonic.com/la/ T= 0800-54565 soporte@viewsonic.com
Macau www.hk.viewsonic.com T= 853 2870 0303 service@hk.viewsonic.com
Middle East ap.viewsonic.com/me/ Contact your reseller service@ap.viewsonic.com
Puerto Rico & Virgin
Islands www.viewsonic.com T= 1-800-688-6688 (English)
T= 1-866-379-1304 (Spanish)
F= 1-909-468-3757
service.us@viewsonic.com
soporte@viewsonic.com
Singapore/Malaysia/Thaila
nd www.viewsonic.com.sg T= 65 6461 6044 service@sg.viewsonic.com
South Africa ap.viewsonic.com/za/ Contact your reseller service@ap.viewsonic.com
United Kingdom www.viewsoniceurope.com/
uk/ www.viewsoniceurope.com/uk/support/call-d
esk/ service_gb@viewsoniceurope.c
om
United States www.viewsonic.com T (Toll-Free)= 1-800-688-6688
T (Toll)= 1-424-233-2530
F= 1-909-468-3757 service.us@viewsonic.com

Limited Warranty
ViewSonic® eBook
What the warranty covers:
ViewSonic warrants its products to be free from defects in material and workmanship, under
normal use, during the warranty period. If a product proves to be defective in material or
workmanship during the warranty period, ViewSonic will, at its sole option, repair or replace the
product with a like product. Replacement product or parts may include remanufactured or
refurbished parts or components. The replacement unit will be covered by the balance of the
time remaining on the customer’s original limited warranty.
ViewSonic provides no warranty for the third-party software included with the product or installed
by the customer.
How long the warranty is effective:
ViewSonic eBooks are warranted for (1) year for all parts and labor from the date of the first
consumer purchase.
User is responsible for the back up of any data before returning the unit for service. ViewSonic is
not responsible for any data lost.
Who the warranty protects:
This warranty is valid only for the first consumer purchaser.
What the warranty does not cover:
1. Any product on which the serial number has been defaced, modified or removed.
2. Damage, deterioration or malfunction resulting from:
a. Accident, misuse, neglect, fire, water, lightning, or other acts of nature, unauthorized
product modification, or failure to follow instructions supplied with the product.
b. Any damage of the product due to shipment.
c. Removal or installation of the product.
d. Causes external to the product, such as electrical power fluctuations or failure.
e. Use of supplies or parts not meeting ViewSonic’s specifications.
f. Normal wear and tear.
g. Any other cause which does not relate to a product defect.
3. Any product exhibiting a condition commonly known as "image burn-in" which results when
a static image is displayed on the product for an extended period of time.
4. Removal, installation, one way transportation, insurance, and set-up service charges.
34

How to get service:
1. For information about receiving service under warranty, contact ViewSonic Customer
Support (Please refer to Customer Support page). You will need to provide your product's
serial number.
2. To obtain warranty service, you will be required to provide (a) the original dated sales slip, (b)
your name, (c) your address, (d) a description of the problem, and (e) the serial number of
the product.
3. Take or ship the product freight prepaid in the original container to an authorized ViewSonic
service center or ViewSonic.
4. For additional information or the name of the nearest ViewSonic service center, contact
ViewSonic.
Limitation of implied warranties:
There are no warranties, express or implied, which extend beyond the description contained
herein including the implied warranty of merchantability and fitness for a particular purpose.
Exclusion of damages:
ViewSonic's liability is limited to the cost of repair or replacement of the product. ViewSonic shall
not be liable for:
1. Damage to other property caused by any defects in the product, damages based upon
inconvenience, loss of use of the product, loss of time, loss of profits, loss of business
opportunity, loss of goodwill, interference with business relationships, or other commercial
loss, even if advised of the possibility of such damages.
2. Any other damages, whether incidental, consequential or otherwise.
3. Any claim against the customer by any other party.
4. Repair or attempted repair by anyone not authorized by ViewSonic.
Effect of state law:
This warranty gives you specific legal rights, and you may also have other rights which vary from
state to state. Some states do not allow limitations on implied warranties and/or do not allow the
exclusion of incidental or consequential damages, so the above limitations and exclusions may
not apply to you.
Sales outside the U.S.A. and Canada:
For warranty information and service on ViewSonic products sold outside of the U.S.A. and
Canada, contact ViewSonic or your local ViewSonic dealer.
The warranty period for this product in mainland China (Hong Kong, Macao and Taiwan
Excluded) is subject to the terms and conditions of the Maintenance Guarantee Card.
For users in Europe and Russia, full details of warranty provided can be found in
www.viewsoniceurope.com under Support/Warranty Information.
4.3: ViewSonic eBook Warranty eBook_LW01 Rev. 1A 06-20-08
35

Mexico Limited Warranty
ViewSonic® eBook
What the warranty covers:
ViewSonic warrants its products to be free from defects in material and workmanship, under
normal use, during the warranty period. If a product proves to be defective in material or
workmanship during the warranty period, ViewSonic will, at its sole option, repair or replace the
product with a like product. Replacement product or parts may include remanufactured or
refurbished parts or components & accessories.
How long the warranty is effective:
ViewSonic eBooks are warranted for (1) year for all parts and labor from the date of the first
consumer purchase.
User is responsible for the back up of any data before returning the unit for service. ViewSonic is
not responsible for any data lost.
Who the warranty protects:
This warranty is valid only for the first consumer purchaser.
What the warranty does not cover:
1. Any product on which the serial number has been defaced, modified or removed.
2. Damage, deterioration or malfunction resulting from:
a. Accident, misuse, neglect, fire, water, lightning, or other acts of nature, unauthorized
product modification, unauthorized attempted repair, or failure to follow instructions
supplied with the product.
b. Any damage of the product due to shipment.
c. Removal or installation of the product.
d. Causes external to the product, such as electrical power fluctuations or failure.
e. Use of supplies or parts not meeting ViewSonic's specifications.
f. Normal wear and tear.
g. Any other cause which does not relate to a product defect.
3. Any product exhibiting a condition commonly known as "image burn-in" which results when a
static image is displayed on the product for an extended period of time.
4. Removal, installation, insurance, and set-up service charges.
36

How to get service:
For information about receiving service under warranty, contact ViewSonic Customer Support
(Please refer to the attached Customer Support page). You will need to provide your product's
serial number, so please record the product information in the space provided below on your
purchase for your future use. Please retain your receipt of proof of purchase to support your
warranty claim.
For Your Records
Product Name:
Model Number: ___________________
Document Number:
Serial Number: ___________________
Purchase Date:
Extended Warranty Purchase? ____________ (Y/N)
If so, what date does warranty expire? ___________
1. To obtain warranty service, you will be required to provide (a) the original dated sales slip, (b)
your name, (c) your address, (d) a description of the problem, and (e) the serial number of the
product.
2. Take or ship the product in the original container packaging to an authorized ViewSonic
service center.
3. Round trip transportation costs for in-warranty products will be paid by ViewSonic.
Limitation of implied warranties:
There are no warranties, express or implied, which extend beyond the description contained
herein including the implied warranty of merchantability and fitness for a particular purpose.
Exclusion of damages:
ViewSonic's liability is limited to the cost of repair or replacement of the product. ViewSonic shall
not be liable for:
1. Damage to other property caused by any defects in the product, damages based upon
inconvenience, loss of use of the product, loss of time, loss of profits, loss of business
opportunity, loss of goodwill, interference with business relationships, or other commercial
loss, even if advised of the possibility of such damages.
2. Any other damages, whether incidental, consequential or otherwise.
3. Any claim against the customer by any other party.
4. Repair or attempted repair by anyone not authorized by ViewSonic.
37
38
Contact Information for Sales & Authorized Service (Centro Autorizado de Servicio) within Mexico:
Name, address, of manufacturer and importers:
México, Av. de la Palma #8 Piso 2 Despacho 203, Corporativo Interpalmas,
Col. San Fernando Huixquilucan, Estado de México
Tel: (55) 3605-1099
http://www.viewsonic.com/la/soporte/index.htm
NÚMERO GRATIS DE ASISTENCIA TÉCNICA PARA TODO MÉXICO: 001.866.823.2004
Hermosillo:
Distribuciones y Servicios Computacionales SA de
CV.
Calle Juarez 284 local 2 Col. Bugambilias C.P: 83140
Tel: 01-66-22-14-9005
E-Mail: disc2@hmo.megared.net.mx
Villahermosa:
Compumantenimietnos Garantizados, S.A. de C.V.
AV. GREGORIO MENDEZ #1504
COL, FLORIDA C.P. 86040
Tel: 01 (993) 3 52 00 47 / 3522074 / 3 52 20 09
E-Mail: compumantenimientos@prodigy.net.mx
Puebla, Pue. (Matriz):
RENTA Y DATOS, S.A. DE C.V. Domicilio:
29 SUR 721 COL. LA PAZ
72160 PUEBLA, PUE.
Tel: 01(52).222.891.55.77 CON 10 LINEAS
E-Mail: datos@puebla.megared.net.mx
Veracruz, Ver.:
CONEXION Y DESARROLLO, S.A DE C.V. Av.
Americas # 419
ENTRE PINZÓN Y ALVARADO
Fracc. Reforma C.P. 91919
Tel: 01-22-91-00-31-67
E-Mail: gacosta@qplus.com.mx
Chihuahu
Soluciones Globales en Computación
C. Magisterio # 3321 Col. Magisterial
Chihuahua, Chih.
Tel: 4136954
E-Mail: Cefeo@soluglobales.com
Cuernavaca Compusupport de Cuernavaca SA de CV
Francisco Leyva # 178 Col. Miguel Hidalgo
C.P. 62040, Cuernavaca Morelos
Tel: 01 777 3180579 / 01 777 3124014
E-Mail: aquevedo@compusupportcva.com
Distrito Federal:
QPLUS, S.A. de C.V.
Av. Coyoacán 931
Col. Del Valle 03100, México, D.F.
Tel: 01(52)55-50-00-27-35
E-Mail : gacosta@qplus.com.mx
Guadalajara, Jal.: SERVICRECE, S.A. de C.V.
Av. Niños Héroes # 2281
Col. Arcos Sur, Sector Juárez
44170, Guadalajara, Jalisco
Tel: 01(52)33-36-15-15-43
E-Mail: mmiranda@servicrece.com
Guerrero Acapulco
GS Computación (Grupo Sesicomp)
Progreso #6-A, Colo Centro
39300 Acapulco, Guerrero
Tel: 744-48-32627
Monterrey:
Global Product Services
Mar Caribe # 1987, Esquina con Golfo Pérsico
Fracc. Bernardo Reyes, CP 64280
Monterrey N.L. México
Tel: 8129-5103
E-Mail: aydeem@gps1.com.mx
MERIDA:
ELECTROSER
Av Reforma No. 403Gx39 y 41
Mérida, Yucatán, México CP97000
Tel: (52) 999-925-1916
E-Mail: rrrb@sureste.com
Oaxaca, Oax.:
CENTRO DE DISTRIBUCION Y
SERVICIO, S.A. de C.V.
Murguía # 708 P.A., Col. Centro, 68000, Oaxaca
Tel: 01(52)95-15-15-22-22
Fax: 01(52)95-15-13-67-00
E-Mail. gpotai2001@hotmail.com
Tijuana:
STD Av Ferrocarril Sonora #3780 L-C
Col 20 de Noviembre
Tijuana, Mexico
FOR USA SUPPORT:
ViewSonic Corporation
381 Brea Canyon Road, Walnut, CA. 91789 USA
Tel: 800-688-6688 (English); 866-323-8056 (Spanish);
Fax: 1-800-685-7276
E-Mail: http://www.viewsonic.com
4.3: ViewSonic Mexico Limited Warranty eBook_LW01 Rev. 1A 06-20-08