ViewSonic VS14406 Tablet PC User Manual 602 User guide 2011 11 11
ViewSonic Corporation Tablet PC 602 User guide 2011 11 11
User Manual
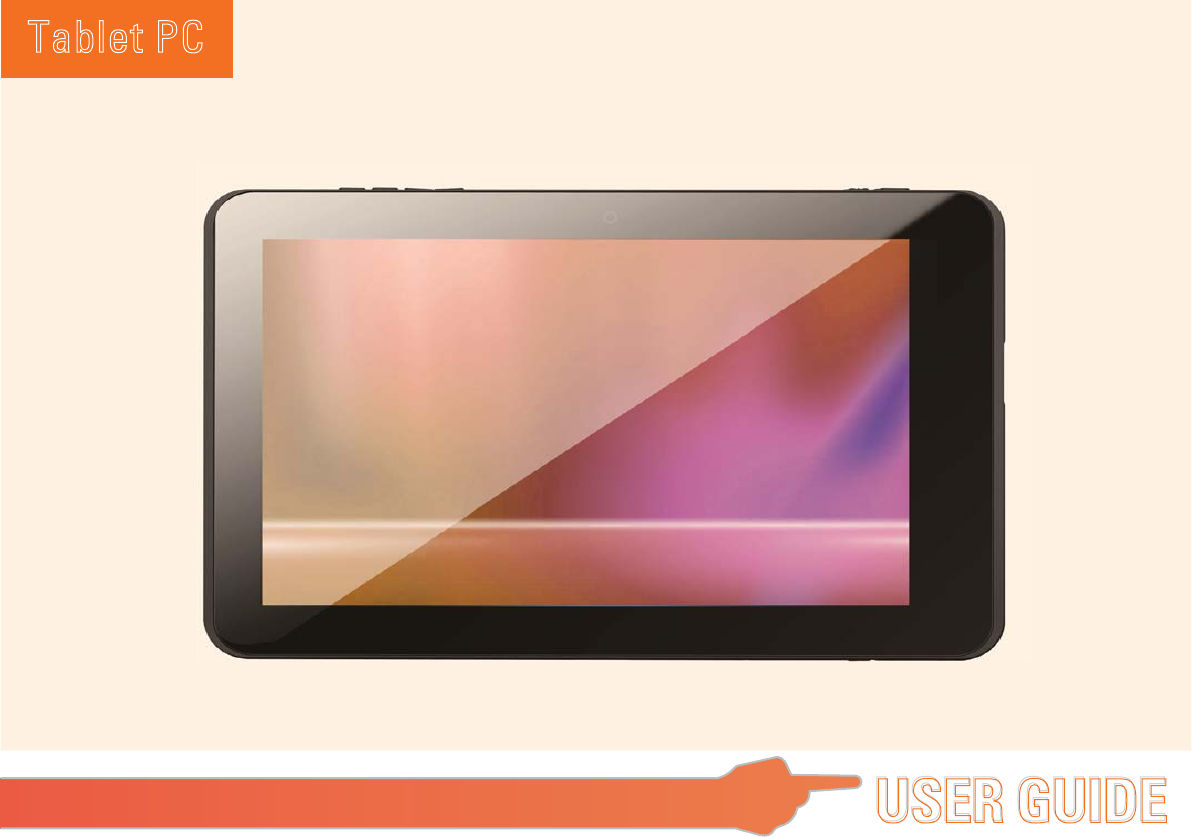
Tablet PC
USER GUIDE
USER GUIDE

Tablet PC
Table of Contents
----------------------------------------------------------------------------------------------
Package contents---------------------------------------------------------------------------------------------
Exploring the Table PC-----------------------------------------------------------------------------------------1
Front view---------------------------------------------------------------------------------------------------- 1
Side view----------------------------------------------------------------------------------------------------- 2
Brief introduction
Rear view-----------------------------------------------------------------------------------------------------1
Indicators---------------------------------------------------------------------------------------------------- 4
Trouble shooting --------------------------------------------------------------------------------------------- 34
5
Dual OS Switching experience------------------------------------------------------------------------------
7
Android system applications--------------------------------------------------------------------------------
Ė
ĕ
Ĕ
ĕ
Brief introduction
Car Charge
(with keyboard or not)
Protect film
1
Exploring the Table PC
Front View Rear View
①
② ③
⑥
⑤
④
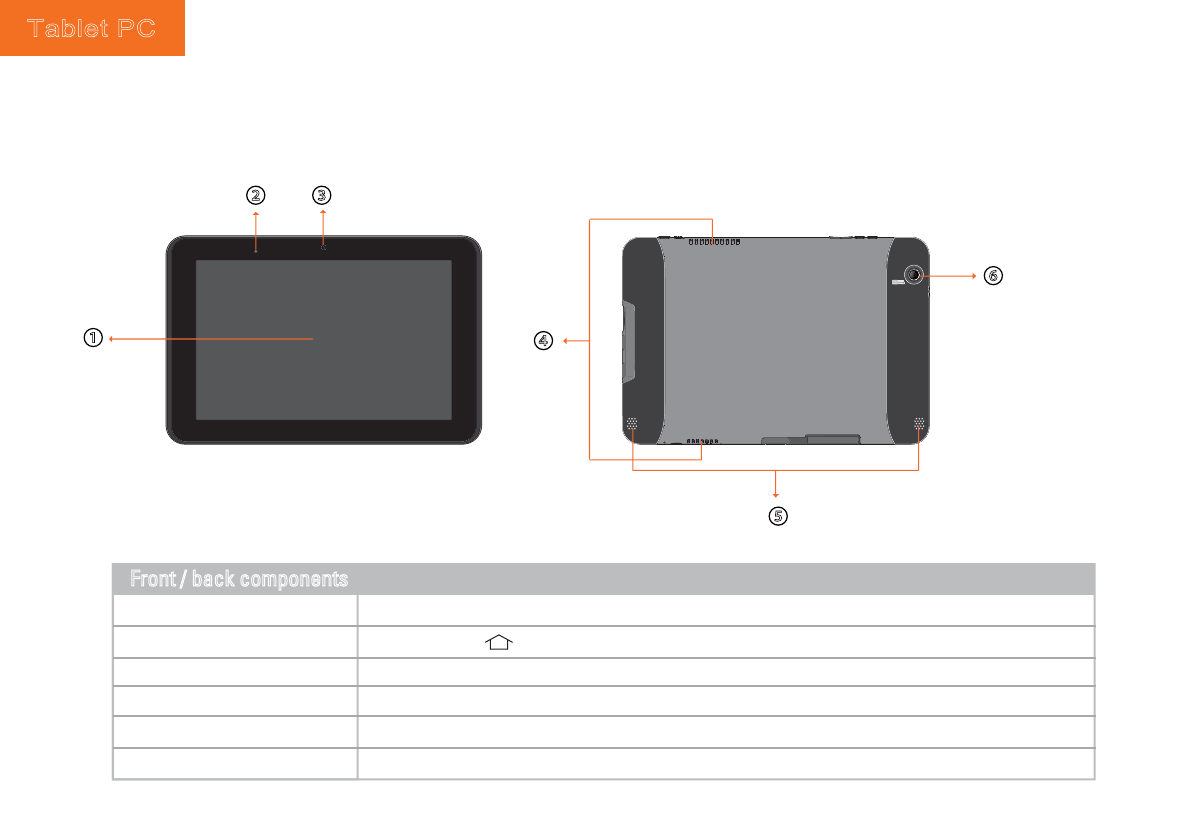
①Touch screen
④
Vent
⑤Speaker
⑥Back camera(Optional)
③
Front Camera
② Light sensor
Front / back components
You can take photos at resolutions up to 2048 x 1536 pixels (3.2 megapixels) and recording videos.
Produces sounds from multimedia files or the operating system.
Dissipate heat and keep your Notebook at an optimal temperature.
A built-in webcam that allows you to capture still images, record videos, and chat online.
Press and hold button 3s to turn on/off the light sensor.
Use finger to control system & application.
Tablet PC
Side View
2
⑧
⑨
⑩
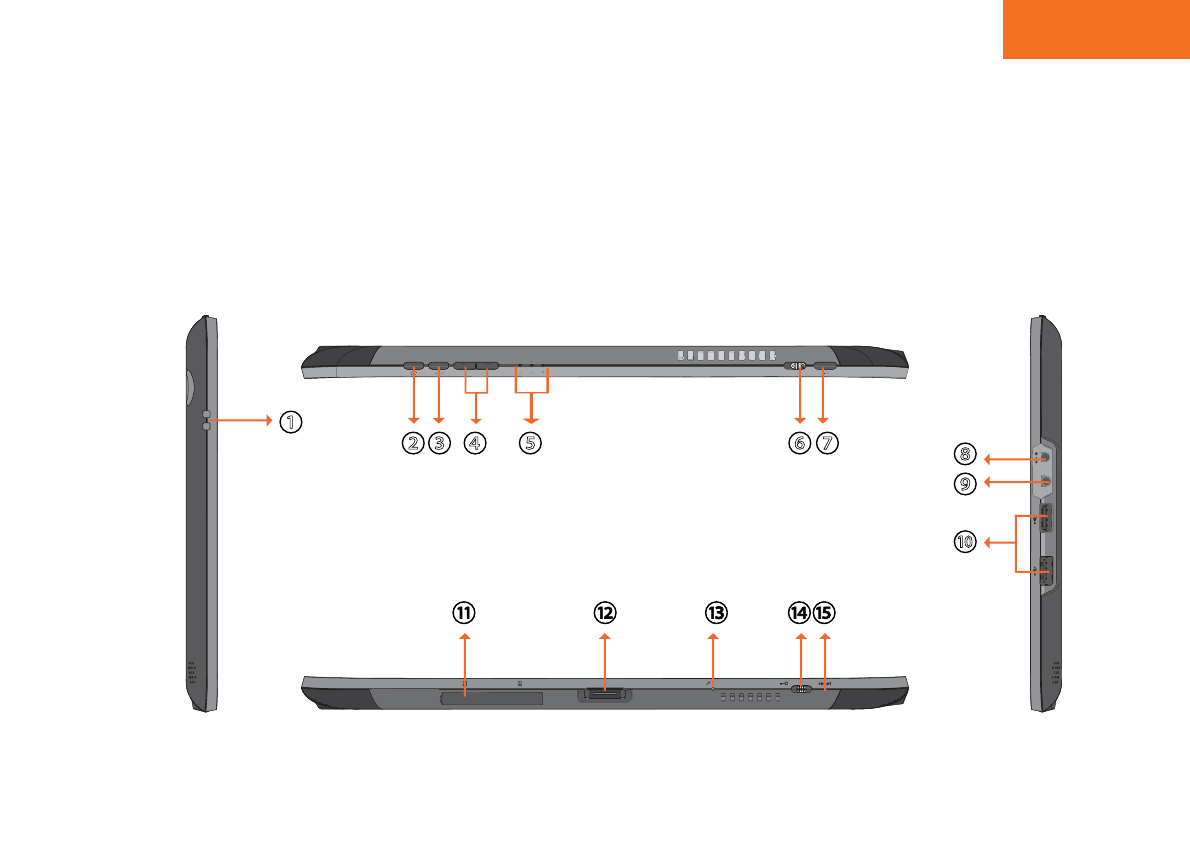
①②③ ④ ⑤ ⑥ ⑦
Top side
Bottom side
Right side
Left side
3
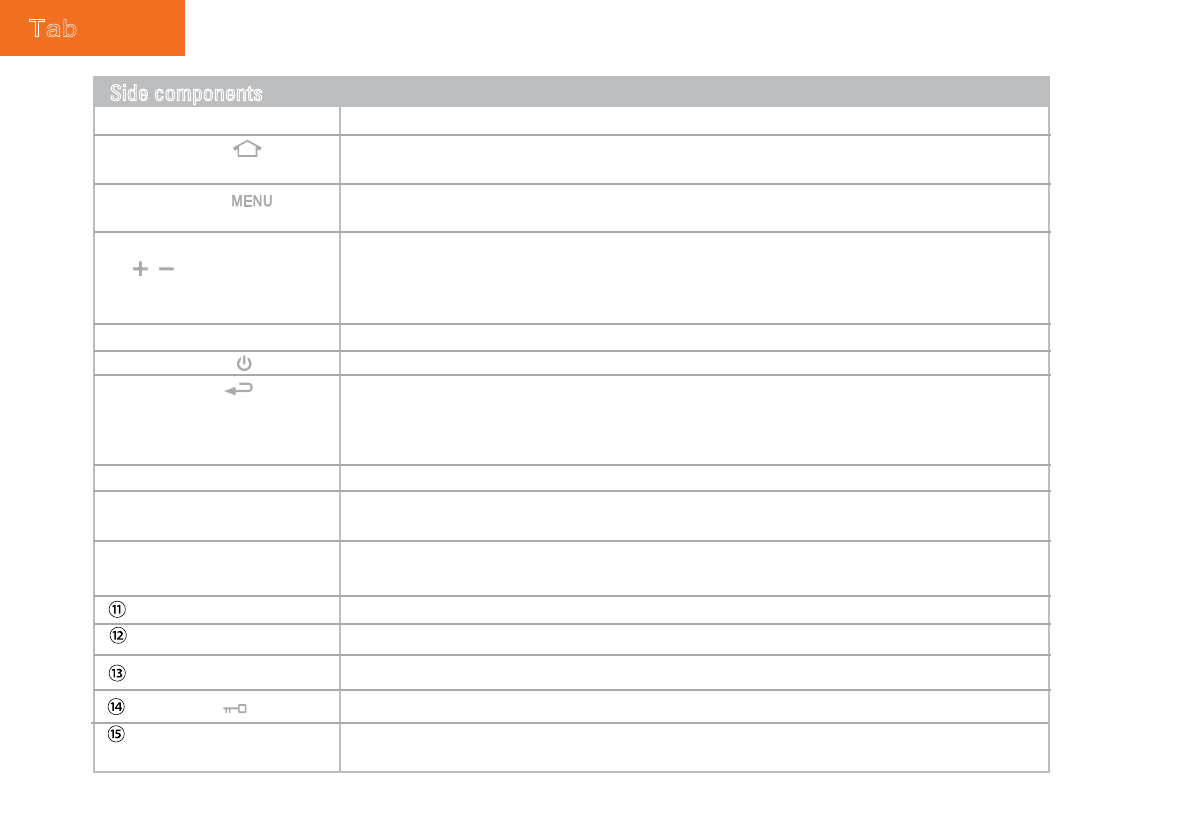
Memory card slot For a SD memory card.
① Keyhole slot
Windows/Android: Press to adjust the volume (+Volume up/-Volume down).
Windows: press and hold 3s to adjust the screen brightness(+increases screen brightness
/-decreases the screen brightness).(If not access the systems, -for the arrow keys"Left"/+for
the arrow keys"Right")
⑥ Power switch Press and hold to Turns your Tablet PC on or off, short press for stanby/Wake up.
⑦ Back button Windows: For the keyboard “ESC”key.
②Home button Windows: Press to go back to the home (desktop),Press 3S to turn on/off the light-sensor.
⑨ Audio output jack
(Mic and headphone 2 in 1)
Connects 4 pole earphone to play audio or chat online.
Lock button Windows/Android: Switch to enable /disable the G-sensor function.
⑧Power jack Connects AC power supply to power the Tablet PC and charge the battery.
⑩ USB ports Connects peripherals such as mice, digital cameras and MP3 players that use the USB 2.0
interface.
Dock connector Connect to your PC to exchange data material between your PC & Tablet PC.
Reset eject hole When system abnormal (can’t start the system or turn off the system), insert a thin,straight
object(such as a paper clip) in the manual eject hole on the Tablet.
④ Volume/brightness buttons
③Menu button Windows: Press for call the “Windows Task Manager”.
Side components
Android: Press for the “Home key”.(If not access the systems, for the arrow keys"Up"
)
Android: Press for the “Back” key.
Windows/Android: Press and hold 10s to go to the touch-screen H/W calibration.
Android: Press to show menu. (If not access the systems, for the arrow keys"Down".)
MIC Receives sounds and voices for recording.
⑤ Indicators Refer to "Indicators" on page 4 for details.
(If not access the systems, for the arrow keys"Enter".)
Tablet PC
4
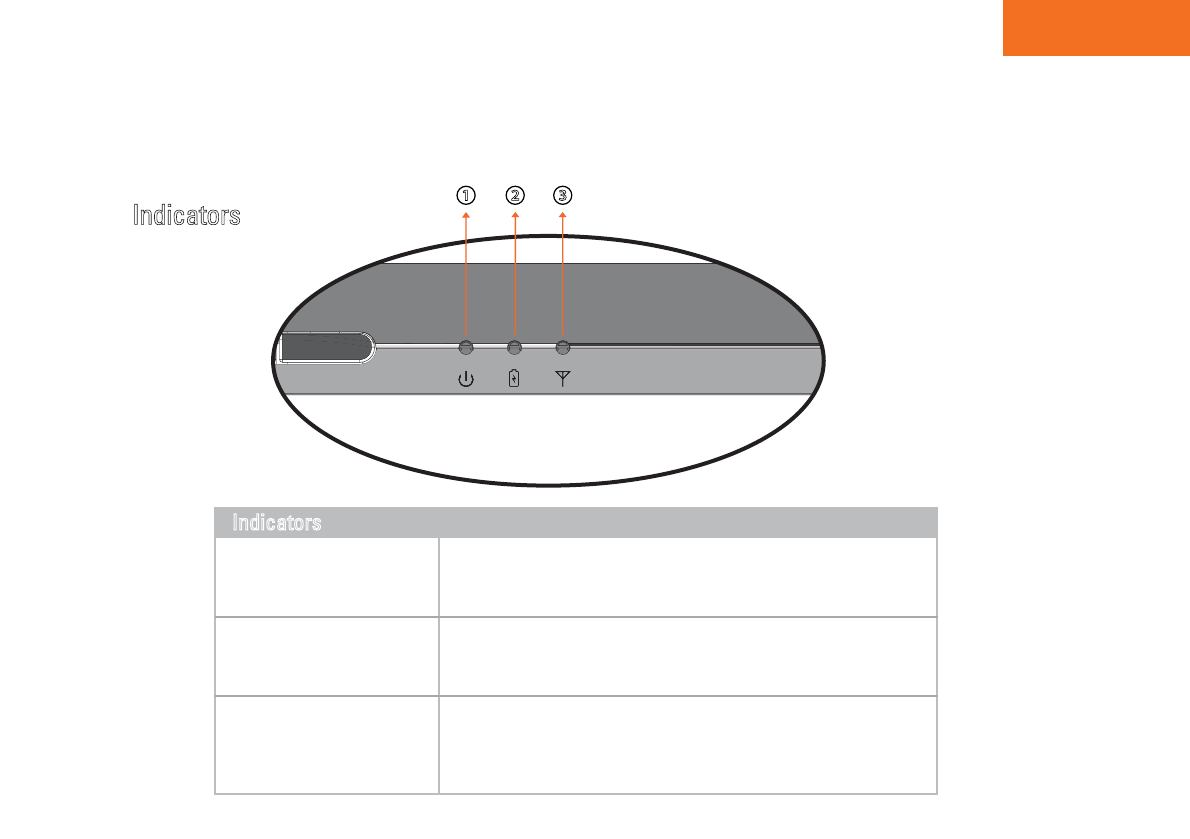
① ② ③
①Power indicator
When the system is on, it lights up in blue.
When the system is in sleep mode, it flashes in blue.
When the system is off or in Hibernation mode, the light goes off.
② Battery status indicator
③Wireless LAN indicator
Indicators
When the battery is charging, it lights up in red.
When the battery is low,it flashes in red.
When the battery is fully charged, it lights up in blue.
When Wi-Fi is turned on, it lights up in blue.
When Wi-Fi is turned off, the light goes off.
Indicators
Dual OS switch experience
Tablet PC
5
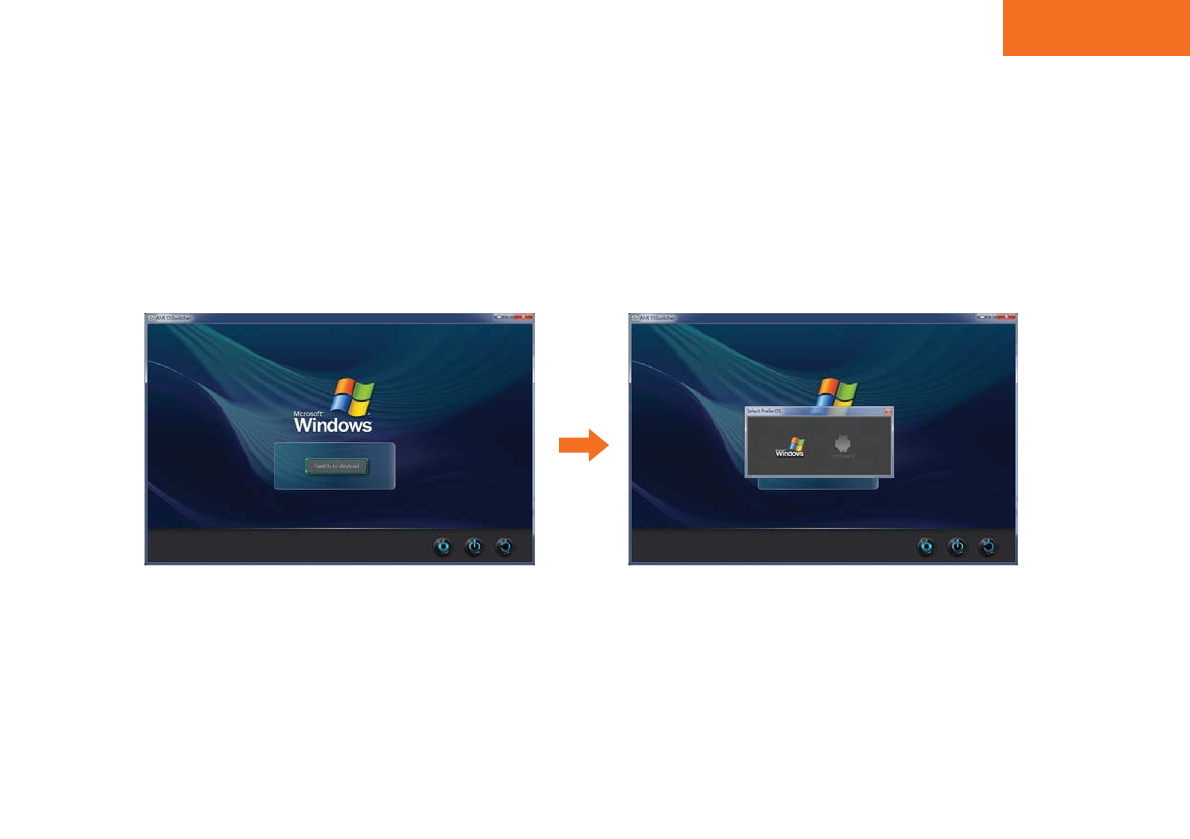
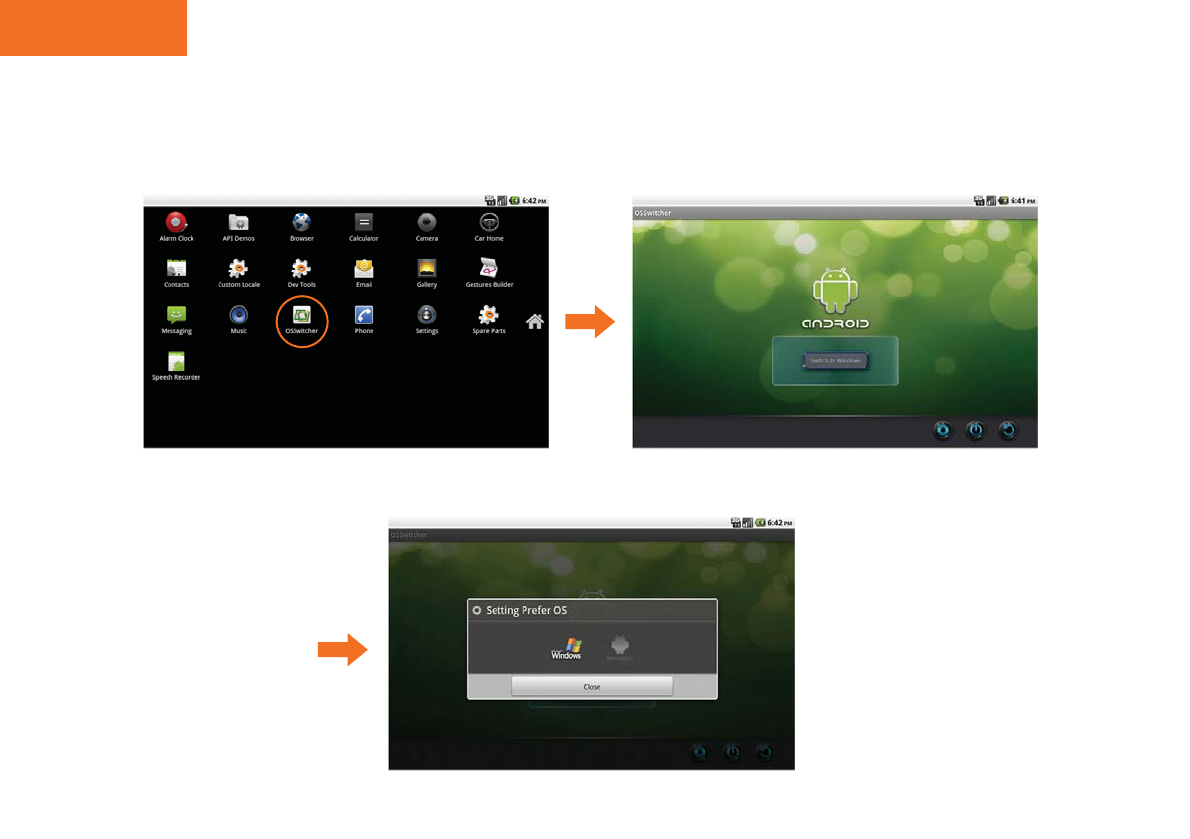
Windows OS swich to Android OS
Run OSSwitcher application at Windows OS, and then click “Swich to Android”, after from pop-up Muti-OS menu to
select and into Android OS.
Switch to Android Muti-OS menu
Dual OS Switching experience
Tablet PC
6
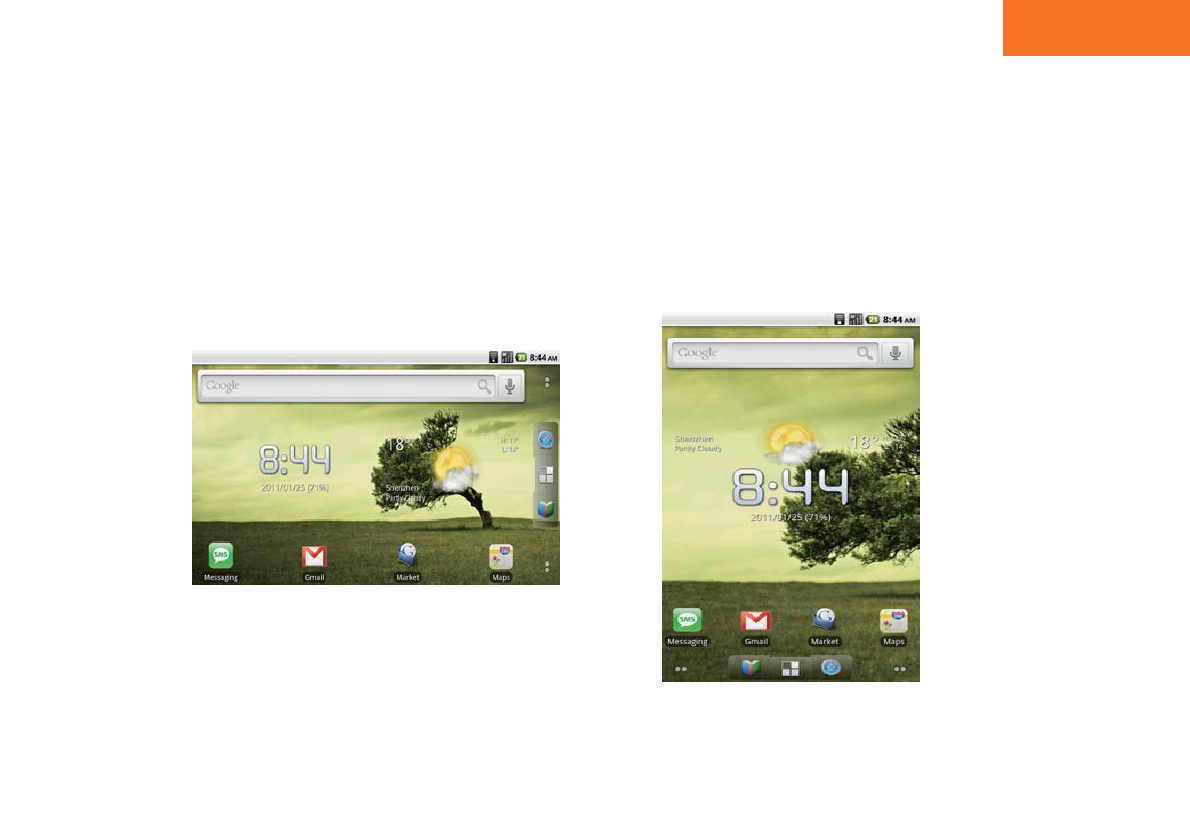
Android OS swich to Windows OS
Run OSSwitcher application from main menu, and then click “Swich to Windows”, after from pop-up Muti-OS menu to
select and into Windows OS.
Switch to Windows
Main menu
Muti-OS menu
Tablet PC
Android system applications
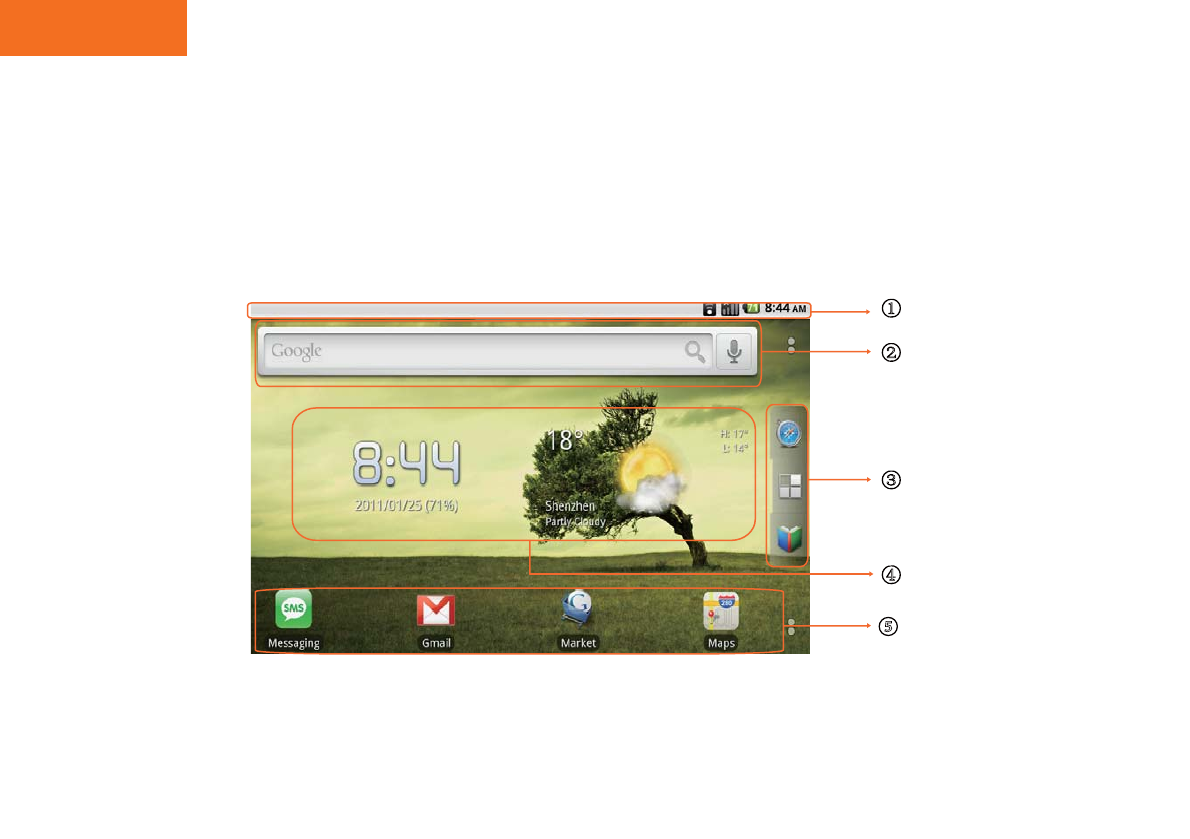
Portrait view
Landscape view
Start using your Tablet PC
Press and hold the power button until the Android logo appears., Then the power indicator would light up in blue.
And then follow the on-screen instructions to complete the initial Operating system setup.
The system Homescreen will appear as follows:
7
Tablet PC
8
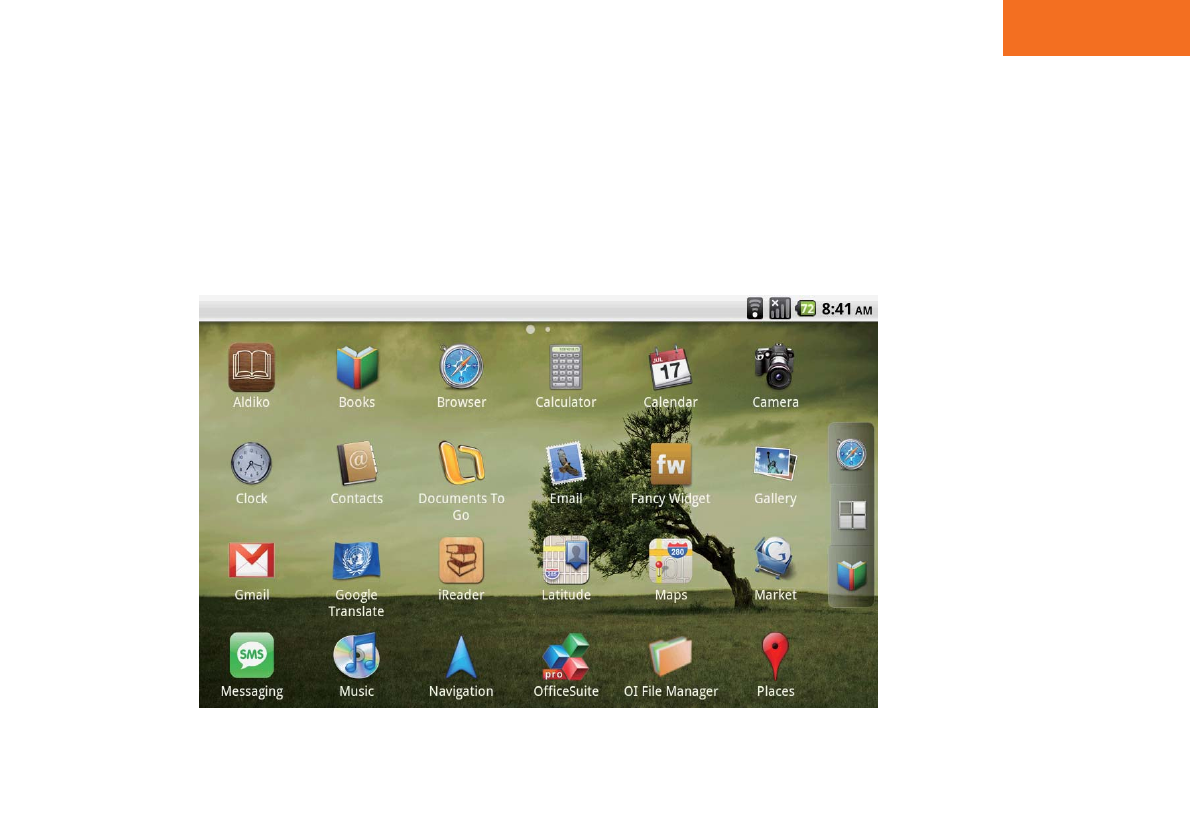
Home(desk)
The default system desk include: ①Status column, ②Quick search bar, ③Main menu column, ④fancy widget,
and ⑤some Shortcuts.
The Status column shows the time, WiFi connection status,battery status, and other information, its also displays
notification icons. Quick search bar can use Google search that you can use directly on the home screen.
The Shortcut help to quick open an application or a folder, and so on. if you press and hold the shortcut icon, then
you can add, move, or delete the shortcut icons.
ķ
ĸ
Ĺ
ĺ
⑤
Tablet PC
Main menu
9
Touch the main menu tab icon to open the main menu from main menu column and view icon for all installed
applications. You can setup system, install and run application.
Main menu column content three tab icon,The middle icon is main menu tab, the other two tabs is shortcut icon, you
can customize these tabs by use drag and drop action. Slide the main menu column from left to right , you can hide it.
Also you can show it in reverse order.(When in main menu, the main menu tab icon charge to be home desktop tab
icon, touch it , you can go back to the home desktop .)
Android system main menu(not default)

Tablet PC
Using Apps
10
The high-resolution Multi-Touch screen and simple finger gestures make it easy to use android apps.
Opening and Switching Apps
You open an app on OakTrail by tapping its icon on the Homescreen or Launcher.
Return to the Home screen:
Press the Home button.
Switch to another Home screen:
Flick left or right, or tap to the left or right of the row of dots.
Go to the first Home screen:
Press the Home button again.
View your recently used apps:
Long Press the Home button.
Your most recently used apps appear at the top-left of the screen, in order starting from the left.
Switch to another app: Tap an app in the recent apps list.
Scrolling
Drag up or down to scroll. On some screens such as email and webpages, you can also scroll side to side.
Dragging your finger to scroll won’t choose or activate anything on the screen.

Tablet PC
Flick to scroll quickly:
You can wait for the scrolling to come to a stop, or touch anywhere on the screen to stop it immediately.
Touching the screen to stop scrolling won’t choose or activate anything.
Zooming In or Out
When viewing photos, webpages, email, or maps, you can zoom in and out. Pinch your fingers together or apart. For
photos and webpages, you can double-tap (tap twice quickly) to zoom in, then double‐tap again to zoom out. For
maps, double tap to zoom in and tap once with two fingers to zoom out.
Zoom is also an accessibility feature that lets you magnify the screen with any app you’re using, to help you see
what’s on the display.
Viewing in Portrait or Landscape Orientation
Many Android apps let you view the screen in either portrait or landscape orientation. Rotate OakTrail and the display
rotates too, adjusting automatically to fit the new screen orientation.
You may prefer landscape orientation for viewing webpages in Browser, or when entering text, for example. In
landscape orientation:
Webpages scale to the wider screen, making the text and images larger.
The onscreen keyboard is larger, which may help increase your typing speed and accuracy.
The following apps support both portrait and landscape orientation:
Browser
Calculator
Camera
etc.
11

Press and hold Fuction button for 10 second, the power indicator will flash , then go to H/W Calibration, When
you into Calibration, do not touch the screen.
Tablet PC
Customizing the Home Screen
12
You can customize the layout of icons on the Home screen. If you want, arrange them over multiple Home screens.
Rearranging Icons
You can arrange the icons on your Home screen in any order you want.
Rearrange icons:
1. Touch and hold any icon on the Home screen until it begins to jiggle.
2. Arrange the icons
You can also add links to your favorite webpages on the Home screen.
Move an icon to another screen:
While arranging icons, drag an icon to the side of the screen.
Adding Wallpaper
You can set an image or photo as wallpaper for the Lock screen. You can also set wallpaper for your Home screen.
You can choose an image that came with OakTrail, a photo from your Camera Roll, or a photo synced to Tablet
from your computer.
Set wallpaper:
1. In Settings, choose Wallpaper, tap the image of the Lock and Home screens, then tap Wallpaper or an album.
2. Tap to choose an image or photo. If you choose a photo, drag to position it and pinch to zoom in or out, until it
looks the way you want.
3. Tap Set, then choose whether you want to use the photo as wallpaper for your Lock Screen, Home screen, or
both.

Tablet PC
Typing
The virtual keyboard appears anytime you need to type.
13
Entering Text
Use the keyboard to enter text, such as email and web addresses. The keyboard corrects misspellings, predicts what
you're typing, and learns as you use it.Depending on the app you’re using, the intelligent keyboard may suggest
corrections as you type, to help prevent mistyped words.
Enter text:
1. Tap a text field, such as in a note or email, to bring up the keyboard.
2. Tap keys on the keyboard.
Start by typing with just your index finger. As you get more proficient, you can type more quickly using two thumbs.
As you type, each letter appears above your thumb or finger. If you touch the wrong key, you can slide your finger to the
correct key. The letter isn’t entered until you release your finger from the key.
Delete the previous character:
Tap [Backspace] button on the virtual keyboard.
Type uppercase:
Tap Shift button before tapping a letter.
Turn caps lock on:
Double‐tap or long‐tap the Shift button, then all letters you type are uppercase. Tap the Shift button again to turn caps lock off.

Tablet PC
14
Show numbers, punctuation, or symbols:
Tap the Number button on the virtual keyboard to see numbers.
Tap the Symbol button to see additional punctuation and symbols.
Searching
You can search many apps on Android, including Calendar, Music, Email and etc. Also you can search an individual
app, or search all apps at once using Search.
Go to Search:
Go to Launcher, tap the icon of Search.
Press search key to start search.
Search device:
On the Search screen, enter text in the Search field. Search results appear as you type. Tap an item in the list to open
it. Tap Search to dismiss the keyboard and see more results. Icons next to the search results show which app the
results are from.
The device may display a top hit for you at the top of the list, based on your previous searches. The Browser search
results include options to search the web or to search Wikipedia.

Tablet PC
15
Connecting to the Internet
Tablet connects to the Internet whenever you use Mail, Browser, YouTube, Stocks, Maps,
Weather, the App Store, or the iTunes Store.
How Tablet Connects to the Internet
Tablet connects to the Internet using a Wi-Fi.Tablet does the following, in order, until connected:
Connects over the last Wi-Fi network you used that’s available.
If no previously used Wi-Fi networks are available, OakTrail shows a list of Wi-Fi networks in range. Tap a network
and, if necessary, enter the password to join. Networks that require a password show the lock icon next to them. You
can prevent OakTrail from automatically showing available networks. See “ Wi-Fi ” settings.
If a Wi-Fi network isn’t available, OakTrail can’t connect to the Internet.

Tablet PC
16
Joining a Wi-Fi Network
The Wi-Fi settings let you turn on Wi-Fi and join Wi-Fi networks.
Turn on Wi-Fi : Choose Settings > Wi-Fi and turn Wi-Fi on.
Join a Wi-Fi network:
Choose Settings > Wi-Fi , wait a moment as Tablet detects networks in range, then select a
network (fees may apply to join some Wi-Fi networks). If necessary, enter a password and tap Join (networks that require
a password appear with a lock icon).
Once you join a Wi-Fi network manually, OakTrail automatically connects to it whenever the network is in range. If more
than one previously used network is in rangeThe Tablet joins the one last used.
When Tablet is connected to a Wi-Fi network, the Wi-Fi icon in the status bar at the top of the screen shows the
connection strength. The more bars you see, the stronger the connection.
For information about configuring Wi-Fi settings, see “Wi-Fi ” Settings.

Tablet PC
17
Battery
Tablet has an internal rechargeable battery.
Charging the Battery
The battery icon in the upper-right corner shows the battery level or charging status. You can also
display the percentage of the battery charge. See Settings.
Charge the battery:
Connect Tablet to a power outlet using the included Dock Connector to
USB Cable and USB power adapter.

Tablet PC
18
Maximizing Battery Life
You can use the following ways to extend battery life:
Adjust the screen brightness to the minimum possible level.
Adjust the computer screen to the normal standard.
Turn off the OakTrail Bluetooth function.
Turn off the OakTrail wireless network function.
Ensure that the power configuration setting is in the "Save power" mode.
Replacing the Battery
Rechargeable batteries have a limited number of charge cycles and may eventually need to be
replaced. The OakTrail battery isn’t user replaceable; it can be replaced only by an authorized service provider.
Restarting or Resetting Tablet
If something isn’t working right, try restarting OakTrail or resetting Tablet.
Restart Tablet:
Press and hold the Power button for 3 seconds. Select Power Off on the Menu to turn off Tablet. To turn Tablet back on,
press and hold the Power button until the Android logo appears.
If you can’t turn off Tablet or if the problem continues, you may need to reset Tablet. A reset should be done only if turning
Tablet off and on doesn’t resolve the problem.
Reset Tablet:
Insert a thin, straight object (Such as a paper clip) in the Reset eject hole on the Tablet.
For more troubleshooting suggestions, see Appendix.

Tablet PC
19
Applications
Browser
Calculator
Using the Calculator
Tap numbers and functions in Calcula tor just as you would with a standard calculator. When you tap the Add, Subtract,
Multiply, or Divide button, a white ring appears around the button to let you know the operation to be carried out.
You can switch to scientific calculator.
Standard Memory Functions
C: Tap to clear the displayed number.
MC: Tap to clear the memory.
M+: Tap to add the displayed number to the number in memory. If no number is in memory, tap to store the displayed
number in memory.
M‐: Tap to subtract the displayed number from the number in memory.
MR: Tap to replace the displayed number with the number in memory. If the button has a white ring around it, there is
a number stored in memory.
The stored number remains in memory when you switch between the standard and scientific calculators.

Tablet PC
20
Calendar
Camera
Clock
World Clocks
You can add clocks to show the time in other major cities and time zones around the world.
View clocks:
Tap World Clock.
If the clock face is white, it’s daytime in that city. If the clock face is black, it’s nighttime. If you have more than four
clocks, flick to scroll through them.
Add a clock:
1. Tap World Clock.
2. Tap ADD, and then type the name of a city.
Cities matching what you’ve typed appear below.
3. Tap a city to add a clock for that city.
If you don’t see the city you’re looking for, try a major city in the same time zone.
Delete a clock: Tap World Clock and tap Edit. Then tap Delete to delete it.
Rearrange clocks: Tap World Clock and tap Edit. Then drag a clock to a new place in the list.

Tablet PC
21
Alarms
You can set multiple alarms. Set each alarm to repeat on days you specify, or to sound only once.
Set an alarm:
1. Tap Alarm and tap Add.
2. Adjust any of the following settings:
To set the alarm to repeat on certain days, tap Repeat and choose the days.
To choose the ringtone that sounds when the alarm goes off, tap Sound.
To set whether the alarm gives you the option to hit snooze, turn Snooze on or off. If Snooze is on and you tap Snooze
when the alarm sounds, the alarm stops and then sounds again in ten minutes.
To give the alarm a description, tap Label. Tablet displays the label when the alarm sounds.
If at least one alarm is set and turned on, Clock icon appears in the OakTrail status bar at the top of the screen.
Important: Some carriers don’t support network time in all locations. If you’re traveling, OakTrail alerts may not sound at
the correct local time.
Turn an alarm on or off:
Tap Alarm and turn any alarm on or off. If an alarm is turned off, it won’t sound again unless you turn it back on.
If an alarm is set to sound only once, it turns off automatically after it sounds. You can turn it on again to re‐enable it.
Change settings for an alarm:
Tap Alarm and tap Edit, then you can change the settings of an Alarm.
Delete an alarm:
Tap Alarm and tap Edit, then tap Delete to delete the Alarm.

Tablet PC
22
Compass
Getting Compass Readings
The built‐in compass shows which direction you’re facing, along with the geographical
coordinates of your current location. You can choose magnetic north, or have Compass adjust the
declination to show true north.
Important: The accuracy of the digital compass may be negatively affected by magnetic or other
environmental interference, including interference caused by the close proximity of the magnets
contained in the headsets. The digital compass should be used only for basic navigation assistance
and should not be solely relied on to determine precise locations, proximity, distance, or direction.
You need to calibrate the compass the first time you use it, and you may need to recalibrate it
occasionally after that. OakTrail alerts you if calibration is needed.
Note: If location service is turned off when you open Compass, you may be asked to turn it on. You
can use Compass without turning on location services.
Email
Gallery
GPS (Navigation)
Market
Tablet PC
Settings
23
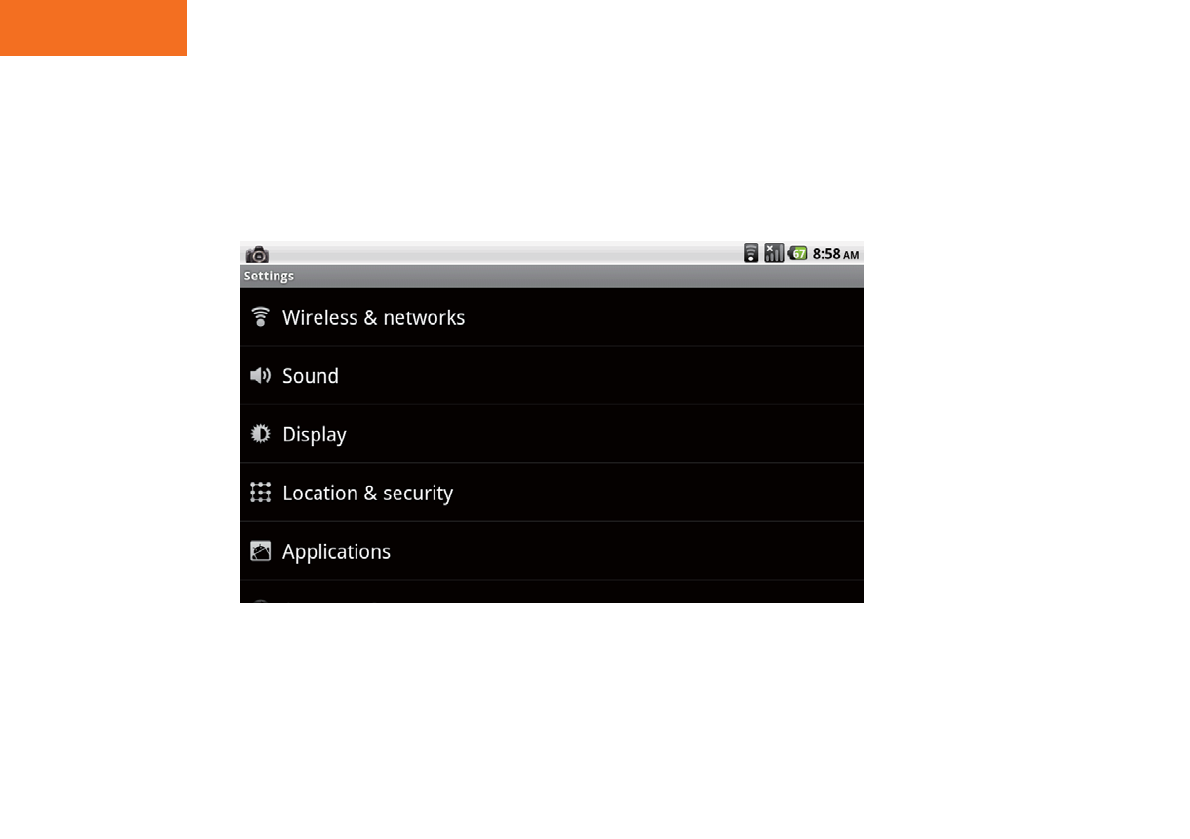
Touch the”settings”icon to open settings from Main menu. Then you can configure related function(such
as Set up a Wi-Fi Connection,adjust time, and so on).
Tablet PC
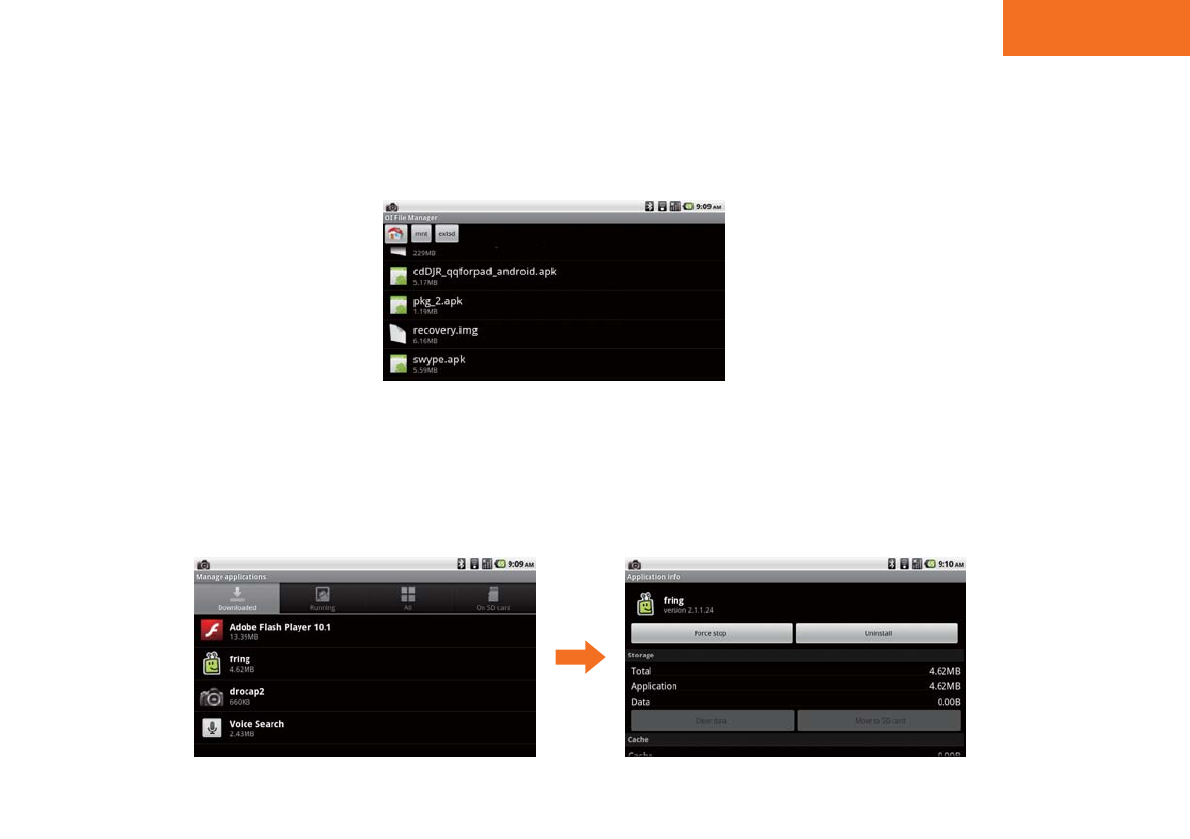
Touch to enter main menu > Settings > Applications>Manage applications, then You will be presented with a list of
applications you have installed.Select the application you want to uninstall, and click the Uninstall button.
Install and remove an applications
Remove an applications
24
Touch the“Oi File Manager”icon from the main menu,then open the List of files & folders; you can quick slide
up-down to select which software you wanted to install it, and click the software icon to install the applications.
List of files & folders
Press and hold Fuction button for 10 second, the power indicator will flash , then go to H/W Calibration, When
you into Calibration, do not touch the screen.
Tablet PC
Touch screen calibration
Set date & time
25
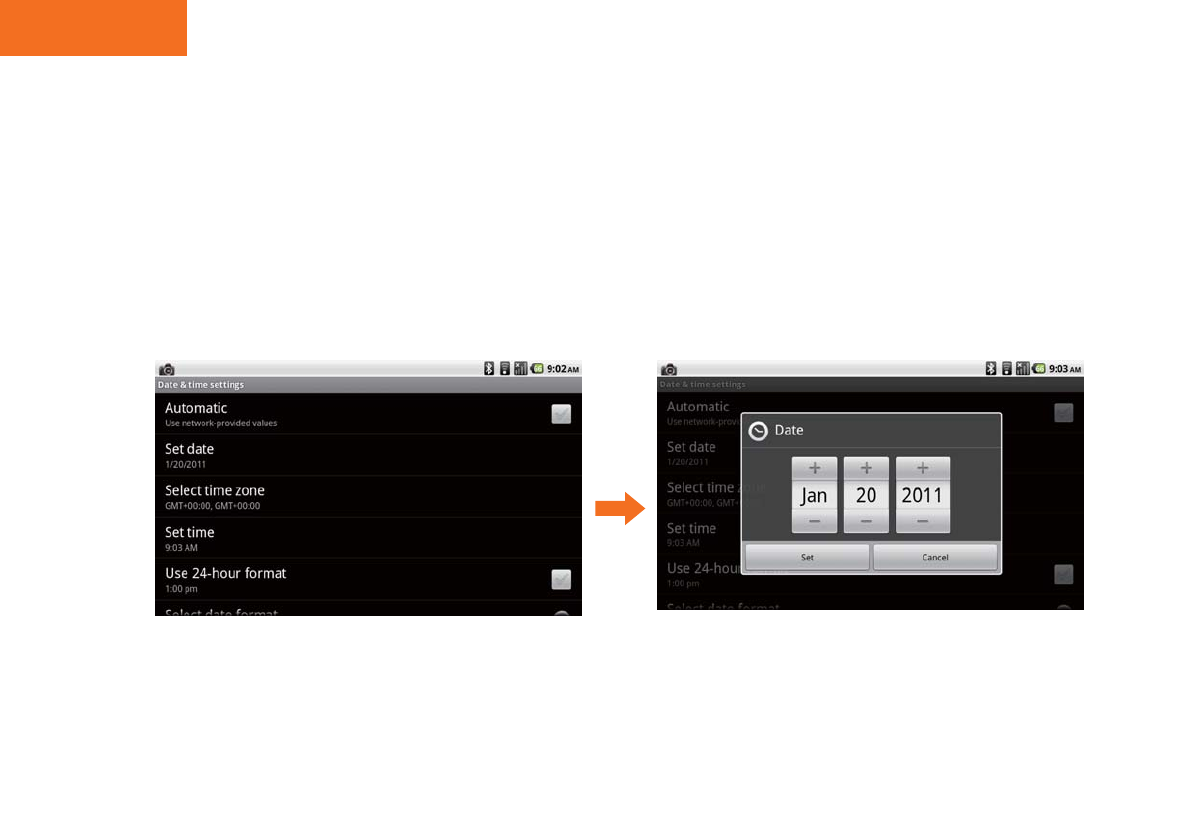
Touch the “Settings”icon from the main menu, after select the“Date & Time”and click to enter the List of Date &
time setting,then you can set date, time zone, time , and so on.
Press and hold Back button 10s to go to the touch-screen H/W calibration.
Tablet PC
Set the system language
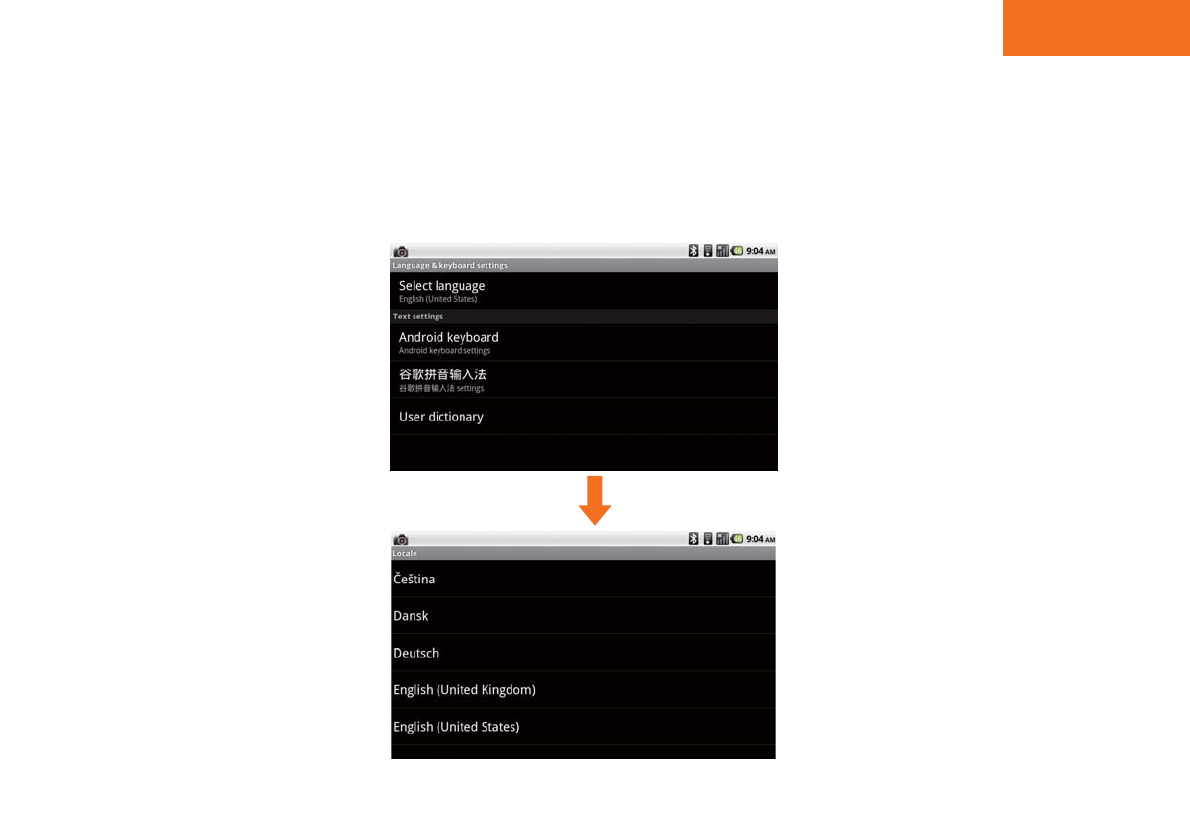
Touch to enter main menu > Settings > Locale & text >select locale,then the language list screen. Touch and
scroll up or down to search the locale and language you want to set. Then, touch the locale and language to
complete the locale and language setting. The screen will then return to the Locale & text settings screen and
the language you have selected will display on the Select locale screen.
26
Tablet PC
Using Wi-Fi
27
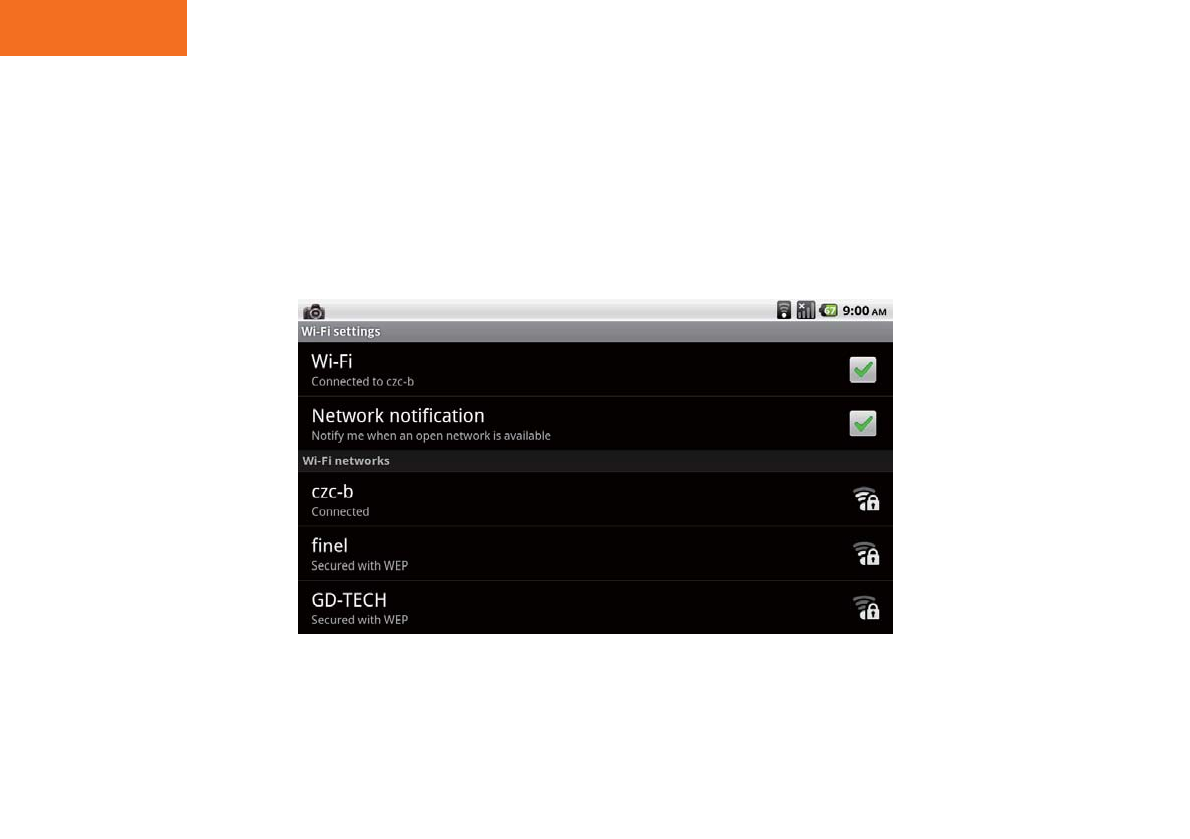
Touch to enter main menu > Settings > Wireless controls.Then touch on Wi-Fi to start scanning for available
wireless networks; Select a network to connect it.
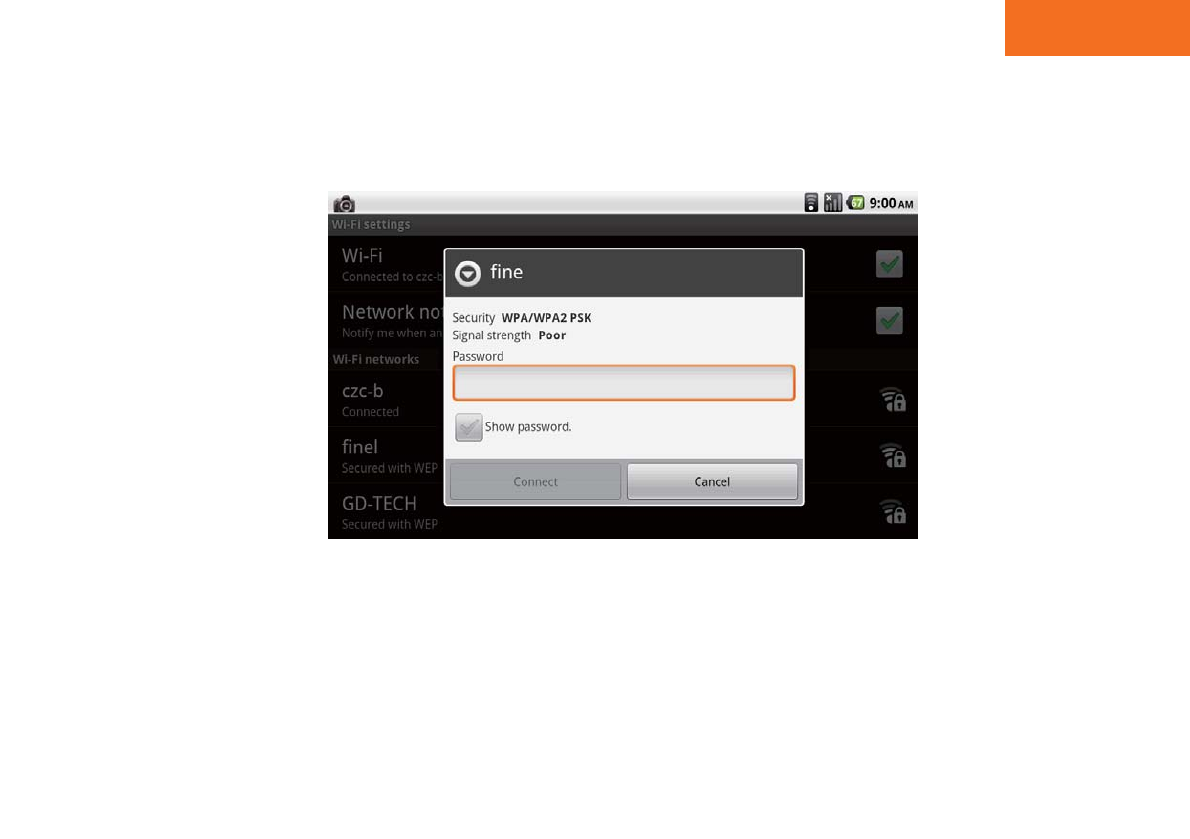
(Notce: If you have selected a network that is secured with WEP, enter the WEP(security) key and then touch
Connect.)
Wi-Fi settings
Tablet PC
28
Connect to a secured networks
Tablet PC
29
Using Bluetooth
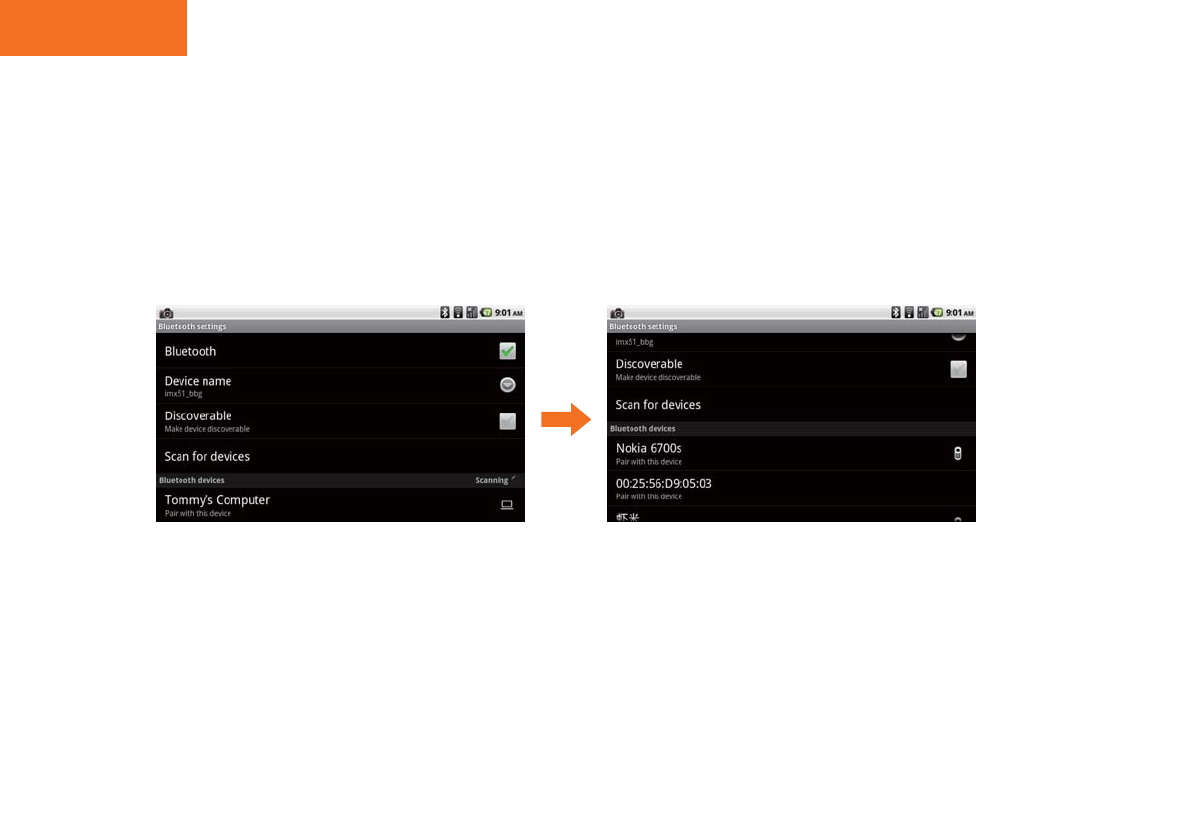
Touch to enter main menu > Settings > Wireless controls.Then touch on Bluetooth to start scanning for available
Bluetooth device; Select a device that you wanted and connect it.
(For secure ,you may need to type the secured code.)
Tablet PC
Web surfing
30
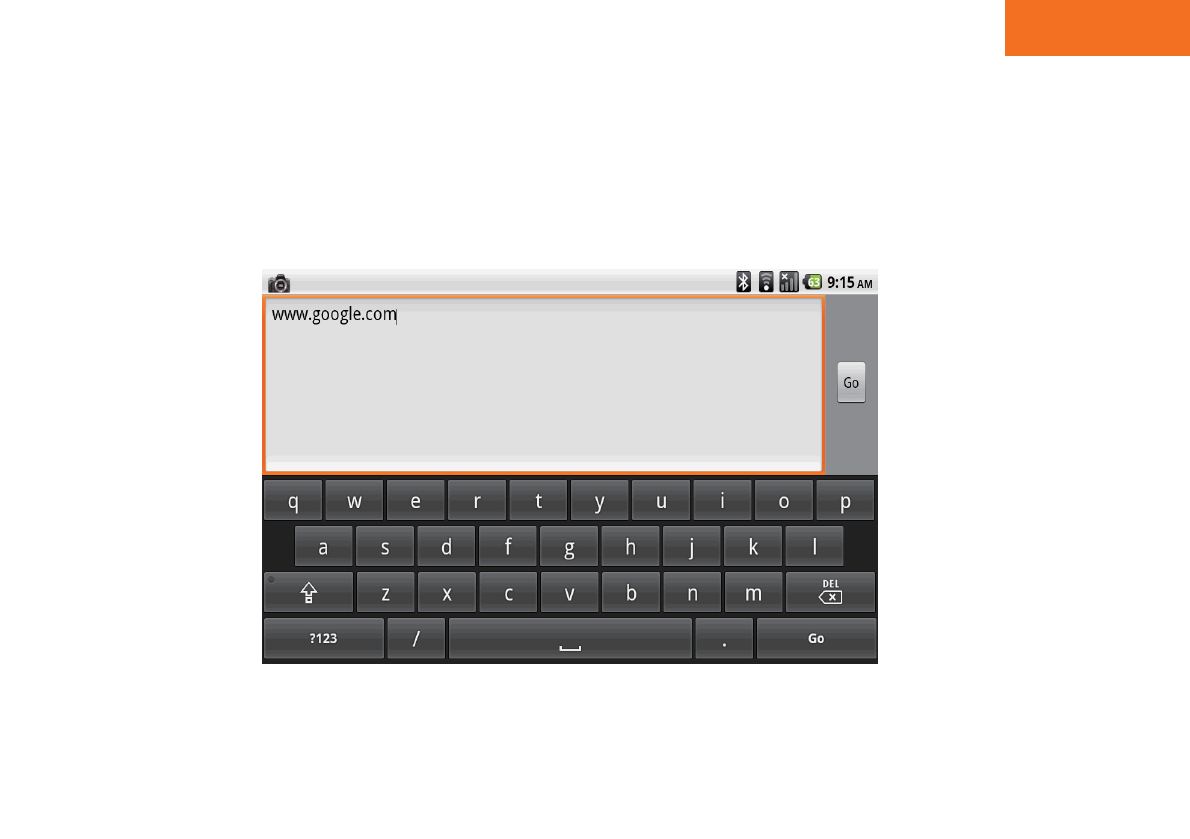
Using the quick search bar from desktop to open the website. you can use soft keyboard to enter the URL.
Before browse the webpage, you must make sure you can connect to the Internet. Also you can use the
browser from main menu to do this work.
Tablet PC
31
Play video
Touch the video icon from main menu to see all your videos displayed as thumbnails. Touch and scroll up or down
to view more video thumbnails and touch to select the thumbnail you would like to watch. The screen will start
playing the video on your Tablet PC.
(.mp4, .3gp, .avi, .wmv/.asf, .mkv/mka, .flv support)
Tablet PC
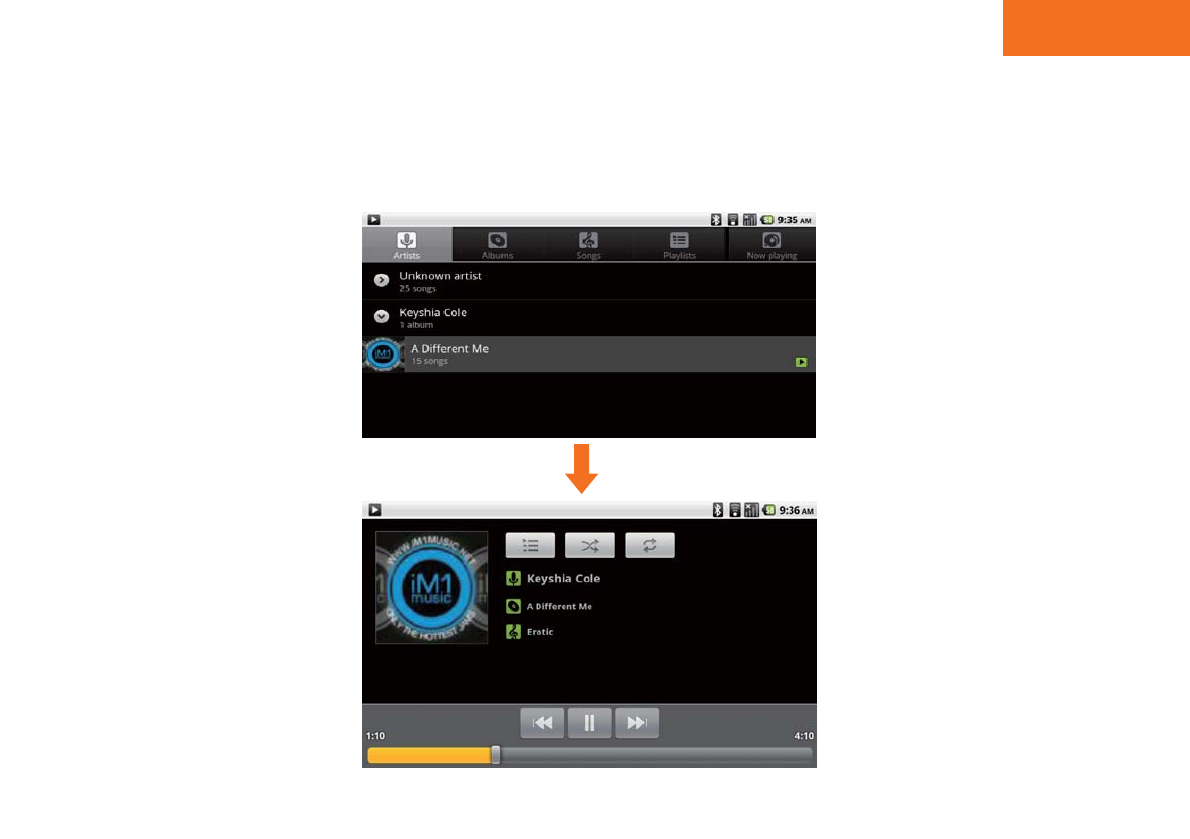
Play music
Touch the “Music”icon from the main menu, after enter the Music applicaton. You may search music by Artists,
Albums, Playlists, or by All songs to play the song you like to listen.
32

Tablet PC
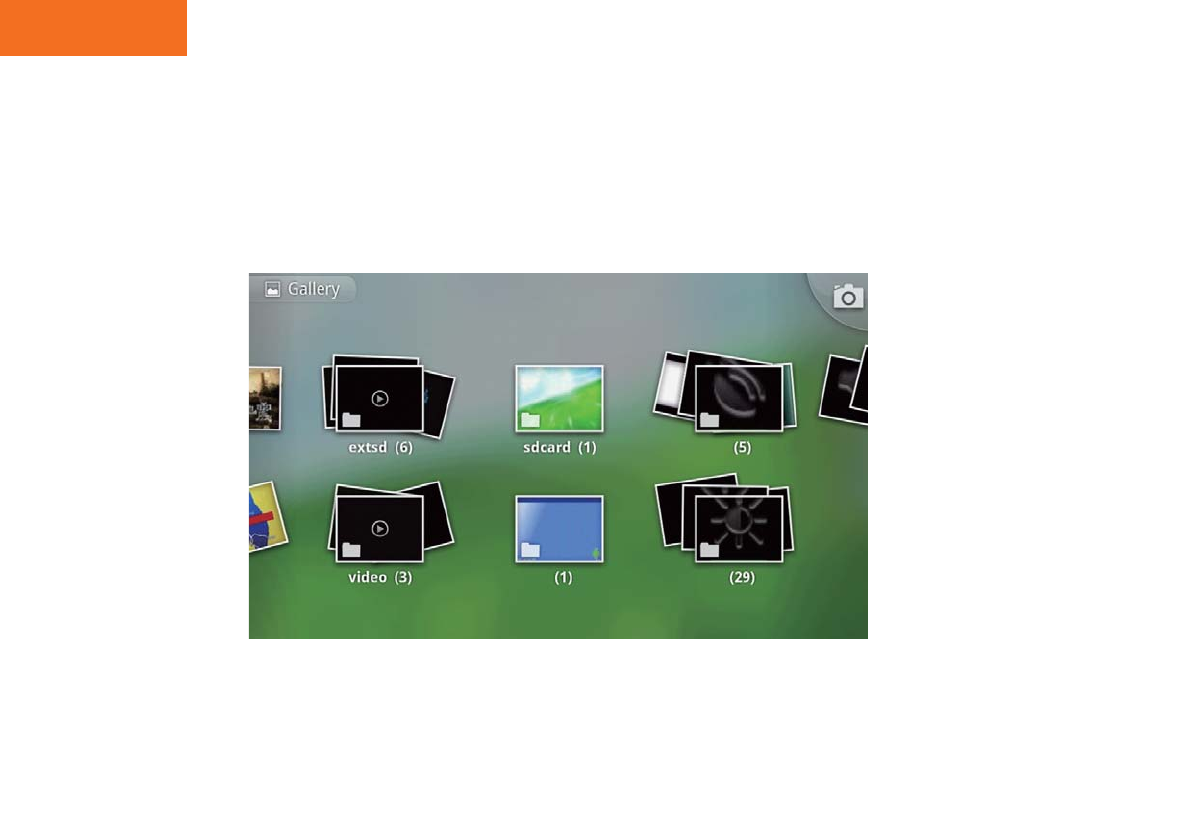
Gallery
Gallery application provides a viewing space for your pictures and videos. Before using Gallery application,
remember to install the Micro SD Card.
Touch the Gallery icon from main menu to enter the Gallery application. On the Gallery screen, the default folders
are the All pictures and All videos. You also can create personal folders in the micro SD Card to manage your files.
33

Tablet PC
34
Trouble shooting
1. If the Wi-Fi does not work, please check the Wi-Fi setting and make sure it is enable. Or clear all the connection
info and connect again. When you are in areas with weak signals or poor reception, you may lose reception. Move
to another area and try again.
2. If the Micro SD card can not be seen, please reinsert and reboot.
3. If the touch is not accurate, go to recalibrate(refer to page15).
4. If your device freezes or hangs, you may need to close programs or reset the device to regain functionality. If your
device is still responsive but a program is frozen, close the program using the task manager. If your device is frozen
and unresponsive, , push down the power button for 4~6 seconds until it is closed and wait for 10 seconds, then
reboot, or use the reset eject hole to reset system. If this does not solve the problem, perform a factory data reset.
In Main Menu mode, select Settings → Privacy → Factory data reset.
5. When you use applications that require more power or use applications on your device for an extended period of
time, your device may feel hot. This is normal and should not affect your device's lifespan or performance.
6. When you use Bluetooth function, you must ensure that the Bluetooth wireless feature is activated on your device,
and ensure that the Bluetooth wireless feature is activated on the device you wish to connect to, if necessary. You
must make sure your device and the other Bluetooth device are within the maximum Bluetooth range (10m).
7. If you don't hear any sounds from you device, please go to Main Menu , select Settings → Sound → Volume,
then increase volume.If this does not solve the problem, please restart you device, try again.

FCC ID : GSS-VS14406
IC : 4280A-VS14406
BRAND
NAME :ViewSonic
MODEL : VS14406
Operation
Frequency 2.412 GHz to 2.462GHz
Max. Output
Power 11b:17.86dBm,11g:14.87dBm,11n(20):13.76dBm,11n(40):12.58dBm
Modulation DBPSK,DQPSK,CCK,16-QAM,64-QAM
Data Rate DSSS(1/2/5.5/11),OFDM(6/9/12/18/24/36/48/54)
See section 1.3 for 802.11n
Number of
channels 11
Antenna
Designation Integrated Antenna
Antenna
Gain Antenna (max): 1.2dBi
Power
Supply DC 10.8V by battery
WARNING:
Changes or modifications to this unit not expressly approved by the party responsible for compliance could void the user’s authority to
operate the equipment.
IC: 4280A-VS14406
This device complies with Industry Canada licence-exempt RSS standard(s). Operation is subject to the following tow conditions: (1) this device
may not cause interference, and (2) this device must accept any interference, includinginterference that may cause undesired operation of the
device.
Cet appareil est conforme avec Industrie Canada RSS standard exempts de licence (s). Son utilisation est soumise à Les
deux conditions suivantes: (1) cet appareil ne peut pas provoquer d'interférences et (2) cet appareil doit accepter Toute interférence, y compris
les interférences qui peuvent causer un mauvais fonctionnement du dispositif.
This device is acting as slave and operating in the 2.4 GHz (2412 – 2462 MHz) band.
Ad Hoc function is supported but not able to operate on non-US frequencies.
RF Exposure Information:
FCC RF Exposure requirements: The highest SAR value reported under this standard during product certification for use next to the body with
the minimum separation distance of 1.5cm is 0.871 W/kg
This transmitter must not be collocated or operating in conjunction with any other antenna or transmitter.
NOTE: This equipment has been tested and found to comply with the limits for a Class B digital device, pursuant to Part 15 of the FCC Rules.
These limits are designed to provide reasonable protection against harmful interference in a residential installation. This equipment generates,
uses and can radiate radio frequency energy and, if not installed and used in accordance with the instructions, may cause harmful
interference to radio communications. However, there is no guarantee that interference will not occur in a particular installation. If this
equipment does cause harmful interference to radio or television reception, which can be determined by turning the equipment off and on, the
user is encouraged to try to correct the interference by one or more of the following measures:
-- Reorient or relocate the receiving antenna.
-- Increase the separation between the equipment and receiver.
-- Connect the equipment into an outlet on a circuit different from that to which the receiver is connected.
-- Consult the dealer or an experienced radio/TV technician for help.