Visteon 06NBTHFA VMVL2.1a User Manual VMVL1 1a HandsFree Profile Interoperability Test
Visteon Corporation VMVL2.1a VMVL1 1a HandsFree Profile Interoperability Test
Visteon >
Contents
- 1. Users Manual 2
- 2. Users Manual 1
Users Manual 1
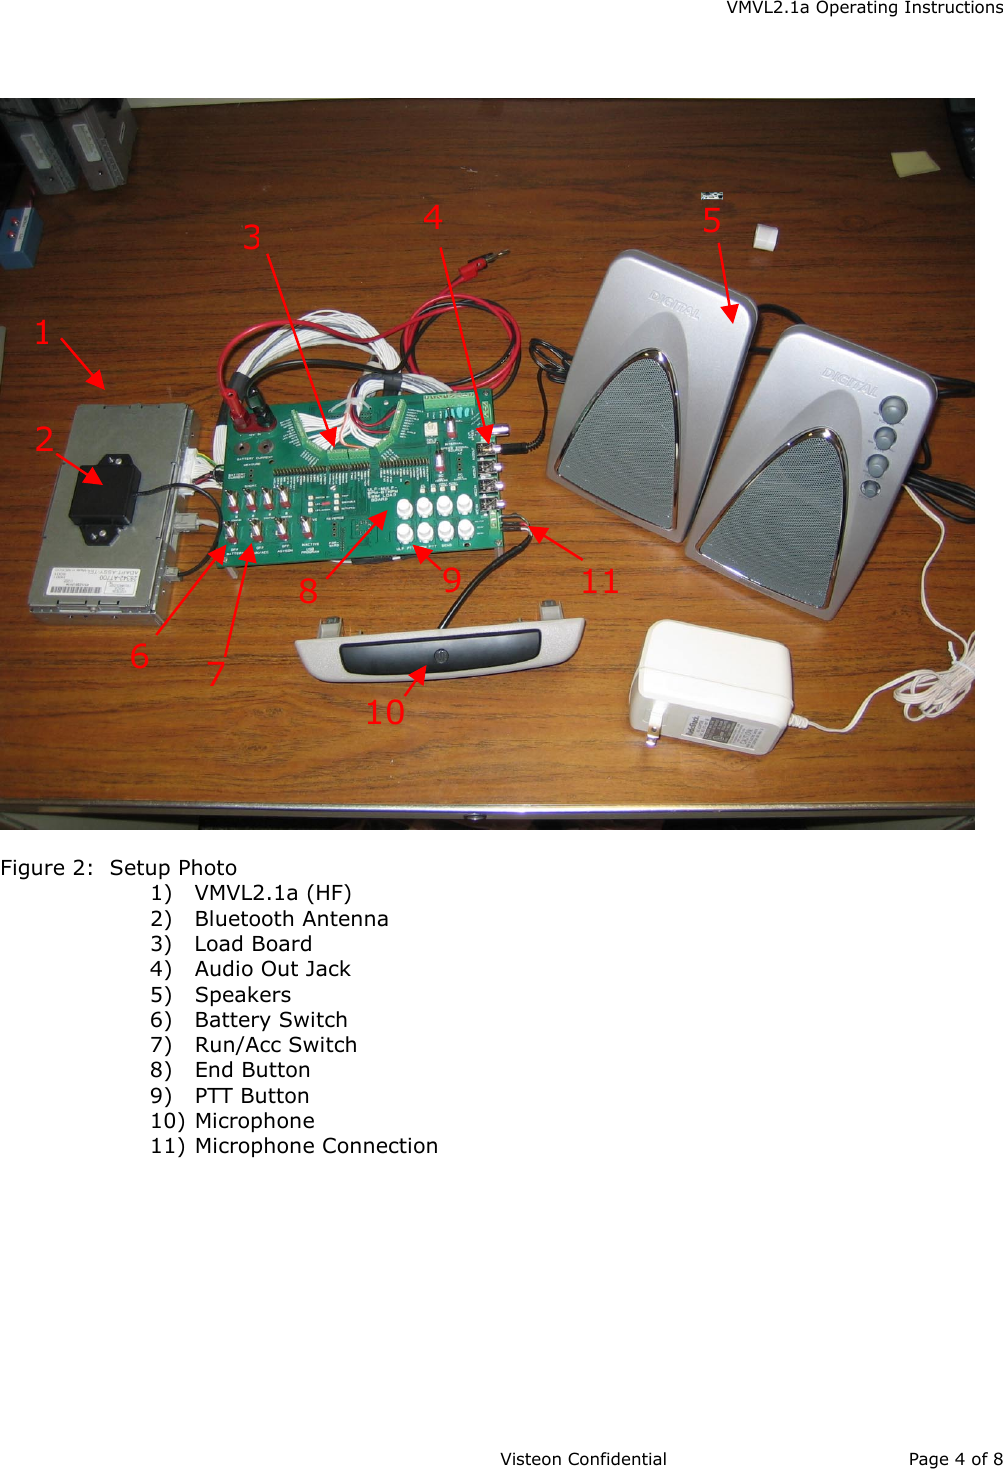
![VMVL2.1a Operating Instructions Visteon Confidential Page 3 of 8 1. SUT Setup 1.1. General SUT Description Product Name: Visteon MACH Voice Link Bluetooth Subsystem version 2.1a Product ID: VMVL2.1a 1.2. Test Setup 1.2.1. Setup : Connection Test Setup consists of the VMVL2.1a (HF), Bluetooth antenna, load board, microphone and two powered speakers. Load board includes battery switch, ignition switch, Push-To-Talk (PTT) button and End button. VMVL2.1a connects to the load board’s 32way pin connector. Microphone is connected to the load board. Microphone’s green wire is connected to MIC_PWR, red wire to MIC IN+ and white wire to MIC IN-. Speaker’s audio jack is connected to the load board’s AUDOUT connector. System is powered by a 12V DC supply. System may be initialized by flipping BATTERY switch to the ON position followed by flipping the RUN/ACC switch to the ON position. AG device communicates to the VMVL2.1a via the Bluetooth antenna allowing audio to channel through speakers. Bi-directional audio communication is possible by using the attached microphone. Calls can be initiated and transferred through the use of the PTT. Call may be terminated and rejected via the End button. Figure 1: Setup Diagram VMVL2.1a [HF] Load Board Batt GndBluetooth Antenna Mic InAudio Out Run/Acc PTT (button) 12VDC J1850 End (button) Powered Speakers Mic PwrAudio Out Mic InMic PwrGnd Microphone](https://usermanual.wiki/Visteon/06NBTHFA.Users-Manual-1/User-Guide-548091-Page-3.png)
![VMVL2.1a Operating Instructions Visteon Confidential Page 5 of 8 2. VMVL2.1a (HF) Functions 2.1. Pairing Once system is initialized as described in Section 1.2.1 user may pair an AG device to the HF by following the steps below. 1. Press PTT button and wait for audible beep 2. Release PTT button after audible beep 3. Every voice recognition session begins at the HF’s Main Menu 4. If no AGs are paired, HF will say “No phone paired. Would you like to pair one now?” 5. Say “Yes”. Go to step 7 6. If an AG is already paired to HF, please say “Setup, Pair Phone” after you press PTT and hear audible beep. 7. HF says “Please initiate pairing from your handset. For further instructions refer to your phone’s user manual.” 8. Initiate pairing from AG 9. HF says “Please say the name for the phone” 10. Say name that you wish to give the AG 11. HF says “Please assign a priority level to <Phonename> by saying [1], [2], [3], [4] or [5]” Up to five AGs may be paired to the HF, but only one will have an active Bluetooth connection. 12. Say one number between 1 and 5 13. HF says “<Phonename> saved with a priority of <priority>” 14. HF says “Would you like to set a custom ring tone for <phonename>” 15. Say “No”. This will speed up the pairing process 16. HF says “No. The default ring tone has been assigned” 17. HF exits voice recognition session with ending beep 18. At this point the AG has completed pairing procedures with the HF. A Bluetooth link between the HF and AG is established within 3-5 seconds after pairing procedures are completed 19. HF is now ready to make outgoing handsfree calls or receive handsfree calls Note: Voice recognition session may be terminated at any time by pressing and releasing either PTT or End button or by saying “Cancel”](https://usermanual.wiki/Visteon/06NBTHFA.Users-Manual-1/User-Guide-548091-Page-5.png)