Visteon MAZGEN6HFT Bluetooth Handsfree Device User Manual J53C EA 1205 1 484
Visteon Corporation Bluetooth Handsfree Device J53C EA 1205 1 484
Visteon >
User Manual
Black plate (223,1)
Antenna
í
qType A
The antenna is incorporated into the
window glass.
CAUTION
When washing the inside of the
window which has an antenna, use a
soft cloth dampened in lukewarm
water, gently wiping the antenna
lines.
Use of glass cleaning products could
damage the antenna.
qType B
Operating Tips for Audio
System
WARNING
Always adjust the audio while the
vehicle is stopped:
Do not adjust the audio control
switches while driving the vehicle.
Adjusting the audio while driving the
vehicle is dangerous as it could
distract your attention from the
vehicle operation which could lead to
a serious accident.
Even if the audio control switches are
equipped on the steering wheel, learn
to use the switches without looking
down at them so that you can keep
your maximum attention on the road
while driving the vehicle.
CAUTION
For the purposes of safe driving,
adjust the audio volume to a level
that allows you to hear sounds
outside of the vehicle including car
horns and particularly emergency
vehicle sirens.
NOTE
lTo prevent the battery from being
discharged, do not leave the audio system
on for a long period of time when the
engine is not running.
lIf a cellular phone or CB radio is used in
or near the vehicle, it could cause noise to
occur from the audio system, however, this
does not indicate that the system has been
damaged.
Interior Features
Audio System
5-13
í
Some models.
CX-5_8CA6-EC-11L_Edition1 Page223
Monday, December 12 2011 11:32 AM
Form No.8CA6-EC-11L

Black plate (224,1)
Do not spill any liquid on the audio
system.
Do not insert any objects, other than CDs,
into the slot.
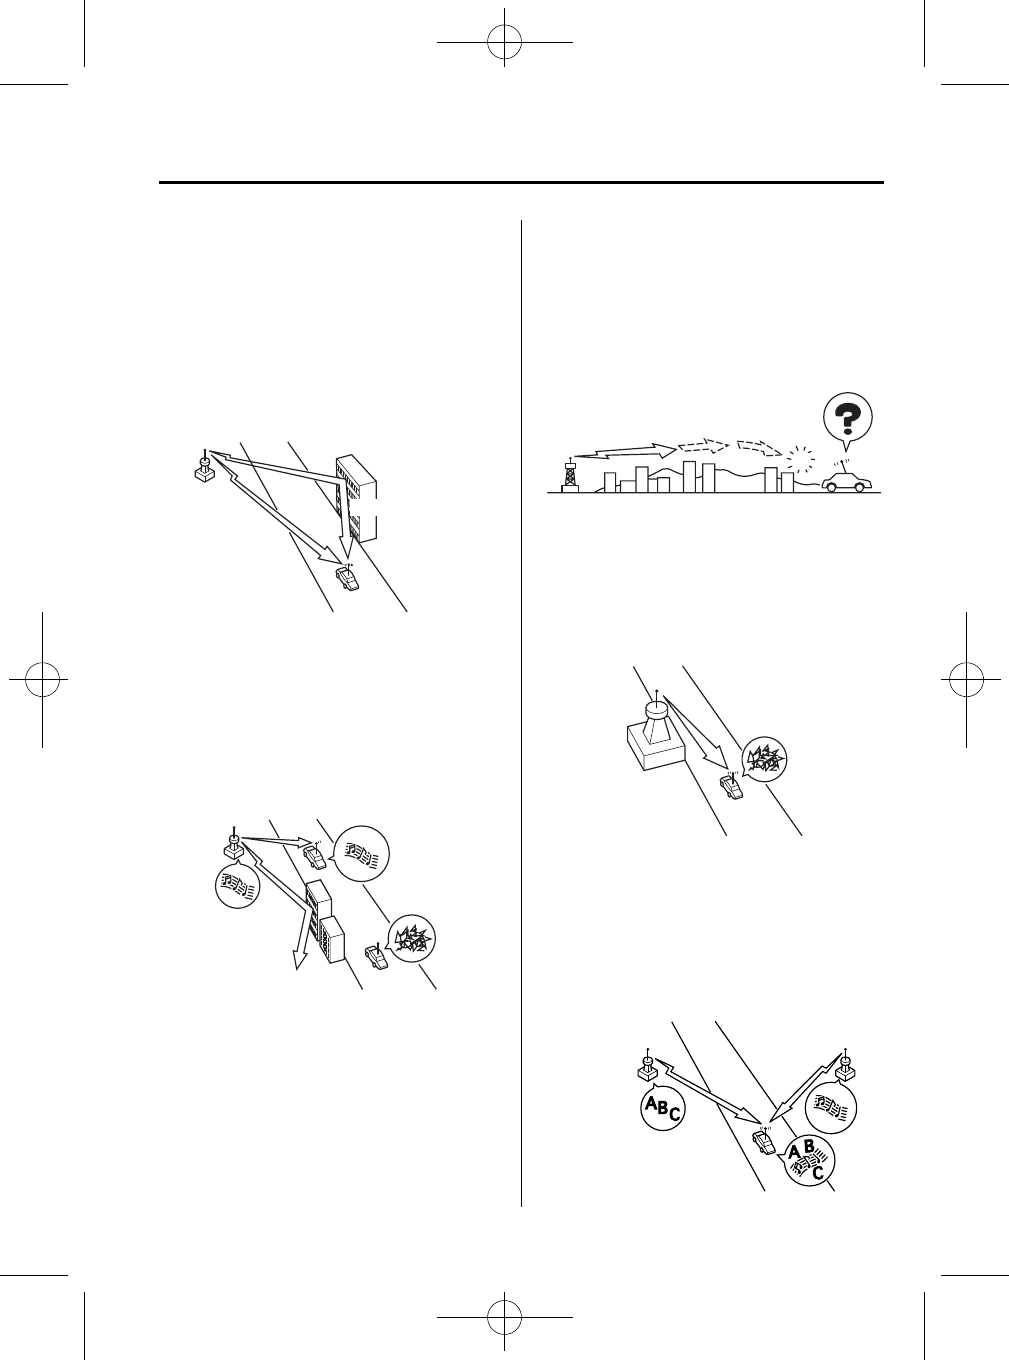
qRadio Reception
AM characteristics
AM signals bend around such things as
buildings or mountains and bounce off the
ionosphere.
Therefore, they can reach longer distances
than FM signals.
Because of this, two stations may
sometimes be picked up on the same
frequency at the same time.
Station 2
Station 1
Ionosphere
FM characteristics
An FM broadcast range is usually about
40―50 km (25―30 miles) from the
source. Because of extra coding needed to
break the sound into two channels, stereo
FM has even less range than monaural
(non-stereo) FM.
FM Station
40—50km
(25—30 miles)
Signals from an FM transmitter are similar
to beams of light because they do not
bend around corners, but they do reflect.
Unlike AM signals, FM signals cannot
travel beyond the horizon. Therefore, FM
stations cannot be received at the great
distances possible with AM reception.
AM wave
FM wave
FM wave
100—200 km (60—120 miles)
Ionosphere
Atmospheric conditions can also affect
FM reception. High humidity will cause
poor reception. However, cloudy days
may provide better reception than clear
days.
5-14
Interior Features
Audio System
CX-5_8CA6-EC-11L_Edition1 Page224
Monday, December 12 2011 11:32 AM
Form No.8CA6-EC-11L
Black plate (225,1)
Multipath noise
Since FM signals can be reflected by
obstructions, it is possible to receive both
the direct signal and the reflected signal at
the same time. This causes a slight delay
in reception and may be heard as a broken
sound or a distortion. This problem may
also be encountered when in close
proximity to the transmitter.
Reflected wave
Direct
Flutter/Skip noise
Signals from an FM transmitter move in
straight lines and become weak in valleys
between tall buildings, mountains, and
other obstacles. When a vehicle passes
through such an area, the reception
conditions may change suddenly, resulting
in annoying noise.
Weak signal noise
In suburban areas, broadcast signals
become weak because of distance from
the transmitter. Reception in such fringe
areas is characterized by sound breakup.
Strong signal noise
This occurs very close to a transmitter
tower. The broadcast signals are
extremely strong, so the result is noise and
sound breakup at the radio receiver.
Station drift noise
When a vehicle reaches the area of two
strong stations broadcasting at similar
frequencies, the original station may be
temporarily lost and the second station
picked up. At this time there will be some
noise from this disturbance.
Station 2
88.3 MHz
Station 1
88.1 MHz
Interior Features
Audio System
5-15
CX-5_8CA6-EC-11L_Edition1 Page225
Monday, December 12 2011 11:32 AM
Form No.8CA6-EC-11L
Black plate (226,1)
qOperating Tips for CD Player
Condensation phenomenon
Immediately after turning on the heater
when the vehicle is cold, the CD or
optical components (prism and lens) in the
CD player may become clouded with
condensation. At this time, the CD will
eject immediately when placed in the unit.
A clouded CD can be corrected simply by
wiping it with a soft cloth. Clouded
optical components will clear naturally in
about an hour. Wait for normal operation
to return before attempting to use the unit.
Handling the CD player
The following precautions should be
observed.
lThe CD revolves at high speed within
the unit. Defective (cracked or badly
bent) CDs should never be used.
lDo not use non-conventional discs
such as heart-shaped, octagonal discs,
etc. The disc may not eject resulting in
a malfunction.
lIf the memory portion of the CD is
transparent or translucent, do not use
the disc.
Transparent
lA new CD may have rough edges on
its inner and outer perimeters. If a disc
with rough edges is used, proper
setting will not be possible and the CD
player will not play the CD. In
addition, the disc may not eject
resulting in a malfunction. Remove the
rough edges in advance by using a ball-
point pen or pencil as shown below. To
remove the rough edges, rub the side of
the pen or pencil against the inner and
outer perimeter of the CD.
lWhen driving over uneven surfaces,
the sound may jump.
5-16
Interior Features
Audio System
CX-5_8CA6-EC-11L_Edition1 Page226
Monday, December 12 2011 11:32 AM
Form No.8CA6-EC-11L
Black plate (227,1)
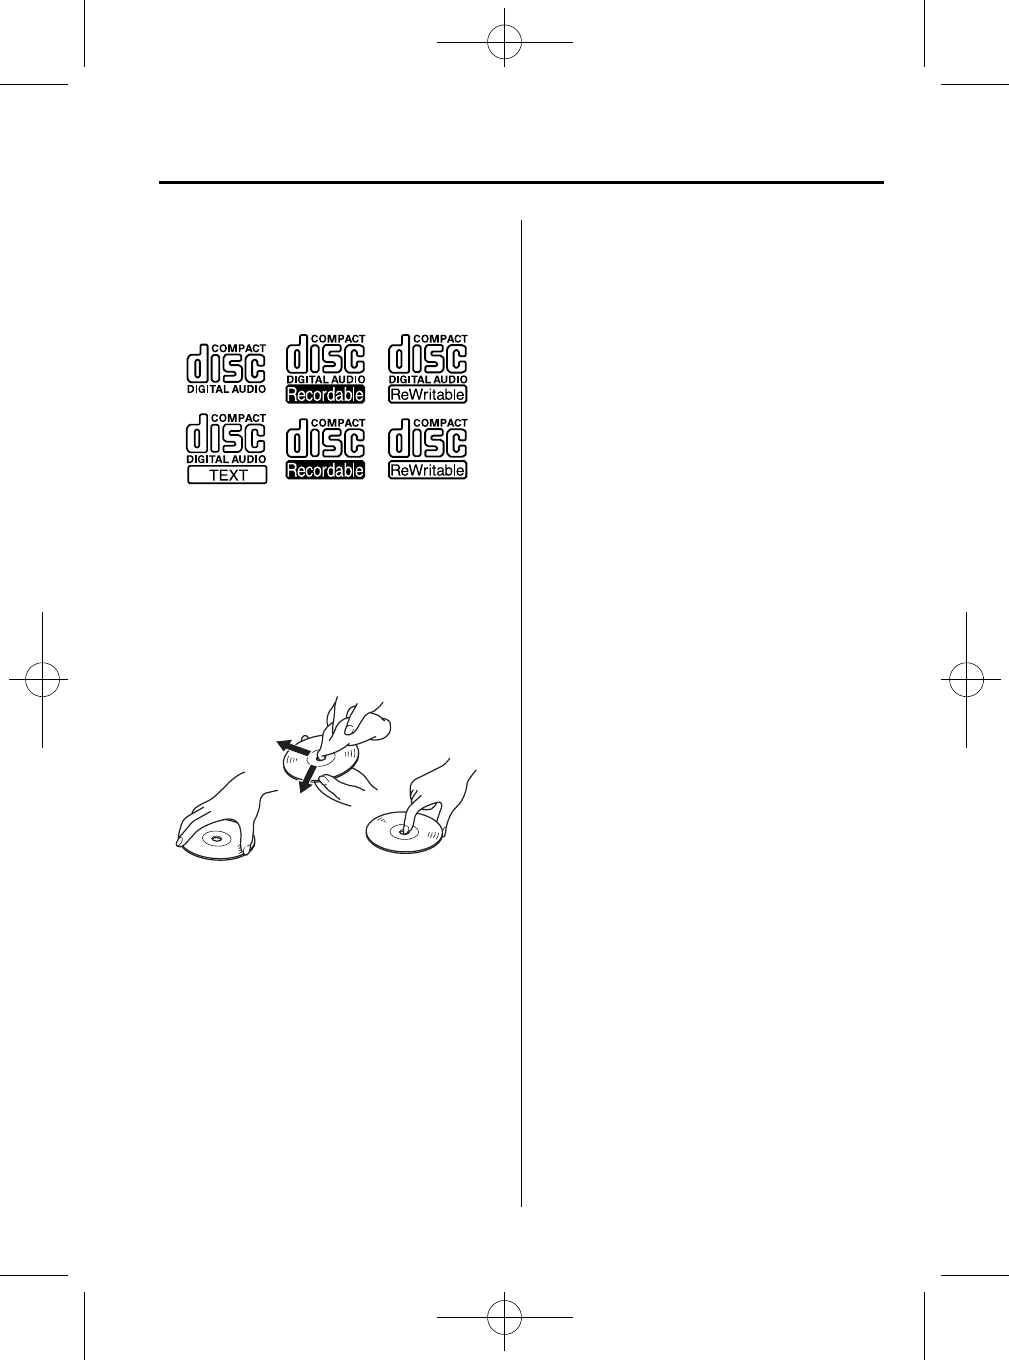
lThe CD player has been designed to
play CDs bearing the identification
logo as shown below. No other discs
can be played.
lUse discs that have been legitimately
produced. If illegally-copied discs such
as pirated discs are used, the system
may not operate properly.
lBe sure never to touch the signal
surface when handling the CDs. Pick
up a CD by grasping the outer edge or
the edge of the hole and the outer edge.
lDo not stick paper or tape on the CD.
Avoid scratching the reverse side (the
side without a label). The disc may not
eject resulting in a malfunction.
lDust, finger smudges, and dirt can
decrease the amount of light reflected
from the signal surface, thus affecting
sound quality. If the CD should
become soiled, gently wipe it with a
soft cloth from the center of the CD to
the edge.
lDo not use record sprays, antistatic
agents, or household spray cleaners.
Volatile chemicals such as benzine and
thinner can also damage the surface of
the CD and must not be used. Anything
that can damage, warp, or fog plastic
should never be used to clean CDs.
lInsert discs one by one. If two discs are
inserted at the same time, the system
may not operate properly.
lThe CD player ejects the CD if the CD
is inserted upside down. Also dirty
and/or defective CDs may be ejected.
lDo not insert cleaning discs in the CD
player.
lDo not insert any disc with a peel-off
seal affixed to it.
lThis unit may not be able to play
certain CD-R/CD-RWs made using a
computer or music CD recorder due to
disc characteristics, scratches,
smudges, dirt, etc., or due to dust or
condensation on the lens inside the
unit.
lStoring CDs in the vehicle exposed to
direct sunlight or high temperature may
damage the CD-R/CD-RWs, and make
them unplayable.
lCD-R/CD-RW exceeding 700 MB
cannot be played.
lThis unit may not be able to play
certain discs made using a computer
due to the application (writing
software) setting used. (For details,
consult the store where the application
was purchased.)
lIt is possible that certain text data, such
as titles, recorded on a CD-R/CD-RW
may not be displayed when musical
data (CD-DA) is playing.
lThe period from when a CD-RW is
inserted to when it begins playing is
longer than a normal CD or CD-R.
Interior Features
Audio System
5-17
CX-5_8CA6-EC-11L_Edition1 Page227
Monday, December 12 2011 11:32 AM
Form No.8CA6-EC-11L

Black plate (228,1)
lCompletely read the instruction manual
and cautions for CD-R/CD-RWs.
lDo not use discs with cellophane tape
adhering, partially peeled off labels, or
adhesive material exuding from the
edges of the CD label. Also, do not use
discs with a commercially-available
CD-R label affixed. The disc may not
eject resulting in a malfunction.
qOperating Tips for MP3
NOTE
Supply of this product only conveys a license
for private, non-commercial use and does not
convey a license nor imply any right to use this
product in any commercial (i.e. revenue-
generating) real time broadcasting (terrestrial,
satellite, cable and/or any other media),
broadcasting/streaming via the Internet,
intranets and/or other networks or in other
electronic content distribution systems, such as
pay-audio or audio-on-demand applications.
An independent license for such use is
required. For details, please visit
http://www.mp3licensing.com.
lThis audio system handles MP3 files
that have been recorded on CD-R/CD-
RW/CD-ROMs. Discs that have been
recorded using the following formats
can be played:
lISO 9660 level 1
lISO 9660 level 2
lJoliet extended format
lRomeo extended format
lThis unit handles MP3 files
conforming to the MP3 format
containing both header frames and data
frames.
lThis unit can play multi-session
recorded discs that have up to 50
sessions.
lThis unit can play MP3s with sampling
frequencies of 8/11.025/12/16/22.
05/24/32/44.1/48 kHz.
lThis unit can play MP3 files that have
been recorded in bit rates of 8 kbps to
320 kbps. Nonetheless, to insure
enjoyment of music with consistent
sound quality, it is recommended to use
discs that have been recorded at a bit
rate of 128 kbps or more.
lIf a disc has both music data (CD-DA)
and MP3 files, playback of the two file
types differs depending on how the
disc was recorded.
lPacket written discs cannot be played
on this unit.
lThis unit does not play CDs recorded
using MP3i (MP3 interactive), MP3
PRO and RIFF MP3 formats.
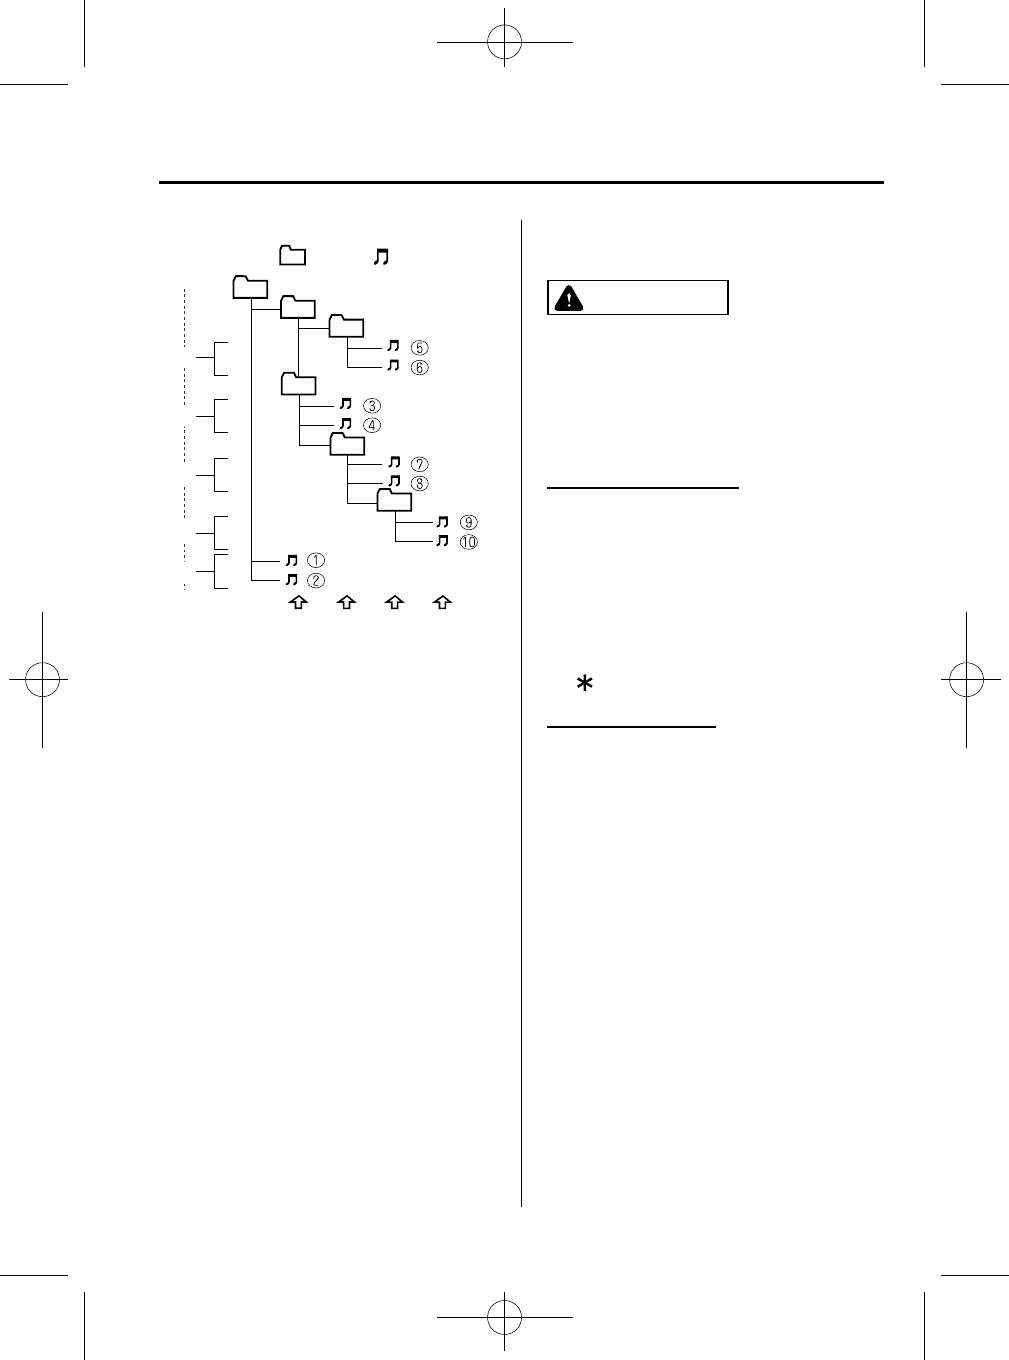
About folders and files
lThe order of hierarchy for MP3 files
and folders during playback or other
functions is from shallow to deep. The
arrangement and playing order of a
recorded disc containing MP3 files is
as follows:
lFile number
A numerical file number is assigned
to each file in a folder starting from
the deepest hierarchy.
lFolder number
A numerical folder number is
assigned to each folder starting from
the deepest hierarchy.
NOTE
Folders and tracks (files) within the same
hierarchy play in the order they were written to
the disc depending on the write software.
5-18
Interior Features
Audio System
CX-5_8CA6-EC-11L_Edition1 Page228
Monday, December 12 2011 11:32 AM
Form No.8CA6-EC-11L
Black plate (229,1)
05
06
01 02 03
04
1
5
4
2
3
Folder
No.
Level1Level2Level3Level4
Playback may not occur in the above
hierarchy depending on the audio unit.
: Track (File): Folder
lThe folder order is automatically
assigned and this order cannot be
optionally set.
lAny folder without an MP3 file will be
ignored. (It will be skipped and the
folder number will not be displayed.)
lMP3 files not conforming to the MP3
format containing both header frames
and data frames will be skipped and
not played.
lThis unit will play MP3 files that have
up to eight levels. However, the more
levels a disc has, the longer it will take
to initially start playing. It is
recommended to record discs with two
levels or less.
lA single disc with up to 512 files can
be played and a single folder with up to
255 files can be played.
lWhen naming an MP3 file, be sure to
add an MP3 file extension (.mp3) after
the file name.
lThe number of characters which can be
displayed is restricted.
CAUTION
This unit can only play MP3 files that
have an MP3 file extension (.mp3)
attached. Do not attach an MP3 file
extension to any other type file as it
could cause noise to be emitted or a
malfunction in the unit.
About ID3 Tag display
lThis unit can only display ID3 Tag
album, track and artist names that have
been input using Ver.1.0/1.1/2.2/2.3/2.4
formats. Any other data that may have
been input cannot be displayed.
lThis unit cannot display some
characters. Characters which cannot be
displayed are indicated by an asterisk
().
Specialized glossary
MP3
Abbreviation for “MPEG Audio Layer 3”.
A technical standard for audio
compression as decided by the ISO
*1
MPEG working group. Use of MP3
allows for audio data to be compressed to
approximately a tenth of the source data
size.
*1 International Organization for
Standardization
ISO 9660
An international standard for logical
formatting of CD-ROM files and folders.
It is divided into three separate levels
based on differences in file naming
procedures, data configuration and other
characteristics.
Interior Features
Audio System
5-19
CX-5_8CA6-EC-11L_Edition1 Page229
Monday, December 12 2011 11:32 AM
Form No.8CA6-EC-11L
Black plate (230,1)
Multi-session
A session is the complete amount of data
recorded from the beginning to the end of
a single period of CD-ROM, CD-R/CD-
RW data recording. Multi-session refers to
the existence of data from two or more
sessions on a single disc.
Sampling
Refers to the process of encoding analog
audio data at regular intervals and
converting it to digital data. The sampling
rate refers to the number of times a
sample is taken in one second and is
expressed in Hz units. Increasing the
sampling rate improves the sound quality
but also increases the data size.
Bit rate
Refers to the volume of data per second,
expressed in bps (bits per second).
Generally, the larger the number of the
transfer bit rate when compressing an
MP3 file, the more information regarding
musical reproduction it carries, and
therefore the better the sound quality.
Packet writing
A general term for the method, similar to
that used for floppy discs or hard drives,
of recording the required file in a single
increment on a CD-R and similar.
ID3 Tag
ID3 tag is a method for storing
information related to the music in an
MP3 file. Information such as track, artist
and album name can be stored. This
content can be freely edited using ID3
editing function software.
VBR
Abbreviation for Variable Bit Rate. While
CBR (Constant Bit Rate) is generally
used, VBR varies the bit rate for audio
compression according to compression
conditions and this allows for
compression with preference given to
sound quality.
qOperating Tips for WMA
WMA is short for Windows Media Audio
and is the audio compression format used
by Microsoft.
Audio data can be created and stored at a
higher compression ratio than MP3.
* Microsoft and Windows Media are
registered trademarks of Microsoft
Corporation U.S. in the United States
and other countries.
Item Content
Specification
Windows Media
Audio Version 7.0,
8.0, 9.0, 10.0
Sampling
frequency Bit rate
32 kHz. ......32,
40, 48 kbps
44.1 kHz. .....32,
48, 64, 80, 96, 128,
160, 192, 256, 320
kbps
48 kHz. ......64,
96, 128, 160, 192
kbps
VBR (Variable Bit Rate) Supported
Channel mode Stereo/Monaural
WMA tag Title, artist name,
album name
5-20
Interior Features
Audio System
CX-5_8CA6-EC-11L_Edition1 Page230
Monday, December 12 2011 11:32 AM
Form No.8CA6-EC-11L
Black plate (231,1)
CAUTION
This unit plays files with the (.wma)
file extension as a WMA file. Do not
use the WMA file extension for files
other than WMA files. Otherwise, it
could result in noise or a
malfunction.
lTrack, artist and album name
information is recorded as data termed
“WMA-Tag”, and this information is
displayable.
lWMA files written under specifications
other than the indicated specification
may not play normally or files or folder
names may not display correctly.
lThe file extension may not be provided
depending on the computer operating
system, version, software, or settings.
In this case, add the file extension “.
wma”to the end of the file name, and
then write it to the disc.
qOperating Tips for AAC
AAC stands for Advanced Audio Coding,
which is standardized voice compression
established by the ISO
*1
working group
(MPEG). Audio data can be created and
stored at a higher compression ratio than
MP3.
*1 International Organization for
Standardization
Playable AAC file specifications
This unit supports playback of AAC files
recorded in CD-R and CD-RW.
Playable AAC files are as follows:
Item Content
Specification MPEG-4AAC
Sampling rate
8/11.025/12 kHz (Quarter rate)
16/22.05/24 kHz (Half rate)
32/44.1/48 kHz (Full rate)
Bit rate 24 kbps―320 kbps
VBR
(Variable Bit Rate) Supported
iTunes, m4a,
Meta-Data
applicable
Song title
Artist name
Album name
CAUTION
This unit plays files with the file
extension (m4a) as a AAC file. Do not
use the AAC file extension for files
other than AAC files. Otherwise, it
could result in noise or a
malfunction.
lSong, artist, and album name
information in the AAC file is recorded
as data termed “iTunes, m4a, Meta-
Data applicable”, and this information
is displayable.
lAAC files written under specifications
other than the indicated specification
may not play normally or files or folder
names may not display correctly.
lThe file extension may not be provided
depending on the computer operating
system, version, software, or settings.
In this case, add the file extension “.
m4a”to the end of the file name, then
write it to the disc.
Interior Features
Audio System
5-21
CX-5_8CA6-EC-11L_Edition1 Page231
Monday, December 12 2011 11:32 AM
Form No.8CA6-EC-11L
Black plate (232,1)
qOperating Tips for USB memory
This unit supports playback of MP3/
WMA/AAC files recorded to USB
memory.
Playable MP3 file specifications
Playable MP3 files are as follows:
Item Content
Specification
MPEG1 AUDIO LAYER III
MPEG2 AUDIO LAYER III
MPEG2.5
Sampling rate
44.1/48/32 kHz (MPEG1)
22.05/24/16 kHz (MPEG2)
11.025/12/8 kHz (MPEG2.5)
Bit rate
32―320 kbps (MPEG1)
8―160 kbps (MPEG2)
8―160 kbps (MPEG2.5)
CAUTION
This unit plays files with the file
extension (mp3) as an MP3 file. Do
not use the MP3 file extension for
files other than MP3 files. Otherwise,
it could result in noise or a
malfunction.
lMP3 files written under specifications
other than the indicated specification
may not play normally or files or folder
names may not display correctly.
lThe file extension may not be provided
depending on the computer operating
system, version, software, or settings.
In this case, add the file extension “
.mp3”to the end of the file name, and
then write it to the memory.
Playable WMA file specification
Playable WMA files are as follows:
Item Content
Specification Windows Media Audio
Version 9.0
Sampling rate 22.05 kHz (MID)
44.1/48/32 kHz (HI)
Bit rate 32―320 kbps
CAUTION
This unit plays files with the file
extension (wma) as a WMA file. Do
not use the WMA file extension for
files other than WMA files.
Otherwise, it could result in noise or
a malfunction.
lWMA files written under specifications
other than the indicated specification
may not play normally or files or folder
names may not display correctly.
lThe file extension may not be provided
depending on the computer operating
system, version, software, or settings.
In this case, add the file extension “.
wma”to the end of the file name, and
then write it to the memory.
Playable AAC file specification
Playable AAC files are as follows:
Item Content
Specification MPEG4 AAC-LC
MP4FF
Sampling rate
11.025 kHz
16/22.05/24 kHz
32/44.1/48 kHz
Bit rate 16―320 kbps
5-22
Interior Features
Audio System
CX-5_8CA6-EC-11L_Edition1 Page232
Monday, December 12 2011 11:32 AM
Form No.8CA6-EC-11L
Black plate (233,1)
CAUTION
This unit plays files with the file
extension (.aac
*1
/.m4a) as a AAC file.
Do not use the AAC file extension for
files other than AAC files. Otherwise,
it could result in noise or a
malfunction.
*1 Type B
Refer to Audio Set (Type B) on
page 5-35.
lAAC files written under specifications
other than the indicated specification
may not play normally or files or folder
names may not display correctly.
lThe file extension may not be provided
depending on the computer operating
system, version, software, or settings.
In this case, add the file extension “.
aac
*1
”or “.m4a”to the end of the file
name, and then write it to the memory.
*1 Type B
Refer to Audio Set (Type B) on
page 5-35.
qOperating Tips for iPod
“iPod”is a registered trademark of Apple
Inc. in the United States and other
countries.
This unit supports playback of music files
recorded to an iPod.
l“iPod”is a registered trademark of
Apple Inc. in the United States and
other countries.
l“iPod classic”is a registered trademark
of Apple Inc. in the United States and
other countries.
l“iPod nano”is a registered trademark
of Apple Inc. in the United States and
other countries.
l“iPod touch”is a registered trademark
of Apple Inc. in the United States and
other countries.
l“iPhone”is a registered trademark of
Apple Inc. in the United States and
other countries.
Connectable iPods are as follows:
liPod: 5G
liPod classic
liPod nano: 1/2/3/4/5G
liPod touch
*1
: 1/2G
liPhone
*1
: 3G/3GS
*1 Only iPod function
Interior Features
Audio System
5-23
CX-5_8CA6-EC-11L_Edition1 Page233
Monday, December 12 2011 11:32 AM
Form No.8CA6-EC-11L
Black plate (234,1)
CAUTION
ØRemove the iPod when it is not in
use. Because the iPod is not
designed to withstand excessive
changes in temperature inside the
cabin, it could be damaged or the
battery may deteriorate due to the
excessive temperature or humidity
inside the cabin if it is left in the
vehicle.
ØIf data in the iPod is lost while it is
connected to the unit, Mazda
cannot guarantee recovery of any
lost data.
ØIf the iPod battery is deteriorated,
the iPod may not recharge and
playback may not be possible
when it is connected to the unit.
Replace the iPod battery
immediately.
ØBe careful not to pinch the iPod
connecting cable when opening/
closing the glove compartment.
ØFor the details on using the iPod,
refer to the iPod instruction
manual.
ØWhen connecting the iPod to a
USB port, all commands are made
from the audio unit. Control on
the iPod side is impossible.
NOTE
lThis unit cannot display the images and
video in an iPod.
lThe iPod functions on the iPod cannot be
operated while it is connected to the USB
port because the audio unit controls the
iPod functions.
5-24
Interior Features
Audio System
CX-5_8CA6-EC-11L_Edition1 Page234
Monday, December 12 2011 11:32 AM
Form No.8CA6-EC-11L
Black plate (235,1)
Audio Set (Type A)
Power/Volume/Sound Controls ......................................................................... page 5-26
Operating the Radio ........................................................................................... page 5-28
Operating the Compact Disc (CD) Player .......................................................... page 5-30
How to use auxiliary jack/USB port .................................................................. page 5-33
Error Indications ................................................................................................ page 5-33
Interior Features
Audio System
5-25
CX-5_8CA6-EC-11L_Edition1 Page235
Monday, December 12 2011 11:32 AM
Form No.8CA6-EC-11L
Black plate (236,1)
qPower/Volume/Sound Controls
Audio control dialPower/Volume dial
Power ON/OFF
Switch the ignition to ACC or ON. Press
the power/volume dial to turn the audio
system on. Press the power/volume dial
again to turn the audio system off.
Volume adjustment
To adjust the volume, turn the power/
volume dial. Turn the power/volume dial
to the right to increase volume, to the left
to decrease it.
Audio sound adjustment
1. Press the audio control dial to select the
function. The selected function will be
indicated.
2. Turn the audio control dial to adjust the
selected functions as follows:
Indication Setting value
Turn Left Turn Right
(Automatic volume
adjustment)
Level
decrease
Level
increase
(Low pitch sound)
Decrease
bass
Increase
bass
(Treble sound)
Decrease
treble
Increase
treble
(Front/back volume
balance)
Shift the
sound to the
front
Shift the
sound to the
rear
(Left/right volume
balance)
Shift the
sound to the
left
Shift the
sound to the
right
(Audio operation sound)
Off On
NOTE
About 5 seconds after selecting any mode, the
volume function will be automatically selected.
To reset bass, treble, fade, and balance, press
the audio control dial for 2 seconds. The unit
will beep and “CLEAR”will be displayed.
5-26
Interior Features
Audio System
CX-5_8CA6-EC-11L_Edition1 Page236
Monday, December 12 2011 11:32 AM
Form No.8CA6-EC-11L
Black plate (237,1)
Automatic Level Control (ALC)
The automatic level control (ALC)
changes the audio volume/quality
automatically according to the vehicle
speed. The faster the vehicle speed, the
higher the volume increases. ALC has
ALC OFF and ALC LEVEL 1 to 7
modes. At ALC LEVEL 7, the amount
that the volume can increase is at the
maximum. Select the mode according to
the driving conditions.
Interior Features
Audio System
5-27
CX-5_8CA6-EC-11L_Edition1 Page237
Monday, December 12 2011 11:32 AM
Form No.8CA6-EC-11L
Black plate (238,1)
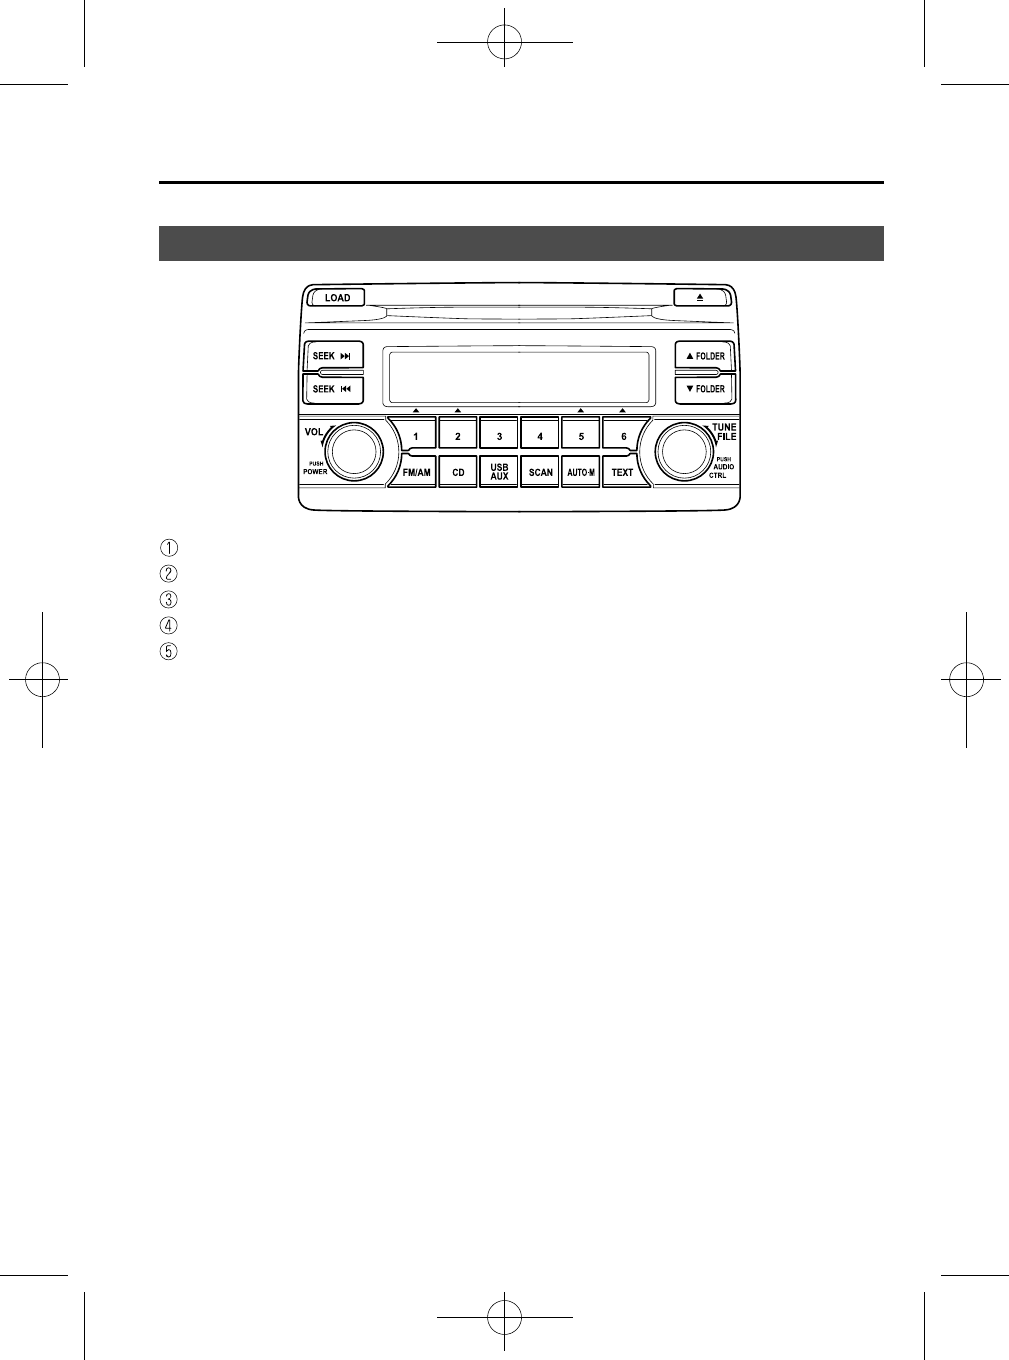
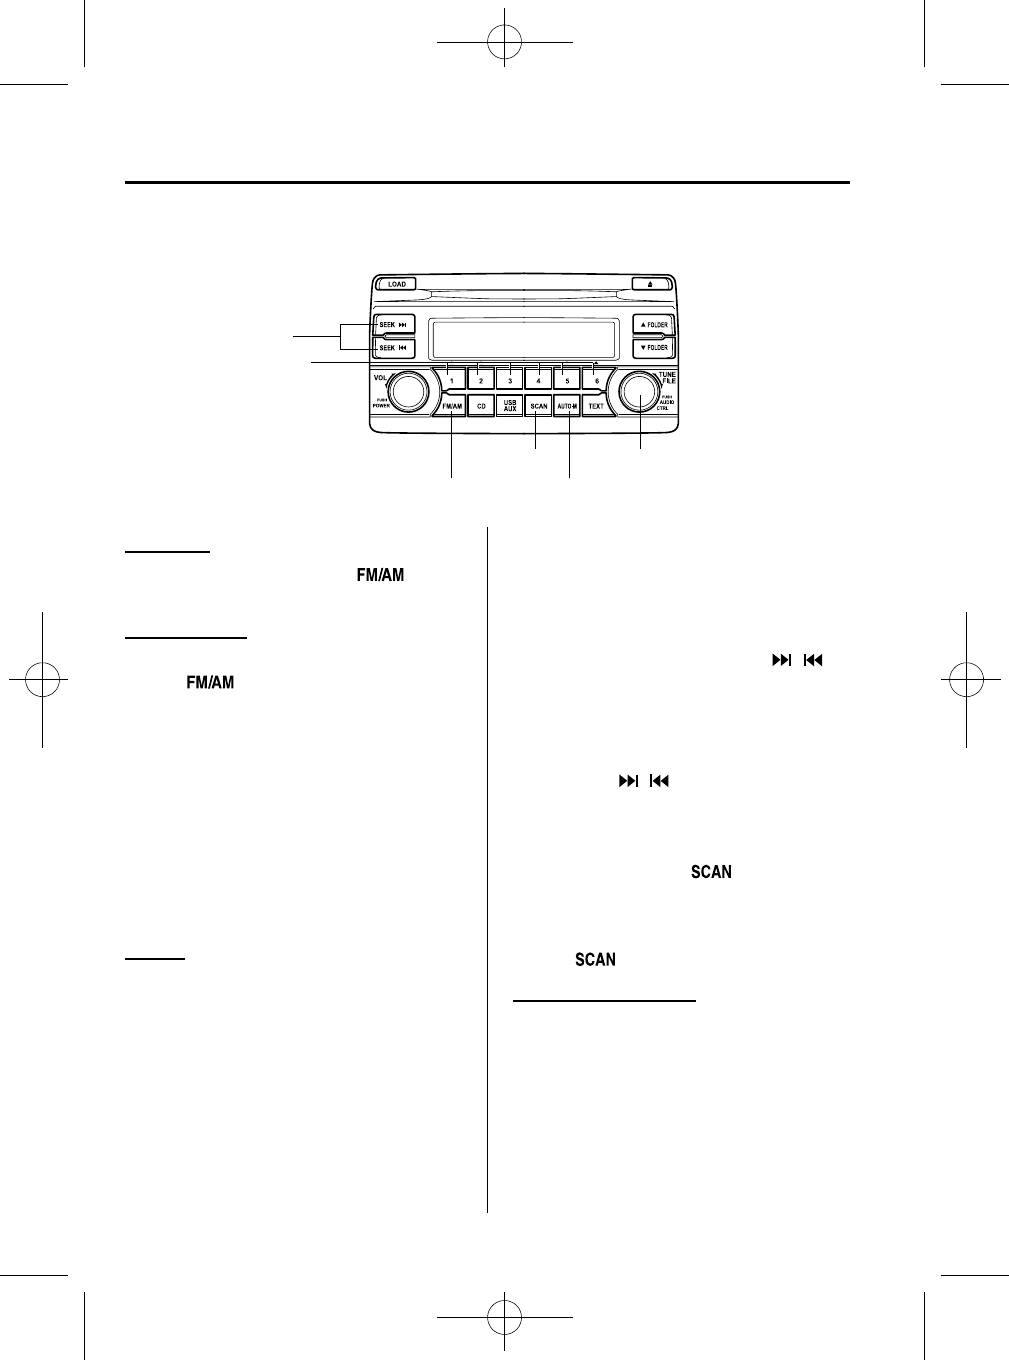
qOperating the Radio
Seek tuning buttons
Band selector buttons
Scan button
Auto memory button
Manual tuning/Audio control dial
Channel preset buttons
Radio ON
Press a band selector button ( )to
turn the radio on.
Band selection
Successively pressing the band selector
button ( ) switches the bands as
follows: FM1→FM2→AM.
The selected mode will be indicated. If
FM stereo is being received, “ST”will be
displayed.
NOTE
If the FM broadcast signal becomes weak,
reception automatically changes from
STEREO to MONO for reduced noise, and the
“ST”indicator will go out.
Tuning
The radio has the following tuning
methods: Manual, Seek, Scan, Preset
channel, and Auto memory tuning. The
easiest way to tune stations is to set them
on preset channels.
NOTE
If the power supply is interrupted (fuse blows
or the battery is disconnected), the preset
channels will be erased.
Manual tuning
Turning the manual tuning dial will
change the frequency higher or lower.
Seek tuning
Pressing the seek tuning button ( , )
will cause the tuner to seek a higher or
lower frequency automatically.
NOTE
If you continue to press and hold the seek
tuning button ( , ), the frequency will
continue changing without stopping.
Scan tuning
Press the scan button ( )to
automatically sample strong stations.
Scanning stops at each station for about 5
seconds. To hold a station, press the scan
button ( ) again during this interval.
Preset channel tuning
The 6 preset channels can be used to store
6 AM and 12 FM stations.
1. To set a channel first select AM, FM1,
or FM2. Tune to the desired station.
5-28
Interior Features
Audio System
CX-5_8CA6-EC-11L_Edition1 Page238
Monday, December 12 2011 11:32 AM
Form No.8CA6-EC-11L

Black plate (239,1)
2. Depress a channel preset button for
about 2 seconds until a beep is heard.
The preset channel number or station
frequency will be displayed. The
station is now held in the memory.
3. Repeat this operation for the other
stations and bands you want to store.
To tune one in the memory, select AM,
FM1, or FM2 and then press its
channel preset button. The station
frequency or the channel number will
be displayed.
Auto memory tuning
This is especially useful when driving in
an area where the local stations are not
known.
Press and hold the auto memory button
() for about 2 seconds until a beep
is heard; the system will automatically
scan and temporarily store up to 6 stations
with the strongest frequencies in each
selected band in that area.
After scanning is completed, the station
with the strongest frequency will be tuned
and its frequency displayed. Press and
release the auto memory button ( )
to recall stations from the auto-stored
stations. One stored station will be
selected each time; its frequency and
channel number will be displayed.
NOTE
If no stations can be tuned after scanning
operations, “A”will be displayed.
Interior Features
Audio System
5-29
CX-5_8CA6-EC-11L_Edition1 Page239
Monday, December 12 2011 11:32 AM
Form No.8CA6-EC-11L
Black plate (240,1)
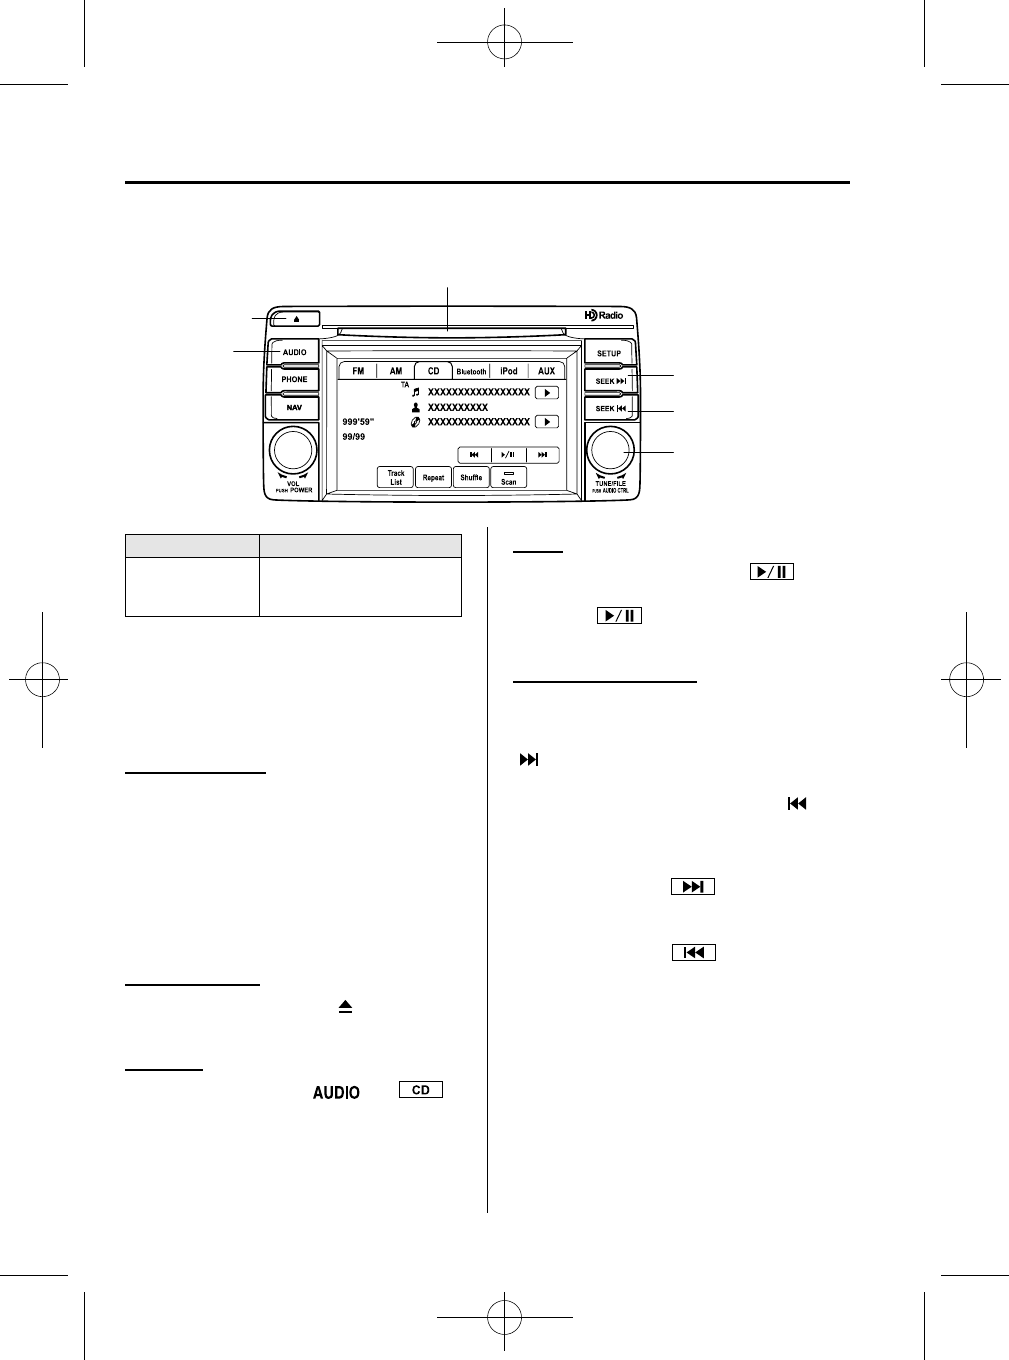
qOperating the Compact Disc (CD) Player
Track up/Fast-forward button
Load button
Track down/Reverse button
Folder up button
Folder down button
Text button
Scan button
CD play button
CD eject buttonRepeat button
Random button
CD slot
File dial
Type Playable data
Music/MP3/WMA/
AAC CD player
lMusic data (CD-DA)
lMP3/WMA/AAC file
NOTE
If a disc has both music data (CD-DA) and
MP3/WMA/AAC files, playback of the two or
three file types differs depending on how the
disc was recorded.
Inserting the CD
Insert the CD into the slot, label-side up.
The auto-loading mechanism will set the
CD and begin play.
NOTE
There will be a short lapse before play begins
while the player reads the digital signals on
the CD.
Ejecting the CD
Press the CD eject button ( ) to eject the
CD.
Playback
Press the CD play button ( ) to start
play when a CD is in the unit. If a CD is
not in the unit when the CD play button
() is pressed, “NO DISC”will flash on
and off.
NOTE
When the load button ( ) is pressed, the
CD will load and play even if the CD eject
button ( ) had been previously pressed.
Fast-forward/Reverse
Press and hold the fast-forward button
() to advance through a track at high
speed. Press and hold the reverse button
() to reverse through a track at high
speed.
Track search
Press the track up button ( ) or turn the
file dial clockwise once to skip forward to
the beginning of the next track. Press the
track down button ( ) or turn the file
dial counterclockwise once to skip back to
the beginning of the current track.
Folder search (during MP3/WMA/AAC
CD playback)
To change to the previous folder, press the
folder down button ( ), or press the
folder up button ( ) to advance to the
next folder.
5-30
Interior Features
Audio System
CX-5_8CA6-EC-11L_Edition1 Page240
Monday, December 12 2011 11:32 AM
Form No.8CA6-EC-11L
Black plate (241,1)
Music scan
During music CD playback
This function scans the titles on a CD and
plays 10 seconds of each song to aid you
in finding a song you want to listen to.
Press the scan button ( ) during
playback to start the scan play operation
(the track number will flash). Press the
scan button ( ) again to cancel scan
playback.
During MP3/WMA/AAC CD playback
This function scans the titles in a folder
currently being played and plays 10
seconds of each song to aid you in finding
a song you want to listen to. Press the
scan button ( ) during playback to
start the scan play operation (the track
number will flash).
Press the scan button ( ) again to
cancel scan playback.
NOTE
If the unit is left in scan, normal playback will
resume where scan was selected.
Repeat playback
During music CD playback
Press the repeat button (1) during
playback to repeat the playback of the
current song. “TRACK RPT”is displayed
during playback.
Press the repeat button (1) while
displaying the “TRACK RPT”to cancel.
During MP3/WMA/AAC CD playback
(Track repeat)
Press the repeat button (1) during
playback to repeat the playback of the
current song. “TRACK RPT”is displayed
during playback.
Press the repeat button (1) two times
while displaying the “TRACK RPT”to
cancel.
(Folder repeat)
Press the repeat button (1) two times
during playback to repeat the playback of
the current song in the folder. “FOLDER
RPT”is displayed during playback.
Press the repeat button (1) while
displaying “FOLDER RPT”to cancel.
Random playback
During music CD playback
Press the random button (2) during
playback to play the tracks in the CD
randomly. “DISC RDM”is displayed
during playback.
Press the random button (2) while
displaying “DISC RDM”to cancel.
During MP3/WMA/AAC CD playback
(Folder random)
Press the random button (2) during
playback to play the tracks in the folder
randomly. “FOLDER RDM”is displayed
during playback.
Press the random button (2) two times
while displaying “FOLDER RDM”to
cancel.
Interior Features
Audio System
5-31
CX-5_8CA6-EC-11L_Edition1 Page241
Monday, December 12 2011 11:32 AM
Form No.8CA6-EC-11L
Black plate (242,1)
(CD random)
Press the random button (2) two times
during playback to play the songs on the
CD randomly. “DISC RDM”is displayed
during playback.
Press the random button (2) while
displaying “DISC RDM”to cancel.
Switching the display
For files with a file name and other
information that have been input, the
display switches between display of the
file name and other information each time
the text button ( ) is pressed during
playback.
Music CD
Track name
Album name
Artist name
Track number/Elapsed time
MP3/WMA/AAC CD
File name
Folder name
Album name
Song name
Artist name
Folder number/File number
File number/Elapsed time
NOTE
lThe information viewable in the display is
only CD information (such as artist name,
song title) which has been recorded to the
CD.
lThis unit cannot display some characters.
Characters which cannot be displayed are
indicated by an asterisk ( ).
Display scroll
Only 9 characters (File name) or 13
characters (Except file name) can be
displayed at one time. To display the rest
of the characters of a long title, press and
hold the text button ( ). The display
scrolls the next 13 characters. Press and
hold the text button ( ) again after
the last 13 characters have been displayed
to return to the beginning of the title.
5-32
Interior Features
Audio System
CX-5_8CA6-EC-11L_Edition1 Page242
Monday, December 12 2011 11:32 AM
Form No.8CA6-EC-11L
Black plate (243,1)
NOTE
The number of characters which can be
displayed is restricted.
Message display
If “CHECK CD”is displayed, it means
that there is some CD malfunction. Check
the CD for damage, dirt, or smudges, and
then properly reinsert. If the message
appears again, take the unit to an
Authorized Mazda Dealer for service.
qHow to use Auxiliary jack/USB
port
í
Audio can be heard from the vehicle's
speakers by connecting a commercially-
available portable audio unit to the
auxiliary jack. In addition, audio can be
played from the vehicle audio device by
connecting USB memory or an iPod to
the USB port.
Refer to AUX/USB/iPod mode on page
5-58.
qError Indications
If you see an error indication on the
display, find the cause in the chart. If you
cannot clear the error indication, take the
vehicle to an Authorized Mazda Dealer.
Indication Cause Solution
CHECK CD
CD is
inserted
upside
down
Insert the CD properly. If
the error indication
continues to display,
consult an Authorized
Mazda Dealer.
CD is
defective
Insert another CD
properly. If the error
indication continues to
display, consult an
Authorized Mazda
Dealer.
Interior Features
Audio System
5-33
í
Some models.
CX-5_8CA6-EC-11L_Edition1 Page243
Monday, December 12 2011 11:32 AM
Form No.8CA6-EC-11L

Black plate (244,1)
MEMO
5-34
CX-5_8CA6-EC-11L_Edition1 Page244
Monday, December 12 2011 11:32 AM
Form No.8CA6-EC-11L
Black plate (245,1)
Audio Set (Type B)
CAUTION
Do not press the panel strongly or press it with a sharp-pointed object. Otherwise,
the panel could be damaged.
Power/Volume/Display/Sound Controls ............................................................ page 5-36
Operating the Radio ........................................................................................... page 5-40
Operating the Satellite Radio ............................................................................. page 5-44
Operating the Compact Disc (CD) Player .......................................................... page 5-52
How to use the Auxiliary jack/USB port ........................................................... page 5-55
Error Indication .................................................................................................. page 5-55
Setup .................................................................................................................. page 5-55
Interior Features
Audio System
5-35
CX-5_8CA6-EC-11L_Edition1 Page245
Monday, December 12 2011 11:32 AM
Form No.8CA6-EC-11L
Black plate (246,1)
qPower/Volume/Display/Sound Controls
Setup button
Audio control dial
Audio button
Phone button
Navigation button
Power/Volume dial
Power ON/OFF
Switch the ignition to ACC or ON.
Press the power/volume dial to turn the
audio system on. Press the power/volume
dial again to turn the audio system off.
Volume adjustment
To adjust the volume, turn the power/
volume dial.
Turn the power/volume dial to the right to
increase volume, to the left to decrease it.
Display setting
Press the setup button ( ) to display
the display setting screen.
Touch the on-screen tab to select
the item you would like to change.
Brightness adjustment
: Increase brightness
: Decrease brightness
Contrast adjustment
: Higher contrast
: Lower contrast
Tint adjustment
*1
: Green tint enhancement color
: Red tint enhancement color
*1 Adjustment can be performed only
while in the rear view camera mode.
Color adjustment
*1
: To deepen a color
: To fade a color
*1 Adjustment can be performed only
while in the rear view camera mode.
Daytime/nighttime screen setting
The daytime or nighttime screen can be
selected even if the headlights are
illuminated or turned off (when bright
screen is required at night or dark screen
is required at noon).
: Daytime screen setting
: Nighttime screen setting
: Switches screen automatically
according to headlight illumination
condition
Display OFF
The display can be turned off. Touch the
on-screen button to turn the
display off.
5-36
Interior Features
Audio System
CX-5_8CA6-EC-11L_Edition1 Page246
Monday, December 12 2011 11:32 AM
Form No.8CA6-EC-11L
Black plate (247,1)
The display can be turned back on as
follows:
lPress the audio button ( )to
display the audio screen.
lPress the navigation button ( )to
display the navigation screen.
lPress the phone button ( )to
display the Bluetooth
®
dial screen.
lPress the setup button ( )to
display the setup dial setting screen.
lPress the audio control dial to display
the setup sound setting screen.
lShift to the R position to change to the
rear view camera mode.
Shift to a position other than R to
return to the display off condition.
NOTE
lWhen an automatic audio operation such
as going to the next song on the playlist
occurs, the information concerning the
audio operation is displayed even with the
display turned off.
lThe screen can also be turned off using
voice recognition.
Refer to Component Parts on page 5-78.
Display setting reset
All of the screen setting values can be
reset to their initial settings.
1. Touch the on-screen button.
2. Touch the on-screen button.
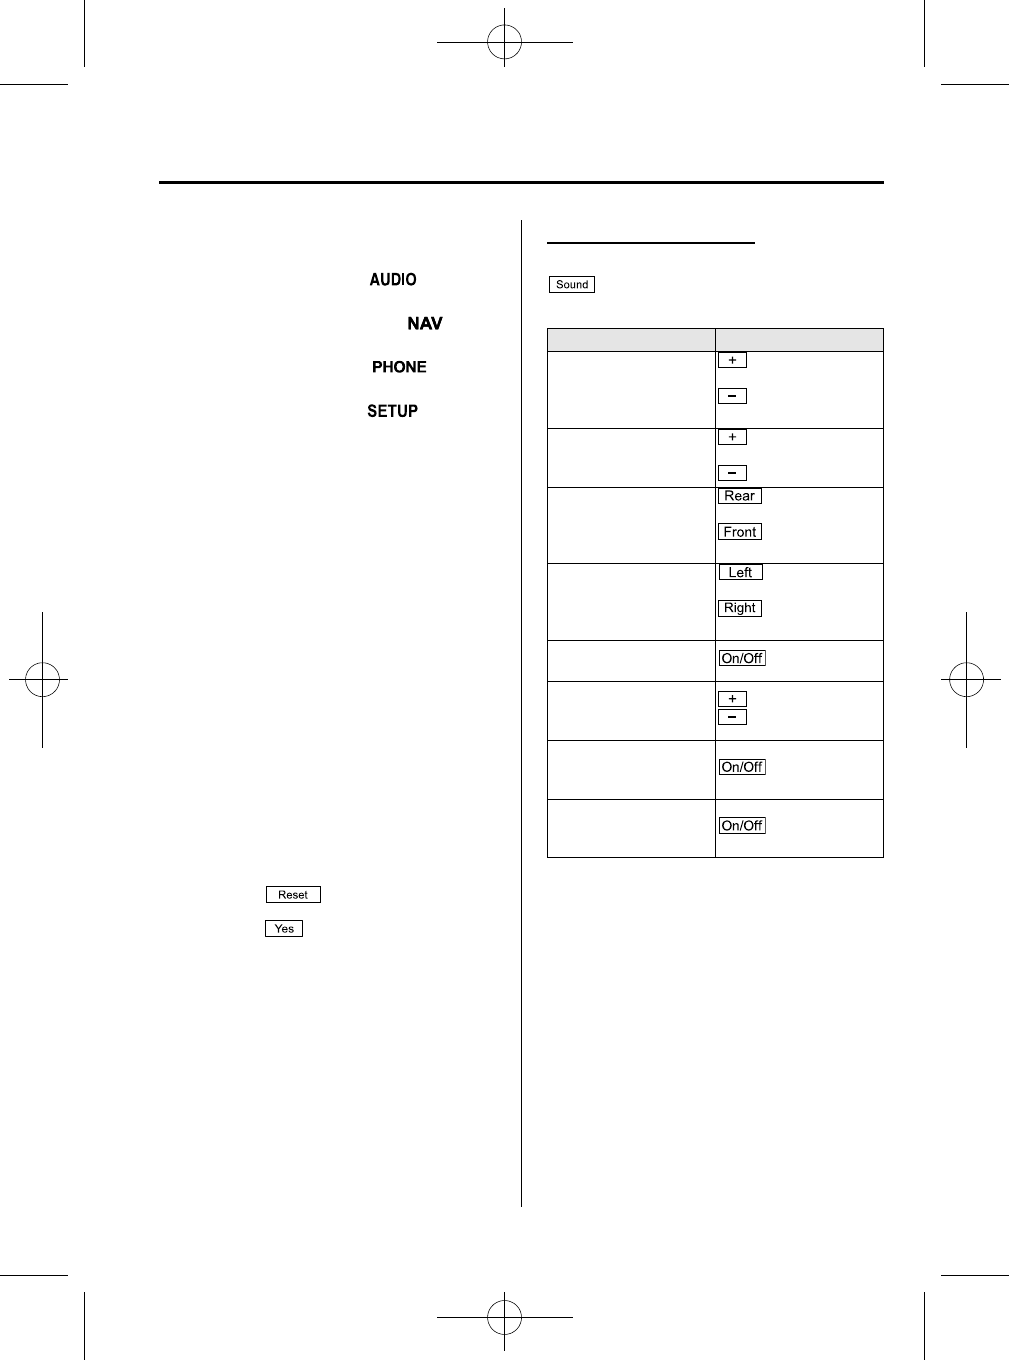
Audio sound adjustment
Press the audio control dial or touch the
on-screen button to display the
sound setting screen.
Indication Setting value
Bass
(Low pitch sound)
: Low pitch
enhancement
: Low pitch
reduction
Treble
(Treble sound)
: Treble
enhancement
: Treble reduction
Fader
(Front/back volume
balance)
: Front speaker
volume reduction
: Rear speaker
volume reduction
Balance
(Left/right volume
balance)
: Right side
volume reduction
: Left side
volume reduction
Button Beep
(Audio operation sound) : on/off
*1
Auto Level Control
*2
(Automatic volume
adjustment)
: Level up
: Level down
AudioPilot
*3
(Automatic volume
adjustment)
: on/off
Centerpoint
*3
(Automatic surround
level adjustment)
: on/off
*1 Some functions do not turn off
*2 Standard audio
*3 Bose
®
Sound System
Automatic Level Control (ALC)
The automatic level control is a feature
that automatically adjusts audio volume
and sound quality according to the vehicle
speed. The volume increases in
accordance with the increase in vehicle
speed, and decreases as vehicle speed
decreases.
Interior Features
Audio System
5-37
CX-5_8CA6-EC-11L_Edition1 Page247
Monday, December 12 2011 11:32 AM
Form No.8CA6-EC-11L
Black plate (248,1)
AudioPilot
®
2
*4
AudioPilot
®
2 automatically adjusts audio
volume and sound quality in accordance
with the level of noise entering the vehicle
interior while driving. When AudioPilot
®
2 is turned on, the system automatically
calculates the conditions for optimum
hearing of sound which may be difficult
to hear depending on exterior noise.
AudioPilot
®
2 can be set on or off.
*4 AudioPilot
®
2 is a registered
trademark of Bose Corporation.
Centerpoint
®*5
Centerpoint
®
offers you the experience of
5.1-channel surround sound in your
vehicle even with your conventional 2-
channel stereo CDs. Centerpoint
®
can be
set on or off.
*5 Centerpoint
®
is a registered trademark
of Bose Corporation.
NOTE
lCenterpoint
®
operates optimally with a 2-
channel stereo CD. MP3 audio files can be
played, however, MP3 audio files encoded
with high compression may result in poor
sound quality.
lCenterpoint
®
is available for 2-channel
stereo audio except for AM radio/FM radio/
AUX/Bluetooth
®
audio.
Sound setting reset
The settings for bass, treble, fade, and
balance can be returned to their initial
settings.
1. Touch the on-screen button.
2. Touch the on-screen button.
5-38
Interior Features
Audio System
CX-5_8CA6-EC-11L_Edition1 Page248
Monday, December 12 2011 11:32 AM
Form No.8CA6-EC-11L

Black plate (249,1)
MEMO
5-39
CX-5_8CA6-EC-11L_Edition1 Page249
Monday, December 12 2011 11:32 AM
Form No.8CA6-EC-11L

Black plate (250,1)
qOperating the Radio
Seek tuning buttons
Manual tuning dial
Audio button
Radio ON
Press the audio button ( ) and touch
the on-screen tab.
Band selection
Touch the on-screen tab to switch
the band as follows:
FM1→FM2→AM
NOTE
lis displayed when FM1 is selected,
is displayed when FM2 is
selected, and is displayed when AM
is selected.
lIf the FM broadcast signal becomes weak,
reception automatically changes from
STEREO to MONO for reduced noise, and
the “STEREO”indicator will no longer
display.
Tuning
The radio has the following tuning
methods: Manual, Seek, Scan, Preset
channel, and Auto memory tuning. The
easiest way to tune stations is to set them
on preset channels.
NOTE
If the power supply is interrupted (fuse blows
or the battery is disconnected), the preset
channels will be erased.
Manual tuning
Turning the manual tuning dial will
change the frequency higher or lower.
NOTE
When an broadcast is being
received, a receivable multicast channel is also
received.
Seek tuning
Pressing the seek tuning button ( , )
will cause the tuner to seek a higher or
lower frequency automatically.
NOTE
lIf you continue to press and hold the seek
tuning button ( , ) the frequency will
continue changing without stopping.
lWhen an broadcast is being
received, a receivable multicast channel is
also received.
5-40
Interior Features
Audio System
CX-5_8CA6-EC-11L_Edition1 Page250
Monday, December 12 2011 11:32 AM
Form No.8CA6-EC-11L
Black plate (251,1)
Scan tuning
You can search for receivable radio
stations by touching the on-screen
button.
Scanning stops at each station for about
five seconds.
Touch the on-screen button one time
during reception to continue receiving a
broadcasting station.
Preset channel tuning
The six preset channels can be used to
store six AM and twelve FM stations.
1. To set a channel, first select AM, FM1,
or FM2. Tune to the desired station.
2. Press and hold any of the preset on-
screen buttons. The reception
frequency is programmed and
displayed on the preset button.
3. Repeat this operation for the other
stations and bands you want to store.
When receiving a programmed
frequency, select AM, FM1, or FM2
and touch the preset on-screen button.
NOTE
The programmed frequency is displayed on the
preset button.
Auto memory tuning
This is especially useful when driving in
an area where the local stations are
unknown. Additional AM/FM stations
can be stored without disturbing the
previously set channels.
1. Touch the on-screen button. The
auto memory preset list is displayed
and the previously tuned frequency is
received.
2. Touch the on-screen button to
display the frequencies of up to ten
radio stations on the auto memory
preset list.
3. Touch the desired frequency.
NOTE
Touch the on-screen button during
auto memory tuning to return to the AM/FM
main screen.
Radio Data System (RDS)
Radio text information display
A maximum of 64 characters of radio text
information sent from a broadcasting
station is displayed in the audio display.
NOTE
Radio text information is a function of FM
radio. Text information is not displayed in the
following:
lDuring reception
lNot an RDS broadcast
lDuring HD reception
lRDS broadcast, but radio text is not
transmitted from the radio station
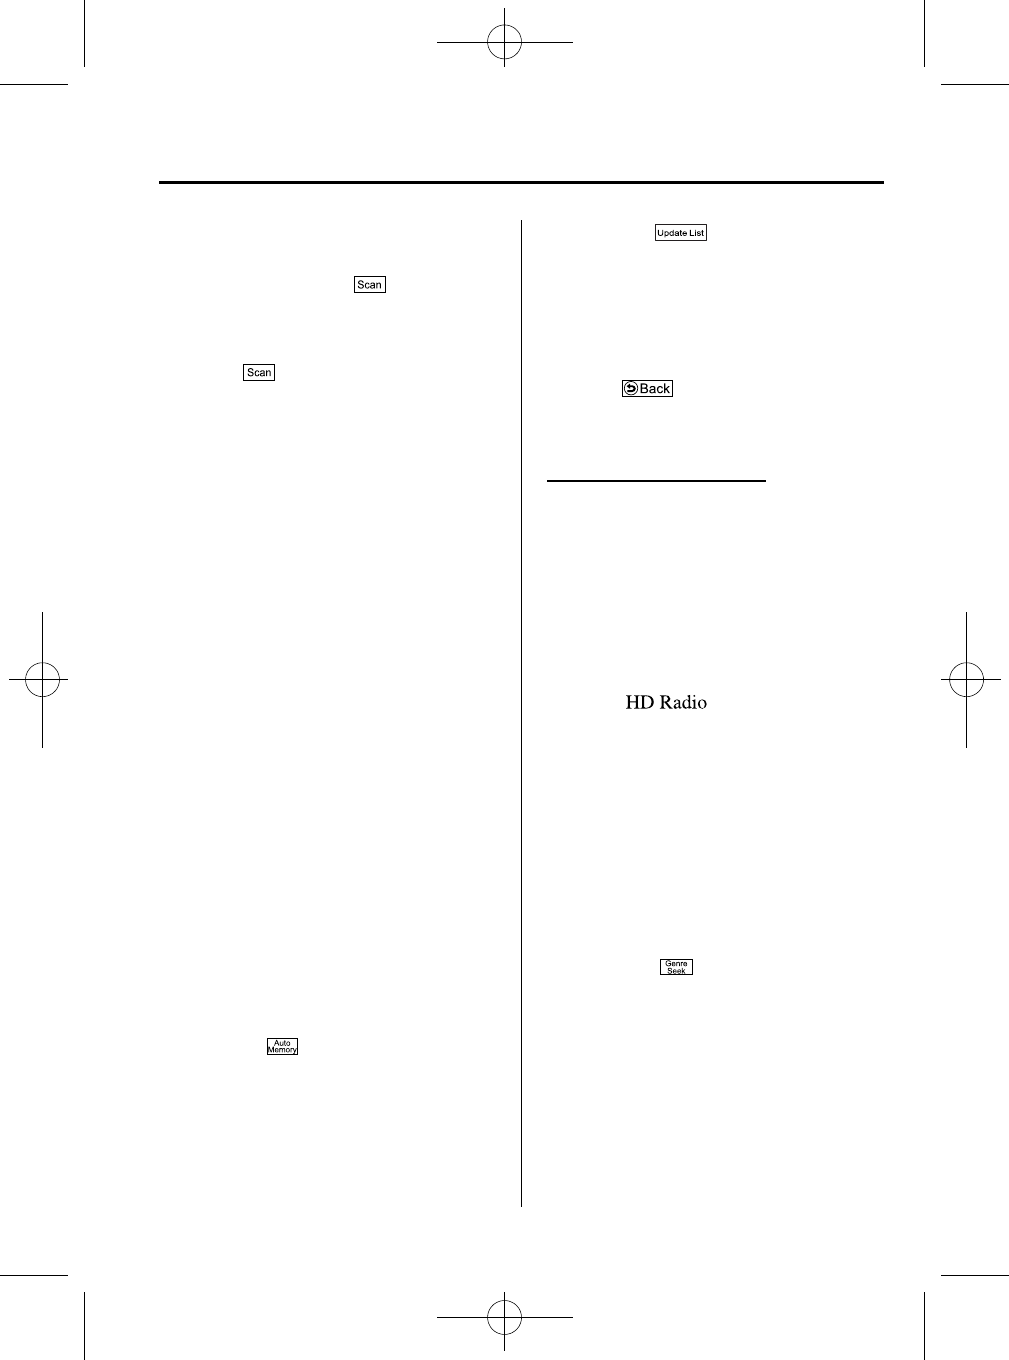
Genre Seek
Some FM stations transmit Genre codes
(Program type like a Rock, News, and so
on). This code enables alternative stations
transmitting the same Genre code to be
found quickly. To select from the genre
list, touch the on-screen button
while in the FM mode and the desired
Genre Seek.
(To scan for Genre Seek:)
1. Touch the genre type which you want
to select.
Interior Features
Audio System
5-41
CX-5_8CA6-EC-11L_Edition1 Page251
Monday, December 12 2011 11:32 AM
Form No.8CA6-EC-11L

Black plate (252,1)
2. When is touched, a higher
frequency station is selected from the
frequencies being received and a radio
station corresponding to the selected
genre is located.
When is touched, a lower
frequency station is selected from the
frequencies being received and a radio
station corresponding to the selected
genre is located.
When on-screen button is touched
during genre selection, the radio
frequency switches in the order of stations
having the best reception.
(Example)
If the radio frequency currently being
received is 89.3, the frequency switches as
follows:
89.3→98.3
*1
→104.3
*1
→98.7→107.1
*1 Radio stations with good reception
NOTE
lOnly one Genre can be selected.
lTouch the on-screen button to
return to the FM1 or FM2 main screen.
lIf the radio reception conditions are poor, it
may not be possible to receive even one
station even if the genre seek button is
pressed.
lIf a program in the selected genre is not
broadcast to a region, reception is not
possible even if the reception conditions are
good.
lThe Genre Seek function searches for genre
code (program type) which FM analog
broadcasts transmit. Digitally broadcast
specialty programs (HD2-
HD8) cannot be searched.
lIf radio stations which are selected by
scanning using the Genre Seek function are
broadcasting stations, they are
changed from analog broadcasts to
broadcasts after a few seconds
if the reception conditions are good. The
genre is displayed after the switch,
however, the genre for FM analog
broadcasts may differ.
HD Radio
í
What is HD Radio™Technology and
how does it work?
HD Radio™Technology is the digital
evolution of analog AM/FM radio. Your
radio product has a special receiver which
allows it to receive digital broadcasts
(where available) in addition to the analog
broadcasts it already receives. Digital
broadcasts have better sound quality than
analog broadcasts as digital broadcasts
provide free, crystal clear audio. For more
information, and a guide to available radio
stations and programming, please visit
www.hdradio.com.
5-42
Interior Features
í
Some models.
Audio System
CX-5_8CA6-EC-11L_Edition1 Page252
Monday, December 12 2011 11:32 AM
Form No.8CA6-EC-11L
Black plate (253,1)
Benefits of HD Radio™Technology
(Information)
The song title, artist name and genre will
appear on the screen when available by
the radio station.
(Multicast)
On the FM radio frequency most digital
stations have “multiple”or supplemental
programs on each FM station.
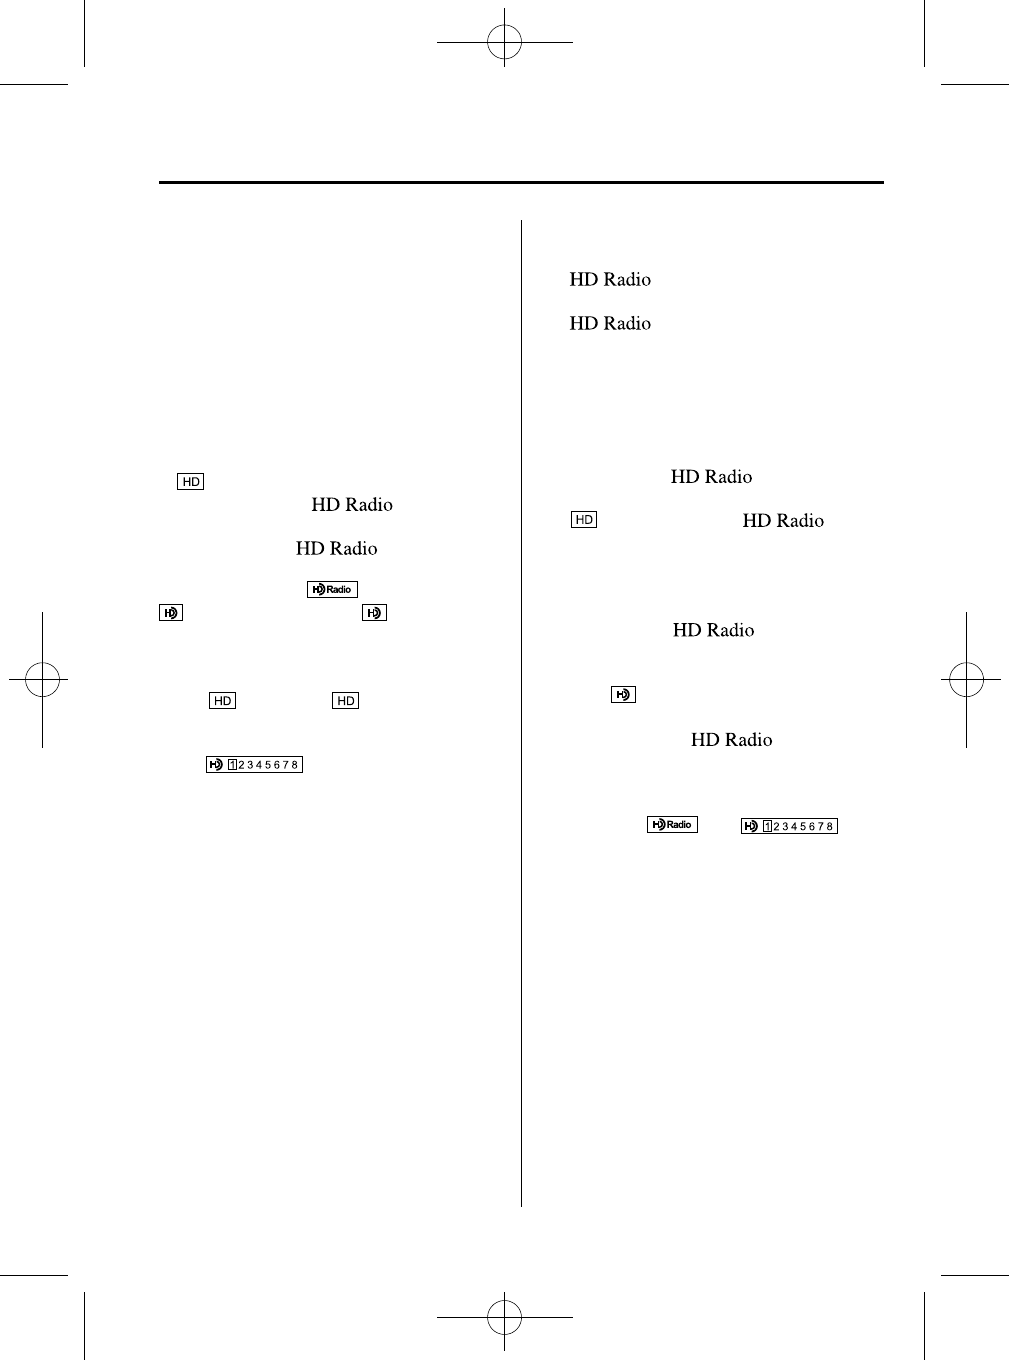
Listening to HD Radio™Technology
If turns on by selecting a radio
station which is an
broadcasting station, the analog broadcast
is switched to an broadcast
automatically after a few seconds and then
received. For FM, , and for AM,
is displayed, and the illuminates
in orange.
If the HD Radio broadcast is stopped and
changed to an analog broadcast, press
down to turn off .
Multicast channel selection (FM)
Press on-screen button to
switch to the multi-cast channel for the
displayed number.
The number of multi-cast channels which
can be received differs depending on the
radio station.
NOTE
lIf an analog broadcast is received once and
is received while HD1 is
selected, the audio unit switches to the
station automatically.
lIf the reception conditions worsen while
receiving an HD specialty channel (HD2 to
HD8), “No HD signal”is displayed, and
audio output stops.
lOnce an analog broadcast is received when
HD1 is selected from the preset channels, it
is switched to automatically. If
the radio reception conditions are poor, or
is off, switching to
broadcasts is not possible.
lWhen an HD specialty channel (HD2 to
HD8) is selected from the preset channels,
“No HD signal”is displayed and no audio
is output until is received. If
the radio reception conditions are poor,
“No HD signal”continues to be displayed.
lIf the is not illuminated or does not
illuminate in orange, information such as
song titles of the station are
received, however, the audio output is
analog. If information can no longer be
received and the non-reception condition
continues, and on-
screen buttons disappear.
Interior Features
Audio System
5-43
CX-5_8CA6-EC-11L_Edition1 Page253
Monday, December 12 2011 11:32 AM
Form No.8CA6-EC-11L
Black plate (254,1)
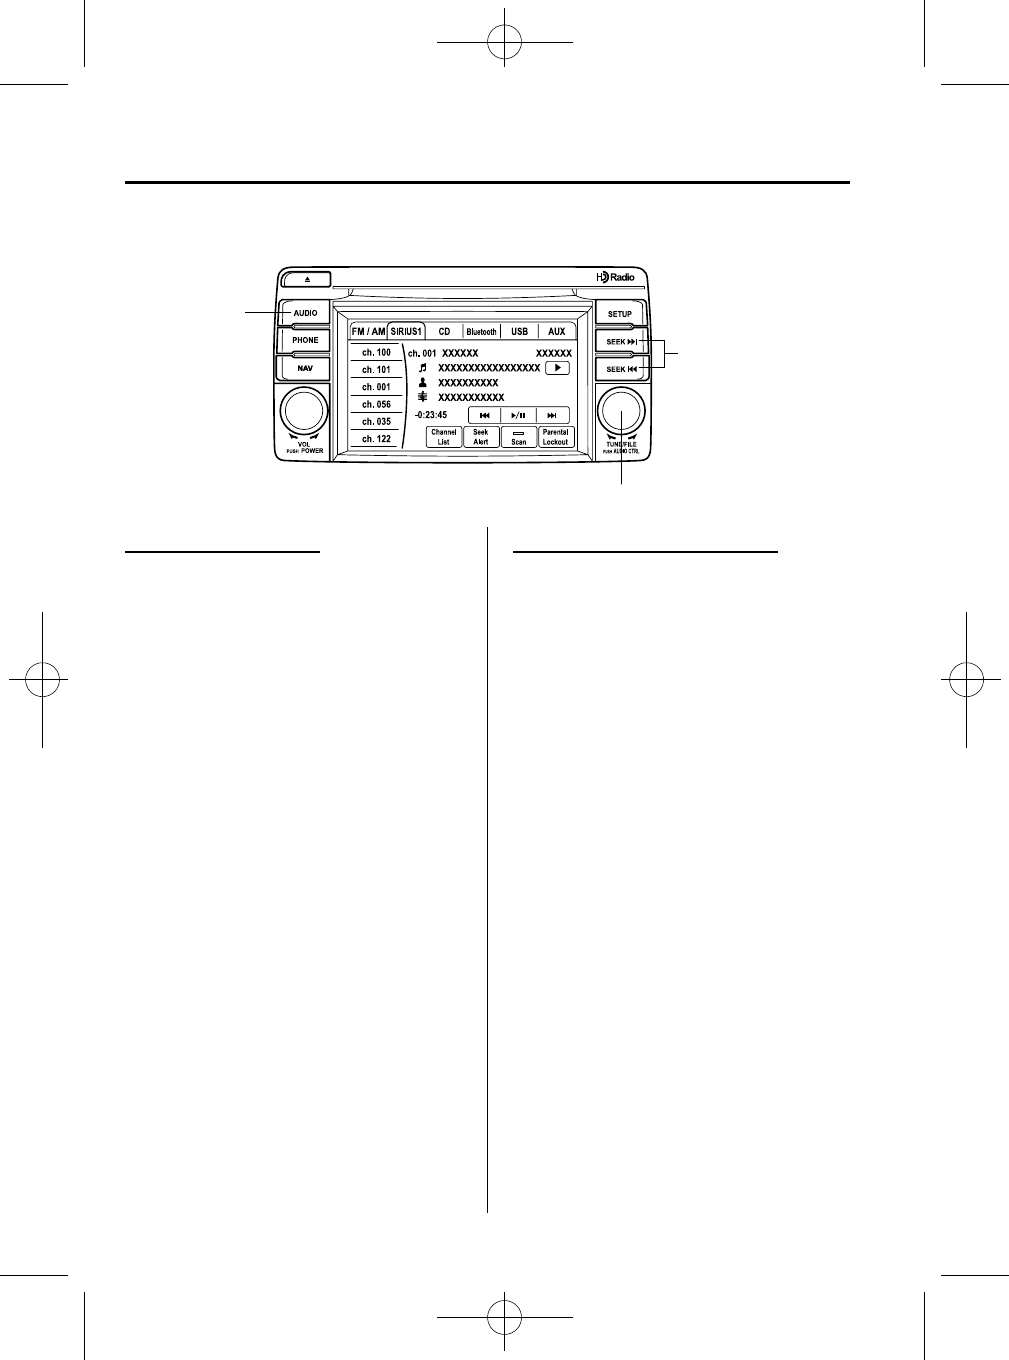
qOperating the Satellite Radio
í
Seek tuning buttons
Manual tuning dial
Audio button
What is satellite radio?
With over 130 channels, SIRIUS Satellite
Radio brings you more of what you love.
Get channels and channels of commercial-
free music, plus sports, news, talk,
entertainment and more.
Commercial-free music from nearly
every genre ―rock to pop, hip-hop to
country, jazz, classical and more. Plus live
performances and artist-dedicated
channels.
Live sports Play-by-Play & Expert Talk
―every NFL game, every NASCAR
®
race, 24/7 sports talk, college sports and
more.
Exclusive entertainment, comedy and
talk ―The biggest names, compelling
talk, hilarious comedy.
World-class news plus local traffic and
weather.
Sign up for SIRIUS Satellite Radio today!
For more information, visit
www.sirius.com. Satellite radio can be
subscribed to and received in the United
States (Except Alaska and Hawaii) and
Canada.
How to Activate Satellite Radio
You must call SIRIUS to activate your
service. Activation is free and takes only a
few minutes.
SIRIUS service uses an ID code to
identify your radio. This code is needed to
activate SIRIUS service, and report any
problems.
To activate your SIRIUS radio tuner, call
a SIRIUS customer service specialist at 1-
888-539-7474 or you can visit SIRIUS
online at www.sirius.com.
Please have the following information
ready:
lSIRIUS ID (12-digit electronic serial
no, or ESN
*1
)
lValid credit card information (may not
be required at initial sign-up)
*1 ESN: Electronic Serial Number
Be sure you are parked outside with a
clear view of open sky, you will be
instructed to turn on your radio (in
SIRIUS mode and tuned to channel 184).
Activation typically takes only 2―5
minutes.
5-44
Interior Features
í
Some models.
Audio System
CX-5_8CA6-EC-11L_Edition1 Page254
Monday, December 12 2011 11:32 AM
Form No.8CA6-EC-11L
Black plate (255,1)
Displaying the SIRIUS ID (ESN)
Turn the manual tuning dial and select
channel 0 to display the twelve-digit
Electronic Serial Number (ESN) for the
SIRIUS tuner.
SIRIUS operation
All operations of the satellite radio are
conducted by means of the audio unit.
SIRIUS radio mode selection
Touch the on-screen tab on the
audio screen to receive the previously
received SIRIUS channel.
Every time the on-screen tab is
touched, the bank changes in the order
shown below.
SIRIUS1 SIRIUS2 SIRIUS3
NOTE
lSIRIUS1, SIRIUS2 and SIRIUS3: six
stations can be stored in each bank for
convenient access to your favorite stations.
lis displayed when SIRIUS1 is
selected, is displayed when
SIRIUS2 is selected, and is
displayed when SIRIUS3 is selected.
Operation in the initial state
It may take some time to start up the
equipment when it is in the initial state,
when there is a change in the user's
subscription condition, when the firmware
is updated or when the SIRIUS channel
map is changed.
“Updating Channels XXX %”is
displayed when the SIRIUS channel map
is changed.
If the user contract content is changed,
“Subscription Updated”is displayed.
When the firmware is updated, the
“Updating Receiver”is displayed.
Updating could take as long as a few
minutes depending on the geographical
area. When the unit is in an initialized
state, channel 184 is displayed after the
display indicates “Updating Receiver”.
NOTE
Do not perform the following operation while
“Updating Channels XXX %”,“Updating
Receiver”is displayed. Otherwise, the
updating procedure will be canceled.
lTurning off the audio power
lSwitching to other modes
lSwitching the ignition off
When the SIRIUS mode is switched to
another mode, or when the power is
turned off, the present channel which is
being received is stored as the last
channel.
Channel up
Turn the manual tuning dial to the right or
press the seek up button ( ).
Channel down
Turn the manual tuning dial to the left or
press the seek down button ( ).
NOTE
The channel is continuously switched to the
next or previous channel while the seek tuning
button ( , ) is continuously pressed.
Unsubscribed channel
When a channel which has been preset
becomes unsubscribed or the current
channel being listened to becomes
unsubscribed, the following is displayed:
“Call 888-539-SIRIUS”
“to subscribe”
Interior Features
Audio System
5-45
CX-5_8CA6-EC-11L_Edition1 Page255
Monday, December 12 2011 11:32 AM
Form No.8CA6-EC-11L
Black plate (256,1)
NOTE
When the subscription contract is canceled, all
of the channels including channel 184 appear
as unsubscribed.
Preset channel programming
1. Select the desired channel to be
programmed.
2. Long-press any of the preset on-screen
buttons.
NOTE
Six stations can be stored in each bank,
SIRIUS1, SIRIUS2 and SIRIUS3 for
convenient access to your favorite stations.
Preset channel call-up
Touch the preset on-screen button for the
channel which you want to select.
NOTE
In the initial setting, all channels are preset to
184.
Selection from channel list
Receivable channels can be displayed on
the channel list screen. You can easily
select the channel you want to listen from
the list. Each category can be also
displayed.
1. Touch the on-screen button.
2. Touch the channel you want to listen
from the list.
NOTE
Currently available channels (including
parental locked channels) are all displayed in
the list.
(Select from category list)
1. Touch the on-screen
button on the channel list screen.
2. Touch the category name which you
want to select from the list. Touch the
on-screen button to return to
the channel list screen.
NOTE
A category can be set only when a channel
which belongs to a category is being received.
Scan tuning
Touch the on-screen button to
automatically sample stations. Scanning
stops at each station for about five
seconds.
To hold a station, touch the on-
screen button again during this interval.
NOTE
Unsubscribed channels, invalid channels,
parental lock channels and channel 0 are not
subject to the scan, therefore these channels
will skip automatically.
Channel number, channel name,
category name, artist name, song titles
and information display
The information regarding the channel
which is currently being received is
displayed.
NOTE
If channels not subscribed and parental locked
channels can be received, the channel name,
category name, artist name, song title and
information is displayed.
Display scroll
If a whole title cannot be displayed at one
time, touch the on-screen button on
the right side of the title. When the last
character is displayed, touch the on-
screen button to display the first character
of the title.
5-46
Interior Features
Audio System
CX-5_8CA6-EC-11L_Edition1 Page256
Monday, December 12 2011 11:32 AM
Form No.8CA6-EC-11L
Black plate (257,1)
NOTE
The on-screen button is displayed only if a
whole title cannot be displayed at one time.
Instant replay
This function allows you to rewind and
replay the program that you were
previously or are currently listening to.
When the on-screen button is
touched, playback starts from the
beginning of the current program.
When the on-screen button is
touched twice, playback starts from the
beginning of the previous program.
Touch and hold the on-screen
button to reverse the program while the
button is being pressed.
When the on-screen button is
touched, playback starts from the
beginning of the next program.
When the on-screen button is
touched while the last program is being
played, the instant replay mode is
canceled.
Touch and hold the on-screen
button to fast-forward the program while
the button is being pressed.
When touching and holding the button
until the end of the program, the instant
replay mode is canceled.
Instant replay (PAUSE)
If the on-screen button is touched,
instant replay mode is turned on in a
paused condition (PAUSE).
Touch the on-screen button again
to resume playback from the point at
which it was paused.
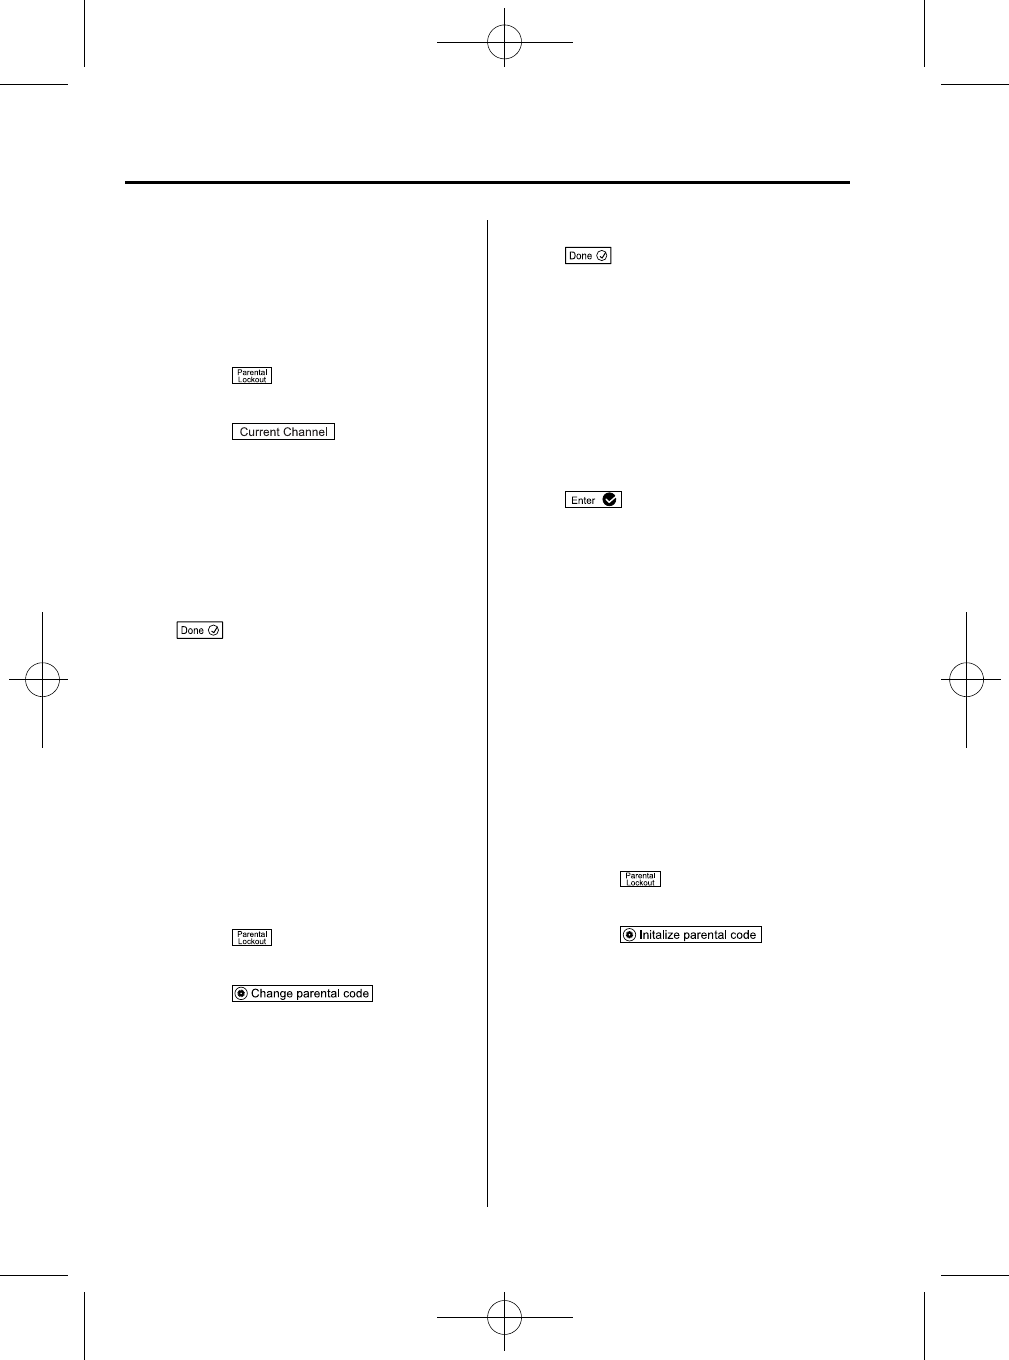
Parental lock
Parental lock, parental unlock, parental
lock code change, and parental lock code
reset can be set.
NOTE
lTouch the on-screen button during
all the settings to return to the previous
display.
lTouch the on-screen button during the
code and master code input to delete an
input number.
lIf only a four-digit code or master code is
input, “Done”can be selected.
lIf the registered code has been forgotten,
reset the code in “Initialize Parental Code”
to [0000].
Parental lock
If a channel is locked, the channel is
muted.
1. Turn the manual tuning dial to select
the desired channel.
2. Touch the on-screen button to
display the settings screen.
3. Touch the on-screen
button to display the parental lock
settings screen.
4. “Input Parental Code”is displayed, and
input of the registered code is possible.
To enter a number, use the numerical
keypad.
5. After inputting the four digits, touch
the on-screen button to confirm
the four digits.
6. If the four digits match the registered
code, “Channel XXX locked”appears
and mute is turned on. If they do not
match the registered code, “Wrong
code”appears and then the display
returns to “Input Parental Code”.
Interior Features
Audio System
5-47
CX-5_8CA6-EC-11L_Edition1 Page257
Monday, December 12 2011 11:32 AM
Form No.8CA6-EC-11L
Black plate (258,1)
Parental unlock
Channels locked using the parental lock
function can be unlocked.
1. Select a channel to be unlocked by
turning the manual tuning dial.
2. Touch the on-screen button to
display the settings screen.
3. Touch the on-screen
button to display the parental unlock
settings screen.
4. “Input Parental Code”is displayed, and
input of the registered code is possible.
To enter a number, use the numerical
keypad.
5. After inputting the four digits, touch
the on-screen button to confirm
the four digits.
6. If the four digits match the registered
code, “Channel XXX unlocked”
appears and mute is canceled. If they
do not match the registered code,
“Wrong code”appears and then the
display returns to “Input Parental
Code”.
Parental-lock code change
When changing the code, the new code is
input after the previous one is input first.
1. Touch the on-screen button to
display the settings screen.
2. Touch the on-
screen button to display the code
change screen.
3. “Enter Current Code”is displayed, and
input of the registered code is possible.
To enter a number, use the numerical
keypad.
4. After inputting the four digits, touch
the on-screen button to confirm
the four digits.
5. If the four digits match the registered
code, “Enter New Code”is displayed.
If they do not match the registered
code, “Wrong code”appears and then
the display returns to “Enter Current
Code”. To enter a number, use the
numerical keypad.
6. After inputting the four digits, touch
the on-screen button to
confirm the four digits.
7. “Code changed”appears to indicate
that the new code input has been
completed.
8. The display returns to its normal
display.
NOTE
Channels locked before changing the code
remain after changing the code. To unlock a
channel, input the changed code.
Parental-lock code reset
If the registered code has been forgotten,
reset the code to the default [0000] code.
1. Touch the on-screen button to
display the settings screen.
2. Touch the on-
screen button to display the code initial
screen.
3. “Enter Master Code”is displayed, and
input of the registered code is possible.
To enter a number, use the numerical
keypad.
5-48
Interior Features
Audio System
CX-5_8CA6-EC-11L_Edition1 Page258
Monday, December 12 2011 11:32 AM
Form No.8CA6-EC-11L
Black plate (259,1)
NOTE
Master code:
The Master Code is used to initialize or re-
initialize the code in the event that the code is
not set to [0000] and/or the personalized code
is not known. The initialization process resets
the code to [0000]. The master code can
potentially defeat the intent of the security of
the parental lock if it is located by persons not
authorized by the owner to access certain
channels.
SIRIUS Satellite Radio Master Code: [0913]
4. After inputting the four digits, touch
the on-screen button to
confirm the four digits.
5. If the four digits match the master
code, “Code initialized”appears. If
they do not match the master code,
“Wrong code”appears and the display
returns to “Enter Master Code”.
6. The code returns to the default [0000]
code.
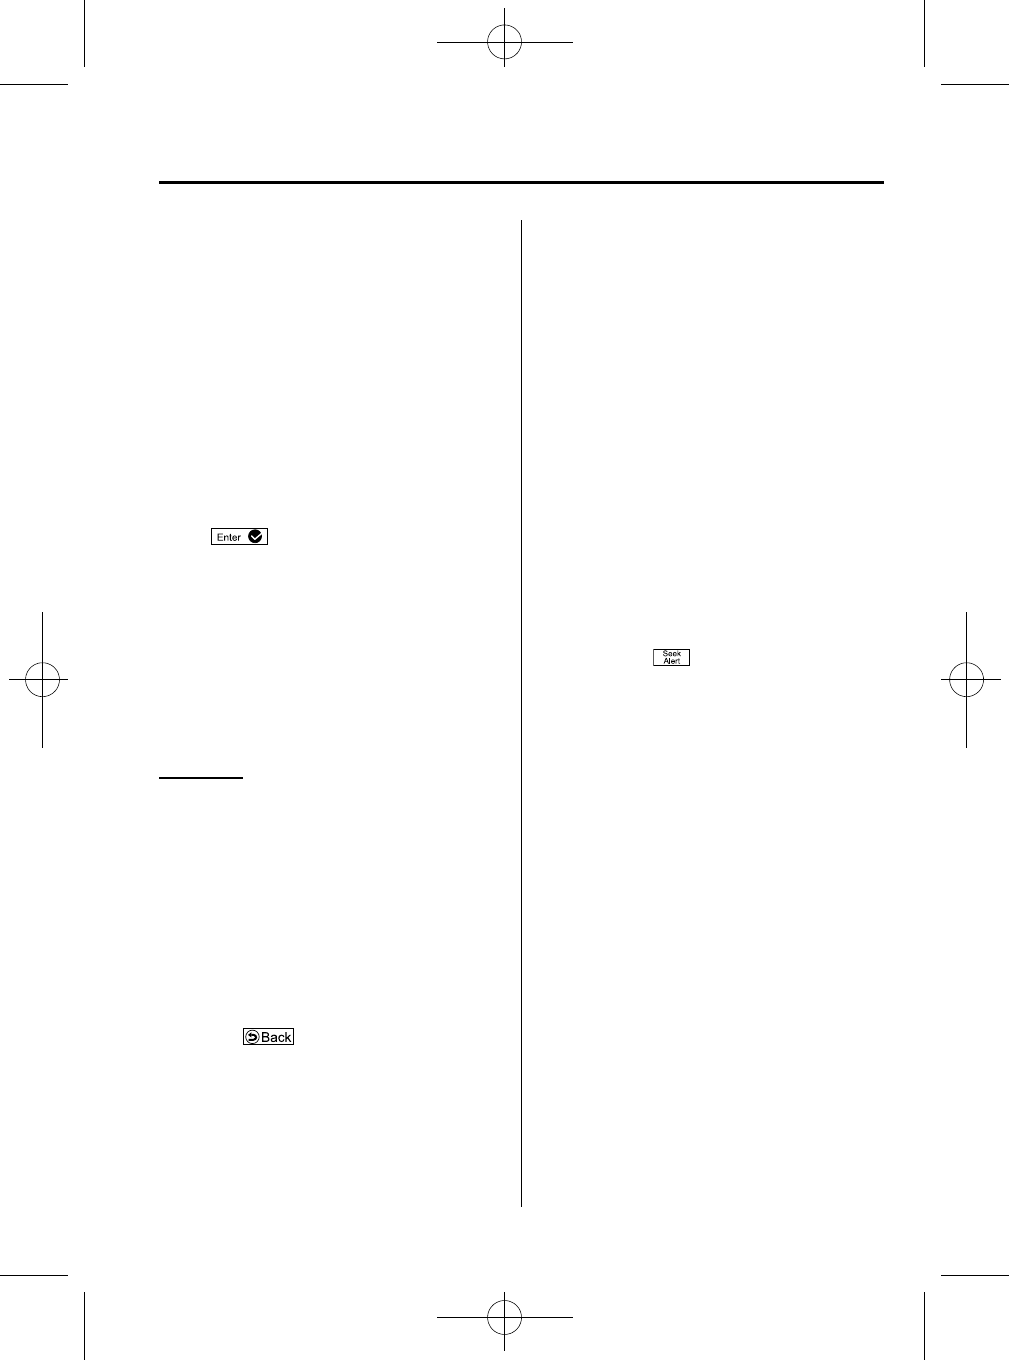
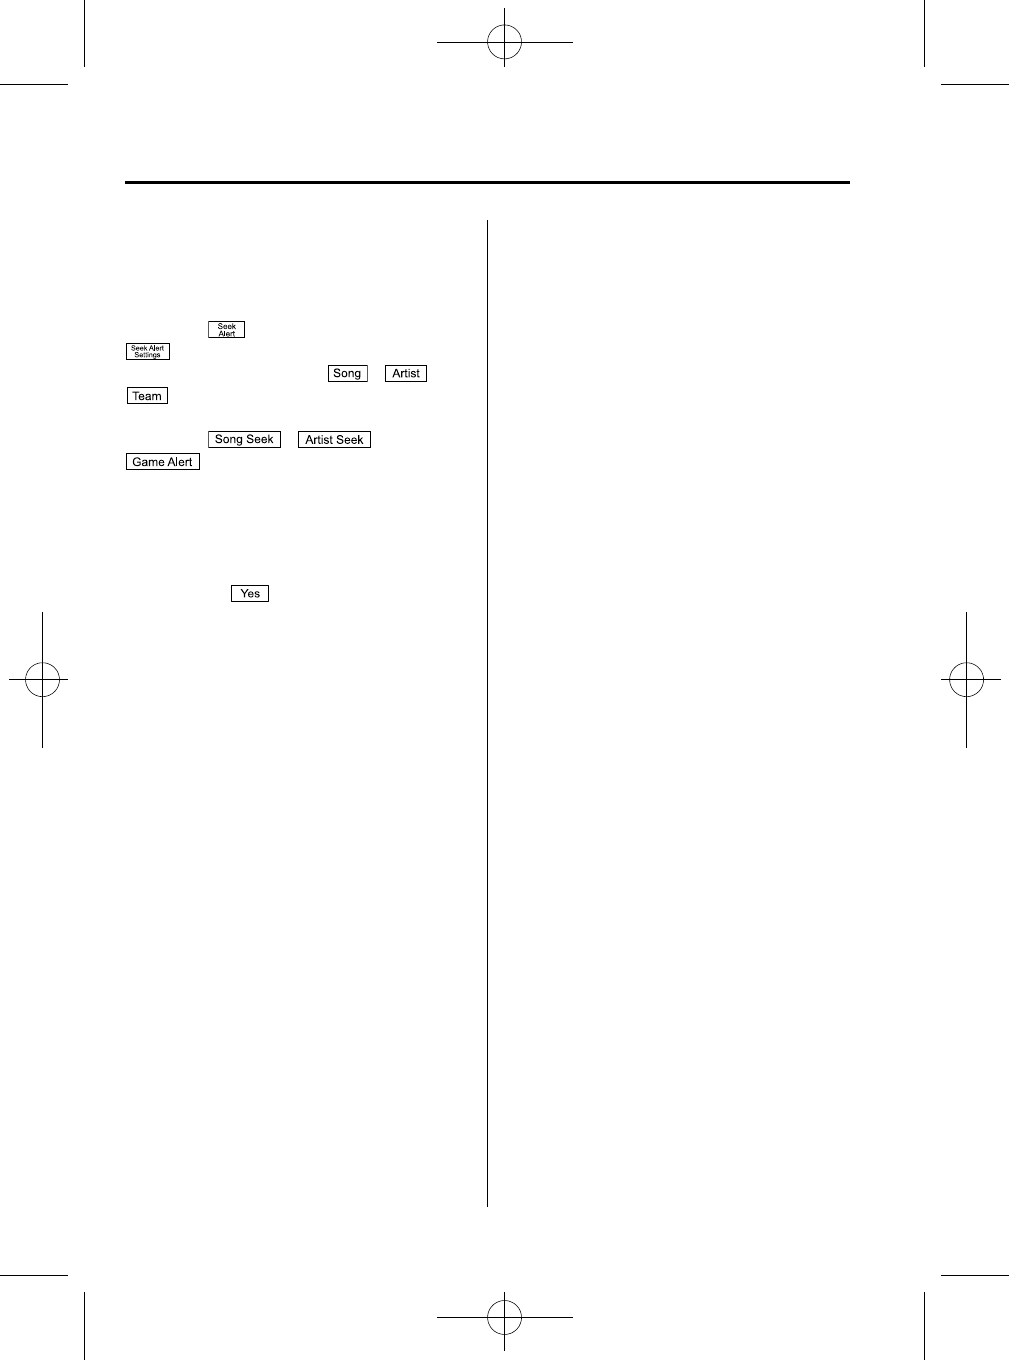
Seek alert
The song title and artist name for the song
currently being listened to, and team
names at the sports game currently being
listened to can be recorded as favorites.
The user is notified when a program
begins which has favorites-related
information recorded.
Selection from seek alert program list
Select the station you want to listen to
from the list to receive the program.
Touch the on-screen button to
return to the receiving screen.
Storing songs, artists, and sports team
names
NOTE
lA maximum of 10 songs, artists, and sports
team names each can be stored.
lIf the song title, artist name, sports team
name cannot be displayed, “No available
items for this program”is displayed.
lEven if the song title, and artist name are
displayed in the main screen, it may not be
possible to record information for old
songs.
lIf a song name is stored, the song seek
function is turned on.
lIf an artist name is stored, the artist seek
function is turned on.
lIf a sports team name is stored, the game
alert function is turned on.
1. Touch the on-screen button to
display the current song and artist
names currently being received. The
sports team name is displayed while
the sports program is being received.
2. Select the item you want to store from
song title, artist name and sports team
name.
3. “XXXXX (song, artist, sports team
name) stored”is displayed.
NOTE
If there is not enough available storage space,
“Song Memory Full”or “Artist Memory Full”
or “Team Memory Full”and “Delete one to
store new one”are displayed. Delete from the
list.
Interior Features
Audio System
5-49
CX-5_8CA6-EC-11L_Edition1 Page259
Monday, December 12 2011 11:32 AM
Form No.8CA6-EC-11L
Black plate (260,1)
Seek alert setting
On or off switching to song seek, artist
seek, or game alert function, and deletion
of stored information can be performed.
Touch the on-screen button and the
on-screen button. Touch the button
you want to change from ,,or
.
(On or off switching)
Touch the , , and
on-screen button.
(Deletion)
1. Select song title, artist name, or sports
team name that you want to delete from
the list.
2. Touch the on-screen button to
display “XXXXX (song, artist, sports
team name) deleted”.
5-50
Interior Features
Audio System
CX-5_8CA6-EC-11L_Edition1 Page260
Monday, December 12 2011 11:32 AM
Form No.8CA6-EC-11L

Black plate (261,1)
MEMO
5-51
CX-5_8CA6-EC-11L_Edition1 Page261
Monday, December 12 2011 11:32 AM
Form No.8CA6-EC-11L
Black plate (262,1)
qOperating the Compact Disc (CD) Player
CD slot
Audio button
CD eject button
Track up/Fast-forward
button
Track down/Reverse
button
File dial
Type Playable data
Music/MP3/WMA/
AAC CD player
lMusic data (CD-DA)
lMP3/WMA/AAC file
NOTE
If a disc has both music data (CD-DA) and
MP3/WMA/AAC files, playback of the two or
three file types differs depending on how the
disc was recorded.
Inserting the CD
Insert the CD into the slot, label-side up.
The auto-loading mechanism will set the
CD and begin play.
NOTE
There will be a short lapse before play begins
while the player reads the digital signals on
the CD.
Ejecting the CD
Press the CD eject button ( ) to eject the
CD.
Playback
Press the audio button ( )or
on-screen tab with a CD inserted.
Pause
To pause playback, touch the on-
screen button.
Touch the on-screen button during
a pause to cancel it.
Fast-forward/Reverse
Operations using audio panel
Press and hold the fast-forward button
() to advance through a track at high
speed.
Press and hold the reverse button ( )to
reverse through a track at high speed.
Operations on screen
Touch and hold the on-screen
button to advance through a track at high
speed.
Touch and hold the on-screen
button to reverse through a track at high
speed.
5-52
Interior Features
Audio System
CX-5_8CA6-EC-11L_Edition1 Page262
Monday, December 12 2011 11:32 AM
Form No.8CA6-EC-11L
Black plate (263,1)
Track search
Operations using audio panel
Press the track up button ( ) or turn the
file dial clockwise once to skip forward to
the beginning of the next track.
Press the track down button ( ) or turn
the file dial counterclockwise once to skip
back to the beginning of the current track.
Operations on screen
Touch the on-screen button once to
skip forward to the beginning of the next
track.
Touch the on-screen button once to
skip back to the beginning of the current
track.
Displaying file list
The desired file list in the CD can be
viewed.
During music CD playback
Touch the on-screen button to display
the track list in the CD.
During MP3/WMA/AAC CD playback
(Viewing file list in desired folder)
1. Touch the on-screen button to
display the folder list in the CD.
2. Touch the folder which you want to
select.
(Viewing file list of current folder)
Touch the on-screen button.
Selecting file/track
Select the file/track you want to play.
During music CD playback
1. Touch the on-screen button to
display the track list in the CD.
2. Touch the track you want to play.
During MP3/WMA/AAC CD playback
1. Touch the on-screen button to
select the folder.
2. Touch the file you want to play.
NOTE
Press the on-screen button on the file list
screen to display the list of folders.
Music scan
During music CD playback
This function scans the titles on a CD and
plays 10 seconds of each song to aid you
in finding a song you want to listen to.
1. Touch the on-screen button
during playback to play 10 seconds of
each subsequent track starting from the
next song.
2. Touch the on-screen button
during playback of the song you want
to listen to and continue the playback
from that point.
During MP3/WMA/AAC CD playback
This function scans the titles in a folder
currently being played and plays 10
seconds of each song to aid you in finding
a song you want to listen to.
1. Touch the on-screen button
during playback to play 10 seconds of
each subsequent track starting from the
next song.
2. Touch the on-screen button
during playback of the song you want
to listen to and continue the playback
from that point.
Interior Features
Audio System
5-53
CX-5_8CA6-EC-11L_Edition1 Page263
Monday, December 12 2011 11:32 AM
Form No.8CA6-EC-11L
Black plate (264,1)
NOTE
lIf the unit is left in scan, normal playback
will resume where scan was selected.
lIf all the tracks are scanned, the unit will
resume normal playback.
Repeat playback
During music CD playback
Touch the on-screen button during
playback to play the song currently being
played repeatedly.“”is displayed
during playback.
Touch the on-screen button while
“”is displayed to cancel.
During MP3/WMA/AAC CD playback
(Track repeat)
Touch the on-screen button to play
the song during playback repeatedly. “”
is displayed during playback.
Touch the on-screen button two
times while “”is displayed to cancel.
(Folder repeat)
Touch the on-screen button two
times to play the songs in the folder
repeatedly. “”is displayed during
playback.
Touch the on-screen button while
“”is displayed to cancel.
Shuffle playback
During music CD playback
Touch the on-screen button during
playback to play the songs in the CD
shuffle. “”is displayed during
playback.
Touch the on-screen button while
“”is displayed to cancel.
During MP3/WMA/AAC CD playback
(Folder shuffle)
Touch the on-screen button during
playback to play the songs in the folder
shuffle. “”is displayed during
playback.
Touch the on-screen button two
times while “”is displayed to cancel.
(CD shuffle)
Touch the on-screen button two
times during playback to play the songs in
the CD shuffle. “”is displayed during
playback.
Touch the on-screen button while
“”is displayed to cancel.
Display scroll
If a whole title cannot be displayed at one
time, touch the on-screen button on
the right side of the title. When the last
character is displayed, touch the on-
screen button to display the first character
of the title.
NOTE
lThe on-screen button is displayed only
if a whole title cannot be displayed at one
time.
lThe information viewable in the display is
only CD information (such as artist name,
song title) which has been recorded to the
CD.
lThis unit cannot display some characters.
Character which cannot be displayed are
indicated by an asterisk ( ).
lThe number of characters which can be
displayed is restricted.
5-54
Interior Features
Audio System
CX-5_8CA6-EC-11L_Edition1 Page264
Monday, December 12 2011 11:32 AM
Form No.8CA6-EC-11L
Black plate (265,1)
Message Display
If “CD Error”is displayed, it means that
there is some CD malfunction. Check the
CD for damage, dirt, or smudges, and
then properly reinsert. If the message
appears again, take the unit to an
Authorized Mazda Dealer for service.
qHow to use Auxiliary jack/USB
port
í
Audio can be heard from the vehicle's
speakers by connecting a commercially-
available portable audio unit to the
auxiliary jack. In addition, audio can be
played from the vehicle audio device by
connecting USB memory or an iPod to
the USB port.
Refer to AUX/USB/iPod mode on page
5-58.
qError Indications
If you see an error indication on the
display, find the cause in the chart. If you
cannot clear the error indication, take the
vehicle to an Authorized Mazda Dealer.
Indication
Cause Solution
CD
Error
CD is inserted
upside down
Insert the CD
properly. If the error
indication continues
to display, consult an
Authorized Mazda
Dealer.
CD is defective
Insert another CD
properly. If the error
indication continues
to display, consult an
Authorized Mazda
Dealer.
qSetup
You can customize settings in the setup
display as follows:
Display
Refer to Power/Volume/Display/Sound
Controls on page 5-36.
Sound
Refer to Power/Volume/Display/Sound
Controls on page 5-36.
Vehicle
lDoor Locks
lLight Control
lWipers Control
1. Press the setup button ( )
2. Touch the on-screen tab to
display the vehicle setting screen.
3. Touch the desired setting item.
4. Select the desired setup item from the
list by touching it.
5. Touch the on-screen button.
Language
1. Press the setup button ( ).
2. Touch the on-screen tab to
display the language setting screen.
3. Touch the desired language from the
list.
4. Touch the on-screen button.
Default (Vehicle settings only)
1. Press the setup button ( ).
2. Touch the on-screen tab.
3. Touch the on-screen button.
4. Touch the on-screen button.
Interior Features
Audio System
5-55
í
Some models.
CX-5_8CA6-EC-11L_Edition1 Page265
Monday, December 12 2011 11:32 AM
Form No.8CA6-EC-11L

Black plate (266,1)
5. Touch the on-screen button.
NOTE
The settings for display, sound, and language
cannot be initialized.
Audio Control Switch
Operation
When the audio unit is turned on,
operation of the audio unit from the
steering wheel is possible.
NOTE
Because the audio unit will be turned off under
the following conditions, the switches will be
inoperable.
lWhen the ignition is switched off.
lWhen the power button on the audio unit is
pressed and the audio unit is turned off.
Without Bluetooth
®
Hands-Free
With Bluetooth
®
Hands-Free
Talk button
Pick-up button
Talk button
Hang-up button
Pick-up button
5-56
Interior Features
Audio System
CX-5_8CA6-EC-11L_Edition1 Page266
Monday, December 12 2011 11:32 AM
Form No.8CA6-EC-11L
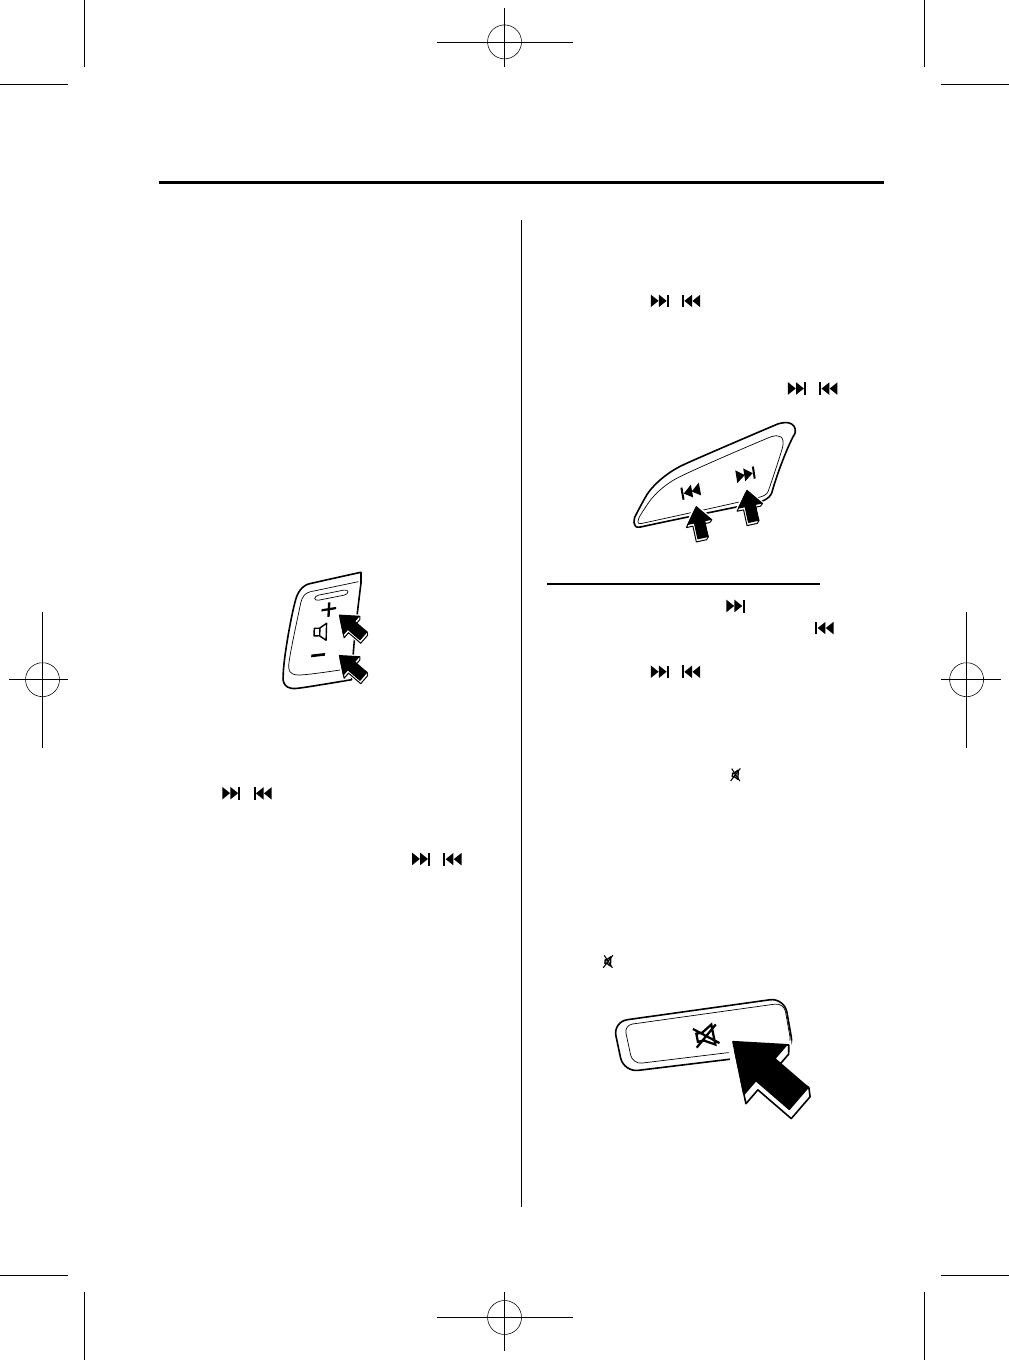
Black plate (267,1)
NOTE
lThe talk button, pick-up button, and hang-
up button are operable with the audio unit
turned off.
lMazda has installed this system to prevent
distraction while driving the vehicle and
using audio controls on the dashboard.
Always make safe driving your first priority.
qAdjusting the Volume
To increase the volume, press up the
volume switch.
To decrease the volume, press down the
volume switch.
qSeek Switch
When listening to the radio, press the seek
switch ( , ). The radio switches to the
next/previous stored station in the order
that it was stored (1―6).
Press and hold the seek switch ( ,)to
seek all usable stations at a higher or
lower frequency whether programmed or
not.
Radio stations which have been
previously stored in the auto memory
tuning can be called up by pressing the
seek switch ( , ) while any radio
station stored in the auto memory tuning
is being received. Radio stations can be
called up in the order they were stored
with each press of the switch ( , ).
When playing a CD or BT audio
Press the seek switch ( ) to skip to the
next track. Press the seek switch ( )to
repeat the current track. Press and hold the
seek switch ( , ) to continuously
switch the tracks up or down.
qMute Switch
í
Press the mute switch ( ) once to mute
audio, press it again to resume audio
output.
NOTE
If the ignition is switched off with the audio
muted, the mute will be canceled. Therefore,
when the engine is restarted, the audio is not
muted. To mute the audio again, press the mute
switch ( ).
Interior Features
Audio System
5-57
í
Some models.
CX-5_8CA6-EC-11L_Edition1 Page267
Monday, December 12 2011 11:32 AM
Form No.8CA6-EC-11L
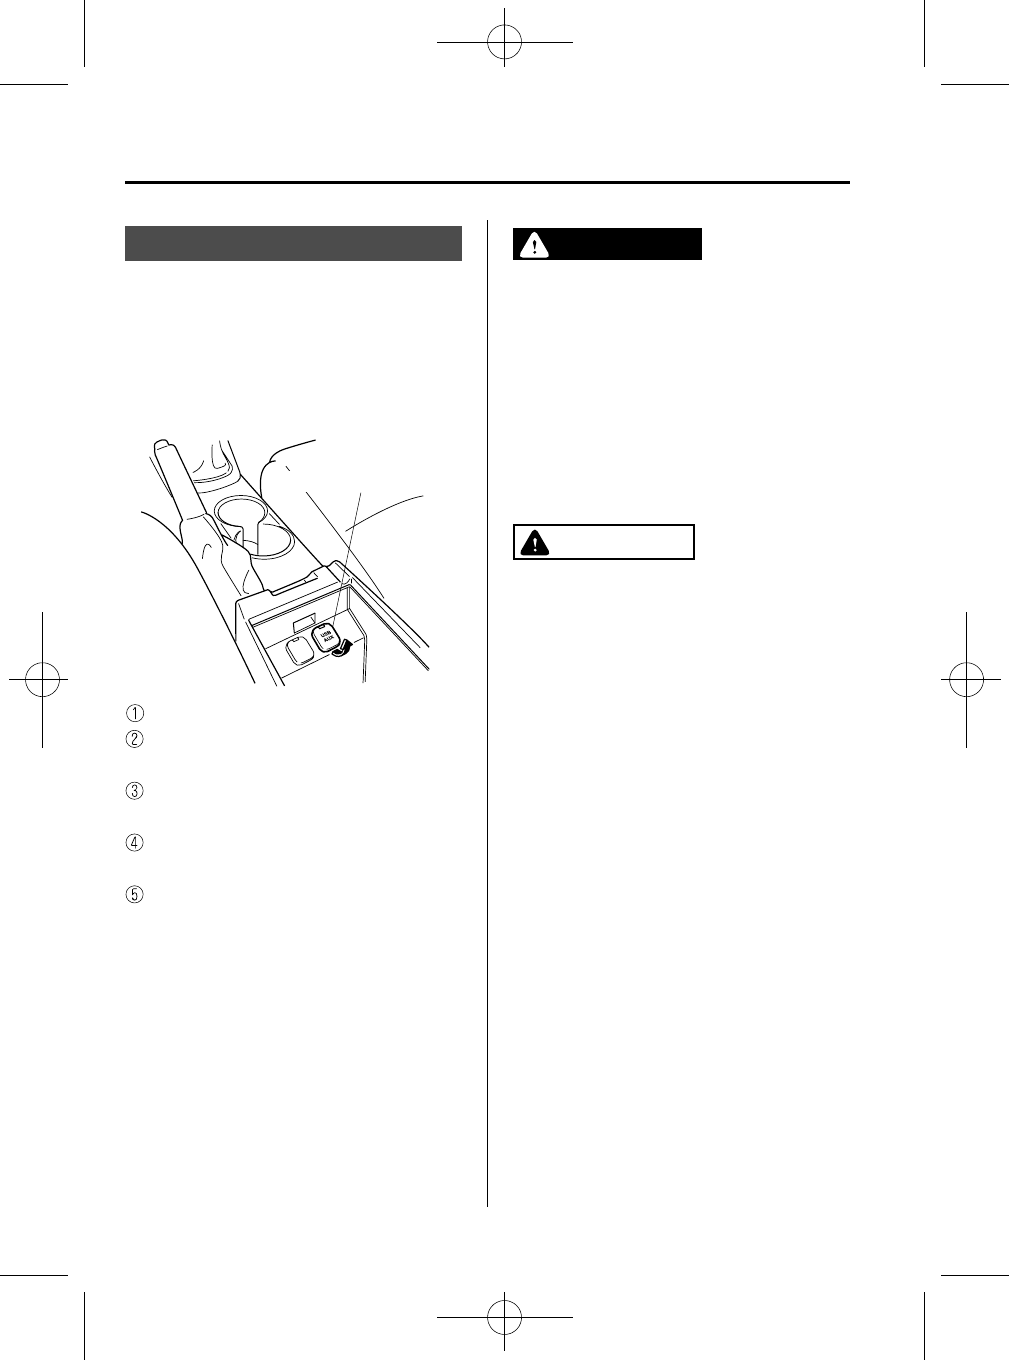
Black plate (268,1)
AUX/USB/iPod mode
í
Audio can be heard from the vehicle's
speakers by connecting a commercially-
available portable audio unit to the
auxiliary jack. In addition, audio can be
played from the vehicle audio device by
connecting USB memory or an iPod to
the USB port.
Auxiliary jack/USB port
How to use AUX mode ....... page 5-60
How to use USB mode (Type
A) ......................................... page 5-62
How to use USB mode (Type
B) ......................................... page 5-66
How to use iPod mode (Type
A) ......................................... page 5-70
How to use iPod mode (Type
B) ......................................... page 5-74
WARNING
Do not adjust the portable audio unit
or a similar product while driving the
vehicle:
Adjusting the portable audio unit or
a similar product while driving the
vehicle is dangerous as it could
distract your attention from the
vehicle operation which could lead to
a serious accident. Always adjust the
portable audio unit or a similar
product while the vehicle is stopped.
CAUTION
ØAlways close the auxiliary jack/
USB port lid when it is not in use.
If foreign matters or liquid
penetrate the auxiliary jack/USB
port, it may cause a malfunction.
ØDepending on the portable audio
device, noise may occur when
using the device with it connected
to the accessory socket equipped
on the vehicle. (If noise occurs, do
not use the accessory socket.)
5-58
Interior Features
í
Some models.
Audio System
CX-5_8CA6-EC-11L_Edition1 Page268
Monday, December 12 2011 11:32 AM
Form No.8CA6-EC-11L
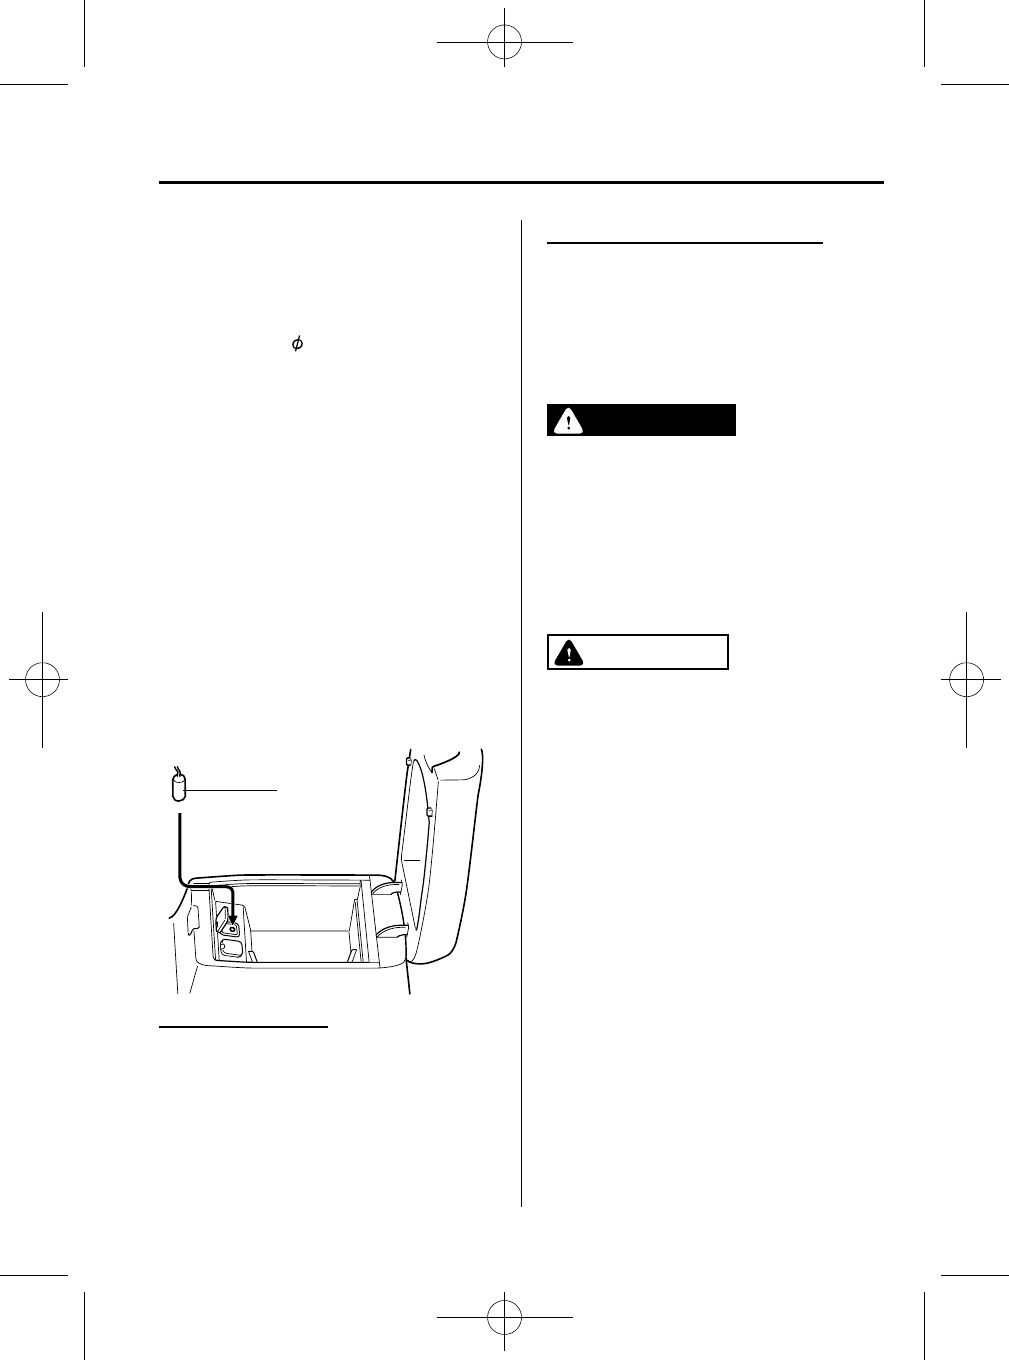
Black plate (269,1)
NOTE
lBefore using the auxiliary jack/USB port,
refer to the instruction manual for the
portable audio device.
lUse a commercially-available, non-
impedance (3.5 ) stereo mini plug for
connecting the portable audio unit to the
auxiliary jack. Before using the auxiliary
jack, read the manufacturer's instructions
for connecting a portable audio unit to the
auxiliary jack.
lTo prevent discharging of the battery, do
not use the auxiliary input for long periods
with the engine off or idling.
lNoise may occur depending on the product
connected to the auxiliary jack.
lWith regard to connecting a portable audio
or similar device to a power source, use the
battery for the device, not the accessory
socket.
qHow to connect USB port/iPod
terminal
Plug
Connecting a device
1. Open the console lid.
2. Open the auxiliary jack/USB port lid.
3. Connect the device plug to the USB
port.
Connecting with connector cable
1. Open the console lid.
2. Open the auxiliary jack/USB port lid.
3. Pass the connection plug cord through
the cutout of the console and insert the
plug into the auxiliary jack.
WARNING
Do not allow the connection plug cord
to get tangled with the parking brake
or the shift lever:
Allowing the plug cord to become
tangled with the parking brake or
the shift lever is dangerous as it
could interfere with driving, resulting
in an accident.
CAUTION
Do not place objects or apply force to
the auxiliary jack with the plug
connected.
NOTE
lInsert the plug to the auxiliary jack/USB
port securely.
lInsert or pull out the plug with the plug
perpendicular to the auxiliary jack/USB
port hole.
lInsert or remove the plug by holding its
base.
Interior Features
Audio System
5-59
CX-5_8CA6-EC-11L_Edition1 Page269
Monday, December 12 2011 11:32 AM
Form No.8CA6-EC-11L
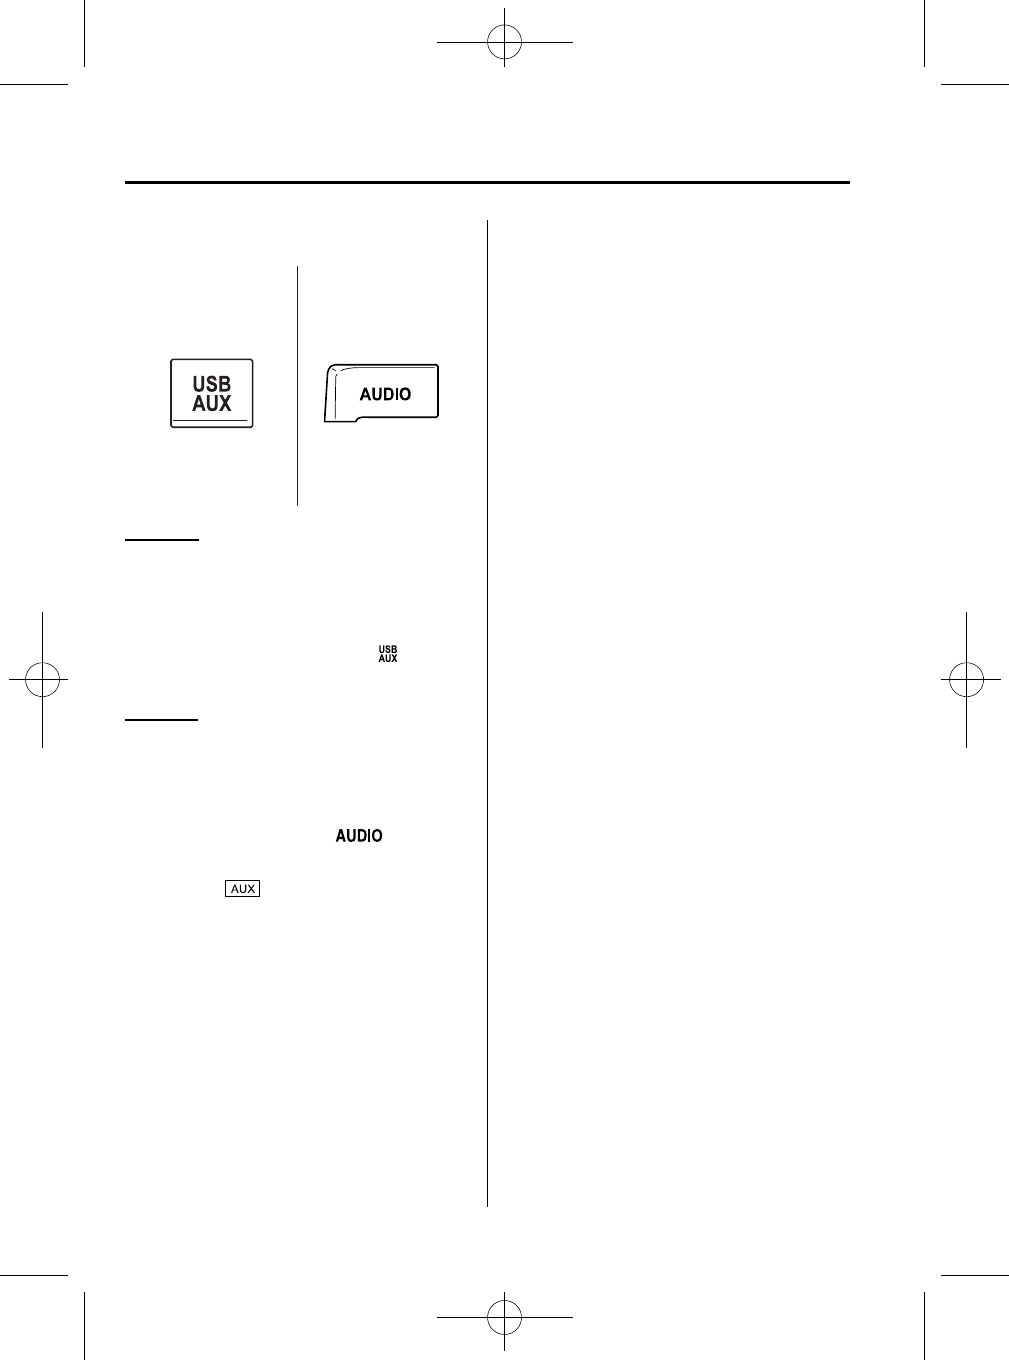
Black plate (270,1)
qHow to use AUX mode
Type A Type B
(Type A)
1. Switch the ignition to ACC or ON.
2. Press the power/volume dial to turn the
audio system on.
3. Press the USB/AUX button ( ) of the
audio unit to change to the AUX mode.
(Type B)
1. Switch the ignition to ACC or ON.
2. Press the power/volume dial to turn the
audio system on.
3. Press the audio button ( )to
display the audio screen.
4. Press the on-screen tab to switch
to the AUX mode.
NOTE
lWhen the device is not connected to the
auxiliary jack, the mode does not switch to
the AUX mode.
lSet the volume of the portable audio unit to
the maximum within the range that the
sound does not become distorted, then
adjust the volume using the power/volume
dial of the audio unit or the up/down switch
of the audio control switch.
lAudio adjustments other than audio volume
can only be done using the portable audio
device.
lIf the connection plug is pulled out from the
auxiliary jack while in AUX mode, noise
may occur.
5-60
Interior Features
Audio System
CX-5_8CA6-EC-11L_Edition1 Page270
Monday, December 12 2011 11:32 AM
Form No.8CA6-EC-11L
Black plate (271,1)
MEMO
5-61
CX-5_8CA6-EC-11L_Edition1 Page271
Monday, December 12 2011 11:32 AM
Form No.8CA6-EC-11L
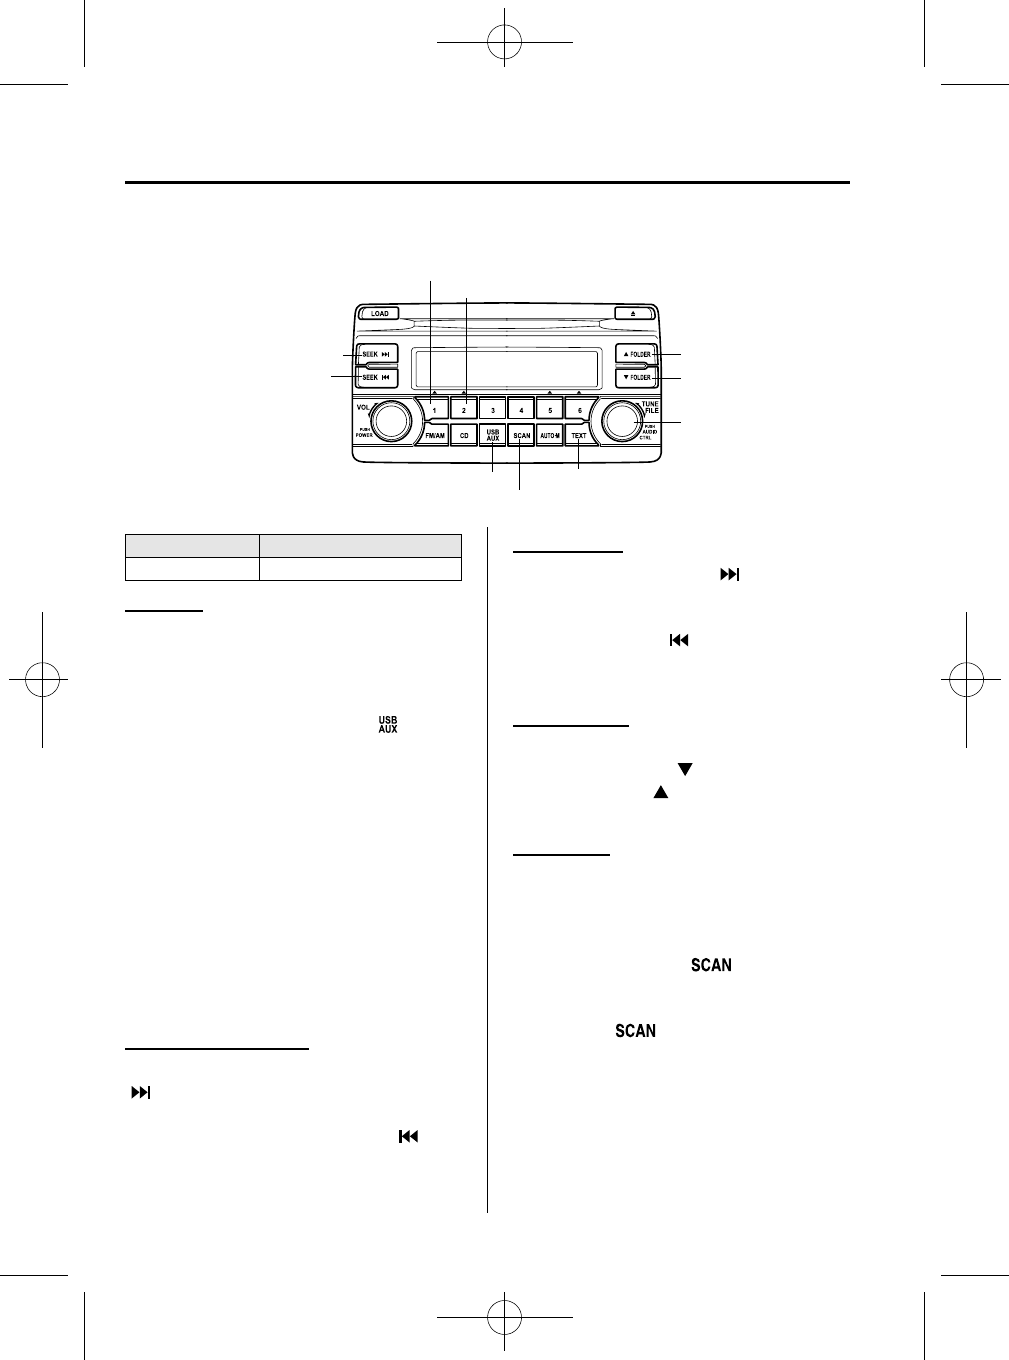
Black plate (272,1)
qHow to use USB mode (Type A)
Track up/Fast-forward button
Track down/Reverse button
Repeat button
Random button
Folder down button
Folder up button
Text button
Scan button
USB/AUX button
File dial
Type Playable data
USB mode MP3/WMA/AAC file
Playback
1. Switch the ignition to ACC or ON.
2. Press the power/volume dial to turn the
audio system on.
3. Press the USB/AUX button ( )to
switch to the USB mode and start
playback.
NOTE
lWhen the USB memory is not connected,
the mode does not switch to USB mode.
lWhen there is no playable data in the USB
memory, “NO CONTENTS”is indicated.
lPlayback of the USB memory is in the order
of the folder numbers. Folders which have
no MP3/WMA/AAC files are skipped.
lDo not remove the USB memory while in
the USB mode. The data may be damaged.
Fast-forward/Reverse
Press and hold the fast-forward button
() to advance through a track at high
speed.
Press and hold the reverse button ( )to
reverse through a track at high speed.
Track search
Press the track up button ( ) or turn the
file dial clockwise once to skip forward to
the beginning of the next track. Press the
track down button ( ) or turn the file
dial counterclockwise once to skip back to
the beginning of the current track.
Folder search
To change to the previous folder, press the
folder down button ( ), or press the
folder up button ( ) to advance to the
next folder.
Music Scan
This function scans the titles in a folder
currently being played and plays ten
seconds of each song to aid you in finding
a song you want to listen to.
Press the scan button ( ) during
playback to start the scan play operation
(the track number will flash). Press the
scan button ( ) again to cancel scan
playback.
NOTE
If the unit is left in scan, normal playback will
resume where scan was selected.
5-62
Interior Features
Audio System
CX-5_8CA6-EC-11L_Edition1 Page272
Monday, December 12 2011 11:32 AM
Form No.8CA6-EC-11L
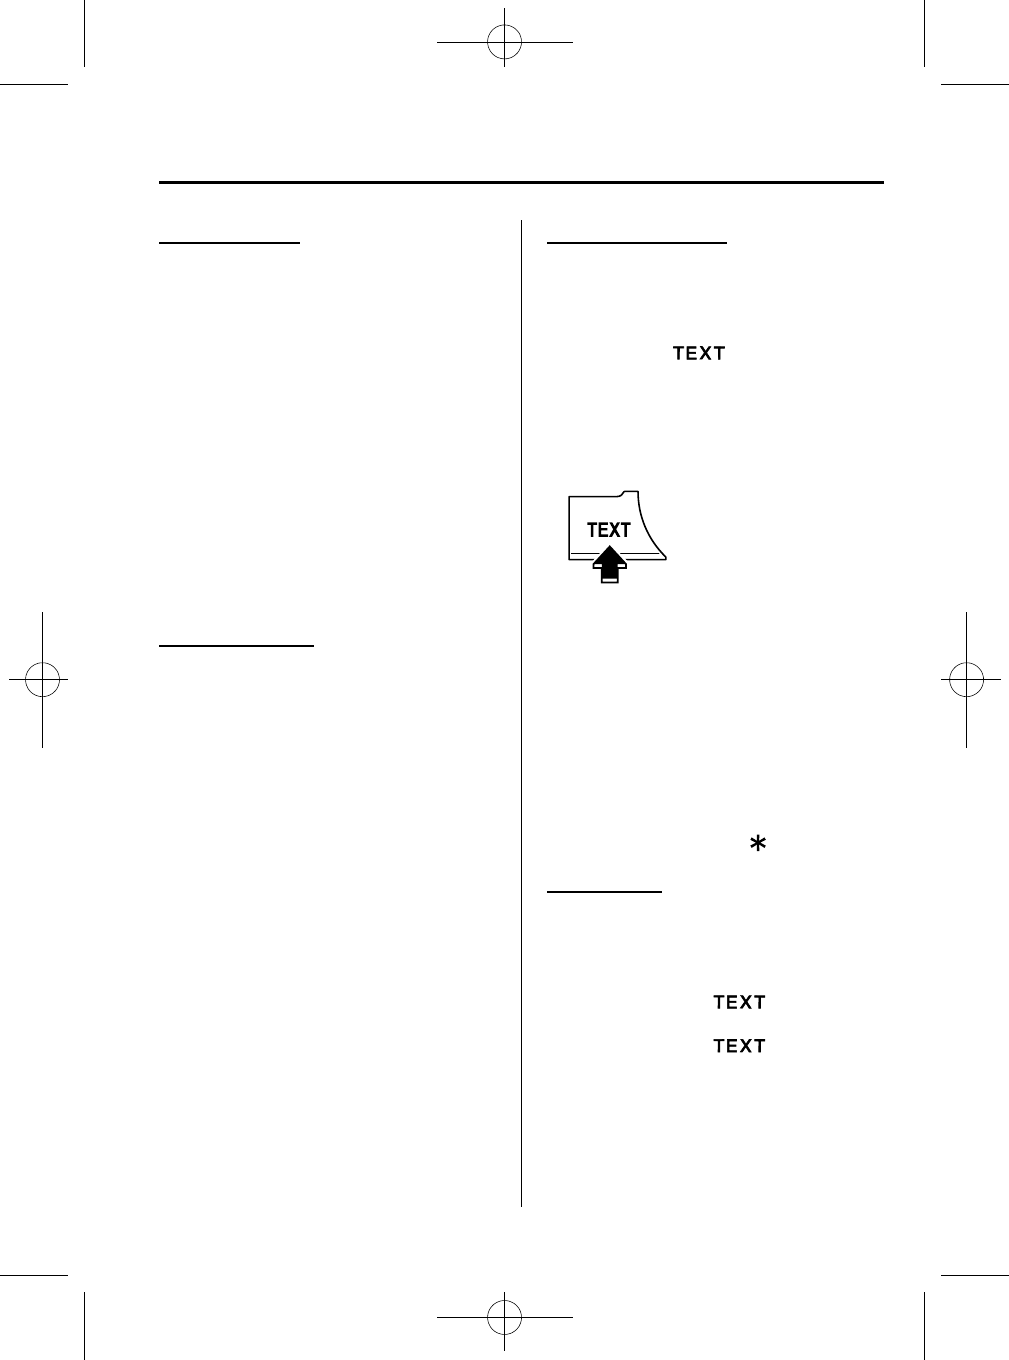
Black plate (273,1)
Repeat playback
(Track repeat)
Press the repeat button (1) during
playback to play the current track
repeatedly. “TRACK RPT”is displayed
during playback.
Press the repeat button (1) two times
while “TRACK RPT”is displayed to
cancel.
(Folder repeat)
Press the repeat button (1) two times
during playback to repeat the playback of
the songs in the current folder. “FOLDER
RPT”is displayed during playback.
Press the repeat button (1) while
“FOLDER RPT”is displayed to cancel.
Random playback
(Folder random)
Press the random button (2) during
playback to play the tracks in the folder
randomly. “FOLDER RDM”is displayed
during playback.
Press the random button (2) two times
while “FOLDER RDM”is displayed to
cancel.
(Media random)
Press the random button (2) two times
during playback to play the songs in the
USB memory randomly. “MEDIA RDM”
is displayed during playback.
Press the random button (2) while
“MEDIA RDM”is displayed to cancel.
Switching the display
For files with a file name and other
information that have been input, the
display switches between display of the
file name and other information each time
the text button ( ) is pressed during
playback.
File number/Elapsed time display
Folder name
File name
Album name
Song name
Artist name
Folder number/File number
NOTE
lThe information (artist name, music name)
is displayed only when the USB memory
information in the USB memory has
information which can be displayed on the
screen.
lThis unit cannot display some characters.
Characters which cannot be displayed are
indicated by an asterisk ( ).
Display scroll
Only 9 characters (File name) or 13
characters (Except file name) can be
displayed at one time. To display the rest
of the characters of a long title, press and
hold the text button ( ). The display
scrolls the next 13 characters. Press and
hold the text button ( ) again after
the last 13 characters have been displayed
to return to the beginning of the title.
NOTE
The number of characters which can be
displayed is restricted.
Interior Features
Audio System
5-63
CX-5_8CA6-EC-11L_Edition1 Page273
Monday, December 12 2011 11:32 AM
Form No.8CA6-EC-11L
Black plate (274,1)
Error Messages
When the message “CHECK USB”is
displayed, it indicates that there is some
error in the USB memory. Verify that the
content recorded in the USB memory has
MP3/WMA/AAC files and re-connect
correctly. If the message reappears, have
the unit checked by an Authorized Mazda
Dealer.
5-64
Interior Features
Audio System
CX-5_8CA6-EC-11L_Edition1 Page274
Monday, December 12 2011 11:32 AM
Form No.8CA6-EC-11L

Black plate (275,1)
MEMO
5-65
CX-5_8CA6-EC-11L_Edition1 Page275
Monday, December 12 2011 11:32 AM
Form No.8CA6-EC-11L
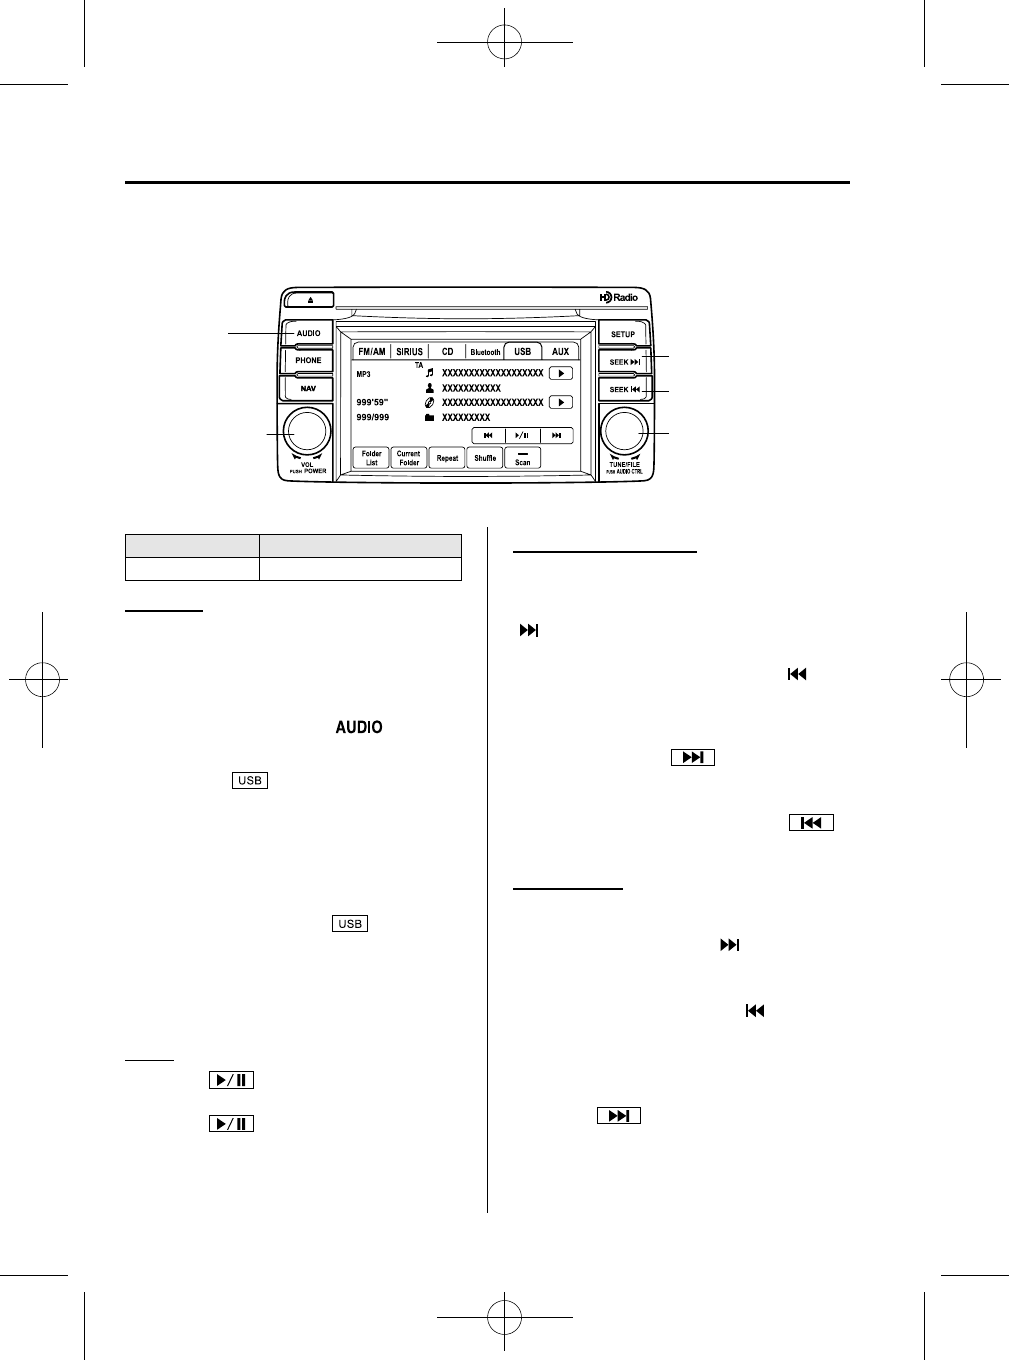
Black plate (276,1)
qHow to use USB mode (Type B)
Audio button
Power/Volume dial
Track up/Fast-forward
button
Track down/Reverse
button
File dial
Type Playable data
USB mode MP3/WMA/AAC file
Playback
1. Switch the ignition to ACC or ON.
2. Press the power/volume dial to turn the
audio system on.
3. Press the audio button ( )to
display the audio screen.
4. Touch the on-screen tab to
switch to USB mode and start
playback.
NOTE
lWhen a USB memory is not connected to
the USB port, the mode does not switch to
the USB mode even if the on-screen
tab is touched.
lDo not remove the USB memory while in
the USB mode. Otherwise, the data could
be damaged.
Pause
Touch the on-screen button to
pause playback.
Touch the on-screen button while
playback is paused to cancel the pause.
Fast-forward/Reverse
Operations using audio panel
Press and hold the fast-forward button
() to advance through a track at high
speed.
Press and hold the reverse button ( )to
reverse through a track at high speed.
Operations on screen
Touch and hold the on-screen
button to advance through a track at high
speed.
Touch and hold the reverse button
to reverse through a track at high speed.
Track search
Operations using audio panel
Press the track up button ( ) or turn the
file dial clockwise once to skip forward to
the beginning of the next track.
Press the track down button ( ) or turn
the file dial counterclockwise once to skip
back to the beginning of the current track.
Operations on screen
Touch the on-screen button once to
skip forward to the beginning of the next
track.
5-66
Interior Features
Audio System
CX-5_8CA6-EC-11L_Edition1 Page276
Monday, December 12 2011 11:32 AM
Form No.8CA6-EC-11L
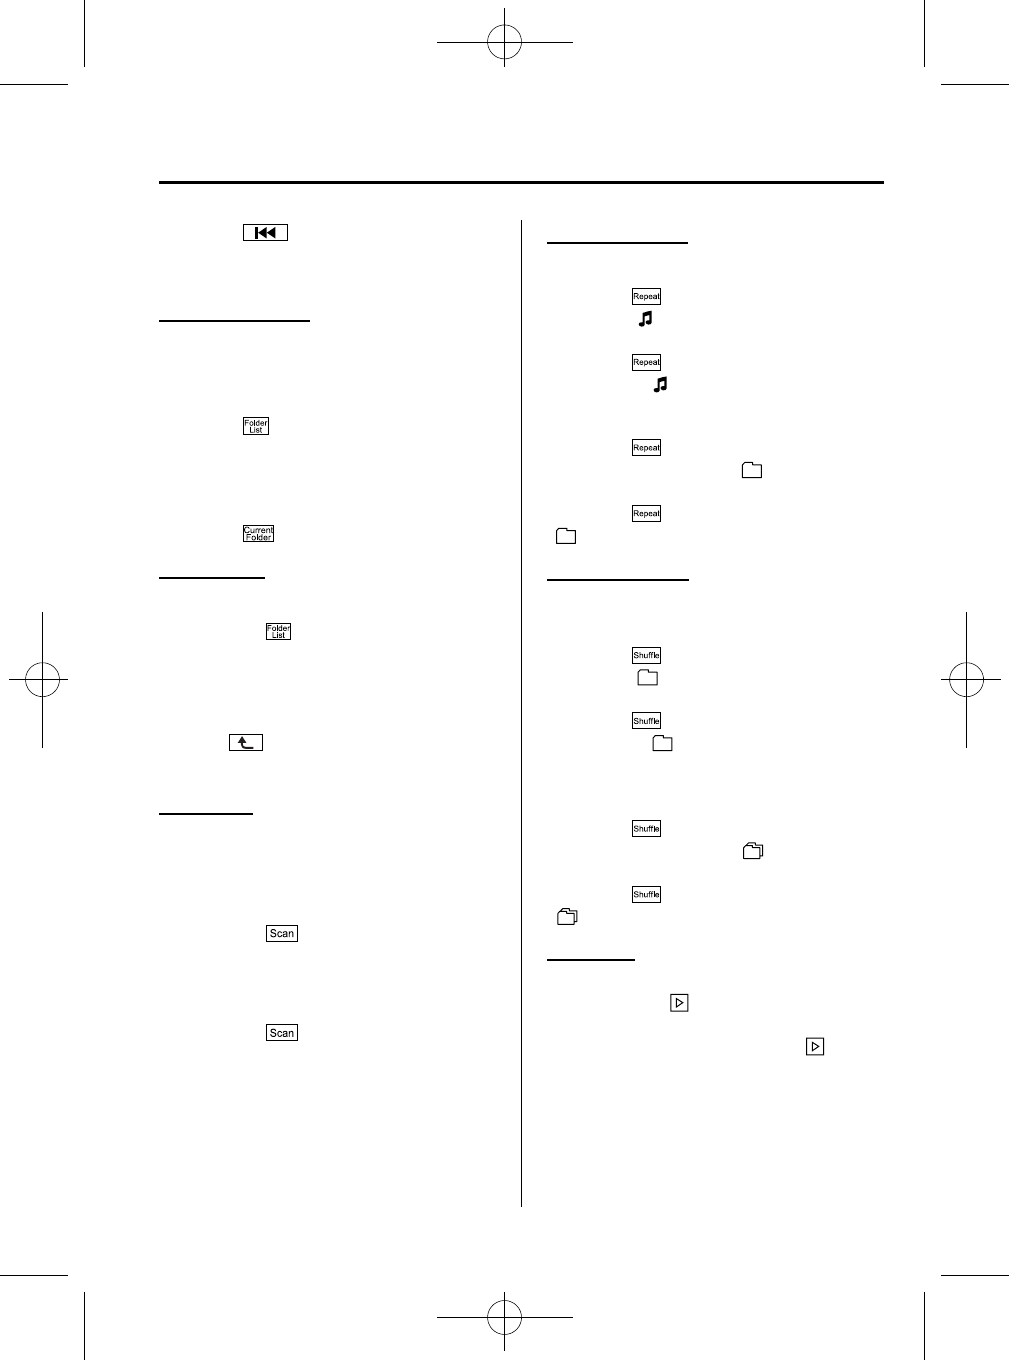
Black plate (277,1)
Touch the on-screen button once to
skip back to the beginning of the current
track.
Displaying file list
The optional file list in the USB memory
can be viewed.
(Viewing file list in optional folder)
Touch the on-screen button to display
the folder list in the USB memory. Touch
the folder to display the file list.
(Viewing file list in the current folder)
Touch the on-screen button.
Selecting file
Select a desired file to play the song.
1. Touch the on-screen button to
select the folder.
2. Touch the file you want to play.
NOTE
Press the on-screen button on the file list
screen to display the list of folders.
Music scan
This function scans the titles in a folder
currently being played and plays ten
seconds of each song to aid you in finding
a song you want to listen to.
1. Touch the on-screen button
during playback to play 10 seconds of
each subsequent track starting from the
next song.
2. Touch the on-screen button
during playback to continue the
playback from that point.
NOTE
If the unit is left in scan, normal playback will
resume where scan was selected.
Repeat playback
(Repeating song during playback)
Touch the on-screen button during
playback. “”is displayed during
playback.
Touch the on-screen button two
times while “”is displayed to cancel.
(Repeating folder during playback)
Touch the on-screen button two
times during playback. “”is displayed
during playback.
Touch the on-screen button while
“”is displayed to cancel.
Shuffle playback
(To listen to tracks in shuffled order
within a folder)
Touch the on-screen button during
playback. “”is displayed during
playback.
Touch the on-screen button two
times while “”is displayed to cancel.
(To listen to tracks in shuffled order
within USB memory)
Touch the on-screen button two
times during playback. “”is displayed
during playback.
Touch the on-screen button while
“”is displayed to cancel.
Text scroll
If a whole title cannot be displayed at one
time, touch the on-screen button on
the right side of each title. When the last
character is displayed, touch the on-
screen button to display the first character
of the title.
Interior Features
Audio System
5-67
CX-5_8CA6-EC-11L_Edition1 Page277
Monday, December 12 2011 11:32 AM
Form No.8CA6-EC-11L
Black plate (278,1)
NOTE
lThe on-screen button is displayed only
when the whole title is not displayed.
lThe information (artist name, music name)
is displayed only when the USB memory
has information which can be displayed on
the screen.
lThis unit cannot display some characters.
Character which cannot be displayed are
indicated by an asterisk ( ).
lThe number of characters which can be
displayed is restricted.
Error Messages
If the message “USB Error”is displayed,
it indicates that there is no playable file in
the USB memory or there is an error in
the USB memory. Verify that the content
recorded in the USB memory has MP3/
WMA/AAC files and re-connect correctly.
If the message reappears, have the unit
checked by an Authorized Mazda Dealer.
5-68
Interior Features
Audio System
CX-5_8CA6-EC-11L_Edition1 Page278
Monday, December 12 2011 11:32 AM
Form No.8CA6-EC-11L

Black plate (279,1)
MEMO
5-69
CX-5_8CA6-EC-11L_Edition1 Page279
Monday, December 12 2011 11:32 AM
Form No.8CA6-EC-11L
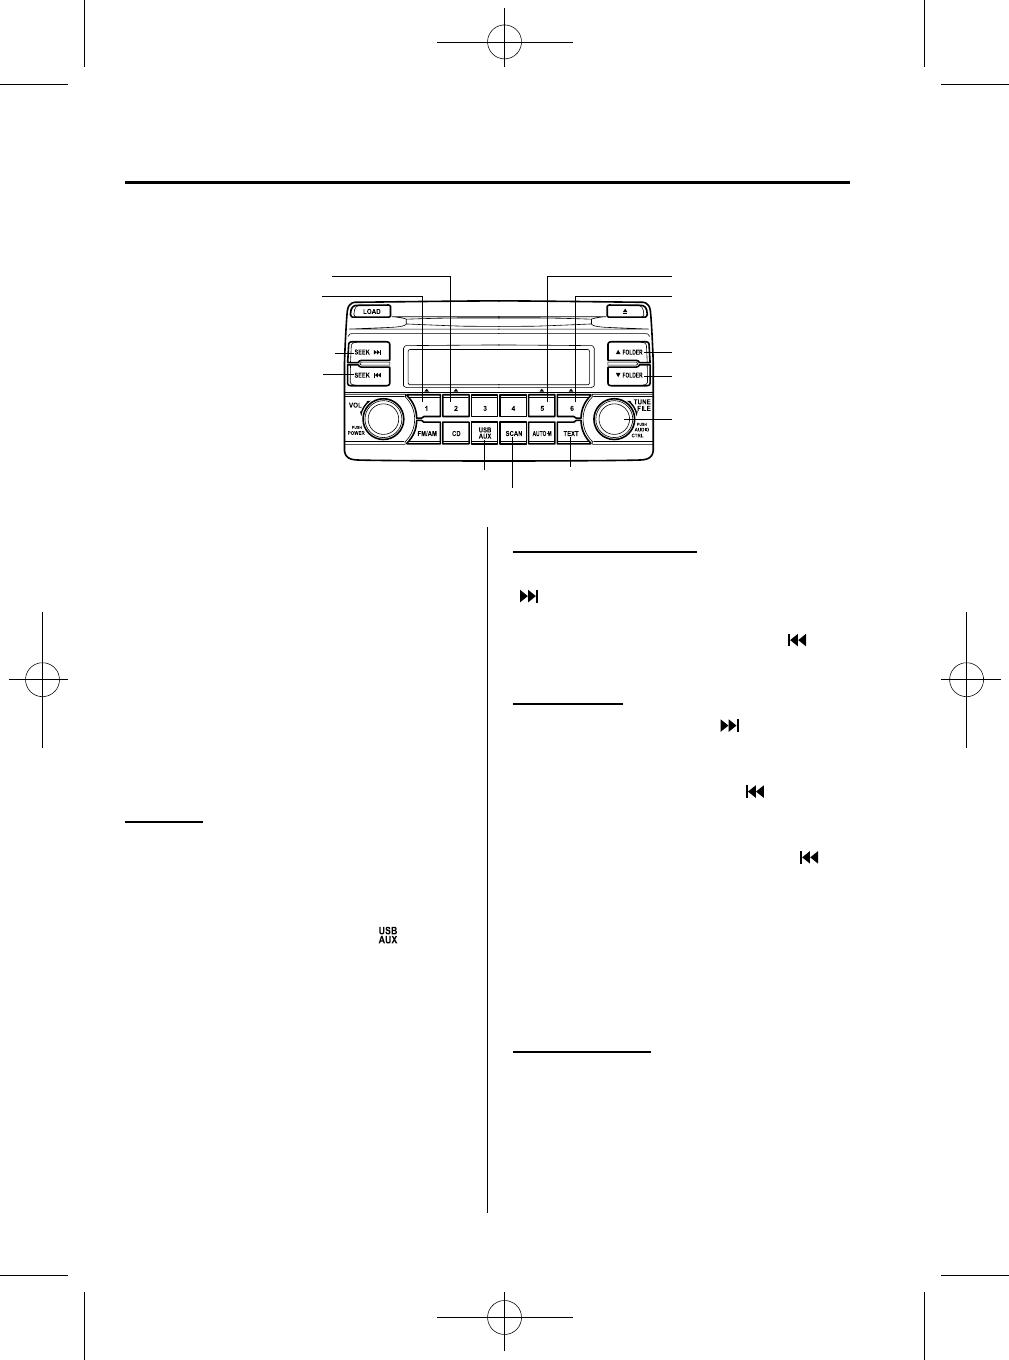
Black plate (280,1)
qHow to use iPod mode (Type A)
Track up/Fast-forward button
Track down/Reverse button
Repeat button
Random button Category down button
Category up button
List down button
List up button
Text button
Scan button
USB/AUX button
File dial
Connectable iPod is as follows:
liPod: 5G
liPod classic
liPod nano: 1/2/3/4/5G
liPod touch
*1
: 1/2G
liPhone
*1
: 3G/3GS
*1 For only iPod functions
NOTE
The iPod functions on the iPod cannot be
operated while it is connected to the unit
because the unit controls the iPod functions.
Playback
1. Switch the ignition to ACC or ON.
2. Press the power/volume dial to turn the
audio system on.
3. Press the USB/AUX button ( )to
switch to the iPod mode and start
playback.
NOTE
lWhen an iPod is not connected, the mode
does not switch to the iPod mode.
lWhen there is no playable data in the iPod,
“NO CONTENTS”is flashed.
lDo not remove the iPod while in the iPod
mode. Otherwise, the data could be
damaged.
Fast-forward/Reverse
Press and hold the fast-forward button
() to advance through a track at high
speed.
Press and hold the reverse button ( )to
reverse through a track at high speed.
Track search
Press the track up button ( ) or turn the
file dial clockwise once to skip forward to
the beginning of the next track.
Press the track down button ( ) or turn
the file dial counterclockwise within a few
seconds after playback begins to track
down. Press the track down button ( )
or turn the file dial counterclockwise after
a few seconds have elapsed to start
playback from the beginning of the track.
The time required to track down/start
playback from the beginning of a track
varies depending on iPod software
version.
Category search
Press the category down button (5) to
select the previous category and press the
category up button (6) to select the next
category.
5-70
Interior Features
Audio System
CX-5_8CA6-EC-11L_Edition1 Page280
Monday, December 12 2011 11:32 AM
Form No.8CA6-EC-11L
Black plate (281,1)
NOTE
The types of categories include Playlist, Artist,
Album, Song, Podcast, Genre, Composer, and
Audio book.
List search
Press the list down button ( ) to select
the previous list and press the list up
button ( ) to select the next list.
NOTE
When the selected category is Song or Audio
book, there is no list.
Music Scan
This function scans the titles in a list
currently being played and plays 10
seconds of each song to aid you in finding
a song you want to listen to.
Press the scan button ( ) during
playback to start the scan play operation
(the track number will flash). Press the
scan button ( ) again to cancel scan
playback.
NOTE
If the unit is left in scan, normal playback will
resume where scan was selected.
Repeat playback
Press the repeat button (1) during
playback to repeat the playback of the
song in the current list. “TRACK RPT”is
displayed during playback.
Press the repeat button (1) while
displaying “TRACK RPT”to cancel.
Random playback
(Song random)
Press the random button (2) during
playback to play the tracks in the list
randomly. “SONG RDM”is displayed
during playback.
Press the random button (2) two times
while “SONG RDM”is displayed to
cancel.
(Album random)
Press the random button (2) two times
during playback to play the songs in the
iPod randomly. “ALBUM RDM”is
displayed during playback.
Press the random button (2) while
“ALBUM RDM”is displayed to cancel.
NOTE
The track number being played randomly is in
the order of the iPod shuffle table.
Switching the display
For files with a file name and other
information that have been input, the
display switches between display of the
file name and other information each time
the text button ( ) is pressed during
playback.
Album name
Song name
Artist name
Category (Playlist title/Genre title
/Composer title/Podcast title)
File number/Elapsed time
Interior Features
Audio System
5-71
CX-5_8CA6-EC-11L_Edition1 Page281
Monday, December 12 2011 11:32 AM
Form No.8CA6-EC-11L
Black plate (282,1)
NOTE
lThe information (artist name, music name)
is displayed only when the iPod has
information which can be displayed.
lThis unit cannot display some characters.
Characters which cannot be displayed are
indicated by an asterisk ( ).
Display scroll
13 characters (Except file name) can be
displayed at one time. To display the rest
of the characters of a long title, press and
hold the text button ( ). The display
scrolls the next 13 characters. Press and
hold the text button ( ) again after
the last 13 characters have been displayed
to return to the beginning of the title.
NOTE
The number of characters which can be
displayed is restricted.
Error Messages
If the message “CHECK iPod”is
displayed, it indicates that there is a
malfunction in the iPod. Verify that the
content recorded in the iPod has playable
files and connect correctly. If the message
reappears, have the unit checked by an
Authorized Mazda Dealer.
5-72
Interior Features
Audio System
CX-5_8CA6-EC-11L_Edition1 Page282
Monday, December 12 2011 11:32 AM
Form No.8CA6-EC-11L

Black plate (283,1)
MEMO
5-73
CX-5_8CA6-EC-11L_Edition1 Page283
Monday, December 12 2011 11:32 AM
Form No.8CA6-EC-11L
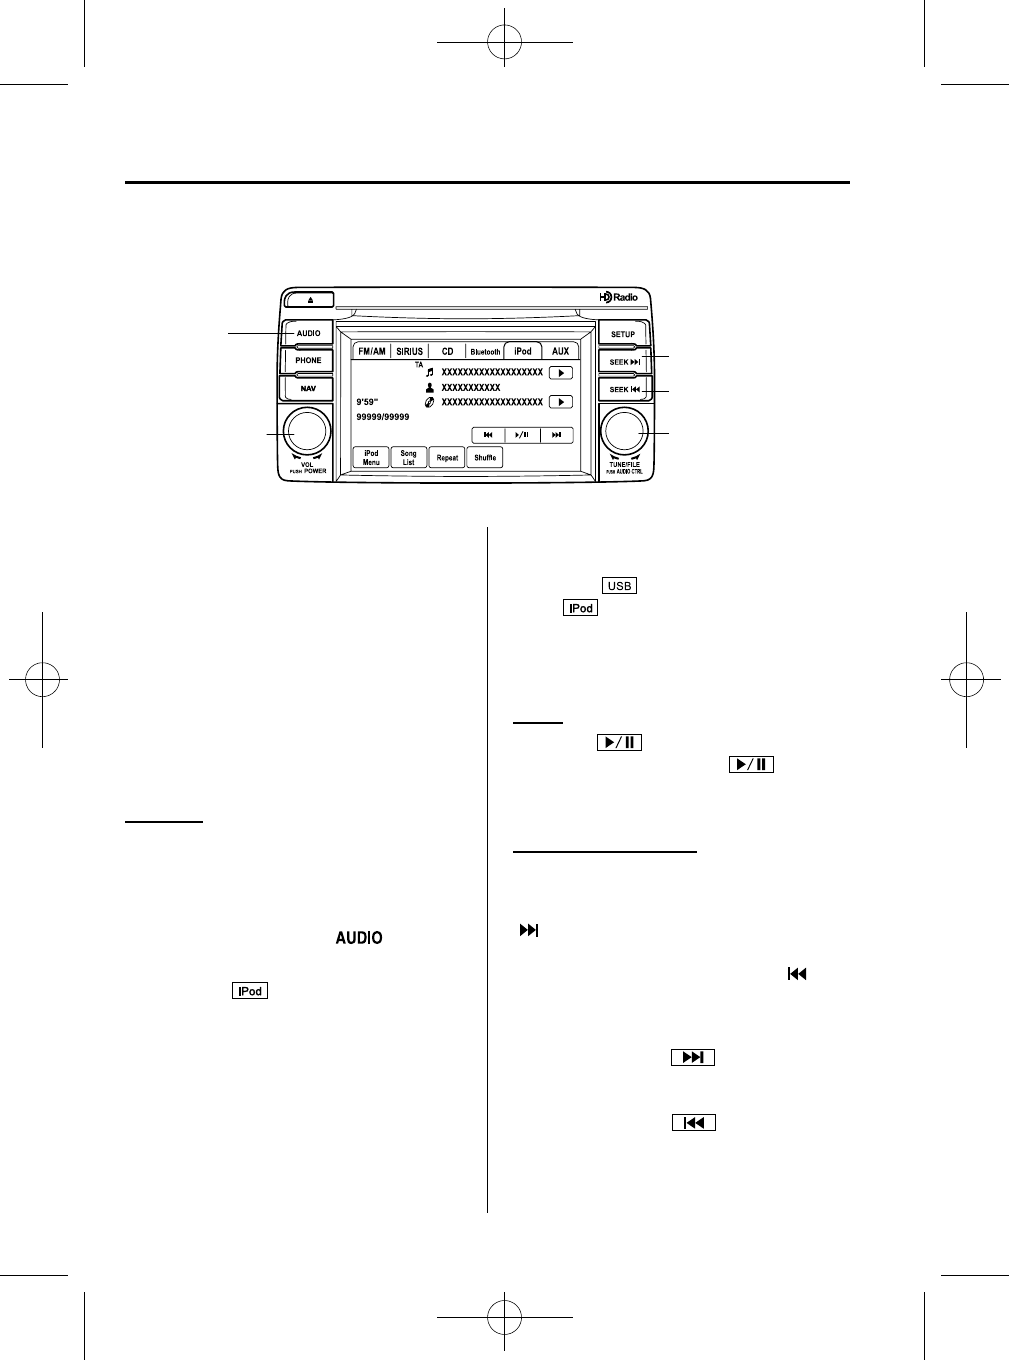
Black plate (284,1)
qHow to use iPod mode (Type B)
Audio button
Power/Volume dial
Track up/Fast-forward
button
Track down/Reverse
button
File dial
The connectable iPods are as follows:
liPod: 5G
liPod classic
liPod nano: 1/2/3/4/5G
liPod touch
*1
: 1/2G
liPhone
*1
: 3G/3GS
*1 Only iPod function
NOTE
The iPod functions on the iPod cannot be
operated while it is connected to the unit
because the unit controls the iPod functions.
Playback
1. Switch the ignition to ACC or ON.
2. Press the power/volume dial to turn the
audio system on.
3. Press the audio button ( )to
display the audio screen.
4. Touch the on-screen tab to
switch to the iPod mode and start
playback.
NOTE
lWhen the iPod is connected to the USB
port, the on-screen tab changes to
the on-screen tab.
lDo not remove the iPod while in the iPod
mode. Otherwise, the data could be
damaged.
Pause
Touch the on-screen button to
pause playback. Touch the on-
screen button while playback is paused to
cancel the pause.
Fast-forward/Reverse
Operations using audio panel
Press and hold the fast-forward button
() to advance through a track at high
speed.
Press and hold the reverse button ( )to
reverse through a track at high speed.
Operations on screen
Touch and hold the on-screen
button to advance through a track at high
speed.
Touch and hold the on-screen
button to reverse through a track at high
speed.
5-74
Interior Features
Audio System
CX-5_8CA6-EC-11L_Edition1 Page284
Monday, December 12 2011 11:32 AM
Form No.8CA6-EC-11L
Black plate (285,1)
Track search
Operations using audio panel
Press the track up button ( ) or turn the
file dial clockwise once to skip forward to
the beginning of the next track.
Press the track down button ( ) or turn
the file dial counterclockwise within a few
seconds after playback begins to track
down. Press the track down button ( )
or turn the file dial counterclockwise after
a few seconds have elapsed to start
playback from the beginning of the track.
The time required to track down/start
playback from the beginning of a track
varies depending on iPod software
version.
Operations on screen
Touch the on-screen button once to
skip forward to the beginning of the next
track.
Touch the on-screen button within
a few seconds after playback begins to
track down. Touch the on-screen
button after a few seconds have elapsed to
start playback from the beginning of the
track. The time required to track down/
start playback from the beginning of a
track varies depending on iPod software
version.
Displaying song list
The song list in the iPod can be viewed.
NOTE
The song list may not display depending on the
conditions.
(Displaying optional list)
1. Touch the on-screen button during
playback.
2. Touch the category which you want to
select. The record list or song list is
displayed.
(Displaying a list being played)
Touch the on-screen button.
NOTE
Press the on-screen button to display the
upper list.
Selecting from list
Select the desired song to play.
1. Press the on-screen button to select
the song list.
2. Touch the song you want to listen to.
NOTE
The selected song list becomes the play list.
Repeat playback
Touch the on-screen button during
playback. “”is displayed during
playback.
Touch the on-screen button two
times while “”is displayed to cancel.
Shuffle playback
(Shuffling songs in list being played)
Touch the on-screen button during
playback. “”is displayed during
playback.
Touch the on-screen button two
times while “”is displayed to cancel.
(Shuffling album in list being played)
Touch the on-screen button two
times during playback. “”is displayed
during playback.
Touch the on-screen button while
“”is displayed to cancel.
Interior Features
Audio System
5-75
CX-5_8CA6-EC-11L_Edition1 Page285
Monday, December 12 2011 11:32 AM
Form No.8CA6-EC-11L
Black plate (286,1)
NOTE
The track number being shuffle played is in the
order of the iPod shuffle table.
Text scroll
If a whole title cannot be displayed at one
time, touch the on-screen button on
the right side of the title to display the
whole title. When the last character is
displayed, touch the on-screen button
to display the first character of the title.
NOTE
lThe on-screen button is displayed only
when no titles are displayed.
lThe information (artist name, music name)
is displayed only when the iPod has
information which can be displayed on the
screen.
lThis unit cannot display some characters.
Characters which cannot be displayed are
indicated by an asterisk ( ).
lThe number of characters which can be
displayed is restricted.
Error Messages
If the message “iPod Error”is displayed,
it indicates that there are no playable files
in the iPod or there is a malfunction.
Verify that the content recorded in the
iPod has playable files and re-connect
correctly. If the message reappears, have
the unit checked by an Authorized Mazda
Dealer.
qError Indications
If you see an error indication on the
display, find the cause in the chart. If you
cannot clear the error indication, take the
vehicle to an Authorized Mazda Dealer.
Indication Cause Solution
CHECK USB
USB
memory
error
Connect other USB
memory correctly.
If the error indication
continues to display,
consult an Authorized
Mazda Dealer.
USB Error
CHECK iPod
iPod
malfunction
Connect other iPod
correctly.
If the error indication
continues to display,
consult an Authorized
Mazda Dealer.
iPod Error
5-76
Interior Features
Audio System
CX-5_8CA6-EC-11L_Edition1 Page286
Monday, December 12 2011 11:32 AM
Form No.8CA6-EC-11L
Black plate (287,1)
Bluetooth®
í
Bluetooth
®
Hands-Free outline
When a Bluetooth
®
device (mobile
phone) is connected to the vehicle's
Hands-Free unit via radio wave
transmission, a call can be made or
received by pressing the talk button, pick-
up button, hang-up button, or voice
command on the steering wheel, or by
operating the panel. For example, even if
a device (mobile phone) is in your coat
pocket, a call can be made without taking
the device (mobile phone) out and
operating it directly.
Bluetooth
®
audio outline
When a portable audio unit equipped with
the Bluetooth
®
communication function is
programmed to the Bluetooth
®
unit, you
can listen to music recorded on the
programmed portable audio device from
the vehicle's speakers. It is not necessary
to connect the portable audio device to the
vehicle's external input terminal. After
programming, operate the vehicle audio
control panel to play/stop the audio.
qBefore Using Bluetooth®
CAUTION
ØA device can be programmed only
when the vehicle is parked.
ØThe types of Bluetooth
®
mobile
device which can be connected to
the Bluetooth
®
unit are limited.
However, even among these
Bluetooth
®
mobile device there
are ones which cannot be
connected or have limited
functionality. Each Bluetooth
®
mobile device to be used with the
Bluetooth
®
system needs to be
checked individually for
compatibility. Therefore, consult
an Authorized Mazda Dealer, a
Web support center, or a call
center for information regarding
Bluetooth
®
mobile device
compatibility:
ØU.S.A.
Phone: 800-430-0153
Web: www.MazdaUSA.com/
bluetooth
ØCanada
Phone: 800-430-0153
Web: www.mazdahandsfree.ca
ØMexico
Center of Attention to Client
(CAC)
Phone: 01-800-01-MAZDA
Web: www.MazdaUSA.com/
bluetooth
NOTE
(Available Languages)
The Bluetooth
®
Hands-Free System applies to
the following languages:
English, Spanish, Canadian French.
Refer to Setup on page 5-55.
Interior Features
Bluetooth®
5-77
í
Some models.
CX-5_8CA6-EC-11L_Edition1 Page287
Monday, December 12 2011 11:32 AM
Form No.8CA6-EC-11L
Black plate (288,1)
qComponent Parts
Microphone
Talk button, Pick-up button and Hang-up button
Microphone
Talk button
Hang-up button
Pick-up button
Audio unit
Audio unit (Type B)
The audio unit (Type B) is used for volume adjustment and touch panel operation.
Bluetooth
®
information is displayed in the display. The screen is switched by touching the
tab for each function to be used.
CAUTION
Do not press the panel strongly or press it with a sharp-pointed object.
Display OFF
The audio unit display can be switched off by voice recognition operation.
1. Press the pick-up button or talk button.
2. Say: [Beep] “Display OFF”
Numeral or symbol entry
Use the numerical keypad.
Long-press the on-screen button to input .
Touch the on-screen button to delete the currently input value.
5-78
Interior Features
Bluetooth®
CX-5_8CA6-EC-11L_Edition1 Page288
Monday, December 12 2011 11:32 AM
Form No.8CA6-EC-11L
Black plate (289,1)
Activating navigation system (vehicles with navigation system)
The voice recognition command for the navigation system is activated.
1. Press the talk button.
2. Prompt: “Ready”
3. Say: [Beep] “Navigation”
Talk button, Pick-Up button and Hang-Up button (Hands-Free)
The basic functions of Bluetooth
®
Hands-Free can be used for such things as making calls
or hanging up using the talk button, pick-up button and hang-up button on the steering
wheel.
Microphone (Hands-Free)
The microphone is used for speaking voice commands or exchanging conversation.
qVolume Adjustment
The power/volume dial of the audio unit
is used to adjust the volume. Turn the dial
to the right to increase volume, to the left
to decrease it.
The volume can also be adjusted using the
volume button on the steering wheel.
Pre-setting
Conversation volume and the volume of
the voice guidance and ringtone can each
be set in advance.
1. Touch the on-screen tab to
display the Bluetooth
®
setting screen.
2. Touch the on-screen
button to display the volume
adjustment screen.
3. (Volume up) Touch the on-screen
button.
(Volume down) Touch the on-
screen button.
4. Prompt: “Phone call will be at this
volume.”or “Voice guidance will be at
this volume.”
NOTE
The volume of the audio unit cannot be
adjusted while Bluetooth
®
Hands-Free is being
used.
qVoice Recognition
To prevent a deterioration in the voice
recognition rate and voice quality, the
following points should be observed:
lThe Hands-free system cannot perform
voice recognition while voice guidance
or a beep sound is operating. Wait until
the voice guidance or the beep sound is
finished before saying your commands.
lDialects or different wording other than
Hands-Free prompts cannot be
recognized by voice recognition. Speak
in the wording specified by the voice
commands.
lIt is not necessary to face the
microphone or approach it. Speak the
voice commands while maintaining a
safe driving position.
lDo not speak too slow or too loud.
lSpeak clearly, without pausing between
words or numbers.
Interior Features
Bluetooth®
5-79
CX-5_8CA6-EC-11L_Edition1 Page289
Monday, December 12 2011 11:32 AM
Form No.8CA6-EC-11L
Black plate (290,1)
lClose the windows and/or the
moonroof to reduce loud noises from
outside the vehicle, or turn down the
airflow of the air-conditioning system
while Bluetooth
®
Hands-Free is being
used.
lMake sure the vents are not directing
air towards the microphone.
NOTE
If the voice recognition performance is not
satisfactory.
Refer to Troubleshooting on page 5-93.
Please be aware that the voice recognition
may still make an error despite following
the above points.
When operating the audio unit or the A/C
while using Bluetooth® Hands-Free, the
beep sounds or voice guidance (audio
unit)/cannot be heard.
qHow to Use This Section
Voice recognition
Descriptions in the text are as follows:
Say: Voice commands to be spoken by
you.
Prompt: Voice guidance output from the
speaker.
NOTE
Say voice commands after the beep sound
[Beep] is heard.
Example)
Say: [Beep] “Dial”
Prompt: “Number, please”
Say: [Beep] “XXXXXXXXXXX (Ex.
“5551234”) (Telephone number)”
Bluetooth
®
Hands-Free Activation
Method
Press the pick-up button or talk button.
The Hands-Free system is activated.
Functions of the Hands-Free telephone,
such as making and receiving calls, can be
used after the activation.Refer to
Bluetooth® Hands-Free on page 5-84.
NOTE
lPress the pick-up button to activate the
phone mode. Press the talk button to
activate the main menu. The phone,
tutorial, or navigation mode can be
activated in the main menu.
lFor vehicles with a navigation system, the
system operates by saying a voice
recognition command of the navigation
system after pressing the talk button with a
short press. For voice recognition details
with the navigation system, refer to the
separate “NAVIGATION SYSTEM Owner's
Manual”.
(Tutorial)
The tutorial explains how to use
Bluetooth
®
Hands-Free.
To activate the tutorial, do the following:
1. Press the talk button.
2. Prompt: “Ready”
3. Say: [Beep] “Tutorial”
4. Follow the prompts to receive the
appropriate voice guidance
instructions.
Panel operation
Bluetooth
®
Hands-Free Activation
Method
Press the phone button ( ).
5-80
Interior Features
Bluetooth®
CX-5_8CA6-EC-11L_Edition1 Page290
Monday, December 12 2011 11:32 AM
Form No.8CA6-EC-11L
Black plate (291,1)
The Hands-Free system is activated.
Functions of the Hands-Free telephone,
such as making and receiving calls, can be
used after the activation.
Refer to Bluetooth® Hands-Free on page
5-84.
qBluetooth® Preparation
Device programming (Pairing)
To use Bluetooth
®
Audio and Hands-Free,
the device equipped with Bluetooth
®
has
to be programmed to the unit using the
following procedure. A maximum of
seven devices including Bluetooth
®
audio
devices and Hands-Free mobile phones
can be programmed to one vehicle.
NOTE
lA device can be programmed only when the
vehicle is parked. If the vehicle starts to
move, the pairing procedure will end.
Attempting to program while driving is
dangerous, therefore, pick-up your device
before you start driving. Park the car in a
safe place before programming.
lSince the communication range of a
Bluetooth
®
equipped device is about 10
meters (32 ft), if a device is placed within a
10-meter (32 ft) radius of the vehicle, it may
be detected/programmed unintentionally
while another device is being programmed.
Concerning the operation of a Bluetooth
®
audio device itself, refer to its instruction
manual. Some Bluetooth
®
audio devices
have PIN codes (four digits). Refer to the
audio device's instruction manual because
the programming procedure differs
depending on whether it has a PIN code
or not.
Voice recognition
1. Press the pick-up button.
2. Prompt: “Available options are: Call,
Dial, Redial, Call back , Setup or
Emergency.”
3. Say: [Beep] “Setup”
4. Prompt: “This operation can only be
performed using the vehicle display.
Select the desired option on the
display. Note that some options are
only available when the vehicle is
stopped. Exiting Hands-Free mode.”
5. The Bluetooth
®
setting screen is
displayed and the voice recognition
mode is finished. Go to Step 3 below
for the “Panel operation”.
Panel operation
1. Touch the on-screen button.
2. Touch the on-screen
button. The list of pairing devices is
displayed.
3. Touch the on-screen button to
display the message and switch to the
device operation.
4. Using the device, perform a search for
the Bluetooth
®
device (Peripheral
device).
5. Select “Mazda”from the device list
searched by the device.
Interior Features
Bluetooth®
5-81
CX-5_8CA6-EC-11L_Edition1 Page291
Monday, December 12 2011 11:32 AM
Form No.8CA6-EC-11L
Black plate (292,1)
NOTE
lIf the Bluetooth
®
version for your device is
2.1 or higher, the SSP (Secure Simple
Pairing) is used for indicating the pairing
type without a PIN code input. The
following two pairing methods for the SSP
are available, and either method is selected
automatically and performed.
lJust Works
lNumeric Comparison
lSome devices accept only a particular
pairing code (Usually, “0000”or “1234”).
If pairing cannot be completed, refer to the
owner's manual of your mobile device, and
try those numbers if necessary.
6. (Device with Bluetooth
®
version 2.0)
Input the displayed 4-digit pairing code
into the device.
(Device with Bluetooth
®
version 2.1
or higher)
lJust Works is detected
The pairing is performed
automatically.
lNumeric Comparison is detected
Verify the displayed 6-digit code on
the audio unit, which is also
displayed on the device, and touch
the on-screen button.
7. (Device with PBAP profile)
Call history (incoming/outgoing
history) for the device is downloaded
automatically.
After a device is registered, the system
automatically identifies the device. By
activating Bluetooth
®
Hands-Free again,
or by activating Bluetooth
®
Hands-Free
first after switching the ignition from OFF
to ACC, the device connection condition
is indicated in the display.
Device selection
If several devices have been programmed,
the Bluetooth
®
unit links the device last
programmed. If you would like to link a
different programmed device, it is
necessary to change the link. The order of
device priority after the link has been
changed is maintained even when the
ignition is switched off.
NOTE
If the device name cannot be displayed, “...”is
added at the end of the title which is displayed.
Connecting other devices
1. Touch the on-screen tab.
2. Touch the device name which you
want to connect to display the device
information screen.
3. Touch the on-screen button to
connect as a Hands-Free device. Touch
the on-screen button to connect
as a Bluetooth
®
audio device.
4. Touch the on-screen button.
5. (Device with PBAP profile)
Call history (incoming/outgoing
history) for the device is downloaded
automatically.
If the connection is completed, the device
name is displayed. Touch the on-
screen button to display the device list
screen and display the or icon in the
new device name which is connected.
Disconnecting a device
1. Touch the on-screen tab.
2. Touch the on-screen
button.
5-82
Interior Features
Bluetooth®
CX-5_8CA6-EC-11L_Edition1 Page292
Monday, December 12 2011 11:32 AM
Form No.8CA6-EC-11L
Black plate (293,1)
3. Touch the device name which is
currently connected to display the
device information screen.
4. Touch the on-screen button to
disconnect the Hands-Free device.
Touch the on-screen button to
disconnect the audio device.
5. Touch the on-screen button.
Registered device deletion
1. Touch the on-screen tab.
2. Touch the on-screen
button.
3. Touch the device name which you
want to delete.
4. Touch the on-screen button.
5. Touch the on-screen button.
NOTE
If you want to delete all of the pairing devices,
perform the restore default.
Refer to Restore Default on page 5-83.
qChanging PIN Code
PIN code (4 digits) can be changed.
1. Touch the on-screen tab.
2. Touch the on-screen button.
3. Delete the PIN code which is currently
set.
4. Input the new PIN code to be set.
5. Touch the on-screen button.
qRestore Default
All the pairing device information and
phonebook data can be deleted.
1. Touch the on-screen tab.
2. Touch the on-screen button.
3. Touch the on-screen button.
4. Touch the on-screen button.
Interior Features
Bluetooth®
5-83
CX-5_8CA6-EC-11L_Edition1 Page293
Monday, December 12 2011 11:32 AM
Form No.8CA6-EC-11L

Black plate (294,1)
Bluetooth® Hands-Free
Applicable Bluetooth
®
specification
Ver. 2.0 or higher
Response profile
lHFP (Hands-Free Profile) Ver. 1.5
lDUN (Dial-up Networking Profile)
Ver. 1.1
lPBAP (Phone Book Access Profile)
Ver. 1.0
lOPP (Object Push Profile) Ver. 1.1
NOTE
lThe Bluetooth
®
Hands-Free system is
operable several seconds after the ignition
is switched to ACC or ON (requires less
than 15 seconds).
lIf the ignition is switched off during a
Hands-Free call, the line is transferred to
the device (Mobile phone) automatically.
qMaking a Call Using a Telephone
Number
NOTE
Practice this while parked until you are
confident you can do it while driving in a non-
taxing road situation. If you are not completely
comfortable, make all calls from a safe
parking position, and move out only when fully
under control and you can devote your eyes
and mind to driving.
Voice recognition
1. Press the pick-up button.
2. Prompt: “Available options are: Call,
Dial, Redial, Call back , Setup or
Emergency.”
3. Say: [Beep] “Dial”
4. Prompt: “Dial. Number, please”
5. Say: [Beep] “XXXXXXXXXXX (Ex.
“5551234”) (Telephone number)
6. Prompt: “XXXXXXXXXXX. (Ex
“5551234”) (Telephone number (first
choice))”
7. Prompt: “Press the pick-up button to
dial, or continue to add numbers. You
can also say ‘Option A’or ‘Option B’
to replace the last block of digits with
the displayed alternate, or say ‘Go
Back’to delete the last block of digits.”
NOTE
The options may not be indicated depending
on the conditions.
8. (Dialing)
Press the pick-up button or say, “Dial”,
then go to Step 9.
(Adding/inputting telephone
number)
Say, “XXXX”(desired telephone
number). Then go to Step 5.
(The last recognized telephone
number is replaced by Option A or
B)
Say, “Option A”or “Option B”. Then
go to Step 6.
(Telephone number correction)
Say, “Go Back”. The prompt replies,
“The last entered numbers have been
removed”. Then go back to Step 4 or
Step 7.
9. The call is made.
NOTE
The “Dial”command and a telephone number
can be combined.
Ex. In Step 3, say, “Dial 1234567”, then, Steps
4 and 5 can be skipped.
5-84
Interior Features
Bluetooth®
CX-5_8CA6-EC-11L_Edition1 Page294
Monday, December 12 2011 11:32 AM
Form No.8CA6-EC-11L
Black plate (295,1)
Panel operation
1. Input the telephone number using the
numerical keypad.
2. Touch the on-screen button to
make the call.
qReceiving an Incoming Call
1. Prompt: “Incoming call, press the
pick-up button to answer”
2. To accept the call, press the pick-up
button or touch the on-screen
button.
To reject the call, press the hang-up
button or touch the on-screen
button.
qHanging Up a Call
Press the hang-up button or touch the
on-screen button during the call.
qHelp Function Use
The help function informs the user of all
the available voice commands under the
current conditions.
1. Press the pick-up button or talk button.
2. Say: [Beep] “Help”
3. Follow the prompts to receive the
appropriate voice guidance
instructions.
qCancel
The Bluetooth
®
Hands-Free system
transitions to standby status if the
following operation is performed while
the system is activating. Press the hang-up
button, or the talk button with a long
press.
qReturning to Previous Operation
This command is for returning to the
previous operation while in the voice
recognition mode.
Say: [Beep] “Go Back”
qPhonebook Usage
Import contact (Download Phonebook)
Phonebook data from your device (Mobile
phone) can be sent and registered to your
Bluetooth
®
Hands-Free phonebook using
Bluetooth
®
.
1. Touch the on-screen tab.
2. Touch the on-screen
button.
3. Touch the or
on-screen button to switch to the
device operation.
NOTE
lIf the phonebook has been already
registered to the Hands-Free unit during
“all phonebooks download”, the current
phonebook is overwritten.
lA maximum of 1000 contacts can be
registered to the phonebook.
lPhonebook, incoming/outgoing call record,
and speed dialing memory is exclusive to
each mobile phone to protect privacy.
4. Download will be started from the
mobile phone.
Phonebook data deletion
1. Touch the on-screen tab.
2. Touch the contact information which
you want to delete.
3. Touch the on-screen button.
Interior Features
Bluetooth®
5-85
CX-5_8CA6-EC-11L_Edition1 Page295
Monday, December 12 2011 11:32 AM
Form No.8CA6-EC-11L
Black plate (296,1)
Making calls using the phonebook
Voice recognition
Telephone calls can be made by saying
the name of a person (voice tag) whose
phone number has been registered in
Bluetooth
®
Hands-Free in advance. Refer
to Import contact (Download Phonebook).
1. Press the pick-up button.
2. Prompt: “Available options are: Call,
Dial, Redial, Call back , Setup or
Emergency.”
3. Say: [Beep] “Call”
4. Prompt: “Call. Name, please.”
5. Say: [Beep] “XXXXX... (Ex. “John”)”
(Say a name registered in the
phonebook.)
The name spoken will be searched for
in the phonebook.
If a contact is matched, go to Step 7.
If multiple contacts are matched, go to
Step 6.
NOTE
If multiple contacts or a name with a similar
pronunciation to the name you spoke has been
registered to the phonebook, multiple contact
information may be identified in the
phonebook. If multiple contacts are identified
in the phonebook, a maximum of three contacts
are listed as a dialing choice.
6. Prompt: “Would you like to call
XXXXX... (Choice 1)?”
(Person you would like to call)
Say: [Beep] “Yes.”Then go to Step 7.
(Person you do not want to call)
Say: [Beep] “No”Then go to Step 6
(Maximum 3 times)
7. Prompt: “Would you like to call
XXXXX... (Ex. “John”) at home, at
work, or mobile, or other... or press the
hang-up button to exit Hands-Free
mode.”
8. Say: [Beep] “XXXXX... (Ex. “at
home”)”
9. Prompt: “XXXXX... (Ex. “John”)
XXXX (Ex. “at home”). Press the pick-
up button to call, or say Go Back to
enter a different name.”
10. (Dialing) Press the pick-up button or
say “Call”. Then go to Step 11.
(Name correction) Say, “Go Back”.
Then go back to Step 4.
11. The call is made.
NOTE
The “Call”command and the voice tag can be
combined.
Ex. In Step 3, say, “Call John's phone”, then,
Steps 4 and 5 can be skipped.
Panel operation
1. Touch the on-screen tab to
display the phonebook screen.
2. Touch the contact you would like to
call to display the screen indicating the
details for the contact.
3. Touch the desired phone number to
make the call.
5-86
Interior Features
Bluetooth®
CX-5_8CA6-EC-11L_Edition1 Page296
Monday, December 12 2011 11:32 AM
Form No.8CA6-EC-11L
Black plate (297,1)
q
Making a Call Using the Call History
A call can be made using the call history
(incoming/outgoing history) downloaded
from the mobile phone (Redial/Call back).
The call history is downloaded
automatically when connecting or pairing
the Hands-Free and mobile phone.
Redial Function
1. Press the pick-up button.
2. Prompt: “Available options are: Call,
Dial, Redial, Call back , Setup or
Emergency.”
3. Say: [Beep] “Redial”
4. A call is made to the most recent call in
the Call history (outgoing).
Call back Function
1. Press the pick-up button.
2. Prompt: “Available options are: Call,
Dial, Redial, Call back , Setup or
Emergency.”
3. Say: [Beep] “Call back”
4. A call is made to the most recent call in
the Call history (incoming).
qEmergency calls
A call can be made to the emergency
phone number (911: U.S.A/Canada, 066:
Mexico) using the voice input command.
It may not function properly in some areas
in Mexico.
1. Press the pick-up button.
2. Prompt: “Available options are: Call,
Dial, Redial, Call back, Setup, or
Emergency.”
3. Say: [Beep] “Emergency”
4. Prompt: “Emergency. Press the Pick-
Up button to dial the Emergency
number.”
5. (Dialing) Press the pick-up button or
say “Call.”
6. Prompt: “Dialing XXX (911: U.S.A/C
anada, 066: Mexico).”
qSpeed Dial Usage
A maximum of eight telephone numbers
can be registered. It will take less time to
make a call after registering the telephone
number. In addition, you do not have to
look for the person you want to call in the
phonebook.
Speed Dial registration from
phonebook
1. Touch the on-screen tab.
2. (New registration)
Touch the on-screen button.
(Changing registered contacts to
other contacts)
Touch the on-screen button.
3. Touch the on-screen button.
4. Touch the contact you would like to
register to the speed dial.
5. Touch the telephone number you
would like to register.
6. Verify that the registered name and
telephone number are displayed in the
phonebook, and touch the on-
screen button.
Making calls using the Speed Dial
1. Touch the on-screen tab.
2. Touch the contact information you
would like to call.
Interior Features
Bluetooth®
5-87
CX-5_8CA6-EC-11L_Edition1 Page297
Monday, December 12 2011 11:32 AM
Form No.8CA6-EC-11L
Black plate (298,1)
Speed Dial data deletion
1. Touch the on-screen tab.
2. Touch the on-screen button for
the contact you would like to delete.
3. Touch the on-screen button to
display the confirmation screen.
qMute
The microphone can be muted during a
call.
Touch the on-screen button.
Touch the on-screen button during
mute to cancel the mute.
qTransferring a Call
Transferring a call from Hands-Free to
a mobile phone
Communication between the Hands-Free
unit and a device (Mobile phone) is
canceled, and the line can be switched to a
standard call using a device (Mobile
phone).
Touch the on-screen button.
Transferring a call from a device
(mobile phone) to Hands-Free
Communication between devices (mobile
phone) can be switched to Bluetooth
®
Hands-Free.
Touch the on-screen button.
qMulti-Call Functions
Call waiting
A call can be interrupted to receive an
incoming call from a third party.
Call interrupt
A call can be switched to a new incoming
call.
Touch the on-screen button or press
the pick-up button on the steering wheel.
NOTE
lAfter receiving a new incoming call, the
previous call is placed on hold.
lTouch the on-screen button or press
the hang-up button on the steering wheel to
refuse a call.
Switching calls
Switching back to the previous call can
also be done.
Touch the on-screen button or
press the pick-up button on the steering
wheel.
Three-way call function
Touch the on-screen button.
qDTMF (Dual Tone Multi-
Frequency Signal) Transmission
This function is used when transmitting
DTMF via the Numerical Keypad. The
receiver of a DTMF transmission is
generally a home telephone answering
machine or a company's automated
guidance call center.
1. Touch the on-screen button
after connecting to a home device or
service to display the tone transmission
screen.
2. Input the number using a numerical
keypad.
NOTE
If the DTMF code has two or more digits or
symbols, each one must be transmitted
individually.
5-88
Interior Features
Bluetooth®
CX-5_8CA6-EC-11L_Edition1 Page298
Monday, December 12 2011 11:32 AM
Form No.8CA6-EC-11L
Black plate (299,1)
qMazda Bluetooth® Hands-Free
Customer Service
lU.S.A.
Phone: 800-430-0153 (Toll-free)
www.MazdaUSA.com/bluetooth
lCanada
Phone: 800-430-0153 (Toll-free)
www.mazdahandsfree.ca
lMexico
Center of Attention to Client (CAC)
Phone: 01-800-01-MAZDA (Toll-free)
www.MazdaUSA.com/bluetooth
Bluetooth® Audio
Applicable Bluetooth
®
specification
Ver. 2.0 or higher
Response profile
lA2DP (Advanced Audio Distribution
Profile) Ver. 1.0/1.2
lAVRCP (Audio/Video Remote Control
Profile) Ver. 1.0/1.3/1.4
A2DP is a profile which transmits only
audio to the Bluetooth
®
unit. If your
Bluetooth
®
audio device corresponds only
to A2DP, but not AVRCP, you cannot
operate it using the control panel of the
vehicle's audio system. In this case, the
Bluetooth
®
audio device can be operated
by controlling the device itself, the same
as when a portable audio system without
the Bluetooth
®
communication function is
connected to the AUX terminal.
Function A2DP
A2DP·AVRCP
Ver.
1.0
Ver.
1.3
Ver.
1.4
Playback ―XXX
Pause ―XXX
File (Track)
up/down
―XXX
Reverse ―― XX
Fast-forward ―― XX
Text display ―― XX
Folder up/down ――― X
Repeat ――― X
Random ――― X
Scan ――― X
X: Available
―: Not available
Interior Features
Bluetooth®
5-89
CX-5_8CA6-EC-11L_Edition1 Page299
Monday, December 12 2011 11:32 AM
Form No.8CA6-EC-11L
Black plate (300,1)
NOTE
lThe system may not operate normally
depending on the Bluetooth
®
audio device.
lTo make sure that your Bluetooth
®
audio
device is Ver. 1.0, 1.3 or 1.4, refer to the
Owner's Manual for the Bluetooth
®
audio
device.
lThe battery consumption of Bluetooth
®
audio devices is higher while Bluetooth
®
connected.
USB connecting
If a general mobile phone device is USB
connected during music playback over the
Bluetooth
®
connection, the Bluetooth
®
connection is disconnected. For this
reason, you cannot have music playback
over a Bluetooth
®
connection and music
playback using a USB connection at the
same time.
qHow to Use the Bluetooth®
Audio System
Switching to Bluetooth
®
audio mode
To listen to music or voice audio recorded
to a Bluetooth
®
audio device, switch to
the Bluetooth
®
audio mode to operate the
audio device using the audio system
control panel. Any Bluetooth
®
audio
device must be programmed to the
vehicle's Bluetooth
®
unit before it can be
used.
Refer to Bluetooth® Preparation on page
5-81.
1. Switch the ignition to ACC or ON.
2. Turn on the Bluetooth
®
audio device's
power.
Make sure that the “”symbol is
displayed in the audio unit's display.
NOTE
Some Bluetooth
®
audio devices need a certain
amount of time before the “”symbol is
displayed in the audio unit's display.
3. Press the audio button ( ) and
then touch the on-screen tab to
switch to the Bluetooth
®
audio mode
and start playback.
NOTE
lIf the Bluetooth
®
audio device does not
begin playback, press the on-screen
button.
lIf the mode is switched from Bluetooth
®
audio mode to another mode (radio mode),
audio playback from the Bluetooth
®
audio
device stops.
Playback
1. To listen to a Bluetooth
®
audio device
over the vehicle's speaker system,
switch the mode to Bluetooth
®
audio
mode. (Refer to “Switching to
Bluetooth
®
audio mode”)
2. To stop playback, press the on-
screen button.
3. Press the button again to resume
playback.
Selecting a file (track)
Selects the next file (track)
Short-press the track up button ( )or
touch the on-screen button.
Selects the beginning of the current file
(track)
Short-press the track down button ( )or
touch the on-screen button.
5-90
Interior Features
Bluetooth®
CX-5_8CA6-EC-11L_Edition1 Page300
Monday, December 12 2011 11:32 AM
Form No.8CA6-EC-11L
Black plate (301,1)
Fast-forward/Reverse (AVRCP Ver. 1.3
or higher)
Fast-forward
Press and hold the fast-forward button
() or touch and hold the on-
screen button.
Reverse
Press and hold the reverse down button
() or touch and hold the on-
screen button.
Folder search (only AVRCP Ver. 1.4)
To change to the previous folder, touch
the on-screen button, or touch the
on-screen button to advance to the
next folder.
Music scan (only AVRCP Ver. 1.4)
This function scans the titles in a folder
currently being played and plays 10
seconds of each song to aid you in finding
a song you want to listen to.
1. Touch the on-screen button
during playback to play 10 seconds of
each subsequent track starting from the
next song.
2. Touch the on-screen button again
during playback of the song which you
want to listen to continue the playback
from that point.
Repeat playback (only AVRCP Ver. 1.4)
Track repeat
Touch the on-screen button to play
the song during playback repeatedly. “”
is displayed during playback.
Touch the on-screen button two
times while “”is displayed to cancel.
Folder repeat
Touch the on-screen button two
times to play the songs in the folder
repeatedly. “”is displayed during
playback.
Touch the on-screen button while
“”is displayed to cancel.
Shuffle playback (only AVRCP Ver. 1.4)
Folder shuffle
Touch the on-screen button during
playback to play the songs in the folder
shuffle. “”is displayed during
playback.
Touch the on-screen button two
times while “”is displayed to cancel.
Device shuffle
Touch the on-screen button two
times during playback to play the songs in
the device shuffle. “”is displayed
during playback.
Touch the on-screen button while
“”is displayed to cancel.
Display scroll
If a whole title cannot be displayed at one
time, touch the on-screen button on
the right side of the title. When the last
character is displayed, touch the on-
screen button to display the first character
of the title.
Interior Features
Bluetooth®
5-91
CX-5_8CA6-EC-11L_Edition1 Page301
Monday, December 12 2011 11:32 AM
Form No.8CA6-EC-11L
Black plate (302,1)
qBluetooth® Audio Device
Information Display
If a Bluetooth
®
audio device is connected,
the following information is displayed in
the display.
AVRCP
Ver. lower
than 1.3
AVRCP
Ver. 1.3
AVRCP
Ver. 1.4 or
higher
Device name X X X
Remaining
battery charge
of device
―XX
Title ―XX
Artist name ―XX
Album name ―XX
File number ―XX
Playback time ―XX
Folder number ―― X
NOTE
Some information may not display depending
on the device, and if the information cannot be
displayed, “-----”is indicated.
5-92
Interior Features
Bluetooth®
CX-5_8CA6-EC-11L_Edition1 Page302
Monday, December 12 2011 11:32 AM
Form No.8CA6-EC-11L
Black plate (303,1)
Troubleshooting
Bluetooth
®
does not operate under the following conditions. Check whether the following
conditions apply to your Bluetooth
®
device:
lThe device is not being operated correctly.
lThe device is not connected to the Bluetooth
®
unit equipped on the vehicle.
lThe device's battery is weak.
lA device which interferes with radio wave reception has been placed in the vehicle.
lThe ignition switch has been turned off.
If none of the above conditions apply, refer to the following to see if any of the problem
symptoms correspond to your device.
If the problem cannot be resolved, consult an Authorized Mazda Dealer or Mazda
Bluetooth
®
Hands-Free Customer Service.
Device pairing, connection problems
Symptom Cause Solution method
Unable to perform pairing
―
First make sure the device is
compatible with the Bluetooth
®
unit,
and then check whether the
Bluetooth
®
function and the Find
Mode/Visible setting
*1
on the device
are turned on. If pairing is still not
possible after this, contact an
Authorized Mazda Dealer or Mazda
Bluetooth
®
Hands-Free Customer
Service.
Unable to perform pairing The Bluetooth
®
function and the
Find Mode/Visible setting
*1
on the
device may turn off automatically
after a period of time has elapsed
depending on the device.
Check whether the Bluetooth
®
function and the Find Mode/Visible
setting
*1
on the device are turned on
and pairing or reconnect.
Does not connect automatically
when starting the engine
Automatically connects, but then
disconnects suddenly
Disconnects intermittently Is the device in a location in which
radio wave interference can occur
easily?
(Inside a bag in a rear seat, in the rear
pocket of a pair of pants)
Move the device to a location in
which radio wave interference is less
likely to occur.
*1 Setting which detects the existence of a device external to the Bluetooth
®
unit
Interior Features
Bluetooth®
5-93
CX-5_8CA6-EC-11L_Edition1 Page303
Monday, December 12 2011 11:32 AM
Form No.8CA6-EC-11L
Black plate (304,1)
Voice recognition related problems
Symptom Cause Solution method
Poor voice recognition lExcessive, slow speech.
lExcessive, forceful speech
(shouting).
lSpeaking before the beep sound
has ended.
lLoud noise
(speaking or noise from outside/
inside vehicle).
lAirflow from A/C is blowing
against the microphone.
lSpeaking in off-standard
expressions (dialect).
Regarding the causes indicated on
the left, be careful with how you
speak. In addition, when numbers are
spoken in a sequence, recognition
ability will improve if no stop is
placed between the numbers.
False recognition of numbers
Names in the phonebook are not
easily recognized
The Bluetooth
®
system is under a
condition in which recognition is
difficult.
By carrying out the following
measures, the rate of recognition will
improve.
lClear memory from the
phonebook which is not used
very often.
lAvoid shortened names, use full
names.
(Recognition improves the longer
the name is. By not using names
such as “Mom”,“Dad”, recogni-
tion will improve.)
You want to skip guidance.
―
Guidance can be skipped by quickly
pressing and releasing the Talk
button.
When the Talk button is pressed,
voice recognition ends
Is the Talk button being held pressed
for too long?
Operate the Talk button as follows:
lPress the button and release it
within 0.7 seconds to start voice
recognition and skip the
guidance.
lPress the button for longer than
0.7 seconds to turn off voice
recognition or end a
conversation.
Regarding problems with calls
Symptom Cause Solution method
When starting a call, vehicle noise
from the other party can be heard.
For about three seconds after starting
a call, the Bluetooth
®
unit's Noise
Suppression function requires time to
adapt to the call environment.
This does not indicate a problem
with the device.
The other party cannot be heard or
the speaker's voice is quiet
Is the volume set at zero or low? Increase the volume.
5-94
Interior Features
Bluetooth®
CX-5_8CA6-EC-11L_Edition1 Page304
Monday, December 12 2011 11:32 AM
Form No.8CA6-EC-11L
Black plate (305,1)
Other problems
Symptom Cause Solution method
The indication for the remaining
battery is different between the
vehicle and the device.
The indication method is different
between the vehicle and the device. ―
When a call is made from the
vehicle, the telephone number is
updated in the incoming/outgoing
call record but the name does not
appear.
Has the number been registered into
the phonebook?
If the number has been registered
into the phonebook, the
incoming/outgoing call record is
updated by the name in the
phonebook when the engine is
restarted.
The cell phone does not synchronize
with the vehicle regarding the
incoming/outgoing call record.
Some types of cell phones do not
synchronize automatically.
Operate the cell phone for
synchronization.
It takes a long time to complete the
function for changing the language.
A maximum of 30 seconds is
required.
―
Interior Features
Bluetooth®
5-95
CX-5_8CA6-EC-11L_Edition1 Page305
Monday, December 12 2011 11:32 AM
Form No.8CA6-EC-11L

Black plate (463,1)
Customer Information and Reporting Safety Defects
Declaration of Conformity
qAudio
System
This
CD
player
is
made
and
tested
to
meet
exacting
safety
standards.
It
meets
FCC
requirements
and
complies
with
safety
performance
standards
of
the
U.S.
Department
of
Health
and
Human
Services.
CAUTION
Ø
This
CD
player
should
not
be
adjusted
or
repaired
by
anyone
except
qualified
service
personnel.
If
servicing
is
required,
contact
an
Authorized
Mazda
Dealer.
Ø
Use
of
controls
or
adjustments
or
performance
of
procedures
other
than
those
specified
herein
may
result
in
hazardous
laser
exposure.
Never
operate
the
CD
player
with
the
top
case
of
the
unit
removed.
Ø
Changes
or
modifications
not
expressly
approved
by
the
party
responsible
for
compliance
could
void
the
user's
authority
to
operate
this
equipment.
NOTE
For
CD
player
section:
This
device
complies
with
part
15
of
the
FCC
Rules.
Operation
is
subject
to
the
following
two
conditions:
(1)
This
device
may
not
cause
harmful
interference,
and
(2)
this
device
must
accept
any
interference
received,
including
interference
that
may
cause
undesired
operation.
NOTE
This
equipment
has
been
tested
and
found
to
comply
with
the
limits
for
a
Class
B
digital
device,
pursuant
to
part
15
of
the
FCC
Rules.
These
limits
are
designed
to
provide
reasonable
protection
against
harmful
interference
in
a
residential
installation.
This
equipment
generates,
uses,
and
can
radiate
radio
frequency
energy
and,
if
not
installed
and
used
in
accordance
with
the
instructions,
may
cause
harmful
interference
to
radio
communications.
However,
there
is
no
guarantee
that
interference
will
not
occur
in
a
particular
installation.
qBluetooth®
Hands-Free
FCC
FCC:
NT8MAZGEN6HFT
NOTE
This
device
complies
with
Part
15
of
the
FCC
Rules.
Operation
is
subject
to
the
following
two
conditions:
(1)
This
device
may
not
cause
harmful
interference,
and
(2)
This
device
must
accept
any
interference
received,
including
interference
that
may
cause
undesired
operation.
WARNING
Changes
or
modifications
not
expressively
approved
by
the
party
responsible
for
compliance
could
void
the
user's
authority
to
operate
the
equipment.
8-47
CX-5_8CA6-EC-11L_Edition1 Page463
Monday, December 12 2011 11:33 AM
Form No.8CA6-EC-11L
Black plate (464,1)
NOTE
This
equipment
has
been
tested
and
found
to
comply
with
the
limits
for
a
Class
B
digital
device,
pursuant
to
Part
15
of
the
FCC
Rules.
These
limits
are
designed
to
provide
reasonable
protection
against
harmful
interference
in
a
residential
installation.
This
equipment
generates,
uses
and
can
radiate
radio
frequency
energy
and,
if
not
installed
and
used
in
accordance
with
the
instructions,
may
cause
harmful
interference
to
radio
communications.
However,
there
is
no
guarantee
that
interference
will
not
occur
in
a
particular
installation.
If
this
equipment
does
cause
harmful
interference
to
radio
or
television
reception,
which
can
be
determined
by
turning
the
equipment
off
and
on,
the
user
is
encouraged
to
try
to
correct
the
interference
by
one
or
more
of
the
following
measures:
l
Reorient
or
relocate
the
receiving
antenna.
l
Increase
the
separation
between
the
equipment
and
receiver.
l
Connect
the
equipment
into
an
outlet
on
a
circuit
different
from
that
to
which
the
receiver
is
connected.
l
Consult
the
dealer
or
an
experienced
radio/TV
technician
for
help.
IC
IC:3043A-MAZGEN6HFT
Licence
exempt
This
device
complies
with
Industry
Canada
licence-exempt
RSS
standard(s).
Operation
is
subject
to
the
following
two
conditions:
(1)
This
device
may
not
cause
interference,
and
(2)
This
device
must
accept
any
interference,
including
interference
that
may
cause
undesired
operation
of
the
device.
The
term
“IC:
”
before
the
radio
certification
number
only
signifies
that
Industry
Canada
technical
specifications
were
met.
The
antenna
used
for
this
transmitter
must
not
be
co-
located
or
operating
in
conjunction
with
any
other
antenna
or
transmitter.
End-users
and
installers
must
be
provided
with
installation
instructions
and
transmitter
operating
conditions
for
satisfying
RF
exposure
compliance.
8-48
Customer Information and Reporting Safety Defects
Declaration of Conformity
CX-5_8CA6-EC-11L_Edition1 Page464
Monday, December 12 2011 11:33 AM
Form No.8CA6-EC-11L