Vitelcom Mobile Technology USA TSM301 Single Band CDMA Cellular Phone User Manual Introduction
Vitelcom Mobile Technology USA, Inc. Single Band CDMA Cellular Phone Introduction
Users manual
Artemis Phone User Manual
Introduction
Congratulations on your purchase of the advanced and compact Artemis cellular phone, designed
to operate with the latest digital mobile communication technology, Code Division Multiple
Access (CDMA). Along with the many advanced features of the CDMA system such as greatly
enhanced voice clarity this phone offers:
● Large, easy-to-read, 8-line backlight color LCD with status line.
● Paging, messaging, voice mail, and caller ID.
● 24-key keypad.
● Long battery stand-by and talk time.
● Menu-driven interface with prompts for easy operation and configuration. Any key answer,
auto answer, auto retry, one-touch and speed dialing with 200 memory locations.
● Support multiple languages (English, Spanish and Portuguese).
INFORMATION TO USER
You must sign up with a wireless service provider and subscribe to the service of your
choice. Your service provider will describe its services and instructions for using them.
This device is an automated self tuning and power adjusting radio that interacts with the
service provider base station operating in the CDMA frequency band and does not require
user intervention to operate the tuning or the power adjustment
Important information
This user’s manual provides important information on the use and operation of your phone. Please
read all the information carefully prior to using the phone for the best performance and to prevent
any damage to or misuse of the phone. Any unapproved changes or modifications void your
warranty.
Getting Started
Phone Components
The following shows key components of your mobile phone.
VX600
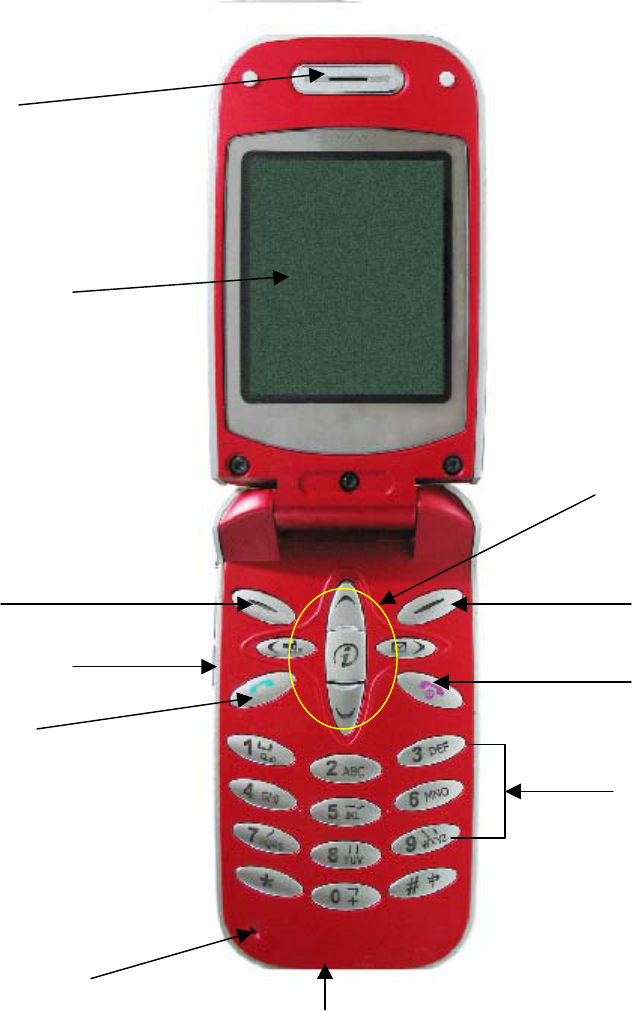
0
Earpiece
LCD screen
Right Soft Key
END/POWER Key
N
avigation Keys
Left Soft Key
Side keys
Send key
Alphanumeric keys
Microphone
Bottom Connector
Using the Battery Pack
Note: It is important to charge the battery fully before the initial use of the phone.
The phone comes with a rechargeable battery. Keep the battery charged while not in use in order
to maximize talk and standby time when using the phone. This phone will only operate with the
battery provided with the phone, or from a authorized retailer.

Installing the Battery
To install the battery, insert the bottom of the battery into the opening on the back of the phone.
Then push the battery down until the latch clicks.
Removing the Battery
Turn the power off. Lift the release latch to detach the battery
Battery Charge Level
The battery charge level is shown at the top right of the LCD screen.
When the battery charge level becomes low, the low battery sensor alerts you in three ways:
sounding an audible tone, blinking the battery icon, and displaying LOW BATTERY
WARNING! If the battery charge level becomes exceedingly low, the phone automatically
switches off and any function in progress is not saved.
Battery Information and Care
1. Never use an unapproved battery since this could damage the phone and / or battery and
could cause the battery to explode.
2. The battery does not need to be fully discharged before recharging.
3. Use only VITELCOM approved chargers specific to your phone model since they are
designed to maximize battery life.
4. Do not disassemble or short-circuit the battery.
5. Keep the battery’s metal contacts clean.
6. Replace the battery when it no longer provides acceptable performance. The battery can be
recharged several hundred times before replacement.
7. Recharge the battery after long periods of nonuse to maximize battery life.
8. Do not expose the battery charger to direct sunlight or use it in areas of high humidity such as
a bathroom.
9. Battery life will decrease if exposed to extreme hot or cold temperatures.
10. Battery life will vary due to usage patterns and environmental conditions.
11. The use of extended backlighting, MiniBrowser, and data connectivity kits affect battery life
and talk/standby times.
Accessories
There are a variety of accessories available for your mobile phone. You can select these options
according to your personal communication requirements. Consult your local dealer for
availability.
Your phone will come with one Travel Charger and one battery.
Optional Accessories: Hands-free headset, data cable.
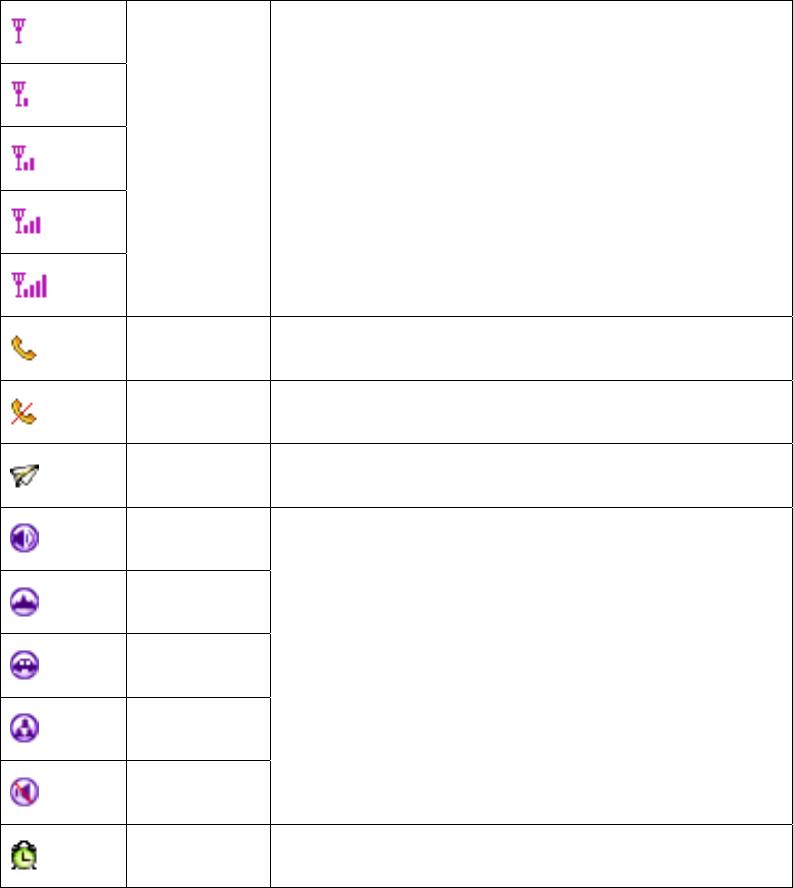
Screen Icons
RSSI Displays the strength of the signal received by the phone
and current signal strength
Online In use. A call is in progress.
No Service No service. The phone is not receiving a system signal.
Roaming Roaming The phone is outside of the home service area.
Normal
Outdoor
In Car
Meeting
Silent
Profiles and environment setting
Alarm Alarm Clock is on

SMS Text message.
Voice mail
Smart
message
Battery Charge level: Indicates battery charge level.
Basic Functions
Phone Overview
1. Earpiece
2. Flip Design: Flip open to answer an incoming call (when Answer Call is set to “Flip Open”)
and close the flip to end the call.
3. Message Key: Shortcut to retrieve or send voice and text messages.
4. SEND Key: Use to place or answer calls.
5. Side Keys: Use to adjust the key beep volume in standby mode and the earpiece volume
during a call.
6. Navigation Key Use for quick access to phone functions
●Up Key: Change the idle screen wallpaper
●Down Key: Enter the contact menu
●Left Key: Set the profiles
●Right Key: Enter the messages menu
7. Soft Keys
Left Soft Key: Use to select an action within a menu.
Right Soft Key: Use to exit from the current menu or as a CLR key to erase text input.
8. END/PWR Use to turn the power on/off and to end a call. Pressing “PWR” key, you can
return to the main menu display screen.
9. Alphanumeric Keypad Use to enter numbers and characters and choose menu items.
10. LCD Screen Displays messages and indicator functions.

11. Microphone
12. Bottom Connector : To connect to charger, hands-free headset or data cable.
Side Keys
Up, Down side key 1.Adjust the key volume during idle state
2.Adjust the speaker volume during a call
Record key 1.Start/stop the record function when in conversation
2.Press the key to enter the voice memo menu when in idle.
3.Hold the key to begin to record.
Alphanumeric, Symbol key
0 1.Press it to show 0
2.Press it to show 0 when in edit mode.
1 1.Press it to show 1 when dialing
2.Press it to show 1 and ” “ when in edit mode.
2 1.Press it to show 2 when dialing
2.Press it to show 2, A, B, C, a, b, c when in edit mode.
3 1.Press it to show 3 when dialing
2.Press it to show 3, D, E, F, d, e, f when in edit mode.
4 1.Press it to show 4 when dialing
2.Press it to show 4, G, H, I, g, h, i when in edit mode.
5 1.Press it to show 5 when dialing
2.Press it to show 5, J, K, L, j, k, l when in edit mode.
6 1.Press it to show 6 when dialing
2.Press it to show 6, M, N, O, m, n, o when in edit mode.
7 1.Press it to show 7 when dialing
2.Press it to show 7, P, Q, R,S, p, q, r, s when in edit mode.
8 1.Press it to show 8 when dialing
2.Press it to show 8, T, U, V, t, u, v when in edit mode.
9 1.Press it to show 9 when dialing
2.Press it to show 9, W, X, Y,Z, w, x, y, z when in edit mode.
* 1.Press it to show * and hold it to show T when dialing
2.Press it to show punctuation when in edit mode.
# 1.Press it to show # and hold it to show P when dialing.
2.Press to change the input mode when in edit mode.
Turning the Phone On and Off
Turning the Phone On
1. Install a charged battery pack or connect the phone to an external power source such as charger.
2. Press and hold “POWER” key for a few seconds until the display turns on.
NOTE: Like any other radio device, avoid any unnecessary contact with the antenna while
your phone is on.
Turning the Phone Off
Press and hold “POWER” key until the display turns off.
Note: Turning the phone off while the charger is connected will put the phone into charging mode.
Making a call
You can make a phone call by the following ways:
1. Key in the phone number and press “SEND” key.
2. Find the record in phone book and press “SEND” key.
3. Press “SEND” key in idle mode and select from the call logs and press “SEND” key
again to make a call.
4. Select received SMS, and return the call to the sending party by press “SEND” key.
5. Speed dialing by key in the list number and “SEND” key.
Receiving Calls
1. When there is an incoming call, press “send key” to answer.
2. Press “END” key to end the call.
Receiving call method can be set in the “Answer Call” menu item. You can choose from “Flip
Open”, “Any Key” or “SEND Only” mode. The phone will be set to “SEND ONLY” by default.
Speed Dialing
Speed dialing is a convenient feature that allows you to make phone calls quickly and easily. Your
mobile phone can store as many as 98 items in its memory.
When “Speed Dial List” is populated with numbers, you can key in the item number and press
“SEND” key to make a call the number in the Speed Dial List.
Phone Menu Reference
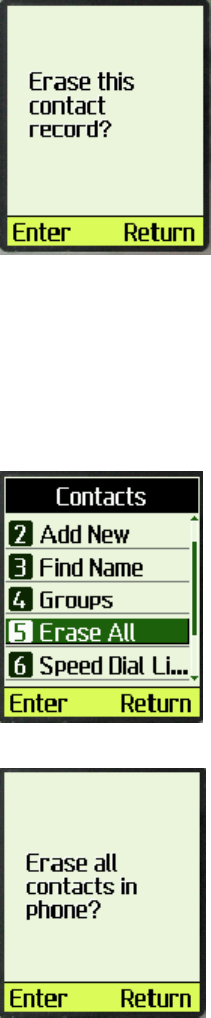
1 Contacts
1 List Contacts
2 Add New
3 Find Name
4 Groups
5 Erase All
6 Speed Dial List
7 Send all as vCards
8 Memory State
2 Messages
1 New Message
2 Inbox
3 Outbox
3 Phone Box
4 Quick Text
5 Erase Msgs
6 Voice Mail
7 Settings
8 Multimedia Box
3 Recent Calls
1 Missed
2 Incoming
3 Outgoing
4 Erase Lists
5 Call Timers
4 Tools
1 Schedule
2 To Do List
3 Alarm Clock
4 Voice Memo
5 Calculator
6 World Clock
7 Stop Watch
5 Settings
1 Display
1. Banner
2. Backlight
3. Screens
4. Menu Style
5. Theme Colors
6. Language
7. Contrast
2 Security
1. Lock Phone
2. Change Code
3. Reset To Default
3 Network Services
1. Call Forwarding
2. Call Waiting
4 Call Setup
1. Auto Answer
2. Voice Privacy
3. Answer Sel.
4. Call Guard
5 Phone Info
1. S/W version
6 vCard Receive
6 Profiles
1 Normal
1. Edit Profile
1.Call Mode
2.Call Ringer
3.Color Status Light
4. Message Promt Mode
5. Volume
6. Key Tone
7.Alerts
8.Answer Call
2. Select Profile
2 Outdoor
3 Car
4 Meeting
5 Silent
7 Amusement
1 Kongming Chess
Chapter 1: Contacts
The phone book can store 200 records. Each contact can contain five phone numbers,
two address, two emails, two URLs, and one note. Each phone number can have 31
digits.
The maximum length of name is 14 characters.
The maximum length of address is 150 characters.
The maximum length of email address is 150 characters.
The maximum length of URL is 150 characters.
The maximum length of note is 250 characters.
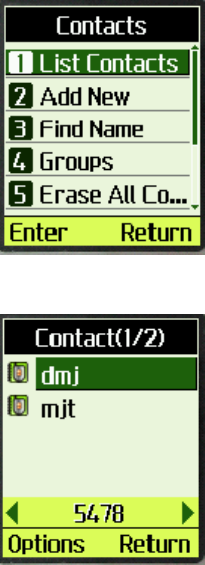
To List Contact
1. Press “Contact” in idle screen (The right Soft Key).
2. Select “List Contacts”
Note:
(1) When one contact is selected, the phone number will show up in the highlighted
bar at the bottom of the window. If the contact has more than one number, an arrow
will show up at both end of the highlighted bar. You can press left/right key to view
the other phone numbers. If you want to call the selected number, You can press

“SEND” key to make the call.
(2) To quickly find a name, you can key in the first character of the name. The first
name start with the character will be selected. For example: press ”m”, it locate the
first name that start with “m”.
3. More operations are available by pressing “Options” soft key
4. Select “Details” in “Option” menu
5. Press “Options” soft key, you can choose from the listed 4 more operations.
5.1 “Send Message”: Send SMS to selected number.
5.2 “Change”: Edit and change the selected contact.
5.3 Select “Add” in the options menu
add new item to contact.
5.4 “Erase”: Erase the record.
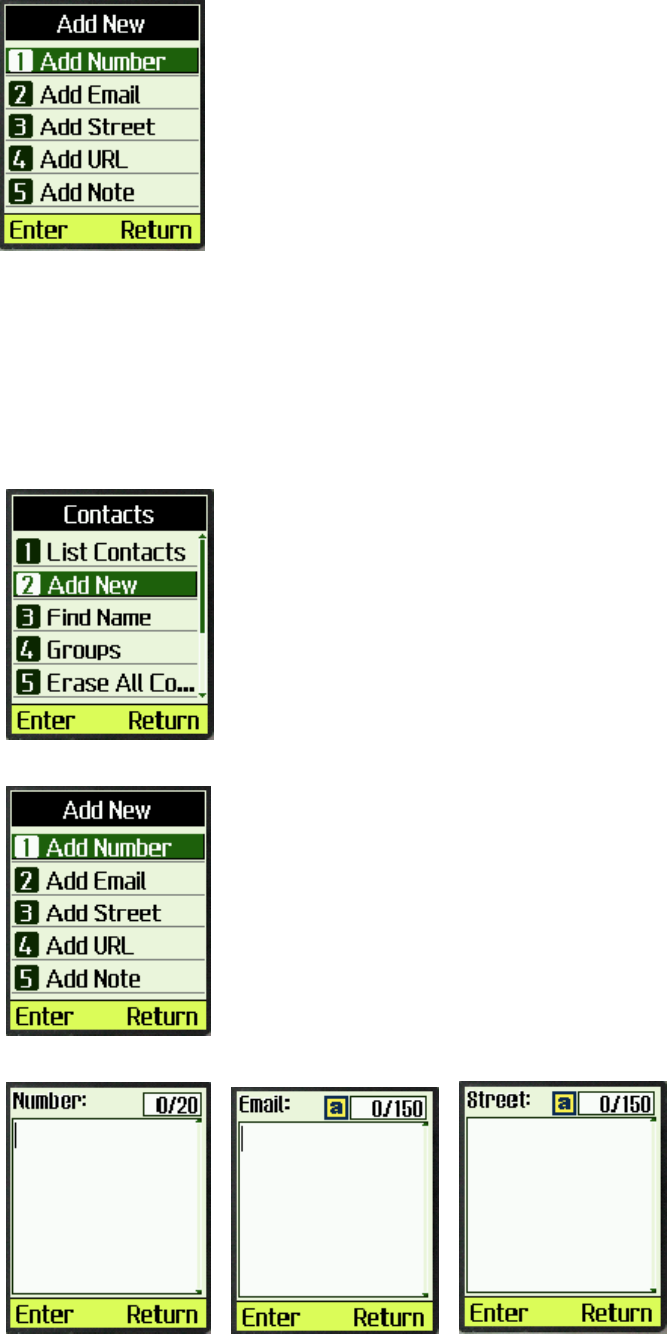
To add new a contact
1. In idle screen, select “Contact”.
2. Select “Add New”
3. Select “Add number” or “Add Email” or “Add Street”, etc
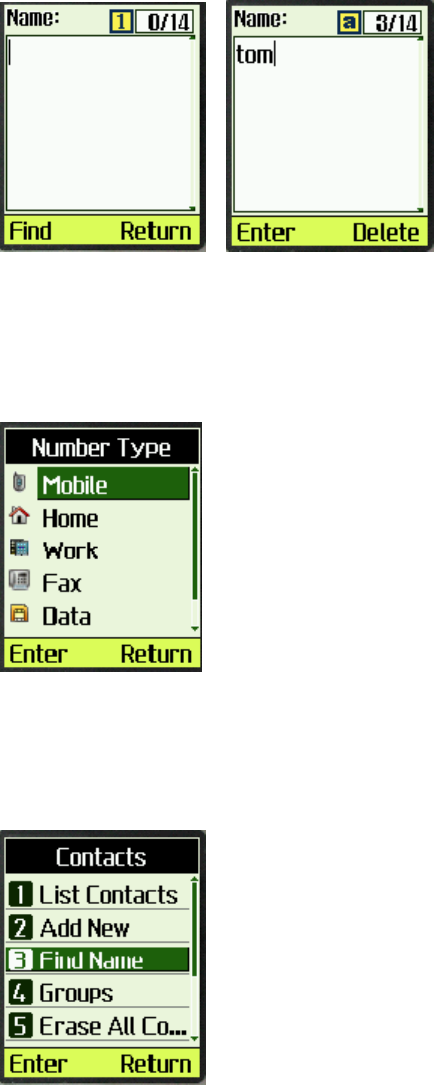
4. Key in the contact number or other, press “Enter”
5. When input name edit box is empty, the left soft key becomes “Find”. You can find a
name, save the number or email or street to this existent contact.
6. Input name in edit box, if the name already exists in the contact, it will save the
number or email or street to this existing contact. If it is a new contact, “Select
number type” menu will display.
To find name
1. Select “Contact” in idle screen

Select “Find Name”
Note: It is not case sensitive.
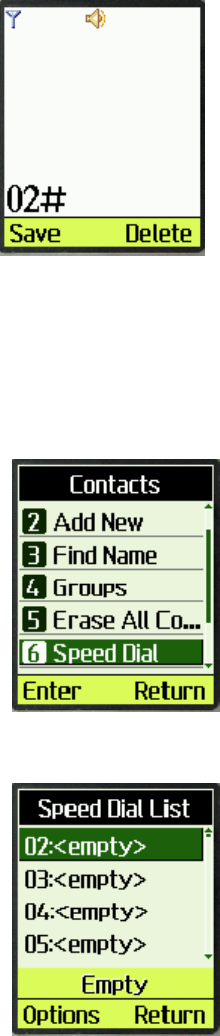
To erase a contact
1. Select one contact in the contact list.
2. Press “Options” soft key.
3. Select “Erase” in “Option” menu
4. Press “Enter” soft key to confirm or “Return” soft key to cancel.
To erase all contacts
1. Select “Contact” in idle screen.
2. Select “Erase All Contacts” in “Contacts” menu to erase all the contacts
Press “Enter” soft key to confirm and “Return” soft key to cancel.
Creating and Using the Speed List
1. You can assign number 02 to 99 to some contacts in “Speed List”. In
idle screen, after key in the Speed List number (02 to 99), you can press
“SEND” to dial immediately, or you can key in “#” to view the number
and then “SEND” to dial.
To add/edit a phone number to speed list
1. Select “contact” in Idle screen.
2. Select “Speed Dial List”
if no contact is assigned to the
Speed Dial Number in this item,
<empty> will be displayed, or else
the contact’s name will be
displayed instead, and displayed
number in the status bar.
3. Select one Speed Dial Number (the
index is the short number). Press

“Options” soft key.
3.1 Select “Set Number” in “Options”
menu
3.2 Select one contact, if the contact has
more than one number, you can
press left/right key to select the
phone number you want. Press soft
key “Enter” to save it to speed list.
3.3 Select “Remove” to erase selected
Speed Dial Number.
3.4 Select “Remove All” to erase all
Speed Dial Numbers.
To list memory state
1. Select “Memory state” in “contacts” menu
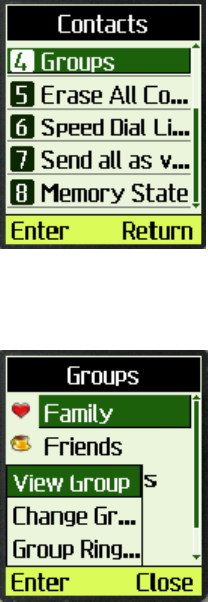
Managing Groups
1. Select “Group” in “contacts” menu.
2. Select “Group” in “contacts” menu.
3. Select “Options” in the groups.
3.1 Select “Change Group” in
“Options”, you can only change
group1 and group2 name, the rest
group names can not be changed.
3.2 Select ”Group Ring” to Change
group ring.
4. Select “view Group” in “Options”.
Note: There must be record in phone
book to allow the following
operation:

5. The group “Family” is empty, it will
prompt “No Members, add new
member?”,
press “Enter” to add new member.
press ”Options” in “Family” group.
6. Select “Add” in “Options” to add
member to this group.
7. Select “Erase member” to erase one
member the selected member.
8. Select “Erase all member” to erase
all member in this group.
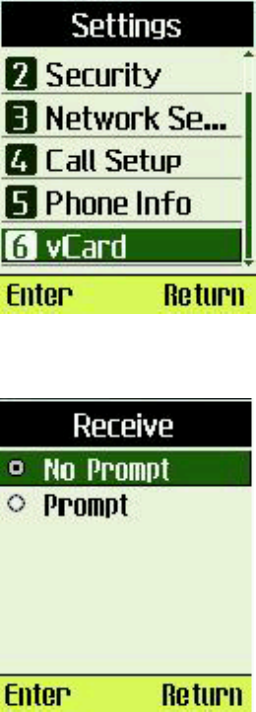
Using the vCard - VCard exchange
The vCard allow you to exchange phonebook entries via SMS with others whose handsets support
Smart Messaging.
Set Reception Mode
The handset support two vCards reception mode, ‘No Prompt’ or ‘Prompt’.
‘No Prompt’ means when you receive a new vCard, the handset will save the contact information
directly on your phonebook, and if the entry with the same contact name exists already in your
phonebook, it will be overwritten without prompt. After the contact information has been saved to
phonebook, the received vCard will be deleted.
‘Prompt’ means the handset will prompt for a new vCard’s incoming. The handset will popup a
dialog to ask you whether read the message right now, and your phone will sound an alert, Your
phone holds up to 120 vCards.
To set reception mode, do the following:
a. Select “Settings” in main menu
b. Select “vCard”
c. Select “Prompt” or “No Prompt”.
Read vCards
If your phone is turned on when it receives a vCard, your phone sounds an alert or vibrates. You
have a choice of reading the message immediately by pressing “View” key or reading it later by
press “Back” key. When you press “View” key, the display will show the content of the vCard
message if there is only one unread vCard message. Otherwise, the display will show the vCard
message list.
To read a vCard
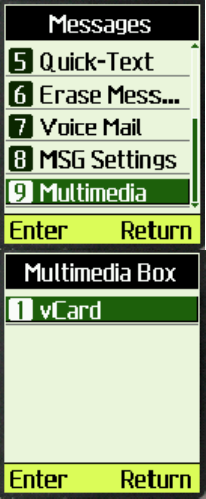
1. Enter ‘Message’ and select “8:
Multimedia Box”.
2. Select “vCard”
3. You can select a vCard by scrolling “↑↓”
keys and press “Option” to choose “View”.
The vCards shown are sorted according to the
time they received.
4. You can read the vCard’s content by scrolling
“↑↓” keys.
5. If you want to save this vCard’s contact
information, press “Save”. If a contact entry
with the same name exists, your phone will
prompt to ask you whether to overwrite the
existed entry.
Send a vCard
You can send a vCard through your phone.
To send a vCard;
1. Press “Contact” key in the
idle screen, and select the
contact entry you want to
send by scrolling “↑↓”
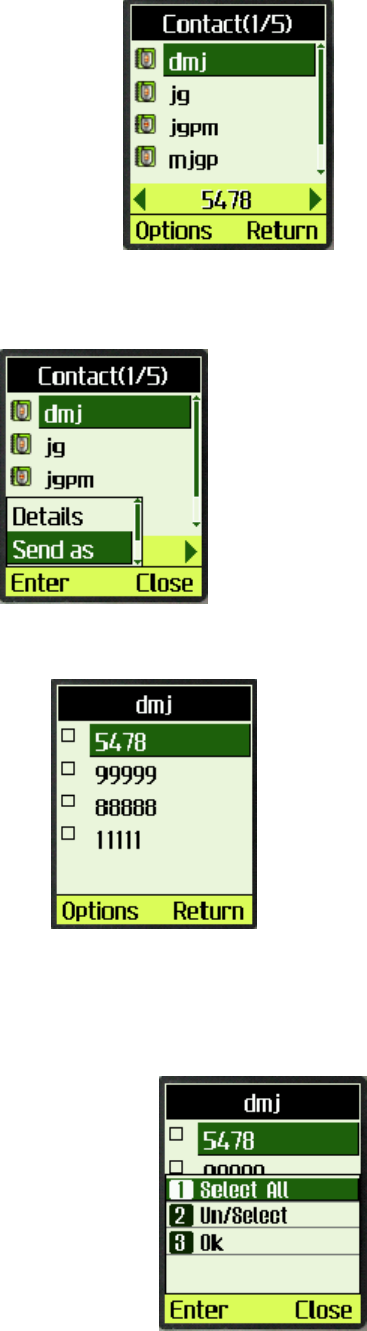
keys.
6. Press “Option” key, and select “Send as
vCard”, then press “Select”.
7. All contact details lists on the display, and
each with a check box.
You can select one details to send by
scrolling “↑↓” keys, and then
press “Option” key to add/delete it
to/from the list,
or add
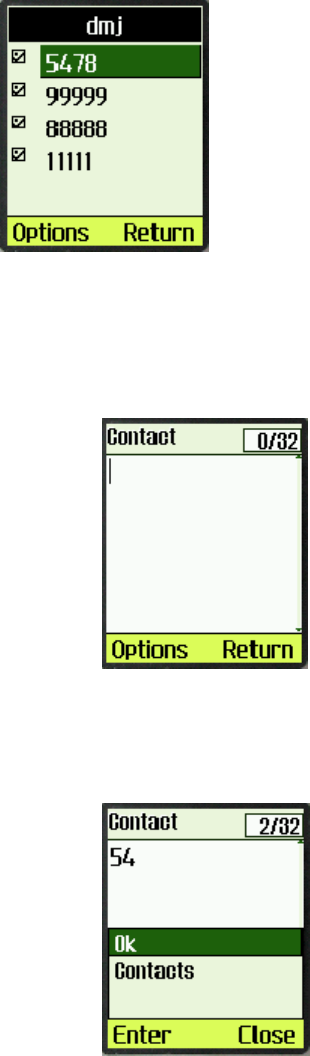
all details into to-be-send data by
selecting “Un/Select”, “Select all”
menus.
8. When you finish selecting the details to send
out, press “Option” key and select “Ok” in
menu, you can input addresses which will
receive the vCard.
You can also press ‘Option’ key and
select ‘Contacts’ in the menu to select
a contact entry to send this vCard.
The selected contact’s mobile phone
number will be displayed.
9. Send out the vCard via SMS by pressing
“Option” key, and selecting ‘Ok’ in the menu,
and you phone will send the vCard to the
address you have inputted.
10. If the vCard has been sent to an address
successfully, your phone will display
‘Message Sent!’.
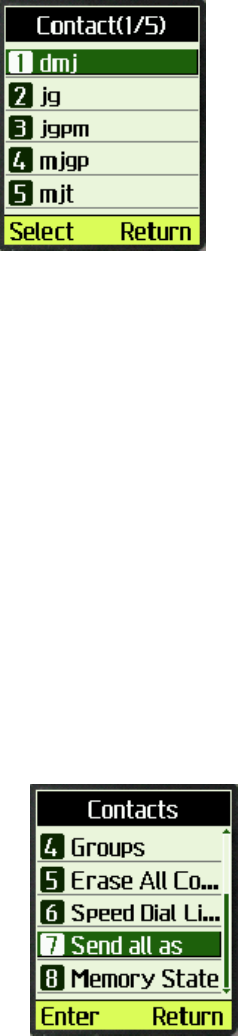
Send all of your phonebook
You can send out all of your phonebook via vCards. To make a batch-send;
2. Press “Contact” Soft key at
the idle state, and enter
contact menu.
11. Select “Send all as vCards” menu.
12. Input the address you want to send the
phonebook to, and then press “send” key. You
can only input one address to make the
batch-send. You can also use the “Option”
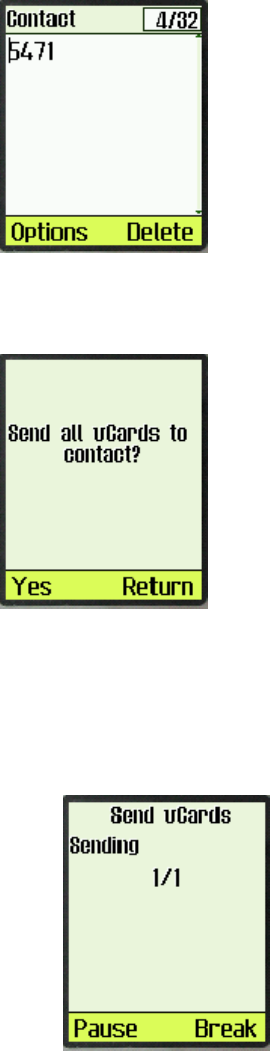
Soft key to find some one in the phone book.
13. Your phone will prompt to ask you whether
you are sure to make the batch-send.
14. Press “Ok” key to confirm.
-
15. The send status will be displayed. For
example:
Delete vCards
You can delete vCards one by one or delete all vCards at once.
To delete a vCard;
3. When you read vCards,
Select the vCard you want to
delete by scrolling “↑↓”
keys. If you want delete all of
the vCards, select any vCard.
16. Press “Option” key, and select “Erase” if you
want to delete this vCard, or select “Erase all”
if you want to delete all of the vCards, then
press “Select”.
17. Your phone will prompt to ask you to confirm
to delete the vCard or delete all the vCards.
18. Press “Ok” key, the vCard(s) will be deleted.
Chapter 2: Messages
This chapter introduces the usage of Short Message.
Using Short Messages
You can use Short Message function to send and receive short message. There is an inbox and
outbox in your phone, inbox and outbox can hold a maximum of 200 messages, each messages
can contain a maximum of 255 bytes. This phone also allows you to send the message at a later
time.
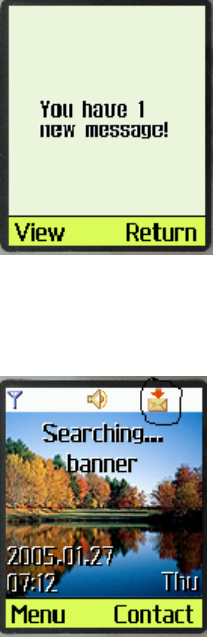
To check for received text messages
1. When a new message comes, you will be noticed and “You have 1 new
message!” will be displayed on screen.
2. Press left soft key to view.
Note: When you have new message(s), there is an icon in idle screen.
If your message memory is full, there is a prompt information indicates
that the message memory is full.
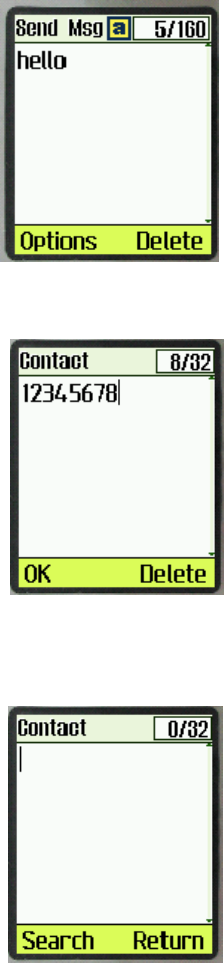
Compose and send new message
1. Select “Messages” from main menu
2. Select “New Message” to edit the text
message.
3. Select “Options->Send” to enter the number you want to send.
Or you can search the number that you want to send message to in
contact list, select “search” in the left soft key bar to search the number.
4. Select “OK” to send the message.
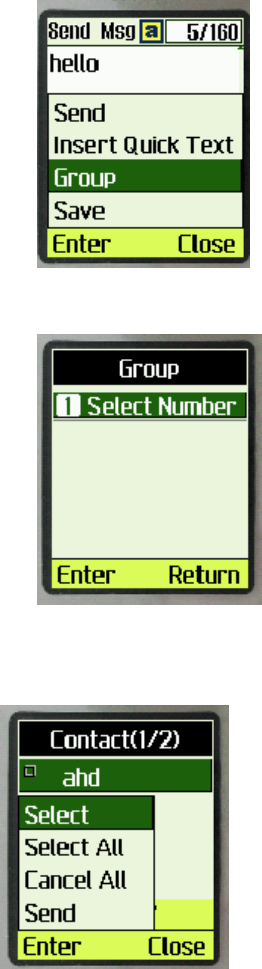
To send a text message to several addresses
1. When you at send text message’s step 2, you can select “Option->Group” to send
the message to several addresses.
2. Select “Select Number” to select number from contact list.
3. Select “Options->Select ” or press OK to select number, the max number you can
send in group one time is 10.
4. After you select the numbers, select “Options->Send” to send message to selected
numbers.

Inbox
1. Select “Messages” in main menu
2. Select “Inbox”
3. Select one message to read a text message.
4. Select “Options->Reply” to reply to the people who send this message to you.
5. Select “Options->Forward” to forward this message to other people.
6. Select “Options->Call Him/Her” to call up him/her.
7. Select “Options->Copy To Phone Box” to copy this message to phone box.
8. Select “Options->Save Address” to save the phone number of the people who
send this message to you.
9. Select “Options->Erase” to erase a text message.
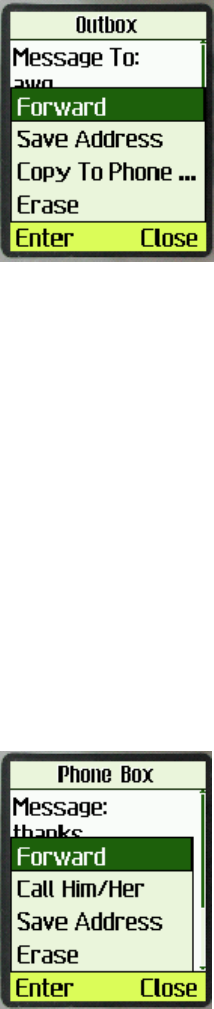
Outbox
1. Select “Messages” in main menu
2. Select “Outbox”
3. Select one message to read a text message.
4. Select “Options->Forward” to forward this message to other people.
5. Select “Options->Save Address” to save the phone number of the people who
send this message to you.
6. Select “Options->Copy To Phone Box” to copy this message to phone box.
7. Select “Options->Erase” to erase a text message.
Phone Box
1. Select “Messages” in main menu
2. Select “Phone Box”
3. Select one message to read a text message.
4. Select “Options->Forward” to forward this message to other people.
5. Select “Options->Call Him/Her” to call up him/her.
6. Select “Options->Save Address” to save the phone number of the people who
send this message to you.
7. Select “Options->Erase” to erase a text message.
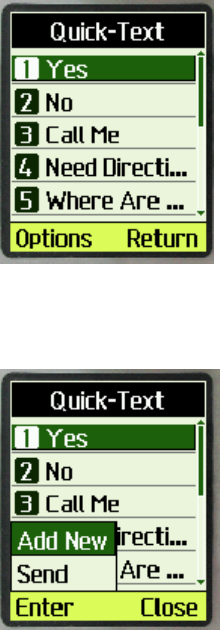
Quick-Text
1. Select “Messages” in main menu
2. Select “Quick-Text”, you can see 11 messages in common use.
3. Select “Options->Add New” to add a new message or “Options->Send” to send
this message to somebody.
Erase Messages
1. Select “ Messages” in
main menu
2. Select “Erase Messages”.
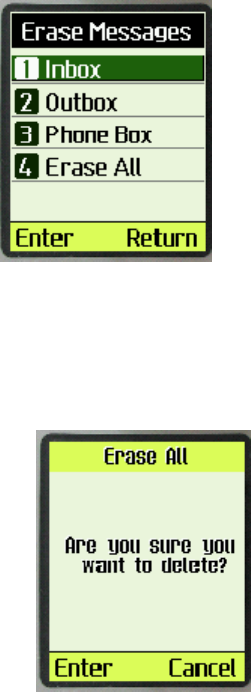
3. Choose which message you want to delete by “UP” and ”DOWN”
keys. For example, you want to delete all messages, you can select
“Erase All” to delete all messages, there will be a prompt message to
indicate you.
4. Select “Enter” to erase all messages and select “Cancel” to cancel
delete.
Voice Mail
1. Select menu “Messages” in main menu.
2. Select menu “Voice Mail”.
3. Select one voice mail message.
4. Select “Options->Call Him/Her” to call him/her back.
5. Select “Options->Erase” to erase this voice message. There will be a prompt
information to indicate you whether you are sure to delete this message,
select “Enter” to delete and select “Cancel” to cancel delete.
MSG Settings
1. Select menu “Messages” in main menu.
2. Select menu “MSG Settings”
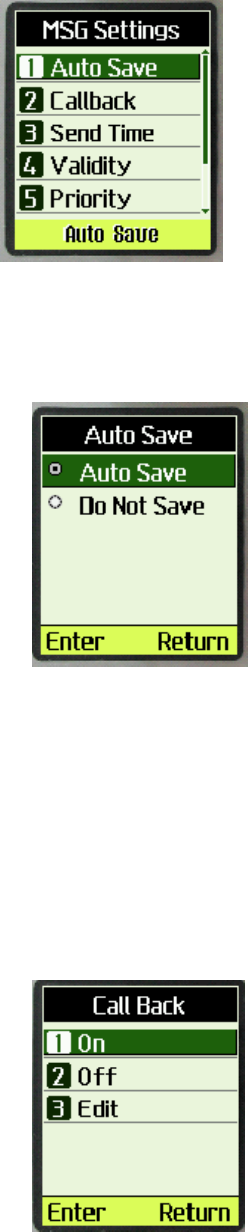
Enable/disable auto save outgoing message
1. Select menu “Auto Save”
2. Select “Auto Save/Do Not Save” to enable/disable auto save outgoing
message.
Set Call Back Number
If you enable Callback number, every message you sent would postfix the
number you set here and the receiver will know which number to callback
when he read the message.
1. Select menu “Callback”.
2. Select “On” to enable Callback number.
3. Select “Off” to disable Callback number.
4. Select “Edit” to enter Callback number, then press “Ok” key.

Set Send Time
If you set Send Time, message will be held in Short Message Center
according to the time you set here, but this function needs operator’s
support.
1. Select menu “Send Time”.
2. Press up and down key to select the deferred time, then press “Enter”
key.
Set Validity Time
If you set Validity Time, Short Message Center will try to send this
message until the Validity Time expired or message sent successfully. But
this function needs operator’s support.
1. Select menu “Validity”.
2. Press up and down key to select the Validity Time, then press “Enter”
key.
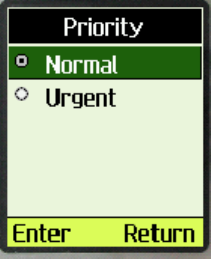
Set Priority
You can set priority of sent message, and the receiver will know which
priority the message is when he read it.
1. Select menu “Priority”.
2. Press up and down key to select the Priority, then press “Enter” key.
Chapter 3: Working with Profiles
A Profile is a group of user defined settings. By switching to a different profile, user can switch all
the settings at one time. Currently, the phone will support 5 different profiles.
For example, once you are in a meeting room, you may want to:
1. Switch your ringer to “Vibrator mode” or to a different ringer at low volume
2. Silent or lower the key press sound
3. Turn off or lower the volume of SMS alert
4. Turn off all other alerts
5. Turn on the color LEDs
6. Answer a call differently ( select from “Flip Open”, “Any Key” or “SEND only” )
All these settings can be defined by the user to one particular profile. Switching the profile just
need a couple key presses.
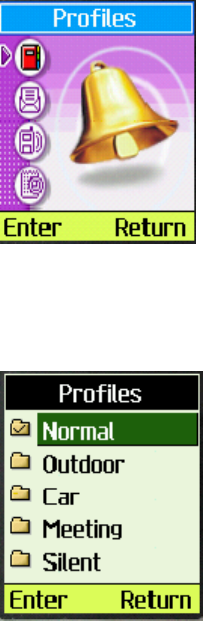
Selecting a Profile
When enter [Menu], you will find the submenu named [Profiles] which may like the following
image.
1. Select [Return] to turn back;
2. Select [Enter] to enter the profiles submenu which may like this:
There are profiles for Normal, Outdoor, Car, Meeting and Silent. Every profile can be manually
changed for your special purpose.
The selected one is marked by a [√], here the Normal Profile is the selected one.
You can select one of them for setting, “Normal” will be used to demonstrate how to work with
profiles.
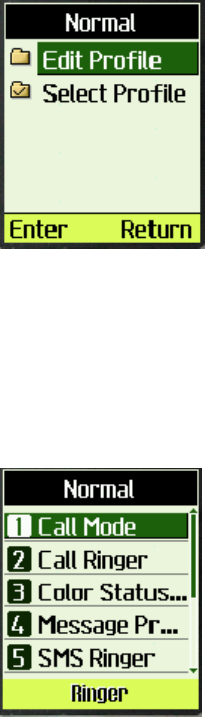
If you chose [Normal], you may see:
1. Select [Return] to turn back;
2. Select [Select Profile] to activating current profile;
3. Select [Edit Profile] for edit;
You will see the following menu:
Note: The bottom line is for displaying the current setting value, here “Ringer” indicates the [Call Mode]
value.
Edit Profile
When select [Edit Profile], you will see the following menu items:
Call Mode : Select the way of alerting when there is an incoming call.
Call Ringer : Select the ringer
Color Status Light : Select the style of flashing LED
Message Prompt Mode : Select how phone should alert when received a message
SMS Ringer: Select the ringer for SMS
Volume: Set volume for ringer, speaker, key beef and alerts
Key Tone : Select between short and long key tones

Alerts: Setting for different alerts
Answer Call: Select how a call is answered.
Select [Call Mode]
You will see:
Select [Return] to turn back;
Select [Enter] on one of them for setting:
1. Select [Ringer] will only play sound when call is coming;
2. Select [Vibration] will only vibrate when call is coming;
3. Select [Vibr. Then Ring.] will firstly vibrate for a while, then play sound when call is
coming;
4. Select [Simultaneous] will vibrate and play sound simultaneously when call is coming;
5. Select [Silence] will prohibit the warning of incoming call;
Select [Call Ringer] and you will see:
The listed is a list of names of the ringer. The actual name on your phone may be different.
Select [Return] to turn back;
Select one of the song and press [Enter] to select it as your incoming call ringer.
Select [Color Status Light] and you will see:

Navigate on the menus will play the style of the selected one.
Select [Return] to turn back;
Move up and down among the items, the LED light will flashing according to different style.
Select [Enter] on one of them will select it as your incoming call flashing style.
Select [Message Prompt Mode], you will see:
Select [Return] to turn back;
Select [Enter] on one of them as your setting:
1. Select [Ringer] will play ringer when message is received;
2. Select [Vibration] will vibrate when message is received;
3. Select [Silence] will have no alert when message is received.
Select [SMS Ringer], you will see:

The listed is a list of names of the ringer. The actual name on your phone may be different.
Select [Return] to turn back;
Select [Enter] on one of them will select it as your incoming SMS ringer.
Select [Volume], you will see:
Select Right Soft Key to turn back;
Select Left Soft Key to enter the item, if Select:
[Ringer]
You will see:
Select [Return] to turn back;
Select [Enter] on one of them for setting, which is the played ringer volume. If chose [Off], the
ringer will not be heard.
[Conversation]
Please refer to [Ringer].
Note: [Conversation] and [Alerts] have no “off” item, it cannot be off.
[Key Beep]
Please refer to [Ringer].

[Alerts]
Please refer to [Ringer].
Select [Key Tone], you will see:
Select [Return] to turn back;
Select [Normal] will play a short key tone even when the key is pressed;
Select [Long] will play a continuous key tone when the key is pressed, the key tone will stop if the
key is released.
Select [Alerts], you will see:
Alerts menu is for setting of alerts, you can switch it On/Off in its sub-menu, which may see like
this:
Select [Return] to turn back;
Select [Enter] on one of them for setting:
If select:
[Service Change] :
Service Change will alert when [On] is chosen, will not when [Off] is
chosen;
[Minute Beep] : During a call, a short alert will sound every one minute.
Minute Beep will alert when [On] is chosen, will not when [Off] is chosen;
[Call Connect] : Alert when call is connected.
Call Connect will alert when [On] is chosen, will not when [Off] is chosen;
[Dropped Call] : Alert when call is dropped.
Dropped Call will alert when [On] is chosen, will not when [Off] is chosen;
[Fail On Outgoing] : Alert when failed to make a call.
Fail On Outgoing will alert when [On] is chosen, will not when [Off] is chosen;
[Power On/Off Tone] : Playing songs when powering on/off the phone.
Power On/Off Tone will alert when [On] is chosen, will not when [Off] is chosen;
[Low Battery] : Alert when battery is low.
Low Battery will alert when [On] is chosen, will not when [Off] is chosen;
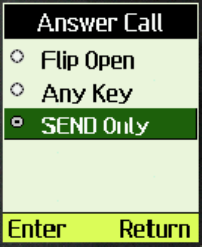
Select [Answer Call], you will see:
Select [Return] to turn back;
Select [Enter] on one of them for setting:
If select:
[Flip Open]

When flip is closed, open the flip will accept incoming call.
[Any Key]
Press any key to accept incoming call.
[Send Only]
Only press [Send] key to accept incoming call.
When phone are shipped from factory, it will be programmed with the following default value:
Normal Mode
Call Mode Ringer
Call Ringer Carmen
Color Status Light Style2
Message Prompt Mode Ringer
SMS Ringer Carmen
Ringer Med
Conversation Med
Key Beep Med
Vo l u m e
Alerts Low
Key Tone Normal
Services Change Off
Minute Beep Off
Call Connect Off
Dropped Call Off
Fail On Outgoing Off
Power On/Off Tone On
Alerts
Low Battery Alert On
Answer Call Send Only
Outdoor/Car/Meeting/Silent
Each of the profiles can be set the same way as the “Normal” profile. Default settings is:
Outdoor:
Call Mode Ringer
Call Ringer Carmen
Color Status Light Style2
Message Prompt Mode Ringer
SMS Ringer Carmen
Ringer Med
Conversation Med
Key Beep Med
Vo l u m e
Alerts Low
Key Tone Normal
Services Change Off
Minute Beep Off
Call Connect Off
Dropped Call Off
Fail On Outgoing Off
Power On/Off Tone On
Alerts
Low Battery Alert On
Answer Call Send Only
Car:
Call Mode Ringer
Call Ringer Carmen
Color Status Light Style2
Message Prompt Mode Ringer
SMS Ringer Carmen
Ringer Med
Conversation Med
Key Beep Med
Vo l u m e
Alerts Low
Key Tone Normal
Services Change Off
Minute Beep Off
Call Connect Off
Dropped Call Off
Fail On Outgoing Off
Power On/Off Tone On
Alerts
Low Battery Alert On
Answer Call Send Only
Meeting:
Call Mode Vibration
Call Ringer Carmen
Color Status Light Style2
Message Prompt Mode Vibration
SMS Ringer Carmen
Vo l u m e Ringer Med
Conversation Med
Key Beep Off
Alerts Low
Key Tone Normal
Services Change Off
Minute Beep Off
Call Connect Off
Dropped Call Off
Fail On Outgoing Off
Power On/Off Tone Off
Alerts
Low Battery Alert On
Answer Call Send Only
Silent:
Call Mode Vibration
Call Ringer Carmen
Color Status Light Style2
Message Prompt Mode Vibration
SMS Ringer Carmen
Ringer Med
Conversation Med
Key Beep Off
Vo l u m e
Alerts Low
Key Tone Normal
Services Change Off
Minute Beep Off
Call Connect Off
Dropped Call Off
Fail On Outgoing Off
Power On/Off Tone Off
Alerts
Low Battery Alert On
Answer Call Send Only
Chapter 4: Recent Calls
1. The call history support 3 different categories of call logs. Incoming Calls,
Outgoing Calls, and Missed Calls.
2. This information can be contained in 3 separate call lists, each of which is capable of
storing the last 10 entries
3. The call history support saving the number into the phone book (if it is not in the phone
book).
4. Numbers dialed, regardless of whether the call is successfully connected, must be
recorded in the outgoing call history.
5. If there is a record in the phonebook, the display will match the caller’s phone number
and display the name accordingly.
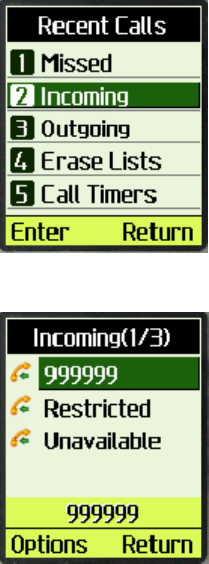
To List Incoming call
1. From the main menu, select [Recent calls].
2. Select [Incoming]
select one call history, if number is available, you can press [Send] key to call this
number
3. Press [Options] soft key.
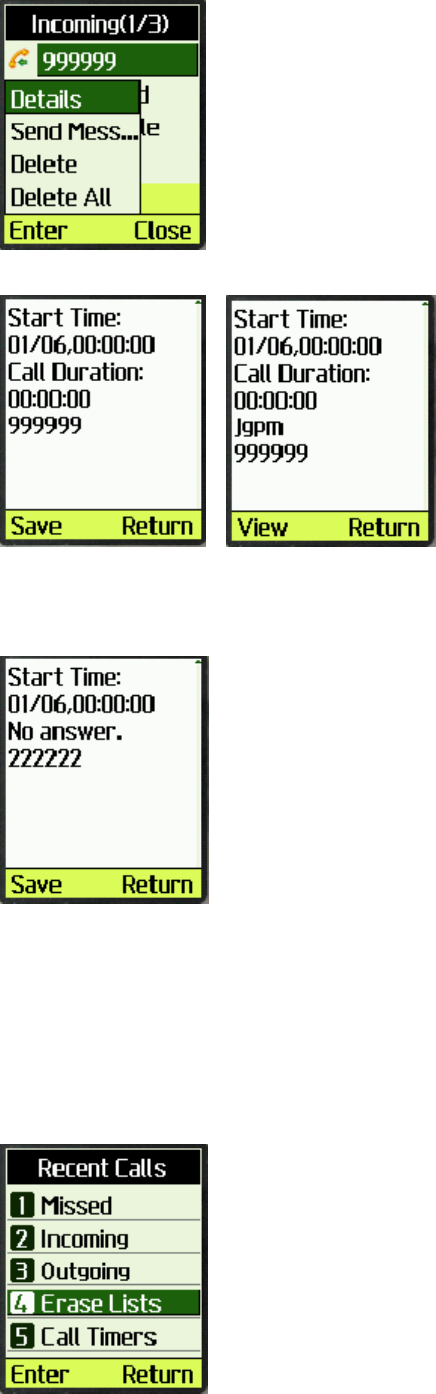
4. Select [Details]
If this number exists in contact, the Left Soft Key will become [View] for you to
view other information of this record.
5. For missed calls, you will see “No Answer” instead of call durations.
6. Select [Delete] to delete one incoming call record
7. Select [Delete All] to delete all incoming call records
8. Select [Send Message] to send a SMS to the selected phone number.
To erase lists
1. From the main menu, select [Recent call]

2. Select [Erase lists] in recent calls menu
3. Press [Enter] to confirm or [Return] to cancel.
Check Call Timer
1. Select [Call Timers] in “Recent
Call” menu
2. Select [Last Call] or [Incoming
Call] or [Outgoing Call] in “Call
Timers” menu, call duration will be
displayed.
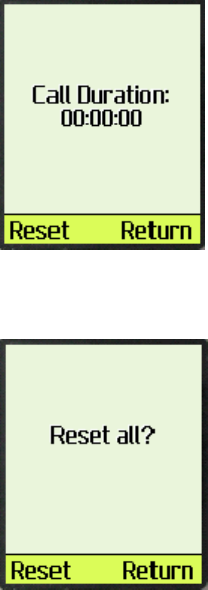
3. Select [Reset] to clear the call timer.
4. Select [Timer Reset] in “Call
Timers” menu.
Press [Reset] to reset all the call
timers to 0, including: last calls,
incoming calls and outgoing calls.
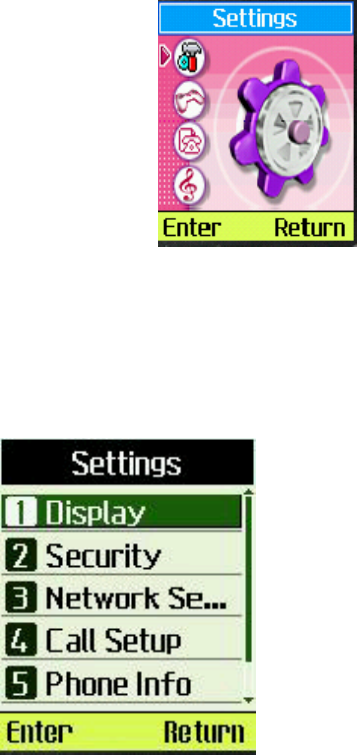
Chapter 5: Setting Up Your Phone
To personalize your phone, you can set and view many properties for display, security, network
service, call setup, phone info and vCard.
Select [Menu] from the idle screen and press “Up/Down” key until you reach the “Setting” screen.
Press [Enter] to enter the “Settings” menu.
Setting up the Display
Customizing your display by creating a banner, adjusting the backlight, selecting the language,
etc.
Creating a display banner
1. Select [Display] menu item.
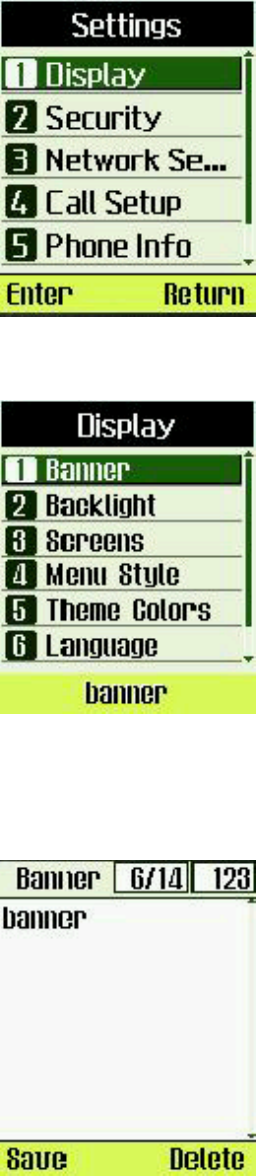
2. Select [Banner] menu item.
3. Editing the banner. You may press
“#” to switch between numbers,
characters and Zi text input.
4. Select [Save] to save banner.
Setting backlight Timer
Setting the timer for the backlight.
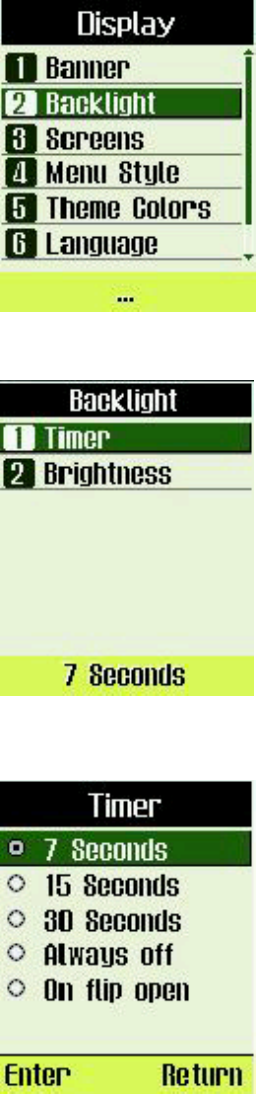
1. Select [Display] menu item.
2. Select [Backlight] menu item.
3. Select [Timer] menu item.
4. Select an option.
5. Select [Enter] to save.
Setting backlight Brightness
Setting the brightness for the backlight.
1. Select [Display] -> [Backlight]
2. Select [Brightness] menu item.
3. Select an option.
Select [Enter] to save or [Return]
to cancel.
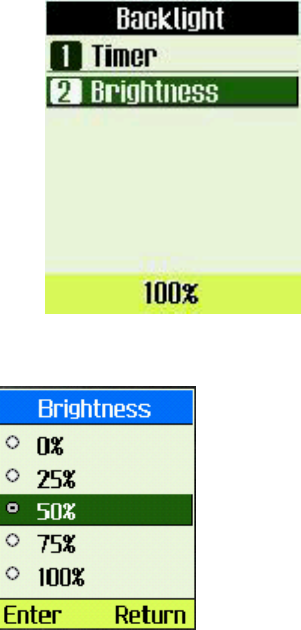
Setting the display Screens Wallpaper
1. Select [Display] -> [Screens]
2. Select [Wallpaper] menu item.
3. Select an option.
Press ‘Left’ or ‘Right’ key to
change image.
Select “Enter” to save.

Note: in idle screen, press “Up”
key can also change the
wallpaper.
Setting the display Screens power on image
Setting the power on image.
1. Select [Display] -> [Screens] -> [Power On] menu
item.
2. Select an option.
Press ‘Left’ or ‘Right’ key to
change image.
Select [Enter] to save or [Return]
to cancel.
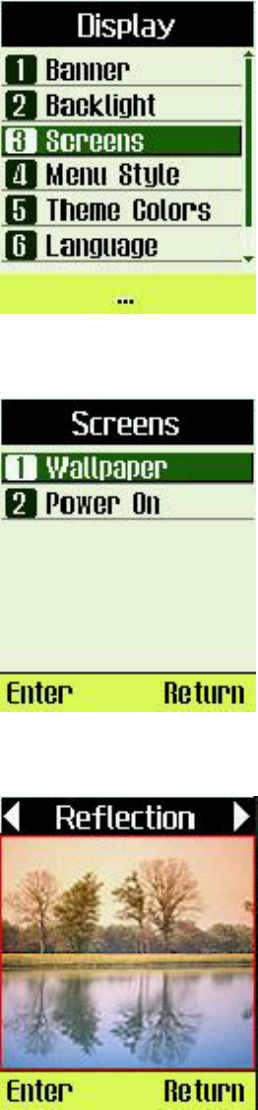
Setting the Menu Style
Setting the menu style.
3. Select [Display] -> [Menu Style] menu item.
4. Select an option.
Select [Enter] to save or [Return] to
cancel.
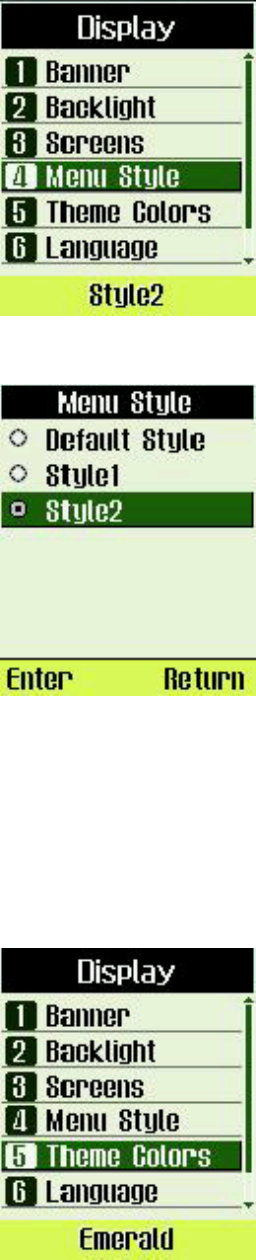
Setting the Theme Colors
1. Select [Display] -> [Theme Colors] menu item.
2. Select an option.
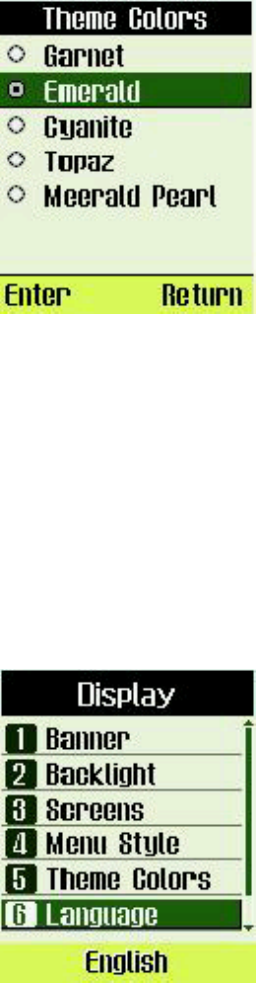
Select [Enter] to save or [Return]
to cancel.
Setting the display language
1. Select [Display] -> [Language]
menu item.
2. Select an option.

Select [Enter] to save or [Return]
to cancel.
Setting the display Contrast
1. Select [Display] -> [Contrast] menu
item.
2. Select an option.
Select [Enter] to save or [Return]
to cancel.
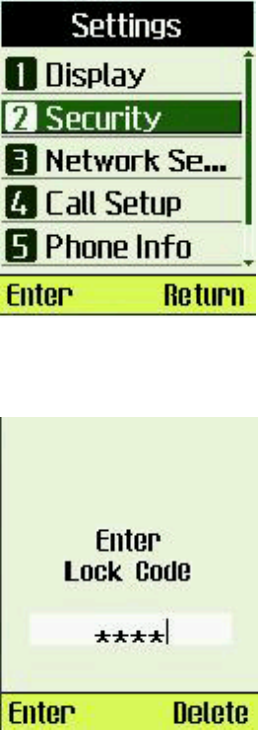
Security
Provide password protection for Lock Phone, Change Code, Reset to Defaul
Login Security
1. Select [Security] menu item.
2. Enter the password, and the default password is
“0000”.
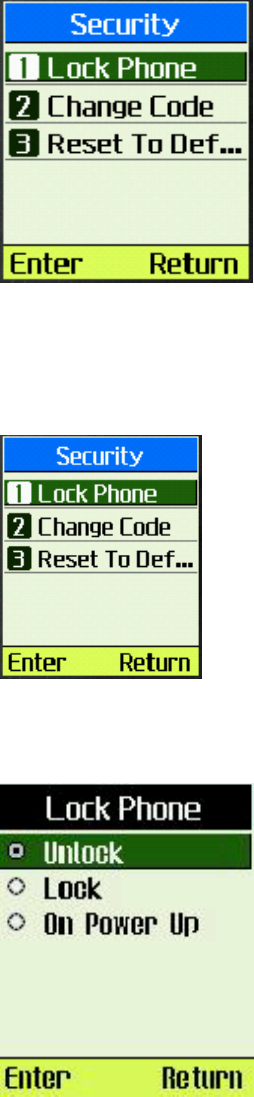
Lock Phone
3. Select [Lock Phone] menu item.
4. Select an option. Selecting [On Power Up] will
lock the phone next time phone is powered up.
Select [Enter] to save or [Return]
to cancel.
Changing lock code
1. Select [Change Code] menu item.

2. Input new password.
3. Confirm password
Select [Enter] to save.
Reset Security settings to default values
1. Select [Reset To Default] menu
item.

2. Select [OK] to reset, [Cancel] to
return.
Network Service
Network Service settings allow user to set CDMA network, call forwarding and call waiting
options.
Select [Network] menu item
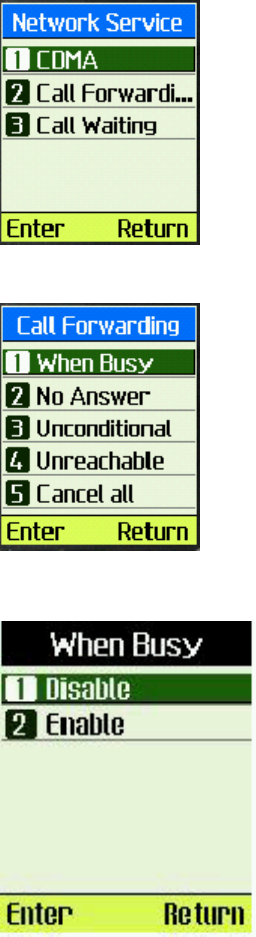
Disable Call Forwarding When your phone is busy
1. Select [Call Forwarding] menu
item.
2. Select [When Busy] menu item..
3. Select [Disable] menu item.
4. Phone will dial to setup the service.

Enable Call Forwarding When your phone is busy
1. Select [Call Forwarding] -> [When Busy] menu
item.
2. Select [Enable].
3. Input Number.
Select [Send] to start the service.
4. Your phone will start a call for the service.
Disable Call Forwarding If there is no answer
1. Select [Call Forwarding] menu
item.
2. Select [No Answer] menu item.
3. Select [Disable] menu item.

4. Will make a call to establish service.
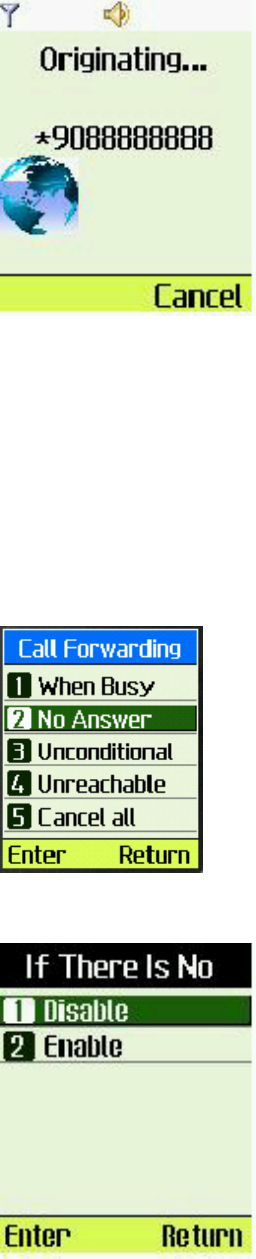
Enable Call Forwarding If there is no answer
1. Select [Call Forwarding] -> [No Answer]
2. Select [Enable]
3. Input Number.
Select [Send].
4. Phone will call to setup the service.
Disable unconditional Call Forwarding
1. Select [Call Forwarding] -> [Unconditional].
2. Select [Disable]
3. Phone will call to setup the service.

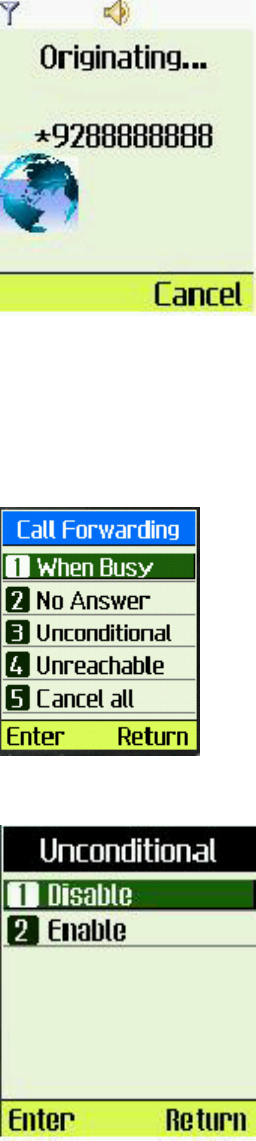
Enable unconditional Call Forwarding
1. Select [Call Forwarding] -> [Unconditional].
2. Select [Enable]
3. Input Number.
Select [Send].

4. Phone will call to setup the service.
Disable Call Forwarding when can not be reached
1. Select [Call Forwarding] -> [Unreachable]
2. Select [Disable].
3. Phone will call to setup the service.

Enable Call Forwarding when can not be reached
1. Select [Call Forwarding] -> [Unreachable]
2. Select [Enable].
3. Input Number.
Select [Send].

4. Phone will call to setup the service.
Cancel all Call Forwarding
1. Select [Call Forwarding] -> [Cancel all].
2. Phone will call to setup the service.
Disable Call Waiting
1. Select [Call Waiting].
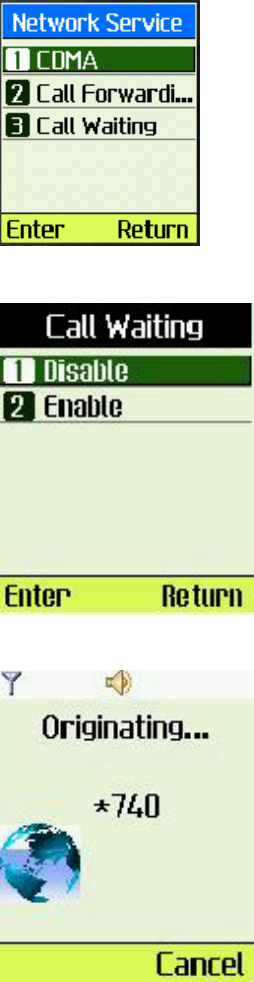
2. Select [Disable]
3. Phone will call to setup the service.
Enable Call Waiting
1. Select [Call Waiting] -> [Enable].
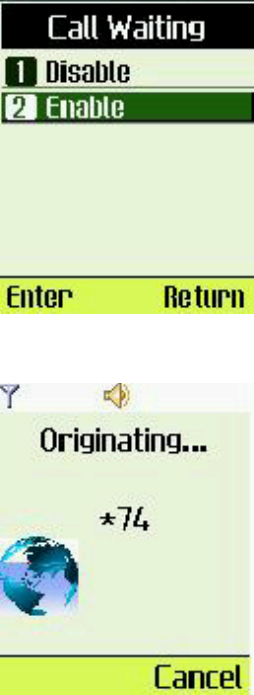
2. Phone will call to setup the service..
Call Setup
In Call Setup menu, you can setup for the following items:
Auto Answer : Allow the phone to automatically answer the call, or put the phone in answering
machine mode.
Voice privacy : is used to encrypt the voice to protect privacy.
Greetings : Select the greetings for answering machine.
Call Guard : Confirm calls on roaming network.
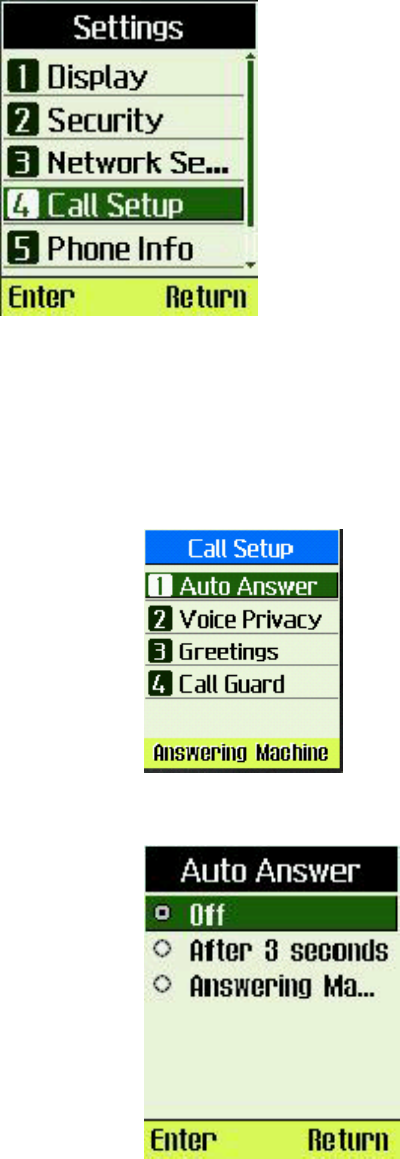
Setting up auto answer
1. Select [Call Setup] -> [Auto
Answer]
2. Select an option.
Select [Enter] to save.
Setting up voice Privacy
1. Select [Voice Privacy]
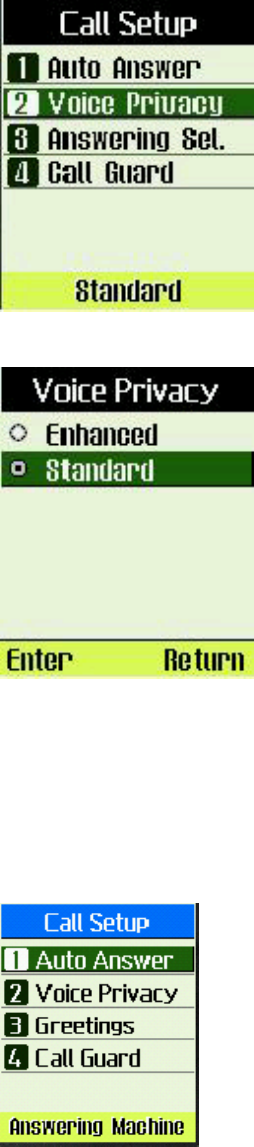
2. Select an option.
Select [Enter] to save.
Selecting the greetings for answering machine
1. Select [Greetings]
2. Select an option.
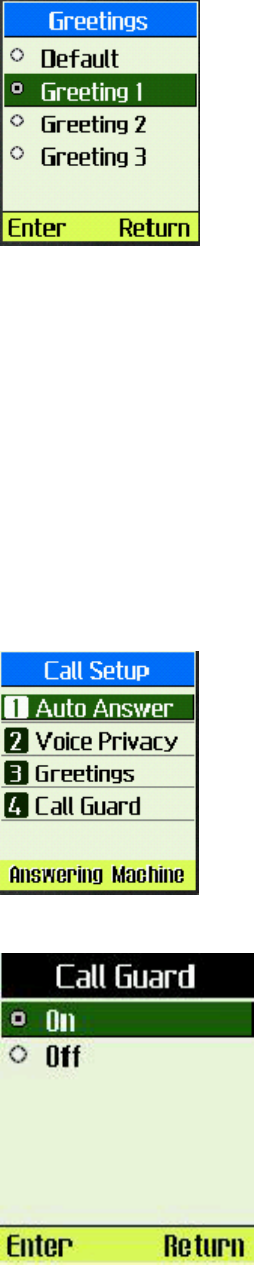
Select [Enter] to save.
Note: To record a greeting, please refer to [Tools] -> [Voice
Memo] -> [Rec. Greeting]
Setting up Call Guard
When the phone is on a roaming network, if Call Guard is turned on, it
will ask user to confirm making the call.
1. Select [Call Setup] -> [Call
Guard].
2. Select an option.
Select [Enter] to save or [Return] to cancel
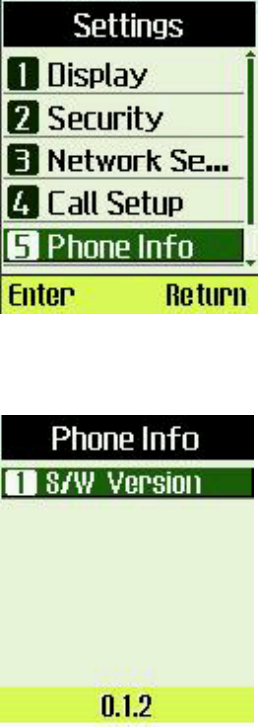
Viewing Phone Information
To view the version of software installed on your phone
1. Select [Phone Info] under [Settings]
menu
2. Will display the related information
for the phone.
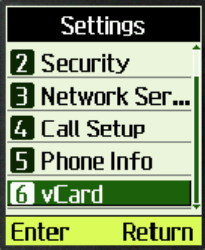
vCard Receiving Prompt
Set the phone to prompt or not to prompt when receive a vCard.
1. Select [vCard] under [Settings]
menu.
2. Select desired option.
Select [Enter] to save or [Return]
to cancel.
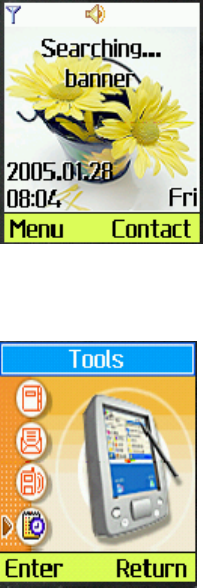
Chapter 6: Using the Tools
The tools menu has many useful tools to convenience your everyday life,
including Schedule, To Do List, Alarm Clock, Voice Memo, Calculator, World
Clock, and Stopwatch.
Note: Your phone must be turned on to use these tools. Do not turn on the
phone when wireless phone use is prohibited or when it may cause interference
or danger.
1. Select “Menu” in the idle screen.
2. Select “Tools” in main menu by pressing up/down key or by
pressing “4” in the alphanumeric key pad. Now you can use
the tools in the Tools menu.
Using the Schedule
You can use schedule to associate an alert with an event.
Note: The alert within the Schedule can not work when the phone is off or
there is not enough power in the battery.
To add a schedule
1. Select “Tools” in main menu.
2. Select “Schedule”.
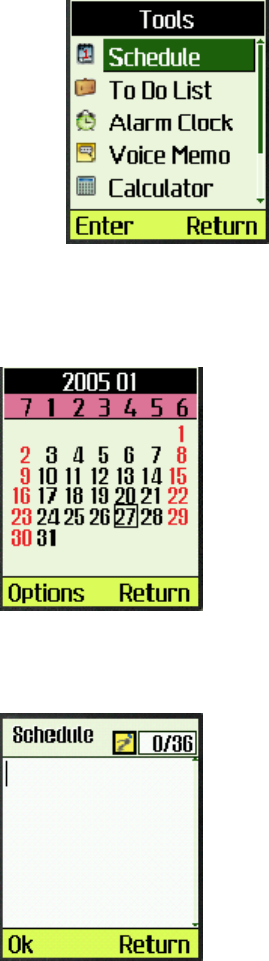
3. Select the day by pressing the up/down key and select the month
by pressing the left/right key. The current date is highlighted by
a black frame.
4. Select “Options”.
5. Select “Add New”.
6. Edit the description, then press “Ok”.
7. Edit the Alarm by pressing the alphanumeric keys and select
the Ringer by pressing the up/down key, then press “OK” to
save. You can use the left/right key to exchange the focused
field between Alarm and Ringer.

To view a schedule
1. Select “Tools” in main
menu.
2. Select “Schedule”.
3. Select “Options”
4. Select “List All”
5. Select “Options”
6. Select “Enter”
7. The information about the schedule displays in
the screen.

To delete one schedule
1. Select “Tools” in main menu.
2. Select “Schedule”.
3. Select “Options”.
4. Select “List All”.
5. The screen displays all the schedules, select the schedules
to be deleted by pressing the up/down key.
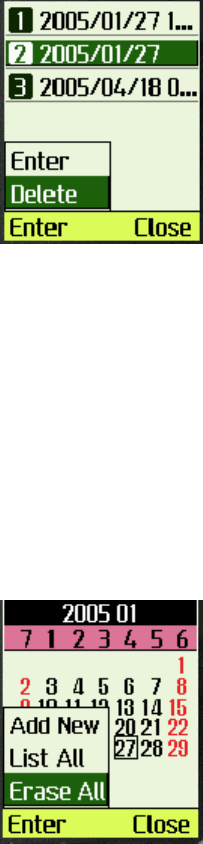
6. Select “Options”.
7. Select “Delete”.
8. Select “Ok”.
To Delete all schedules
1. Select “Tools” in main menu.
2. Select “Schedule”.
3. Select “Options”.
4. Select “Erase All”.
5. Select “Ok”.
Using the To-Do List
You can keep track of your tasks with the to-do list tool. With this tool you can
make a new note, delete an existing note, and set or change the note’s status.
To add new item
1. Select “Tools” in main menu.
2. Select “To Do List”.

3. Select “Add New”.
4. Edit the description.
5. Select “Priority” to set the note’s priority among
high, normal and low.
6. Select “Deadline” to select the date. You can use
the up/down key to select the day and the
left/right key to select the month.

7. Select “save”.
To delete one item
1. Select “Tools” in main
menu.
2. Select “To Do List”.
3. Select “List”.
4. Select among “To Do, Done,
All”
5. Select “Enter”
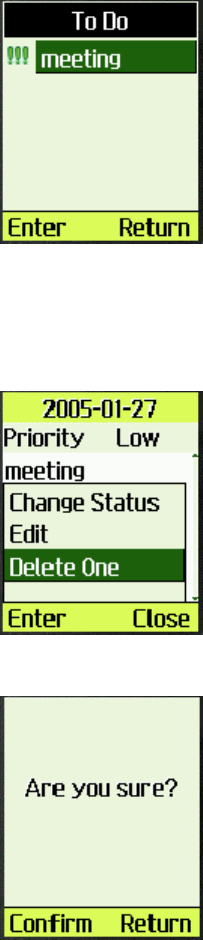
6. Select “Enter”.
7. Select “Options”.
8. Select “Delete One”.
9. Select “Enter”.
10. Select “Confirm”
To delete multiple items
1. Select “Tools” in main
menu.
2. Select “To Do List”.
3. Select “Batch Deletion”.
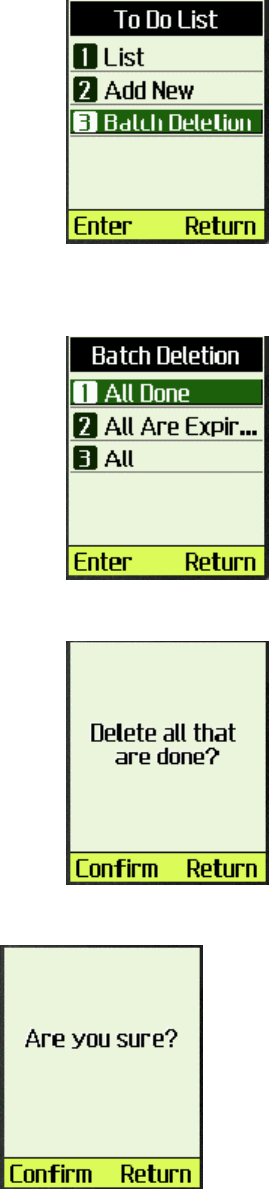
4. Select among “All Done, All Are Expired, All” to
decide which to be erased.
5. Select “Enter”.
6. Select “Confirm”.
7. Select “Confirm”.
To change the status of one item
1. Select “Tools” in main
menu.
2. Select “To Do List”.
3. Select “List”.
4. In this case a note with the status of to do will
be changed to the status of done. So select “To
Do”.
5. Select “Enter”.
6. Find the item and select
“Enter”.
7. Select “Options”, then select “Change Status” to
change the status of the item.

8. Select “Enter”.
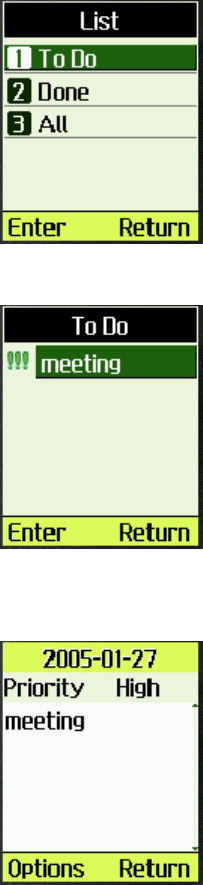
To edit an existing item
1. Select “Tools” in main
menu.
2. Select “To Do List”.
3. Select “List”.
4. In this case edit an existing item in To Do. So
select “To Do”.
5. Select “Enter”.
6. Select “Options” and
“Edit”.
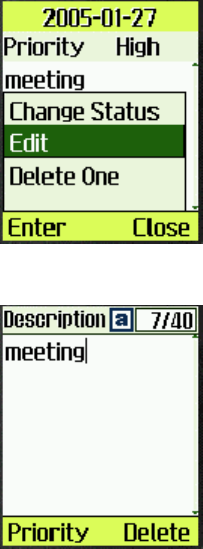
7. Edit the item.
8. Select “Priority” to set the item’s priority
among high, normal and low.
9. Select “Deadline” to set
the date.
10. Select “Save”.
Using the Alarm Clock
Alarm Clock sounds an alert at the time you specified.
Note: The Alarm Clock can work only under the condition of the system clock
has been set. The Alarm Clock can not work when the phone is off or there is
not enough power in the battery. When the Alarm Clock is triggered, the Alarm
Clock sounds an alert or turns for 30 seconds. If you do not press a key, the
alarm stops for 5 minutes, and then sounds again. The Alarm Clock stays on
until the alarm is turned off or a key is pressed.
Up to 3 alarms can be set at the same time. “Quick Alarm” function will
quickly set the alarm to sound after 10 minutes, 30 minutes, 1 hour or 3 hours
respectively.
To set the alarm time
1. Select “Tools” in main menu.
2. Select “Alarm Clock”.
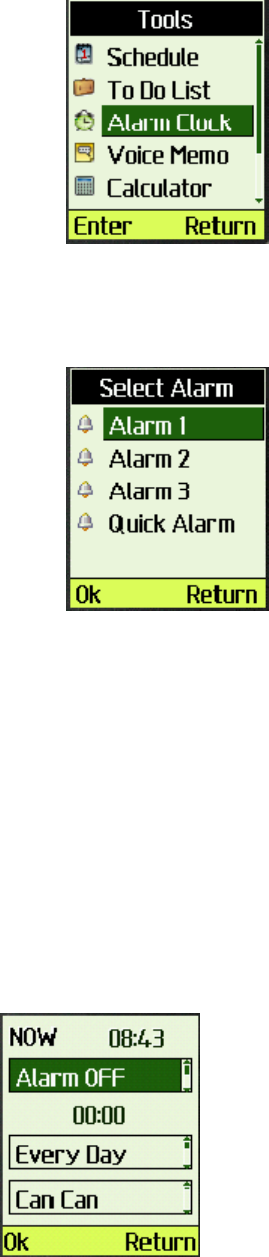
3. Select alarm among “Alarm1,
Alarm2, Alarm3, Quick
Alarm”.
4. Use “Left/Right” key to move between the fields and use
“Up/Down” to select from the available options.
Turn alarm on/off in “Cond” field by up/down key.
You can set alarm time by pressing the digit keys once
the “Alarm” time is highlighted.
Use “Up/Sown” key to select among “Every Day,
Work Day, Once”.
Press “Left/Right” key to highlight the “Ringer” field
and use “Up/Down” key to select desired ringer.
5. Select “Ok”.

To use quick alarm
1. Select “Tools” in main
menu.
2. Select “Alarm Clock”.
3. Select “Quick Alarm”.
4. Select among “After 10min, After 30min, After
1h, After 3h, Cancel” by pressing up/down key.
5. Select “Ok”.
To turn off the alarm
1. Select “Tools” in main menu.
2. Select “Alarm Clock”.
3. Select alarm among “Alarm1, Alarm2, Alarm3, Quick
Alarm”.
4. Select “Alarm OFF” in condition field.

5. Select “Ok”
Using the Voice Memo and Voice Messages
To add a memo
1. Select “Tools” in main menu.
2. Select “Voice Memo”.
3. Select “Enter”.
4. Select “Memo List”.
5. Select “Options” and select “Add”.
6. Select “Enter”, record your new memo

7 Select “Complete”, complete recording the memo.
To play the memo
1. Select “Tools” in main menu.
2. Select “Voice Memo”.
3. Select “Memo List”.
4. Select “Enter”.
5. Select “Options”.
6. Select “Play”.
7. Select “Enter” to play the memo.
8. Select “Complete” to end playing.
To delete one memo
1. Select “Tools” in main menu.
2. Select “Voice Memo”.
3. Select “Memo List”.
4. Select “Enter”.
5. Select the memo to be deleted by pressing up/down key.
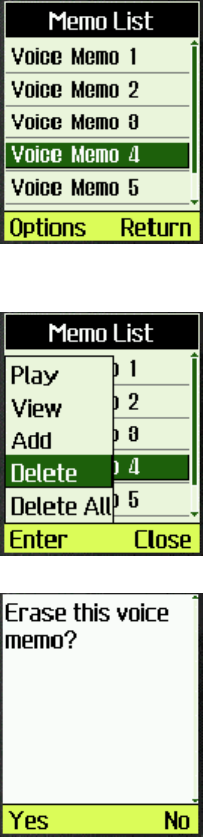
6. Select “Options”.
7. Select “Delete”.
8. Select “Enter” to delete the memo.
9. Select “Yes” to delete the memo.
Message List
Voice Message is recorded by the caller when the answering machine is on.
Please refer to Memo List.
To record greetings
1. Select “Tools” in main menu.
2. Select “Voice Memo”.
3. Select “Rec. Greeting”.

4. Select “Enter”.
5. Select “Enter”.
6. Select “Record”.
7. Select “Complete” to end recording.
Using the Calculator
Note: This calculator has limited accuracy and is designed for simple
calculations.
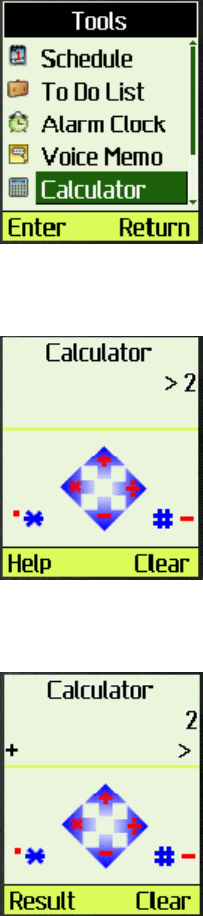
To use the calculator
1. Select “Tools” in main
menu.
2. Select “Calculator”.
3. Enter the number by pressing the alphanumeric
key.
4. Enter an operator by pressing the up/down key or
left/right key.
5. Enter another number.

6、Select “Result” to get the result.
Using the World Clock
World Clock provides a useful tool when you want to make a call to people in a
different time zone.
1. Select “Tools” in main
menu.
2. Select “World Clock”.
3. Select the city by pressing the up/down key.
4. Select “Enter”

Using the Stop Watch
Note: The stopwatch has limited accuracy.
1. Select “Tools” in main menu.
2. Select “Stop Watch”.
3. Enter the stopwatch.
4. Select “Start”, the stopwatch works.
5. Select “Pause”.
6. Select “Resume”, the
stopwatch
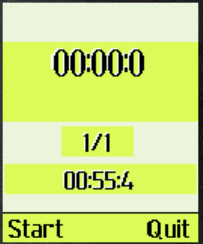
continues working.
7. Select “Reset” to restart
stopwatch.
8. Select “Quit” to exit stopwatch.
.
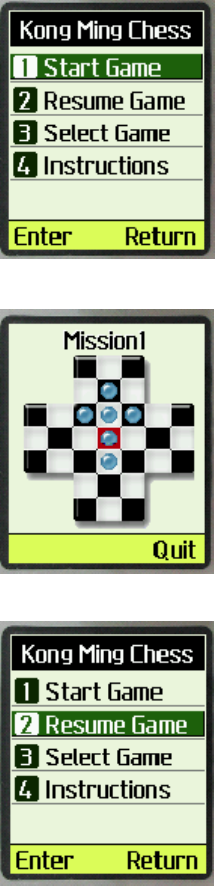
Chapter 7: Amusement
This chapter describes how to play the Kongming Chess.
1. Select [Amusement] in main menu
2. Select [Kong Ming Chess].
3. Select [Start Game] to start Kong Ming Chess.
4. Then you can play this game in mission 1.
5. If you quit in during the game, you can select [Resume Game] to resume this game,
6. Also you can select game other than mission 1, you may choose any mission from the 30
missions provided. Select [Select Game] to select one mission to play.
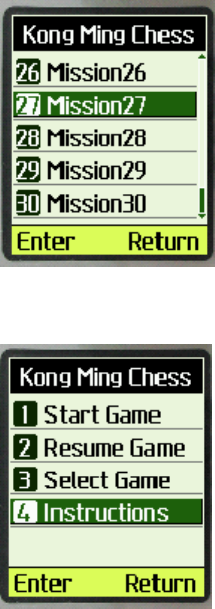
7. If you don’t know how to play, you can read instructions by selecting [Instructions].
8. The game rule is as follows:
Use [Up]/[2], [Down]/[8], [Left]/[4] and [Right]/[6] to control the cursor. Use [OK]/[5] to select a
chessman. When Chessman X moves over Chessman Y next to it, Y will be removed from the
chessboard. Only one chessman can be removed at one time. Player wins if there is only one
chessman left in the center of the chessboard
Chapter 8 Health and Safety Information
Exposure to Radio Frequency (RF) Signals
Your wireless phone is a radio transmitter and receiver. It is designed and manufactured not to
exceed the emission limits for exposure to radio frequency (RF) energy set by the Federal
Communications Commission (FCC) for the U.S. Government. These limits are part of
comprehensive guidelines and establish permitted levels of RF energy for the general
population. The guidelines are based on the safety standards that were developed by
independent scientific organizations through periodic and thorough evaluation of scientific
studies.
The standards include a substantial safety margin designed to assure the safety of all persons,
regardless of age and health.
The exposure standard for wireless phones employs a unit of measurement known as Specific
Absorption Rate (SAR). The SAR limit set by the FCC is 1.6 W/kg.1
SAR tests are conducted using standard operating positions specified by the FCC with the
phone transmitting at its highest certified power level in all tested frequency bands. Although
the SAR is determined at the highest certified power level, the actual SAR level of the phone
while operating can be well below the maximum value. This is because the phone is designed
to operate at multiple power levels so as to use only the power required to reach the network.
In general, the closer you are to a wireless base station antenna, the lower the power output of
the phone.
Before a new model phone is available for sale to the public, it must be tested and certified by
the FCC to insure that it does not exceed the limit established by the government adopted
requirement for safe exposure. The tests are performed in positions and locations (e.g., at the
ear and worn on body) as required by the FCC for each model. While there may be
differences between SAR levels of various phones and at various positions, they all meet the
government requirement.
The FCC has granted an Equipment Authorization for this model phone with all reported SAR
levels evaluated as in compliance with the FCC RF exposure guidelines. SAR information on
this model phone is on file with the FCC and can be found on the FCC website
(http://www.fcc.gov/oet/fccid) after searching the FCC ID printed in the label on the phone.
The highest SAR value for this model phone when tested for use at the ear is 1.30 W/kg, and
when worn on the body, as described in this user guide, is 0.96 W/kg.
1 In the U.S. and Canada, the SAR limit for mobile phones used by the public is 1.6 watts/kg (W/kg)
averaged over one gram of tissue. The standard incorporates a substantial margin of safety to give
additional protection for the public and to account for any variations in measurements.

For Body Operation
To maintain compliance with FCC RF exposure requirements, use only belt-clips, holsters or
similar accessories that maintain a 1.5 cm separation distance between the user’s body and the
back of the phone, including the antenna, whether extended or retracted. The use of belt-clips,
holsters and similar accessories should not contain metallic components in its assembly. The
use of accessories that do not satisfy these requirements may not comply with FCC RF
exposure requirements, and should be avoided.
For more information concerning exposure to radio frequency signals, see the following
websites:
Federal Communications Commission (FCC) http://www.fcc.gov/oet/rfsafety
Cellular Telecommunications Industry Association (CTIA) http://www.wow-com.com
U.S. Food and Drug Administration (FDA) http://www.fda.gov/cdrh/consumer
World Health Organization (WHO) http://www.who.int/peh-emf/en