Vitelcom Mobile Technology USA TSM601 Single Band CDMA Mobile Phone User Manual Camera
Vitelcom Mobile Technology USA, Inc. Single Band CDMA Mobile Phone Camera
UserManual.wiki
>
Vitelcom Mobile Technology USA
>
TSM601 User Manual
users manual
Navigation menu
Upload a User Manual
Namespaces
Wiki Guide
HTML
PDF
Info
Views
User Manual
Discussion / Help
Navigation

![Getting Started Turning On/Off the Phone 1. Press & hold the ‘END’ key until the phone switches on. 2. If necessary, enter your 4-digit unlock code and press ‘OK’ key to unlock the phone Note: The display language is preset to Spanish at the factory. To change the language, use the ‘Settings’ menu option in the ‘Other Function’ menu 4. When you wish to turn off the phone, Press & hold the ‘END’ key until the power-off animation is started Making a call When the idle screen is displayed(the slider of phone is open), enter the area code and phone number and press the ‘SEND’ key. When you have finished your call, close the slider or briefly press the ‘END’ key. Making a call using the Contacts You can store phone numbers that you use regularly in the phone’s memory, called Contacts. Once you have stored phone numbers in Contacts, you can dial them simply by selecting the name or phone number you want to call. Making a call using the speed dialing number Memory locations 0 through 799 are special one-touch locations. You can dial the phone numbers stored in the Contacts memory from 0 through 799 simply by pressing one button. Making a call using the call records The call records stores the last 60 numbers dialed. To recall any of these numbers, proceed as follows. (1) If there are any characters on the display, clear the display by holding down the ‘CLR’ key for more than one second. (2) Press ‘SEND’ key. The list of the calls is displayed. (3) Use the ‘UP’, ‘DOWN’ key of Navigation keys to scroll through the numbers until you select the required number. (4) Press ‘SEND’ key to dial the number displayed. [note] Three Way Call (1) Enter a number you wish to call and press ‘SEND’. -10-](https://usermanual.wiki/Vitelcom-Mobile-Technology-USA/TSM601/User-Guide-616487-Page-10.png)
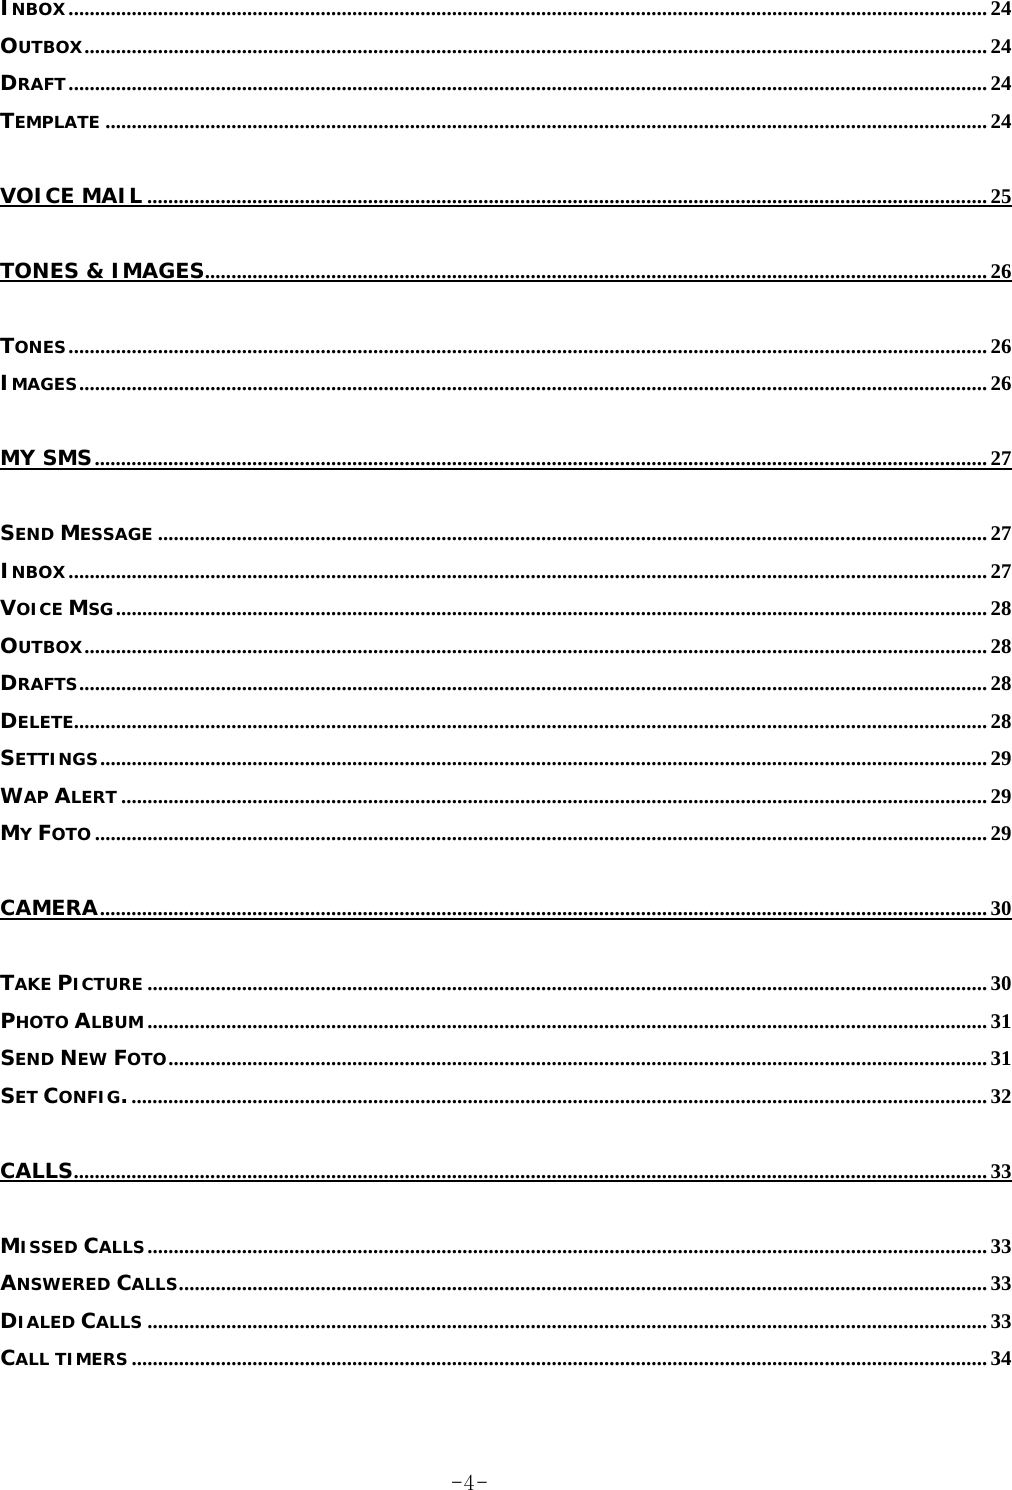
![Character Chart Key Upper Case Lower Case 0 0 Chapter of Symbols 0 1 1 . , @ ¿ ? ¡ ! ’ “ - + * / % ( ) [ ] < > _ $ £ ¥ … 2 A B C 2 Á Ã Â À Ç a b c 2 á ã â à ç 3 D E F 3 É Ê d e f 3 é ê 4 G H I 4 Í g h i 4 Í 5 J K L 5 j k l 5 6 M N O 6 Ó Õ Ô Ñ m n o 6 ó õ ô ñ 7 P Q R S 7 p q r s 7 8 T U V 8 Ú Ü t u v 8 ú ü 9 W X Y Z 9 w x y z 9 # Space * Switch on the mode such as ‘ABC’ or ‘Abc’ or ‘abc’ (Short Pressing) eZi Mode or Multitap Text Input Mode (Long Pressing) 1. Using the eZi Text Mode The eZi predictive text input mode allows you to key in any character using single keystroke. (1) When you are in the eZi predictive text mode, start entering a word by pressing keys ‘2’ to ‘9’ .Press each key only once for one letter. (2) 4~7 candidate horizontal words display in English mode. (3) Navigate through the list of candidates shown on the screen width left right arrows .’Down’ key or ‘0’ key to refresh lists of candidate .’Up’ key or ‘CLR’ key to return to the previous list of candidates (4) If the words you wanted are displayed, select the candidates under cursor by pressing a ‘OK’ key. (5) To Enter punctuation or other characters, press the ‘1’key (6) To delete English 1 characters or space, press ‘C’ key. And to delete complete text, press and hold the ‘C’’ key -14-](https://usermanual.wiki/Vitelcom-Mobile-Technology-USA/TSM601/User-Guide-616487-Page-14.png)
![For example, you can input ‘tomorrow’ with eZi text Editor (1) Press the ‘8(TUV)’ key (2) Press the ‘6(MNO) key (3) Press the ‘6(MNO)’ key (4) Press the ‘6(MNO)’ key (5) Press the ‘OK’ key 2. Using the Alphabet mode (1) Press the key labeled with the required letter; .Once for the first letter .Twice for the second letter .And so on (2) Select the other letters in the same way [note] The cursor moves to the right when you press a different key. When entering the same letter twice or a different letter on the same key, just wait for a few seconds for the cursor to move right automatically, and then select the next letter. z To enter some symbols such as commas, colons in the Alphabet mode, Press ‘1’key until you get the symbol you want to input z To switch to Upper case or Lower case, Press ‘#’ key and you will see the following current status displayed at the bottom bar; -15-](https://usermanual.wiki/Vitelcom-Mobile-Technology-USA/TSM601/User-Guide-616487-Page-15.png)
![.’ABC’ : input an Upper-case letters .’Abc’ : The first letter is an Upper-case and then Low-case .’abc’ : input an Low-case letters 3.Using the Symbol mode (1) Press the ‘Menu’ key(Soft key(left)) (2) Select ‘3.Symbol’ menu and then display the various symbols (3) Use the navigation keys to scroll to the desired symbol and then press ‘OK’ key ※ Symbol Chart- General Mode(Contacts, schedule…and so on) ! " # $ % & ' ( ) * + , - . / : ; < = > ? @ [ \ ] ^ _ ` { | } ~ ¡ ¢ £ ¤ ¥ ¦ § ¨ © ª « ¬ - ® ¯ ° ± ² ³ ´ µ ¶ · ¸ ¹ º » ¼ ½ ¾ ¿ × ÷ ※ Symbol Chart- Only when you input the new messages in SMS Mode ! " # $ % & ' ( ) * + , - . / : ; < = > ? @ [ \ ] ^ _ ` { | } ~ 4.Using the Number mode Press the keys corresponding to the required digits 5.Using the Canned MSG mode The Canned MSG enables you to easily enter some frequently used words or sentences. (1) Press the ‘MENU’ key (2) Select ‘5.Canned MSG’ (3) Select the desired words or sentence on the list [note] This pop-up menu is shown to you only when you edit the SMS messages. -16-](https://usermanual.wiki/Vitelcom-Mobile-Technology-USA/TSM601/User-Guide-616487-Page-16.png)
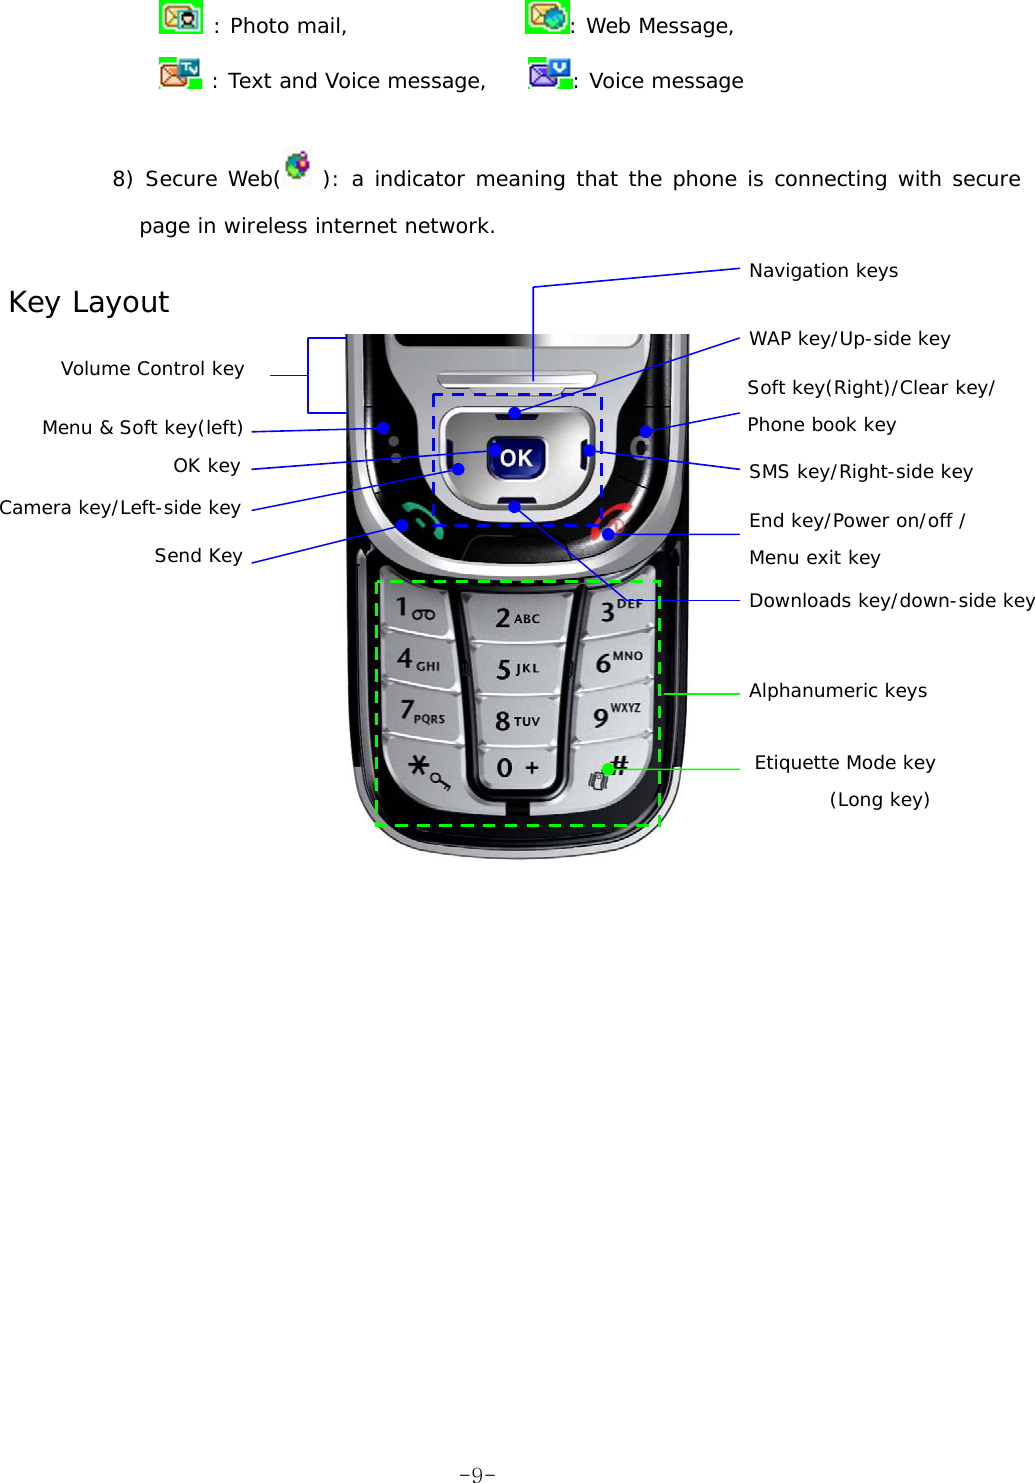
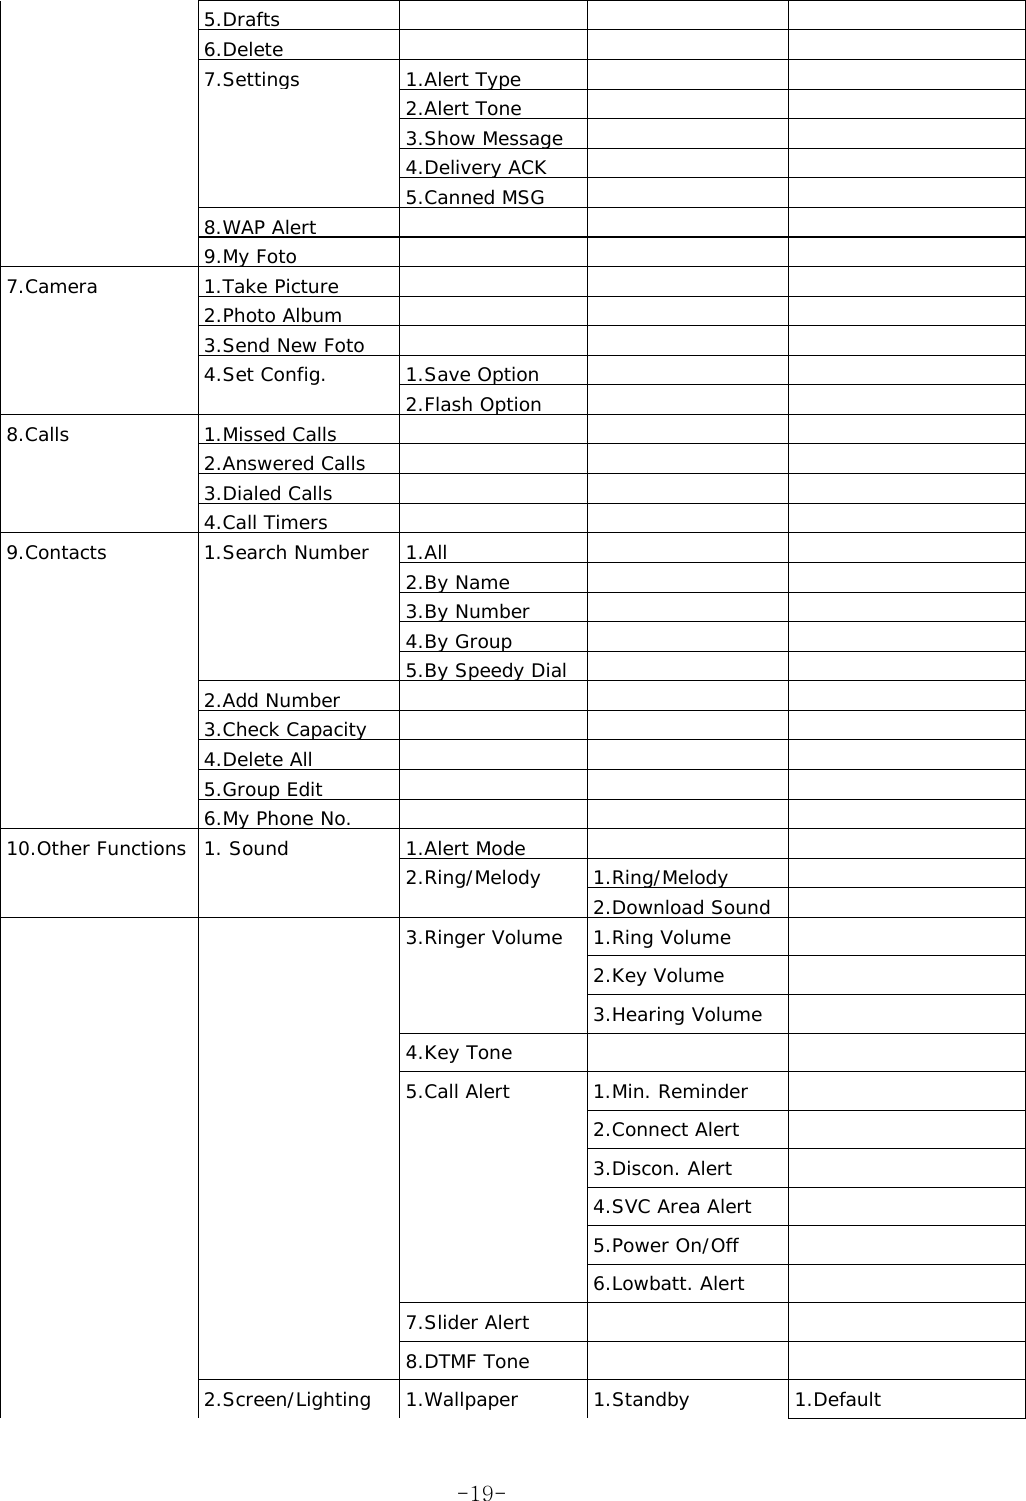
![Using the Menus You can access most of your phone’s features through a system of menus. And these functions are arranged in menus and sub-menus. The menus and sub-menus can be accessed by scrolling with the navigation keys or by using the shortcuts. Accessing Menu Functions by scrolling (1) In idle mode, press the Menu key(soft key(left)) to access menu mode. (2) Press the navigation key to scroll to reach the required main menu (3) Press the ‘OK’ key to select the desired menu. z To return to the previous menu level, press ‘C’ key z To exit the menu mode without changing the settings, press ‘END’ key Using Shortcuts to access Menu Functions The menu items(menu, sub-menus and options) are numbered and can be accessed quickly by using their number. Simply press the ‘MENU’ key and key in the required number. [note] z The numbers assigned to each menu option are indicated in the list on the next page. If user changes the menu order, they may not match the menu number on the phone. List of Menu Functions Menu Icons Icon Feature Icon Feature DOWNLOADS WAP My Foto Voice mail Tones & Images My SMS Camera Calls CONTACTS OTHER FUNCTIONS -17-](https://usermanual.wiki/Vitelcom-Mobile-Technology-USA/TSM601/User-Guide-616487-Page-17.png)

![- Normal, B/W, Sepia, Emboss, Sketch,Nego 5.Decorate Screen Allow you to decorate screen using the some funny like as a photo frame. [note] This function is only available in Large and Small image size. 6.Set Frame Mode Allow you to select the place where you take a picture to set the optimized camera condition - In Door - Out Door - Night Photo Album This menu allows you to review your photos When you enter this menu, the list of photo’s names is displayed. Press the ‘up’ and ‘down’ key to scroll through the photos and by pressing the ‘DEL’ key, you can use the following options; z Delete : Allow you to delete the highlighted photo z Delete All : Allow you to delete all the saved photo And if you press the ‘VIEW’ key, you can see the saved photo. At this stage, if you press the ‘MENU’ key, you can use the following options; z Decorate Photo : Allow you to decorate the selected photo z Save Screen : Allow you to change the selected photo to Standby Screen. z Rename : Allow you to change the photo name z Delete : Allow you to delete the selected photo z Send Foto : Allow you to send the selected photo to MMS and then you can send it to someone Send New Foto In this menu, you can take a new picture and send it to someone at once When you enter this menu, you can see the screen same as “Take Picture” menu. If you press the ‘MENU’ key (Left soft key), you can use the variable options same as ‘Take Picture’.(see 29 page) At this stage, if you press the ‘OK’ key to take picture, the MMS edit screen is displayed and you can add or change the picture and melody and then send the MMS to someone else. -31-](https://usermanual.wiki/Vitelcom-Mobile-Technology-USA/TSM601/User-Guide-616487-Page-31.png)
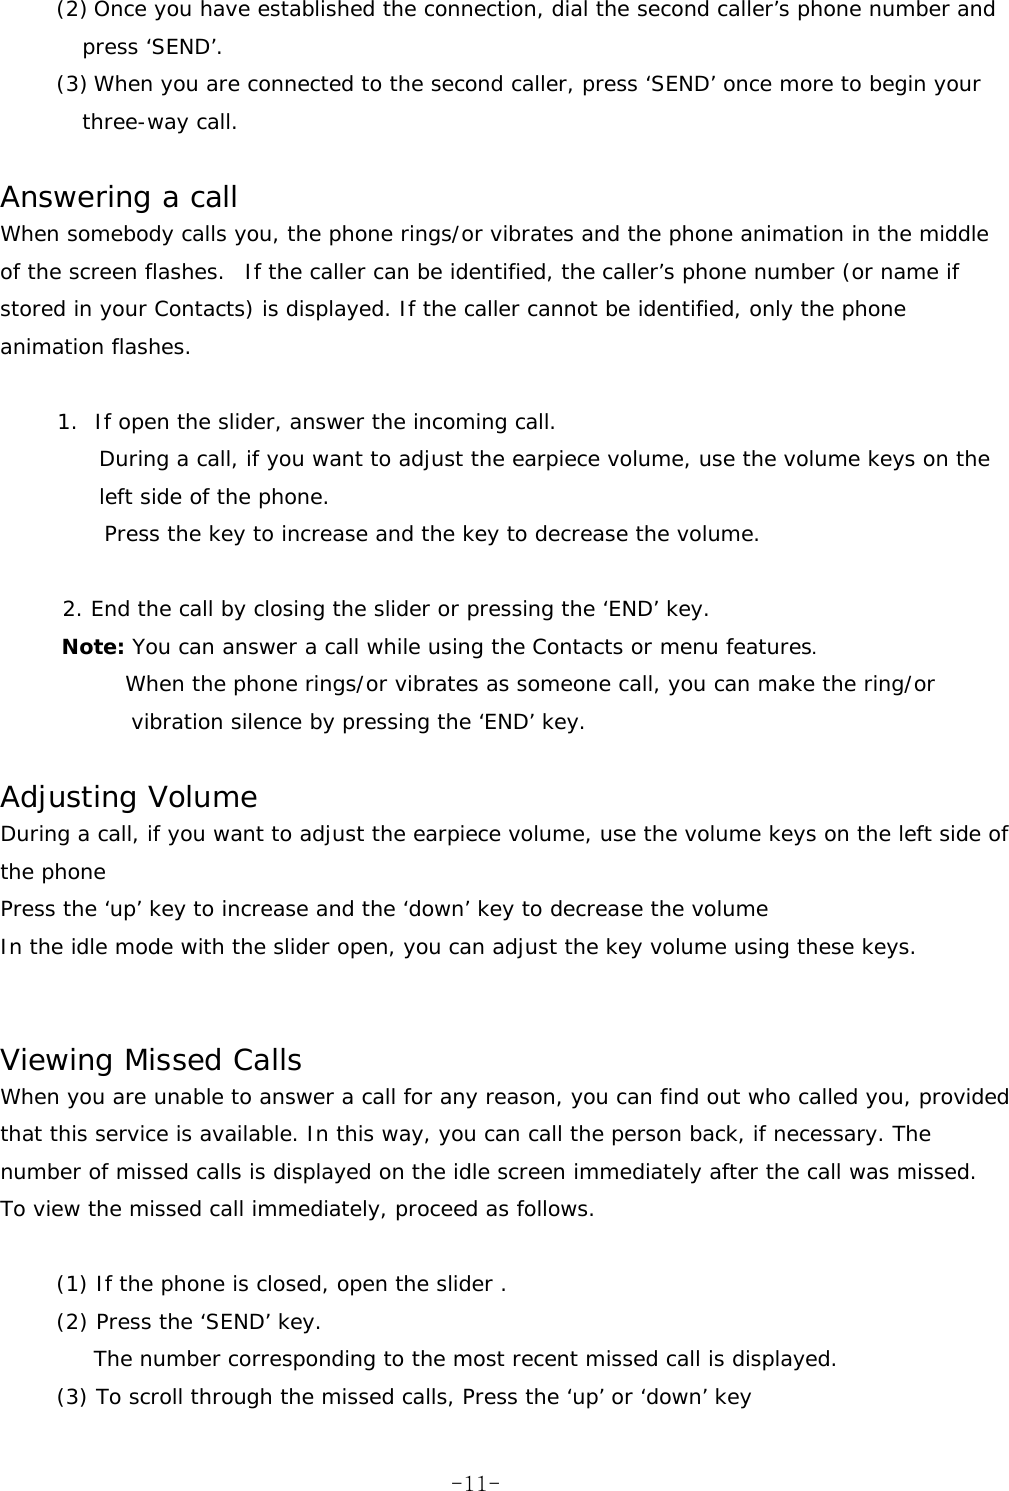
![Calls In this menu, you can view the ; z missed, incoming or outgoing calls z length of time of the call you made or received [note] You can access all of the numbers in the three types of call records by pressing the ‘send’ key in idle mode Missed Calls In this menu, you can view the unanswered calls (1) Select ‘Missed Calls’ menu (2) The list of unanswered calls are displayed (3) Select the desired call and then the number and name, if available, are displayed, together with the date and time when the call was received z By pressing the ‘Menu’ soft key(left), you can; .edit the number, if available, and save it in the contacts. .send SMS to people who made a call to you .delete the highlighted number .delete all calls on the list Answered Calls In this menu, you can view the answered calls (1) Select ‘Answered Calls’ menu. (2) The list of answered calls are displayed (3) Select the desired call and then the number and name, if available, are displayed, together with the date and time when the call was received z By pressing the ‘Menu’ soft key(left), you can; .edit the number, if available, and save it in the contacts. .send SMS to people who made a call to you .delete the highlighted number .delete all calls on the list. Dialed Calls In this menu, you can view the dialed calls (1) Select ‘Dialed Calls’ menu (2) The list of dialed calls is displayed. -33-](https://usermanual.wiki/Vitelcom-Mobile-Technology-USA/TSM601/User-Guide-616487-Page-33.png)