Vivitar 990Hd Users Manual
Vivitar-Dvr-990-Hd-Users-Manual-799289 vivitar-dvr-990-hd-users-manual-799289
990HD to the manual 3caae9f7-a7b0-4270-8451-9bae76ca64c6
DVR-990 HD - User Manual DVR_990HD_ENG Free User Guide for Vivitar Camcorder, Manual
2015-02-04
: Vivitar Vivitar-990Hd-Users-Manual-391560 vivitar-990hd-users-manual-391560 vivitar pdf
Open the PDF directly: View PDF ![]() .
.
Page Count: 39
High Denition
Digital Video Camera
990HD
User’s Manual
© 2009-2011 Sakar International, Inc. All rights reserved.
Windows and the Windows logo are registered trademarks of Microsoft Corporation.
All other trademarks are the property of their respective companies.

2
EN
Read This Before Using the Camera
SAFETY INSTRUCTIONS
• Donotdrop,punctureordisassemblethecamera.
• Usethecamerawithcare.Roughhandlingmaydamagetheinternalcomponents.
• Donotexposethecameratohightemperature.Avoidcontactwithwater.
• Pleasenoticethatthecamerabodymaybecomewarmwhenoperatingitforanextendedperiod.
• Testforproperoperationbeforeusingthecamera.
• Onlyuseaccessoriessuppliedbythemanufacturer.
• Useonlythetypeofbatterythatcamewithyourcamera.
• Removethebatteryifthecameraisnotgoingtobeusedforlongperiods.
Product Information
• Designsandspecicationsofthecameraaresubjecttochangewithoutnotice.Thisincludesprimary
productspecications,software,andthisUser’sManual.
• ThisUser’sManualisageneralreferenceguideforthecamera.
• Theillustrationsinthismanualmaynotbethesameastheactualdesignofyourcameraandthose
youseeontheLCDscreen.
Contents
Read This Before Using the Camera ................................................... 2
Section 1 Getting to Know Your Camera ........................................... 4
Section 2 Getting Started .................................................................... 7
Section 3 Enjoying the Record Mode ................................................ 9
Section 4 Enjoying the Playback Mode ........................................... 21
Section 5 Setting Your Camera ....................................................... 26
Section 6 Viewing Photos and Videos on TV .................................. 30
Section 7 Using the Software ........................................................... 31
Section 8 Transferring Media ........................................................... 34
Section 9 Sakar Warranty Card ........................................................ 35
Section 10 Technical Support ............................................................ 37
Section 11 Specications and System Requirements ..................... 36
Section 12 Troubleshooting ............................................................... 38

4
EN
Section 1
Getting to Know Your Camera
Overview
Thecameraisequippedwitha5Mega Pixel sensor that can take H.264 format videos.TheH.264
technologyallowsforextandedvideorecordingwithlessmemory.Highqualityimagesupto16mega-
pixelscanalsobedeliveredsmoothly.WithacolorLCDmonitor,youcanviewandexaminethevideos
andphotoseasily.
The camera features 3” (16:9) LCD touch panel which is an ideal platform for you to operate your
camera.Themenuoptionsareaccessiblewithyournger.Withthetouchpanel,youcanselect the
optionsdirectlyandquickly.
ThecameraalsofeaturesvideorecordingatanHDresolutionof1920x1080.Youcanalsoconnectitto
anHDTVviaanHDMIcable,andeasilyplaybacktherecordedhigh-denitionvideosonthewidescreen
HDTV.
Moreover, the CD included with the camera has an advanced uploading feature. With the exclusive
Vivitar Experience Image Managerapplication,youcanuploadvideosandphotoscapturedbythe
cameratoonlinesocialnetworksiteseffortlessly.
ISO sensitivity and color balance can either be adjusted automatically or changed manually.A 23 x
Opticalzoomhelpsyoutocontroloverthevideosandphotosyoutake.
Thevariedeffectoptions,suchasTimeLapseandSlowMotion,makerecordingmorefun.
Thebuilt-inmemoryallowsyoutotakephotosandtorecordvideoswithoutamemorycard.Thememory
cardslotallowsuserstoincreasethestoragecapacity.
Note
• Partialmemoryofthebuilt-inmemoryisusedforthecamera’sFirmwarecodeandsoftware.
• Install the bundled software application on the CD, Vivitar Experience Image Manager, for
viewingthevideosandphotosonaPC.
Standard Accessories
Unpackthepackageandmakesureallstandardaccessorieslistedareincluded:
• Camera
• USBCable
• AVCable
• HDMICable
• Adaptor
• Lithium-ionRechargeableBattery
• CameraEasyGuide
• CD-ROM(Software,User’sManual)
• Pouch
• LensCoverSet(LenscoverandStrap)
5
EN
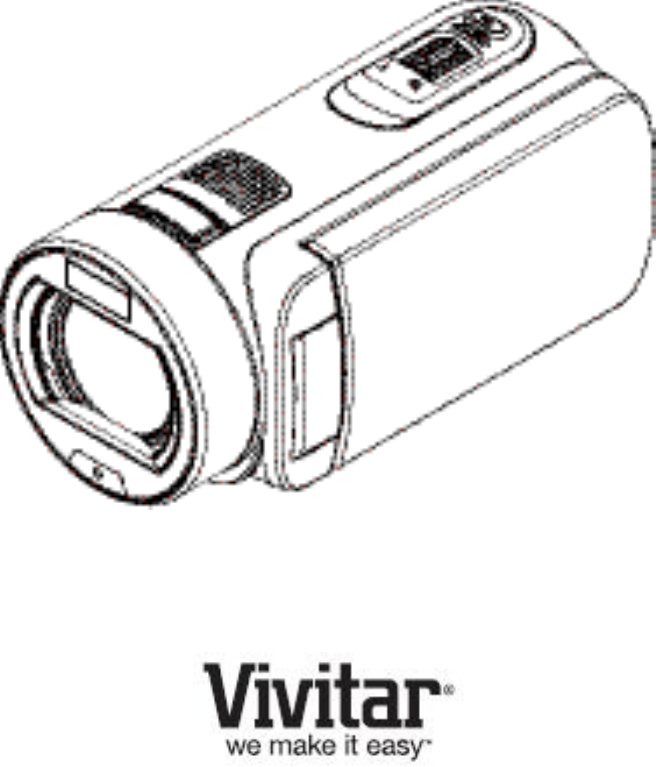
Front View
Rear View
Lens
Microphone
Photo Button
Tele/Wide Button
Flash
Self-timer LED
LCD Touch Panel
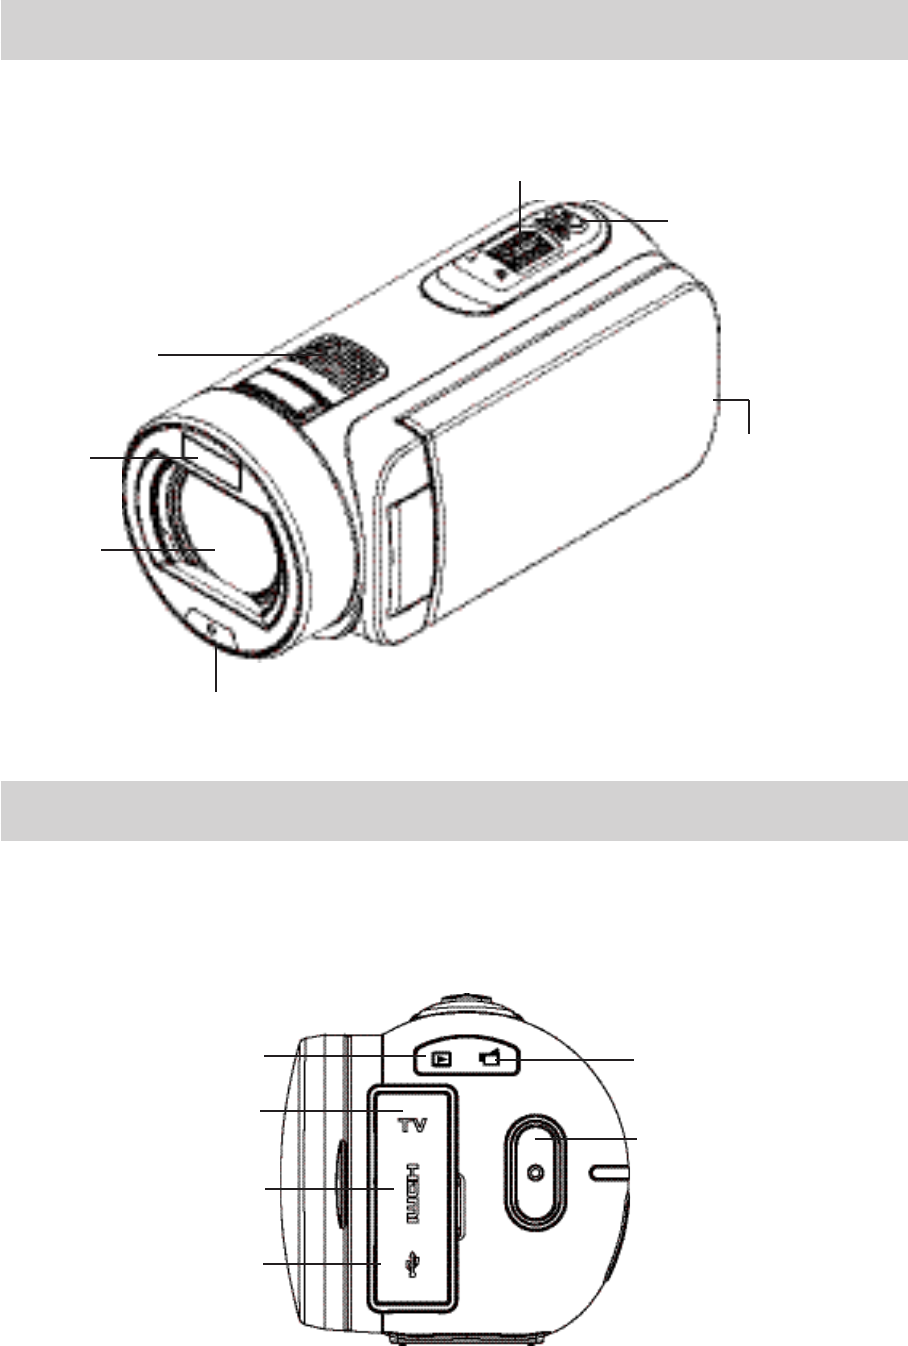
HDMI Port
Mini USB 2.0 Port
Video Button
TV Port
Record LED
Indicator
Playback LED
Indicator
6
EN
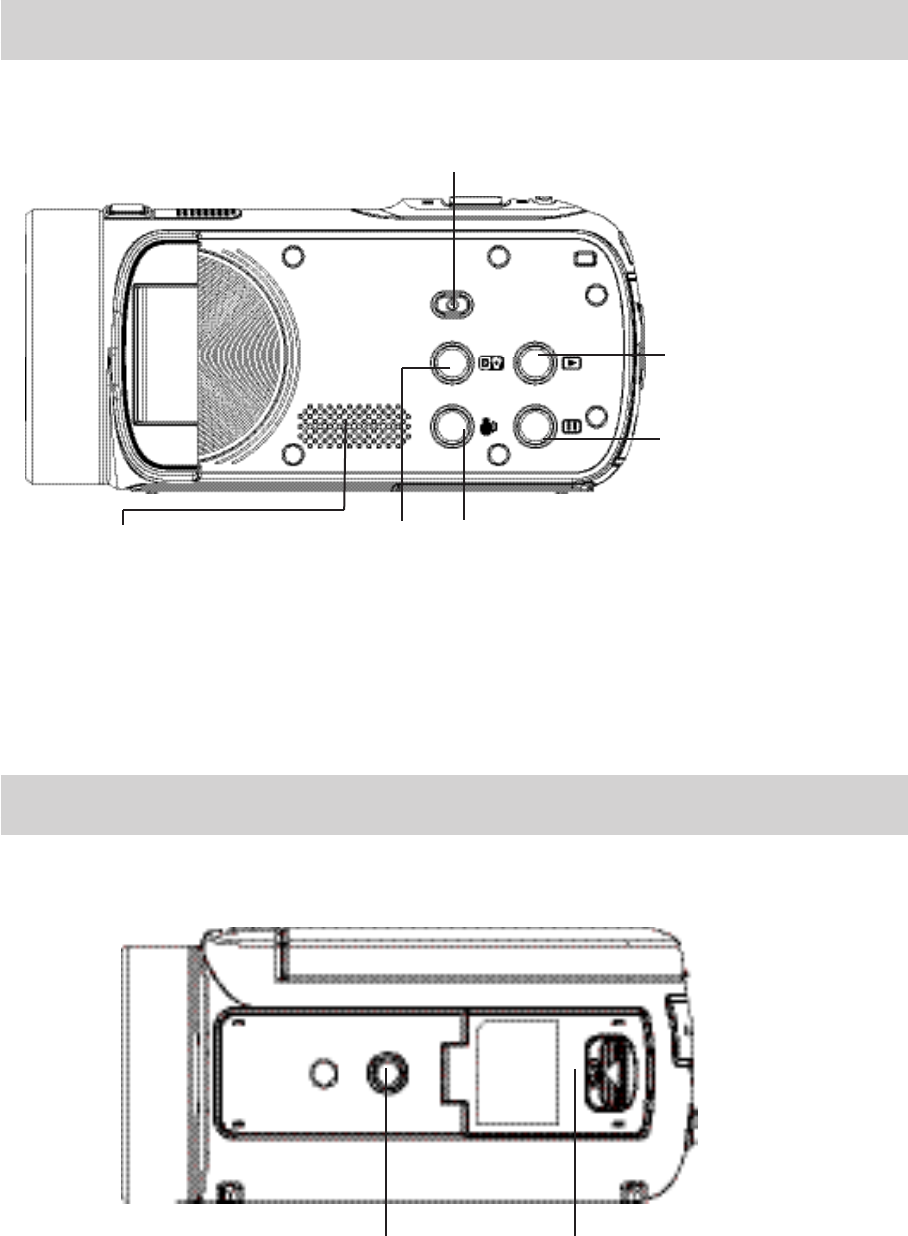
Side View
Bottom View
Speaker
Power Button
Playback Button
Stabilization ButtonDigital Light Button
Pause Button
Tripod Socket Battery/SD card Cover
7
EN
Section 2
Getting Started
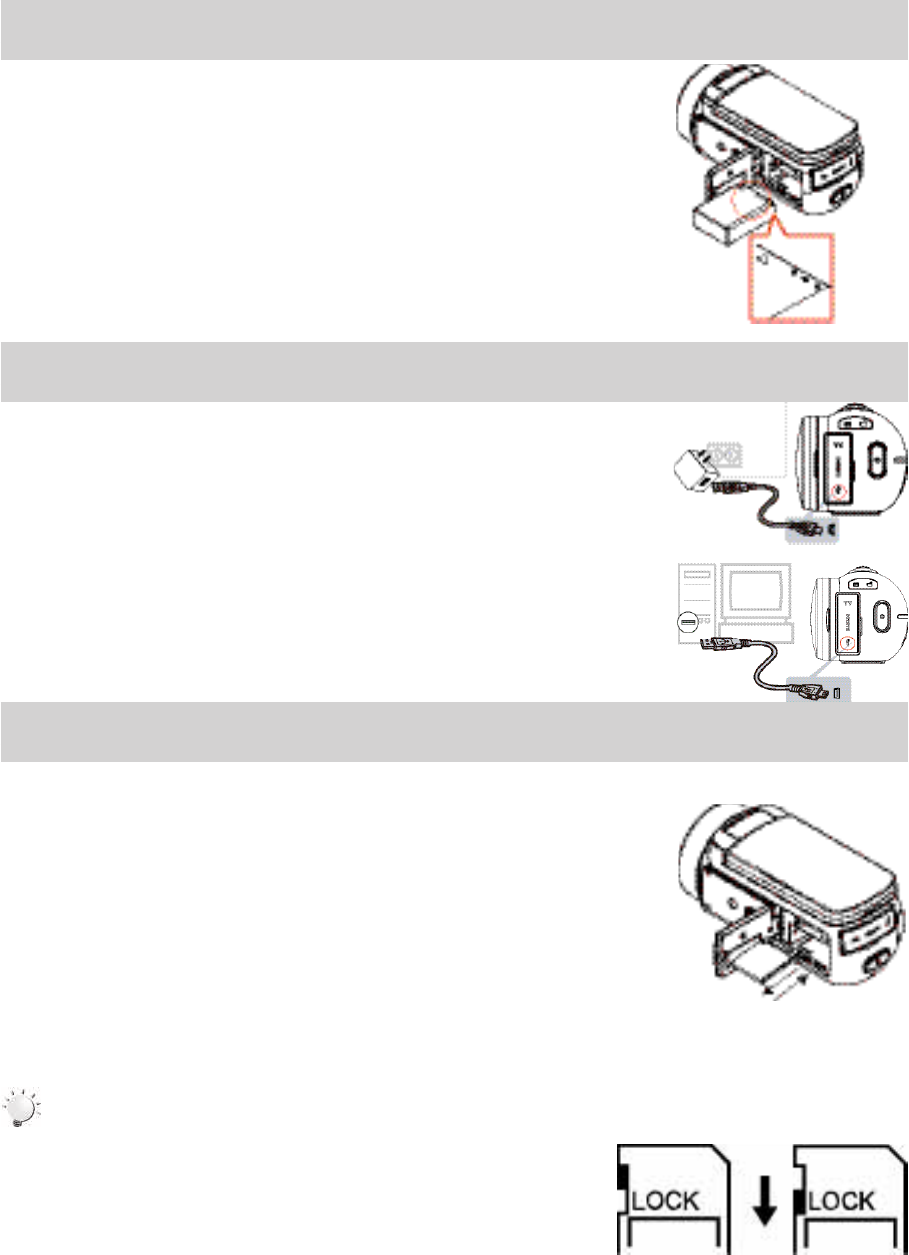
Loading the Battery
Beforeusingthecamera,youmustloadtheLithium-ion
rechargeablebatterycomewithinthepackage.
1.Insert the battery according to the correct polarity marks
(+or-).
2.Closethebatterycoverrmly.
Charging the Battery
YoumustusethesuppliedACchargerortheUSBcable.Thecameramustbe
turnedOFF.Theblinkinglightconrmsthecameraiscurrentlycharging,and
thelightbecomesconstantafterthechargingiscompleted.InACcharging
Mode,thelightwillturnitselfoffautomatically after 3~5 minutes .Thefull
chargetimeisabout4to5hours.(Actualchargingtimemayvary.Itdepends
onthebatteryconditions.)
Inserting and Removing an SD Card (Optional)
Thecameracomeswithaninternalmemorythatallowsyoutostore
photosandvideos.Youcanexpandthememorycapacitybyusingan
optionalSDmemorycard.
1.Insertthememorycardintotheslot.Pleaserefertothegureon
therightside.
2.ToremovetheinstalledSDcard,pressthecardinwardtorelease
it.
3.Whenthecardpopsout,gentlyremoveitfromitsslot.
4.Recommendedmemorycapacity:1GBorabove.
Note
• When a memory card is tted, videos/photos are saved to the card rather than the built-in
memory.
• ProtectingDataonanSDCard:SDCardisread-only
whenitislocked.Nophotosorvideoscanberecorded
whentheSDcardislocked.Makesurethelockison
thewriteablepositionbeforerecordinganymedia.
Writeable
position
Write-Protected
Position
8
EN
Turning the Camera On
• Toturnonthecamera:
1. FlipouttheLCDpanel;thecamerawillturnonautomatically.
2. Orpress[PowerButton]forapproximatelyonesecondtoturniton.
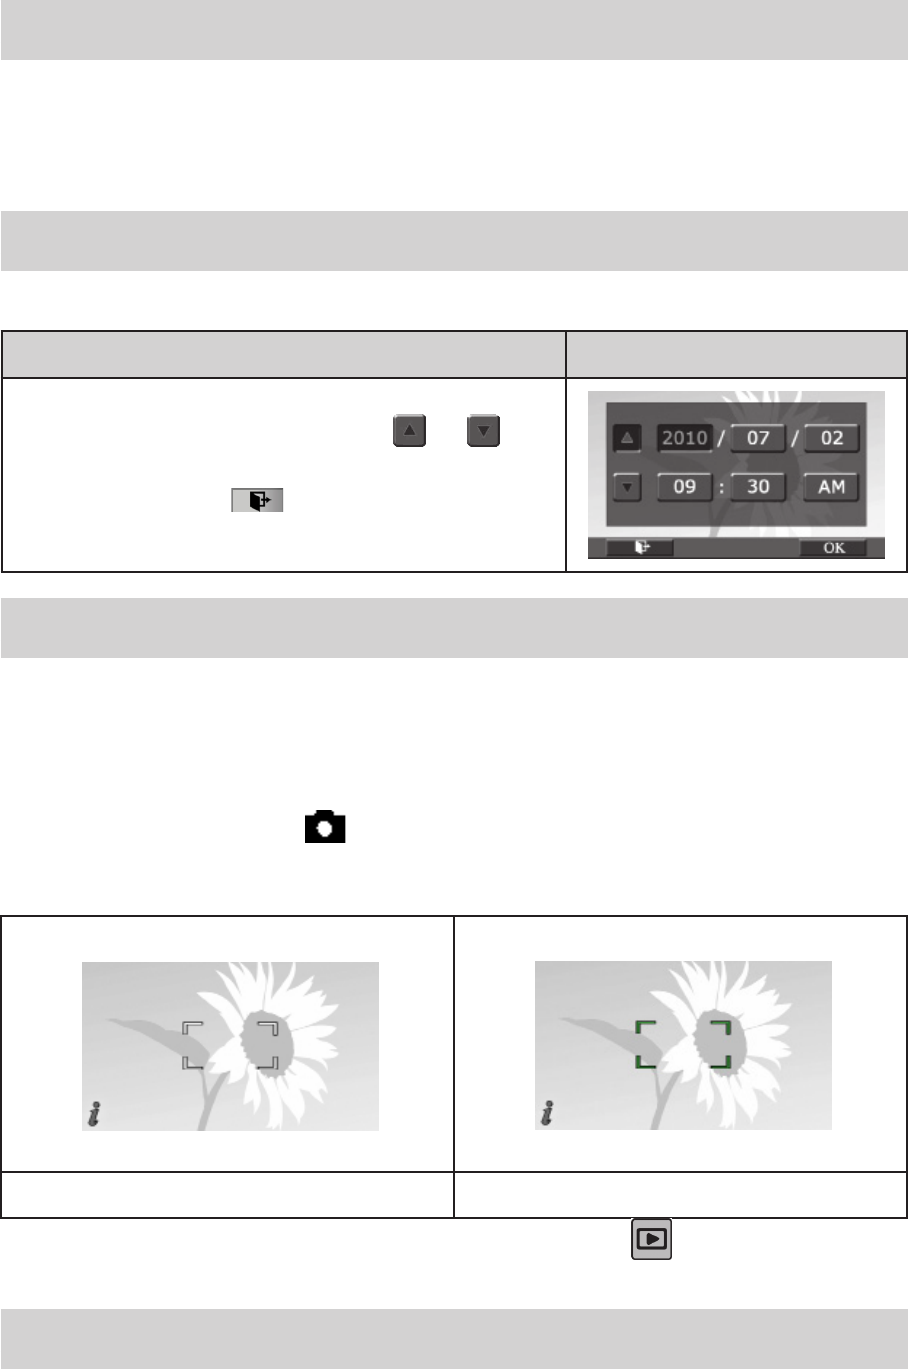
Conguring the Initial Date and Time Setup
• Thetimesettingscreenappearstoallowyoutosetupdateandtime:
Operation Display Screen
1. TouchYear,Month,Day,Hour,Minute,andAM/PMtoset.
2. Adjustthenumericvaluebytouching /
3. Touchthe[OK]icontovalidatethesetting.
4. TouchtheExiticon()toexit.
Getting Started
• Torecordvideo:Press[VideoButton]torecordvideo.Tostoprecording,pressitagain.
• To pause recording: Press [Pause Button] to pause recording. To continue the recording, press it
again.
• Totakeaphotoduringvideorecording:Whenrecordingvideo,press[PhotoButton]tocapturethe
image.TheDualrecordicon( )appearsontheLCDmonitor.
• Totakeaphoto:Press[PhotoButton]halfwaydownuntilthefocusingframeturnsfromwhitetogreen.
Then,pressitfullydowntotakephoto.
FocusingFrame:White FocusingFrame:Green
• Toviewstoredvideosandphotos:Press[PlaybackButton]ortouch onthescreentoswitchto
thePlaybackmode.
Turning the Camera Off
• Toturnoffthecamera:Youcaneitherpress[PowerButton]foronesecond,oryoucanplacetheLCD
panelbacktoitsoriginalposition.
9
EN
Section 3
Enjoying the Record Mode
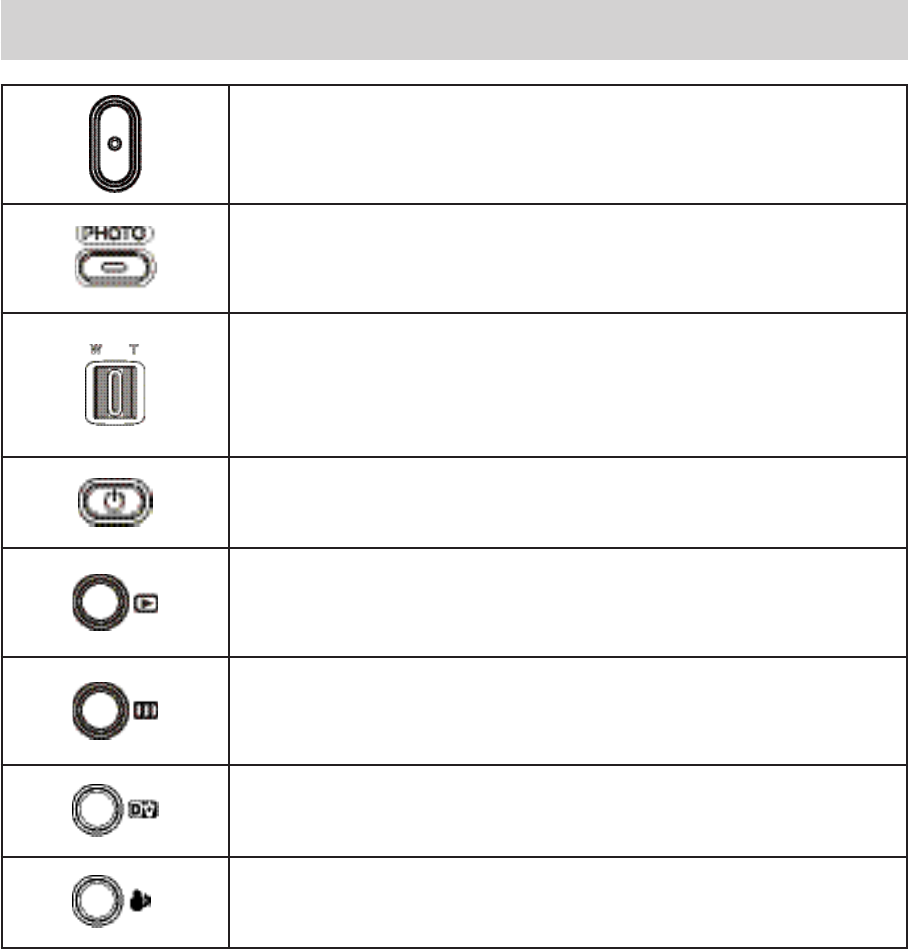
Button Function
Video Button:
1.Presstotakevideo.
2.Tostoprecording,pressitagain.
Photo Button:
1. Presstotakephoto.
2. Whenrecordingvideo,presstocapturetheimage.
Tele Button:
1.ZoomIn.
Wide Button
1.Zoomout.
Power Button:
1. Pressdownforonesecondtoturnonorturnoffthecamera.
Playback Button:
1.SwitchbetweenRecord/PlaybackMode.
2.Forquickreview,pressitafterrecording.
Pause Button:
1. Presstopausetherecording.
2. Tocontinuetherecording,pressitagain.
Digital Light Button:
DigitalLightOn/Off.
Stabilization Button:
StabilizationOn/Off.
10
EN
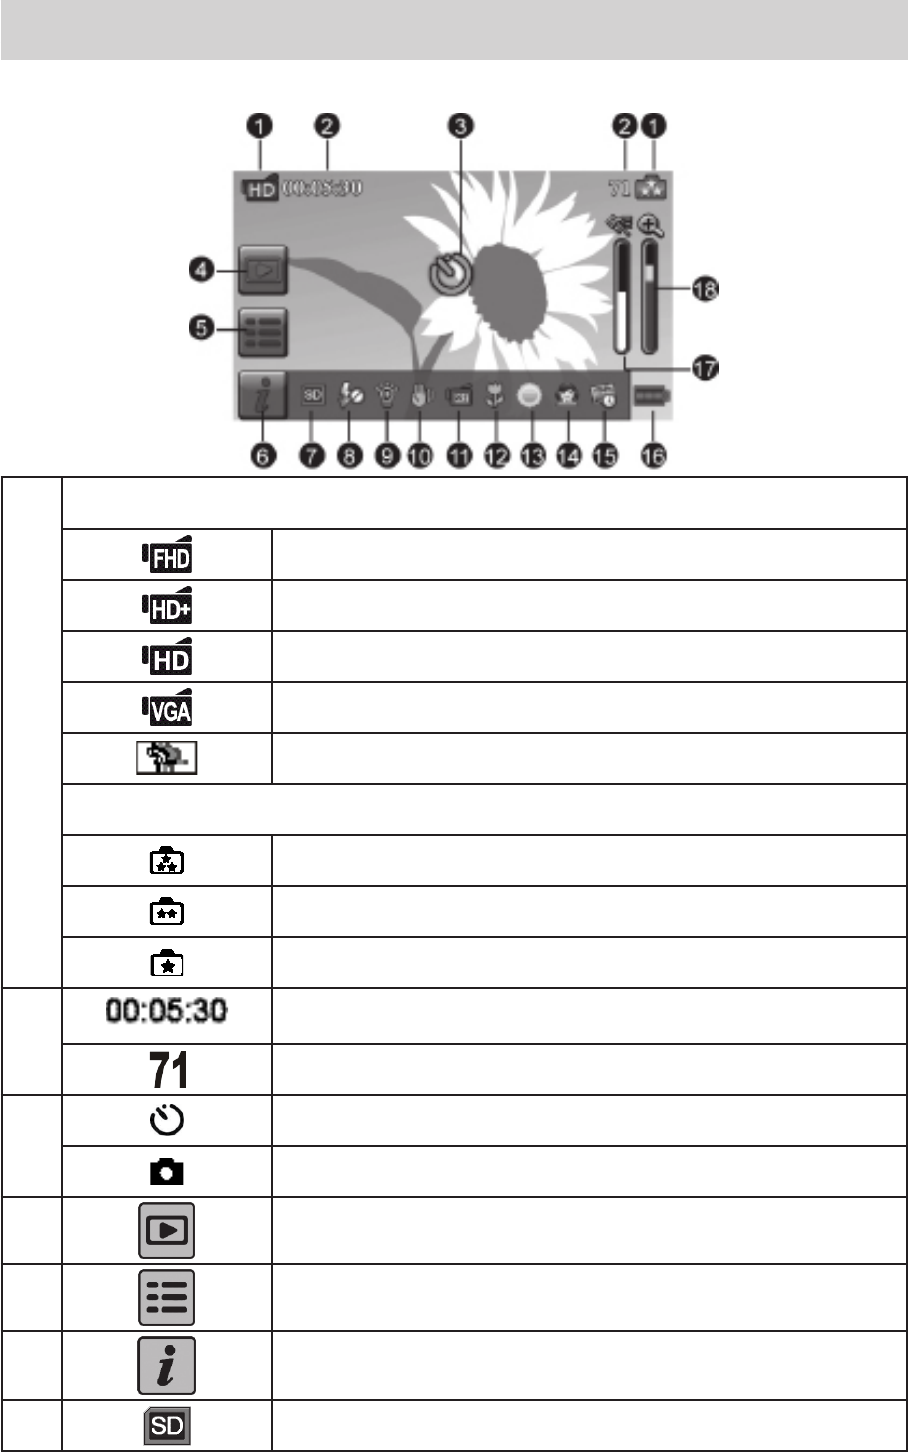
LCD Monitor Information
TheindicatorsshownbelowmaydisplayonLCDwhenvideosandphotosarerecorded:
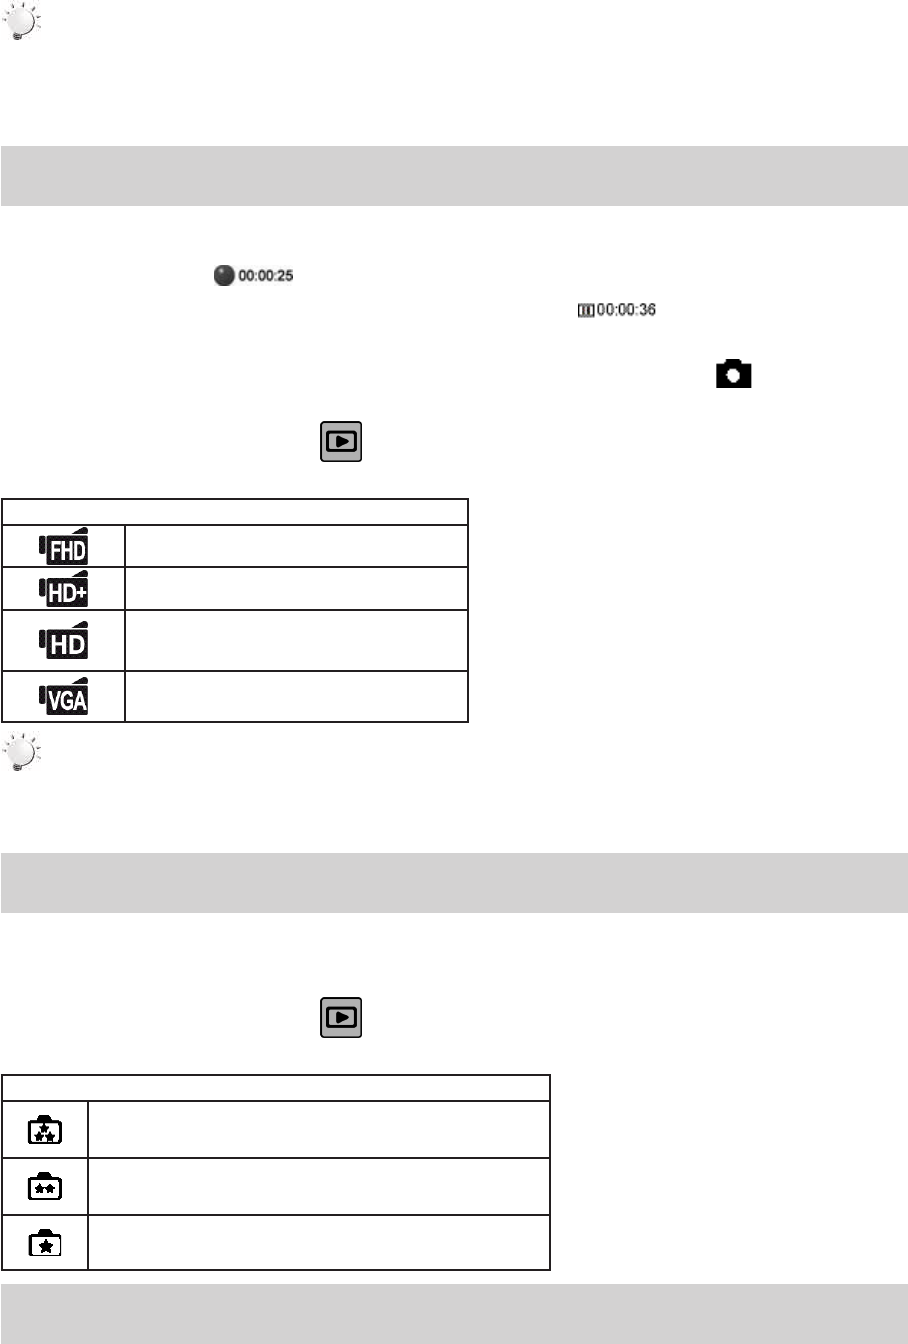
(1)
VideoResolution
FullHD(1080p30fps)
HD(720p60fps)
HD(720p30fps)
VGA(640X480)
SlowMotion(Recordvideoat432x240(QVGA)resolution.)
PhotoResolution
16MP
5MP
3MP
(2)
Recordingtimeofthevideothatcanstillbetakenatcurrent
resolution
Numberofimagesthatcanstillbetakenatcurrentresolution
(3)
Self-timerenabled
DualRecord
(4) PlaybackModeOn
(5) MenuOn
(6) InformationbarOn
(7) SDCardInserted
11
EN
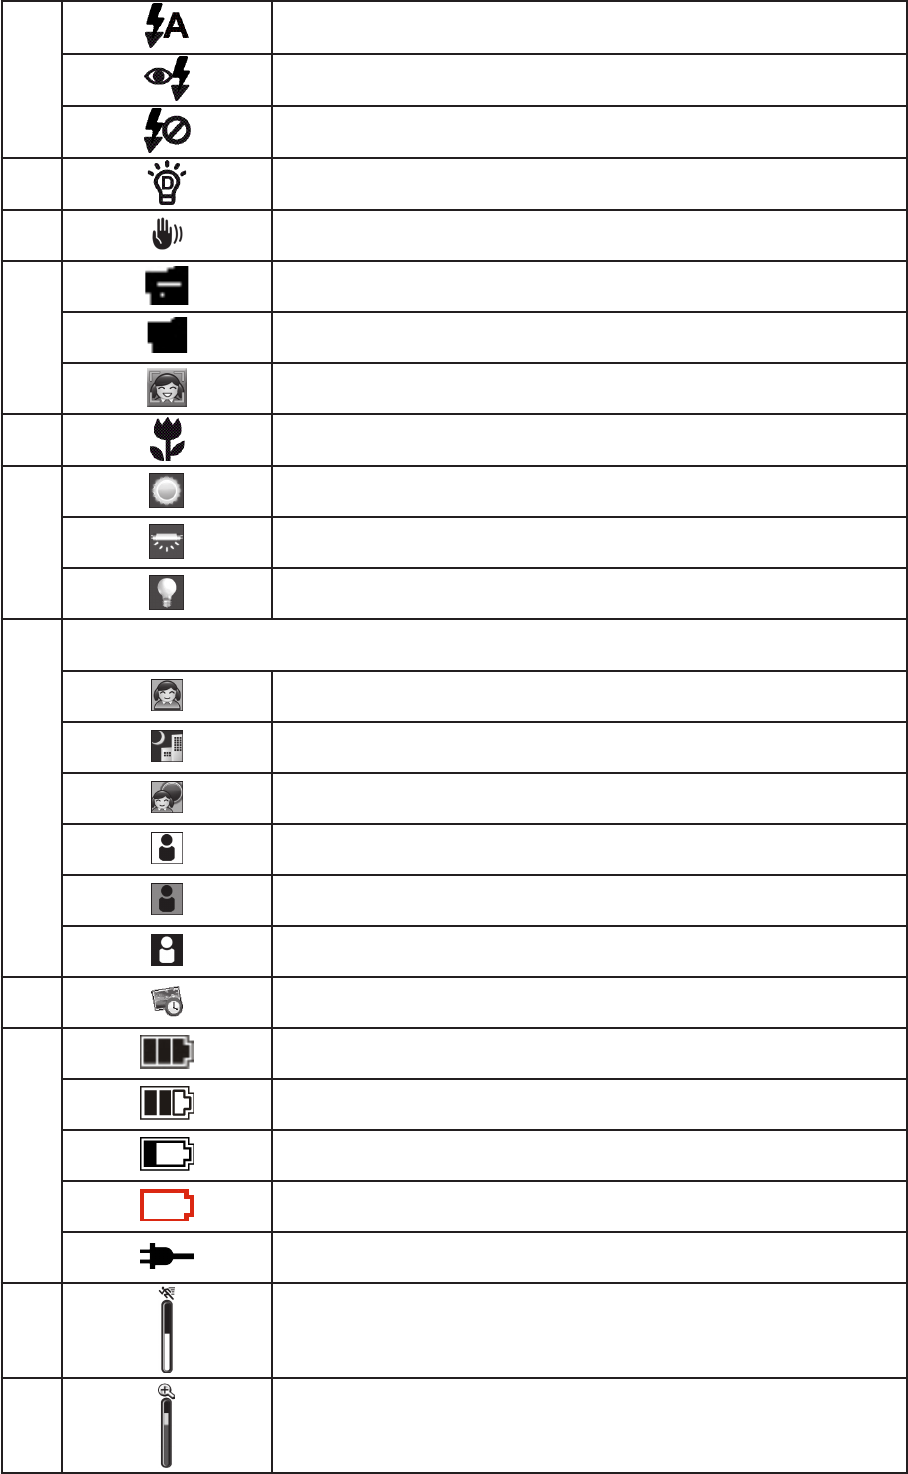
(8)
FlashAuto(PhotoRecordingOnly)
RedEyeReduction(PhotoRecordingOnly)
FlashOff
(9) DigitalLightOn
(10) Stabilization
(11)
Pre-RecordMode
TimeLapse
SmileDetection
(12) MacroFocusingOn
(13)
Daylight
Fluorescent
Tungsten
(14)
Scene
Skin
Night
Backlight
Black/White
Classic
Negative
(15) DatePrintingOn
(16)
Battery:fullpower
Battery:mediumpower
Battery:lowpower
Battery:emptypower
DCpowermode
(17) MotionDetection
(18) Zoommeter:
1X~2700X(23XOpticalzoomand120XDigitalzoom)
12
EN
Note
• Stabilization,TimeLapse,andSlowMotionfunctionscannotbeusedsimultaneously.
• StabilizationandNightModefunctionscannotbeusedsimultaneously.
• Pre-Record,MotionDetect,SlowMotion,andTimeLapsefunctionscannotbeused
simultaneously.
Video Recording
• Press[VideoButton]tostartrecording.Whenavideoisbeingrecorded,atimeindicatorwilldisplay
ontheLCDmonitor( ).Tostoprecording,pressitagain.
• Topauserecording:Press[PauseButton]topauserecording( ).Tocontinuetherecording,
pressitagain.
• Dualrecord:press[PhotoButton]tocapturetheimage.TheDualrecordicon( )appearsonthe
LCDmonitor.
• Press[PlaybackButton]ortouch onthescreentoviewtherecordedvideo.
• Fourresolutionsettingsareavailable:
Video Quality
FullHD(1080p30fps)
HD(720p60fps)
HD(720p30fps)
VGA(640X480)
Note
• Theimageresolutioncapturedduringvideorecordingisthesameasthevideoresolution.
• Theashcannotbeusedwhencapturingimageduringmoviesrecording.
Photo Capturing
• Press[PhotoButton]halfwaydownuntilthefocusingframeturnsfromwhitetogreen.Then,pressit
fullydowntotakephoto.
• Press[PlaybackButton]ortouch onthescreentoviewthephotos.
• Threeresolutionsettingsareavailable:
Image Quality
16 Mega Pixels
5 Mega Pixels
3 Mega Pixels
Using Zoom Function
• Thezoommagniesimageswhenrecordingvideoortakingphoto.
1.Tozoomin/out,presstheTele/WideButton.
2.Itcanbesetfrom1X~2700X(23XOpticalzoom)
13
EN
Using Digital Light Function
• Thesettingallowsyoutoextendthebrightnessoftheobjectsthataredarkorintheshadow.Itcan
extendthedynamicrangeforbacklightandhighcontrastsense,sothattheobjectswillbebrighter
andclearer.
• TousetheDigitalLightfunction:
1.Press[DigitalLightButton]inRecordMode.TheDigitalLighticon( )appearsontheLCD
monitor.
2.Press[VideoButton]tostartrecordingorpress[Photobutton]totakephoto.
Using Stabilization Function
• Torecordwithaneffectofreducingcamerashaketoresultinmorestablevideo.
• TousetheStabilizationfunction:
1.Press[StabilizationButton]inRecordMode.TheStabilizationicon( )appearsontheLCD
monitor.
2.Press[VideoButton]tostartrecording.
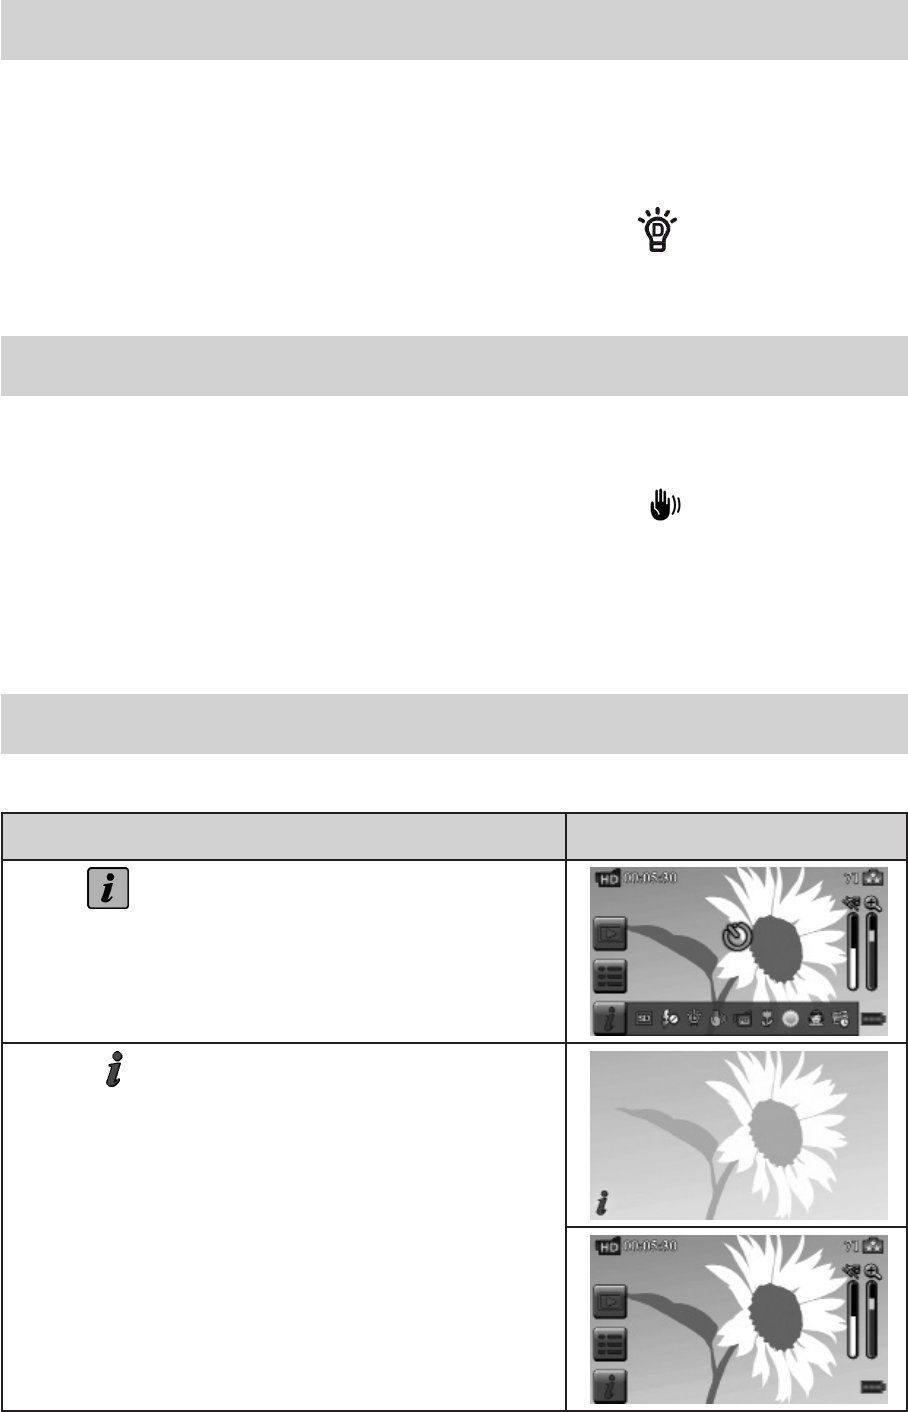
Showing Information on the screen
• Touchtheon-screenbuttontodisplayornottodisplaytheindicatorsontheLCDscreen.
Operation Screen
1.Touch onthescreen.Theinformationbarwilldisplay
onthescreen.
2.Touchagaintohideallindicators.
3.Touch todisplaytheindicators.
14
EN
Options for Record Menu
Video Photo Effect Setting*
• Resolution
• Pre-record
• MotionDetect
• SlowMotion
• TimeLapse
• Resolution
• Flash
• Self-Timer
• SmileDetect
• ISO
• Scene
• WB(WhiteBalance)
• MacroMode
• FaceTracking
• Sound
• TV
• Language
• TimeSetting
• DatePrinting
• Format
• DefaultSetting
*PleaserefertoSection5forthedetailedinformationabout[Setting].
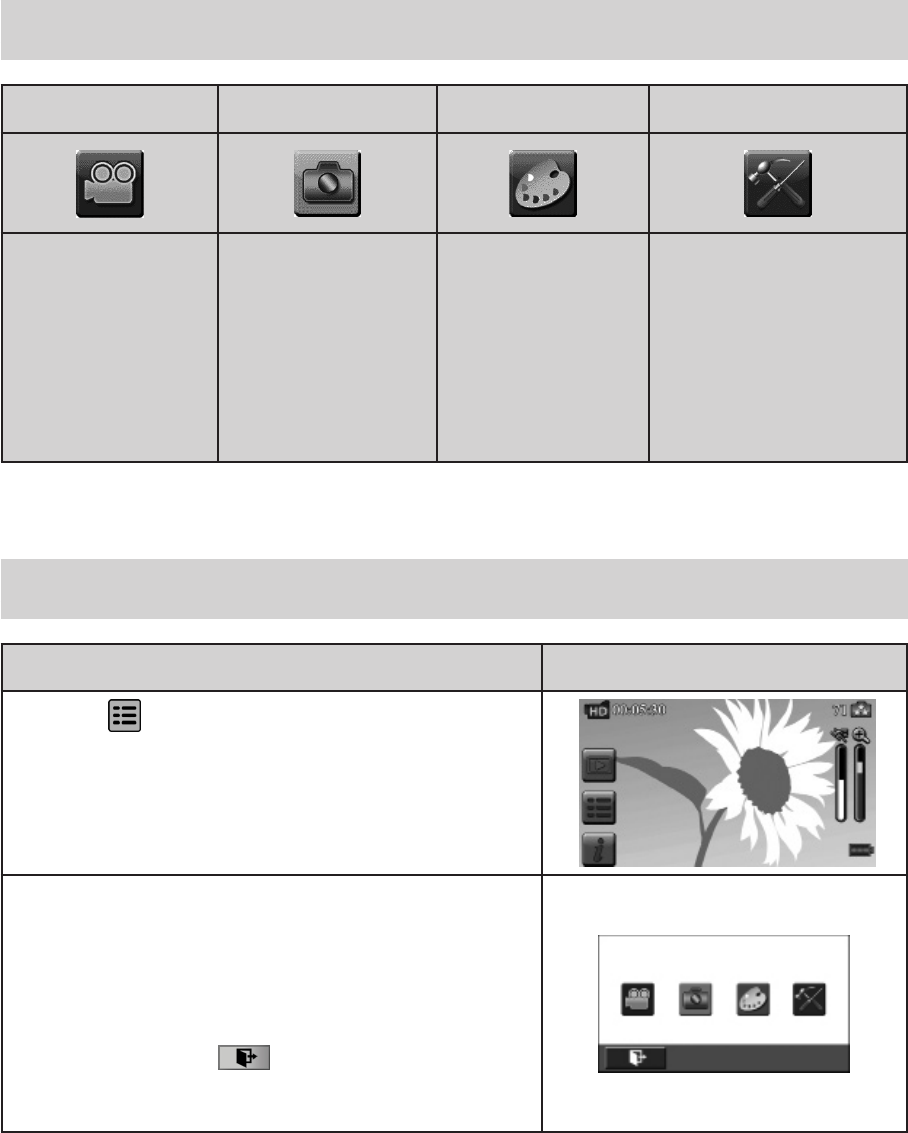
Operations for Record Mode
Operation Display Screen
1.Touch onthescreeninRecordMode.Themenu
willappearonthescreen.
2.Touch the option icons on the screen lightly with your
nger.TheoptionsareVideo,Photo,Effect,andSetting.
3.Theoptionsubmenuswillpopuponthescreen.
4.Touch to select the specic option you want to adjust.
(Theselectedoptionwillbehighlighted.)
5.TouchtheExiticon()toexit.
15
EN
Video
Operation Display Screen
1. Touch onthescreeninRecordMode.Themenu
willappearonthescreen.
2. Touchthe[Video]icononthescreen.SubmenuofVideo
willpopoutonthescreen.
3. TheVideosubmenucontains5options--Resolution,Pre-
record,MotionDetect,SlowMotion,andTimeLapse--for
youtoadjustthecamerasettings.
Video Resolution
Fourresolutionsettingsareavailable.
• FHD (1080p 30):Recordvideosat1920x1080p30fpsresolution.
• HD+ (720p 60):Recordvideosat1280x720p60fpsresolution.
• HD (720p 30):Recordvideosat1280x720p30fpsresolution.
• VGA (640X480): Recordvideosat640x480p30fpsresolution.
Operation Display Screen
1. In the Video menu, touch the [Resolution] icon on the
screen.
2. Touchtoselectthedesiredoption.
3. TouchtheExiticon()toexit.
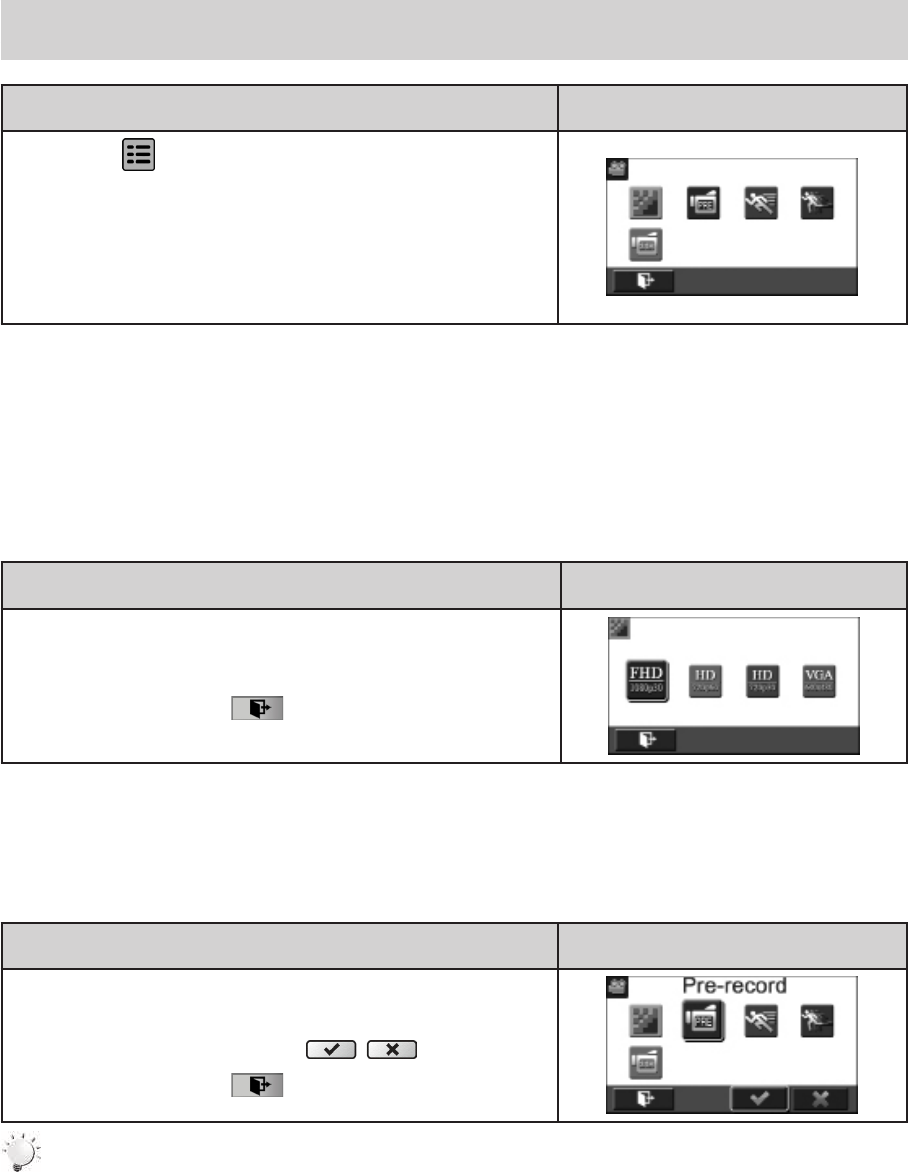
Pre-record
ThePre-recordfunctionensuresthatyouwillnotmissanycriticalrecordingopportunities.Thevideos
arerecorded3additionalsecondsbeforethe[VideoButton]ispressed.
Operation Display Screen
1. In the Video menu, touch the [Pre-record] icon on the
screen.
2. Touchtoselect[Off]or[On]().
3. TouchtheExiticon()toexit.
Note
• Aimthecameraatthesubjectandpositionitsecurely.
16
EN
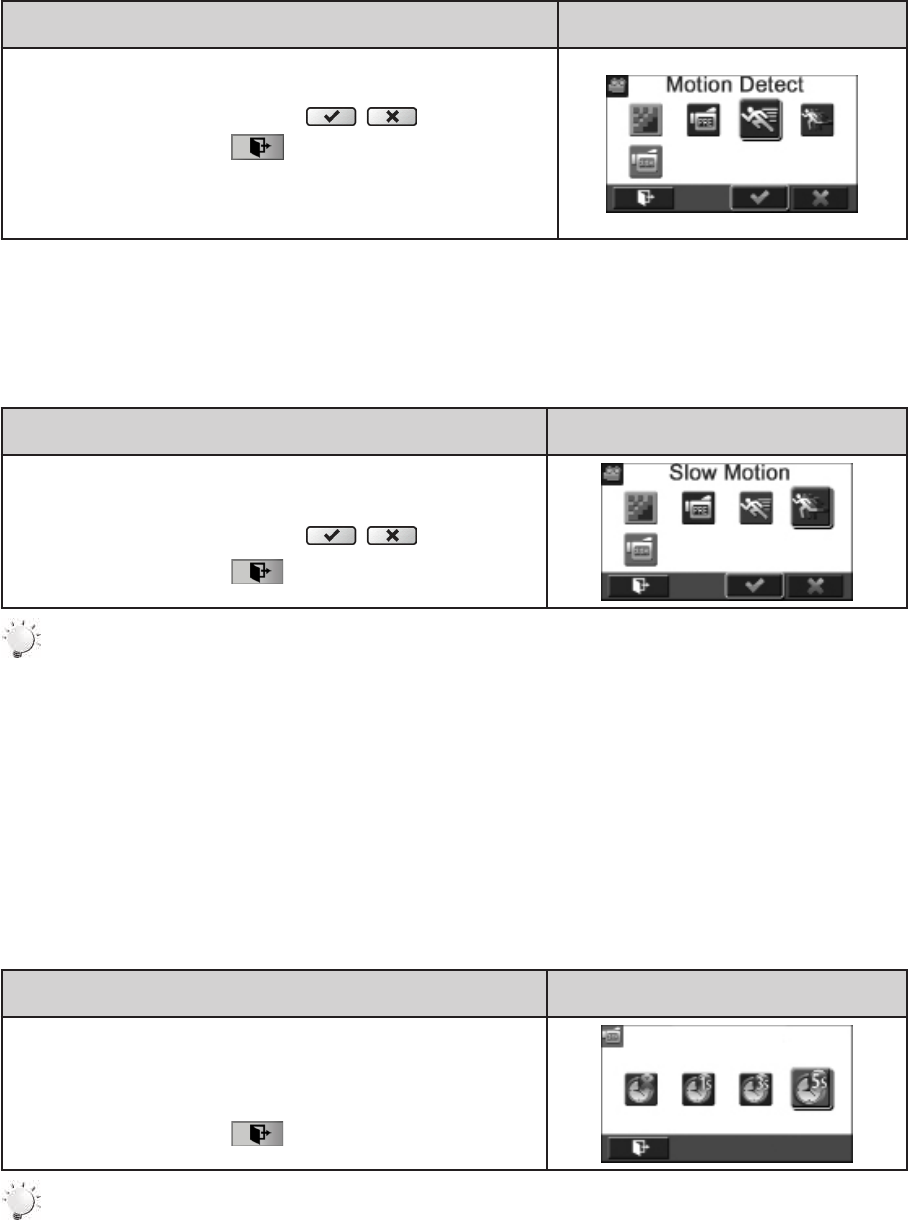
Motion Detection
Recordvideosautomaticallywhenthecameradetectsamovement.
Operation Display Screen
1. IntheVideomenu,touchthe[MotionDetect]icononthe
screen.
2. Touchtoselect[Off]or[On]().
3. TouchtheExiticon()toexit.
4. The camera will start to record video automatically if it
detects a movement. The camera stops recording if it
doesnotdetectamovement.
Slow Motion
Recordvideoswithslowmotioneffect.Whenthevideoisplayed,theplaybacktimewillbelongerthan
theactualrecordingtime.
Operation Display Screen
1. IntheVideomenu,touchthe[SlowMotion]icononthe
screen.
2. Touchtoselect[Off]or[On]().
3. TouchtheExiticon()toexit.
Note
• PausefunctioncannotbeusedwhenSlowMotionfunctionisactivated.
Time Lapse
Recordstillimagesatspecicintervalsyoucansetandplaythemasonevideole.
• Off:DisableTimeLapse.
• 1 Second.: Recordoneframepersecond.
•3 Seconds: Recordoneframeevery3seconds.
•5 Seconds: Recordoneframeevery5seconds.
Operation Display Screen
1. IntheVideomenu,touchthe[TimeLapse]icononthe
screen.
2. Touchtoselectthedesiredoption.
3. TouchtheExiticon()toexit.
Note
• PausefunctioncannotbeusedwhenTimeLapsefunctionisactivated.

17
EN
Photo
Operation Display Screen
1. Touch on the screen in Record Mode. The
menuwillappearonthescreen.
2. Touch the [Photo] icon on the screen. Submenu of
Photowillpopoutonthescreen.
3. ThePhotosubmenucontains5optionsforyoutoadjust
the camera settings -- Resolution, Flash, Self-Timer,
SmileDetect,andISO.--
Photo Resolution
Threephotoresolutionsettingsareavailable.
• 16MP:Shootphotoat4608x3456,16MPquality.
• 5MP:Shootphotoat2592x1944,5MPquality.
• 3MP:Shootphotoat2048x1536,3MPquality.
Operation Display Screen
1. In the Photo menu, touch the [Resolution] icon on the
screen.
2. Touchtoselectthedesiredoption.
3. TouchtheExiticon()toexit.
Flash
Thiscamerahasthreeashsettings.
• Flash Auto: The ashresautomatically accordingtolightconditions. Usethismodefor general
photography.
• Red Eye Reduct.(RedEyeReduction) :Thepre-ashwillretoreducethered-eyeeffect.
• Flash Off: Theashwillnotreunderanycircumstances.Usethismodewhentakingphotoina
placewhereashphotographyisprohibited,orwhenthesubjectisdistant(beyondtherangeofthe
ash).
Operation Display Screen
1. InthePhotomenu,touchthe[Flash]icononthescreen.
2. Touchtoselectthedesiredoption.
3. TouchtheExiticon()toexit.
Note
Theashwillbedisabledautomaticallywhenthebatterypowerislow( ).
18
EN
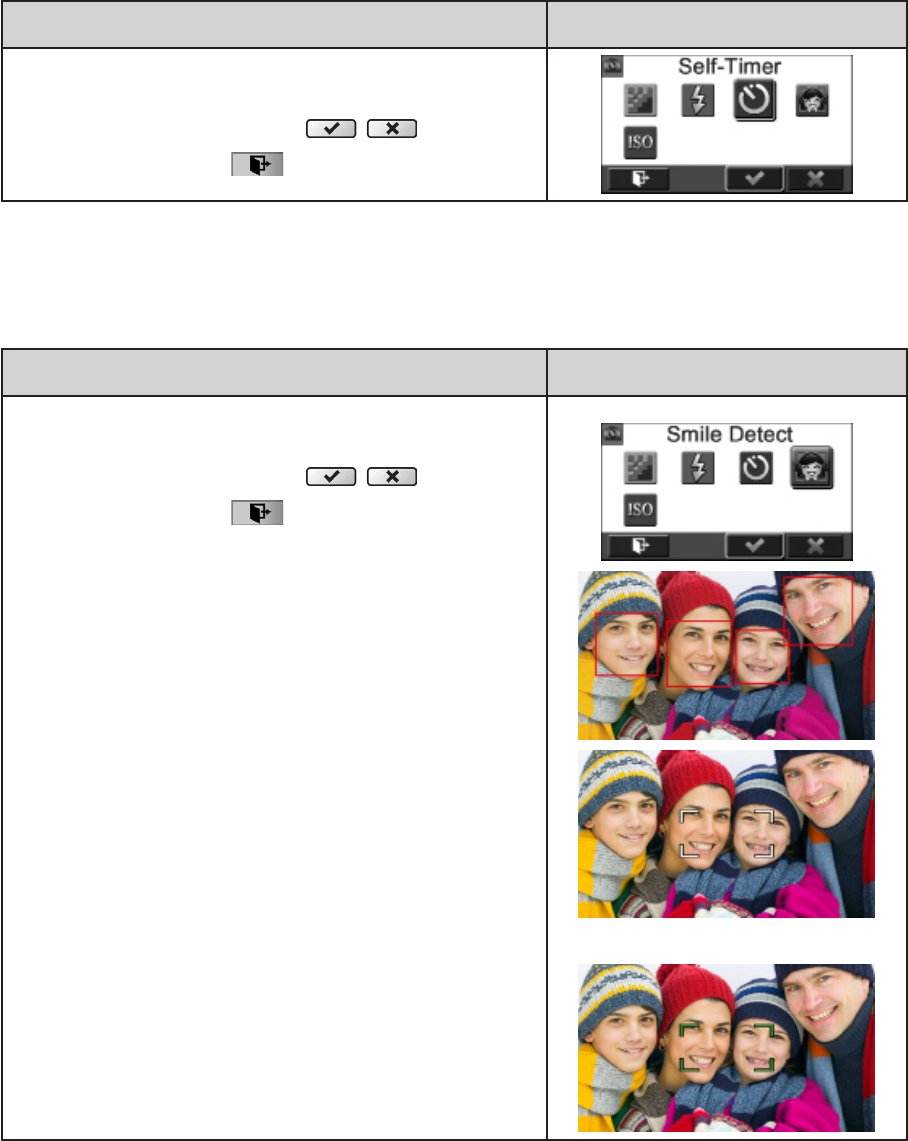
Self-Timer
TheSelf-Timerallowsyoutotakephotoswithaten-secondtimedelay.TheSelf-Timerlightonthefront
ofthecamerawillalsoblink.Thespeedofblinkingwillincreasejustbeforethephotoistaken.
Operation Display Screen
1. In the Photo menu, touch the [Self-Timer] icon on the
screen.
2. Touchtoselect[Off]or[On]().
3. TouchtheExiticon()toexit.
Smile Detection
Captureanimageautomaticallywhenthecameradetectsasmile.
Operation Display Screen
1. InthePhotomenu,touchthe[SmileDetect]icononthe
screen.
2. Touchtoselect[Off]or[On]().
3. TouchtheExiticon()toexit.
19
EN
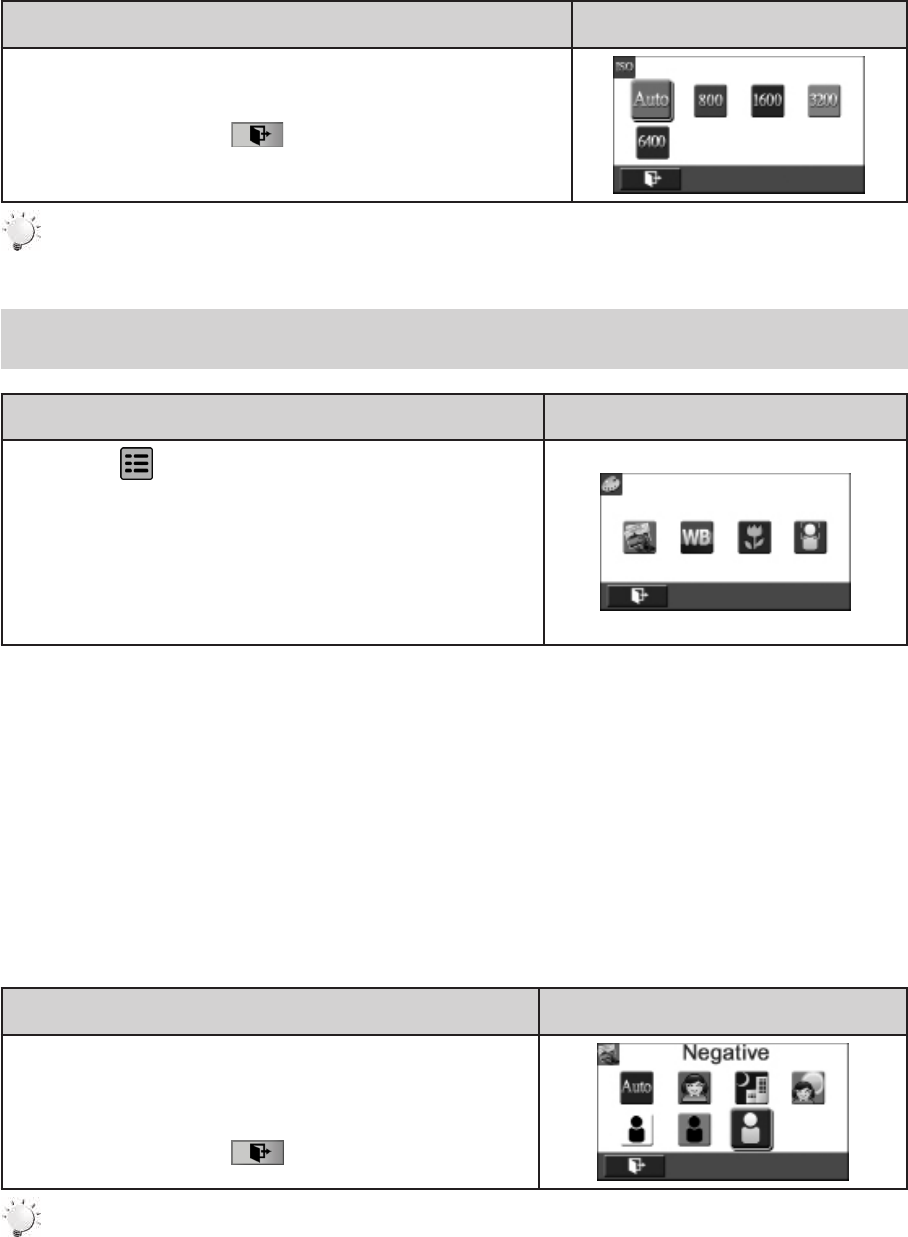
ISO
ThecameraadjuststheISOsensitivityofitsimagesautomatically.FourmanualISOsensitivitysettings
are available. (800/1600/3200/6400). The larger the number is, the higher the ISO sensitivity is set.
Selectasmallnumbertoshootasmootherimage.Selectalargenumbertoshootanimageinadark
locationortoshootasubjectmovingathighspeed.
Operation Display Screen
1. InthePhotomenu,touchthe[ISO]icononthescreen.
2. Touchtoselectthedesiredoption.
3. TouchtheExiticon()toexit.
Note
TheimagemaybecomenoisywhentheISOnumberislarge.
Effect
Operation Display Screen
1. Touch onthescreeninRecordMode.Themenu
willappearonthescreen.
2. Touchthe[Effect]icononthescreen.SubmenuofEffect
willpopoutonthescreen.
3. TheEffectsubmenucontains4optionsforyoutoadjust
the camera settings -- Scene, White Balance, Macro
Mode,andFaceTracking.
Scene
Youcanselectthemodeaccordingtothescenecondition.
• Auto:Shootwithoutanyspecialeffectontheimage.
• Skin: Shootwithaneffectthatmakesskintonesmorenatural.
• Night: UseNightModefornightscenesorlowlightconditions.
• Backlight:Youcantakeshotswhenthebrightlightisbehindthesubject.
• Black/White: Theimageisconvertedtoblack-and-white.
• Classic: Theimageisconvertedtoasepialook.
• Negative: Theimageisconvertedasthenegativeofthenormal.
Operation Display Screen
1. In the Effect menu, touch the [Scene] icon on the
screen.
2. Touchtoselectthedesiredoption.
3. TouchtheExiticon()toexit.
Note
Toavoidblurryphotos,placethecameraonaat,steadysurface,oruseatripodwhentaking
shotsintheNightMode.
20
EN
White Balance
Thecameraadjuststhecolorbalanceofimagesautomatically.Threemanualwhitebalancesettingsare
available:
• Auto: Thecameraautomaticallyadjustswhitebalance.
• Daylight: Underoutdoorcondition.
• Fluorescent: Underuorescentlightcondition.
• Tungsten: Undertungstenlightcondition.
Operation Display Screen
1. IntheEffectmenu,touchthe[WhiteBalance]iconon
thescreen.
2. Touchtoselectthedesiredoption.
3. TouchtheExiticon()toexit.
Macro Mode
YoucanselecttheMacromodeforrecordingclose-upvideosandphotos.
Operation Display Screen
1. IntheEffectmenu,touchthe[MacroMode]icononthe
screen.
2. Touchtoselect[Off]or[On]().
3. TouchtheExiticon()toexit.
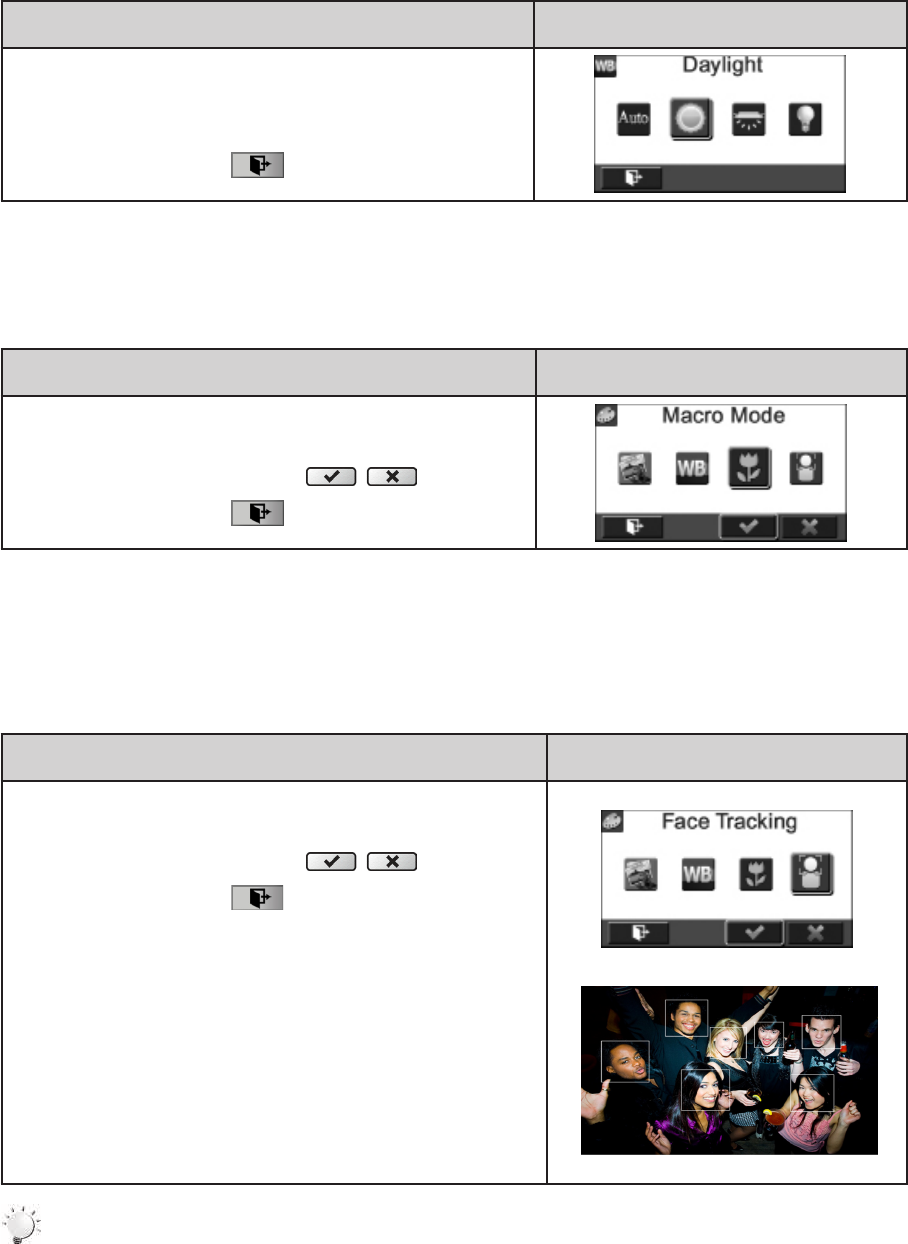
Face Tracking
The camera can detect human face(s) and focus on the face(s) automatically. This function works
withvideorecordingandphotocapturing.Itiswonderfulforcapturingbeautifulportraitsinabacklight
situation.
Operation Display Screen
1. In the Effect menu, touch the [FaceTracking] icon on
thescreen.
2. Touchtoselect[Off]or[On]().
3. TouchtheExiticon()toexit.
Note
WhenFaceTrackingisactivated,aimthecameraatthehumanface(s).Thefocusframe(s)will
appearontheLCDbeforethe[VideoButton]/[PhotoButton]ispressed.

21
EN
Section 4
Enjoying the Playback Mode
Button Function
TheButtonshavethefollowingfunctionsinPlaybackMode.
Video Button:
1.SwitchtoRecordMode.
Tele Button:
1.ZoomIn.
Wide Button
1.Zoomout.
Playback Button:
1.SwitchbetweenRecord/PlaybackMode.
2.Forquickreview,pressitafterrecording.
Pause Button:
1. InVideoPlaybackMode,presstopausetherecordedvideo.

22
EN
LCD Monitor Information
IndicatorsontheLCDscreenwhileinPlaybackMode:
VideoPlaybackMode PhotoPlaybackMode
(1)
VideoResolution
FullHD(1080p30fps)
HD(720p60fps)
HD(720p30fps)
VGA(640X480)
SlowMotion(432x240(QVGA))
PhotoResolution
16MP
5MP
3MP
DualRecord(Theimageresolutioncapturedduringvideosrecording
isthesameasthevideoresolution.)
(2)
Videoplaybacktimecounter.
Currentnumber/Totalnumberofphoto/video.
(3) Volume
(4)
Return
Videostop
(5) Previousvideo/photo
(6) Videofastrewind
23
EN
(7)
Videoplay
Videopause
(8) Videofastforward
(9) Nextvideo/photo
(10) Delete
(11)
SlideShow
SlideShowstop
(12) MagnicationIndicator
Operations for Playback Mode
ThePlaybackModeallowsyoutoviewandmanageyourcapturedvideosandphotosfromthebuilt-in
memoryorfromtheSDCard.
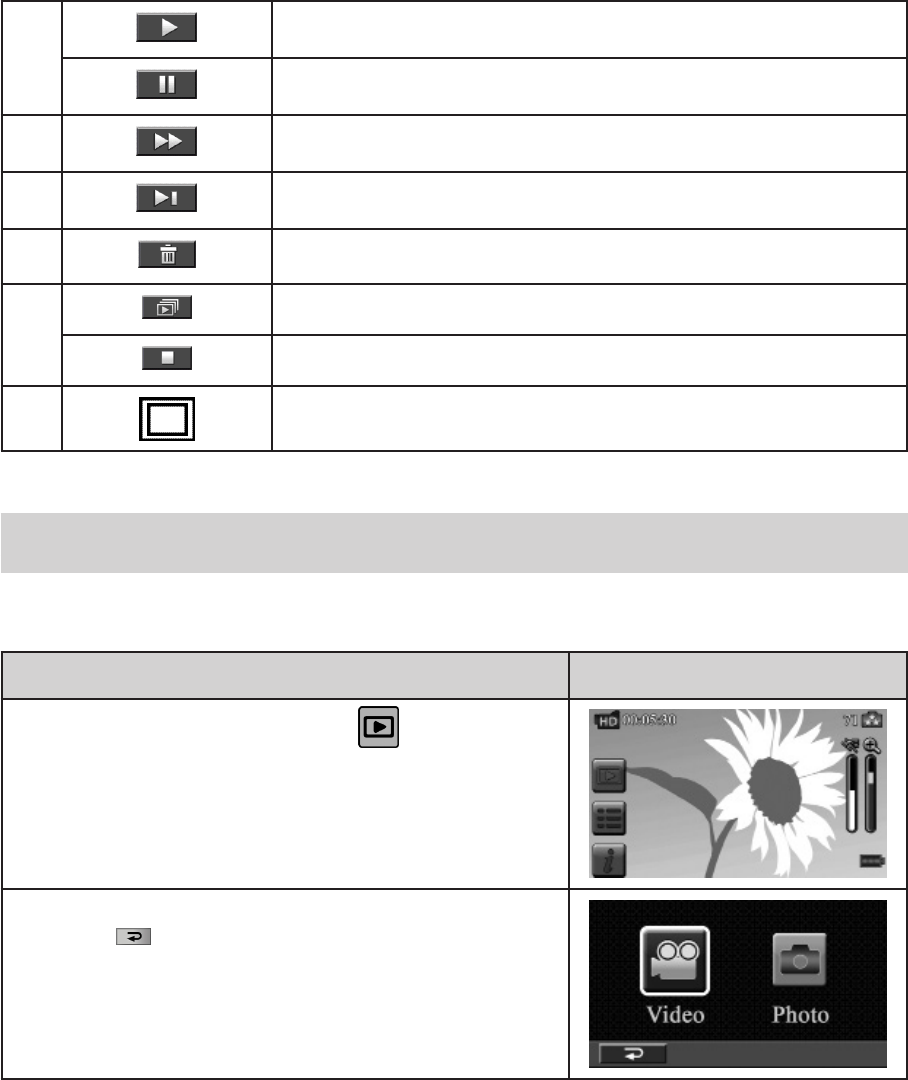
Operation Display Screen
1. Press [Playback Button] or touch on the screen to
switchtothePlaybackmode.
2. Touchtoselectthespecicoption.
3. Touch( )tobacktoRecordMode.
24
EN
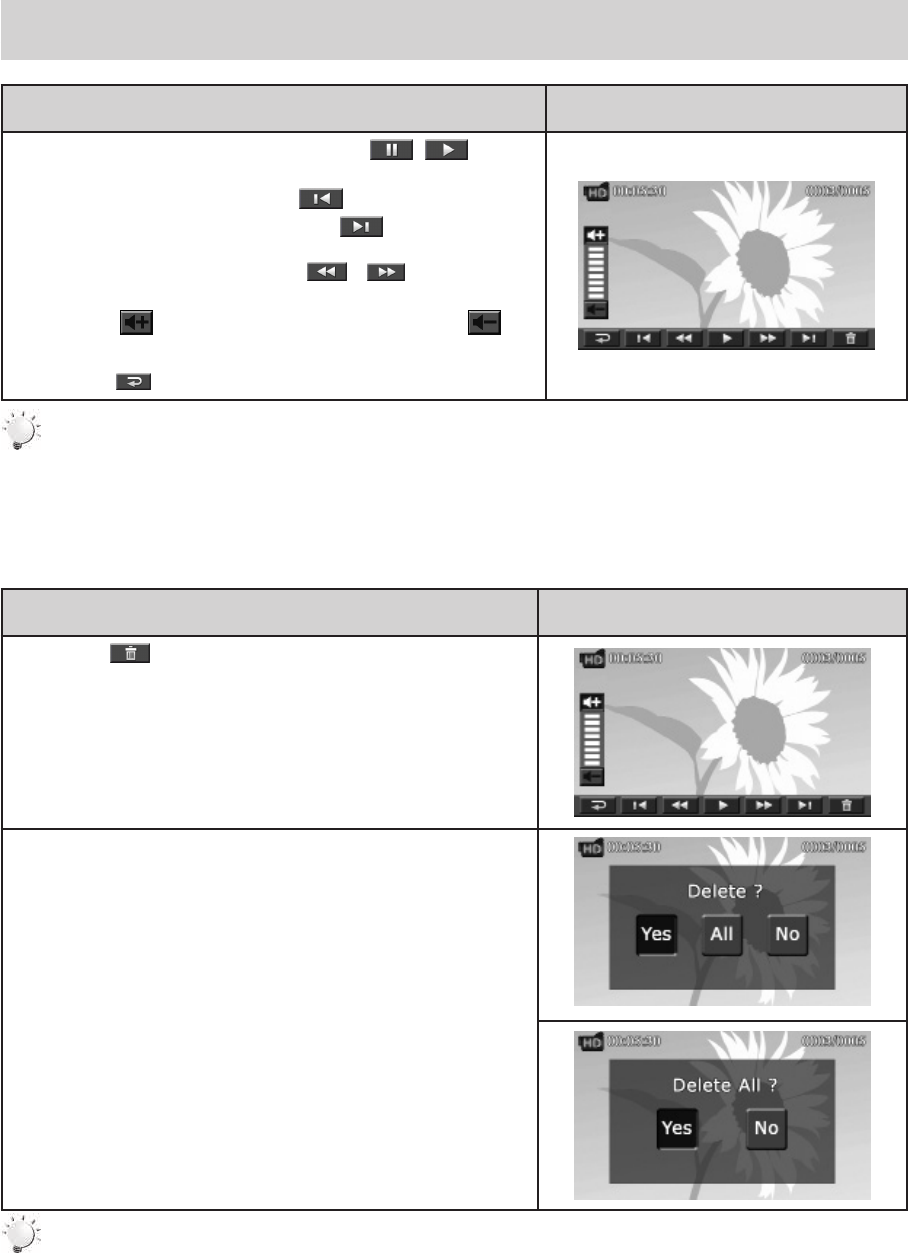
Video Playback
Operation Display Screen
1. IntheVideoPlaybackmode,touch / toplay
orpausethevideos.
2. Sweeptotherightortouch togototheprevious
video;sweeptotheleftortouch togotothenext
video.
3. While playing videos, touch / to fast rewind/
forward.
4. Touch to increase the volume; touch to
reducethevolume.
5. Touch( )toexit.
Note
• WhentheLCDisidleforafewseconds,theplaybackfunctioniconswilldisappear
automatically.
Delete Videos
Operation Display Screen
1. Touch togototheDeleteoptionscreen.
2. Touch[Yes]todeletethecurrentvideoor[No]tocancel
the operation and to exit; touch [All (Delete All)] to
deleteallvideos.
3. Beforeallvideosareabouttobedeleted,aconrmation
screenwillappear;touch[Yes]toexecutetheoperation
and[No]tocanceltheoperation.
Note
• Ifamemorycardhasbeeninserted,youcanonlydeletethosevideosstoredonthecard.
• Videosonawritten-protectedmemorycardcannotbedeleted.
25
EN
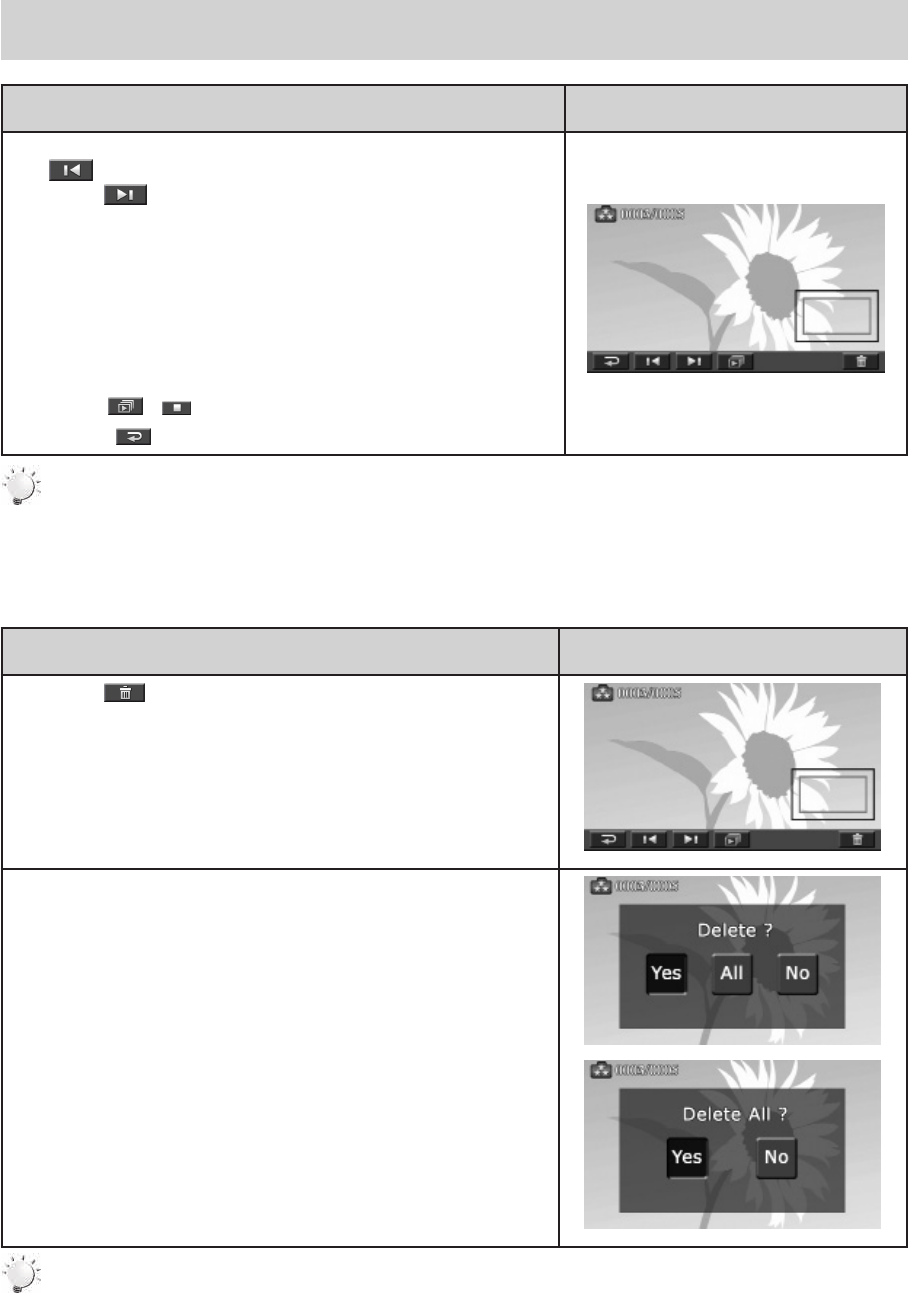
Photo Playback
Operation Display Screen
1. InthePhotoPlaybackmode,sweeptotherightortouch
to go to the previous photo; sweep to the left or
touch togotothenextphoto.
2. Whilethephotoisselected,press[TeleButton]tomagnify.
(TheMagnicationIndicatorappearsonthescreen)
3. Tonavigatethemagniedphoto,pressonthescreenand
move as well. (The inner Magnication Indicator turns
red)
4. Press[WideButton]tozoomoutorexitthemagnication
mode.
5. Touch / tostartortostoptheSlideShow.
6. Touch( )toexit.
Note
• WhentheLCDisidleforafewseconds,theplaybackfunctioniconswilldisappear
automatically.
Delete Photo
Operation Display Screen
1. Touch togototheDeleteoptionscreen.
2. Touch[Yes]todeletethecurrentphotoor[No]tocancel
theoperationandtoexit;touch[All(DeleteAll)]todelete
allphotos.
3. Beforeallphotosaredeleted,aconrmationscreenwill
appear;touch[Yes]toexecutetheoperationand[No]to
canceltheoperation.
Note
• Ifamemorycardhasbeeninserted,youcanonlydeletethosephotosstoredonthecard.
• Photosonawritten-protectedmemorycardcannotbedeleted.

26
EN
Section 5
Setting Your Camera
Setting Menu
Operation Display Screen
1. Touch onthescreeninRecordMode.Themenu
willappearonthescreen.
2. Touch the [Setting] icon on the screen. The Setting
Submenuswillappearonthescreen.
3. TheSettingsubmenucontains7optionsforconguring
your camera setup: Sound (operation sound), TV,
Language, Time Setting, Date Printing, Format, and
DefaultSetting.
Sound
Enableordisablethekeypadtoneandtheoperationsound.
Operation Display Screen
1. In the Setting menu, touch the [Sound] icon on the
screen.
2. Touchtoselect[Off]or[On]().
3. TouchtheExiticon()toexit.
TV
Ensure that the appropriate TV standard of your area is selected – either NTSC or PAL. Wrong TV
systemsettingmaycauseimageickers.
• NTSC(60Hz):USA,Canada,Japan,SouthKoreaandTaiwan,etc.
• PAL(50Hz):UK,Europe,China,Australia,SingaporeandHongKong,etc.
Operation Display Screen
1. IntheSettingmenu,touchthe[TV]icononthescreen.
2. Touchtoselect[PAL]or[NTSC].
3. TouchtheExiticon()toexit.
27
EN
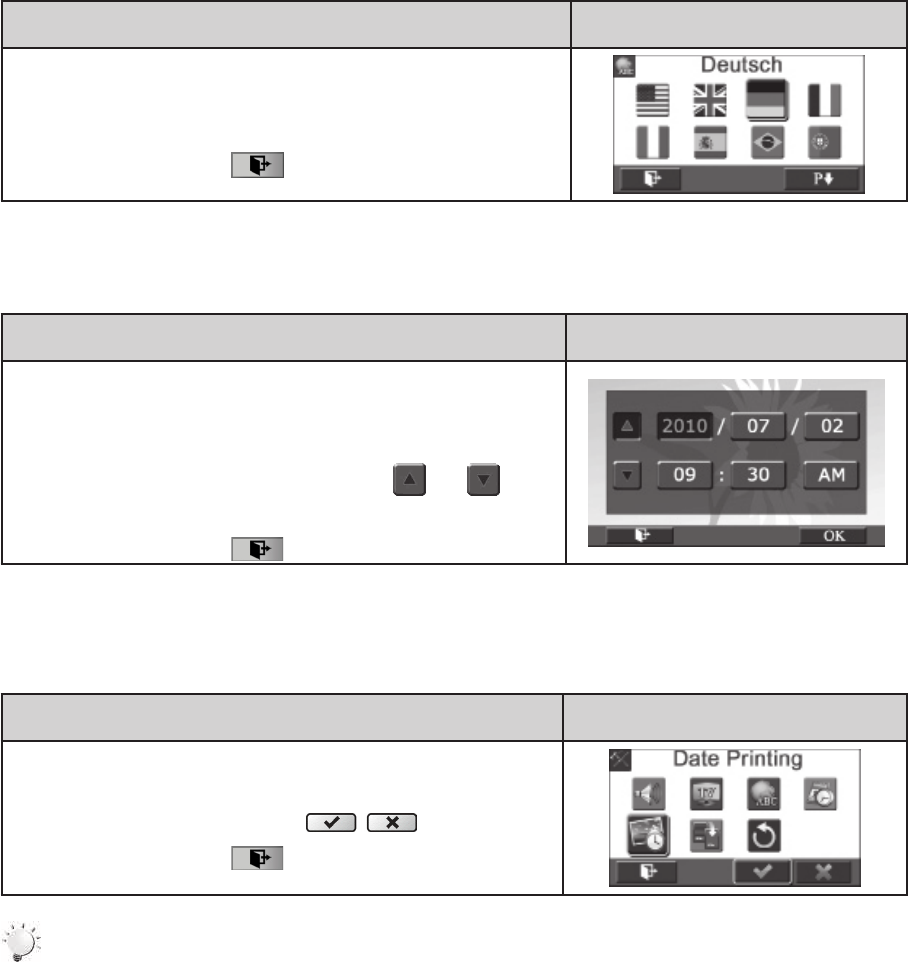
Language
Usethisoptiontoselectthelanguageoftheuserinterface.
Operation Display Screen
1. In the Setting menu, touch the [Language] icon on the
screen.
2. Touchtoselectthedesiredoption.
3. TouchtheExiticon()toexit.
Time Setting
Operation Display Screen
1. IntheSettingmenu,touchthe[TimeSetting]icononthe
screentoenterthetimesettingscreen.
2. TouchYear,Month,Day,Hour,Minute,andAM/PMtoset.
3. Adjustthenumericvaluebytouching /
4. Touchthe[OK]icontovalidatethesetting.
5. TouchtheExiticon()toexit.
Date Printing
Imprintthedateandtimeonthevideoandphoto.
Operation Display Screen
1. IntheSettingmenu,touchthe[DatePrinting]icononthe
screen.
2. Touchtoselect[Off]or[On]().
3. TouchtheExiticon()toexit.
Note
• DatePrintingfunctioncannotbeusedwhenSlowMotionfunctionisactivated.
28
EN
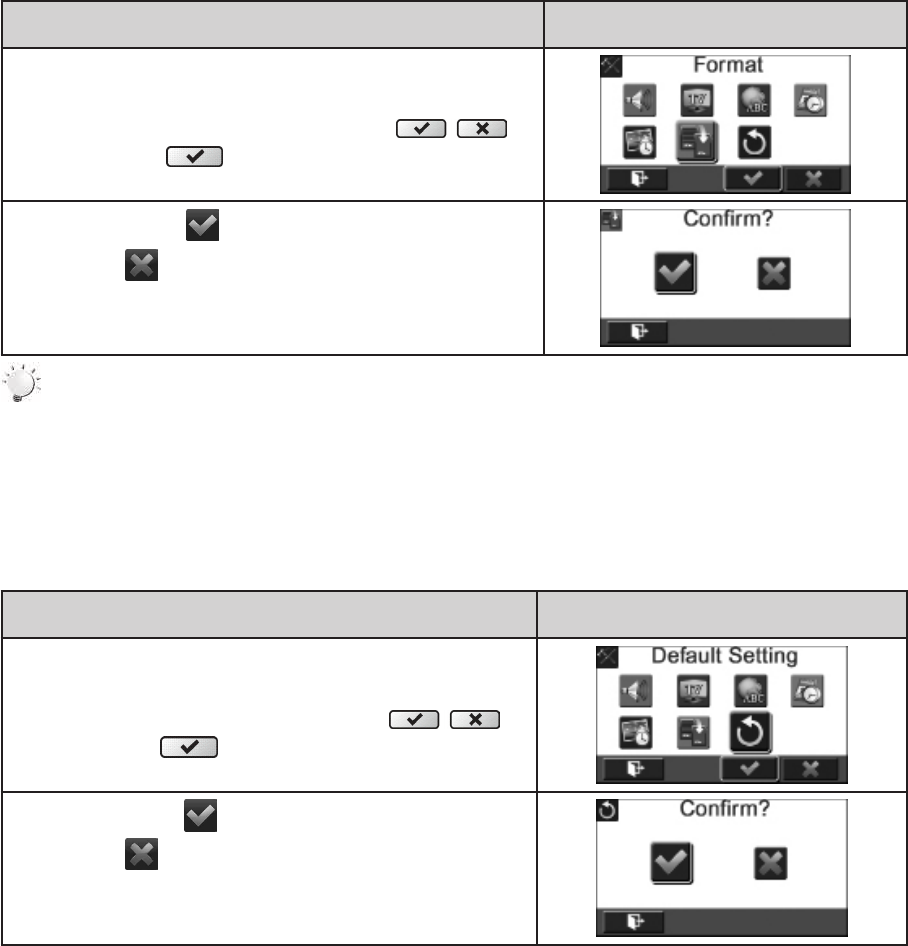
Format
• Yes: Formatthebuilt-inmemory(whenthereisnoSDcardinthecamera)/SDCard(whenthereis
anSDcardinthecamera).
• No: Donotformatthebuilt-inmemory(whenthereisnoSDcardinthecamera)/SDCard(when
thereisanSDcardinthecamera).
Operation Display Screen
1. In the Setting menu, touch the [Format] icon on the
screen.
2. Touch to select [Yes] or [No] ( ).
(Touch[Yes] toentertheconrmationscreen.)
3. Touchthe[Yes ]icontoexecutetheoperationand
the[No ]icontocanceltheoperation.
Note
AllthedatawillbeerasediftheSDcardisformatted.Makesureallthedataarecopiedtoyour
PCbeforeformattingtheSDcard.
Default Setting
Torestorethedefaultfactorysetting,selectthisoption.
Operation Display Screen
1. IntheSettingmenu,touchthe[DefaultSetting]iconon
thescreen.
2. Touch to select [Yes] or [No] ( ).
(Touch[Yes] toentertheconrmationscreen.)
3. Touchthe[Yes ]icontoexecutetheoperationand
the[No ]icontocanceltheoperation.

29
EN
Thefollowingtableindicatesthecamera’sdefaultsettings
Setting Default Factory Setting
Resolution FHD(1080p30)forVideo
5MPforPhoto
Stabilization Off
Motion Detection Off
Slow Motion Off
Time Lapse Off
Self-Timer Off
Smile Detection Off
ISO Auto
Scene Auto
White Balance Auto
Face Tracking Off
Flash Off
Sound On
TV Dependsonshippingarea
Language Dependsonshippingarea
Date Printing Off
Volume Level6

30
EN
Section 6
Viewing Photos and Videos on TV
Connecting to a High-Denition 16:9(Wide) TV
1.ConnecttheHDMIcabletoyourcamera’sHDMIOutport.
2.Connecttheotherendofthecabletoatelevision.
3.SetthevideoinputsourceofyourTVto“HDMI.”
4.ThestepsforviewingstoredvideosandphotosonHDTVareexactlythesameasforviewingthem
ontheLCDmonitor.
Connecting to a non-high-denition 4:3 TV
1.ConnectoneendoftheAVcabletoyourcamera’sAVoutport.
2.Connecttheotherendofthecabletoatelevision.
3.ThestepsforviewingstoredvideosandphotosonTVareexactlythesameasforviewingthemon
theLCDmonitor.
31
EN
Section 7
Using the Software
Installing the Software
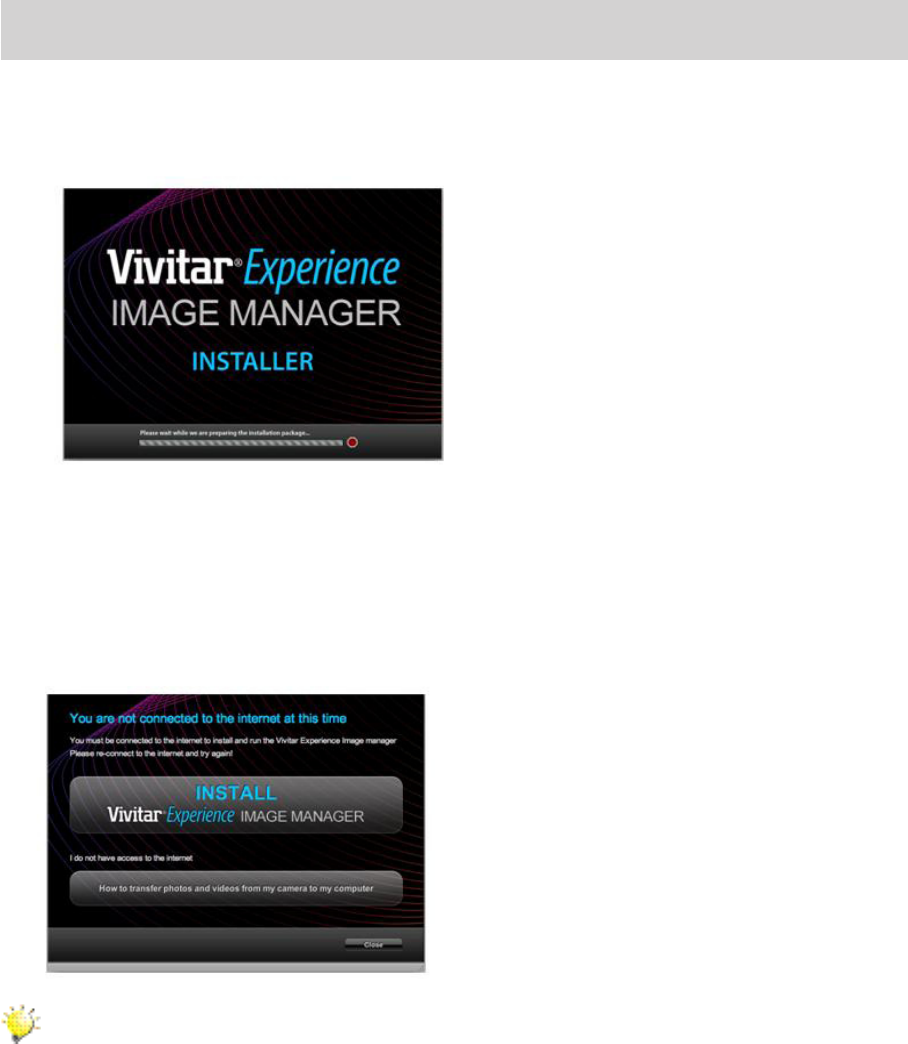
You must be connected to the internet to install and run the Vivitar Experience Image Manager software.
1. InserttheinstallationCDintoyourCD-ROMdrive.Theinstallationscreenshouldautomaticallyopen.
2. OnPC:TheVivitarExperienceImageManagerInstallerwindowappears.Ifthewindowdoesnot
appear,opentheapplication’sCD/DVDdriveandclickon“Setup.exe”tolaunchtheinstaller.
3. OnMacintosh:ClicktheiconthatappearsonthedesktoptoinstalltheVivitarExperienceImage
Manager.
4. IfyoudonothaveinternetaccessatthetimeofinsertingtheCD-ROM,connecttotheinternetand
thenclickthe“InstallVivitarExperienceImageManager”buttontobegintheinstallation.
Note
• Ifyoudonothaveinternetaccess,youcanstilldownloadmediafromthecamera.Clickthe
“Howtotransferphotosandvideosfrommycameratomycomputer”buttonforinstructions.
5. Ifyouhaveinternetaccess,the“Chooseyourlanguage”windowopens,chooseyourlanguage
andclick“Next”toopenthenextwindow.
6. Selectyourcameramodelfromthelistandclick“Next”toopenthenextwindow.
7. Click“Next”toconrmyourcameramodelselectionandtoinstalltheapplication.
8. Pleasewaitwhiletheapplicationisbeinginstalledonyourcomputer.
9. Pleasereviewthelicenseterms.
OnPCandMacintosh:Clickthe“Iacceptthetermsofthislicenseagreement”andthenclick
32
EN
“Next”tocontinue.
10. OnPConly:Letthe“VivitarExperienceImageManager”installercreatethefoldertowherethe
programwillbeinstalled,andthenclick“Install”.
11. Pleasewaitwhiletheapplicationcontinuestheinstallationprocessonyourcomputer.
12. OnPC:Clickthe“Close”buttonwhentheinstallationiscomplete.
Clickthe“LaunchVivitarExperienceImageManager”toopentheapplication.
13. OnMacintosh:Clickthe“Quit”buttonwhentheinstallationiscomplete.
Clickthe“LaunchVivitarExperienceImageManager”toopentheapplication.
14. IfyouclosetheapplicationyoucanruntheVivitarExperienceImageManagerfromthePrograms
(PC)orApplications(Mac)menuonyourcomputer.
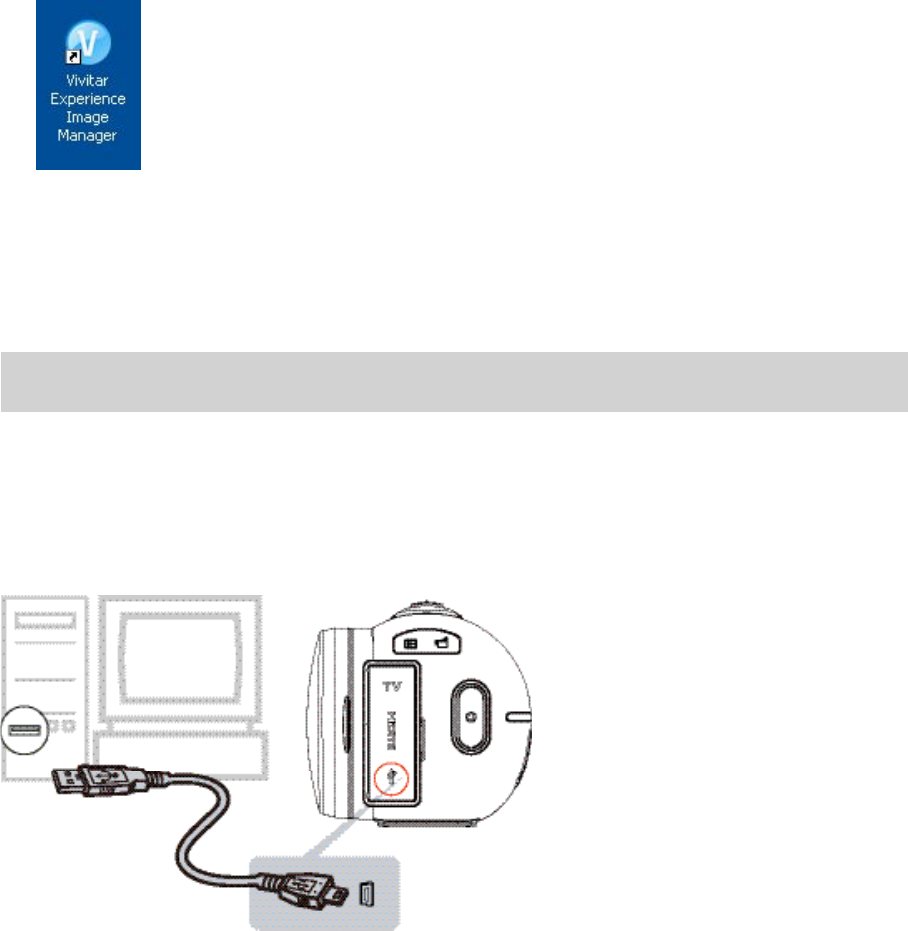
Connecting the Camera to a Computer
1.ConnectthecomputerandcamerawiththesuppliedminiUSB2.0cable.
2.PowerthecameraON.
3.Thersttimeyouconnectthedevicetothecomputeryouwillhavetowaitafewsecondsuntilthe
computerrecognizesthedevice.
33
EN
Getting Photos and Videos from your Camera to your Computer
Donotdisconnectthecableduringtransfer.Doingsowillcancelthetransferofanylesontheirwayto
yourcomputer.
1. Selectthe“GetImages”buttonfromtheMainmenu.
2. The“GetImagesfromdevice”windowopens.
3. Youcanselecttodownloadphotos,videosorboth.
4. Selectyourcamera(removabledisk)fromthedevicewindow.IfyourcameraistheonlyUSBdevice
connectedthenitwillbeselectedautomatically.
5. Selectalocationonthecomputerwheretoplacethenewphotoandvideoles.
6. Addthenewphotoandvideolestoalbumsifdesired.
7. Selecttoremovethemedialesfromtheselecteddevice(removabledisk)aftertheimport.
8. Clickthe“GetImages”buttontotransferthephotosandvideosfromyourcameratoyourcomputer.
9. A media download progress bar appears on the bottom left showing the number of media les
downloadingtoyourcomputer.Amessageappearswhenthedownloadiscomplete.
10. Thephotoandvideolesthatyouselectedarenowdownloadedtoyourcomputertotheselected
folderandalbumsreadyforyouruse.
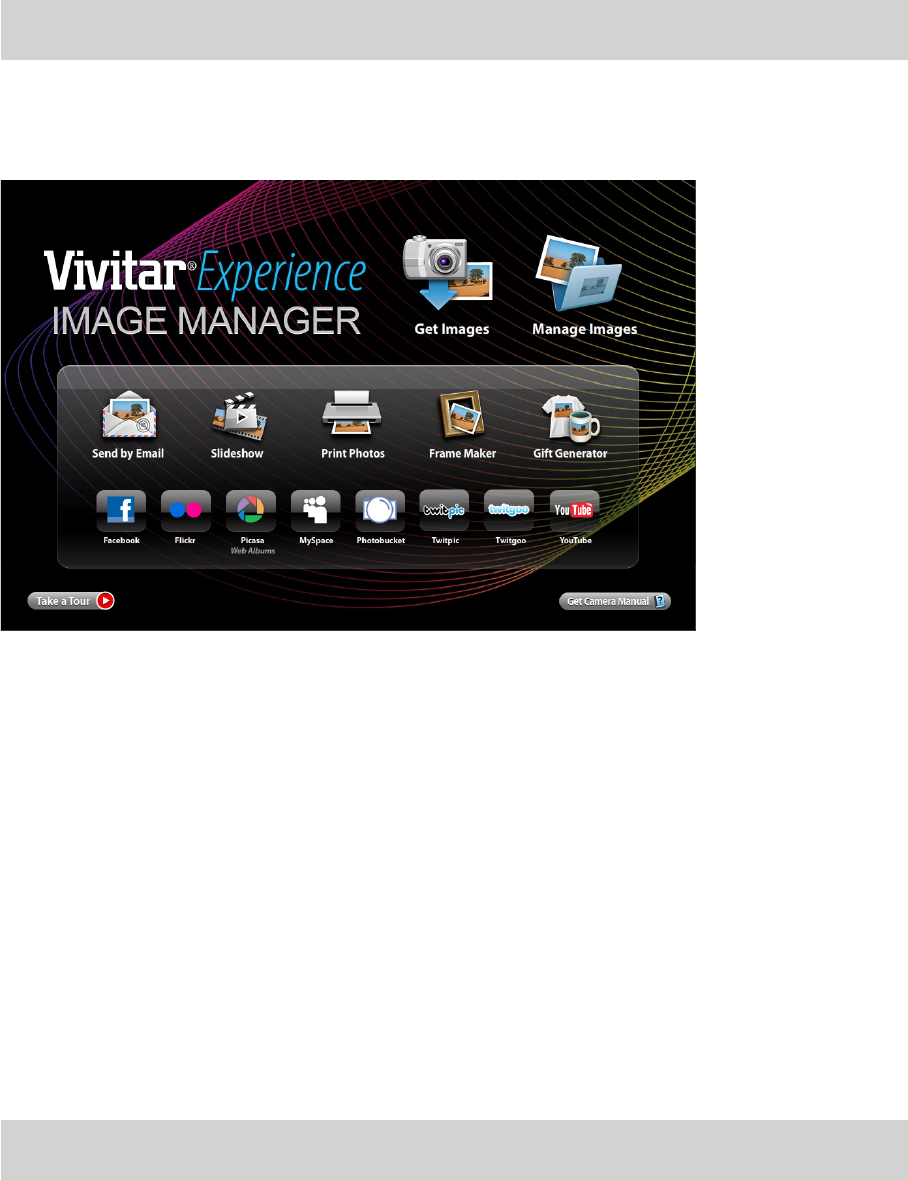
Get Started!
UsingtheVivitarExperienceImageManager,youcan:
• Upload and manage photos and videos to and from the most popular photo sharing and social
networkingsites-Facebook,Flickr,Picasa,MySpace,Photobucket,Twitpic,TwitgooandYouTube
• Seamlesslytransferphotosandvideosfromonesocialnetworktoanother
• Organizeyourimagesbycreatingofineandonlinealbums
• Editimagesusingautomaticandmanualtools
• Useautomatic“Geotagging”withbuiltinGoogleMaps
FormoredetailsonhowtousetheVivitarExperienceImageManageropentheHelpleorclickthe
“TaketheTour”buttonontheapplication`sHomepage.

34
EN
Section 8
Transferring Media
Transferring Videos and Photos: Using Windows
TotransfermediafromyourcameratoyourcomputermanuallyusingWindows:
1. UsetheUSBcablethatcamewithyourcameratoconnectyourcameratoyourcomputer.
2. MSDCappearsontheLCD.
3. Awindowappearswithalistofoptions,select“Openfoldertoviewles”andclickOK.
4. OpentheDCIMfolderandthefolderinsidetoviewthemediales.
5. Selectthemediaandcopythelesfromthisfolderintoyourcomputer.Optionally,selecttheles
andchooseCopyfromtheEditmenu.ThenselectafolderandchoosePastefromtheEditmenu.
6. ItisrecommendedthatyoucopytheimagesintothePictures/MyPicturesfolderandthevideosinto
theVideos/MyVideosfolder.
7. Donotdisconnectthecableduringtransfer.Doingsowillcancelthetransferofanylesontheir
waytoyourcomputer.
Transferring Videos and Photos: Using Macintosh
TotransfermediafromyourcameratoyourcomputermanuallyusingMacintosh:
1. UsetheUSBcablethatcamewithyourcameratoconnectyourcameratoyourcomputer.
2. MSDCappearsontheLCD.
3. Thecamera’sdeviceiconappearsonthedesktop.
4. ClickonthedeviceiconandopentheDCIMfolderandthefolderinsidetoviewthemediales.
5. Selectthelesanddragthemintoyourcomputer.Optionally,selectthelesandchooseCopyfrom
theFinder’sEditmenu.ThenselectafolderandchoosePastefromtheEditmenu.
6. WerecommendthatyoucopytheimagesintothePicturesfolderandthevideosintotheMovies
folder.
7. Donotdisconnectthecableduringtransfer.Doingsowillcancelthetransferofanylesontheir
waytoyourcomputer.

35
EN
Section 9
Sakar Warranty Card
Thiswarranty coversfortheoriginalconsumer purchaseronlyandisnot transferable.Productsthat
failtofunctionproperlyUNDER NORMAL USAGE,duetodefectsinmaterialorworkmanshipwillbe
repairedatnochargeforpartsorlaborforaperiodofoneyearfromthetimeofpurchase.
What Is Not Covered By Warranty:
Damages or malfunctions not resulting from defects in material or workmanship and damages or
malfunctions from other than normal use, including but limited to, repair by unauthorized parties,
tampering,modicationoraccident.
What to Do When Service Is Required:
Whenreturningyourdefectiveproduct(postagepre-paid)forservice,yourpackageshouldinclude:
1) Copyoforiginalbillofsale
2) Adetailedwrittendescriptionoftheproblem.
3) Yourreturnaddressandtelephonenumber(Daytime)
MAIL TO ADDRESS BELOW:
SakarUS SakarUK/Europe SakarAustralia
SakarInternational
Attention:ServiceDepartment
195CarterDrive
Edison,NJ
08817
Attention:ServiceDepartment
2D,SiskinParkwayEast
4020MiddlemarchBusinessPark
Coventry,CV34PE
Return faulty camera to the
Refund Counter at the store
wherepurchased
Section 10
Technical Support
For technical support issues please visit our website at www.vivitar.com. You can nd manuals,
softwareandFAQ’satthewebsite.Can’tndwhatyouarelookingfor?E-mailusatsupport@vivitar.
comandoneofourtechnicalsupportteammemberswillansweryourquestions.Forphonesupport
intheUSpleasecall1-800-592-9541,intheUKcall08009174831,inAustraliacall1800-006-614.If
youwouldliketocallfromanywhereelse,pleasevisitwww.vivitar.comforyourlocaltollfreenumber.

36
EN
Section 11
Specications and System Requirements
Specication
Imagesensor 5MegapixelCMOSsensor
Operationmodes Videorecord,Photorecord
Lens AutoFocusLens(F3.5)
Focusrange MacroMode:1cm~120cm
NormalMode:1cm~innite
Zoom 1X~2700X(23XOpticalzoomand120XDigitalzoom)
Shutter Electronic
LCDmonitor 3”touchLCD(16:9)
Storagemedia Built-in128MBmemory(partialmemoryisusedforrmwarecodeandsoftware);
SD/SDHC/SDXCcardslotsupport(upto64GB)
Imageresolution High4608x3456(16Mpixels)(Interpolated)
Standard2592x1944(5Mpixels)
Low2048x1536(3Mpixels)
Videoresolution FHD(1080p30)1920X1080(30fps)
HD+(720p60)1280X720(60fps)
HD(720p30)1280X720(30fps)
VGA(640X480)640X480(30fps)
Whitebalance Auto/Manual(Daylight,Fluorescent,Tungsten)
ISO Auto/800/1600/3200/6400
Self-timer 10secondsdelay
Flash FlashAuto/Red-Eye-Reduction/FlashOff
Fileformat Photo:JPG
Video:AVI
Imageplay Singleimage/SlideShow
PCinterface MiniUSB2.0port
TVout NTSC/PALselectable,HDMI
Battery Lithium-ionrechargeablebattery
Dimension 126mm(L)x57mm(H)x60mm(W)
Weight 340g(withoutbattery)

37
EN
System requirements
WINDOWS OS
TobeabletodownloadphotosandvideostoyourPC,youwillneedthefollowingminimumconguration:
• Microsoft®WindowsXPwithServicePack3,WindowsVistawithServicePack1orWindows7
• Pentium®4processor(orabove)
• 512MBofRAM,with250MBoffreeharddiskspace
• 16-bitColormonitor,1024X768recommendedscreenresolution
• CD-ROMDrive
• QuickTime®6orhigher
• Microsoft®InternetExplorer7orhigher
• WindowsMediaPlayer10orhigher
• DirectX9orhigher
• Internetconnectionrequired
MACINTOSH OS
TobeabletodownloadphotosandvideostoyourMAC,youwillneedthefollowingminimumconguration:
• IntelprocessorrunningMacOSXv10.5.xorlater
• 256MBRAM,250MBfreeharddiskspace
• Display:1024x768orhigher-resolutionmonitor
• QuickTime®6orhigher
• Internetconnectionrequired
Note
TheLCDscreenismanufacturedusingextremelyhigh-precisiontechnology,soover99.99%of
thepixelsareoperationalforeffectiveuse.However,sometinyblackand/orbrightdots(white,
red, blue or green) may appear on the LCD screen. These dots are a normal result of the
manufacturingprocess,anddonotaffecttherecording.
38
EN
Section 12
Troubleshooting
1. The ash is not working.
Thebatterypowerislow.
ThecameraisinDCpowermode.
Inashautomode,cameraashresONLYwhennecessary(indarksettingasexample).
2. The les on the memory card do not display smoothly when the LCD shows the “!” marking.
The“!”meanstheSDcardislowspeedorishavingwrongcontentinside.Thewaytosolvethis
conditionistoformatSDcardbythecamerainsteadofaPC(PleaserefertothedetailedFormat
instructioninSection5).
OrpleasechangetheSD/SDHC/SDXCcardtoahighspeedone.
3. Why do some of my indoor photos look blurry and dark?
Thecameraextendsphotoexposuretimeunderlowlight/indoorcondition.Keepthecamera(and
thetargetsubject)steadyforseveralsecondswhentakingphotos.Theshutterwillsoundwhen
photosarebeingtaken.
4. How do I charge battery?
YoumustusethesuppliedACchargerortheUSBcable.ThecameramustbeturnedOFF.The
blinkinglightconrmsthecameraiscurrentlycharging,andthelightbecomesconstantafterthe
chargingiscompleted.InACchargingMode,thelightwillturnitselfoffautomaticallyafter3~5
minutes.Thefullchargetimeisabout4to5hours.(Actualchargingtimemayvary.Itdependson
thebatteryconditions.)
5. After connecting the USB cable to the computer, ……
A. The disk [DV] indicates the internal memory of the camera. (The disk label may be different
accordingtodifferentmodelandPCOS.)
B. [Removable Disk] indicates the external memory. (Under the circumstances of within the SD/
SDHC/SDXCcardinthecamera)
6. I have taken photos and selected the “Get Images” button. I get a message that the images
were successfully transferred but the photos do not appear on my computer. What do I
do?
Firstensurethatyouhaveinfacttakenphotos.PresstheShutterbuttontotakesomesample
photosandthentrydownloadingthemagain.
Withtestphotosifthecamerapowersoffbeforeyouuploadthemtothecomputerthephotosare
notstoredinthecamera`smemory.Thesephotosshouldbeuploadedquicklybeforethecamera
powersoff.IfthephotosaresavedtotheSDmemorycardthenallthephotosshouldappear.
39
EN
7. How do I make sure I don’t lose important pictures?
Werecommendalwaysdownloadingyourphotostoyourcomputerassoonaspossibletoprevent
unintentionaldataloss.
8. I deleted images using the Vivitar Experience Image Manager. The images were also
deleted from my computer. How do I recover images that I accidently deleted?
AllimagesdeletedusingtheVivitarExperienceImageManageraresenttoyourcomputer`s
RecycleorTrashBinandcanberetrievedfromthere.
