Vocollect TT600-40300 User Manual Table Of Contents
Vocollect Inc Table Of Contents
Contents
- 1. Users Manual
- 2. Revised User Manual
Revised User Manual
1
Table Of Contents
TABLE OF CONTENTS .......................................................................................1
CONTACT INFORMATION ................................................................................11
CONTACT INFORMATION
CONTACT INFORMATIONCONTACT INFORMATION
CONTACT INFORMATION ..........................................................................11
Version.......................................................................................................................12
Regulatory Policy Compliance ...................................................................................12
Talkman T2 Federal Communications Commission Compliance ...........................................12
Part 15 (b) of the Federal Communications Commission (FCC) Rules..............................................14
CE Marking & European Compliance .....................................................................................14
Applicable Directives..........................................................................................................................14
USING THE ONLINE HEL
USING THE ONLINE HELUSING THE ONLINE HEL
USING THE ONLINE HELP SYSTEM
P SYSTEMP SYSTEM
P SYSTEM........................................................ 15
Overview....................................................................................................................15
Using the Help System............................................................................................... 15
Contents Tab .............................................................................................................15
Index Tab................................................................................................................... 16
Search Tab ................................................................................................................16
Favorites Tab............................................................................................................. 17
Glossary Words within Topics ....................................................................................18
# | a | b | c | d | e | f | g | h | i | j | k | l | m |................................................................19
n | o | p | q | r | s | t | u | v | w | x | y | z........................................................................19
#..........................................................................................................................19
A.........................................................................................................................19
B..........................................................................................................................19
C..........................................................................................................................20
D.........................................................................................................................20
E..........................................................................................................................21
F..........................................................................................................................21
G.........................................................................................................................22
H.........................................................................................................................22
2
I...........................................................................................................................22
J..........................................................................................................................22
K..........................................................................................................................23
L..........................................................................................................................23
M.........................................................................................................................23
N.........................................................................................................................24
O.........................................................................................................................24
P..........................................................................................................................24
Q.........................................................................................................................25
R..........................................................................................................................25
S..........................................................................................................................25
T..........................................................................................................................26
U.........................................................................................................................27
V..........................................................................................................................27
W.........................................................................................................................27
X..........................................................................................................................28
Y..........................................................................................................................28
Z..........................................................................................................................28
HARDWARE.......................................................................................................29
Access Points .......................................................................................................29
Overview..................................................................................................................................29
Specifications ..........................................................................................................................29
Supported Access Points for Talkman T2..........................................................................................29
Supported Access Points for Talkman OPEN.........................................................................29
Frequency................................................................................................................................29
Bar Code Readers.........................................................................................................31
Overview ..................................................................................................................................31
Procedures.................................................................................................................................31
Specifications ............................................................................................................................31
3
Bar Code Guns.....................................................................................................................................31
Bar Code Wands...................................................................................................................................31
Overview....................................................................................................................31
Procedures ................................................................................................................32
Specifications............................................................................................................. 32
Standard Battery Specifications ..............................................................................................32
Electrical Specifications .....................................................................................................................32
Mechanical and Environmental Specifications ...................................................................................32
High Capacity Battery Specifications ......................................................................................33
Electrical Specifications .....................................................................................................................33
Mechanical and Environmental Specifications ...................................................................................33
Cleaning Battery Contacts.......................................................................................................34
Overview..................................................................................................................... 34
Procedures...................................................................................................................34
Specifications...............................................................................................................34
Overview..................................................................................................................... 35
Procedures...................................................................................................................36
Specifications...............................................................................................................36
Belt Sizes ..................................................................................................................................36
Belt Specifications .....................................................................................................................36
Overview..................................................................................................................... 36
Procedures...................................................................................................................37
Specifications...............................................................................................................37
Temperature Range Specifications...............................................................................................37
Microphone Information.............................................................................................................37
Element Features ..................................................................................................................................37
Element Specifications..........................................................................................................................37
Portable Printers.................................................................................................. 38
Overview..................................................................................................................................38
Procedures ..............................................................................................................................38
Specifications ..........................................................................................................................38
Remote Listening Systems ............................................................................... 39
Overview..................................................................................................................................39
Procedures ..............................................................................................................................39
Specifications ..........................................................................................................................39
Overview....................................................................................................................39
Procedures ................................................................................................................40
Specifications............................................................................................................. 40
Connection Port Pin Assignments...........................................................................................41
Headset Port......................................................................................................................................41
4
Maintenance Port...............................................................................................................................42
Bar Code Port ....................................................................................................................................42
Overview..................................................................................................................... 43
Procedures...................................................................................................................43
Specifications...............................................................................................................43
Overview..................................................................................................................... 44
Procedures...................................................................................................................44
Specifications...............................................................................................................44
Visual Training Devices ................................................................................................46
Overview ..................................................................................................................................46
Procedures.................................................................................................................................46
Specifications ............................................................................................................................46
Wired Portable Speakers................................................................................... 47
Overview..................................................................................................................................47
Procedures ..............................................................................................................................47
Specifications ..........................................................................................................................47
LEARNING ZONE ..............................................................................................48
LED Indicators ......................................................................................................48
Blinking green..........................................................................................................................48
What to do if the terminal isn't blinking green while in a terminal charger or when selecting a task...48
Blinking red..............................................................................................................................48
Flashing green and orange .....................................................................................................49
Flashing red and green ...........................................................................................................49
Flashing red and orange .........................................................................................................49
Off............................................................................................................................................49
When the indicator is off and it should not be ....................................................................................50
Solid green ..............................................................................................................................50
When the indicator is solid green but the terminal does not respond to voice or button controls .......50
Solid orange ............................................................................................................................50
Solid red ..................................................................................................................................50
When the LED is solid red and the terminal has not just been turned off or on..................................50
Operator Overview .............................................................................................. 52
The Talkman® System............................................................................................................52
An Example of How the The System Works ......................................................................................52
Talkman Terminals and Accessories ......................................................................................53
Terminals ...........................................................................................................................................53
Headsets............................................................................................................................................53
Batteries and Chargers ......................................................................................................................53
Other Accessories and Peripherals....................................................................................................53
Using the Talkman Terminal ...................................................................................................53
Overview ............................................................................................................................................54
5
Sampling Noise with the Terminal......................................................................................................54
Training the Talkman Terminal to Recognize an Operator's Voice ....................................................54
Task Dialog ........................................................................................................................................54
Phonetic Alphabet ........................................................................................................ 56
SOLUTION ZONE ..............................................................................................57
Other Issues ..........................................................................................................57
Equipment Problems ...............................................................................................................57
Other Problems .......................................................................................................................57
I can't get an assignment. .......................................................................................................57
I can't get my battery on. .........................................................................................................58
I can't get my battery off. .........................................................................................................58
I can't hear anything through the headset. ..............................................................................58
I can't log on. ...........................................................................................................................58
I can't unplug my headset. ......................................................................................................58
I don't know what to say next. .................................................................................................58
My bar code reader won't scan. ..............................................................................................59
My battery keeps falling off......................................................................................................59
My belt doesn't fit.....................................................................................................................59
My equipment is broken. .........................................................................................................59
My headset won't stay on. .......................................................................................................59
The Talkman terminal beeps every few seconds....................................................................59
The Talkman terminal does not appear in Terminal Manager. ...............................................59
The Talkman terminal does not recognize a word. .................................................................59
The Talkman terminal does not hear anything I say. ..............................................................60
The Talkman terminal does not respond to button presses....................................................60
The Talkman terminal heard something I did not say. ............................................................60
The Talkman terminal is telling me there are errors. ..............................................................60
The Talkman terminal keeps shutting off. ...............................................................................61
The Talkman terminal makes clicking noises..........................................................................61
The Talkman terminal makes static noises. ............................................................................61
The Talkman terminal will not load a task. ..............................................................................61
The Talkman terminal will not load an operator template. ......................................................62
The Talkman Terminal will not turn on. ...................................................................................62
Sending Equipment Back for Repairs: Return Material Authorization (RMA) Procedures ..... 63
General Information ...................................................................................................................63
Procedure..................................................................................................................................63
Packaging..................................................................................................................................64
TRAINING ZONE................................................................................................65
Operator Training ................................................................................................65
Orientation ...............................................................................................................................65
Hardware Care & Maintenance...............................................................................................65
Getting Started ........................................................................................................................65
6
Daily Tasks..............................................................................................................................66
Troubleshooting.......................................................................................................................66
WORKING ZONE ...............................................................................................67
Adding a Terminal to the Network .................................................................67
Purpose ...................................................................................................................................67
Before You Begin ....................................................................................................................67
Procedure ................................................................................................................................67
Purpose .......................................................................................................................68
Procedure ....................................................................................................................68
Purpose .......................................................................................................................69
Procedure ....................................................................................................................69
Purpose .......................................................................................................................70
Procedures................................................................................................................... 70
Button Controls .........................................................................................................................70
Voice Controls...........................................................................................................................70
Assembling a Talkman® OPEN Battery Housing........................................ 71
Purpose ...................................................................................................................................71
Before You Begin ....................................................................................................................71
Procedure ................................................................................................................................71
Caring for Headsets & Microphones ............................................................................... 74
Purpose.....................................................................................................................................74
Routine Maintenance..................................................................................................................74
Purpose ..................................................................................................................... 74
Procedures ................................................................................................................74
Removing a Battery.................................................................................................................74
Inserting a Battery ...................................................................................................................75
Changing Configurable Parameters ...............................................................76
Purpose ...................................................................................................................................76
Before You Begin ....................................................................................................................76
Parameters that Apply to a Task........................................................................................................76
Parameters that Apply to an Operator................................................................................................77
Parameters that Apply to a Terminal..................................................................................................77
Precedence Order of Parameter Settings ..........................................................................................78
Procedures ..............................................................................................................................78
Changing Configuration Block Parameters ........................................................................................78
Changing Task and Operator Parameters .........................................................................................78
Purpose .......................................................................................................................80
Before You Begin......................................................................................................... 80
Procedure ....................................................................................................................82
7
Purpose .......................................................................................................................82
Procedure ....................................................................................................................82
Conditioning a Talkman® OPEN Battery ......................................................84
Purpose ...................................................................................................................................84
Before You Begin ....................................................................................................................84
Procedures ..............................................................................................................................84
Configurable Parameters ..................................................................................85
System Parameters.................................................................................................................85
Speech Recognition Parameters................................................................................ 91
Configuring a Terminal.......................................................................................93
Purpose ...................................................................................................................................93
Before You Begin ....................................................................................................................93
Procedure ................................................................................................................................93
Configuring Remote Listening Systems........................................................94
Purpose ...................................................................................................................................94
Before You Begin ....................................................................................................................94
Procedure ................................................................................................................................94
Setting Up the Transmitting Communicator .......................................................................................94
Setting Up the Receiving Communicator ...........................................................................................95
Purpose ..................................................................................................................... 96
Before You Begin.......................................................................................................96
Procedures ................................................................................................................97
Connecting and Disconnecting Headsets ...............................................................................97
Connecting and Disconnecting Bar Code Readers ................................................................98
Connecting and Disconnecting Wired Portable Speakers ......................................................98
Connecting and Disconnecting Remote Listening Devices ....................................................99
Connecting and Disconnecting Visual Training Devices.........................................................99
Connecting and Disconnecting a Portable Printer ................................................................100
Configuring Visual Training Devices ............................................................................ 101
Purpose...................................................................................................................................101
Procedure................................................................................................................................101
Troubleshooting.......................................................................................................................101
QTERM Contrast Correction Procedure................................................................................................101
Creating Operator Voice Templates (enrollment training) ................... 102
Purpose .................................................................................................................................102
Before You Begin ..................................................................................................................102
Procedures ............................................................................................................................103
Using Visual Training Devices .........................................................................................................103
Using Headsets................................................................................................................................104
Erasing Spoken Responses ............................................................................106
8
Purpose .................................................................................................................................106
Procedures ............................................................................................................................106
Erasing One Word............................................................................................................................106
Erasing the Entire Response ...........................................................................................................106
Purpose ................................................................................................................... 107
Before You Begin..................................................................................................... 107
Procedure ................................................................................................................ 107
Troubleshooting ....................................................................................................... 108
Purpose ................................................................................................................... 108
Before You Begin..................................................................................................... 108
Procedure ................................................................................................................ 108
Purpose ................................................................................................................... 109
Before You Begin..................................................................................................... 109
Procedure ................................................................................................................ 109
Purpose ................................................................................................................... 110
Before You Begin..................................................................................................... 110
Procedure ................................................................................................................ 113
Putting a Terminal to Sleep............................................................................ 115
Purpose .................................................................................................................................115
Procedures ............................................................................................................................115
Voice Method ...................................................................................................................................115
Button Method..................................................................................................................................115
Troubleshooting.....................................................................................................................115
Purpose ................................................................................................................... 116
Procedure ................................................................................................................ 116
Removing a Talkman® T2 Terminal from a Belt ...................................... 118
Purpose .................................................................................................................................118
Before You Begin ..................................................................................................................118
Procedure ..............................................................................................................................118
Purpose .....................................................................................................................118
Procedure ..................................................................................................................118
Repeating Prompts............................................................................................ 120
Purpose .................................................................................................................................120
Procedures ............................................................................................................................120
Repeat the current prompt ...............................................................................................................120
Repeat the previous prompt, the operator's last response, and the current prompt.........................120
Erase the operator's entire current response and repeat the current prompt...................................120
Purpose .....................................................................................................................121
9
Before You Begin....................................................................................................... 121
Procedure ..................................................................................................................121
Purpose ................................................................................................................... 122
Procedure ................................................................................................................ 123
Talkman® Terminals & Terminal Chargers ...............................................124
Turning Off a Talkman® Terminal................................................................. 125
Purpose .................................................................................................................................125
Procedure ..............................................................................................................................125
Troubleshooting.....................................................................................................................125
Turning On a Talkman® Terminal ................................................................. 126
Purpose .................................................................................................................................126
Before You Begin ..................................................................................................................126
Procedure ..............................................................................................................................126
Using a Talkman® Terminal ........................................................................... 128
Purpose ................................................................................................................... 128
Procedures .............................................................................................................. 128
Placing a Terminal Cover onto a Terminal............................................................................128
Removing a Terminal Cover from a Terminal .......................................................................129
Using a Terminal During Each Shift ............................................................. 130
Purpose .................................................................................................................................130
Procedures ............................................................................................................................130
At the Beginning of the Shift.............................................................................................................130
During the Shift ................................................................................................................................130
At the End of the Shift ...........................................................................................................131
Troubleshooting ....................................................................................................... 131
Using Bar Code Readers.................................................................................. 132
Purpose .................................................................................................................................132
Before You Begin ..................................................................................................................132
Procedures ............................................................................................................................132
Using Bar Code Wands....................................................................................................................132
Using Bar Code Guns ......................................................................................................................133
Waking a Terminal Up ...................................................................................... 137
Purpose .................................................................................................................................137
Procedures ............................................................................................................................137
Voice Method ...................................................................................................................................137
Button Method..................................................................................................................................137
Purpose .....................................................................................................................138
Procedures................................................................................................................. 138
Wearing the Headset ................................................................................................................138

11
Contact Information
Contact Information
Contact InformationContact Information
Contact Information
For returns, technical support, or other customer service issues, contact Customer
Service at support@vocollect.com, 412.829.8145, or toll free at 866.VOCOLLECT.
For sales or any other inquiry, please contact Vocollect at info@vocollect.com,
412.829.8145, or toll free at 866.VOCOLLECT.
Vocollect
701 Rodi Road, Suite 200
Pittsburgh, PA 15235
t) 412.829.8145
Toll-free) 866.VOCOLLECT (866.862.6553)
f) 412.829.0972
w) http://www.vocollect.com
e) info@vocollect.com
Frequently Asked Questions World Wide Web page:
http://www.vocollect.com/sitehtml/voice_at_work/faq.php
Note: None of the e-mail links on this page will work unless this computer is
connected to the Internet AND configured to launch e-mail when you click mailto
links. If you have questions, please contact your system administrator.

12
Talkman® T2 System Version and Compliance Information
Note: The information in this topic applies specifically to the Talkman® T2 system.
To view this information for the Talkman® OPEN system, click on the image of the
terminal.
• Version
• Regulatory Policy Compliance
• Talkman® T2 Federal Communications Commission Compliance
• CE Marking & European Compliance
Version
For version information, please consult the Help | About menu option of any Vocollect
application or check the release notes that accompanied the Talkman Management Software.
Software Release Version
Talkman® T2
Terminal Software
Consult the release
notes included with
your Talkman
Management Software
.
Terminal Manager Consult the Help |
About menu option.
Operator Manager Consult the Help |
About menu option.
Regulatory Policy Compliance
• Talkman T2 Federal Communications Commission Compliance
• CE Marking & European Compliance
Talkman T2 Federal Communications Commission
Compliance
This device complies with Part 15 (b) of the Federal Communications Commission (FCC)
Rules.
This product has been tested to the following standards:
Standard
European Union/ Manufacturers
declaration of Conformity. EMC
Directive 89/336/EEC and
amendment 92/31/EEC
Emissions -EN
55022: 1998: Class B:
Limits & Methods of Measurement
of Radio Disturbance
Characteristics of Information
Technology Equipment
Immunity -EN 55024:1998:
Electromagnetic Compatibility-
Immunity of Information

13
Technology Equipment (ITE),
which consists of:
EN61000-4-2; ESD
EN61000-4-3; Radiated Immunity
EN61000-4-6; Conducted
Immunity
EN61000-4-11; Voltage
Interruptions
United States/Federal
Communications Commission
FCC Part 15, Class B:
Code of Federal Regulations,
Title 47 Telecommunication
Part 15-Radio Frequency Devices
Canada/Industry Canada ICES-003:
Industry Canada Interference-
Causing Equipment
This product may contain one of these radio devices. See device label.
Card Manufacturer and P/N Vocollect Talkman FCC ID #
Symbol-LA-3021- 101-US
2Mbps 100mW
H9PLA3021-100
MQOTT600-22300
Symbol-LA-4121- 1020-US
H9PLA4121
MQOTT600-35300
Lucent-PC24E-H-FC
WorldCard
MQOTT500-33300
CISCO- AIR-PCM350
LDK102040
MQOTT600-40300
Proxim 7400
IMK-ILC1PC
The Talkman product is separately approved for:
1. FCC Part 15 Subpart C
2. Industry Canada RSS211 and RSS139
3. ETSI 300-328, ETSI 300-826, EN 60950
The Talkman T2 is nominally a Class B digital device, pursuant to Part 15 of the FCC
Rules.
Caution: Exposure to Radio Frequency Radiation.
The Talkman T2 terminal contains an internal low-power radio. The radiated output
power of the radio is far below the FCC radio frequency exposure limits. Nevertheless,
the Talkman T2 terminal shall be used in such a manner that the potential for human
contact with the radio antenna during normal operation is minimized. The terminal
should not be used if the case is open or if the internal antenna is exposed. When not in
use, the Talkman T2 terminal should be powered off. In addition, the terminal should be
worn in accordance with the instructions for this device.
Vocollect terminals are designed to be compliant with the rules and regulations in the
locations into which they are sold and are labeled as required. Vocollect terminals are
type approved and do not require the user to obtain license or authorization before using
them. Any changes to Vocollect equipment not expressly approved by Vocollect could
void the user's authority to operate the equipment.
This Class B digital apparatus complies with Canadian ICES-003.

14
Cet appareil numérique de la classes B est conforme à la norme NMB-003 du Canada.
N773
Warning: The Talkman T2 terminal is a class B product. In a domestic environment,
this product may cause radio interference in which case the user may be required to
take adequate measures.
Part 15 (b) of the Federal Communications Commission (FCC) Rules
Note: This equipment has been tested and found to comply with the limits for a
Class B digital device, pursuant to Part 15 of the FCC Rules. These limits are
designed to provide reasonable protection against harmful interference in a
residential installation. This equipment generates, uses and can radiate radio
frequency energy and, if not installed and used in accordance with the instructions,
may cause harmful interference to radio communications. However, there is no
guarantee that interference will not occur in a particular installation. If this
equipment does cause harmful interference to radio or television reception, which
can be determined by turning the equipment off and on, the user is encouraged to
try to correct the interference by one or more of the following measures:
• Reorient or relocate the receiving antenna.
• Increase the separation between the equipment and receiver.
• Connect the equipment into an outlet on a circuit different from that to
which the receiver is connected.
• Consult the dealer or an experienced radio/TV technician for help.
CE Marking & European Compliance
Products intended for sale within the European Union are marked with the CEMark, which
indicates compliance to applicable Directives and European Normes (EN) as follows.
Amendments to these Directives or ENs are included.
Applicable Directives
• Electromagnetic Compatibility Directive 89/336/EEC
• EN 55022: 1998 Class B
• EN 55025: 1998

15
Using the Online Help System
Using the Online Help SystemUsing the Online Help System
Using the Online Help System
The Vocollect online help system is your key to finding answers to questions that you have
about the Talkman® system. This topic contains a brief description of the help system,
including basic instructions for navigating through the help topics and finding the information
you need.
• Overview
• Using the Help System
• Contents Tab
• Index Tab
• Search Tab
• Favorites Tab
• Glossary Words within Topics
Overview
Vocollect designed the online help system as a reference, training, and troubleshooting
resource for the Talkman system. The help system provides information for all Talkman system
components, including hardware, software, networking, procedures, and operations.
Using the Help System
The online help system provides you with a number of different ways to find the information
you need. To access different topics, use any of the tabs in the upper left-hand corner of the
screen. The tabs are as follows:
• Contents: This tab contains a table of contents that provides a complete list of all of
the topics available in the online help system.
• Index: This tab contains a complete index of all of the information that can be found in
the system.
• Search: This tab provides you with the ability to search for information via user-
defined words or phrases.
• Favorites: This tab enables you to keep a convenient list of the topics that you access
most often.
Contents Tab
The Contents tab provides you with a complete table of contents that lists all of the topics
available in the online help system. This tab is particularly useful if you know the name of the
topic for which you are looking, or if you would simply like to get an idea of what information
can be found in the help system.
Viewing information via the Contents tab is as simple as clicking directly on the topic you wish
to view. When you click on a topic, the information associated with it appears in the window to
the right of the topic list.
The and icons denote that a topic heading has subtopics beneath it. To view the list of
subtopics, double-click on the main topic heading or click the icon.

16
The and icons denote that a particular branch of the tree has been expanded and that
you are viewing all of the topics under a particular heading.
Index Tab
The Index tab contains a complete index of all of the information that can be found in the
online help system. This tab is useful if you would like to search for a topic using keywords that
describe the topic.
To use this tab, follow these steps:
1. Click on the Index tab.
2. Click in the keyword box at the top of the tab and begin typing a word or phrase that
describes the information you are tying to find.
The topic that is the closest match to what you are typing will automatically be
highlighted in the index list.
3. To view the information associated with the highlighted topic, click the Display button
at the bottom of the tab.
Search Tab
The Search tab provides you with the ability to search the entire online help system using user-
defined words or phrases. This tab is useful if you would like to generate a list of all of the
topics that contain the specific keyword or phrase that you defined.
The Search tab provides you with a number of different options that enable you to narrow your
search so that it is more efficient and effective at returning the information you need.
The first of these options is wildcard expressions. These expressions allow you to search for
one or more characters using a question mark or an asterisk. The last row in the following table
describes the results you can expect to see when using wildcard expressions. The other rows in
the table explain how to search for single words, phrases, and multiple words.
To search for: Example of what you could
type into the keyword box:
Results
A single word train Topics that contain the word "train" as well
as topics that contain grammatical
variations of the word, such as "trainer" or
"training".
A phrase "enrollment training"
It is important to note that
you must put the phrase in
quotation marks.
Topics that contain the literal phrase
"enrollment training".
Multiple words enrollment training Without quotation marks, the phrase is
interpreted as enrollment AND training,
which will return topics that contain both of
the individual words instead of the phrase.
Wildcard
expressions config*
or
123?5
Topics that contain the terms "config,"
"configure," "configuration," and so on.
Topics that contain the terms "12315,"
"12325," "12335," and so on.
Another option that is available to help narrow a search is boolean operators. These operators,
accessed via the black, right-facing arrow beside the keyword box, enable you to precisely
define your search criteria. The operators you can select from include AND, OR, NOT, or
NEAR.

17
Note: AND is the default operator. Therefore, if multiple words (without quotation marks)
are typed into the keyword box and no operator is specified, the words are treated as if
you had selected AND.
The following table describes the uses of the different operators.
To search for: Example of what you could
type into the keyword box
and which operator you
would select:
Results
Both words in the
same topic
operator AND training Topics containing both the words "operator"
and "training."
Either word in a
topic
operator OR user Topics containing either the word "operator"
or "user" or both words.
The first word
without the second
word
configuration NOT block Topics containing the word "configuration,"
but not the word "block."
Both words, close
together, in the
same topic
warehouse NEAR out Topics containing the word "warehouse"
within eight words of the word "out."
The last group of options you can use to narrow a search are the check boxes found at the
bottom of the Search tab. The following table explains when to use each check box.
To: Use this check box:
Make a search faster by searching only the topic
titles and not the content of the topics
Search titles only
Find words similar to those you typed into the
keyword box
Match similar words
Narrow a completed search down even farther
by searching only the list of topics returned by
the original search
Search previous results
To conduct a search, follow these steps:
1. Click on the Search tab.
2. Click in the keyword box at the top of the tab and type in the keyword or phrase for
which you would like to search. When typing in the keyword or phrase, use the black,
right-facing arrow beside the keyword box to select one (or more) of the AND, OR,
NOT, or NEAR options in order to narrow your search.
3. To further define your search, use the check boxes at the bottom of the tab.
4. Click the List Topics button.
A list of topics that meet the criteria you specified is generated.
5. Highlight a topic in the list by clicking directly on it.
6. Click the Display button at the top of the tab.
The topic is displayed and the words you specified as the search criteria are
highlighted throughout the topic.
Note: To turn off the feature that highlights the words for which you searched, click
the Options button on the toolbar and select the Search Highlight Off option.
Favorites Tab
The Favorites tab enables you to create a list of the topics that you access most often. This
tab is very useful for customizing your help system so that you can access specific information

18
quickly and efficiently.
To add a topic to this tab, follow these steps:
1. Use one of the other tabs (Contents, Index, or Search) to access the topic that you
wish to add to the Favorites tab.
2. With the particular topic open in the right pane of the help system, click on the
Favorites tab.
The name of the topic that you opened appears in the Current topic box at the
bottom of the tab.
3. Click the Add button at the bottom of the Favorites tab.
The topic is added to the topics list displayed on this tab.
To display a topic using this tab, follow these steps:
1. Click on the Favorites tab.
2. In the topics list on this tab, highlight the topic that you wish to view by clicking
directly on it.
The topic name is highlighted in blue.
3. Click the Display button at the bottom of the tab.
The topic is displayed in the right pane of the help system.
To remove a topic from this tab, follow these steps:
1. Click on the Favorites tab.
2. In the topics list on this tab, highlight the topic that you wish to remove by clicking
directly on it.
The topic name is highlighted in blue.
3. Click the Remove button at the bottom of the tab.
The topic is removed from the topics list.
Glossary Words within Topics
As you view different topics in the online help system, you will notice that some words appear
in the color maroon. These words are underlined just like normal hyperlinks (which appear in
blue) that are used to jump to other topics. However, the maroon color denotes that the word
is a glossary word and that you can see the definition of the word by clicking directly on it.
When you click on a glossary word, the definition of the word appears on the screen in a small
window. To close the window with the definition, simply click the left mouse button anywhere
on the screen.
(For an example, click the following word: operator)
19
# | a | b | c | d | e | f | g | h | i | j | k | l | m |
n | o | p | q | r | s | t | u | v | w | x | y | z
#
10Base-2: An Ethernet local area network capable of transferring 10 Mb of data per second via
thin coaxial cables that can be up to 185 meters long.
a
administrator: A broad term that encompasses anyone managing any aspect of a Talkman® T2
system. Shift supervisors, warehouse supervisors, system administrators, systems analysts, and
even information systems personnel may all serve as administrators in some fashion.
alias: An alphanumeric name used with DNS to refer to an IP address; a secondary or symbolic
name for a file, a collection of data, a computer user, or a computer device.
assignment: A collection or group of picks that can be assigned to an operator in Pick Manager;
also referred to as trips.
audio cable: The red cable (i.e. the cable with the red bend relief) that includes only an audio
jack. This cable is used to connect the terminal to an audio device, such as a wired portable
speaker.
b
background noise sampling: A Talkman® terminal must be able to distinguish an operator's
voice from any other noise that is going on around the operator. In order to differentiate
between the operator's voice and any background noise (i.e. all other sounds going on around
an operator when he or she is speaking to a terminal), the terminal takes a sampling of the
background noise as well as the operator's voice. This sample enables the terminal to tell the
difference between the operator's voice and other sounds that may be going on around the
operator.
baud rate: The maximum number of changes that can occur per second in the electrical state
of a communications circuit.
bend relief: The flexible plastic material (colored red, yellow, or blue) near the connector end
of the cable on peripheral products such as headsets and bar code wands. Match the bend
relief color to the red, yellow, or blue port on the Talkman terminal when connecting
peripherals.
BIOS: Basic input-output system. A set of programs encoded in read-only memory (ROM) in IBM
compatible computers. These programs handle startup operations such as the power-on self-
test (POST) and low-level control for hardware, such as disk drives, keyboards and monitors.
boot block: The block of flash memory in a terminal that contains the code for the terminal to
boot and to run diagnostics.
20
BSD: Berkeley Software Distribution. A version of the Unix operating system.
buffer: A unit of memory that holds information temporarily.
burn: To load software code onto a terminal.
c
chase assignment: An assignment that consists of reported shorts. When a reported short is
replenished, administrators can include it in a chase assignment in order to fulfill the pick
associated with the reported short. Chase assignments are also referred to as shorts
assignments and scratch assignments.
check digit: The number printed on a label at a pick location. Operators say these digits to the
Talkman® terminal to verify that they are picking from the correct location. The operator must
speak the check digits that correspond to the pick location before proceeding with the pick. At
some sites, check alphas (letters) are used rather than check digits.
COM port: The serial port on the host computer to which a Talkman® terminal can be
connected via a maintenance cable.
command prompt: In the Pick Manager application, a command prompt is used to execute a
Microsoft NT command file to import or export data.
configuration block: The block of flash memory in a terminal that contains the parameters
used to configure a terminal, such as radio parameters and Terminal Manager's IP address.
crash: The abnormal termination of the execution of a computer program. In most cases, you
must reboot the computer to recover from a crash.
d
default: A setting that is automatically configured or set up with a certain predefined value or
option, usually because such a setting is likely to be preferred by most users or is required by
the particular system or application.
desktop: A term that is usually used to refer to the background of a computer screen. On the
Microsoft Windows desktop, you see icons representing deleted files (Recycle Bin), access to
your files (My Computer), and other programs and features.
DHCP: Dynamic host configuration protocol. Used to assign IP addresses to devices on a
network. Devices may have different IP addresses every time they connect to the network. The
device's IP address can even change while it is still connected. This makes managing the
network easier, because the software keeps track of IP addresses rather than requiring an
administrator to do so. An administrator can add a new terminal to a network without manually
assigning it a unique IP address.
DIN connector: DIN stands for Deutsches Institut für Normung, a German standards-setting
organization. DIN connectors are connectors that conform to a DIN standard. The six-pin
connector on the Maxon remote listening system is one such connector.
direct sequence: The radio signal in a direct sequence (DS) system is encoded in such a way
21
that it is possible to distinguish the desired DS signal from background radio frequency (RF)
noise and it can withstand some interference. DS systems typically use only one of the
available channels and do not change channels in the course of normal operation. If there is
interference on one of the channels, the system is configured to use a different channel. There
are three non-overlapping channels for DS systems governed by the FCC.
DNS: Domain name system. A static, hierarchical name service for TCP/IP hosts. The network
administrator configures the DNS with a list of host names and IP addresses, allowing users of
workstations configured to query the DNS to specify remote systems by host names rather than
IP addresses.
e
embedded digit strings: Strings of digits (usually three digits in length) that contain a
particular digit that is being trained; embedded digit strings are used during enrollment and
update training to train digits that are used in a particular task; for example, for the digit 2,
the embedded digit strings might be 020, 212, and 222; so, to fully train the digit 2, the
operator will not only have to say the digit four times by itself, but he or she will also have to
repeat all of the embedded digit strings that contain the digit 2. Also, if the task that is being
run contains decimal points (i.e. the word "point"), the embedded digit strings will contain
strings with the word "point" in them (e.g. 2 point 2).
enrollment training: The process of having a new operator train all of the vocabulary words
that are used in a particular task at a specific site.
Ethernet: A type of local area network that can link up to 1,024 nodes in a bus network and
can transfer data at a rate of 10 Mb per second. Ethernet uses carrier sense multiple access
with collision detection (CSMA/CD) to maintain network stability in the event that two devices
attempt to access the network at the same time.
exception: Occurs when there are not enough product units at a pick location for an operator
to fulfill a pick. This does not necessarily mean that the units are not in the warehouse, just
that they are not at the pick location. Exceptions are also referred to as scratches, reported
shorts, cuts, markouts, or redlines.
f
firmware: The system software stored in a computer's read-only memory (ROM) or elsewhere in
the computer's circuitry, such as the BIOS chips in IBM compatible computers.
flash files: Located in a terminal's flash memory, these files contain the terminal's operating
system files and the Vocollect Talkman software.
flash memory: A special type of read-only memory (ROM) that enables users to upgrade the
information contained in the memory chips; also referred to as flash BIOS and flash EPROM. In a
Talkman® terminal, the flash memory is a memory chip that retains its content without power.
frequency hopping: In a spread spectrum frequency hopping radio system, the radio signal
"hops" from frequency to frequency with a specific band. Both the transmitter and the receiver
must know the hopping pattern, called the channel.
22
FTP: File transfer protocol. A way for a server that is storing files to send those files to another
computer (such as a Talkman terminal). FTP also allows the other computer to send files to the
server.
g
h
high noise: A working environment with noise exposure at or above 85 decibels (dB) averaged
over 8 working hours, or an eight-hour time-weighted average (TWA). The Occupational Safety
& Health Administration (OSHA) explains this designation more fully at http://www.osha-
slc.gov/Publications/osha3074.html.
host: Generally, in networks and telecommunications, a server that performs centralized
functions such as making program or data files available to other computers. In the Talkman®
system, the Talkman Management Software is installed on the host computer.
host computer: The computer on which the Vocollect software is loaded. This computer
communicates with the Talkman® terminals via the radio network.
i
ICMP: Internet control message protocol. An extension to the original internet protocol that
provides error and congestion control. Using ICMP, for example, a router could tell another
router that a particular branch of a network is congested or not responding.
image: The binary code that is burned into the flash files of the Talkman® terminal.
instance: A single occurrence of an application running on a computer. Multiple instances of
one application can be running at the same time. This is not the same as having multiple
windows open at the same time within a single instance. You will see a button on your taskbar
for each instance of an application that is running.
IP address: A 32-bit binary number that uniquely identifies a computer on a network. Each
number consists of four parts, separated by decimal points, each representing eight bits of the
address. An example of an IP address is 176.200.32.8.
j
23
k
l
LAN: Local area network. A LAN consists of computers in a physically limited location, linked
for information exchange and sharing.
Lemo® connector: The input/output (I/O) ports on the Talkman OPEN terminal are Lemo
connectors (except for the speaker connector). Peripheral products (such as headsets and bar
code readers) and serial cables provided by Vocollect, are modified with Lemo connectors that
attach to the I/O ports on the Talkman terminals.
Lernout & Hauspie ™: Currently, Talkman terminals use the L&H text to speech (TTS)
synthesizer. Lernout & Hauspie (L&H™) is a registered trademark of Lernout & Hauspie.
m
MAC address: MAC stands for media access control. In a network, MAC controls when a
computer can access physical media to originate a message to another computer. A protocol
regulates this access in order to prevent data from colliding on the network when two
computers try to send a message at the same time. The hardware address that the protocol
uses is unique to each computer on the network.
maintenance cable: The red cable (i.e. the cable with the red bend relief) that includes both
a serial connector and an audio jack. This cable is used to connect the terminal directly to a
host computer and/or to an audio device, such as a wired portable speaker.
memory effect: The decrease in life span of a rechargeable battery. A user may notice that,
over time, a rechargeable battery that has been fully charged will not last as long as it did
when the battery was new. This condition, known as memory effect, occurs when a
rechargeable battery is continuously recharged without allowing the battery to first reach a
fully discharged state. A battery conditioner can be used to fix this problem.
Microsoft Windows: Name for a family of Microsoft systems, including Microsoft Windows CE
and Microsoft Windows NT.
middleware: Software that operates as an intermediary between clients and servers,
particularly when the clients and servers operate on different platforms.
MS-DOS: Microsoft disk operating system. A command-line operating system that requires you
to enter commands, arguments, and syntax.
24
n
name resolution: Defines a correlation between host names and IP addresses, and between
service names and port numbers. Terminals can use this information to look up IP addresses
and port numbers when host names and service names have been used to define a host
connection.
noise sample: A Talkman® terminal must be able to distinguish an operator's voice from any
other noise (background noise) that is going on around the operator. In order to differentiate
between the operator's voice and any background noise, the terminal takes a sampling of the
background noise as well as the operator's voice. This sample enables the terminal to tell the
difference between the operator's voice and other sounds that may be going on around the
operator.
o
ODBC: Object database connectivity. A standard that enables applications (including web
browsers) to communicate with a variety of database applications by means of a standardized
set of SQL queries.
offline: Not connected to another computer. For example, a Talkman® terminal is considered
to be offline by a software application such as Terminal Manager when it is not communicating
with that application.
online: Connected to another computer. For example, a Talkman® terminal is considered to be
online by a software application such as Terminal Manager when it is communicating with that
application.
operator: The user of a Talkman® terminal. This person may be a warehouse picker, an order
filler or assembler, or any other individual receiving instructions from or giving feedback to a
computer or network.
output data records (ODRs): Output data record. The data format and mechanism by which a
task transfers data from Talkman terminals to the host computer.
p
parse: To break down into components. Spreadsheet programs, for example, often have
parsing features that will break ASCII data into parts that will fit into cells.
pick: The retrieval of a product unit or units by an operator.
PING: Packet Internet groper. Determines whether a particular machine can access a specific IP
address by sending a packet to it and waiting for a reply.
port number: Identifies the location of a particular application (such as Terminal Manager) on
a computer that is connected to a computer network. Port numbers tell a computer's receiving
software where to deliver incoming data.
profile: Defines the characteristics, such as file name, service name, or port number, for a
25
single instance of an application.
q
QTERM-J10™: A device used to visually display information (such as vocabulary words during
enrollment training); a trademark of the QSI Corporation.
r
radio files: The firmware that is loaded onto a Talkman® terminal's radio card.
radio range: The area in which a Talkman® terminal stays in contact with an access point as
determined by a site survey. Talkman terminals have built-in radios through which information
is exchanged via an access point to and from the host computer.
RCM file: Recognizer script file. This type of file is created when a task is saved.
reported short: Occurs when there are not enough product units at a pick location for an
operator to fulfill a pick. This does not necessarily mean that the units are not in the
warehouse, just that they are not at the pick location. Reported shorts are also referred to as
scratches, exceptions, cuts, markouts, or redlines.
RF: Radio frequency.
ROM: Read-only memory.
RS-232C: A standard recommended by the Electronics Industries Association (EIA) concerning
the transmission of data between computers using serial ports. Most personal computers are
equipped with an RS-232-compatible serial port, to which external modems, printers, scanners,
and other peripheral devices can connect.
s
scratch: Occurs when there are not enough product units at a pick location for an operator to
fulfill a pick. This does not necessarily mean that the units are not in the warehouse, just that
they are not at the pick location. Scratches are also referred to as reported shorts, exceptions,
cuts, markouts, or redlines.
serial cable: A cable used to transmit serial data between two computers (or a computer and a
device such as a modem). Vocollect modifies serial cables so that one end has a standard serial
port connection to be connected to the COM port on the host computer and the other end has a
connection that connects to a Talkman® terminal.
serial port: A port that synchronizes and manages asynchronous communication between a
computer and devices such as serial printers, modems, and other computers.
short: Occurs when there are not enough product units at a pick location for an operator to
26
fulfill a pick. This does not necessarily mean that the units are not in the warehouse, just that
they are not at the pick location. Shorts are also referred to as scratches, exceptions, cuts,
markouts, or redlines.
shorts assignment: An assignment that consists of reported shorts. When a reported short is
replenished, administrators can include it in a shorts assignment in order to fulfill the pick
associated with the reported short. Shorts assignments are also referred to as chase
assignments and scratch assignments.
site survey: A survey of a warehouse floor to determine the coverage area of a radio frequency
network that is provided via a series of access points. It is through this network that Talkman®
terminals communicate to the host computer and the wired network.
SLIP: Serial line internet protocol. One of two Internet standards that specify the method by
which a workstation or personal computer can use a dial-up connection to link to the Internet.
This standard enables computers that are not connected to a local area network to connect to
the Internet.
sniffer: Software or hardware that monitors network traffic.
socket: A virtual port that enables the Talkman® terminal to connect to an application (such
as VISocketODR) on the host computer. To achieve a connection, specify both the IP address
and the port number in the profile of the server application.
SQL: Structured query language. In database management systems, an IBM-developed query
language that has become the de facto standard for querying databases in a client/server
network.
Startup group: This group contains instructions that specify the applications which should run
automatically when a computer is powered on.
stream: A continuous flow of data, as opposed to data delivered in packets.
subnet mask: A transformation performed on an organization's IP address that enables the
network administrators to create subnets, which are virtual subunits of the organization's
physical network.
t
Talkman Management Software: The CD-ROM given to Vocollect customers that contains
Terminal Manager, Operator Manager, and the rest of the software required to run a Talkman®
system.
\Talkman Software\apps: The path into which the Vocollect software applications are stored
on the host computer.
task: A file that represents and facilitates the dialog between a Talkman® terminal and an
operator. See also task dialog.
taskbar: A bar at the bottom of the Windows screen that includes the Start button, commonly
used commands in the form of icons, and the task buttons for any open applications.
Task Builder: A software application developed by Vocollect that is used to create and modify
task files.
task dialog: The actual voice dialog (derived from a task file) that occurs between a Talkman®
terminal and an operator. The terminal asks a question or gives a prompt based upon a
response or a request from the operator. Each site has a specific task dialog, customized
27
according to the site's operations.
TCP/IP: Transmission control protocol/internet protocol. TCP allows two computers to connect
to one another for the primary purpose of transferring data. The sending computer continues
to send until the receiving computer confirms that it has successfully received the data. IP
determines how the sending computer packets and addresses the data.
template: The information that is necessary for a terminal to recognize a single word spoken
by a specific operator. Once a template has been trained for an operator, that template can be
used in any task.
thermistor: A resistor whose resistance decreases with increases in temperature.
trainer: Anyone who trains new administrators or operators on the Talkman® system. While
some companies have separate training departments, or at least one person whose job is solely
training, this term applies equally to administrators who train new operators, or experienced
administrators who train new administrators.
training cable: The red cable (i.e. the cable with the red bend relief) that includes both a
training device connector and an audio jack. This cable is used to connect the terminal to a
training device, such as a QTERM, and/or to an audio device, such as a wired portable speaker.
tree structure: A way of organizing information into a hierarchical structure with one root and
several branches, much like a family tree or genealogy chart.
trip: A collection of picks that can be assigned to an operator in Pick Manager; also referred to
as assignments.
u
unit: A product unit. A unit is also are referred to as an item.
v
vocabulary word: A valid response from an operator to a terminal prompt during a task dialog.
w
warehouse out: Insufficient product units in the warehouse to fulfill a pick. Occurs when a
reported short cannot be replenished. A reported short is changed to a warehouse out when an
administrator determines that the reported short cannot be fulfilled.
web browser: A program that runs on an Internet-connected computer and provides access to
the World Wide Web (WWW). The two most popular web browsers are Microsoft Internet
Explorer and Netscape Navigator.
window: A rectangular, on-screen frame that acts as a viewing area for programs. Most
28
windows can be moved and sized. In a Windows environment, more than one window can be
open at a time.
windscreen: The soft foam covering over a headset's microphone. The windscreen protects the
microphone from dirt, moisture, and other environmental factors that can decrease the
Talkman® terminal's ability to understand an operator. This screen also increases recognition
significantly by reducing the likelihood that the terminal will think it heard an unnaturally loud
noise because of air flow (or rushes of air) around the microphone.
WinZip™: A compression/decompression program for Microsoft Windows. WinZip is a registered
trademark of WinZip Computing, Inc.
WMS: Warehouse management system. A system that controls and monitors all product flow
within a warehouse.
x
y
z

29
Hardware
Access Points
Access Points Access Points
Access Points
• Overview
• Specifications
Overview
An access point is a hardware device that is connected to the wired network and receives
information from and sends information to Talkman® terminals via radio communication. A
terminal must be in radio range (as determined by a site survey ) of an access point for
information exchange between the Talkman terminal and any computer connected to the
network.
The radio signal from an access point works in either a direct sequence system or a frequency
hopping system.
Note: Vocollect does not manufacture access points. Please consult the manufacturer's
documentation for details and notes about your access points.
Specifications
Vocollect supports a number of access points, manufactured by various vendors. Consult the
manufacturer's documentation for further information.
• Supported Access Points for Talkman T2
• Supported Access Points for Talkman OPEN
Supported Access Points for Talkman T2
Manufacturer/ Product Protocol Frequency Wireless
Medium
Max Bit Rate
(in
Megabits
per second -
- Mbps)
Web Site
Link
Cisco Aironet 350 802.11b 2.4 GHz Direct
Sequence 11 Mbps www.cisco.c
om
Lucent Orinoco 802.11b 2.4GHz Direct
Sequence 11 Mbps www.lucent
.com
Symbol LM4111 802.11b 2.4 GHz Direct
Sequence 11 Mbps www.symbol
.com
Symbol Spectrum24 802.11b 2.4 GHz Frequency
Hopping 2 Mbps www.symbol
.com
Supported Access Points for Talkman OPEN
Manufacturer/ Product Protocol Frequency
Wireless
Medium
Max Bit Rate
(in
Megabits
per second -
- Mbps)
Web Site
Link

30
Aironet 3500 802.11 2.4 GHz Frequency
Hopping 2 Mbps www.airone
t.com
Aironet 4500 802.11 2.4 GHz Direct
Sequence 2 Mbps www.airone
t.com
Aironet 4800 802.11 2.4 GHz Direct
Sequence 11 Mbps www.airone
t.com
Cisco Aironet 350 802.11b 2.4 GHz Direct
Sequence 11 Mbps www.cisco.c
om
Lucent Orinoco 802.11b 2.4 GHz Direct
Sequence 11 Mbps www.lucent
.com
Lucent WaveLAN 802.11 2.4 GHz Frequency
Hopping 2 Mbps www.wavela
n.com
Lucent WaveLAN 802.11 2.4 GHz Frequency
Hopping 11 Mbps
www.wavela
n.com
Proxim 802.11 2.4 GHz Direct
Sequence 11 Mbps www.proxim
.com
Symbol LM4111 802.11b 2.4 GHz Direct
Sequence 11 Mbps www.symbol
.com
Symbol Spectrum24 802.11 2.4 GHz Frequency
Hopping 2 Mbps www.symbol
.com

31
Bar Code Readers
• Overview
• Procedures
• Specifications
Overview
The Talkman® system supports the use of bar code readers, including both wand and gun
styles. Bar code readers have a connector with a blue bend relief. The connector end of
the bar code reader is attached to the blue port on the Talkman terminal.
A holster is provided with the bar code wand. The holster clips on to the operator's clothing or belt. Place
the bar code wand into its holster when not in use.
The Talkman terminal only supports decoded bar code readers. A decoded bar code
reader translates a digital bar code pattern and sends this information to the Talkman
terminal through an RS-232 serial port (i.e. the blue port on the Talkman terminal).
Procedures
• Connecting & Disconnecting Peripherals
• Using Bar Code Readers
Specifications
Note: Visit the web site of the specific bar code reader manufacturer (listed below) to see
detailed information about a particular device, or consult the documentation provided
with the bar code reader.
Bar Code Guns
The following bar code gun is available for sale with the Talkman system:
• Symbol Technologies LS4004 Bar Code Gun (for Talkman T2 and Talkman
OPEN)
• Symbol Technologies LS3603 Bar Code Gun (for Talkman OPEN only)
Bar Code Wands
The following bar code wand is available for sale with the Talkman system:
• Welch Allyn 6180 bar code wand (for Talkman T2 and Talkman OPEN)
Talkman® T2 Batteries
Note: The information in this topic applies specifically to the Talkman® T2 system.
To view this information for the Talkman® OPEN system, click on the image of the
terminal.
• Overview
• Procedures
• Specifications
Overview
32
The Talkman® T2 terminal is powered by a battery that was designed by and specially made for
Vocollect. The battery is available in two models: standard and high capacity. The primary
difference between the two models is the length of time that the batteries will power a
terminal before they need to be recharged. The standard battery does not provide the
extended runtime that is achieved by using the high capacity battery. However, the standard
battery is more compact in size and sits flush with the top of the terminal when it is placed
into the terminal's battery compartment. The high capacity battery, while offering the greater
runtime, is larger than the standard battery and does not sit flush with the top of the terminal
when it is placed into the battery compartment.
Over time, the life cycle of a normal rechargeable battery decreases, or suffers memory
effect. However, this is not the case with either of the Talkman terminal's batteries. Due to
the lithium ion battery technology that has been incorporated into their design, the Talkman
batteries do not suffer memory effect. This means that it is not necessary to fully deplete the
battery’s current charge before recharging the battery. Also, battery reconditioning should not
be necessary.
The length of time that it takes to completely charge a fully depleted battery is approximately
3 hours for the standard battery and 5 hours and 30 minutes for the high capacity battery. This
does not include any time that may be necessary to bring a battery that is too cold, too warm,
or completely dead into a charging state (a battery that is too cold, too warm, or completely
dead needs to warm up, cool down, or partially charge before it actually enters a fast charging
state).
Procedures
• Changing a Battery
• Charging a Battery in a Battery Charger
Specifications
• Standard Battery Specifications
• High Capacity Battery Specifications
• Cleaning Battery Contacts
Standard Battery Specifications
The following information details the specifications for the two-cell custom battery pack
designed specifically for the Talkman terminal.
Electrical Specifications
• Cells: The standard battery pack uses two lithium ion cells.
• Nominal voltage = 7.2V
• Capacity = 1500mAhr or greater
• Protection circuit characteristics: The pack contains a protection circuit that prevents
over and under voltage conditions on the cells and protects the pack from damage as a
result of a short circuit between the positive and negative terminals of the battery.
• Thermistor: The battery pack contains a negative temperature coefficient thermistor.
The charger uses the voltage drop across the thermistor to determine that the battery
pack is within the proper charging temperature limits.
• Battery Charging: It is very important to note that the battery pack should only be
charged in a Vocollect designated charger.
Mechanical and Environmental Specifications
• Drop test specifications
• The standard battery meets the MIL STD 810F specification for shock and transient
drop criteria.
33
• Note: The drop test failure criteria consists of the following:
1. A split or separation of the ultrasonic weld joint greater than one linear inch.
2. Inability to meet open circuit voltage, serial number input, thermistor output,
and charge tests.
Minor cosmetic damage to the battery, such as scratches and dents, is acceptable.
• Environmental specifications: The battery pack halves are sonically welded together to
protect the internals from water and dust. The battery functions properly in the
following conditions:
Temperature: -4°F to 122°F
Humidity: 95% non-condensing
Rain/dust: IP67
• The pin out from left to right (when looking at the contacts with the battery's label
facing down) is as follows:
Battery +
Thermistor
ID Data
Battery -
High Capacity Battery Specifications
Electrical Specifications
• Cells: The high capacity battery pack uses four lithium ion cells.
• Nominal voltage = 7.2V
• Capacity = 3000mAhr or greater
• Protection circuit characteristics: The pack contains a protection circuit that prevents
over and under voltage conditions on the cells and protects the pack from damage as a
result of a short circuit between the positive and negative terminals of the battery.
• Thermistor: The battery pack contains a negative temperature coefficient thermistor .
The charger uses the voltage drop across the thermistor to determine that the battery
pack is within the proper charging temperature limits.
• Battery ID: The battery pack contains a Dallas Semiconductor DS2401 serial ID chip. In
future enhancements to both the terminal and the terminal software, this chip will be
used to provide data about features such as battery life, capacity monitoring, and asset
tracking.
• Battery Charging: It is very important to note that the battery pack should only be
charged in a Vocollect designated charger.
Mechanical and Environmental Specifications
• Drop test specifications
• The high capacity battery meets the MIL STD 810F specification for shock and
transient drop criteria.
• Note: The drop test failure criteria consists of the following:
1. A split or separation of the ultrasonic weld joint greater than one linear inch.
2. Inability to meet open circuit voltage, serial number input, thermistor output,
and charge tests.
Minor cosmetic damage to the battery, such as scratches and dents, is acceptable.
• Environmental specifications: The battery pack halves are sonically welded together to
protect the internals from water and dust. The battery functions properly in the
following conditions:
Temperature: -4°F to 122°F

34
Humidity: 95% non-condensing
Rain/dust: IP67
• The pin out from left to right (when looking at the contacts with the battery's label
facing down) is as follows:
Battery +
Thermistor
ID Data
Battery -
Cleaning Battery Contacts
It is recommended that a brush similar to the one found at the following link be used to clean
the contacts on the battery. Gently brush the contacts to clean away dirt and other
obstructions that might prohibit them from making a solid connection.
http://web-tronics/852.html
The brush found at this link is a small, inexpensive, three-row toothbrush style, general
cleaning brush. It is made of natural, stiff hog hair bristles and has a 7 3/4" plywood handle.
This brush is excellent for general circuit board cleanup.
Talkman® T2 Battery Chargers
Note: The information in this topic applies specifically to the Talkman® T2
system. To view this information for the Talkman® OPEN system, click on
the image of the terminal.
• Overview
• Procedures
• Specifications
Overview
Talkman® T2 terminal batteries can be charged in the terminal charger, however, a
separate battery charger is also available. The battery charger is only available in one
model that includes five battery slots. The charger can be used to store and charge up to
and including five batteries at a time.
The battery charger comes with either a desk mount or a wall mount. The desk mount is
used to set the charger upright on a desk or table and the wall mount is used to mount the
entire unit to a wall.
Procedures
• Changing a Battery
• Charging a Battery in a Battery Charger
Specifications
Length Approximately 24" (61
cm)
Length (with desk Approximately 24" (61

35
mount feet) cm)
Width Approximately 2.5" (6.5
cm)
Width (with desk mount
feet)
Approximately 5" (12.7
cm)
Height Approximately 5.25"
(13.3 cm)
Height (with desk
mount feet)
Approximately 5.375"
(13.65 cm)
Power 90-264 Vac 50/60 Hz
72 W
Uses standard IEC 630
cord
Operating
Temperature
50° to 113° F (10° to 45°
C)
Storage Temperature -22° to 158° F (-30° to
70° C)
Humidity Functional to 90% non-
condensing
Note: It is recommended that a brush similar to the one found at the following link be
used to clean the contacts on the battery charger. Gently brush the contacts to clean away
dirt and other obstructions that might prohibit them from making a solid connection.
http://web-tronics/852.html
The brush found at this link is a small, inexpensive, three-row toothbrush style, general
cleaning brush. It is made of natural, stiff hog hair bristles and has a 7 3/4" plywood
handle. This brush is excellent for general circuit board cleanup.
Talkman® T2 Belts & Belt Clips
Note: The information in this topic applies specifically to the Talkman® T2
system. To view this information for the Talkman® OPEN system, click on
the image of the terminal.
• Overview
• Procedures
• Specifications
Overview
Operators wear Talkman® T2 terminals on their waist by connecting the terminal, via a
specially designed clip, to a customized belt that is purchased from Vocollect.
The main concept for operators to keep in mind with regard to the belt clip and the
terminal is that they are two separate entities. The clip should be attached to the Vocollect
belt at the beginning of a shift. Then, the operator can attach the terminal to and remove
the terminal from the clip as often as necessary throughout the shift. Once the shift is
over, the operator can then remove the clip from the belt.

36
Vocollect sells two types of mounting clips:
1. Slim Belt Clip
This clip is used to connect a terminal to the customized Talkman T2 belt.
2. Heavy Duty Belt Clip
This clip is used to connect a terminal to the customized Talkman OPEN belt
(i.e. the belt that is sold with Vocollect's previous Talkman terminal).
Procedures
• Wearing a Talkman Terminal
• Removing a Talkman Terminal from a Belt
Specifications
Belt Sizes
Belt number Belt size
620024 XS 18" - 26"
620025 S 24" - 32"
620026 M 28" - 36"
620027 L 34" - 42"
620028 XL 40" - 48"
620029 XXL 46" - 54"
620030 XXXL 52" - 60"
Belt Specifications
Belt material Nylon
Velcro® YKK Hook and Loop
Belt fastener ITW Nexus 127-3200
Talkman® T2 Headsets, Microphones, Windscreens, & Earpieces
Note: The information in this topic applies specifically to the Talkman® T2
system. To view this information for the Talkman® OPEN system, click on
the image of the terminal.
• Overview
• Procedures
• Specifications
Overview
An operator interacts with a Talkman® T2 terminal using a headset with an attached
microphone. The operator hears instructions through the earpiece of the headset and then
communicates information back to the terminal (and then to the host computer) by
speaking into the microphone.
Vocollect offers two different headset models: lightweight and freezer. The primary
difference between the two models is the earpiece through which the operator hears
instructions. The earpiece on the lightweight headset covers, but does not cup, the
operator 's ear. This headset works well in normal warehouse environments. The freezer
headset's earpiece is larger and actually cups the operator 's entire ear. This headset has
37
been designed for use in a freezer or dairy environment.
Another difference between the two headsets is the temperature range in which they will
operate. For more information about the temperature ranges, see the Specifications section
below.
Each headset and microphone unit comes with a windscreen. Windscreens reduce breathing and other
background noises that can make it hard for the terminal to understand what an operator is saying. For more
information about windscreen care and maintenance, see the Procedures section below.
Note: Vocollect strongly recommends that operators do not share headsets. Assigning one
headset to each operator reduces the likelihood that germs will pass between operators.
Procedures
• Caring for Headsets & Microphones
• Connecting & Disconnecting Peripherals
• Wearing a Talkman Terminal
• Wearing & Removing Headsets
Specifications
Vocollect sells two different headset models:
• VXI lightweight headset
• VXI cupped headset (for freezer use)
Temperature Range Specifications
VXI lightweight headset 32°F to 120°F
VXI cupped headset (for freezer use) -20°F to 120°F
Microphone Information
Both of the headsets that Vocollect sells contain a noise canceling electret microphone
element (model 3217-1).
Element Features
• Noise canceling electret microphone element with integral FET
• Rising frequency response across speech band
• Low distortion
• EMI and RFI protected
• Weatherproof, shock and vibration resistant
Element Specifications
Frequency response 50 Hz to 10KHz
Size .312" (7.9 mm) dia x .15" (3.8 mm)
Environmental Tested per MIL Std 810 E
Temperature -40°F to 158°F operating and storage
Humidity 0% - 100% relative humidity (non-
condensing)
Immersion 2 feet
38
Portable Printers
Portable PrintersPortable Printers
Portable Printers
• Overview
• Procedures
• Specifications
Overview
The Talkman® terminal supports the use of portable printers. The end of the portable printer
cable is connected to the red port on the Talkman terminal. The terminal's configurable
parameters must be configured to match the default settings of the printer in use, including
the baud rate , parity, stopbits, and word length. Refer to the Configurable Parameters Table
and your portable printer's manual for more information.
Procedures
The procedure for using a portable printer will vary depending on how your task is written. You
will have to directly connect the portable printer to your terminal with a serial cable to
transfer information. See Connecting and Disconnecting Peripherals.
Specifications
Vocollect does not provide portable printers. Please refer to your portable printer's manuals for
more information.
39
Remote Listening Systems
Remote Listening Systems Remote Listening Systems
Remote Listening Systems
• Overview
• Procedures
• Specifications
Overview
The remote listening system (consisting of two Maxon® 49-HX Communicators) allows trainers,
administrators, or other operators to listen in on the conversation between an operator and the
Talkman® terminal that he/she is currently using.
Two Maxon 49-HX Communicators create a wireless speaker system. One of the communicators
is modified so that it acts as a dedicated transmitter that plugs into a Talkman terminal
through the speaker outlet. This modified communicator transmits all communication between
an operator and the Talkman system over a particular channel or frequency. The person who is
listening to the operator carries the other communicator that serves as a dedicated receiver
when tuned to the same channel or frequency as the communicator being monitored.
Trainers can use this system to monitor several operators by setting each transmitting
communicator to a different channel, and then changing the channel on the receiving
communicator. For more information about training with the remote listening system, see
Training Setup. For information about configuring the Communicators for use, see Configuring
Remote Listening Systems.
Procedures
• Configuring Remote Listening Systems
• Training Setup (found in the Talkman Management Software online documentation)
Specifications
For detailed specifications for the Maxon 49-HX Hands-Free Communicator, visit the Maxon
America, Inc. web site.
Talkman® T2 Terminals
Note: The information in this topic applies specifically to the Talkman® T2 system.
To view this information for the Talkman® OPEN system, click on the image of the
terminal.
• Overview
• Procedures
• Specifications
Overview
The Talkman® T2 terminal, the latest product in the Talkman® series, is a portable, belt-
mounted data collection device that allows operators to use simple voice commands to gather
data or receive instructions to perform tasks such as warehouse order picking, factory floor
inspection, and mobile data collection.
40
Operators wear Talkman terminals on their waist by connecting the terminal, via a specially
designed clip, to a customized belt that is purchased from Vocollect. A headset with an
attached microphone allows the operator to hear the Talkman terminal's instructions or
questions. The microphone lets the operator talk to the Talkman terminal to request
information or enter data. The Talkman terminal may ask a question that the operator can
then answer, or it may give instructions to the operator.
Since operators wear the Talkman terminal on the waist, they are free to use their hands to
inspect items, pick product, or repair defects.
The Talkman terminal offers real-time, two-way communications with a host computer across a
network.
Procedures
• Connecting & Disconnecting Peripherals
• Placing a Talkman Terminal into a Terminal Charger
• Turning off a Talkman Terminal
• Turning on a Talkman Terminal
• Voice & Button Controls
• Wearing a Talkman Terminal
Specifications
Weight 15.9 ounces (with
standard battery)
Length 6.5" (16.5 cm)
Width 3.38" (8.5 cm)
Depth 1.5" (4 cm)
I/O Ports • Headset port
(yellow)
• Maintenance
port with
audio out and
RS-232 serial
support (red)
• Bar code port
with RS-232
decoded bar
code support
(blue)
Note: The red
maintenance port
supports all of the
following cables:
• Maintenance
cable
• Training cable
• Audio cable
Operating
Temperature
-29° to 50° C (-20° to
122° F)
Storage Temperature -34° to 60° C (-30° to
140° F)
Drop Tested The Talkman terminal

41
meets the MIL STD -
810F specification for
shock and vibration.
In addition, the
terminal has been
tested to the
following
specifications:
• 25 drops from
5 feet and 10
additional
drops 6 feet
onto polished
concrete
• 10 drops from
5 feet at -20°
F onto
polished
concrete
Humidity Functional from 5% to
95% non-condensing
Connection Port Pin Assignments
Each connection port on the terminal has nine pins:
The pins serve the following functions:
Headset Port
Pin Function
1 Headset ID
In
2 Speaker +
3 Speaker -
4 Secondary
Microphone
42
5 Analog
Ground
6 Primary
Microphone
7 Boom Switch
8 Digital
Ground
9 Battery +
Maintenance Port
Pin Function
1 Digital
Ground
2 +5 Volt
Output
3 Audio Line
Out
4 Analog
Ground
5 RXD
(receives
data into the
terminal)
6 TXD
(transmits
data from the
terminal)
7 Battery
Temperature
8 Digital
Ground
9 +12 Volt
Input
Bar Code Port
Pin Function
1 Scanner ID
Input
2 +5 Volt
Output
3 Not Used
4 Not Used
5 RXD
(receives
data into the
terminal)
6 TXD
(transmits
data from the
terminal)
7 Not Used
8 Digital
Ground
9 Ground
Note: It is recommended that a brush similar to the one found at the following link be used

43
to clean the contacts on the terminal (i.e. the terminal's battery contacts as well as the
contacts on the terminal's peripheral connector plate). Gently brush the contacts to clean
away dirt and other obstructions that might prohibit them from making a solid connection.
http://web-tronics/852.html
The brush found at this link is a small, inexpensive, three-row toothbrush style, general
cleaning brush. It is made of natural, stiff hog hair bristles and has a 7 3/4" plywood handle.
This brush is excellent for general circuit board cleanup.
Talkman® T2 Terminal Chargers
Note: The information in this topic applies specifically to the Talkman® T2
system. To view this information for the Talkman® OPEN system, click on
the image of the terminal.
• Overview
• Procedures
• Specifications
Overview
Terminal chargers store Talkman® T2 terminals as well as recharge their batteries. A
terminal should not be placed into a terminal charger without the battery attached.
The terminal charger is available in one model that includes five terminal slots. The
charger can be used to store up to and including five terminals at a time.
The terminal charger comes with either a desk mount or a wall mount. The desk mount is
used to set the charger upright on a desk or table and the wall mount is used to mount the
entire unit to a wall.
Note: If a terminal that has been in use for more than 8 straight hours is placed into a
terminal charger without first being powered off, the terminal will automatically power
off and then back on after it has been in the charger for 5 minutes. Also, if a terminal has
been sitting in a charger for more than 8 straight hours, the terminal will automatically
power off and then back on.
Procedures
• Changing a Battery
• Charging a Battery in a Battery Charger
• Placing a Talkman Terminal into a Terminal Charger
Specifications
Length Approximately 24" (61
cm)
Width Approximately 4" (10
cm)
Height Approximately 5.25"
(13.3 cm)
Power 90-264 Vac 50/60 Hz

44
72 W
Uses standard IEC 630
cord
Operating
Temperature
50° to 113° F (10° to 45°
C)
Storage Temperature -22° to 158° F (-30° to
70° C)
Humidity Functional to 90% non-
condensing
Note: It is recommended that a brush similar to the one found at the following link be
used to clean the contacts on the terminal charger. Gently brush the contacts to clean
away dirt and other obstructions that might prohibit them from making a solid
connection.
http://web-tronics/852.html
The brush found at this link is a small, inexpensive, three-row toothbrush style, general
cleaning brush. It is made of natural, stiff hog hair bristles and has a 7 3/4" plywood
handle. This brush is excellent for general circuit board cleanup.
Talkman® T2 Terminal Covers
Note: The information in this topic applies specifically to the Talkman® T2
system. To view this information for the Talkman® OPEN system, click on
the image of the terminal.
• Overview
• Procedures
• Specifications
Overview
Vocollect offers an optional protective cover for the Talkman® T2 terminal. This durable
cover is used to protect the terminal from the normal wear and tear associated with
everyday operation. Although the use of a terminal cover is not required, Vocollect
highly recommends that Talkman terminals be used in conjunction with this cover. Using
the cover will help to preserve the appearance and prolong the life of the terminals.
Procedures
• Using a Terminal Cover
Specifications
Fabrics Ballistic nylon, 1050-
denier black
Nylon taffeta, 80-denier
black
Foam 1/8" thick high-density
closed-cell foam
Clear Vinyl Sleeve Double polished 0.06
45
Thread T-70 nylon, size 69
Cordura 1000 Used for edge binding
bias tape
Velcro® Used to hold the cover
flap down
46
Visual Training Devices
• Overview
• Procedures
• Specifications
Overview
Visual training devices enable operators to read the words they need to say during the
enrollment training process. Vocollect recommends the QTERM-J10.
A QTERM-J10 device has an liquid-crystal display screen that displays words that an
operator needs to train. Operators are more likely to speak in their normal conversational
tone when reading the words than when hearing the Talkman® terminal say the words
during training. Vocollect provides a cable with a connector so that the QTERM-J10 can
be attached to the red port on the Talkman terminal.
Note: If you cannot see the words displayed on the QTERM screen, there may be a
problem with the contrast on the QTERM. Please refer to the Troubleshooting section of
Configuring Visual Training Devices.
Procedures
• Configuring Visual Training Devices
• Creating Operator Voice Templates (enrollment training)
Specifications
For detailed specifications for the QTERM-J10 , refer to the user manual that
accompanied the QTERM-J10 or visit the QSI Corporation web site.
47
Wired Portable Speakers
Wired Portable Speakers Wired Portable Speakers
Wired Portable Speakers
• Overview
• Procedures
• Specifications
Overview
The portable speaker (Radio Shack® Mini Amplifier Speaker), which is directly wired to the
Talkman® terminal, allows trainers to listen in on the conversation between an operator and
the Talkman terminal that he or she is currently using.
For information about physically connecting the wired portable speaker to a Talkman terminal,
see Connecting & Disconnecting Peripherals.
Procedures
• Connecting & Disconnecting Peripherals
• Training Setup (found in the Talkman Management Software online documentation)
Specifications
For more information about the Radio Shack Mini Amplifier Speaker, consult the user manual
provided with this device or visit the Radio Shack web site.
48
Learning Zone
LED Indicators
LED IndicatorsLED Indicators
LED Indicators
The following information lists the majority of the possible states of the LED indicator on the
Talkman® terminal. Click the link that best describes the state (blinking one color, flashing
between two colors, off, or solidly one color) and color (red, green, orange) of the indicator.
Try the steps in sequence, one at a time, until the problem is resolved. Do not skip one step in
favor of a later step. Do not continue with other steps once the problem is fixed. If the steps
listed do not solve the problem, contact Vocollect for technical support.
• Blinking green
• Blinking red
• Flashing green and orange
• Flashing red and green
• Flashing red and orange
• Off
• Solid green
• Solid orange
• Solid red
Blinking green
There are two ways that the terminal blinks green:
• Once a second: The terminal blinks green once a second when it is in sleep mode and
not in a terminal charger.
• Four times a second: The terminal blinks green four times a second when it has been
properly placed into a terminal charger.
The terminal can be removed from its charger when the LED indicator starts blinking green.
The LED indicator should blink green when the terminal sleeps (see Putting a Terminal to
Sleep). It should also blink green when a task is being selected (see Loading a Task onto a
Terminal). The terminal will also blink green during some parts of the firmware loading
process.
Warning: Do not remove the battery when the terminal is sleeping, or you may lose all of
the data that has been collected.
What to do if the terminal isn't blinking green while in a terminal
charger or when selecting a task
1. The terminal may be busy. Wait a minute to see if it starts blinking green.
2. Make sure the terminal has been properly placed into the terminal charger. See Placing
a Talkman Terminal into a Terminal Charger.
3. Clean the battery connector pins with a cleaning brush, then put the terminal back into
the terminal charger.
4. Reboot the terminal. See Rebooting a Terminal.
Blinking red
The indicator blinks red when changing operators using the operator button (see Loading an
Operator Template onto a Talkman Terminal). It also blinks red during a task load, or while the
49
terminal is busy performing some internal action, such as changing the task (see Loading a Task
onto a Terminal). It will also blink red while in a terminal charger until it is ready to use, and
then it will blink green. The terminal will also blink red during some parts of the firmware
loading process.
Warning: Do not remove the battery or power when the LED indicator is blinking red. If the
terminal is in a terminal charger, do not remove it from the charger when the LED is
blinking red.
Flashing green and orange
If the LED indicator flashes green and orange, you have entered the boot menu mode. Because
you cannot see the boot menu, this can be dangerous.
1. Push the yellow play/pause button to continue.
2. Reboot the terminal (see Rebooting a Terminal).
Flashing red and green
An LED indicator flashing red and green means that the terminal is trying to get an IP address
from the server. If this continues, the terminal will eventually turn itself off.
1. Try turning the terminal on again (see Turning On a Talkman Terminal).
2. Make sure that you have a fully charged battery on the terminal.
3. Make sure that the terminal is within range of an access point.
4. Verify that the DHCP server is running, if your site uses DHCP to assign IP addresses.
5. View the terminal's properties in Terminal Manager. For details about Terminal
Manager, refer to the Terminal Manager topic in the Talkman Management System
online documentation.
6. Make sure that the terminal's IP address is set to 0 (if appropriate) using zeroes, not
the letter O.
7. Make sure that the Terminal Manager host IP address is correct.
8. Make sure that the IP address is unique. It cannot duplicate any other IP address on the
network. For details about duplicate IP addresses, refer to the Checking for Duplicate
IP Addresses topic found in the Talkman Management Software online documentation.
9. Make sure the FTP server is running.
10. Check that the host application receiving the records is still running.
11. Put the terminal into debug mode. For details about debug mode, refer to the Logging
Debug Information for a Terminal topic found in the Talkman Management Software
online documentation.
1. Look for the message, "Attempted to reach host 15 times. No response from host ."
If you see this message more than five times in a row, remove the terminal from
the charger and then place it back into the charger (see Placing a Talkman
Terminal into a Terminal Charger). Then edit the task and change the output data
records to point to the right machine. For details about editing a task, refer to the
Task Builder online documentation.
2. Look for the message, "Invalid host name." If you see this message, add the host
name to your DNS server, and make sure the DNS server is running.
Flashing red and orange
The LED indicator should flash red and orange when the terminal is receiving a firmware
download.
Off
The LED indicator turns off completely when a terminal is powered off (see Turning Off a
50
Talkman Terminal).
Note: When a terminal is powered off, the indicator will turn red first and then turn off.
When the indicator is off and it should not be
1. Make sure the battery is properly installed (see Changing a Battery).
2. Turn the terminal on (see Turning On a Talkman Terminal).
3. Make sure the terminal is properly placed into a terminal charger (see Placing a
Talkman Terminal into a Terminal Charger).
Solid green
The LED indicator should be solid green when the terminal is on (see Turning On a Talkman
Terminal). It may also turn solid green during parts of the firmware loading process.
The indicator must also be solid green when:
• adjusting volume using the Talkman louder or Talkman softer voice controls, or the +/
button
• getting help using the Talkman help or Talkman repeat voice controls
• sampling background noise (see Sampling Noise).
• retraining a word (see Retraining a Word).
• resuming regular operation after using a voice control using the Talkman continue voice
control
• erasing data using the Talkman back up or Talkman erase voice controls
• changing the active operator (see Loading an Operator Template onto a Talkman
Terminal).
When the indicator is solid green but the terminal does not
respond to voice or button controls
1. Put the terminal to sleep and then turn it back on (see Putting a Terminal to Sleep and
Turning On a Talkman Terminal).
2. Turn the terminal off then back on (see Turning Off a Talkman Terminal and Turning
On a Talkman Terminal).
3. Reboot the terminal (see Rebooting a Talkman Terminal).
4. Give the operator a new terminal and load the operator 's template onto it (see
Loading an Operator Template onto a Terminal).
Solid orange
You should not see this indicator.
1. Reboot the terminal (see Rebooting a Talkman Terminal).
Solid red
The LED indicator should turn red, then turn off when an operator turns the terminal off (see
Turning Off a Talkman Terminal). It should also turn red when the terminal first comes on,
then flash red and green, then turn solid green (see Turning On a Talkman Terminal). If the
terminal continuously displays a solid red light, contact your system administrator.
When the LED is solid red and the terminal has not just been
turned off or on
1. Turn the terminal off then back on (see Turning Off a Talkman Terminal and Turning
On a Talkman Terminal).
2. Reboot the terminal (see Rebooting a Talkman Terminal).
51
52
Operator Overview
Operator Overview Operator Overview
Operator Overview
• The Talkman® system
• Talkman® terminals and accessories
• Using the Talkman® terminal
The Talkman® System
The Talkman® system is a verbal computing system that can be used for a variety of labor-
intensive tasks including warehouse order picking, factory floor inspection, and mobile data
collection.
The Talkman system consists of Talkman terminals and a host computer, both running Talkman
software. The host computer and terminals communicate using radio transmit-and-receive
devices called access points.
• Talkman terminals are small, portable computers that operators use to communicate
with the computer system that monitors and controls information at your site, such as
inventory and distribution. Operators wear Talkman terminals on their waists
(connected to a specially designed Talkman belt) and hear terminal voice prompts
through a headset. Operators speak to terminals using a microphone attached to the
headset.
• The host computer is the computer on which the Talkman Management Software is
installed. Usually, the host application software is also installed on the host computer.
The host application is the software that manages information at your site, such as
tracking inventory or managing picking assignments. Talkman terminals communicate
with the host computer using a radio network.
• Access points are connected via a wired network to the host computer, and they
receive information from and send information to Talkman terminals via a radio
network. A terminal must be within radio range of an access point in order for it to
exchange information with the host computer .
The Talkman system receives information from your site's host application and directs
operators on what actions to take with spoken prompts (rather than with lists and labels).
Operators speak their responses to the system, and the information contained in the responses
is sent to the host application.
An Example of How the The System Works
Using warehouse order picking as an example, this is basically how the Talkman system
works:
1. The host application sends picking assignment data from the host computer to the
radio network. In this example, the host application is warehouse management
system (WMS) software.
2. The access points on the radio network transmit the data to the intended Talkman
terminal.
3. When the terminal receives the data, it translates the data into normal speech
instructions and speaks the instructions to the operator wearing the terminal. In
this example, the terminal instructs the operator to go to a particular product
location in the warehouse.
4. The operator responds to the terminal. In this example, when the operator
reaches the location, he reads check digits to the terminal to verify that he is at
the correct product location.
5. The terminal then translates the operator's speech into digital data and transmits
the data to the access points on the radio network.
53
6. The access points transmit the data to the host computer .
7. The host computer then processes this data using the host application and sends
the next instruction for the operator back across the radio network. In this
example, the next instruction is how many product items the operator should pick
at the location.
Talkman Terminals and Accessories
• Terminals
• Headsets
• Batteries and Chargers
• Other Accessories and Peripherals
Terminals
Operators use Talkman terminals to gather data or perform warehouse operations, such as
order picking. Operators wear terminals on their waists, mounted onto a specially designed
Talkman belt. Since they communicate with the terminals using speech, operators' hands
and eyes are free to do their work. However, there are buttons on the terminal that
operators use to perform certain functions, such as turning the terminal on or retraining a
word.
Headsets
An operator wears a headset (with an attached microphone) that is connected to the
Talkman terminal. The headset allows each operator to hear the terminal's instructions or
questions, and the microphone enables the operator talk to the terminal.
Batteries and Chargers
Talkman terminals are powered by rechargeable batteries. A fully charged battery may or
may not last for an entire shift (depending upon the length of the shift). If the battery
charge does become low, the terminal will tell the operator to change the battery.
Batteries are recharged in battery chargers.
When a terminal is not actively being used, it should be put into a terminal charger.
Note: A terminal should always have a battery attached to it when it is placed into a
terminal charger.
Terminal chargers are used to store terminals. While a terminal is in a charger, it can send
and receive certain administrative information to and from the host computer that cannot
be sent or received when the terminal is being used.
Note: Terminal chargers are also used to charge the battery that is currently attached
to the terminal.
Other Accessories and Peripherals
Sometimes other equipment is used with a terminal. Some sites use bar code readers
connected directly to terminals. Other peripherals include printers, visual training devices,
or remote listening systems. If you have questions about adding features or equipment to
your Talkman system, contact Vocollect.
Using the Talkman Terminal
• Overview
• Sampling noise with the terminal
• Training the Talkman terminal to recognize an operator's voice
54
• Task dialog
Overview
Since the Talkman terminal is worn on the waist, operators are free to use their hands to
inspect items, pick products, or repair defects. Operators do not have to use hands or eyes
to read from labels, lists, or an electronic display. There are a few button controls on the
Talkman terminal, but almost all interaction with the terminal is done with the operator's
voice.
Voice prompts from a terminal, heard through the headset, direct operators on what
actions to take. Operators respond to the terminal through the microphone attached to the
headset. A response can answer a question that the terminal has asked, verify information,
request help from the terminal, or ask the terminal to perform a certain action.
If an operator needs help or makes a mistake while using a Talkman terminal, he or she
can pause the terminal, ask the terminal to repeat the last prompt or ask for help, or
erase responses, all by speaking to the terminal.
Talkman terminals can be used in a variety of environments: hot, cold, noisy, humid, and
so on. The Talkman terminal has buttons and an LED indicator light, but not a display
screen (which are often temperature sensitive). As a result, terminals continue to work
well on a noisy loading dock or in a freezer.
Sampling Noise with the Terminal
A Talkman terminal must be able to distinguish an operator's voice from any other noise
that is going on around the operator. In order to differentiate between the operator's voice
and background noise (i.e. all other sounds going on around an operator when he or she is
speaking to a terminal), the terminal takes a sampling of the background noise as well as
the operator's voice. This sample enables the terminal to tell the difference between the
operator's voice and other sounds that may be going on around the operator.
Each time a terminal is turned on, the terminal takes a noise sample. During use, the
terminal also takes noise samples occasionally throughout the day. This helps the terminal
to better understand what an operator is saying, especially in an environment where the
noise level changes frequently.
Training the Talkman Terminal to Recognize an Operator's
Voice
The first time an operator uses a terminal in the Talkman system at your site, the operator
must train the system to understand his or her speech by speaking the vocabulary words
used at the particular site.
Sometimes an operator's terminal might have a hard time understanding a word that the
operator is saying. When this situation occurs, the operator may need to retrain the word.
The operator may have pronounced the word differently during enrollment training from
how he or she pronounces it during everyday speech, and the terminal may have a difficult
time recognizing the word.
Task Dialog
When an operator uses a Talkman terminal, what words the terminal speaks and what
words the operator can say to respond to the terminal depend on something called the
task dialog. The task dialog is the spoken output of a task. In the Talkman system, the task
contains terminal prompts with acceptable operator responses for each prompt. The
terminal uses the task dialog to determine whether or not an operator's response is
allowable and what to do with any given response.
55
When the Talkman system is installed at your site, the task dialog is customized by
Vocollect according to your site's operations. Some sites have more than one task dialog
due to the complex nature of their operations.

56
Phonetic Alphabet
Use the words below to say letters to a Talkman® terminal. Digit strings (i.e. a few
numbers in a row) should be spoken naturally with no pause between the digits. For
instance, if the check digit is CT-120, say, "charlie tango one two zero."
Alpha November
Bravo Oscar
Charlie Papa
Delta Quebec
Echo Romeo
Foxtrot Sierra
Golf Tango
Hotel Uniform
India Victor
Juliet Whiskey
Kilo X-ray
Lima Yankee
Mike Zulu
57
Solution Zone
Other Issues
Other IssuesOther Issues
Other Issues
Sometimes you will not see an LED indicator change or hear an error message, but will see
some other sign of trouble. Click the description below that most accurately describes what
you see. Follow the steps in sequence until the issue is resolved; start with the first option and
see if that solves your problem before moving on to the second, and so on. If none of the listed
steps resolve the problem, contact Vocollect to send the equipment back for repair, or to
speak with a support representative (see Repair or Contact Information).
• Equipment Problems
• Other Problems
Equipment Problems
• My bar code reader won't scan.
• My battery keeps falling off.
• My belt doesn't fit.
• My equipment is broken.
• My headset won't stay on.
• I can't get my battery on.
• I can't get my battery off.
• I can't hear anything through the headset.
• I can't unplug my headset.
• The Talkman terminal beeps every few seconds.
• The Talkman terminal does not appear in Terminal Manager.
• The Talkman terminal does not recognize a word.
• The Talkman terminal does not hear anything I say.
• The Talkman terminal does not respond to any button presses.
• The Talkman terminal heard something I did not say.
• The Talkman terminal is telling me there are errors.
• The Talkman terminal keeps shutting off.
• The Talkman terminal makes clicking noises.
• The Talkman terminal makes static noises.
• The Talkman terminal will not load a task.
• The Talkman terminal will not load an operator template.
• The Talkman terminal will not turn on.
Other Problems
• I can't get an assignment.
• I can't log on.
• I don't know what to say next.
I can't get an assignment.
1. If this site uses Pick Manager, make sure you are in the user table of Pick Manager. For
details about Pick Manager, refer to the Pick Manager topic found in the QuickPick
online documentation. If you are not in the user table, create a new operator in Pick
Manager. For details about creating a new operator, refer to the Creating a New
58
Operator in Pick Manager topic found in the QuickPick online documentation.
2. Verify that the Pick Manager system is up and running.
3. Make sure you are in radio range of an access point.
4. Verify that VISocketODBC is running. For details about VISocketODBC, refer to the
VISocketODBC online documentation.
5. Reboot the terminal.
I can't get my battery on.
1. Make sure you are placing the battery on correctly. See Inserting a Battery.
2. Check the battery compartment on the terminal to make sure it is not damaged. If it is
damaged, send the terminal back to Vocollect for repair. See Sending Equipment Back
for Repairs.
I can't get my battery off.
1. Make sure you are following the proper procedure for removing a battery. See
Removing a Battery.
I can't hear anything through the headset.
1. Make sure the terminal has a fully charged battery. See Changing a Battery.
2. Try the headset on a terminal that is not having problems.
3. Try a different headset on the terminal with the problem. See Wearing a Talkman
Terminal and Connecting & Disconnecting Peripherals.
4. Turn the terminal off and then back on again. See Turning Off a Talkman Terminal and
Turning On a Talkman Terminal.
5. Reboot the terminal.
6. If the headset is broken, send it back to Vocollect for repair. See Sending Equipment
Back for Repairs.
I can't log on.
1. If this site uses Pick Manager, make sure you are in the user table of Pick Manager. For
details about Pick Manager, refer to the Pick Manager topic found in the QuickPick
online documentation. If you are not in the user table, create a new operator in Pick
Manager. For details about creating a new operator, refer to the Creating a New
Operator in Pick Manager topic found in the QuickPick online documentation.
2. Make sure you are in radio range of an access point.
3. Verify that VISocketODBC is running. For details about VISocketODBC, refer to the
VISocketODBC online documentation.
I can't unplug my headset.
1. Make sure you are following the proper procedure. See Connecting & Disconnecting
Headsets.
2. If the terminal connector is damaged, send the terminal back to Vocollect for repair.
See Sending Equipment Back for Repairs.
3. If the headset connector is damaged, send the headset back to Vocollect for repair.
See Sending Equipment Back for Repairs.
I don't know what to say next.
1. Say, "Talkman help." You will hear all your available vocabulary responses.
2. If you don't hear a list of available responses, ask your administrator because a task
change might be necessary.
59
My bar code reader won't scan.
1. Make sure the bar code scanner is plugged into the terminal properly. See Connecting
and Disconnecting Bar Code Readers.
2. Try a different bar code scanner.
3. Try connecting the bar code scanner to a different terminal. If the bar code scanner is
damaged, send it back to Vocollect for repair. See Sending Equipment Back for
Repairs.
4. Verify that the (task).vcf contains the correct bar code configurations. See Changing
Configurable Parameters.
My battery keeps falling off.
1. Make sure you are putting it on right. See Inserting a Battery.
2. Check the battery compartment on the terminal to make sure it is not damaged. If it is
damaged, send the terminal back to Vocollect for repair. See Sending Equipment Back
for Repairs.
My belt doesn't fit.
1. Adjust the belt. See Putting a Terminal on a Belt.
2. Get a different size belt from your supplies.
My equipment is broken.
1. Send the terminal back to Vocollect for repair. See Sending Equipment Back for
Repairs.
My headset won't stay on.
1. Make sure the headset wire is clipped properly to your clothing and you are following
the proper procedure for wearing a headset. See Wearing a Headset.
The Talkman terminal beeps every few seconds.
1. Wait for a few minutes. The terminal may just be communicating with the host.
2. If the beeping continues beyond a few minutes, see the administrator.
The Talkman terminal does not appear in Terminal
Manager.
1. Turn the terminal off then back on again. See Turning Off a Talkman Terminal and
Turning On a Talkman Terminal.
2. Make sure that the terminal is properly configured. See Configuring a Terminal
Manually.
3. Make sure the terminal is within range of an access point.
4. Make sure the access point is connected to the network.
5. Make sure the network is up.
6. Make sure the terminal's IP address does not duplicate another. For details about
duplicate IP addresses, refer to the Checking for Duplicate IP Addresses topic found in
the Talkman Management Software online documentation.
7. Send the terminal back to Vocollect for repair. See Sending Equipment Back for
Repairs.
The Talkman terminal does not recognize a word.
1. Make sure you have positioned the microphone properly. See Wearing a Talkman
60
Terminal.
2. Ensure that the headset is properly connected to the terminal. See Connecting &
Disconnecting Peripherals.
3. Take a background noise sample. See Sampling Noise.
4. Ensure that you are using your own template. Press the gray operator button and listen
to the operator name. If the name is not yours, load your template . See Loading an
Operator Template onto a Terminal.
5. Retrain the word. See Retraining a Word.
6. Make sure you are using valid words in response to the prompt.
The Talkman terminal does not hear anything I
say.
1. Make sure the microphone is positioned properly. See Wearing a Talkman Terminal.
2. Try saying words you know are valid, such as Talkman, which is valid any time.
3. Make sure the terminal is properly connected to a charged battery. See Charging a
Battery in a Battery Charger and Changing a Battery.
4. Turn the terminal off and back on again. See Turning Off a Talkman Terminal and
Turning On a Talkman Terminal.
5. Try using a different headset. See Wearing a Talkman Terminal and Connecting &
Disconnecting Peripherals.
6. Reboot the Terminal.
The Talkman terminal does not respond to button
presses.
1. Make sure the terminal is properly connected to a charged battery. See Charging a
Battery in a Battery Charger and Changing a Battery.
2. Take the battery off and then on again. See Changing a Battery.
3. Reboot the Terminal.
4. Send the terminal back to Vocollect for repair. See Sending Equipment Back for
Repairs.
The Talkman terminal heard something I did not
say.
1. Make sure the microphone is positioned properly. See Wearing a Talkman Terminal.
2. Take a noise sample. See Sampling Noise.
3. If the terminal is interpreting background noise as one particular word, retrain that
word. See Retraining a Word.
The Talkman terminal is telling me there are
errors.
1. Verify that VISocketODBC is running. For details about VISocketODBC, refer to the
VISocketODBC online documentation.
2. Make sure you are in radio range of an access point.
3. Find out the specific error in Terminal Manager and then view the error messages table
to determine the nature of the error. The error messages table can be found in the
Talkman Management Software online documentation.
4. If this site uses Pick Manager, make sure you are in the user table of Pick Manager. For
details about Pick Manager, refer to the Pick Manager topic found in the QuickPick
online documentation. If you are not in the user table, create a new operator in Pick
Manager. For details about creating a new operator, refer to the Creating a New
61
Operator in Pick Manager topic found in the QuickPick online documentation.
The Talkman terminal keeps shutting off.
1. Change the Battery.
2. Make sure you are placing the battery on correctly. See Inserting a Battery.
3. Check the battery compartment on the terminal to make sure it is not damaged. If it is
damaged, send the terminal back to Vocollect for repair. See Sending Equipment Back
for Repairs.
4. Check the host computer for crash dump files with this terminal's specific serial
number. For details about crash dump files, refer to the Sending Crash Dumps &
Snapshot Dumps to Vocollect topic found in the Talkman Management Software online
documentation.
The Talkman terminal makes clicking noises.
1. If the noise is more closely described as static, follow the directions for the Talkman
terminal makes static noises.
2. Reboot the Terminal.
3. Reload the code onto the Terminal. See Configuring a Terminal.
The Talkman terminal makes static noises.
1. If the noise is more closely described as clicking, follow the directions for the Talkman
terminal makes clicking noises.
2. Verify that the headset is connected properly. See Connecting & Disconnecting
Headsets.
3. Try the headset on a terminal that is not having problems.
4. Try a different headset on the terminal with the problem. See Wearing a Talkman
Terminal and Connecting & Disconnecting Peripherals.
5. Send the terminal back to Vocollect for repair. See Sending Equipment Back for
Repairs.
The Talkman terminal will not load a task.
1. Try loading the task again. For details about loading the task, refer to the Assigning a
Task to a Terminal Group topic found in the Talkman Management Software online
documentation.
2. Make sure the terminal is properly placed in a terminal charger. See Placing a Talkman
Terminal into a Terminal Charger.
3. Check for error messages in Terminal Manager. For details, refer to the error messages
section of the Talkman Management Software online documentation.
4. Put the terminal in debug mode to look for a clue to the problem. For details about
debug mode, refer to the Logging Debug Information from a Terminal topic found in
the Talkman Management Software online documentation.
5. Check to be sure the green status light beside the terminal icon in the Terminal
Manager window is blinking green.
6. Make sure you are in radio range of an access point.
7. Make sure the terminal's ChangeTaskEnabled parameter is set to 1. See Configuring a
Terminal.
8. Make sure that tasklist.vtl exists on the FTP server and contains the name of the task
you are trying to load. Refer to the Importing Files to the FTP Server topic found in
the Talkman Management Software online documentation.
9. Make sure the task has been imported to the FTP server. For details about importing
files, refer to the Importing Files to the FTP Server topic found in the Talkman
Management Software online documentation.
10. Reboot the terminal. See Rebooting a Talkman Terminal.
62
The Talkman terminal will not load an operator
template.
1. Make sure you are loading the operator properly. See Loading an Operator Template
onto a Terminal.
2. Make sure the operator has created a voice template . See Creating Operator Voice
Templates.
3. Make sure the operator's team is selected. See Loading an Operator Template onto a
Terminal.
4. Make sure the operator's template has been imported to the FTP server. For details
about importing files, refer to the Importing Files to the FTP Server topic found in the
Talkman Management Software online documentation.
5. Make sure you are radio range .
6. Reboot the terminal. See Rebooting a Talkman Terminal.
The Talkman Terminal will not turn on.
1. Make sure the battery is properly seated on the terminal. See Changing a Battery.
2. Make sure you have a fully charged battery in place. See Charging a Battery in a
Battery Charger and Changing a Battery.
3. Reboot the Talkman terminal. See Rebooting a Terminal.
4. Send the terminal back to Vocollect for repair. See Sending Equipment Back for
Repairs.
63
Sending Equipment Back for Repairs: Return Material Authorization
(RMA) Procedures
• General Information
• Procedure
• Packaging
General Information
Warning: If you are sending a terminal back for repair, you must delete the terminal from
Terminal Manager. For details about Terminal Manager, refer to the Terminal Manager
topic found in the Talkman Management Software online documentation. Failure to
remove the terminal from Terminal Manager will cause problems with your system.
When the terminal is returned to you, follow the directions for adding a terminal to the
network.
Vocollect issues RMAs for all returns regardless of the reason for the return. This guarantees proper
tracking of equipment, ensures proper handling, and facilitates a fast return.
The Customer Service department generally issues RMAs to customers for returning products that are in
need of repair. However, Vocollect may issue RMAs for other reasons, such as the following:
• The product belongs to Vocollect. Vocollect may have lent the product to a customer, or the
product could be a sample.
• Vocollect requested that the customer return the item, perhaps for testing.
• A Vocollect employee at the customer site has determined that the product should go back to
Vocollect for some other reason.
Some Vocollect customers have service contracts with repair depots to perform repairs on Vocollect
products. Customers with these service contracts should contact their repair depot to return equipment that
is in need of repair. Follow the RMA issuance procedures to eliminate unnecessary repair costs and to
ensure timely product receipt.
If you have a question about the RMA process, please contact Vocollect Customer Service (see contact
information).
Procedure
To return equipment for repair, follow these steps. If you have any questions, please contact Vocollect
Customer Service.
1. Contact Customer Service to request an RMA number.
2. Provide Customer Service with the following information:
• Name of customer contact person
• Company name
• Company address
• Phone number
• Fax number
• Provide Customer Service with the following information about the items being returned.
• Quantity
• Description of product
• Serial number
• Description of problem or reason for return
64
• Whether a loaner is required or requested
• Whether the product is covered by warranty or extended service plan (ESP)
• Write down the RMA number that Customer Service gives to you. Customer Service will also fax
or e-mail the RMA form to Canadian and European customers. Those customers should be sure to
include a copy of the form with the shipment.
• Include the RMA number on the shipping label, if shipping items to Vocollect.
• Package the equipment according to the packaging instructions.
• Address the shipping label to:
Vocollect, Inc.
701 Rodi Road, Suite 200
Attn: Service Department
Pittsburgh, PA 15235
Packaging
Vocollect may charge a handling fee of $65.00 for each RMA that does not comply with these
requirements. To avoid this handling fee, return items in their original packaging.
1. Pack that items so that no items can come into direct contact with one another or with the sides,
bottom, or top of the shipping container. Line the shipping container with at least one layer of
padding, preferably anti-static bubble pack.
2. Pack each item individually in a bag or wrapping, preferably anti-static bubble bags or wrapping.
If individual wrapping is not possible, place some packing material (such as anti-static bubble
pack) on the bottom of the shipping container, then pack items between layers of the material.
Avoid using foam peanuts as the only packing material because they do not prevent items from
coming into contact with each other or the walls of the shipping container. Peanuts can, however,
fill empty space in the shipping container and on top of items that have been individually packed
in anti-static bubble bags.
Vocollect will ensure that packing materials are returned for re-use in order to minimize the cost for
customers. Vocollect appreciates customer assistance and adherence to these requirements. Properly
packaged RMA items facilitate faster repair and return of Vocollect products.
65
Training Zone
Operator Training
Operator TrainingOperator Training
Operator Training
When training a new operator, be sure to cover all of the following topics. For more
information on training new operators, including how to print training packets from this page,
refer to the Training Setup topic found in the Talkman Management Software online
documentation.
• Orientation
• Hardware Care & Maintenance
• Getting Started
• Daily Tasks
• Troubleshooting
Orientation
This section introduces operators to the Talkman® system (what it does and how it works) and
to the Talkman terminal itself. When they complete this section, the operators should
understand the purpose of the Talkman terminal.
• Overview
• What is a Talkman terminal?
Hardware Care & Maintenance
This section describes to operators the full set of equipment they will use on a daily basis. It
introduces each item and explains the proper way to connect and disconnect them to the
terminal. When they finish this section, operators should know how to take a Talkman terminal
out of its charger, connect a charged battery, connect the terminal to a belt, connect any
peripherals used at your installation, disconnect those peripherals, charge a battery, and
properly store a terminal.
• Remove a terminal from a terminal charger
• Change the battery
• Mount the Talkman terminal onto a belt
• Connect and disconnect peripherals
• Put on and remove a headset
• Care for headsets and microphones
• Charge a battery
• Placing a Talkman terminal into a terminal charger
Getting Started
This section teaches operators the basic controls for the Talkman terminal. The section then
covers the enrollment training process. When they finish this section, operators should know
each of the button and voice controls and the uses for them, what each change in the LED
indicator means and what to do when they see one, and how to say the phonetic alphabet, if
necessary. They should also have created their voice templates.
• Voice & Button Controls
• LED Indicators
• Phonetic Alphabet
66
• Creating an Operator Voice Template (enrollment training)
Daily Tasks
During this section, operators learn how to actually use the terminal to complete an
assignment. They begin by starting the terminal and preparing it for use. They then learn to
use the voice and button controls discussed in the previous section. They learn how to retrain
words, control the terminal during an assignment, and shut it down properly at the end of their
day.
• Turn on a terminal
• Load an operator onto a terminal
• Load a task onto a terminal
• Delete the last response
• Put the terminal to sleep
• Adjust terminal volume using your voice or using the terminal buttons
• Adjust the speed of the terminal's voice
• Adjust the pitch of the terminal's voice
• Choose a different terminal voice
• Sample (measure) background noise
• Retrain a word (update train)
• Use a bar code reader (if applicable)
• Turn off the Talkman terminal
Troubleshooting
Operators need to know some basic troubleshooting information, like how to deal with the
most common problems. Introducing them to the kinds of error messages they may hear will
take some of the anxiety out of this process for some operators. Teaching them how to deal
with common difficulties, like the terminal not understanding or hearing them, will improve
productivity. When they finish this section, operators should feel comfortable with how you
want them to handle various types of problems that they may encounter during their day.
• Error messages (found in the Talkman Management Software online documentation)
• LED Indicators
• Other Problems
67
Working Zone
Adding a Terminal to the
Adding a Terminal to the Adding a Terminal to the
Adding a Terminal to the
Network
NetworkNetwork
Network
• Purpose
• Before You Begin
• Procedure
Purpose
This document contains instructions for adding a new or repaired Talkman® terminal to the
network.
Note: Before adding a repaired terminal to Terminal Manager, verify that the terminal was
previously deleted from Terminal Manager.
Before You Begin
Before a terminal can be recognized in Terminal Manager and before it can be added to your
site's network, the terminal must first be properly configured. (For details about Terminal
Manager, refer to the Talkman Management System online documentation.) When the Talkman
system is first installed at your site, a Vocollect System Engineer configures the Talkman
terminals.
If the terminal has not been properly configured to communicate with Terminal Manager, it
cannot be added to your site's network. Loaded onto each terminal is a ROM configurable
parameters file containing the information needed for the terminal to communicate with
Terminal Manager. There may already be a configurable parameters file for your site that can
be manually loaded onto the terminal. If you need to create a configurable parameters file,
see Configuring a Terminal.
Once a terminal is on the network, you can make changes to its configurable parameters by
loading firmware onto the terminal online.
Procedure
To add a terminal to the network, perform the following steps:
1. Place the terminal in a powered charger within radio range of the network.
Terminal Manager automatically recognizes a new terminal if the terminal has been
properly configured. The terminal is then added to Terminal Manager. By default,
Terminal Manager assigns all new terminals to the Root group.
2. Select the Root group in the left pane of the Terminal Manager window.
Note: If the terminal is within radio range of an access point, but does not appear in
the Root group, you must configure the terminal. See Configuring a Terminal.
3. Select the new terminal in the right pane of the Terminal Manager window.
Note: Terminal Manager names a new terminal with its serial number.
4. Look in the Cur. Software column in the right pane of the Terminal Manager window
for the software (i.e. firmware) version of the terminal. If the firmware version is not

68
the same as the one used at your site, you must change the firmware by loading the
flash image file (.ffi) and bootblock file (.bbi) with the correct firmware version onto
the terminal.
Note: You may need to scroll to the right until you can see the Cur. Software field.
5. Rename the terminal. For details about renaming a terminal, refer to the Renaming a
Terminal topic found in the Talkman Management Software online documentation.
If you are using operator list files with terminal assignments or if you are maintaining
terminal names for some other reason, you may want to change the name of the
terminal. If the new terminal is replacing one that will no longer be used at your site,
you may want to delete the old terminal from Terminal Manager. For details about
deleting the old terminal, refer to the Deleting a Terminal topic found in the Talkman
Management Software online documentation.
6. If your site uses terminal groups, assign the terminal to a terminal group. For details
about assigning a terminal to a terminal group, refer to the Assigning a Terminal to a
Terminal Group topic found in the Talkman Management Software online
documentation.
Since the terminal is in a terminal charger, if the group has a default task, the task
will automatically load.
Note: You must wait until it the task has completed loading before you can remove
the terminal from the terminal charger.
7. If the group does not have a default task, load a task using the terminal.
Adjusting Pitch for Talkman® T2
Note: The information in this topic applies specifically to the Talkman® T2
system. To view this information for the Talkman® OPEN system, click on
the image of the terminal.
• Purpose
• Procedure
Purpose
This document explains how to adjust the pitch of the voice that the Talkman® T2 terminal uses to issue
prompts to operators.
Procedure
To adjust the pitch, perform the following steps:
1. Make sure the terminal is on or sleeping.
The LED indicator should be either solid green or blinking green.
2. Press the operator button.
The terminal says, "Current operator is (operator name). Select menu item."
3. Press the + or button until the terminal says, "Change pitch." Then, press the
operator button.
Note: Change Pitch is the fifth menu item in the list, assuming that the + button is
used to scroll through the options.
4. Press the + button to make the voice higher and the button to make the voice
lower. The terminal says "higher" each time you press the + button and "lower"
each time you press the button. If the pitch of the voice is at the highest possible

69
setting, the terminal will say, "This is highest." If the pitch of the voice is at the
lowest possible setting, the terminal will say, "This is lowest."
Note: You can exit from this menu without changing the pitch level by pressing the
yellow play/pause button before you press the operator button.
5. When the pitch reaches the level you want, press the operator button to save the new pitch setting.
Adjusting Speed for Talkman® T2
Note: The information in this topic applies specifically to the Talkman® T2
system. To view this information for the Talkman® OPEN system, click on
the image of the terminal.
• Purpose
• Procedure
Purpose
This document explains how to adjust the speed of the voice that the Talkman® T2 terminal uses to issue
prompts to operators.
Procedure
To adjust the speed, perform the following steps:
1. Make sure the terminal is on or sleeping.
The LED indicator should be either solid green or blinking green.
2. Press the operator button.
The terminal says, "Current operator is (operator name). Select menu item."
3. Press the +/ buttons until the terminal says, "Change speed." Then, press the
operator button.
Note: Change Speed is the fourth menu item in the list, assuming that the + button
is used to scroll through the options.
4. Press the + button to make the voice faster and the button to make the voice
slower. The terminal says "faster" each time you press the + button and "slower"
each time you press the button. If the speed of the voice is at the fastest possible
setting, the terminal will say, "This is fastest." If the speed of the voice is at the
slowest possible setting, the terminal will say, "This is slowest."
Note: You can exit from this menu without changing the voice speed by pressing
the yellow play/pause button before you press the operator button.
5. When the voice is speaking as quickly or as slowly as you want, press the operator button to save
the new speed setting.
Adjusting Volume for Talkman® T2
Note: The information in this topic applies specifically to the Talkman® T2
system. To view this information for the Talkman® OPEN system, click on
the image of the terminal.
70
• Purpose
• Procedures
Purpose
This document explains how to adjust the volume of the voice that the Talkman® T2 terminal uses to issue
prompts to operators.
Procedures
Operators may adjust the volume using either:
• Button Controls
• Voice Controls
Button Controls
To adjust the volume using buttons, perform the following steps:
1. Make sure that the terminal is either on or sleeping.
The LED indicator should be either solid green or blinking green.
2. Press the + button to make the voice louder, or the button to make the voice
quieter.
The terminal says "louder" when the + button is pressed and "softer" when the
button is pressed.
If the volume of the voice is at the loudest possible setting, the terminal will say,
"This is loudest." If the volume of the voice is at the softest possible setting, the
terminal will say, "This is softest."
Voice Controls
To adjust the volume using voice controls, perform the following steps:
1. Make sure the terminal is on.
The LED indicator should be green.
2. Say, "Talkman volume."
3. Say "louder" to make the voice louder, or "softer" to make it softer.
If the terminal says, "This is softest" or "This is loudest", you cannot make the volume any louder
or softer.
4. When the voice is as loud or as soft as you want it, say, "Talkman continue" to
return to your task.
71
Assembling a Talkman® OPEN
Assembling a Talkman® OPEN Assembling a Talkman® OPEN
Assembling a Talkman® OPEN
Battery Hous
Battery HousBattery Hous
Battery Housing
inging
ing
• Purpose
• Before You Begin
• Procedure
Purpose
This document contains instructions for assembling a battery housing for batteries used with
the Talkman® OPEN terminal. This procedure applies only to sites that use battery housings.
Before You Begin
Vocollect recommends using battery housings to protect batteries. For more information on the
batteries used with Talkman OPEN terminals, see Talkman® OPEN Batteries. Each battery
housing assembly kit comes complete with:
• Battery section (battery housing top): This larger section is where the battery fits. The
Vocollect logo is on the outside of this section.
• Contact section (battery housing bottom): This smaller section holds the battery
contacts.
• 5 pronged battery contacts
• 4 Torx screws
• A Torx #8 screwdriver
Procedure
To assemble a battery housing, perform the following steps:
1. Remove the rubber band securing the battery section to the contact section.
Note: The 5 pronged battery contacts and the Torx screws are sealed in plastic and
are enclosed by the battery contact sections.
2. Position the battery section so that the three contacts on the label inside the battery
section are to the right and the side with the cut-out feature is closest to you.
3. Position the battery so that the contacts are face up and the side with the three
contacts in a row is to the right (see Image 1).
Image 1: Battery Section with Battery
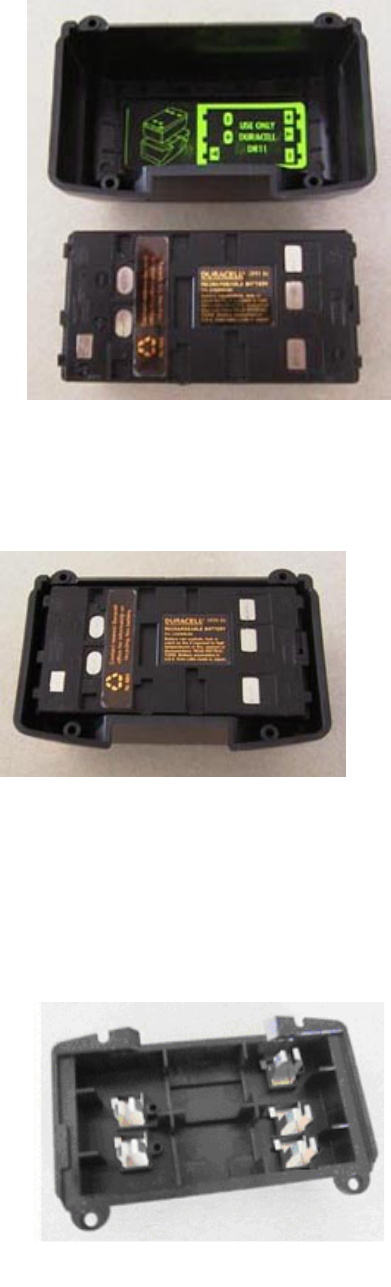
72
4. Place the battery into the battery section.
Note: Line up the three contacts on the battery with the three contacts on the label
inside the battery section. Make sure that the contact side of the battery is up (see
Image 2).
Image 2: Battery in Battery Section
5. Position the contact section so that the three square holes are to the right and the two
complete rounded holes are at the front.
6. Remove the five pronged battery contacts from the plastic bag.
7. Place the five pronged battery contacts into the five square holes (one contact per
hole) in the contact section so that the tab at the base of each prong settles into the
notch in each square hole (see Image 3).
Image 3: Contact Section Prongs in Place
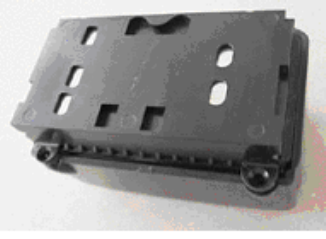
73
8. Make sure the prongs are separated and completely seated in the square holes.
9. Place the battery section on top of the contact section so that the cut-out feature of
the battery section is away from you. The two complete holes on the battery section
and the two complete holes on the contact section should be lined up.
10. Firmly hold the two sections together and flip the housing over so that it is laying on
the battery side (see Image 4).
Image 4: Battery Housing Assembly Ready for Screws
11. Remove the four Torx screws from the plastic bag.
12. Insert the screws into the four holes and tighten them to secure the sections together.
Warning: Do not tighten the screws too much, or you may crack the plastic or strip
the screws.

74
Caring for Headsets & Microphones
• Purpose
• Routine Maintenance
Purpose
This document describes the proper methods of caring for headsets, microphones, windscreens, and
earpieces on a routine basis. For more information on headsets and microphones, refer to Headsets,
Microphones, Windscreens & Earpieces.
Routine Maintenance
The headsets and microphones used with the Talkman® system are delicate pieces of electronic equipment.
Proper care will ensure that they work well for a long time. Care for high noise and regular headsets in the
same manner. For more information, refer to Headsets, Microphones, Windscreens & Earpieces.
• Vocollect highly recommends that operators do not share headsets. The primary reason for this
recommendation is sanitary in nature (i.e. the microphone is close to the mouth and can trap germs
and moisture). Also, operators tend to take better care of a headset that has been assigned
specifically to them. Set up a system for storing the headsets so that operators can easily locate
their own headset every time they report to work.
• Change windscreens every 90 days. Over time, the windscreen accumulates dirt
and moisture, making it more difficult for the Talkman terminal to understand the
operator. These conditions are even worse in a freezer, where condensation can
build up and freeze on the windscreen.
• If the windscreen becomes dirty or wet, slip it off of the microphone, then clean it. Clean the
windscreen by running it under warm water and rubbing it gently with soapy hands. Rinse it and
let it dry thoroughly before putting it back onto the microphone.
Changing a Talkman® T2 Battery
Note: The information in this topic applies specifically to the Talkman® T2 system.
To view this information for the Talkman® OPEN system, click on the image of the
terminal.
• Purpose
• Procedures
Purpose
This document contains instructions for changing a battery.
Procedures
• Removing a Battery
• Inserting a Battery
Removing a Battery
To remove a battery from a Talkman® T2 terminal, perform the following steps:
1. If the terminal is not off, press and hold the yellow play/pause button until the
LED indicator turns solid red.
75
After the LED indicator turns red, the terminal says, "Powering off" and the LED
indicator eventually turns off.
Warning: Do not remove the battery until the LED indicator is off. If you remove the
battery when the terminal is on or sleeping, any collected data could be lost.
2. Hold the terminal in one hand with the battery compartment facing toward you.
3. Press the battery release button all the way down until the top of the battery pops
up from the battery compartment.
Note: The battery release button is located just above the battery compartment.
Warning: Do not turn the terminal upside down (i.e. with the battery compartment
facing the floor) when you are pressing the battery release button. Doing so will
cause the battery to fall out of the terminal and could result in damage to the battery.
4. Lift the battery out of the compartment.
Inserting a Battery
To insert a battery into a Talkman terminal, perform the following steps:
1. Make sure that the battery has been charged before inserting it into the Talkman
terminal.
2. Hold the terminal in one hand with the battery compartment facing toward you.
3. Place the end of the battery with the battery contacts into the compartment first.
Place this end of the battery into the compartment so that the contacts on the
battery line up with the contacts in the compartment.
4. Press down on the battery until it snaps into place.
Warning: Do not force the battery into the compartment. Doing so may result in
damage to the battery or the terminal. If the battery does not snap easily into place,
reposition the battery in the compartment and try again.
5. Make sure the battery is firmly in place and cannot be removed without pressing
the battery release button.
76
Changing Configurable
Changing Configurable Changing Configurable
Changing Configurable
Parameters
ParametersParameters
Parameters
• Purpose
• Before You Begin
• Procedures
Purpose
This document contains instructions for changing the configurable parameters of a Talkman®
terminal. Several general parameters, as well as those associated with the operator and the
task, can be reconfigured to optimize the Talkman system. The Talkman terminal has default
settings for all parameters. If your site uses the default setup, you usually do not need to make
changes to the configurable parameters.
Warning: Consult a Vocollect representative before attempting to change any parameters.
See Contact Information.
Before You Begin
There are many parameters that Vocollect has created to allow the user to customize the
behavior of the Talkman. For a list of these parameters, please refer to the Configurable
Parameters Table.
There are three types of configurable parameters:
• parameters that apply to a task
• parameters that apply to an operator
• parameters that apply to a terminal
Parameters are set in different types of files. Operator and task parameters are usually set in
operator and task files (.vcf), and terminal parameters are usually set in a terminal's
configuration block (.cci) file.
Note: All of the parameters can be set in any of these three types of files. Where to put a
given parameter setting depends on what makes the most sense in the situation. In
instances when parameters are configured in more than one place, certain settings have
precedence over others. See Precedence Order of Parameter Settings for more details.
Parameters that Apply to a Task
Some parameters should be set for any time a particular task runs. For example, the
MaxSpeakAsNumber configurable parameter is best associated with a given task. Setting
this parameter ensures that during the running of that task, a number will be spoken out
fully (e.g., 22="twenty two") below the MaxSpeakAsNumber setting, and as individual digits
(e.g., 222="two two two") above the setting.
The terminal looks in the \Talkman\Task directory on the FTP server for this file. The file
is transferred to the terminal when loading a task and takes effect after the task load is
complete. If the terminal currently has a task, the current task and associated task (.vcf)
files are cleared, and the new task and associated task files are loaded.
Note: If a parameter was set only in the (task).vcf file, and that parameter is removed
from the .vcf file, the task must be reloaded for that parameter to revert back to its
default value.
77
To change this type of parameter, see Changing Task and Operator Parameters.
Parameters that Apply to an Operator
Some parameters apply to a particular operator, regardless of the task, but not to all
operators. These parameters should be set in the operator file. For instance, let's assume
an operator would like a terminal to stay on for a longer period of time before
automatically turning off when he or she is not speaking. By increasing the
SpeechWaitSecs parameter value in the operator's specific file, the administrator can
change the parameter without effecting other operators, terminals, or tasks.
The terminal looks in the \Talkman\Oper directory on the FTP server for this file. The file
is transferred to the terminal when loading an operator and takes effect after the operator
load is complete.
Note: If a parameter was set only in the (operator).vcf file, and then is removed, the
operator must be reloaded for that parameter to revert back to its default value.
To change this type of parameter, see Changing Task and Operator Parameters.
Parameters that Apply to a Terminal
Some parameters apply to terminal hardware, including such information as radio settings.
When a terminal is turned on, this type of parameter takes effect immediately.
To change these parameters, see Changing Configuration Block Parameters.
Terminal Communication Parameters
Some terminal parameters are set to establish communications between a terminal
and the Talkman network. It is very important that these parameters are set correctly
or the terminal will not be able to communicate with the Talkman system.
Network and Radio Parameters
The terminal automatically detects the type of radio being used. Some radio protocols
have a network ID, a domain, or other security or roaming parameters. The terminal
uses the radio defaults for these parameters unless an alternative is specified in the
terminal's configuration block (.cci) file.
The Talkman terminal must be given an IP address. A terminal normally obtains this IP
address from a DHCP server. If your site does not use a DHCP server, assign a static IP
address and subnet mask to each terminal in the terminal's configuration block.
Note: The above parameters are not listed in the Configurable Parameters Table,
but are found in the configuration block (.cci) file. If you have any questions about
the parameters in the configuration block , contact a Vocollect representative.
Terminal Manager Connection Parameters
The Talkman terminal requires a socket connection to the host computer running
Terminal Manager. For details about Terminal Manager, refer to the Terminal
Manager topic found in the Talkman Management System online documentation. The
terminal normally establishes this connection by looking for a host computer called
voctmgr on the network, and opening a socket on port 15001 to that computer. If DNS
is not being used, or if the host computer running the Terminal Manager application
has a different name than voctmgr, specify the Terminal Manager IP address or host
name in the terminal's configuration block (.cci) file.
Similarly, if Terminal Manager is set up to use a port other than 15001, the new
Terminal Manager port number must be specified in each terminal's configuration
block.

78
Precedence Order of Parameter Settings
Any task, operator, or terminal hardware parameters can be set in the (task).vcf file, the
(operator).vcf file, or the configuration block (.cci) file. They can even be set in all three
places at the same time. Obviously, this can mean that a parameter could potentially have
two different settings in two different files.
If this occurs, the setting in the configuration block overrides anything in the task or
operator files. Similarly, the settings in the operator file override those in the task file.
Note: If parameters are changed in the configuration block, the new configuration file
that is created from this procedure will need to be loaded onto every terminal for the
parameter to take effect. If parameters are changed in the (task).vcf, the new
parameters will take effect when the task is loaded onto a terminal. If an
(operator).vcf is added to an operator 's files, the new parameters will take effect
when the operator's files are loaded onto a terminal.
Procedures
• Changing Configuration Block Parameters
• Changing Task and Operator Parameters
Changing Configuration Block Parameters
Warning: Consult a Vocollect representative before attempting to change any
parameters. See Contact Information.
The terminal has a configuration block in its flash memory that contains configuration
parameters for radio and network communications, the Terminal Manager connection, and
the terminal itself. For a list of parameters, refer to the Configurable Parameters Table.
To change or set configuration block parameters, perform the following steps:
1. Click Start | Programs | Accessories | Notepad.
A blank Notepad file opens.
2. In Notepad, click File | Open.
3. Navigate to \program files\Vocollect\Talkman Software\firmware\config.vrg.
4. Click Open.
5. Edit the file.
Note: For questions about editing this file, contact a Vocollect representative.
Warning: Do not edit the config.cci file directly.
6. Click File | Exit.
7. Click Yes to save the changes to the config.vrg file.
8. Click Start | Programs | Windows Explorer.
9. Navigate to the \\program files\Vocollect\Talkman Software\firmware directory.
10. Double-click config.bat.
A new configuration file (config.cci) is automatically created and placed in the
folder.
11. Load this new configuration file onto the terminal.
Changing Task and Operator Parameters
Warning: Consult a Vocollect representative before attempting to change any
parameters. See Contact Information.
For a list of parameters, refer to the Configurable Parameters Table.
To set or change task or operator parameters, perform the following steps:
1. Click Start | Programs | Accessories | Notepad.

79
This will open a blank Notepad file.
2. Navigate to and open either the existing task.vcf in \program
files\Vocollect\Talkman Software\Task or the existing operator.vcf file in
\program files\Vocollect\Talkman Software\Task.
Note: If a (task).vcf or (operator).vcf file has already been created for this task or
operator, open that file, located in the \Talkman\Task or \Talkman\Oper directories,
respectively, on the FTP server.
3. Type in the parameter(s) to set.
Note: The following rules apply:
• White space(s) before and after the = are permissible and ignored.
• The file treats each new line as a separate value.
• Blank lines are permissible and ignored.
• Comments must be on a separate line. Blank lines and lines that start with a
semi-colon or a space are ignored. In the following example, the only line that
the system reads is SpeechWaitSecs = 7. The first and third lines are ignored
because they begin with a space and a semi-colon, respectively. The blank
lines are also ignored.
The following parameter is a frequently used timeout parameter.
SpeechWaitSecs = 7
;Changed from 10 by MRL on 2/21/01
• String parameters can include any printable character, as in the following
example:
SomeStringParam = this string.
• Floating-point numbers have a decimal point, such as SomeFloatParam = 7.2.
• Integers do not have decimal points. Some integer values require hexadecimal
representation, which includes the characters a, b, c, d, e, f, and x, such as
SomeIntegerHexParam = 0x0d0a.
• Parameter names are NOT case-sensitive.
• Each parameter definition begins with the parameter name, followed by an =.
The parameter type is determined by the format of the remainder of the line.
See the third column in the Configurable Parameters Table for permissible
parameter settings.
Warning: Files require an extra carriage return at the end. The last parameter
value must have a line-feed/carriage-return after it.
4. Click File | Save As.
Save task parameter files as (task).vcf to the \ftphome\Talkman\Task directory
on the FTP server.
Save operator parameter files as (operator).vcf to the \ftphome\Talkman\Oper
directory on the FTP server.
5. Click File | Exit.
Charging a Talkman® T2 Battery in a Battery Charger
Note: The information in this topic applies specifically to the Talkman® T2
system. To view this information for the Talkman® OPEN system, click on
the image of the terminal.
• Purpose
• Before You Begin

80
• Procedure
Purpose
This document contains instructions for charging a battery. Talkman® T2 terminal batteries can be charged
in one of two ways:
• Leave the battery connected to a terminal and place the terminal into a terminal charger. For more
information, see Placing a Talkman Terminal into a Terminal Charger.
• Remove the battery from the terminal and place the battery into a battery charger.
Before You Begin
All battery chargers come equipped with two LED indicators below each battery slot on the charger. The
following table details the different colors of the indicators when a battery is being charged:
Left
Indicator
Color
Right
Indicator
Color
If no battery is in
the charger...
If a battery is being charged...
Off Off Normal state; no
action is
necessary.
Abnormal condition; check the battery contacts
and the charger contacts for dirt or other
obstructions that would keep the contacts from
making a solid connection; clean the contacts if
necessary; if both LED indicators remain off,
return the charger for service.
Solid Amber Off Charger module is
malfunctioning;
return for service.
Normal state; the battery is not ready to be
charged; a battery is not ready to be charged if it
is too cold, too hot, or if it is completely dead.
The charger waits for the battery to warm up,
cool off, or partially charge before it begins fast
charging (at which point the left LED indicator
turns solid red).
The following information details the
length of time that it will take for a
cold battery to warm up enough to
begin fast charging:
• If the battery was being used
at -4°C (24.8°F), it will take
approximately 6 minutes for
the battery to warm up.
• If the battery was being used
at -10°C (14.0°F), it will take
approximately 10 minutes for
the battery to warm up.
• If the battery was being used
at -20°C (-4.0°F), it will take
approximately 22 minutes for
the battery to warm up.
If the battery was being used at -
30°C (-22.0°F), it will take
approximately 30 minutes for the
battery to warm up.
Off Solid Green Char
g
er module is Normal state; the batter
y
is char
g
ed and read
y
to

81
malfunctioning;
return for service.
be used.
Solid Red Off Charger module is
malfunctioning;
return for service.
Normal state; the battery is being charged.
Blinking Red Off Charger module is
malfunctioning;
return for service.
Abnormal condition; the battery may be
defective; remove the battery from the
charger and check for moisture on the
battery contacts; if moisture exists, wipe off
the contacts and place the battery back into
the charger; if the LED indicator continues
to blink red, the battery is defective; remove
the battery from the charger and give it to
your system administrator.
Blinking
Red, then
Off
Blinking
Green,
then Off
Charger
module is
malfunctionin
g; return for
service.
Error condition; the battery is
defective; remove the battery from
the charger and give it to your
system administrator.
Blinking
Orange
Off Charger
module is
malfunctionin
g; return for
service.
Abnormal condition; check the
battery contacts and the charger
contacts for dirt or other obstructions
that would keep the contacts from
making a solid connection; clean the
contacts if necessary; if the LED
indicator continues to blink orange,
try various combinations of batteries
and chargers to determine if the
problem follows the battery or the
charger module; return the faulty
equipment for service.
Solid Orange Solid Green Charger module is
malfunctioning;
return for service.
Normal state; this state only occurs for about a
second when a battery is removed from the
charger; if this state occurs for an extended
period of time, it is an abnormal condition and
should treated the same as the abnormal
conditions listed above.
The length of time that it takes to completely charge a fully depleted battery is
approximately 3 hours for the standard battery and 5 hours and 30 minutes for the high
capacity battery. This does not include any time that may be necessary to bring a battery
that is too cold, too warm, or completely dead into a charging state (a battery that is too
cold, too warm, or completely dead needs to warm up, cool down, or partially charge
before it actually enters a fast charging state).
Note: It is recommended that a brush similar to the one found at the following link be
used to clean the contacts on the terminal, battery, and charger. Gently brush the contacts
to clean away dirt and other obstructions that might prohibit them from making a solid
connection.
http://web-tronics/852.html
The brush found at this link is a small, inexpensive, three-row toothbrush style, general

82
cleaning brush. It is made of natural, stiff hog hair bristles and has a 7 3/4" plywood
handle. This brush is excellent for general circuit board cleanup.
Procedure
To charge a battery, perform the following steps:
1. Make sure the battery charger module(s) is powered. The orange power light (i.e. LED indicator)
on the left end of the battery charger should be lit.
2. Remove the battery from the Talkman terminal. See Changing a Battery for detailed instructions.
3. Hold the battery with the battery contacts to the bottom and the battery label facing away from
you.
4. Place the battery into one of the open slots on the battery charger.
5. Push on the battery until it snaps into place.
6. When the battery is placed into the charger properly, the left LED indicator for the slot into which
the battery was placed should turn red, indicating that the battery is being charged.
To remove a battery from a charger, perform the following steps:
1. Only remove and use batteries that are fully charged (i.e. the right LED indicator is solid green).
2. Press the battery release button on the charger and remove the battery.
Choosing a Different Speaker for Talkman® T2
Note: The information in this topic applies specifically to the Talkman® T2
system. To view this information for the Talkman® OPEN system, click on
the image of the terminal.
• Purpose
• Procedure
Purpose
This document explains how to choose a different speaker for terminal prompts (i.e. how to change the
gender of the terminal's voice).
Note: Male and female speakers are available for English only. All other languages only
have one voice option at this time.
Procedure
To choose a different speaker, follow these steps:
1. Make sure the terminal is either on or sleeping.
The LED indicator will be either solid green or blinking green.
2. Press the operator button.
The terminal says, "Current operator is (operator name). Select menu item."
3. Press the +/ buttons until the terminal says, "Change speaker." Then, press the
operator button.
Note: Change Speaker is the sixth menu item in the list, assuming that the + button
is used to scroll through the options.
4. Press the +/ button to hear the next speaker.
The terminal says, "This is female" when it toggles to the female voice, or "This
is male" to indicate the male voice.
Note: You can exit from this menu without changing the speaker by pressing the
83
yellow play/pause button at this point.
5. When you hear the speaker you want to use, press the operator button to select that speaker.
84
Conditioning a Talkman® OPEN
Conditioning a Talkman® OPEN Conditioning a Talkman® OPEN
Conditioning a Talkman® OPEN
Battery
BatteryBattery
Battery
• Purpose
• Before You Begin
• Procedures
Purpose
This document contains information about conditioning a Talkman® OPEN battery.
Note: If you have a cradle labeled CR-002-x, you do not have to carry out any of the
following procedures to condition your batteries. The new cradles contain the Pulse
Power™ charger which charges batteries in such a way that they will not suffer memory
effect.
Before You Begin
If you have a cradle labeled CR-001-x, Vocollect recommends using a battery conditioner. The
following are two examples of battery conditioners.
• JBRO® TP3501Q; Telepower Conditioner/Analyzer from JBRO Batteries, Inc.
• Pulse Power™ Charger SE9PAN; Pulse Power, Inc.
The JBRO conditioners discharge and recharge batteries.
The Pulse Power conditioner does not discharge batteries, but uses a proprietary technology to
charge and condition batteries.
Vocollect recommends running a reconditioning cycle for every 30 shallow charges. A shallow
charge is defined as one where the battery has not been drained past the Talkman's first
battery warning. If using the battery in a freezer environment, you should condition the
battery every 20 charges.
Procedures
To condition a battery, perform the following steps:
1. When using a JBRO conditioner, discharge and charge the battery for three to five
cycles according to the manufacturer's directions.
When using a SAGE pulse charger, follow the manufacturer's instructions to charge the
battery on the SAGE unit and use it three to five times on the terminal.
2. Charge the battery in a Talkman battery charger.

85
Configurable Parameters
Configurable ParametersConfigurable Parameters
Configurable Parameters
The name, description, and legal values of most of the common parameters appear in the
following tables.
Warning: Changing configurable parameters could affect the Talkman® system's
performance. Please contact Vocollect before you make any changes to these parameters.
Note: These tables include only parameters that customers may edit. Default values are
highlighted in yellow. Where no value is highlighted, there is no default value. All
parameters set defaults for your whole site, unless otherwise noted. If you are curious
about a parameter that does not appear in the following tables, do not edit it. Contact
Vocollect with any questions.
• System Parameters
• Speech Recognition Parameters
System Parameters
Parameter Name Description Applicable Values and Default
Value
BarcodeBaud Defines the baud rate for the
bar code port as required by
the bar code reader.
50, 75, 100, 150, 300, 600,
1200, 1800, 2000, 2400, 3600,
4800, 7200, 9600, 19200,
31250, 38400
BarcodeFlowControl Controls whether hardware
flow control is enabled or
disabled on the bar code
device port.
0 = disable
1 = enable
BarcodeParity Defines the parity on the bar
code port as required by the
bar code reader.
1 = no parity
2 = odd parity
3 = even parity
4 = mark parity
5 = space parity
BarcodePort Defines the port to which the
bar code reader is connected.
Blue or Green (not case-
sensitive)
BarcodeStopBits Defines the number of stop bits
for the bar code reader port as
required by the bar code
reader.
1 = one stop bit
2 = two stop bits
BarcodeTermChar1 Defines the first character that
terminates a string of
characters generated during a
bar code read as required by
the bar code reader.
Any integer, entered as a
hexadecimal number
0x0d
BarcodeTermChar2 Defines the second character
that terminates a string of
characters generated during a
bar code read as required by
the bar code reader.
Any integer, entered as a
hexadecimal number
0x0a
BarcodeWordLen Defines the number of bits per 5, 6, 7, 8

86
character on the bar code port
as required by the bar code
reader.
ChangeTaskEnabled When enabled, allows the user
to change the task from the
terminal.
0 = cannot change the task
from the terminal
1 = can change the task from
the terminal
Event_Cradled_Timeout Using in conjunction with the
Event_Term_Powered_On_Tim
eout parameter; when a
terminal has been powered on
for the amount of time (in
minutes) as defined by the
Event_Term_Powered_On_
Timeout parameter, the
terminal will automatically
power off and then back on
after it has been in the charger
for the number of minutes as
defined by this parameter.
For example, assume that the
Event_Term_Powered_On_Tim
eout parameter is set to 480
and that this parameters it set
to 5. Now assume that a
terminal has been in use for
the last 8 hours (which is 480
minutes). If the terminal is
placed into a charger without
first being powered off, it will
automatically power off and
then back on after it has been
in the charger for 5 minutes.
5
Recommended minimum value
= 5
Recommended maximum value
= 30
Although it is possible for the
user to input a value for this
parameter that is outside of
the minimum and maximum
values defined above, it is
highly recommended that the
value be set between 5 and 30.
Event_Poweroff_Timeout Controls the length of time
spent sleeping, without any
activity, before a terminal will
automatically turn itself off.
Any number of minutes
10
Event_Term_Powered_On_
Timeout If a terminal has been in a
charger for the amount of time
(in minutes) as defined by this
parameter, the terminal will
automatically power off and
then back on.
Also, if a terminal has been in
use for the amount of time (in
minutes) as defined by this
parameter and then the
terminal is placed into a
charger, the terminal will
automatically power off and
then back on after the number
of minutes as defined by the
Event_Cradled_Timeout
480
Recommended minimum value
= 240
Recommended maximum value
= 720
Although it is possible for the
user to input a value for this
parameter that is outside of
the minimum and maximum
values defined above, it is
highly recommended that the
value be set between 240 and
720.

87
parameter.
FlashODR Selects between storing ODRs
to flash prior to sending or
sending them directly from
RAM.
0 = off
1 = on
LowFlashThreshold Sets the amount of flash
memory that is allocated for
storage of OFF files. The OFF
files are created when the
terminal is powered off. This
parameter insures that there is
always enough memory
available to properly power off
the terminal.
262144 (256 Kilobytes)
Minimum value = 65536 (64
Kilobytes)
Maximum value = 1048576
(1024 Kilobytes)
Values should be entered as
bytes from 65536 to 1048576.
It is recommended that this
parameter not be set below
262144. If it is set lower, the
terminal may not be able to
properly power off.
LowFlashWarningThreshold Sets the threshold for when
flash warning messages are
spoken to the operator
because the terminal is running
low on available flash memory.
In most cases, this lets the
operator know that he or she
needs to upload his or her
ODRs. A warning message is
spoken once a minute when
the amount of flash is less than
the LowFlashWarning
Threshold +
LowFlashThreshold.
So, for example, if the
LowFlash Threshold = 262144
and LowFlash
WarningThreshold is set to
131072, then the warning
messages will start when
available flash memory drops
below 393216 bytes.
131072 (128 Kilobytes)
Minimum value = 32768 (32
Kilobytes)
Maximum value = 524288 (512
Kilobytes)
Values should be entered as
bytes from 32768 to 524288.
MaxSpeakAsNumber Identifies the maximum
number that is spoken as a
natural number (e.g. twenty-
three) as opposed to a string of
digits (e.g. two, three).
1 - 1000000
99
NoSpeechHeardRetryCount The number of times that the
terminal will prompt for a
given word without hearing
anything before giving up and
going to sleep.
4
Minimum value = 0
Maximum value =
2,147,483,647
NoTalkOverPriorityPrompt Determines whether or not
operators have to wait until
the end of priority prompts
before a terminal will accept
0 = allows talk over priority
prompts
1 = does not allow talk over
priority prompts

88
speech input. If set to 1,
SpeechOutSpeechIn Delay
determines how much of the
priority prompt can be talked
over.
ODRConfirmationByte It is possible to guarantee that
an output data record (ODR)
was acted upon by the host
application by forcing the
terminal to wait for the host
application to confirm the
receipt of the ODR. This
parameter is used to enable
the receipt confirmation.
Setting this parameter to any
value of between 0x00 to 0xFF
forces the terminal to wait for
the host application to respond
with the appropriate
confirmation byte (i.e. the
value of the parameter) when
an ODR is sent from the
terminal.
For example, if this parameter
is set to 0x50, then the
terminal software does not
consider the transmission of an
ODR to be a success until the
host application sends the byte
0x50 back to the terminal. If
any other character is sent to
the terminal (or no character is
sent), the transmission of the
ODR is considered to have
failed.
Minimum value = 0x00
Maximum value = 0xFF
This value can be input in the
format 0x00 or as a single
alphanumeric character (such
as A-Z, a-z, or 1-9).
The value 0x100 is also valid
for this parameter. When the
parameter is set to this value,
the terminal will wait for a
confirmation byte from the
host application. However, the
byte will not be compared to
tany expected value (i.e. any
byte sent back to the terminal
will be accepted as
confirmation that the ODR was
received by the host
application).
OutputVolume Determines the initial setting
of the terminal speech output
volume
1 - 10
6
PrinterBaud Sets the baud rate for the
printer port.
50, 75, 100, 150, 300, 600,
1200, 1800, 2000, 2400, 3600,
4800, 7200, 9600, 19200,
31250, 38400
PrinterFlowControl Controls whether hardware
flow control is enabled or
disabled on the printer port.
0 = disable
1 = enable
PrinterParity Parity for the printer port. 1 = no parity
2 = odd parity
3 = even parity
4 = mark parity
5 = space parity
PrinterPort The port on the terminal
where the printer message is
sent.
Red or Blue
PrintStopBits The number of stop bits for the 1

89
printer port. 2
PrinterTermChar1 Defines the first character that
terminates a string of
characters generated during a
printer read as required by the
printer.
Any integer, entered as a
hexadecimal number
0x0d
PrinterTermChar2 Defines the second character
that terminates a string of
characters generated during a
printer read as required by the
printer.
Any integer, entered as a
hexadecimal number
0x0a
PrinterWordLen The number of bits per
character on the printer port.
5, 6, 7, 8
RadFtpHost Identifies the host IP address
or computer name where the
FTP server is running.
Any alphanumeric string that
names a valid TCP\IP address
RadFtpPswd Identifies the password
associated with the user
account specified by the
RadFtpUser parameter.
Any valid password on the host
computer
RadFtpUser Identifies the user account to
use when performing file
transfers via FTP when using
the radio network.
Any valid account name on the
host computer
RestartTask Determines if the task is forced
to the start node after the
terminal is put into a terminal
charger. Setting this parameter
to 0 (default value) causes the
task to maintain history when
placed into a charger;
therefore, when a terminal
goes back on air, it starts in
the task at the exact point
where it left off. If the
parameter is set to 1, the task
begins at the start node after
being placed into a charger.
0 = does not restart at start
node
1 = restarts at start node
SpeechWaitSecs Defines the number of seconds
before the terminal sleeps if
the operator does not speak at
all.
5 - 600
240
SpeechWakeupEnable Enables and disables the
"Talkman, wake up" feature.
This feature allows an operator
to get a terminal that is
sleeping back to an on-air
state by saying "Talkman, wake
up" rather than pressing the
yellow play/pause button.
0 = disabled (i.e. the operator
must press the yellow
play/pause button to return a
sleeping terminal to an on-air
state)
1 = enabled
SupportedRate Gives the user the ability to set
the maximum bit rate for a
terminal's radio card. This rate
is the rate at which the card
tt t t t f d t
2 = 1 megabit per second
4 = 2 megabits per second
11 = 5.5 megabits per second

90
attempts to transfer data over
the radio frequency network.
By default, a terminal's radio
card will always try to run at
the maximum rate for that
card. This parameter is used to
set that maximum rate to a
lower rate.
22 = 11 megabits per second
As stated in the description to
the left, a terminal's radio
card will always attempt to
transfer data at the maximum
rate for that card unless the
user sets this parameter to
one of the above values.
System_Say_Again_Enable Enables the "Say again" control
phrase; when this phrase is
enabled, operators can get a
terminal to repeat the last
thing it said by simply saying,
"Say again".
0 = disabled
1 = enabled
TmgrService Defines the destination socket
address or port value for
Terminal Manager for radio
communications.
1 - 65535, recommended >
15000
15001
TrainDeviceBaud Defines the baud rate for the
training device port as
required by the training
device.
50, 75, 100, 150, 300, 600,
1200, 1800, 2000, 2400, 3600,
4800, 7200, 9600, 19200,
31250, 38400
TrainDeviceFlowControl Controls whether hardware
flow control is enabled or
disabled on the training device
port.
0 = disable
1 = enable
TrainDeviceParity Defines the parity on the
training device port as
required by the training
device.
1 = no parity
2 = odd parity
3 = even parity
4 = mark parity
5 = space parity
TrainDevicePort Defines the port to which the
training device is connected.
Red (not case sensitive)
None
TrainDeviceStopBits Defines the number of stop bits
for the training device port.
1 = one stop bit
2 = two stop bits
TrainDeviceWordLen Defines the number of bits per
character on the training
device port as required by the
training device.
5, 6, 7, 8
TrainDeviceTermChar1 Defines the first character that
terminates a string of
characters generated during a
training device read as
required by the training
device.
Any integer, entered as a
hexadecimal number
0x0d
TrainDeviceTermChar2 Defines the second character
that terminates a string of
characters generated during a
training device read as
required by the training
device.
Any integer, entered as a
hexadecimal number
0x0a
TTSPitch Controls the pitch (higher or
lower) of the terminal's voice. 1 - 9
5

91
TTSSpeechRate Controls the speech rate
(faster or slower) of the
terminal's voice.
1 - 9
6
TTSSpeechRateMax Sets the maximum speech rate
of the terminal's voice. 2 - 9
9 (must be greater than
TTSSpeechRateMin)
TTSSpeechRateMin Sets the minimum speech rate
of the terminal's voice. 1 - 8
1 (must be less than
TTSSpeechRateMax)
TTSVoice Controls the gender (male or
female) of the terminal's voice.
female
male
TTSVolume Controls the volume (louder or
softer) of the terminal's voice. 1 - 9
9
VT_Emulation_Task Determines whether a task
uses VT220 terminal emulation
or not.
0 = off
1 = on
Speech Recognition Parameters
Parameter Name Description Applicable Values and Default
Value
BlueStreak_Agc_DialogEnable Determines whether or not
Automatic Gain Control is
enabled during decoding.
0 = disabled
1 = enabled
BlueStreak_Decode_
RejectLengthEmbeddedLowerT
ol
The lower length tolerance, in
seconds, for words that were
trained in an embedded (i.e.
phrase) context. If using a
custom training prompt file
(.emb file), this value may
need to be increased to
prevent good recognitions from
being rejected.
Minimum value = 0
Maximum value = 4
0.250
BlueStreak_Decode_
RejectLengthMinimumLength
The minimum allowable
length, in seconds, of a word.
Words that are shorter than
this value are rejected.
Minimum value = 0
Maximum value = 4
0.130
BlueStreak_Decode_Sensitivity This parameter defines
BlueStreak's word rejection
threshold.
BlueStreak's sensitivity is tuned
for warehouse case picking
applications. However, this
tuning may not be optimal for
all applications. Increasing the
value of this parameter will
make it more difficult for
words to be accepted;
decreasin
g
this value will allow
Minimum value = -5
Maximum value = 5
0

92
more words to be accepted.
For example, in applications
where the operator is
constantly talking, changing
this parameter to a negative
number (-0.5 is a good number
to start with) may result in
better overall system
recognition performance. The
tradeoff is that out of
vocabulary words and
extraneous noises are more
likely to be erroneously
recognized as words.
BlueStreak_Frontend_
PrintBackgroundInterval
How often, in seconds, the
background energy is printed
out in debug.
10
BlueStreak_Train_
EmbeddedMiddleWord
When doing catchweights (or
some other rapid-digit task)
and there is a word that is
often mixed in with the digits
(such as point or decimal),
then that word should be
specified in this parameter.
The word will then be trained
in an embedded context with
the digits, improving
recognition performance on
catchweights. To use no
embedded word, set this
parameter to NONE.
. (i.e. the default is "point")
BlueStreak_Train_
MaximumUttSeconds The maximum length, in
seconds, of a training
utterance. Utterances longer
than this value will be
discarded.
The value for this parameter
must be increased when
extremely long vocabulary
words are used in a task. This
value can also be decreased to
help ensure proper training
data when only shorter words
are used.
Minimum value = 1
Maximum value = 10
7
BlueStreak_Train_
RandomizeEnable
Gives the system administrator
the ability to randomize
training the same way or
differently every time an
operator goes through the
enrollment training process.
0 = randomize training the
same way every time
1 = randomize training
differently every time
93
Configuring a Terminal
Configuring a TerminalConfiguring a Terminal
Configuring a Terminal
• Purpose
• Before You Begin
• Procedure
Purpose
This document contains instructions for configuring a Talkman® terminal by loading a
configurable parameters (.cci) file onto a terminal.
If you want to change the configurable parameters found in a terminal's task or operator files,
see Changing Task and Operator Parameters in the Changing Configurable Parameters topic.
Before You Begin
Before you configure a terminal, you must determine if you can use an existing configurable
parameters file or if you need to create a new file specific to your terminal. For example, if
you are adding a new or repaired terminal to the network, and your site uses static IP
addresses (rather than DHCP ), you would need to assign the IP address for the terminal in the
configurable parameters file specific to that terminal before loading the file onto the terminal.
For more information on configurable parameters, see Changing Configurable Parameters.
Procedure
To configure a Talkman terminal, perform the following steps:
1. Make any needed changes to the configurable parameters file. See Changing
Configurable Parameters.
2. If the terminal is already on the network, load the configurable parameters file online.
If the terminal is not already on the network, load the configurable parameters file
offline.
Note: If you are configuring a new or repaired terminal that has not been able to
connect to the network, you must load the configurable parameters file offline.
94
Configuring Rem
Configuring RemConfiguring Rem
Configuring Remote Listening
ote Listening ote Listening
ote Listening
Systems
SystemsSystems
Systems
• Purpose
• Before You Begin
• Procedure
Purpose
This procedure explains how to set up Vocollect's recommended model of remote listening
system, the Maxon 49-HX Communicator, in order to train a new operator.
Before You Begin
You will need the following items:
• Two Maxon 49-HX Communicator kits (one to transmit and one to receive). Each
communicator kit contains the following items:
• Maxon Hands-Free Communicator--Model 49-HX
• Headset
• 14" cable with a 6-pin DIN connector on one end and a 1/8" plug on the other
• 1/8" shorting plug
• Six AA batteries
• Holster
• The operator's Talkman® terminal with a headset and belt.
Procedure
To configure a remote listening system for training, you must set up two different types of
communicators:
• Setting up the transmitting communicator
• Setting up the receiving communicator
Setting Up the Transmitting Communicator
The transmitting communicator is set up as a dedicated transmitter and it is connected to
the operator's terminal. To set up this communicator, perform the following steps:
1. Put three AA batteries into transmitting communicator.
2. Remove the communicator's headset. It is not used.
3. Set the Intercom/Transmit (marked INT/TX) switch to TX.
4. Turn VOX off on the communicator. Do this by holding the communicator so that
the label reading Maxon 49-HX Communicator is facing you and the VOX dial is on
the left, then rolling the dial toward PTT (Push to Talk) until it clicks.
5. Set the channel using the channel selector (marked CH) on the transmitting
communicator.
6. Set the transmitting communicator's volume to its lowest setting, using the volume
dial (marked VOL).
7. Insert the separate 1/8" plug into the remote jack (marked REM) on the
transmitting communicator. This serves the same function as holding down the
PUSH TO TALK button continuously, so that the operator does not have to do this
manually (see image 1).
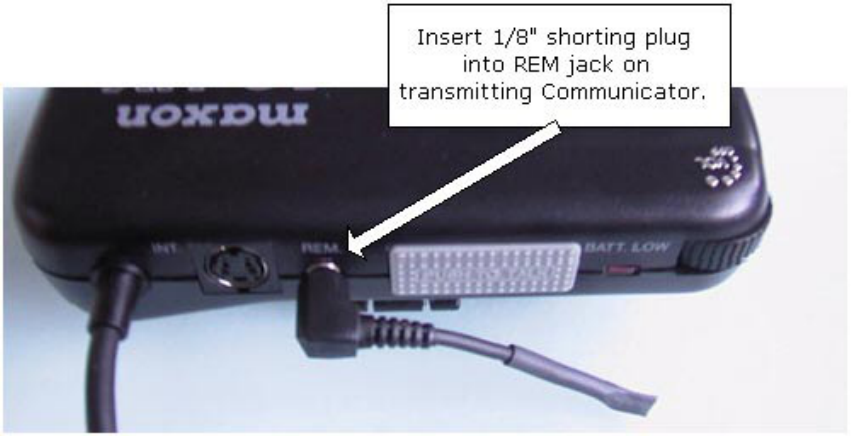
95
Image 1: Inserting 1/8" Plug into Remote Jack.
8. Slide the holster onto the operator's belt.
9. Place the transmitting communicator into the holster on the operator's belt (see
image 2).
10. Plug the 6-pin DIN connector on the 14" cable into the 6-pin DIN connector on the
transmitting communicator.
11. Obtain a Talkman terminal audio cable. This cable is the one that has a red bend
relief above its connector and an audio jack on the other end.
12. Locate the red connection port on the Talkman terminal. This port is the one with
the red arrow above it on the terminal.
13. Hold the audio cable's connector so that its release lever in on the bottom.
14. Tilt the connector and insert the top of it into the top slot of the terminal's red
connection port.
15. With the top slot in place, tilt the connector down onto the terminal until the
release lever snaps into place on the connection port.
16. Insert the 1/8" plug on the other end of the communicator's 14" cable into the
audio jack on the other end of the terminal's audio cable.
Setting Up the Receiving Communicator
The receiving communicator is set up as a dedicated receiver for use by a trainer. To set
up this communicator, perform the following steps:
1. Put three AA batteries into the receiving communicator.
2. Set the receiving communicator's gray Intercom/Transmit (marked INT/TX) switch
to TX.
3. Turn VOX off on the receiving communicator. Do this by holding the communicator
so that the label reading Maxon 49-HX Communicator is facing you and the VOX
dial is on the left, then rolling the dial toward PTT (Push to Talk) until it clicks.
4. Set the channel to the same channel as the transmitting communicator (see
Setting Up the Transmitting Communicator," step 5).
5. Adjust the receiving communicator's volume to a comfortable, audible level.
6. Slide the holster onto the trainer 's belt.
7. Put the communicator into the holster (see image 2).
Image 2: Inserting Communicator into Holster
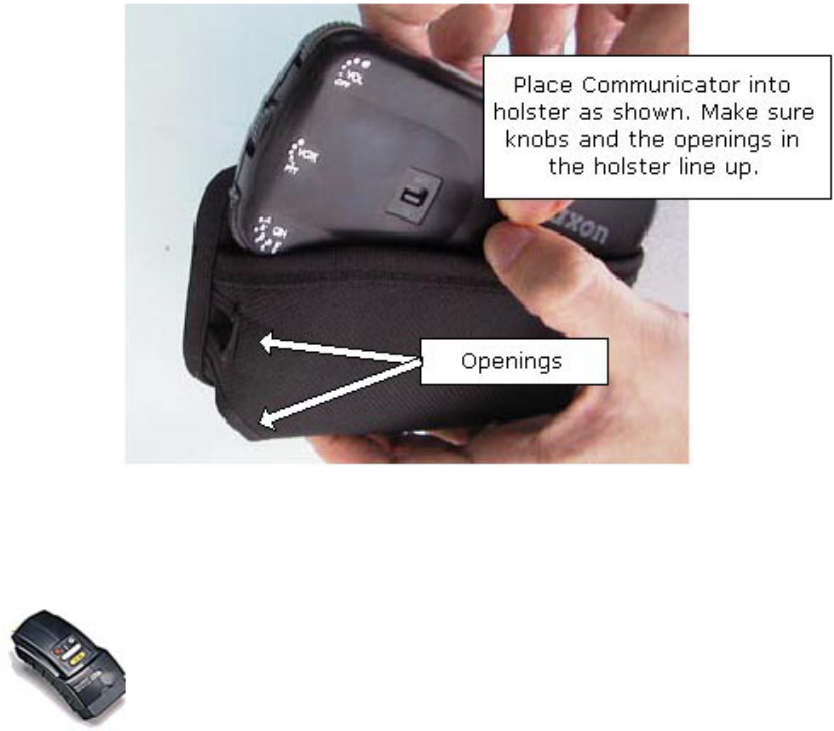
96
8. Connect the communicator's headset.
Note: If you are monitoring more than one operator, make sure each operator 's
transmitting communicator is set to a different channel. One receiving communicator
can listen to up to five transmitting communicators.
Connecting & Disconnecting Talkman® T2 Peripherals
Note: The information in this topic applies specifically to the Talkman® T2 system.
To view this information for the Talkman® OPEN system, click on the image of the
terminal.
• Purpose
• Before You Begin
• Procedures
Purpose
This document contains instructions for connecting and disconnecting peripheral devices that
are used with the Talkman® T2 terminal. Peripheral devices include:
• bar code readers (and other RS-232 devices)
• headsets
• portable printers
• remote listening devices
• visual training devices
• wired portable speakers
Before You Begin
Peripherals are connected to a Talkman terminal via the connector plate on the end of the
terminal. The connector plate has three ports. Peripherals are attached to the ports with
connectors. The connectors secure the peripherals to the terminal by snapping directly onto
the terminal's ports.
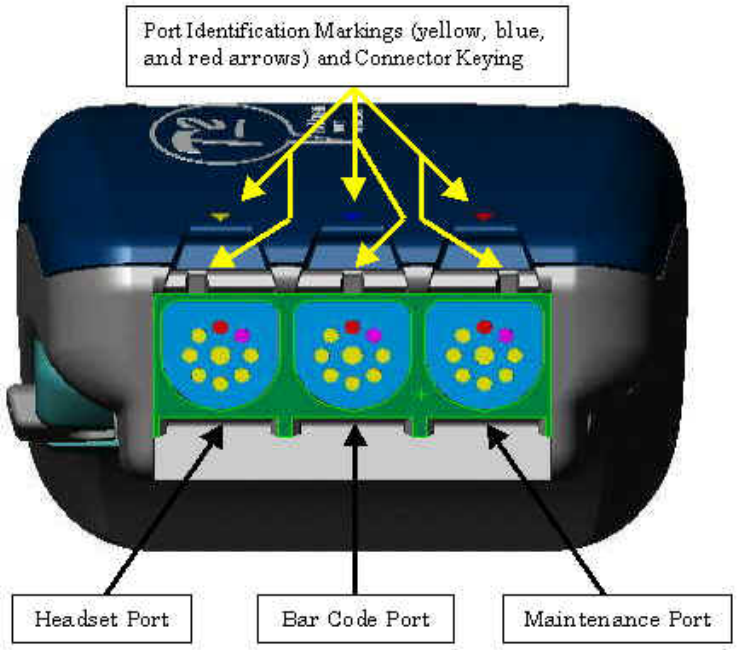
97
The terminal's connection ports are color-coded (with red, yellow, and blue arrows) to match
the color on the bend relief of the peripheral device's connector cable. The connectors are
keyed so that there is only one way to attach a peripheral's connector cable to the Talkman
terminal. If you attempt to attach a peripheral incorrectly, you may damage both the terminal
and the peripheral's connector.
Warning: A peripheral device should only be removed from a terminal by grasping the
connector and pressing its release lever. You should never pull directly on the peripheral
device's connector cable, as this could result in damage to the peripheral device and the
terminal.
Note: Some peripherals must be configured before they will work with the Talkman system.
You do not need to configure headsets and wired portable speakers. For information on
configuring other peripherals see Configuring Remote Listening Systems, Configuring Visual
Training Devices, or the manufacturer's documentation for configuring bar code readers.
Procedures
• Connecting and disconnecting headsets
• Connecting and disconnecting bar code readers (and other RS-232 devices)
• Connecting and disconnecting wired portable speakers
• Connecting and disconnecting remote listening devices
• Connecting and disconnecting visual training devices
• Connecting and disconnecting a portable printer
Connecting and Disconnecting Headsets
To connect a headset to a terminal, perform the following steps:
98
1. Locate the yellow connection port on the terminal. This port is the one with the
yellow arrow above it on the terminal.
2. Hold the headset's connector so that its release lever is on the bottom.
3. Tilt the connector and insert the top of it into the top slot of the terminal's yellow
connection port.
4. With the top slot in place, tilt the connector down onto the terminal until the
release lever snaps into place on the connection port.
To disconnect a headset from a terminal, perform the following steps:
1. Grasp the headset's connector.
Warning: Do not pull on the headset's cable.
2. Press the connector's release lever.
3. Tilt the bottom of the connector off the terminal.
4. Lift the connector up and off the terminal.
Connecting and Disconnecting Bar Code Readers
To connect a bar code reader to a terminal, perform the following steps:
1. Locate the blue connection port on the terminal. This port is the one with the blue
arrow above it on the terminal.
2. Hold the bar code reader's connector so that its release lever is on the bottom.
3. Tilt the connector and insert the top of it into the top slot of the terminal's blue
connection port.
4. With the top slot in place, tilt the connector down onto the terminal until the
release lever snaps into place on the connection port.
To disconnect a bar code reader from a terminal, perform the following steps:
1. Grasp the bar code reader's connector.
Warning: Do not pull on the bar code reader's cable.
2. Press the connector's release lever.
3. Tilt the bottom of the connector off the terminal.
4. Lift the connector up and off the terminal.
Connecting and Disconnecting Wired Portable Speakers
To connect a wired portable speaker to a terminal, perform the following steps:
1. Obtain a Talkman terminal audio cable. This cable is the one that has a red bend
relief above its connector and an audio jack on the other end.
Note: A wired portable speaker can also be connected to the terminal using either a
maintenance cable or a training cable.
2. Locate the red connection port on the terminal. This port is the one with the red
arrow above it on the terminal.
3. Hold the audio cable's connector so that its release lever is on the bottom.
4. Tilt the connector and insert the top of it into the top slot of the terminal's red
connection port.
5. With the top slot in place, tilt the connector down onto the terminal until the
release lever snaps into place on the connection port.
6. Plug the connector at the end of the wired portable speaker's audio cable into the
audio jack at the end of the cable.
To disconnect a wired portable speaker from a terminal, perform the following steps:
1. Grasp the connector at the end of the speaker's audio cable in one hand and grasp
the audio cable's audio jack in the other.
2. Pull the speaker's connector out of the audio cable's audio jack.
3. Grasp the audio cable's connector.
Warning: Do not pull on the audio cable itself.
99
4. Press the connector's release lever.
5. Tilt the bottom of the connector off the terminal.
6. Lift the connector up and off the terminal.
Connecting and Disconnecting Remote Listening Devices
To connect a remote listening device to a terminal, perform the following steps:
1. Obtain a Talkman terminal audio cable. This cable is the one that has a red bend
relief above its connector and an audio jack on the other end.
Note: A remote listening device can also be connected to the terminal using either a
maintenance cable or a training cable.
2. Locate the red connection port on the terminal. This port is the one with the red
arrow above it on the terminal.
3. Hold the audio cable's connector so that its release lever is on the bottom.
4. Tilt the connector and insert the top of it into the top slot of the terminal's red
connection port.
5. With the top slot in place, tilt the connector down onto the terminal until the
release lever snaps into place on the connection port.
6. Plug the connector at the end of the remote listening device's cable into the audio
jack at the end of the cable.
To disconnect a remote listening device from a terminal, perform the following steps:
1. Grasp the connector at the end of the device's cable in one hand and grasp the
audio cable's audio jack in the other.
2. Pull the device's connector out of the audio cable's audio jack.
3. Grasp the audio cable's connector.
Warning: Do not pull on the audio cable itself.
4. Press the connector's release lever.
5. Tilt the bottom of the connector off the terminal.
6. Lift the connector up and off the terminal.
Connecting and Disconnecting Visual Training Devices
To connect a visual training device to a terminal, perform the following steps:
1. Obtain a Talkman terminal training cable. This cable is the one that has a red bend
relief above its connector and both a training jack and an audio jack on the other
end.
2. Locate the red connection port on the terminal. This port is the one with the red
arrow above it on the terminal.
3. Hold the training cable's connector so that its release lever is on the bottom.
4. Tilt the connector and insert the top of it into the top slot of the terminal's red
connection port.
5. With the top slot in place, tilt the connector down onto the terminal until the
release lever snaps into place on the connection port.
6. Plug the connector at the end of the training cable into the visual training device.
To disconnect a visual training device from a terminal, perform the following steps:
1. Grasp the connector at the end of the training cable in one hand and grasp the
visual training device in the other.
2. Remove the cable's connector from the visual training device.
3. Grasp the training cable's connector.
Warning: Do not pull on the training cable itself.
4. Press the connector's release lever.
5. Tilt the bottom of the connector off the terminal.
6. Lift the connector up and off the terminal.
100
Connecting and Disconnecting a Portable Printer
To connect a portable printer to a terminal, perform the following steps:
1. Obtain a Talkman terminal maintenance cable. This cable is the one that has a red
bend relief above its connector and both a serial connector and an audio jack on
the other end.
2. Locate the red connection port on the terminal. This port is the one with the red
arrow above it on the terminal.
3. Hold the maintenance cable's connector so that its release lever is on the bottom.
4. Tilt the connector and insert the top of it into the top slot of the terminal's red
connection port.
5. With the top slot in place, tilt the connector down onto the terminal until the
release lever snaps into place on the connection port.
6. Plug the serial connector at the end of the maintenance cable into the portable
printer.
To disconnect a portable printer from a terminal, perform the following steps:
1. Grasp the serial connector at the end of the maintenance cable in one hand and
grasp the portable printer in the other.
2. Remove the cable's serial connector from the portable printer.
3. Grasp the maintenance cable's connector.
Warning: Do not pull on the maintenance cable itself.
4. Press the connector's release lever.
5. Tilt the bottom of the connector off the terminal.
6. Lift the connector up and off the terminal.
101
Configuring Visual Training Devices
• Purpose
• Procedure
• Troubleshooting
Purpose
This document explains how to configure the visual training device that Vocollect recommends (the
QTERM-J10 hand-held terminal) for use in enrollment training with the Talkman® T2 terminal.
Procedure
To configure a visual training device for use with the Talkman system, perform these steps:
1. Verify that the training device is set up properly. Refer to the instructions that QSI or your reseller
provided with the training device for more information.
2. Connect the training device to the Talkman terminal using the cable provided. See Connecting &
Disconnecting Peripherals.
3. In the < task name>.vcf file, set the configurable parameter TrainDevicePort = Red to turn on
the training device port. See Changing Configurable Parameters.
4. Reload the task onto the terminal. See Loading a Task onto a Terminal.
Troubleshooting
QTERM Contrast Correction Procedure
If you cannot read the visual training device screen, you may need to increase the contrast. To do so,
perform these steps:
1. Verify that the task is loaded onto the Talkman terminal. See Loading a Task onto a Terminal.
2. Verify that the terminal is sleeping. See Putting a Terminal to Sleep.
3. Verify that the training device is connected to the Talkman terminal. See Connecting &
Disconnecting Peripherals.
4. On the training device, press and hold the 1 key.
5. Still holding the 1 key, press the Talkman terminal's yellow play/pause button.
Contrast appears on the training device screen.
6. On the training device, press 1 to increase the contrast.
Baud Rate appears on the training device screen.
7. On the training device, press 3 to accept 19200 as the baud rate.
Bits appears on the training screen.
8. On the training device, press 3 to accept 8 as the bits setting.
Parity appears on the training device screen.
9. On the training device, press 3 to accept n (i.e. None) as the parity setting.
Stop Bits appears on the training device screen.
10. On the training device, press 3 to accept 1 as the stop bits setting.
11. On the Talkman terminal, press the yellow play/pause button to turn the terminal
on.
The terminal will take a background noise sample and begin training. The
terminal will say, "Now please say the following words as they appear on the
screen." The words that are being trained then appear, one at a time, on the
training device screen.
102
Creating Operator Voice
Creating Operator Voice Creating Operator Voice
Creating Operator Voice
Te
TeTe
Templates (enrollment training)
mplates (enrollment training)mplates (enrollment training)
mplates (enrollment training)
• Purpose
• Before You Begin
• Procedures
Purpose
In order for the Talkman® terminal to understand what an operator says, the operator must
create a voice template through a process called enrollment training.
Before You Begin
During enrollment training, the Talkman terminal gives the operator words to say, and the
operator says the words to the Talkman terminal. The terminal prompts the operator for each
word in the task at least four times. The software then stores one version of each word in
template files for that operator.
Note: When an operator is training a digit, the operator will not only have to say the digit
four times, but he or she will also have to say all of the embedded digit strings that contain
the particular digit. Embedded digit strings are strings of numbers that contain the digit
that is being trained. For example, for the digit "2", the embedded strings might be 020,
212, and 222. When training the embedded digit strings, the digits should be spoken
without pauses between them. The operator should speak the digits as naturally as he or
she would when telling someone a phone number.
Also, if the task that is being run contains decimal points (i.e. the word "point"), the
embedded digit strings will contain strings with the word "point" in them (2 point 2).
An operator can either hear or read the words to say during enrollment training. In order to
hear them, operators simply listen to the words through their headsets. To train by reading the
words, operators use either a visual training device or a computer running Display Manager. For
details about Display Manager, refer to the Display Manager topic found in the Talkman
Management Software online documentation. Vocollect recommends training operators using
the visual training device, as operators are more likely to speak in their natural voices when
they read the words than when they hear them. Operators should try to speak as naturally as
possible while creating their templates.
Allow adequate time for operators to complete this process. The amount of time required will
depend upon the length of your task; allow about 40 minutes for every 100 words in the task.
Once you have trained a few operators, you will have a good idea of the amount of time to
allow for future enrollment training sessions. It is best to create the voice templates all at
once; if an operator stops training, the Talkman terminal will time out and turn off (just as it
does during regular use). If this happens, pressing the yellow play/pause button will restart the
terminal.
For best recognition results, the vocabulary words should be trained in the same noise
environment in which the terminal is going to be used. However, this rule only holds true if the
environment does not have a lot of loud non-stationary sounds (i.e. pallet drops, horn beeps,
PA system, etc). If the environment in which the terminal is going to be used does have a lot of
these types of noises, then better results will be achieved by training the unit in an
environment where these noises are not quite as prevalent.
Prepare the terminal before the operator begins. Load the task (see Loading a Task Onto a
103
Terminal) onto the terminal, and be sure the correct operator is active on the terminal (see
Loading an Operator Template onto a Terminal).
Procedures
There are three methods used for creating operator voice templates:
• Using Visual Training Devices
• Using Headsets
• Using Display Manager (For details about using Display Manager, refer to the Display
Manager topic found in the Talkman Management Software online documentation.)
Each method of creating voice templates is explained below. For all three methods, perform
these steps first:
1. Be sure the operator who will be training has been created in Operator Manager. For
details about creating a new operator, refer to the Creating a New Operator in
Operator Manager topic found in the Talkman Management Software online
documentation.
2. Load the task onto the Talkman terminal. (See Loading an Operator Template onto a
Terminal.)
3. Load the operator onto the terminal. (See Loading an Operator onto a Terminal.)
4. Make sure a fully charged battery is attached to the Talkman terminal. (See Changing a
Battery)
5. Attach a headset with microphone to the Talkman terminal. (See Connecting &
Disconnecting Peripherals)
Note: It is very important to make sure that the headset's microphone has a
windscreen on it at all times (during training as well as normal, everyday use).
6. Put the headset on and, if desired, the Talkman terminal and belt. (See Wearing a
Talkman Terminal.)
Using Visual Training Devices
To create a voice template using a visual training device, perform the following steps:
1. Be sure the training device is configured. (See Configuring Visual Training Devices)
2. Connect the device to the Talkman terminal. (See Connecting & Disconnecting
Peripherals)
3. Turn the terminal on by pressing the yellow play/pause button.
The LED indicator turns red for a few moments, then turns green. (If it does not,
see LED Indicators.)
The Talkman terminal says and the device displays, "Please keep quiet for a few
seconds."
Note: If the Talkman terminal does not say this, press the operator button to
manually perform a background noise sample.
The terminal says and the device displays, "Please say zero."
4. Say "Zero."
The terminal says and the device displays, "One."
Note: Always speak in your normal tone of voice. You are training the Talkman
terminal to recognize words you say in your normal voice, so that you can speak
naturally while you work.
5. Say "One."
The terminal says and the device displays, "Two."
6. Say "Two."
The terminal says and the device displays, "Three."
7. Say "Three."
The terminal says and the device displays, "Four."
104
8. Say "Four."
The terminal says, "Please say the following words as they appear on the screen."
Note: If you cannot see the words displayed on the training device screen, there may
be a problem with the contrast on the device. Please refer to the manufacturer's
documentation.
9. As each word appears on the device display, say it to the Talkman terminal. The
terminal will prompt you with the same word at least four times; repeat the word
each time it asks. If it prompts you for phrases, say the phrase naturally, without
exaggerated pauses between the words.
When the Talkman terminal has asked for all words in the task the necessary
number of times, the terminal will say, "Creating voice templates. Please wait." It will
then beep periodically until all of the remaining voice templates have been created.
Note: The majority of the voice templates are actually created at the same time that
the operator is speaking the vocabulary words.
During the beeping, the terminal will periodically speak the aforementioned phrase to
alert the user that it is still busy. When the remaining voice templates have been
created, the terminal will say, "Finished creating voice templates." The terminal will
then go to sleep. The operator can begin the task by pressing the yellow play/pause
button.
Note: The operator can expect the terminal to beep for approximately two minutes
after all of the vocabulary words have been spoken. If the operator presses any of
the terminal's buttons during this time period, the terminal says, "Creating voice
templates. Please wait."
10. Disconnect the training device. (See Connecting & Disconnecting Peripherals.)
Using Headsets
To create a voice template using a headset alone, with no additional training devices,
perform the following steps:
1. Turn the terminal on by pressing the yellow play/pause button.
The LED indicator turns red for a few moments, then turns green. (If it does not,
see LED Indicators.)
The Talkman terminal says, "Please keep quiet for a few seconds."
After a pause, the terminal says, "Please say zero."
2. Say "Zero."
The terminal says, "One."
Note: Always speak in your normal tone of voice. You are training the Talkman
terminal to recognize words you say in your normal voice, so that you can speak
naturally while you work.
3. Say "One."
The terminal says, "Two."
4. Say "Two."
The terminal says, "Three."
5. Say "Three."
The terminal says, "Four."
6. Say "Four."
The terminal says, "Please say the following words..."
7. As the terminal says each word, say it back to the Talkman terminal. The terminal
will prompt you with the same word at least four times; repeat the word each time
it asks. If it prompts you for phrases, say the phrase naturally, without
exaggerated pauses between the words.
When the Talkman terminal has asked for all words in the task the necessary
number of times, the terminal will say, "Creating voice templates. Please wait." It will
105
then beep periodically until all of the remaining voice templates have been created.
Note: The majority of the voice templates are actually created at the same time that
the operator is speaking the vocabulary words.
During the beeping, the terminal will periodically speak the aforementioned phrase to
alert the user that it is still busy. When the remaining voice templates have been
created, the terminal will say, "Finished creating voice templates." The terminal will
then go to sleep. The operator can begin the task by pressing the yellow play/pause
button.
Note: The operator can expect the terminal to beep for approximately two minutes
after all of the vocabulary words have been spoken. If the operator presses any of
the terminal's buttons during this time period, the terminal says, "Creating voice
templates. Please wait."
106
Erasing Spoken Responses
Erasing Spoken ResponsesErasing Spoken Responses
Erasing Spoken Responses
• Purpose
• Procedures
Purpose
This document explains how to use voice controls to erase information that an operator has
given to the Talkman® terminal.
Procedures
Operators can erase the last words they have said to the Talkman terminal one word at a time,
or they can erase the entire response they have just given to the current prompt.
Note: Either command will work to erase a one-word response. The difference between
these two commands is only relevant if the response consisted of multiple words.
• Erasing One Word
• Erasing the Entire Response
Erasing One Word
1. Say, "Talkman erase."
The terminal beeps.
2. Repeat to erase more words as desired.
For example, if you just said, "Two seven," but the check digits were 2 and 9, you
would say, "Talkman erase." The terminal would beep, and you would say, "Nine."
If you just said, "Two seven," but the check digits were 1 and 7, you could say,
"Talkman erase." The terminal would beep, erasing the seven. You could then say,
"Talkman erase" again, and the terminal would beep again, erasing the two. You would
then say, "One seven."
Note: The Talkman terminal can only erase information it has not yet uploaded to
the host computer.
Erasing the Entire Response
1. Say, "Talkman back up" or say, "Say again."
The terminal erases your entire last response and repeats the current prompt.
For example, if you just said, "Charlie bravo two seven," but the check digits were C,
F, 1, and 7, you could say, "Talkman back up" or "Say again." The terminal would erase
your entire response and then repeat the current prompt. You would then say, "Charlie
foxtrot one seven."
Note: The difference between saying "Talkman back up" and "Say again" is only
apparent if each phrase is said more than once. If an operator says "Talkman back
up" more than once, the terminal will continue to back up to previous prompts until
it reaches a point where it cannot back up anymore (such as a point where data has
already been transmitted to the host computer). If an operator says "Say again" more
than once, the terminal will continue to repeat the last thing it said (i.e. the current
prompt) again and again. It will not back up any further than the previous prompt.
Loading a Task onto a Talkman® T2 Terminal

107
Note: The information in this topic applies specifically to the Talkman® T2 system.
To view this information for the Talkman® OPEN system, click on the image of the
terminal.
• Purpose
• Before You Begin
• Procedure
• Troubleshooting
Purpose
This document contains instructions for assigning a task to a Talkman® T2 terminal using the
terminal itself. You can also assign a task to a terminal group using Terminal Manager. For
details about Terminal Manager, refer to the Terminal Manager topic found in the Talkman
Management Software online documentation.
Before You Begin
If your site is set up with more than one task, assigning a task can only be done when the
Talkman terminal is in radio range. If you have trouble assigning a task, move to a spot that is
within radio range.
Procedure
To assign a task to a Talkman terminal, perform the following steps:
1. Make sure the terminal is either on or sleeping.
The LED indicator should be either solid green or blinking green.
2. Press the operator button.
The terminal says, "Current operator is (operator name). Select menu item."
3. Press the + or button until the terminal says, "Change task." Then, press the operator
button.
Note: Change Task is the seventh menu item in the list, assuming that the + button is
used to scroll through the options.
4. The terminal says, "Please wait. Loading task list." It may take a few moments for the
terminal to retrieve a list of the available tasks.
Note: While the terminal is retrieving the task list, the LED indicator blinks red. If a
transaction during the assign task procedure takes more than six seconds, the
terminal will begin to beep, letting the operator know the Talkman system is busy
attempting an operation.
If the task list is not in the FTPHome\talkman\task directory, the terminal says,
"Function not available."
If a task list is found, the terminal then says, "Current task is (task name). Select task."
5. Press the +/ buttons until the terminal says the name of the task that you want to use.
Note: You can exit from the menu without loading the new task by pressing the
yellow play/pause button before you press the operator button to begin loading the
selected task.
6. Press the operator button to select the particular task.
When the terminal is preparing to load the task, the terminal says, "Preparing for task
load."

108
When the task is loading, the terminal says, "Loading task."
When the task is done loading, the terminal says, "Task load complete."
Troubleshooting
Refer to the Error Messages topic found in the Talkman Management Software online
documentation if you receive any error messages from the terminal during the task loading
process.
Loading an Operator's Templates onto a Talkman® T2 Terminal
Note: The information in this topic applies specifically to the Talkman® T2 system.
To view this information for the Talkman® OPEN system, click on the image of the
terminal.
• Purpose
• Before You Begin
• Procedure
Purpose
This document explains how to load the operator templates onto a terminal for the operator
who is about to use the particular terminal.
Before You Begin
You should have a Talkman® T2 terminal with a charged battery, headset, and any other
equipment (belt, bar code reader) you are going to use. You must be within radio range and
the terminal must be on with a flashing or solid green LED. (See Turning on a Talkman Terminal
for more information about this.)
Procedure
To load an operator onto a terminal, perform the following steps:
1. Make sure the terminal is on or sleeping.
The LED indicator should be either solid green or blinking green.
2. Press the operator button.
The terminal says, "Current operator is (operator name). Select menu item."
3. Press the + or button until the terminal says, "Change operator." Then, press the
operator button.
Note: Change Operator is the third menu item in the list, assuming that the + button
is used to scroll through the options.
4. The terminal says, "Please wait." At this point, the terminal retrieves a list of operators
and teams. This process may take a few moments.
5. Wait for the terminal to say, "Change team" or "Current operator is (operator name).
Change operator."
6. If the terminal says, " . . . Change operator ," skip to step 9.
7. Press the + or button to scroll through the list of operator teams until you hear the
name of a team to which you belong.
Note: Every operator in the system belongs to the "All Operators" team.
8. Press the operator button.

109
The terminal says, "Please wait." At this point, the terminal retrieves a list of all
operators who belong to the team that was selected. This process may take a few
moments.
The terminal then says, "Current operator is (operator name). Select new operator."
9. Press the + or button to scroll through the list of available operator names until you
hear your name.
Note: If you do not hear your name, press the yellow play/pause button to cancel this
operation and start over from step 2. When selecting a team in step 7, choose the
"All Operators" team. Consult with your supervisor if you are not listed in the "All
Operators" team.
10. Press the operator button.
The terminal says, "Loading operator." At this point, the terminal loads your
templates.
Once it has loaded your templates, the terminal says, "Current operator is (your
operator name). Good night." The terminal then goes to sleep.
The next time you turn the terminal on, it will be ready to use. See Turning on a
Talkman Terminal for more information.
Note: You can press the yellow play/pause button to get out of the menu as long as
you have not started loading a new operator.
Putting a Talkman® T2 Terminal on a Belt
Note: The information in this topic applies specifically to the Talkman® T2 system.
To view this information for the Talkman® OPEN system, click on the image of the
terminal.
• Purpose
• Before You Begin
• Procedure
Purpose
This document contains instructions for putting a Talkman® T2 terminal onto the specially
designed Talkman T2 belt.
Before You Begin
The main concept for operators to keep in mind with regard to the belt clip (which is used to
mount the terminal onto the belt) and the terminal is that they are two separate entities. The
clip should be attached to the belt at the beginning of a shift. Then, the operator can attach
the terminal to and remove the terminal from the clip as often as necessary throughout the
shift. Once the shift is over, the operator can then remove the clip from the belt.
Note: Vocollect highly recommends that the Talkman terminal be worn on the right side of
the body with the terminal's buttons on the top and its connectors toward your back.
Procedure
To put a Talkman terminal onto the specially designed Talkman T2 belt, an operator must have
a slim belt clip (provided with the belt). With this clip in hand, perform the following
procedures:
1. If the belt is buckled, open the belt's buckle by lifting up on its faceplate. (If the belt is

110
not buckled, proceed to step 4.)
2. Pull up on the end of the belt (the end without the buckle) to separate its Velcro® tab
from the belt's Velcro® strip.
3. Slide the end of the belt with the Velcro® tab all the way back through the buckle.
4. Slide the slim belt clip onto the end of the belt with the Velcro® tab.
5. Put the belt around your waist.
6. Slide the end of the belt with the Velcro® tab back through the belt's buckle. Pull the
belt through the buckle until it fits comfortably around your waist.
7. Push down on the end of the belt with the Velcro® tab to fasten it to the belt's Velcro®
strip.
8. Close the belt's buckle by pushing down on its face plate.
9. Connect the Talkman terminal to the belt clip by sliding the terminal onto the clip until
it snaps into place.
Note: The terminal should not be able to be removed from the clip without pressing
the terminal's clip release button.
Placing a Talkman® T2 Terminal into a Terminal Charger
Note: The information in this topic applies specifically to the Talkman® T2 system.
To view this information for the Talkman® OPEN system, click on the image of the
terminal.
• Purpose
• Before You Begin
• Procedure
Purpose
This document contains instructions for placing a Talkman® T2 terminal into a terminal
charger. The terminal should be placed into a terminal charger when it is not being used to
collect data. The terminal charger serves as a link to the host computer so that new tasks can
be downloaded, terminal settings can be reconfigured, and terminal software can be updated.
The terminal charger also serves as a battery charger by charging the battery that is currently
connected to the terminal.
Warning: A terminal should not be placed into a terminal charger without a battery
attached to it. Do not remove the battery from the terminal when placing the terminal into a
charger.
Note: A terminal will always be on when it is in a terminal charger. Therefore, when a
terminal that is powered off is placed into a terminal charger, it will automatically turn on
and the terminal's LED indicator will eventually begin to blink green.
Before You Begin
As was stated above, terminal chargers also serve as battery chargers by charging the battery
that is currently connected to the terminal. To support this feature, all terminal chargers come
equipped with two LED indicators below each terminal slot on the charger. These indicators are
used to determine the battery's charging status.
Note: These indicators do not have anything to do with the status of the terminal; they
apply only to the battery.
The following table details the different colors of the indicators:
111
Left
Indicator
Color
Right
Indicator
Color
If no terminal
is in the
charger...
If a terminal
without a
battery is in the
charger...
If a terminal with a battery is
in the charger...
Off Off Normal state;
no action is
necessary.
Normal state;
place a battery
into the terminal
without removing
the terminal from
the charger.
Abnormal condition; check the
terminal connector pins and the
charger pogo pins for dirt or
other obstructions and clean if
necessary; also, check the
terminal battery contacts and
the contacts on the battery for
dirt or other obstructions that
would keep the contacts from
making a solid connection;
clean the contacts if necessary;
if both LED indicators remain
off, return the charger for
service.
Solid Amber Off Charger
module is
malfunctionin
g; return for
service.
Charger module
is
malfunctioning;
return for
service.
Normal state; the battery is not
ready to be charged; a battery
is not ready to be charged if it
is too cold, too hot, or if it is
completely dead. The charger
waits for the battery to warm
up, cool off, or partially charge
before it begins fast charging
(at which point the left LED
indicator turns solid red).
The following information
details the length of time that it
will take for a cold battery to
warm up enough to begin
charging:
• If the battery was being
used at -4°C (24.8°F),
it will take
approximately 6
minutes for the battery
to warm up.
• If the battery was being
used at -10°C (14.0°F),
it will take
approximately 10
minutes for the battery
to warm up.
• If the battery was being
used at -20°C (-4.0°F),
it will take
approximately 22
minutes for the battery
to warm up.
If the battery was being used at
-30°C (-22.0°F), it will take
112
approximately 30 minutes for
the battery to warm up.
Off Solid Green Charger
module is
malfunctionin
g; return for
service.
Charger module
is
malfunctioning;
return for
service.
Normal state; the battery is
charged and ready to be used.
Solid Red Off Charger
module is
malfunctionin
g; return for
service.
Charger module
is
malfunctioning;
return for
service.
Normal state; the battery is
being charged.
Blinking
Red
Off Charger
module is
malfunctionin
g; return for
service.
Charger module
is
malfunctioning;
return for
service.
Abnormal condition; the battery
may be defective; remove the
terminal from the charger and
then place it back into the
charger; if the LED indicator
continues to blink red, remove
the battery from the terminal
and check for moisture on the
battery contacts; if moisture
exists, wipe off the contacts
and place the battery back into
the terminal; if the LED
indicator continues to blink red,
the battery is defective; remove
the battery from the terminal
and give it to your system
administrator.
Blinking
Red, then
Off
Blinking
Green, then
Off
Charger
module is
malfunctionin
g, return for
service.
Charger module
is
malfunctioning,
return for
service.
Error condition; the battery is
defective; remove the battery
from the terminal and give it to
your system administrator.
Off, but the
terminal's
LED
indicator is
on
Off, but the
terminal's
LED
indicator is
on
Normal state;
no action is
necessary.
Normal state;
place a battery
into the terminal
without removing
the terminal from
the charger.
Error condition; the fuse in the
terminal is malfunctioning;
return the terminal for service.
Blinking
Orange
Off Charger
module is
malfunctionin
g; return for
service.
Charger module
is
malfunctioning;
return for
service.
Abnormal condition; check the
terminal connector pins and the
charger pogo pins for dirt or
other obstructions and clean if
necessary; also, check the
terminal battery contacts and
the contacts on the battery for
dirt or other obstructions that
would keep the contacts from
making a solid connection;
clean the contacts if necessary;
if the LED indicator continues
to blink orange, try various
combinations of terminal units,
batteries, and chargers to
determine if the problem
113
follows the terminal, the
battery, or the charger module;
return the faulty equipment for
service.
Solid
Orange
Solid Green Charger
module is
malfunctionin
g; return for
service.
Charger module
is
malfunctioning;
return for
service.
Normal state; this state only
occurs for about a second
when a terminal is removed
from the charger; if this state
occurs for an extended period
of time, it is an abnormal
condition and should treated
the same as the abnormal
conditions listed above.
The length of time that it takes to completely charge a fully depleted battery is approximately
3 hours for the standard battery and 5 hours and 30 minutes for the high capacity battery. This
does not include any time that may be necessary to bring a battery that is too cold, too warm,
or completely dead into a charging state (a battery that is too cold, too warm, or completely
dead needs to warm up, cool down, or partially charge before it actually enters a fast charging
state).
Note: It is recommended that a brush similar to the one found at the following link be used
to clean the contacts on the terminal, battery, and charger. Gently brush the contacts to
clean away dirt and other obstructions that might prohibit them from making a solid
connection.
http://web-tronics/852.html
The brush found at this link is a small, inexpensive, three-row toothbrush style, general
cleaning brush. It is made of natural, stiff hog hair bristles and has a 7 3/4" plywood handle.
This brush is excellent for general circuit board cleanup.
Procedure
To place a Talkman terminal into a terminal charger, perform the following steps:
1. Make sure the charger is powered. The charger's orange power light (i.e. LED indicator)
is lit when the charger is powered.
2. If you sign on and sign off terminals at your site, sign off the terminal.
3. Press and hold the yellow play/pause button until the LED indicator turns solid red and
then turns off. If you have any question about properly turning off a terminal, see
Turning Off a Talkman Terminal.
Note: It is not absolutely necessary to turn the terminal off before placing it into the
charger.
4. Remove the Talkman terminal from the belt clip.
5. Disconnect the headset.
6. Disconnect any other peripherals that are connected to the terminal.
7. If you are using a terminal cover with the terminal, remove the cover from the
terminal. See Using a Terminal Cover.
8. Insert the Talkman terminal into one of the terminal charger slots with the button
controls of the terminal to the top and facing toward the left.
Warning: Do not attempt to place the Talkman terminal into a terminal charger
unless you have first disconnected the headset and any other peripheral devices.
Also, do not remove the battery from the terminal when placing a terminal into a
charger.
9. After the terminal has been placed into the charger, make sure that the LED indicator
on the terminal turns on and that it eventually begins to blink green. When the
114
terminal is properly placed into the charger, the LED on the terminal will blink green
four times a second (a terminal that is in sleep mode and not in a charger blinks once a
second). (See Turning On a Talkman Terminal for more information on the status of the
LED indicator when turning on a terminal.) If the LED does not turn on after 30
seconds, remove the terminal from the charger slot and then place it into the slot
again. If the LED indicator still does not turn on, try another terminal charger slot.
Note: A terminal is ready to use and can be removed from a terminal charger when
the LED indicator on the terminal is blinking green. If the LED indicator on a terminal
is blinking red, do not remove the terminal from the terminal charger.

115
Putting a Terminal to Sleep
Putting a Terminal to SleepPutting a Terminal to Sleep
Putting a Terminal to Sleep
• Purpose
• Procedures
• Troubleshooting
Purpose
The Talkman® terminal tries to interpret everything it hears as a command. When an operator
does not want a terminal to interpret what is being said (for example, when an operator is
speaking to a co-worker), the operator should put the Talkman terminal to sleep. This
document details the procedures for putting a terminal to sleep.
Note: Once a terminal has been put to sleep, the operator must wake it up before he or she
can begin using it again. Please see Waking a Terminal Up.
Procedures
Operators can put Talkman terminals to sleep using either a voice command or the buttons on
the terminal.
• Voice Method
• Button Method
Voice Method
1. Say, "Talkman, sleep."
The terminal goes into an off-air state and stops trying to interpret an operator's
words as voice commands. Also, the terminal's LED indicator blinks green once per
second when a terminal is sleeping.
Button Method
1. Press the yellow play/pause button.
The terminal goes into an off-air state and stops trying to interpret an operator's
words as voice commands. Also, the LED indicator blinks green once per second
when a terminal is sleeping.
Troubleshooting
If the terminal's LED indicator does not blink green once per second when a terminal is
sleeping, see LED Indicators.
Rebooting a Talkman® T2 Terminal
Note: The information in this topic applies specifically to the Talkman® T2 system.
To view this information for the Talkman® OPEN system, click on the image of the
terminal.
• Purpose
• Procedure
116
Purpose
The purpose of this document is to explain how to reboot (i.e. reset) a Talkman® T2 terminal.
Procedure
Operators can use either of the following two reset methods to force a Talkman terminal to
reboot and enter a state that is specific to the type of reset that has been invoked.
• Powering Off
• Forced Reset
Powering Off
This type of reset is the most commonly used reset and is invoked by pressing and holding the
yellow play/pause button for several seconds until the terminal has safely stored the data to
flash memory and has powered off.
• Powering Off by Using the Yellow Play/Pause Button
• Powering Off Due to Inactivity
• Powering Off Due to Low Battery Levels
• The Off State
• Booting a Terminal after Powering Off
Powering Off by Using the Yellow Play/Pause Button
To force a Talkman terminal into an off state, an operator can press and hold the yellow
play/pause button for several seconds. When this button is pressed and held, the
terminal's LED indicator turns red and the terminal stores any data that has not been
transmitted into its flash memory. When this process is complete, the terminal will say,
"Powering off" and the LED indicator will turn off. The terminal is now off.
Powering Off Due to Inactivity
If the Talkman terminal's software detects no terminal activity for a specified length of
time, the terminal will power off automatically. When a terminal powers off due to
inactivity, it behaves in the same manner as if the operator had powered it off by pressing
and holding the yellow play/pause button.
Powering Off Due to Low Battery Levels
If the Talkman terminal's software detects that the current battery level is critically low,
the terminal will power off automatically. However, this situation will only occur after the
operator has been warned more than once by the terminal that battery power has dropped
below a safe level and that the battery should be replaced. When a terminal powers off
due to low battery levels, it behaves in the same manner as if the operator had powered it
off by pressing and holding the yellow play/pause button.
The Off State
Once a terminal is off (identified by a solid off LED indicator), the operator can remove
the terminal's battery without the risk of losing any data. The terminal and its collected
data will remain safe indefinitely without a battery if the terminal was properly turned off
before the battery was removed. This is true because all dynamic collected data is written
to the terminal's flash files as part of the powering off process. The following dynamic data
is stored to the flash files when a terminal is powered off:
• History data
• Lookup Table data
• Dynamic process history data
• Configuration parameter data
• Hosts data
• Services data
117
• List of operator templates to be sent to host computer
• Task and operator name information
• Field debug message information
Task files and operator templates are stored to flash files as part of the task load and
operator load operations. Therefore, these files and templates do not need to be saved to
flash as part of the powering off process.
Booting a Terminal after Powering Off
If a terminal was properly placed into an off state, the terminal will perform the following
operations after a battery is placed onto the terminal (if the battery was removed) and the
yellow play/pause button is pressed:
• Perform a background noise sample.
• Continue operation at the place in the task where the operator left off.
• Transfer any templates to the host (once network communication is established)
that had not been sent prior to turning off.
• Transfer any output data records to the host (once network communication is
established) that had not been sent prior to going into the off state.
• Transfer any look up tables (once network communication is established) to the
terminal that had not been received from the host prior turning off.
Forced Reset
This type of reset is invoked by removing the battery from the back of the Talkman terminal
without properly powering the terminal off first.
Warning: If an operator reboots a terminal in this manner, the contents of the terminal's
memory, including any information gathered during data collection, will be lost. An
operator should perform a forced reset only as a last resort.
When the battery is replaced and the terminal is turned back on (by pressing the yellow
play/pause button), the terminal will boot and attempt to load the current task and operator.
Once the task and operator have been successfully loaded, the terminal behaves identically to
a terminal that has just had new task or operator loaded. The terminal performs some
initialization, verifies that all operator templates (vocabulary words and phrases) have been
trained, checks the task for validity, and starts the operator over at the beginning of the task.
Warning: When a forced reset is performed, the terminal will not return to the place in the
task where the operator left off. The operator will start over at the beginning of the task.
Note: If a forced reset is performed when an operator is in the process of retraining a
vocabulary word (during the update training process), it should be noted that the terminal
will send all of the operator 's vocabulary word templates back to the host computer once
the terminal is turned back on. This occurs because the terminal does not know exactly
which word was being retrained at the time that the forced reset was performed. The
operator should be aware that the terminal is resending the templates at that time and he
or she should not attempt to perform certain actions, such as loading a new operator or
task, until after the templates have been resent (which could be anywhere from several to
twenty or thirty minutes).

118
Removing a Talkman® T2
Removing a Talkman® T2 Removing a Talkman® T2
Removing a Talkman® T2
Terminal from a Belt
Terminal from a BeltTerminal from a Belt
Terminal from a Belt
• Purpose
• Before You Begin
• Procedure
Purpose
This document contains instructions for removing a Talkman® T2 terminal from the specially
designed Talkman T2 belt clip.
Before You Begin
The main concept for operators to keep in mind with regard to the belt clip (which is used to
mount the terminal onto the belt) and the terminal is that they are two separate entities. The
clip should be attached to the belt at the beginning of a shift. Then, the operator can attach
the terminal to and remove the terminal from the clip as often as necessary throughout the
shift. Once the shift is over, the operator can then remove the clip from the belt.
Note: Vocollect highly recommends that the Talkman terminal be worn on the right side of
the body with the terminal's buttons on the top and its connectors toward your back.
Procedure
To remove a Talkman terminal from the specially designed Talkman T2 belt clip, perform the
following procedures:
1. Grasp the terminal firmly.
2. Press the terminal's clip release button. This button is located to the right of the
terminal's keypad.
3. Lift the terminal up and off the belt clip.
Removing a Talkman® T2 Terminal from a Terminal Charger
Note: The information in this topic applies specifically to the Talkman® T2
system. To view this information for the Talkman® OPEN system, click on
the image of the terminal.
• Purpose
• Procedure
Purpose
This document contains instructions for removing a Talkman® T2 terminal from a terminal charger.
Note: For information about the different states of the LED indicators that are found on a
terminal charger, see Placing a Talkman Terminal into a Terminal Charger.
Procedure
To remove a Talkman terminal from a terminal charger, perform the following steps:
119
1. Make sure that the terminal is ready to use.
Note: The terminal is ready to use when the LED indicator on the terminal is
blinking green. If the LED is blinking red, the terminal is not ready to be used.
Warning: If a terminal continuously displays a solid red light, contact your system administrator.
2. Pull up on the terminal to remove it from the terminal charger.
120
Repeating Prompts
Repeating PromptsRepeating Prompts
Repeating Prompts
• Purpose
• Procedures
Purpose
This document explains the various ways that an operator can get the Talkman® terminal to
repeat prompts.
Procedures
Operators can get the Talkman terminal to repeat a prompt in three ways:
• Repeat the current prompt
• Repeat the previous prompt, the operator's last response, and the current prompt
• Erase the operator's entire current response and repeat the current prompt
Repeat the current prompt
To hear the current prompt again, follow these steps:
1. Say, "Talkman continue."
The Talkman terminal repeats the current prompt.
Repeat the previous prompt, the operator's last response, and
the current prompt
To hear the previous prompt, what you answered to that prompt, and the current prompt,
follow these steps:
1. Say, "Talkman repeat."
The terminal will repeat the previous prompt, repeat back to you what you said in
response to that prompt, and then repeat the current prompt. You need only respond
to the current prompt.
Erase the operator's entire current response and repeat the
current prompt
To hear the current prompt again while erasing any response you have already given at that
prompt, follow these steps:
1. Say, "Talkman backup" or say, "Say again."
The terminal will erase any response given to the current prompt and then repeat the
prompt again.
Note: The difference between saying "Talkman back up" and "Say again" is only
apparent if each phrase is said more than once. If an operator says "Talkman back
up" more than once, the terminal will continue to back up to previous prompts until
it reaches a point where it cannot back up anymore (such as a point where data has
already been transmitted to the host computer). If an operator says "Say again" more
than once, the terminal will continue to repeat the last thing it said (i.e. the current
prompt) again and again. It will not back up any further than the previous prompt.
Retraining a Word with Talkman® T2

121
Note: The information in this topic applies specifically to the Talkman® T2
system. To view this information for the Talkman® OPEN system, click on
the image of the terminal.
• Purpose
• Before You Begin
• Procedure
Purpose
This document contains instructions for retraining a word while using a Talkman® T2 terminal. This
procedure is performed if a terminal is having trouble understanding a word that an operator is saying.
Before You Begin
To retrain a word, you must be at a prompt where that word is one of the valid vocabulary words that you
can say to answer the prompt. For example, to retrain the word "two," you must be at a prompt where the
word "two" is a valid response. You can retrain the main voice control word (i.e. Talkman) at any time. To
retrain all other voice control words (i.e. louder, softer, sleep, etc.), you must be at a point where you can
say the exact control word that you wish to train. For example, to retrain the word "louder", you must say
"Talkman volume" first so that you are at a point where "louder" is a valid word to speak next.
Note: You can press the yellow play/pause button to cancel the retraining of a word at
any time during the procedure.
Procedure
To retrain a word while using a Talkman terminal, perform the following steps:
1. Make sure the terminal is on or sleeping.
The LED indicator should be either solid green or blinking green.
2. Press the operator button.
The terminal says, "Current operator is (operator name). Select menu item."
3. Press the +/ buttons until the terminal says, "Retrain word." Then, press the
operator button.
Note: Retrain Word is the second menu item in the list, assuming that the + button
is used to scroll through the options.
4. If the terminal requires a noise sample first, it will say, "Please keep quiet for a
few seconds." The terminal will then complete a background noise sample via the
process described in the Sampling Noise topic.
5. The terminal says, "Current operator is (operator name). Use the plus and minus buttons to scroll
through the words to train. Press the operator button to select."
6. Use the +/ buttons to scroll through the list of words. When you hear the word
that you wish to retrain, press the operator button.
7. Once you have chosen the word to retrain, the terminal says, "Please say the
following words: <Word that is being retrained>." You are then prompted to
repeat the selected word ten times.
Note: You can press the yellow play/pause button to cancel the retraining of a word
at any time during the procedure.
8. After the terminal has created a new template for the word that is being retrained,

122
the terminal then proceeds with the task from the point at which you left off.
Note: The length of time that it takes for the terminal to compute the model for the word or digit that
has been retrained is approximately five seconds for a word and twenty seconds for a digit.
Note: When an operator is retraining a digit, the operator will not only be prompted
to repeat the digit four times (as opposed to ten times for regular words), but he/she
will also be prompted to say some of the embedded digit strings that contain the
particular digit. Embedded digit strings are strings of numbers that contain the digit
that is being trained. For example, for the digit "2", the embedded strings might be
020, 212, and 222. When training the embedded digit strings , the digits should be
spoken without pauses between them. The operator should speak the digits as
naturally as he/she would when telling someone a phone number.
Also, if the task that is being run contains decimal points (i.e. the word "point")
and the operator chooses to retrain a digit, the embedded digit strings will contain a
string with the word "point" in it (i.e. 2 point 2).
Sampling Noise with Talkman® T2
Note: The information in this topic applies specifically to the Talkman® T2 system.
To view this information for the Talkman® OPEN system, click on the image of the
terminal.
• Purpose
• Procedure
Purpose
This document contains instructions for taking a noise sample for a Talkman® T2 terminal. You
may need to take a noise sample if the terminal is having trouble hearing you because of
changes in the noise level in your working environment.
If the terminal is having trouble with only a word or two and taking a background noise sample
does not improve the terminal's recognition, you may need to retrain the word or words that
the terminal is having trouble recognizing.
Notes:
• A noise sample is taken by having the operator repeat the digits '0' through '4'. If
the terminal does not hear the operator say one of the digits, it will say, "I didn't
hear you, please speak up a bit." The terminal will then have the operator repeat
the digit that it couldn't hear before continuing with the rest of the noise sample .
• If the terminal completes the noise sample and determines that the input volume is
unacceptable, it may ask the operator to move the microphone away from his or
her mouth by saying, "Please move microphone farther away from your mouth."
• During a noise sample , if the terminal detects a sound that is loud enough to be
considered speech and that lasts longer than two seconds, the terminal says,
"Ignoring last phrase. Too long." When the terminal can no longer detect the sound,
it will ask the operator to repeat the digit that just failed. This feature has been
designed to handle scenarios that could adversely affect a noise sample , such as
having the PA system go off while performing a noise sample . However, since the
terminal must wait until the sound has ended before continuing the noise sample
123
process, there are some situations that may require operator intervention. If the
sound is caused by the start of a constant background noise that is part of the
operator 's normal working environment, such as the start of a freezer fan, the
operator should restart the noise sample . If the sound is fairly constant but is not
part of the normal working environment, such as coworkers talking, the operator
should move away from the source of the sound and continue the noise sample as
normal.
• You must successfully complete a noise sample once the process has been initiated.
If you abort the noise sample, fail the noise sample, or the noise sample times out,
you will not be able to continue with your task until the sample has been completed
successfully.
Procedure
To take a noise sample for a Talkman terminal, perform the following steps:
1. Make sure the terminal is on or sleeping.
The LED indicator should be either solid green or blinking green.
2. Press the operator button.
The terminal says, "Current operator is (operator name). Select menu item."
3. Press the +/ buttons until the terminal says, "Noise sample ." Then, press the operator
button.
Note: Noise Sample is the first menu item in the list, assuming that the + button is
used to scroll through the options.
4. The terminal then says, "Please keep quiet for a few seconds." Wait silently for the
next prompt.
5. The terminal says, "Say zero." Respond by saying "zero."
6. The terminal then prompts the operator to say the digits one, two, three, and four.
The operator should repeat these digits when prompted.
7. After the operator has completed the noise sample, the terminal adjusts the settings
for background noise and then returns the operator to the place in the task where he
or she left off.
124
Talkman® Terminals & Terminal
Talkman® Terminals & Terminal Talkman® Terminals & Terminal
Talkman® Terminals & Terminal
Chargers
ChargersChargers
Chargers
• Placing a Talkman Terminal into a Terminal Charger
• Removing a Terminal from a Terminal Charger
125
Turning Off a Talkman®
Turning Off a Talkman® Turning Off a Talkman®
Turning Off a Talkman®
Terminal
TerminalTerminal
Terminal
• Purpose
• Procedure
• Troubleshooting
Purpose
This document contains instructions for turning off a Talkman® terminal.
Procedure
To turn off a Talkman terminal, perform the following steps:
1. Press and hold the yellow play/pause button on the Talkman terminal until the LED
indicator turns red.
After a few seconds, the terminal says, "Powering off." At this point, the terminal
turns off and the LED indicator light goes out.
Warning: You must turn off a terminal before you change the battery (if necessary)
or you will lose the data that you have collected. Do not remove the battery until the
LED indicator is off.
Note: You should not turn off the terminal if the LED indicator is blinking red, unless
it has been blinking red for several minutes. If a terminal is turned off when the LED
indicator is blinking red, the terminal may not be ready to use when it is turned back
on.
Troubleshooting
If the LED indicator does not turn red after holding the yellow play/pause button for more than
5 seconds, stop pressing the button and then try again. If the LED indicator still does not turn
red, there may be a problem with the keypad. Notify your system administrator.
If the LED indicator turns red, but the terminal does not turn off after 2 minutes, remove the
battery.
126
Turning On a Talkman®
Turning On a Talkman® Turning On a Talkman®
Turning On a Talkman®
Terminal
TerminalTerminal
Terminal
• Purpose
• Before You Begin
• Procedure
Purpose
This document contains instructions for turning on a Talkman® terminal.
Before You Begin
Before you turn on a Talkman terminal, you should make sure that there is a charged battery
properly connected to the terminal and that you have put on a properly connected headset.
Procedure
To turn on a Talkman terminal, perform the following steps:
1. Press the yellow play/pause button on the Talkman terminal.
Note: You will see the LED indicator go through the following sequence:
• The LED indicator first turns solid red while the processor reboots.
When turning on a terminal for the first time after a boot block file (.bbi), a
configuration block file (.cci), or a flash file (.ffi) has been loaded and burned
into the terminal, the LED indicator will blink red for several minutes before
flashing red and green.
• It then flashes red and green as it tries to obtain its IP address.
• The LED indicator turns solid red as the Talkman application begins.
• It then blinks red as the terminal automatically loads the task and operator
files.
• Finally, the LED indicator turns solid green after the terminal resumes the
operator's place in the task .
Note: When you turn on a Talkman terminal, the terminal automatically begins a new
data collection session by taking a background noise sample.
2. The terminal says, "Current operator is (operator name). Please keep quiet for a few
seconds." After a pause, the terminal says, "Please say zero."
Say "zero".
3. The terminal then says, "one."
Say "one."
4. The terminal then says, "two."
Say "two."
5. The terminal then says, "three."
Say "three."
6. The terminal then says, "four."
Say "four."
127
After a brief pause, the terminal says, "Please wait."
After another pause, the terminal begins asking questions or providing instructions
according to your site's installation.

128
Using a Talkman® Terminal
Using a Talkman® TerminalUsing a Talkman® Terminal
Using a Talkman® Terminal
• Adjusting Pitch
• Adjusting Speed
• Adjusting Volume
• Changing a Battery
• Choosing a Different Speaker
• Erasing Spoken Responses
• Loading a Task onto a Terminal
• Loading an Operator onto a Terminal
• Placing a Talkman® Terminal into a Terminal Charger
• Putting a Terminal to Sleep
• Rebooting a Talkman® Terminal
• Removing a Terminal from a Terminal Charger
• Repeating Prompts
• Retraining a Word
• Sampling Noise
• Turning off a Talkman® Terminal
• Turning on a Talkman® Terminal
• Using a Terminal During Each Shift
• Voice & Button Controls
• Wearing a Talkman® Terminal
Using a Talkman® T2 Terminal Cover
Note: The information in this topic applies specifically to the Talkman® T2 system.
To view this information for the Talkman® OPEN system, click on the image of the
terminal.
• Purpose
• Procedures
Purpose
This document contains instructions for placing a terminal cover onto, as well as removing it
from, a Talkman® T2 terminal.
Warning: You must remove the terminal cover from a terminal before placing the terminal
into a terminal charger. Failure to do so could result in damage to both the terminal and
the charger.
Procedures
• Placing a Terminal Cover onto a Terminal
• Removing a Terminal Cover from a Terminal
Placing a Terminal Cover onto a Terminal
To place a terminal cover onto a terminal, perform the following steps:
1. If the terminal is not already off, press and hold the yellow play/pause button until
the LED indicator turns solid red and then off.
129
2. Disconnect any peripherals, such as a headset or bar code reader, that are
connected to the terminal.
3. Hold the terminal with the battery compartment facing up and the terminal's
buttons facing toward you. Hold the terminal cover so that the Velcro® flap is on
top and the circular opening through which you will be able to access the
terminal's buttons is facing toward you.
4. Open the Velcro® flap on the top of the terminal cover.
5. Place the end of the terminal with the peripheral connector plate down through
the opening in the top of the cover.
6. Slide the terminal down into the cover until the connector plate rests firmly in the
plastic sleeve at the bottom of the cover.
7. Slide the top of the cover up over the top corners of the terminal.
8. Close the flap on top of the terminal cover.
9. Attach the peripherals that you will be using.
Removing a Terminal Cover from a Terminal
To remove a terminal cover from a terminal, perform the following steps:
1. If the terminal is not already off, press and hold the yellow play/pause button until
the LED indicator turns solid red and then off.
2. Disconnect any peripherals, such as a headset or bar code reader, that are
attached to the terminal.
3. Open the flap on top of the terminal cover.
4. Slide the top of the cover down off the top of the terminal.
5. Pull the terminal up through the opening in the top of the cover.

130
Using a Terminal During Each
Using a Terminal During Each Using a Terminal During Each
Using a Terminal During Each
Shift
ShiftShift
Shift
• Purpose
• Procedures
• Troubleshooting
Purpose
This document contains information about using a Talkman® terminal during each shift.
Procedures
• At the beginning of the shift
• During the shift
• At the end of the shift
At the Beginning of the Shift
Below is a list of procedures performed at the beginning of a shift. Some procedures may
not be required at your site.
• Remove the terminal from the terminal charger
• Insert a charged battery into the terminal
• Mount the terminal onto a belt and belt clip
• Put on and connect the headset
• Connect the peripherals (if applicable)
• Turn on the terminal
• Load your operator voice template (if it is not already loaded)
• Load a task onto the terminal (if it is not already loaded)
During the Shift
While you are using the terminal, there are several different procedures you may perform,
many of which depend on what is happening in your environment.
Note: If you have any questions about using the voice or button controls on the
terminal, see Voice & Button Controls.
The following are procedures that may be performed during a shift, along with the
reason(s) you may perform them:
Action If...
Sample noise the terminal is having difficulty hearing you
Retrain a word the terminal is having difficulty understanding a
word you are saying
Put the terminal to sleep you need to pause in the middle of collecting data
or picking
Place the terminal into a terminal charger you are not actively collecting data or picking
Change the battery the terminal gives you a low-battery warning
Charge the battery you change the battery
Adjust the volume you are having difficulty hearing the terminal
Adjust the speed you would like the terminal to speak faster or
slower

131
Adjust the pitch you would like the terminal to speak in a higher or
lower voice
Erase a response you wish to change your last response
Ask the terminal to repeat a prompt you wish to hear the terminal's last prompt
Change the task your site uses more than one task, you may use
more than one task during a shift
Use a bar code reader your site uses bar code readers
Reboot the terminal only if directed in the procedures for error
messages (found in the Talkman Management
Software online documentation) or Other Issues
At the End of the Shift
Below is a list of actions performed at the end of a shift. Some actions may not be
required at your site.
• Turn off the terminal
• Remove the headset
• Remove the peripherals
• Remove the battery
• Charge the battery
• Place the terminal into a terminal charger
Troubleshooting
If you encounter problems while using the Talkman terminal, refer to the following:
• Error messages (found in the Talkman Management Software online documentation)
• Other issues
• LED indicators
132
Using Bar Code Readers
Using Bar Code ReadersUsing Bar Code Readers
Using Bar Code Readers
• Purpose
• Before You Begin
• Procedures
Purpose
This document contains instructions for scanning bar codes with bar code readers. There are
two types of bar code readers:
• bar code wands
• bar code guns
Before You Begin
Terminals must be configured to work with bar code readers. If a terminal has not been
configured, you must set the necessary parameters in the Talkman® T2 terminal's <task>.vcf
before using a bar code reader with the terminal. See Changing Task and Operator Parameters
in the Changing Configurable Parameters document.
Connect the bar code reader to the Talkman terminal before scanning a bar code. See
Connecting a Bar Code Reader.
Procedures
• Using Bar Code Wands
• Using Bar Code Guns
Using Bar Code Wands
When prompted by the task to scan a label using bar code wand, follow these steps:
1. Remove the bar code wand from its holster.
2. Place the tip of the bar code wand to the left of all the black lines of the bar code
label.
3. Slide the bar code wand, from left to right, over the entire bar code label (see
Image 1).
The terminal continues on to the next part of the task. In some instances, you
hear a beep before the task continues. If no new prompt is given, scan the bar
code label again.
Image 1: Scanning Bar Code with a Wand

133
4. Place the bar code wand back in its holster when your are finished (see Image 2).
Image 2: Placing the Bar Code Wand into Its Holster
Using Bar Code Guns
When prompted by the task to scan a label using bar code gun, follow these steps:
1. Remove the bar code gun from its holster.
2. Hold the bar code gun a few inches above the label.
3. Squeeze and hold the trigger on the bar code gun.
A red horizontal line appears (see Image 3).
Image 3: Scanning with a Bar Code Gun
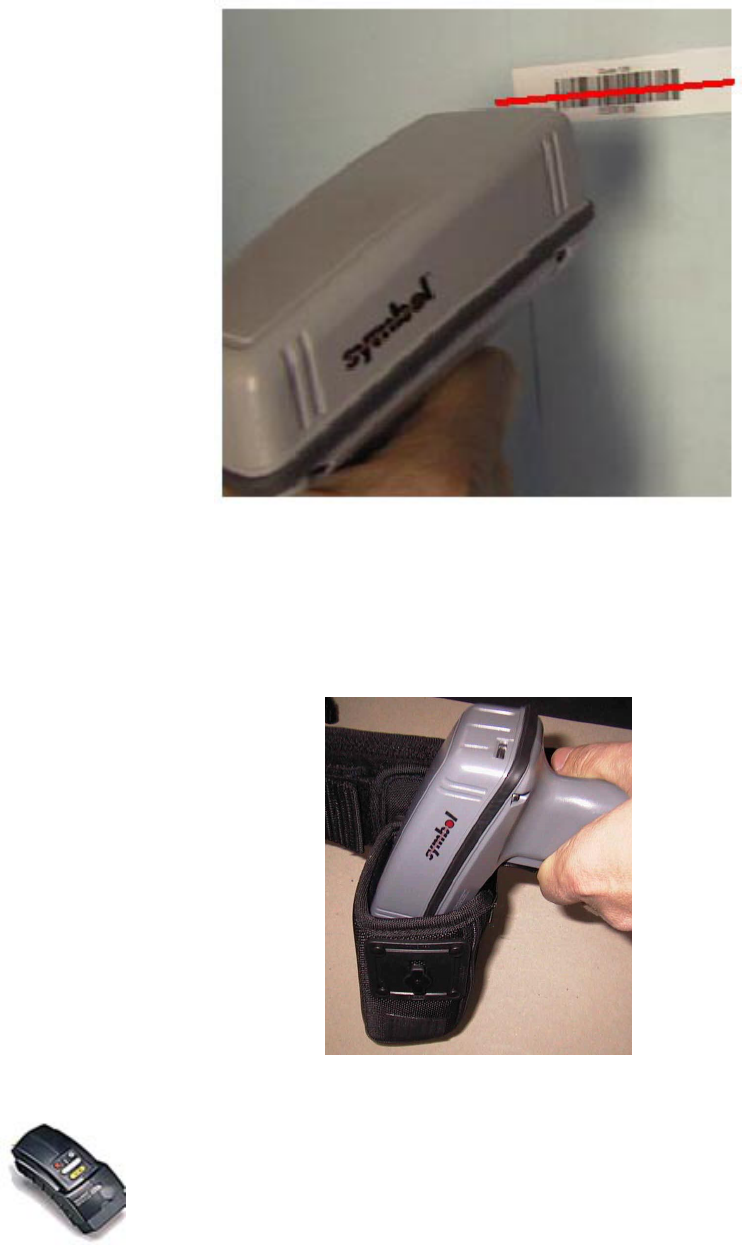
134
4. Tilt and adjust the line until the terminal continues on to the next part of the task.
In some instances, you hear a beep before the task continues. If no new prompt is
given, scan the bar code label again.
5. Place the bar code gun into its holster when you are finished.
Image 4: Placing the Bar Code Gun into Its Holster
Talkman® T2 Voice & Button Controls
Note: The information in this topic applies specifically to the Talkman® T2 system.
To view this information for the Talkman® OPEN system, click on the image of the
terminal.
135
Operators can control the Talkman® T2 terminal using voice commands as well as buttons on
the terminal itself.
• Changing the voice the Talkman terminal uses
• Repeating prompts & erasing answers
• Starting & finishing a shift
Changing the voice the Talkman terminal uses
To Button Voice Related
Procedures
Adjust pitch Operator button
and +/ buttons Adjusting Pitch
Adjust speed Operator button
and +/ buttons Adjusting Speed
Adjust volume +/ buttons Talkman
volume
Adjusting
Volume
Choose a
different
speaker
Operator button
and +/ buttons Choosing a
Different
Speaker
Repeating prompts & erasing answers
To Button Voice Related
Procedures
Erase the last
word spoken
by the operator
Talkman erase Erasing Spoken
Responses
Repeat the
current prompt Talkman
continue
Repeating
Prompts
Repeat the
previous
prompt, the
operator's last
response, and
the current
prompt
Talkman repeat Repeating
Prompts
Erase the
operator's
entire current
response and
repeat the
current prompt
Talkman back
up
Note: If an
operator says
"Talkman back
up" more than
once, the
terminal will
continue to
back up to
previous
prompts until it
reaches a point
where it cannot
back up
anymore (such
as a point
where data has
already been
Erasing Spoken
Responses &
Repeating
Prompts
136
transmitted to
the host
computer).
Erase the
operator's
entire current
response and
repeat the
current prompt
Say again
Note: If an
operator says
"Say again"
more than
once, the
terminal will
continue to
repeat the last
thing it said
again and
again. It will
not back up any
further than the
previous
prompt.
Erasing Spoken
Responses &
Repeating
Prompts
Starting & finishing a shift
To Button Voice Related
Procedures
Turn the
terminal off
Yellow
play/pause
button
Turning off a
Talkman
Terminal
Turn the
terminal on
Yellow
play/pause
button
Turning on a
Talkman
Terminal
Load an
operator
Operator button Loading an
Operator
Template onto a
Terminal
Choose a task Operator button
and +/ buttons Loading a Task
onto a Terminal
Put the
terminal to
sleep
Yellow
play/pause
button
Talkman sleep Putting a
Terminal to
Sleep
Wake the
terminal up
Yellow
play/pause
button
Talkman wake
up
Waking a
Terminal Up
Retrain words Operator button Retraining a
Word
Sample noise Operator button Sampling Noise

137
Waking a Terminal Up
Waking a Terminal UpWaking a Terminal Up
Waking a Terminal Up
• Purpose
• Procedures
Purpose
The Talkman® terminal tries to interpret everything it hears as a command. When an operator
does not want a terminal to interpret what is being said (for example, when an operator is
speaking to a co-worker), the operator should put the Talkman terminal to sleep (see Putting a
Terminal to Sleep). Once a terminal has been put to sleep, the operator must return it to an on
state in order to begin using it again. This document details the procedures for waking a
terminal up.
Procedures
An operator can wake a Talkman terminal up using either a voice command or the buttons on
the terminal.
• Voice Method
• Button Method
Voice Method
Note: The terminal will only respond to the voice method when 1) the terminal is in
the sleep state, 2) a task and fully trained operator are loaded onto the terminal, and
3) at least one successful noise sample has been completed.
1. Say, "Talkman wake up."
The terminal returns to an on state and continues executing the task.
Button Method
1. Press the yellow play/pause button.
The terminal returns to an on state and continues executing the task.
Wearing a Talkman® T2 Terminal
Note: The information in this topic applies specifically to the Talkman® T2 system.
To view this information for the Talkman® OPEN system, click on the image of the
terminal.
Before using a Talkman® T2 terminal, you should first remove it from its charger and insert a
charged battery. To wear a Talkman terminal, perform these steps:
1. Mount the terminal on a belt.
2. Put on and connect a headset.
3. Connect any other peripherals (if applicable).

138
Wearing and Removing Talkman® T2 Headsets
Note: The information in this topic applies specifically to the Talkman® T2
system. To view this information for the Talkman® OPEN system, click on
the image of the terminal.
• Purpose
• Procedures
Purpose
This document describes the proper methods of putting on and removing headsets, as well routine
maintenance for the care of headsets and microphones. For more information on headsets and microphones,
refer to Headsets, Microphones, Windscreens, & Earpieces and Caring for Headsets & Microphones.
Procedures
• Wearing the headset
• Removing the headset
Wearing the Headset
To wear a headset, perform the following steps:
1. Put the headset on and adjust the ear pad(s) to a comfortable position.
2. Place the microphone at the corner of your mouth, about 1/4" away from the
face, out of the direct flow of your breath.
Note: Make sure that there is a windscreen on the microphone. Not using a
windscreen reduces the performance of the Talkman® T2 system.
Note: There is a dot on the microphone. This dot should be positioned so that it
faces your mouth.
3. Clip the headset wire to your collar, below and behind the ear piece connected to the wire.
4. Let the wire fall down your back, and clip it to the belt near the terminal.
5. Locate the yellow connection port on the terminal. This port is the one with the yellow arrow
above it on the terminal.
6. Hold the headset's connector so that its release lever is on the bottom.
7. Tilt the connector and insert the top of it into the top slot of the terminal's yellow connection
port.
8. With the top slot in place, tilt the connector down onto the terminal until the release lever
snaps into place on the connection port.
Removing the Headset
To remove a headset, perform the following steps:
1. Grasp the headset's connector.
Warning: Do not pull on the headset's cable.
2. Press the connector's release lever.
3. Tilt the bottom of the connector off of the terminal.
4. Lift the connector up and off the terminal.
5. Unclip the headset wire from your collar and belt.
6. Being careful with microphone boom, remove the headset from your head.
139

140
Vocollect Hardware Online Documentation, Version 1.0, June 2002
© 2002 Vocollect, Inc. All rights reserved. Vocollect product and company names, as well as
their respective logos are trademarks or registered trademarks of Vocollect, Inc. All other
product names mentioned herein are trademarks or registered trademarks of their respective
owners.
This online help system provides information for Vocollect customers who are using the
Talkman system and its associated software.
For use by employees, partners, and customers of Vocollect, Inc.
Vocollect, Inc. has carefully checked the information in this help system and believes it to be
accurate. However, Vocollect assumes no responsibility for any inaccuracies that this system
may contain. In no event will Vocollect be liable for direct, indirect, special, exemplary,
incidental, or consequential damages resulting from any defect or omission in this system, even
if advised of the possibility of such damages.
In the interest of product development, Vocollect reserves the right to make improvements to
the information in this help system and the products that it describes at any time, without
notice or obligation.