Vortex Systems TRX876 Telemetry Transmitter User Manual LCTL5L XX Users Manual Rev D
Vortex Systems LLC Telemetry Transmitter LCTL5L XX Users Manual Rev D
L5L-Users Manual
3731 Rutledge Road
Albuquerque, NM 87109
505-856-5285 phone
505-856-5942 fax
Monitron
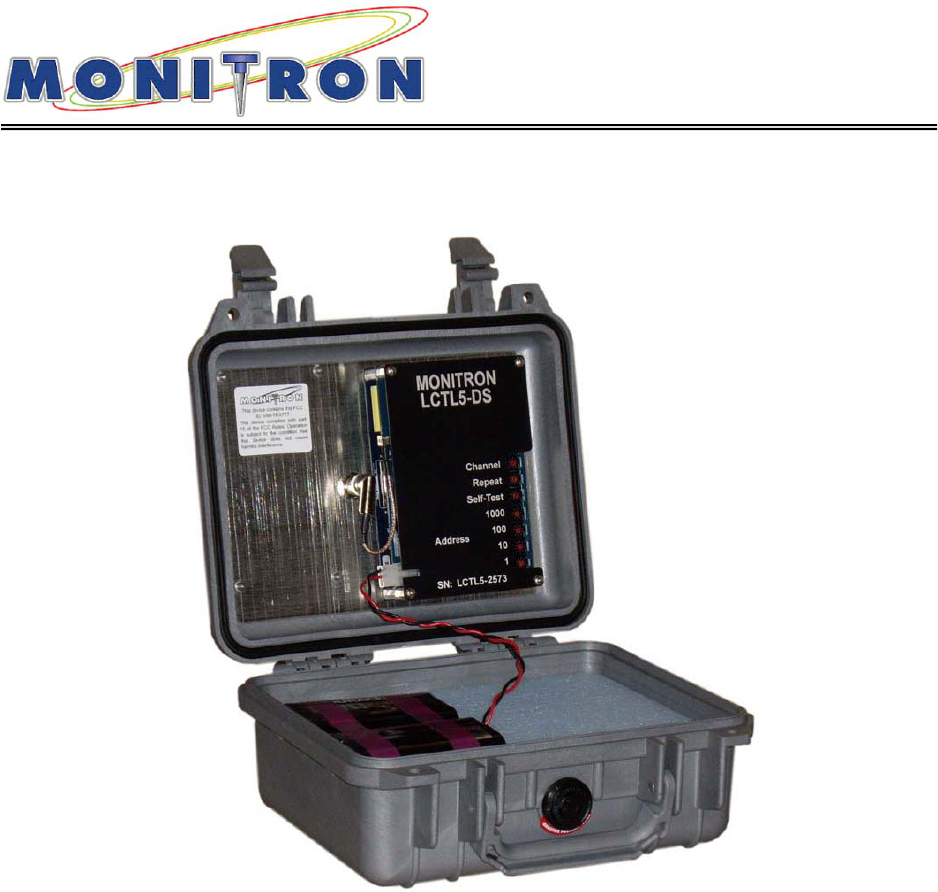
LCTL5L-XX Sensor Transmitter
User’s Manual
Monitron Inc.
3731 Rutledge Road
Albuquerque, NM 87109
(505) 856-5285 voice, (505) 856-5942 FAX
LCTL5L-XX USER’S MANUAL Rev. D Page 2 of 19
Table of Contents
Disclaimer…………………………………………………………………………….3
I. FCC Information................................................................................................3
II. Introduction......................................................................................................4
III. Connections & Controls.................................................................................5
IV. Antenna Preparation......................................................................................6
V. Battery Installation..........................................................................................6
VI. Encoder/Transmitter Settings.......................................................................7
VII. Setting Gain Level.........................................................................................8
VIII. Selecting Classify or Detect Mode............................................................10
IX. Selecting Output Ports.................................................................................10
X. LCTL5L-CC Contact Closure Transmitters....................................................12
XI. Sensor Board Input Pin Assignments........................................................12
XII. Examples......................................................................................................15
XIII. Deployment Tips.........................................................................................16
XIV. Specifications.............................................................................................18
XV. Warranty.......................................................................................................19
LCTL5L-XX USER’S MANUAL Rev. D Page 3 of 19
Disclaimer: This device is not designed nor intended for use
as a life safety device.
I. FCC Information
This device complies with part 15 of the FCC rules. Operation is subject to the following
two conditions: 1) This device may not cause harmful interference, and 2) this device
must accept any interference received, including interference that may cause undesired
operation.
WARNING: Under FCC 15.21, any changes or modifications (including the
antennas) made to this device that are not expressly approved by the
manufacturer may void the user’s authority to operate the equipment.
Note: The manufacturer is not responsible for any radio or TV interference caused by
unauthorized modifications to this equipment. Such modifications could void the user’s
authority to operate the equipment.
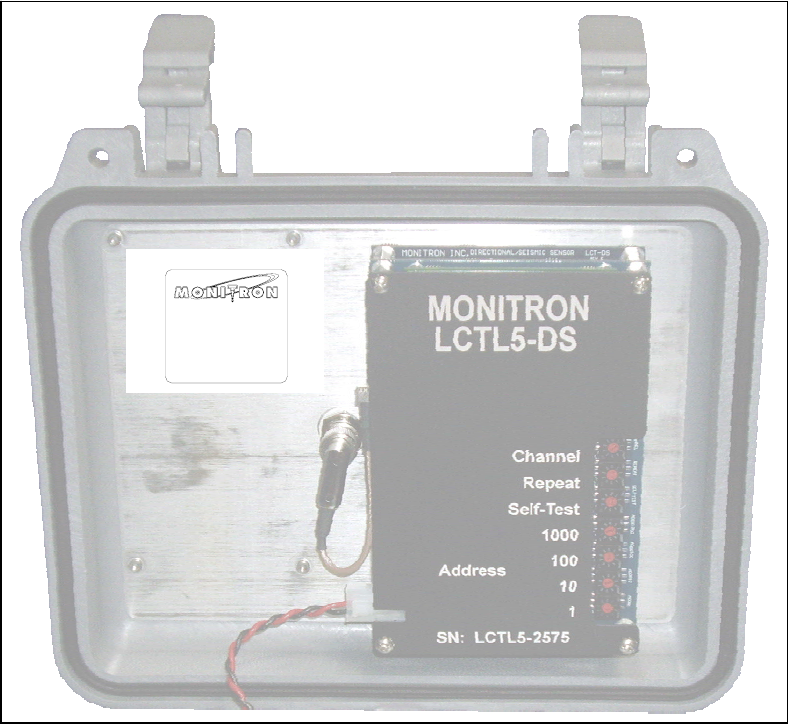
Location of FCC Label Inside LCTL5L-XX Lid (LCTL5 is shown for reference only)
This device contains:
FCC ID: V88-TRX876
This device complies with part
15 of the FCC Rules. Operation
is subject to the condition that
this device does not cause
harmful interference.
LCTL5L-XX USER’S MANUAL Rev. D Page 4 of 19
II. Introduction
The LCTL5L-XX Sensor Transmitter is a sophisticated processor and transmitter
housed in a compact rugged case which facilitates storage, transportation, and
concealment. This unit is ideal for long term deployment from 3 months to one year or
longer depending on configuration. Constructed of injection-molded plastic, the
watertight and corrosion-proof case may either be deployed above ground or buried for
security and stealth. Only the antenna needs to be above ground for proper operation.
A single LCTL5L-XX unit receives, processes, and transmits information generated by
contact closure/open, seismic (SPS-21), passive infrared (PIR), or dual-axis
magnetometer (MS-10) probes either individually or in various combinations of
deployment, giving the system maximum flexibility. A classify/detect switch combined
with PORT SELECT switches control how the inputs are processed. Four standard
models are available with the following designations and inputs:
LCTL5L-DS 1 Directional + 1 Seismic + 1 Pair N.O. Contacts
LCTL5L-DD 2 Directional
LCTL5L-SS 2 Seismic + 1 Pair N.O. Contacts
LCTL5L-CC 3 Pairs N.O. Contacts + 3 Pairs N.C. Contacts
The LCTL5L-XX was optimized to operate on two 6 VDC lantern batteries and can
transmit over 90,000 alarms before battery replacement is required. Other power supply
options are available and include rechargeable batteries as well as an external power
input for sources such as an external battery, solar-panel, or other 12 VDC supply.
Proper selection of these options depends on environmental conditions and the length
of time the unit is to be deployed. For further information, contact Monitron, Inc.
Alarm Format
When an intrusion is detected and classified, an alarm is encoded using the following
format:
XXXX-P, where: XXXX = unit’s address, P = alarm Port number generated by
the processor. When the LCTL5L-XX generates a self test alarm, or a test alarm
is manually sent, P is the unit’s programmed port number.
The letter “B” is added to the end of the alarm message when the batteries need
to be replaced.
LCTL5L-XX USER’S MANUAL Rev. D Page 5 of 19
III. Connections & Controls
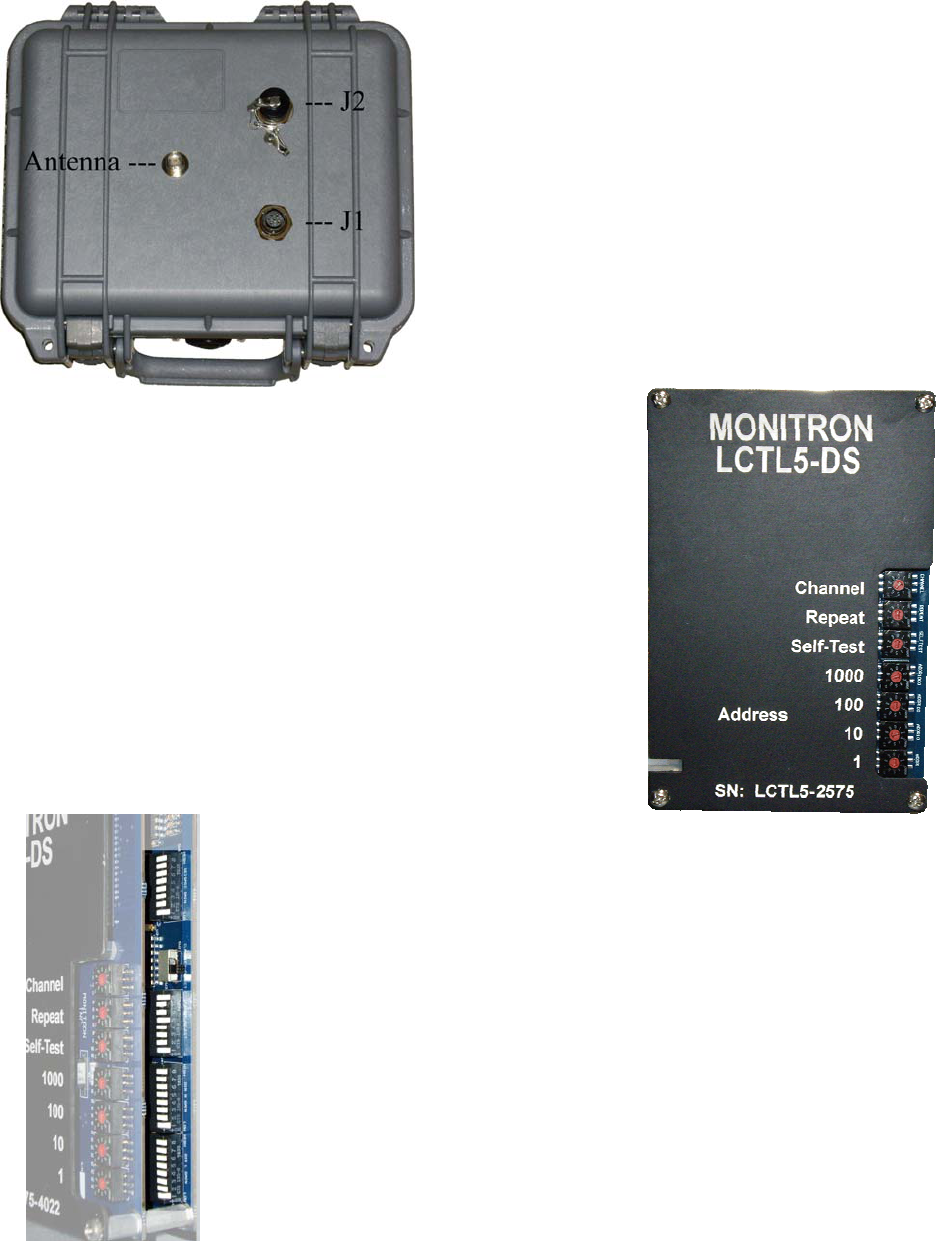
Input connectors and the standard BNC
jack for the antenna are located on the
lid of the LCTL5L-XX. Note that input J1
is closer to the handle and J2 is closer to
the hinge.
Control functions for channel select, power output, alarm
repeat, self-test time, and address are set using decimal
format rotary switches, which are clearly labeled and
easily read.
Each sensor input has user selectable individual
sensitivity gain setting and alarm number (Port). A slide
switch controls operation in either classify or detect mode.
IV. Antenna Preparation
LCTL5L-XX USER’S MANUAL Rev. D Page 6 of 19
Using the Allen wrench included with the antenna, loosen the set screw in the side of
the BNC connector and remove the whip. Refer to the Rod Cutting Chart included with
the antenna and cut the whip to the length appropriate for the frequency the LCTL5L-XX
will be transmitting on. Insert the whip into the connector and tighten the set screw.
V. Battery Installation
The LCTL5L-XX has been impedance matched for use with two Duracell ProCell 6 volt
lantern batteries (PC915). The use of inferior batteries may significantly shorten
operational time.
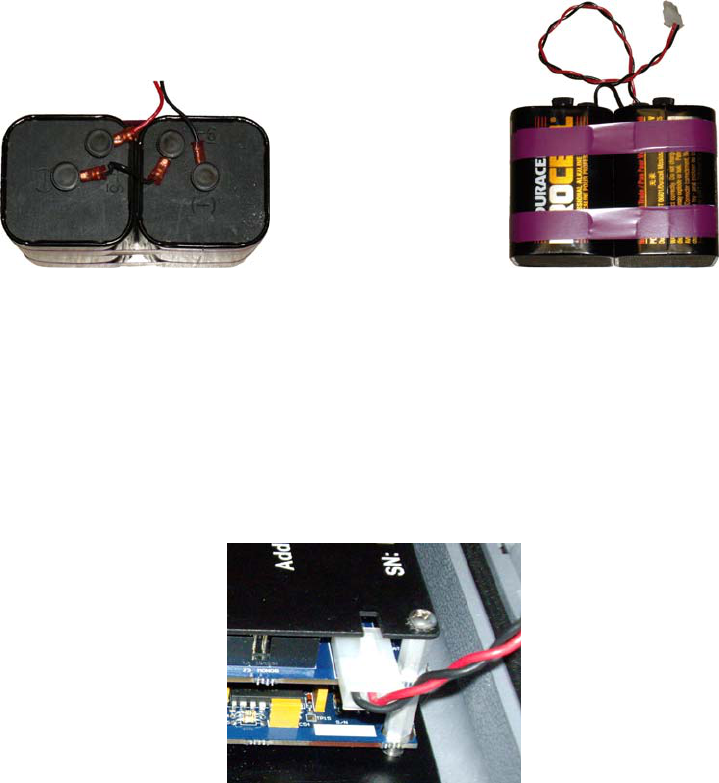
Connect the red wire of the battery wire harness to the positive terminal of the first
battery (Figure 1) and the black wire to the negative terminal of the second battery.
Connect the black jumper wire to the remaining two terminals. Verify that all four
terminal knobs are securely tightened. Tape the batteries together (Figure 2) to prevent
unnecessary movement.
Figure 1
Figure 2
Insert the batteries on their side into the cutout section of foam in the bottom of the
LCTL5L-XX case. Orient the batteries so that the screw terminals are in the center of
the case. Install the antenna BEFORE plugging the battery into the into ET board
socket, as shown in Figure 3. NOTE: It is normal for the LCTL5L-XX to transmit one to
three “false” alarms right after the batteries are connected. It also transmits the first
self-test within one minute of powering up.
Figure 3
LCTL5L-XX USER’S MANUAL Rev. D Page 7 of 19
VI. Encoder/Transmitter Settings
All Encoder/Transmitter functions are set via the decimal-format rotary switches. To
avoid damage to the switch, adjustments should ONLY be made with a standard, flat-
blade 2.5 mm screwdriver. The triangle points to the current switch position. There are
also detents at each position providing a tactile indication that the switch is properly set.
Failure to have the switch settled in the detent will lead to erratic behavior. Switch
functions are as follows:
Channel: Channel 1 = F1 @ 5 Watts full power
Channel 2 = F2 @ 5 Watts full power
Channel 3 = F1 @ approximately 75% of full power
Channel 4 = F2 @ approximately 75% of full power
Channel 5 = F1 @ approximately 50% of full power
Channel 6 = F2 @ approximately 50% of full power
Channel 7 = F1 @ approximately 25% of full power
Channel 8 = F2 @ approximately 25% of full power
Channel 9 = F1 @ 5 Watts full power
Channel 0 = F2 @ approximately 25% of full power
Repeat: Valid operational settings are 0 through 3. Position 9 may be used to
measure transmitter RF power output.
0 – No repeat. One message sent for every alarm or self test.
1 – 1 repeat. 2 transmissions of each alarm.
2 – 2 repeats. 3 transmissions of each alarm.
3 – 3 repeats. 4 transmissions of each alarm.
9 – Transmitter power cycles between 3 seconds on CCW and 12 off
Settings 4-8 are reserved. Setting Repeat to these positions will not cause the unit to
malfunction, but should be avoided as they may be used to implement future diagnostic
modes.
Self-Test: Settings are 0 through 9.
0 – No self-test is sent.
1 – Self-test sent once per minute.
2 – Self-test sent once every five minutes.
3 – Self-test sent once every 65 minutes.
4 – Self-test sent once every 360 minutes (6 hours).
5 - Self-test sent once every 1500 minutes (25 hours). DEFAULT
6 – Self-test sent once every 25 hours w/ 5 seconds transmit delay
7 – Self-test sent once every 25 hours w/ 10 seconds transmit delay
8 – Self-test sent once every 25 hours w/ 15 seconds transmit delay
9 - Self-test sent once every 25 hours w/ random 15-40 seconds
transmit delay
o The processor reads the self-test switch once a minute to check for a change in
setting. When a change is detected the LCTL5L-XX transmits a Port 4 alarm and
LCTL5L-XX USER’S MANUAL Rev. D Page 8 of 19
the new self test interval begins.
o Self-test transmissions begin within 60 seconds after the operator changes the
Self-Test switch.
o With transmit delay settings, when a target triggers the sensor, the LCTL5L-XX
waits for the specified time before sending the alarm message. During the delay
period, additional trigger events will be ignored.
Address: Set the desired four-digit unit address, reading from top to bottom.
The address can be any number between 0000 and 9999.
VII. Setting Gain Level
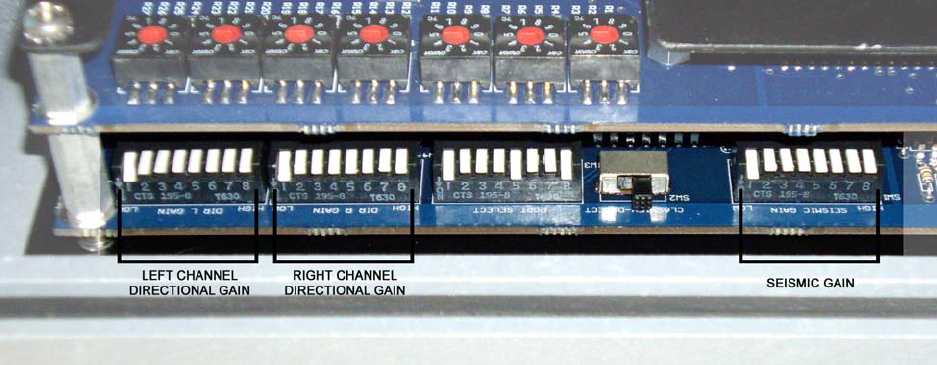
Gain Switch Locations
Gain switches adjust the sensitivity of the sensor. One (1) is the lowest gain level and
eight (8) is the highest level. To select a gain, press the switch in towards the board. It
is important to use ONLY the minimum gain needed for the area under
surveillance to reduce the possibility of false alarms. For directional inputs, set
both gain switches for a particular input to the same value. The picture above is for an
LCT-DS. For LCT-DD transmitters, the Seismic Gain switches on the right are replaced
by two sets of Directional Gain switches like those on the left. For LCT-SS transmitters,
the two sets of Directional Gain switches on the left are replaced by a single bank of
Seismic Gain switches.
GAIN WARNINGS:
• For Directional Gains, both the Right and Left channels must be set.
• Gain for an unused input must be set to one for the LCTL5L-XX to function
properly.
• There is no “zero” gain. If a gain is not selected, background noise is
amplified by a factor of 700,000 rendering the LCTL5L-XX inoperative until
the gain is correctly set.

LCTL5L-XX USER’S MANUAL Rev. D Page 9 of 19
It is possible to select gain settings that are between the standard eight single-switch
levels. Refer to table below for switch combinations and relative gain levels.
Switch(es) Seismic Gain Level Directional Gain Level
1+2 0.28 3.38
1 0.37 5.1
2+3 0.81 6.67
2 1.1 10
3+4 2.2 12
3 3.1 20
4+5 4.8 17.7
4 7.5 30
5+6 9.9 27.3
5 13.5 43
6+7 27.3 42.9
6 37.5 75
7+8 60 60
7 100 100
8 150 150
Note: Contact Closure boards do not have gain settings.
LCTL5L-XX USER’S MANUAL Rev. D Page 10 of 19
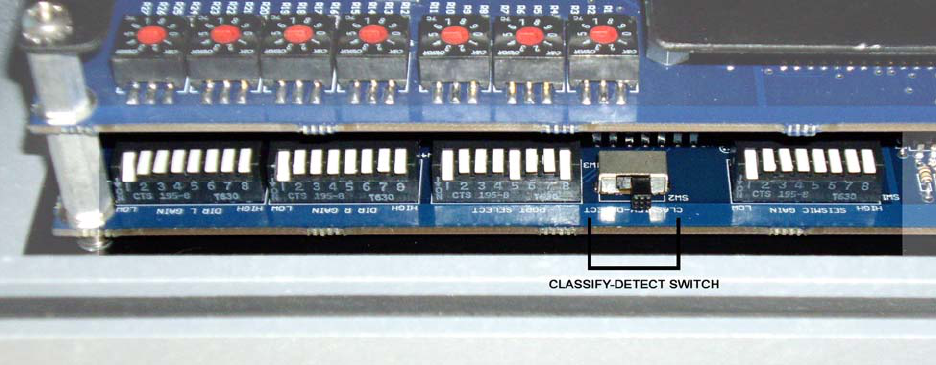
VIII. Selecting Classify or Detect Mode
In Classify Mode, the LCTL5L-XX generates alarm codes based on the TYPE of signal
the probe sees, regardless of the input source. Although there are special situations
where two probes provide the most effective intrusion detection, Classify Mode is
utilized primarily with a single probe to:
• Discriminate between pedestrian and vehicular seismic signals
• Determine direction of travel in front of infrared and magnetic probes
In Detect Mode, the LCTL5L-XX generates alarm codes based on which input SOURCE
(J1 or J2) is stimulated, but does not distinguish the type (vehicle/pedestrian or direction
of travel) of the signal. Detect mode can be used with either one or two probe inputs.
NOTE: Contact Closure (CC) sensor boards do not have Classify/Detect modes.
IX. Selecting Output Ports
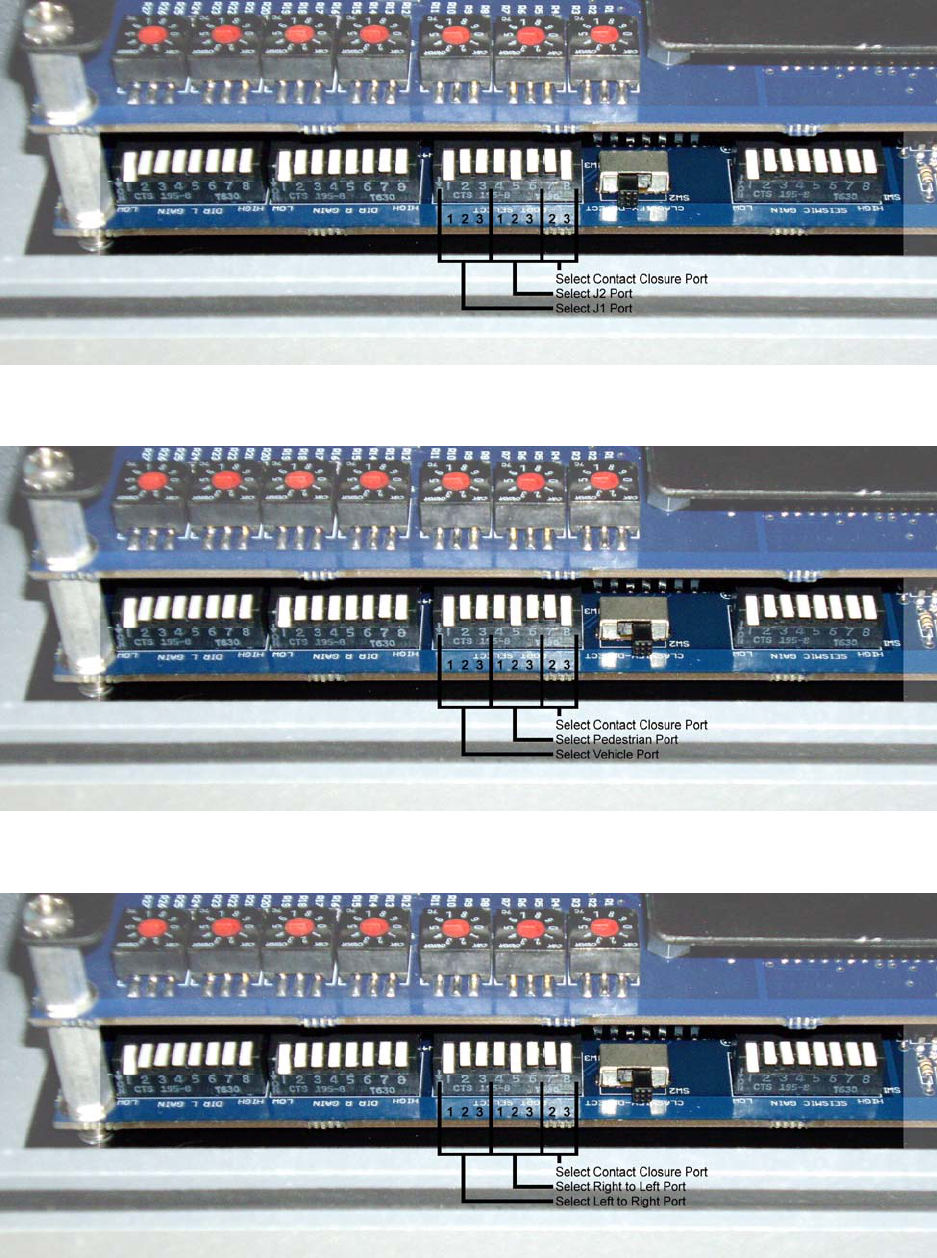
A sensor board’s output ports are the three lines of communication from it to the
Encoder/Transmitter board. Alarm pulses generated by the sensor board are (or are
not) sent to the Encoder/Transmitter board depending on which PORT SELECT
switches are turned on. To turn a switch on, press it down towards the circuit board.
Only select one Port for each function. Do not select duplicate Ports for different
functions as this prevents the alarm from being sent. To prevent a particular function
from being sent, do not select a Port for it. The Contact Closure (CC) switches are only
used when a normally open contact closure probe is connected to J1 on LCTL5L-DS
and LCTL5L-SS models. The pictures on the next page show the PORT SELECT
switch assignments for all models except the LCTL5L-CC which do not have selectable
ports.
LCTL5L-XX USER’S MANUAL Rev. D Page 11 of 19
Detect Mode Port Select Switch Assignments
Classify Mode Port Select Switch Assignments for Seismic Probe Only
Classify Mode Port Select Switch Assignments for Directional Probe Only
LCTL5L-XX USER’S MANUAL Rev. D Page 12 of 19
X. LCTL5L-CC Contact Closure Transmitters
The LCTL5L-CC provides three sets of inputs for external devices that signal detected
activity by means of opening or closing a switch. Unlike other LCTL5L-XX models,
there are no sensor board switches to set with these transmitters. Instead, alarm pulses
are automatically assigned to the Ports associated with the inputs. For each of the
three Ports, there is a normally closed pair of contacts in J1 and a normally open pair of
contacts in J2.
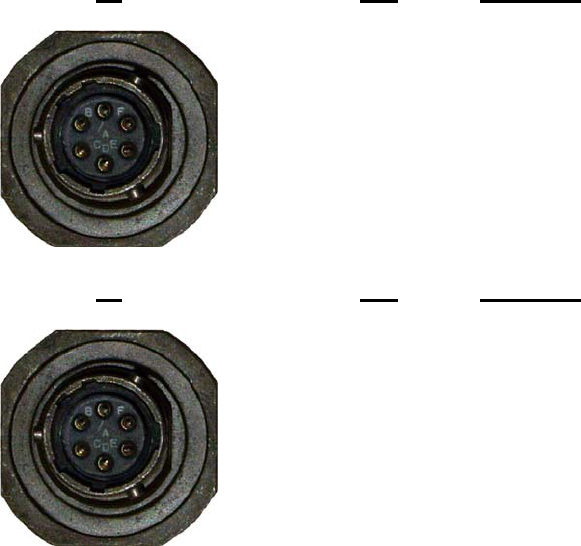
XI. Sensor Board Input Pin Assignments
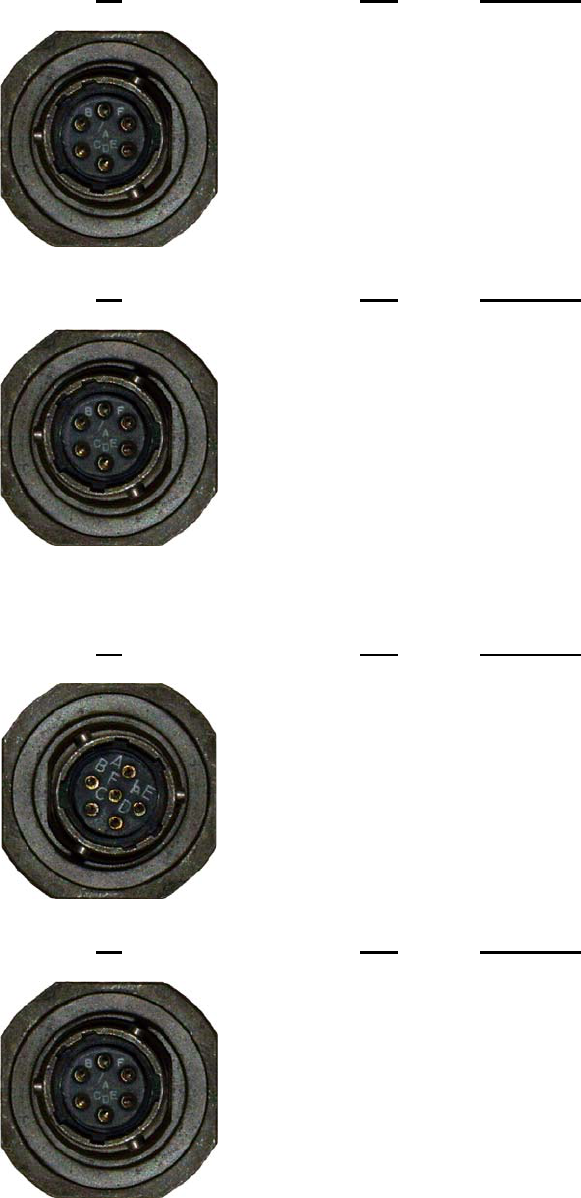
LCTL5L-CC Triple Contact Closure Sensor
J1 Pin Function
A
B
C
D
E
F
Normally Closed 1
Common 1
Normally Closed 2
Common 2
Normally Closed 3
Common 3
J2
Pin
Function
A
B
C
D
E
F
Normally Open 1
Common 1
Normally Open 2
Common 2
Normally Open 3
Common 3
LCTL5L-XX USER’S MANUAL Rev. D Page 13 of 19
LCTL5L-DD Dual Directional Sensor
J1 Pin Function
A
B
C
D
E
F
Right input
Signal Ground
Left input
Probe +6 VDC supply
Probe -6 VDC supply
Shield Ground
J2
Pin
Function
A
B
C
D
E
F
Right input
Signal Ground
Left input
Probe +6 VDC supply
Probe -6 VDC supply
Shield Ground
LCTL5L-DS Directional / Seismic Sensor
J1 Pin Function
A
B
C
D
E
F
Seismic (+)
Seismic (-)
No connection
Contact Closure input
Contact Closure common
Shield Ground
J2
Pin
Function
A
B
C
D
E
F
Right input
Signal Ground
Left input
Probe +6 VDC supply
Probe -6 VDC supply
Shield Ground
LCTL5L-XX USER’S MANUAL Rev. D Page 14 of 19
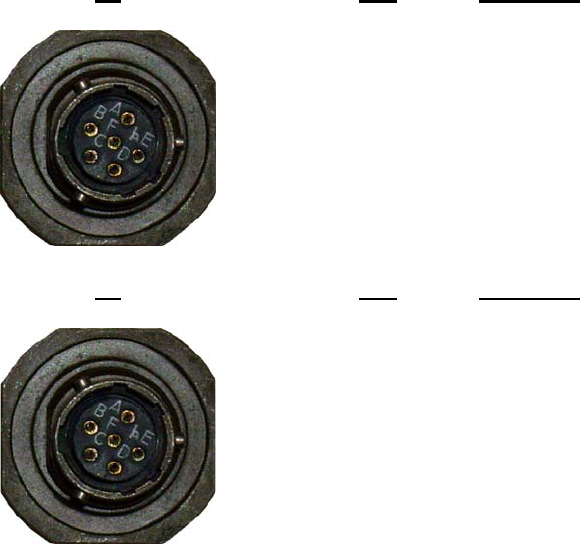
LCTL5L-SS Dual Seismic Sensor
J1 Pin Function
A
B
C
D
E
F
Seismic (+)
Seismic (-)
No connection
Contact Closure input
Contact Closure common
Shield Ground
J2
Pin
Function
A
B
C
D
E
F
Seismic (+)
Seismic (-)
No connection
Contact Closure input
Contact Closure common
Shield Ground
LCTL5L-XX USER’S MANUAL Rev. D Page 15 of 19
XII. Examples
1. An LCTL5L-DS with both SPS-21 and PIR probes connected and PORT SELECT
switches 1 and 5 selected responds as follows:
• In Classify Mode:
o A vehicle stimulating the SPS-21 triggers a Port 1 alarm.
o A pedestrian stimulating the SPS-21 triggers a Port 2 alarm.
o A vehicle or pedestrian traveling left to right in front of the PIR (looking
out from the PIR) triggers a Port 1 alarm.
o A vehicle or pedestrian traveling right to left in front of the PIR (looking
out from the PIR) triggers a Port 2 alarm.
• In Detect Mode:
o A vehicle or pedestrian stimulating the SPS-21 triggers a Port 1 alarm.
o A vehicle or pedestrian stimulating the PIR in either direction triggers a
Port 2 alarm.
2. An LCTL5L-DD with a PIR probe connected to J1, an MS-10 connected to J2,
and PORT SELECT switches 2 and 4 selected responds as follows:
• In Classify Mode:
o A vehicle or pedestrian traveling right to left in front of the PIR (looking
out from the PIR) triggers a Port 1 alarm.
o A vehicle or pedestrian traveling left to right in front of the PIR (looking
out from the PIR) triggers a Port 2 alarm.
o A vehicle traveling left to right in front of the MS-10(looking out from
the MS-10) triggers a Port 1 alarm.
o A vehicle traveling right to left in front of the MS-10 (looking out from
the MS-10) triggers a Port 2 alarm.
• In Detect Mode:
o A vehicle or pedestrian stimulating the PIR in either direction triggers a
Port 1 alarm.
o A vehicle stimulating the MS-10 in either direction triggers a Port 2
alarm.
3. An LCTL5L-SS with a normally open contact closure device connected to J1, an
SPS-21 connected to J2, and PORT SELECT switches 4 and 7 selected
responds as follows:
• In Classify Mode:
o A pedestrian stimulating the SPS-21 triggers a Port 1 alarm.
o A vehicle stimulating the SPS-21 does not trigger an alarm.
o A contact closure in the device connected to J1 triggers a Port 2 alarm.
• In Detect Mode:
o A vehicle or pedestrian stimulating the SPS-21 triggers a Port 1 alarm.
o A contact closure in the device connected to J1 triggers a Port 2 alarm.
LCTL5L-XX USER’S MANUAL Rev. D Page 16 of 19
XIII. Deployment Tips
A. LCTL5L-XX
• When changing batteries or settings, it is important to make sure that
the case O-ring and mating surface are clean. Debris between the O-
ring and mating surface creates a leak path which allows water to enter
the unit.
• The LCTL5L-XX should only be buried deeply enough to cover the
input connectors. If it is buried too deeply, the antenna’s signal is
significantly attenuated.
• Maximum transmit range is achieved when the LCTL5L-XX has an
unobstructed line of sight to the receiver’s or repeater’s antenna.
When circumstances permit, use coax to remote-mount the antenna in
an elevated location to improve performance in difficult terrain.
B. Seismic Probes (SPS-21)
• Although the probe’s cable is shielded, strong sources of
electromagnetic energy can be conducted to the LCTL5L-XX’s seismic
amplifiers. Excess coiled cable should be placed under the unit to
avoid picking up alarm transmissions. The unit should also be
deployed away from other strong EM sources such as high-power
transmission lines, power transformers, and radio towers.
• To reduce the possibility of non-target alarms, deploy probes well away
from sources of ground noise such as: heavy traffic; windblown trees,
signs, etc.; pumps, compressors, and other machinery; livestock and
animal trails.
• Vibrations travel farther and retain more energy in hard or rocky
ground. If the probe seems too sensitive with the LCTL5L-XX on the
lowest gain setting (switches 1 and 2 down), one or more of the
following techniques should be used:
o Use a shorter spike on the probe or eliminate it altogether.
o Dig an oversized hole for the probe an fill it with a softer
material like potting soil.
o Connect an attenuator cable between the probe cable and
transmitter to cut the signal in half.
o Connect additional probes end to end to form a line string.
Line strings may be composed of up to six probes.
• Vibrations dampen out quickly soft or wet soil. To increase the probe’s
sensitivity, replace the probe’s spike with a longer one or with a length
of 3/8”-16 all-thread.
LCTL5L-XX USER’S MANUAL Rev. D Page 17 of 19
C. Dual-Axis Magnetometer Probes (MS-10)
• Magnetic probes generate an alternating magnetic field and react to
ferrous metals and other magnetic fields moving within that field. If the
magnetometer is deployed above ground, it must be rigidly secured to
prevent movement. Whether above or below ground, the MS-10 must
not be deployed near sources of interference such as: windblown
fencing, guy wires, signs, etc.; power lines and transformers; and
electric motors.
• Under certain circumstances, the temperature of the MS-10’s may be
elevated above its operational limit of 60°C (140F°). This typically
occurs during very hot weather and when the MS-10 is in direct
sunlight or is shallowly buried in an unshaded area. If the probe gets
too hot, false alarms may be generated. To eliminate false alarms,
bury the probe a few inches deeper or deploy it in a shaded location.
D. Passive Infrared Probes (PIR)
• Passive infrared probes react to changes in temperature in the
direction they are pointed. False alarms may be generated if the probe
is pointed where there is background or animal movement, heat
waves, or excessive incident light.
• It is important that the probe be rigidly mounted so that its own
movement does not cause false alarms.
• NOTE: under no circumstances should an infrared probe be pointed
where it will see direct or strongly reflected sunlight.

LCTL5L-XX USER’S MANUAL Rev. D Page 18 of 19
XIV. Specifications
ELECTRICAL
Operating Power: 12VDC nominal
Standby current:
Dual Seismic: 510µA
Dual Directional: 520µA + 385 µA for each MS-10 and/or 15 µA for each PIR
Seismic / Directional: 515µA + 385 µA for MS-10 or 15 µA for PIR
Contact Closure/Open: 470µA
Transmit current: 2.5A
Power Supply: (2x) 6VDC Duracell PC915 lantern batteries
TRANSMITTER
FCC ID: V88-TRX876
FCC Rules: Part 90
Input Voltage: 8.5 to 14 VDC
Operating Bandwidth: Narrowband (12.5 kHz)
Frequency Range: 150-174 MHz
RF Output Power: 5 watts, factory preset
Frequency Stability: ± 2.5 ppm
Transmitter Attack Time
From Power Up: 15ms
RF Load Impedance: 50 ohms
MECHANICAL
Size: 10⅝” x 9⅞ ” x 4⅞”
Weight: 4.0 lbs. w/o batteries
Case construction: Polypropylene with O-ring seal
Weather resistance: IP64
User Interface: decimal coded rotary switch
DIP switch for gain and port settings
Slide toggle switch for Classify/Detect Mode setting
RF Output Connector: BNC
Input Connections: (2) Environmental connectors
Operating Temp: -4° to 158° F (-20° to +70° C)
LCTL5L-XX USER’S MANUAL Rev. D Page 19 of 19
XV. Warranty
Limited Warranty
Monitron products are warranted against defects in materials and workmanship for a period of
one year from the date of shipment, as evidenced by receipts or other documentation. Monitron
Inc. will, at its option, repair or replace equipment that proves to be defective during the
warranty period. This warranty includes parts and labor.
A Return Material Authorization (RMA) number must be obtained from Monitron Inc. and must
be clearly marked on the outside of the package before any equipment will be accepted for
warranty work. Monitron Inc. will pay the shipping costs of returning to the owner parts which
are covered by warranty.
Monitron Inc. is responsible for the information in the enclosed manual and believes the
information to be accurate. The document has been carefully reviewed for technical accuracy
and its contents have been approved by Monitron, Inc. In the event that technical or
typographical errors exist, Monitron Inc. reserves the right to make changes to subsequent
editions of this document without prior notice to holders of this edition. The reader should
consult Monitron Inc. if errors are suspected. In no event shall Monitron Inc. be liable for any
damages arising out of or related to this document or the information contained in it.
EXCEPT AS SPECIFIED HEREIN, MONITRON INC. MAKE ANY WARRANTIES, EXPRESS
OR IMPLIED, AND SPECIFICALLY DISCLAIM ANY WARRANTY OF MERCHANTABILITY OR
FITNESS FOR A PARTICULAR PURPOSE. CUSTOMER’S RIGHT TO RECOVER DAMAGES
CAUSED BY FAULT OR NEGLIGENCE ON THE PART, MONITRON INC. SHALL BE LIMITED
TO THE AMOUNT THERETOFORE PAID BY THE CUSTOMER. MONITRON INC. WILL BE
LIABLE FOR DAMAGES RESULTING FROM LOSS OF DATA, PROFITS, USE OF
PRODUCTS, OR INCIDENTAL OR CONSEQUENTIAL DAMAGES, EVEN IF ADVISED OF
THE POSSIBILITY THEREOF. This limitation of the liability of Monitron Inc and/or its
distributors will apply regardless of the form of action, whether in contract or tort, including
negligence. Any action against Monitron Inc. must be brought within six months after the cause
of action occurs. Monitron shall be liable for any delay in performance due to causes beyond
their reasonable control. The warranty provided herein does not cover damages, defects,
malfunctions or service failures caused by owner’s failure to follow the Monitron installation,
operation, or maintenance instructions: owner’s modification of the product; owner’s abuse,
misuse, or negligent acts; power failure or surges; fire, flood, accident, actions of third parties, or
other events outside reasonable control.
© Copyright 2009
Under the copyright laws, this publication may not be reproduced or transmitted in any form, electronic or
mechanical, including photocopying, recording, storing in an information retrieval system, or translating, in whole
or in part, without the prior written consent of Monitron Inc.
Trademarks
All copyrights and Trademarks belong to their respective owners.