Voxx Accessories HSDB1 Wi-Fi Video Doorbell User Manual
Voxx Accessories Corp. Wi-Fi Video Doorbell
User Manual

1
NOW YOU NEVER HAVE TO ASK…
WHO’S THERE?
HSDB1 QSG 00
2
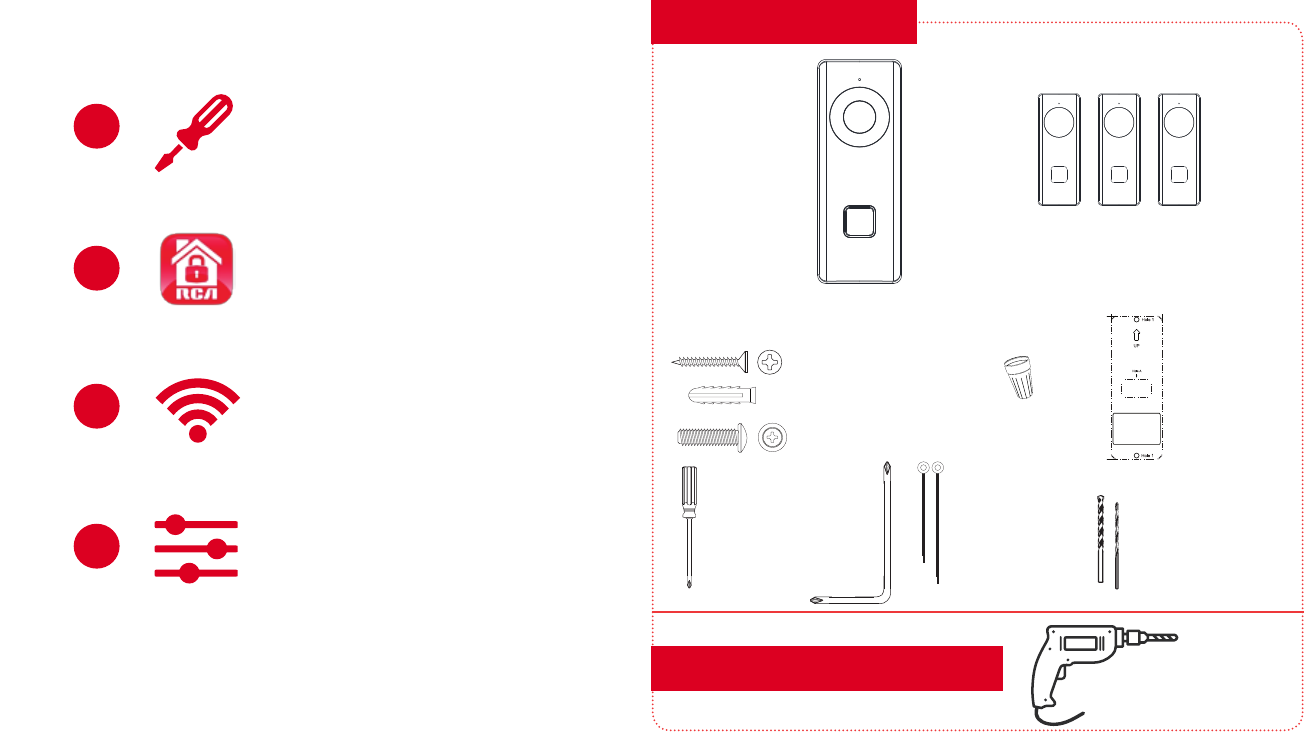
WiFi doorbell
camera
with 1 faceplate
installed
WHAT YOU GET
TOOLS YOU’LL NEED
3 extra faceplate options
Installation kit:
x2 Mounting anchors
x2 Mounting screws
Drill
#1 Phillips-Head
Screwdriver
~ 4.5 in
~ 1.5 in
Mounting Template
Paste the template on the
required place.Drill screw
holes and cable holes
according to the template.
Hole A:Cable Hole.
Hole 1:Wall Mounting Screw
Hole.
.
.
Mounting
template
x2 Set screws
Security
screwdriver
x2 Wire nuts
7/32” Masonry
Drill Bit
1/16” Wood
Drill Bit
x2 Wire leads
EASY SETUP
1Mount the doorbell camera
to an existing doorbell
2Download the RCA
Security App
3Connect to Wi-Fi
4Customize your device
settings
3
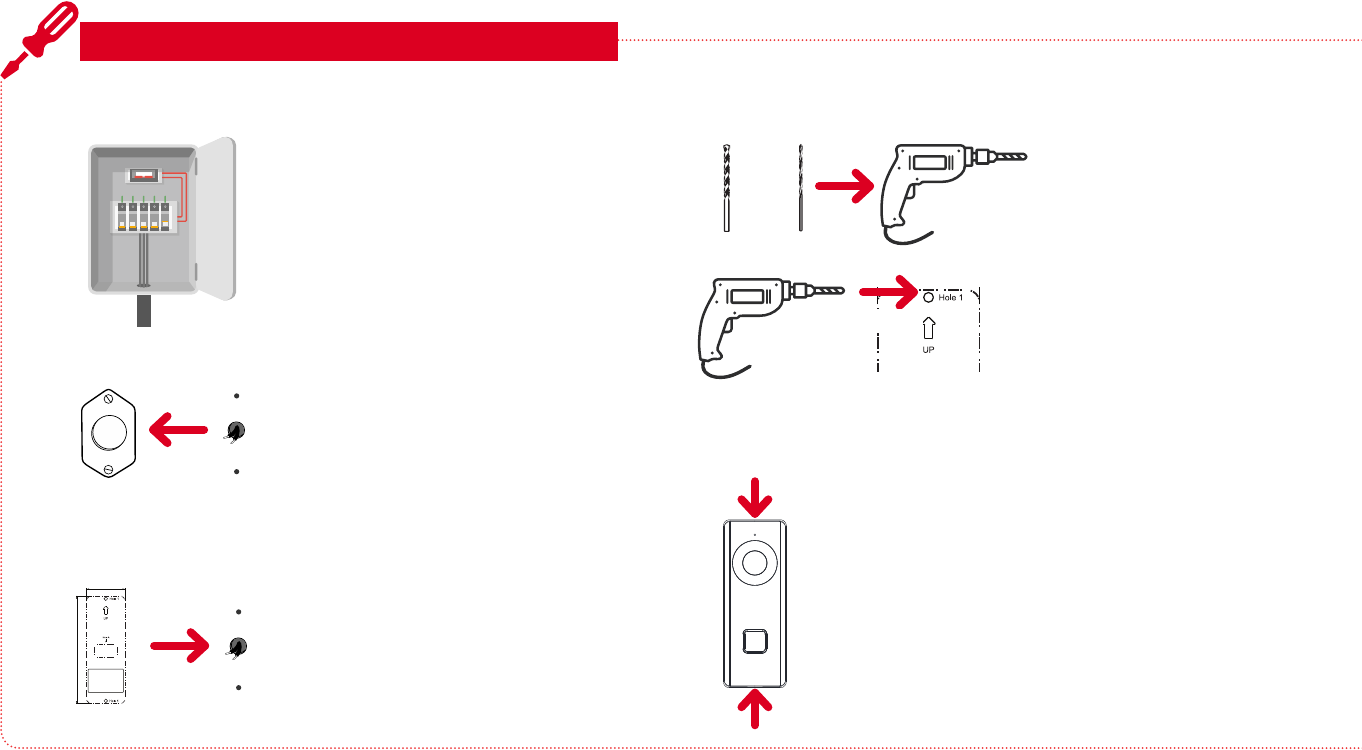
Find the breaker that controls the
circuit for your doorbell. Turn it o
before you continue installation.
Apply the mounting template sticker to the wall
Align the space marked “Hole A”
on the mounting template with the
access point for the cables that will
power the doorbell camera.
Stick the mounting template sticker to
the wall.
3
~ 4.5 in
~ 1.5 in
Mounting Template
Paste the template on the
required place.Drill screw
holes and cable holes
according to the template.
Hole A:Cable Hole.
Hole 1:Wall Mounting Screw
Hole.
.
.
MOUNT THE DOORBELL CAMERA
Turn o power to your doorbell’s circuit
1
Remove your existing doorbell
2
Carefully remove your existing
doorbell from the wall. Then unhook
your home’s wiring from the doorbell’s
terminals.
Remove &
unhook
Apply
4Drill holes for the doorbell camera
Drill two holes where
indicated by the mounting
template.
~ 4.5 in
~ 1.5 in
Mounting Template
Paste the template on the
required place.Drill screw
holes and cable holes
according to the template.
Hole A:Cable Hole.
Hole 1:Wall Mounting Screw
Hole.
.
.
Insert one of the drill bits
in your drill—for masonry
or brick, use the larger drill
bit provided. For wood,
the smaller.
—OR—
Drill
Insert
5Remove the faceplate from the doorbell camera
Before you mount it, take the faceplate o the
doorbell camera—you’ll need access to several
items behind the faceplate during setup.
To remove the faceplate: Push down on the top
and bottom of the doorbell camera and push the
button and just below the camera to remove the
doorbell camera from the faceplate. Be careful not
to touch the camera lens!
continues on the next page...

4
IMPORTANT! Handle the doorbell camera carefully! Make
sure not to scratch its lens.
Connect the doorbell camera to home power
6
Check if your home’s doorbell power wires are long enough to
connect directly to the terminals on the back of the doorbell
camera.
Loosen
Doorbell
camera
back
Terminals If your home’s doorbell power wires are long
enough:
Use the screwdriver provided in this package
to loosen the terminal screws on the back of
the doorbell camera.
Terminals
Home
doorbell
wires
Tighten
If your home’s doorbell power wires are NOT
long enough:
Use the wire leads and wire nuts included in
this package to connect them to the doorbell
camera.
First, put the ends of one wire lead and one
home doorbell wire together and insert them
into a wire nut. Then twist the wire nut until
you feel tension. Repeat with the other wire
lead, home doorbell wire, and wire nut.
Home
doorbell
wires
Wire nut Twist
Wire
leads
Unscrew
& remove
Doorbell
camera
back
Terminals
Connect the doorbell power wires directly
to the terminals on the back of the doorbell
camera. Loop each wire end around each
terminal on the back of the doorbell camera.
Note: It doesn’t matter which wire you put on
which terminal.
Tighten the screws to hold the wires rmly in
place.
Next, unscrew the terminal screws on the back
of the doorbell camara and remove them.
Place each screw through the ring on the other
end of each wire lead, then screw the terminal
screws back onto the doorbell camera.
Tighten
MOUNT THE DOORBELL CAMERA (continued)
5
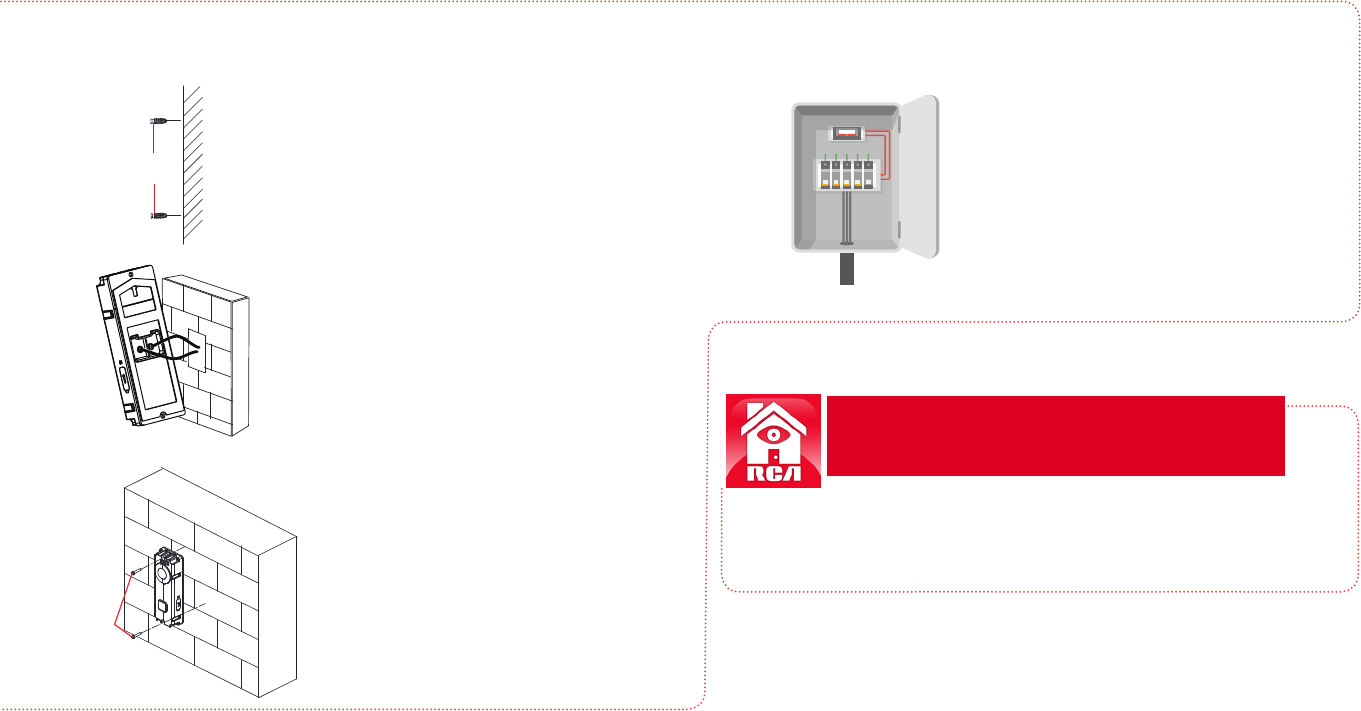
Mount the doorbell camera to the wall
7
Screws
Route the power wires and/or wire leads into
the wall.
Anchors
If you’re mounting to masonry or brick, insert
the provided anchors in the holes you drilled
before proceeding.
Align the holes on the doorbell camera’s
body with the holes you drilled.
Mount the doorbell camera to the wall
using the screws provided.
Turn on power to your doorbell’s circuit
Turn the circuit that powers your
doorbell back on. The doorbell
camera’s blue indicator light turns on.
8
In the Google Play or Apple App Stores, search for “RCA
DOORBELL CAMERA” and look for the icon shown here. Then
download and install the App.
DOWNLOAD THE RCA
SECURITY APP
6
Launch the App
Once the RCA Doorbell Camera App has
installed on your smarphone or tablet, press the
icon to launch the App.
IMPORTANT: The rst time you launch it, the
App will ask if it can send you notications. Click
“Allow” to let the App push notications to your
phone or tablet.
1
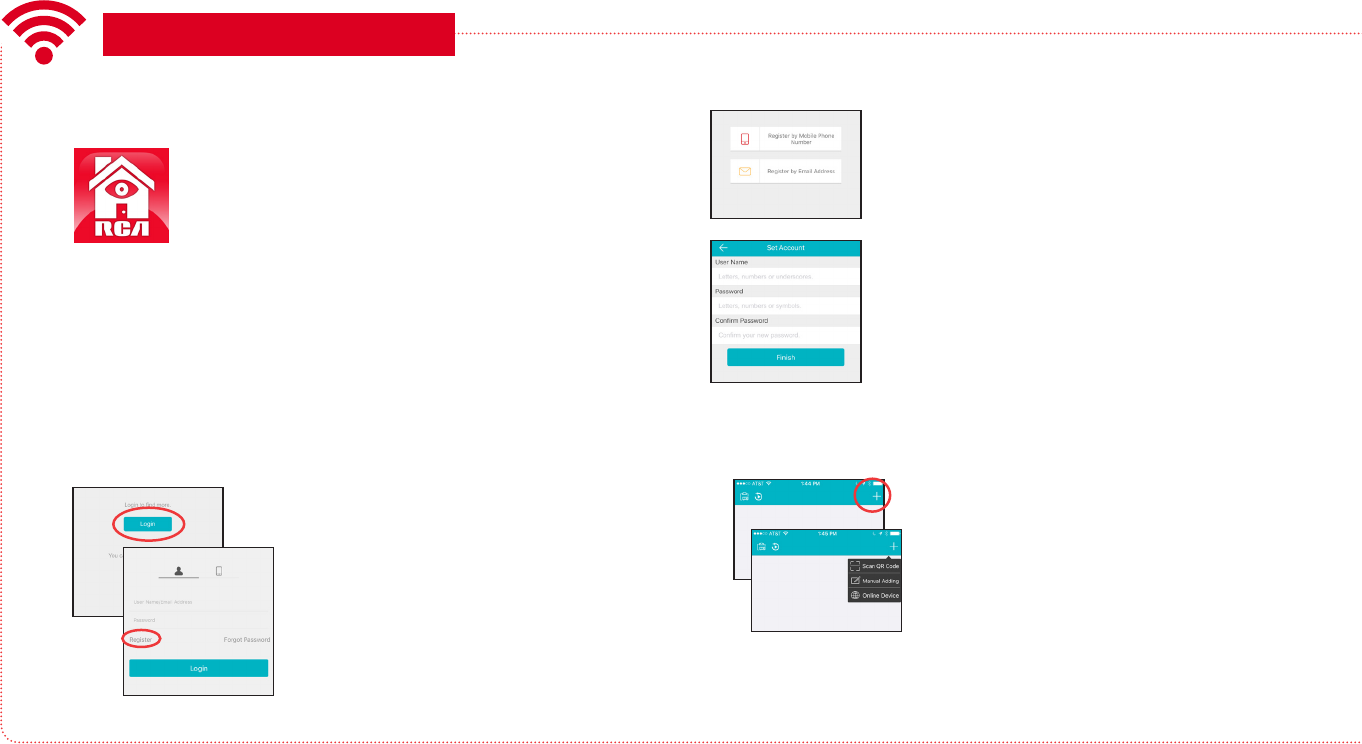
Create an App user name and password
The rst time you launch the RCA Doorbell Camera App, you’ll
need to create a user name and password so that you can
access your camera securely.
2
Press the Login button to start, then
press Register on the screen that
follows.
You can register by mobile phone number
or by email. The App will send you a
verication code to link this number or
e-mail address with your account. Follow
the steps in the App to proceed.
CONNECT TO WIFI
Create a user name and password and
press Finish
Connect the camera with your WiFi network
3
In the RCA Doorbell Camera App, tap the
+ symbol in the upper-right corner of the
screen.
In the menu that pops up, choose “Scan
QR Code.”
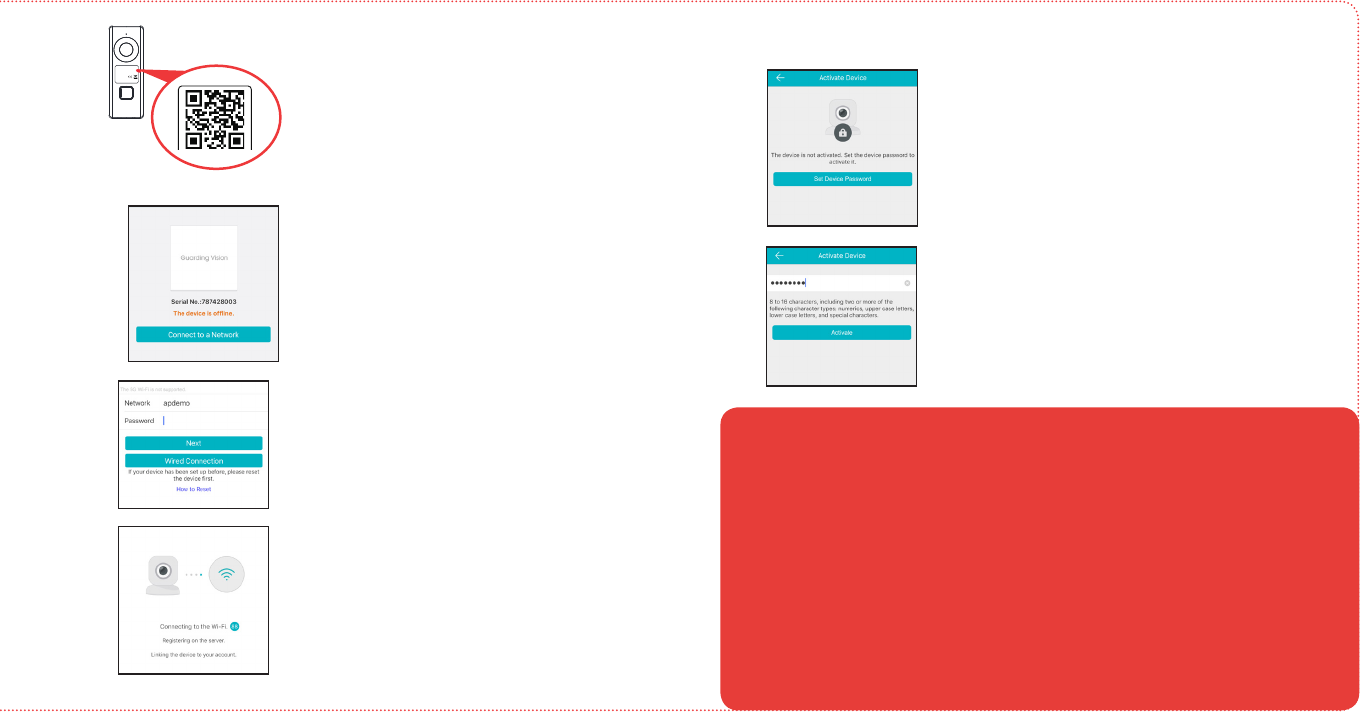
7
Find the QR code and serial number on
the front of the doorbell camera. Scan the
QR code with your phone when prompted
by the App (or enter the serial number
manually).
Enter the name and password for the WiFi
network your phone is connected to.
The App will connect the camera with your
WiFi network, then register it with the RCA
Doorbell Camera server for extra security.
Once the App recognizes your doorbell’s
serial number, the App asks you to
connect to your WiFi network. Tap the
Connect to a Network button in the App.
Once the doorbell camera has connected
to your WiFi network, the Activation page
appears in the App.
Press Set Device Password and create a
password for using the doorbell camera.
Activate the camera
4
Then press Activate to nish activation.
NOTE: If you manually input the serial number for your doorbell camera
(instead of scanning the QR code), you’ll need to input a verication code
as a last step to verication. Enter this code from the doorbell and press
OK in the App to nish.
+ Make sure your phone or tablet is connected to the WiFi network you want to use.
+ Make sure the camera is getting a good signal from your WiFi router.
+ Test your WiFi network with other devices to make sure its working.
+ Double check that you’ve entered the correct password for your WiFi network in the App.
+ Make sure that Wi-Fi signal is 2.4GHz. The RCA Doorbell Camera does not support 5GHz WiFi.
+ Make sure that your WiFi router uses either WPA2-PSK/WPA-PSK or AES as its encryption
method.
+ Make sure that there is no MAC lter on router or add MAC address to router whitelist.
+ Reset the camera to set up connection again. Press and hold RESET key for 15 seconds. The
camera announces when it is fully reset (rebooting).
Connection Troubleshooting
For additional assistance, please call 1-800-645-7750.
8
Set Screw
Install a faceplate
1
Choose the included faceplate that you
want to use and place it over the doorbell
camera’s body. Insert one of the security
screws into the bottom of the doorbell
camera and screw it into place with the
security screwdriver.
CUSTOMIZE AND USE!
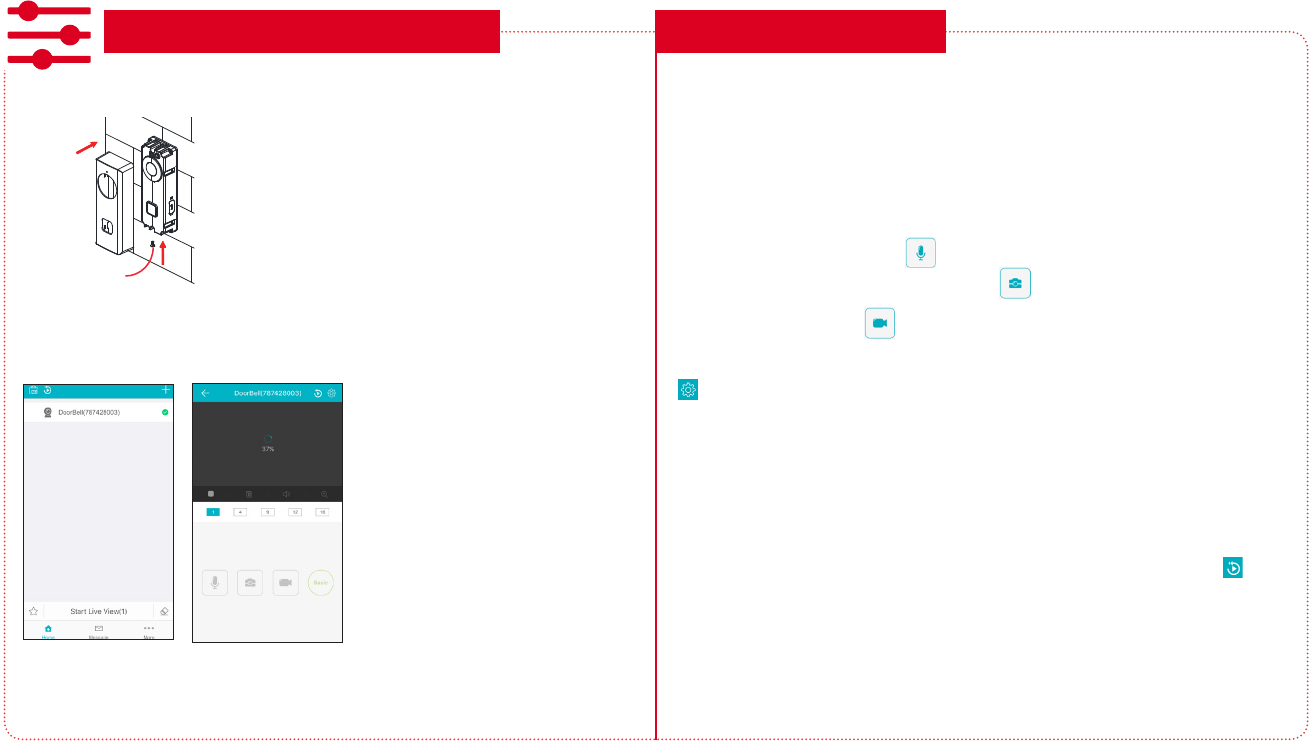
Choose the camera from the home screen
2
In the home screen for the
RCA Doorbell Camera App,
choose the camera you just
activated, and press Start
Live View at the bottom of the
screen.
The Live View screen is your
gateway to total control of
your Doorbell Camera from
virtually anywhere.
The next section gives you a
tour of the features available
from this screen.
EVERYDAY USE
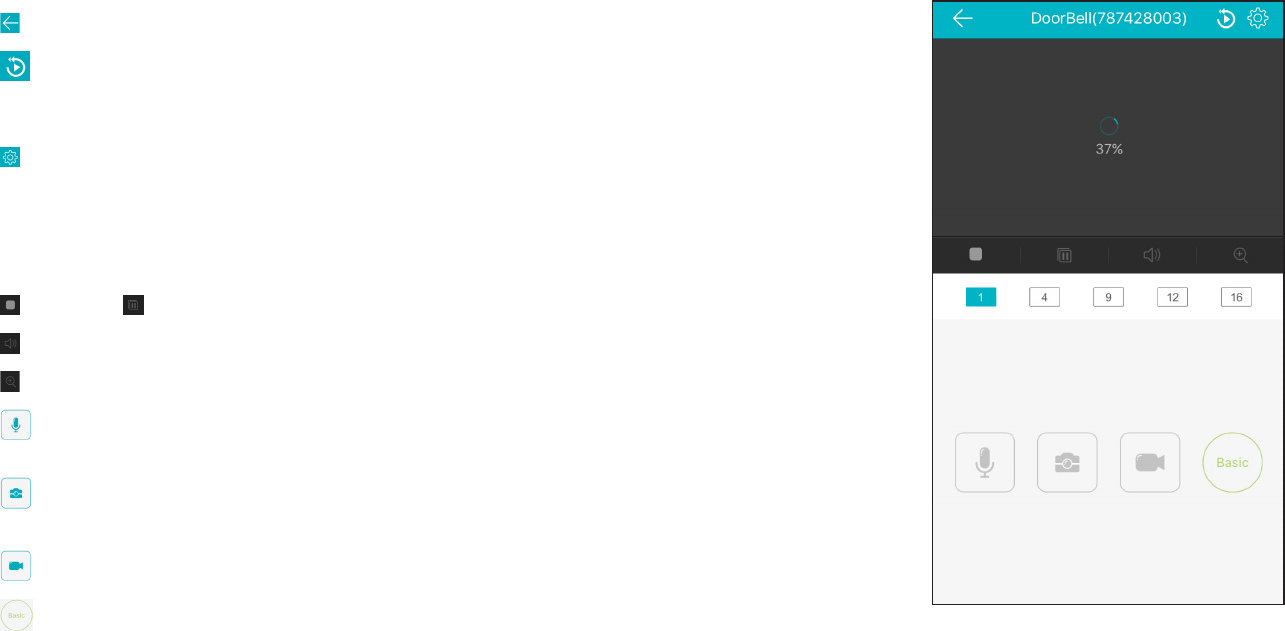
Live View Launch the RCA Doorbell Camera App and press Start
Live View.
Who’s There? (Video Intercom) When a visitor rings the doorbell,
you get a push notication on your phone or tablet. Press the
notication to go to the App, then press Start Live View get a live
view from the doorbel camera. From the live view screen you can...
Talk to the visitor (press )
Take a snapshot of the visitor (press )
Record video (press )
Set Automatic Motion Alerts In the Live View screen, press
(Settings) to access the Settings menu. Then choose Alarm
Notication and set it to Enabled. The doorbell camera will
automatically record video on its pre-installed micro-SD card and
send you a notication when it detects motion.
To see the video captured from any alarm messages, press the
Messages icon at the bottom of the device list screen.
Playback In the App, choose a connected device and press
(Micro-SD Card) to play back any images or videos stored in that
device’s memory card.
9
(Back) goes back to the device list screen.
(Micro-SD Card) accesses any content stored on the camera’s Micro-SD Card (pre-installed).
Press this icon to start viewing or downloading motion/sound-activated videos or images from the
camera’s Micro-SD Card. (This is where you’ll see auto recordings.)
(Settings) accesses the Settings menu for this camera. Press this icon to adjust the time and date
settings, turn motion alarms on or o, adjust camera speaker and microphone volume, check storage
status and the version of the device’s software, and see a settings overview for the device.
Camera view shows you the image from your Doorbell Camera. Turn your phone/tablet sideways to
take over the entire screen.
(Stop) and (Pause) stops/starts or pauses the live video.
(Sound On/O) turns the sound from the camera on and o.
(Zoom) zooms in on the live view.
(Talk) lets you speak through this camera’s built-in speaker. Press and hold this icon to start
speaking.
(Snapshot) takes a still photo of the camera video. The snapshot le is saved to your
smartphone or tablet.
(Record) starts/stops recording video. The video le is saved to your smartphone or tablet.
(HD-SD Select) lets you switch between high- and standard-denition video on the view screen.
1 / 4 / 9 / 12 / 16 (Multi-Camera View) lets you see multiple cameras at once on a single screen (if
you’ve set up multiple cameras). Press the number you want to access a multi-camera view screen.
TOUR OF THE SYSTEM: LIVE VIEW SCREEN
10
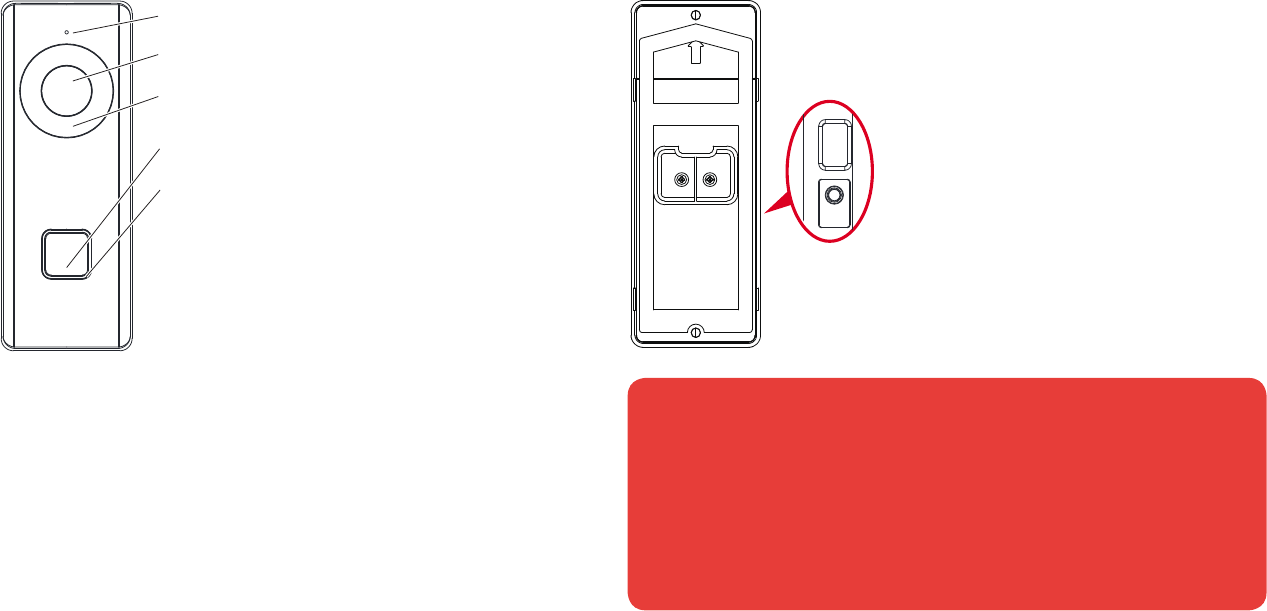
TOUR OF THE DOORBELL CAMERA
FRONT AND BOTTOM BACK
RESET button (left side) restores the
doorbell camera to factory settings
(hold for 15 seconds).
Micro SD card slot (right side, not
shown) holds the micro SD card that
comes with your doorbell camera.
Mic captures audio around the doorbell.
Lens captures video in front of the doorbell.
IR light (behind panel) activates automatically
for night vision.
Call button sounds the doorbell.
Indicator light shows the camera status:
Solid blue when starting up and working
normally
Flashing blue and red when WiFi is not
connected
Flashing red when the doorbell camera is
updating its rmware
Flashing blue when the doorbell camera is
calling the App
Off when the doorbell camera is
communicating with the App
Speaker (bottom, not shown) broadcasts
your voice when talkback is activated.
Screw terminals 1 and 2 connect to the power
source from your home.
Your doorbell camera comes with an SD card pre-installed, for recording alerts.
To remove or replace this card, you’ll rst need to remove the doorbell camera’s
faceplate by unlocking its set screw and pressing on its bottom and top and pulling it
o. Then use the included set screw tool to gently pry the bottom of the SD card slot
(on the right side) open. Press the installed SD card to unlock it and pull it out. Place
the new SD card in and lock it into place. Then place the SD card cover back on and
put the doorbell camera’s faceplate over the doorbell camera. Finally, insert the set
screw and screw it back in place.
Removing/Replacing the SD Card
FCC Information
Please take attention that changes or modication not expressly approved by the
party responsible for compliance could void the user’s authority to operate the
equipment.
FCC compliance: This equipment has been tested and found to comply with
the limits for a Class B digital device, pursuant to part 15 of the FCC Rules.
These limits are designed to provide reasonable protection against harmful
interference in a residential installation. This equipment generates, uses and
can radiate radio frequency energy and, if not installed and used in accordance
with the instructions, may cause harmful interference to radio communications.
However, there is no guarantee that interference will not occur in a particular
installation. If this equipment does cause harmful interference to radio or television
reception, which can be determined by turning the equipment o and on, the user
is encouraged to try to correct the interference by one or more of the following
measures:
—Reorient or relocate the receiving antenna.
—Increase the separation between the equipment and receiver.
—Connect the equipment into an outlet on a circuit dierent from that to which
the receiver is connected.
—Consult the dealer or an experienced radio/TV technician for help.
This equipment should be installed and operated with a minimum distance 20cm
between the radiator and your body.
FCC Conditions
This device complies with part 15 of the FCC Rules. Operation is subject to the
following two conditions:
1. This device may not cause harmful interference.
2. This device must accept any interference received, including interference that
may cause undesired operation.
Industry Canada ICES-003 Compliance
This device meets the CAN ICES-3 (B)/NMB-3(B) standards requirements.
This device complies with Industry Canada licence-exempt RSS standard(s).
Operation is subject to the following two conditions:
(1) this device may not cause interference, and
(2) this device must accept any interference, including interference that may
cause undesired operation of the device.
Le présent appareil est conforme aux CNR d’Industrie Canada applicables
aux appareils radio exempts de licence. L’exploitation est autorisée aux deux
conditions suivantes :
(1) l’appareil ne doit pas produire de brouillage, et
(2) l’utilisateur de l’appareil doit accepter tout brouillage radioélectrique subi,
même si le brouillage est susceptible d’en compromettre le fonctionnement.
Under Industry Canada regulations, this radio transmitter may only operate using
an antenna of a type and maximum (or lesser) gain approved for the transmitter by
Industry Canada. To reduce potential radio interference to other users, the antenna
type and its gain should be so chosen that the equivalent isotropically radiated
power (e.i.r.p.) is not more than that necessary for successful communication.
Conformément à la réglementation d’Industrie Canada, le présent émetteur
radio peut fonctionner avec une antenne d’un type et d’un gain maximal (ou
inférieur) approuvé pour l’émetteur par Industrie Canada. Dans le but de réduire
les risques de brouillage radioélectrique à l’intention des autres utilisateurs, il faut
choisir le type d’antenne et son gain de sorte que la puissance isotrope rayonnée
équivalente (p.i.r.e.) ne dépasse pas l’intensité nécessaire à l’établissement d’une
communication satisfaisante.
This equipment should be installed and operated with a minimum distance 20cm
between the radiator and your body.
Cet équipement doit être installé et utilisé à une distance minimale de 20 cm entre
le radiateur et votre corps.
Symbol Conventions
The symbols that may be found in this document are dened as follows.
Provides additional information to emphasize or supplement important points of
the main text.
Indicates a potentially hazardous situation, which if not avoided, could result in
equipment damage, data loss, performance degradation, or unexpected results.
Indicates a hazard with a high level of risk, which if not avoided, will result in death
or serious injury.
WARNING
● The working temperature of the device is from -30° C to 50° C .
● All the electronic operation should be strictly compliance with the electrical
safety regulations, re prevention regulations and other related regulations in
your local region.
● Please use the power adapter, which is provided by normal company. The
NOTE
WARNING
DANGER
power consumption cannot be less than the required
value.
● Do not connect several devices to one power adapter
as adapter overload may cause over-heat or re hazard.
● Please make sure that the power has been
disconnected before you wire, install or dismantle the
device.
● When the product is installed on wall, the device shall
be rmly xed.
● If smoke, odors or noise rise from the device, turn o the power at once and
unplug the power cable, and then please contact the service center.
● If the product does not work properly, please contact your dealer or the nearest
service center. Never attempt to disassemble the device yourself. (We shall
not assume any responsibility for problems caused by unauthorized repair or
maintenance.)
● Do not drop the device or subject it to physical shock, and do not expose it to
high electromagnetism radiation. Avoid the equipment installation on vibrations
surface or places subject to shock (ignorance can cause equipment damage).
● Do not place the device in extremely hot (refer to the specication of the device
for the detailed operating temperature), cold, dusty or damp locations, and do
not expose it to high electromagnetic radiation.
● The device cover hall be kept from rain and moisture.
● Exposing the equipment to direct sun light, low ventilation or heat source such
as heater or radiator is forbidden (ignorance can cause re danger).
● Do not aim the device at the sun or extra bright places. A blooming or smear
may occur otherwise (which is not a malfunction however), and aecting the
endurance of sensor at the same time.
● Please use the provided glove when open up the device cover, avoid direct
contact with the device cover, because the acidic sweat of the ngers may
erode the surface coating of the device cover.
● Please use a soft and dry cloth when clean inside and outside surfaces of the
device cover, do not use alkaline detergents.
● Please keep all wrappers after unpack them for future use. In case of any failure
occurred, you need to return the device to the factory with the original wrapper.
Transportation without the original wrapper may result in damage on the device
and lead to additional costs.
● Please connect a resistor (included in the box content) to the doorbell if no
electrical chime or mechanical chime is connected.
NOTE
Make sure the power voltage across the doorbell should be between 16 VAC and
24 VAC.
• The power supply must conform to LPS. The recommended adaptor models
and manufacturers are shown as below. Use the attached adapter, and do not
change the adaptor randomly.
Model Manufacturer
MKAC-57-242500M MACABLE
MKAC-57-242200M MACABLE
MKAC-57-241500M MACABLE
Legal Disclaimer
TO THE MAXIMUM EXTENT PERMITTED BY APPLICABLE LAW, THE PRODUCT
DESCRIBED, WITH ITS HARDWARE, SOFTWARE AND FIRMWARE, IS
PROVIDED “AS IS”, WITH ALL FAULTS AND ERRORS, AND VOXX MAKES NO
WARRANTIES, EXPRESS OR IMPLIED, INCLUDING WITHOUT LIMITATION,
MERCHANTABILITY, SATISFACTORY QUALITY, FITNESS FOR A PARTICULAR
PURPOSE, AND NON-INFRINGEMENT OF THIRD PARTY. IN NO EVENT
WILL VOXX, ITS DIRECTORS, OFFICERS, EMPLOYEES, OR AGENTS BE
LIABLE TO YOU FOR ANY SPECIAL, CONSEQUENTIAL, INCIDENTAL, OR
INDIRECT DAMAGES, INCLUDING, AMONG OTHERS, DAMAGES FOR LOSS
OF BUSINESS PROFITS, BUSINESS INTERRUPTION, OR LOSS OF DATA OR
DOCUMENTATION, IN CONNECTION WITH THE USE OF THIS PRODUCT, EVEN
IF VOXX HAS BEEN ADVISED OF THE POSSIBILITY OF SUCH DAMAGES.
REGARDING TO THE PRODUCT WITH INTERNET ACCESS, THE USE OF
PRODUCT SHALL BE WHOLLY AT YOUR OWN RISKS. VOXX SHALL NOT
TAKE ANY RESPONSIBILITIES FOR ABNORMAL OPERATION, PRIVACY
LEAKAGE OR OTHER DAMAGES RESULTING FROM CYBER ATTACK, HACKER
ATTACK, VIRUS INSPECTION, OR OTHER INTERNET SECURITY RISKS;
HOWEVER, VOXX WILL PROVIDE TIMELY TECHNICAL SUPPORT IF REQUIRED.
SURVEILLANCE LAWS VARY BY JURISDICTION. PLEASE CHECK ALL
RELEVANT LAWS IN YOUR JURISDICTION BEFORE USING THIS PRODUCT
IN ORDER TO ENSURE THAT YOUR USE CONFORMS THE APPLICABLE LAW.
VOXX SHALL NOT BE LIABLE IN THE EVENT THAT THIS PRODUCT IS USED
WITH ILLEGITIMATE PURPOSES.
IN THE EVENT OF ANY CONFLICTS BETWEEN THIS MANUAL AND THE
APPLICABLE LAW, THE LATER PREVAILS.
HSDB1 NA Safety-Warranty 00
12-Month Limited Warranty
Voxx Accessories Corporation (the “Company”) warrants to the original retail
purchaser of this product that should this product or any part thereof, under
normal use and conditions, be proven defective in material or workmanship within
12 months from the date of original purchase, such defect(s) will be repaired or
replaced with new or reconditioned product (at the Company’s option) without
charge for parts and repair labor. To obtain repair or replacement within the terms
of the warranty, the product is to be delivered with proof of warranty coverage
(e.g. dated bill of sale), specication of defect(s), transportation prepaid, to an
approved warranty station. For the location of the nearest warranty station to you,
call toll-free to our control oce: 1-844-393-7338.
This Warranty is not transferable and does not cover product purchased, serviced
or used outside the United States or Canada. The warranty does not extend to
the elimination of externally generated static, noise, or loss of range or audio/video
quality due to external factors, to costs incurred for the installation, removal or
reinstallation of the product, or to damage to digital media devices or memory. The
warranty does not apply to any product or part thereof which, in the opinion of the
company, has suered or been damaged through alteration, improper installation,
mishandling, misuse, neglect, accident or exposure to moisture. This warranty
does not apply to damage caused by an AC adapter not provided with the
product or by removal or defacement of factory serial number/barcode labels.
THE EXTENT OF THE COMPANY’S LIABILITY UNDER THIS WARRANTY IS
LIMITED TO THE REPAIR OR REPLACEMENT PROVIDED ABOVE AND, IN NO
EVENT, SHALL THE COMPANY’S LIABILITY EXCEED THE PURCHASE PRICE
PAID BY PURCHASER FOR THE PRODUCT.
This Warranty is in lieu of all other express warranties or liabilities. ANY IMPLIED
WARRANTIES, INCLUDING ANY IMPLIED WARRANTY OF MERCHANTABILITY
OR FITNESS FOR A PARTICULAR PURPOSE, SHALL BE LIMITED TO DURATION
OF THIS WARRANTY. ANY ACTION FOR BREACH OF ANY WARRANTY
HEREUNDER, INCLUDING ANY IMPLIED WARRANTY, MUST BE BROUGHT
WITHIN A PERIOD OF 24 MONTHS FROM THE DATE OF ORIGINAL PURCHASE.
IN NO CASE SHALL THE COMPANY BE LIABLE FOR ANY CONSEQUENTIAL
OR INCIDENTAL DAMAGES WHATSOEVER. No person or representative is
authorized to assume for the Company any liability other than expressed herein in
connection with the sale of this product.
Some states/provinces do not allow limitations on how long an implied warranty
lasts or the exclusion or limitation of incidental or consequential damage so the
above limitations or exclusions may not apply to you. This Warranty gives you
specic legal rights and you may also have other rights which vary from state/
province to state/province.