Voxx Accessories PNM411 Monitor User Manual PNM411 part 1
Voxx Accessories Corp. Monitor PNM411 part 1
Users Manual
User Guide
What’s inside
Welcome! ................................................................ 2
Getting started ...................................................... 3
Tour of the system ............................................... 7
Everyday use .........................................................13
Cameras ............................................................14
Motion/Alerts .................................................. 18
Recording .........................................................21
Playing Back Pictures and Videos .......22
Sleep Mode .....................................................23
Lullabies ...........................................................24
Contrast............................................................25
Settings ............................................................26
Troubleshooting / FAQs ..................................28
Getting Started
2
Step 1: Unpack
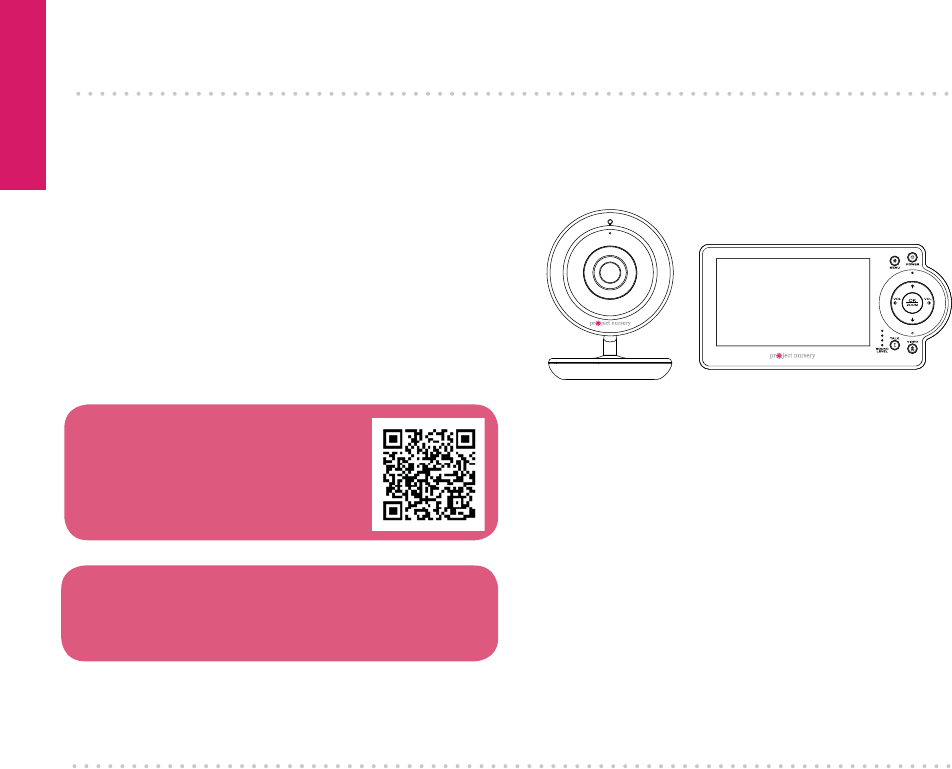
WELCOME!
This baby monitoring system
makes it simple to keep your
eyes and ears on your little
one! This guide takes you
through the steps to get
started!
See our setup videos
Go to ProjectNursery.com/
Electronics or scan the QR code
here.
Before you start...
Make sure you read the Important Information
sheet included in this package.
Wireless camera Parent monitor
The accessories:
(2) 10-foot charging cables
(2) power adapters
Getting Started
3
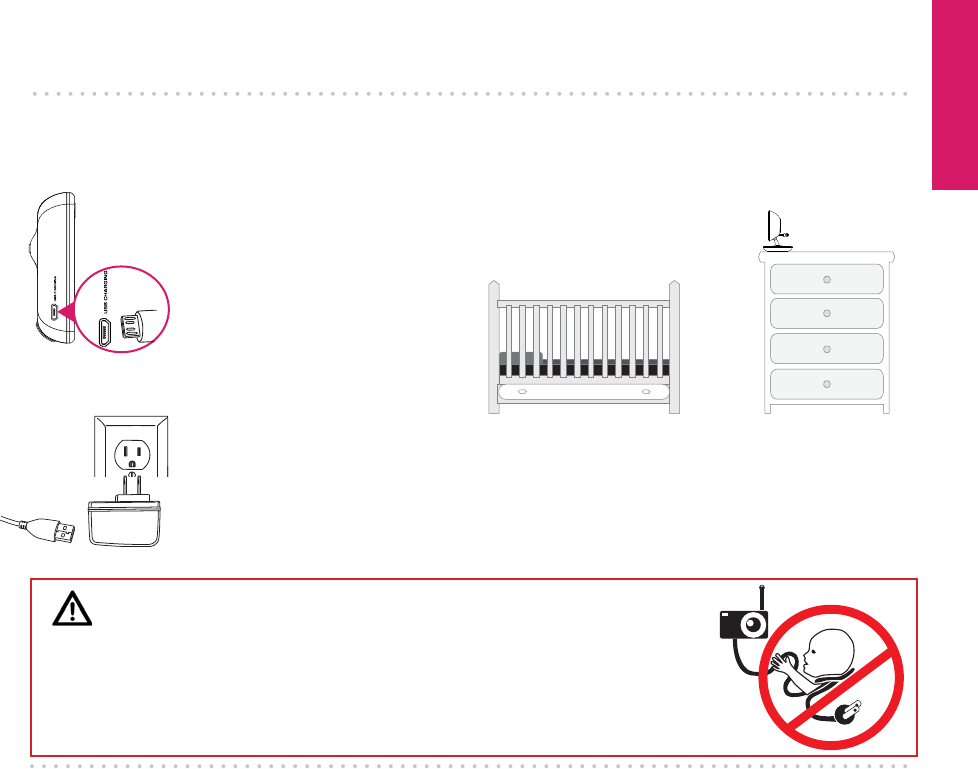
GETTING STARTED
Plug the other end of the
charging cable into one of the
included charging adapters.
Then plug the adapter into an
outlet or surge protector.
Find one of the charging
cables included in this
package.
Plug one end of this cable into
the USB CHARGING jack on
the side of the parent monitor.
Step 2: Charge the monitor
Find a location for the
camera that gives you the
best view of your baby in his
or her crib.
Place the camera on a flat surface, like a
dresser or shelf, or mount the camera to a wall
using the keyhole slots on its bottom.
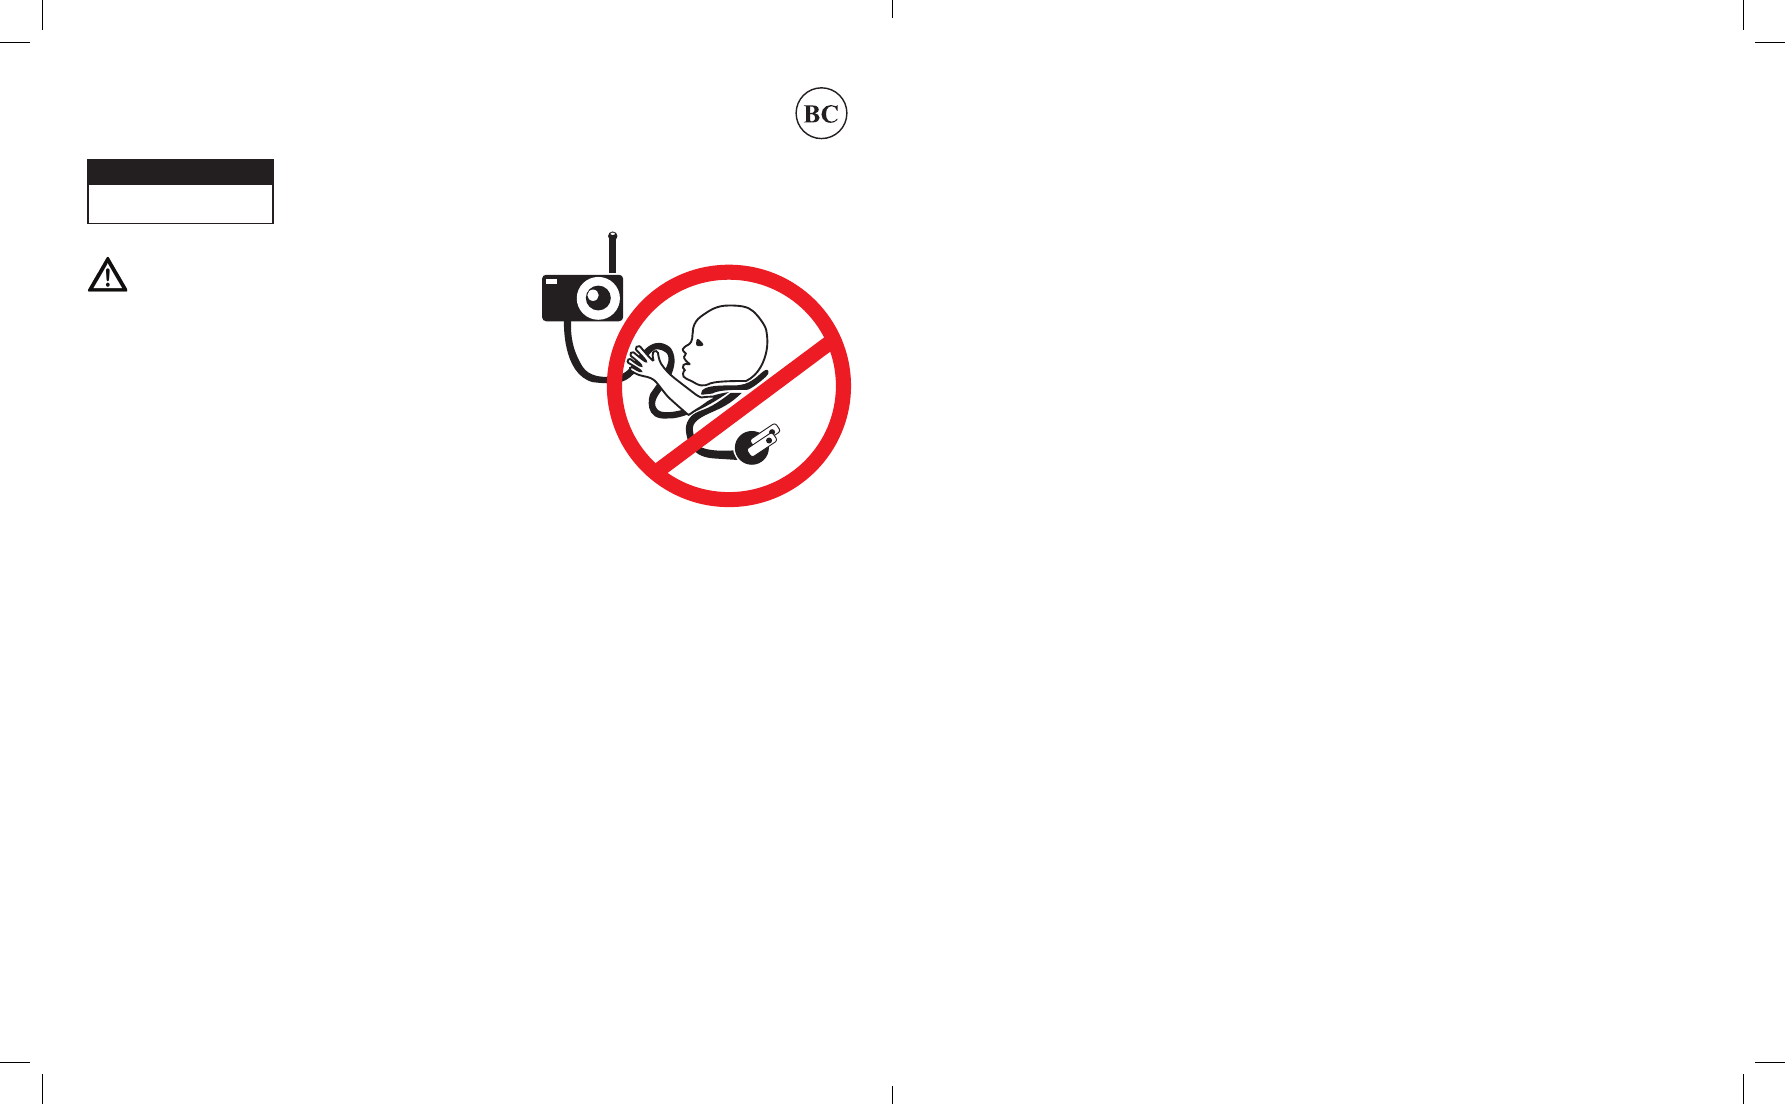
IMPORTANT: NEVER place the camera or cords
of any kind inside the crib. NEVER place the
camera or cords within reach of the baby.
Step 3: Position the camera(s)
WARNING
Strangulation Hazard: Children have STRANGLED in
cords. Keep this cord out of the reach of children (more
than 3ft (0.9m) away). Never use extension cords with
AC Adapters. Only use the AC Adapters provided.
Getting Started
4
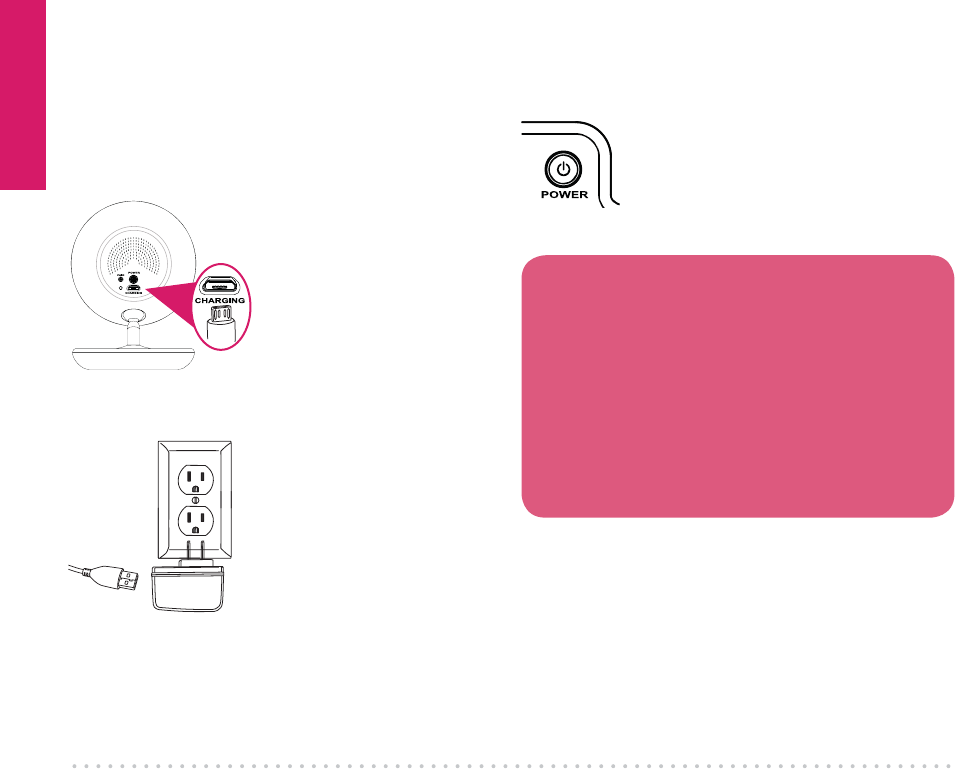
Find the other charging cable(s) included in
this package.
Plug one end into the
CHARGING jack on the
back of the camera(s).
Plug the other end into
a charging adapter. Then
plug the adapter into an
outlet or surge protector.
The camera turns on
automatically when it’s
plugged in (the indicator
light on the base below
the camera lens turns
blue).
Step 4: Plug in the camera(s)
Press and hold the POWER
button on the parent monitor to
turn it on.
Step 5: Turn on the monitor
Congratulations!
Your system is ready to use! The camera(s)
comes pre-paired with your parent monitor.
However, it’s a good idea to go ahead and set
the time on your parent monitor now, before
you start using it.
For information on how to use your new
system, see the next chapter of this owner’s
manual.
Getting Started
5
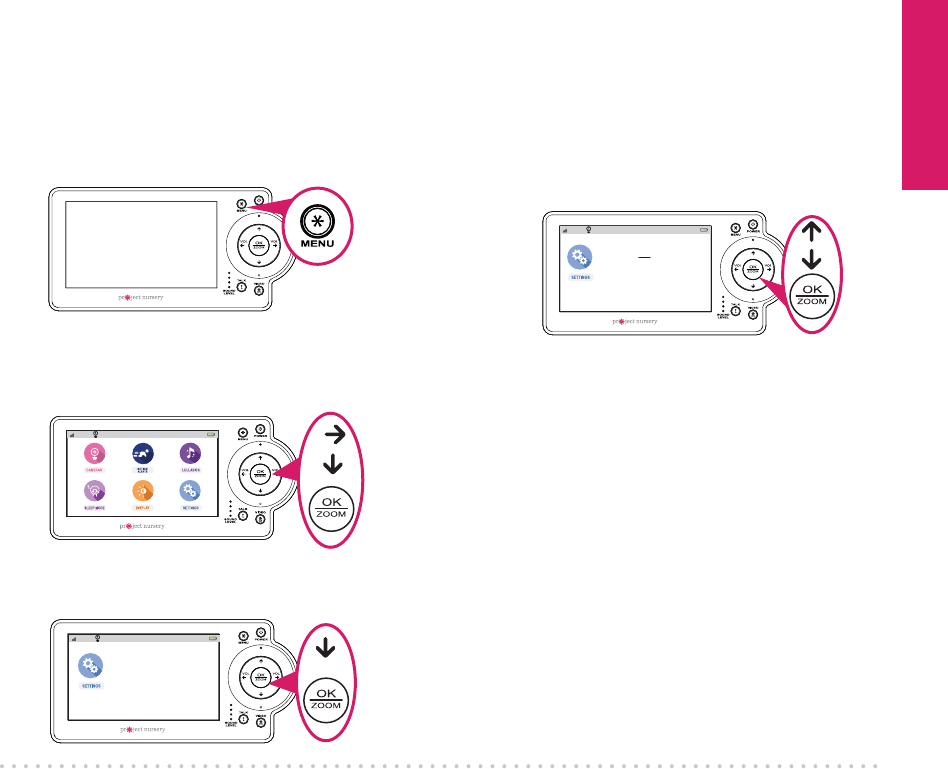
Use the up/down arrow buttons to set the
hours, minutes, and AM/PM. Press OK/
ZOOM when you’re finished.
4
Step 6: Set the time on the monitor
Use the arrows to highlight SETTINGS. Press
OK/ZOOM to select it. The Settings menu
appears on screen.
Press the down arrow to highlight Time Set.
Press OK/ZOOM to select it.
Press the MENU button on the parent
monitor. The menu appears on screen.
1
2
3
12:00AM
72º
12:00AM
72º
Temperature
Time Set
Factory Reset
Support
Product Information
Temperature
Time Set
Factory Reset
Support
Product Information
Time: 12:00 AM
12:00AM
72º

Tour of the system
6
Parent Monitor accesses the system’s menu screens.
turns the monitor on and off (press and
hold).
and turn the volume down/up. In menu
screens, these navigate left/right.
zooms the camera in/out.
and navigate up/down in menu screens.
SOUND LEVEL indicators show you the level of
sound from your baby’s room.
lets you talk through the camera’s
speaker. Press and hold while talking.
turns the screen on and off. Press and
hold to switch cameras.
TOUR OF THE SYSTEM
Watching baby
You can turn the display on and off without
turning the monitor off. You’ll still hear your
baby, but the display will be asleep until you
awaken it.
To turn the display on or off: Press the
VIDEO ON/OFF button on the parent
monitor.
Tour of the system
7
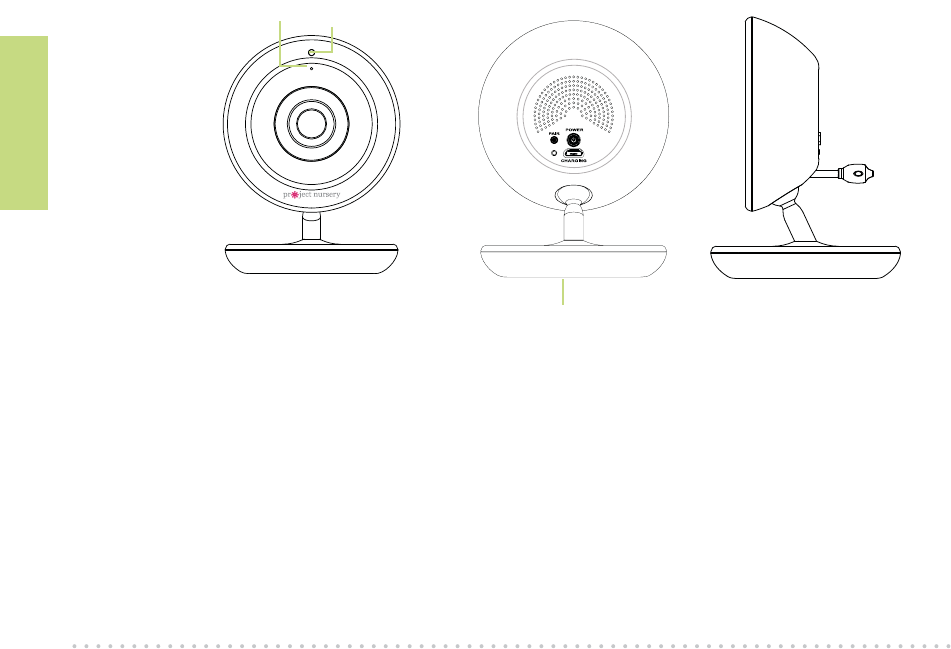
Parent monitor side and back panels
USB CHARGING jack plugs into your charging cable to recharge
or power the parent monitor.
Built-in easel stand lets you stand the unit on a flat surface.
Zoom
To zoom the active camera:
Press the OK/ZOOM button
on the parent monitor.
Talking to baby
To talk through the speaker
on the active camera: Press
and hold the TALK button on
the parent monitor.
Talk normally to the parent
monitor while you’re
pressing the TALK button—
your voice will come out on
the camera’s speaker.
Release the TALK button
when you’re done talking.
Built-in easel
stand
Listening to baby
The SOUND LEVEL
indicators on the parent
monitor show you at a
glance the sound level in
your baby’s room, regardless
of how loud the audio is on
the parent monitor.
To increase or decrease
the volume of the audio
monitor: Press the VOL+ or
VOL– buttons on the parent
monitor.
Tour of the system
8
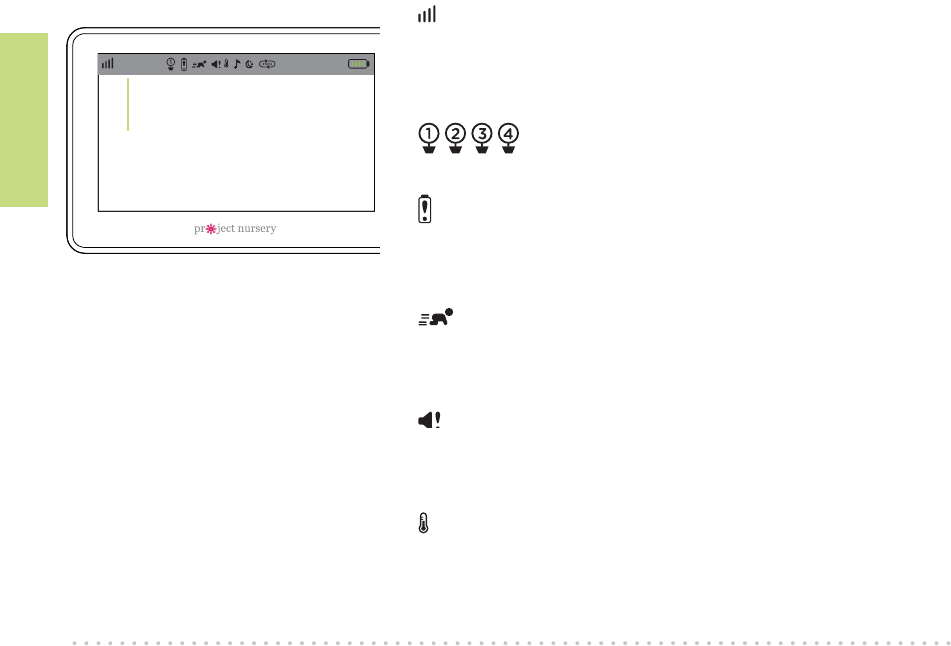
Status Bar Indicators
shows the strength of the current camera’s signal.
Temperature reading shows the temperature in Fahrenheit
at the active camera. If you want to change this to Celsius,
see page 27 for instructions.
shows the camera that the monitor is currently
displaying.
indicates that the Low Battery Noise alert is on. This
means the monitor gives an audio signal when it needs to
be recharged. See page 18 for instructions on turning this
on and off.
indicates that Motion Activated Video Alert is on. This
means the monitor automatically switches on whenever
the camera detects motion. See page 18 for instructions on
turning this on and off.
indicates that Sound Activated Video Alert is on. This
means the monitor automatically switches on whenever
the camera detects sound. See page 18 for instructions on
turning this on and off.
indicates that Temperature Alert is on. This means
the monitor shows an alert message if the temperature
at a camera gets too high or too low. See page 19 for
instructions on setting temperature alerts.
72º 2:35 PM
Temperature
reading
Parent monitor
Tour of the system
9
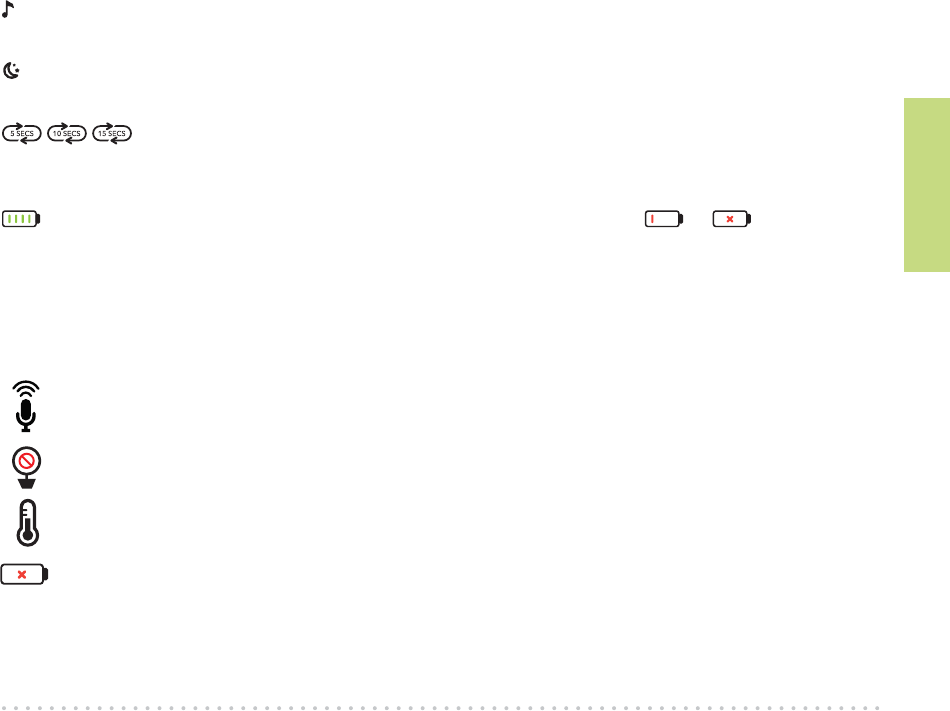
indicates the Lullabies are playing through one of the cameras. See page 24 for instructions on
playing lullabies.
indicates that the camera is using night vision. The cameras automatically switch to night vision
when they detect that the room has gotten dark.
indicate that the monitor is scanning through the available cameras. The number
indicates how quickly the monitor switches cameras. See page 17 for information on turning
camera scanning on and off.
indicates the level of the monitor’s rechargeable battery. If you see or in this space,
it’s time to recharge. See page 3 for more information.
On-Screen Indicators
appears when you’ve pressed the TALK button and are talking through the camera’s
speaker. See page 8 for more information.
appears when the monitor cannot get the signal from the active camera or when another
monitor is in use. See page 27 for more information.
appears when a Temperature Alert has been triggered because your baby’s room is too hot
or cold.
appears when the monitor’s rechargeable battery has less than 10% charge.
Tour of the system
10
Camera (front, back, and side)
Nighttime sensor
POWER (back) turns the camera on and off (press and hold).
PAIR (back) links the camera securely with the monitor (press and hold).
CHARGING (back) plugs into your charging cable to recharge or power the camera.
Mounting keyholes (bottom) let you mount the camera on a wall (mounting hardware not
included).
Thermal sensor detects the temperature around the camera.
Microphone
Mounting keyholes
Thermal
sensor
Everyday use
11
3. EVERYDAY USE
This system’s menus let you set
up more cameras, set motion
and temperature alerts, and
much more. This section takes
you through each menu. Parent Monitor Menu
GETTING AROUND IN THE MENUS
Press MENU to access the menus.
Use the arrows to
highlight items.
Press OK/ZOOM to
select.
12:00AM
72º
Everyday use
12
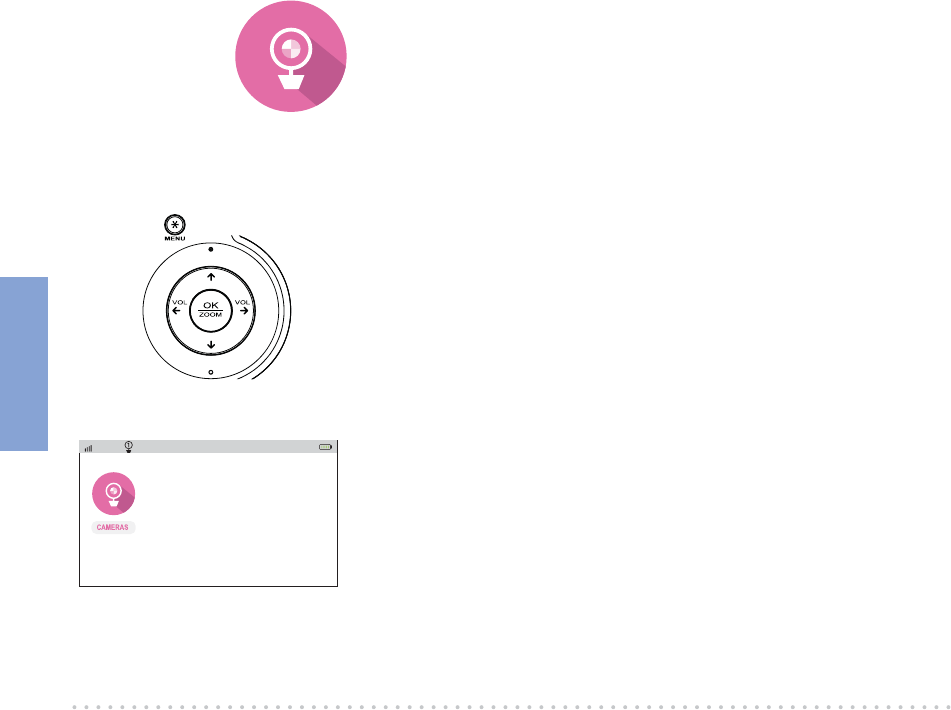
Cameras
The Cameras menu lets you pair additional cameras or remove
them from your list of cameras. If you have multiple cameras,
this menu also lets you scan through them one by one.
ACCESSING THE CAMERAS MENU
Parent Monitor
1 Press MENU on the parent monitor.
2 Use the arrow buttons to highlight the Cameras icon, and
press OK/ZOOM to select it.
PAIRING AN ADDITIONAL CAMERA
1 Before you start pairing the monitor with your new camera,
bring the camera into the same room so that you have it
handy. You can put it back in the baby’s room once you’ve
finished pairing. Make sure the camera is plugged in and
turned on before you start.
2 In the Cameras menu, press the down arrow to highlight Pair
Camera. Press OK/ZOOM to select it.
Front
12:00AM
72º
View Camera
Scan Cameras
Pair Camera
Delete Camera

Everyday use
13
3 Press the Pair button on the bottom of the new camera.
4 Use the up/down arrows to select Pair: Camera 2, Pair:
Camera 3, or Pair: Camera 4. Press OK/ZOOM to select it.
5 If the monitor screen shows a green checkmark next to Pair:
Camera, you’re all set to use the monitor and the camera! (If
it shows a red X, put the camera closer to the monitor and
try again.)
12:00AM
72º
View Camera
Scan Cameras
Pair Camera
Delete Camera
Pair: Camera 1
Pair: Camera 2
Pair: Camera 3
Pair: Camera 4
VIEWING AND SCANNING CAMERAS
You can customize how you view your cameras on screen.
To view a dierent camera:
1 In the Cameras menu, highlight View Camera. Press OK/
ZOOM to select it.
2 Use the up/down arrows to select the camera you want to
view. Press OK/ZOOM to select it. The screen switches to
that camera, and the status bar at the top of the screen
indicates the camera you’re viewing: , , , or .
TIP: You can also switch cameras by pressing and holding the
VIDEO ON/OFF button on the parent monitor.
12:00AM
72º
View Camera
Scan Cameras
Pair Camera
Delete Camera
12:00AM
72º
View Camera
Scan Cameras
Pair Camera
Delete Camera
View: Camera 1
View: Camera 2
View: Camera 3
View: Camera 4
Everyday use
14
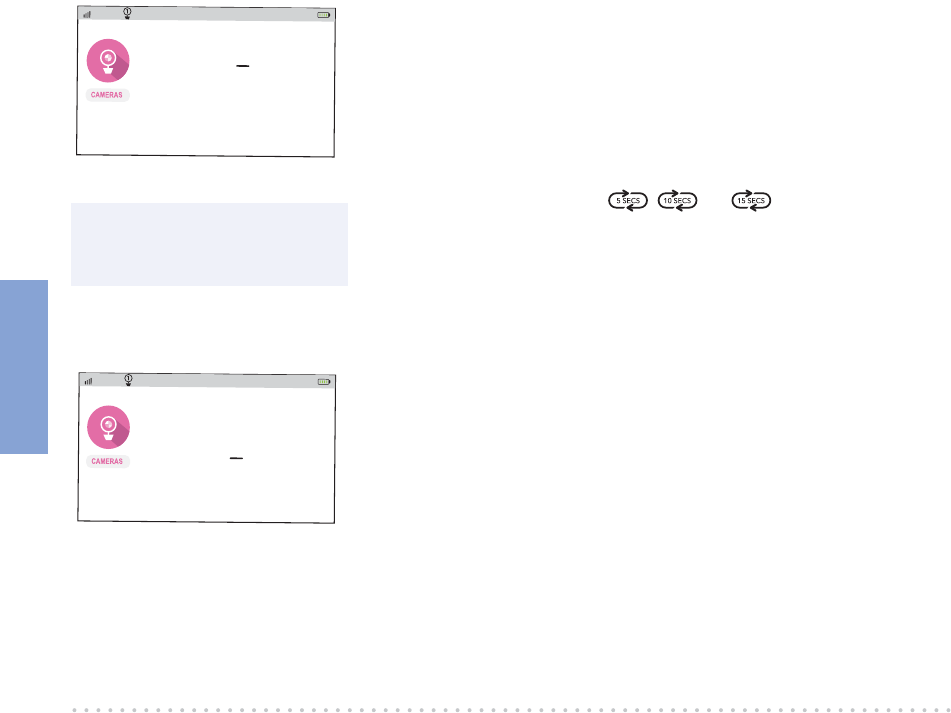
To scan through the cameras automatically:
1 In the Cameras menu, highlight Scan Cameras. Press OK/
ZOOM to select it.
2 Use the up/down arrows to select how quickly you want
to switch cameras: every 5, 10, or 15 seconds. Press OK/
ZOOM to select that option. The screen switches to the first
camera, and the status bar at the top of the screen shows an
indicator for scanning: , , or . It also shows the
camera you’re viewing.
To stop scanning cameras: select Scan Cameras in the
Cameras menu. Then select Scan: Off.
REMOVING A CAMERA FROM THE LIST
1 In the Cameras menu, highlight Delete Camera. Press OK/
ZOOM to select it.
2 Use the up/down arrows to select the camera you want to
remove from the list. Press OK/ZOOM to select it. The screen
confirms that the camera has been deleted.
IMPORTANT: In order to use this camera with the system,
you’ll need to pair it with this monitor again.
12:00AM
72º
View Camera
Scan Cameras
Pair Camera
Delete Camera
Scan: Off
Scan: 5 Secs
Scan: 10 Secs
Scan: 15 Secs
12:00AM
72º
View Camera
Scan Cameras
Pair Camera
Delete Camera
Delete: Camera 1
Delete: Camera 2
Delete: Camera 3
Delete: Camera 4
NOTE: You must have more
than one camera paired with
a monitor in order to scan
cameras.
Everyday use
15
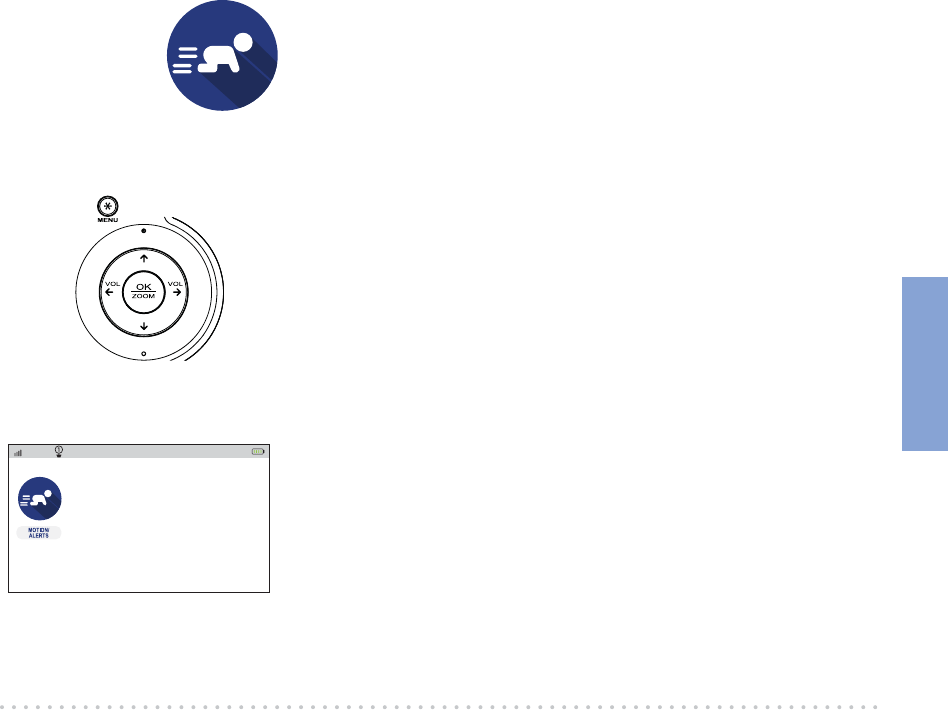
SETTING UP MOTION ACTIVATION
You can set up the monitor so that it automatically shows video
when the camera detects that your baby is moving.
1 In the Motion/Alerts menu, press OK/ZOOM to select
Motion Activated Video.
12:00AM
72º
Motion Activated Video: OFF
Sound Activated Video: OFF
Temperature Alert: OFF
Low Battery Noise Alert: OFF
Out of Range Alert: OFF
Motion/Alerts
The Motion/Alerts menu lets you set up alerts that are activated
by motion, sound, or temperature in your baby’s room. It also
lets you set up an alert for when the monitor’s rechargeable
battery needs to be recharged.
ACCESSING THE MOTION/ALERTS MENU
1 Press MENU on the parent monitor.
2 Use the arrow buttons highlight the Motion/Alerts icon,
and press OK/ZOOM to select it.
Parent Monitor
Front
Everyday use
16
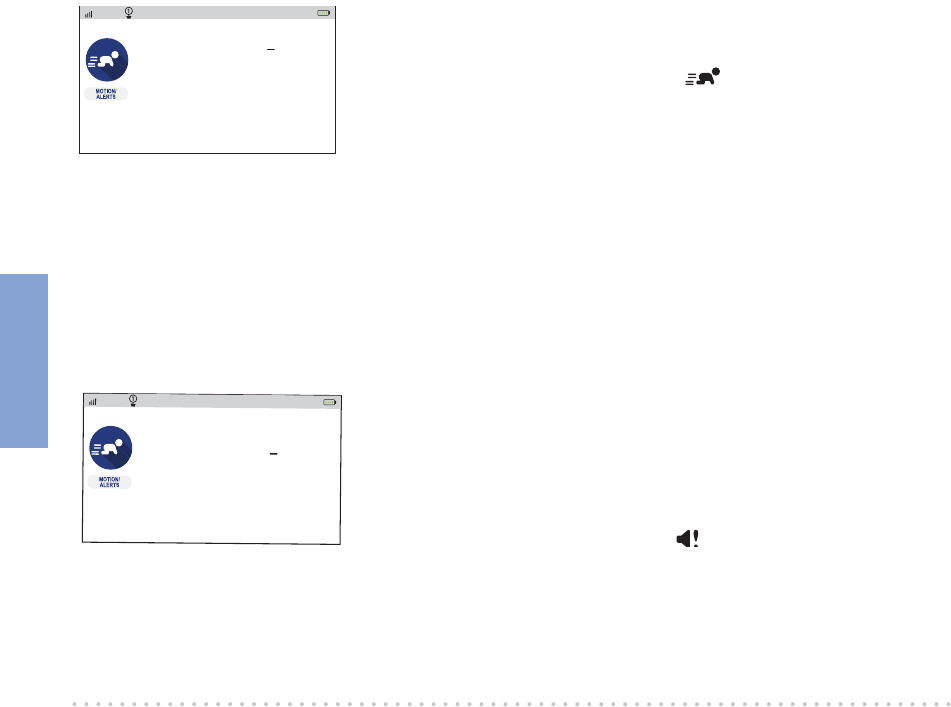
SETTING UP SOUND ACTIVATION
You can set up the monitor so that it automatically shows video
when the camera detects sound from your baby.
1 In the Motion/Alerts menu, press OK/ZOOM to select Sound
Activated Video.
2 Use the up/down arrows to select the amount of sensitivity
you want for the sound sensor: ON: Low, ON: Medium, or
ON: High. The status bar at the top of the screen shows an
indicator for sound activation: .
Note: You might want to test different levels of sensitivity
for this alert, to find the best fit for your environment and
preference.
12:00AM
72º
Motion Activated Video: OFF
Sound Activated Video
Temperature Alert: OFF
Low Battery Noise Alert: OFF
Out of Range Alert: OFF
OFF
ON: LOW
ON: Medium
ON: High
2 Use the up/down arrows to select the amount of sensitivity
you want for the motion sensor: ON: Low, ON: Medium, or
ON: High. The status bar at the top of the screen shows an
indicator for motion activation: .
Note: You might want to test different levels of sensitivity
for this alert, to find the best fit for your environment and
preference.
12:00AM
72º
Motion Activated Video
Sound Activated Video: OFF
Temperature Alert: OFF
Low Battery Noise Alert: OFF
Out of Range Alert: OFF
OFF
ON: LOW
ON: Medium
ON: High
Everyday use
17
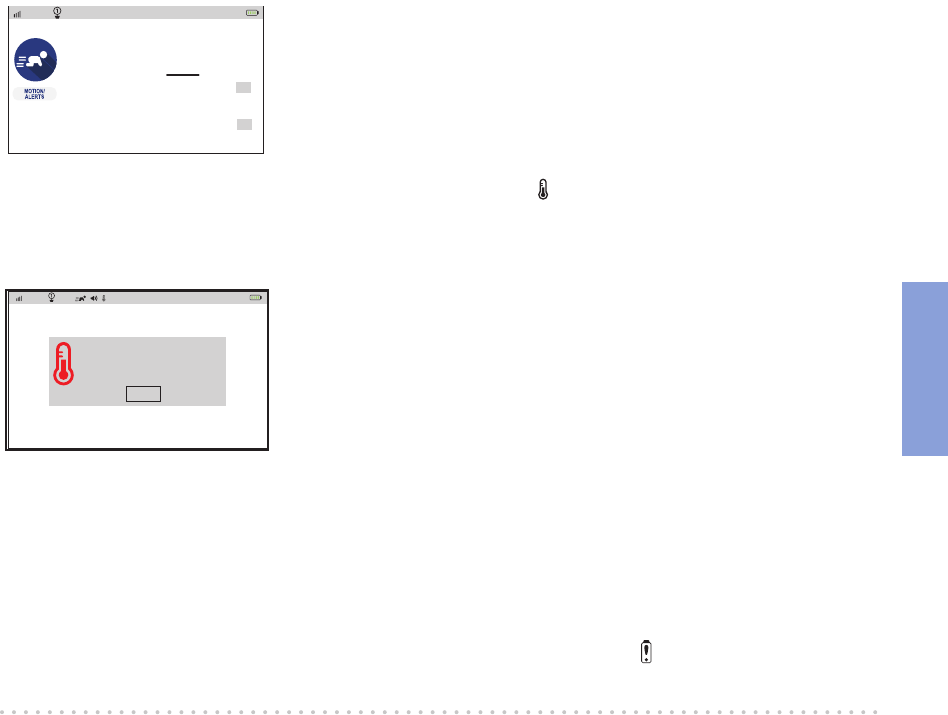
SETTING TEMPERATURE ALERTS
These alerts tell you when your baby’s room is too hot or too
cold.
1 In the Motion/Alerts menu, select Temperature Alert.
2 Activate the temperature alert you want to use, then set it.
The status bar at the top of the screen will show an indicator
for temperature alerts: .
To set a high temperature alert: Highlight High Temp: ON
and press OK/ZOOM. Use the up/down arrows to set the
temperature you want to set for the high temperature alert.
Press OK/ZOOM to set it.
To set a low temperature alert: Highlight Low Temp: ON
and press OK/ZOOM. Use the up/down arrows to set the
temperature you want to set for the high temperature alert.
Press OK/ZOOM to set it.
If the temperature in your baby’s room goes beyond the limit(s)
you set, the parent monitor displays an alert.
SETTING A LOW-BATTERY ALERT
This alert tells you when the monitor needs to be recharged.
1 In the Motion/Alerts menu, highlight Low Battery Noise and
press OK/ZOOM to select it.
2 Use the up/down arrows to turn the low-battery alert on
or off. The status bar at the top of the screen shows an
indicator for the low-battery alert: .
12:00AM
72º
Motion Activated Video: OFF
Sound Activated Video: ON
Temperature Alert
Low Battery Noise Alert: OFF
Out of Range Alert: OFF
High Temp:
ON: 81
OFF
Low Temp:
ON: 63
OFF
12:00AM
72º
High Temperature level
has been detected
Camera 1: 81º F
OK
Everyday use
18
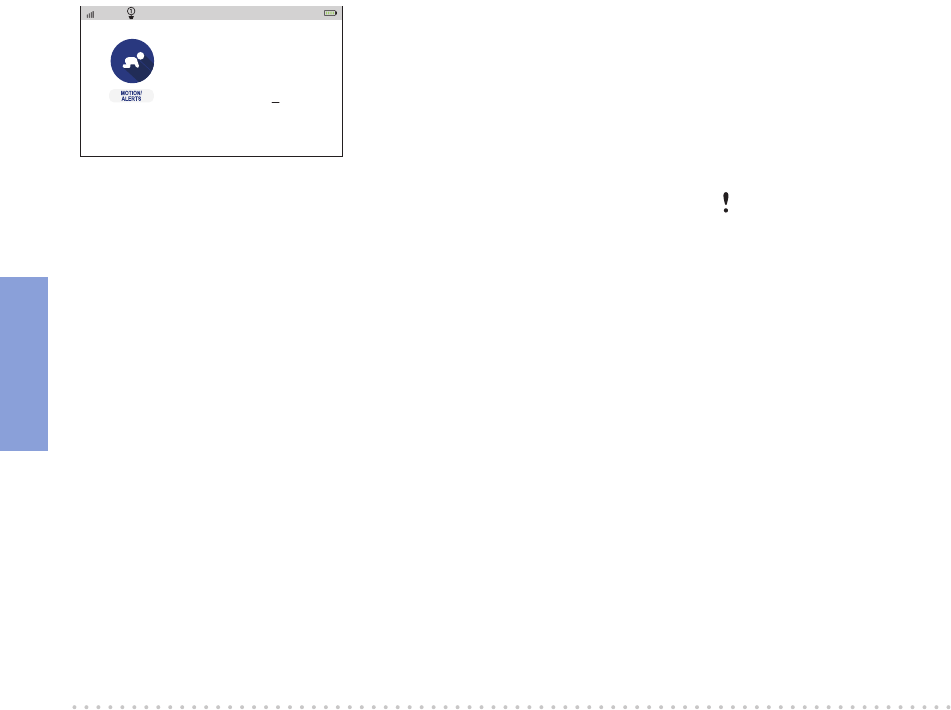
SETTING AN OUT-OF-RANGE ALERT
This alert tells you when the monitor is out of range of the
camera.
1 In the Motion/Alerts menu, highlight Out of Range Alert and
press OK/ZOOM to select it.
2 Use the up/down arrows to turn the out-of-range alert on
or off. The status bar at the top of the screen shows an
indicator for the out-of-range alert: .
12:00AM
72º
Motion Activated Video: OFF
Sound Activated Video: OFF
Temperature Alert: OFF
Low Battery Noise Alert: ON
Out of Range Alert
OFF
ON

Everyday use
19
SETTING SLEEP MODE
1 In the Sleep Mode menu, press OK/ZOOM to turn sleep
mode on.
2 Use the up and down arrows to select the delay before the
display turns off automatically: 5, 30, or 60 minutes. (The
audio from your camera will stay on even when the display is
off.)
Sleep Mode
You can set up your monitor to turn off the display
automatically after a set amount of time.
ACCESSING THE SLEEP MODE MENU
1 Press MENU on the parent monitor.
2 Use the arrow buttons to highlight the Sleep Mode icon,
and press OK/ZOOM to select it.
Parent Monitor
Front
72º
Sleep Mode (video off, sound on)
OFF
ON: 5 mins
ON: 30 mins
ON: 60 mins
12:00AM
Everyday use
20
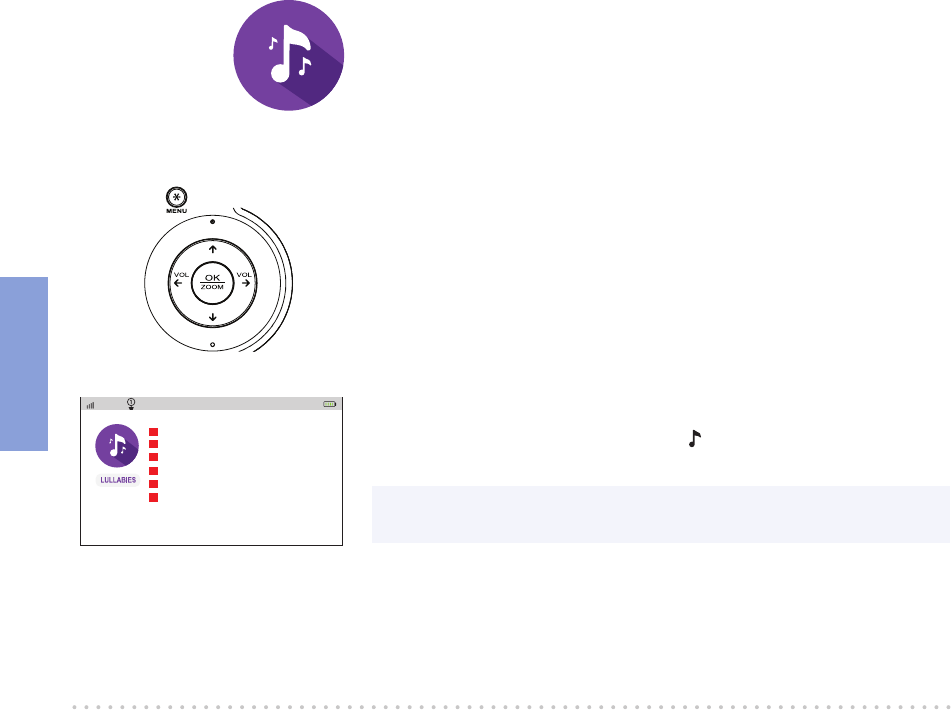
Lullabies
This Project Nursery system comes with 3 lullabies, a nature
sound, and white noise ready to play—simply choose the one
you want, and the camera you’re on will play it back.
PLAYING LULLABIES OR WHITE NOISE
1 Make sure the monitor is displaying the camera you want to
play the lullaby on. If you want to play on a different camera,
press the MENU button and select CAMERAS. Then press
OK/ZOOM to select View Camera and choose the camera
you want.
2 Press the MENU button to access the main menu.
3 Highlight LULLABIES and press OK/ZOOM to choose it.
4 Highlight the option you want to play and press OK/ZOOM
to start playing it. The status bar at the top of the screen
shows an indicator for lullabies: .
NOTE: If there’s a lullaby currently playing on a camera, a green arrow
icon appears next to it.
Parent Monitor
Front
72º 12:00AM
“Mozart”
“Twinkle, Twinkle Little Star”
“Brahms’ Lullaby”
White Noise
Waves
Play All
Everyday use
21
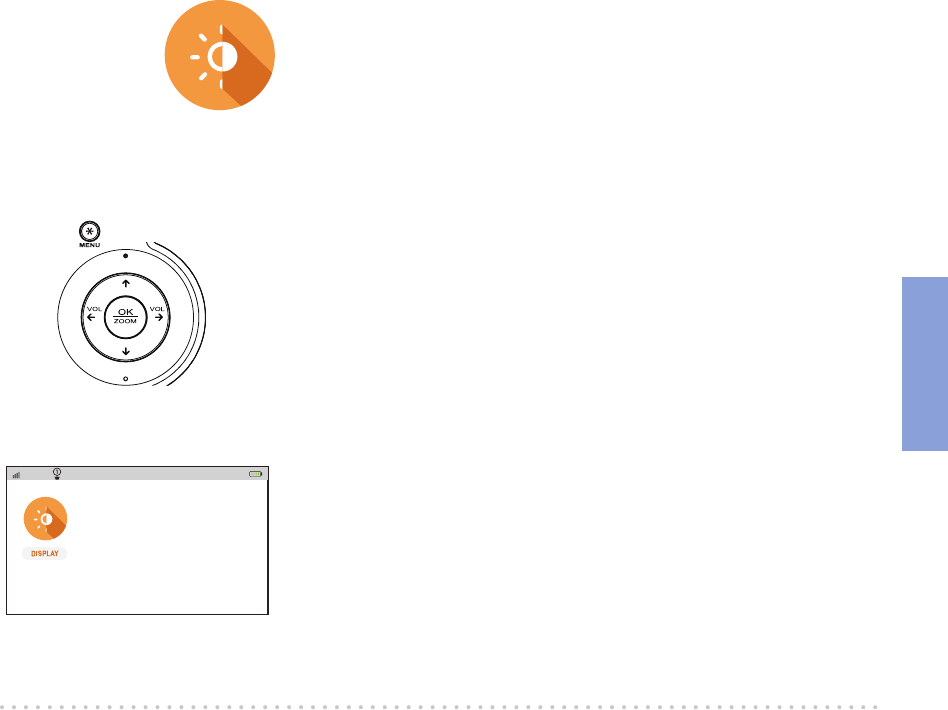
Display
You can adjust the brightness of the display, and set it to
automatically dim after a set amount of time.
ADJUSTING BRIGHTNESS
1 Press MENU on the parent monitor.
2 Use the arrow buttons to highlight the Display icon, and
press OK/ZOOM to select it.
3 In the Display menu, highlight Adjust Brightness, and press
OK/ZOOM to select it.
4 Use the up and down arrows to adjust the brightness. Press
OK/ZOOM when you’ve finished.
SETTING AUTO DIMMING
1 In the Display menu, highlight Auto Dimming. Press OK/
ZOOM to select it.
2 Use the up and down arrows to choose the delay for auto
dimming the display: 5, 10, or 30 minutes. Press OK/ZOOM
to select.
Parent Monitor
Front
Adjust Brightness
Auto Dimming
72º 12:00AM
Everyday use
22
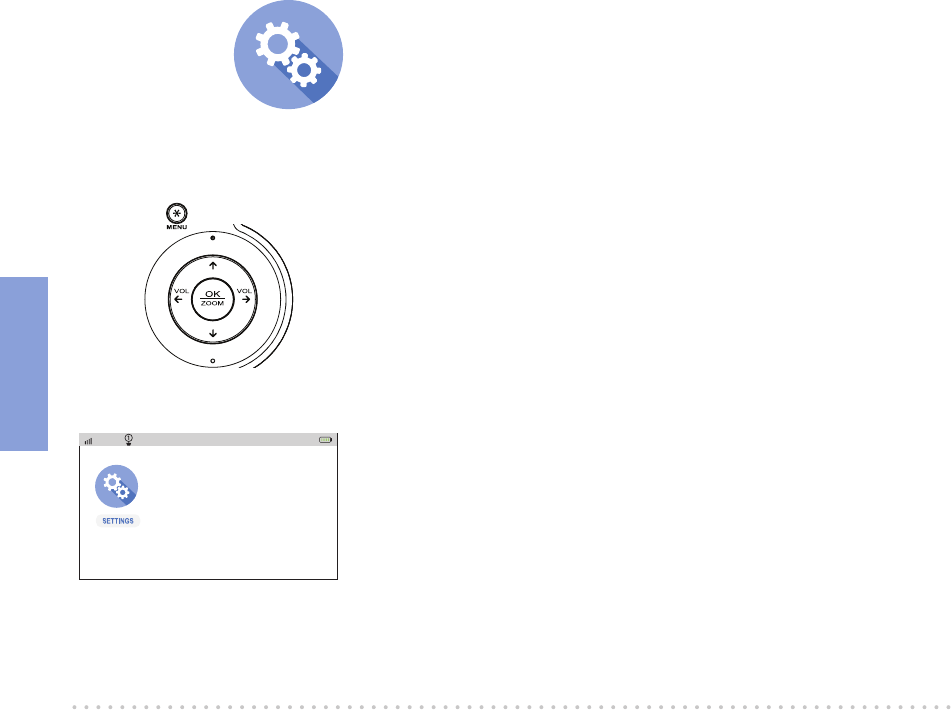
Settings
The Settings menu lets you customize the monitor to match
your preferences. It also gives you technical information about
the monitor and support.
ACCESSING THE SETTINGS MENU
1 Press MENU on the parent monitor.
2 Use the arrow buttons to highlight the Settings icon, and
press OK/ZOOM to select it.
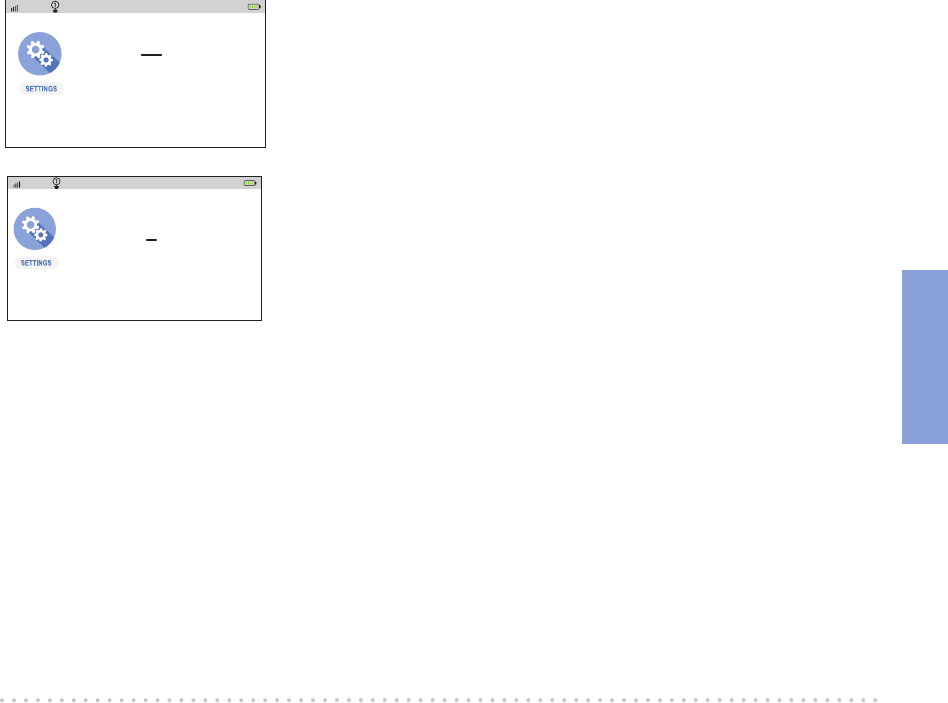
SETTING YOUR TEMPERATURE PREFERENCE
1 In the Settings menu, press OK/ZOOM to select
Temperature.
2 Use the up and down arrows to select how you’d like
temperature to be displayed: in degrees Fahrenheit or
Celsius. Press OK/ZOOM when you’ve finished.
Parent Monitor
Front
12:00AM
72º
Temperature
Time Set
Factory Reset
Support
Product Information
Everyday use
23
SETTING THE TIME
1 In the Settings menu, press the down arrow to highlight
Time Set. Press OK/ZOOM to select it.
2 Use the up/down arrows to set the time. Press OK/ZOOM
when you’re finished.
RESETTING TO FACTORY SETTINGS
If you’ve tried all of the troubleshooting solutions to solve
a problem, and nothing seems to work, you might need to
reset the monitor to its factory settings and start setup again.
WARNING: Resetting to factory settings erases all of your
custom settings. You will have to set up the monitor from
scratch.
GETTING SUPPORT AND TECHNICAL
INFORMATION
1 In the Settings menu, press the down arrow to highlight one
of the support or technical information options: Support or
Product Information. Press OK/ZOOM to select it.
2 Press OK/ZOOM to exit.
Temperature
Time Set
Factory Reset
Support
Product Information
Time: 12:00 AM
12:00AM
72º
Temperature
Time Set
Factory Reset
Support
Product Information
Reset to Factory Default?
YES
Cancel
12:00AM
72º

Troubleshooting
24
4. TROUBLESHOOTING / FAQS
Most issues with the Project Nursery baby monitoring system can be solved by following one of
the troubleshooting tips below. For additional assistance, please call 1-844-393-7338.
I don’t see video from the camera on my monitor.
+ Make sure your monitor is turned on (press the Power button). If it is, press the VIDEO ON/
OFF button to make sure the monitor’s display is awake. Make sure the camera is plugged in to
a working outlet and turned on.
I see the icon on the screen.
+ Make sure the camera you’re trying to view is plugged in to a working outlet and turned on.
+ Make sure the monitor is within range (maximum 800 ft) of the camera you’re trying to display
(certain kinds of signal obstacles, like large metal objects, might shorten the range somewhat).
+ The monitor you’re using might have become un-paired with the camera. See page 15 for
instructions on pairing a monitor and camera.
I can’t hear sounds from baby’s room.
+ Make sure the monitor is turned up. Press the VOL+ button until you hear sounds from your
baby’s room.
+ Make sure the microphone on the camera is not blocked. The microphone is just above the
lens.
The lullabies aren’t playing.
+ If you have multiple cameras, make sure you’ve chosen the one you want the lullabies to play
on before you start the lullaby. Go to Cameras > Select Camera and choose the camera you
want. Then go to Lullabies and select an option to play.

Troubleshooting
25
The temperature alerts don’t work.
+ Make sure you’ve set the temperature preference to the system you use, Fahrenheit (standard
in the US) or Celsius (standard outside the US). To switch your temperature preference, go to
Settings > Temperature.
+ Make sure you’ve set the right kind of temperature alert—for example, if you want to make sure
your baby’s room does not get below 68 degrees Fahrenheit, set the Low Temp Temperature
Alert to 68. If you want to make sure your baby’s room doesn’t get above a certain
temperature, set the High Temp Temperature Alert to that temperature.
Motion alerts don’t work.
+ You might need to adjust the sensitivity of the alerts—for example, if Motion Activated Video
is set to ON: Low, the monitor will not come on as often as when Motion Activated Video is
set to ON: Medium or ON: High. To adjust this setting, go to Motion/Alerts > Motion Activated
Video.
+ If you have multiple cameras, you might need to change the active camera—motion alerts work
for the active camera only. Press VIDEO ON/OFF to make sure the camera you want to use for
motion alerts—the one with the clearest view of your baby, for example—is the one displayed.
Sound alerts don’t work.
+ You might need to adjust the sensitivity of the alerts—for example, if Sound Activated Video is
set to ON: Low, the monitor will not come on as often as when Sound Activated Video is set to
ON: Medium or ON: High. To adjust this setting, go to Motion/Alerts > Sound Activated Video.
+ If you have multiple cameras, you might need to change the active camera—sound alerts work
for the active camera only. Press VIDEO ON/OFF to make sure the camera you want to use for
sound alerts—the one closest to your baby, for example—is the one displayed.
©2017 Voxx Accessories Corp.
3502 Woodview Trace, Suite 220
Indianapolis, IN 46268 PNM4N11 UG 00
IMPORTANT INFORMATION
for Project Nursery PNM4N11
RISK OF ELECTRIC SHOCK.
DO NOT OPEN.
CAUTION Caution: To reduce the risk of electric shock, do not remove cover (or back).
No user serviceable parts inside. Refer servicing to qualified service personnel.
For PLUGGABLE EQUIPMENT, the socket-outlet shall be installed near the equipment and shall be easily
accessible.
The power unit for this device should be plugged in so that it stays vertical or lies flat.
This product contains a non-removeable Lithium Ion rechargeable battery.
Baby Unit SET UP & USE:
• Determine a location for the Baby Unit that will provide the best view of your baby in his/her crib.
• Place the Baby Unit on a flat surface, such as a dresser, bureau, or shelf or mount the Unit to a wall securely
using the keyhole slots under the stand.
• NEVER place the Baby Unit or cords within the crib.
• Do not place the Baby Unit or cords in the crib or within reach of the baby (the unit and cords should be
more than 3 feet away).
WARNING
This digital video Baby Monitor is compliant with all relevant standards regarding electromagnetic fields and
is, when handled as described in the User’s Guide, safe to use. Therefore, always read the instructions in this
User’s Guide carefully before using the device.
• Adult assembly is required. Keep small parts away from children when assembling.
• This product is not a toy. Do not allow children to play with it.
• This Baby Monitor is not a substitute for responsible adult supervision.
• Keep this User’s Guide for future reference.
• Do not place the Baby Unit or cords in the crib or within reach of the baby (the unit and cords should be
more than 3 feet away)
• Keep the cords out of reach of children.
• Do not cover the Baby Monitor with a towel or blanket.
• Never use extension cords with power adapters. Only use the power adapters provided.
• Test this monitor and all its functions so that you are familiar with it prior to actual use.
• Do not use the Baby Monitor near water.
• Do not install the Baby Monitor near a heat source.
CAUTION
The Unit shall be installed and used such that parts of the user’s body other than the hands are maintained at
a distance of approximately 8 inches (20 cm) or more.
The camera should be installed and operated with a minimum distance of 20cm between the radiator and
your body.
The USB Port is for charging only.
Ecology
At the end of the product lifecycle, you should not dispose of this product with normal household waste. Take
this product to a collection point for the recycling of electrical and electronic equipment. The symbol on the
product, user’s guide and/or box indicates this.
Some of the product materials can be reused if you take them to a recycling point. By reusing some parts or
raw materials from used products you make an important contribution to the protection of the environment.
Please contact your local authorities in case you need more information on the collection points in your area.
Dispose of the battery pack in an environmentally-friendly manner according to your local regulations.
Cleaning
Clean the Baby Monitor with a slightly damp cloth or with an anti-static cloth. Never use cleaning agents or
abrasive solvents.
Cleaning and care
• Do not clean any part of the product with thinners or other solvents and chemicals –- this may cause
permanent damage to the product which is not covered by the warranty.
• Keep the Baby Monitor away from hot, humid areas or strong sunlight, and don’t let it get wet.
• Every effort has been made to ensure high standards of reliability for your Baby Monitor. However, if
something does go wrong, please do not try to repair it yourself –- contact Customer Service for assistance.
FCC and IC regulations
FCC Part l5
NOTE: This equipment has been tested and found to comply with the limits for a Class B digital device,
pursuant to Part 15 of the Federal Communications Commission (FCC) rules. These limits are designed
to provide reasonable protection against harmful interference in a residential installation. This equipment
generates, uses and can radiate radio frequency energy and, if not installed and used in accordance with
the instructions, may cause harmful interference to radio communications. However, there is no guarantee
that interference will not occur in a particular installation. If this equipment does cause harmful interference
to radio or television reception, which can be determined by turning the equipment off and on, the user is
encouraged to try to correct the interference by one or more of the following measures:
• Reorient or relocate the receiving antenna.
• Increase the separation between the equipment and receiver.
• Connect the equipment into an outlet on a circuit different from that to which the receiver is connected.
• Consult the dealer or an experienced radio/TV technician for help.
Changes or modifications to this equipment not expressly approved by the party responsible for compliance
could void the user’s authority to operate the equipment.
This device complies with Part 15 of the FCC rules. Operation is subject to the following two conditions: (1)
this device may not cause harmful interference, and (2) this device must accept any interference received,
including interference that may cause undesired operation.
Privacy of communications may not be ensured when using this device.
To ensure safety of users, the FCC has established criteria for the amount of radio frequency energy that can
be safely absorbed by a user or bystander according to the intended usage of the product. This product has
been tested and found to comply with the FCC criteria.
WARNING:
Strangulation Hazard: Children have
STRANGLED in cords. Keep this cord
out of the reach of children (more
than 3ft (1m) away). Never use
extension cords with AC Adapters.
Only use the AC Adapters provided.
• Only use the chargers and power adapters provided. Do not use other chargers or power adapters as this
may damage the device and battery pack.
• Only insert a battery pack of the same type.
• Do not touch the plug contacts with sharp or metal objects.

Product Information
Keep your sales receipt to obtain warranty parts and service and for proof of purchase. Attach it
here and record the serial and model numbers in case you need them. These numbers are located
on the product.
Model No.: _____________________________________________________________________
Purchase Date: _________________________________________________________________
Dealer/Address/Phone: ___________________________________________________________
FCC Caution: To assure continued compliance, any changes or modifications not expressly approved by the
party responsible for compliance could void the user’s authority to operate this equipment. (Example - use
only shielded interface cables when connecting to computer or peripheral devices).
FCC Radiation Exposure Statement
This equipment complies with FCC RF radiation exposure limits set forth for an uncontrolled environment. This
equipment should be installed and operated with a minimum distance of 20 centimeters between the radiator
and your body.
This transmitter must not be co-located or operating in conjunction with any other antenna or transmitter.
The antennas used for this transmitter must be installed to provide a separation distance of at least 20
cm from all persons and must not be co-located or operating in conjunction with any other antenna or
transmitter.
IC Radiation Exposure Statement
This equipment complies with IC RSS-102 radiation exposure limits set forth for an uncontrolled environment.
This equipment should be installed and operated with minimum distance 20 cm between the radiator and
your body.
Déclaration d’exposition à la radiation
Cet équipement respecte les limites d’exposition aux rayonnements IC RSS-102 définies pour un
environnement non contrôlé. Cet équipement doit être installé et mis en marche à une distance minimale de
20 cm qui sépare l’élément rayonnant de votre corps.
This Class B digital apparatus complies with Canadian ICES-003.
CAN ICES-3(B)/NMB-3(B)
WARNING
Changes or modifications, to this equipment not expressively approved by the party responsible for
compliance could void the user’s authority to operate the equipment.
The socket-outlet shall be installed near the equipment and shall be easily accessible.
Industry Canada
This device complies with Industry Canada licence-exempt RSS standard(s): Operation is subject to the
following Two conditions:(1) this device may not cause interference, and (2) this device must accept any
interference, including interference that may cause undesired operation of the device.
The term “IC: “ before the certification/registration number only signifies that the Industry Canada technical
specifications were met. This product meets the applicable Industry Canada technical specifications.
Le présent appareil est conforme aux CNR d’Industrie Canada applicables aux appareils radio exempts
de licence. L’exploitation est autorisée aux deux conditions suivantes : (1) l’appareil ne doit pas produire
de brouillage, et (2) l’utilisateur de l’appareil doit accepter tout brouillage radioélectrique subi, même si le
brouillage est susceptible d’en compromettre le fonctionnement.
PNM4N11 Safety/Warranty 01
12 Month Limited Warranty
Voxx Accessories Corporation (the “Company”) warrants to the original retail purchaser of this product that
should this product or any part thereof, under normal use and conditions, be proven defective in material or
workmanship within 12 months from the date of original purchase, such defect(s) will be repaired or replaced
with new or reconditioned product (at the Company’s option) without charge for parts and repair labor.
To obtain repair or replacement within the terms of the warranty, the product is to be delivered with proof of
warranty coverage (e.g. dated bill of sale), specification of defect(s), transportation prepaid, to an approved
warranty station. For the location of the nearest warranty station to you, call toll-free to our control office:
1-844-393-7338.
This Warranty is not transferable and does not cover product purchased, serviced or used outside the United
States or Canada. The warranty does not extend to the elimination of externally generated static, noise, or
loss of range or audio/video quality due to external factors, to costs incurred for the installation, removal or
reinstallation of the product, or to damage to digital media devices or memory.
The warranty does not apply to any product or part thereof which, in the opinion of the company, has
suffered or been damaged through alteration, improper installation, mishandling, misuse, neglect, accident or
exposure to moisture. This warranty does not apply to damage caused by an AC adapter not provided with
the product or by removal or defacement of factory serial number/barcode labels.
THE EXTENT OF THE COMPANY’S LIABILITY UNDER THIS WARRANTY IS LIMITED TO THE REPAIR OR
REPLACEMENT PROVIDED ABOVE AND, IN NO EVENT, SHALL THE COMPANY’S LIABILITY EXCEED THE
PURCHASE PRICE PAID BY PURCHASER FOR THE PRODUCT.
This Warranty is in lieu of all other express warranties or liabilities. ANY IMPLIED WARRANTIES, INCLUDING
ANY IMPLIED WARRANTY OF MERCHANTABILITY OR FITNESS FOR A PARTICULAR PURPOSE, SHALL
BE LIMITED TO DURATION OF THIS WARRANTY. ANY ACTION FOR BREACH OF ANY WARRANTY
HEREUNDER, INCLUDING ANY IMPLIED WARRANTY, MUST BE BROUGHT WITHIN A PERIOD OF 24
MONTHS FROM THE DATE OF ORIGINAL PURCHASE. IN NO CASE SHALL THE COMPANY BE LIABLE
FOR ANY CONSEQUENTIAL OR INCIDENTAL DAMAGES WHATSOEVER. No person or representative is
authorized to assume for the Company any liability other than expressed herein in connection with the sale of
this product.
Some states/provinces do not allow limitations on how long an implied warranty lasts or the exclusion or
limitation of incidental or consequential damage so the above limitations or exclusions may not apply to
you. This Warranty gives you specific legal rights and you may also have other rights which vary from state/
province to state/province.
©2017 Voxx Accessories Corp. 3502 Woodview Trace, Suite 220 Indianapolis, IN 46268
For customer service, call 1-844-393-7338