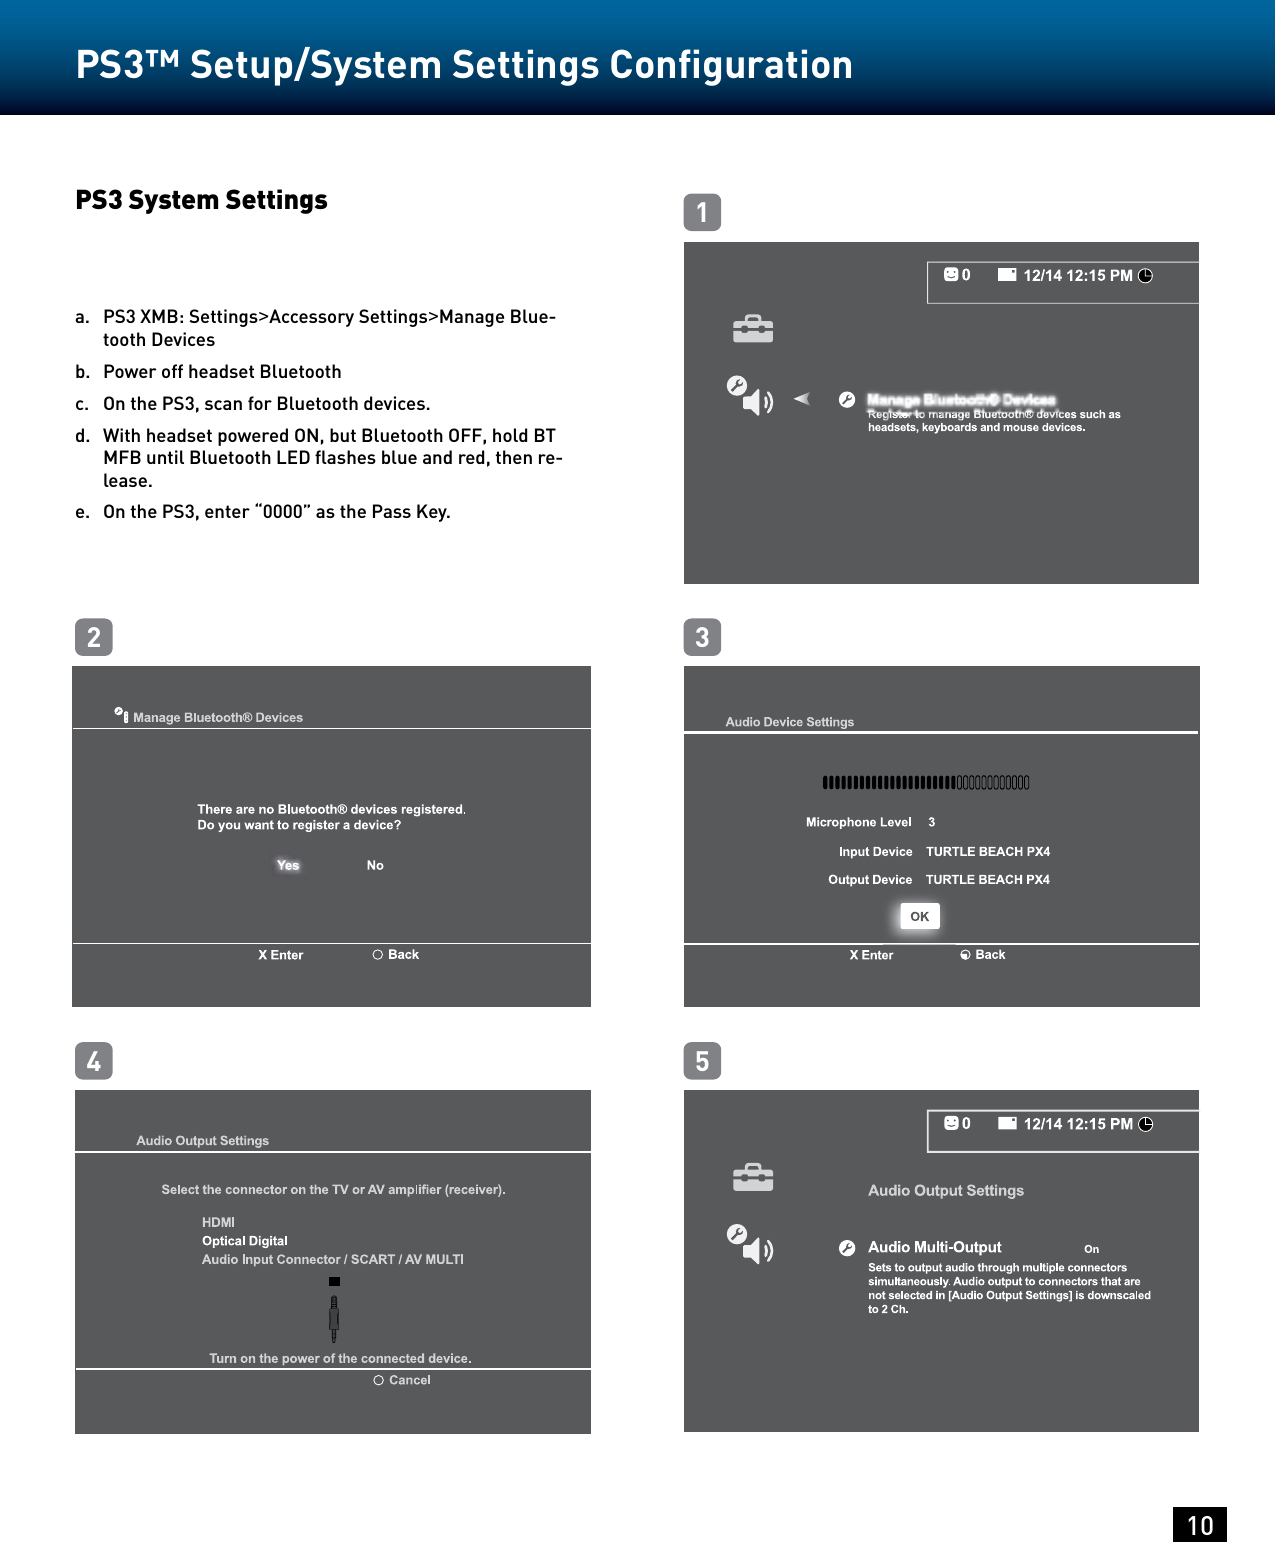
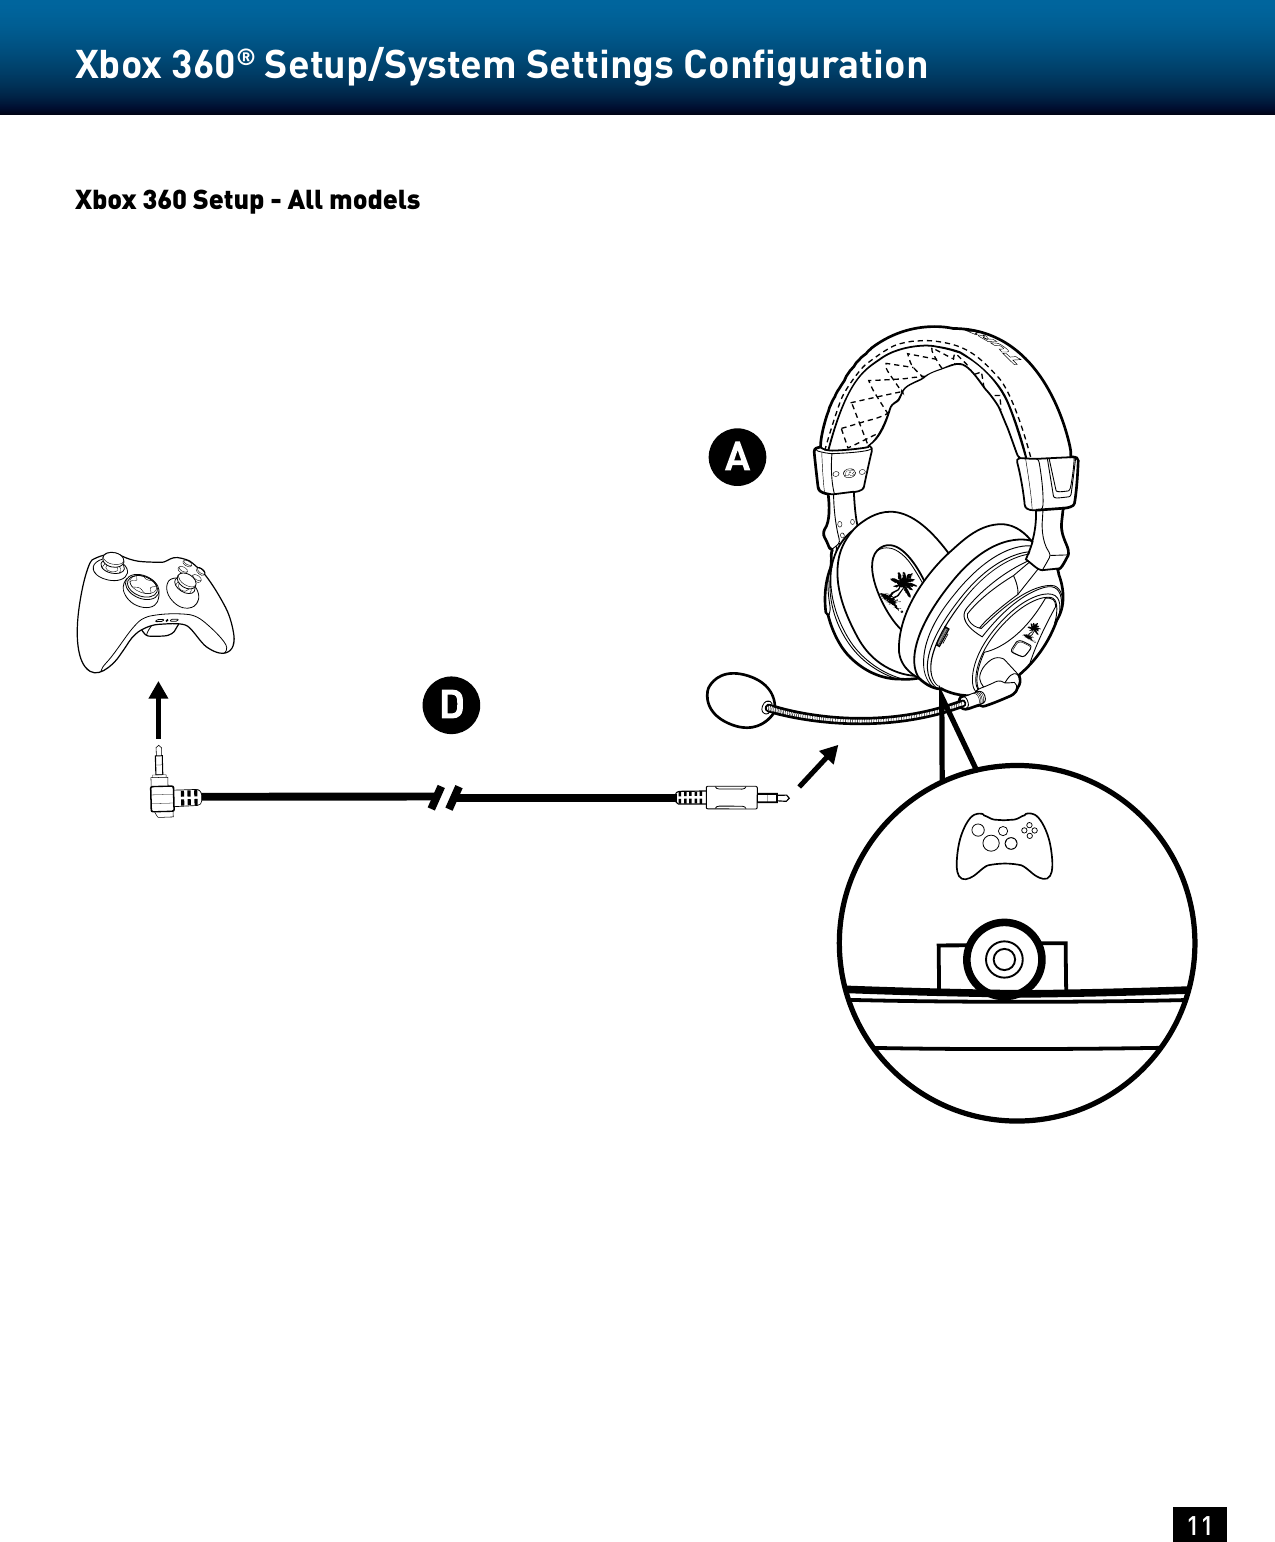
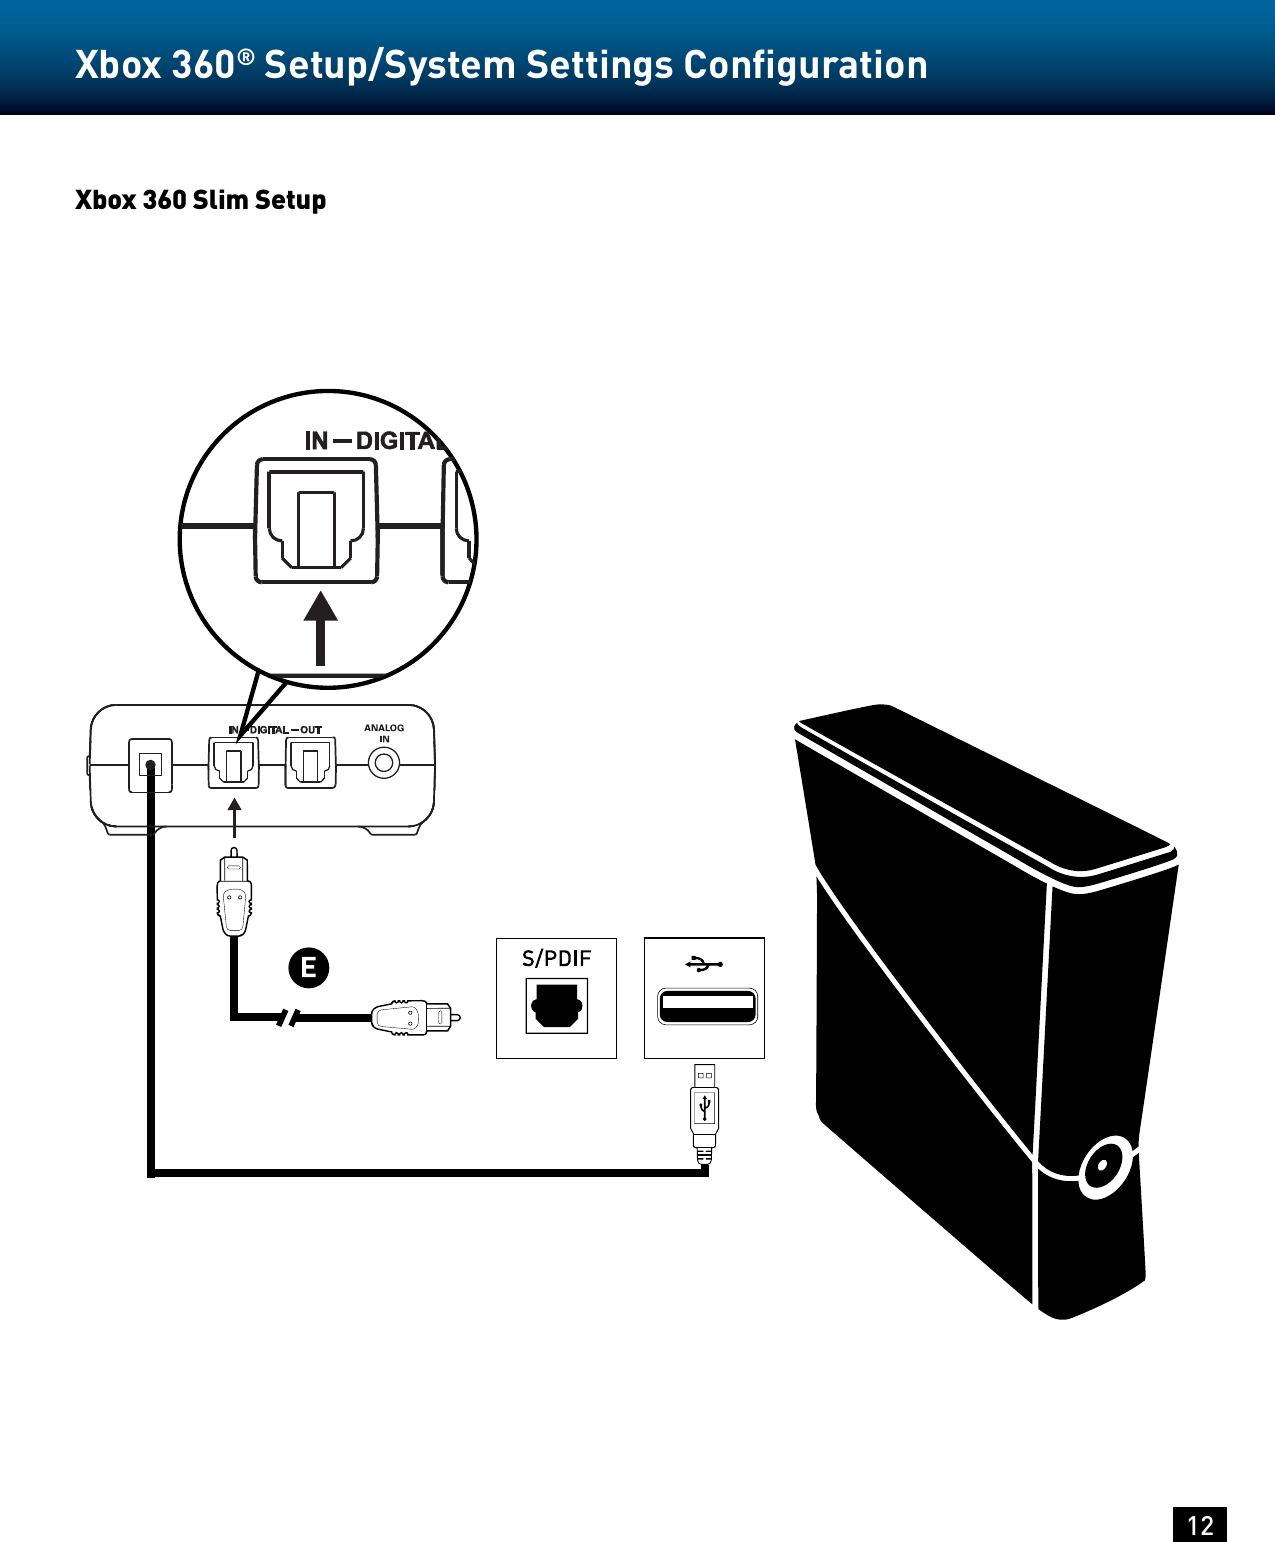
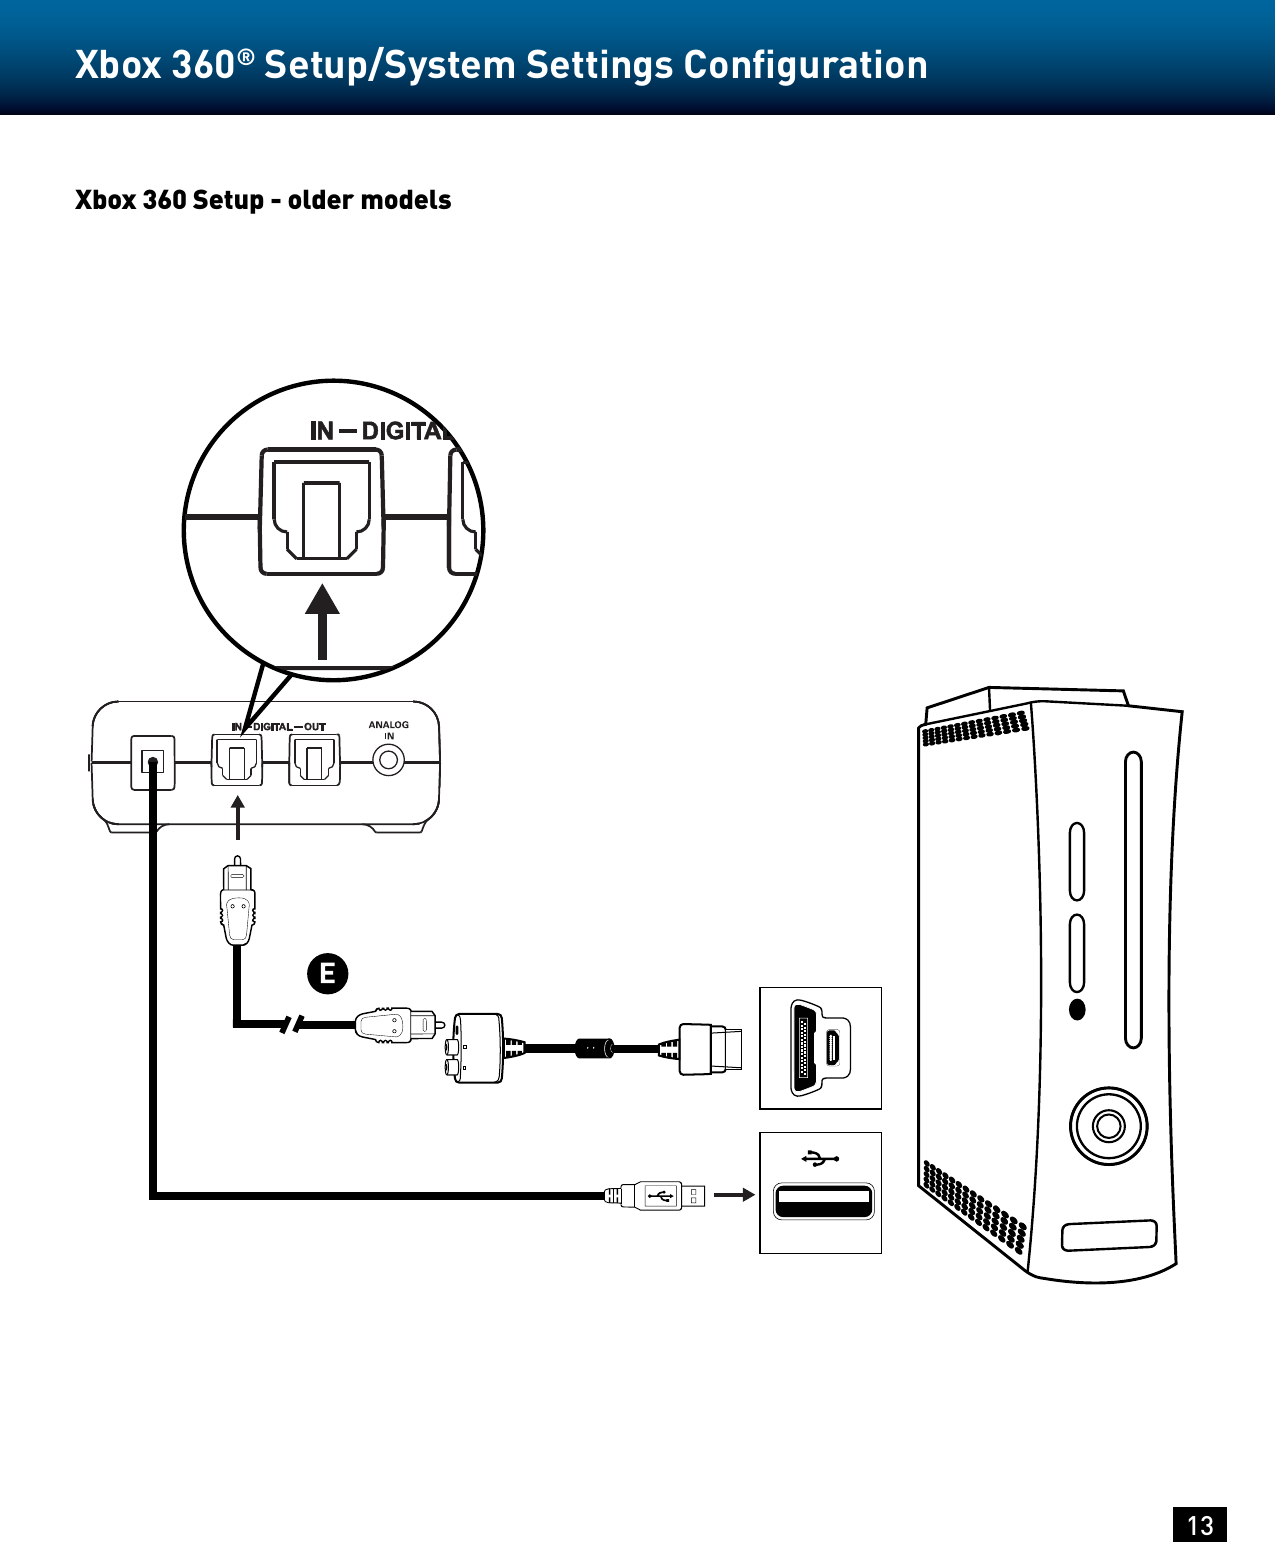
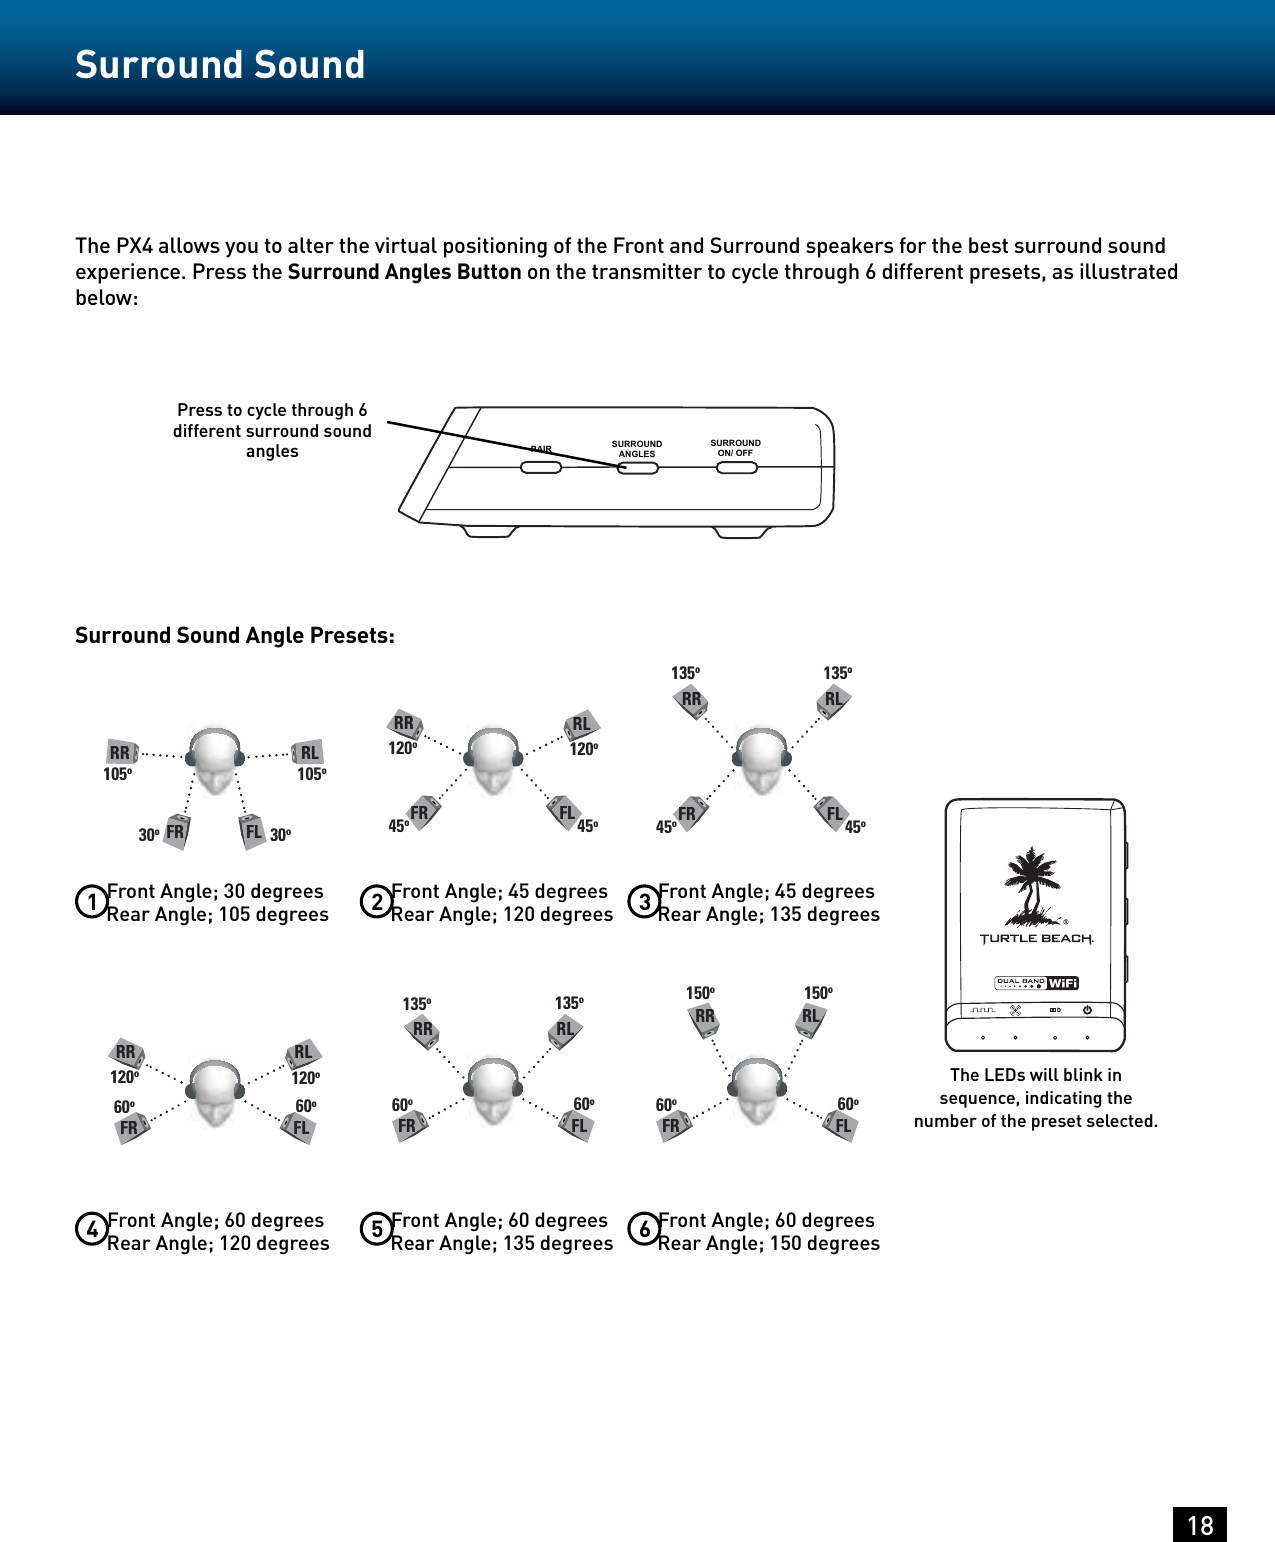
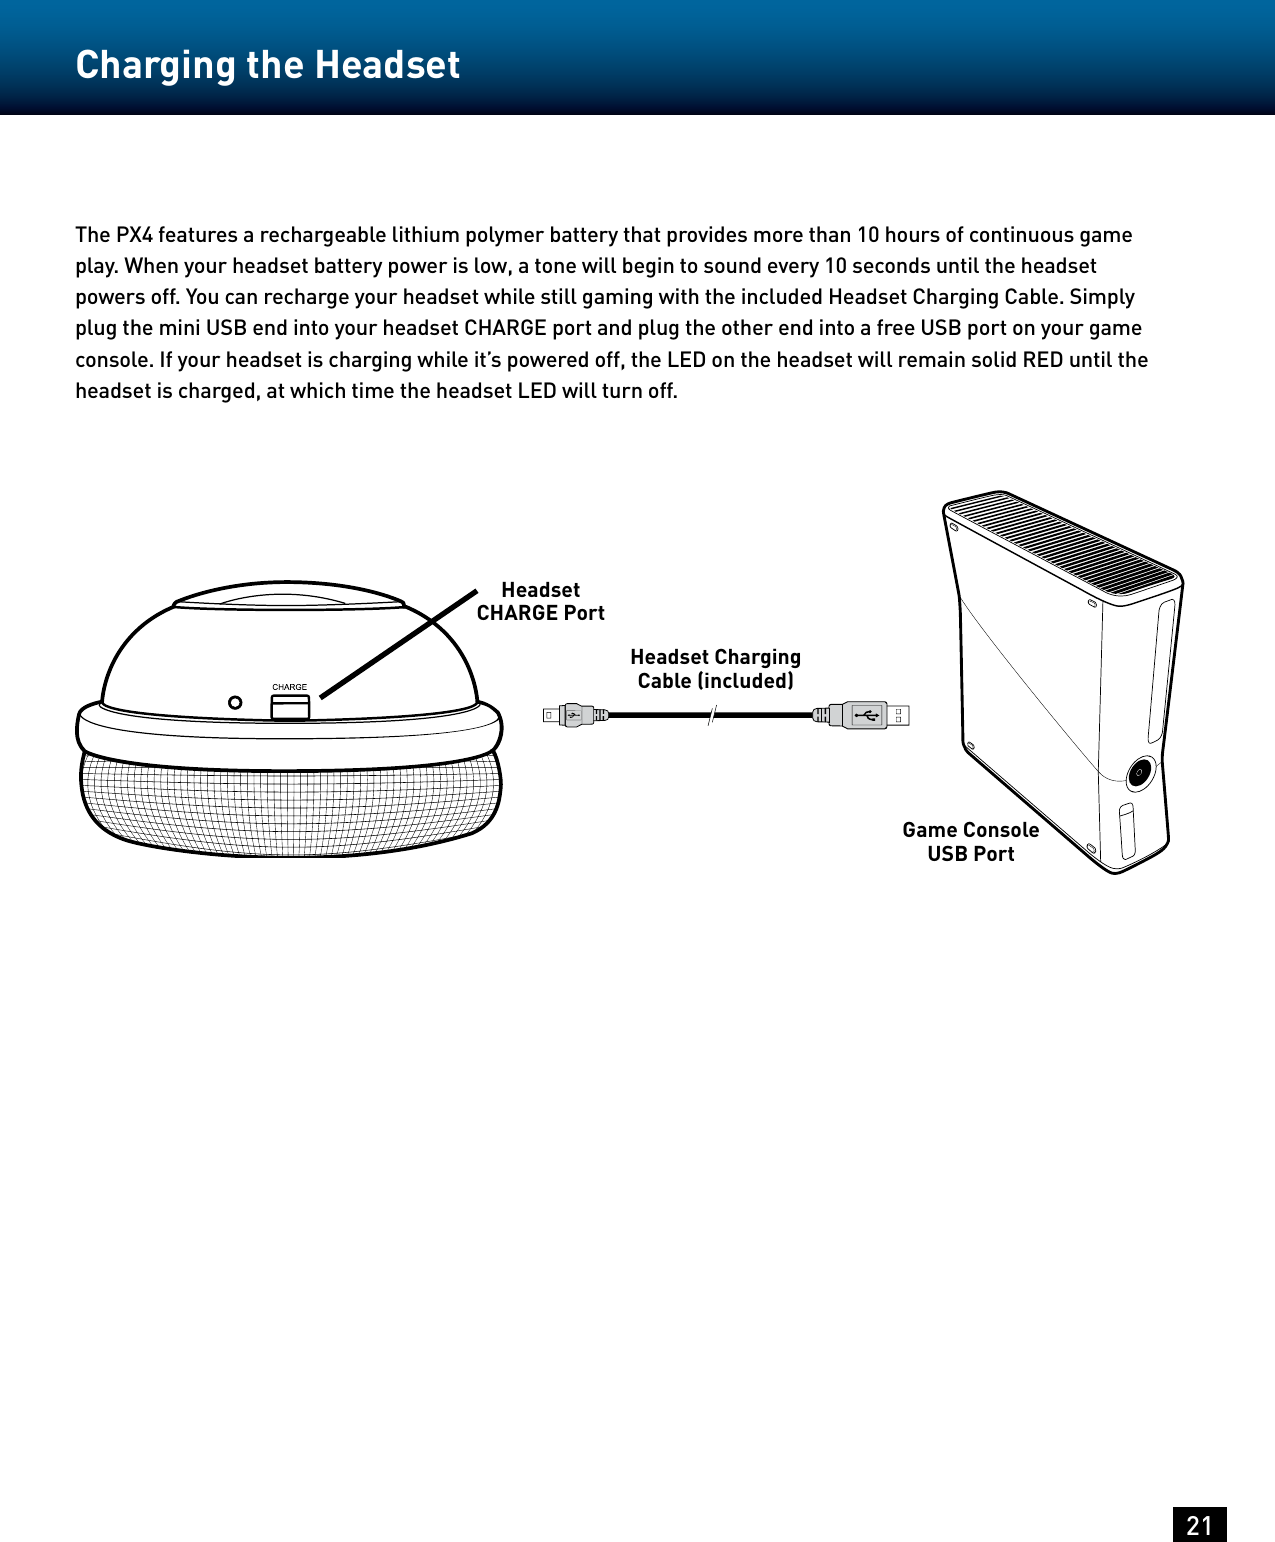
Voyetra Turtle Beach TB2271A Ear Force PX4 TX Wireless Audio Transmitter User Manual UG

Voyetra Turtle Beach, Inc. Ear Force PX4 TX Wireless Audio Transmitter UG

UG

User GUideWIREDFor: PS4™  I  PS3™  I  Xbox 360®MobileWIRELESS DOLBY® SURROUND SOUND GAMING HEADSET
Congratulations on your purchase of the Ear Force PX4 headset from Turtle Beach. The PX4 works with your consoles, PC or Mac and all of your favorite mobile devices. Welcome to the Turtle Beach Audio Advantage!For our Knowledgebase and Technical Support Contact info please visit: http://www.turtlebeach.com/support
Table of ContentsPackage Contents  P4Features  P5PX4 Headset - Left View  P6PX4 Headset - Right View  P7PX4 Transmitter  P8PS3™ Setup/System Settings Configuration  P9Xbox 360® Setup/System Settings Configuration  P11Home Theater Setup  P15Connecting a Digital Music Player  P16Dolby® Digital Processing  P17Surround Sound  P18Bluetooth Setup  P19Charging the Headset  P21Adjusting Sound  P22Specifications  P24Compliance / Conformity  P25Warranty  P27
4Package ContentsXbox 360 Talkback CableDigital Optical CableHeadset Charging CablePX4 Headset PX4 TransmitterPS4 Chat Cable Turtle Beach Stickers
5The Ear Force™ PX4 is a premium, Dolby surround sound headset designed for Xbox 360® and PS3™ gaming. To get the most from your PX4, please take a few minutes to review this introduction.Dolby® Surround SoundThe PX4 transmitter processes Dolby Digital surround sound from your Xbox 360 or PS3 and sends it to the headset via digital RF. The result is an immersive sound environment that makes you feel as if you’re right in the middle of the action. It also helps you react quicker by hearing exactly where the sound cues in the game are coming from.Dual-Band Wi-FiThe Ear Force PX4 headset provides wireless CD-quality game sound via dual-band digital RF (radio frequency) that communicates with the PX4 transmitter. This advanced dual-band Wi-Fi technology uses either 5GHz or 2.4GHz signals to transmit high fidelity digital audio and finds the optimum frequency to help eliminate interference with other wireless devices and Wi-Fi networks. Unlike the RF technology used in most other wireless headsets, the dual-band Wi-Fi technology found in the PX4 coexists with wireless networks for optimum performance.Dual Pairing Bluetooth ®The PX4 incorporates Bluetooth technology which can be used to simultaneously pair to two Bluetooth-enabled devices at once. For example, you can pair the PX4 to your PS3 and your mobile phone at the same time. This allows you to use your PX4 to accept phone calls all while totally immersed in the action of the game.Rechargeable BatteryThe PX4 also features a rechargeable lithium polymer battery that provides up to 15 hours of continuous game play on a single charge. The battery can also be recharged while gaming with the included charging cable so you’ll never miss out on the action.Engineered for High-Quality SoundThe PX4 headset is engineered to deliver high-quality audio that makes it ideal for gaming, movies and digital music playback. The high-fidelity, 50mm speakers are encased in acoustically-tuned ear cups with soft fabric cushions and deliver extended bass with extraordinary dynamic range for optimum audio performance.dual band wirelessWiFi5GHzFeatures
6PX4 Headset - Left ViewPower Button: Turn on the headset by pressing the power button for a couple of seconds, then release. You will hear 2 beeps and the power LED should start flashing. Turn off the headset by pressing the button until the LED stays on and you hear 2 beeps, then release. To enter Pairing Mode, press and hold the power button for about 6 seconds until you hear 2 fast beeps and the LED begins to flash rapidly (see pg 6).  The headset will turn off after several minutes if there’s no audio detected or if the transmitter is turned off. Tone Button: Press this button to activate the different EQ presets. A beep will indicate which preset is selected. (see pg. 18)Blast Limiter Button: Press this button to activate the different Blast Limiter presets. A beep will indicate which preset is selected. (see pg. 18) Variable Mic Monitor: Adjusts the level of your voice heard in the headset. (see pg. 19) NOTE: Turning up the mic monitor may cause the mic to pick up room sounds which will make the silence detector not automatically shut off the headset when it’s not being used. If the power is not automatically shutting down, turn down this mic monitor control. Xbox 360 Controller Jack: Used for optional wired chat setup (see pg. 9)Game Volume: Turn to adjust the game sound level. Removable Microphone with Adjustable Boom:  The microphone can be removed from the headset when chat is not required by detaching it from the boom.To properly position the mic: Remove the foam cover, insert the boom into the socket so the holes on the mic casing are facing your mouth. Then replace the foam cover. The boom jack also has a marker to indicate the proper mic position.12345671234567
7PX4 Headset - Right View1234Bluetooth® Volume: Press Chat (+) or Chat (–) to adjust Bluetooth volume level. A tone will sound each time the volume level changes.Bluetooth LED: Flashes blue once per second when paired with a device. Flashes blue twice per second when not paired with a device.  Flashes blue and red quickly when in pairing mode.Bluetooth Multi-Function Button (BT MFB): Powers on the Bluetooth and performs several other functions described in the “Bluetooth” section. (see pg. 15)  NOTE: The Bluetooth feature is normally powered on. If it is not paired to another device, it will automatically turn off after 5 minutes to conserve battery power.  Mic Mute Button: Press to toggle between muting and unmuting the microphone. A high beep will sound when the mic is unmuted and a low beep will sound when the mic is muted. When using the XBA Bluetooth Adapter, the mic can also be muted by double-pressing the button on the puck. When using the optional Talkback cable, the mic can be muted directly from the switch on the Talkback cable.Headset Charging Port: The headset may be charged by connecting this Mini USB input to a free USB port on your gaming console using the included Headset Charging Cable. (see pg. 17) NOTE:  The Headset Charging Cable included with the XP400 can only be used to charge the headset and cannot be used as a standard USB data cable.  Charging LED: Turns red when charging and turns off  when charged.12345566
8PX4 Transmitter123467Digital Input LED: This LED turns on when a digital input signal is detected. When this LED is ON, the analog input is turned off.Surround Sound LED: The LED will light whenever the digital input is being processed by the surround sound decoder. When this LED is off, the audio signal will be heard in stereo.Dolby® Digital LED: The LED will light whenever a Dolby Digital encoded signal is detected on the digital input.Power/Link LED: When the transmitter is powered on and communicating with the headset, this LED will be on solid. When the headset is turned off, the LED will turn off. A slowly pulsing LED indicates that the transmitter can’t communicate with the headset. This could happen when the headset is out of range, turned off or not paired with the transmitter. (see pg. 6)Digital Input and Output: Connect the digital input to the Xbox 360 digital output using the included digital optical cable. The digital input is passed through to the digital output so you can connect the PX4 transmitter and your home theater system to hear the Xbox sound on the headset and speakers at the same time. When a digital signal is detected by the optical input, the Digital Input LED will be lit.Analog Input Jack: Provides a 3.5mm input for digital music players or additional audio sources. (3.5mm cable sold separately) NOTE: The analog input is deactivated whenever a digital input is active, so both the digital and analog inputs cannot be used at the same time.Pair Button: Press and hold to activate pairing mode. (See pg. 6)Surround Sound Angles Button: Press to select different HRTF surround angles. (see pg. 14)Surround Sound On/Off Button: Pressing this button toggles between surround sound and stereo sound. When surround sound is active, the Surround Sound LED will be lit.Transmitter RangeThe transmitter sends game audio from your Xbox 360® to the headset via digital radio frequency (RF) signal, so a direct line of sight is not required. When you’re out of range, you may hear popping or clicking sounds if the headset loses the RF signal. For best performance, place the transmitter in an open area that is unobstructed by objects that might absorb RF signals from the internal antenna. Avoid placing it on a metal surface, such as the top of a home theater A/V receiver.89SURROUND ANGLESSURROUND     ON/ OFFPAIR7 8 951 2 3 456Optimum range: within 30 ft.
9PS3™ Setup/System Settings Configuration PS3 Hardware Setup
10PS3™ Setup/System Settings Configuration PS3 System Settings a.   PS3 XMB: Settings>Accessory Settings>Manage Blue-tooth Devicesb.   Power off headset Bluetoothc.   On the PS3, scan for Bluetooth devices.d.   With headset powered ON, but Bluetooth OFF, hold BT MFB until Bluetooth LED flashes blue and red, then re-lease.e.   On the PS3, enter “0000” as the Pass Key.13254
11Xbox 360® Setup/System Settings Configuration Xbox 360 Setup - All models
12Xbox 360® Setup/System Settings Configuration Xbox 360 Slim Setup
13Xbox 360® Setup/System Settings Configuration Xbox 360 Setup - older models
14Xbox 360® Setup/System Settings Configuration Xbox 360 System Settingsa. Settings > Preferences > Voice.  b. Set Voice Volume to “10”.c. Set Game Volume to “10”.d. Set Voice Output to “Play Through Headset”.a.  Settings > System Settings > Console Set-tings > Audio > Digital Output.b.  Set Digital Output to “Dolby Digital 5.1”.12
15Home Theater SetupSetting up the transmitter as illustrated below lets you listen to your console or TV with the PX4 headset. You can also hear your console on your home theater speakers without disconnecting the optical cable from the transmitter.Connecting the PX4 transmitter digital output to your home theater system will pass your console’s game audio from the transmitter’s digital input to the home theater A/V receiver digital input, so you can hear the game audio on your PX4 headset and your surround sound speakers at the same time. To hear the game audio only on the PX4 headset, turn down or mute your speakers.* Whenever a DIGITAL INPUT is detected, the ANALOG INPUT is turned OFF. So if you have your TV plugged into the ANALOG IN jack, you won’t hear it if your game console is transmitting digital audio to the transmitter.Home TheaterDIGITAL OUTUSB Digital InDigital Optical Cable(included)USB Power Cable (included)Additional Digital Optical Cable(sold separately) Optional 3.5mm to RCA Cable* (sold separately)whiteredCONSOLE
16Connecting a Digital Music PlayerThe PX4 features an analog input for connecting digital music players or other analog sources. The Analog Input volume can be adjusted directly from the digital music player or analog source.Connect the digital music player to the Analog Input if you want to process the music with Virtual Surround Sound.* Whenever a DIGITAL INPUT is detected, the ANALOG INPUT is turned OFF. So if you have your TV plugged into the ANALOG IN jack, you won’t hear it if your game console is transmitting digital audio to the transmitter.Digital Music PlayerAnalog Input*3.5mm Cable (sold separately)Connect the digital music player tothe Analog Input if you want to process the music with Virtual Surround Sound.
17Dolby® Digital Processing The XP400 uses Dolby Digital 5.1 surround processing technology – the industry-standard format for encoding multi-channel game audio.  Dolby Digital processing recreates 5.1 channel surround sound using the XP400 headset so you can hear the sound all around you, as if you were listening to a 5.1 speaker system.Stereo Sound FieldSound field with Dolby® Digital 5.1Surround Sound ProcessingDigital Input  LEDSur-round Sound LEDDolby Digital  LEDHere’s how the Dolby Digital mode operates:·   When the digital input signal is active, the Digital Input LED           turns on and the analog inputs are turned off.·   If the Surround LED           is ON, surround sound processing is activated. If the LED is OFF, surround sound processing is deactivated and the signal will be heard as stereo.·   If a Dolby Digital encoded signal is detected by the digital input, the front             LED turns on and Dolby Digital processes the channels to create surround sound in the headset. The surround sound must be turned on to enable the Dolby Digital processing. centerfront leftfront rightsurround leftsurround rightsubright left
18Surround Sound SURROUND ANGLESSURROUND     ON/ OFFPAIRThe PX4 allows you to alter the virtual positioning of the Front and Surround speakers for the best surround sound experience. Press the Surround Angles Button on the transmitter to cycle through 6 different presets, as illustrated below:Press to cycle through 6 different surround sound anglesSurround Sound Angle Presets:The LEDs will blink in sequence, indicating the number of the preset selected.Front Angle; 30 degrees  Rear Angle; 105 degrees    CRLFL 30o105oCFR105oRR30oRR RL45o120o45o120oFR FLFront Angle; 45 degrees  Rear Angle; 120 degrees    135oRR135oRL45o45oFR FLFront Angle; 45 degrees  Rear Angle; 135 degrees    60oFR FL60oRR RL120o120oFront Angle; 60 degrees  Rear Angle; 120 degrees    135oRR135oRL60oFR FL60oFront Angle; 60 degrees  Rear Angle; 135 degrees    150o150oRL60oFR FL60oRRFront Angle; 60 degrees  Rear Angle; 150 degrees    1 2 34 5 6
The PX4 incorporates Dual Pairing Bluetooth technology that can be simultaneously paired to 2 Bluetooth enabled devices at once.This lets you communicate with PSN™ chat and answer calls on your mobile phone. If you’re not using either of these Bluetooth features, you should turn off the Bluetooth to conserve battery power. The PX4 will automatically remember the last 2 paired devices upon powering on.Pairing the Bluetooth for Xbox LIVE or PSN ChatSee “PS3 Setup” on page XX.Pairing a Mobile PhoneThe PX4 Bluetooth must be powered off before you start:On the PX4, press and hold the Bluetooth Button (BT MFB) for 5 seconds until the flashing LED begins to alter-nate blue and red—then release the button.On your phone, make sure Bluetooth is powered on and search for Bluetooth devices as described in its user manual.When your device is finished scanning, select “TURTLE BEACH BLUETOOTH CHAT” from the list and follow the prompts to connect.Enter “0000” as the Pass Key and select “OK”. The Bluetooth LED on the headset will start flashing blue about once per second, indicating that the headset and phone are paired.*NOTE: Only one Bluetooth device can be active on the headset at a time. For example, if you are making a call with the headset while on PSN chat, the chat will be deactivated until the call is over.19Bluetooth Setup1234
20Making Calls with iPhoneOnce the headset is successfully paired with your mobile phone, you can use it to make and receive calls. It can be used with voice dialing if your phone supports this function.If you want to… Then…Activate voice recognition* Press and hold the BT MFB for 3 seconds, or until you hear a tone—then release.Use your Phone to dial Call normally, once the call has been placed the sound will automati-cally be transferred to the headsetRedial Last Number Double-Click the BT MFBTurn off the Microphone Press the Mic Mute Button.  Press again to turn the microphone back onAdjust the Volume Press the Bluetooth Volume up and down buttonsEnd a call Press the BT MFB once* Some mobile phones may not have a redial or voice recognition function. If a phone does not have a redial function, then a double-click of the MFB will initiate the voice recognition state instead. If a phone does not have either function, then a double-click or 3-second press of the MFB will have no effect.Receiving CallsWhen the PX4 Bluetooth is powered on and there is an incoming call you will hear a phone ring chime in the headset.If you want to… Then…Accept a call. Press the BT MFB once.Reject a call. Press and hold the BT MFB until you hear a beep.  The call will be sent directly to your voice mail.End a call. Press the BT MFB once.
21Charging the HeadsetHeadset Charging Cable (included)Headset CHARGE PortGame Console USB Port The PX4 features a rechargeable lithium polymer battery that provides more than 10 hours of continuous game play. When your headset battery power is low, a tone will begin to sound every 10 seconds until the headset powers off. You can recharge your headset while still gaming with the included Headset Charging Cable. Simply plug the mini USB end into your headset CHARGE port and plug the other end into a free USB port on your game console. If your headset is charging while it’s powered off, the LED on the headset will remain solid RED until the headset is charged, at which time the headset LED will turn off.
22Adjusting SoundEqualizer (EQ) PresetsThe PX4 features multiple Equalizer presets to enhance your gaming audio experience. Press the TONE button on the PX4 headset to cycle through the EQ presets as illustrated:Equalizer (EQ) Presets:1.  Flat2.  Bass Boost3.  Treble Boost4.  Bass and Treble BoostBlast Limiter PresetsThe Blast Limiter presets help protect your ears from deafening sounds such as explosions and gunfire by limiting the maximum level of the game sound. You won’t hear the effect unless a loud sound occurs in the game. For example, if you’re in a quiet sec-tion of the game, you might want to turn up the volume to hear softer sounds like footsteps. If an explosion or gunshot suddenly occurs, it could be uncomfortably loud because you turned up the volume for the footsteps. Turning on the Blast Limiter will reduce these louder sounds so you can boost the lower sounds. Press the LIMITER button to cycle through the three settings as illus-trated:Blast Limiter Presets:1.  Limiter Off2.  Mild Limiter3.  Medium Limiter4.  Max LimiterTone ButtonLimiter Button
23Adjusting SoundChat Boost™Chat Boost is a dynamic talkback expander built into the PX4 headset that automatically increases chat volume during loud moments in your game, so you can always hear your teammates or other players, regardless of the game volume.Typically, if you turn up a headset’s game volume, the incoming chat level from other players could become dif-ficult to hear over the game sound. However, with Chat Boost, as the game audio increases, the chat volume also increases. When the game volume quiets down again, Chat Boost automatically returns the chat level to your original volume setting.To properly set the Chat Boost function:1.  Turn down the volume control on the headset so there’s no game audio.2.   Adjust the chat volume control on the headset so you can hear the chat voices at a comfortable level.3.   Turn up the headset game volume and the chat volume will increase whenever the game gets louder, just as if the chat volumecontrol is being automatically turned up along with the game level.Variable Mic MonitorThe PX4 headset includes a unique variable microphone monitor feature that allows you to adjust the level of your voice heard in the headset so you won’t have to shout. This can be adjusted by turning the MIC MONITOR wheel on the left ear cup.NOTE: Turning up the mic monitor may cause the mic to pick up room sounds which will make the silence detec-tor not automatically shut off the headset when it’s not being used. If the power is not automatically shutting down, turn down this mic monitor control.Mic MonitorWITHOUT Chat Boost,chat volume is overwhelmed by loud game audioWITH Chat Boost,chat volume increases along with game volumeNOTE: If the chat volume on the headset is set too loud, Chat Boost might increase the volume so much that the voices will distort. If that happens, turn down the chat volume on the headset.
24SpecificationsHeadset·   50mm diameter speakers with neodymium magnets·   Game audio frequency response: 20Hz - 20kHz, >120dB SPL @ 1kHz·   Condenser microphone frequency response: 50Hz - 15kHz·   Game audio Dual Band WiFi Digital 2.4-2.495GHz/5.0-5.8GHz RF wireless reception·   Bluetooth® radio with dual-pairing mode·   Headphone amplifier: Stereo 27mW/ch, THD <1%·   Rechargeable Li-Po Battery (1000 mAh)·   Automatic shut down after approx 5 minutes of carrier loss or audio silence to conserve battery power·   Battery booster circuit extends battery life for up to 15 hoursTransmitter·   Dual Band Digital 2.4-2.495GHz/5.0-5.8GHz RF wireless transmission with up to 30 foot range·   Frequency response: 20Hz - 20kHz·   Optical TOSLINK digital audio input compatible with 48kHz digital audio stream·   Optical TOSLINK digital audio output pass-through of digital input stream·   Stereo 3.5mm analog input jack·   Maximum analog input level: 2Vpp (700mV rms)·   USB Power – (5V DC @ 350mA max)
25Regulatory Compliance Statements  for the PX4 ModelsFederal Communications Commission (FCC) Compliance NoticesClass B Interference StatementThis equipment has been tested and found to comply with the limits for a Class B digital device, pursuant to Part 15, Subpart B of the FCC Rules. These limits are designed to provide reasonable protection against harmful interference in a residential installation. This equipment generates, uses, and can radiate radio frequency energy and, if not installed and used in accordance with the instructions, may cause harmful interference to radio communications. However, there is no guarantee that interference will not occur in a particular installation. If this equipment does cause harmful interference to radio or television reception, which can be determined by turning the equipment off and on, the user is encouraged to try to correct the interference by one or more of the following measures:   • Reorient or relocate the receiving antenna.  • Increase the separation between the equipment and receiver.  • Connect the equipment into an outlet on a circuit different from that to which the receiver is connected.  • Consult the dealer or an experienced radio/TV technician for help.FCC Caution:This device complies with Part 15 of the FCC Rules. Operation is subject to the following two conditions: (1) This device may not cause harmful interference, and (2) this device must accept any interference received, including interference that may cause undesired operation.Canadian ICES StatementsCanadian Department of Communications Radio Interference RegulationsThis digital apparatus does not exceed the Class B limits for radio-noise emissions from a digital apparatus as set out in the Radio Interference Regulations of the Canadian Department of Communications. This Class B digital apparatus complies with Canadian ICES-003.Règlement sur le brouillage radioélectrique du ministère des CommunicationsCet appareil numérique respecte les limites de bruits radioélectriques visant les appareils numériques de classe A pre-scrites dans le Règlement sur le brouillage radioélectrique du ministère des Communications du Canada. Cet appareil numérique de la Classe B est conforme à la norme NMB-003 du Canada.European Union and European Fair Trade Association (EFTA) Regulatory ComplianceThis equipment may be operated in the countries that comprise the member countries of the European Union and the European Fair Trade Association. These countries, listed below, are referred to as The European Community throughout this document:AUSTRIA, BELGIUM, BULGARIA, CYPRUS, CZECH REPUBLIC, DENMARK, ESTONIA, FINLAND, FRANCE, GERMANY, GREECE, HUNGARY, ICELAND, IRELAND, ITALY, LATVIA, LICHTENSTEIN, LITHUANIA, LUXEMBOURG, MALTA, NETHERLANDS, NOR-WAY, POLAND, PORTUGAL, ROMANIA, SLOVAKIA, SLOVENIA, SPAIN, SWEDEN, SWITZERLAND, UNITED KINGDOM
26HeadingDeclaration of ConformityMarking by this symbol: indicates compliance with the Essential Requirements of the EMC Directive of the European Union (2004/108/EC). This equipment meets the following conformance standards:Safety:   EN 60950-1: 2006 + A11 + A1 + A12 (T-Mark License)  Also Licensed for Standards:  EC 60950-1: 2005 + A1: 2009, (CB Scheme Report/Certificate),  UL60950-1 (NRTL License), CSA22.2, 60950-1 (SCC License)  Additional licenses issued for specific countries available on requestEmissions:  EN 55022: 2010, EN 50332-1: 2000, EN50332-2: 2003  EN61000-3-2: 2006 +A1: 2009 +A2: 2009, EN61000-3-3: 2008  CISPR 22: 2010Immunity:  EN 55024: 2010, EN61000-4-2: 2008, EN61000-4-3: 2010,  EN61000-4-4: 2011, EN 61000-4-5: 2005, EN 610004-6: 2008,  EN61000-4-11: 2004The products are licensed, as required, for additional country specific standards for the International Marketplace. Ad-ditional issued licenses available upon request.Environmental:  Low Voltage Directive 2006/95/EC,  RoHS 2002/95/EC  REACH 1907/2006/EC  WEEE 2002/96/ECWarning!This is a Class B product. In a domestic environment, this product may cause radio interference, in which case, the user may be required to take appropriate measures.Achtung!Dieses ist ein Gerät der Funkstörgrenzwertklasse B. In Wohnbereichen können bei Betrieb dieses Gerätes Rundfunk-störungen auftreten, in welchen Fällen der Benutzer für entsprechende Gegenmaßnahmen verantwortlich ist.Attention!Ceci est un produit de Classe B. Dans un environnement domestique, ce produit risque de créer des interférences ra-dioélectriques, il appartiendra alors à l’utilisateur de prendre les mesures spécifiques appropriées.
27LIMITED ONE YEAR WARRANTY FOR TURTLE BEACH PRODUCTS:Voyetra Turtle Beach, Inc. (“VTB”) warrants to the original end-user purchaser (“Purchaser”) that the retail Turtle Beach hardware product herein (“Product”) will be free of defects in materials and workmanship for a period of one year from the date of purchase by the Purchaser (“Warranty Period”). Any Extended Warranty or Service Plans purchased through a Retail store are not honored by VTB. The Warranty refers to the repair/replace-ment of a defective product during this period and not a refund. This limited warranty is extended only to the original Purchaser of a new product, which was not sold “AS IS”. It is not transferable or assignable to any subsequent purchaser. This limited warranty is applicable only in the country or territory where the Product was purchased from an authorized VTB retailer and does not apply to a Product that has been purchased as used or refurbished or was included as part of a non-VTB product. WARRANTY SERVICE:In the USA and CANADA Warranty Service is provided by our Turtle Beach USA offices and in all other Countries it is provided by our local International Distributors when available. Refurbished/Recertified products are sold on an AS IS basis with a 90-day Warranty or less in accordance with each ven-dor’s policy. VTB does not warrant uninterrupted or error-free operation of the Product and is under no obligation to support the Product for all computer operating systems or future versions of such operating systems. If a defect should occur during the Warranty Period, Purchaser must contact VTB to obtain a Return Merchandise Authorization (“RMA”) number on the basis of the dated purchase receipt. Purchaser will be responsible for shipping costs incurred in returning the defective Product to an authorized VTB service center, or to the repair facility located at VTB’s corporate headquarters. VTB will not be responsible for other products or accessories included with the defective Product sent to VTB. The RMA number must be clearly indicated on the outside of the package. Packages without an RMA number will be refused by VTB or its representatives and returned to sender at the sender’s expense. In the event of a defect, Purchaser’s sole and exclusive remedy, and VTB’s sole liability, is expressly limited to the correction of the defect by adjust-ment, repair, or replacement of the Product at VTB’s sole option and expense. VTB owns all Products it has replaced and all parts removed from repaired Products. VTB uses new and reconditioned parts made by various manufacturers in performing warranty repairs and building replacement products. If VTB repairs or replaces a product, the original Warranty Period is not extended, however, VTB warrants that repaired or replacement parts will be free from defects in material and workmanship for a period of thirty (30) days from the date of repair or replacement, or for the remainder of the Warranty Period, whichever is greater.This warranty does not apply to any Product that has had its serial number altered, removed or defaced, or any Product damage caused by shipping, improper storage, accident, problems with electrical power, abuse, misuse, neglect, ordinary wear, acts of God (e.g. flood), failure to follow directions, improper maintenance, use not in accordance with product instructions, unauthorized modification or service of the Product or damage resulting from the use of the Product with hardware, software or other products not provided by or specifically recommended by VTB. NOTES: - Replacement Parts and accessories that are subject to “wear and tear” such as earpads, mic foam covers, talkback cables, etc. have a three (3) month Warranty.- Replacement Parts for Discontinued Products are sold on an AS IS basis, they are not supported and come with a 30 day Warranty. THIS LIMITED WARRANTY IS PURCHASER’S SOLE AND EXCLUSIVE REMEDY AND IS IN LIEU OF ALL OTHER WARRANTIES, EXPRESS OR IMPLIED. TO THE EXTENT PERMITTED BY APPLICABLE LAW, VTB HEREBY DISCLAIMS THE APPLICABILITY OF ANY IMPLIED WARRANTY OF MERCHANTABILITY, FITNESS FOR A PARTICULAR PURPOSE OR USE FOR THE PRODUCT. IF SUCH A DISCLAIMER IS PROHIBITED BY APPLICABLE LAW, THE IMPLIED WARRANTY IS LIMITED TO THE DURATION OF THE FOREGOING LIMITED WRITTEN WARRANTY. IN NO EVENT SHALL VTB BE LIABLE FOR ANY INDIRECT, INCIDENTAL, SPECIAL, PUNITIVE OR CONSEQUENTIAL DAMAGES, OR DAMAGES, INCLUDING BUT NOT LIMITED TO ANY LOST PROFITS, DATA, OR LOSS OF USE, ANY THIRD PARTY CLAIMS, AND ANY INJURY TO PROPERTY OR BODILY INJURY (INCLUD-ING DEATH) TO ANY PERSON, ARISING FROM OR RELATING TO THE USE OF THIS PRODUCT OR ARISING FROM BREACH OF THE WARRANTY, BREACH OF CONTRACT, NEGLIGENCE, TORT, OR STRICT LIABILITY, EVEN IF VTB HAS BEEN ADVISED OF THE POSSIBILITY OF SUCH DAMAGES. This warranty supersedes all prior agreements or understandings, oral or written, relating to the Product, and no representation, promise or condi-tion not contained herein will modify these terms. Some states do not allow the exclusion or limitation of incidental or consequential damages, so the above exclusion or limitation may not apply to you. This warranty gives you specific legal rights. You may also have other rights, which vary from state to state. Any action or lawsuit for breach of warranty must be commenced within eighteen (18) months following the purchase of the Product.
28EXCLUSIONS FROM LIMITED WARRANTY:This Limited Warranty shall not apply and VTB has no liability under this Limited Warranty if the Turtle Beach Product:-  is used for commercial purposes such as “LAN, Call Centers” (including rental or lease);-  is modified or tampered with;-  is damaged by Acts of God, power surge, misuse, abuse, negligence, accident, wear and tear, mishandling, misapplication, or other causes unrelated to defective materials or workmanship; - serial number is defaced, altered or removed;-  is not used in accordance with the documentation and use instructions; or-  is repaired, modified or altered by other than authorized repair centers.-  is no longer available because it was discarded.
Copyright © 2013 Voyetra Turtle Beach, Inc. (VTB, Inc.) All rights reserved. Turtle Beach, the Turtle Beach Logo, Voyetra, and Ear Force are either trademarks or registered trademarks of VTB, Inc. Xbox, Xbox 360, and Xbox LIVE are registered trademarks of Microsoft Corporation. PlayStation is a registered trademark and PS3 is a trademark of Sony Computer Entertainment, Inc. Mac is a registered trademark of Apple, Inc. All other trademarks are properties of their respective companies and are hereby acknowledged. Actual product appearance may differ from package imagery. Made in China.This product is compliant with the Consumer Product Safety Improvement Act of 2008, Public Law 110-314 (CPSIA)Watch Turtle Beach product training videos at:youtube.com/TurtleBeachVideos TurtleBeach.com/supportProduct support and warranty information:For: PS3™  I  Xbox 360®  I  PCMac®  I  Mobile

Navigation menu