Vtech Go Smart Friends Busy Sounds Discovery Home Owners Manual
2014-11-12
: Vtech Vtech-Go-Go-Smart-Friends-Busy-Sounds-Discovery-Home-Owners-Manual-109282 vtech-go-go-smart-friends-busy-sounds-discovery-home-owners-manual-109282 vtech pdf
Open the PDF directly: View PDF ![]() .
.
Page Count: 20
User’s Manual
© 2014 VTech
Printed in China
US
Busy Sounds Discovery Home™
91-002974-000
Dear Parent,
Welcome to the world Go! Go! Smart Friends™! We’re cited you’ve
decided to go on an adventure with us and plore all that Go! Go! Smart
Friends™ has to er. ese ts have been designed to give your child a
thrilling learning perience with hours fun.
Go! Go! Smart Friends™ features a collection characters and playsets
(each sold separately) that interact with your child by lighting up and
playing fun responses. introduce themselves, talk about their
favorite things and more while encouraging first words and early
vocabulary. But that’s only the beginning the learning citement!
When your child interacts with our innovative MagicPoint™ technology,
th will love watching the characters and playsets come to life with
mion, lights, music, and sounds as th play!
Additionally, our Go! Go! Smart Friends™ playsets feature buons, gears
and her manipulative elements to encourage the development your
child’s fine mor skills.
With Go! Go! Smart Friends™, it's playtime where iendship leads to
learning™!
Sincerely,
Your iends at VTech®
To learn more about VTech® ts, visit www.vtechkids.com
2
INTRODUCTION
Thank you for purchasing the VTech® Go! Go! Smart Friends™ Busy
Sounds Discovery Home™!
Welcome to the Go! Go! Smart Friends™ Busy Sounds Discovery
Home™ by VTech®. Friends and the home come to life with
MagicPoint™ locations as you explore each room in this three-story
interactive house.
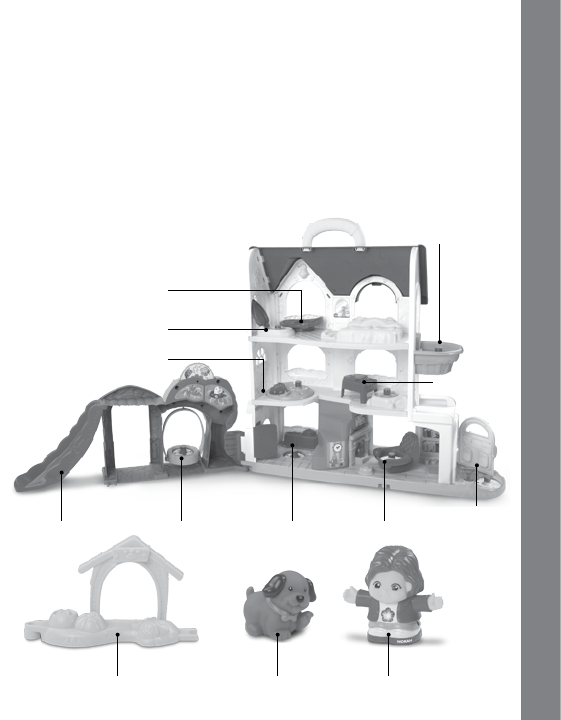
Introduction
SLIDE SWING KITCHEN
DOG HOUSE DOG
CHAIR FRONT
DOOR
PLAYROOM
PIANO
MOTORIZED
ELEVATOR
BATHTUB
TOILET
MagicPoint™ Miss Norah
3
INCLUDED IN THIS PACKAGE
• OneVTech® Go! Go! Smart Friends™ character
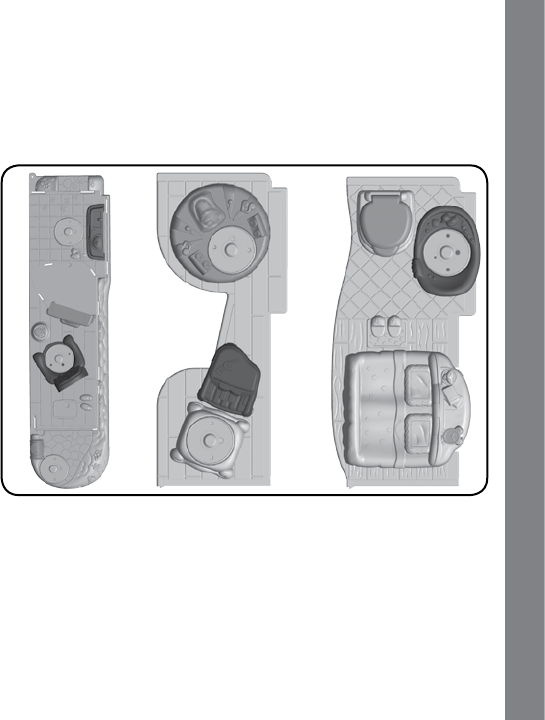
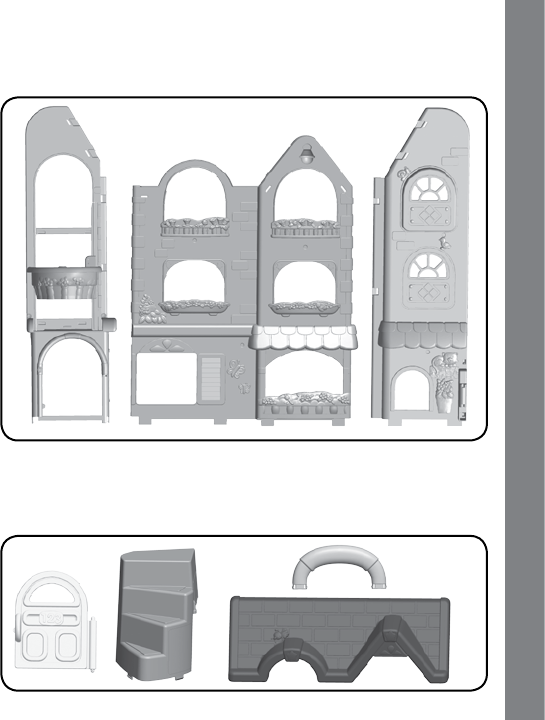
• One1stoorbasewith3MagicPoint™ locations
• One2ndoorpiecewith2MagicPoint™ locations
• One3rdoorpiecewith2MagicPoint™ locations
Included in this Package
4
• OneleftwallwithMagicPoint™ location
• Onecenterwall
• Onerightwall
• Onedoor
• Onestaircase
• Onehandle
• Onerooftop
Included in this Package
5
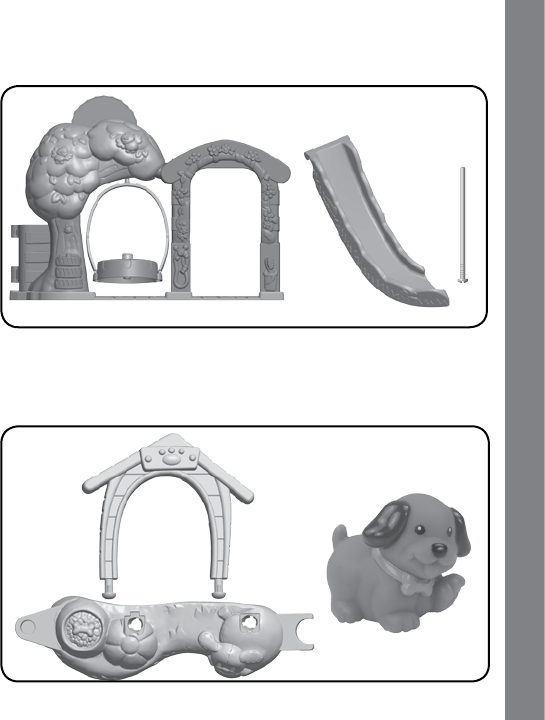
• OneyardbasewithMagicPoint™ location
• Oneslide
• Onelongscrew
• Onedoghousepiece
• Onedoghousebase
• Onedogaccessorypiece
Included in this Package
6
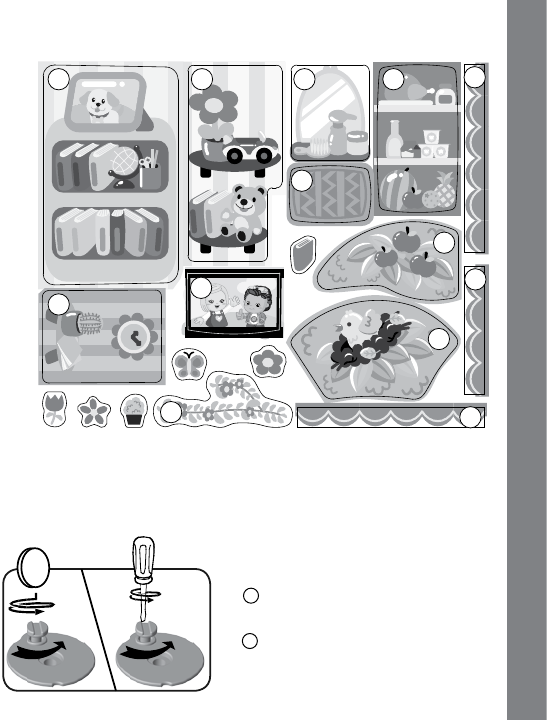
• Onelabelsheet
• Oneuser’smanual
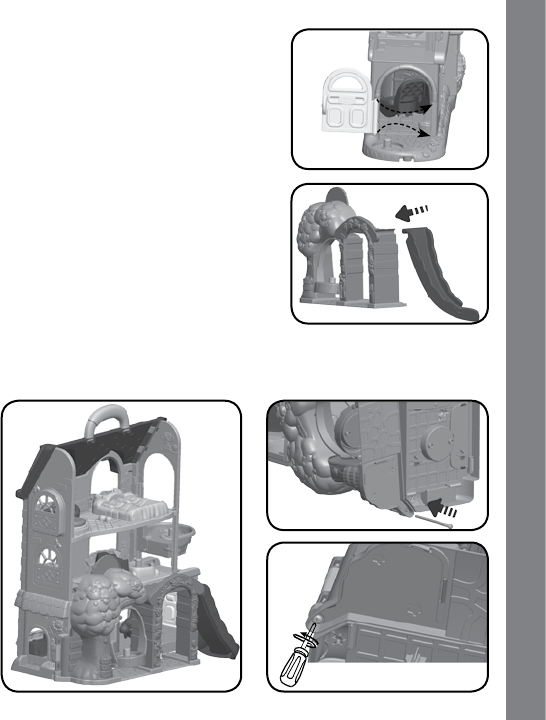
Unlock the packaging lock:
There is one packaging lock located on the character.
4
9
75
6
8
3
1
2
11
10
10
12
Use a coin or a screwdriver to
loosen the screw.
Pull out the screw with the
packaging lock.
1
2
Included in this Package
7
WARNING:
All packing materials, such as tape, plastic sheets, packaging locks
and tags are not part of this toy, and should be discarded for your
child’ssafety.
ATTENTION:
Pour la sécurité de votre enfant, débarrassez-vous de tous les
produitsd’emballagetelsquerubansadhésifs,feuillesdeplastique,
attachesetétiquettes.Ilsnefontpaspartiedujouet.
NOTE:
Pleasekeepuser’smanualasitcontainsimportantinformation.
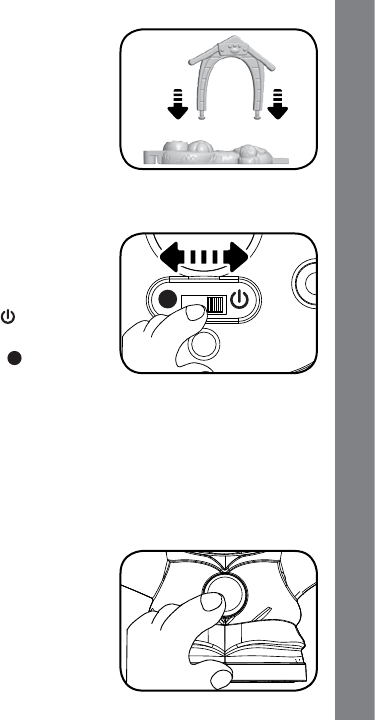
GETTING STARTED
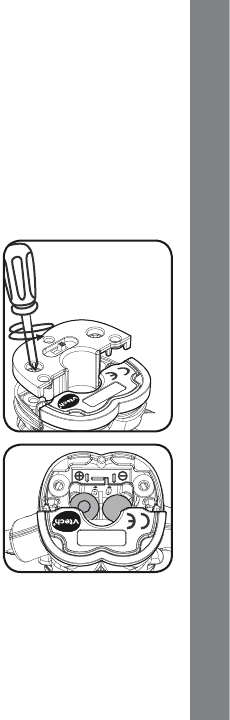
BATTERY INSTALLATION
1. Make sure the unit is OFF.
2. Locate the battery cover on the bottom
of the unit. Use a screwdriver to loosen
the screws.
3. Install2new“AAA”size(LR03/AM-4)
batteries following the diagram inside
the battery box. (The use of new
alkaline batteries is recommended for
maximumperformance.)
4. Replace the battery cover and tighten
the screws to secure.
BATTERY NOTICE
• Usenewalkalinebatteriesformaximumperformance.
• Useonlybatteriesofthesameorequivalenttypeas
recommended.
• Donotmixdifferenttypesofbatteries:alkaline,standard(carbon-
zinc)orrechargeable(Ni-Cd,Ni-MH),ornewandusedbatteries.
• Donotusedamagedbatteries.
Getting Started
8
• Insertbatterieswiththecorrectpolarity.
• Donotshort-circuitthebatteryterminals.
• Removeexhaustedbatteriesfromthetoy.
• Removebatteriesduringlongperiodsofnon-use.
• Donotdisposeofbatteriesinre.
• Donotchargenon-rechargeablebatteries.
• Removerechargeablebatteriesfromthetoybeforecharging(if
removable).
• Rechargeablebatteriesareonlytobechargedunderadult
supervision.
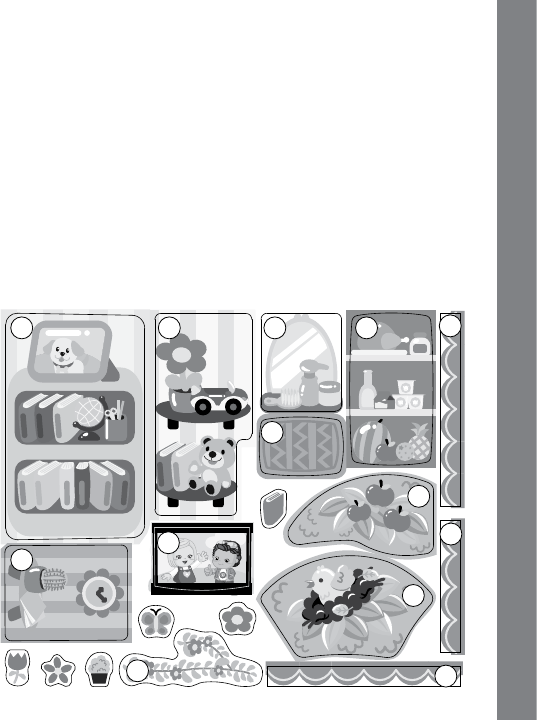
Please adhere the labels to the playset
securely as indicated below:
4
9
75
6
8
3
1
2
11
10
10
12
Label Application
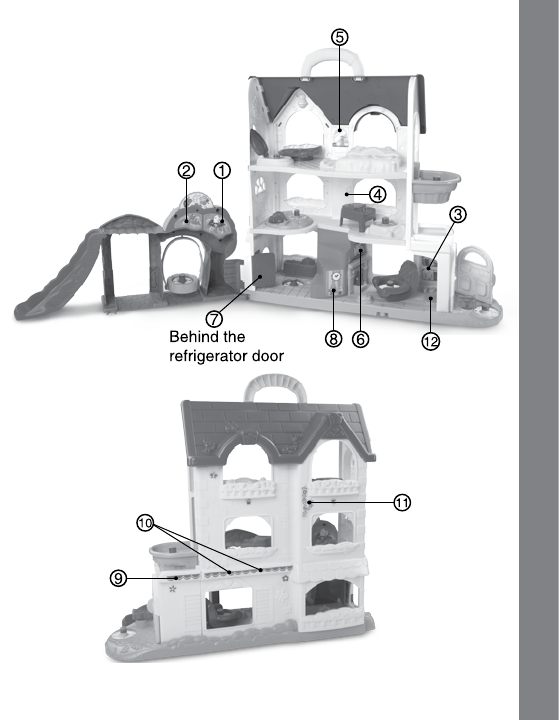
9
Additional labels have been added so you can customize your house!
Label ApplicationLabel Application
10
ASSEMBLY INSTRUCTIONS
With the VTech® Go! Go! Smart Friends™ Busy Sounds Discovery
Home™, safety comes rst. To ensure your child’s safety, adult
assembly is required. You will need a Phillips head screwdriver to
assembletheplayset(notincluded).
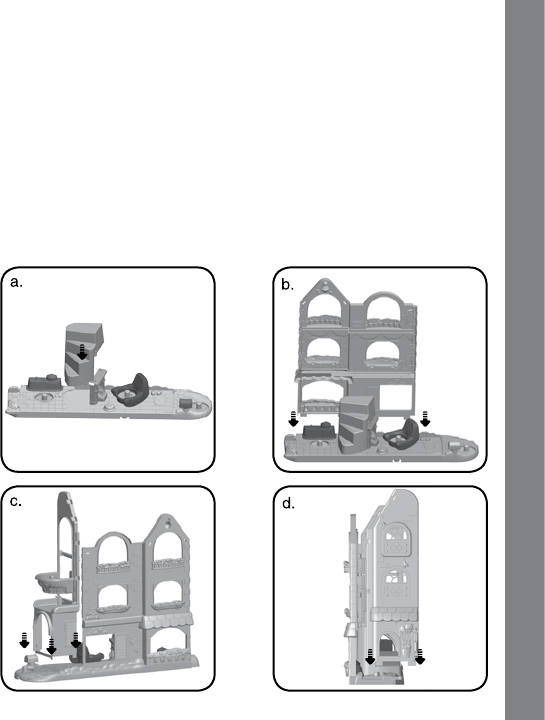
Assemble the Discovery Home:
1. Locatethe1stoorbase.Insertthestaircaserst,theninsertthe
center, right and left walls into the base as shown in the pictures.
Thenrmlypushtheleftandrightwallintothecenterwall’stracks
untilthey“click”intoplace.
Assembly Instructions
11
2. Nowattachthe2ndand3rdoorpiecestothecenter,leftandright
wallsasshowninthepictures.Youwillheara“click”soundwhen
the pieces are secure.
3. Attachthehandletothetopoftherooftop.Thenattachtherooftop
to the center, left and right walls as shown in the picture.
Assembly Instructions
12
4. Attach the door to the left wall.
6. Attach the slide to the yard base.
7. Connect the yard base to the assembled house as shown in the
picture.Finally,insertthelongscrewintotheholewheretheyjoin
and use a screwdriver to tighten the screw.
Assembly Instructions
13
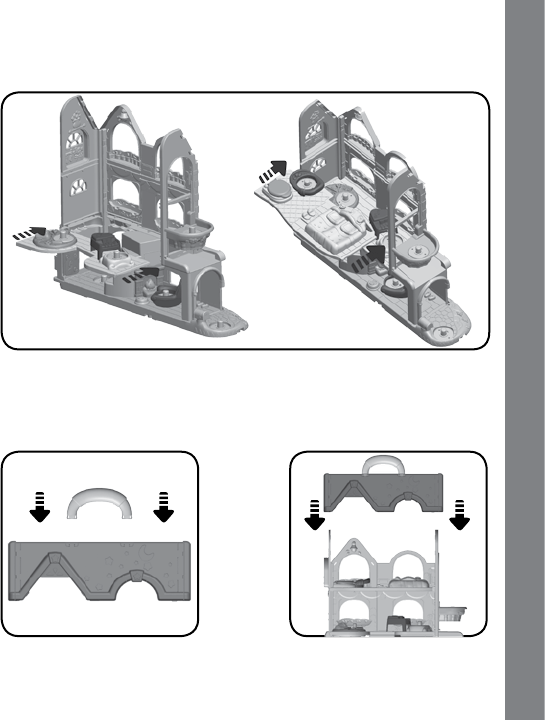
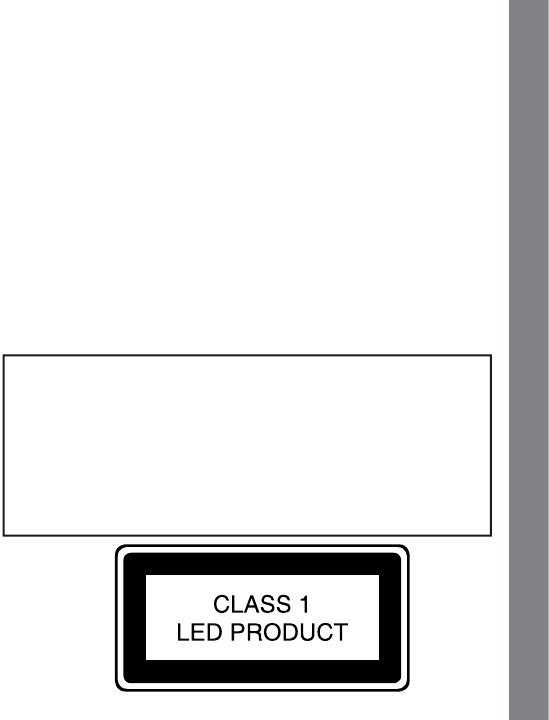
Assemble the Dog House:
8. Attach the dog house piece to the dog
house base as shown in the picture.
PRODUCT FEATURES
1. ON/OFF SWITCH
The ON/OFF SWITCH is located on
the bottom of the character.
To turn the unit on, slide the ON/OFF
SWITCH to the ON () position. To
turn the unit off, slide the ON/OFF
SWITCH to the OFF( )position.
2. AUTOMATIC SHUT-OFF
To preserve battery life, the VTech® Go! Go! Smart Friends™
character will automatically power down after several minutes of no
input. The unit can only be turned on again by pressing the LIGHT-
UP BUTTON or placing it on a MagicPoint™ location.
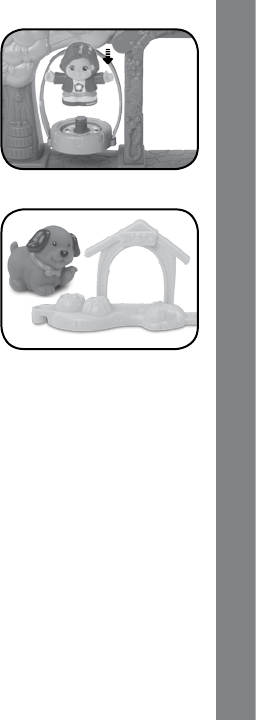
ACTIVITIES – CHARACTER
1. Slide the ON/OFF SWITCH to turn
the unit ON. Then press the LIGHT-
UP BUTTON to hear voices, songs,
melodies and fun sounds.
M
A
D
E
I
N
C
H
I
N
A
F
A
B
R
I
Q
U
É
E
N
C
H
I
N
E
M
A
D
E
I
N
C
H
I
N
A
F
A
B
R
I
Q
U
É
E
N
C
H
I
N
E
Assembly Instructions / Product Features
14
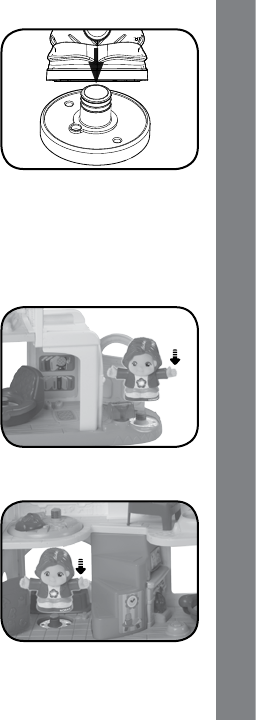
2. Place the character on one of
the playset’s nine MagicPoint™
locations to hear phrases, fun
sounds, short tunes, and sing-along
songs. Some of the MagicPoint™
locations can even trigger motion
or turn on the playset’s lights. The
character can also interact with other
VTech® Go! Go! Smart Friends™
playsets(eachsoldseparately).
ACTIVITIES - Busy Sounds Discovery
Home™
1. Place the character on the
MagicPoint™ located near the
FRONT DOORtoturnonthehouse’s
light and to hear fun responses.
2. Place the character on the KITCHEN
MagicPoint™ location to pretend
she is a chef.
M
A
D
E
I
N
C
H
I
N
A
F
A
B
R
I
Q
U
É
E
N
C
H
I
N
E
Activities

15
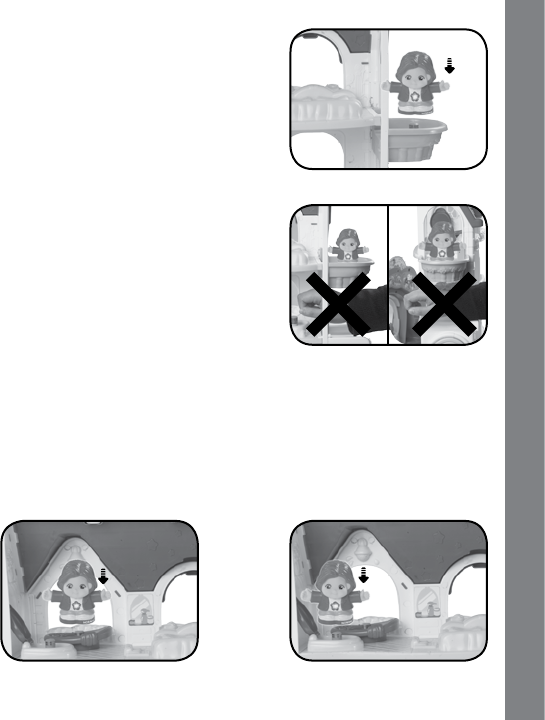
3. Place the character on the
MagicPoint™ located on the CHAIR
toturnonthereplaceandtoletthe
character rest as they watch TV!
4. There are two MagicPoint™ locations in the PLAYROOM:
a. Place the character on the
MagicPoint™ located on the
PLAYROOM’s rug to turn on the
room’s light and to play. Manually
rotate the rug to see the character
dance!
b. Place the character on the PIANO’s
MagicPoint™ to hear her play the
piano.
If you have an additional Go! Go! Smart Friends™ MagicPoint™
character, place one character on each of the PLAYROOM’S two
MagicPoint™ locations to activate the MagicChat™ feature. You can
hearthecharacterstalkandsingtogether.(Additionalcharacternot
included.Eachsoldseparately.)
Activities
16
5. Put the character on the MOTORIZED
ELEVATOR MagicPoint™ to see it
move up and down on its own.
Important Note: For your child’s
safety, do not play with the moving
elevator near your clothing, body
or hair. If something gets caught in
the elevator’s track while the motor
is on, remove the character from
the device to turn off the motor.
The elevator can be manually
moved up or down to help dislodge
anything that gets stuck. Do not
insert your hand or other body part
into the house’s windows while the
elevator is in motion.
6. Place the character on the MagicPoint™ locations on the BATHTUB
and TOILET for pretend-play fun!
Activities
17
7. Place the character on the
MagicPoint™ located on the SWING
to hear fun responses. Push the
swing to help the character swing up
high!
8. The DOG HOUSE accessory piece
can connect to other Go! Go! Smart
Friends™playsetaccessories(each
soldseparately).
CARE & MAINTENANCE
1. Keep the unit clean by wiping it with a slightly damp cloth.
2. Keep the unit out of direct sunlight and away from any direct heat
sources.
3. Removethebatterieswhentheunitisnotinuseforanextended
period of time.
4. Do not drop the unit on a hard surface and do not expose the unit
to excess moisture or water.
Care & Maintenance

18
TROUBLESHOOTING
If for some reason the unit stops working or malfunctions while playing
with the MagicPoint™ accessory, please remove the character from
the accessory and place the character back onto the MagicPoint™.
If the unit still does not function, or if for some reason the unit stops
workingormalfunctionsonitsown,pleasefollowthesesteps:
1. Please turn the unit OFF.
2. Interrupt the power supply by removing the batteries.
3. Lettheunitstandforafewminutes,thenreplacethebatteries.
4. Turn the unit ON. The unit should now be ready to play again.
5. If the product still does not work, replace with a new set of batteries.
If the problem persists, please call our Consumer Services Department
at1-800-521-2010intheU.S.or1-877-352-8697inCanada,anda
service representative will be happy to help you.
IMPORTANT NOTE:
Creating and developing Toddler learning products is accompanied
by a responsibility that we at VTech® take very seriously. We make
every effort to ensure the accuracy of the information, which forms
the value of our products. However, errors sometimes can occur.
It is important for you to know that we stand behind our products
and encourage you to call our Consumer Services Department
at1-800-521-2010intheU.Sor1-877-352-8697inCanada,with
anyproblemsand/orsuggestionsthatyoumighthave.Aservice
representative will be happy to help you
Note:Thisequipmenthasbeentestedandfoundtocomplywiththe
limits for a Class B digital device, pursuant to Part 15 of the FCC
Rules. These limits are designed to provide reasonable protection
againstharmfulinterferenceinaresidentialinstallation.Thisequipment
generates,uses andcan radiateradiofrequency energyand, ifnot
Troubleshooting / Note
19
installed and used in accordance with the instructions, may cause
harmful interference to radio communications. However, there is no
guarantee that interference will not occur in a particular installation. If
thisequipmentdoescauseharmfulinterferencetoradioortelevision
reception,whichcanbedeterminedbyturningtheequipmentoffand
on, the user is encouraged to try to correct the interference by one or
moreofthefollowingmeasures:
• Reorientorrelocatethereceivingantenna.
• Increasetheseparationbetweentheequipmentandreceiver.
• Connecttheequipmentintoanoutletonacircuitdifferentfromthat
to which the receiver is connected.
• Consultthedealeroranexperiencedradio/TVtechnicianforhelp.
Caution: Changes or modications not expressly approved by the
party responsible for compliance could void the user’s authority to
operatetheequipment.
THIS DEVICE COMPLIES WITH PART 15 OF THE FCC
RULES. OPERATION IS SUBJECT TO THE FOLLOWING TWO
CONDITIONS:
(1)THISDEVICEMAYNOTCAUSEHARMFULINTERFERENCE,
AND (2) THIS DEVICE MUST ACCEPT ANY INTERFERENCE
RECEIVED, INCLUDING INTERFERENCE THAT MAY CAUSE
UNDESIRED OPERATION.
CAN ICES-3 (B)/NMB-3(B)
Note
