Vtech V Smile Art Studio Owners Manual 67000
2014-11-12
: Vtech Vtech-V-Smile-Art-Studio-Owners-Manual-109831 vtech-v-smile-art-studio-owners-manual-109831 vtech pdf
Open the PDF directly: View PDF ![]() .
.
Page Count: 24


Dear Parent,
At VTech®, we know that every year, children are asking to play video games
at younger and younger ages. At the same time, we understand the hesitation
of most parents to expose their children to the inappropriate content of many
popular video gamtyou feel confident in allowing your childen to play these
games, and still educate and entertain them in a healthy, age-appropriate
manner?
Our solution to this on-going debate is the V.SMILE™ TV Learning System
– a unique video game system created especially for children aged 3 to 7.
The V.SMILE™ TV Learning System combines a kid-friendly design,
age-appropriate curriculum, entertaining graphics, and fun game play into
a unique experience that your child will love and you can support. The
V.SMILE™ TV Learning System engages your child with two modes of play:
the Learning Adventure - an exciting exploratory journey in which learning
concepts are seamlessly integrated, and the Learning Zone - a series of games
designed to focus on specific school skills in a fun, engaging way. Both of these
educational modes offer your child hours of learning fun.
As part of the V.SMILE™ TV Learning System, VTech® offers a library of
game Smartridges™ based on popular children’s characters that engage and
encourage your child to play while learning. The library is organized into
three levels of educational play – Early Learners (ages 3-5), Junior Thinkers
(ages 4-6) and Master Minds (ages 6-8) – so that the educational content of
the system grows with your child.
At VTech®, we are proud to provide you with a much-needed solution to the
video game dilemma, as well as another innovative way for your child to learn
while having fun. We thank you for trusting VTech®‚ with the important job
of helping your child explore a new world of learning!
Sincerely,
Your Friends at VTech®
To learn more about the V.SMILE™ TV Learning System and other VTech®
toys, visit www.vtechkids.com

INTRODUCTION
Thank you for purchasing the V.SMILE Art Studio™!
With the help of the V.SMILE™ TV Learning System, this art studio will
help your child become the next budding Picasso! This interactive, creative
studio provides opportunities to unleash your child’s imagination! With an
interactive pen, touch-sensitive drawing pad, and over twelve activities,
including drawing lessons and games, kids can tap into their creativity by
creating their own, unique masterpieces!
This creative studio connects directly to the V.SMILE™ TV Learning
System (sold separately) for fun, creative game play on your home TV!
INSTRUCTIONS
INCLUDED IN THIS PACKAGE
• One VTech® V.SMILE Art Studio™
• One VTech® V.SMILE Art Studio Smartridge™
• One User’s Manual
WARNING: All packing materials such as tape, plastic sheets, wire ties
and tags are not part of this toy and should be discarded for
your child’s safety.
INTRODUCTION / INSTRUCTIONS
2
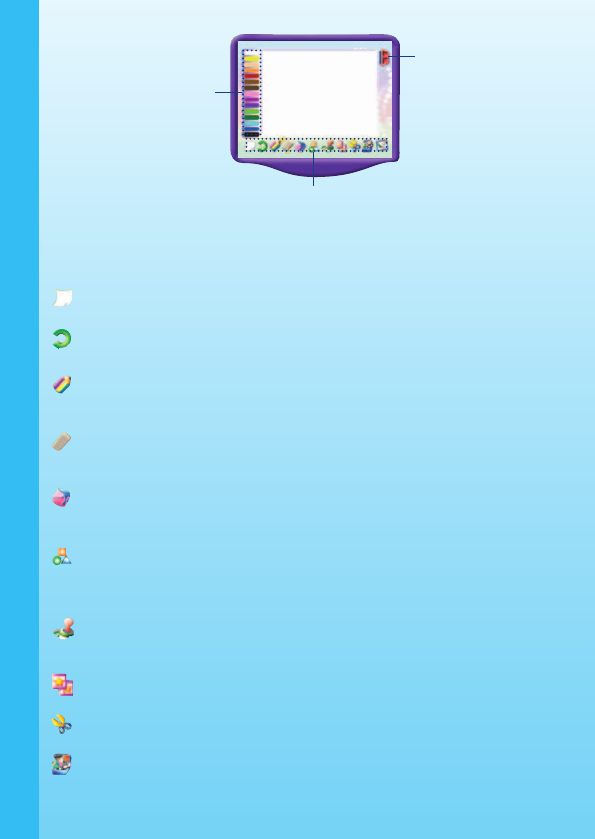
V.SMILE Art Studio™
V.SMILE Art
Studio
Smartridge™
Touch-sensitive Drawing Pad
User’s
Manual
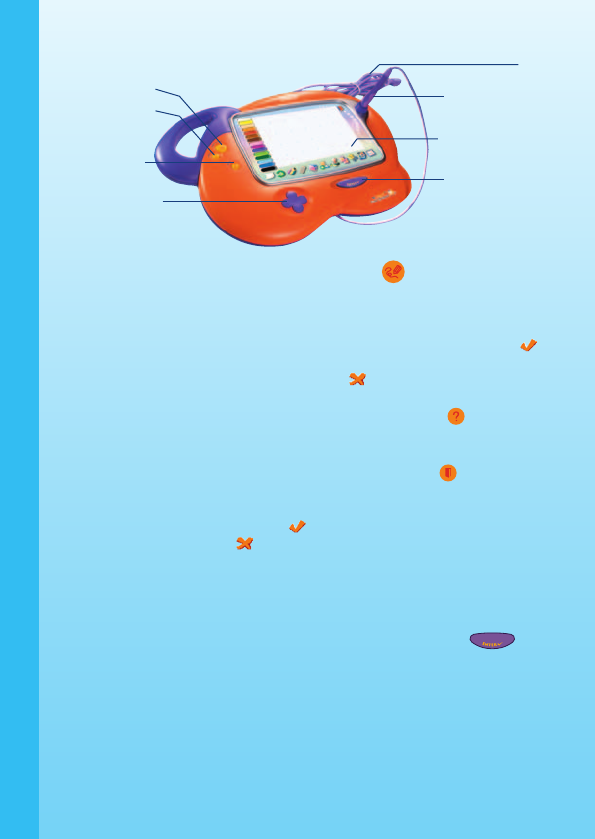
PRODUCT FEATURES
FREE DRAW Button The FREE DRAW button is a shortcut that takes
you to the Free Draw mode. When you press the
FREE DRAW button, the game will pause. An EXIT
message will pop up to make sure you want to quit.
Move the pen or arrow buttons left to “Yes ” to
leave the game and go directly to the Free Draw
mode or right to “No ” to keep playing. Hold down
the pen or press the ENTER button to confirm.
HELP Button When you press the HELP button , you will hear
some helpful hints, or the instructions to the current
game you are playing will be repeated for you.
EXIT Button When you press the EXIT button , the game will
pause and an EXIT message will pop up to make
sure you want to quit. Move the pen or arrow buttons
left to “Yes ” to leave the game or to the right to
“No ” to keep playing. Hold down the pen or press
the ENTER button to confirm.
Arrow Buttons You can use the four-directional arrow buttons to
choose selections on screen by moving up, down,
left and right.
ENTER Button When you press the ENTER button , it will
select your current game choice. You can also use
this to confirm answers within a given game.
Cable Connect the V.SMILE Art Studio™ cable to the
PLAYER 1 slot on your V.SMILE™.
Touch-sensitive Use the pen on the pad to choose your play
mode.
Interactive Pen Select the activity with the pen and hold it down
when you are finished.
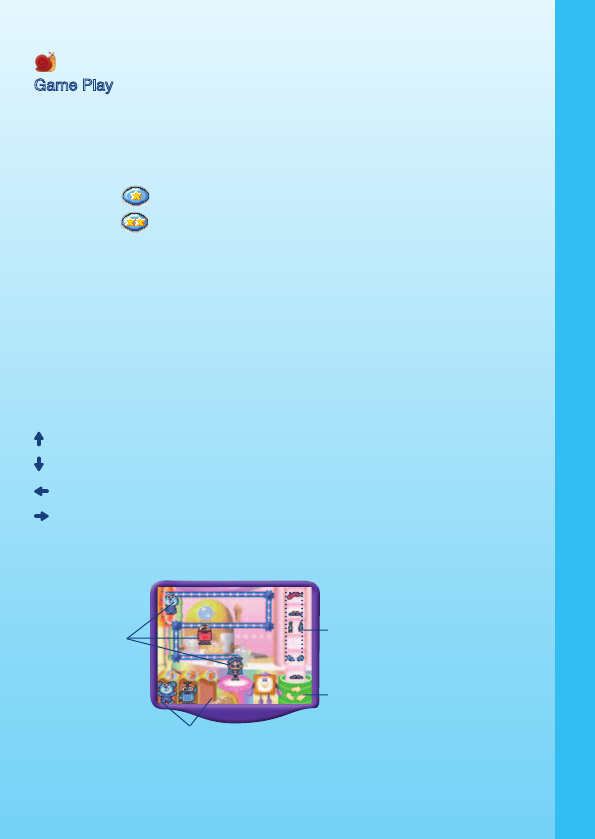
PRODUCT FEATURES
3
Cable
Interactive Pen
FREE DRAW Button
EXIT Button
Arrow Buttons
ENTER Button
Touch-sensitive
Drawing Pad
HELP Button
Drawing Pad
GETTING STARTED
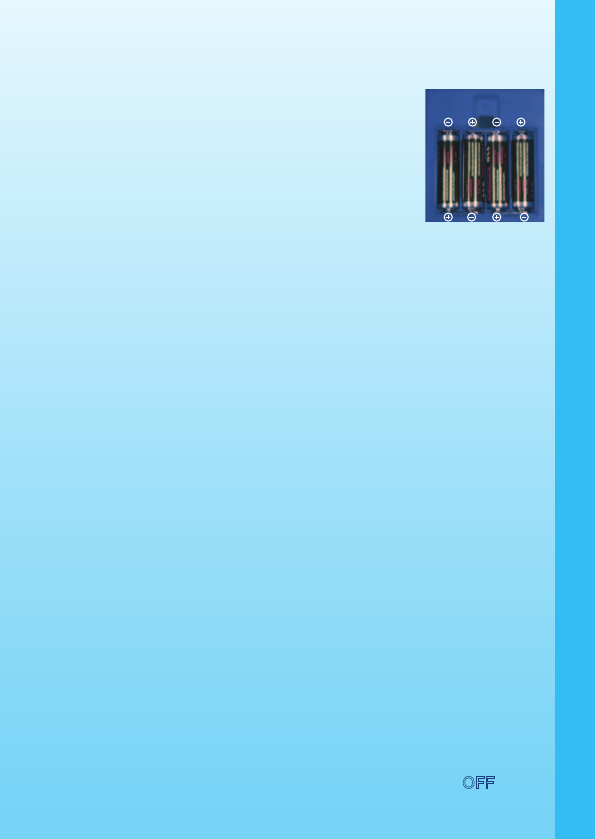
BATTERY PACK INSTALLATION
1. Locate the battery cover on the bottom of the main
unit.
2. Remove the battery cover.
3. Insert 4”AA”size batteries as illustrated.
4. Replace the battery cover.
BATTERY NOTICE
• Do not try to recharge non-rechargeable batteries.
• Rechargeable batteries are only to be charged under adult
supervision.
• Do not mix different types of batteries.
• Do not mix new and used batteries.
• Only use batteries of the recommended or equivalent type.
• Always insert batteries properly matching the plus (+) and minus (-)
signs.
• Batteries that have run out of energy must be removed from the toy.
• Do not short-circuit the supply terminals.
• Do not use more batteries than recommended.
• Do not dispose of batteries in fire, as batteries may explode or leak.
• Remove batteries from the toy if it will not be used for an extended period
of time.
CONNECTING THE V.SMILE ART STUDIO™ TO V.SMILE™
NOTE: Before you connect the V.SMILE Art Studio™ to V.SMILE™,
check to make sure that the V.SMILE™ is working. Once you
have turned the unit ON, the power indicator light (ON Button)
should glow. If the ON Button does not glow, check to see the
adaptor is connected, or that the batteries are installed correctly.
If the batteries are not installed correctly, the V.SMILE™ TV
Learning System will not function and damage to the unit could
result. Make sure that the TV and the unit are turned OFF before
you begin making connections.
GETTING STARTED
4
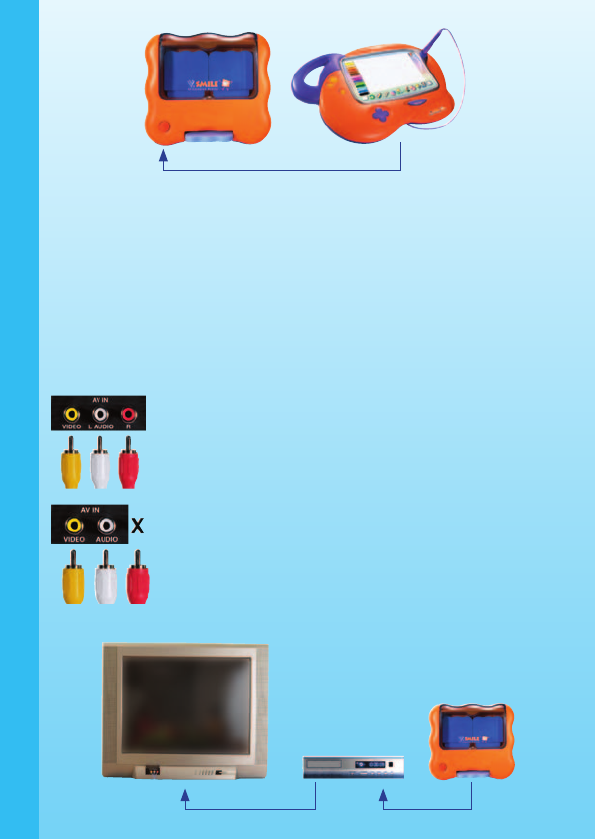
Connect the V.SMILE Art Studio™ cable to the PLAYER 1 slot on your
V.SMILE™ as illustrated.
NOTE: If you connect the cable to the PLAYER 2 slot, there will be
no responses when pressing the HELP button or EXIT button.
Therefore, please be sure to plug the cable into the PLAYER 1 slot.
CONNECTING TO A TELEVISION
Connect the V.SMILE™ TV Learning System to your TV or monitor by
plugging the colored cables on the unit into the matching color video and
audio input jacks on your TV set.
For TVs with stereo audio inputs:
- Connect the yellow plug on the V.SMILE™ cable to
the yellow video input terminal on your TV.
- Connect the white and red plugs on the V.SMILE™
cable to the white and red audio input terminals on
your TV.
For TVs with a mono audio input:
- Connect the yellow plug on the V.SMILE™ cable to
the yellow video input terminal on your TV.
- Connect the white or red plug on the V.SMILE™ cable
to the white or red audio input terminal on your TV.
CONNECTING TO A VCR
5
GETTING STARTED
If there is no video IN and audio IN terminal on your TV set, you can
connect V.SMILE™ to a VCR.
- Connect the yellow plug on the V.SMILE™ cable to
the yellow video input terminal on your VCR.
- Connect the white and red plugs on the V.SMILE™
cable to the white and red audio input terminals on
your VCR.
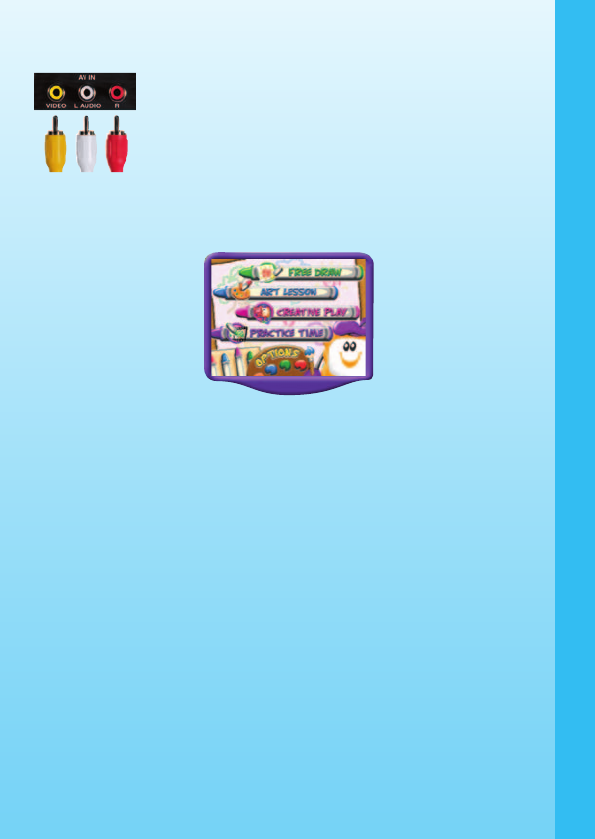
TO BEGIN PLAY
STEP 1: CHOOSE YOUR PLAY MODE
Touch your pen on the touch-sensitive drawing pad to choose the activity
mode, or press the arrow buttons up and down to play. Hold down the pen
or press the ENTER button when you are finished.
1. Free Draw
This mode allows you to draw anything you wish! You can use the user-
friendly art functions such as choosing colors, adding stamp images,
choosing an animation, and more to create your own masterpiece!
2. Art Lesson
This mode provides seven different drawing lessons that help you learn
about the elements of art and using these elements to create your own
drawing. In the Art Lesson menu, choose any of the seven lessons you
like.
Hold down the pen or press the ENTER button to make your choice. Use
the pen or arrow buttons to move the cursor to the lesson you want and
hold down the pen or press the ENTER button to play.
Note: For the details of the ‘Art Lesson’ games, please refer to the
“Activities – Art Lesson” section.
6
GETTING STARTED
3. Creative Play
In this mode, you can play two learning games that focus on specific
gaming skills.
Note: For the details of the ‘Creative Play’ games, please refer to the
“Activities – Creative Play” section.
4. Practice Time
This mode provides two activities to encourage your creativity.
Note: For the details of the ‘Practice Time’ games, please refer to the
“Activities – Practice Time” section.
5. Options
In this screen, you can move the pen or arrow buttons up and down to
move the cursor between Chances and Music options.
Chances: Normal/Unlimited Selection
To choose between Normal and Unlimited chances of play, move the pen
or arrow buttons left or right to either “Normal” or “Unlimited” . Hold
down the pen or press the ENTER button to make your choice.
Music: On/ Off Selection
To turn the background music and sounds On or Off, move the pen or
arrow buttons left or right to either “On” or “Off” . Hold down the
pen or press the ENTER button to make your choice.
Level of Difficulty: Easy/Hard Levels
To change the level of difficulty, move the pen or arrow buttons to the left to
choose the Easy level or to the right to choose the Hard level .
STEP 2: CHOOSE YOUR GAME SETTINGS
The Art Lesson, Creative Play and Practice Time modes each have their
own game settings on their activity selection screens. Please refer to each
section for details.
STEP 3: START YOUR GAME
For Free Draw, please go to the “Activities – Free Draw” section.
For Art Lesson, please go to the “Activities – Art Lesson” section.
For Creative Play, please go to the “Activities – Creative Play” section.
For Practice Time, please go to the “Activities – Practice Time” section.
7
GETTING STARTED

8
ACTIVITIES
EDUCATIONAL CURRICULUM
Free Draw: Independent Creativity & Imaginative Skills
Art Lessons
Lesson 1 Line Drawing Basic Drawing Skills
Lesson 2 Shape Drawing Advanced Shape Drawing
Lesson 3 Shape Combination Shape Matching
Lesson 4 Color Filling Colors
Lesson 5 Color Mixing Primary & Secondary Colors
Lesson 6 Object Drawing Advanced Drawing Skills
Lesson 7 Animation Sequencing
Creative Play
Game 1 Rainbow Chase Colors, Problem Solving
Game 2 Toy Maker Logic Skills, Color Matching
Practice Time
Activity 1 Animation Maker Drawing, Sequencing, Creativity
Activity 2 Coloring Fun Colors, Creativity
FREE DRAW MODE
BASIC OPERATIONS
Move the pen upward Cursor moves upwards.
Move the pen downward Cursor moves downwards.
Move the pen to the left Cursor moves to the left.
Move the pen to the right Cursor moves to the right.
Hold down the pen Confirm your choice / use the current
function.
Cursor moves upwards.
Cursor moves downwards.
Cursor moves to the left.
Cursor moves to the right.
ENTER button Confirm your choice / use the current
function.
ACTIVITIES
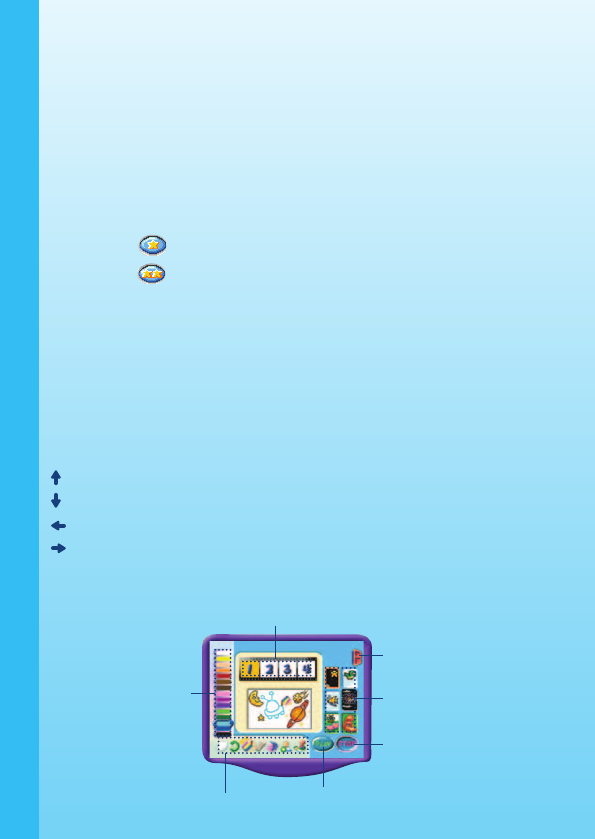
Color Icons
Function Icons
Quit Icon
Cursor This is the cursor you control on the screen.
Color Icons Select it to choose a color. There are 15 colors you can
use in this activity.
Clear Icon Use it to clear all the drawings on your current
picture.
Undo Icon Use it to undo the last action you took.
Pencil Icon Use it to draw lines – the default color is black. To
select the size of the pencil line, select one of the three
different-sized lines in the pop-up menu.
Eraser Icon Use it to erase lines on your drawing. To select the size
of the eraser, select one of the three different-sized
circles in the pop-up menu.
Color Filling Icon
Use it to fill an area of your drawing with a solid color-
the default color is black.
Line and Shape Use it to draw solid or dotted lines and outlined or filled
shapes. Click in the drawing area and hold down the
pen to adjust the size of the shape. Then release the
pen to see the size. The thickness of the line and shape
depends on the current size of the pencil selected.
Stamp Icon
Select it to open a submenu. You will see a variety of
stamps. Select your favorite one and it will be added
to your picture.
Copy Icon
Use it to copy sections of your artwork to another
location.
Cut Icon
Use it to cut sections of your artwork to another
location.
Advanced Art Tools
Select it to open a pop-up menu of advanced art
tools.
ACTIVITIES
9
Drawing Icon
Animation Select it to open a submenu and select your favorite
animation to add to your picture.
Move an Animation Use it to pick up an existing animation and place it
at a new location within your picture.
Delete an Animation Use it to remove an existing animation.
Texture Filling Select it to open a submenu and use it to fill an area
of your drawing with a selected texture.
Border Select it to open a submenu and select your favorite
border to add to your picture.
Background Select it to open a submenu and select your favorite
background to add to your picture.
My Drawings Select it to open a pop-up menu of your drawings.
Load Select it to open a submenu and open your saved
pictures.
Save Select it to open a submenu and save your current
pictures. You can save up to five pictures.
Slideshow Select it to see your artwork slideshow.
Quit Icon Select it to exit the Free Draw mode. You will also
see this icon in all activity modes to exit from the
activity.
ART LESSONS
BASIC OPERATIONS
Move the pen upward Cursor moves upwards.
Move the pen downward Cursor moves downwards.
Move the pen to the left Cursor moves to the left.
Move the pen to the right Cursor moves to the right.
Hold down the pen Confirm your choice / use the current function.
Cursor moves upwards.
Cursor moves downwards.
Cursor moves to the left.
Cursor moves to the right.
ENTER button Confirm your choice / use the current function.
10
ACTIVITIES
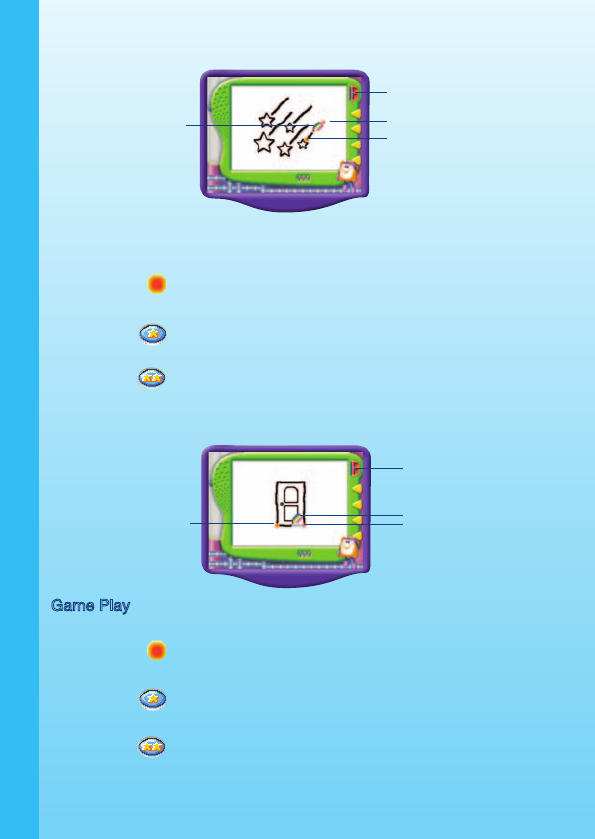
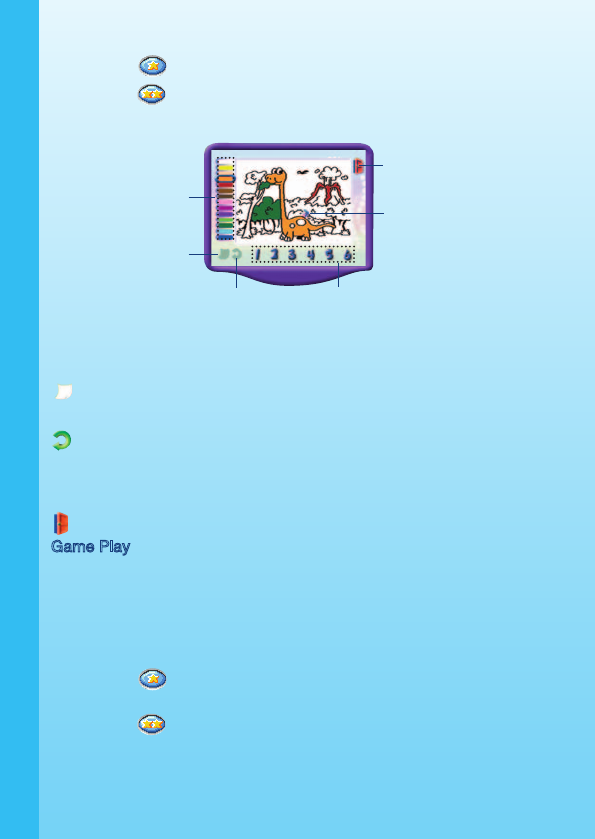
Lesson 1 – Line Drawing
Game Play
Learn how to draw lines step by step. Hold down the pen on the blinking,
starting point and follow the grey lines to draw.
Curriculum: Basic Drawing Skills
Easy Level : Draw four simple lines that are horizontal, vertical,
diagonal, and curved lines.
Hard Level : Draw four complex lines that are wavy, zigzag, curly,
and scalloped lines.
Lesson 2 – Shape Drawing
Game Play
Learn how to draw shapes step by step. Hold down the pen on the blinking,
starting point and follow the grey lines to draw.
Curriculum: Advanced Shape Drawing
Easy Level : Draw three simple shapes including square, rectangle
and circle.
Hard Level : Draw four complex shapes including triangle, semi-circle,
trapezium and oval.
11
ACTIVITIES
End Point
Cursor Starting Point
Quit Icon
Quit Icon
End Point
Starting Point Cursor
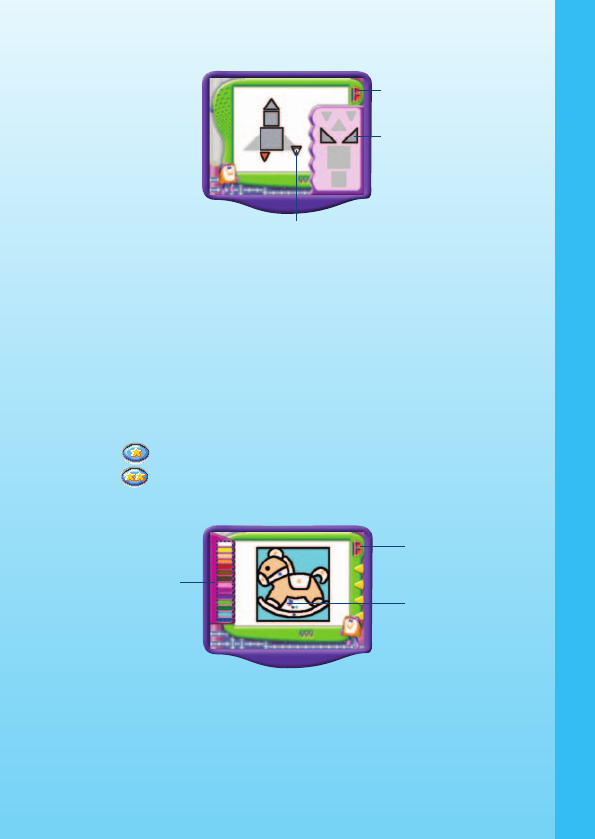
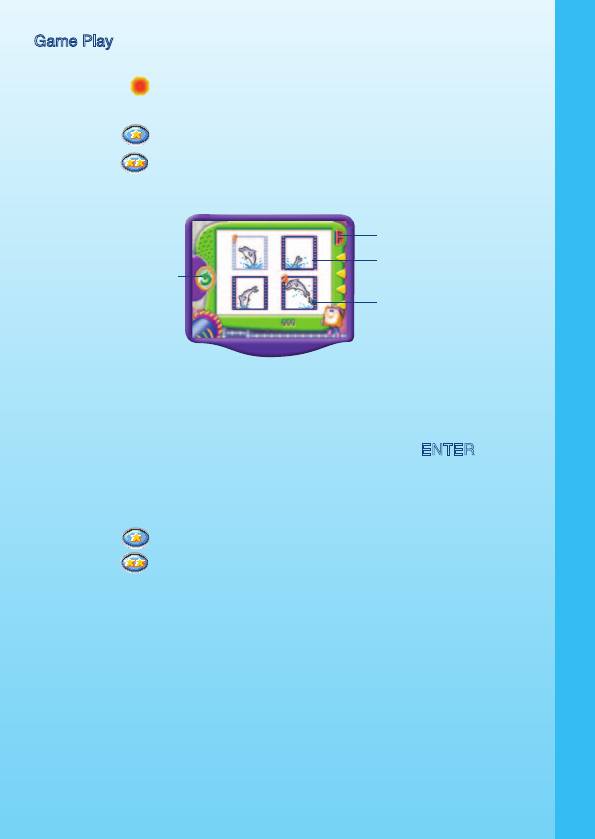
Lesson 3 – Shape Combination
Game Play
Learn how to use geometric shapes to create an object. On the right side
of the screen, you will see some colorful shapes. Match these shapes to
the shaded, grey areas of the object. Move the pen or arrow buttons onto
the shape and hold down the pen or press the ENTER button to pick it
up. Use the pen or arrow buttons to move the selected shape onto the
correct shaded shape in the picture, and hold down the pen or press the
ENTER button to release it.
Curriculum: Shape Matching
Easy Level : Build pictures that contain fewer shapes.
Hard Level : Build pictures that contain more shapes.
Lesson 4 – Color Filling
Game Play
Fill the correct color in each area inside the picture by matching the color
icons with the color dots. Move the pen or arrow buttons onto the color
icon and hold down the pen or press the ENTER button to select it. Next,
move the pen or arrow buttons onto the matching color dots and hold down
your pen or press the ENTER button to fill them.
ACTIVITIES
12
Quit Icon
Collectable Shape
Cursor
Quit Icon
Cursor
Color Icons
Curriculum: Colors
Easy Level : Each picture has a clear outline and the color dots are
used to define the colors of each area.
Hard Level : Each picture has abstract areas and numbers are used
to define the colors of each area.
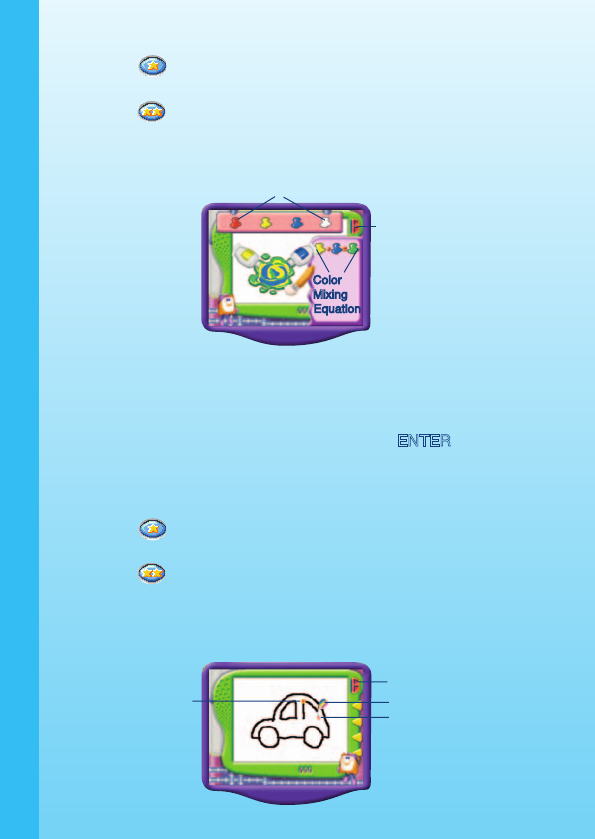
Lesson 5 – Color Mixing
Game Play
You can make mixed colors by selecting two given colors and mixing them
together. Move the pen or arrow button onto the color swatches at the top
of the screen, and hold down the pen or press the ENTER button to select
them. You will see the two colors being mixed together and then the new
color name will be announced.
Curriculum: Primary & Secondary Colors
Easy Level : Four colors will be given including white, red, blue and
yellow. A total of six mixed colors can be created.
Hard Level : Seven colors will be given including white, red, blue,
yellow, orange, green and purple. A total of twenty-one
mixed colors can be created.
Lesson 6 – Object Drawing
ACTIVITIES
13
Quit Icon
Primary Colors
Color
Mixing
Equation
Quit Icon
Cursor
End Point
Starting Point
Game Play
Learn how to draw objects step by step. Hold down the pen on the blinking,
starting point and follow the grey lines to draw the object.
Curriculum: Advanced Drawing Skills
Easy Level : Learn simple objects with fewer steps.
Hard Level : Learn complex objects with more steps.
Lesson 7 – Animation
Game Play
Learn sequencing skills by putting the animation frames in the correct
order to create an animation. Move the pen or the arrow buttons onto the
animation frame and hold down the pen or press the ENTER button to
confirm it. Continue to follow these instructions for each frame until the
entire animation is complete. Then watch it play!
Curriculum: Sequencing
Easy Level : This includes four frames for each animation.
Hard Level : This includes six frames for each animation.
CREATIVE PLAY
Game 1 – Rainbow Chase
BASIC OPERATIONS
Move the pen upward Character moves upwards.
Move the pen downward Character moves downwards.
Move the pen to the left Character moves to the left.
Move the pen to the right Character moves to the right.
ACTIVITIES
14
Quit Icon
Cursor
Undo Icon
Animation Frames
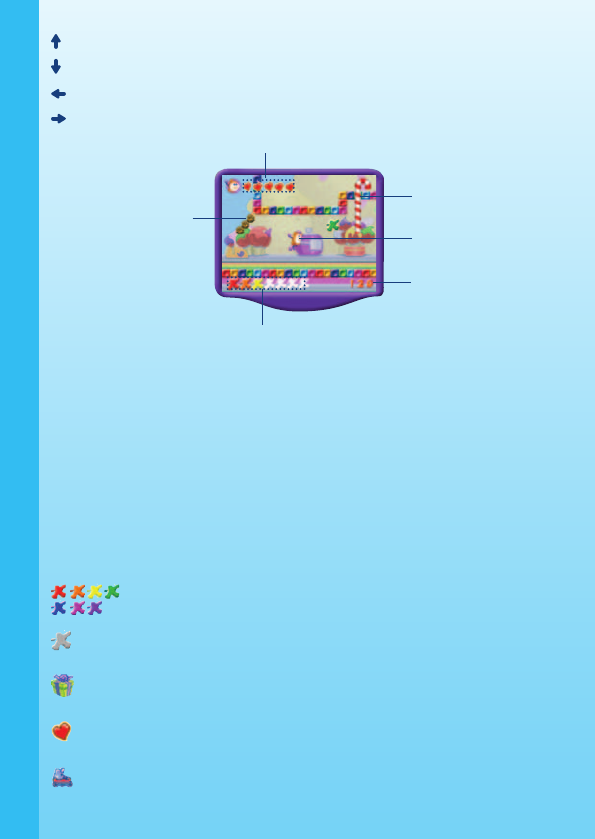
Character moves upwards.
Character moves downwards.
Character moves to the left.
Character moves to the right.
Character This is the cursor you control on the screen.
Character Life Value Displays the current point (life) value of the
character.
Collected Color Indicator
Displays the chosen rainbow colors in the
current stage.
Moving Obstacles Character will collide with them – you should
try to avoid these.
Counting Down Timer Displays the remaining time in the current
stage.
Rainbow Color Icons Collect the seven rainbow colors as you see
them move across the screen.
Wrong Color Icon Select it and your score will be reduced.
Bonus Icon Select it and your score will be increased.
Life Icon Select this to restore the character’s health.
Speed Up Icon Select it to increase the moving speed of the
character.
ACTIVITIES
15
Character
Collected Color Indicator
Counting
Down
Timer
Moving
Obstacles
Moving
Obstacles
Character Life Value
Slow Down Icon Select it to decrease the moving speed of the
character.
Game Play
Help the character collect the seven rainbow colors within the maze. Look
out for the sides of the path and the moving obstacles! Move the pen or
arrow buttons to control the character inside the maze.
Curriculum: Colors, Problem Solving
Easy Level : Seven rainbow colors exist in the maze.
Hard Level : Seven rainbow colors and grey exist in the maze.
Game 2 – Toy Maker
BASIC OPERATIONS
Move the pen upward Character moves upwards.
Move the pen downward Character moves downwards.
Move the pen to the left Character moves to the left.
Move the pen to the right Character moves to the right.
Hold down the pen Pick up a toy accessory / put the toy accessory
on a toy body.
Character moves upwards.
Character moves downwards.
Character moves to the left.
Character moves to the right.
ENTER Button Pick up a toy accessory / put the toy accessory
on a toy body.
Cursor This is the cursor you control on the screen.
Selectable Toy Parts Put these on the corresponding toy bodies.
ACTIVITIES
16
Score
Trash Bin
Selectable
Toy Parts
Toys
Toys Put the selectable toy parts on these toys.
Trash Bin Put the unwanted toy parts into it.
Score Displays the current total of all toys built correctly.
Game Play
Help the character build toys with the correct accessories. Control your
cursor to select a toy part. Then, try to match the toy part with the correct
toy body by using your pen to place the toy part onto the body. The more
toys you build correctly, the more points you will earn!
Curriculum: Logic Skills, Color Matching
Easy Level : Each toy has one color toy part.
Hard Level : Each toy has three colors and three separate toy
parts.
PRACTICE TIME
BASIC OPERATIONS
Move the pen upward Cursor moves upwards.
Move the pen downward Cursor moves downwards.
Move the pen to the left Cursor moves to the left.
Move the pen to the right Cursor moves to the right.
Hold down the pen Confirm your choice / use the current function.
Cursor moves upwards.
Cursor moves downwards.
Cursor moves to the left.
Cursor moves to the right.
ENTER button
Activity 1 – Animation Maker
ACTIVITIES
17
Quit Icon
Theme Icons
Stop
Button
Play Button
Function Icons
Color
Icons
Animation Frame Number
Color Icons Select it to choose a color. There are 15 colors you
can use in this activity.
Clear Icon Use it to clear all the drawings on the current
animation.
Undo Icon Use it to undo the last action you took.
Pencil Icon Use it to draw lines - the default color is black. To
select the size of the pencil line, click on one of the
three different-sized lines in the pop-up menu.
Eraser Icon Use it to erase your lines in your drawing. To select the
size of the eraser, click on one of the three different-
sized circles in the pop-up menu.
Color Filling Icon Use it to fill an area of your drawing with a solid color
- the default color is black.
Line and Shape Use it to draw solid or dotted lines and outlined or
filled shapes. Click in the drawing area and hold down
the pen to adjust the size of the shape. Then release
the pen to confirm the size. The thickness of the line
and shape depends on the current size of the pencil
selected.
Stamp Icon Select it to open a submenu and select your favorite
stamp to add in your picture.
Play Button Select it to play your animation.
Stop Button Select it to stop your animation.
Theme Icons Select a theme to add into your animation.
Animation Frame Select an animation frame to create.
Quit Icon Click it to exit this activity. You will also see this icon
in all activity modes to exit from the activity.
Enter Button Confirm your choice / use the current function.
Game Play
Create your own animation in this activity. Click the animation frame number
and then draw on each frame of your animation. You can use the color
icons and your pen to create fun drawings. You can also select a theme
for your animation by clicking the theme icons on the right-hand side of
the screen to add to your animation. When you are ready to play it, select
the Play button and watch your animation! If you want to stop watching
your animation, select the Stop button.
ACTIVITIES
18
Number
Drawing Icon
Curriculum: Drawing, Sequencing, Creativity
Easy Level : There are four frames for each animation.
Hard Level : There are six frames for each animation.
Activity 2 – Coloring Fun
Color Icons Select it to choose a color. There are 15 colors you
can use in this activity.
Clear Icon Use it to clear all the drawings in the animation.
Undo Icon Use it to undo the last action you took.
Coloring Picture Icons
Select your favorite coloring picture. There are a
total of six to choose from.
Quit Icon Select it to exit this activity. You will also see this icon
in all activity modes to exit from the activity.
Game Play
Choose your favorite picture and add any color you like by selecting the
color icons with your pen. Once you select a color, hold your pen down to
the area where you want color filled and your drawing will automatically
be colored.
Curriculum: Colors, Creativity
Easy Level : All areas are filled with the same color when you select
each related area.
Hard Level : Each enclosed area is filled separately with a different
color.
ACTIVITIES
19
Quit Icon
Undo Icon
Clear Icon
Coloring Picture Icons
Color Icons Cursor
CARE & MAINTENANCE
1. Keep your V.SMILE Art Studio™ clean by wiping it with a slightly damp
cloth. Never use solvents or abrasives.
2. Keep it out of direct sunlight and away from direct sources of heat.
3. Remove the batteries when not using it for an extended period of
time.
4. Avoid dropping it. NEVER try to dismantle it.
5. Always keep the V.SMILE Art Studio™ away from water.
WARNING
A very small percentage of the public, due to an existing condition, may
experience epileptic seizures or momentary loss of consciousness when
viewing certain types of flashing colors or patterns, especially on television.
While the V.SMILE™ TV Learning System does not contribute to any
additional risks, we do recommend that parents supervise their children
while they play video games. If your child experiences dizziness, altered
vision, disorientation, or convulsions, discontinue use immediately and
consult your physician.
Please note that focusing on a television screen at close range and
handling a joystick for a prolonged period of time may cause fatigue or
discomfort. We recommend that children take a 15 minute break for every
hour of play.
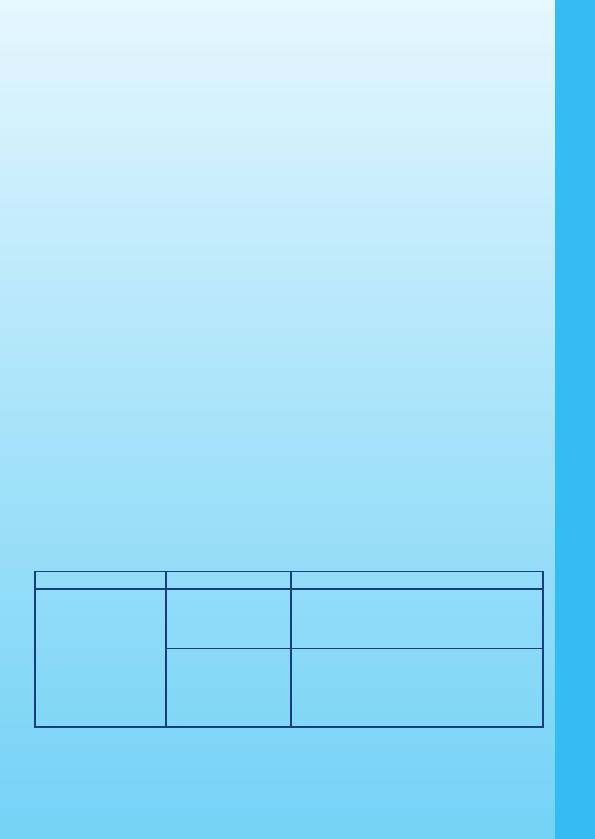
TROUBLESHOOTING
Problem Possible Reason Solution
The V.SMILE™ power
light does not come on
when the ON Button is
pressed.
1. Incorrect or missing
power connection
1. Check that new batteries are correctly
installed, or an AC/DC adaptor (9V 300mA,
center-positive) is properly connected to
the main unit.
2. Program needs to
be reset
2.1 Disconnect all power supplies (batteries
and adaptor), then reconnect power
supplies.
2.2 Remove the SMARTRIDGE™ and then
re-insert it.
CARE & MAINTENANCE / WARNING
20
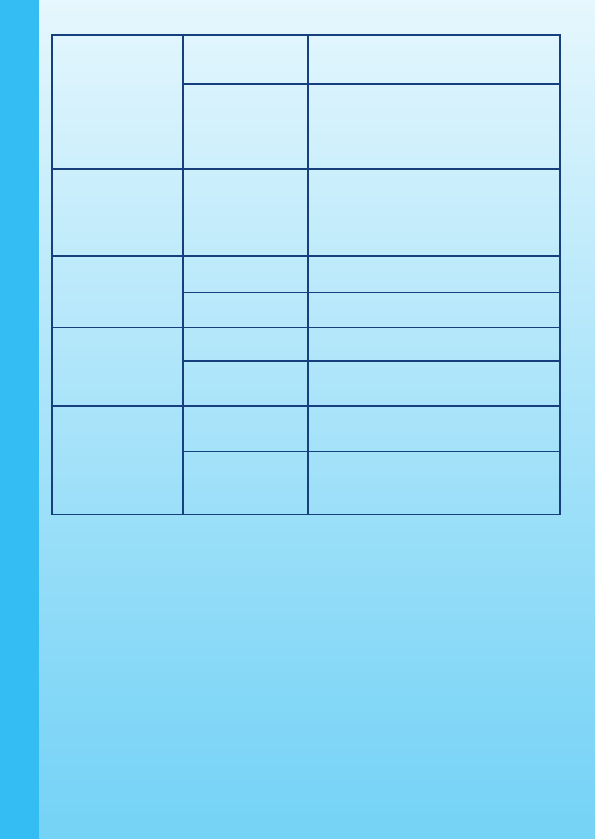
The V.SMILE™ power
light is ON, but there
is no picture on the
screen.
1. Incorrect TV
connection
1. Make sure that the yellow plug of the main
unit is connected to the video IN terminal
(usually yellow) of the TV.
2. Incorrect TV mode
selected
2. Make sure that the TV is set to “video”
mode. Some TVs have several video
inputs - please make sure you have
selected the video input that matches the
video port connected to the V.SMILE™
unit.
The V.SMILE™ power
light is ON, but there is
no picture (or incorrect
picture) on the TV,
and pressing the OFF
Button has no effect.
1. Program needs to
be reset
1.1 Remove the SMARTRIDGE™ and then
re-insert it.
1.2 Disconnect all power supplies (batteries
and adaptor), then reconnect power
supplies.
The TV picture is black
and white.
1. Non-matching color
system
1. Make sure that the TV is set to the correct
TV system (e.g. NTSC or Auto).
2. Cable connection
problem
2. Make sure that the video cable is firmly
connected to the video input of the TV.
There is a picture on
the TV, but no sound.
1. TV setting 1. Raise the volume of the TV, and make sure
it is not set to “Mute”.
2. Cable connection
problem
2. Make sure that the white and/or red plug is
firmly connected to the audio input of the
TV.
The V.SMILE Art
Studio™ does not
work.
1. Improper V.SMILE
Art Studio™
connection
1. Make sure that the V.SMILE Art Studio™
is firmly connected to the V.SMILE™
joystick port.
2. V.SMILE Art
Studio™ was
reconnected after
program start
2. Turn the unit OFF and then ON again.
TECHNICAL SUPPORT
If you have a problem that cannot be solved by using this manual, we
encourage you to visit us online or contact our Consumer Services
Department with any problems and/or suggestions that you might have.
A support representative will be happy to assist you. Before requesting
support, please be ready to provide or include the information below:
• The name of your product or model number (the model number is
typically located on the back or bottom of your product).
• The actual problem you are experiencing.
• The actions you took right before the problem occurred.
Internet : www.vtechkids.com
Phone : 1-800-521-2010 in the U.S. or 1-877-352-8697 in Canada
TROUBLESHOOTING / TECHNICAL SUPPORT
21
OTHER INFO
DISCLAIMER AND LIMITATION OF LIABILITY
VTech® Electronics North America, L.L.C. and its suppliers assume
no responsibility for any damage or loss resulting from the use of this
handbook. VTech® Electronics North America, L.L.C. and its suppliers
assume no responsibility for any loss or claims by third parties that may
arise through the use of this software. VTech® Electronics North America,
L.L.C. and its suppliers assume no responsibility for any damage or loss
caused by deletion of data as a result of malfunction, dead battery, or
repairs. Be sure to make backup copies of important data on other media
to protect against data loss.
Company: VTech® Electronics North America, L.L.C.
Address: 1155 West Dundee Rd., Suite 130, Arlington Heights, IL 60004 USA
Phone : 1-800-521-2010 in the U.S. or 1-877-352-8697 in Canada
NOTICE: This equipment has been tested and found to comply with the
limits for a Class B digital device, pursuant to Part 15 of the FCC Rules.
These limits are designed to provide reasonable protection against harmful
interference in a residential installation. This equipment generates, uses
and can radiate radio frequency energy and, if not installed and used in
accordance with the instructions, may cause harmful interference to radio
communications. However, there is no guarantee that interference will
not occur in a particular installation. If this equipment does cause harmful
interference to radio or television reception, which can be determined by
turning the equipment off and on, the user is encouraged to try to correct
the interference by one or more of the following measures:
-- Reorient or relocate the receiving antenna.
-- Increase the separation between the equipment and receiver.
-- Connect the equipment into an outlet on a circuit different from that to
which the receiver is connected.
-- Consult the dealer or an experienced radio/TV technician for help.
OTHER INFO
22

2005 © VTech
Printed in China
91-02146-000
