Vulcan Portals E1500 FlipStart E-1500 series with HSDPA User Manual FlipStart E 1001S User Guide
Vulcan Portals Inc. FlipStart E-1500 series with HSDPA FlipStart E 1001S User Guide
Users Manual

User Guide
© 2007 FlipStart Labs. All rights reserved. Reproduction of any part of this manual without the
prior written permission of Vulcan Portals Inc. is strictly prohibited.
Information in this document is subject to change without notice. Screen images simulated.
Actual product may differ.
FlipStart, the FlipStart logo, InfoPane, FlipStart Navigator, FlipStart Zoom, and FlipStart Control
Center are trademarks of Vulcan Portals Inc. Microsoft, Windows, Vista and Outlook are
trademarks of Microsoft Corporation. The Bluetooth word mark and logos are owned by the
Bluetooth SIG, Inc. and any use of such marks by Vulcan Portals Inc. is under license. Other
trademarks and trade names in this document refer to the entities claiming the marks and
names or their products. FlipStart Labs disclaims any proprietary interest in trademarks and
trade names other than its own.
The FlipStart® device, accessories bearing the FlipStart logo and FlipStart proprietary software
are protected by copyright, international treaties and patents, including the following U.S.
patents: 6,839,231 and 6,977,811. Additional patents are registered or pending in countries
around the world.
Part no. 600-0118-01

i
Contents
Introduction 1
Typographical conventions and icons used in this manual ........................................................... 2
Safety precautions .............................................................................................................................................. 3
General precautions ............................................................................................................................... 3
AC adapter.................................................................................................................................................. 4
Batteries ....................................................................................................................................................... 4
Airplane travel and hospitals ............................................................................................................. 4
Using FlipStart Help Central ........................................................................................................................... 5
Getting help from FlipStart ............................................................................................................................. 6
Getting to know your FlipStart 7
Welcome to FlipStart! ....................................................................................................................................... 7
The productivity of a PC ...................................................................................................................... 7
Familiar form factor ............................................................................................................................... 7
Easy access ................................................................................................................................................ 7
Straightforward connectivity ............................................................................................................ 7
What's in the box? ............................................................................................................................................... 9
Front view with display open ...................................................................................................................... 10
Top view with display closed ....................................................................................................................... 12
Right side view ..................................................................................................................................................... 13
Back view ............................................................................................................................................................... 14
Setting up 15
Quick Start ............................................................................................................................................................ 16
Turning the FlipStart on for the first time .............................................................................................. 17
Charging the battery before using unplugged .......................................................................18
How to hold the FlipStart .............................................................................................................................. 19
Using input devices .......................................................................................................................................... 20
Using the keyboard ............................................................................................................................. 20
Using the mouse controls ................................................................................................................ 23
Direction pad (D-pad) ....................................................................................................................... 23
Zoom key .................................................................................................................................................. 24
Using the Jog Dial ................................................................................................................................ 24
Getting connected to the Internet ........................................................................................................... 26
Connecting for the first time .......................................................................................................... 26
Configuring Wi-Fi (802.11b/g) wireless networking ........................................................... 26
Configuring cellular wireless broadband networking ........................................................ 28
Configuring wired Ethernet networking ................................................................................... 28
Configuring a network connection using Bluetooth wireless technology .............. 29
Configuring Ethernet/wireless network switching using Control Center ................. 31
How to install software .................................................................................................................................. 33
Installing from a local network ...................................................................................................... 33
Installing downloaded files from the Internet ........................................................................ 33
Installing from a removable storage device ........................................................................... 33
Installing programs directly from another computer ........................................................ 33

.
Contents ii
Expanding your FlipStart .............................................................................................................................. 35
Attaching the port replicator .......................................................................................................... 36
Connecting an external USB mouse or USB keyboard ..................................................... 36
Connecting an external VGA monitor ........................................................................................ 36
Connecting Bluetooth devices to the FlipStart ..................................................................... 37
Using your FlipStart 39
Customizing your desktop preferences and settings ................................................................... 40
Windows Personalization ................................................................................................................ 40
Using power management ........................................................................................................................... 42
Power options available in Windows .......................................................................................... 42
Power options available in Control Center .............................................................................. 42
Using your FlipStart on-the-go ................................................................................................................. 44
Tips for using your FlipStart on-the-go ................................................................................... 44
Maximizing battery life ...................................................................................................................... 44
Using FlipStart InfoPane ................................................................................................................................ 45
How does FlipStart InfoPane work? ............................................................................................ 45
Using FlipStart InfoPane.................................................................................................................... 45
Setting up InfoPane to check for new e-mail automatically .......................................... 47
Using FlipStart software ................................................................................................................................49
Using FlipStart Navigator .................................................................................................................49
Using FlipStart Zoom ........................................................................................................................... 51
Using FlipStart Control Center ...................................................................................................... 53
Using the webcam ............................................................................................................................................ 55
Using your webcam ............................................................................................................................. 55
Using audio ........................................................................................................................................................... 56
Using the internal speaker ................................................................................................................ 56
Using the internal microphones .................................................................................................... 56
Controlling audio output volume .................................................................................................. 56
Using the audio jacks .......................................................................................................................... 57
Controlling audio playback .............................................................................................................. 58
Using the FlipStart with external keyboard, video, and mouse ............................................... 60
Using the port replicator .................................................................................................................. 60
Attaching an external monitor or other video source ....................................................... 62
Using Bluetooth devices ................................................................................................................... 63
Connecting USB keyboards, mice and other devices ........................................................64
Learning more about Windows ................................................................................................................. 66
Windows Help ........................................................................................................................................ 66
Windows Update .................................................................................................................................. 66
Solving problems 69
Getting more help ............................................................................................................................................. 69
Troubleshooting ................................................................................................................................................. 70
What to do if you have battery or other power problems ............................................. 70
What to do if the FlipStart or an application freezes ......................................................... 71
What to do if you can't connect to a network ....................................................................... 71
What to do if you can't print........................................................................................................... 74
What to do if you have video or screen problems .............................................................. 75
What to do if you have problems with input devices ........................................................ 75
What to do if you have problems with FlipStart InfoPane .............................................. 76
What to do if FlipStart software is not working properly................................................ 76
What to do if you have problems with Microsoft Windows ........................................... 77

.
Contents iii
Specifications 79
Main Unit................................................................................................................................................................ 79
Port Replicator ................................................................................................................................................... 80
Regulatory information 81
FCC Compliance Statement ..........................................................................................................................81
Radio and Television Interference .................................................................................................81
FlipStart Software End User License Agreement 83
1. Definitions ............................................................................................................................................. 83
2. Program license ................................................................................................................................ 83
3. No warranty ....................................................................................................................................... 84
4. Termination ........................................................................................................................................ 84
5. General terms .................................................................................................................................... 85
Index 87

1
The FlipStart® User Guide contains information and instructions that will help you to:
Get up and running with your FlipStart.
Learn to use the FlipStart's hardware and software.
Maintain and care for your FlipStart.
Troubleshoot possible problems and technical issues.
Additional information about the use and features of your FlipStart can be found within Help
Central, which you can open by double-clicking the Help Central icon on the FlipStart desktop.
In This Chapter
Typographical conventions and icons
used in this manual ................................................................... 2
Safety precautions ......................................................................... 3
Using FlipStart Help Central ...................................................... 5
Getting help from FlipStart ........................................................ 6
CH A P T E R 1
Introduction
.
Introduction 2
Typographical conventions and
icons used in this manual
Before you start using this guide, it is important to understand the icons and typographical
conventions used in the documentation. Safety precautions are marked with the following
symbols:
Warning! Failure to follow instructions marked with this symbol could result in death,
bodily injury, or property damage.
Caution! Failure to follow instructions marked with this symbol could result in damage
to the FlipStart or to your data.
Other special information is indicated by the following kinds of formatting:
Formatting convention
Type of Information
Triangular Bullet()
Step-by-step procedures. You can
follow these instructions to
complete a specific task.
Special Bold
Items you must select, such as
menu options, command buttons,
or items in a list.
Emphasis
Use to emphasize the importance
of a point or for variable
expressions such as parameters.
CAPITALS
Names of keys on the keyboard, for
example, SHIFT, CTRL, or ALT.
KEY+KEY
Key combinations for which the
user must press and hold down one
key and then press another, for
example, CTRL+P, or ALT+F4.

.
Introduction 3
Safety precautions
WARNING! Please read all of the following safety precautions carefully before using or
storing your FlipStart. Failure to follow these instructions may result in death, bodily
injury, or property damage.
General precautions
Do not insert objects into openings in the FlipStart. Doing so may cause fire or electric
shock.
Do not cover or block the air ventilator or use the FlipStart if the air ventilator is not
functioning properly. Do not use your FlipStart on a bed, sofa, chair, rug, or other surface
that does not permit sufficient air circulation. Do not place a powered-on FlipStart in a
carrying bag or other container. Overheating and damage to the FlipStart may result.
Do not use your FlipStart in or around water, including near a bath tub, sink, or swimming
pool. Electric shock or property damage may result.
Do not subject your FlipStart or battery to extreme heat, cold, humidity, or severe shock.
Protect your FlipStart from dust, dirt, food, liquids, extreme temperatures, and
overexposure to sunlight.
Do not use your FlipStart or connect or disconnect any cables during an electrical storm.
Do not use your FlipStart while driving a moving vehicle. Serious injury or death could
result.
If you notice smoke, fire, extreme heat, or unusual noises or odors while using your FlipStart,
disconnect the FlipStart immediately and contact Customer Support.
Do not attempt to disassemble, modify, or repair the FlipStart, battery, or AC adapter.
Doing so may cause serious personal injury or property damage.
Before cleaning your FlipStart, disconnect the AC adapter, the battery, and any cables or
accessories. Clean your FlipStart with a soft cloth slightly dampened with water. Do not use
any aerosols, sprays, solvents, or abrasive cleaners and do not allow liquid or moisture to
enter the FlipStart.
If you move your FlipStart between environments that differ significantly in temperature or
humidity, condensation may form on or within the FlipStart. To avoid damage to the
FlipStart, allow sufficient time for the FlipStart to acclimate to room temperature before
turning it on.
Improper or prolonged use of the FlipStart may result in injury. Viewing the display for
extended periods of time may result in eye strain.
If you drop your FlipStart or battery causing damage, you should have the FlipStart or
battery inspected before using it further.

.
Introduction 4
AC adapter
Use the AC adapter only in a well-ventilated area. Do not cover the adapter or use it inside
of a carrying case. The AC adapter may become hot during normal use. Use care when
handling the adapter to avoid injury or damage to property.
Use only the AC adapter provided by FlipStart Labs or specifically approved by FlipStart
Labs for use with this FlipStart.
Do not place objects on the power cord. Do not use a damaged power cord or adapter. Fire
or electric shock may result.
Never unplug the adapter by pulling on the cable. Doing so may damage the power cord,
resulting in a risk of fire or electric shock.
Batteries
Use only batteries provided by FlipStart Labs or specifically approved by FlipStart Labs for
use with this FlipStart.
Do not use the FlipStart without the battery attached. Do not remove the battery while the
FlipStart is turned on.
Do not disassemble the battery. Doing so may cause fire, explosion, or leakage, resulting in
personal injury or property damage.
Do not place your battery near a heat source or expose it to high temperatures. The battery
could explode or catch fire.
Your FlipStart uses a lithium-polymer battery. Do not dispose of the battery in a fire or with
your household waste. Contact your local waste disposal agency for the nearest disposal
site.
Airplane travel and hospitals
Certain locations, like hospitals and airports, may restrict the use of RF-emitting devices.
Always comply with posted regulations concerning the use of your FlipStart to avoid
interfering with aircraft, medical, or other equipment.
Federal Aviation Administration rules and individual airline regulations may prohibit the use
of your FlipStart while on board an aircraft, particularly during take-off and landing. Please
follow all instructions provided by airline personnel.
Do not expose your FlipStart to an airport metal detector or magnetic wand. X-ray security
machines will not harm your FlipStart.

.
Introduction 5
Using FlipStart Help Central
In addition to this manual and the printed materials included in the package, you can view
electronic versions of FlipStart documentation via FlipStart Help Central on your FlipStart.
FlipStart Help Central serves as a portal to a wealth of information about your FlipStart. You
can find information about topics such as:
Getting help and troubleshooting problems.
Contacting FlipStart Customer Support.
Connecting to the Internet.
Using FlipStart software such as FlipStart Navigator™ and FlipStart Zoom™.
Using FlipStart InfoPane™.
Maintaining your FlipStart and using it safely.
To access FlipStart Help Central
1 Locate the FlipStart Help Central icon on the Windows desktop.
2 Double-click the Help Central icon.
The Help Central portal opens.
3 Select the topic that best suits your needs.

.
Introduction 6
Getting help from FlipStart
If you are encountering problems, your first resource is the Solving problems section (on page
69) in this manual. If the documentation has not helped you solve these problems, and you still
need assistance, check the following resources for further information:
FlipStart Customer Support Knowledge Base on the Web at www.flipstart.com/support.
Customer Support phone support: 800-399-3037
Before contacting Customer Support, please have the following information available:
Model number of your FlipStart.
Serial number of your FlipStart.
You can find this information on the label located underneath the battery on the bottom of
your FlipStart.
For information on how to recycle this device, please visit www.eRecycle.org.

7
Welcome to FlipStart!
The FlipStart model E-1001S is a super-compact Microsoft® Windows® personal
computer with a familiar clamshell design packed with innovative features that make it
easy to use † in your hand, on your desk, or mounted in your vehicle.
The productivity of a PC
FlipStart offers the capabilities you expect from your laptop † comfortable application usage,
communications, entertainment, and Internet connectivity. Its industry standard components
include an Intel® Pentium® M Ultra Low Voltage platform, 1.1 GHz of processing power, and a
30 GB hard drive with the choice of Microsoft Windows XP Professional or Windows Vista™
Business operating systems.
Familiar form factor
If you’re a laptop user, you’ll find the clamshell design immediately familiar. With its adjustable
screen angle, balanced weight, dual-function keyboard, and high-resolution 5.6” display, the
FlipStart is comfortable in your hands, on your desk, or mounted in your car. In addition, the
QWERTY keyboard, touchpad, and touchstick provide easy navigation, while the 1024 x 600
Wide SVGA display provides comfortable screen viewing.
Easy access
FlipStart InfoPane™ provides a low-power interactive display on the outside of the case giving
you instant access to daily details in the Microsoft Office Outlook® messaging system such as
e-mail, calendar, and contacts. When open, the FlipStart Navigator™ software provides a fully
customizable shortcut menu for one-button access to the applications, files, and systems that
you access most often. The nine-level FlipStart Zoom™ enables you to quickly drill down on a
screen or window for more detail.
Straightforward connectivity
Wireless wide area network (WWAN) capabilities give you high-speed cellular data access at
DSL speeds. FlipStart also provides 802.11 b/g functionality, so you can access office, home,
and public Wi-Fi networks. Built-in Bluetooth® wireless technology delivers connectivity to
wireless peripherals such as keyboards, mice, headsets, and others. Moreover, your FlipStart
includes a slim, removable port replicator to provide VGA output for projectors and large
monitors, wired Ethernet, additional USB ports, and audio output.
CH A P T E R 2
Getting to know your FlipStart

.
Getting to know your FlipStart 8
The topics in the remainder of this chapter provide a quick visual tour of your FlipStart. The
remaining chapters in this manual help you get up and running using FlipStart software and
hardware.
In This Chapter
What's in the box............................................................................ 9
Front view with display open ................................................... 10
Top view with display closed ................................................... 12
Right side view ................................................................................ 13
Back view ........................................................................................... 14

.
Getting to know your FlipStart 9
What's in the box?
Your FlipStart package contains the following items:
FlipStart PC
FlipStart standard, high-capacity lithium-polymer battery
AC adapter
Port replicator
Getting Started guide
Stereo ear bud/microphone combination with volume control
Soft carrying case
Screen polishing cloth
Recovery software DVD (requires external DVD drive)
Microsoft Windows Vista Start Guide or Microsoft Windows XP Start Here guide
Warranty card
.
Getting to know your FlipStart 10
Front view with display open
FlipStart feature
Description
A. Main screen
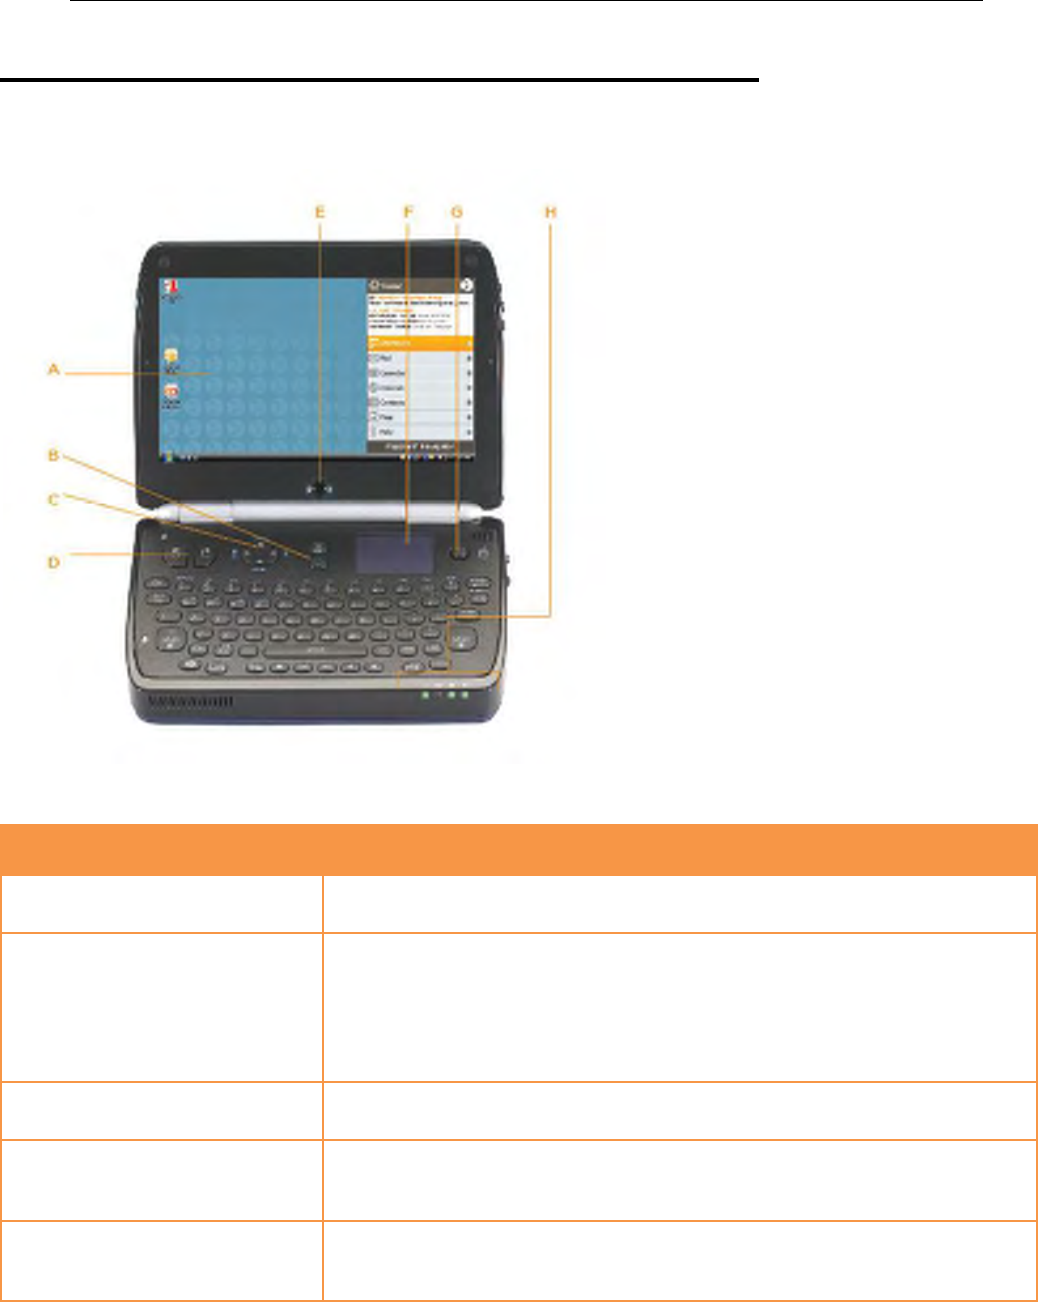
When Windows is running on your FlipStart, the Windows desktop
appears on the display.
B. Power button
The power button has the following functions:
Controls power to turn your FlipStart on and off.
Puts Windows to sleep when Windows is running.
Shuts Windows down by pressing and holding more than 5
seconds.
C. Directional pad (D-pad)
The D-pad duplicates the functions of the arrow keys on a full-sized
keyboard.
D. Mouse buttons
The FlipStart keyboard contains special keys for left mouse click and
right mouse click. Pressing either mouse click button functions like a
left-click or right-click on a mouse.
E. Webcam
The webcam is located in the bottom center of the display panel.
When the FlipStart is open, the webcam is pointed towards the user.
The webcam can be used for video recording or conferencing.
.
Getting to know your FlipStart 11
FlipStart feature
Description
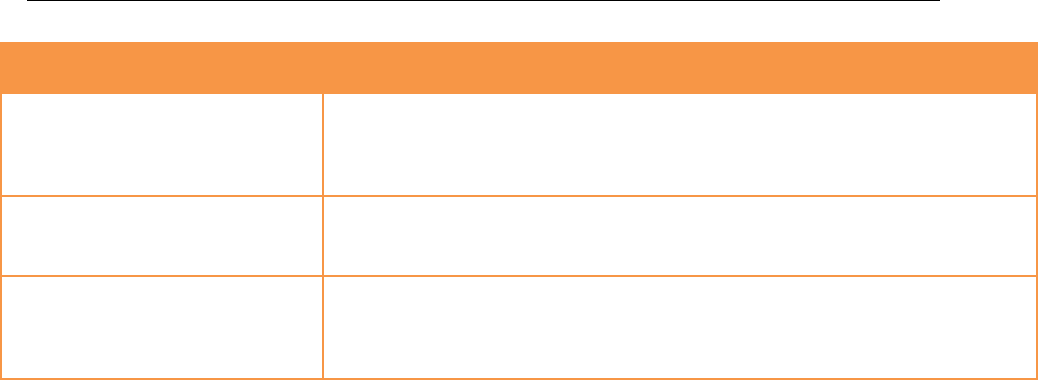
F. Touchpad
The touchpad enables you to control the mouse pointer on the screen
with the tip of your finger. Put the tip of your finger on the touchpad
and lightly move it in the direction you want to move the mouse. Click
or double-click by tapping on the touchpad.
G. Touchstick
The touchstick controls the mouse on the screen. Using the tip of
your finger or thumb, gently move the rubber touchstick in the
direction you want the mouse to move.
H. Status LEDs
The Status LEDs provide information at a glance about the status of
the FlipStart, such as whether the power is on, whether the battery is
charging or discharging, whether the hard drive is being accessed,
and whether any of the wireless devices are on.
.
Getting to know your FlipStart 12
Top view with display closed
FlipStart feature
Description
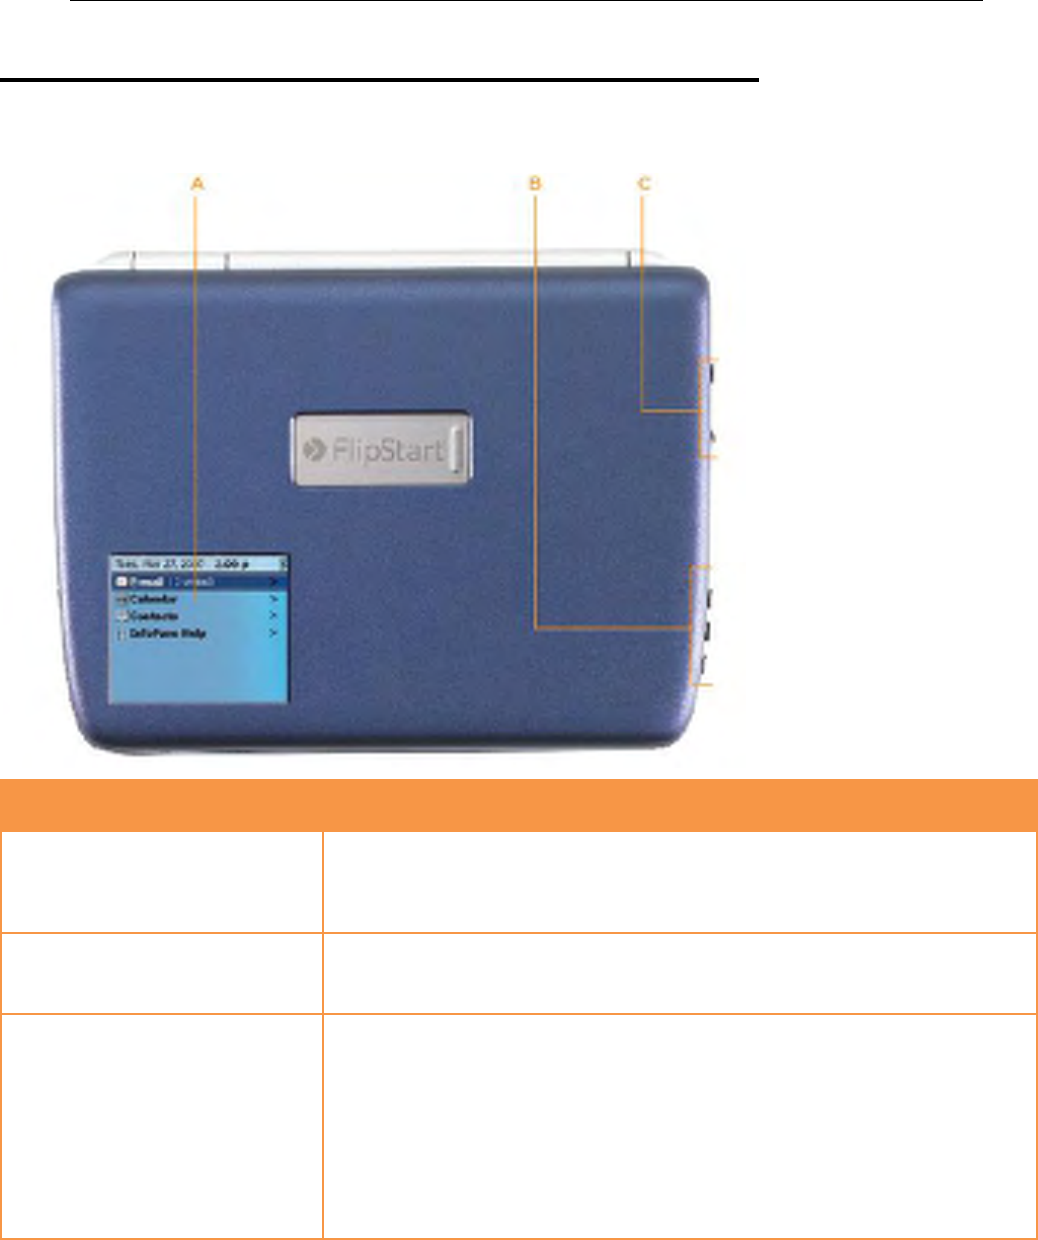
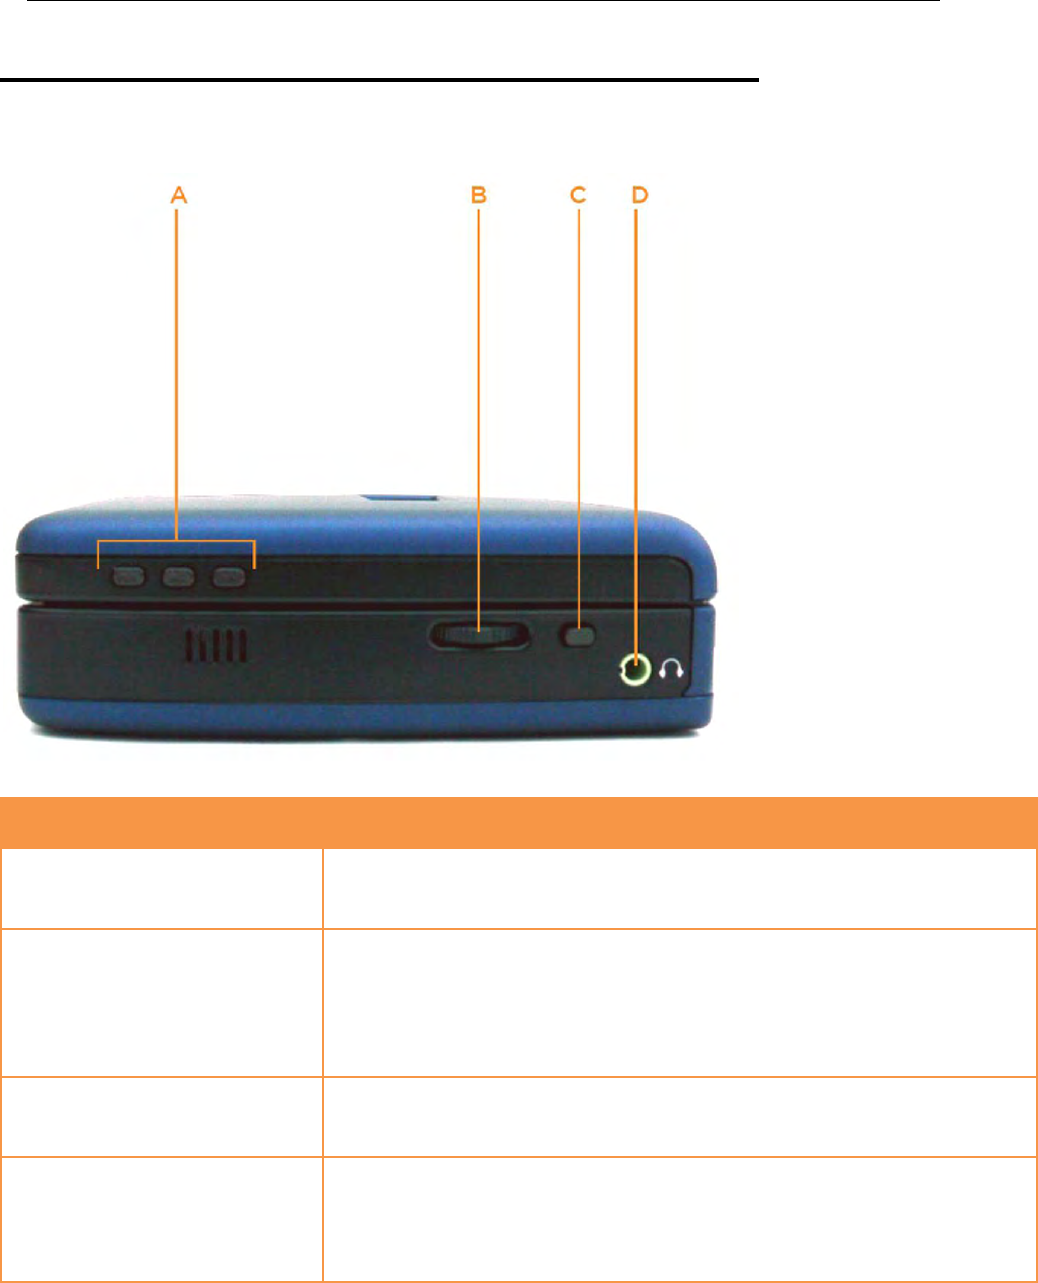
A. InfoPane screen
The InfoPane screen provides at-a-glance, view-only access to
Microsoft Office Outlook information. InfoPane can be manually
configured to sync this informatio at specified intervals, enabling you
to see up-to-date information while conserving battery power.
B. Audio control buttons
Three audio control buttons (Start/Pause/Stop, Forward, Back) along
the edge of the display panel are used to control music playback in
Windows.
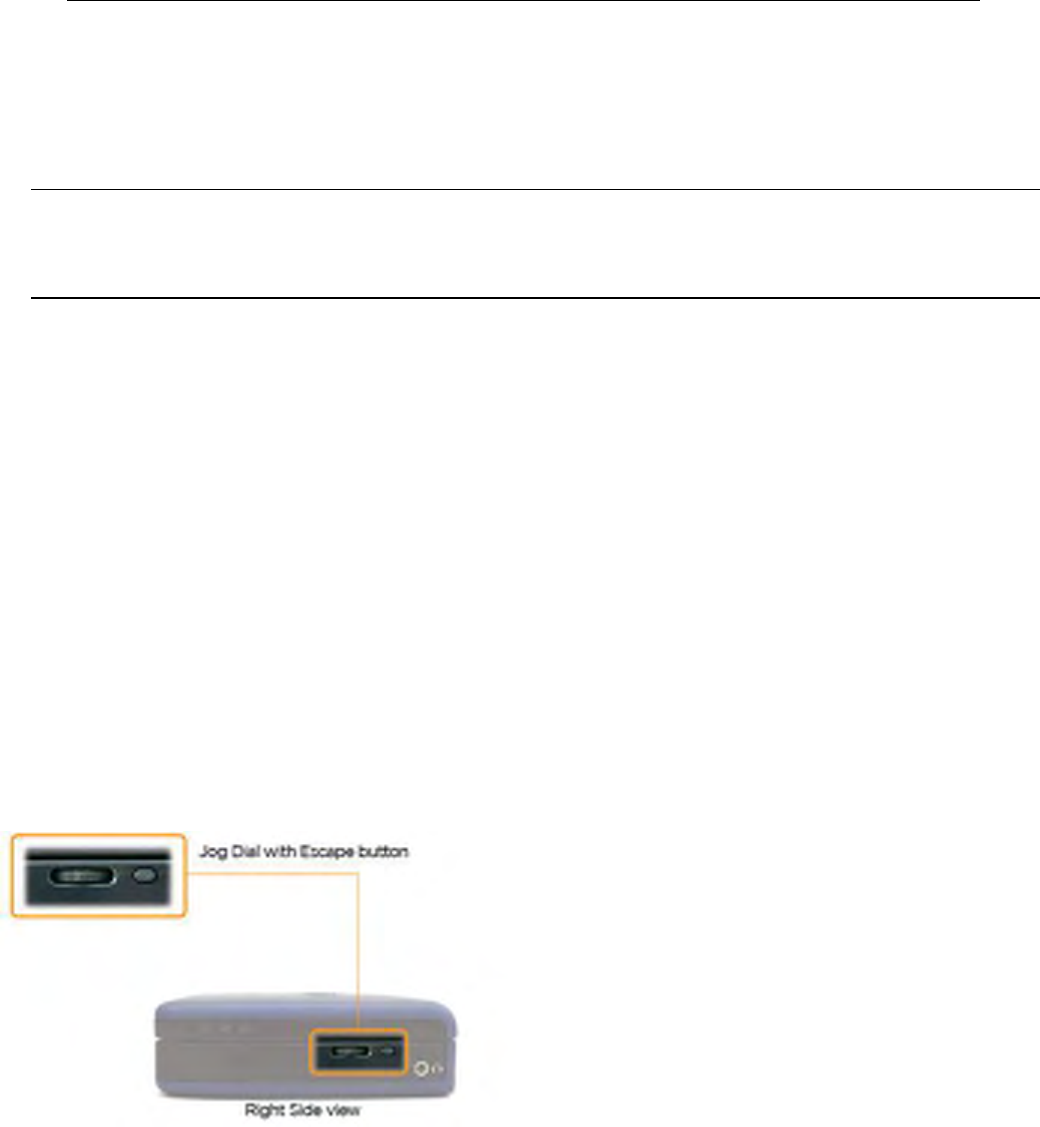
C. Jog Dial and Escape button
The Jog Dial has multiple functions, depending on what you are doing
with your FlipStart. In general, moving the Jog Dial up and down
scrolls or moves a highlight up or down. Pressing the Jog Dial in
makes a selection. The Jog Dial can also function as the equivalent of
a mouse’s scroll wheel in certain situations.
The Escape button is used in conjunction with the Jog Dial to
navigate menus in FlipStart InfoPane and FlipStart Navigator.
Pressing the Escape button in most situations within these
applications takes you back one screen or up one level in a menu.
.
Getting to know your FlipStart 13
Right side view
FlipStart feature
Description
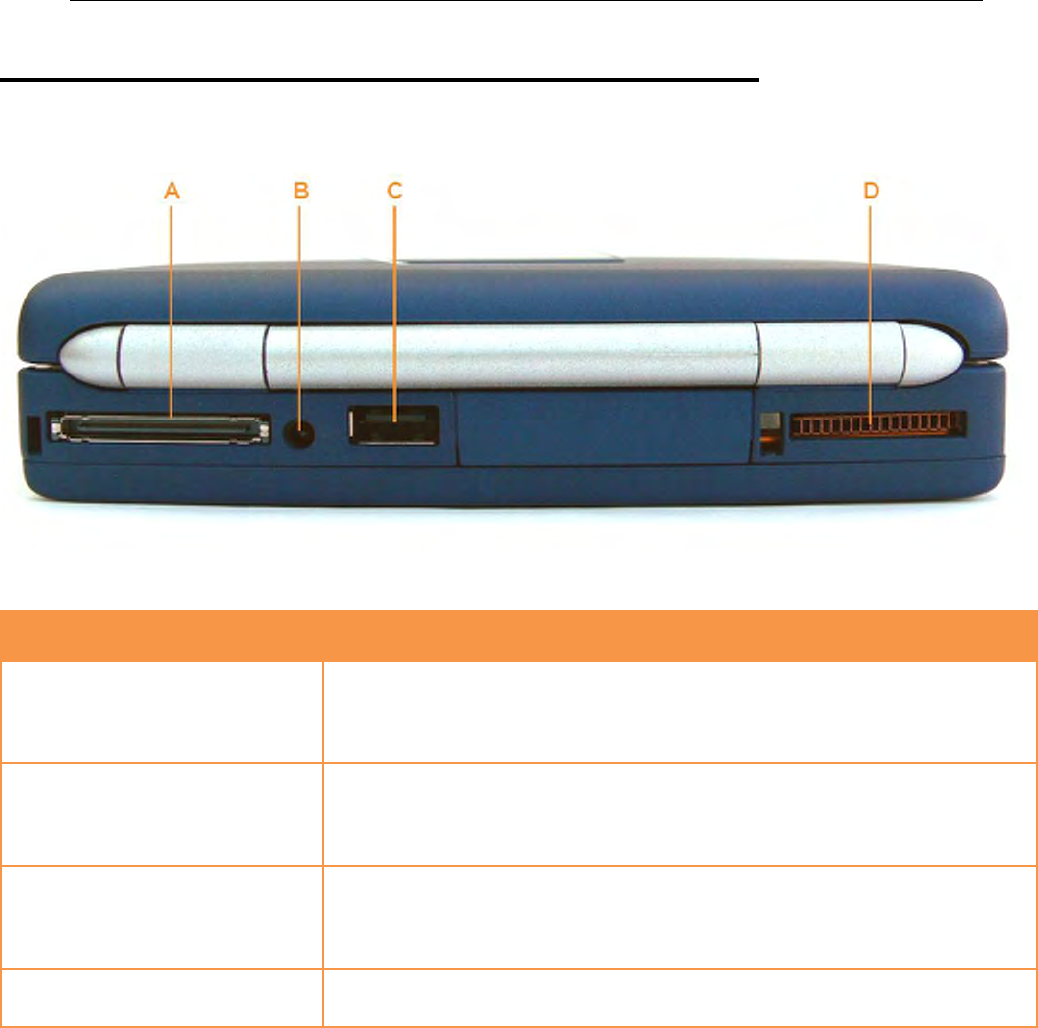
A. Audio control buttons
Three audio control buttons (Start/Pause/Stop, Forward, Back) along
the edge of the display panel are used to control music playback in
Windows.
B. Jog Dial
The Jog Dial has multiple functions, depending on what you are doing
with your FlipStart. In general, moving the Jog Dial up and down
scrolls or moves a selection up or down. Pressing the Jog Dial in is the
equivalent of pressing the Enter key on the keyboard. The Jog Dial can
also function as the equivalent of a mouse’s scroll wheel in certain
situations.
C. Escape button
The Escape button is used in conjunction with the Jog Dial to
navigate menus in InfoPane and Navigator. Pressing Escape in most
situations will take you back one screen, or up one level in a menu.
D. Multi-function audio-
input/output jack
Connect audio devices to this jack. This jack can provide audio input,
audio output, or both simultaneously with certain audio devices. For
example, the ear buds included with the FlipStart can serve as both
headphones and a microphone simultaneously when plugged into this
jack.
.
Getting to know your FlipStart 14
Back view
FlipStart feature
Description
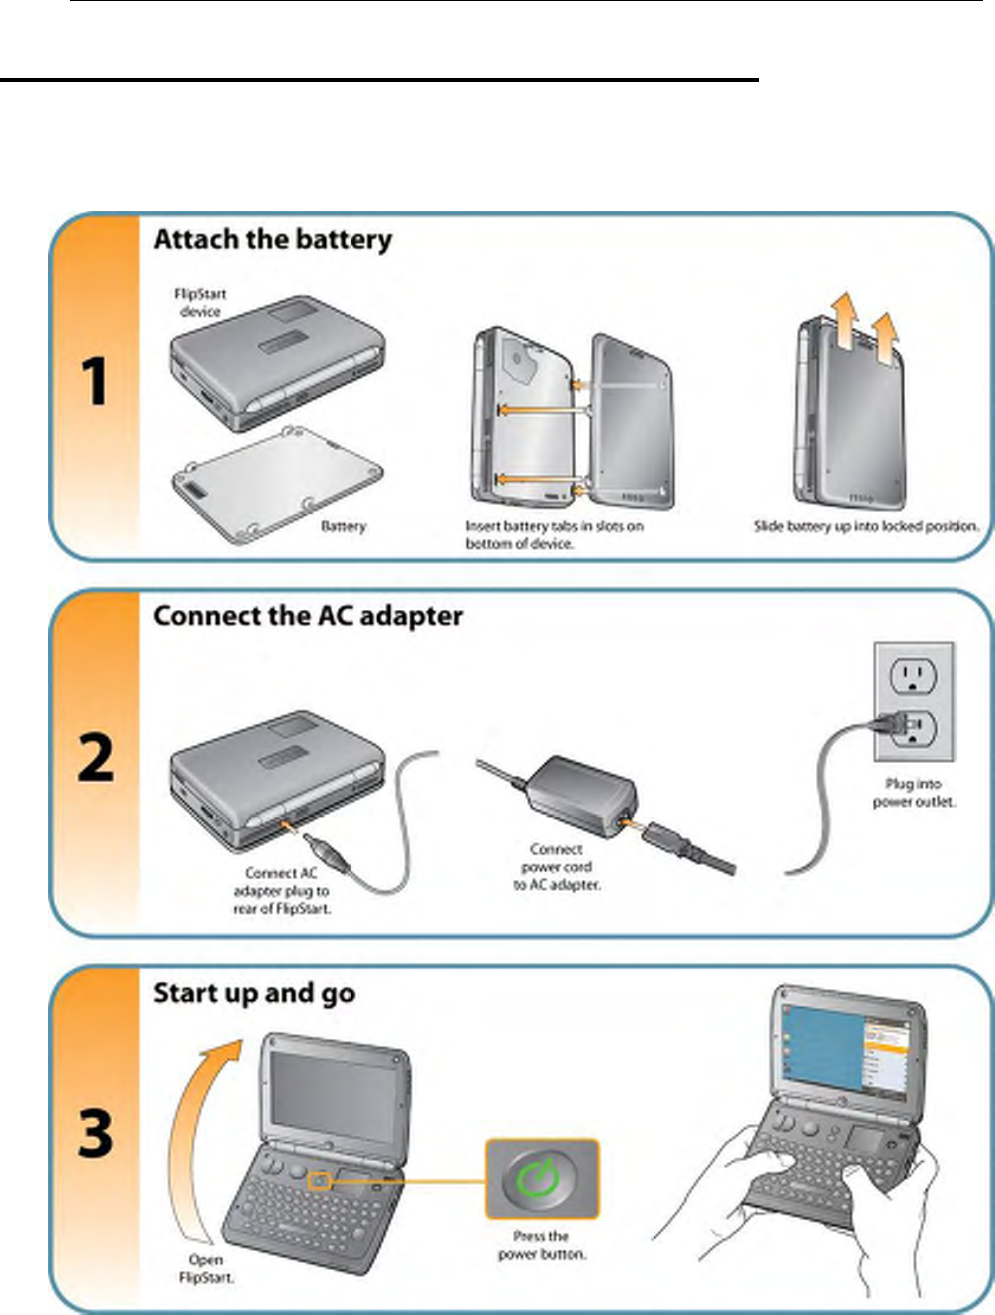
A. Port replicator connector
Connect the included port replicator to add additional connectivity to
the FlipStart. The port replicator includes 2 USB 2.0 ports, a
10/100Base-T Ethernet port, an AC power adapter port, and an audio
input/output multi-function jack.
B. AC power adapter port
Connect the included AC power cord here and to a live wall socket to
provide power to the FlipStart. The battery automatically recharges
whenever the AC power cord is plugged into this port and into a live
wall socket.
C. USB 2.0 port
Connect additional devices to your FlipStart, including flash memory
drives, external hard drives, external optical drives, additional input
devices (such as an external keyboard or mouse), digital cameras,
digital music players, or any other USB device.
D. Air ventilator
Assists in cooling your FlipStart by circulating air through the
FlipStart.

15
This chapter provides all the information you need to get up and running with your new
FlipStart.
Important: Please read all of the setup and installation instructions carefully before plugging in
and using your FlipStart.
In This Chapter
Quick Start ......................................................................................... 16
Turning the FlipStart on for the first time .......................... 18
How to hold the FlipStart ........................................................... 19
Using input devices ........................................................................ 20
Getting connected to the Internet ......................................... 26
How to install software ................................................................ 33
Expanding your FlipStart ............................................................ 35
CH A P T E R 3
Setting up
.
Setting up 16
Quick Start
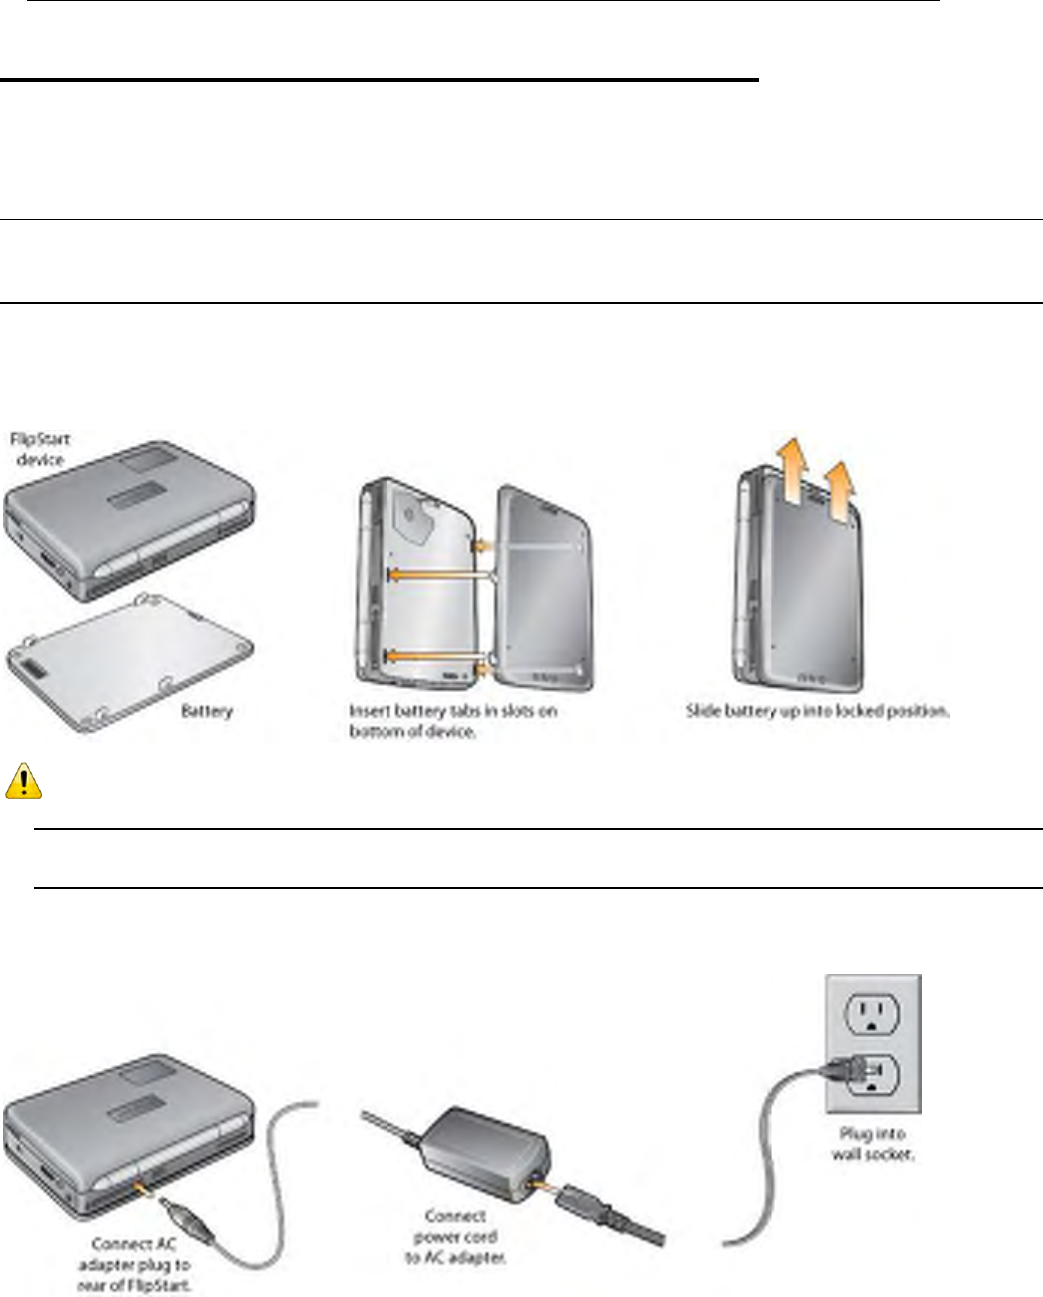
To get up and running quickly, follow the steps in the illustration below:
.
Setting up 17
Turning the FlipStart on for the
first time
Important: Before attaching the battery, be sure to make a note of the Microsoft Windows
Product Activation Key on the bottom of your FlipStart. You will need this information during
Windows activation.
1 Attach the battery to the bottom of the FlipStart as indicated in the illustration below.
a) Place the clips on the battery into the slots on the bottom of the FlipStart as shown.
b) Slide the battery up gently until it clicks into place.
Warning! Do not attempt to use your FlipStart without the battery attached, even if the
FlipStart is plugged into the AC adapter.
Note: To remove the battery, press the battery release button on the bottom end of the
battery. Then, gently slide the battery down and away from the main unit.
2 Connect the AC adapter power cord to the AC adapter.
3 Connect the AC adapter to the DC power port on the rear of the FlipStart.
.
Setting up 18
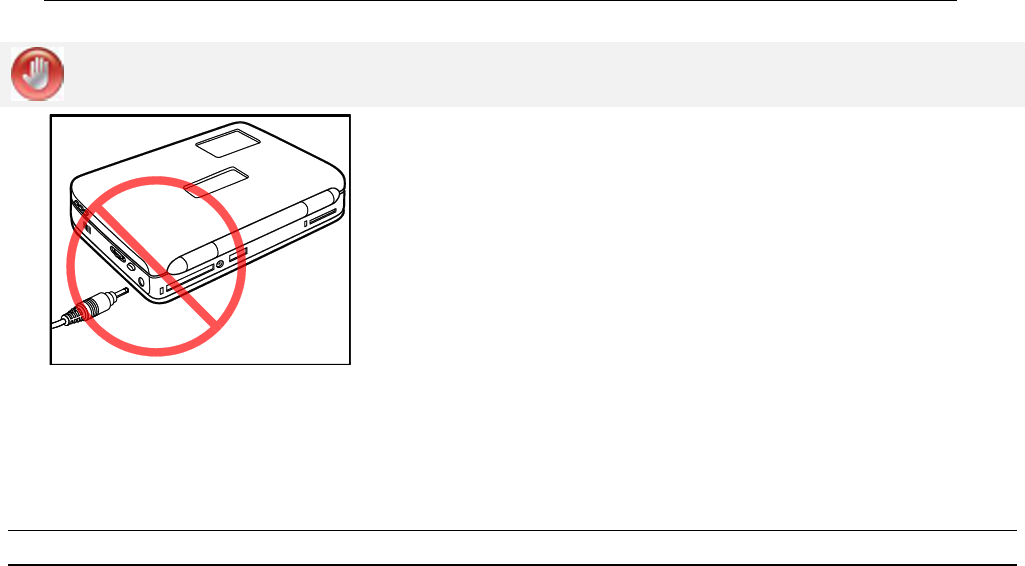
Caution! Do not insert the AC power cord into the headphone jack on the right side of
the FlipStart.
Wrong way to insert AC adapter power jack!
4 Connect the AC adapter power cord to an AC outlet.
5 Open the display to a comfortable viewing angle by raising the top lid of the FlipStart.
6 Press the power button once and release it to turn on the power.
You will see a startup screen before Microsoft Windows loads.
Note: Do not continue to press down the power button, or the FlipStart will turn off.
During initial startup, Windows will step you through Windows Product Activation. Use the
Product Activation Key located on the bottom of your FlipStart. (As noted above, you should
have written down this key before attaching the battery. If the key is not available, power down
the FlipStart, unplug the power adapter cord, remove the battery, write down the key from the
Certificate of Authenticity sticker on the bottom, reattach the battery, reattach the power
adapter cord, and restart the computer.)
You also may be asked some questions about how you want to set up your network, and how
you would like to configure Windows. If you know the answers, you can enter this information
now. If not, this information can be entered at a later time. For more information on setting up
your network, see Getting connected to the Internet (on page 26).
Once you have finished the initial startup process, the Windows desktop will appear.
If you have questions or would like more information about the Windows setup process or
about Microsoft Windows product activation, please refer to the Windows manual included in
your FlipStart box.
Charging the battery before using unplugged
The battery that ships in the FlipStart box is not fully charged. Before using the FlipStart on
battery power alone (that is, unplugged from AC power), allow the battery to charge fully; a
full charge is indicated when the amber “charging” LED battery light on the front right of the
FlipStart turns green.
See Using power management (on page 42) for information on how to maximize the FlipStart's
battery life.
.
Setting up 19
How to hold the FlipStart
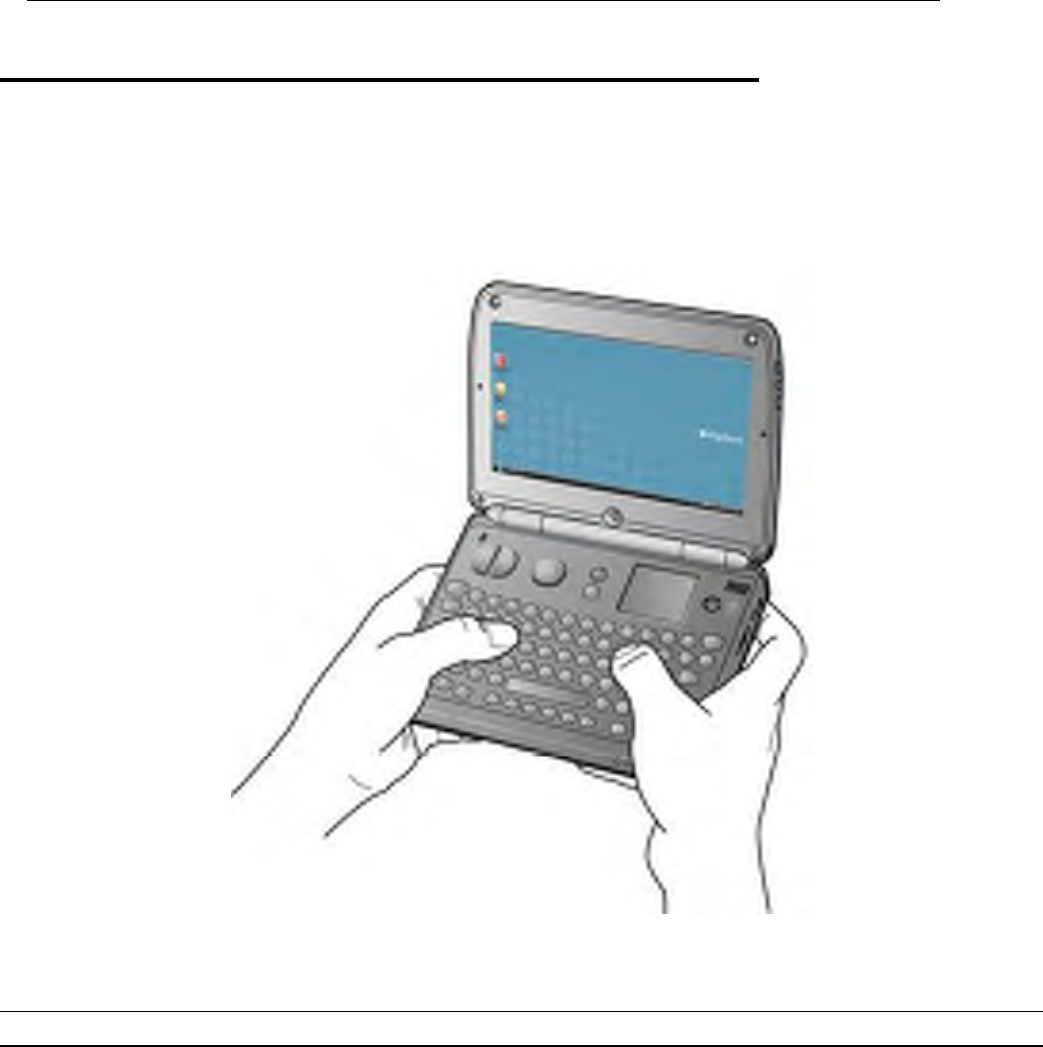
The FlipStart can be placed on a flat surface and used much as you might use a laptop
computer. However, the FlipStart is also designed to be held in both hands, using your thumbs
to press keys on the keyboard, like this:
Feel free to experiment with different hand positions and display angles until you find one that
is both efficient and comfortable.
Note: If the port replicator is not attached, the screen can fold all the way back 180°.
.
Setting up 20
Using input devices
The FlipStart provides multiple methods for working with your FlipStart, including an
integrated full QWERTY keyboard, a touchpad, a touchstick, left and right mouse button keys,
and a Jog Dial with an Escape button. All of these devices can be used, either singly or in
combination with others, to enter text, control the mouse, navigate the screen, and use the
FlipStart.
Using the keyboard
The FlipStart keyboard provides not only a full QWERTY layout but also provides a number of
special keys and input devices to help make using your FlipStart as easy as possible.
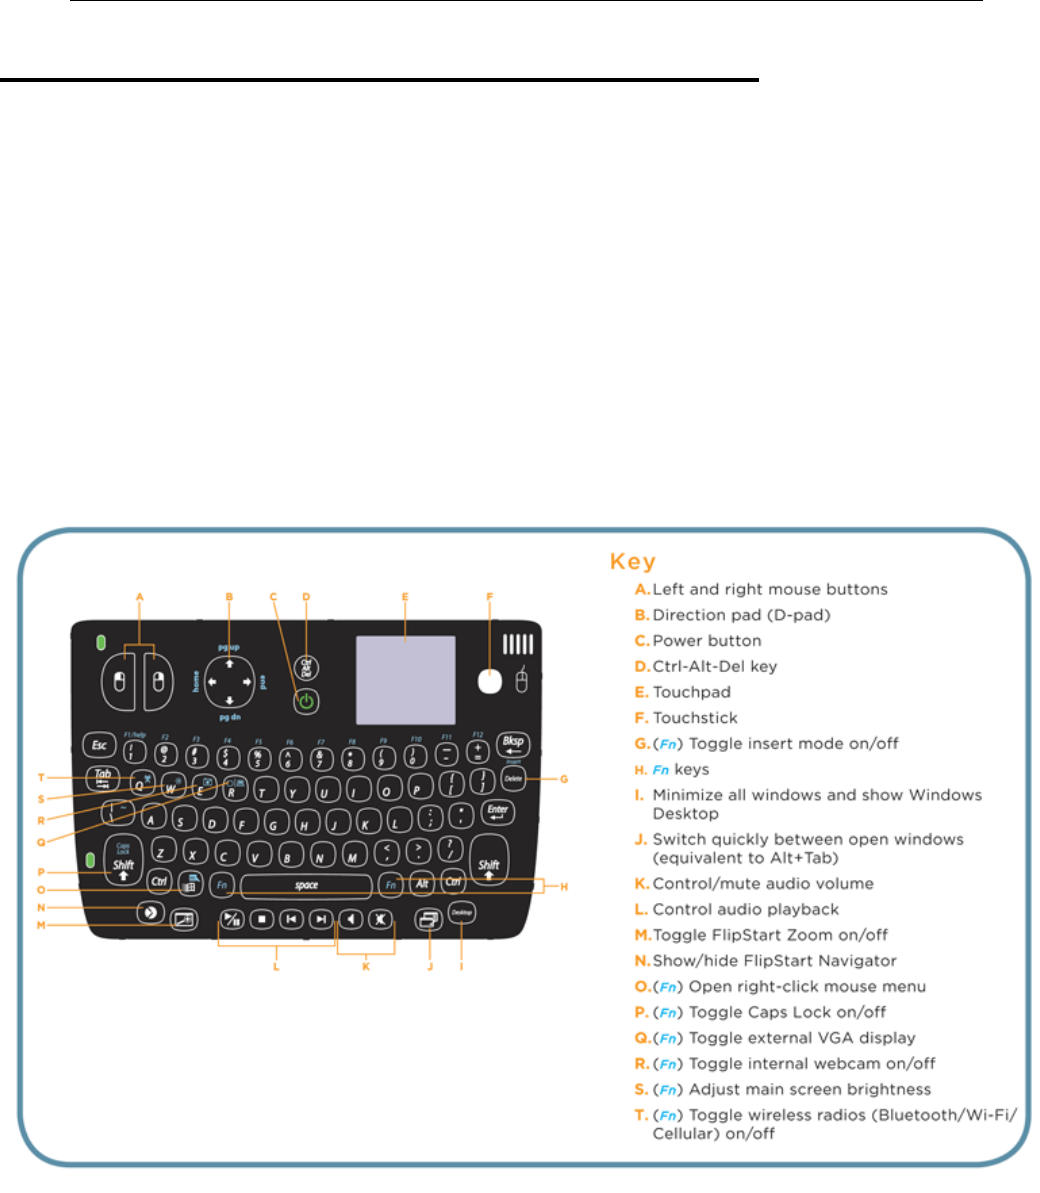
The illustration below calls out special keys and input devices on the FlipStart.
Special keys and input devices on the keyboard
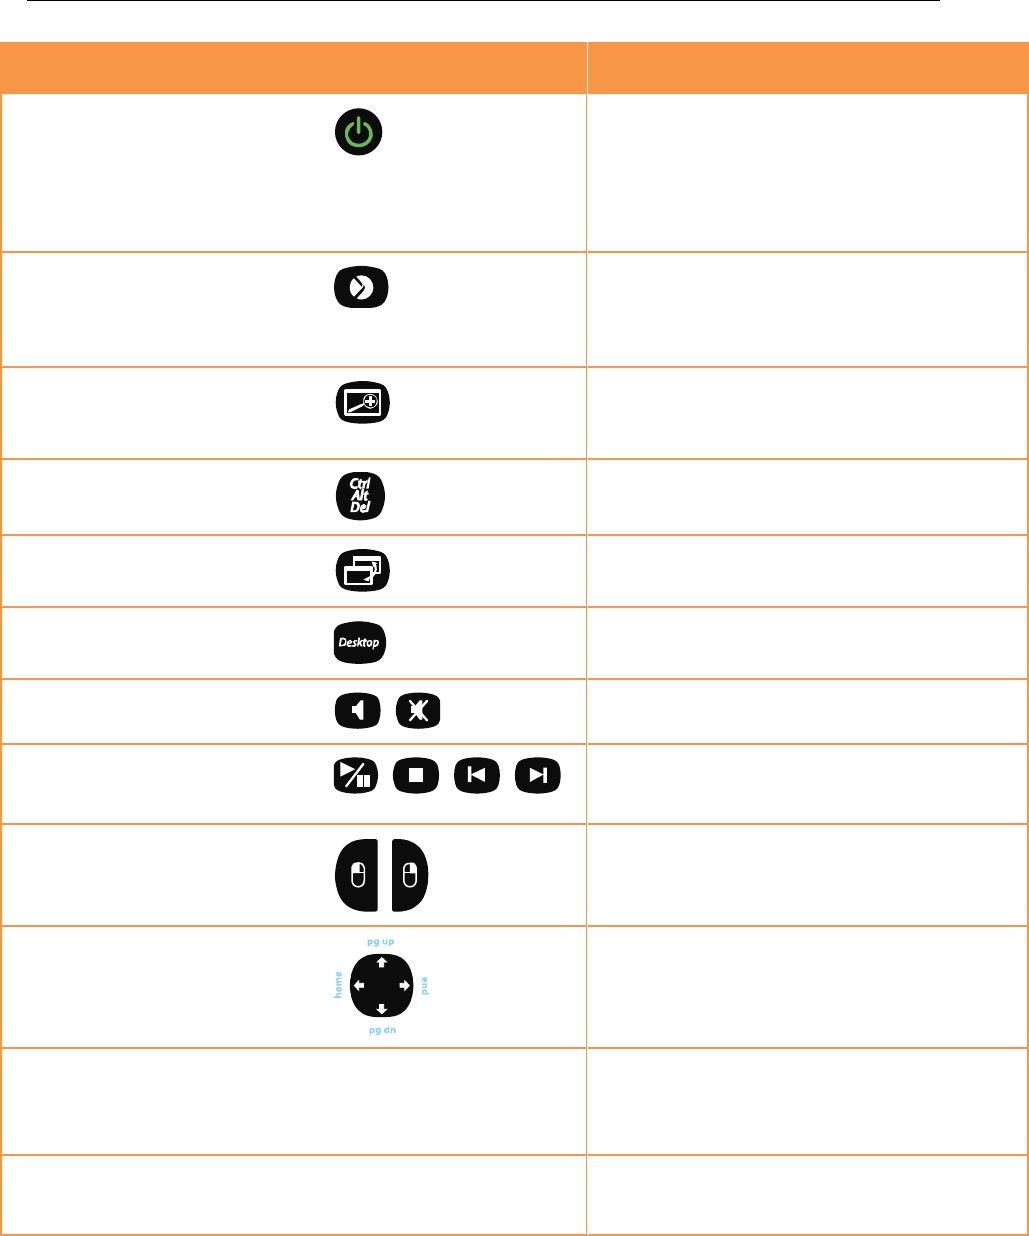
In addition to the standard QWERTY keys the FlipStart keyboard includes a number of special
keys and input devices as described in the following table.
.
Setting up 21
Use…
To…
Power button
Turn the FlipStart on when it is turned
off.
Put Windows to sleep when Windows
is running (configurable in Windows).
Force system to power off by pressing
and holding more than 5 seconds.
Navigator key
Show/hide the FlipStart Navigator
application.
(See “Using FlipStart Navigator” on page
49 for more information.)
Zoom key
Turn the FlipStart Zoom function on/off.
(See “Using FlipStart Zoom” on page 51
for more information.)
CTRL-ALT-DEL key
Equivalent to pressing CTRL+ALT+DEL keys
on a full-sized keyboard.
Fast window switching key
Switch quickly between open windows.
(Equivalent to pressing ALT+Tab.)
Desktop key
Minimize all windows and show the
Windows desktop.
Audio volume controls
Adjust volume (press key and then adjust
using Jog Dial) and mute audio volume.
Audio player controls
Control music playback in Windows-
compatible media players (play/pause,
stop, previous track, next track).
Left and right mouse buttons
Left-click or right-click a mouse button.
Direction pad (D-pad)
Duplicate the functions of the arrow keys
on a full-sized keyboard.
Touchpad
Located on upper right
of keyboard
Move the mouse pointer around the
screen.
Left-click a mouse button (by tapping
on the touchpad).
Touchstick
Located on upper right
of keyboard, to the right
of the touchpad
Move the mouse pointer around the
screen.
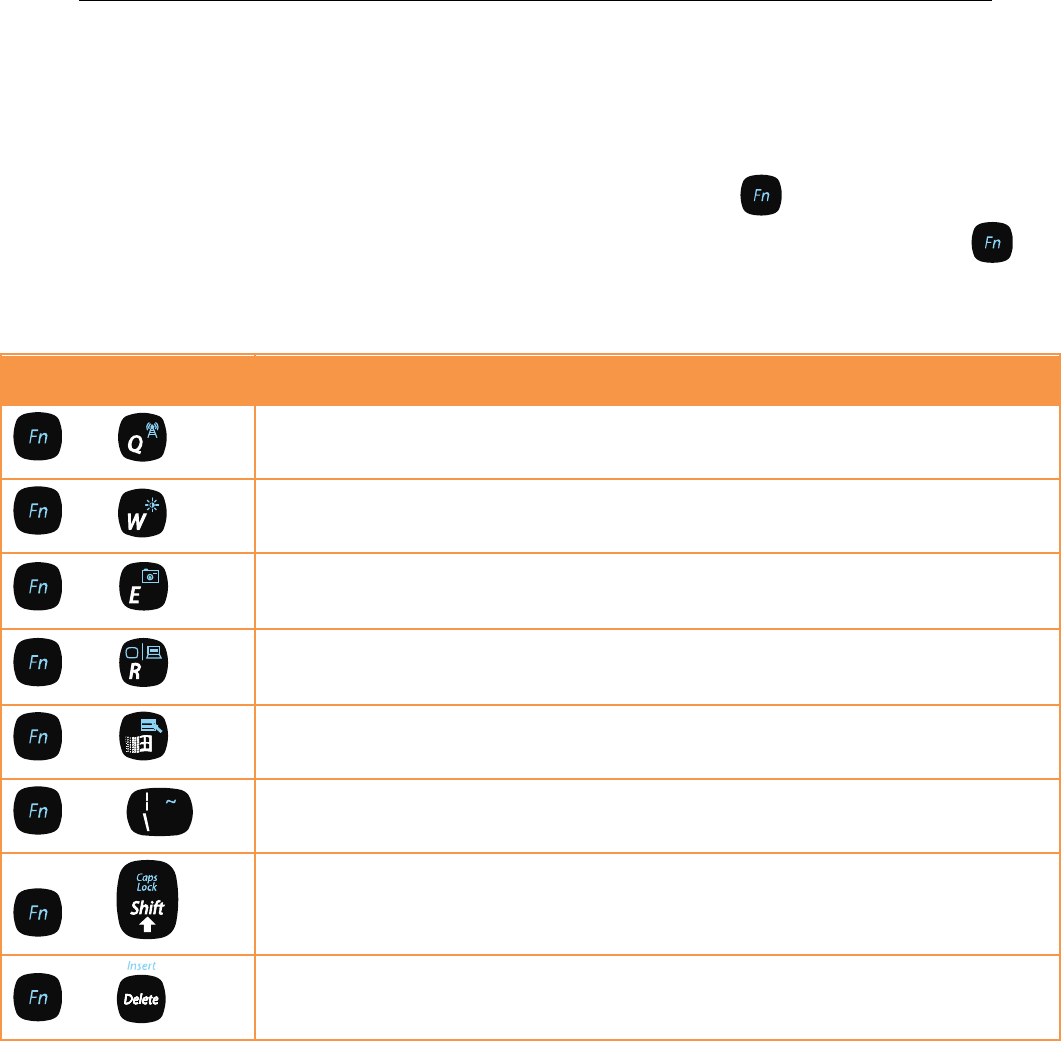
.
Setting up 22
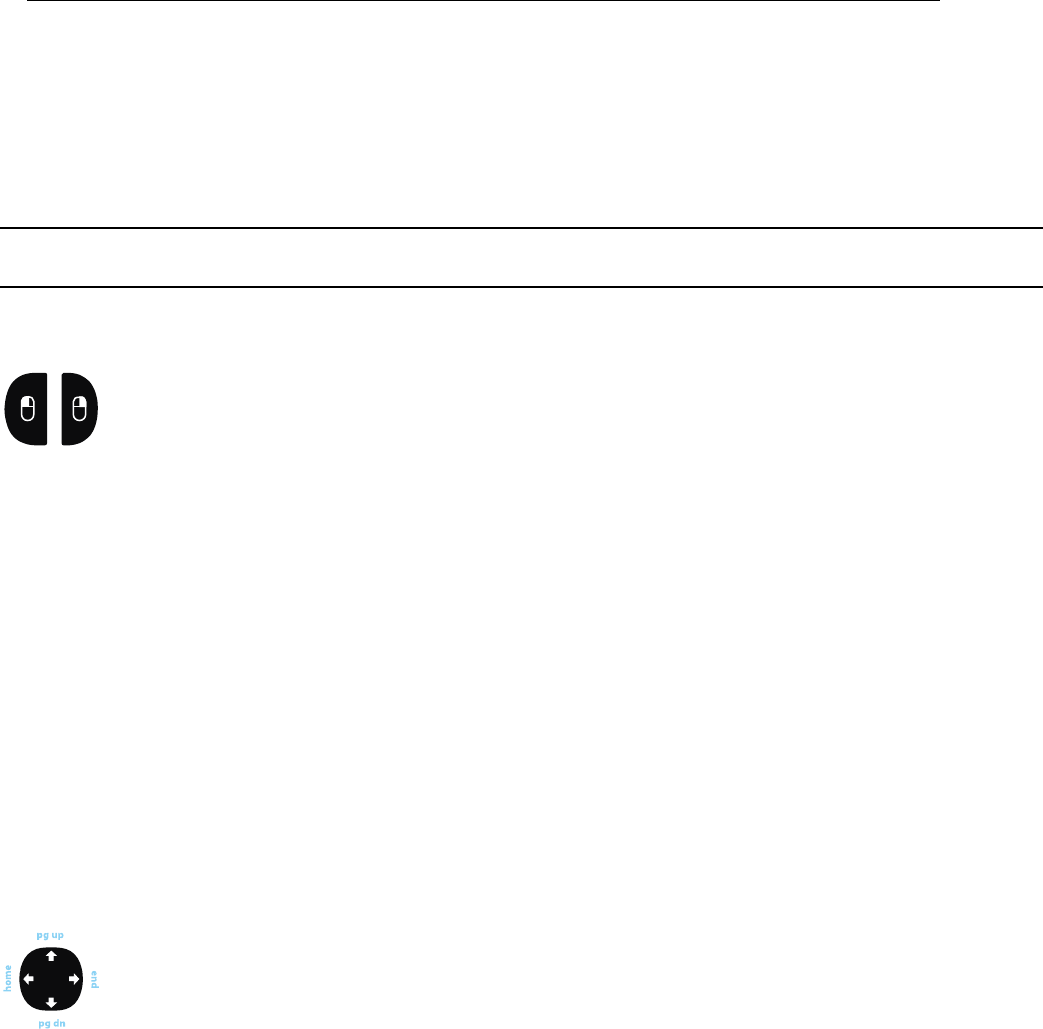
Fn key combinations
In addition to the special keys on the keyboard, pressing down the key in combination with
other keys provides quick access to particular functions of your FlipStart. There are two
keys located on the FlipStart keyboard, one on either side of the spacebar.
Press …
To…
+
Turn all currently switched on wireless radios (Bluetooth, Wi-Fi, cellular) off, or
turn back on. (Turns “Airplane mode” on/off.)
+
Change the brightness of the main screen (press keys and then adjust
brightness with Jog Dial).
+
Turn the webcam on or off.
+
Switch to an external VGA display (when an external monitor is connected to
the VGA connection on the FlipStart port replicator).
+
Open mouse right-click Shortcut menu.
+
Type a tilde character.
+
Turn caps lock on or off.
+
Turn Insert mode on or off.
.
Setting up 23
Using the mouse controls
The FlipStart provides several keyboard-based methods for controlling the mouse pointer on
the screen, combining use of the following input devices to perform tasks normally done with a
mouse on a desktop computer.
Note: You can also add an external USB or Bluetooth mouse. See Expanding your FlipStart (on
page 35).
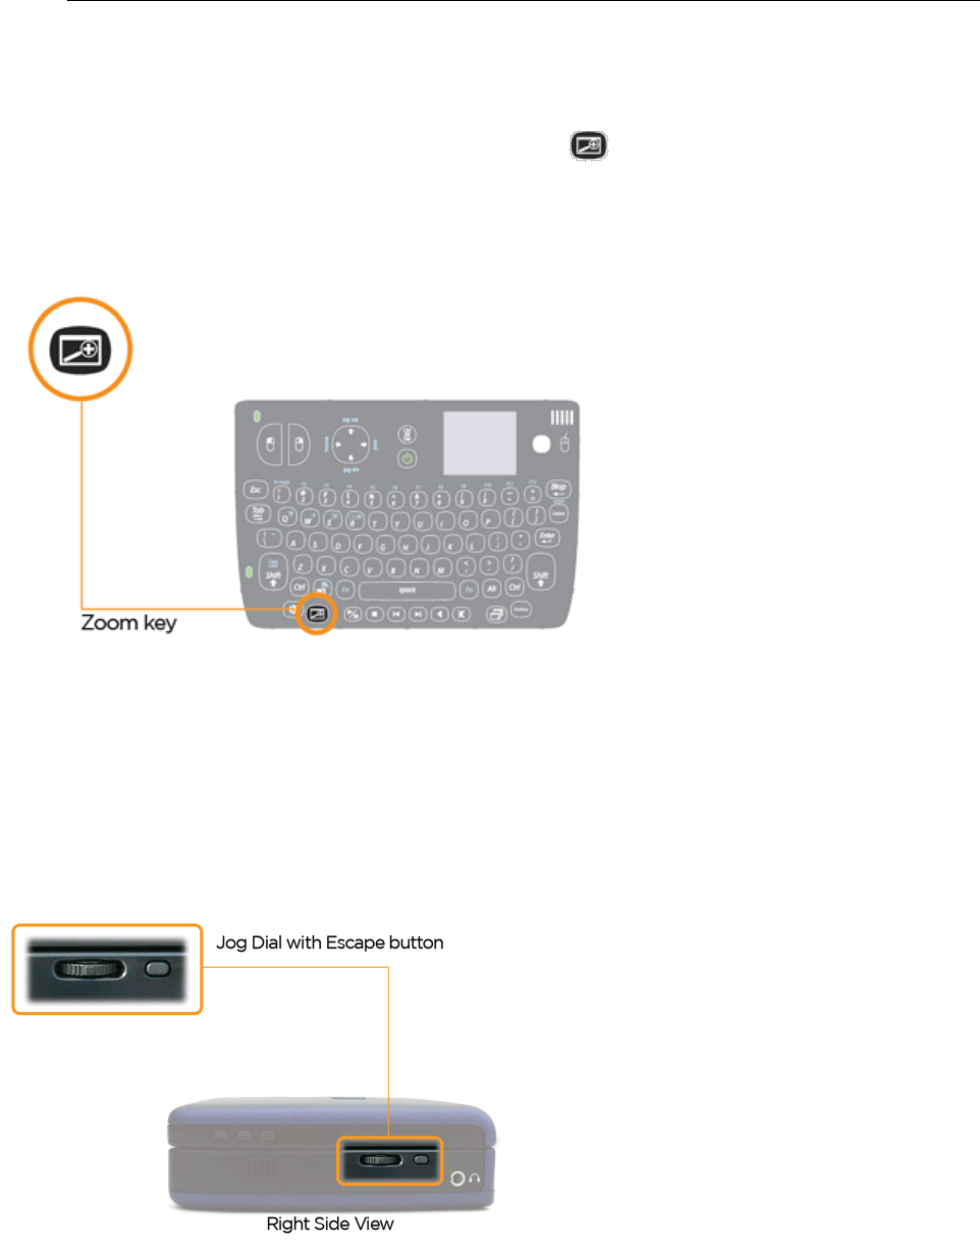
Mouse buttons
The FlipStart keyboard contains special keys for left mouse button and right mouse button.
Pressing the left or right mouse button will function like a left-click or right-click on a mouse.
Mouse touchpad
The touchpad enables you to control the mouse pointer on the screen with the tip of your
finger. Put the tip of your finger on the touchpad and lightly move it in the direction you want
to move the mouse pointer on the screen. Click or double-click by tapping or double-tapping
on the touchpad.
Mouse touchstick
The small touchstick controls the mouse on the screen. Using the tip of your finger or thumb,
gently move the rubber touchstick in the direction you want the mouse pointer to move.
Direction pad (D-pad)
The D-pad duplicates the functions of the up and down arrow keys on a full-sized keyboard.
Use the D-pad to move the cursor or selection horizontally or vertically on the screen, or, in
combination with pressing an Fn-key, to page up or page down.
.
Setting up 24
Zoom key
The FlipStart keyboard contains a special Zoom key for zooming the currently active
screen item. Zoom enables you to change the magnification of items on the screen by pressing
and holding down the Zoom key, and then using the Jog Dial to zoom in or out. For more
information, see Using FlipStart Zoom (on page 51).
Using the Jog Dial
Located on the right-hand side of the FlipStart is the Jog Dial, next to the Escape button.
Moving the Jog Dial up or down has a different function, depending on what you are doing.
The following table outlines what the Jog Dial does in different contexts:

.
Setting up 25
When you are...
Use the Jog Dial to...
Using FlipStart InfoPane or FlipStart Navigator
Scroll the selection bar up or down. Press the
Jog Dial in to make a selection. (The Escape
button usually cancels an action or moves one
level back in the navigation system.)
Viewing a Web page in a Web browser
Scroll the page up and down, as with a mouse
scroll wheel.
Adjusting audio volume or display brightness
Increase or decrease audio volume/display
brightness.
Using FlipStart Zoom
Increase and decrease screen magnification
while simultaneously holding down the Zoom
key.

.
Setting up 26
Getting connected to the Internet
Your FlipStart can connect to home networks, office networks, and the Internet. The FlipStart
supports several types of networking technologies for these connections. You can connect
using:
Wi-Fi (802.11b/g) wireless networks.
Wired Ethernet connections on a home or office network.
High-speed cellular broadband wide-area networks (WWANs) via a supported wireless data
carrier’s data network.
A Bluetooth wireless technology connection to a cellular phone and a wireless carrier’s data
network.
This section describes how to configure your FlipStart to connect to the different types of
wireless and wired networks.
Connecting for the first time
When you first turn on a new FlipStart, Windows can help finalize the networking options you
want to use. If you are familiar with your network connections and have the required
information†password (for password-enabled networks), network names and addresses, and
so on†you can set up your network at that time.
To set up a network connection after Windows has been started for the first time, see one of
the following topics.
Configuring Wi-Fi (802.11b/g) wireless networking
Your FlipStart can connect to 802.11b and 802.11g Wi-Fi networks in the home, in public
locations, and in the office. Wireless networks can be set up in several different ways,
depending upon who is accessing the system and what level of security is required. Many
wireless networks require some type of access key or password to log on to the wireless
connection and use it to connect to the Internet. You can manage your Wi-Fi networking
connections using Windows.
About Wi-Fi security
Wi-Fi networks are either open (accessible by anyone) or encrypted (accessible only by those
with access codes). Wi-Fi encryption types include WEP, WPA, and EAP.
If you are trying to access an encrypted network, you will need to configure your Wi-Fi
connection manually. To configure Wi-Fi security settings, you need to know in advance what
type of security is enabled on the access point and any necessary authentication information,
such as passwords or encryption keys. This information is usually available from your network
administrator, or you can get this information from the configuration of your home network.
.
Setting up 27
Note: Using Wi-Fi security encryption is strongly recommended to protect personal
information on your FlipStart.
Configuring Wi-Fi access
Regardless of the Windows version you are running on your FlipStart, the majority of Wi-Fi
configuration tasks will be performed using Windows Control Panel. Your FlipStart also
provides quick access to some common Wi-Fi configuration tasks.
Activating the Wi-Fi radio
Your first step in configuring Wi-Fi wireless networking is to turn on the Wi-Fi radio on your
FlipStart.
To turn the Wi-Fi radio on or off:
1 Double-click the Control Center™ icon in the system tray to open FlipStart Control Center.
2 Select Turn Network Devices On/Off, and select Wi-Fi On in the Wi-Fi/Cellular Devices section.
3 Click Apply and then click OK.
Note: The Wi-Fi radio and the cellular broadband modem cannot both be switched on
simultaneously.
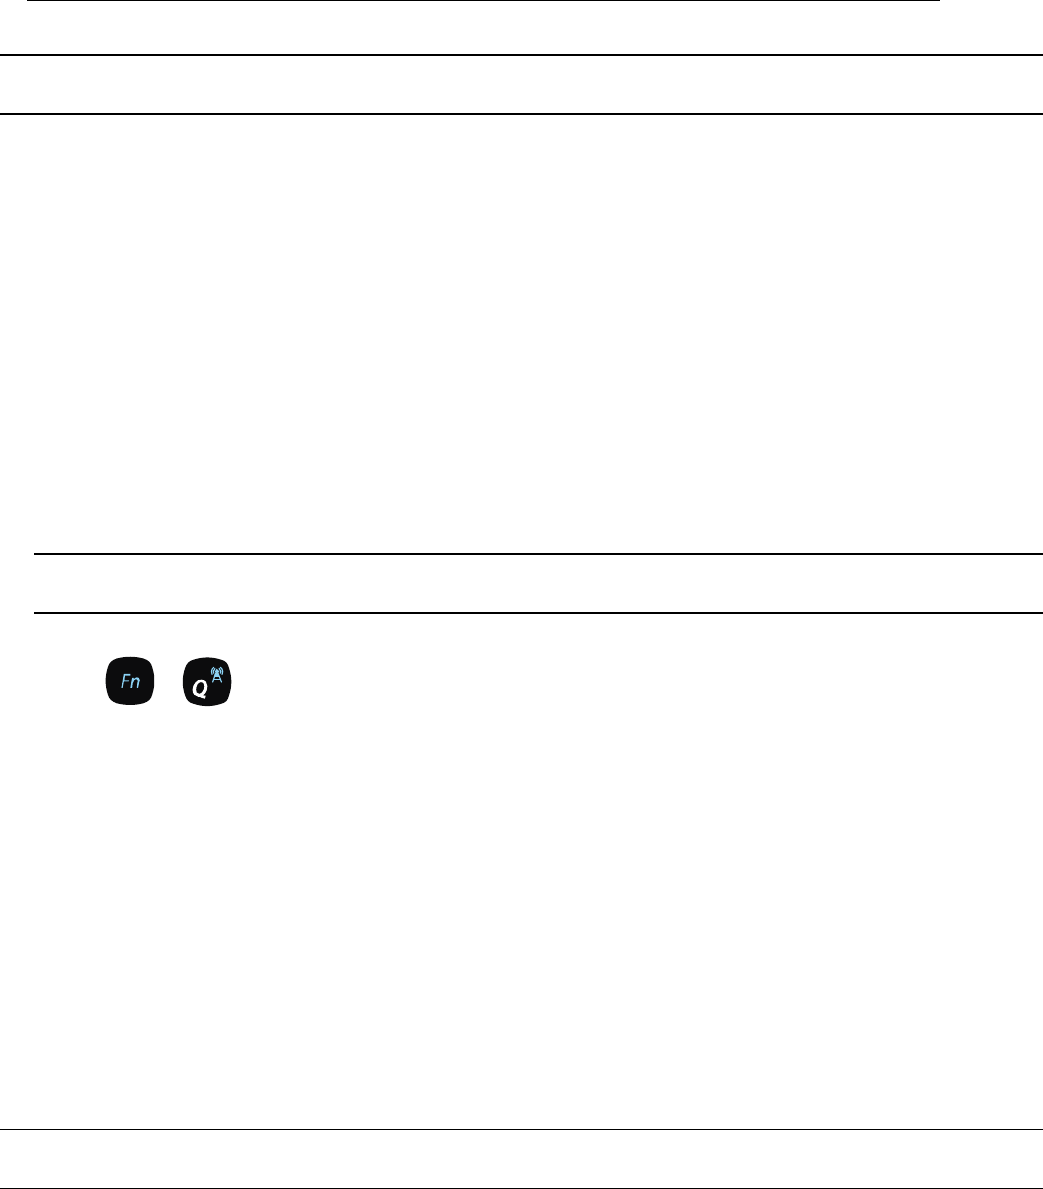
Once you have selected the wireless radios that you want to enable, you can turn them on and
off using + . Press this same key combination if you see the message Airplane Mode is in
effect in Control Center.
Configuring Wi-Fi access using Windows
Windows can be configured to manage your wireless connections and experience
automatically. The following instructions will help you get started configuring Wi-Fi networking
on your FlipStart. See Help for your version of Windows for detailed instructions.
To configure Wi-Fi access using Windows:
For Windows XP users, go to Start | Control Panel | Network and Internet Connections, and then follow
the instructions on the Connections tab.
For Windows Vista users, go to Start | Control Panel | Network and Sharing Center and choose the
task that you want to perform from the list.
In Windows, you can press F1 to access Help for the specific task you are trying to perform.
Note: You also have quick access to configuring networking by double-clicking the network
icon in the system tray of your FlipStart.
.
Setting up 28
Accessing Windows network management tools using Control Center
FlipStart Control Center provides you with shortcut access to Windows networking information
and management tools.
To manage Windows network connections in Control Center:
1 Double-click the Control Center icon in the system tray.
2 Click Connectivity.
3 Click Open Windows Network Connections in the Windows and other software section. Right-click
on the network connection that you want to manage and select an action.
4 Close the window to return to Control Center.
Configuring cellular wireless broadband networking
The FlipStart can use its built-in, cellular broadband modem to connect to the Internet via a
supported wireless carrier’s data network.
Important: To connect to a network for Internet access using the built-in, cellular broadband
device, you must first have purchased and activated a cellular data plan from a supported
FlipStart cellular carrier. For more information about activating a data plan for supported data
carriers, see the activation information included in the FlipStart package or on the FlipStart
Web site at http://www.flipstart.com.
To connect to a network using cellular wireless:
1 Enable the cellular broadband radio on your FlipStart.
1. Double-click the Control Center icon in the system tray.
2. Click Turn Network Devices On/Off.
3. Click Cellular Network On in the Wi-Fi/Cellular Devices section.
Note: Press + to turn on the wireless radios if you see the message Airplane Mode is
in effect in Control Center
4. Click OK.
Note: The Wi-Fi radio and cellular broadband modem cannot both be switched on
simultaneously.
2 Use the wireless carrier’s mobile broadband connection manager software to connect to the
wireless data network.
For more information about a carrier’s connection manager software, see the online Help for
that software or contact your wireless carrier for further help.
Configuring wired Ethernet networking
The FlipStart can connect to home and office networks using a wired Ethernet cable. To do
this, you must first have a standard Ethernet cable to use for making the connection.

.
Setting up 29
Note: These instructions explain configuration of the most common type of Ethernet networks.
To connect to more advanced or specially configured Ethernet networks, please contact your
network administrator for instructions.
To connect the FlipStart to the network
1 If you have not already done so, connect the FlipStart port replicator to the rear of the
FlipStart. For more information, see Attaching the port replicator (on page 36).
2 Turn on the FlipStart and start Windows.
3 Firmly connect one end of the Ethernet cable to the network jack you intend to use with
your FlipStart. This may be a connection to a router already configured on your network, or
an Ethernet port in the wall of your home or office.
4 Locate the Ethernet port on the rear of the FlipStart port replicator.
5 Firmly connect the Ethernet cable to the Ethernet port on the FlipStart port replicator. The
connector should click into place when properly inserted.
Configuring the Ethernet connection
In most situations, there will not be any configuration needed to join a network that has already
been set up. When you connect the Ethernet cable, Windows will recognize the new network
and negotiate a TCP/IP address to use when communicating with the network and the Internet.
If your network is not automatically recognized, you may need to run the Windows Network Setup
Wizard. The following instructions will help you get started configuring the Ethernet connection
for your FlipStart. See Help for your version of Windows for detailed instructions.
To set up a network connection:
For Windows XP users, go to Start | Control Panel | Network Setup Wizard, and then follow the
instructions on the Connections tab.
For Windows Vista users, go to Start | Control Panel | Network and Sharing Center and choose the
task that you want to perform from the list.
Note: You also have quick access to configuring networking by double-clicking the network
icon in the system tray of your FlipStart.
Configuring a network connection using Bluetooth wireless
technology
The FlipStart contains a Bluetooth radio that you can use to connect to networks and hands-
free devices. For example, you can use the Bluetooth wireless radio on your FlipStart to pair
with your mobile phone and then use the phone as a modem to connect to the Internet.

.
Setting up 30
There are many different Bluetooth wireless mobile devices that use unique methods to
configure and connect to their networks. These instructions will help guide you through
configuring a Bluetooth connection from your FlipStart, but some information will be needed
from the Bluetooth mobile device's user manual or help files. Make sure that you have this
documentation available during setup.
Connecting to a network using Bluetooth wireless technology
Before you can use Bluetooth wireless technology, you must enable Bluetooth on your
FlipStart by activating the Bluetooth radio. Then, to connect to a network for Internet access
using a phone with Bluetooth wireless, you must 'pair' your phone with your FlipStart:
To enable Bluetooth wireless technology on your FlipStart:
1 Double-click the Control Center icon in the system tray.
2 In Control Center, click Turn Network Devices On/Off.
3 Click On in the Bluetooth section, and then click OK.
To pair your FlipStart with your phone:
1 Double-click the Bluetooth icon in the Windows system tray
2 Click New Connection.
3 Follow the instructions in the window that appears. For more information, see the help
documentation for the Bluetooth utility.
After pairing, the procedure for connecting to a network differs depending on the make and
model of your phone and on your cellular data carrier. Refer to the user manual of your cellular
phone or contact your carrier’s customer support for more information about the network
setup process.
Once you have paired your mobile phone with your FlipStart, you can then use your phone’s
built-in modem to connect your FlipStart to a network by using Windows dial-up networking.
Note: Before you begin, you must obtain the dialing instructions and phone number for data
access from your wireless carrier.
To connect to a network using Bluetooth wireless technology:
1 Click Start | Control Panel | Network and Sharing Center, and then click Network Connections.
2 Click Create a new connection under Network Tasks on the left side of the window.
The New Connection Wizard appears.
3 Click Connect to the Internet, and then click Next.
4 Click Set up my connection manually, and then click Next.
5 Click Connect using a dial-up modem, and then click Next.
6 Type a name for your connection (for example “Bluetooth phone”) and then click Next.
7 Type the data access phone number provided by your wireless carrier, and then click Next.

.
Setting up 31
8 Indicate whether you want to make this connection available just for yourself or make it
available to all users of the FlipStart, and then click Next.
9 If necessary, enter a user name, password, and domain for your wireless carrier, and then
click Next. Consult your mobile phone documentation for more information.
10 Indicate whether you want to add a shortcut to your connection to your Windows Desktop,
and click Finish.
Making a connection
Once you have configured your Bluetooth network connection, you can use the dial-up
connection from your FlipStart by following these steps.
To make a connection:
1 Ensure that your Bluetooth phone is turned on and paired with your FlipStart.
2 If you created a desktop shortcut for your connection, double-click it, and click Dial.
3 If you did not create a desktop shortcut, click Start, click Control Panel, click Network and Internet
Connections, click Network Connections, double-click the dial-up networking connection you
created, and click Dial.
For more information on setting up and configuring Bluetooth devices, see Using Bluetooth
devices (on page 63).
For more information on troubleshooting Bluetooth connection problems, see Solving
problems with Bluetooth (on page 73).
Configuring Ethernet/wireless network switching using
Control Center
If you frequently switch between the different network connections available on the FlipStart,
you can customize certain options to enable and disable network devices automatically. For
example, you can use Control Center to choose whether or not wireless devices are
automatically switched off whenever you connect using wired Ethernet.
To automate your settings when connecting to an Ethernet network:
1 Double-click the Control Center icon in the Windows system tray.
2 From the Control Center screen, select Connectivity.
3 Click Ethernet/Wireless settings.
4 Click the Connecting to Ethernet tab.
5 Under When Ethernet is plugged in:, select your desired network behavior:
Select Turn off Wi-Fi or Cellular automatically to automatically disable wireless networks when
using an Ethernet network.
Select Prompt me to turn off Wi-Fi or Cellular to prompt for changes.

.
Setting up 32
Select Do nothing to leave your wireless networks on when connecting to an Ethernet
network. Note that leaving the wireless radios on will drain your battery faster.
6 Click Apply to save your changes, and OK to close the window.
To automate your settings when disconnecting from an Ethernet network:
1 Double-click the Control Center icon in the Windows system tray.
2 From the Control Center screen, select Connectivity.
3 Click Ethernet/Wireless switching.
4 Click the Disconnecting from Ethernet tab.
5 Under When Ethernet connection is unplugged:, select your desired network behavior:
Select Turn on Wi-Fi or Cellular automatically to automatically enable wireless networks when
disconnecting from an Ethernet network.
Select Prompt me to choose a wireless device to prompt for the network you want to use.
Select Do nothing to leave your wireless networks in their current state when disconnecting
from an Ethernet network. Note that leaving the wireless radios on will drain your battery
faster.
6 Click Apply to save your changes, and OK to close the window.

.
Setting up 33
How to install software
Although system requirements for specific programs may vary, almost any software that is
compatible with your Microsoft Windows XP or Microsoft Windows Vista operating system
should run successfully on the FlipStart.
There are several ways to install programs onto your FlipStart, depending on the program to
be installed.
Installing from a local network
When you have successfully connected to your home or office network, you can access other
computers on your network to install programs. There are two ways to do this:
Share a CD-ROM, DVD-ROM, or hard disk drive on a computer, and then access it with
your FlipStart from the network. Run the installation program from the shared drive, and
choose the installation location on your FlipStart's C: drive.
Copy the installation files from another computer to your FlipStart over the network.
Then, run the installation from your FlipStart.
Installing downloaded files from the Internet
When you have successfully connected to the Internet, you can download software installation
files from Internet sites. Once an installation file is on your FlipStart, you can run the installation
program from your FlipStart.
Installing from a removable storage device
Removable storage devices range from CD or DVD drives to an external hard drive to USB
flash drives. If you have one of these storage devices, you can install programs on your
FlipStart simply by plugging the drive into the FlipStart’s USB port.
Installing programs directly from another computer
If you have an Ethernet crossover cable, you can connect your FlipStart to another Windows-
based computer directly to form a network. An Ethernet crossover cable is a special type of
network cable specifically used to connect two computers to each other.
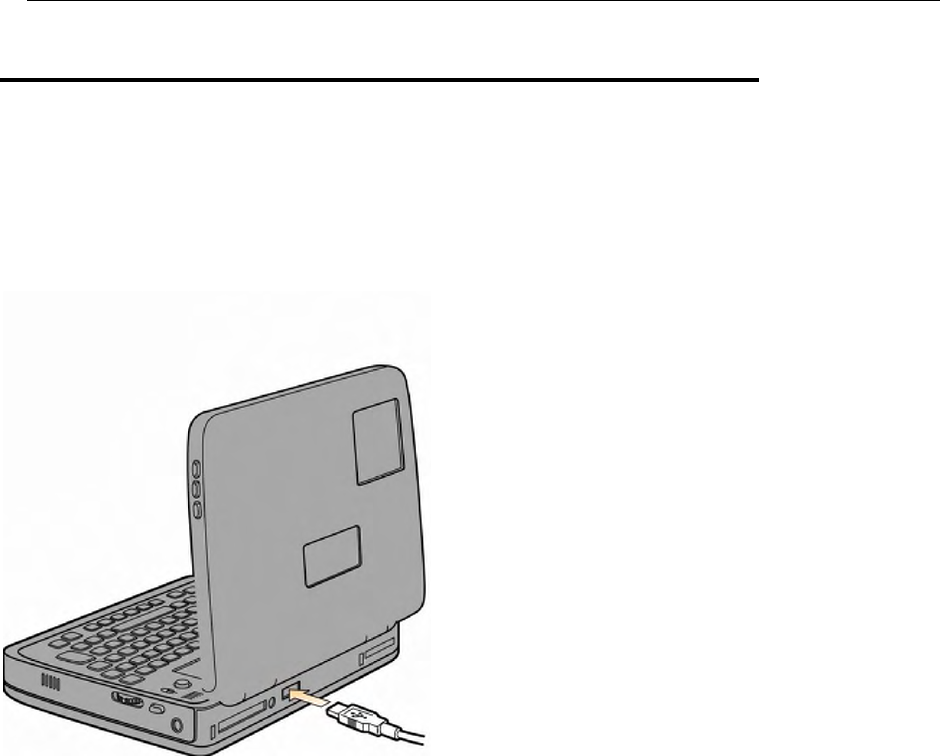
To connect your computers, plug one end of your crossover cable into the Ethernet port of
your desktop or laptop computer. Plug the other end of the Ethernet cable into your FlipStart's
Ethernet port, located on the back of the port replicator. (For more information about using
the port replicator, see Expanding your FlipStart (on page 35). Windows will recognize the new
network and show a 'connected' icon in the lower part of your screen in the system tray.

.
Setting up 34
Once your computers are connected, you can install software from the network as described
above in Installing from a local network.
.
Setting up 35
Expanding your FlipStart
It’s easy to expand your FlipStart to accommodate your working environment. When traveling,
a FlipStart functions on its own without any additional accessories†though you can use the
USB 2.0 port and/or Bluetooth connectivity to connect external devices such as an optical disk
drive, a keyboard, or a mouse.
.
Setting up 36
Attaching the port replicator
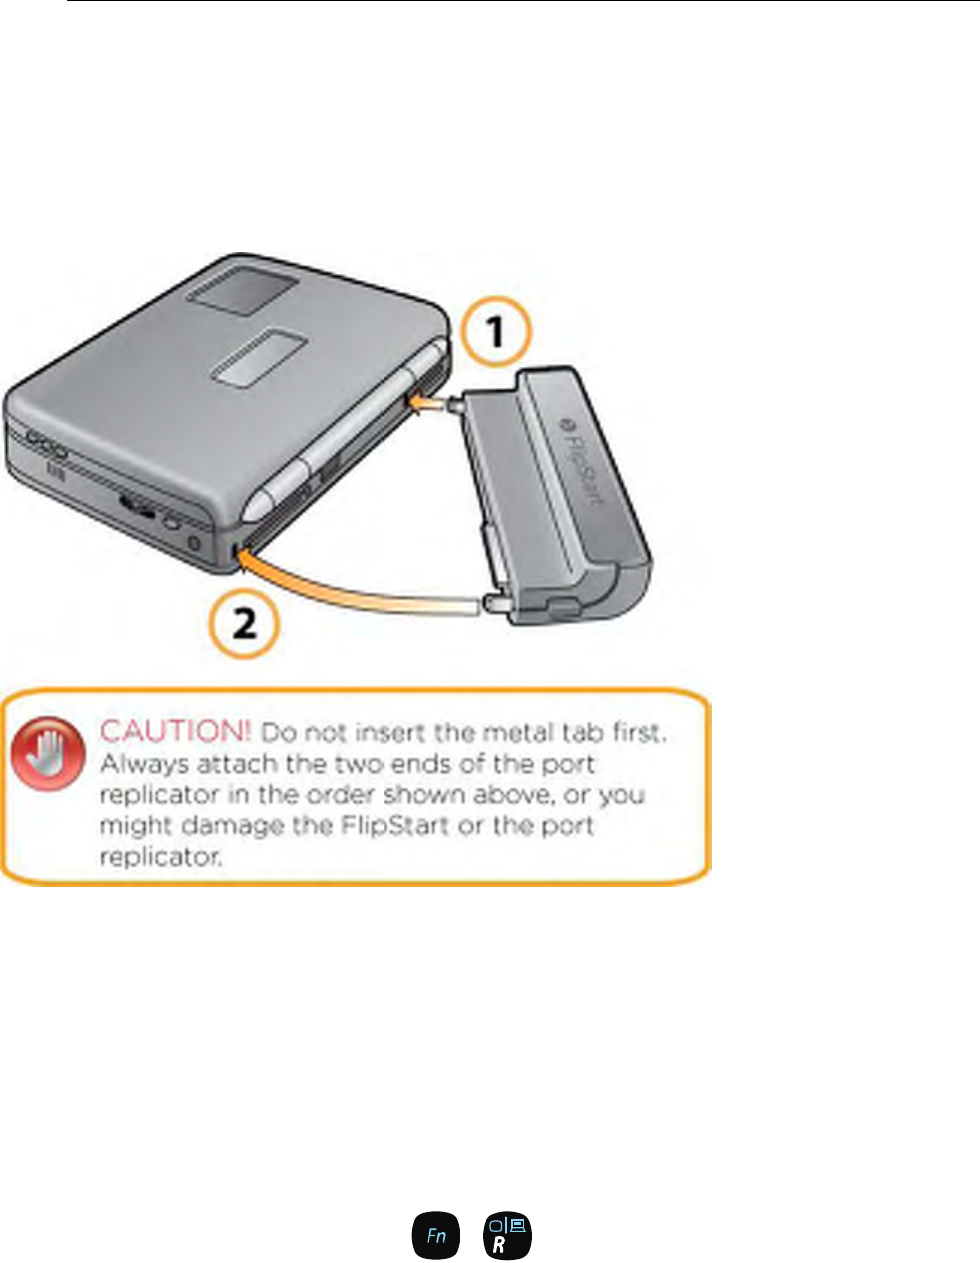
Snap the included port replicator onto the rear of the FlipStart as shown in the illustration.
Then, connect other hardware to the FlipStart to make your computing experience easier and
more efficient. For more information about the port replicator, see Using the port replicator (on
page 60).
Connecting an external USB mouse or USB keyboard
You can easily add a USB keyboard or mouse to your FlipStart. Simply plug the USB connector
into a USB port on the back of the FlipStart or the port replicator, and the device will be
recognized and ready for use.
Connecting an external VGA monitor
To use an external VGA monitor with your FlipStart, connect the port replicator to the rear of
your FlipStart, and then connect the monitor’s VGA cable to the port replicator. To switch the
display to the external monitor, press + .

.
Setting up 37
Connecting Bluetooth devices to the FlipStart
Nearly any Bluetooth-compatible device can be connected to your FlipStart. To add a device,
first consult that device’s instructions for any special needs or limitations. Then, use the
Bluetooth Settings wizard to add the device.
To connect Bluetooth devices to the FlipStart
1 If the Bluetooth radio is turned off on your FlipStart, enable it by opening Control Center and
choosing Turn Network Devices On/Off. Set Bluetooth to On in the Connectivity Status area.
2 Double-click the Bluetooth icon in the Windows system tray and follow the instructions in
the window that appears. For more information, see the help documentation for the
Bluetooth utility.
Note: You may need to refer to the instruction manual for your Bluetooth device for more
information during the process.
For more information on setting up and configuring Bluetooth devices, see Using Bluetooth
devices (on page 63).
For more information on troubleshooting Bluetooth connection problems, see Solving
problems with Bluetooth (on page 73).

39
Once you have set up your FlipStart, you can begin using the FlipStart just like a regular
desktop or laptop computer. The following sections provide more information on using and
customizing the special features of your FlipStart, as well as information on FlipStart's custom
software applications: FlipStart Navigator, FlipStart Control Center, FlipStart InfoPane, and
FlipStart Zoom.
In This Chapter
Customizing your desktop preferences
and settings .................................................................................. 40
Using power management ......................................................... 42
Using your FlipStart on-the-go ................................................ 44
Using FlipStart InfoPane .............................................................. 45
Using FlipStart software .............................................................. 49
Using the webcam .......................................................................... 55
Using audio ........................................................................................ 56
Using the FlipStart with external keyboard,
video, and mouse ....................................................................... 60
Learning more about Windows ............................................... 66
CH A P T E R 4
Using your FlipStart

.
Using your FlipStart 40
Customizing your desktop
preferences and settings
As a mobile, ultra-compact device, the FlipStart has a smaller screen than larger computers.
You can customize your preferences to optimize your desktop look and feel for the small
screen and for mobile usage.
Because your FlipStart runs a full version of Microsoft Windows, you can customize your
desktop using the full range of options available from the Windows Control Panel. The
following is a partial list of preferences that you can set to help you use your FlipStart.
For detailed information on customizing your desktop preferences, see Windows Help.
Windows Personalization
You can change the Windows settings on your FlipStart to best suit your working style and
computing environment. Windows offers a range of personalization options. Several options
are listed here, with instructions to get you started with Windows personalization. Press F1 at
any time to access Help for the specific Windows task you are trying to perform.
Modifying your fonts
You can adjust the size of default fonts in Windows to be larger or a different font style. Fonts
are normally part of the display settings on your system.
To modify your fonts:
In Windows XP, click Start | Control Panel | Display and click the Appearance tab.
In Windows Vista, click Start | Control Panel | Personalization, and then choose Adjust font size (DPI).
You can adjust your font settings on the DPI Scaling tab.
Display options and themes
In addition to customizing your font size, you can configure the style and color schemes of
your desktop to help make the screen easier to read. Themes can be configured and then
saved to your FlipStart, so that you can switch between multiple themes.
To modify your theme settings:
In Windows XP, click Start | Control Panel | Display and click the Themes tab.
In Windows Vista, click Start | Control Panel | Personalization, and then choose Theme.
Choose other personalization options such as Display Settings and Desktop Background to create the
display environment that is right for you.

.
Using your FlipStart 41
Start menu and Taskbar settings
The taskbar is the status area that runs along the bottom of your screen. You can customize
the Start menu and the taskbar features to optimize their use on a small screen, including:
Automatically hiding the taskbar, or keeping it on top of other windows.
Configuring the number of programs that appear in the Start menu.
Showing or hiding pre-set programs that normally appear on the start menu, such as My
Computer or My Network Places.
To modify these settings in Windows XP and Windows Vista, click Start | Control Panel | Taskbar and
Start Menu.

.
Using your FlipStart 42
Using power management
Power management is one of the most important features of any mobile device, including your
FlipStart. Power management settings are used to configure how your FlipStart uses the
battery and AC power, what power-consuming features are enabled or disabled, and what
types of feedback you are given about the current level of available power.
There are two types of power management settings that can be configured. Windows provides
applets in the Control Panel that enable you to configure power management options, and the
FlipStart Control Center provides options specific to your FlipStart.
Power options available in Windows
The Control Panel in Windows provides several options for power management in the Power
Options section:
Power schemes - This allows you to configure the time elapsed before your FlipStart
automatically turns off your monitor or hard disk, and when or whether the system should
go into Standby mode.
Advanced - This tab allows you to determine if a password should appear when coming out of
standby mode, and whether your FlipStart should power down or go into Standby mode
when the power button is pressed.
Hibernate - Enabling this option tells your FlipStart to store the active data in memory to your
hard disk before shutting down. When the FlipStart turns on again, the data is restored and
Windows returns to its previous state.
For more information about power options in Windows, see Windows Help.
Power options available in Control Center
Control Center provides a range of FlipStart-specific options to help manage your power
usage.
To configure power options in Control Center:
1 Double-click the Control Center icon in the system tray to open Control Center.
1 Choose Power, and select from the following configuration options:
Power Profiles ‟ Click Select a power profile preference for quick access to Windows power
settings. Select the power profile or power plan that you want to use.
Advanced power profile settings ‟ With these FlipStart custom settings, you can
configure your power performance to best meet your needs. Choose Change fan speed to
choose low or high fan speed mode, or Change hard drive timeout to configure your hard
drive to shut down after a period of inactivity.
View power settings ‟ In this section, click View battery status or View all power related settings to
see the power settings currently in use.

.
Using your FlipStart 43
2 Close Control Center.
For more information on Control Center power management options, see Control Center Help.

.
Using your FlipStart 44
Using your FlipStart on-the-go
As a mobile computer, the FlipStart is designed to be used nearly anywhere you can use a full-
sized laptop computer. To take best advantage of the features of your FlipStart, you can
customize power management settings and practice responsible power usage to maximize the
life of your battery.
Tips for using your FlipStart on-the-go
Use InfoPane to keep track of important information without starting Windows. You can
synchronize your Microsoft Office Outlook e-mail, contacts, and calendar information with
InfoPane, and refer to it on-the-go without starting Windows. Use the Jog Dial to turn on
the InfoPane display when the lid is closed; also, use the Jog Dial together with the Escape
button to navigate InfoPane. For more information, see Using FlipStart InfoPane (page 45).
Note: If you would like InfoPane to check for new e-mail messages when the lid is closed,
you must first enable this option in the InfoPane section of FlipStart Control Center.
Use FlipStart Navigator to quickly choose programs, perform tasks, and configure settings
from within Windows using the Jog Dial and Escape button, rather than mouse input
devices and the keyboard.
Use Control Center to add frequently used programs such as Bluetooth Settings to your
Navigator Shortcuts. For more information, see Navigator Help in the Navigator application.
Maximizing battery life
Turn off wireless components when you don't use them regularly. Disabling the Bluetooth
or Wi-Fi radios, for example, helps to save power and extend the FlipStart’s battery life. For
more information, see Control Center Help.
Customize your FlipStart’s power management settings in Windows and in Control Center
to best fit your usage patterns. For more information, see Using power management (on
page 42) and the Control Center Help.
Avoid processor- or hard drive-intensive applications and tasks, such as video playback or
video editing.
For more information on configuring your FlipStart for mobile use, see Control Center Help.
.
Using your FlipStart 45
Using FlipStart InfoPane
Your FlipStart includes an external screen, called the InfoPane, built into the lid. You can use
FlipStart InfoPane to:
View your Microsoft Office Outlook e-mail inbox.
View your Microsoft Office Outlook calendar and appointments.
Look up contact information from Microsoft Office Outlook.
How does FlipStart InfoPane work?
InfoPane communicates with Windows to access your information. When you close the
FlipStart, Windows automatically goes into Standby mode and InfoPane turns on. InfoPane
stores a “snapshot” of your Microsoft Office Outlook information so that you can look up your
e-mail and calendar items while Windows is turned off, helping to save the battery life on your
FlipStart.
Note: FlipStart InfoPane only displays information. You cannot enter new information or edit
existing information while using FlipStart InfoPane. If you need to perform actions such as
these, just open the display, and after Windows starts up, use Microsoft Office Outlook to
perform the desired action.
Using FlipStart InfoPane
FlipStart InfoPane enables you to view selected Microsoft Office Outlook information from the
secondary screen on your FlipStart.
The InfoPane home screen
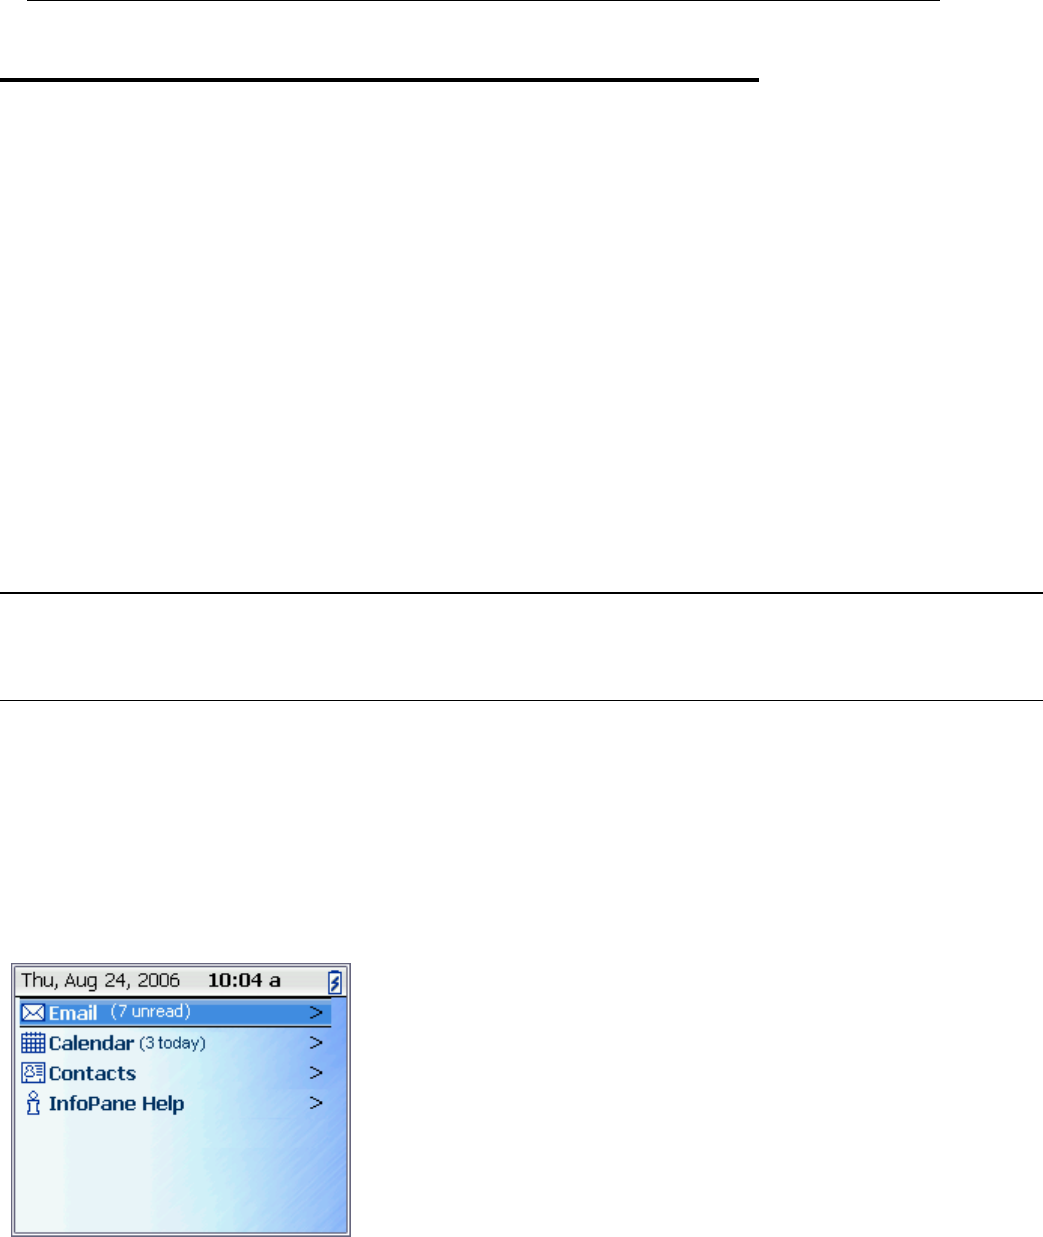
When the FlipStart is on and the lid is closed, the InfoPane is
activated. Press the Jog Dial in to display the home screen.
The home screen is your jumping off point for using all
InfoPane features. Using the home screen, you can quickly
display e-mail messages, appointments, and contacts.
Using the Jog Dial and Escape button on the side of the
FlipStart, you can select options from the home screen, and
then refine your choices to accomplish a specific action.
There are several areas on the screen:
.
Using your FlipStart 46
Title Bar - This line displays the current date and time. In the upper right corner, a battery
indicator shows the remaining battery power on the FlipStart. When the battery reaches 5%
or less, a red critical icon is displayed.
E-mail - Select this option to browse e-mail in your Inbox that has been synchronized with
the InfoPane. If there are unread messages, the display reads (x unread).
Note: If you would like InfoPane to check for new e-mail messages when the lid is closed,
you must first enable this option in the InfoPane section of FlipStart Control Center. For
more information, see Setting up InfoPane to check for new e-mail automatically (on page
47).
Calendar - Select this option to browse the calendar information synchronized from Outlook.
If there are any meetings and appointments scheduled for the current day, the display reads
(x today).
Contacts - Select this option to search through your synchronized contact list and view
important contact details for quick reference.
InfoPane Help - Select this option to view quick reference information about using the
InfoPane, providing easy answers without having to start Windows to view help.
Navigating the InfoPane screen
The following controls are available to navigate the InfoPane screen:
Jog Dial - Used to scroll up and down in lists of items displayed on the InfoPane, and to
select items from lists.
Escape button - Used to cancel out of a screen and return to the previous screen.
Using the Jog Dial
To navigate the InfoPane screen and choose menu items, use the Jog Dial and Escape button
on the right side of the FlipStart.
Use the Jog Dial to navigate items displayed on the InfoPane and to select entries, as follows:

.
Using your FlipStart 47
Move the Jog Dial up and down to move the selection bar from one item to the next on the
screen.
Press the Jog Dial in and release it to select the currently highlighted entry on the screen.
Press the Escape button to go up one level in the menu structure.
Press and hold the Escape button for two or more seconds to quickly return to the main
InfoPane screen.
If a screen contains large amounts of information, such as a large list of contact names, the Jog
Dial goes into "fast scrolling" mode:
Move the Jog Dial up and hold it up to scroll quickly upward in a list.
Move the Jog Dial down and hold it down to scroll quickly downward in a list.
Limitations of the InfoPane
InforPane’s e-mail, calendar, and contact information can only synchronize with Microsoft
Office Outlook. Other e-mail, messaging, or personal information manager software cannot be
used with InfoPane.
Microsoft Office Outlook information displayed on the InfoPane is presented in a read-only
format. You also cannot interact with items as you can when using Microsoft Office Outlook.
Things you cannot do using the InfoPane:
Reply to, delete, or forward e-mail.
Accept meeting requests.
Update meeting and appointment details.
Add, remove, or update contact information.
However, any of these tasks can be accomplished by opening the FlipStart and using Microsoft
Office Outlook normally.
Setting up InfoPane to check for new e-mail automatically
You can set up InfoPane to check for new e-mail messages when the lid is closed. Note,
however, that this feature is turned off by default. To enable this feature, you must first set up
your FlipStart using the following procedure.
To set up automatic e-mail synchronization:
1 Ensure that the following features in Microsoft Office Outlook and Windows are set up
properly:
Microsoft Office Outlook has an e-mail account set up, and you are able to retrieve e-
mail messages using this account.
Microsoft Office Outlook is not configured to prompt for a password whenever you
check for new messages.
Microsoft Windows is not set up to prompt for a password when waking up from
Standby mode.

.
Using your FlipStart 48
2 Enable a sync interval using FlipStart Control Center. (Navigate to InfoPane > Change
InfoPane/Windows sync intervals, and make a selection.)
3 Ensure that the default behavior for putting Windows in Standby mode when the lid is
closed is enabled in FlipStart Control Center. (Navigate to InfoPane > Turn on/off Windows standby
mode).
4 Ensure that you have set up a wired or wireless network connection and that the network
device is available (for example, that the Wi-Fi radio is switched on).
Note: You must be within range of a network for InfoPane to be able to retrieve new e-mail
messages while the lid is closed.
5 Ensure that Microsoft Office Outlook is running and connected when you close the lid.
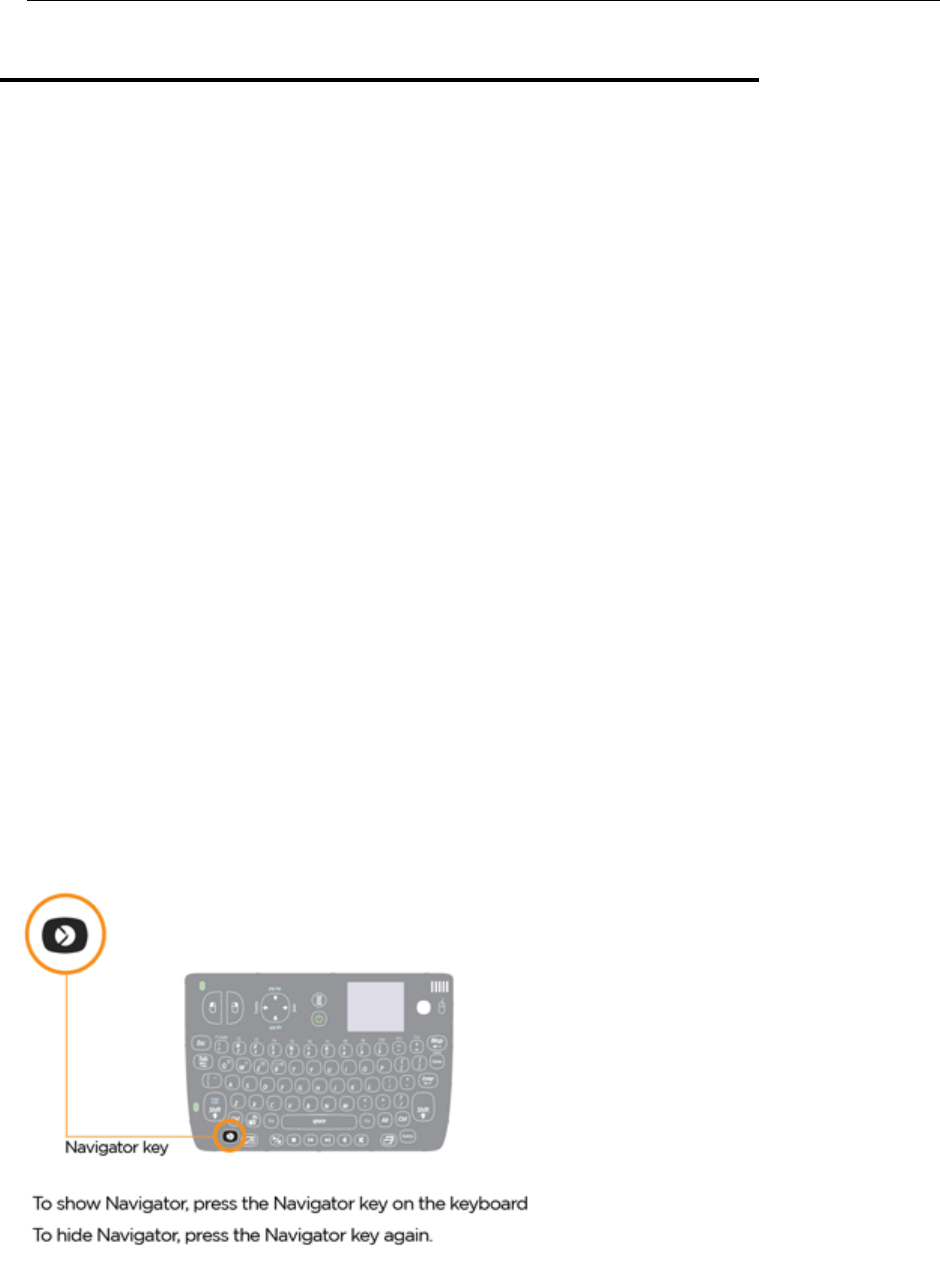
.
Using your FlipStart 49
Using FlipStart software
Your FlipStart contains several custom software applications designed to make your FlipStart
computing experience easier and more efficient. Each section below provides more information
on the different FlipStart software applications installed.
Using FlipStart Navigator
FlipStart Navigator makes it easy to quickly access frequently used programs and frequently
used information. Because Navigator can quickly be started from the keyboard and controlled
using the Jog Dial and Escape button, Navigator helps free you from the navigational
constraints inherent in typical handheld devices.
Navigator makes it a snap to:
View e-mail messages.
View upcoming appointments.
Look up contact information.
Open Web pages.
Navigate the Windows file system.
Open files, folders, and applications from a list of shortcuts defined by you.
How does Navigator work?
Navigator automatically starts whenever your FlipStart first starts up, so it is always running in
the background on your FlipStart, ready to appear when you need it. Simply press the
Navigator key on the keyboard to start the program.
When you start Navigator, a window slides open on the right side of the Windows desktop:
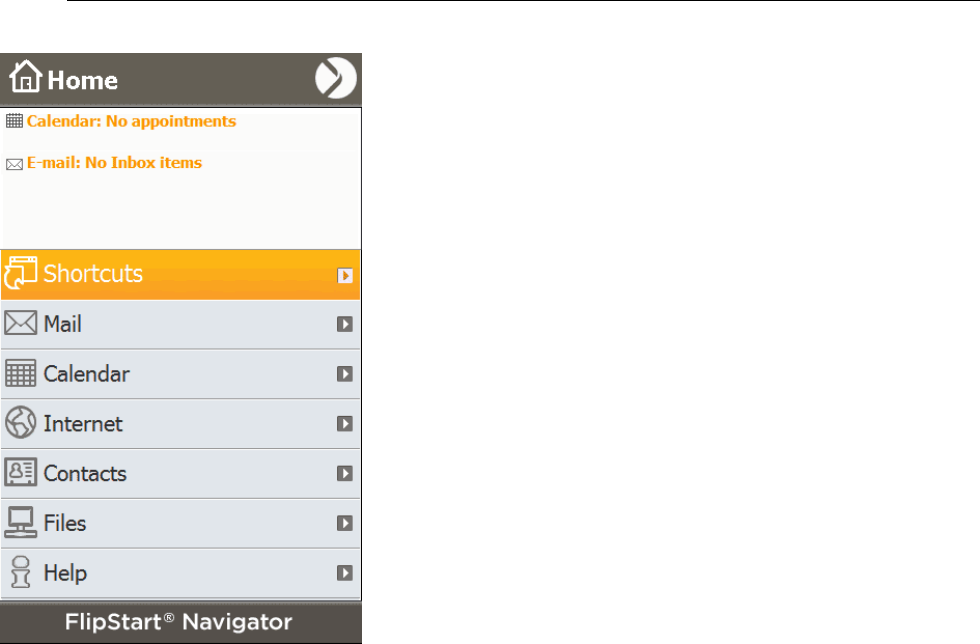
.
Using your FlipStart 50
How do I use Navigator?
Open Navigator by pressing the Navigator key on the keyboard.
Control the Navigator application using the Jog Dial and Escape button located on the right
side of the FlipStart.
Information on Navigator is organized in lists of items in a hierarchical tree structure. Use the
Jog Dial and Escape button to move the selection bar up and down the list and to drill down or
drill up in the hierarchy as follows:
Move the Jog Dial up and down to highlight different items on a list.
Press the Jog Dial in to select a highlighted item and either drill down to a different level of
the hierarchy or perform an action.
Press the Escape button to go up one level in the hierarchy.
Press and hold the Escape button for two or more seconds to return to the Navigator home
screen.
Limitations of Navigator
Navigator’s e-mail, calendar, and contact information can only synchronize with Microsoft
Office Outlook. Other e-mail, messaging, or personal information manager software cannot be
used with Navigator.

.
Using your FlipStart 51
Microsoft Office Outlook and Windows information displayed in Navigator is presented in a
read-only format. You also cannot interact with items as you can when using Microsoft Office
Outlook or Windows
Things you cannot do using Navigator:
Reply to, delete, or forward e-mail.
Accept meeting requests.
Update meeting and appointment details.
Add, remove, or update contact information.
However, any of these tasks can be accomplished by using Microsoft Office Outlook normally.
Using FlipStart Zoom
FlipStart Zoom is a program that magnifies items on the FlipStart screen so that you can better
view and work with them.
For example, if text in a window is difficult to read, use Zoom to magnify the window
containing the text to a size that is more easily readable for you. Or if you are using a Web
browser and an image on a page is too small to see any details, use Zoom to magnify the
image so that you can see the details more clearly.
How does Zoom work?
Zoom works by magnifying the currently active item on the Windows desktop such as a
program window, a dialog box, a pop-up box, a Web page, or an image embedded in a Web
page. However, Zoom does not control the magnification feature already built in to some
programs, and in those programs, pressing the Zoom button and using the Jog Dial will
magnify the entire program window.
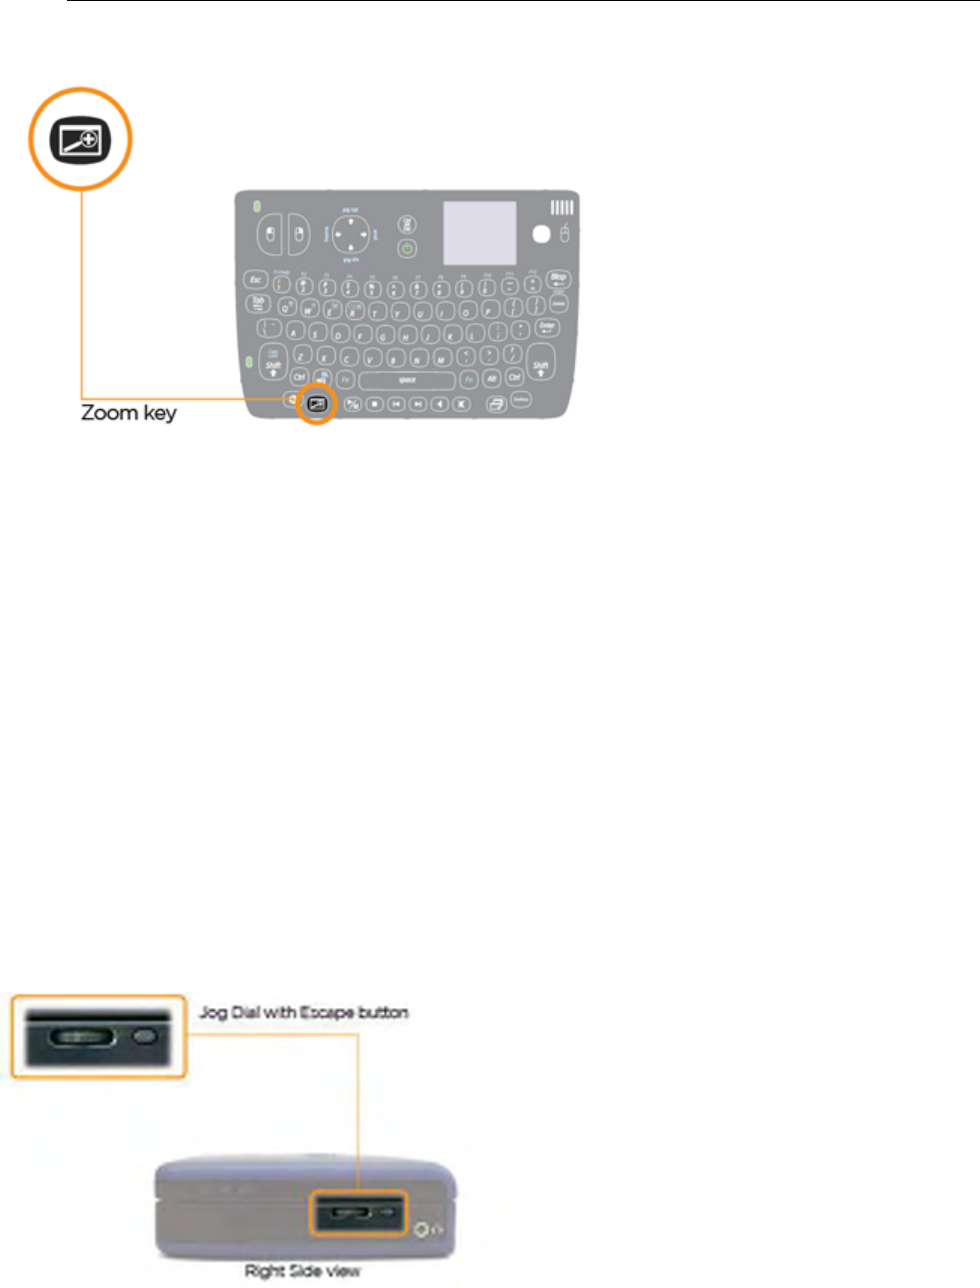
.
Using your FlipStart 52
Limitations of Zoom
Zoom works with most applications, but it may not work properly or at all with some third-
party applications, including programs that render video or graphics using overlays. The
following applications are known to have compatibility issues with Zoom:
Windows Media Player
RealPlayer
Some third-party software DVD players
How do I use Zoom?
You turn Zoom on or off by using the Zoom key.
Once Zoom is turned on, press and hold the Zoom key and then use the Jog Dial on the right
side of the FlipStart to zoom in and out.
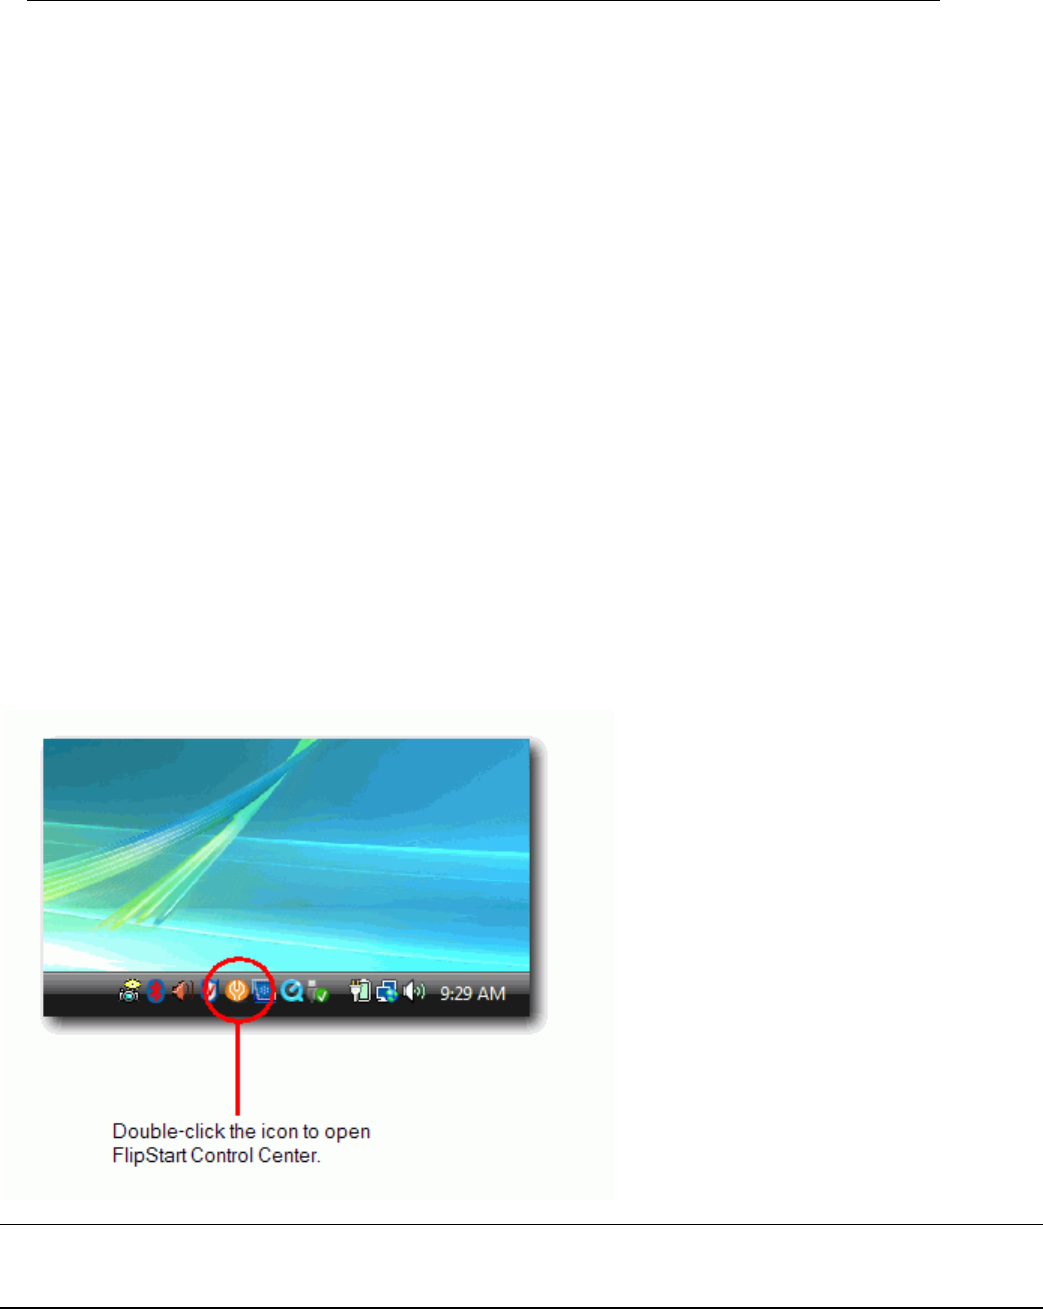
.
Using your FlipStart 53
Once you've reached a comfortable zoom level, you can work in your program as you normally
would. Click outside of the zoomed area, or press the Zoom key again to return to normal
magnification.
Using FlipStart Control Center
FlipStart Control Center is the main hub of settings for changing hardware and software
options unique to your FlipStart.
Using Control Center, you can:
Configure your wireless and Ethernet network settings.
Configure your camera, keyboard, and mouse settings.
Configure InfoPane to synchronize automatically with Microsoft Office Outlook.
Customize FlipStart Navigator.
Get quick access to power management options.
View system information and software version numbers.
Configure Zoom application options.
Starting Control Center
Control Center can be started in a number of ways. The easiest way to launch Control Center is
by double-clicking the Control Center icon in the Windows system tray.
Tip: You can also start Control Center from the Start Menu in Windows, or by adding the
Control Center application to your FlipStart Navigator shortcuts and then launching it using
Navigator.
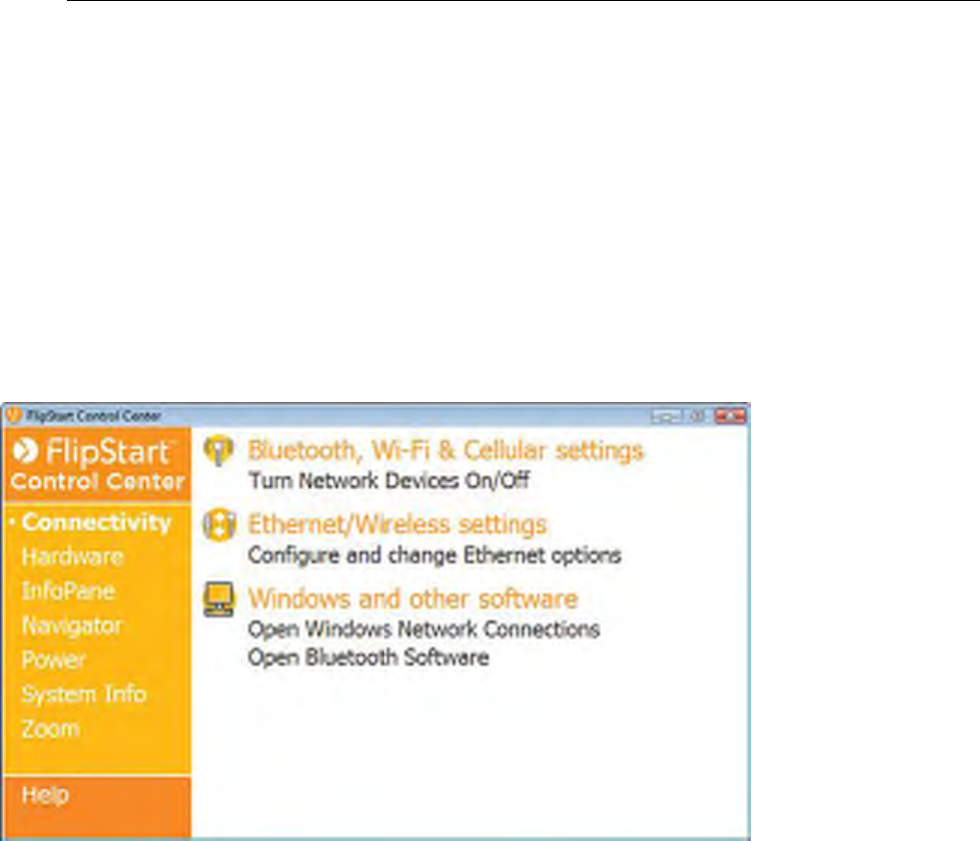
.
Using your FlipStart 54
Using Control Center
Once Control Center has started, select a category of options to configure from the list on the
left side of the window, and then select a specific option to configure from the right side of the
window. For example, to configure connectivity options, click Connectivity from the list on the
left, and then select an item from the list that appears on the right side of the window.
Depending on what you choose, another window opens and enables you to set any available
configuration options.
If you need more information about any of the available options, click Help at the bottom of the
list on the left.
.
Using your FlipStart 55
Using the webcam
Your FlipStart includes a built-in webcam that can be used to record video to a file or stream
video over the Internet. The webcam is located in the center of the bezel just below the main
display of the FlipStart, facing you when you are using the FlipStart normally.
Using your webcam
The webcam can be used for many purposes, including video conferencing, video chat, and
recording still images.
To conserve battery power, the webcam is turned off by default and must be switched on
before you can use it. You can switch the webcam on and choose webcam settings with
Control Center.
To turn the webcam on or off
1 Click the Control Center icon in the system tray and select Hardware.
2 Under Camera settings, choose Turn camera on/off.
The default webcam software automatically starts when you turn the webcam on.
Note: You can also turn the webcam on and off by pressing + on the FlipStart
keyboard.
To change the default camera software
You can change the default program that starts whenever the webcam is turned on to one of
your own choosing.
1 Click the Control Center icon in the system tray and select Hardware.
2 Under Camera settings, choose Select default camera software.
3 On the Select default camera software window, click Browse in the Select application to launch with camera
section.
4 Use the Select application for camera window to locate the application on your hard drive, and
click OK.

.
Using your FlipStart 56
Using audio
Your FlipStart provides multiple ways to enjoy the audio capabilities of Windows and Windows
programs.
Using the internal speaker
The FlipStart includes an internal speaker, which plays back sounds from Windows and
Windows programs.
If an audio output device, such as headphones or external speakers, is plugged into the audio
jack on the FlipStart, the internal speaker is automatically disabled until you unplug the device.
Using the internal microphones
The FlipStart includes two internal microphones (one on each side of the main LCD), which can
be used to record or input sound to Windows and Windows programs. Please see the
documentation for Windows or the Windows program for further information about how to set
options for audio input.
Note: If an audio device, such as a pair of headphones, is plugged into the audio jack, the
internal microphones are automatically disabled until you unplug the device.
Controlling audio output volume
You can control the audio output volume using the standard volume control in the Windows
system tray or from within most Windows applications that provide audio playback.
You can also control audio volume using the built in volume control keys located near the front
of the FlipStart keyboard.
To adjust audio volume up or down:
1 Press the volume key on the keyboard.
2 When the volume control overlay appears on the screen, use the Jog Dial to adjust the
volume up or down.

.
Using your FlipStart 57
To mute audio volume:
Press the mute key on the keyboard.
Using the audio jacks
The FlipStart provides two audio jacks:
A multi-function audio jack on the main unit that you can use for either audio input (with
the supplied ear buds/microphone) or audio output.
A line-out audio jack on the port replicator (available only when the port replicator is
attached).
About the multi-function audio jack
The multi-function audio jack on the FlipStart can provide audio input, audio output, or both
simultaneously with certain audio devices. It is located on the right side of the FlipStart near
the rear of the FlipStart and is marked with green color-coding.
For example, the ear buds included with the FlipStart can serve as both headphones and a
microphone simultaneously when plugged into the multi-function audio jack.
When you plug a device into it, the multi-function audio jack automatically senses what type of
device is connected.
Note: The audio jack on the port replicator only provides unamplified audio output. You cannot
use audio input devices connected to the port replicator line-out audio jack.
Connecting speakers, headphones, and other audio output devices
While the FlipStart comes with a set of ear buds that can function as both headphones and
microphone, you can also connect other audio output devices, such as powered external
speakers, headphones, or another audio device that connects to outgoing speakers (such as
some home entertainment receivers).
Note: You might have to purchase a third-party cable to connect to certain other audio input
devices. Additional audio cables are not included with the FlipStart.
To connect an audio output device:
1 If the port replicator is not attached to your FlipStart, plug your device into the multi-
function audio jack on the main unit.
If the port replicator is attached, plug your audio output device into the line-out audio jack
on the port replicator.
2 Once you connect the output device, all sound output is redirected automatically to the
newly connected speaker or device.
Note: Plugging an audio output device into the built-in multifunction jack does not disable
output to the audio line-out jack on the port replicator, if the port replicator is plugged in.

.
Using your FlipStart 58
Using a microphone
The multi-function audio jack can also be used for audio input from the supplied ear
buds/microphone.
To connect the microphone:
1 Plug the supplied ear bud/microphone jack into the multi-function audio jack on the main
unit.
Note: You must use the multi-function jack on the main unit for audio input. The audio jack
on the port replicator only provides audio output. For microphone functions, you can only
use the supplied ear bud/microphone unit. Other external microphones do not function in
this jack.
2 Once you connect the ear bud/microphone, the internal microphones are disabled and all
sound input is redirected automatically to the external microphone.
See the documentation for Windows or your Windows program for further information on
controlling audio input devices.
Controlling audio playback
Your FlipStart includes dedicated keys and buttons to control audio playback in almost any
media playback application in Windows. These keys are located on the front of the keyboard,
and additional buttons are located on the right side of the lid. You can control audio playback
as you would with any music device.
There are four buttons on the front of the FlipStart keyboard used to control audio playback.
Play/Pause
To start playback, press and release this button.
To pause playback while audio is playing, press and release this button.
To resume paused playback, press and release the button.
Stop
To stop playback while audio is playing, press and release this button.
Rewind/Prev Track
Press and release this button to skip back one track in the current playlist.
If no audio is playing, this button is not functional.

.
Using your FlipStart 59
Fast Forward/Next Track
Press and release this button to skip forward one track in the current playlist.
If no audio is playing, this button is not functional.
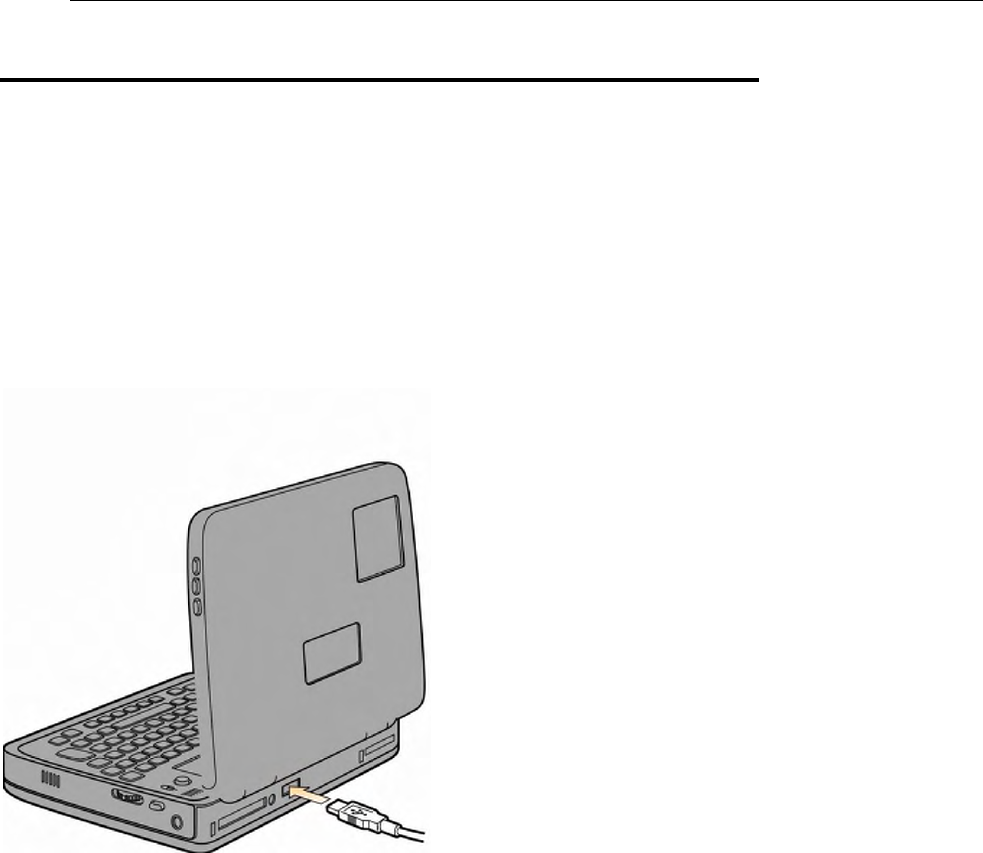
.
Using your FlipStart 60
Using the FlipStart with external
keyboard, video, and mouse
It’s easy to expand your FlipStart to accommodate your working environment. When traveling,
a FlipStart functions just fine on its own without any additional accessories. When in the office
or at home, you can connect other hardware to the FlipStart to make your computing
experience easier and more efficient.
The FlipStart comes with a single, built-in USB 2.0 port on the rear of the FlipStart.
You can also use the included port replicator to expand the number of accessories you can
attach.
Here are just a few examples of how you can expand your FlipStart, some of which can be used
with the FlipStart’s USB 2.0 port, some of which require use of the port replicator:
Add an external monitor for a larger picture.
Add a USB keyboard or mouse, either wired or wireless.
Add Bluetooth devices such as keyboards or mice.
Add a USB disk drive to expand storage.
Using the port replicator
The port replicator is an attachment that you connect to your FlipStart to expand the number
of ports and connectors available to you. The port replicator provides a VGA port, Ethernet
port, two USB ports, an AC power connection, and an audio line-out port, as illustrated below.
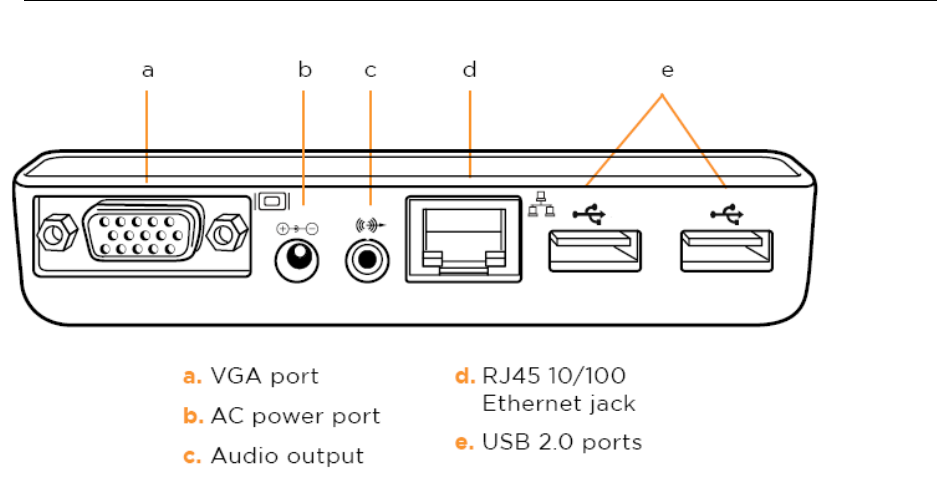
.
Using your FlipStart 61
a. External VGA video out connector
Connect an external VGA monitor or projector to your FlipStart. External devices require a
VGA connector.
b. AC power adapter port
Connect the included AC power cord here and to a live wall socket to provide power to the
FlipStart. The battery automatically recharges whenever the AC power cord is plugged into
this port and into a live wall socket.
c. Line-out audio jack (unamplified)
Connect powered external speakers or any other sound output device that provides its
own amplification.
d. Ethernet 10/100Base-T port
Connect to a 10 or 100/Base-T Ethernet network, or connect (using a crossover Ethernet
cable) to another computer's Ethernet port.
e. Two USB 2.0 ports
Connect additional devices to your FlipStart, including flash memory drives, external hard
drives, external optical drives, additional input devices (such as an external keyboard or
mouse), digital cameras, digital music players, or any other USB device.
Attaching the port replicator
To connect the port replicator, turn off your FlipStart and plug the replicator into the back of
the FlipStart as indicated in the illustration below.
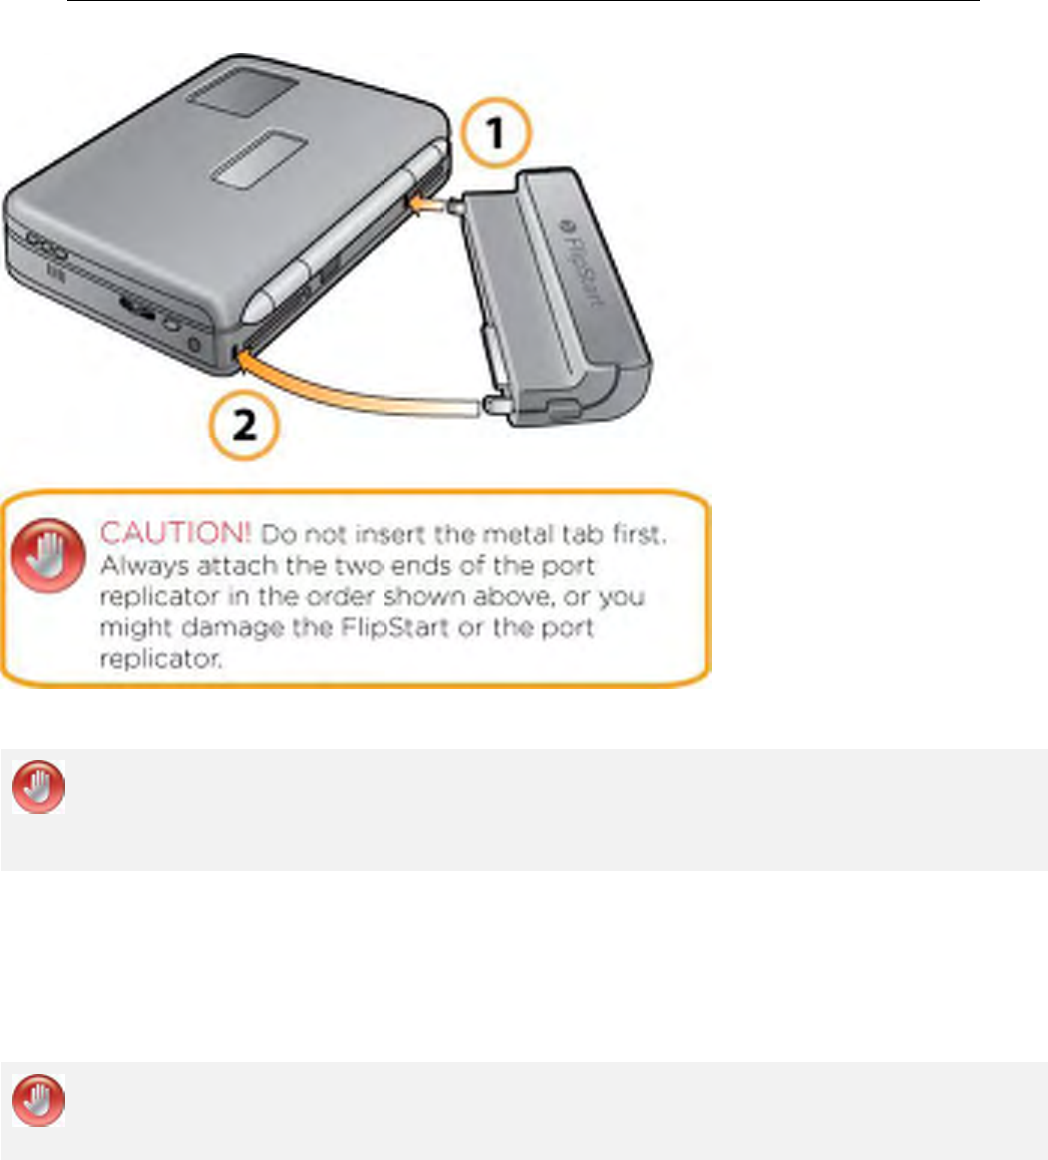
.
Using your FlipStart 62
Turn your FlipStart back on and connect your peripherals directly into the port replicator.
Caution! Insert the port replicator connectors in the order shown above. Do not try to
insert them into the connector slots in any other manner. Do not try to force the
connectors into the slots. If you do, you may damage the connectors, the port
replicator, or the main FlipStart.
Removing the port replicator
To remove the port replicator, press the release button in and gently pull the button end of the
port replicator away from the main unit.
As soon as one connector is detached from the FlipStart, gently unlatch the other end of the
port replicator from the connecting slot on the main unit.
Caution! Do not try to force the connectors out. Do not pull both connectors out at the
same time. If you do, you may damage the connectors, the port replicator, or the
FlipStart.
Attaching an external monitor or other video source
It’s easy to expand your FlipStart to accommodate your working environment by adding a
larger computer monitor. The port replicator that comes with your FlipStart includes a VGA
port that allows you to connect any CRT or LCD monitor that has a standard VGA connector.

.
Using your FlipStart 63
To connect an external monitor:
1 Turn off the FlipStart.
2 Connect the port replicator to the back of your FlipStart.
3 Connect the VGA cable from the external monitor to the VGA port on the port replicator.
4 Turn on the monitor and the FlipStart.
5 Press + .
The Windows desktop from your FlipStart should now appear on the external monitor. To take
your FlipStart mobile again, simply shut off the FlipStart and disconnect the monitor. The next
time you power on the FlipStart, video output will again appear on the FlipStart's screen.
Using Bluetooth devices
Nearly any Bluetooth-compatible device can be connected to your FlipStart. To add a device,
first consult that device’s instructions for any special needs or limitations. Then, use the
Bluetooth Settings wizard to add the device.
To connect to Bluetooth devices:
1 If the Bluetooth radio is turned off on your FlipStart, enable it by opening Control Center and
choosing Turn Network Devices On/Off. Set Bluetooth to On in the Connectivity Status area.
2 Double-click the Bluetooth icon in the Windows system tray and follow the instructions in the
window. For more information, see the help documentation for the Bluetooth utility.
Note: You may need to refer to the instruction manual for your Bluetooth device for more
information during the process.
Changing Bluetooth settings
If you need to change Bluetooth settings for your FlipStart, use the following instructions.
To change Bluetooth settings:
For Windows XP users, go to Start | Control Panel | Network and Internet Connections and click Bluetooth
Devices.
For Windows Vista users, go to Start | Control Panel | Network and Internet and click Bluetooth Devices.
On the Options tab, choose the task that you want to perform from the list. Some of the
options include:
Allow Bluetooth devices to find this computer.
Allow Bluetooth devices to connect to this computer.
Alert me when a new Bluetooth device wants to connect.
Show the Bluetooth icon in the notification area. Select this option to quickly access
Bluetooth settings.

.
Using your FlipStart 64
Changing settings for your external Bluetooth devices
For more detailed information on configuring an external Bluetooth device, see the User's
Guide or help files that came with that device.
To change external Bluetooth device settings:
For Windows XP users:
1 Click Start | Control Panel | Printers and Other Hardware | Bluetooth Devices.
2 Select the icon of the Bluetooth device you want to configure, and click Properties.
3 In the Properties window, click the Services tab to see a list of available services for that device.
Select the check boxes of the options you want to make available and clear the ones you do
not want to be available.
4 Click OK, and then OK again.
For Windows Vista users:
1 For Windows Vista users, click Start | Control Panel | Network and Internet | Bluetooth Devices.
2 On the Devices tab, select the icon of the Bluetooth device you want to configure, and click
Properties.
3 In the Properties window, click the Services tab to see a list of available services for that device.
Select the check boxes of the options you want to make available and clear the ones you do
not want to be available.
4 Click OK, and then OK again.
Note: Many Bluetooth configuration options can be quickly selected by right clicking on the
Bluetooth icon in the system tray, and then selecting an option.
For more information, on troubleshooting Bluetooth wireless technology connection problems,
see Solving problems with Bluetooth (on page 73).
Connecting USB keyboards, mice and other devices
The FlipStart main unit has one built-in USB 2.0 port on the rear, and the FlipStart port
replicator provides two USB 2.0 ports. In addition, you can connect USB hubs to connect as
many devices as needed.
Note: Some USB devices draw power from your FlipStart. Be aware that using some USB
devices while your FlipStart is running on battery power can greatly reduce the amount of time
the battery charge will last. Also, some USB devices might function only if they are using their
own power supply.
Connecting USB devices such as keyboard, mice, cameras, and disk drives to your FlipStart
requires little or no configuration. Many USB devices can be connected and disconnected while
Windows is running.

.
Using your FlipStart 65
However, when connecting some USB devices for the first time, you may need to turn off the
FlipStart first and then connect the USB device or you may need to install special Windows
drivers for the device. For special installation instructions for your USB device, please consult
your device’s documentation before attaching it to the FlipStart.
To connect a USB device to your FlipStart:
1 Plug the USB device into the USB port on the back of the FlipStart, or to one of the USB
ports on the port replicator.
2 Windows should recognize the newly connected USB device, load any needed drivers, and
notify you when the device is ready to be used.

.
Using your FlipStart 66
Learning more about Windows
There are several resources available to help you learn to use Windows successfully and keep
your FlipStart up-to-date.
Windows Help
Windows contains an extensive help system, called the Help and Support Center. Windows
Help and Support provides extensive resources for:
Learning about using Windows.
Networking and the Internet.
Customizing your computer.
Using built-in Windows applications.
Getting additional Windows help.
To access Windows Help, simply press F1 while using the Windows desktop, or select Help and
Support from the Start Menu.
Windows Update
Windows Update is a Windows feature that keeps your FlipStart up-to-date with the latest
program updates, security fixes, and new features and accessories from Microsoft. It is very
important to keep your FlipStart up-to-date because potential security risks from malicious
programs can put your personal and financial information at risk.
Windows Update works by occasionally checking in with Microsoft to see if there are new
updates available. You can have Windows Update check automatically, or manually check for
updates when you are connected to a network. It is strongly recommended that you use
automatic updates to ensure the best protection for your FlipStart.
To turn on Automatic Updates:
For Windows XP users:
1 Click Start | Control Panel | System to open the System Properties window.
2 In the Automatic Updates tab, select Automatic (recommended) if it is not already selected.
3 Select the day and time you want the update process to take place.
4 Click OK to save your changes.
For Windows Vista users:
1 Click Start | All Programs | Windows Update to open the Windows Security Center window.
2 Select Change settings, and choose Install updates automatically (recommended).
3 Select the day and time you want the update process to take place.

.
Using your FlipStart 67
4 Click OK to save your changes.
Note: Press F1 at any time to access Windows Help for the specific task you are trying to
perform.

69
If you have questions or run into problems with your FlipStart hardware or software, there are
several ways to find a solution to your problem. This section contains a series of topics that can
help you troubleshoot your issues, and includes information on getting further help.
In This Chapter
Getting more help........................................................................... 69
Troubleshooting .............................................................................. 70
Getting more help
If you do not find the answer to your question in this section, there are several other
alternatives that you can use to find help.
Help Central - For specific help on FlipStart-specific software such as Control Center, Zoom,
InfoPane or Navigator, launch Help Central from your FlipStart’s desktop and explore the
help sections for those programs.
Online Web support - Visit the FlipStart Web site at http://www.flipstart.com/support for
support articles and contact options.
Customer Support - If you cannot find your answer by using one of the above resources, you
can contact a FlipStart Customer Support representative at 800-399-3037.
CH A P T E R 5
Solving problems

.
Solving problems 70
Troubleshooting
What to do if you have battery or other power problems
Problem: Nothing happens when I press the FlipStart power button.
Suggested troubleshooting steps:
Ensure you have charged the battery before trying to use the FlipStart without an AC
adapter.
Ensure that you have inserted the AC adapter plug into the AC port on the rear of the
computer rather than into the audio jack on the right side of the computer.
Disconnect and reconnect the battery plate on the bottom of your FlipStart to ensure a
good connection. See Charging the battery before using unplugged (on page 18).
Check that the AC adapter is firmly connected to the power source and receiving power.
Problem: The battery seems to run down quickly. What can I do to maximize battery life?
Suggested troubleshooting steps:
Try turning off unused wireless radios and adjusting your power options. For more
information, see Using power management (on page 42).
Problem: The battery is not charging correctly.
Suggested troubleshooting steps:
Detach and re-attach the battery on the bottom of your FlipStart to ensure a good
connection.
Ensure that you have inserted the AC adapter plug into the AC port on the rear of the
computer rather than into the audio jack on the right side of the computer.
Warning! Do not disassemble the battery or attempt to repair damage yourself. Doing
so may result in increased risk of fire, explosion, or leakage, which could result in
personal injury or death.
Warning! There is a danger of explosion if the battery is incorrectly replaced. Replace
only with the same or equivalent battery type as recommended by FlipStart. Labs.

.
Solving problems 71
What to do if the FlipStart or an application freezes
Problem: My application stops responding while I am using it.
Suggested troubleshooting steps:
If an application freezes, try pressing the Ctrl-Alt-Del key to launch Task Manager and
manually end the application.
If an application will not close, or will not restart after closing, restart your FlipStart.
If an application will still not restart, try reinstalling the application.
Problem: My FlipStart stops responding while I am using it.
Suggested troubleshooting steps:
If the FlipStart locks up, try restarting the FlipStart and attempting the same task. Press
and hold the power button for five seconds or longer to turn the FlipStart off, and then
press the power button again to restart.
If the FlipStart still locks up, troubleshoot that application or feature set that caused the
lockup, or refer to the documentation or customer support information for that
application.
What to do if you can't connect to a network
Troubleshooting a problem with your network can be different depending upon which type of
network you are using.

.
Solving problems 72
Solving problems with Wi-Fi connections
Problem: My Wi-Fi radio doesn’t seem to be working at all.
Suggested troubleshooting steps:
Make sure the Wi-Fi radio is enabled in FlipStart Control Center.
Problem: My FlipStart cannot find any public Wi-Fi networks to connect to.
Suggested troubleshooting steps:
Make sure the Wi-Fi radio is enabled in FlipStart Control Center.
Ensure you are within range of an active 802.11b or 802.11g wireless network.
If this is your first time using Wi-Fi, make sure that your wireless network connection has
been configured in Windows, and that the connection icon is visible in the Windows
system tray and shows that you are connected. For more information, see Configuring
Wi-Fi (802.11b/g) wireless networking (on page 26).
Try restarting your FlipStart.
Problem: My FlipStart can see a Wi-Fi network, but cannot connect to it.
Suggested troubleshooting steps:
Check Windows wireless network settings to make sure they match the settings of the
Wi-Fi connection.
Verify that you are using the correct password and encryption type for the wireless
network you wish to join.
Problem: My Wi-Fi connection is spotty or loses connection.
Suggested troubleshooting steps:
You may be close to going out of range. Ensure you are within range of an active 802.11b
or 802.11g wireless network.
Move to where there is a clear view of the wireless network base station or transmitter;
avoid interference from concrete or metal objects and walls.
Check for interference from objects in your environment that emit radio signals, such as
microwave ovens or cordless telephones.

.
Solving problems 73
Solving problems with cellular broadband connections
Problem: My cellular broadband modem doesn’t seem to be working at all, or I am having trouble
connecting to my carrier’s network.
Suggested troubleshooting steps:
Make sure the cellular broadband radio is enabled in FlipStart Control Center.
Make sure that you have purchased a data plan from a supported cellular broadband
wireless carrier, and that you have activated your FlipStart’s cellular broadband device to
work with that network.
Make sure that your wireless carrier’s provides cellular broadband coverage in the area
from which you are attempting to connect.
Consult the documentation for the cellular broadband connection manager software that
you use to connect to your wireless carrier’s network.
Contact your wireless carrier’s customer support for further help.
Solving problems with wired Ethernet connections
Problem: I cannot connect to a network using an Ethernet cable.
Suggested troubleshooting steps:
Make sure other computers on the network can connect to the network successfully.
Disconnect and reconnect the Ethernet cable to your FlipStart, and try accessing the
network again.
Verify that you have your network connection configured correctly. For more
information, see Configuring wired Ethernet networking (on page 28).
Make sure no firewall or security software on your FlipStart is blocking network
connections.
Solving problems with Bluetooth connections
Problem: My FlipStart cannot find my Bluetooth device (or vice-versa) to pair with it.

.
Solving problems 74
Suggested troubleshooting steps:
Check to see if your Bluetooth device is in “discovery” mode. The procedure for making
a device discoverable is different for different devices; a mobile phone might require that
you select an option from a menu, while a keyboard or mouse might only require that
you press a button.
If you made your device discoverable earlier, check to make sure that it is still in
“discovery” mode. Some devices (such as some mobile phones) only enable discovery
for a limited amount of time.
Problem: My Bluetooth connection is very slow in responding or the connection between the
devices keeps dropping out intermittently or is not working at all.
Suggested troubleshooting steps:
Make sure the two devices are still paired.
Check that the external device is in range of the FlipStart. Some connection problems
can be caused by the Bluetooth devices being too far away from each other. Refer to
your device’s user manual for recommended operating distances.
Check that Windows is configured to accept incoming Bluetooth connections (for more
information, see Windows help).
Check that there are no other Bluetooth devices in the area either trying to connect to
the FlipStart or actively using it. If there are, wait until the other Bluetooth devices have
finished using the device you want to use, or disable your Bluetooth device from being
“discovered” by other Bluetooth devices.
Check that there are no other devices in the area using the same radio frequency (2.4
GHz) as Bluetooth. Some devices that might cause radio interference include microwave
ovens, Wi-Fi enabled computers or access points, and some cordless telephones. If this
might be the problem, try moving your FlipStart and Bluetooth device out of the range
of the potentially interfering device.
If all else fails, try removing the device and then adding it again using the steps outlined in
Using Bluetooth devices (on page 63).
What to do if you can't print
Problem: I cannot print to a printer connected to my FlipStart.
Suggested troubleshooting steps:
Make sure the printer is turned on, has paper, and is ready to print.
Verify the printer driver has been installed on your FlipStart. For more information, see
your printer's setup instructions.
Check the cable connecting your FlipStart to your printer.

.
Solving problems 75
Problem: I cannot print to a network printer.
Suggested troubleshooting steps:
Verify the printer driver has been installed on your FlipStart. For more information, see
your printer's setup instructions.
Verify that you have network connectivity and can access other shared network
resources from the FlipStart.
Make sure the printer has been configured to be used by networked computers. Printer
sharing permissions are configured on the computer hosting the printer.
What to do if you have video or screen problems
Problem: My screen has a picture, but it is distorted or unreadable.
Suggested troubleshooting steps:
Try shutting down your FlipStart. Restart the FlipStart to see if the problem has been
solved.
Launch Windows in Safe Mode by pressing F8 at the beginning of startup. If you can
read the screen in Safe Mode, check Display Properties in the Control Panel to verify you
are using the correct display resolution and color depth.
Problem: Certain applications or games that should work on my FlipStart are not functioning
correctly.
Suggested troubleshooting steps:
Update your video drivers. To locate the latest video drivers, check with FlipStart's online
support at http://www.flipstart.com/support.
What to do if you have problems with input devices
Problem: My Bluetooth keyboard or mouse is not functioning or is only working part of the time.

.
Solving problems 76
Suggested troubleshooting steps:
Make sure the two devices are still paired.
Check that the external device is in range of the FlipStart. Some connection problems
can be caused by the Bluetooth devices being too far away from each other. Refer to
your device’s user manual for recommended operating distances.
Problem: My touchstick or touchpad is not working correctly.
Suggested troubleshooting steps:
Use your finger as the pointing device for the touchpad, not a sharp pointing device like
a pencil. Sharp objects can damage the touchpad.
Inspect your touchpad closely to ensure no crumbs, particles, or oil smears are marring
the surface. Clean the input device with a damp, soft cloth, if necessary.
Problem: The Jog Dial on the side of my FlipStart is not working correctly.
Suggested troubleshooting steps:
Inspect your Jog Dial closely to ensure no crumbs, particles, or oil smears are marring
the surface. Clean the Jog Dial with a damp, soft cloth, if necessary.
What to do if you have problems with FlipStart InfoPane
Problem: When I close my FlipStart, the InfoPane does not turn on.
Suggested troubleshooting steps:
Press the Jog Dial in to activate the InfoPane screen.
Make sure you have closed your FlipStart completely.
Verify that InfoPane is enabled in the Control Center. For more information, see InfoPane
options in Control Center Help.
Try restarting your FlipStart.
What to do if FlipStart software is not working properly
Problem: I am having problems using FlipStart Navigator, FlipStart Control Center, or FlipStart
Zoom.

.
Solving problems 77
Suggested troubleshooting steps:
Try restarting your FlipStart.
Make sure that you have no applications running that could interfere with your software,
such as desktop control programs or spyware.
What to do if you have problems with Microsoft Windows
Problem: I am having problems with Microsoft Windows features or configuring Windows.
Suggested troubleshooting steps:
Microsoft Windows and the Microsoft Web site (http://www.microsoft.com/windows)
contain extensive resources for troubleshooting Windows.
To start Windows help in Windows XP, click Start and then choose Help and Support.
To start Windows help in Windows Vista, click the Vista button, and select Help and Support.
To view help information for the feature you are working with, press F1 (Fn+1) at any time.

79
Main Unit
CPU
1.1 GHz Intel® Pentium® M Processor, Ultra Low Voltage
RAM
512 MB DDR RAM
Video memory
256 MB (shared)
Dimensions
5.9”x4.5”x1.35” with Slimline Battery
5.9”x4.5”x1.5” with Extended Life Battery
Form factor
Clamshell
Hard drive
30 GB (shock-mounted)
Display
5.6” Wide SVGA TFT, 1024 x 600 resolution, 216 dpi
Rear display
1.88” color LCD, 220 x 176 resolution
Keyboard
QWERTY thumb keyboard
Pointer
Touchpad and touchstick
Other input devices
Jog Dial with Escape button, audio control buttons
Sound chip
16/20/24-bit PCM
Bluetooth wireless
technology
V2.0
Ethernet
Yes (on Port Replicator)
Wireless WAN
3G cellular broadband mobile networking (EV-DO)
Wi-Fi
802.11b/g
USB
1 USB 2.0 port on device
Power connector
Auto switching 110/240 volt AC power adapter and
battery charger
Lithium-Polymer battery
life
Slimline: 1-3 hours (approximate, depending on usage)
Standard high capacity battery: 3-6 hours
(approximate, depending on use)
Weight
1.5 lbs. with Slimline Battery
1.75 lbs. with Standard High-Capacity Battery
Operating system and
other applications
Microsoft Windows Vista Business or Microsoft
Windows XP Professional
FlipStart InfoPane, FlipStart Navigator, FlipStart
Zoom, FlipStart Control Center
AP P E N D I X A
Specifications

.
Appendix A Specifications 80
Camera
VGA: 640x480 resolution
Color depth: 8bpp
Frame rate: 30 fps
Audio
2 internal microphones
1 internal speaker
1 3.5mm multi-function audio input/output jack
Operating environment
Temperature: 41° F - 95° F (5° C - 35° C)
Relative humidity: 10% to 90% RH (non-condensing)
Port Replicator
Ports and
connectors
VGA output port
Audio line-out jack
10/100 Ethernet port
Two USB 2.0 ports
AC power jack

81
FCC Compliance Statement
This device complies with part 15 of the FCC rules. Operation is subject to the following two
conditions: (1) this device may not cause harmful interference, and (2) this device must accept
any interference received, including interference that may cause undesired operation.
Radio and Television Interference
This equipment has been tested and found to comply with the limits for a Class B digital
device, pursuant to Part 15 of the FCC Rules. These limits are designed to provide reasonable
protection against harmful interference in a residential installation. This equipment generates,
uses and can radiate radio frequency energy and, if not installed and used in accordance with
the instructions, may cause harmful interference to radio communications. However, there is no
guarantee that interference will not occur in a particular installation. If this equipment does
cause harmful interference to radio or television reception, which can be determined by turning
the equipment off and on, the user is encouraged to try to correct the interference by one or
more of the following measures:
Reorient or relocate the receiving antenna.
Increase the separation between the equipment and receiver.
Connect the equipment into an outlet on a circuit different from that to which the receiver
is connected.
If necessary, consult a FlipStart-authorized service provider or see the service and support
information that came with your FlipStart product. Or, consult an experienced radio/television
technician for additional suggestions.
Important: Any changes or modifications not expressly approved by Vulcan Portals Inc. could
void the user’s authority to operate the equipment.
AP P E N D I X B
Regulatory information

.
Appendix B Regulatory information 82
This product was tested for EMC compliance under conditions that included the use of
FlipStart peripheral devices. It is important that you use FlipStart peripheral devices to reduce
the possibility of causing interference to radios, television sets, and other electronic devices.
You can obtain FlipStart peripheral devices through a FlipStart-authorized dealer. For non-
FlipStart peripheral devices, contact the manufacturer or dealer for assistance.
This device has been evaluated for RF exposure compliance for body-worn, or laptop
configurations only. Use in other configurations, may expose the user to harmful Radio
Frequency energy in excess of the FCC’s maximum permissible limit (1.6 W/kg). This device
operates below the FCC required limit.
Responsible party (contact for FCC matters only):
Vulcan Portals Inc.
Product Compliance
505 5th Ave. S., Suite 900
Seattle, WA 98104
USA

.
Appendix C FlipStart Software End User License Agreement 83
This Software End User License Agreement (“Agreement”) is between you (both the individual
installing the Program and any single legal entity on behalf of which such individual is acting)
(“You” or “Your”) and FlipStart Labs, a dba of Vulcan Portals Inc. (“Vulcan”).
IT IS IMPORTANT THAT YOU READ CAREFULLY AND UNDERSTAND THIS AGREEMENT. YOU
AGREE TO BE BOUND BY THE TERMS OF THIS AGREEMENT BY INSTALLING, COPYING, OR
OTHERWISE USING THE PROGRAM AND EQUIPMENT. IF YOU DO NOT AGREE WITH ALL
THE TERMS OF THIS AGREEMENT AND DO NOT AGREE TO BE BOUND BY THIS
AGREEMENT, PLEASE DO NOT INSTALL OR USE THIS PROGRAM OR EQUIPMENT. IF YOU
DO NOT ACCEPT THIS AGREEMENT, YOU WILL NOT BE REGISTERED TO USE OR ACCESS
THE PROGRAM.
1. Definitions
1.1 “Documentation” means the user guides for installation and use of the Program that Vulcan
makes generally available.
1.2 “Program” means the software created by Vulcan, including FlipStart InfoPane, FlipStart
Navigator, FlipStart Control Center, and FlipStart Zoom, in object code form only, and the
media, Documentation and any updates provided by Vulcan to You and for which You are
granted a license pursuant to this Agreement.
1.3 “Equipment” means the Vulcan FlipStart ultra-portable computer.
2. Program license
2.1 Limited License. Vulcan hereby grants to You a limited, non-exclusive, non-transferable
license (without the right to sublicense):
(a) to use a single copy of the Program solely for Your own internal personal use on the
Equipment on which the Program was first installed or, on a temporary basis, on a backup
system if such Equipment is inoperative, consistent with the limitations specified or referenced
in this Agreement and the Documentation;
(b) to use the Documentation provided with the Program in support of Your authorized use of
the Program; and
AP P E N D I X C
FlipStart Software End User
License Agreement

.
Appendix C FlipStart Software End User License Agreement 84
(c) to copy the Program for archival or backup purposes, and to make a sufficient number of
copies for the intended use described in the Documentation, provided that all titles and
trademark, copyright and restricted rights notices are reproduced on all such copies.
2.2 Restrictions. You will not copy or use the Program (including the Documentation) except
as expressly permitted by this Agreement. You will not relicense, sublicense, rent or lease the
Program or use the Program for third-party training, commercial time-sharing or service
bureau use. You will not, and will not permit any third party to, modify, adapt, translate, reverse
engineer, disassemble, decompile or make derivative works of any Program, except to the
extent expressly permitted by applicable law, and then only after You have notified Vulcan in
writing of Your intended activities. You will not use the Program on multiple processors
without the prior written consent of Vulcan.
2.3 Ownership. Vulcan will retain all right, title and interest in and to the patent, copyright,
trademark, trade secret and any other intellectual property rights in the Program and any
derivative works thereof, subject only to the limited licenses set forth in this Agreement. You
do not acquire any other rights, express or implied, in the Program other than those rights
expressly granted under this Agreement.
2.4 No Support. Unless otherwise agreed upon, Vulcan has no obligation to provide support,
maintenance, upgrades, modifications or new releases under this Agreement.
3. No warranty
IN THE ABSENCE OF ANY WARRANTY BY A THIRD-PARTY, VULCAN MAKES NO
REPRESENTATIONS OR WARRANTIES, EITHER EXPRESS OR IMPLIED, OF ANY KIND WITH
RESPECT TO THE PROGRAM. THE PROGRAM IS PROVIDED “AS IS” WITH NO WARRANTY.
YOU AGREE THAT YOUR USE OF THE PROGRAM IS AT YOUR SOLE RISK. TO THE FULLEST
EXTENT PERMISSIBLE UNDER APPLICABLE LAW, VULCAN EXPRESSLY DISCLAIMS ALL
WARRANTIES OF ANY KIND, EXPRESS OR IMPLIED, WITH RESPECT TO THE PROGRAM,
INCLUDING WARRANTIES OF MERCHANTABILITY, FITNESS FOR A PARTICULAR PURPOSE,
SATISFACTORY QUALITY, ACCURACY, TITLE AND NON-INFRINGEMENT, AND ANY
WARRANTIES THAT MAY ARISE OUT OF COURSE OF PERFORMANCE, COURSE OF
DEALING OR USAGE OF TRADE. VULCAN DOES NOT WARRANT THAT THE PROGRAM WILL
OPERATE IN COMBINATION WITH HARDWARE, SOFTWARE, SYSTEMS OR DATA NOT
PROVIDED BY VULCAN, EXCEPT AS EXPRESSLY SPECIFIED IN THE DOCUMENTATION, OR
THAT THE OPERATION OF THE PROGRAM WILL BE UNINTERRUPTED OR ERROR-FREE.
4. Termination
This Agreement is effective until terminated. Vulcan may terminate this Agreement at any time
upon Your breach of any of the provisions hereof. Upon termination of this Agreement, You will
cease all use of the Program, return to Vulcan or destroy the Program and all Documentation
and related materials in Your possession, and so certify to Vulcan. Except for the license
granted herein and as expressly provided herein, the terms of this Agreement will survive
termination.

.
Appendix C FlipStart Software End User License Agreement 85
5. General terms
5.1 Law. This Agreement and all matters arising out of or relating to this Agreement will be
governed by the internal laws of the State of Washington without giving effect to any choice of
law rule. This Agreement will not be governed by the United Nations Convention on Contracts
for the International Sales of Goods, the application of which is expressly excluded. In the event
of any controversy, claim or dispute between the parties arising out of or relating to this
Agreement, such controversy, claim or dispute may be tried solely in a state or federal court
for King County, Washington, and the parties hereby irrevocably consent to the jurisdiction and
venue of such courts.
5.2 Limitation of Liability. In no event will either party be liable for any indirect, incidental,
special, consequential or punitive damages, or damages for loss of profits, revenue, business,
savings, data, use or cost of substitute procurement, incurred by either party or any third party,
whether in an action in contract or tort, even if the other party has been advised of the
possibility of such damages or if such damages are foreseeable. In no event will Vulcan’s
liability for damages hereunder exceed the amounts actually paid by You to Vulcan for the
Program. The parties acknowledge that the limitations of liability in this Section 5.2 and in the
other provisions of this Agreement and the allocation of risk herein are an essential element of
the bargain between the parties, without which Vulcan would not have entered into this
Agreement. Vulcan’s pricing reflects this allocation of risk and the limitation of liability specified
herein.
5.3 Severability and Waiver. If any provision of this Agreement is held to be illegal, invalid or
otherwise unenforceable, such provision will be enforced to the extent possible consistent with
the stated intention of the parties, or, if incapable of such enforcement, will be deemed to be
severed and deleted from this Agreement, while the remainder of this Agreement will continue
in full force and effect. The waiver by either party of any default or breach of this Agreement
will not constitute a waiver of any other or subsequent default or breach.
5.4 No Assignment. You may not assign, sell, transfer, delegate or otherwise dispose of,
whether voluntarily or involuntarily, by operation of law or otherwise, this Agreement or any
rights or obligations under this Agreement without the prior written consent of Vulcan. Any
purported assignment, transfer or delegation by You will be null and void. Subject to the
foregoing, this Agreement will be binding upon and will inure to the benefit of the parties and
their respective successors and assigns.
5.5 Export Administration. You will comply fully with all relevant export laws and regulations of
the United States, including, without limitation, the U.S. Export Administration Regulations
(collectively “Export Controls”). Without limiting the generality of the foregoing, You will not,
and You will require Your representatives not to, export, direct or transfer the Program, or any
direct product thereof, to any destination, person or entity restricted or prohibited by the
Export Controls.

.
Appendix C FlipStart Software End User License Agreement 86
5.6 Entire Agreement. This Agreement constitutes the entire agreement between the parties
and, other than any Vulcan standard form customer agreement signed by the parties,
supersedes all prior or contemporaneous agreements or representations, written or oral,
concerning the subject matter of this Agreement. In the event of a conflict between the terms
of this Agreement and a signed Vulcan standard form customer Agreement, the terms of the
signed customer agreement will control. This Agreement may not be modified or amended
except in a writing signed by a duly authorized representative of each party; no other act,
document, usage or custom will be deemed to amend or modify this Agreement. It is expressly
agreed that the terms of this Agreement will supersede the terms in any of Your purchase
orders or other ordering documents.

87
A
AC power „ 14, 61
activation key
Windows „ 17
adding
accessories to FlipStart „ 29, 36
external devices to FlipStart „ 29, 36
air ventilator „ 14
arrow keys
D-pad „ 10, 21
attaching
battery „ 17
port replicator „ 61
USB devices „ 14
audio
connecting output devices „ 57
control button appearance „ 13
controling output volume „ 56
controls „ 12
input jack „ 13
output jack „ 13
player controls „ 21
using audio jacks „ 57
volume controls „ 21
B
battery
attaching „ 17
maximizing battery life „ 44
power indicator „ 18
removing „ 17
troubleshooting problems „ 70
Bluetooth wireless devices
changing Bluetooth device settings „ 64
changing Bluetooth settings „ 63
configuring networking using Bluetooth
wireless „ 29
connecting Bluetooth devices „ 37, 63
connecting to a network „ 30
enabling on FlipStart „ 30
making a connection „ 31
network connections „ 26
troubleshooting problems „ 73
brightness
adjusting the screen „ 22
C
calendar
InfoPane „ 46
Navigator „ 49
camera
changing webcam software „ 55
capitalization
caps lock „ 22
caps lock „ 22
cellular broadband
network connections „ 26
cellular wireless broadband
configuring networking „ 28
clicking
mouse buttons „ 10, 21
touchpad „ 11, 21
touchstick „ 11, 21
connecting
external monitor „ 36
FlipStart to the Internet „ 26
USB mouse or keyboard „ 36
Connectivity
Control Center „ 54
contacts
InfoPane „ 46
Navigator „ 49
context menu
opening „ 22
Control Center
about „ 53
appearance „ 54
connectivity „ 54
Hardware „ 54
Help „ 54
icon appearance „ 53
InfoPane „ 54
Navigator „ 54
Power „ 54
power options „ 42
starting „ 53
System Info „ 54
using „ 54
Windows networking tools „ 28
Zoom „ 54
cooling „ 14
CTRL-ALT-DEL key „ 21
customer support
contacting „ 6, 69
Help Central „ 5
Knowledge Base „ 6, 69
D
desktop
Index

.
Index 88
customizing settings and preferences „ 40
desktop key „ 21
direction keys
D-pad „ 10, 21
display
attaching external video „ 36, 62
options and themes „ 40
switching to external display „ 22
troubleshooting problems „ 75
D-pad „ 10
appearance „ 21
E
e-mail
automatic checking in InfoPane „ 47
checking for new e-mail „ 47
InfoPane „ 46
Navigator „ 49
encryption
using Wi-Fi security encryption „ 27
End User License Agreement „ 83
Escape button
appearance „ 13
navigating „ 12
Navigator „ 50
using InfoPane „ 46
Ethernet
configuring network switching „ 31
configuring the Ethernet connection „ 29
configuring wired networking „ 28
network connections „ 26
troubleshooting problems „ 73
external devices
adding to FlipStart „ 29, 36
attaching external video „ 36, 62
attaching port replicator „ 61
connecting Bluetooth devices „ 37
connecting USB devices „ 64
connecting USB mouse or keyboard „ 36
keyboard „ 60
mouse „ 60
removing port replicator „ 62
troubleshooting „ 75
video „ 60
F
FlipStart
attaching the port replicator „ 29, 36
Control Center „ 53
customer support „ 6, 69
customizing the desktop „ 40
enabling Bluetooth „ 30
End User License Agreement „ 83
holding „ 19
maximizing battery life „ 44
maximizing performance „ 44
Navigator „ 39, 49
preparing for first use „ 17
regulatory information „ 81
setting up „ 16
specifications „ 79
troubleshooting „ 69, 70
turning on „ 10, 21
using „ 39
using external devices „ 60
webcam „ 55
Zoom „ 21, 24, 51
Fn keys „ 22
fonts
modifying fonts „ 40
function keys „ 22
H
Hardware
Control Center „ 54
headphones
connecting „ 57
Help
Control Center „ 54
Help Central „ 69
InfoPane „ 46
using Help Central „ 5
Windows „ 66
Help Central
accessing „ 5
Help „ 69
home screen
InfoPane „ 45
I
inbox
InfoPane „ 46
Navigator „ 49
updating InfoPane e-mail „ 47
InfoPane

.
Index 89
about „ 45
calendar „ 46
checking for new e-mail „ 47
contacts „ 46
Control Center „ 54
e-mail „ 46
Help „ 46
home screen „ 45
inbox „ 46
limitations „ 47
navigating „ 46
screen „ 12
troubleshooting „ 76
using „ 39, 45
using on-the-go „ 44
using the Escape button „ 46
using the Jog Dial „ 46
input devices
keyboard „ 20
using „ 20
insert „ 22
installing software „ 33
downloaded from the Internet „ 33
from a local network „ 33
from a removable storage device „ 33
from another computer „ 33
Internet
Bluetooth wireless connections „ 26
bookmarks in Navigator „ 49
cellular broadband „ 26
configuring Wi-Fi „ 26, 72
connecting FlipStart „ 26
Ethernet „ 26
supported networking technologies „ 26
Wi-Fi „ 26
J
jacks
audio „ 13, 57
Jog Dial
appearance „ 13
location and appearance „ 24
navigating „ 12
Navigator „ 50
using InfoPane „ 46
using with FlipStart „ 24
K
key
activation key „ 17
keyboard
appearance „ 20
connecting USB keyboard „ 36, 64
external keyboard „ 60
special keys „ 20
keys
CTRL-ALT-DEL key „ 21
desktop key „ 21
Navigator key „ 21
window switching key „ 21
Zoom key „ 21
Knowledge Base
accessing „ 6, 69
L
LED
battery power indicator „ 18
status „ 11
M
microphone
connecting „ 58
using internal microphones „ 56
Microsoft
Windows activation key „ 17
monitor
attaching an external monitor „ 36, 62
switching to external monitor „ 22
mouse
clicking mouse buttons „ 10, 21
connecting USB mouse „ 36, 64
external mouse „ 60
mouse buttons „ 10, 21
touchpad „ 11, 21
touchstick „ 11, 21
mouse buttons
appearance „ 21
music
audio controls „ 12, 21
controlling playback „ 58
playing „ 58
N
navigating
Escape button „ 12
InfoPane „ 46
Jog Dial „ 12
Navigator „ 50
Navigator

.
Index 90
about „ 49
appearance „ 49
calendar „ 49
contacts „ 49
Control Center „ 54
Escape button „ 50
finding files „ 49
inbox „ 49
Internet bookmarks „ 49
Jog Dial „ 50
limitations „ 50
navigating „ 50
Navigator key „ 21
shortcuts „ 49
turning on and off „ 49
networking
automating connection settings „ 31
Bluetooth networks „ 26
cellular broadband connections „ 26
cellular wireless broadband „ 28
configuring Bluethooth wireless „ 29
configuring Ethernet „ 28, 29
configuring network switching „ 31
configuring Wi-Fi „ 26, 72
configuring Wi-Fi access „ 27, 28
connecting to a network using Bluetooth
wireless„ 30
Ethernet networks „ 26
troubleshooting problems „ 71
Wi-Fi networks „ 26
O
Outlook
InfoPane calendar „ 39, 45
InfoPane contacts „ 39, 45
InfoPane inbox „ 39, 45
P
personalization
display options and themes „ 40
modifying fonts „ 40
start menu and taskbar „ 41
Windows „ 40
port replicator
appearance „ 36, 60
attaching „ 29, 36, 61
connector „ 14
removing „ 62
using „ 36, 60
ports
AC power „ 14
USB „ 14
power
AC port „ 14
configuring power options „ 42
Control Center options „ 42
maximizing battery life „ 44
maximizing power usage „ 44
power button „ 10, 21
power management „ 18, 42, 44, 70
status LEDs „ 11
troubleshooting problems „ 70
Windows power options „ 42
Power
Control Center „ 54
preferences
display options and themes „ 40
modifying fonts „ 40
start menu and taskbar settings „ 41
printing
troubleshooting problems „ 74
R
radios
activating Wi-Fi radio „ 27
turning on and off „ 22
wireless radios „ 22
removing
battery „ 17
port replicator „ 61
S
screen
adjusting brightness „ 22
InfoPane screen „ 12
main screen „ 10
troubleshooting problems „ 75
security
using Wi-Fi security encryption „ 27
Wi-Fi „ 26
setting up
FlipStart „ 16
shortcuts
Navigator „ 49
software
changing default webcam software „ 55
installing „ 33
installing downloaded files „ 33
installing from a local network „ 33
installing from a removable storage device „ 33
installing from another computer „ 33
launching webcam software „ 55
troubleshooting FlipStart software „ 76
speakers
connecting „ 57
using internal speaker „ 56
specifications
FlipStart „ 79
start menu settings „ 41
support

.
Index 91
contacting customer support „ 6, 69
FlipStart support „ 6, 69
Knowledge Base „ 6, 69
using Help Central „ 5
System Info
Control Center „ 54
T
taskbar settings „ 41
tilde „ 22
touchpad
controling mouse „ 11, 21
touchstick
controlling mouse „ 11, 21
troubleshooting
application stops responding „ 71
battery problems „ 70
Bluetooth connections „ 73
Ethernet connections „ 73
external devices „ 75
FlipStart „ 69, 70
FlipStart software „ 76
InfoPane „ 76
networking problems „ 71
printing „ 74
video problems „ 75
Wi-Fi problems „ 72, 73
Windows „ 77
turning on
FlipStart „ 10, 21
U
updates
automatic Windows updates „ 66
USB
connecting USB devices „ 64
connecting USB mouse or keyboard „ 36
ports „ 14
V
ventilator „ 14
video
attaching external video „ 62
external monitor „ 60
troubleshooting problems „ 75
volume
audio controls „ 21
controlling audio output „ 56
W
webcam „ 10
changing default software „ 55
FlipStart „ 55
launching software „ 55
turning on and off „ 22
using „ 55
Wi-Fi
activating radio „ 27
configuring access „ 27
configuring access using Windows „ 27
configuring wireless networking „ 26, 72
configuring with Control Center „ 28
security „ 26
troubleshooting problems „ 72, 73
wireless network „ 26
window switching key „ 21
Windows
activation key „ 17
automatic updates „ 66
configuring Wi-Fi-access „ 27
Help „ 66
personalization „ 40
power options „ 42
troubleshooting „ 77
update „ 66
wireless radios
turning on and off „ 22
Z
Zoom
about „ 21, 24, 51
Zoom key „ 21
Zoom key
location and appearance „ 24

Online support: www.flipstart.com/support
Customer support: 800-399-3037
© 2007 FlipStart Labs. All rights reserved. FlipStart® and InfoPane™ are registered trademarks
and/or unregistered trademarks of Vulcan Portals Inc. The
Bluetooth
word mark and logos
are owned by the Bluetooth SIG, Inc. and any use of such marks by Vulcan Portals Inc. is
under license. All other brands, product names, company names, trademarks, or service marks
are the properties of their respective owners. Screen images simulated. Actual product may differ.
Part no. 600-0118-01