WELBILT Breadmaker Manual L0903103
Welbilt-manual-ABM4100T Welbilt-manual-ABM4100T
User Manual: WELBILT WELBILT Breadmaker Manual WELBILT Breadmaker Owner's Manual, WELBILT Breadmaker installation guides
Open the PDF directly: View PDF ![]() .
.
Page Count: 47
...._;;iiii
_ _!:i_!_i, i'_
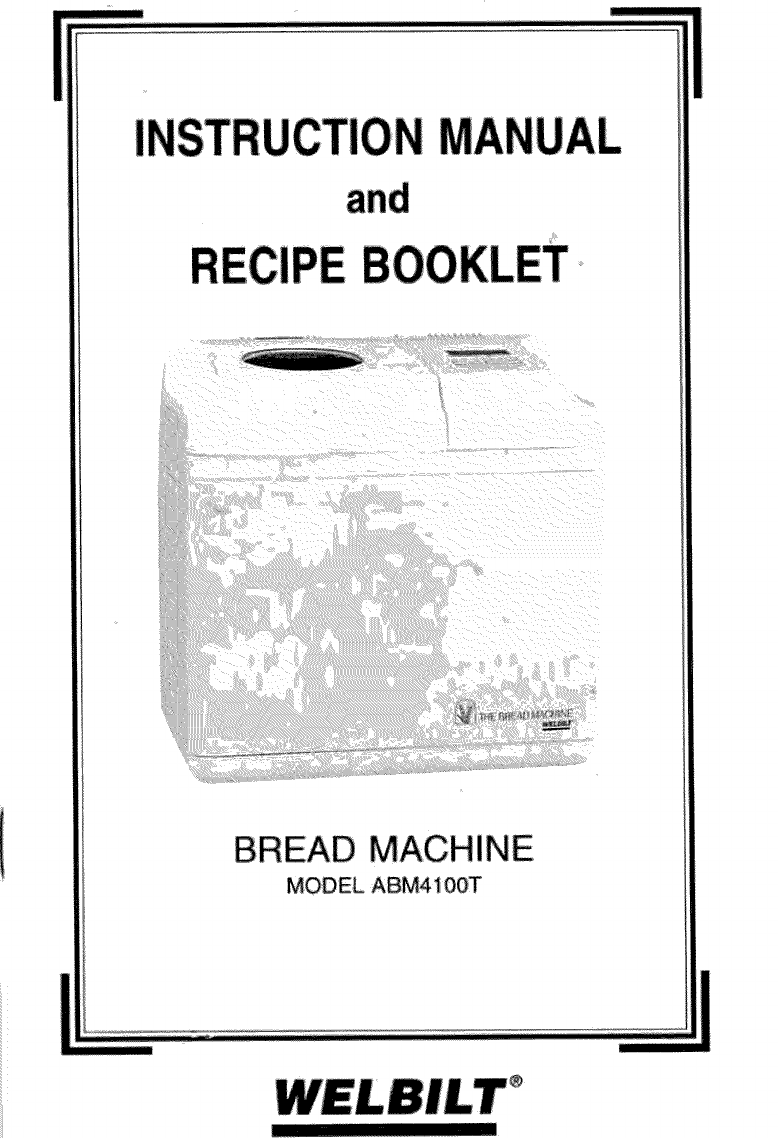
BREAD MACHINE
MODEL ABM4100T
There never has been as much interest in home bread baking as since
the introduction of the first automatic bread machines in 1987. Since
then. millions of people have learned to enjoy the pleasure and
gratification of making and serving fresh homemade bread to family
and friends. And to think that the best part of all is that the bread
machine does all of the work and only requires a few minutes of your
time and attention.
Before using the Bread Machine for the first time, please read the
instructions contained in this manual. Follow the steps carefully and
use the ingredients specified in the recipes.
If you should have any questions about your Welbilt Bread Machine.
please write to:
DELETED BECAUSE THEY WENT OUT OF BUSINESS
Check with http://www.tritronicsinc.com/
IMPORTANT SAFEGUARDS HOUSEHOLD USE ONLY
When using electrical appliances, basic safety precautions should
always be followed, including the following:
1. Read all instructions before using the appliance.
2. Do not touch hot surfaces. Use the appliance's handles or knobs.
3. To protect against electrical shock, do not immerse power cord,
plugs, or the appliance in water or other liquid.
4. To prevent injuries or burns, do not insert your hand into the
appliance when it is operating.
5. Close supervision is necessary when any appliance is used by or
near children.
6. Unplug the appliance from the wall outlet after use and before
cleaning. Allow the appliance to cool before attaching or removing
parts.
7. Do not operate any appliance with a damaged power cord or plug,
or after the appliance malfunctions, or after the appliance has been
damaged in any manner. Return appliance to the nearest authorized
service facility for examination, repair or adjustment.
8. The use of accessory attachments not recommended by the
appliance manufacturer may cause injuries.
9. Do not use the appliance outdoors.
10. Do not let cord hang over edge of table or, counter or touch hot
su rfaces.
11. Do not place the appliance on or near a hot gas or electric burner
or in a heated oven.
12. Extreme caution must be used when moving an appliance that
contains hot liquids.
13. When using an extension cord, always attach the plug to the
appliance first, then plug the extension cord into the wall outlet. To
disconnect, first turn any appliance controls to OFF, then disconnect
the plug from the wall outlet.
14. Do use any appliance for anything other than its intended use.
This unit has a short power supply cord to reduce the risk resulting
from becoming entangled in or tripping over a longer cord. An
extension cord may be used if you are careful in its use. If a longer
detachable power- supply cord or extension cord is used, (1) the
marked electrical rating of the cord set or extension cord should be at
least as great as the electrical ration of the appliance, and (2) the cord
should be arranged so that it will not drape over the countertop or
tabletop where it can be pulled on by children or tripped over
accidentally. If the appliance is of the grounded type, the extension
cord should be a grounding type 2-wire cord. The power cord must be
kept dry and must hot be bent or have anything put on top of it.
SAVE THESE INSTRUCTIONS FOR LATER USE
To reduce the hazard of potential shock, this item has a polarized
plug(one blade is wider than the other),which will fit only one way in a
polarized outlet. If the plug does not fit the outlet properly, turn the
plug the other way; if it still does not fit, contact a qualified electrician
for assistance. Never use this plug with an extension cord unless it fits
properly. DO NOT ATTEMPT TO DEFEAT THIS SAFETY FEATURE.
Table of Contents
Your Welbilt Bread Machine
Control Panel
Using Your Welbilt Bread Machine
Tips For Best Baking Results
Suggestions For Maximum Enjoyment and Safety
Getting Started
Inserting and Removing the Bread Pan
Kneading, Rising, and Baking Cycles
How to Make Bread or Dough
Recipes and Baking Guide
Cleaning Instructions
Consumer Assistance
Trouble Shooting Guide
Specifications
Limited Warranty
5
6
7
9
I0
II
12
13
15
17
44
45
46
48
49
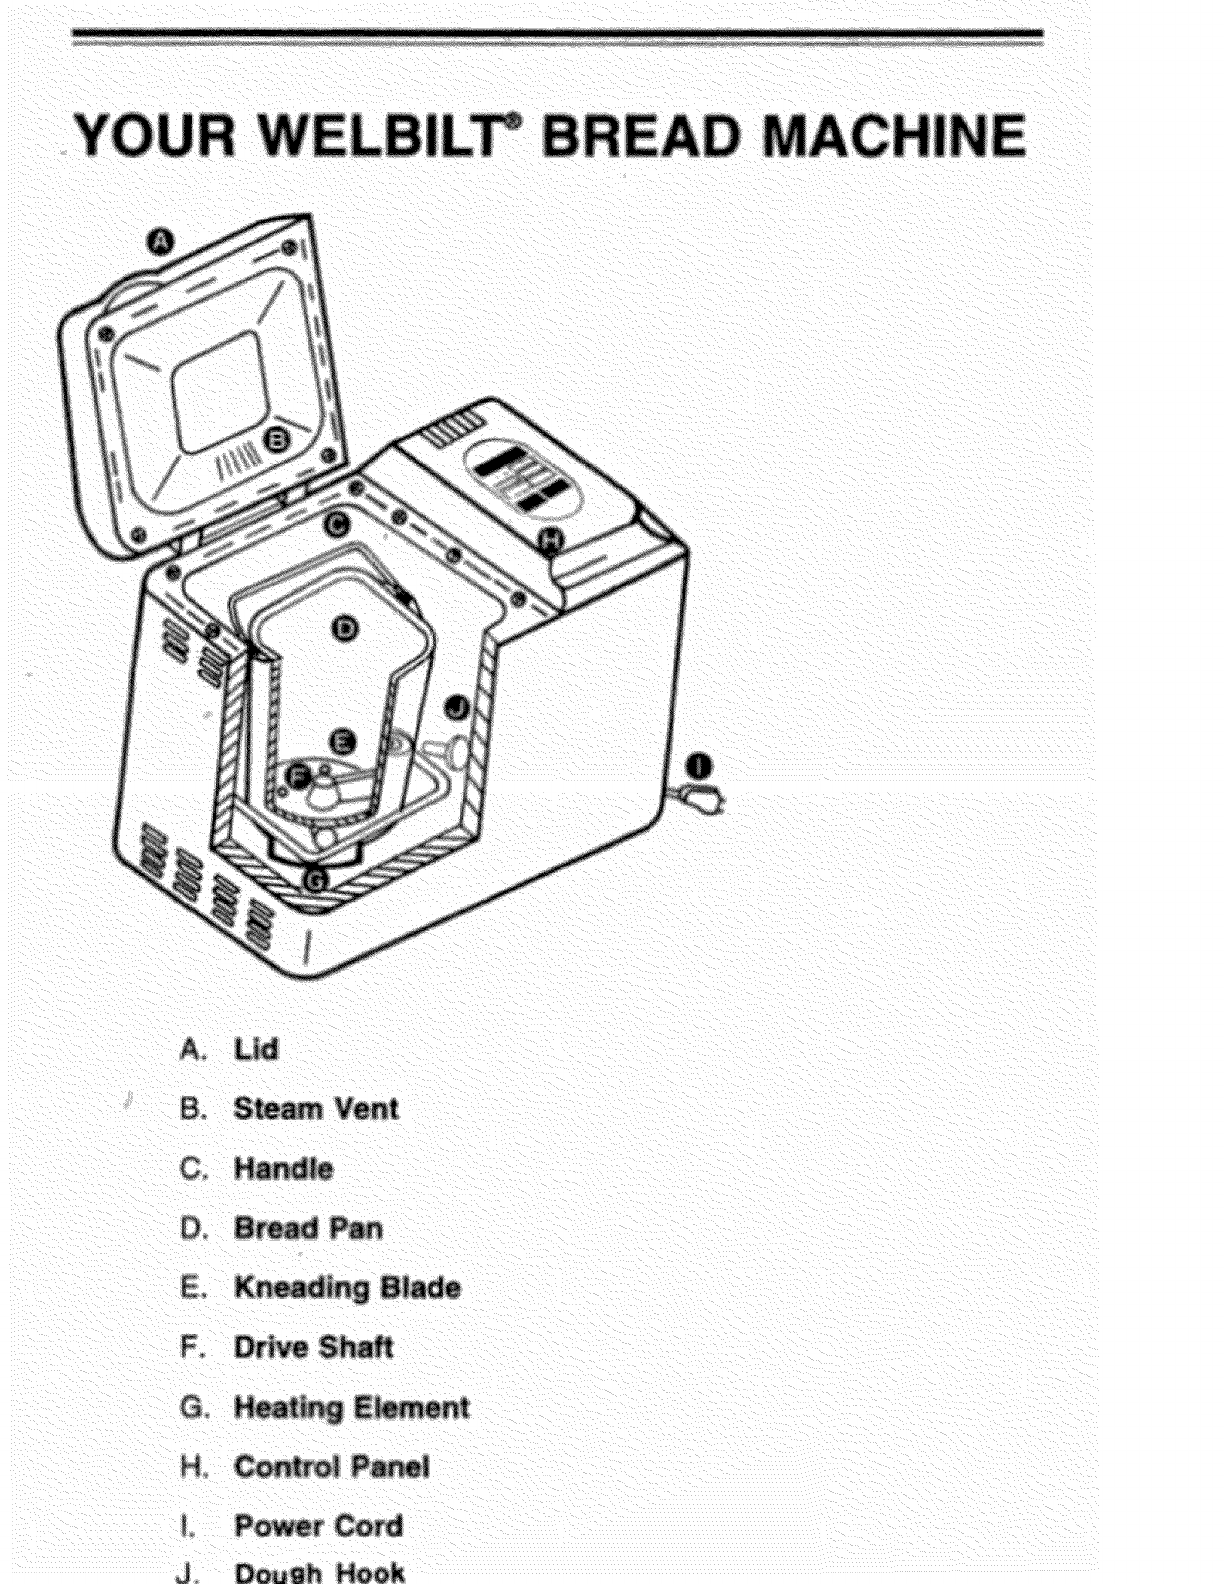
D_
_o Pr
J_ DouSh k
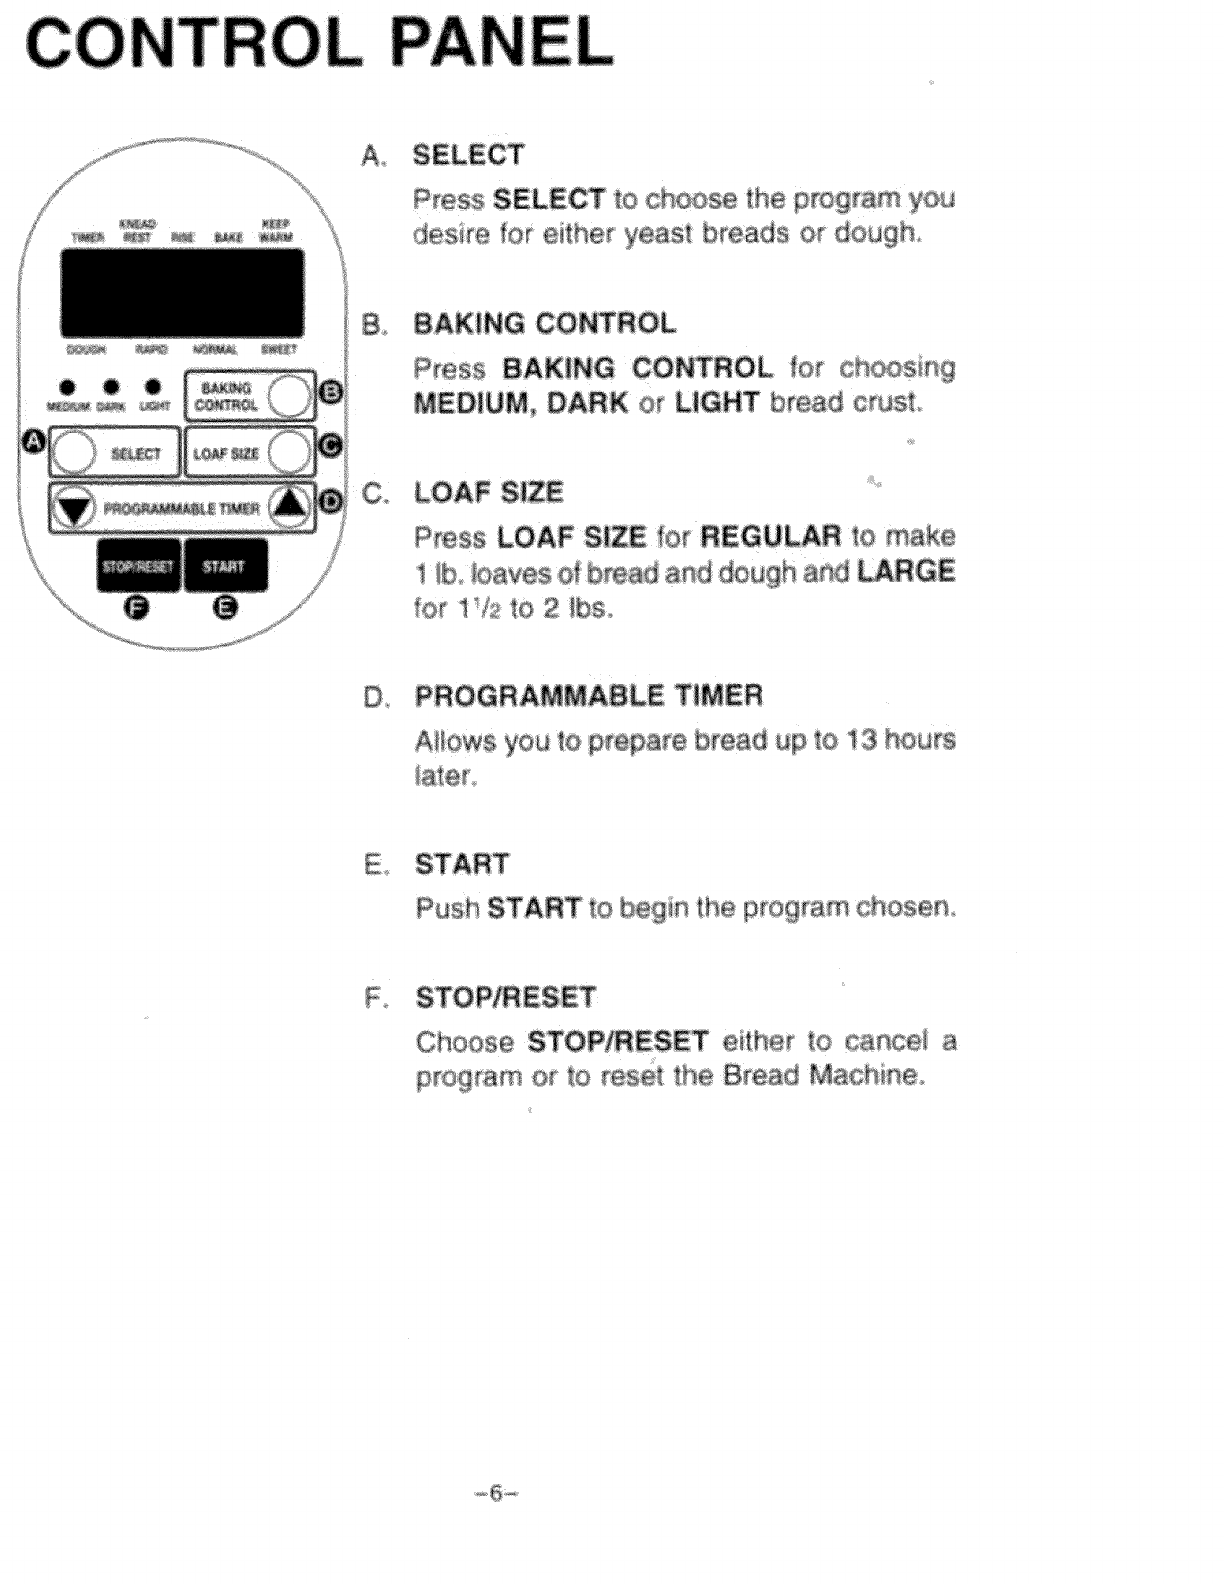
P_eas SELECT _o ¢:h se _:hep_o_:a:m you
desi:r@for eith÷t yeast: b_eads o:r dough
BAKING C:O ROL
Press BAKING CONTROL _or ch®o:s_ 9
:MEDIUM, DARK or LIGHT ::bread ¢_US_
LOAF SIZE
Pres_ LOAF SiZE for REGU:LAR t:o make
1 ..... :r
Ib,,_oaves d bead and dough a_ _RGE
PROGRAMMABLE
AHOwsyou to pf_are b_ead _o ! :3hours
Push START _:obegin the program chosen
Choose STOP_:ESET eithe_ to canoe a
@
p_sgram or _o [÷se_ _h,,,,Bread Mac:hi_se
USING YOUR WELBILT® BREAD MACHINE
Before using your Bread Machine for the first time, be sure o carefully
read all of the instructions included in this manual.
1. You can make any of the delicious recipes included with your Bread
Machine. You also can use bread machine pre-mixes sold in many
specialty stores or through mail order catalogs. Be sure that you never
exceed 1-1/2 teaspoons of yeast when baking bread from scratch
(unless specified in your Welbilt recipe) or when using any other recipe
or pre-mix.
2. You also can use any 2. 3 or 4 cup flour capacity recipe from many
of the bread machine cookbooks available from your local bookstore or
library. Never exceed teaspoons of yeast if baking bread in the Bread
Machine.
3. It you wish to convert a favorite family recipe for use in your bread
machine, find a similar one in this booklet to see how to scale it down
proportionately. Never exceed 1/2 teaspoons of yeast when baking
bread in the Bread Machine.
4. For best results, never exceed the maximum amount of four cups of
flour if you plan to bake the bread in the appliance.
5 Before making your bread or dough determine the size loaf or the
amount of dough you plan to make. You can use 2. 3, or 4 cups of
flour depending on the recipe. Press the LOAF SIZE button to choose
either REGULAR for 1 lb. loaf of bread or dough or LARGE for 1 1/2 to
2 Ibs.
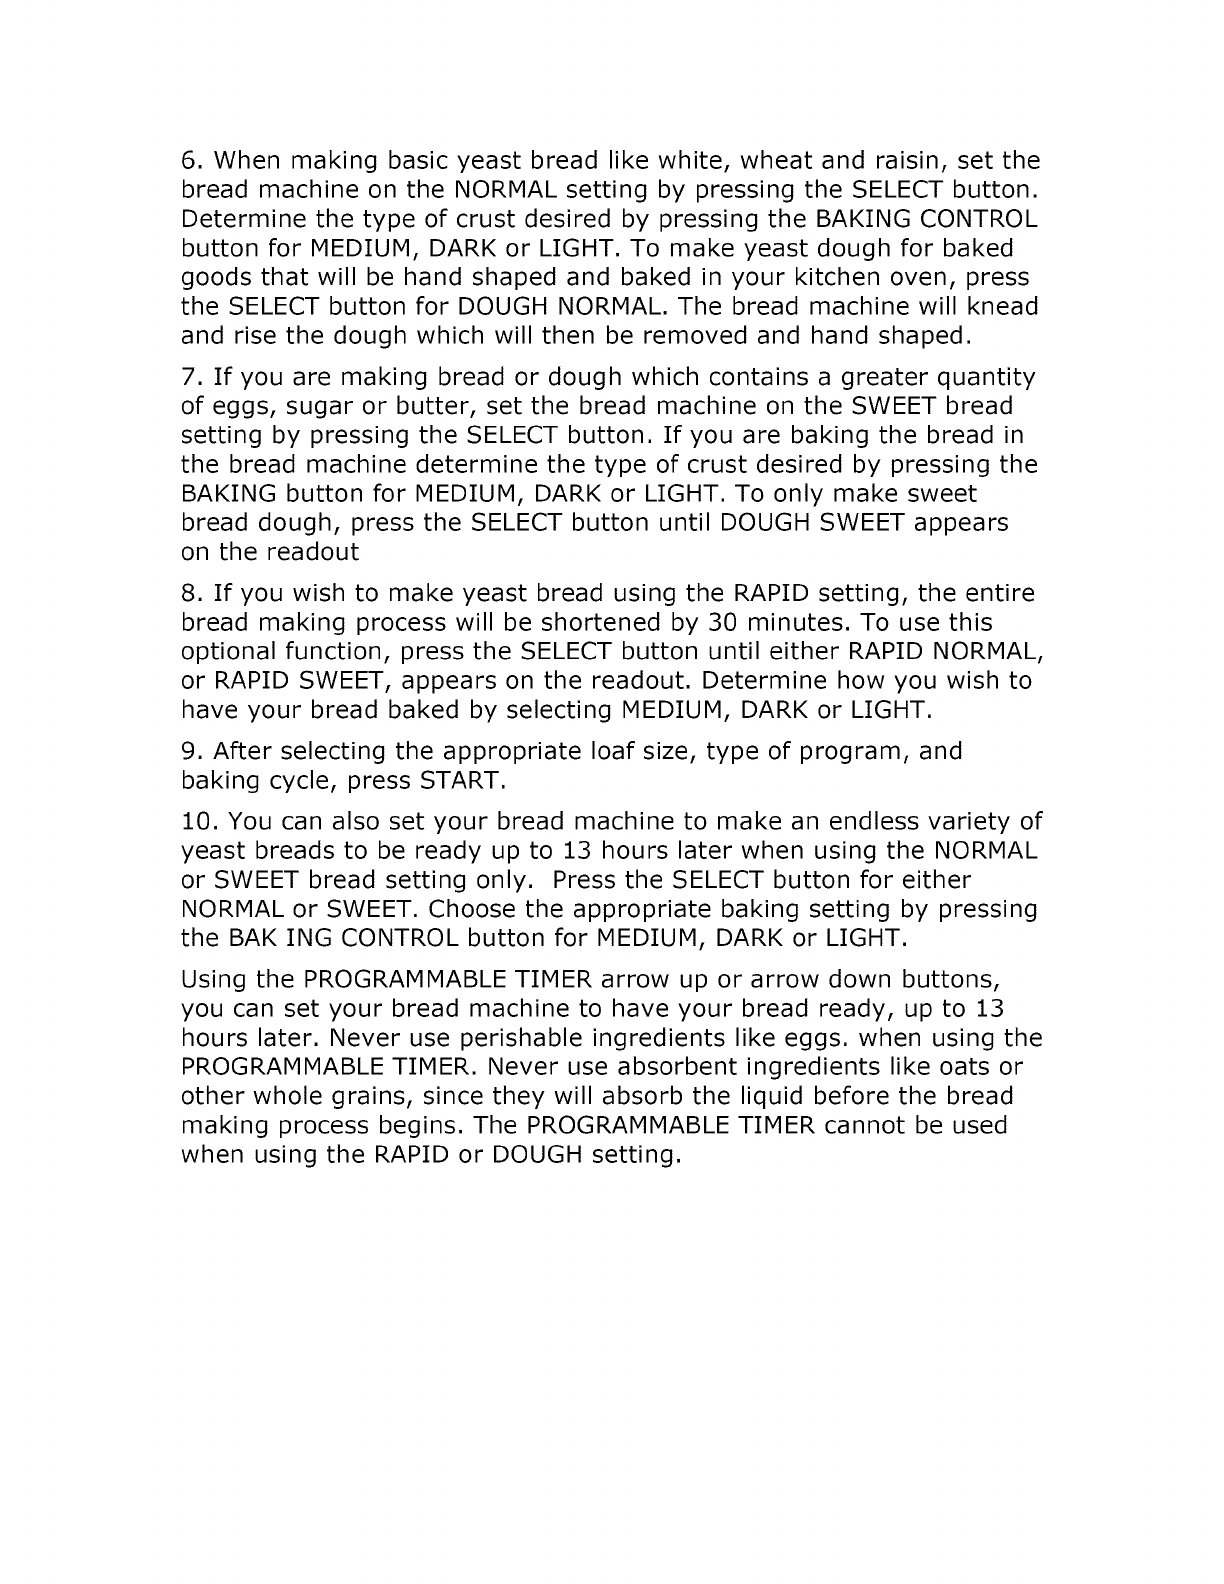
6. When making basic yeast bread like white, wheat and raisin, set the
bread machine on the NORMAL setting by pressing the SELECT button.
Determine the type of crust desired by pressing the BAKING CONTROL
button for MEDIUM, DARK or LIGHT. To make yeast dough for baked
goods that will be hand shaped and baked in your kitchen oven, press
the SELECT button for DOUGH NORMAL. The bread machine will knead
and rise the dough which will then be removed and hand shaped.
7. If you are making bread or dough which contains a greater quantity
of eggs, sugar or butter, set the bread machine on the SWEET bread
setting by pressing the SELECT button. If you are baking the bread in
the bread machine determine the type of crust desired by pressing the
BAKING button for MEDIUM, DARK or LIGHT. To only make sweet
bread dough, press the SELECT button until DOUGH SWEET appears
on the readout
8. If you wish to make yeast bread using the RAPID setting, the entire
bread making process will be shortened by 30 minutes. To use this
optional function, press the SELECT button until either RAPID NORMAL,
or RAPID SWEET, appears on the readout. Determine how you wish to
have your bread baked by selecting MEDIUM, DARK or LIGHT.
9. After selecting the appropriate loaf size, type of program, and
baking cycle, press START.
10. You can also set your bread machine to make an endless variety of
yeast breads to be ready up to 13 hours later when using the NORMAL
or SWEET bread setting only. Press the SELECT button for either
NORMAL or SWEET. Choose the appropriate baking setting by pressing
the BAKING CONTROL button for MEDIUM, DARK or LIGHT.
Using the PROGRAMMABLE TIMER arrow up or arrow down buttons,
you can set your bread machine to have your bread ready, up to 13
hours later. Never use perishable ingredients like eggs. when using the
PROGRAMMABLE TIMER. Never use absorbent ingredients like oats or
other whole grains, since they will absorb the liquid before the bread
making process begins. The PROGRAMMABLE TIMER cannot be used
when using the RAPID or DOUGH setting.
TIPS FOR BEST
BAKING RESULTS
1. All ingredients must be at room temperature.
2. Yeast is what causes the dough to rise. It is a living single cell
organism that is sold dehydrated. When mixed with water, yeast is
reactivated. Unfortunately, yeast can be adversely affected by extreme
temperatures. If the ingredients being used are not at room
temperature, the yeast may not be activated effectively.
3. Yeast also can be adversely affected by temperatures that are too
hot. Only use room temperature water (75 °- 80°F) even though the
yeast package may specify something totally different.
4. Always measure ingredients carefully. Spoon flour into the
measuring cup and level off with a blunt knife. Do not pack down.
5. Always use bread flour unless otherwise specified. It is available in
most supermarkets.
6. Do not open the lid during operation since this can adversely affect
the quality of the bread.
7. Be careful not to unplug the Bread Machine during use. If this
should happen, or if there is a power failure, you will not be able to go
back o where it left off. However, if the Bread Machine was not in the
baking cycle and the dough had been kneaded at least once, you can
remove it, hand-shape and bake it in a conventional oven.
8. if you try to use the Bread Machine immediately after baking a loaf
of bread, the yea may be killed since the appliance will be very hot. If
you press the START button the Bread Machine will beep and not
knead. This is your warning that the pan should be removed and the
unit be allowed to cool down.
SUGGESTIONS FOR MAXIMUM ENJOYMENT AND SAFETY
1. The baking portion and lid of the Bread Machine become extremely
hot during baking. Always use a kitchen mitt or pot holder when
touching these parts.
2. Do not operate this appliance on the same circuit as other high
voltage appliances.
3. Position the Bread Machine at least 4 inches from the f of the
counter or working surface. Do not place any flammable materials or
objects on top of the appliance when plugged in or during operation.
4. Do not use the Bread Machine near any electrical equipment like
radios, TVs, or stereos since poor reception or interference may occur.
5. Always use the Bread Machine on a clean, dry work surface away
from exposed elements, direct sunlight, or other sources of heat or
cold.
6. Only use the Bread Machine on a non-flammable work surface or
counter. Never use on floor or on carpeting or on top of any cloth
objects like tablecloths or placemats.
7. Never stick your hand or any kitchen utensils into the bread pan
during operation.
8. Do not use accessories or attachments not included or
recommended by Welbilt.
9. Do not put any components in the dishwasher.
10. Do not attempt to tamper with or make any adjustments to the
electrical components or parts.
11. Do not use this appliance other than for its intended use.
GETTING STARTED
Your Welbilt® Bread Machine has twelve separate
programs to choose from.
Making Bread Automatically:
Choose the NORMAL, SWEET, RAPID/NORMAL, RAPID/SWEET,
REGULAR or LARGE capacity program when making bread
automatically, by pressing the SELECT and LOAF SIZE buttons. The
Bread Machine will knead and rise the dough twice and then bake it to
perfection.
Making Yeast Dough Automatically:
Choose the DOUGH/NORMAL or DOUGH/SWEET, REGULAR or LARGE
capacity program, by pressing the SELECT and LOAF SIZE buttons.
The Bread Machine will knead and rise the dough twice. At the end of
the program you will remove the dough and hand-shape it according
to your recipe. Dough will then be baked in a conventional oven.
INSERTING AND REMOVING THE BREAD PAN
1. Before using the Bread Machine for the first time, be certain to wash
the bread pan and dough blade with warm water and mild dish-
washing liquid. Towel dry. Never put the bread pan and blade in the
dishwasher.
2. All mixing, kneading, rising, and baking, when appropriate, take
place in the bread pan. The pan is covered with a non-stick fluorine
coating which will scratch if not treated and cared for properly. Clean
and treat the pan as you would a non-stick frying pan.
3. To reinsert the pan, place over the locking mechanism located on
the bottom of the baking compartment. Push down. To remove the
pan, pull up.
4. Remember to insert the kneading blade on the shaft located in the
bread pan before adding your ingredients. It is not necessary to
remove the kneading blade after you make every loaf of bread. Always
be certain that the dough hook is securely screwed in the pan..
5. Since the bread pan will be hot after the baking cycle, always use a
kitchen mitt or pot holder when removing it,
6. To remove the bread from the pan, remove the dough hook, invert
upside down and gently shake up and down until the loaf slides out. If
the bread does not come out of the pan easily, use a non-metallic
kitchen utensil to pry it out.
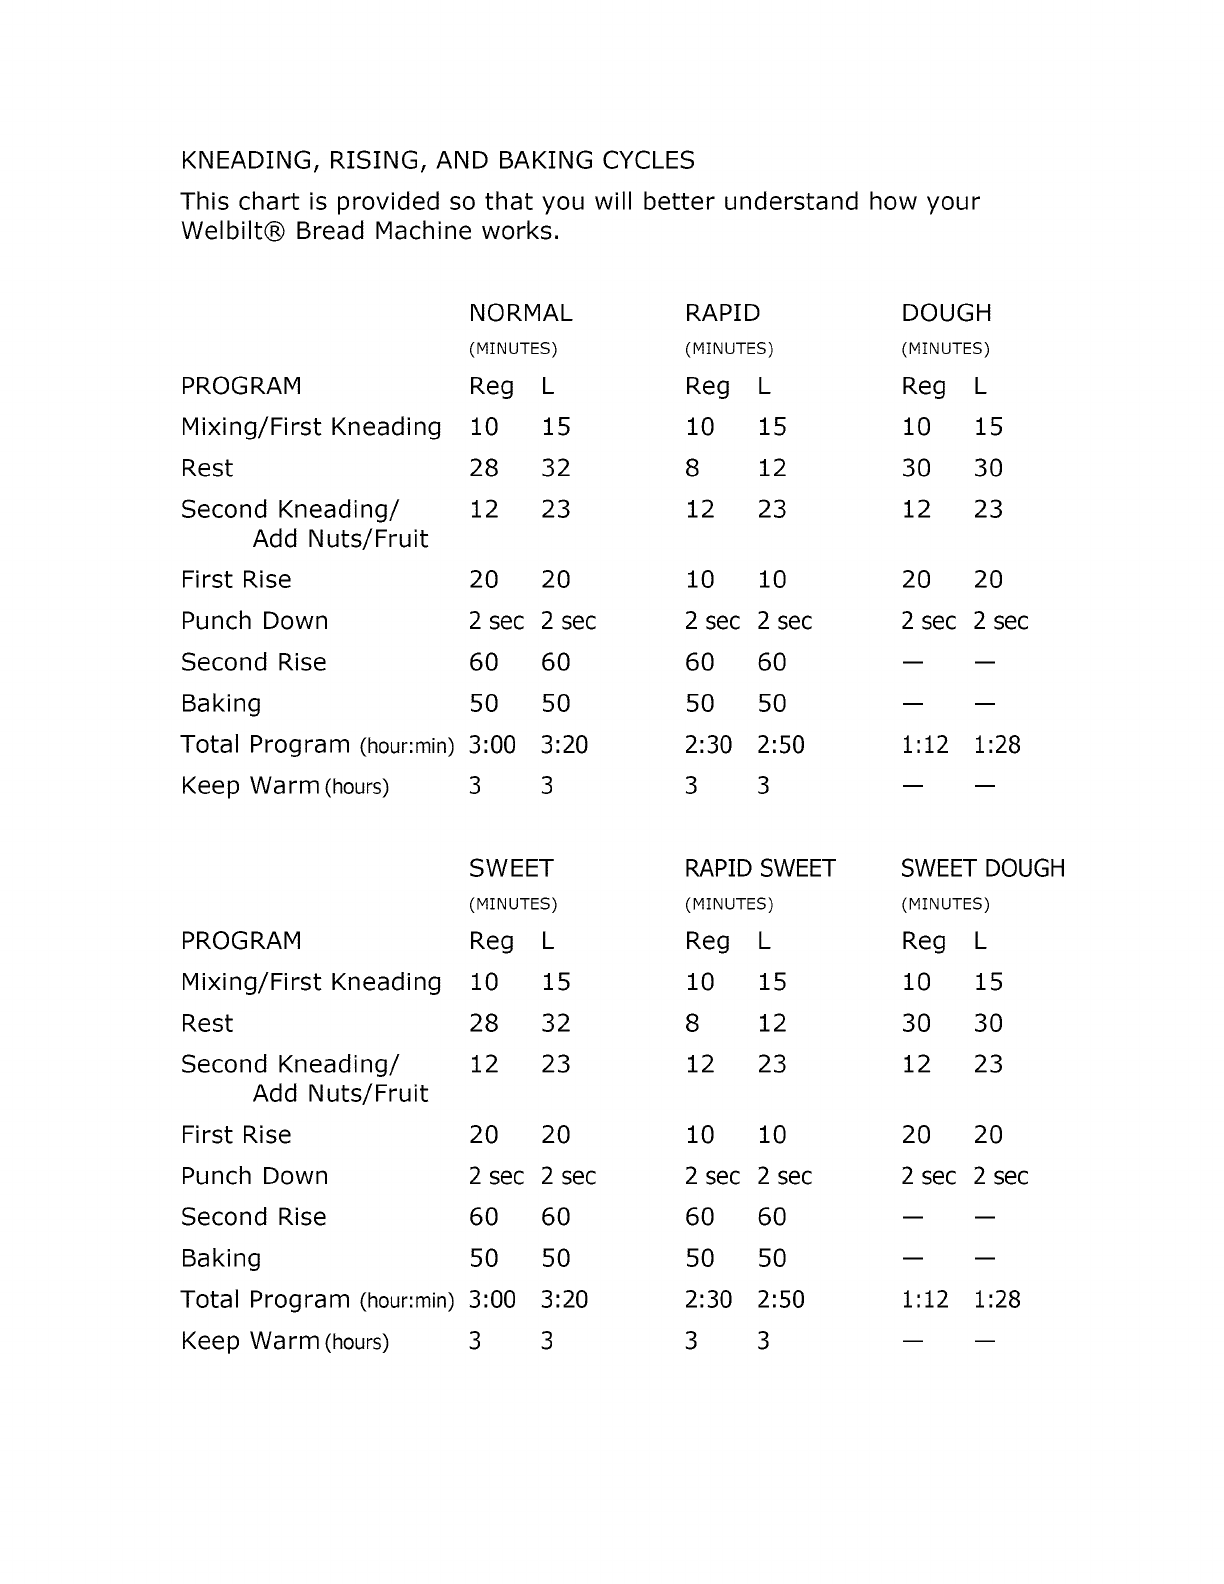
KNEADING, RISING, AND BAKING CYCLES
This chart is provided so that you will better understand how your
Welbilt® Bread Machine works.
PROGRAM
Mixing/First Kneading
Rest
Second Kneading/
Add Nuts/Fruit
First Rise
Punch Down
Second Rise
Baking
Total Program (hour:min)
Keep Warm (hours)
NORMAL RAPID DOUGH
(MINUTES) (MINUTES) (MINUTES)
Reg L Reg L Reg L
10 15 10 15 10 15
28 32 8 12 30 30
12 23 12 23 12 23
20 20 10 10 20 20
2sec 2sec 2sec 2sec 2sec 2sec
60 60 60 60 -- --
50 50 50 50 -- --
3:00 3:20 2:30 2:50 1:12 1:28
3 3 3 3 -- --
PROGRAM
Mixing/First Kneading
Rest
Second Kneading/
Add Nuts/Fruit
First Rise
Punch Down
Second Rise
Baking
Total Program (hour:min)
Keep Warm (hours)
SWEET RAPID SWEET SWEET DOUGH
(MINUTES) (MINUTES) (MINUTES)
Reg L Reg L Reg L
10 15 10 15 10 15
28 32 8 12 30 30
12 23 12 23 12 23
20 20 10 10 20 20
2sec 2sec 2sec 2sec 2sec 2sec
60 60 60 60 -- --
50 50 50 50 -- --
3:00 3:20 2:30 2:50 1:12 1:28
3 3 3 3 -- --
Mixing/First Kneading: The Bread Machine will intermittently mix the
ingredients So, 2 minutes at which time it will then begin to knead the
dough to (arm a smooth, elastic ball.
Second Kneading: Knead the dough makes the gluten elastic enough
to form the structure of the bread.
Add Fruit/Nuts: The Bread Machine will beep B times, 5 minutes before
the end of the second kneading. This is the best time to add
ingredients like nuts and raisins, etc.
First Rise: When dough has been well-kneaded, the gluten forms thin
elastic strands that make up the structure of the bread. As the yeast
develops and multiplies, it produces carbon dioxide gas. The gas
becomes trapped in the gluten strands, forming bubbles. As these
bubbles collect, the dough expands and rises.
Punch Down: The Bread Machine kneads the dough for 30 seconds to
deflate it,
Second Rise: The gluten strands are now strong enough to support the
loaf. The yeast will once again produce carbon dioxide gas and the
dough will rise to its maximum height.
Baking: The bread will be baked to perfection when using any program
except DOUGH.
Keep Warm: I you are unable to remove the bread immediately after
baking, the Bread Machine will keep the loaf warm to reduce the
effects of the condensation that will form between the bat and the pan.
Nevertheless, always remove the bread as quickly as possible after the
baking cycle.
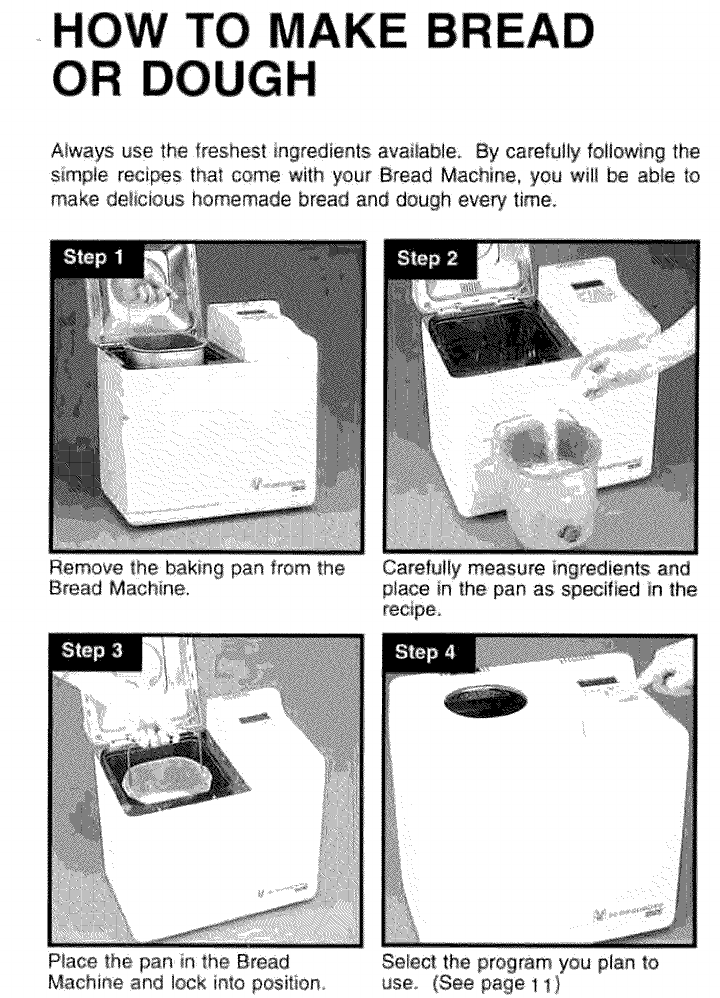
Always use the freshesl ingredients avaiiabie, By carefuily foliowing the
simple recipes that come with your Bread Machine, you w'ill be able to
make deiicious homemade bread and dough every time
Remove |he baking pan from the
Bread Machine, Carefuiiy measure ingredients and
place in t:he pan as specified in the
Place the pan in the Bread
Machine and lock into position Select the program you plan to
use, (See page 11)
Step 5
Press START.
Step 6
If you plan to make a bread or dough with raisins, dried fruits or nuts,
add these ingredients when the Bread Machine beeps eight times, five
minutes before the end of the second kneading cycle. When making
bread automatically, the Bread Machine will beep at the end of the
baking cycle indicating that the bread is done. Although the Bread
Machine tias a 3 hour keep warm cycle, the baked bread is best
removed from tilt appliance and the pan immediately after baking. Use
a kitchen mitt i pot holder to carefully remove the bread pan by pulling
up and out. Unscrew and remove the dough hook from the pan. Invert
the pan and remove bread. Let cool for one hour before slicing.
Step 7
Press STOP/RESET to end the bread making program.
Step 8
If you are, only making dough, the Bread Machine will beep atjhe end
of the program. Press STOP/RESET, remove dough and hand-shape
according to recipe.
RECIPES AND BAKING GUIDE
PREPARATION FOR GOOD RESULTS
Your Welbilt Bread Machine produces satisfying results if you carefully
follow directions and use the indicated ingredients.
1. Bread Flour: When making bread in a bread machine be sure to
always use bread flour which is available in 5 lb. bags in your local
supermarket. Bread flour is higher in gluten, a natural protein found in
wheat that gives bread its chewy texture and high volume.
2. Active Dry Yeast: Yeast is a living organism that when mixed with
liquids and starch multiplies producing carbon dioxide gas which
causes the dough to rise. We recommend that you use active dry yeast
when making bread or dough in the bread machine.
3. Sweetener and Salt: The addition of a sweetener to a recipe is
important because it supplies the yeast with food. Without the
sweetener the dough will rise slower and may not reach its maximum
height prior to baking. Salt helps to stabilize the yeast so that the
dough rises evenly.
4., Non-fat Dry Milk: We recommend that you use non-fat dry milk
when making bread in the bread machine since it will not spoil.
5. Shortening: Always use stick butter or margarine and never
whipped or soft.
6. Water and Liquids: All liquid temperatures should be between 75'
and 80
HOW TO JUDGE IF THINGS ARE GOING WELL
1. Always measure the ingredients carefully using U.S. standard
measuring cups and spoons. Kitchen flatware and coffee cups vary in
size and should never be used. All ingredients should be at room
temperature unless otherwise noted in recipe. Since you will be using
all natural ingredients to make your homemade bread, the quality of
'the ingredients is important. Since flour is milled from wheat and
other grains, the quality and make up of the flour will vary from crop
to crop and from year to year even though the mills make every
attempt to blend the grains for proper consistency.
Nevertheless, you may see that your bread does not come out the
same when using flour from a different brand. If this the case, we
suggest that you experiment. (If, for example, the bread made from
brand × bread flour does not provide a satisfactory loaf of bread, try
another brand. The same applies to yeast.) Some packages of yeast
will provide greater rising activity than others. If your bread does not
rise well, try another package of yeast or another brand. We have also
seen that certain brands of yeast work better with certain brands of
flour. (Experiment until you find the combination that works best for
you.)
2. Although the quality of the bread should not be affected by the
type! source of water used, extremely hard or soft water can
determine whether a loaf of bread is good or bad. If your water falls in
this category, only make bread using bottled spring water with a low
mineral content or try substituting low fat milk for the water.
3 After the first kneading cycle, the ball of kneaded dough should be
smooth and elastic. The top of the dot should be slightly sticky and
should begin to fill out on the bottom of the pan while rising. If the
dough appears stiff and lumpy, it is too dry. You should add an
additional one or two tablespoons of water at the inside edge of the
pan once the Bread Machine begins the second kneading cycle. Dough
that is too dry can result in short loaves of bread which appear
overbaked.
4. When measuring flour never scoop it out of the bag or the canister
with the measuring cup. Always spoon the flour into the cup. Insert a
clean kitchen knife into the flour a couple of times to eliminate clumps
or air pockets. Level off the top of the cup with the knife. Never pack
the flour down.
5. If the dough appears to be very loose and sticky, it is too moist. You
can overcome this problem by making sure you measure the
ingredients properly or add less water (approximately one to two
tablespoons less) to compensate for a higher than normal moisture
content of the flour. (Dough that is too moist can result in over-risen,
collapsed, wrinkled loaves of bread.)
6. Always set your Bread Machine on the proper baking setting as
specified in the recipe. If the bread bakes too dark, try a lighter
setting. If the bread continues to bake too dark the dough may be too
dry inhibiting the bread from rising properly. (Try adding one to two
tablespoons of additional water for better baking results. )Too much
sugar in a recipe may also cause bread to over bake. The same is true
with dried fruits. Try cutting down on the amount called for in the
recipe by 25 to 50%.
7. Do not use your Bread Machine if the room temperature is lower
than 65°F since the dough will not rise well and the loaves will be
short. If the ambient temperature is higher than 85°F the dough can
over-rise and the bread can possibly collapse or wrinkle during baking
and the crumb texture will be course. The ideal temperature for
making bread is always 68 ° to 80°F.
8. For a crisp, crunchy crust, always remove the bread from the Bread
Machine after the baking cycle. Remove from the pan and let cool on a
wire rack in a draft free. For a softer crust, immediately place the
baked loaf of bread in an open plastic bag or loosely wrap in foil.
91 The size of the baked loaf will vary from loaf to loaf due to
ingredients and ambient conditions. Nevertheless, the general rule is
that the bread size should be near the top of the pan to 1-inch below.
SPECIAL NOTE:
Wheat harvests can vary from crop to crop. This can affect the natural
protein level of the flour. Commercial bakers may add a natural dough
conditioner to their bread doughs to achieve uniform and consistent
results.
If you should experience periodic inconsistencies when making any of
the recipes, we suggest that you try adding 1 teaspoon of lemon juice.
The lemon juice will help strengthen the dough for better baking
results. It will not affect the taste of the bread.
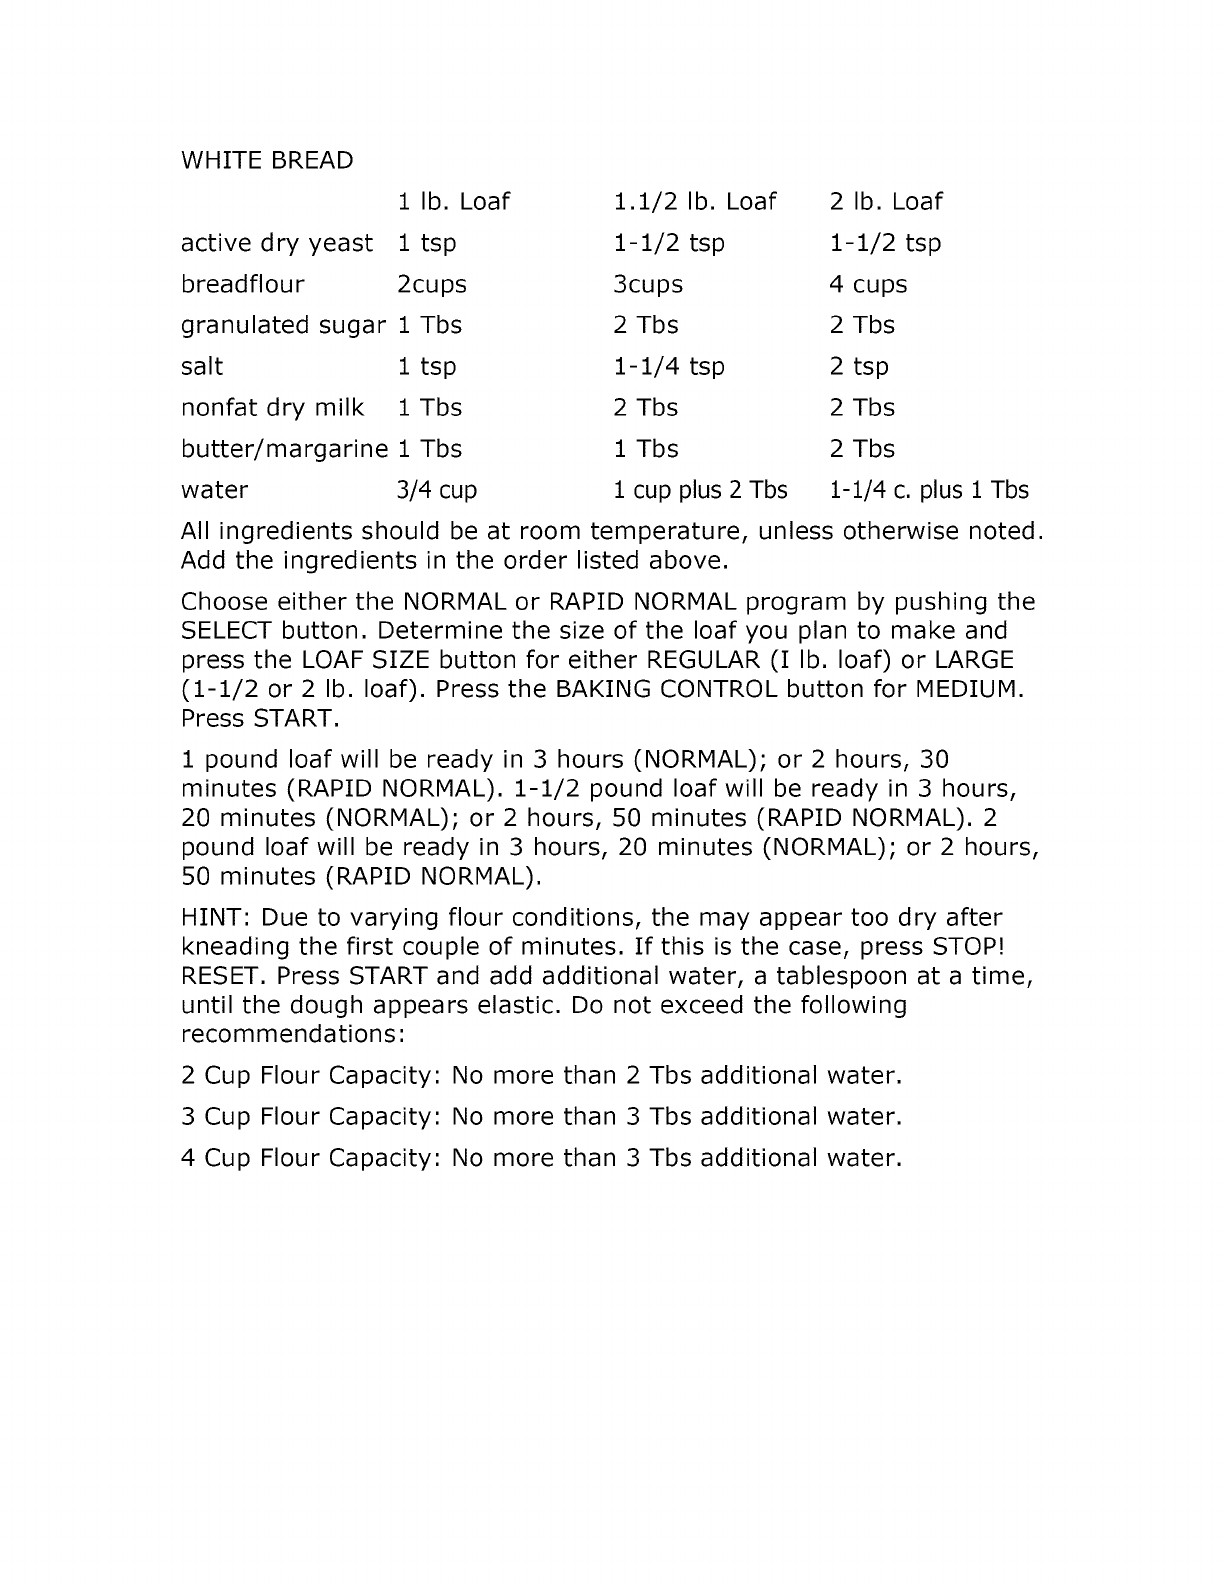
WHITE BREAD
1 lb. Loaf
active dry yeast 1 tsp
breadflour 2cups
granulated sugar 1 Tbs
salt 1 tsp
nonfat dry milk 1 Tbs
butter/margarine 1 Tbs
water 3/4 cup
1.1/2 lb. Loaf 2 lb. Loaf
1-1/2 tsp 1-1/2 tsp
3cups 4 cups
2 Tbs 2 Tbs
1-1/4 tsp 2 tsp
2 Tbs 2 Tbs
1 Tbs 2 Tbs
1 cup plus 2 Tbs 1-1/4 c. plus 1Tbs
All ingredients should be at room temperature, unless otherwise noted.
Add the ingredients in the order listed above.
Choose either the NORMAL or RAPID NORMAL program by pushing the
SELECT button. Determine the size of the loaf you plan to make and
press the LOAF SIZE button for either REGULAR (I lb. loaf) or LARGE
(1-1/2 or 2 lb. loaf). Press the BAKING CONTROL button for MEDIUM.
Press START.
1 pound loaf will be ready in 3 hours (NORMAL); or 2 hours, 30
minutes (RAPID NORMAL). 1-1/2 pound loaf will be ready in 3 hours,
20 minutes (NORMAL); or 2 hours, 50 minutes (RAPID NORMAL). 2
pound loaf will be ready in 3 hours, 20 minutes (NORMAL); or 2 hours,
50 minutes (RAPID NORMAL).
HINT: Due to varying flour conditions, the may appear too dry after
kneading the first couple of minutes. If this is the case, press STOP!
RESET. Press START and add additional water, a tablespoon at a time,
until the dough appears elastic. Do not exceed the following
recommendations:
2 Cup Flour Capacity:
3 Cup Flour Capacity:
4 Cup Flour Capacity:
No more than 2 Tbs additional water.
No more than 3 Tbs additional water.
No more than 3 Tbs additional water.
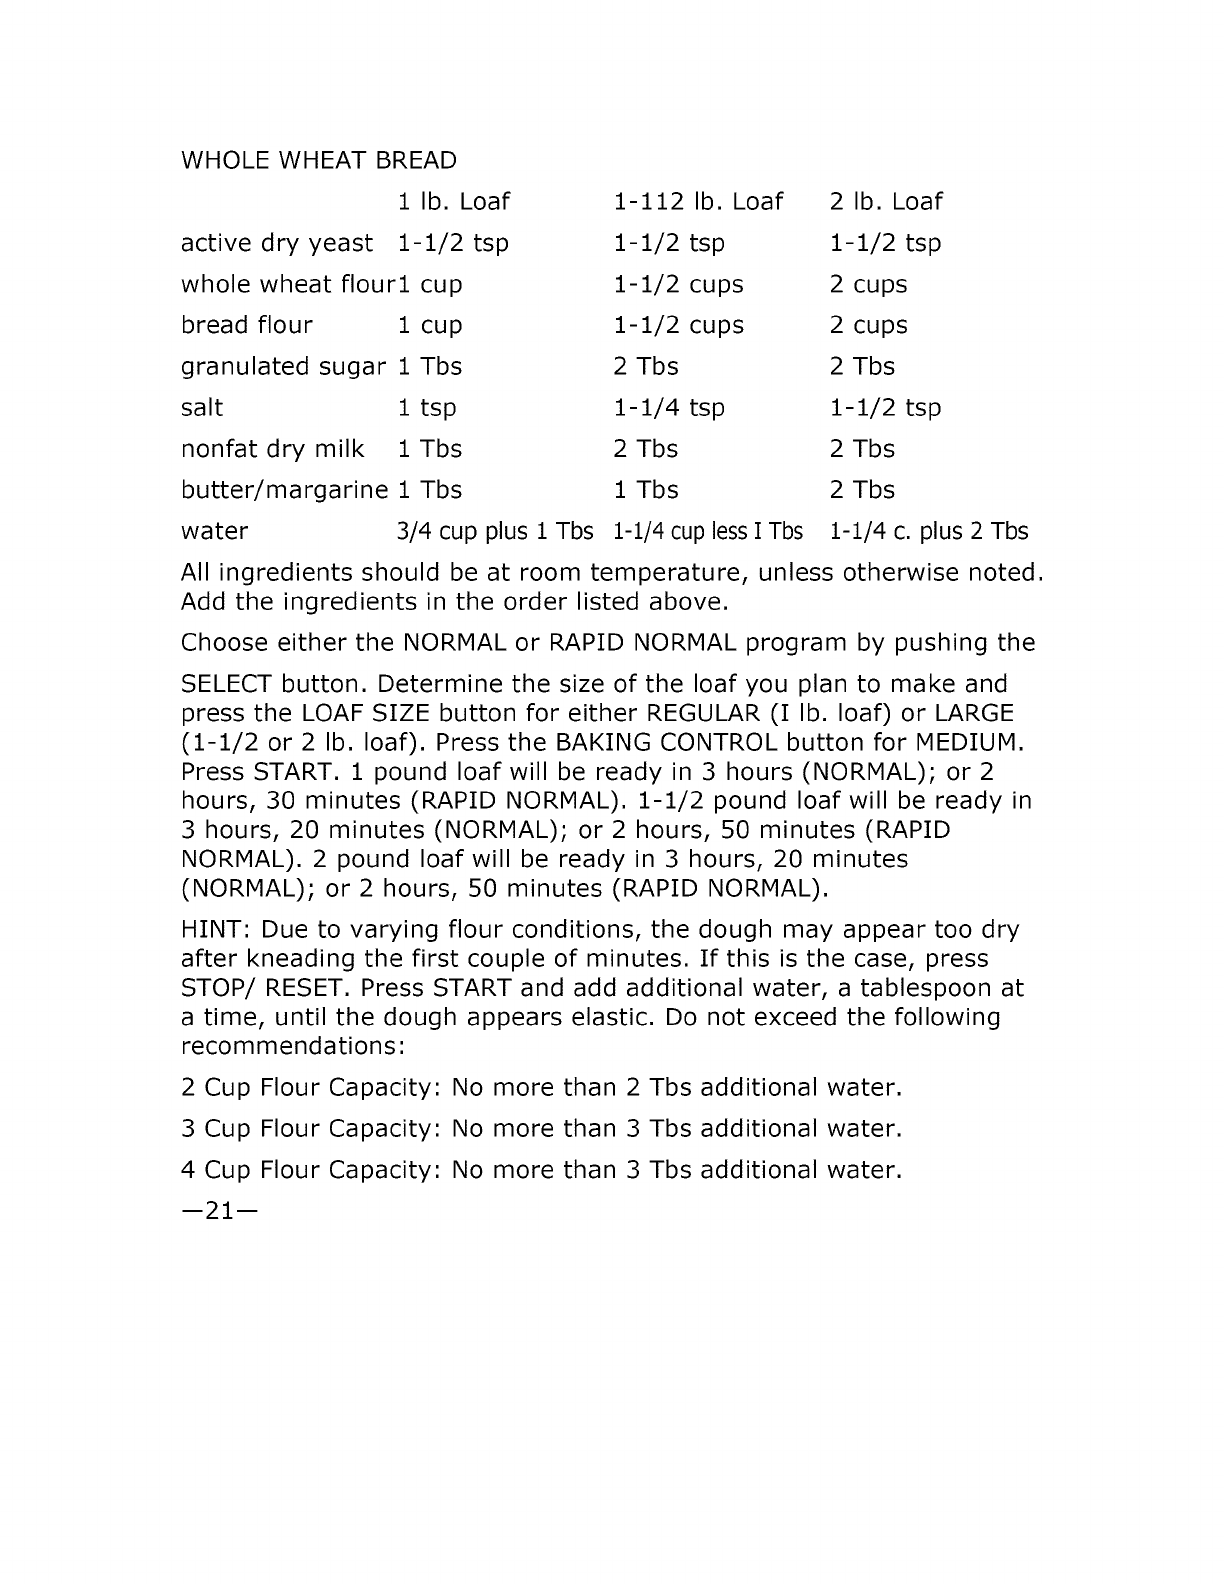
WHOLE WHEAT BREAD
1 lb. Loaf
active dry yeast 1-1/2 tsp
whole wheat flour1 cup
bread flour 1 cup
granulated sugar 1 Tbs
salt 1 tsp
nonfat dry milk 1 Tbs
butter/margarine 1 Tbs
water 3/4 cup plus 1 Tbs
1-112 lb. Loaf 2 lb. Loaf
1-1/2 tsp 1-1/2 tsp
1-1/2 cups 2 cups
1-1/2 cups 2 cups
2 Tbs 2 Tbs
1-1/4 tsp 1-1/2 tsp
2 Tbs 2 Tbs
1 Tbs 2 Tbs
1-1/4cuplessI Tbs 1-1/4 c. plus 2 Tbs
All ingredients should be at room temperature, unless otherwise noted.
Add the ingredients in the order listed above.
Choose either the NORMAL or RAPID NORMAL program by pushing the
SELECT button. Determine the size of the loaf you plan to make and
press the LOAF SIZE button for either REGULAR (I lb. loaf) or LARGE
(1-1/2 or 2 lb. loaf). Press the BAKING CONTROL button for MEDIUM.
Press START. 1 pound loaf will be ready in 3 hours (NORMAL); or 2
hours, 30 minutes (RAPID NORMAL). 1-1/2 pound loaf will be ready in
3 hours, 20 minutes (NORMAL); or 2 hours, 50 minutes (RAPID
NORMAL). 2 pound loaf will be ready in 3 hours, 20 minutes
(NORMAL); or 2 hours, 50 minutes (RAPID NORMAL).
HINT: Due to varying flour conditions, the dough may appear too dry
after kneading the first couple of minutes. If this is the case, press
STOP/ RESET. Press START and add additional water, a tablespoon at
a time, until the dough appears elastic. Do not exceed the following
recommendations:
2 Cup Flour Capacity:
3 Cup Flour Capacity:
4 Cup Flour Capacity:
No more than 2 Tbs additional water.
No more than 3 Tbs additional water.
No more than 3 Tbs additional water.
m21m
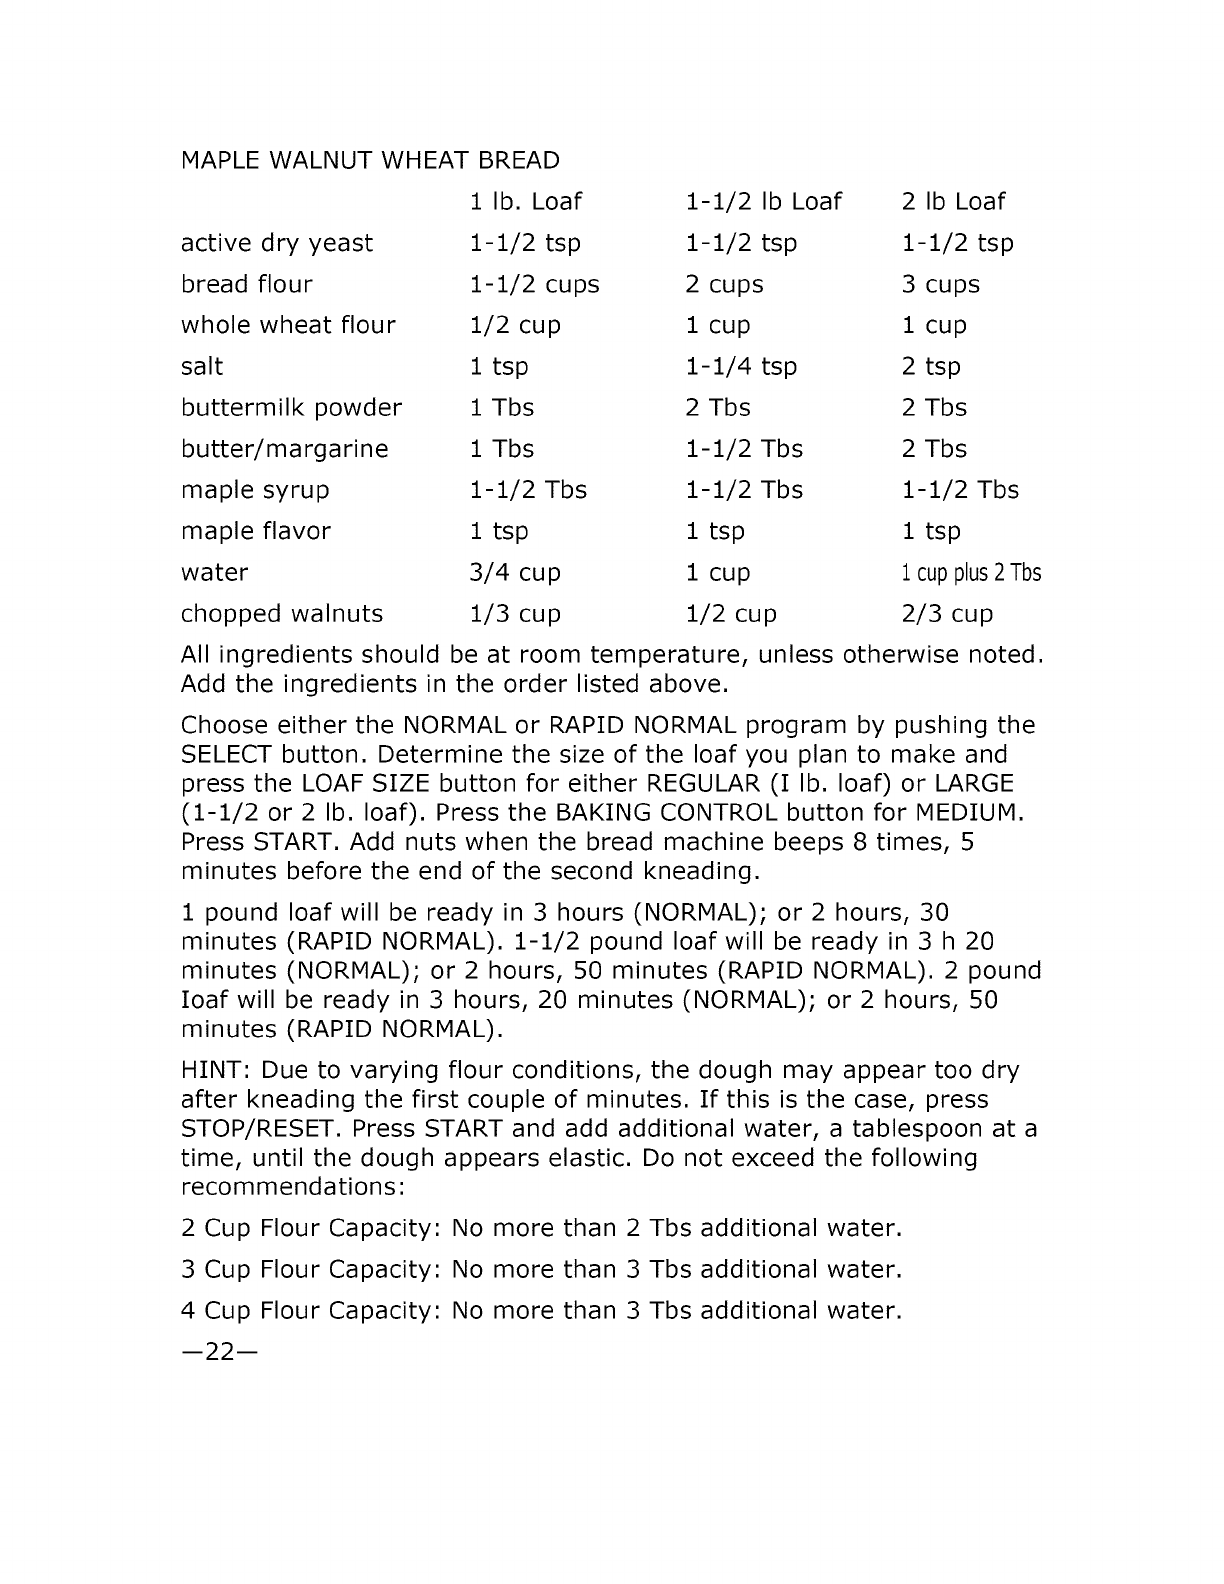
MAPLE WALNUT WHEAT BREAD
1 lb. Loaf 1-1/2 Ib Loaf 2 Ib Loaf
active dry yeast 1-1/2 tsp 1-1/2 tsp 1-1/2 tsp
bread flour 1-1/2 cups 2 cups 3 cups
whole wheat flour 1/2 cup 1 cup 1 cup
salt 1 tsp 1-1/4 tsp 2 tsp
buttermilk powder 1 Tbs 2 Tbs 2 Tbs
butter/margarine 1 Tbs 1-1/2 Tbs 2 Tbs
maple syrup 1-1/2 Tbs 1-1/2 Tbs 1-1/2 Tbs
maple flavor 1 tsp 1 tsp 1 tsp
water 3/4 cup 1 cup i cupplus2Tbs
chopped walnuts 1/3 cup 1/2 cup 2/3 cup
All ingredients should be at room temperature, unless otherwise noted.
Add the ingredients in the order listed above.
Choose either the NORMAL or RAPID NORMAL program by pushing the
SELECT button. Determine the size of the loaf you plan to make and
press the LOAF SIZE button for either REGULAR (I lb. loaf) or LARGE
(1-1/2 or 2 lb. loaf). Press the BAKING CONTROL button for MEDIUM.
Press START. Add nuts when the bread machine beeps 8 times, 5
minutes before the end of the second kneading.
1 pound loaf will be ready in 3 hours (NORMAL); or 2 hours, 30
minutes (RAPID NORMAL). 1-1/2 pound loaf will be ready in 3 h 20
minutes (NORMAL); or 2 hours, 50 minutes (RAPID NORMAL). 2 pound
Ioaf will be ready in 3 hours, 20 minutes (NORMAL); or 2 hours, 50
minutes (RAPID NORMAL).
HINT: Due to varying flour conditions, the dough may appear too dry
after kneading the first couple of minutes. If this is the case, press
STOP/RESET. Press START and add additional water, a tablespoon at a
time, until the dough appears elastic. Do not exceed the following
recommendations:
2 Cup Flour Capacity:
3 Cup Flour Capacity:
4 Cup Flour Capacity:
No more than 2 Tbs additional water.
No more than 3 Tbs additional water.
No more than 3 Tbs additional water.
--22--
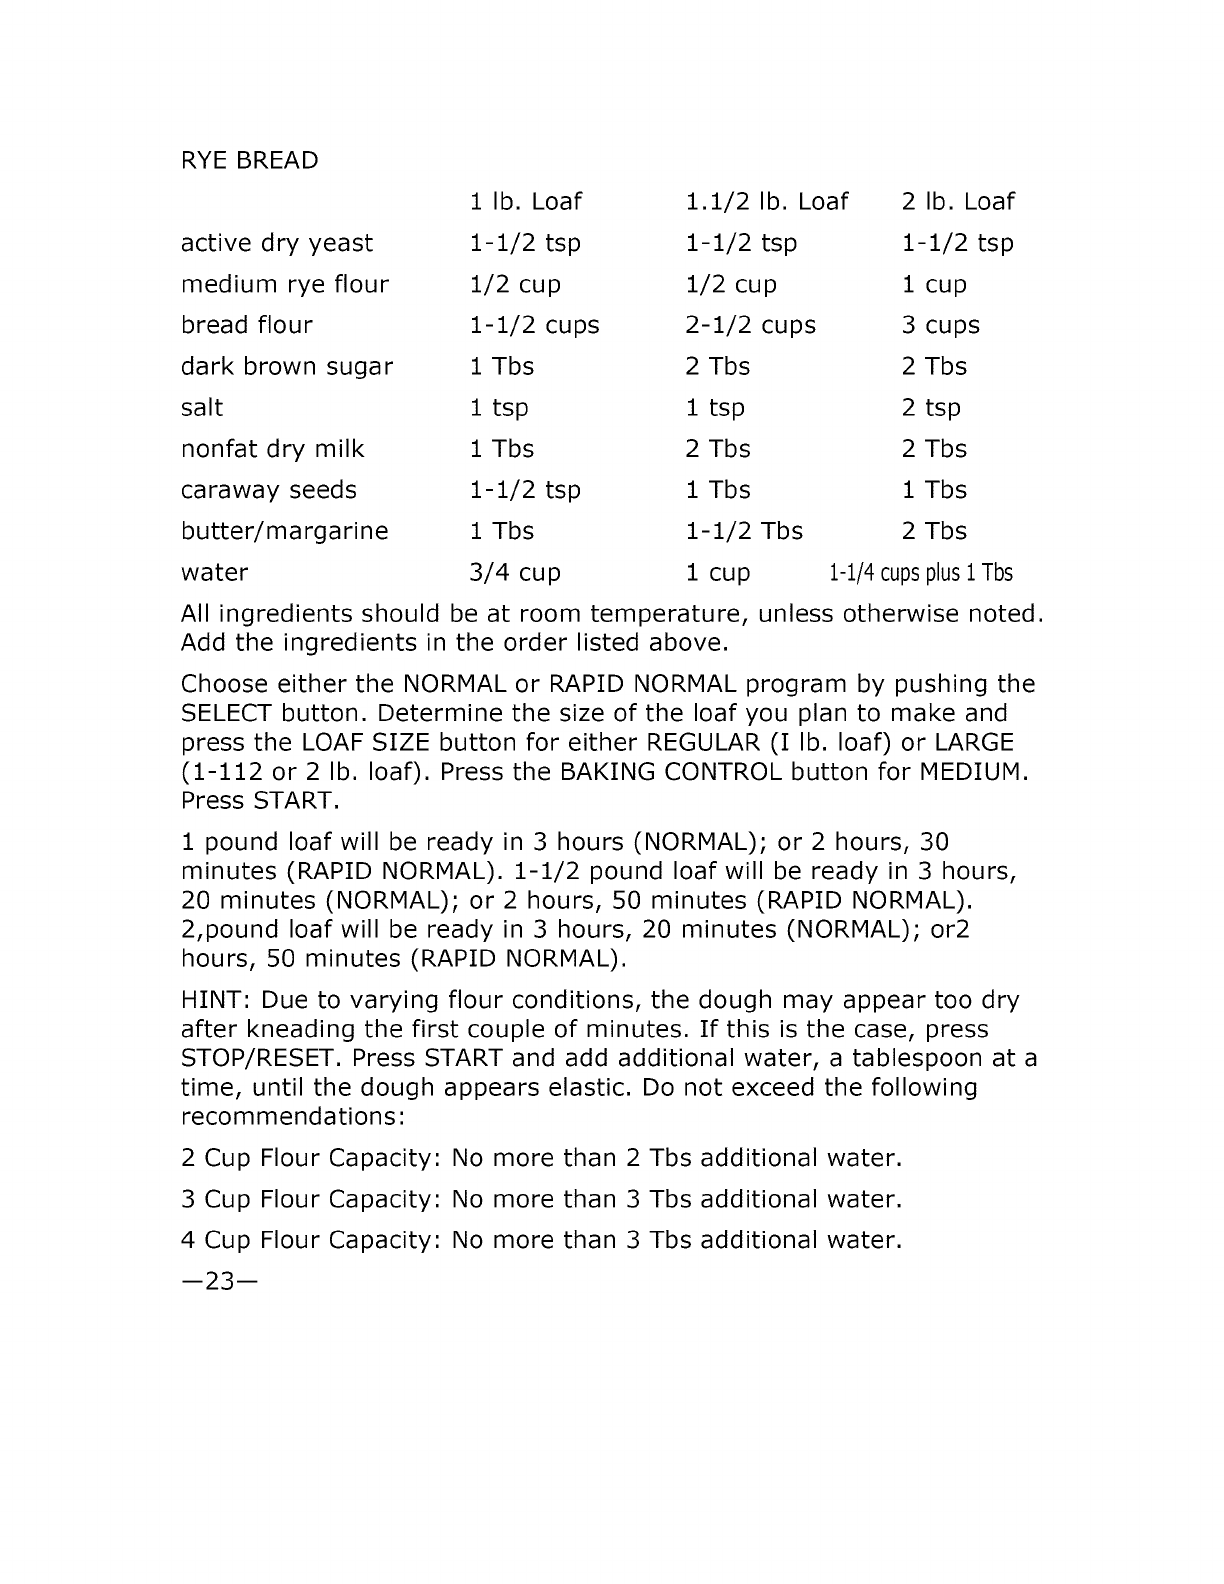
RYE BREAD
1 lb. Loaf 1.1/2 lb. Loaf 2 lb. Loaf
active dry yeast 1-1/2 tsp 1-1/2 tsp 1-1/2 tsp
medium rye flour 1/2 cup 1/2 cup 1 cup
bread flour 1-1/2 cups 2-1/2 cups 3 cups
dark brown sugar 1 Tbs 2 Tbs 2 Tbs
salt 1 tsp 1 tsp 2 tsp
nonfat dry milk 1 Tbs 2 Tbs 2 Tbs
caraway seeds 1-1/2 tsp 1 Tbs 1 Tbs
butter/margarine 1 Tbs 1-1/2 Tbs 2 Tbs
water 3/4 cup 1 cup 1-1/4cupsplus1Tbs
All ingredients should be at room temperature, unless otherwise noted.
Add the ingredients in the order listed above.
Choose either the NORMAL or RAPID NORMAL program by pushing the
SELECT button. Determine the size of the loaf you plan to make and
press the LOAF SIZE button for either REGULAR (I lb. loaf) or LARGE
(1-112 or 2 lb. loaf). Press the BAKING CONTROL button for MEDIUM.
Press START.
1 pound loaf will be ready in 3 hours (NORMAL); or 2 hours, 30
minutes (RAPID NORMAL). 1-1/2 pound loaf will be ready in 3 hours,
20 minutes (NORMAL); or 2 hours, 50 minutes (RAPID NORMAL).
2,pound loaf will be ready in 3 hours, 20 minutes (NORMAL); or2
hours, 50 minutes (RAPID NORMAL).
HINT: Due to varying flour conditions, the dough may appear too dry
after kneading the first couple of minutes. If this is the case, press
STOP/RESET. Press START and add additional water, a tablespoon at a
time, until the dough appears elastic. Do not exceed the following
recommendations:
2 Cup Flour Capacity:
3 Cup Flour Capacity:
4 Cup Flour Capacity:
No more than 2 Tbs additional water.
No more than 3 Tbs additional water.
No more than 3 Tbs additional water.
m23m
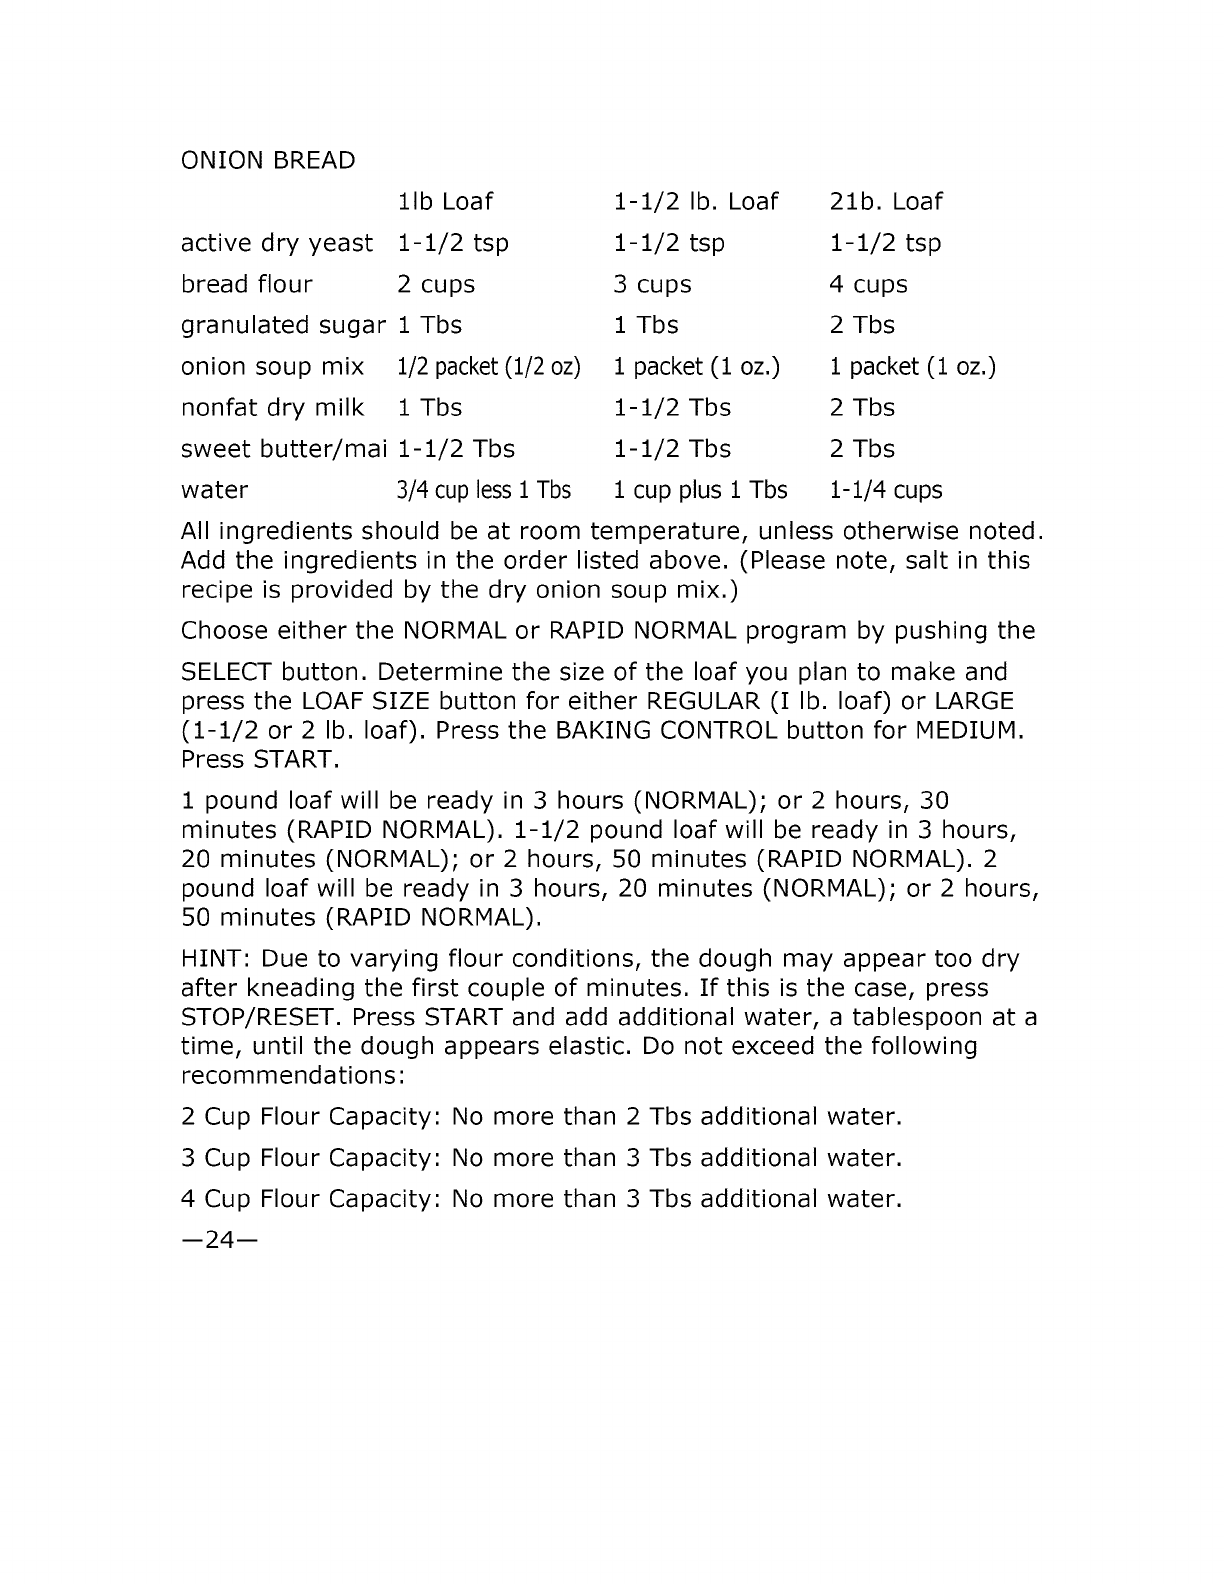
ONION BREAD
lib Loaf
active dry yeast 1-1/2 tsp
bread flour 2 cups
granulated sugar 1 Tbs
onion soup mix 1/2packet(1/2 oz)
nonfat dry milk 1 Tbs
sweet butter/mai 1-1/2 Tbs
water 3/4 cupless1 Tbs
1-1/2 lb. Loaf 21b. Loaf
1-1/2 tsp 1-1/2 tsp
3 cups 4 cups
1 Tbs 2 Tbs
1 packet (1 oz.) 1 packet (1 oz.)
1-1/2 Tbs 2 Tbs
1-1/2 Tbs 2 Tbs
1 cup plus 1 Tbs 1-1/4 cups
All ingredients should be at room temperature, unless otherwise noted.
Add the ingredients in the order listed above. (Please note, salt in this
recipe is provided by the dry onion soup mix.)
Choose either the NORMAL or RAPID NORMAL program by pushing the
SELECT button. Determine the size of the loaf you plan to make and
press the LOAF SIZE button for either REGULAR (I lb. loaf) or LARGE
(1-1/2 or 2 lb. loaf). Press the BAKING CONTROL button for MEDIUM.
Press START.
1 pound loaf will be ready in 3 hours (NORMAL); or 2 hours, 30
minutes (RAPID NORMAL). 1-1/2 pound loaf will be ready in 3 hours,
20 minutes (NORMAL); or 2 hours, 50 minutes (RAPID NORMAL). 2
pound loaf will be ready in 3 hours, 20 minutes (NORMAL); or 2 hours,
50 minutes (RAPID NORMAL).
HINT: Due to varying flour conditions, the dough may appear too dry
after kneading the first couple of minutes. If this is the case, press
STOP/RESET. Press START and add additional water, a tablespoon at a
time, until the dough appears elastic. Do not exceed the following
recommendations:
2 Cup Flour Capacity:
3 Cup Flour Capacity:
4 Cup Flour Capacity:
No more than 2 Tbs additional water.
No more than 3 Tbs additional water.
No more than 3 Tbs additional water.
--24--
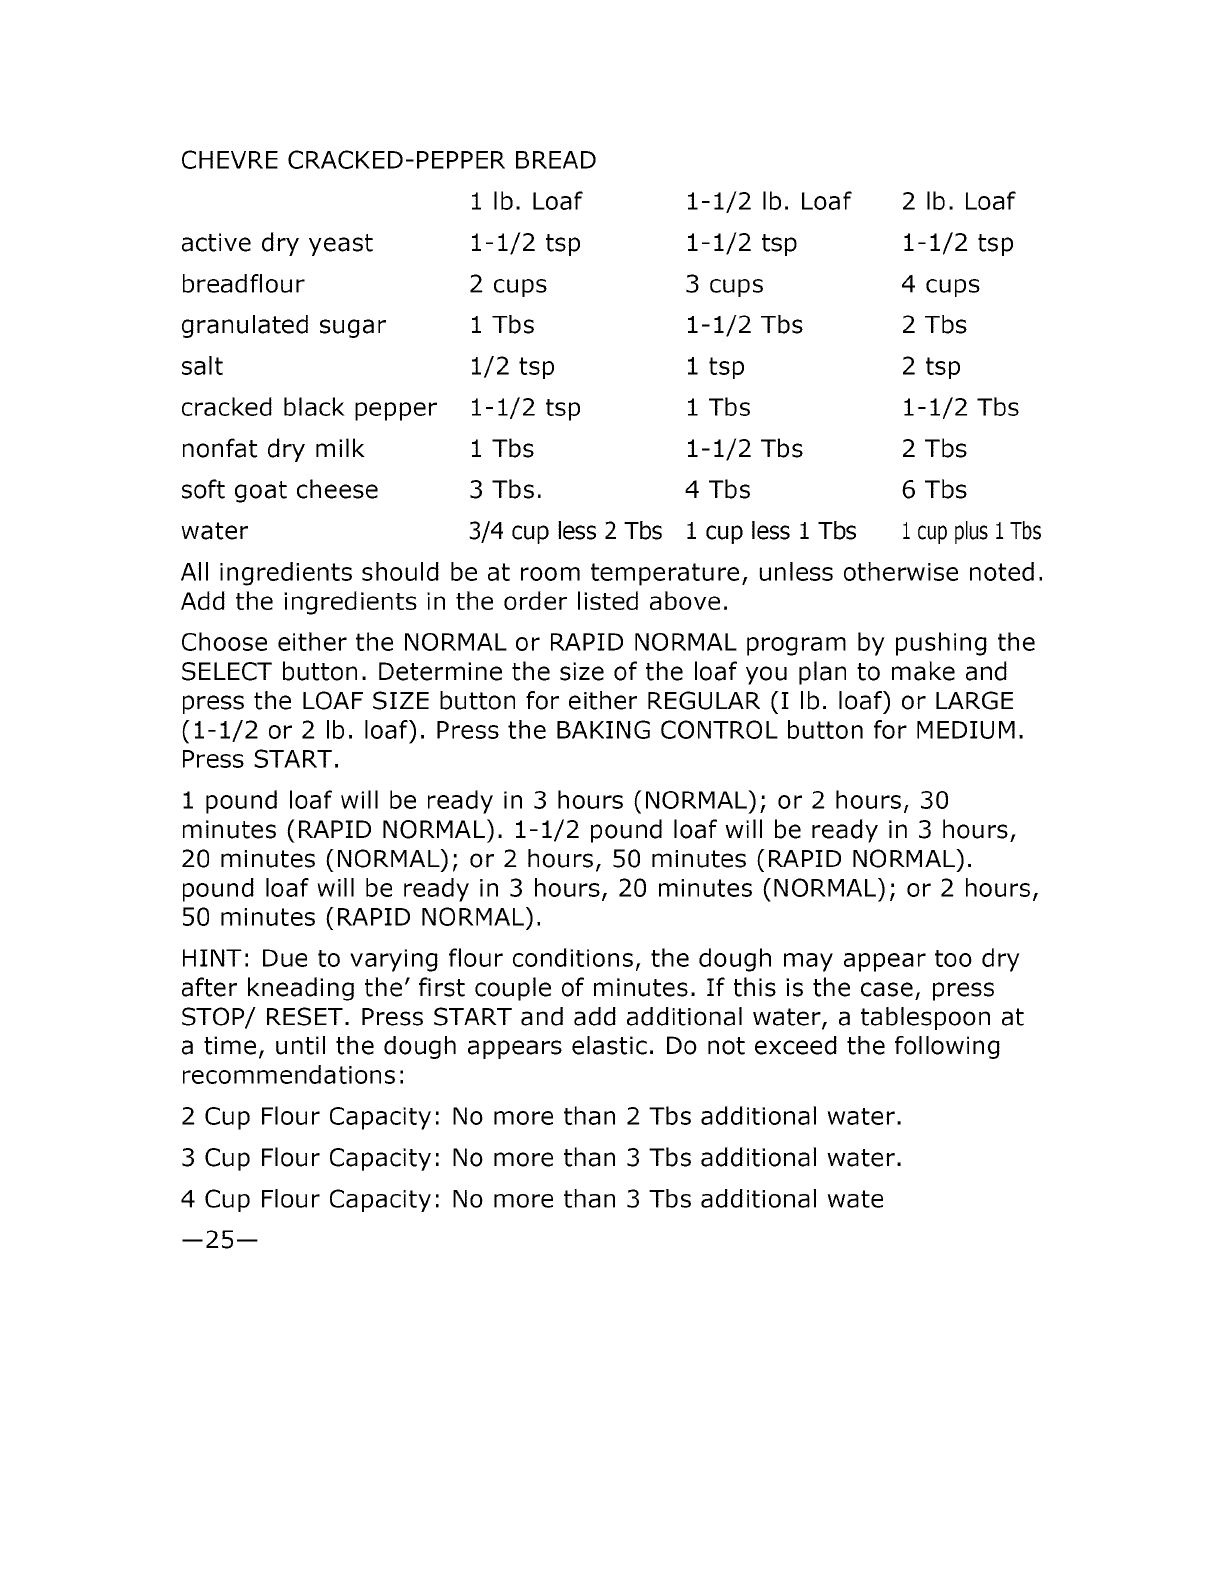
CHEVRE CRACKED-PEPPERBREAD
1 lb. Loaf 1-1/2 lb. Loaf 2 lb. Loaf
active dry yeast 1-1/2 tsp 1-1/2 tsp 1-1/2 tsp
breadflour 2 cups 3 cups 4 cups
granulated sugar 1 Tbs 1-1/2 Tbs 2 Tbs
salt 1/2 tsp 1 tsp 2 tsp
cracked black pepper 1-1/2 tsp 1 Tbs 1-1/2 Tbs
nonfat dry milk 1 Tbs 1-1/2 Tbs 2 Tbs
soft goat cheese 3 Tbs. 4 Tbs 6 Tbs
water 3/4 cup less 2 Tbs 1 cup less 1 Tbs i cupplus1Tbs
All ingredients should be at room temperature, unless otherwise noted.
Add the ingredients in the order listed above.
Choose either the NORMAL or RAPID NORMAL program by pushing the
SELECT button. Determine the size of the loaf you plan to make and
press the LOAF SIZE button for either REGULAR (I lb. loaf) or LARGE
(1-1/2 or 2 lb. loaf). Press the BAKING CONTROL button for MEDIUM.
Press START.
1 pound loaf will be ready in 3 hours (NORMAL); or 2 hours, 30
minutes (RAPID NORMAL). 1-1/2 pound loaf will be ready in 3 hours,
20 minutes (NORMAL); or 2 hours, 50 minutes (RAPID NORMAL).
pound loaf will be ready in 3 hours, 20 minutes (NORMAL); or 2 hours,
50 minutes (RAPID NORMAL).
HINT: Due to varying flour conditions, the dough may appear too dry
after kneading the' first couple of minutes. If this is the case, press
STOP/ RESET. Press START and add additional water, a tablespoon at
a time, until the dough appears elastic. Do not exceed the following
recommendations:
2 Cup Flour Capacity:
3 Cup Flour Capacity:
4 Cup Flour Capacity:
No more than 2 Tbs additional water.
No more than 3 Tbs additional water.
No more than 3 Tbs additional wate
m25m
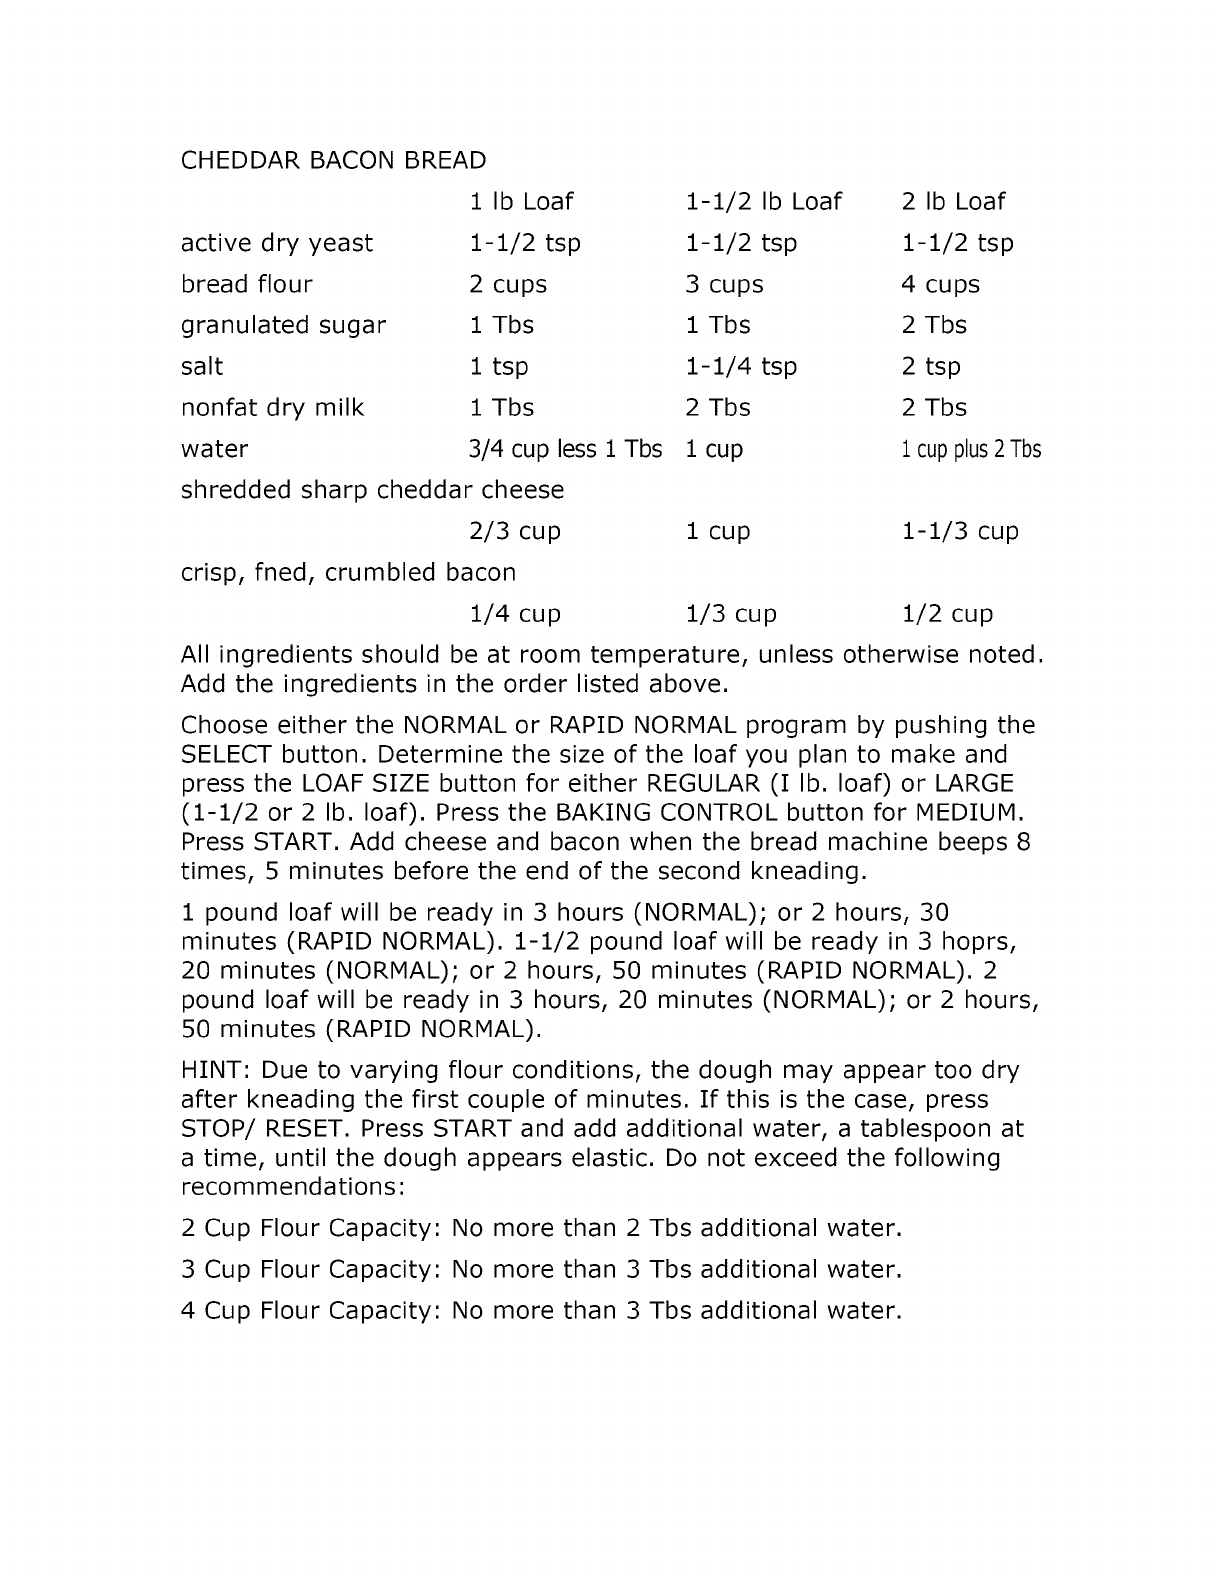
CHEDDAR BACON BREAD
1 Ib Loaf 1-1/2 Ib Loaf 2 Ib Loaf
active dry yeast 1-1/2 tsp 1-1/2 tsp 1-1/2 tsp
bread flour 2 cups 3 cups 4 cups
granulated sugar 1 Tbs 1 Tbs 2 Tbs
salt 1 tsp 1-1/4 tsp 2 tsp
nonfat dry milk 1 Tbs 2 Tbs 2 Tbs
water 3/4 cup less 1 Tbs 1 cup i cupplus2Tbs
shredded sharp cheddar cheese
2/3 cup
crisp, fned, crumbled bacon
1/4 cup
1 cup 1-1/3 cup
1/3 cup 1/2 cup
All ingredients should be at room temperature, unless otherwise noted.
Add the ingredients in the order listed above.
Choose either the NORMAL or RAPID NORMAL program by pushing the
SELECT button. Determine the size of the loaf you plan to make and
press the LOAF SIZE button for either REGULAR (I lb. loaf) or LARGE
(1-1/2 or 2 lb. loaf). Press the BAKING CONTROL button for MEDIUM.
Press START. Add cheese and bacon when the bread machine beeps 8
times, 5 minutes before the end of the second kneading.
1 pound loaf will be ready in 3 hours (NORMAL); or 2 hours, 30
minutes (RAPID NORMAL). 1-1/2 pound loaf will be ready in 3 hoprs,
20 minutes (NORMAL); or 2 hours, 50 minutes (RAPID NORMAL). 2
pound loaf will be ready in 3 hours, 20 minutes (NORMAL); or 2 hours,
50 minutes (RAPID NORMAL).
HINT: Due to varying flour conditions, the dough may appear too dry
after kneading the first couple of minutes. If this is the case, press
STOP/ RESET. Press START and add additional water, a tablespoon at
a time, until the dough appears elastic. Do not exceed the following
recommendations:
2 Cup Flour Capacity:
3 Cup Flour Capacity:
4 Cup Flour Capacity:
No more than 2 Tbs additional water.
No more than 3 Tbs additional water.
No more than 3 Tbs additional water.
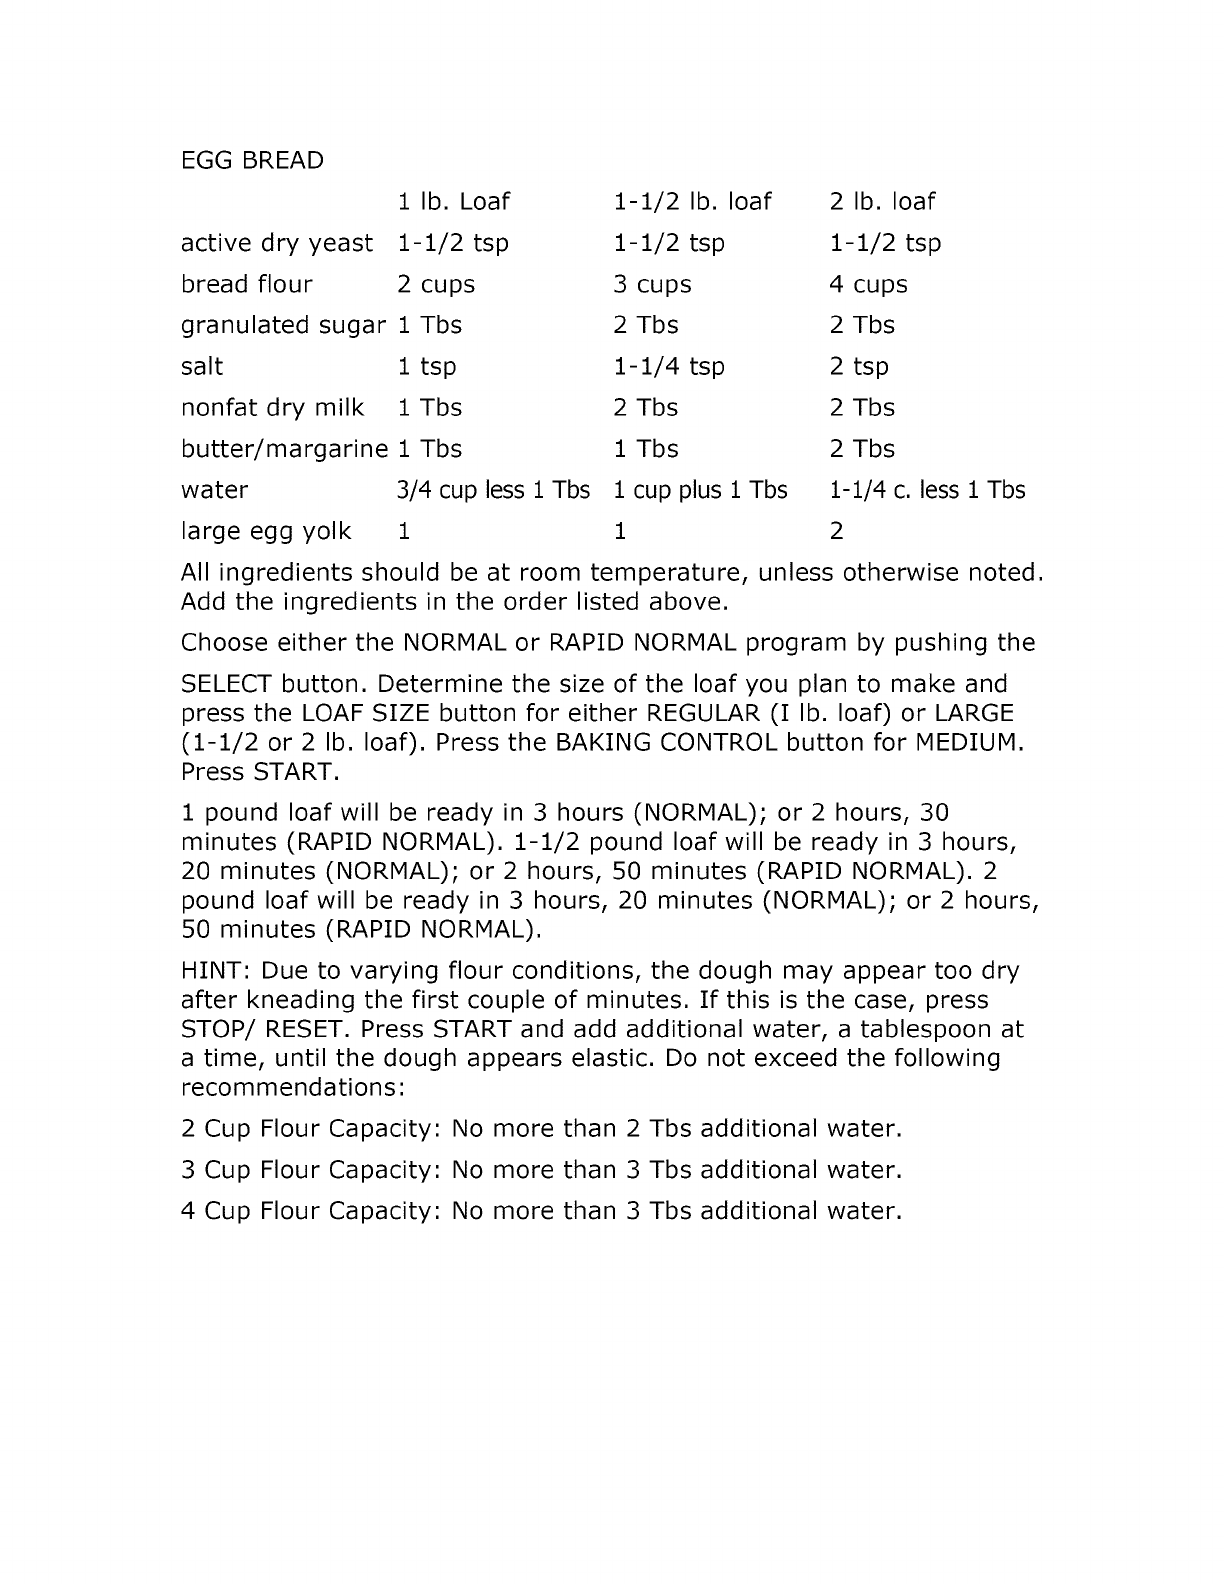
EGG BREAD
active dry yeast
bread flour
1 lb. Loaf
1-1/2 tsp
2 cups
granulated sugar 1 Tbs
salt 1 tsp
nonfat dry milk 1 Tbs
butter/margarine 1 Tbs
water 3/4 cup less 1 Tbs
large egg yolk 1
1-1/2 lb. loaf 2 lb. loaf
1-1/2 tsp 1-1/2 tsp
3 cups 4 cups
2 Tbs 2 Tbs
1-1/4 tsp 2 tsp
2 Tbs 2 Tbs
1 Tbs 2 Tbs
1 cup plus 1 Tbs 1-1/4 c. less 1 Tbs
1 2
All ingredients should be at room temperature, unless otherwise noted.
Add the ingredients in the order listed above.
Choose either the NORMAL or RAPID NORMAL program by pushing the
SELECT button. Determine the size of the loaf you plan to make and
press the LOAF SIZE button for either REGULAR (I lb. loaf) or LARGE
(1-1/2 or 2 lb. loaf). Press the BAKING CONTROL button for MEDIUM.
Press START.
1 pound loaf will be ready in 3 hours (NORMAL); or 2 hours, 30
minutes (RAPID NORMAL). 1-1/2 pound loaf will be ready in 3 hours,
20 minutes (NORMAL); or 2 hours, 50 minutes (RAPID NORMAL). 2
pound loaf will be ready in 3 hours, 20 minutes (NORMAL); or 2 hours,
50 minutes (RAPID NORMAL).
HINT: Due to varying flour conditions, the dough may appear too dry
after kneading the first couple of minutes. If this is the case, press
STOP/ RESET. Press START and add additional water, a tablespoon at
a time, until the dough appears elastic. Do not exceed the following
recommendations:
2 Cup Flour Capacity:
3 Cup Flour Capacity:
4 Cup Flour Capacity:
No more than 2 Tbs additional water.
No more than 3 Tbs additional water.
No more than 3 Tbs additional water.
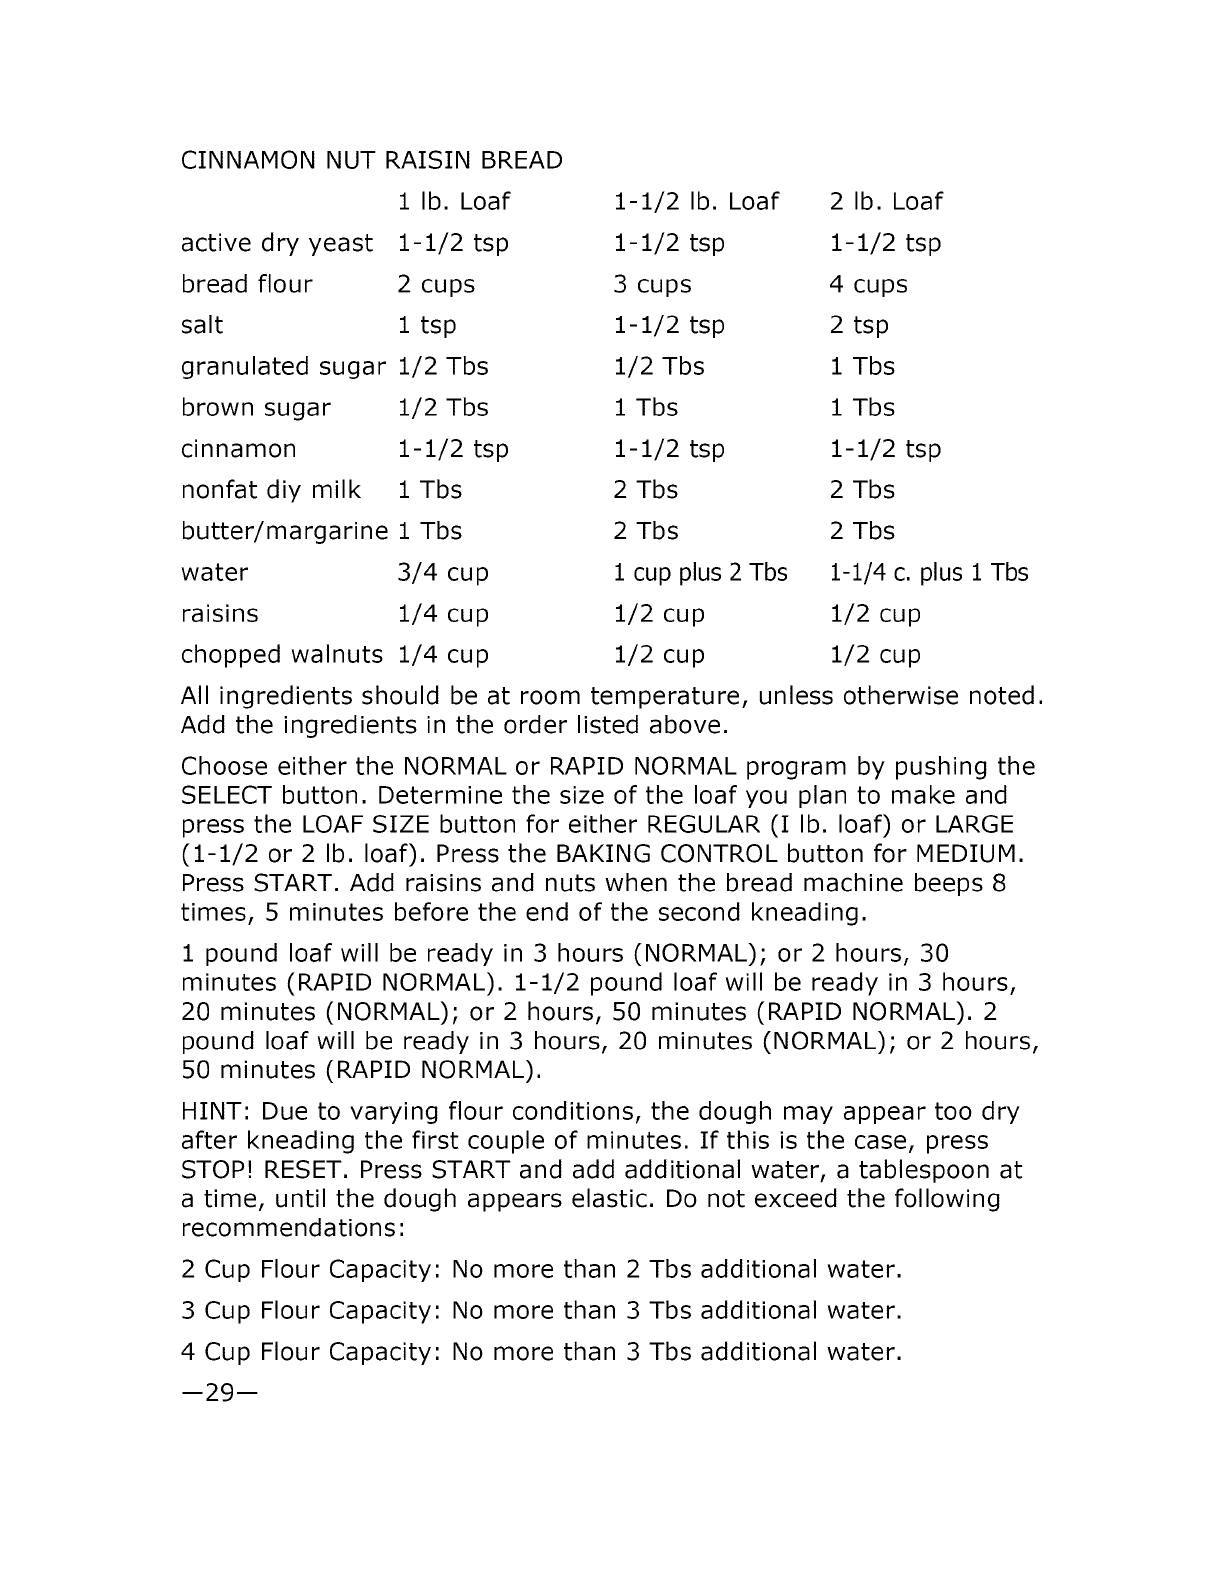
CINNAMON NUT RAISIN BREAD
1 lb. Loaf 1-1/2 lb. Loaf 2 lb. Loaf
active dry yeast 1-1/2 tsp 1-1/2 tsp 1-1/2 tsp
bread flour 2 cups 3 cups 4 cups
salt 1 tsp 1-1/2 tsp 2 tsp
granulated sugar 1/2 Tbs 1/2 Tbs 1 Tbs
brown sugar 1/2 Tbs 1 Tbs 1 Tbs
cinnamon 1-1/2 tsp 1-1/2 tsp 1-1/2 tsp
nonfat diy milk 1 Tbs 2 Tbs 2 Tbs
butter/margarine 1 Tbs 2 Tbs 2 Tbs
water 3/4 cup 1 cup plus 2 Tbs 1-1/4 c. plus 1Tbs
raisins 1/4 cup 1/2 cup 1/2 cup
chopped walnuts 1/4 cup 1/2 cup 1/2 cup
All ingredients should be at room temperature, unless otherwise noted.
Add the ingredients in the order listed above.
Choose either the NORMAL or RAPID NORMAL program by pushing the
SELECT button. Determine the size of the loaf you plan to make and
press the LOAF SIZE button for either REGULAR (I lb. loaf) or LARGE
(1-1/2 or 2 lb. loaf). Press the BAKING CONTROL button for MEDIUM.
Press START. Add raisins and nuts when the bread machine beeps 8
times, 5 minutes before the end of the second kneading.
1 pound loaf will be ready in 3 hours (NORMAL); or 2 hours, 30
minutes (RAPID NORMAL). 1-1/2 pound loaf will be ready in 3 hours,
20 minutes (NORMAL); or 2 hours, 50 minutes (RAPID NORMAL). 2
pound loaf will be ready in 3 hours, 20 minutes (NORMAL); or 2 hours,
50 minutes (RAPID NORMAL).
HINT: Due to varying flour conditions, the dough may appear too dry
after kneading the first couple of minutes. If this is the case, press
STOP! RESET. Press START and add additional water, a tablespoon at
a time, until the dough appears elastic. Do not exceed the following
recommendations:
2 Cup Flour Capacity:
3 Cup Flour Capacity:
4 Cup Flour Capacity:
No more than 2 Tbs additional water.
No more than 3 Tbs additional water.
No more than 3 Tbs additional water.
m29m
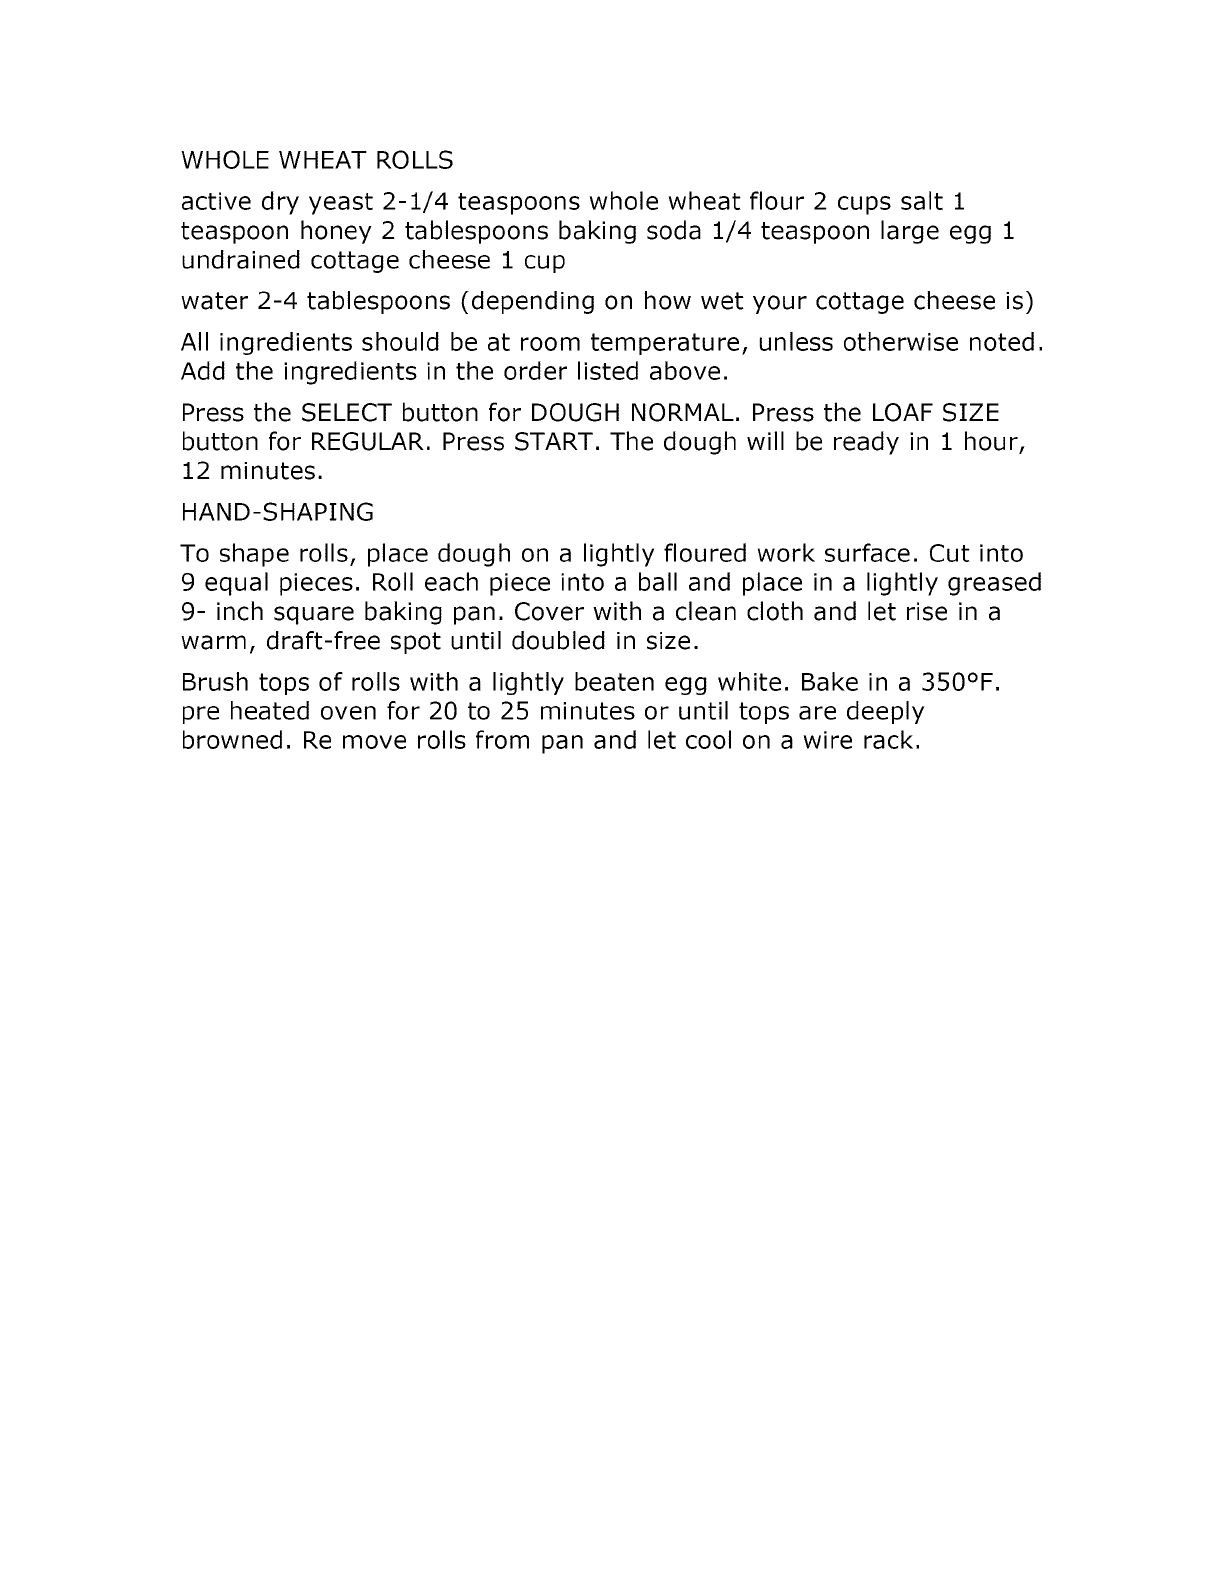
WHOLE WHEAT ROLLS
active dry yeast 2-1/4 teaspoons whole wheat flour 2 cups salt 1
teaspoon honey 2 tablespoons baking soda 1/4 teaspoon large egg 1
undrained cottage cheese 1 cup
water 2-4 tablespoons (depending on how wet your cottage cheese is)
All ingredients should be at room temperature, unless otherwise noted.
Add the ingredients in the order listed above.
Press the SELECT button for DOUGH NORMAL. Press the LOAF SIZE
button for REGULAR. Press START. The dough will be ready in 1 hour,
12 minutes.
HAND-SHAPING
To shape rolls, place dough on a lightly floured work surface. Cut into
9 equal pieces. Roll each piece into a ball and place in a lightly greased
9- inch square baking pan. Cover with a clean cloth and let rise in a
warm, draft-free spot until doubled in size.
Brush tops of rolls with a lightly beaten egg white. Bake in a 350°F.
pre heated oven for 20 to 25 minutes or until tops are deeply
browned. Re move rolls from pan and let cool on a wire rack.
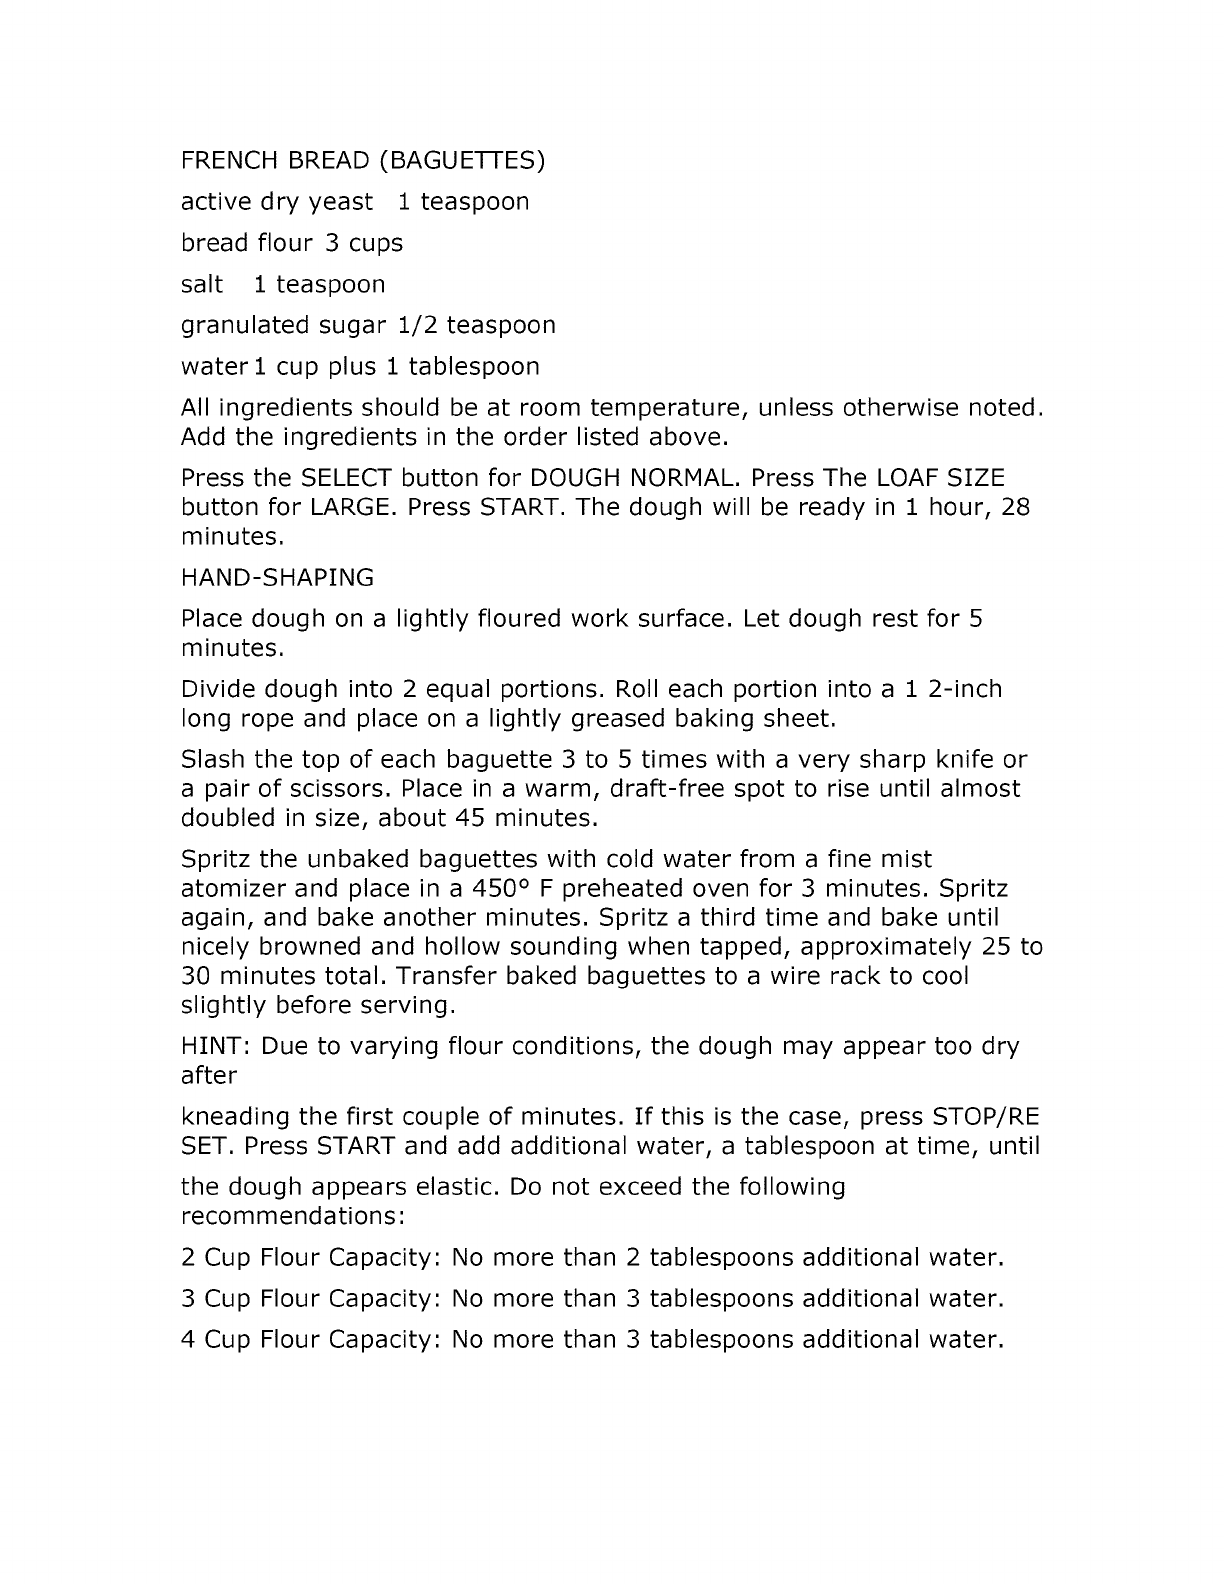
FRENCH BREAD (BAGUE-I-I-ES)
active dry yeast 1 teaspoon
bread flour 3 cups
salt 1 teaspoon
granulated sugar 1/2 teaspoon
water I cup plus 1 tablespoon
All ingredients should be at room temperature, unless otherwise noted.
Add the ingredients in the order listed above.
Press the SELECT button for DOUGH NORMAL. Press The LOAF SIZE
button for LARGE. Press START. The dough will be ready in 1 hour, 28
minutes.
HAND-SHAPING
Place dough on a lightly floured work surface. Let dough rest for 5
minutes.
Divide dough into 2 equal portions. Roll each portion into a 1 2-inch
long rope and place on a lightly greased baking sheet.
Slash the top of each baguette 3 to 5 times with a very sharp knife or
a pair of scissors. Place in a warm, draft-free spot to rise until almost
doubled in size, about 45 minutes.
Spritz the unbaked baguettes with cold water from a fine mist
atomizer and place in a 450 ° F preheated oven for 3 minutes. Spritz
again, and bake another minutes. Spritz a third time and bake until
nicely browned and hollow sounding when tapped, approximately 25 to
30 minutes total. Transfer baked baguettes to a wire rack to cool
slightly before serving.
HINT: Due to varying flour conditions, the dough may appear too dry
after
kneading the first couple of minutes. If this is the case, press STOP/RE
SET. Press START and add additional water, a tablespoon at time, until
the dough appears elastic. Do not exceed the following
recommendations:
2 Cup Flour Capacity:
3 Cup Flour Capacity:
4 Cup Flour Capacity:
No more than 2 tablespoons additional water.
No more than 3 tablespoons additional water.
No more than 3 tablespoons additional water.

PIZZA DOUGH
active dry yeast
bread flour
salt
granulated sugar
olive oil
water
Two 12-inch pizzas
1-3/4 tsp
2-1/2 cups
1 tsp
1/2 tsp
1-1/2 Tbs
1 cup less 2 Tbs
Four 12-inch Pizzas
2 tsp
4 cups
1-1/2 tsp
3/4 tsp
2-1/2 Tbs
1-1/4 cups
All ingredients should be at room temperature, unless otherwise noted.
Add the ingredients in the order listed above.
Press the SELECT button for DOUGH NORMAL. Press the LOAF SIZE
button for either REGULAR (2 pizzas) or LARGE (4 pizzas). Press
START. The dough will be ready in 1 hour, 12 minutes (2 pizzas) or 1
hour, 28 minutes (4 pizzas).
HAND-SHAPING
Preheat oven to 400°F.
Place dough on a lightly floured surface. Cover dough with a clean
cloth, and let dough rest for 10 minutes. Cut into halves (or quarters
for 4 pizzas). Press each evenly into a lightly greased 12-inch pizza
pan. Spread! sprinkle crust with your favorite pizza toppings.
Bake for 10 to 15 minutes, or until toppings are melted and bubbling.
HINT: Due to varying flour conditions, the dough may appear too dry
after kneading the first couple of minutes, if this is the case, press
STOP/RESET. Press START and add additional water, a tablespoon at
time, until the dough appears elastic. Do not exceed the following
recommendations:
2 Cup Flour Capacity:
3 Cup Flour Capacity:
4 Cup Flour Capacity:
No more than 2 Tbs additional water.
No more than 3 Tbs additional water.
No more than 3 Tbs additional water.
--33--
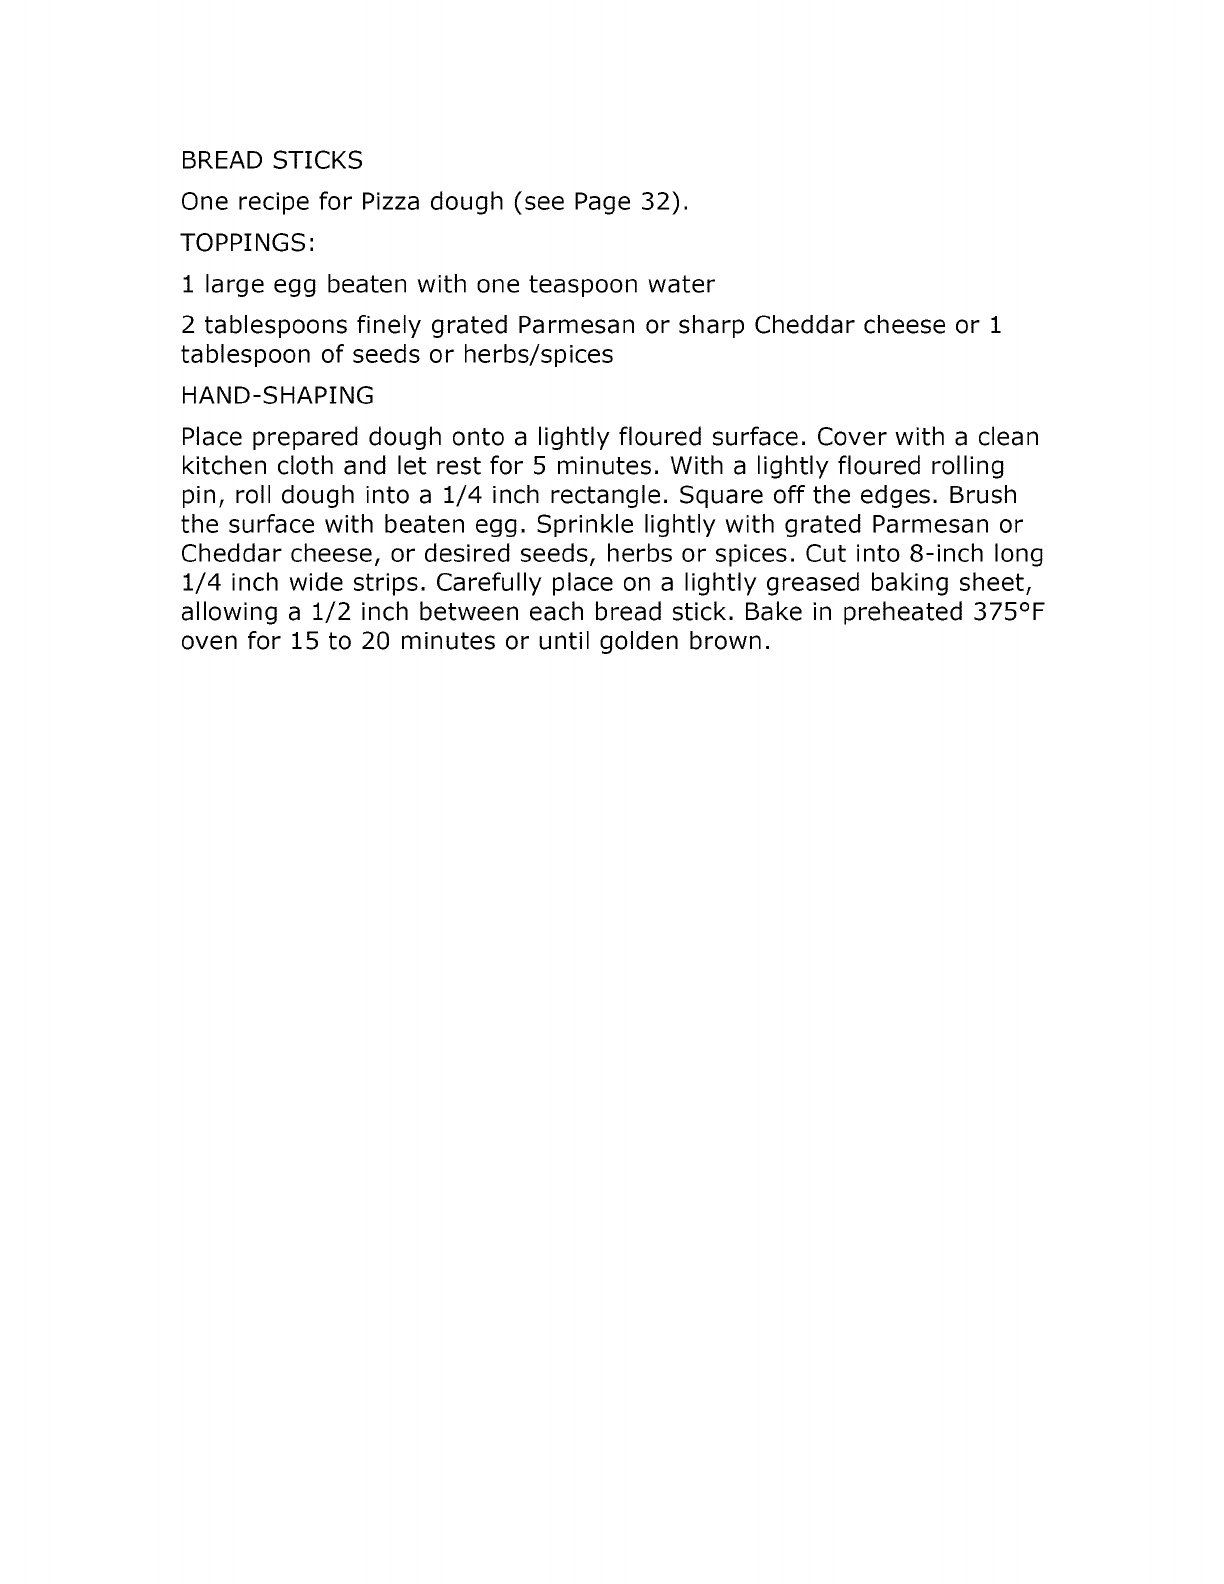
BREAD STICKS
One recipe for Pizza dough (see Page 32).
TOPPINGS:
1 large egg beaten with one teaspoon water
2 tablespoons finely grated Parmesan or sharp Cheddar cheese or 1
tablespoon of seeds or herbs/spices
HAND-SHAPING
Place prepared dough onto a lightly floured surface. Cover with a clean
kitchen cloth and let rest for 5 minutes. With a lightly floured rolling
pin, roll dough into a 1/4 inch rectangle. Square off the edges. Brush
the surface with beaten egg. Sprinkle lightly with grated Parmesan or
Cheddar cheese, or desired seeds, herbs or spices. Cut into 8-inch long
1/4 inch wide strips. Carefully place on a lightly greased baking sheet,
allowing a 1/2 inch between each bread stick. Bake in preheated 375°F
oven for 15 to 20 minutes or until golden brown.
CHALLAH
Prepare one Ilb. recipe for egg bread (see page 26) by using the
dough program.
PREPARE AND RESERVE
1 large egg beaten with 1 teaspoon water
OPTIONAL TOPPING
1 teaspoon poppy or sesame seeds
All ingredients should be at room temperature, unless otherwise noted.
Add the ingredients in the order listed above.
Press the SELECT button for DOUGH SWEET. Press the LOAF SIZE
button for REGULAR. Press START. The dough will be ready in 1 hour,
12 minutes.
HAND-SHAPING
Place the dough on a lightly floured surface. Cover with a clean cloth
and let the dough rest for 5 minutes. Divide the dough into three equal
pieces. Shape each piece into a 14-inch rope by rolling back and forth
with your fingertips. The easiest way to do this is to start in the center
and by applying even pressure, roll the dough back and forth from the
center to the ends.
Lay the three pieces of shaped dough side by side and pinch top ends
together. Braid the dough and pinch bottom ends together. Tuck the
ends under and place the braid on a lightly greased baking sheet.
Cover with a clean kitchen cloth and let rise until doubled in size in a
warm, draft-free spot.
Brush the braid with the beaten egg and sprinkle with seeds, if
desired. Bake in a 375°F preheated oven for 25 to 30 minutes, or until
deep golden brown.
sheet which has been tightly sprinkled with cornmeal. Sprinkle bagels
with optional toppings. Bake in a 375°F preheated oven for 20 to 25
minutes, or until golden brown.
HINT: Due to varying flour conditions, the dough may appear too dry
after
kneading the first couple of minutes. If this is the case, press
STOP/RESET. Press START and add additional water, a tablespoon at a
time, until
the dough appears elastic. Do not exceed the following
recommendations:
2 Cup Flour Capacity:
3 Cup Flour Capacity:
4 Cup Flour Capacity:
No more than 2 tablespoons additional water.
No more than 3 tablespoons additional water.
No more than 3 tablespoons additional water.

HINT: Due to varying flour conditions, the dough may appear too dry
after kneading the first couple of minutes. If this is the case, press
STOP! RESET. Press START and add additional water, a tablespoon at
a time, until the dough appears elastic. Do not exceed the following
recommendations:
2 Cup Flour Capacity:
3 Cup Flour Capacity:
4 Cup Flour Capacity:
No more than 2 tablespoons additional water.
No more than 3 tablespoons additional water.
No more than 3 tablespoons additional water.
DANISH PASTRIES
Pastry
active dry yeast 2 teaspoons
bread flour 2 cups
salt 1 teaspoon
granulated sugar 2 tablespoons
cold, unsalted butter cut into 24 pieces
large egg yolk 1
milk 1/2 cup
water 1/4 cup
5 tablespoons
Glaze and Fillings
egg white 1
fruit filling, jam or preserves 3/4 cup
All ingredients should be at room temperature, unless otherwise noted.
Add the ingredients in the order listed above.
Press the SELECT button for DOUGH SWEET. Press the LOAF SIZE
button for REGULAR. Press START. The dough will be ready in 1 hour,
12 minutes.
HAND-SHAPING
Place the dough in a lightly greased 3-quart bowl. Tightly cover with
foil or plastic wrap and refrigerate 8 to 24 hours. Remove from the
refrigerator and punch down. Place the dough on a lightly floured work
surface and divide into 12 equal pieces. Roll the dough in 16-inch long
ropes. Coil each rope and tuck the end under the Danish. Place on a
lightly greased baking sheet. Cover with a clean kitchen cloth and let
rise until doubled in size in a warm, draft-free spot.
Make a deep indentation with your thumb in the center of each Danish
and fill with fruit, jam or preserves. Brush the edges with the egg
white glaze. Bake in a 375°F preheated oven for 15 to 20 minutes, or
until golden brown.
HINT: Due to varying flour conditions, the dough may appear too dry
after kneading the first couple of minutes. If this is the case, press
STOP/RESET.

Press START and add additional water, a tablespoon at a time, until
the dough appears elastic. Do not exceed the following
recommendations:
2 Cup Flour Capacity:
3 Cup Flour Capacity:
4 Cup Flour Capacity:
No more than 2 tablespoons additional water.
No more than 3 tablespoons additional water.
No more than 3 tablespoons additional water.
--40--
CINNAMON ROLLS
Prepare one recipe for holiday braid bread (see page 37). Do not add
raisins. Use hand-shaping technique given on this page.
1 Ib Loaf 1-1/2 Ib Loaf 2 Ib Loaf
Brown Sugar Filling
dark brown sugar
cinnamon
softened butter
1/4 cup 1/3 cup
1-1/2 tsp 2-1/2 tsp
1-1/2 Tbs 2.1/2 Tbs
Combine all ingredients to form a smooth paste. Set aside.
1/2 cup
3 tsp
3 Tbs
Icing
softened butter 2 Tbs 3 Tbs
all-purpose flour 1-1/2 tsp 2 tsp
confectioner's sugar 1/4 cup 1/3 cup
vanilla extract 1/2 tsp 1 tsp
Blend all ingredients until smooth. Set aside.
HAND-SHAPING
4 Tbs
3 tsp
1/2 cup
1 tsp
Place prepared dough on a lightly floured surface. Cover with a clean
kitchen cloth and let dough rest for 5 minutes. With a lightly floured
rolling P roll dough into a 1/4-inch thick rectangle. Square off edges.
Spread evenly with brown sugar-cinnamon filing. Roll up lengthwise,
jelly-roll fashion. Pinch the edges together. Slice into 1-inch thick
rounds. Place on a lightly greased baking sheet. Cover it with a clean
cloth and let rise until doubled in size. Bake in preheated 350°F oven
for 15 to 20 minutes, until golden brown: Remove and cool on a rack.
When cooled to room temperature, drizzle with icing.
HINT: Due to varying flour conditions, the dough may appear too dry
after kneading the first couple of minutes. If this is the case, press
STOP/RE SET. Press START and add additional water, a tablespoon at
a time, until the dough appears elastic. Do not exceed the following
recommendations:
2 Cup Flour Capacity:
3 Cup Flour Capacity:
4 Cup Flour Capacity:
No more than 2 Tbs additional water.
No more than 3 Tbs additional water.
No more than 3 Tbs additional water.
--41--
CROISSANTS
Dough
active dry yeast 1-1/2 teaspoons
bread flour 2 cups
salt 1 teaspoon
granulated sugar 1 tablespoon
vegetable shortening 1 teaspoon
water3/4 cup less 2 tablespoons
PREPAREAND RESERVE
chilled sweet butter, thinly sliced 1 slicks I large egg beaten with 1
teaspoon water
All ingredients should be at room temperature, unless otherwise noted.
M the Ingredients in the order listed above.
Press the SELECT button for DOUGH NORMAL. Press the LOAF SIZE
button for REGULAR. Press START. The dough will be ready in 1 hour,
12 minutes.
HAND SHAPING
Place the dough on a lightly floured surface. Cover with a clean kitchen
cloth and let dough rest for 5 minutes. With a lightly floured rolling
pin, roll the dough into a 1 thick rectangle. Place the dough on a lightly
greased baking sheet. Cover with a clean cloth and place in the freezer
for one hour.
Remove the dough from the freezer. Place on a lightly floured surface
and roll into a 1/4-inch thick rectangle. Cover the dough with chilled
butter slices. Fold the dough in half. Gently roll with rolling pin into a
1/4-inch thick rectangle. Repeal folding process two more limes. Place
dough on previously greased baking sheet. Cover with clean cloth and
place in refrigerator for one hour.
Remove dough from refrigerator and place on tightly floured surface.
Fold dough in half and roll into a 1/4 inch rectangle. Repeat folding
process two more times.
Place dough on greased baking sheet, cover with cloth and return to
refrigerator for two more hours. Remove dough from refrigerator and
place on a lightly floured surface. Roll into a 1/8-inch thick rectangle.
Square off edges.
Cut dough In half lengthwise. Cut strips on an angle to form triangles.
Brush lightly with egg wash.
Roll triangles up from broad end to the point. Form into crescents and
place on lightly greased baking sheets, Cover with clean cloth and let
rise n draft-free spot until doubled in size approximately one hour.
Bake in 350°F preheated oven approximately 20 minutes or until
golden.
HINT: Due to varying flour conditions, the dough may appear too dry
after kneading the first couple of minutes. If this is the case, press
STOP, RESET. Press START and add additional water, a tablespoon at a
time, until the dough appears elastic. Do not exceed the following
recommendations:
2 Cup Flour Capacity:
3 Cup Flour Capacity:
4 Cup Flour Capacity:
No more than 2 tablespoons additional water.
No more than 3 tablespoons additional water.
No more than 3 tablespoons additional water
CLEANING INSTRUCTIONS
If taken care of properly, your WelbiIt Bread Machine will provide you
with many years of use and hundreds of loaves of delicious bread!
1 After each use, unplug the Bread Machine. Let the unit cool down to
room temperature. Wipe out the baking compartment and the inner lid
with a clean, damp cloth or sponge.
2. Remove the kneading blade from the pan. It may be necessary to
fill the pan with water in order to loosen the blade from the shaft.
Clean the pan and blade with warm water and mild dishwashing liquid.
Never use abrasive or strong household cleaners since they will
damage the non-stick finish. Towel dry.
3. Wipe down the cabinet of the Bread Machine with a clean, damp
cloth or sponge. Towel dry.

CONSUMER ASSISTANCE
As with any new small electric appliance, carefully read the
instructions and recipes before proceeding.
For mechanical or operational difficulties, refer to the Trouble Shooting
Guide on Page 46 of this manual.
If you should encounter any difficulties or require baking assistance.
please call our trained customer service assistanis Monday, Friday.
9:00 AM to 5:00 PM Eastern time, at (516) 747-959
If a customer service assistant is unable to take your call, please leave
a brief message. To enable us to assist you better, please specify your
model number and the reason for your call. Every attempt will be
made to return your call promptly. Please do not leave more than one
message. In the event that we are unable to contact you the first time
we return your call, we will make two additional attempts. During
periods of peak baking, especially during and after holidays, it may
take a couple of days before you hear from us. But, please be assured
that every attempt will be made to answer your call in the order that it
was received, as soon as possible.
To order a replacement part, or to obtain service on your Bread
Machine please refer to the enclosed Parts Order Form. You may also
call our Parts and Service Department at (516) 747-9595.
Please do not return your Bread Machine to Welbilt' without prior
authorization.

TROUBLE SHOOTING GUIDE
Before calling for assistance, please read the following suggestions In
order to achieve maximum satisfaction from your Bread Machine.
Problem: The Bread Machine will not start.
Cause: Appliance not plugged property into wired outlet.
Solution: Always plug appliance into 120v, 60Hz outlet capable of
providing up to 600 watts of electricity.
Cause: Programmable timer was set inadvertently.
Solution: Cancel program by pushing STOP/RESET. Select appropriate
program and push START.
Problem: The Bread Machine does not mix the ingredients.
Cause: The dough hook and/or kneading blade were not placed in
position.
Solution: Push STOP/RESET. Move the ingredients to the side of the
pan and put in the dough hook and kneading blade.
Problem: The Bread Machine beeps when START button is pushed.
Cause: The Bread Machine is too hot to use after making a loaf of
bread.
Solution: Remove the pan and let the Bread Machine cool down
sufficiently before trying to make bread or dough.
Problem: The Bread Machine does not bake the bread.
Cause: The DOUGH program was selected.
Solution: To bake bread automatically, choose the appropriate
program for making bread.
Problem: Baked loaf of bread soggy after removal from Bread Machine
Cause: Hot loaf of bread is not removed from appliance and pan after
being baked.
Solution: Remove bread from pan as soon as possible after bread has
finished baking.
Problem: Bread burns.
Cause: Baking temperature is too high.
Solution: Set Bread Machine on lower setting.
Cause: Recipe has been modified.
Solution: Reduce amount of sweetener and shortening.
Problem: Dough/Bread did not rise enough.
Cause: Ingredients were not at room temperature. Ingredients were
not place in the Bread Pan In the recipes recommended order.
Solution: Ingredients must be at room temperature unless otherwise
noted. Place ingredients in the Bread Pan in the recommended order.
Cause: Yeast did not activate.
Solution: Be certain yeast is fresh, check expiration date on the
package Do not reduce amount of sugar or sweetener called for in the
recipe, do not use artificial sweetener.
Cause: Too much salt used inhibiting rising.
Solution: Use amount specified in the recipe.
Cause: High altitude
Solution: For every 1000 feet above 3.000 feet sea level, reduce the
water by 1 tablespoon, up to 4 tablespoons maximum.
Problem: Bread collapses when baked.
Cause: Dough rose unevenly.
Solution: Make sure water is no warmer than room temperature (75 to
8OF). The flour is very absorbent and absorbs moisture from the air
during periods of excessive humidity. If dough is too sticky, the bread
can collapse. Reduce the water or liquid in the recipe by up to 4
tablespoons. Let appliance knead for 1 to 2 minutes, if the dough

appears too dry, add additional water 1 tablespoon at a time, up to 3
tablespoons.
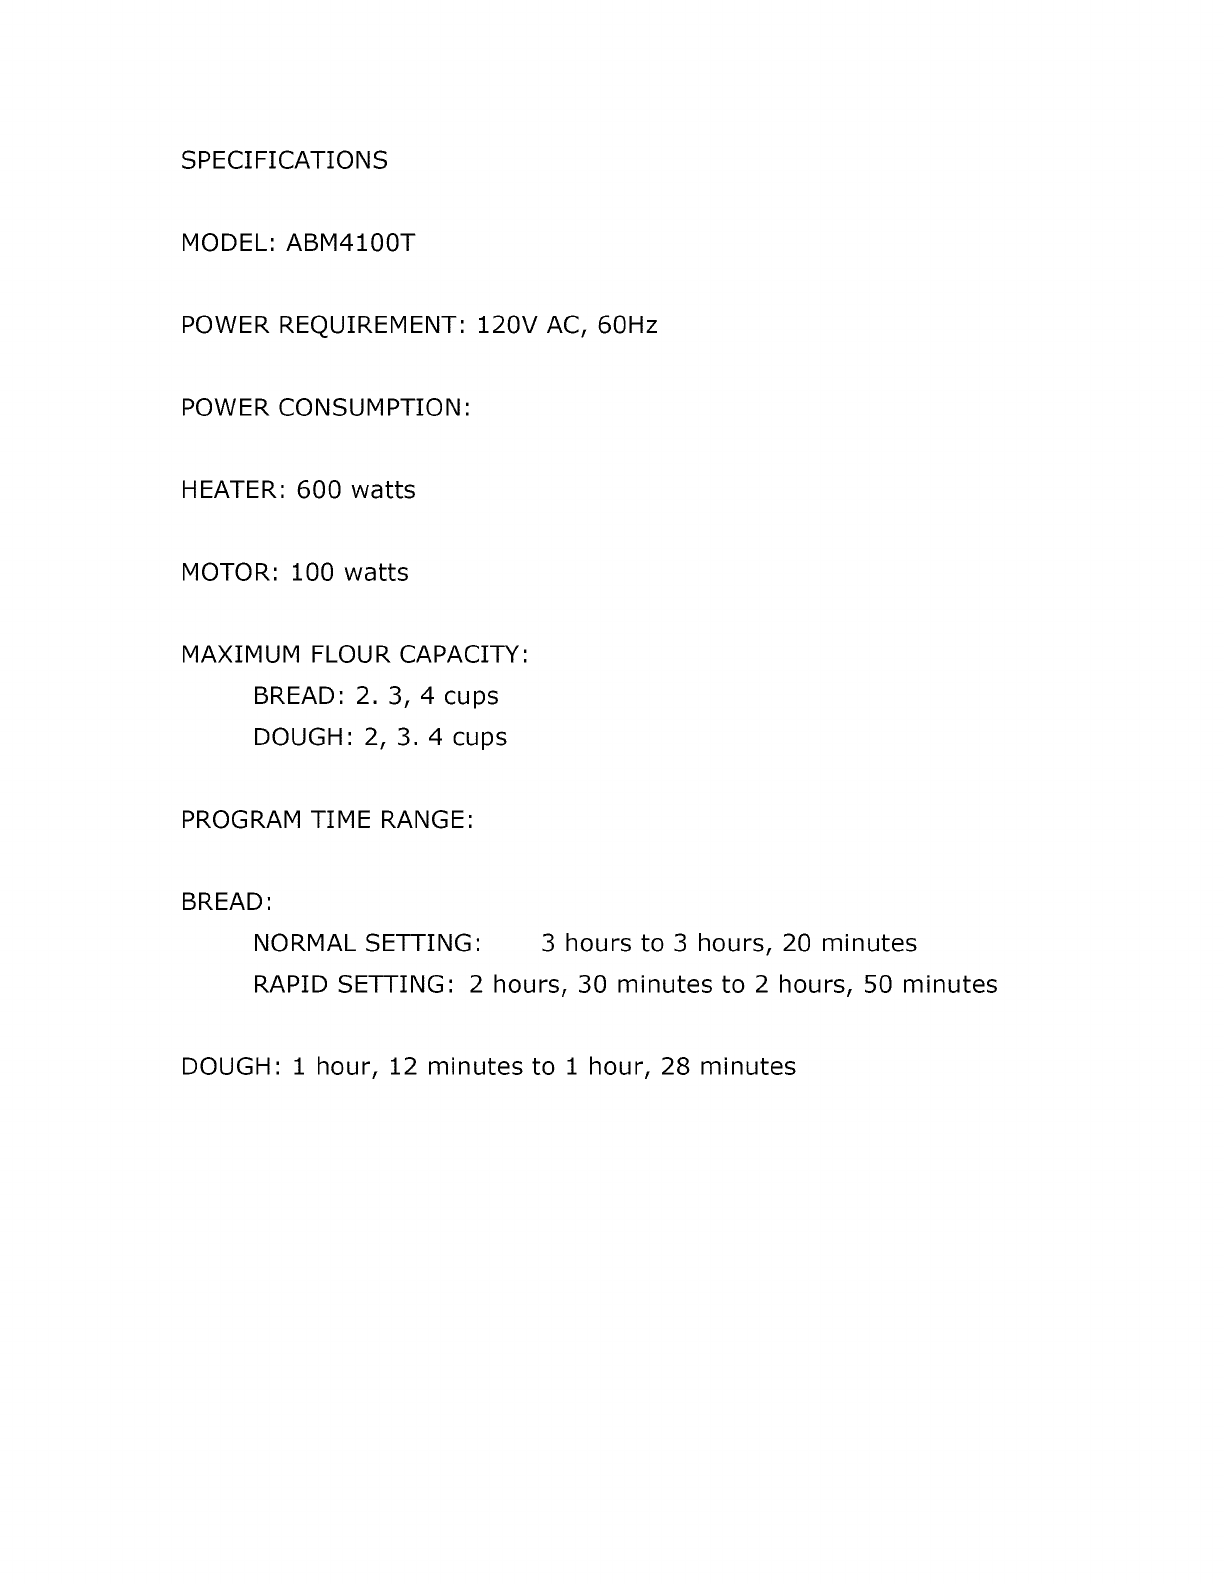
SPECIFICATIONS
MODEL: ABM4100T
POWER REQUIREMENT: 120V AC, 60Hz
POWER CONSUMPTION:
HEATER: 600 watts
MOTOR: 100 watts
MAXIMUM FLOUR CAPACITY:
BREAD: 2. 3, 4 cups
DOUGH: 2, 3. 4 cups
PROGRAM TIME RANGE:
BREAD:
NORMAL SETTING: 3 hours to 3 hours, 20 minutes
RAPID SETTING: 2 hours, 30 minutes to2 hours, 50 minutes
DOUGH: 1 hour, 12 minutes to 1 hour, 28 minutes
