Users Manual

͑
͑
͑
͑
͑
͑
͑
͑
͑
͑
͑
͑
͑
͑
͑
͑
͑
͑
͑
͑
͑
͑
͑
͑
͑
>> Getting Started
͑
͑
͑
͑
͑
͑
͑
͑
͑
͑
͑
͑
͑
͑
͑
͑
͑
͑
͑
͑
͑
͑
͑
͑
͑
͑
͑
͑
͑
͑
͑
͑
͑
͑
͑
͑
Cha
p
ter 1
Before You Get Started
Safety Precautions
Proper Posture During Product Use
Important Safety Information
Replacement Parts and Accessories
Regulatory Compliance Statements
Approval of Windows XP
Overview
02
04
09
11
12
13
14
15
NOTE
Ŷ Some devices and software referred in the User Guide may not be provided and/or changed by upgrade.
Note that the product environment referred in the User Guide may not be the same as your own
environment.
Ŷ The image used for the cover and text of the User Guide may not be the same as actual ones.
Safety Precaution Notations
Icon Notation Description
Warning Failing to follow instructions
marked with this symbol, may
cause personal injury and or
fatality.
Caution Failing to follow instructions
marked with this symbol, may
cause slight injury to yourself
or damage your property.
User Guide Information
This product is supplied with a Quick Start, and a User Guide.
You can even more easily and conveniently use the product by using any of the guides depending on your needs.
- Quick Start : This guide is provided so that you can conveniently refer to this guide when using the product for the
first time after purchasing it.͑
- User Guide : The document you are currently reading is the User Guide. This document includes the product
functions, how to use the functions, and how to use the program.
Utilization of the User Guide
ل
1 Be sure to read the Safety Precautions before using the product.
ل
2 For basic usage of the product refer to the additionally supplied Quick Start.
ل
3 Refer to the User Guide for the procedures to use the product.
ل
4 Using the Index of the User Guide, you can easily find any information you are looking for.
ل
5 Using the glossary of the User Guide, you can easily find meanings for technical terms.
ل
6 If any problem occurs, refer to the FAQ included in the User Guide or refer to the website (www.wibrain.com).
Text Notations
Icon Notation Description
Before Content included in this section
You Get includes information required
Started before using a function.
Caution Content included in this section
includes information required
about the function.
Note Content included in this section
includes helpful information to
use the function.
02
Ɣ Before You Get Started : Before reading the User Guide, first check the following information.
NOTE
Ŷ This guide describes procedures for both the touch pad and the stylus pen together.
A ‘Click’ in this manual refers to a ‘Single-tap’ for the Stylus Pen or the touch pad.
Ŷ The figures in this guide are provided assuming that your operating system is Windows XP.
The figures are subject to change.
Ŷ The User Guide supplied with product may be varied depending on model.

Precautions for Operating System Support
The operating system (OS) installed on this product is the latest version of Windows XP. You cannot install an operating
system other than Windows XP as well as any unauthorized copy of Windows XP.
Other operating systems (Windows 98, Windows ME, Windows 2000, Windows 2003 server, UNIX and LINUX, other
Windows Vista versions, etc.) other than the operating system already installed on this product are not supported.
If any problem occurs because of the installation of another operating system, the company will not provide technical
support, a replacement or refund, and if our service engineer visits you due to this problem, a service charge will be
applied.
In addition, installing a program that does not support Windows XP, may cause the program not to work properly.
In this case, ask the corresponding software manufacturer about the problem. If you request our services to resolve a
problem caused by incompatible software, a service charge will be applied.
Copyright
© 2007 Wibrain, Inc.
Wibrain, Inc. owns the copyright of this manual.
No part of this manual may be reproduced or transmitted in any form or by any means, electronic or mechanical,
without the consent of Wibrain, Inc.
The information in this document is subject to change without notice due to improving the performance of the product.
Wibrain shall not be liable for any data loss. Please take care to avoid losing any important data and backup your data
to prevent any such data loss.
03
Warning
Failing to follow instructions marked with this symbol may cause personal injury and even fatality.
Ɣ Safety Precautions : For your security and to prevent damage, please read the following safety instructions carefully.
Installation Related
- Do not install the product in places exposed to humidity such as a bathroom.
There is a danger of electric shock. Use the product within the operating conditions specified in the Manufacturers
User Guide.
- Keep the plastic bags out of the reach of children.
There is a danger of suffocation.
Power Related
The power plugs and wall outlet figures may differ depending on the country specifications and the product model.
- Do not touch the main plug or power cord with wet hands.
There is a danger of electric shock.
- Do not exceed the standard capacity (voltage/current) of a multi-plug or power outlet extension when
using it for the product.
There is a danger of electric shock or fire hazard.
- If the power cord or power outlet makes a noise, disconnect the power cord from the wall outlet and
contact a service center.
There is a danger of electric shock or fire hazard.
- Do not use a damaged or loose mains plug or power cord or power outlet.
There is a danger of electric shock or fire hazard.
- Plug the power cord firmly into the power outlet and AC adapter.
Failing to do so may cause fire hazard.
- Do not unplug the power cord out by pulling the cable only.
If the cord is damaged, it may cause electric shock.
- Do not bend the power cord excessively or do not place a heavy object over the power cord. It is
especially important to keep the power cord out of reach of infants and pets.
If the cord is damaged, it may cause electric shock or fire.
- If water or another substance enters the power input jack, AC adapter or the product, disconnect the
power cord and contact the service center.
Damage to the device within the product may cause electric shock or fire hazard.
Battery Usage Related
- Keep the battery out of the reach of infants and pets, as they could put the battery into their mouths.
There is a danger of electric shock or choking.
04
Caution
Failing to follow instructions marked with this symbol may cause slight injury or damage to the product.
Usage Related
- Disconnect all cables connected to the product before cleaning it.
There is a danger of electric shock or damage to the product.
- Do not connect a phone line connected to a digital phone to the modem.
There is a danger of a electric shock, fire or damage to the product.
- Do not place any container filled with water or chemicals over or near the product.
If water or chemicals enter the product, this may cause fire or electric shock.
- If the product is broken or dropped, disconnect the power cord and contact a service center for a safety
check.
Using a broken product may cause electric shock or fire hazard.
- Avoid direct sunlight when the product is in an air-tight location such as inside a vehicle.
There is a danger of a fire hazard. The product may overheat and also present opportunity to thieves.
Upgrade Related
- Never disassemble the power supply or AC adapter.
There is a danger of electric shock.
- Use only authorized parts (multi-plug, battery and memory) and never disassemble parts.
There is a danger of damaging the product, electric shock or fire hazard.
- Turn off the product and disconnect all cables before disassembling the product. If there is a modem,
disconnect the phone line. Make sure to remove the battery.
Failing to do so, may cause electric shock.
Custody and Movement Related
- Follow the instructions for the relevant location (e.g. airplane, hospital, etc.) when using a wireless
communication device (wireless LAN, Bluetooth, etc.).
Installation Related
- Do not block the ports (holes), vents, etc. of the product and do not insert objects.
Damage to a component within the product may cause electric shock or fire.
- When using the product with it lying on its side, place it so that the vents are not blocked.
Failing to do so, may cause the internal temperature of the product to rise and the product to malfunction or halt.
- Do not place a heavy object on the product.
This may cause a problem with the product. In addition, the object may fall and cause injury, or damage the
product.
05

Battery Usage Related
- Dispose of worn-out batteries properly.
There is a danger of fire or explosion.
The battery disposal method may differ depending on your country and region.
Dispose of the used battery in an appropriate way.
- Do not throw or disassemble the battery and do not put it into water.
This may cause an injury, fire or explosion.
- Use only a battery authorized by Wibrain, Inc.
Failing to do so may cause an explosion.
- Avoid contact with metal objects such as car keys or clips when keeping or carrying a battery.
Contact with a metal may cause excessive current and a high temperature and may damage the battery or cause
a fire.
- Charge the battery according to the instructions in the manual.
Failing to do so, may cause an explosion or fire from damage to the product.
- Do not heat the battery or expose it to heat (e.g. inside a vehicle during the summer).
There is a danger of explosion or fire.
Usage Related
- Do not place a candle, lighted cigar, etc. over or on the product.
There is a danger of fire.
- Make sure to have the product tested by a safety service engineer after repairing the product.
Authorized Repair Centers will carry out safety checks after a repair. Using a repaired product without testing it for
safety might cause electric shock or fire.
- In case of lightening, immediately turn the system off, disconnect the power cord from the wall outlet and
line.
There is a danger of electric shock or fire.
- Connect only permitted devices to the connectors or ports of the product.
Failing to do so, may cause electric shock and fire.
- Take care not to drop the product while using it.
This may cause personal injury or loss of data.
- When handling parts of the product, follow the instructions on the manual supplied with the parts.
Failing to do so, may cause damage to the product.
- If the product emits smoke, or there is a burning smell, disconnect the power plug from the wall outlet and
contact a service center.
There is a danger of fire.
06
Usage Related (Desktop Cradle)
- Do not press the Eject Button on the desktop cradle while the Floppy Disk/CD-ROM drive is in operation.
You might lose data and the disk might be suddenly ejected and could cause an injury.
- Do not place your face close to the Optical Disk Drive tray when it is operating.
There is a danger of injury due to an abrupt ejection.
- Do not use a damaged or modified CD.
There is a danger of damaging the product or personal injury.
- On the cradle, emergency disk eject method using paperclip should not be used while the disk is in
motion. Make sure to use the emergency disk eject method only when the Optical Disk Drive is stopped.
There is a danger of injury.

Upgrade Related
- Take care when touching the product or parts.
The device may be damaged or you may be injured.
- Take care not to throw or drop a part of product or device.
This may cause injury or damage to the product.
- Use parts authorized by Wibrain only.
Failing to do so, may cause fire or damage the product.
- Never disassemble or repair the product by yourself.
There is a danger of electric shock or file.
- To connect a device that is not manufactured or authorized by Wibrain, enquire at your service center
before connecting the device.
There is a danger of damaging the product.
Custody and Movement Related
- When moving the product, turn the power off and separate all connected cables first.
The product might be damaged or users may trip over the cables.
- For long periods of not using the product, discharge the battery and preserve as it is detached.
The battery will be preserved at its best condition.
- Keep the Stylus Pen out of reach of children.
Children may injure themselves by swallowing it or damaging their eyes.
- Use a product cleansing solution when cleaning the product.
Using a cleansing solution or chemical that is not developed for a product may damage the product.
- Do not use or watch the product while driving a vehicle.
This may cause a traffic accident. Concentrate on driving.
LCD Related
- LCD Dead Pixels
The limits of LCD manufacturing technology permit a maximum of 5 abnormal or dead pixels, which does not
affect the system performance.
This system may have the same level of abnormal or dead pixels as any other company’s products.
- Cleaning the LCD
When cleaning the LCD panel, use only product specific cleaners with a soft cloth, and lightly wipe in one
direction.
Pressing down hard may damage the LCD.
07

Cautions on Preventing Data Loss (Hard Disk Management)
To prevent data loss due to damage to the hard disk drive, please backup your data frequently.
- Take care not to damage the data on a hard disk drive.
Ŷ A hard disk drive is so sensitive to external impact that an external impact may cause loss of data on the surface
of the disk.
Ŷ Take extra care, because moving the product or an impact on the product when it is turned on may damage the
data of the hard disk drive.
Ŷ The company is not liable for the loss of any data caused by customer such as the carelessness usage or bad
environmental condition.
- Causes that may damage the data of a hard disk drive and the hard disk drive itself.
Ŷ The data may be lost when an external impact is applied to the disk while disassembling
or assembling the product.
Ŷ The data may be lost when the product is turned off or reset by a power failure while the hard disk drive is
operating.
Ŷ The data may be lost and irrecoverable due to a virus infection.
Ŷ The data may be lost if the power is turned off while running a program.
Ŷ Moving or causing an impact to the product while the hard disk drive is operating, may cause files to be
corrupted or bad sectors on the hard disk.
08
Maintaining a proper posture during product use is very important to prevent physical harm.
The following instructions are about maintaining a proper posture during product use developed through human engineering.
Please read and follow them carefully when using the product.
Otherwise, the probability of (RSI: Repetitive Strain Injury) from repeated operations may increase and serious physical harm
may be caused.
Use Time (Break Time)
Ŷ Take a break for 10 minutes or more after a 50-minute period when working for more than one hour.
Ɣ Proper Posture During Product Use
Proper Posture
ŶDo not use the product close to your skin for a long time.
There is a danger of burns due to the high temperature of the product.
Ŷ Keep frequently used work items within an easy working range
(Where you can reach them with your hands easily.)
Eye Position
Keep a distance of at least 50cm between the LCD and your eyes.
Ŷ Adjust the height of the LCD screen so that its top height is equal to or lower than your eyes.
Ŷ Avoid setting the LCD excessively bright.
Ŷ Keep the LCD screen clean.
Ŷ When wearing glasses, clean them before using the product.
Hand Position
Ŷ It is recommended to connect and use an external keyboard and mouse when using the product for a long time.
Ŷ Do not hold the Stylus Pen with excessive force.
Ŷ Do not press the Touch screen with excessive force.
Volume Control (Headphones and Speakers)
Check your volume first to listen to music.
Ŷ Check if the volume is too loud before using headphones.
Ŷ Do not turn the volume to the maximum level right from the start. Instead, start the volume at a low level and
increase it slowly while listening to the sound.
Ŷ It is not recommended using headphones for long periods of time.
09
NOTE
Ŷ This guide describes procedures for both the mouse and the stylus pen together.
A ‘Click’ in this manual refers to a ‘Single-tap’ for the Stylus Pen.
Ŷ The figures in this guide are provided assuming that your operating system is Windows XP.
The figures are subject to change.
Ŷ The User Guide supplied with product may be varied depending on model.

RF Exposure to radio frequency radiation
■ To comply with FCC RF exposure compliance requirements, a separation distance of at least 20 cm
must be maintained between the antenna of this device and all persons.
This device must not be co-located or operating in conjunction with any other antenna or transmitter
Marketting of the place
■ This product which can be placed on the market and be put into service EU except for some contry (FR,BYL,ROU)
Information to the User
■ NOTE: This equipment has been tested and found to comply with the limits for a Class B digital device, pursuant to
part 15 of the FCC Rules. These limits are designed to provide reasonable protection against harmful interference in a
residential installation.
This equipment generates, uses and can radiate radio frequency energy and, if not installed and used in accordance
with the instructions, may cause harmful interference to radio communications. However, there is no guarantee that
interference will not occur in a particular installation. If this equipment does cause harmful interference to radio or
television reception, which can be determined by turning the equipment off and on, the user is encouraged to try to
correct the interference by one or more of the following measures:
- Reorient or relocate the receiving antenna.
- Increase the separation between the equipment and receiver.
- Connect the equipment into an outlet on a circuit different from that to which the receiver is connected.
- Consult the dealer or an experienced radio/TV technician for help.
EU restriction statement
European standards dictate maximum radiated transmit power of 100mW EIRP and frequency range 2.400-2.4835GHz.
France - 2.4GHz for Metropolitan France :
In all Metropolitan départements, wireless LAN frequencies can be used under the following conditions,
either for public or private use:
- Indoor use: maximum power (EIRP*) of 100 mW for the entire 2400-2483.5 MHz frequency band
- Outdoor use: maximum power (EIRP*) of 100 mW for the 2400-2454 MHz band and with maximum power (EIRP*)
of 10 mW for the 2454-2483 MHz band
Label declaration
■ the label will be visible at the time of purchase and before the first use
( the battery must be installed before the first use.)
……………………………………………………………………………………………………………………
* CAUTION :
■Changes or modifications not expressly approved by the party responsible for compliance could void
the user’s authority to operate the equipment.
■ UMPC device is designed for hand-held operation only
……………………………………………………………………………………………………………………
Illumination
■ Do not use the product in dark locations.
The illumination level for product use must be as bright so for reading a book.
■ Indirect illumination is recommended. Use a curtain to prevent reflection on the LCD screen.
Operation Condition
■ Do not use the product in hot and humid locations.
■ Use the product within the allowed temperature and humidity range specified in the User Guide.
10
Ɣ Important Safety Information.
م͑ Safety instructions
Your system is designed and tested to meet the latest standards for safety of information technology equipment.
However, to ensure safe use of this product, it is important that the safety instructions marked on the product
and in the documentation are followed.
11
ƔSafety instructions
Your system is designed and tested to meet the latest standards for safety of information technology equipment.
However, to ensure safe use of this product, it is important that the safety instructions marked on the product
and in the documentation are followed.
Caution
Always follow these instructions to help guard against personal injury and damage to your system.
Setting Up your System
Ŷ Read and follow all instructions marked on the product and in the documentation before you operate your system.
Retain all safety and operating instructions for future use.
Ŷ Do not use this product near water or a heat source such as a radiator.
Ŷ Set up the system on a stable work surface.
Ŷ The product should be operated only with the type of power source indicated on the rating label.
Ŷ Ensure that the electrical outlet you are using to power your equipment is easily accessible in case of a fire or
short circuit.
Ŷ Openings in the product case are provided for ventilation. Do not block or cover these openings. Make sure you
provide adequate space, at least 2 inches (5 cm), around the system for ventilation when you set up your work
area. Never insert objects of any kind into the product ventilation openings.
Ŷ Ensure that the fan vents on the backside of the casing are clear at all times. Do not place the product on a soft
surface, doing so will block the backside vents.
Ŷ If you use an extension cord with this system, make sure that the total power rating on the products plugged into
the extension cord does not exceed the extension cord power rating.͑
Care During Use
Ŷ Do not walk on the power cord or allow anything to rest on it.
Ŷ Do not spill anything on the system. The best way to avoid spills is to not eat or drink near your system.
Ŷ When the product is turned off, a small amount of electrical current still flows through the product. To avoid
electrical shock, always unplug all power cables, remove the battery and modem cables from the wall outlets
before cleaning the system.
Ŷ Unplug the system from the wall outlet and refer servicing to qualified personnel if :
– The power cord or plug is damaged.
– Liquid has been spilled into the system.
– The system does not operate properly when the operating instructions are followed.
– The system was dropped or the casing is damaged.
– The system performance changes.
The Instruction on Safety Operation of UMPC
1 When installing and operating devices, please refer to safety requirements on the User Guide.
2 Devices can be used only with the equipment specified in the technical specifications of the devices.
3 If any smell of burning or smoke from the product the unit should be switched off and battery removed.
The unit should be checked by a qualified technician before reuse.
4Service and repair of devices should be carried out by authorized service centers.͑
Ɣ Important Safety Information
ƔBattery Disposal
ƔReplacement Parts and Accessories :Use only replacement parts and accessories recommended by Wibrain
NOTE
Do not use this product in areas classified as hazardous. Such areas include patient care areas of medical
and dental facilities, oxygen rich environments, or industrial areas.
Contact Wibrain for information on how to dispose of batteries that you cannot use or recharge any longer. Follow all
local regulations when disposing of old batteries.
Caution
Do not put rechargeable batteries or products powered by non-removable rechargeable batteries in the
garbage.
Caution
THERE IS A RISK OF EXPLOSION IF BATTERY IS REPLACED BY AN INCORRECT TYPE. DISPOSE
OF USED BATTERIES ACCORDING TO THE INSTRUCTIONS.
ALSO IF THE BATTERY IS PLACED IN THE CAR FOR A CERTAIN TIME ESPECIALLY IN SUMMER
OR WINTER, THERE WOULD BE A POSSIBILITY OF EXPLOSION OR OUT OF ORDER.
ƔPower Cord Requirements
The power cord set (wall plug, cable and AC adapter plug) you received with your product meets the requirements
for use in the country where you purchased your equipment.
Power cord sets for use in other countries must meet the requirements of the country where you use the product.
For more information on power cord set requirements, contact your authorized dealer, reseller, or service provider.
- All power cord sets must be approved by an acceptable accredited agency responsible for evaluation in the
country where the power cord set will be used.͑
ƔConnect and Disconnect the AC adapter
The socket-outlet shall be installed near the equipment and shall be easily accessible.
Do not unplug the power cord out by pulling the cable only.͑
12
ƔRegulatory Compliance Statements
م͑ Wireless Guidance
Low power, Radio LAN type devices (radio frequency (RF) wireless communication devices), operating in the
2.4GHz Band, may be present (embedded) in your notebook system. The following section is a general overview
of considerations while operating a wireless device.
Additional limitations, cautions, and concerns for specific countries are listed in the specific country sections
(or country group sections). The wireless devices in your system are only qualified for use in the countries
identified by the Radio Approval Marks on the system rating label. If the country you will be using the wireless
device in, is not listed, please contact your local Radio Approval agency for requirements. Wireless devices are
closely regulated and use may not be allowed.
The RF field strength of the wireless device or devices that may be embedded in your notebook are well below all
international RF exposure limits as known at this time. Because the wireless devices (which may be embedded
into your notebook) emit less energy than is allowed in radio frequency safety standards and recommendations,
manufacturer believes these devices are safe for use. Regardless of the power levels, care should be taken to
minimize human contact during normal operation.
This transmitter must not be collocated or operate in conjunction with any other antenna or transmitter except the
installed Bluetooth transmitter.
Some circumstances require restrictions on wireless devices. Examples of common restrictions are listed below:
͑
Caution
Ŷ Radio frequency wireless communication can interfere with equipment on commercial aircraft. Current
aviation regulations require wireless devices to be turned off while traveling in an airplane.
802.11B (also known as wireless Ethernet or WiFi) and Bluetooth communication devices are examples of
devices that provide wireless communication.
Ŷ In environments where the risk of interference to other devices or services is harmful or perceived as
harmful, the option to use a wireless device may be restricted or eliminated. Airports, Hospitals, and
Oxygen or flammable gas laden atmospheres are limited examples where use of wireless devices may be
restricted or eliminated. When in environments where you are uncertain of the sanction to use wireless
devices, ask the applicable authority for authorization prior to use or turning on the wireless device.
Ŷ Every country has different restrictions on the use of wireless devices. Since your system is equipped
with a wireless device, when traveling between countries with your system, check with the local Radio
Approval authorities prior to any move or trip for any restrictions on the use of a wireless device in the
destination country.
Ŷ If your system came equipped with an internal embedded wireless device, do not operate the wireless
device unless all covers and shields are in place and the system is fully assembled.
Ŷ Wireless devices are not user serviceable. Do not modify them in any way.
Modification to a wireless device will void the authorization to use it. Please contact manufacturer for
service.
Ŷ Only use drivers approved for the country in which the device will be used. See the manufacturer
System Restoration Kit, or contact manufacturer Technical Support for additional information.
13
ƔWireless Guidance
Low power, Radio LAN type devices (radio frequency (RF) wireless communication devices), operating in the
2.4GHz Band, may be present (embedded) in your system. The following section is a general overview of
considerations while operating a wireless device.
Additional limitations, cautions, and concerns for specific countries are listed in the specific country sections
(or country group sections). The wireless devices in your system are only qualified for use in the countries
identified by the Radio Approval Marks on the system rating label. If the country you will be using the wireless
device in, is not listed, please contact your local Radio Approval agency for requirements. Wireless devices are
closely regulated and use may not be allowed.
The RF field strength of the wireless device or devices that may be embedded in your product are well below all
international RF exposure limits as known at this time. Because the wireless devices (which may be embedded
into your product) emit less energy than is allowed in radio frequency safety standards and recommendations,
manufacturer believes these devices are safe for use. Regardless of the power levels, care should be taken to
minimize human contact during normal operation.
This transmitter must not be collocated or operated in conjunction with any other antenna or transmitter except the
installed Bluetooth transmitter.
Some circumstances require restrictions on wireless devices. Examples of common restrictions are listed below:
ƔGetting Started the Operating System
To start the operating system, you need to install the Windows XP. Please take a look at the instruction as below.
a. Set the Windows XP environment till it asks “Is this a genuine copy of Microsoft Windows?”.
b. On the screen you will see 5 boxes that you need to type the product key which is placed on the back side of the product.
If you didn’t detach the battery you please remove the battery to find the label. The sticker starts with “Windows XP Home
Edition OEM Software”.
c. After filling up those boxes, click “Next”.
d. On the next page you will find “Help protect your PC” for the Windows automatic updates.
e. MS recommends you to choose “Help protect my PC by turning on Automatic Updates now”.
͑
ƔGetting the Approval
[Telephone Approval]
a. After installing or recovering of the Windows XP, you will see “Let’s activate Windows”.
Check “Yes, I want to telephone a customer service representative to activate Windows”.
b. Select your country and make a phone call to the customer service representative that shows on the Step 2.
c. Fill in the boxes with the number that the customer service representative gave you.
d. Follow the instruction.
[Internet Approval]
a. After installing or recovering of the Windows XP, you will see “Let’s activate Windows”.
Check “Yes, let’s activate Windows over the Internet now”.
b. Follow the instruction or visit Wibrain web-site (www.wibrain.com) and refer to FAQ.
ƔApproval of Windows XP
14
NOTE
If the label of Windows XP gets damaged you may be in difficulty for getting the approval.
Caution
The installed Windows XP is the latest version, you cannot re-install the Windows of a previous version.
It doesn’t support different Operating System such as Windows 98, Windows 2000 Series, Windows
2003 Server, Unix and Linux but Windows XP.
If you install different Operating Systems voluntarily, we cannot guarantee the technical support,
exchange, and refund. Also a service charge can be applied.
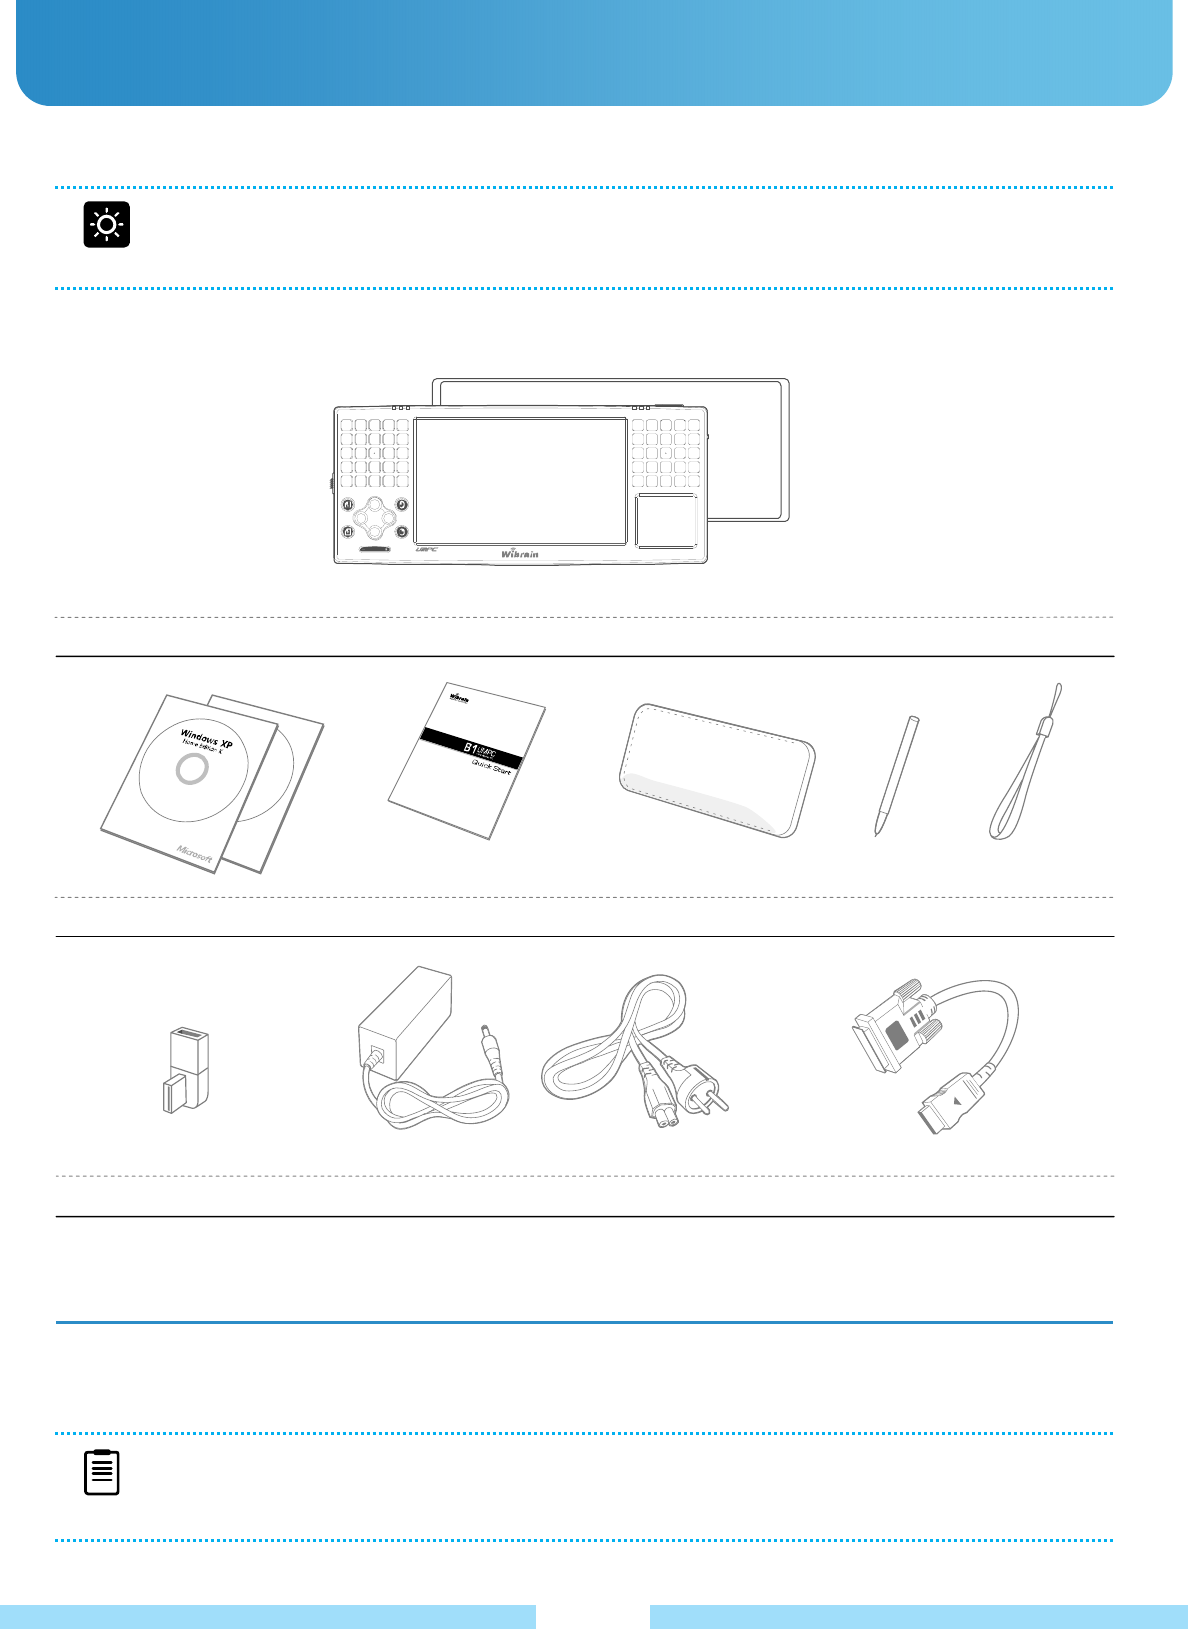
ƔIn the Giftbox
గ Optional Accessories
External Battery / Intelligent Pouch / Earphones / Desktop Cradle / Car Cradle(for navigation)
͑
15
Device & Battery
Windows CD Quick Start Soft Pouch Styles Pen͑Hand Strap
USB Gender͑Adapter + Power Cable VGA Cable
NOTE
Ŷ You can purchase optional accessories the shop where you bought the device.
Ŷ Do not remove labels or stickers on each item for the better repair service.
ƔOverview
͑
͑
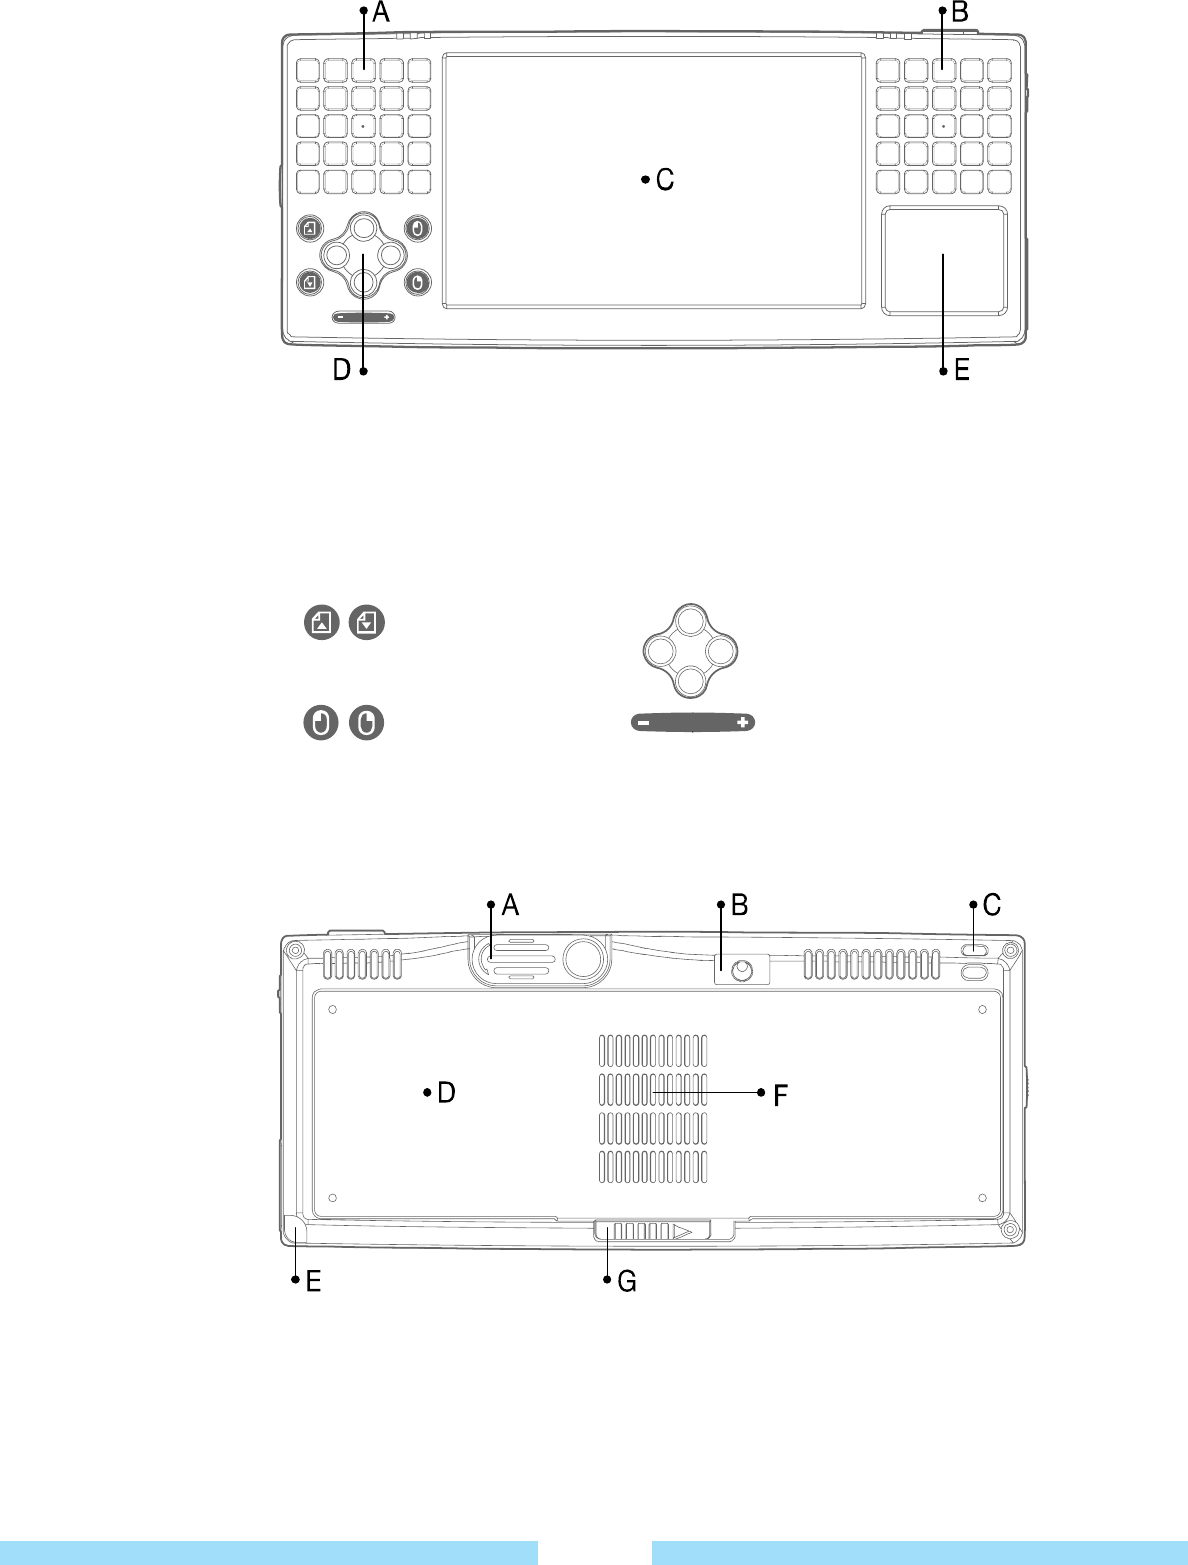
ƔFront View
ƔBack View
A / B
Keyboard : Using the keyboards, users can enter letters or numbers directly.
Avoid dropping water on the keypad.
C
LCD : Displays the screen.
D
Buttons : You can configure this button to launch a frequently used program
E
Touch Pad (Synaptic)
ΒΘΖ͑ΆΡ͑͑͠͵ΠΨΟ͑͑͑͑͑͑͑͑͑͑͑͑͑͑͑͑͑͑͑͑͑͑͑ͥ͑͵ΚΣΖΔΥΚΠΟ͑ͼΖΪΤ͑
͑
͑
ͽΖΗΥ͑͑͠ΚΘΙΥ͑;ΠΦΤΖ͑͑͑͑͑͑͑͑͑͑͑͑͑͑͑͑͑͑͑͑͑·ΠΝΦΞΖ͑ͼΖΪ͑
16͑
A
WEBCAM : Using the front side camera.
You can use it for the video chatting as well as taking pictures.
B
Stand Hole : With the stylus pen, you can use the screen at a comfortable angle.
͑
͑
ƔTop & Bottom
View
ƔLeft / Right
View
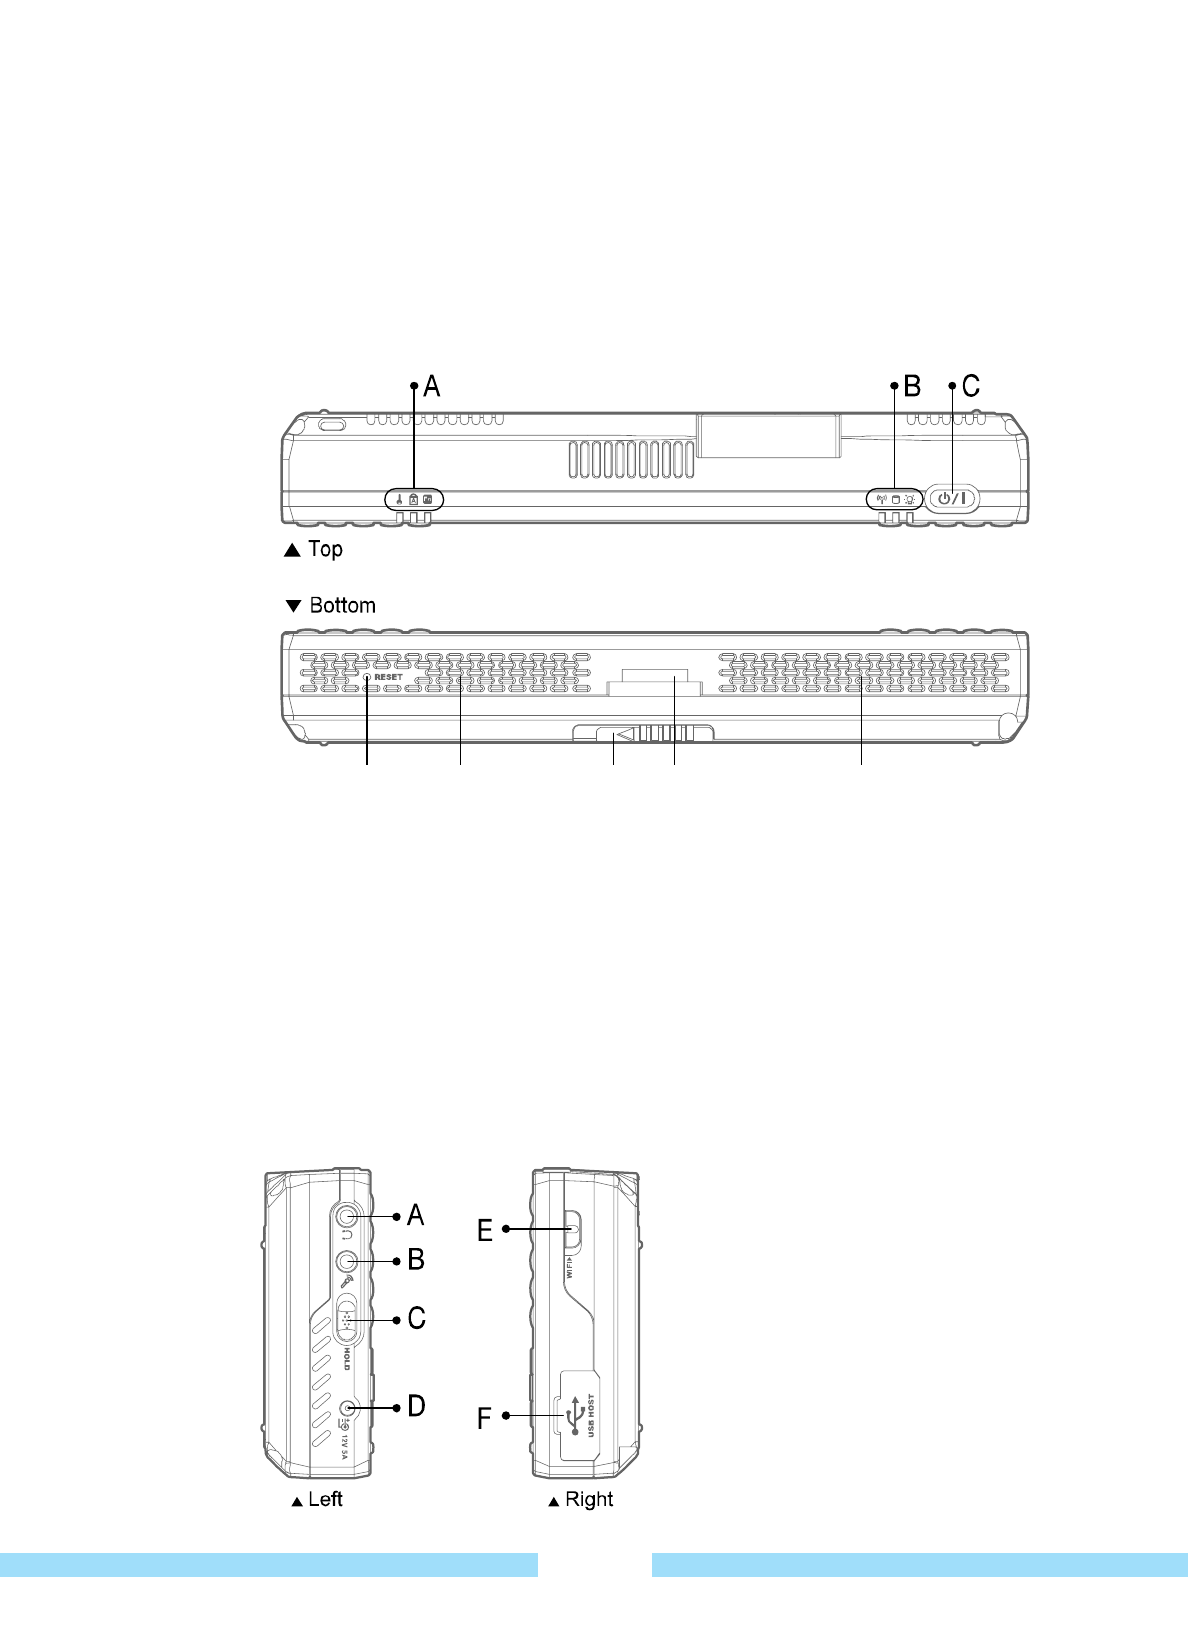
A/B
LED : They show the status of the device.
C
Power Button : With pushing this button you can power on and off.
D
Reset : For the rebooting the device, push this hole with the stylus pen.
E
Battery Clip : To remove the battery, push the clip to the right side.
F
24Pin Port : For the external display, connect the 24PIN cable at the port.
G
Speaker : Generates sound from the product.
C
Hand Strap Hole : You can attach the hand strap at this hole for holding the device in safe.
D
Battery : A lithium-Ion rechargeable battery supplies power for the product.
E
Stylus Pen Slot : You can keep the stylus pen in this slot.
The Stylus pen helps that you can enter programs on the touch screen.
F
Vents : Emits heat generated inside the product.
Avoid blocking the vents as this may overheat the product.
G
Battery Clip : To remove the battery, you can push the clip to the right side.
17
A
Earphone Port : You can connect the earphones.
B
Microphone in : You can connect a microphone
to input the sound.
C
Hold Switch : Slide the switch upward to hold the
keys.
It also shows at LED on the top of
the device.
D
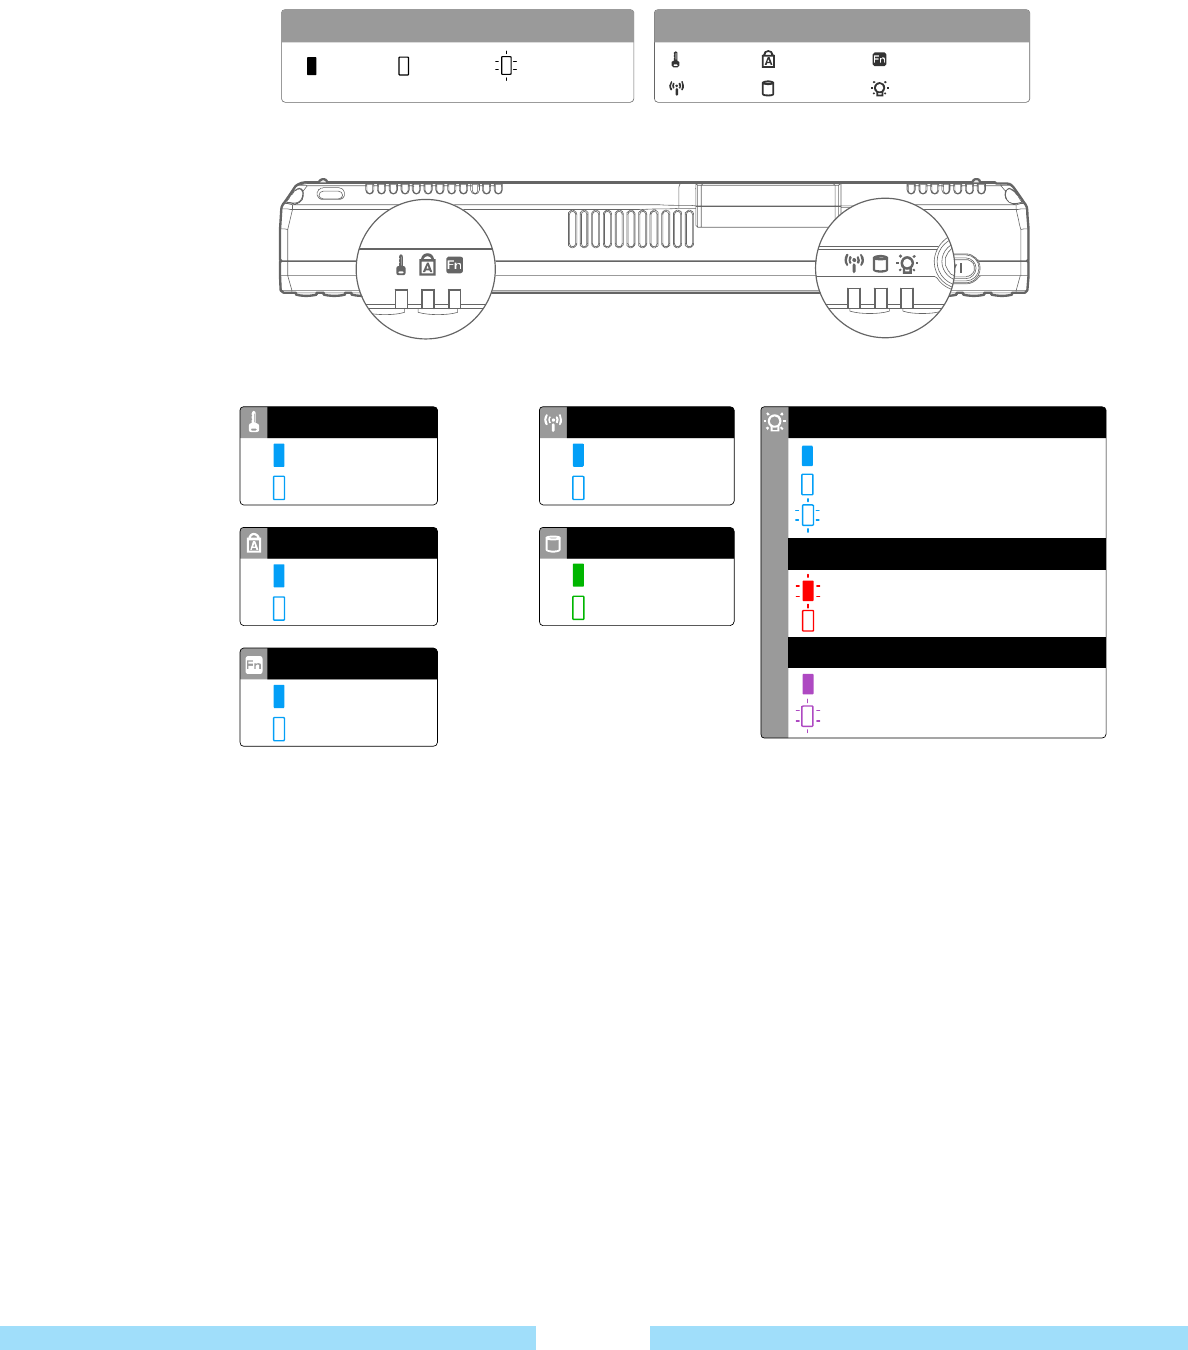
͑
ƔLED
Explanation
LED Status LED Icon
ź Top
LED On LED Off LED
blinking
Hold Caps Lock Fn
(Function)
WiFi HDD Power
Hold / Blue
Hold On
Hold Off
Caps / Blue
Hold On
Hold Off
Fn / Blue
Fn On
Fn Off
WiFi / Blue
WiFi On
WiFi Off
HDD / Green
HDD Read
Power / Blue
Power On
Power Off
Windows Standby
Power / Red
Full Charged
Rechar
g
in
g
Power / Purple
Windows Running & Full Charged
Windows Running & Recharging
18

>> Using the Product
Cha
p
ter 2
Turning the Product On and Off
Entering Text
20
21
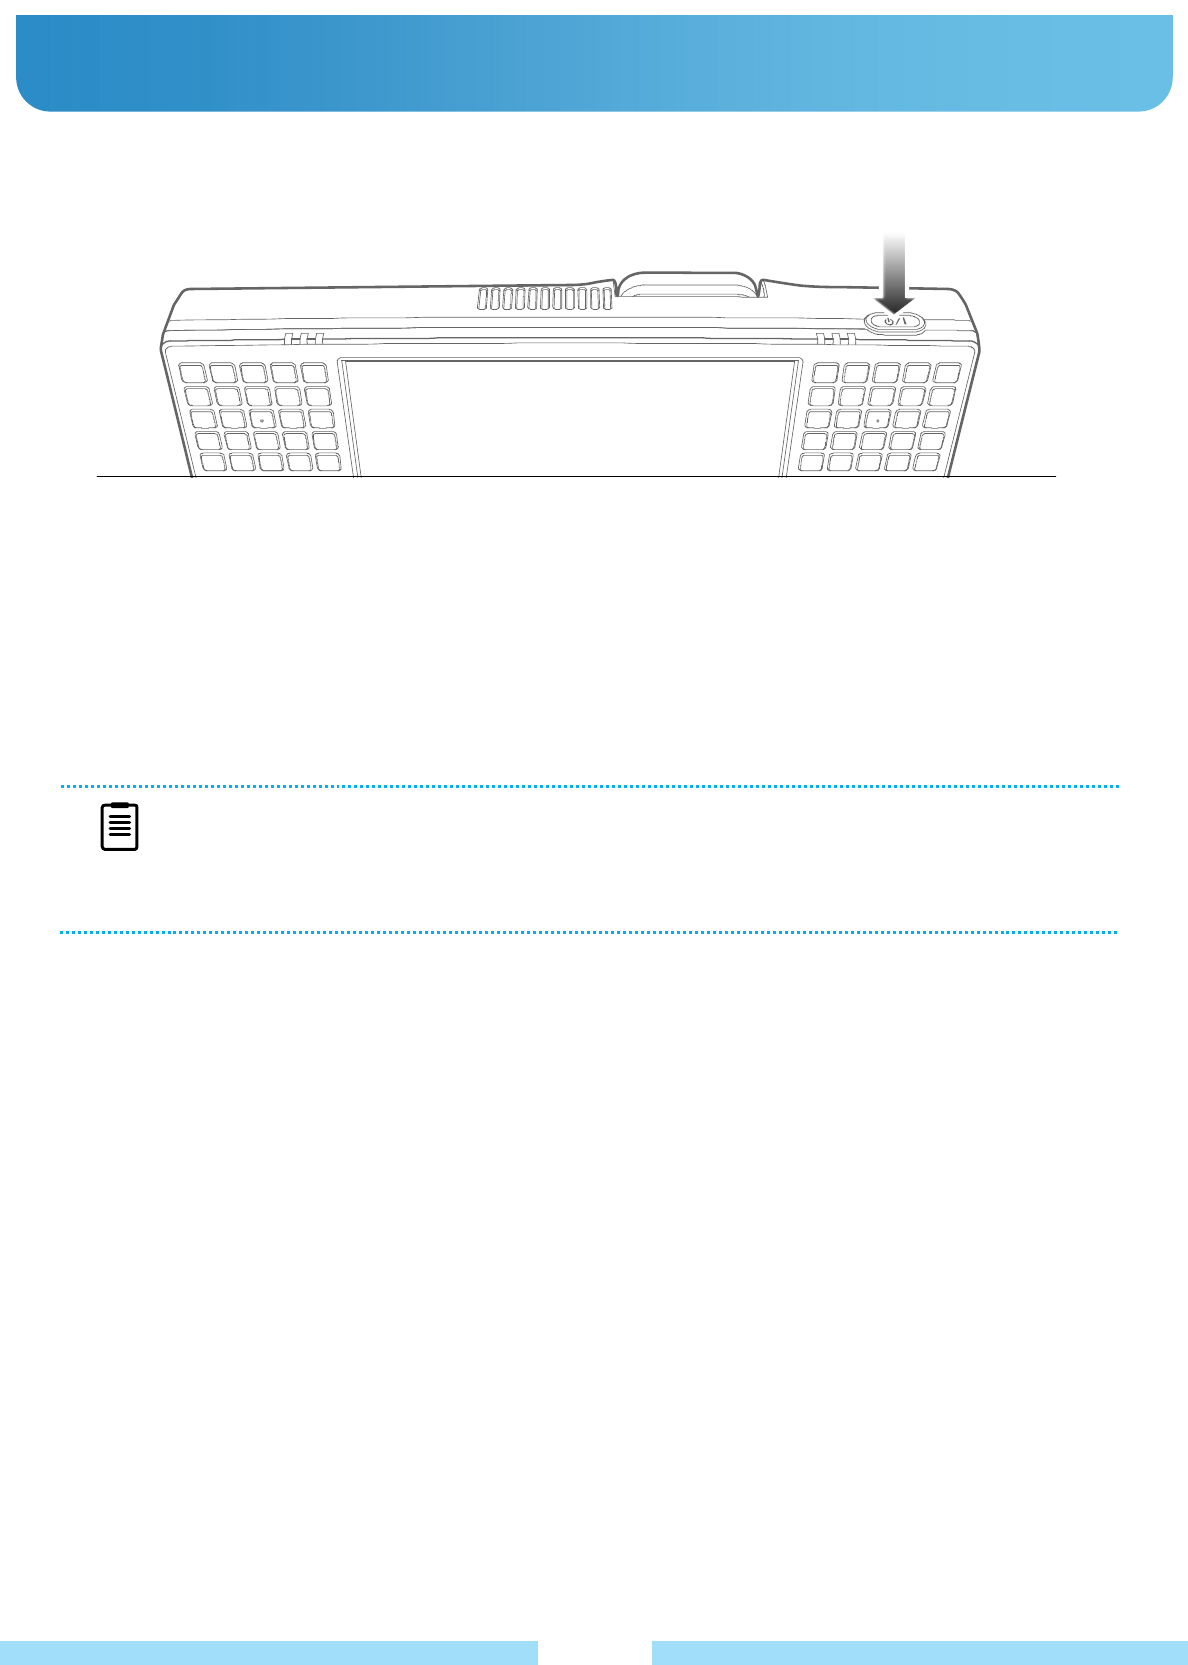
ƔTurning the Product On and Off
ƔTurning On
1. Attach the battery or connect the AC adapter.
2. Push the power button.
NOTE
If the product does not shutdown properly due to a system error, push and hold the power switch for more
than 4 seconds to turn it off by force.
When turning the product on again after it was turned off forcefully, the system examination program may
run.
ƔTurning Off
1. Click the “Start” button on the taskbar.
2. Click the “Turn off” button in the middle of the window. The product will be turned off.
20
Before You Get Started
Ŷ For long periods of use, use a normal keyboard or a USB keyboard for your convenience.
Ŷ Also connecting external monitor would be helpful for long time use.
Ŷ The Desk top cradle would be more convenient for connecting several USB devices and using ODD.
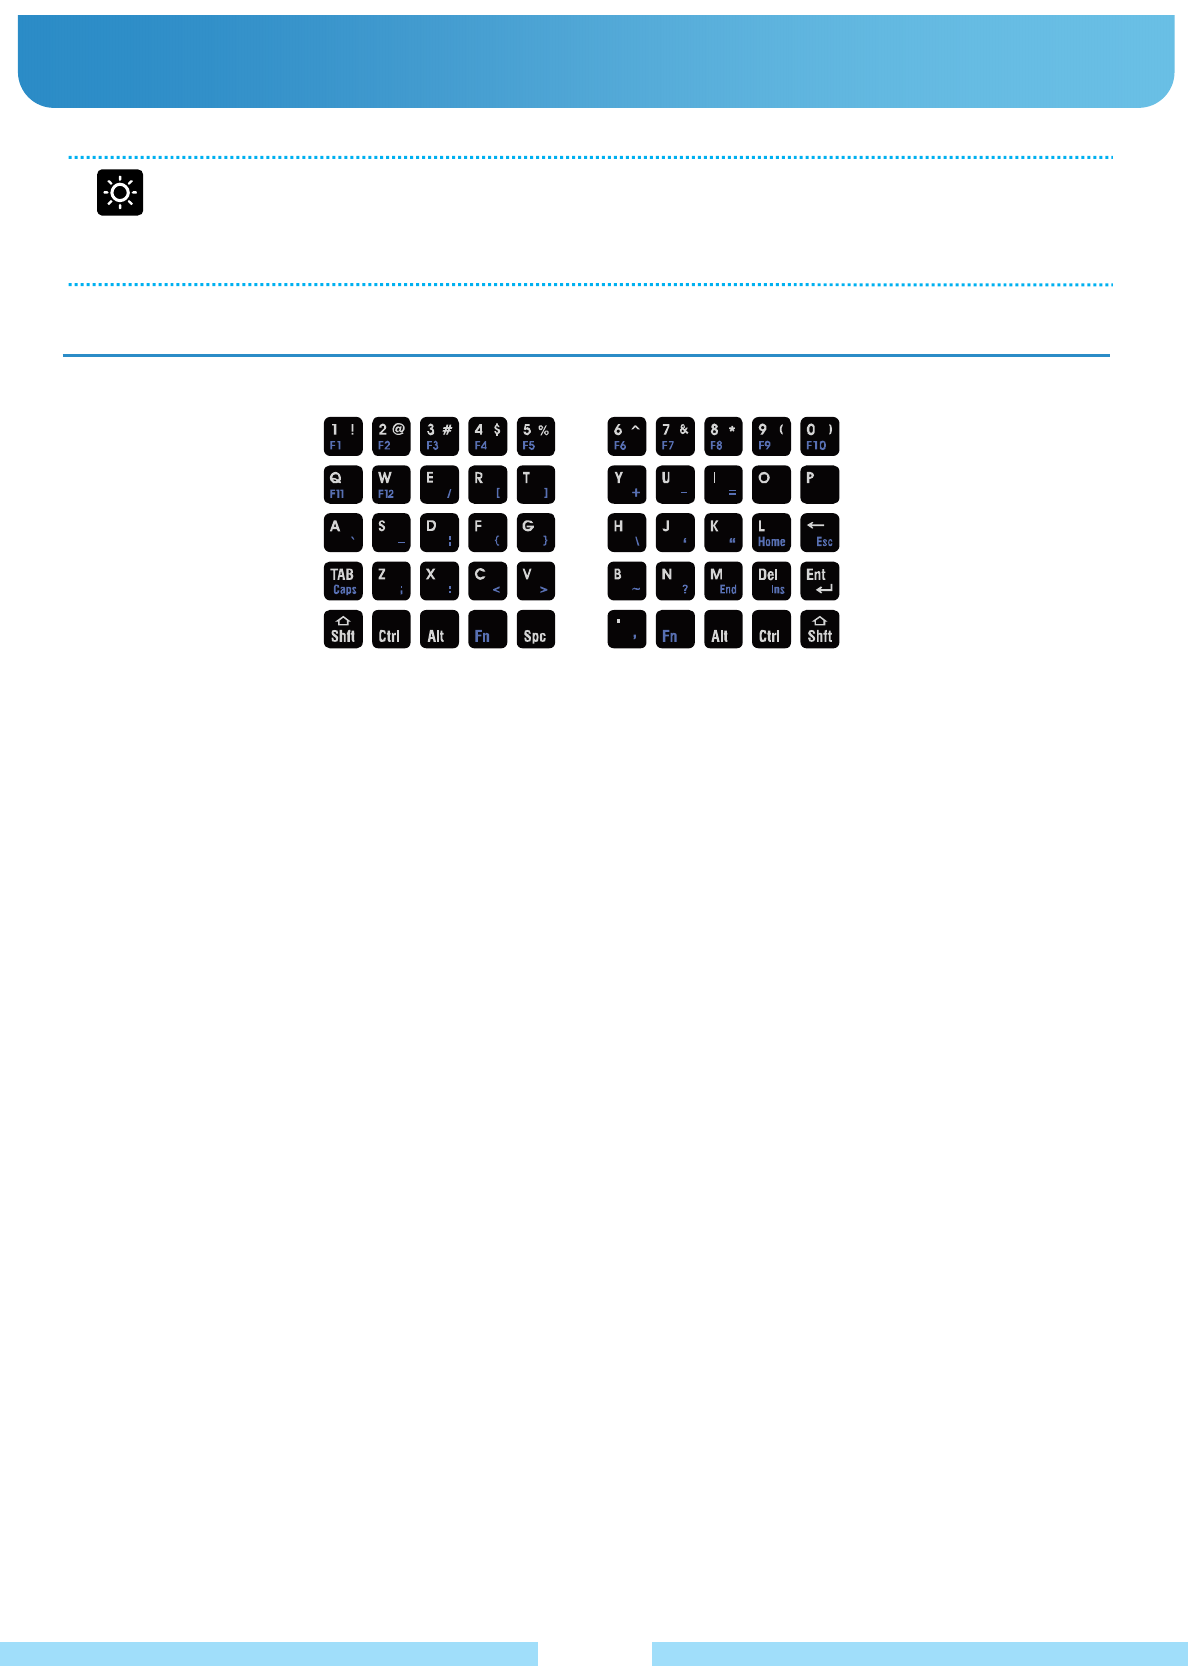
ƔEntering Text : You can input characters using the Keyboards.
Using the Keyboard
͑
21
Ɣ Character / Numeric Key
You can directly enter characters/numbers to the screen by pressing these keys.
The actual keyboard may differ from the keyboard image.
Ɣ Shift [Shft] Key
This key also performs the role of inputting “! / @ / # / $ / % / ^ / &...” keys.
Ɣ Function [Fn] Key
To input such as F1 / F2 / F3 / F4, etc. or symbols like ; / : / < / > / ? / [ / ], etc. press and hold “Fn Key” and input
those symbols simultaneously.
Ɣ Caps Lock
- Setting Caps Lock
The “Fn key” and the left “Tab/Caps key” work setting the Caps Lock.
When it’s working, the LED light of the top is lightening and you can input the CAPITAL LETTERS.
- Releasing Caps Lock
Press the “Fn key” and the left “Tab/Caps key” together.
You can check the “Caps Lock” is released by the LED light off.
Ɣ Fn Lock
To lock the Fn key, just press the left and the right Fn Key together
If you want to keep inputting F1 / F2 / F3 / F4, etc. or symbols like ; / : / < / > / ? / [ / ], etc. you can use “Fn lock”.
You can check the “Fn Lock” is released by the LED light off.
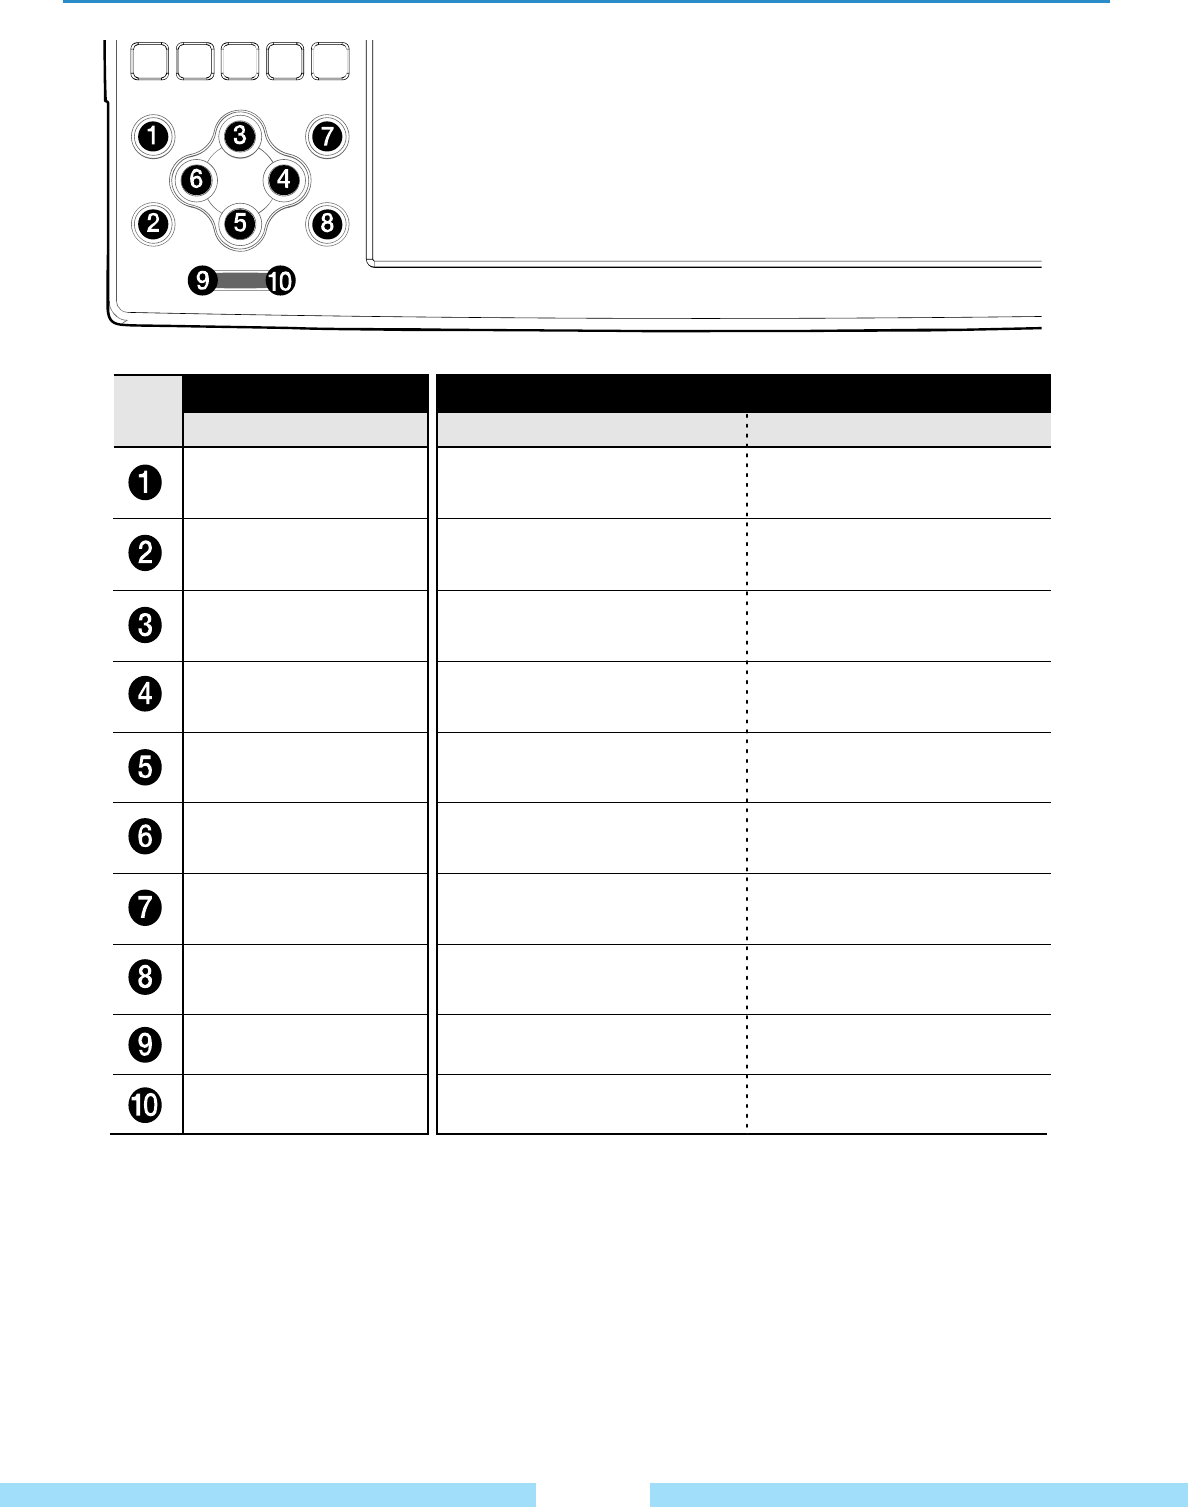
Using Hotkeys
Input Function Remark
͑
22
Input Input with Fn key
Page Up
Page Down
Arrow Key (Ĺ)
Arrow Key (ĺ)
Arrow Key (Ļ)
Arrow Key (ĸ)
Mouse Left Key
Mouse Right Key
Volume Down
Volume Up
Resolution Setting
(1024x600/ 800x600 / 800x480)
LCD Back Light Setting
+ Brighter͑
LCD Back Light Setting
- Darker͑
͑
Mouse Left Key͑
Mouse Right Key͑
Volume Down͑
Volume Up͑
͑
By pressing this button the
menu would be changed.͑
There’re 8 steps of brightness.
There’re 8 steps of brightness.
͑
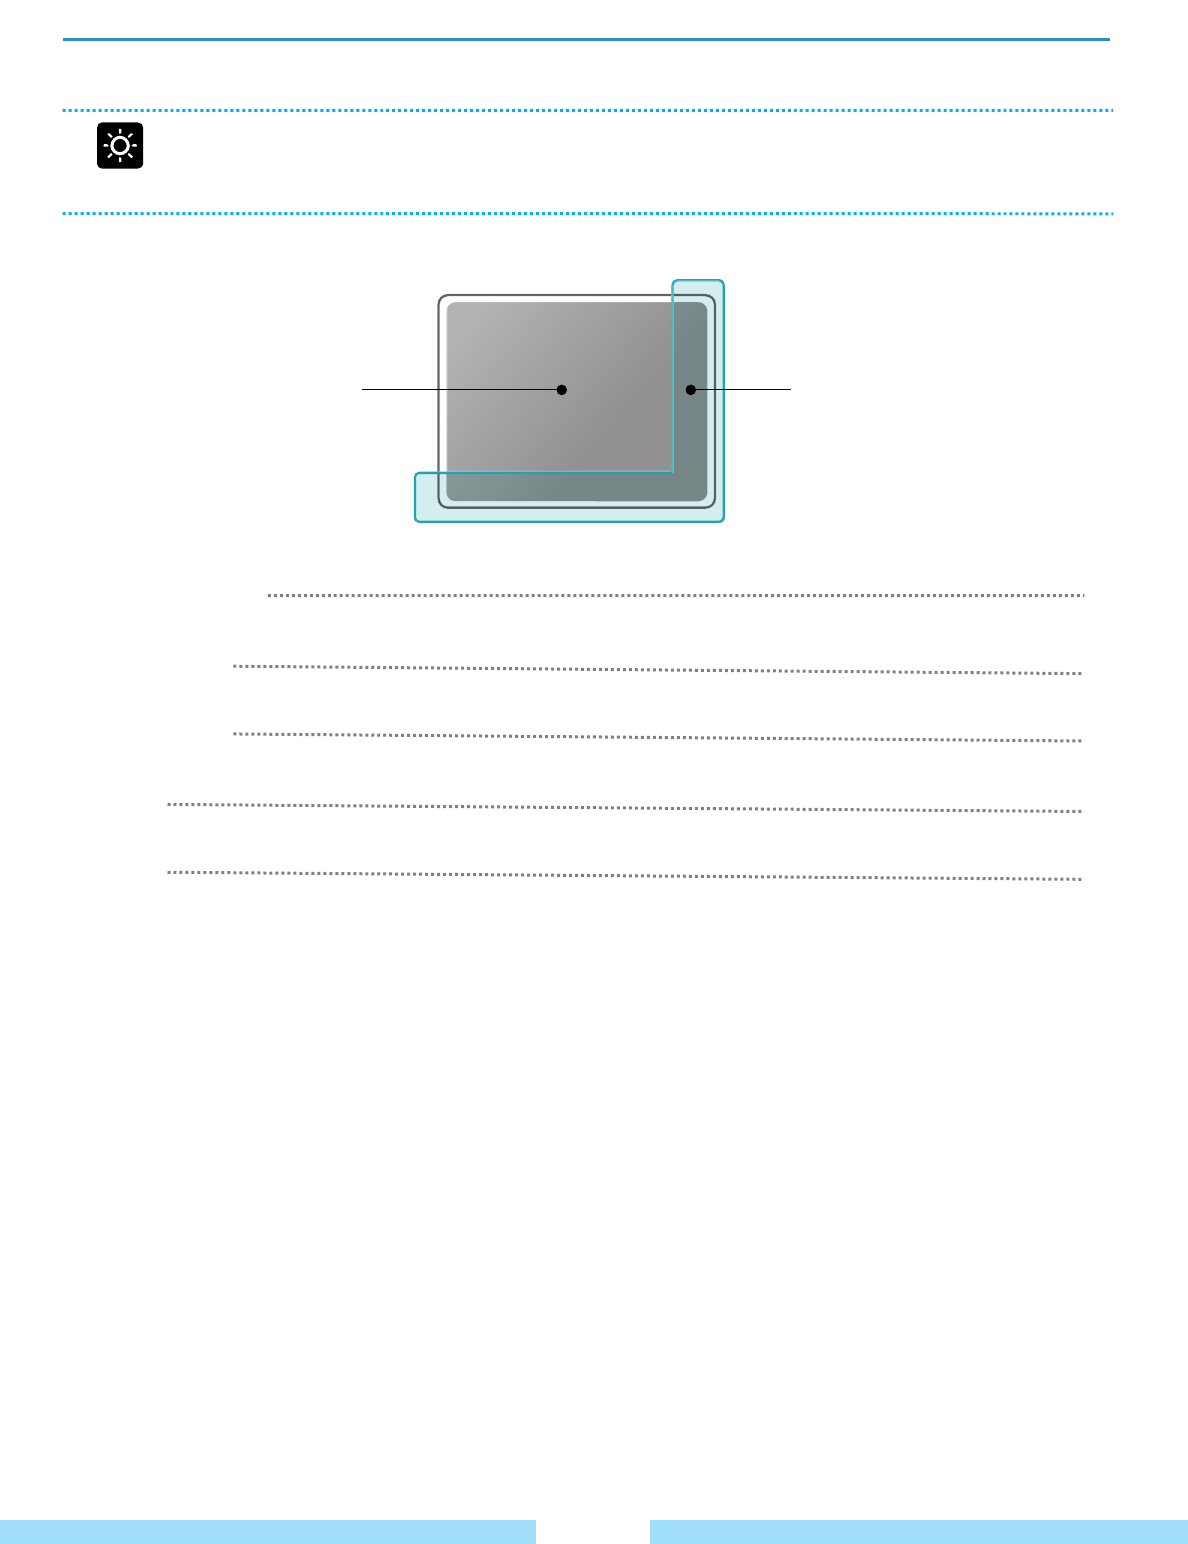
Using Touch Pad
It operates just like what a computer mouse does.
Before You Get Started
Ŷ Use your fingers on it. The sharp objects may scratch or damage the touch pad surface.
Ŷ It may delay the booting time that you operate the pad while the device is in the middle of booting.
Touch Pad :
When you’d like
to move the cursor.
͑
Scroll Area :
It’s like a mouse wheel, you
can drag your finger up &
down or left & right on this
area.͑
Move the cursor
Place your finger on the touch pad and move your finger where you’d like to make a move of the cursor.
Single-Click
Single tap with your finger on it to select an item.
Double-Click
Double tap with your finger on it to execute an item.
Drag
Tap an item and drag it with the pen to move the item.
Scroll
It’s just like a mouse wheel.
The right side or bottom area make the screen moves to up and down or left and right.
** Setting of Touch Pad : Go to “Start -> Control Panel -> Mouse” **
23
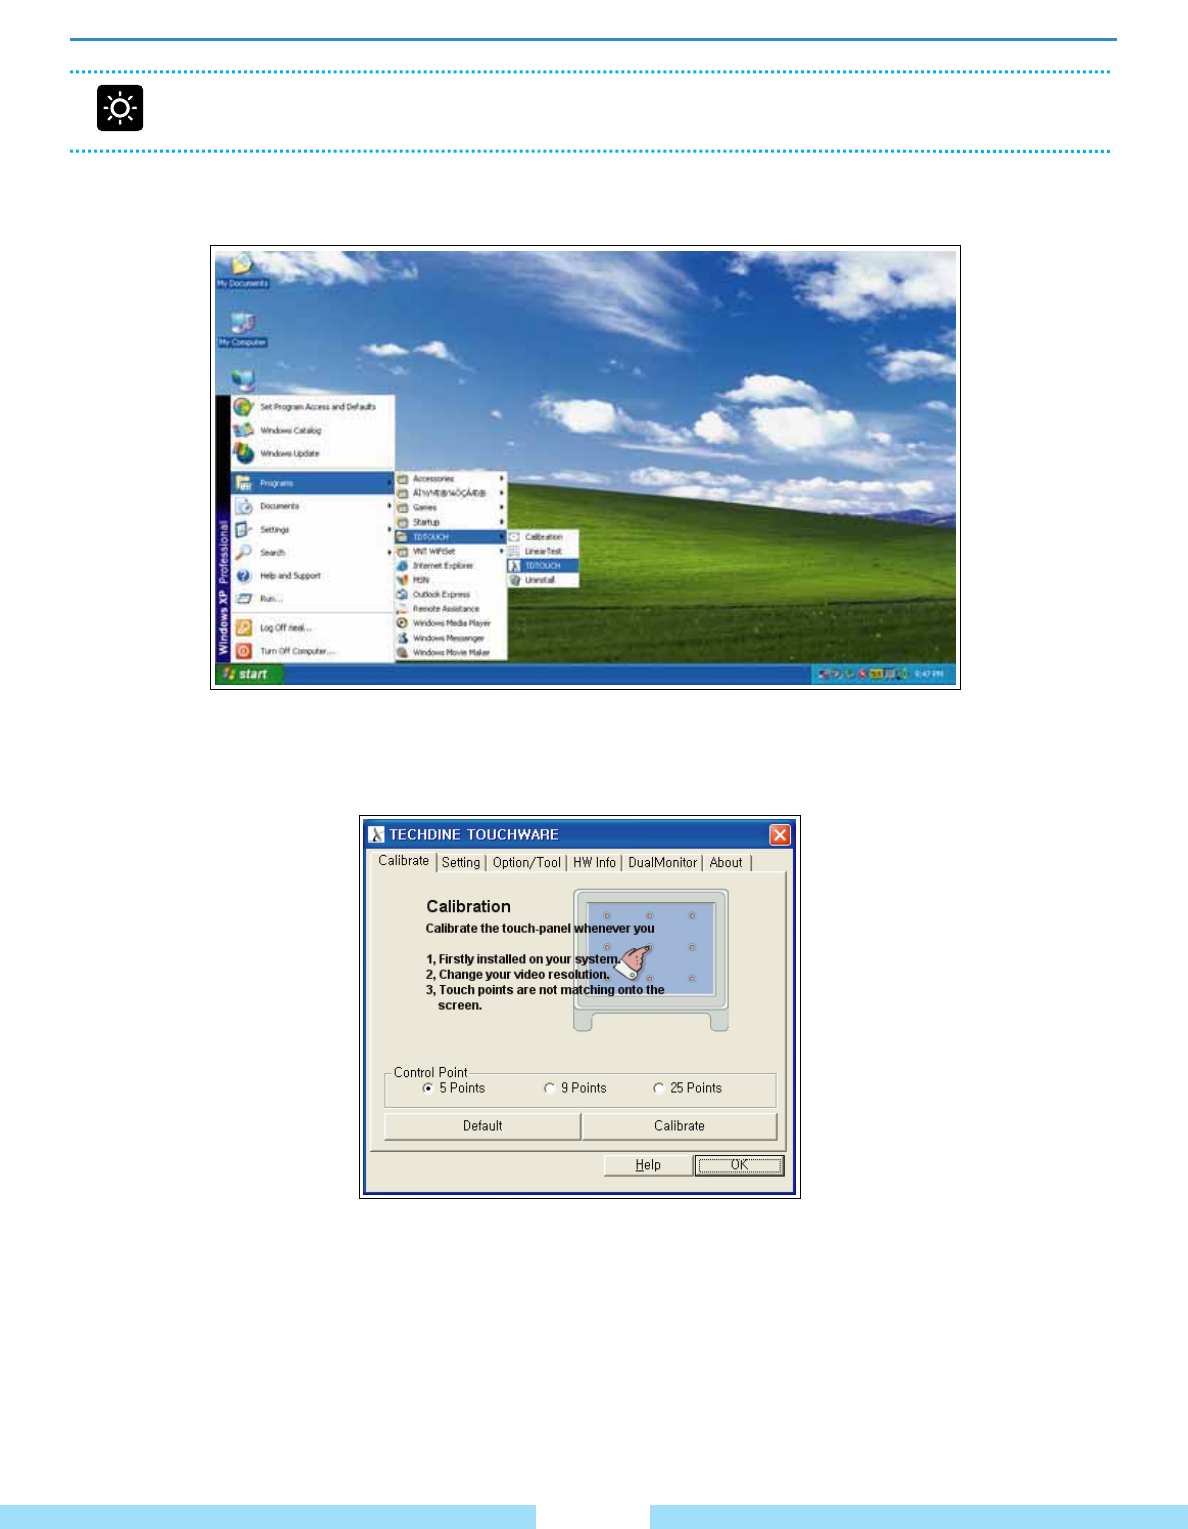
1. Setting the touch screen
ل
1Go to “Program -> TDTOUCH -> TDTOUCH”.
Using Touch Screen
Before You Get Started
Ŷ It is recommended to use a stylus pen. Sharp objects may scratch or damage the LCD surface.
24
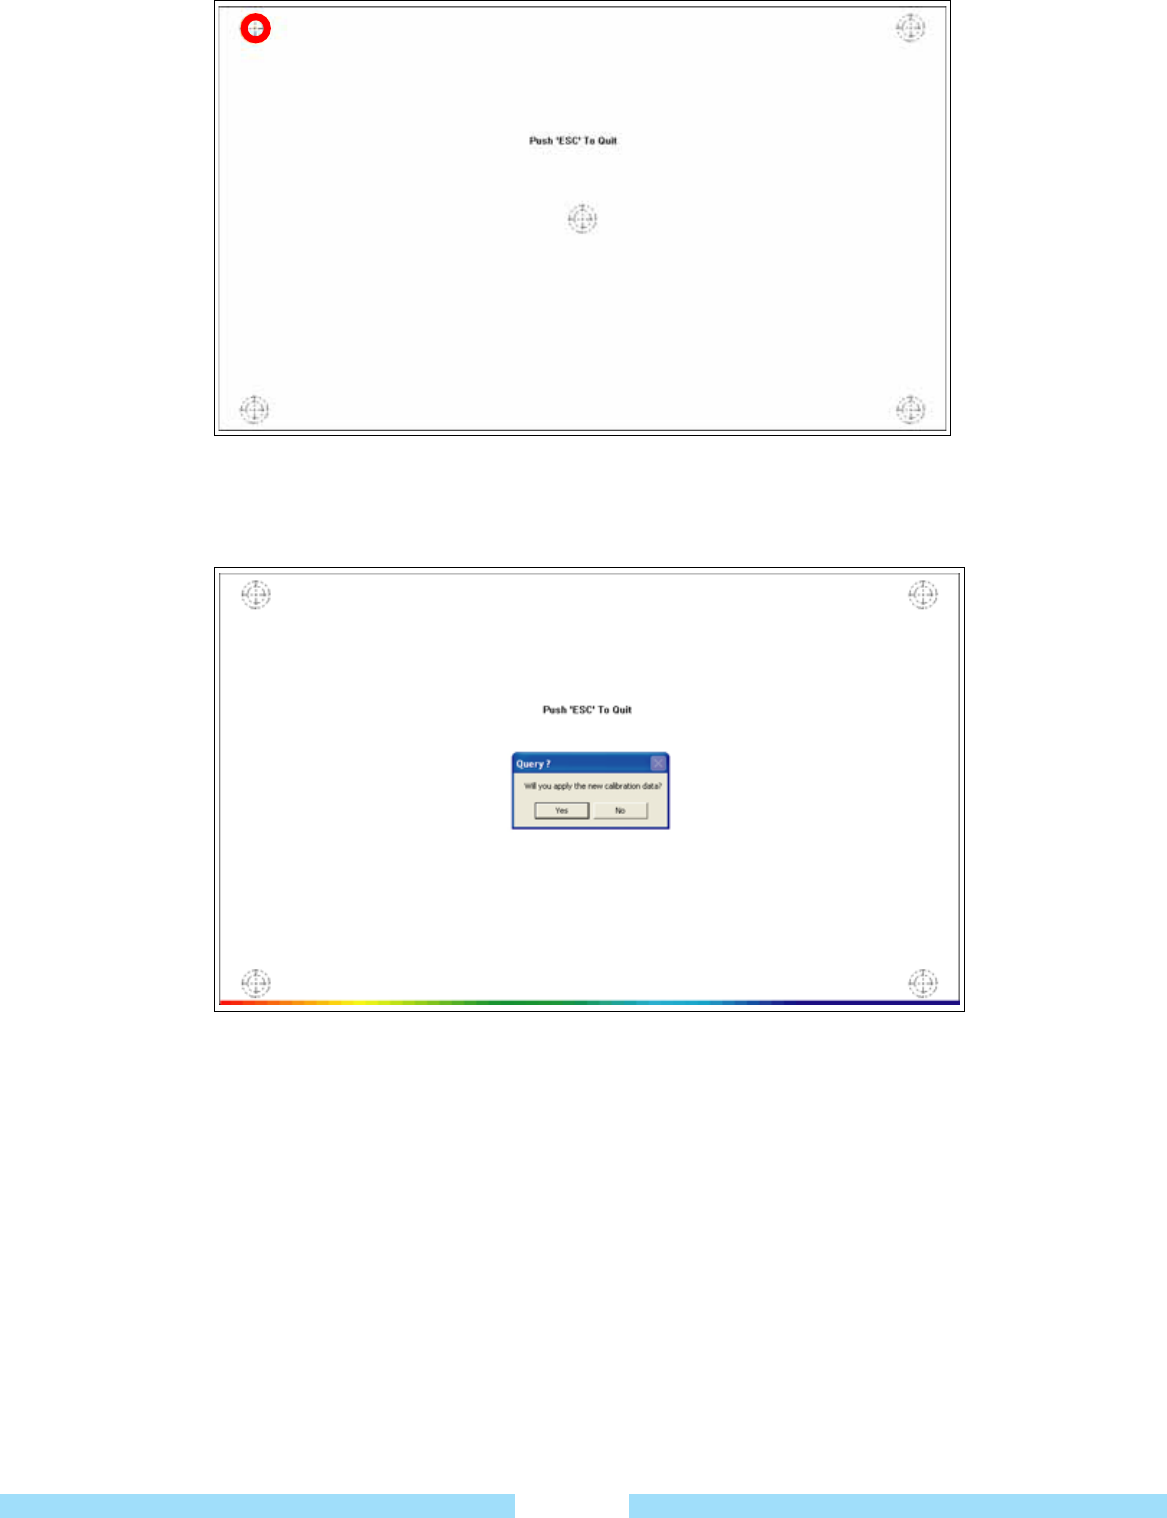
ل
2 In the calibrate tab of the Techdine Touchware area, click the “Calibrate” button.
ل
3 Tap the crosshair(+) displayed on the screen with the stylus pen whenever it appears on the screen.
ل
4 If you have pressed all the crosshairs, the calibration finishing window pops up.
Tap the OK button to apply the calibration result for the pointing position correction.
2. Using the touch screen
Click : Tap an icon what you’d like to select.
Drag : Tap an icon and drag it with the stylus pen to move the item.
25
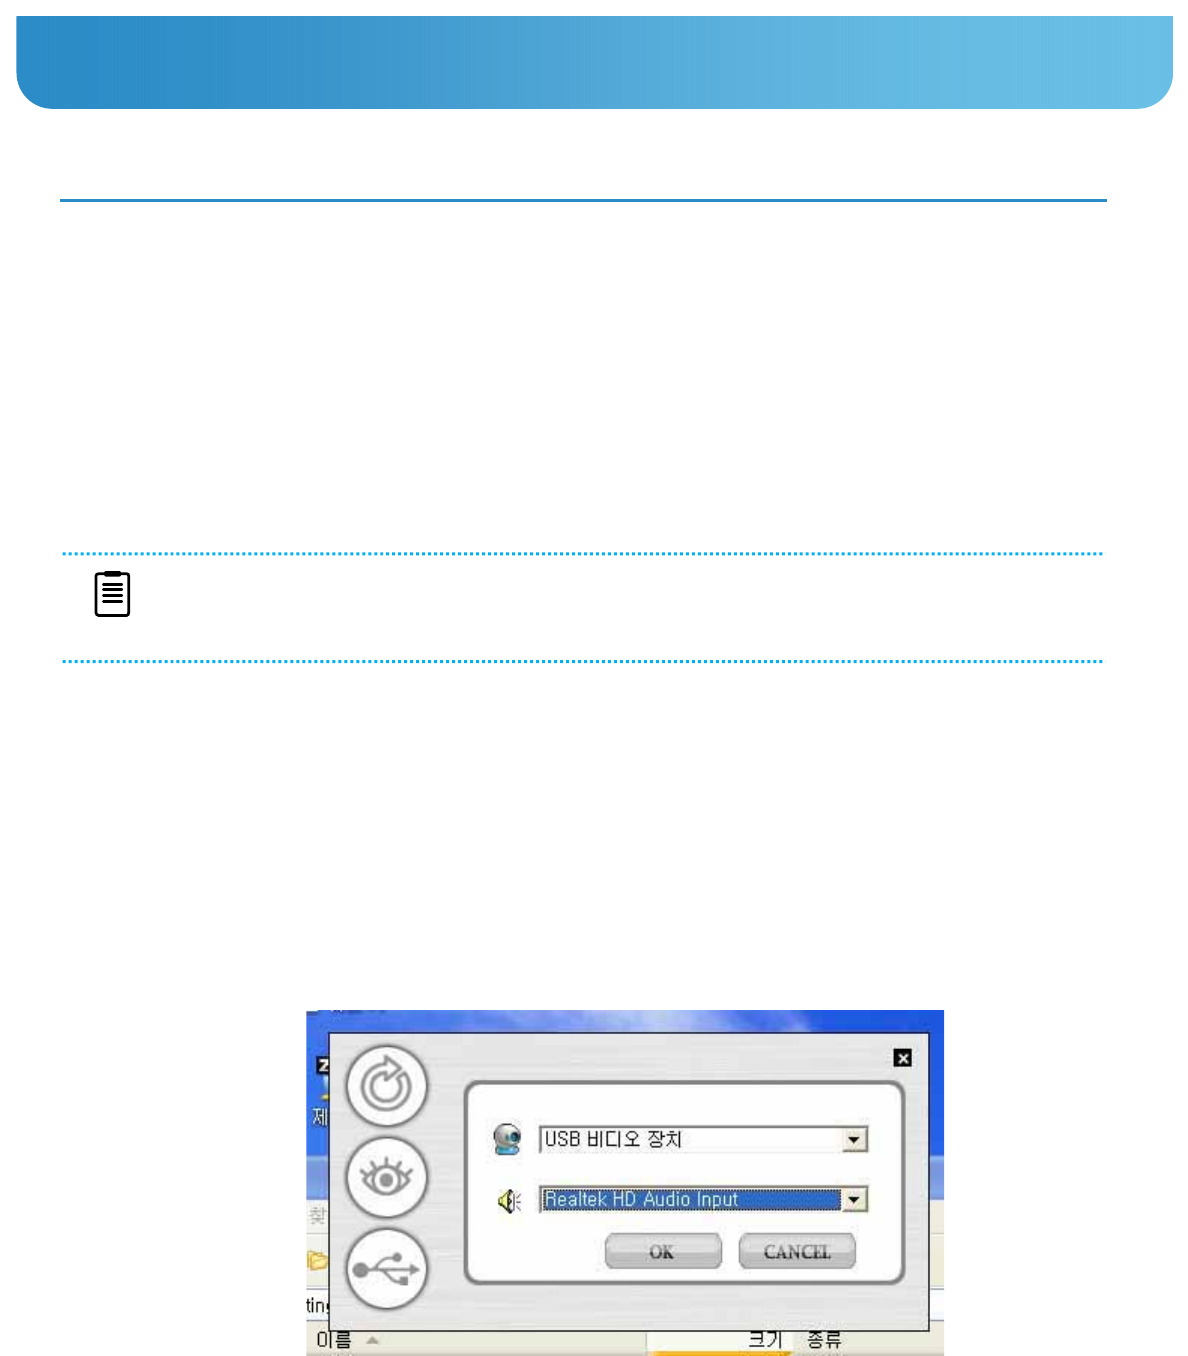
Ɣ How to use Webcam software
ᐭ Execute “Vimicro Camera Tuner” program on the Windows Desktop.
ᐮ Select גUSB Video device / IDT Audioד and click גOKד button.
(You need to set it when you firstly execute the program. Please refer to the image as below.)
ᐯ You need to pull the camera upward, the software goes to “Preview” mode automatically.
ᐰ Click an icon you’d like to use.
͑
ƔUsing WEBCAM : It shows how to use Webcam.
Ɣ Basic Usage
The WEBCAM is for enjoying the video chatting.
The resolution of default setting is 320x240 pixels and it supports upto 640x480 pixels.
Ɣ Additional Usage
1. You can take a Snapshot (upto 640x480).
2. You can record a video file.
(It supports upto 640x480 but the quality would be not good enough. 320x240 would be recommended.)
How to Use Webcam
͑
Vimicro Camera Tunner is a program that enables users to enjoy taking pictures, video recording, capturing still cuts
and video conferencing.
NOTE
Ŷ Webcam doesn’t support to be used more than 2 programs simultaneously.
If you were using a webcam mode you need to finish it before use other webcam program.
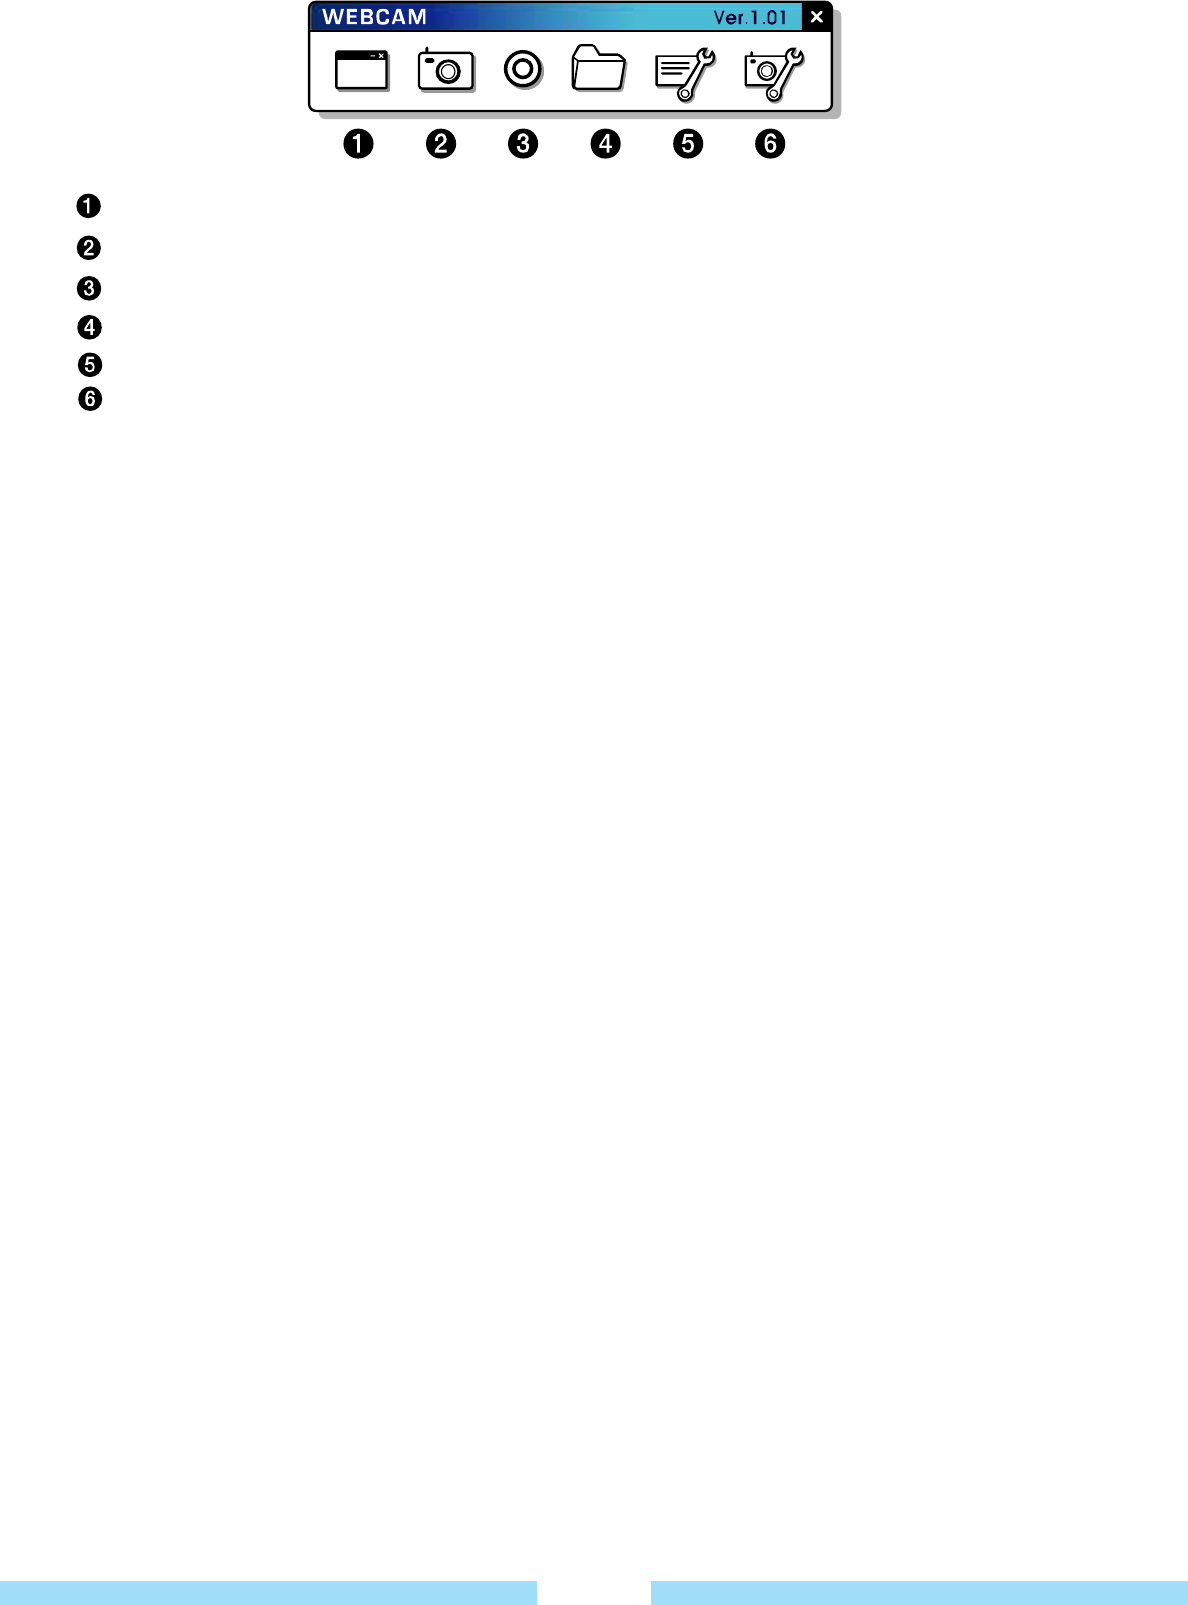
Ɣ Icon Usage
Ɣ Video Chatting via instant messenger
ᐭ Log-in an instant messenger program.
ᐮ Pull the webcam upward.
ᐯ Click the video chatting icon on the messenger program.
ᐰ Follow the instruction of the messenger and enjoy a video chatting.
26
Preview : You can check a screen what the camera is showing.
Capture : You can take a photo under the resolution you have set up.
Record : You can record a video file under the resolution you have set up.
Open Folder : You can open files that you have saved.
Setting : You can set a resolution, a frame, etc.
Video Filter Setting : You can set the video filter.
Ɣ The features of “Mfmgr” program
͑ ΄ΖΥΥΚΟΘ͑ΥΙΖ͑ΤΡΖΖΕ͑ΠΗ͑ͷΒΟ͑
͑ ΄ΖΥΥΚΟΘ͑ΥΙΖ͑ͼΖΪΓΠΒΣΕ͑ͳΒΔΜΝΚΘΙΥ͑;ΠΕΖ͑ ͑
͑ ΄ΖΥΥΚΟΘ͑ΥΙΖ͑·Ͳ͠ʹ΅͑ΦΥ͑
͑ ΄ΖΥΥΚΟΘ͑ΥΙΖ͑ΖΤΠΝΦΥΚΠΟ͑
Ɣ How to use “Mfmgr” program
ᐭ Double click the icon on the system tray.͑
ᐮ You can find a window pop up as below.
ᐯ Click the status of Fan as well as the Keyboard backlight youd like to set.
Ɣ Main Features
1. Adjustment of the Fan Speed
1.1 Silent Mode : To make the sound of Fan turn down at the quite places such as library, you can select this mode.
There would be a possibility to make the temperature of the product higher than other modes.
1.2 Normal Mode : To make the sound of Fan as well as the temperature of the product normal, you can select this mode.
1.3 Cool Mode : To make the temperature of the product cooler because of the long time use, you can select this mode.
The sound of Fan would be louder than other modes.
2. Setting the Keyboard Backlight
2.1 On : It makes the keyboard backlight always on.
2.2 Auto : Whenever you type the keyboard, the backlight will be on during 20 seconds. It’s automatically off afterward.
3. VGA/CRT Out
Push “Fn” and “Page Up” Keys simultaneously the display mode will be changed into VGA or CRT out.
(If the MFmgr program is turned off, it doesn’t work.)
4. Setting the Resolution
Push “Fn” and “Page Down” Keys simultaneously the display mode will be adjusted into 1024x600, 800x600, 800x480.
(If the MFmgr program is turned off, it doesn’t work.)
͑
͑
͑
͑
͑
͑
͑
͑
ƔUsing the B1 Utility Program
What the “Mfmgr”program is
͑
It’s executed automatically when the system is started.
The setting will be saved and applied automatically.

͑
͑
͑
͑
͑
͑
>> Using the Network
Cha
p
ter 3
28
30
34
35
38
39
40
Wireless Network
Using Bluetooth
Using Wired Network
BIOS Setup
Introducing Programs
Battery
Product Specifications͑
A wireless network (Wireless LAN) environment is a network environment that enables communicating between
multiple products at home or a small-size office through wireless LAN devices.
Wireless LAN Connections
Wireless network connections can be classified into 3 categories and this manual describes the connection
procedures for connecting through an Access Point (AP).
ŶAccess Point (AP)
You can connect to the Internet or another computer on the network through an AP.
ŶComputer-to-computer (ad hoc) Network
This is also called a peer-to-peer network. In computer-to-computer wireless networks,
you can connect 2 or more computers with wireless LAN modules.
For details, look at the descriptions that appear when clicking Start->Help and Support->Networking and the Web.
When you use Ad-Hoc, you have to change the McAfee Firewall settings.
ŶWireless Service via Telecommunication Companies
You can enjoy the wireless service via telecommunication companies at hotels, schools, subways, etc.
In that case you need to subscribe for the wireless service.
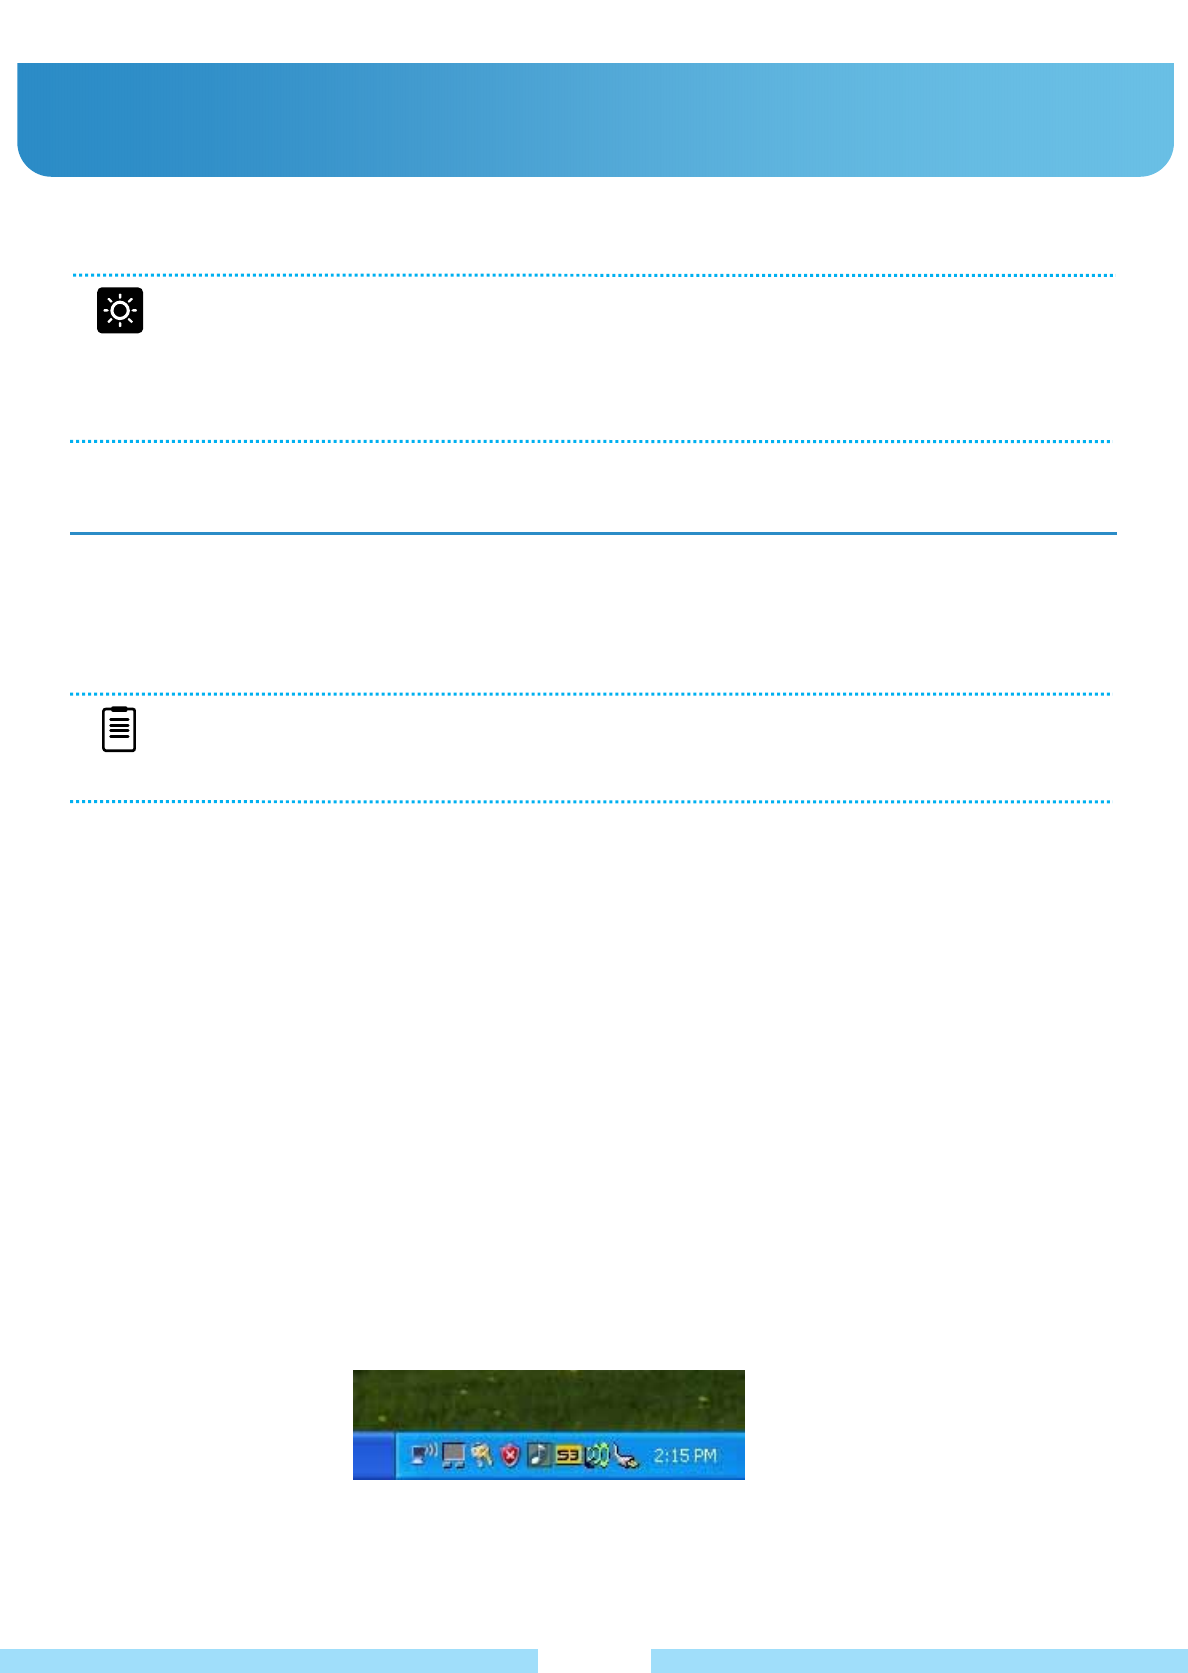
͑Right-click on the Network Connections icon on the taskbar and click Connect to the Network.
(You can check the status when you are on mouse status on the Network Connections icon.)
͑
͑
͑
ƔWireless Network
28
Before You Get Started
Ŷ The descriptions below are for models with a Wireless LAN card or device. To check the installed
wireless LAN card, click Start -> Control Panel -> WIFISET. The actual ones may differ from the
figures in this manual depending on your wireless LAN device model.
Ŷ To use the wireless LAN, you have to turn the wireless LAN on first. To turn it on, slide the WiFi switch
upward. If the wireless LAN is turned on, the Wireless LAN LED light is lit.
Ɣ Connecting to a Wireless LAN
If there is an AP, you can connect to the Internet via the AP using the Wireless LAN connection method provided
by Windows XP.
The OS you are using would be a bit different from the instruction because it’s based on Windows XP Service
Pack 2.
NOTE
Ŷ An AP is a network device that bridges wired and wireless LANs, and corresponds to a wireless hub in
a wired network. You can connect multiple wireless LAN installed computers to an AP.
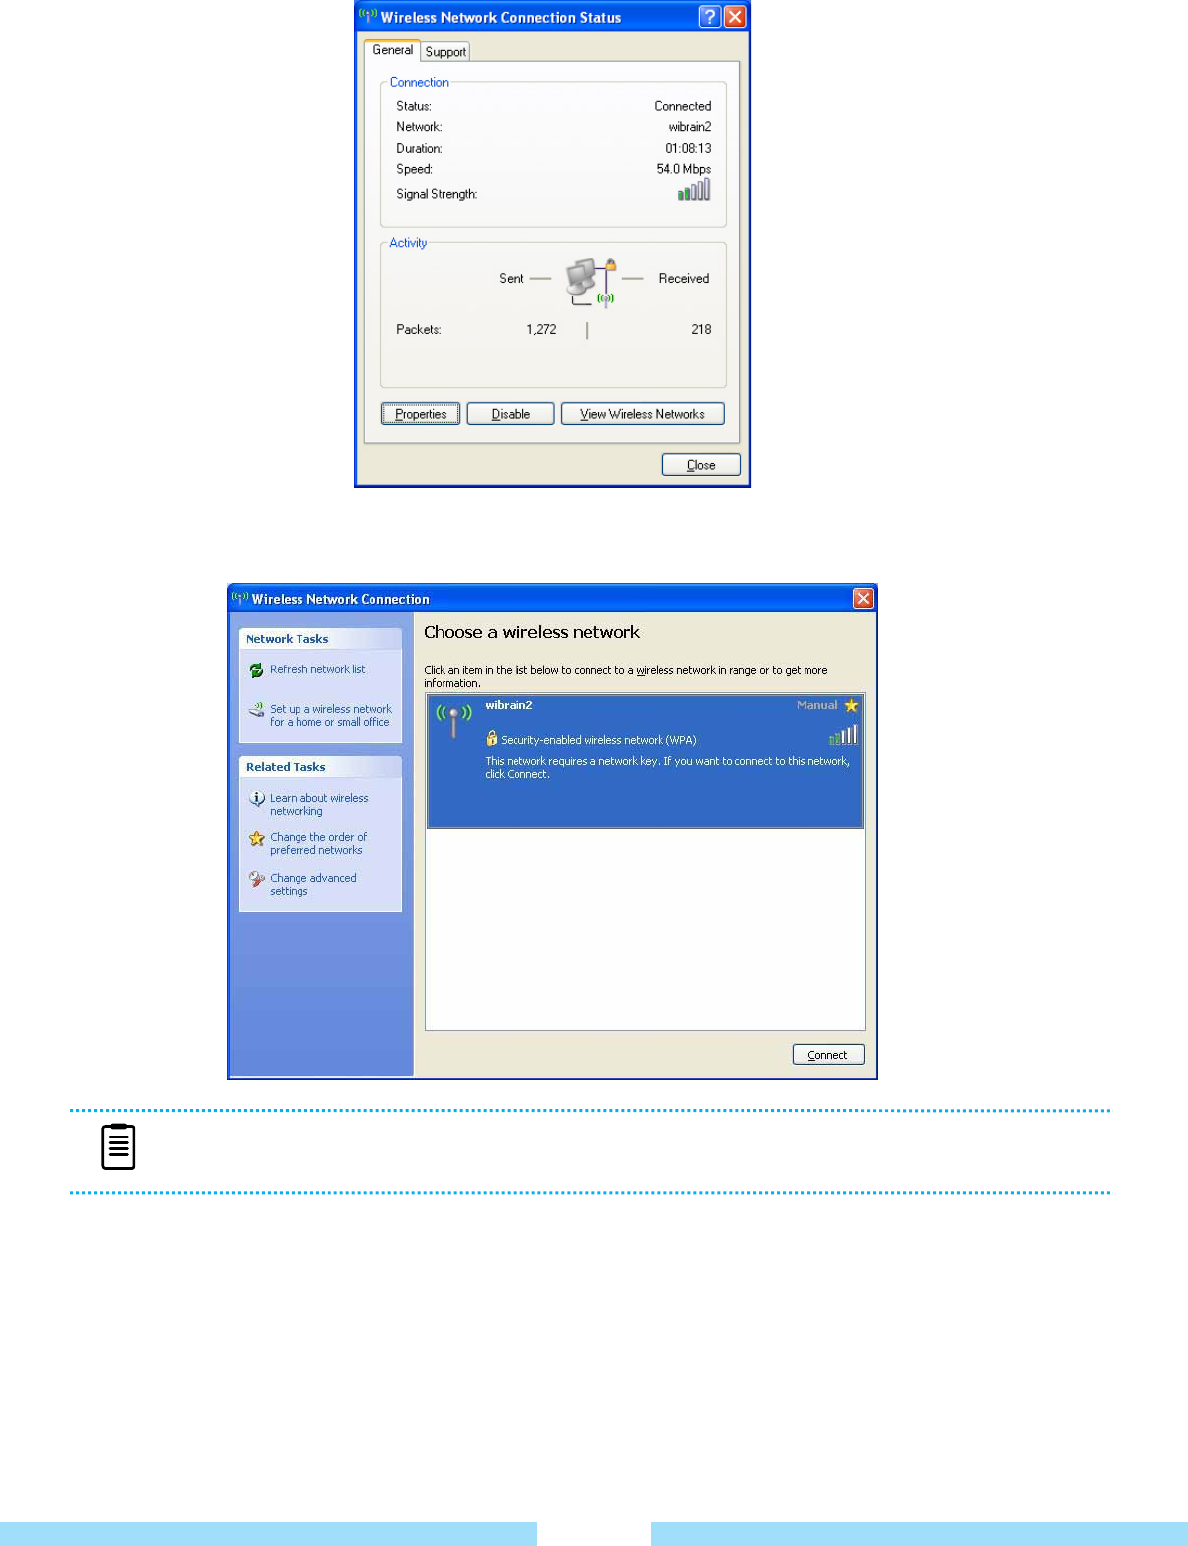
ᐮ͑ When the Network Connection window pops up, click View Wireless Networks.
͑
͑
͑
͑
͑
͑
͑
͑
͑
͑
͑
͑
͑
͑
͑
͑
͑
͑
͑
͑
ᐯ͑ Select an AP to connect to and click Connect. It there is a configured network key for the AP to connect to,
the Enter Network Key window appears. Enter the network key in the window and then click the Connect button.
ᐰ͑ When Connected to the AP is displayed, click the Close button.
You can access the network.
ᐱ͑ If it’s “Security-enabled Wireless Network” you need to input “Network Key”.
If you have no idea what the key is, ask the network administrator what it is.
ᐲ͑ Checking the network connection status.͑
If you move the pointer over the Network Connections icon of the taskbar, you can check the connection status.
NOTE
Ŷ Ask your network administrator for the network key, if necessary.
29
Bluetooth is wireless communications technology that allows access to nearby devices such as another computer,
cell phone, printer, keyboard, mouse, ect. without a cable connection.
Using Bluetooth, you can exchange files, connect to the Internet, and construct a private network.
Bluetooth Function
ƔFile Transmission
You can exchange files between two Bluetooth devices.
You can exchange files with another Bluetooth device such as another computer, cell phone, PDA, etc.
Ɣ Network Access
You can connect to another Bluetooth-installed computer in the same way as an ad-Hoc mode in wireless LAN and
connect to the network via an AP or an Internet connection sharing server.
Ɣ Network Access through a Phone Connection
You can connect to the network via a Bluetooth cell phone.
Ɣ Data Sync (Synchronization)
You can synchronize PIMS data (Outlook E-mail address data) with Bluetooth devices such as a cell phone, PDA,
another notebook computer, etc.
Ɣ Electronic Business Card (Vcard) Exchange
You can exchange business cards with Bluetooth devices such as a cell phone, PDA, another notebook computer,
etc.
Ɣ Sound Output
You can output computer sound to another Bluetooth device or vice versa.
Ɣ HID Connections
You can connect and use Bluetooth peripherals such as a keyboard, mouse, joystick, etc.
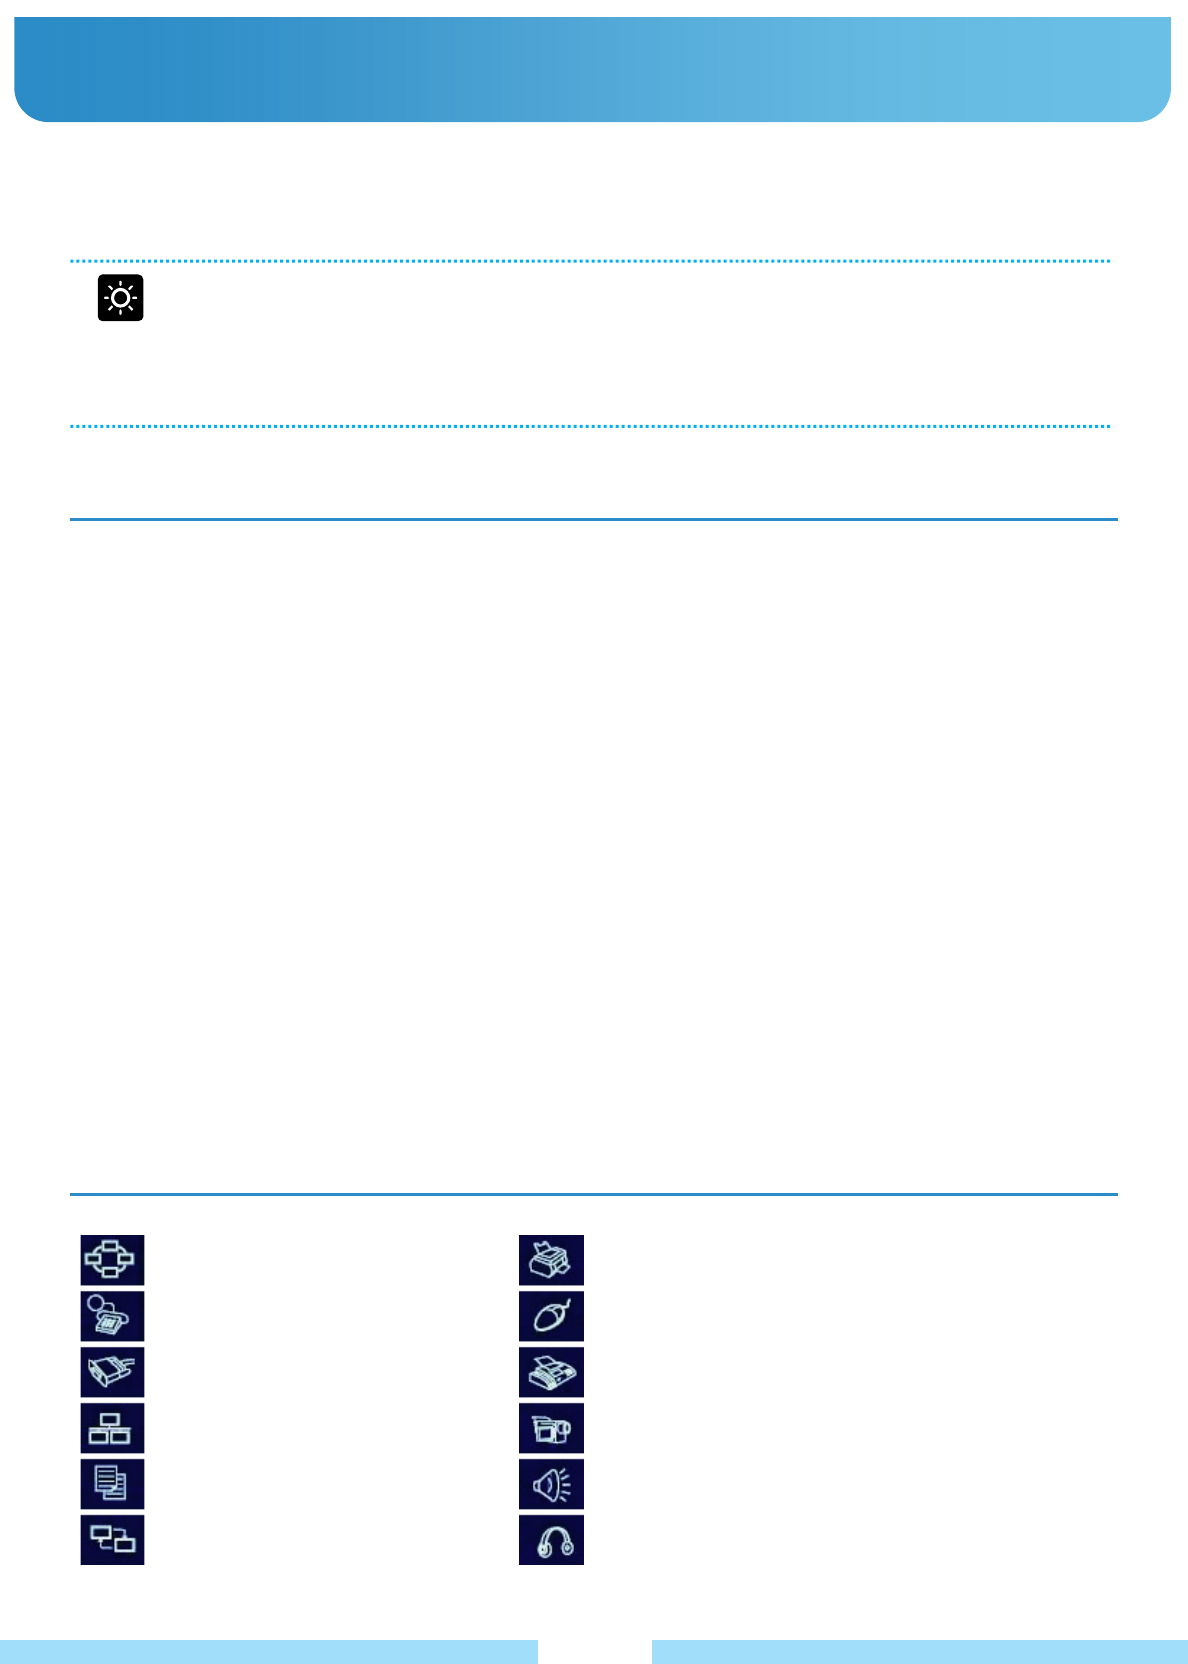
Bluetooth Icon
ƔUsing Bluetooth
Personal Network Service
Dial Network Service
Serial Port Service
LAN Connecting Service
File Transmission Service
Data Sync Service ͑
30
Before You Get Started
Ŷ The Bluetooth supporting function is only available between devices (a computer, cell phone, PDA,
printer, etc.) and the connection may be restricted according to the profile of the corresponding device
Ŷ The Bluetooth function is optional and may not be supported depending on your model.
Ŷ Compatibility to devices without the authentication or the logo of Bluetooth is not guaranteed
FAX Service
Printer Service
Human Interface Service
Basic Image Service
Audio/Video Service
Headset Service
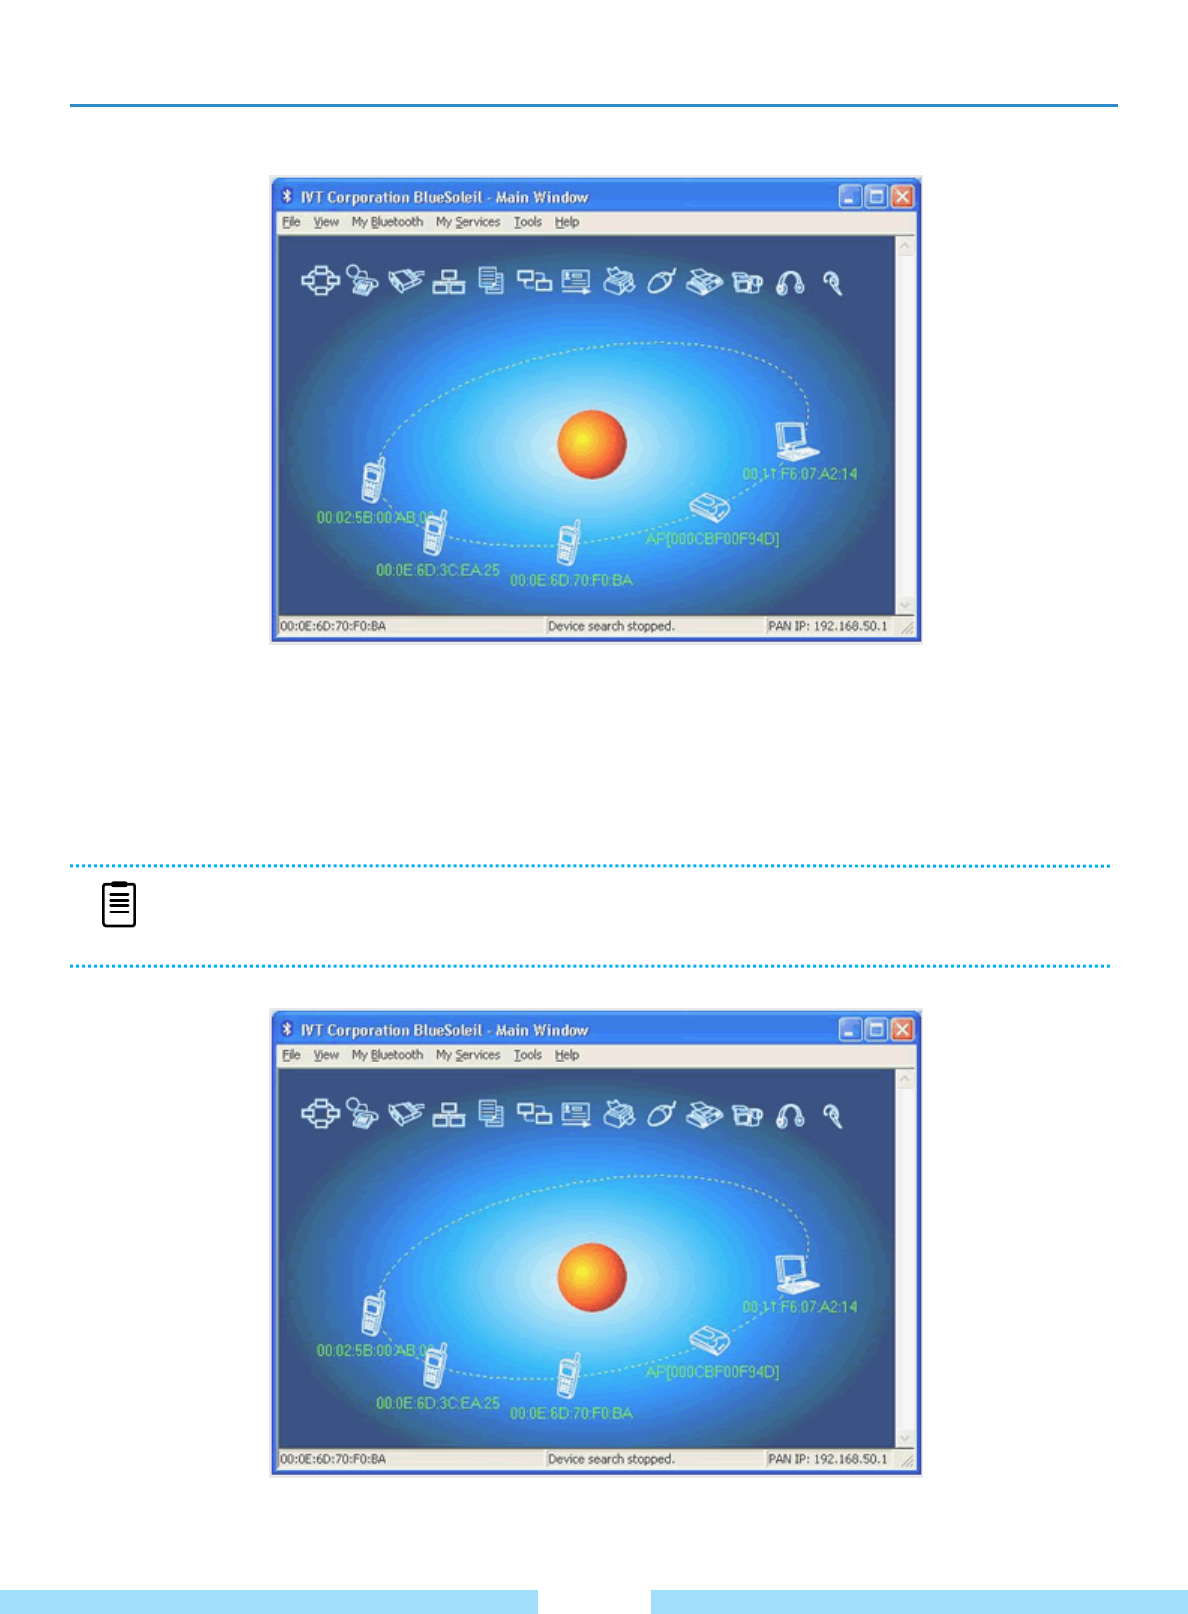
Start up BlueSoleil
ᐭ Double click the BlueSoleil icon on the Windows Desktop. You can find the mail page of BlueSoleil as below.
͑
ᐮ͑ ʹlick the red ball in the middle of the main page in order to start searching the Bluetooth devices nearby
the product.
ᐯ Bluetooth devices would be detected in orbit.
ᐰ Choose a device that you’d like to connect.
ᐱ Choose “Pair Device” with right-clicking for pairing on the device icon.
31
NOTE
Ŷ Go to Start -> Help and Support -> Networking and the Web -> Wireless Networking -> Bluetooth
Device.You can find more information about Windows.
Ɣ BlueSoleil (Standard) Edition Quick Installation Guide
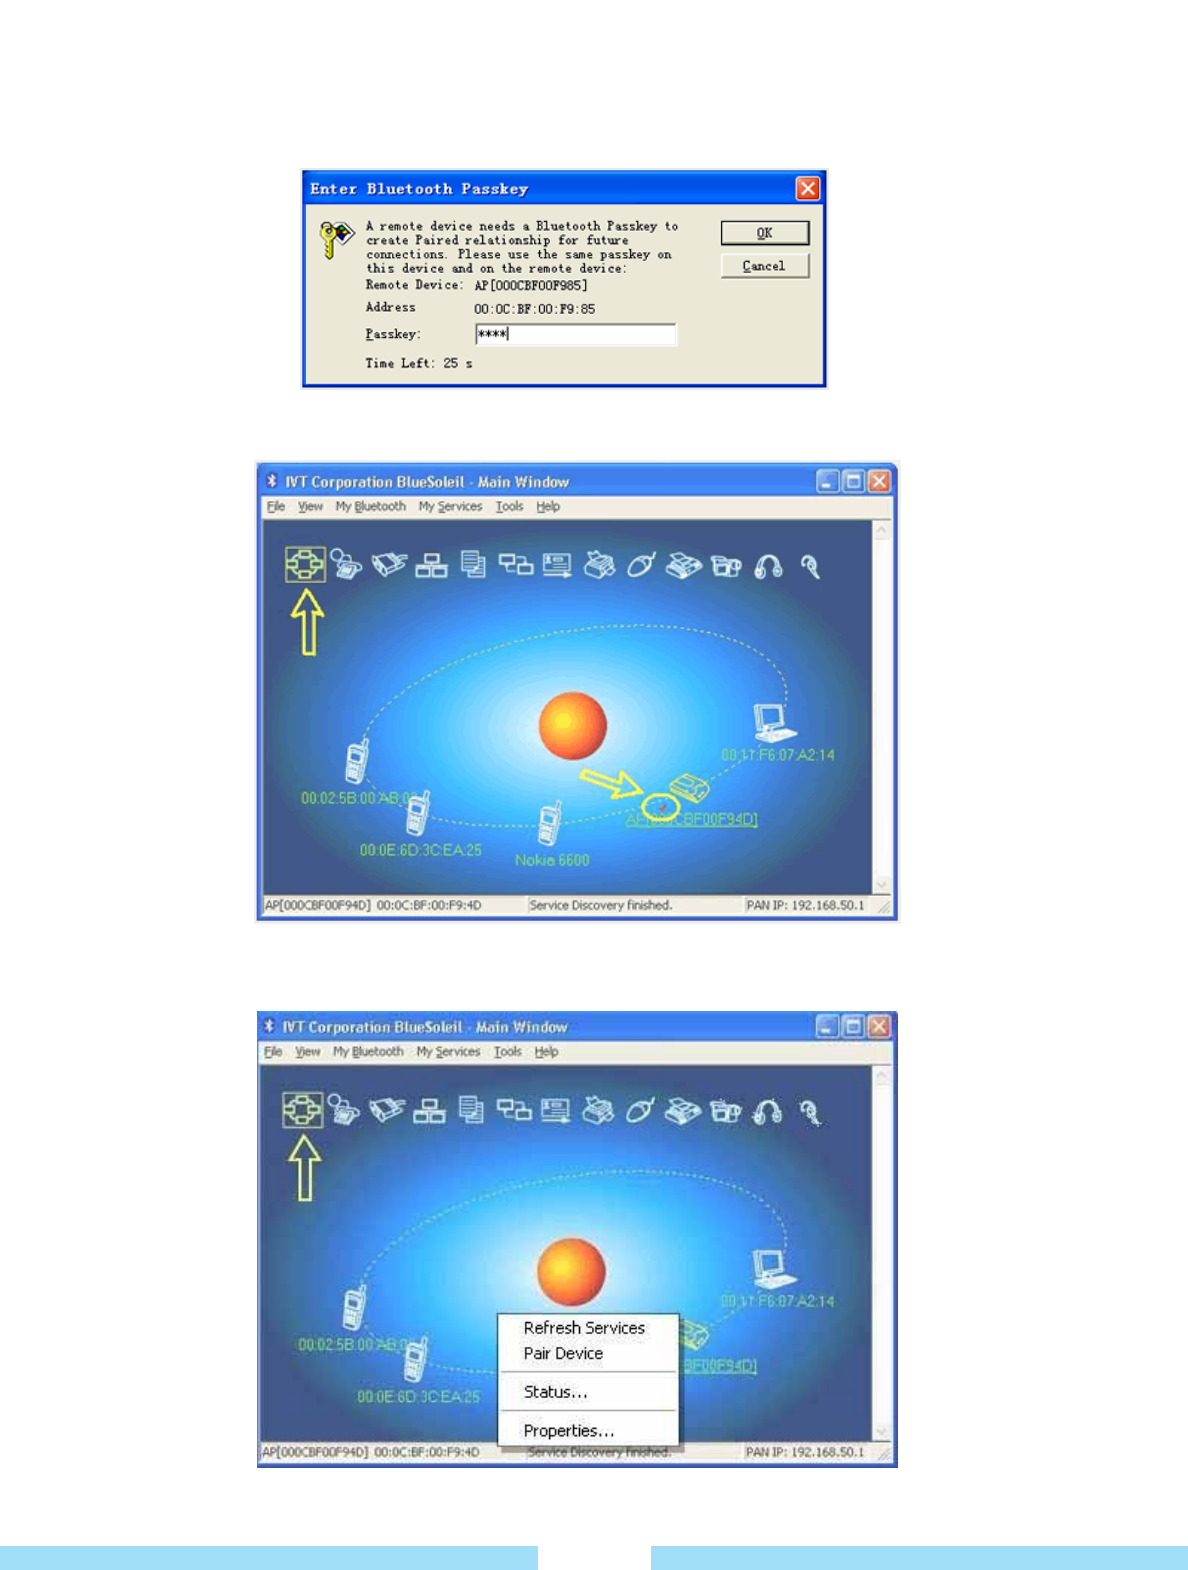
ᐱ At this time the Bluetooth device should be the pairing available status.
ᐲ Double click the device icon to browse its service.
Note:In some cases, you need to make the trusted relationship between BlueSoleil and the remote device by
inputting the same passkey on both sides.
On BlueSoleil side, the following window will pop up, you can enter the passkey here.
͑
ᐳ͑ After the pairing procedure succeeds, you can find the available service icons as below.͑
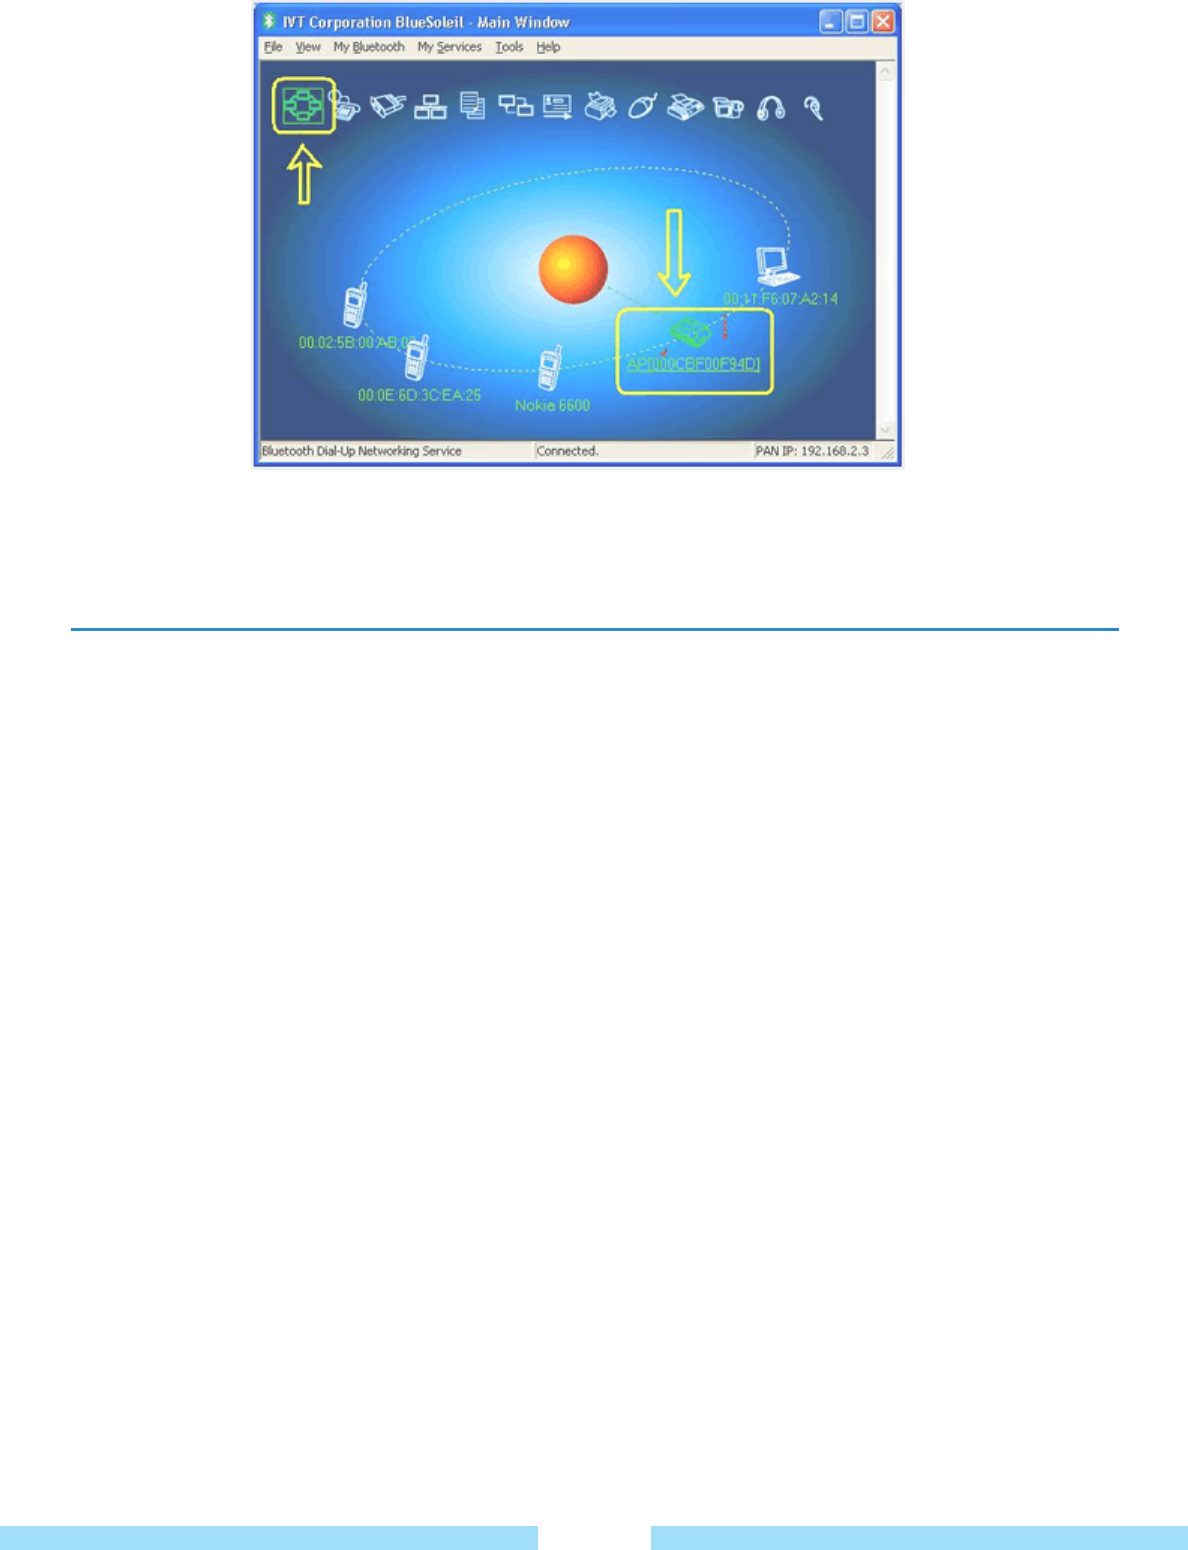
ᐴ͑ Single click one of the highlighted service icons, BlueSoleil will establish a Bluetooth connection to the remote
device. The device icon changes to green color and a line appears between the red ball and the device icon.͑
32
Notice for Windows XP
Expected outcome:
2-1. Installed Files & Directories (by default):
Ɣ Go to “Start -> Program -> IVT BlueSoleil -> BlueSoleil”
BlueSoleil execution and support files.
Ɣ Go to “My Documents -> Bluetooth” Support directory.
This is the directory for Object Push and Synchronization. Received cards and other objects will be put here.
2-2. Installed devices:
Ɣ 11 Bluetooth Serial ports(e.g. COM3-COM13)
Ɣ Bluetooth PAN Network Adapter
Ɣ 4 Bluetooth virtual Modem
Ɣ Bluetooth AV Audio Device
Ɣ Bluetooth SCO Audio Device
Ɣ Bluetooth HID Enum device
Ɣ Bluetooth Vcomm Manager
Ɣ Bluetooth HID Manager
ᐵ͑ Cancelation : Right-click on the device icons and click the cancelation.͑
33
A wired network is a network environment used for a company network or broadband internet connection at home.
ᐭ Connect a LAN cable to the LAN port of the Desktop Cradle (Optional Item).
ᐮ Go to Start -> Control Panel -> Network and Internet Connection -> Network Connection
ᐯ Right-click on the Local Area Connection and select Properties.
ᐰ Select Internet Protocol Version 4(TCP/IP) from the Networking tab and click Properties.
ᐱ Configure the IP settings.
When using DHCP, select Obtain an IP address automatically.
To use a static IP address, select Use the following IP address, and set the IP address manually.
ᐲ When you have completed the settings, click the OK button.
The network settings have been completed.
Using both DHCP and a fixed IP simultaneously.
Using the Alternate Configuration providing by Windows XP, you can set both automatic and fixed IP address or
select to use either of them to connect to the Internet.
ᐭ Go to Start -> Control Panel -> Network and Internet -> Network Connection -> Local Area Connection
ᐮ Right-click on the Local Area Connection and select Properties.
ᐯ Select Internet Protocol Version 4 (TCP/IP) from the Networking tab and select Properties.
ᐰ Select the Alternate Configuration tab, select User configured and fill in the corresponding fields.
ᐱ When you have completed the settings, click the OK button.
ƔUsing Wired Network
34
NOTE
Ŷ The LAN device driver may differ depending on your LAN device model.
To add a network component, click Install in the screen shown in the figure above. You can add
clients, services and protocols.
NOTE
Ŷ The LAN device driver may differ depending on your LAN device model.
To add a network component, click Install in the screen shown in the figure above. You can add
clients, services and protocols.
NOTE
Ŷ When not using DHCP, ask your network administrator for the IP address.
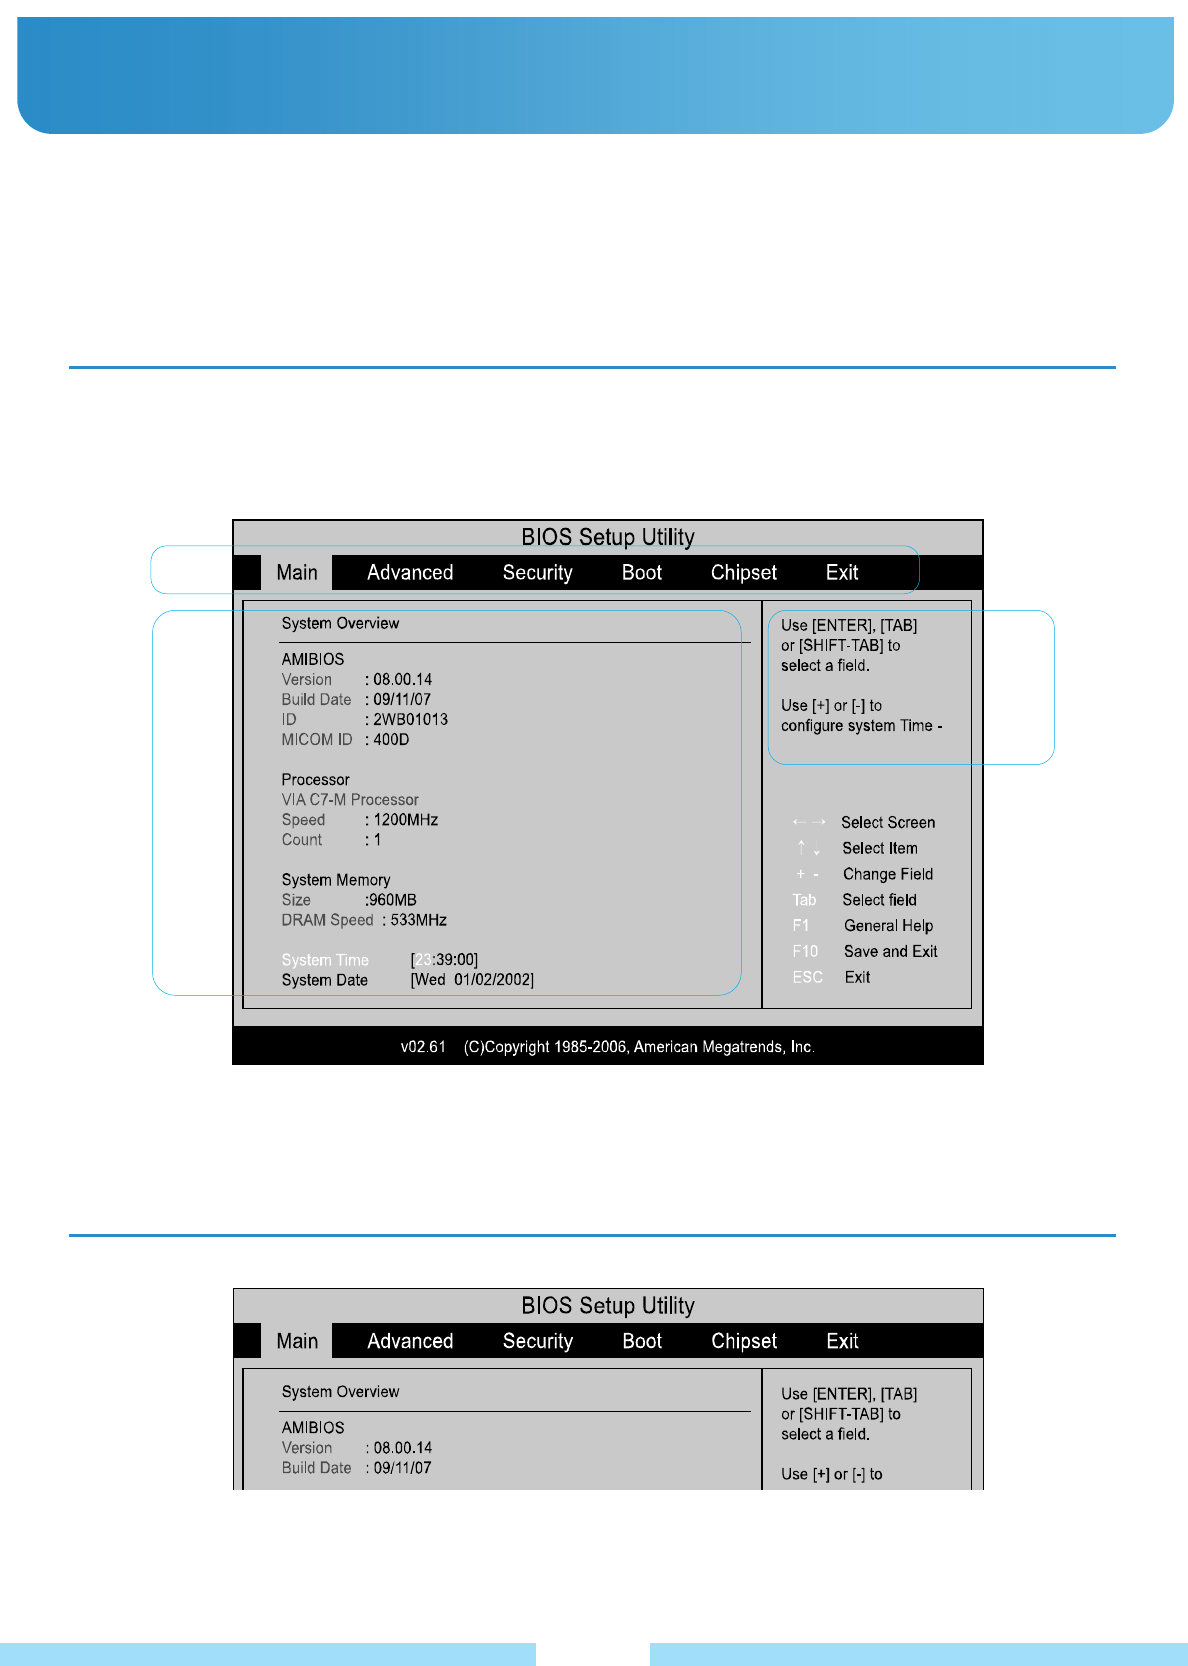
A : Setup Menu B : Setup Items(B) C : Help: Help for the selected item appears automatically.
ƔBIOS Setup
The BIOS Setup menus and items may differ depending on your model. Entering the BIOS Setup
1. Slide the Power Switch down. The product is turned on.
2. The booting screen appears. Press the Fn+2[F2].
3. After a moment, the BIOS setup screen appears.
The items in the BIOS setup may differ depending on the product.
͑
The BIOS Setup enables you to configure your product hardware according to your needs.
Ŷ Use the BIOS setup to define a boot password, change the booting priority, or add a new device.
Since incorrect settings may cause your system to malfunction or crash, take care when configuring the BIOS.
Ŷ The functions of the BIOS setup are subject to change for product function enhancement purposes.͑
A
B C
The BIOS Setup Screen
35
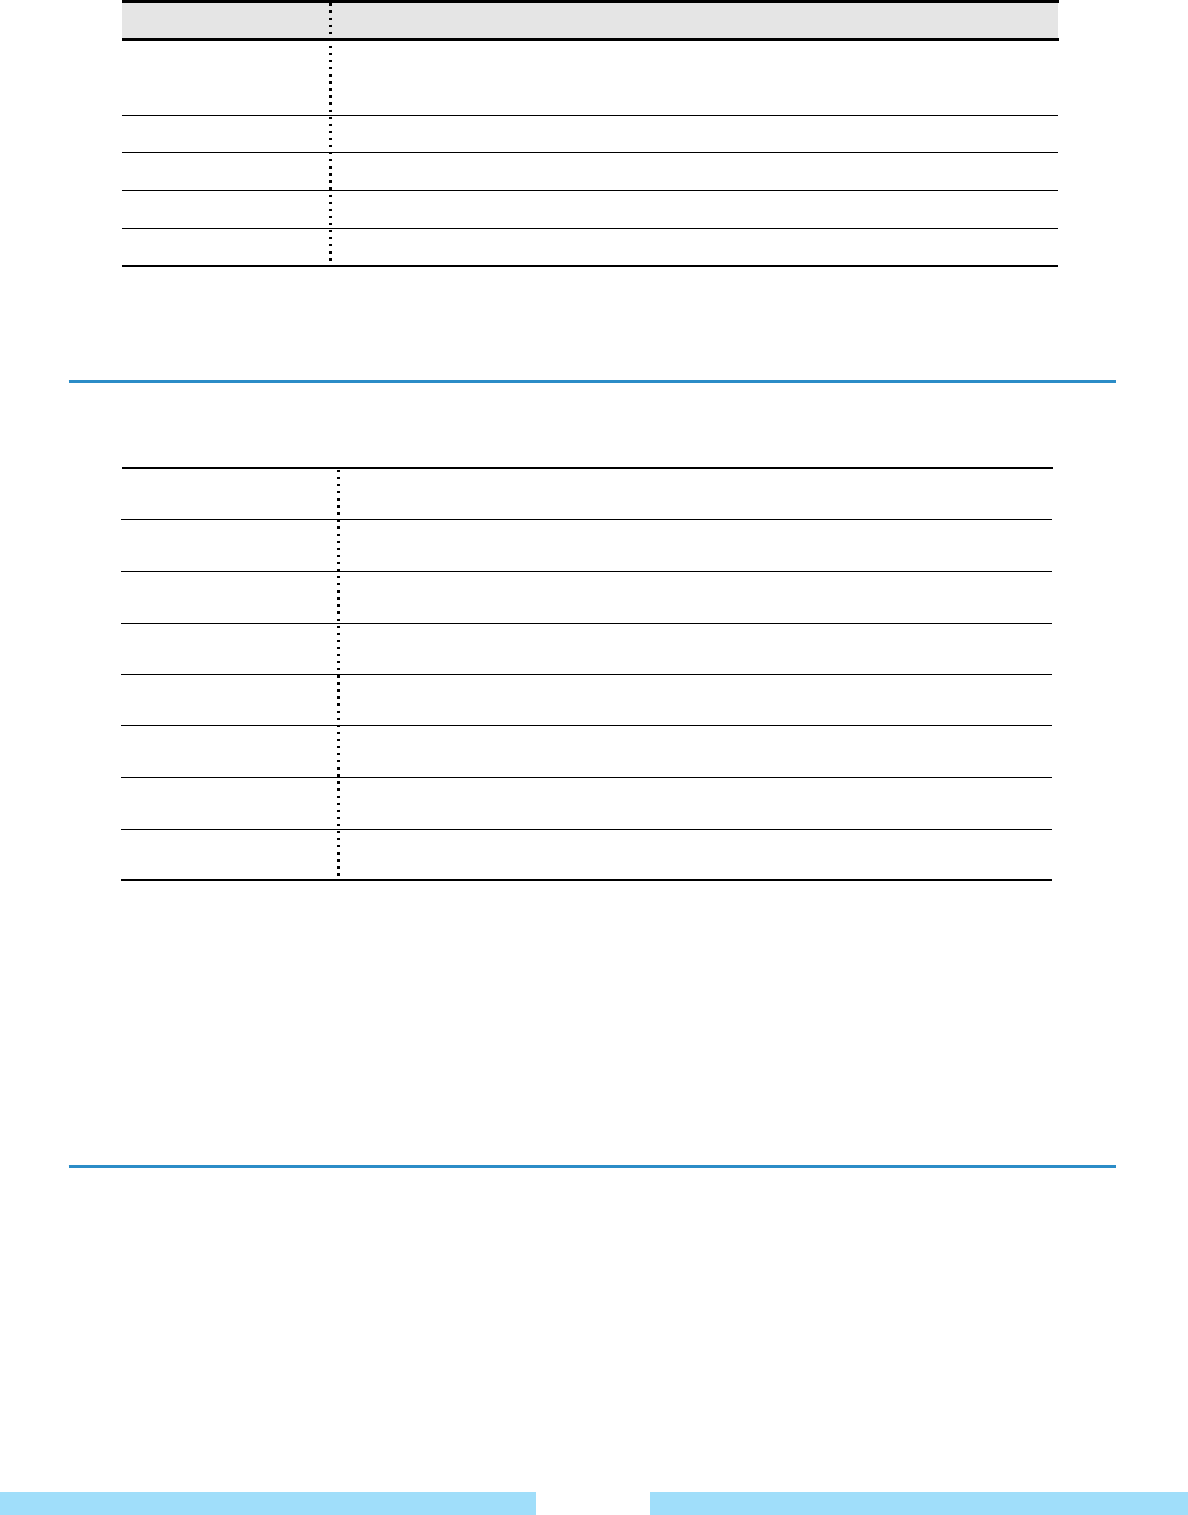
Menu Description
Advanced
Security
Boot
Chipset
Exit
Main Used to change the basic system and environment settings.
Used to configure advanced functions on your product around devices and
chipsets.
Used to configure security functions, including passwords.
Used to set the boot priority and other boot options.
Used to finish the setup.
Used to exit the Setup either saving the changes or not.͑
Setup Key Button Function
System Setup Buttons (Keys)
The following Buttons(keys) are used in System Setup.
F1(Fn+1) Key
Up & Down Key
F5(Fn+5)Key/
F6(Fn+6) Key
F9(Fn+9) key
Esc(Fn+ĸ) key
4way key/Left & Right
Enter
F10
(
Fn+0
)
If you press the F1(Fn+1) button, Help appears.
If you push the 4way key/Up or Down, you can move up or down the item
list.
Press the F5(Fn+5) / F(Fn+6) buttons to change the value of anitem.
To initialize the setup settings, press the F9(Fn+9) key on the external
keyboard.
Press the Esc(Fn+ĸ) key to return to a higher-level menu or to move
to the Exit menu.
If you push the 4way key/Left or Right, you can move to another menu.
(Enter Key) Selects an item or opens a submenu.
To save the changes press the F10(Fn+0) key.͑
Ɣ Setting a Boot Password
When setting a password, you have to enter a password to use the product or enter the BIOS Setup.
By configuring a password, you can restrict system access to authorized users only and protect data and files
saved on the product.
Do not lose or forget your password.
If you have forgotten your password, contact a service center. In this case, a service fee will be charged.͑
1. Setting a Supervisor Password
A Supervisor Password is required to turn the product on or to start the System Setup.
When setting a Supervisor Password, users other than a supervisor cannot use the product.
1. Select the Security menu in the BIOS Setup.
2. In the Set Supervisor Password item, press <Enter>.
36
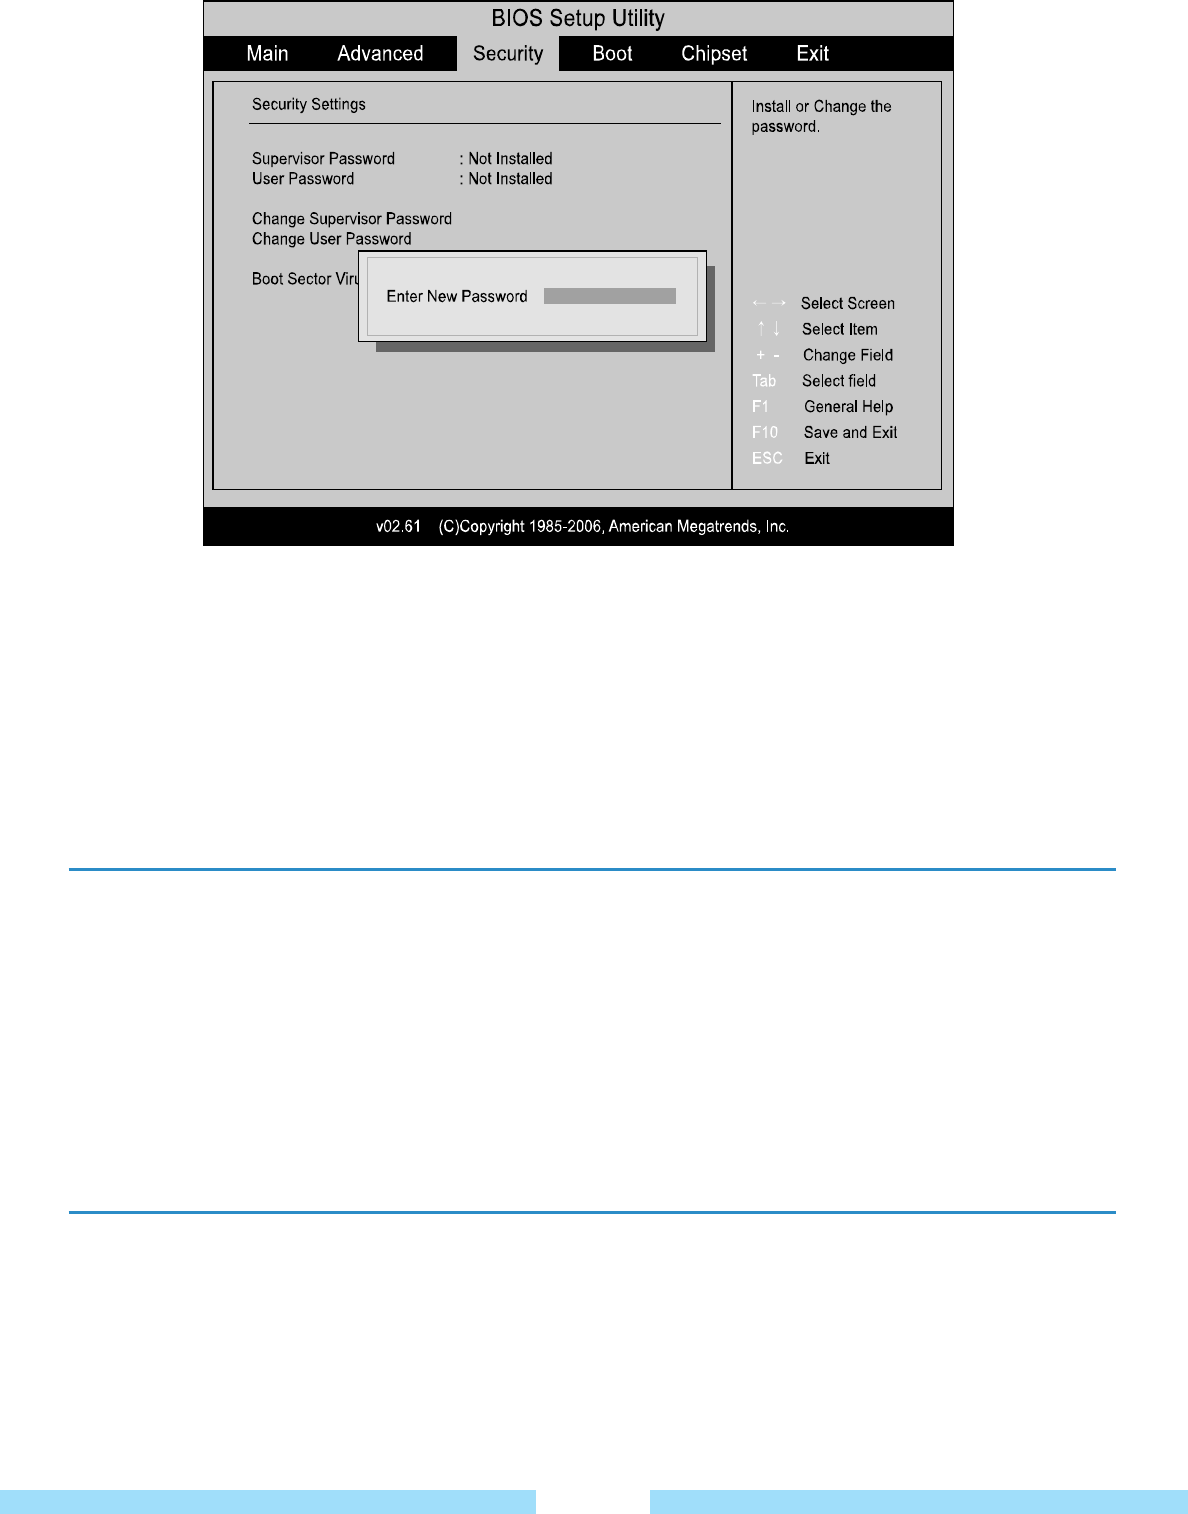
3. Enter the password with the keypad and press the Enter button.
Reenter the password and press the Enter button.
You can use up to 7 alphanumeric characters for a password but you cannot use special characters.
4. When a message confirming the password configuration appears in the [Setup Notice] window,
press <Enter>.
The supervisor password has been set. The supervisor password is required to turn the product on or
to enter System Setup.
2. Setting a User Password
Users can start the system with a user password, but cannot enter the System Setup. By doing this, you can
prevent other users from entering Setup.
Before configuring a user password, a supervisor password must have been configured. Deactivating the
supervisor password also deactivates the user password.
In the Set User Password item, press <Enter> and complete the procedures of Step 3 of Setting a Supervisor
Password.
Activating the Booting Password Before activating the booting password, a supervisor password must have been
configured.
Set the Password on boot option to Enabled. From now on, system booting will not proceed without the password.
3. Deactivating the Password
1. On the password to be deactivated, press <Enter>. For example, to deactivate a supervisor password in
the Set Supervisor Password item, press <Enter>.
2. In the Enter Current Password item, enter the current password and press <Enter>.
3. Leave the Enter New Password item field empty, and press <Enter>.
4. Leave the Confirm New Password field empty, and press <Enter>.
5. In the [Setup Notice] window, press <Enter>. The password is deactivated.
37

Using the software supplied with the device, you can easily use functions and troubleshoot problems.
Try to use the software after learning about the basic use of the software. For detailed information, refer to the help
section of the corresponding software. Every software program may not be provided or the version may differ
depending on your product model.
In addition, the screen capture images may differ from actual ones depending on the product model and software
version.
ƔIntroducin
g
Pro
g
rams
38
Please refer to the following instructions when running the product on battery power without connecting the AC power.
A Lithium-Ion battery is supplied with this product.
Read carefully and follow the precautions printed on the battery before using the battery.
ƔBattery
Precautions
Use only chargers specified in the User Guide.
Never heat the battery pack, put it near or in a fire or use at a temperature higher than 60°C, as this may
cause fire.
Never cause a short circuit between the battery pack terminals or disassemble the battery pack.
Read carefully and follow the precautions printed on the battery and the safety instructions in the User
Guide before using the battery. Operate and store the battery at room temperature.
Installing/Removing the Battery
1. Shutdown the system and place the product upside down on a flat surface.
2. Push the Battery Latch to the right side.
Lift the battery up and separate it.
3. To reinstall the battery, align the battery to the outside of the product and insert the battery.
Make sure that the battery latch is located on the left side.
Charging the Battery
1. Attach the battery and connect the AC adapter to the power supply jack of the product.
The battery will start charging.
2. When charging is completed, the Charge LED light turns to red. (Power off status)
Status Charge(Windows status) LED
Charging(Windows running)
Charging complete(Windows running)
Charging(Power off)
Charging complete(Power off)
Purple blink
Purple
Red blink
Red
Measuring the Remaining Battery Charge
You can check the battery charge status by completing the following procedures.
Click the recharging icon on the taskbar. The status of recharging window pops up.͑
Battery Warning
Ŷ You will hear an alarm when the remaining battery charge reaches below 10%.
In this case, connect the AC adapter or turn off the product and install a fully charged battery.
Ŷ When the remaining battery charge is under 3%, the product automatically saves the current work and turns off.
Battery Usage Time Information
A battery is an expendable supply, so when using it over a long time, the capacity/battery life is shortened. If the
battery life is reduced to less than half of its initial time, we recommend purchasing a new battery.
For long periods of not using the battery, keep the battery after discharging it. This extends the battery life time.
39

>> FAQ, Troubleshooting & Support
Cha
p
ter 4
FAQ and Troubleshooting 42
Warranty 43͑

This section provides information on possible problem, solutions and other references for using the system.
If you cannot solve the problems please contact our Authorized Repair Center.
Q
ƔFAQ and Troubleshooting
QI cannot run any functions.
A_1This may happen when the product is in the HOLD status. When pushing the HOLD switch upward, the HOLD LED
light will be lit. Slide the HOLD switch downwards and try again.
A_2If the product is running on battery power, check the battery charge status.
͑
QWhy doesn’t my product enter Sleep or Hibernate mode?
AYour product may become unstable if the operating mode is changed before the product completely enters Sleep or
Hibernate mode.
To restore your product to normal operating stability,
- Save and Close all open programs.
- Click Start and Shutdown and Restart.
- If your product does not restart, press the Ctrl+Alt+Delete keys and click the Turn off button and Restart.
- If this procedure doesn’t work, press and hold the power button until the product turns off.
(Turning off your product with the power switch may cause loss of unsaved data.)
͑
QThe memory capacity is different from the specification of the product.
AIt shows less capacity than itself because some of them are used for the graphic memory.
If your memory capacity is 64MB less than the specification, there’s no problem at all.
͑
QThe FAN is suddenly noisy.
A It adjusts the heat of the product inside. If the product gets hot the fan is supposed to make it cooler, in that case you
may hear the noise.
͑
QI’m using 512MB RAM but I’d like to use high capacity RAM. Is it possible to upgrade to 1GB?
AOur product has got only memory slot, it would not be able to make an additional memory input.
If you’d like to upgrade the memory capacity into 1GB, we’d like to recommend you to ask the authorized customer
service center. If you do it by yourself voluntarily, the company will not provide technical support, a replacement or
refund, and if our service engineer visits you due to this problem, a service charge will be applied.
QThe operating time of a fully charged battery has decreased from when the player was new.
AOver time, operating time of a fully charged battery can decrease, based on a number of variables :
the number of times the battery has been charged, how much the player has been used, and how long the product
has been stored unused. This is normal way for a rechargeable battery and may indicate that the battery needs
replacement.
͑
QWhat should I do if the battery indicator is flashing and my product does not start?
AThis issue could be due to the battery pack not being installed properly. To resolve this issue, turn off your product
and remove the battery pack. Then install the battery pack to the product again.
AIf the issue persists after performing the above, it means the installed battery pack is not compatible. Remove the
battery pack and contact an authorized Wibrain Repair center.͑
͑
QThe battery cannot be charged.
AThe warranty of the battery is 6 months. If it’s under the warranty period you’d better exchange it.
(Even though it’s under warranty, you may be charged if the problem has been caused by your fault.)
͑
42

͑
QHow to install the different Windows version.
AB1 has been optimized Windows XP. If you install the different Windows version, we cannot guarantee the proper
operation.
QI could find a Window label that has been torn.
AIf you can see the product key properly, there’s no problem. The original label is designed as it is for the protection
purpose. (If the label has been damaged, you may get disadvantages of the Windows approval.)͑
͑
QHow to connect wired Internet.
AYou need to purchase a USB wired LAN card or the optional desktop cradle.
͑
QThere are tiny black pixel points or bright pixel points (red, white, blue, or green) that continuously appear
on the Liquid Crystal Display (LCD) screen.͑͑
AHigh precision technology is used to manufacture these LCD displays to maintain a high standard of operation. In all
LCD panels, however, there may be a small number of pixels that do not change color. This is a normal occurrence
for all LCD displays from all manufacturers. Most defects are noticeable only while the product is starting or on an all
white or all black screen and should not be noticeable under normal operation.
͑͑͑͑However if you can find more than 5 dead pixels we are offering you a replacement service.
Also only dead pixel in the middle of the LCD would belong to the replace condition.
QNo Bluetooth device is found or cannot be connected via Bluetooth.
A_1If the Bluetooth device is already connected to another device, you may not be able to find it and cannot connect to
the device even if the device is found.
Disconnect the connection to the other device and then start the search again.
A_2Check that the Bluetooth functionality of the device with which you want to communicates is on.
See the other device’s manual for more information.
A_3In general, a Bluetooth headset has 2 operating modes, On/Off mode and Pairing mode.
To connect the device to the product, it must be in Pairing mode.
Switch the device to Pairing mode and then retry the search operation.
In general, the device in Pairing mode automatically returns to On/Off mode after a certain period of time.
QWhy is my Bluetooth connection slow?
A_1The data transfer speed depends on the obstacles and/or the distance between the two devices, on the radio wave
quality, and on the operating system or the software in use. Move your product and Bluetooth devices closer to each
other or remove obstacles between your product.
A_2Note that due to limitations of the Bluetooth standard, large files may occasionally be corrupted during continuous
transfer due to electromagnetic interference in the environment.
QWhy can’t I use the Bluetooth utility software when I switch a user?
A_1If you switch a user without logging off your system, the Bluetooth utility software will not work successfully.
Be sure to log off before switching a user. To log off your system, click Start and Log off.
Also it may not be available to a user with a standard user account on your product. Log onto the product as a user
with administrator rights.
QWhat should I do if I cannot connect a USB device?
A_1If applicable, check the USB device is turned on and using its own power supply. For example, if you are using a
digital camera, check if the battery is charged. If you are using a printer, check if the power cable is connected
properly to the AC outlet.
A_2Try using one of the USB ports on the port replicator. The driver could be installed to the specific port you used the
first time you connected the device.
A_3USB hubs may prevent a device from working because of the distribution of power. We recommend you connect the
device directly to your product without a hub.
43
Type of equipment: UMPC
Brand Name /Trade Mark: WIBRAIN
Type designation /model: B1
Manufacturer: WIBRAIN,INC.
In accordance with the following Directives:
Directive 1999/5/EC Radio Equipment and Telecommunications Terminal Equipment and the
mutual recognition of their conformity
Including amendments by the CE Marking Directive 1999/5/EC
The following harmonized European standards or technical specifications have been applied:
Art.3.1.a) EN 60950-1: 2001 + A11:2004
Art.3.1.a) EN 50383 / EN 50385
Art.3.1.b) ETSI EN 301 489-1 V1.7.1 (2007-04)
ETSI EN 301 489-17 V1.3.2 (2007-06)
Art.3.2) ETSI EN 300 328 V1.7.1 (2006-10)
Test report issued by:
RF: CTK Co., Ltd.
LVD: CTK Co., Ltd.
EMC: CTK Co., Ltd.
The CE Marking on the products and/or their packaging signifies that WIBRAIN,INC. hold the
reference technical file available to the European Union authorities.
Place and date of issue: 306 JEI Platz, 459-11 Gasan-dong, Geumcheon-gu, Seoul, Korea /
December 5, 2007
[Place, date]
EU
December 17, 2007
[Name and signature of person responsible]
jace.kim/ Manager