WINIA Electronics 7NF0010 VCR With DVD Player User Manual DV6T812N LT GB
Dongbu Daewoo Electronics Corporation VCR With DVD Player DV6T812N LT GB
UserManual.wiki
>
WINIA Electronics
>
7NF0010 User Manual
User Manual
Navigation menu
Upload a User Manual
Namespaces
Wiki Guide
HTML
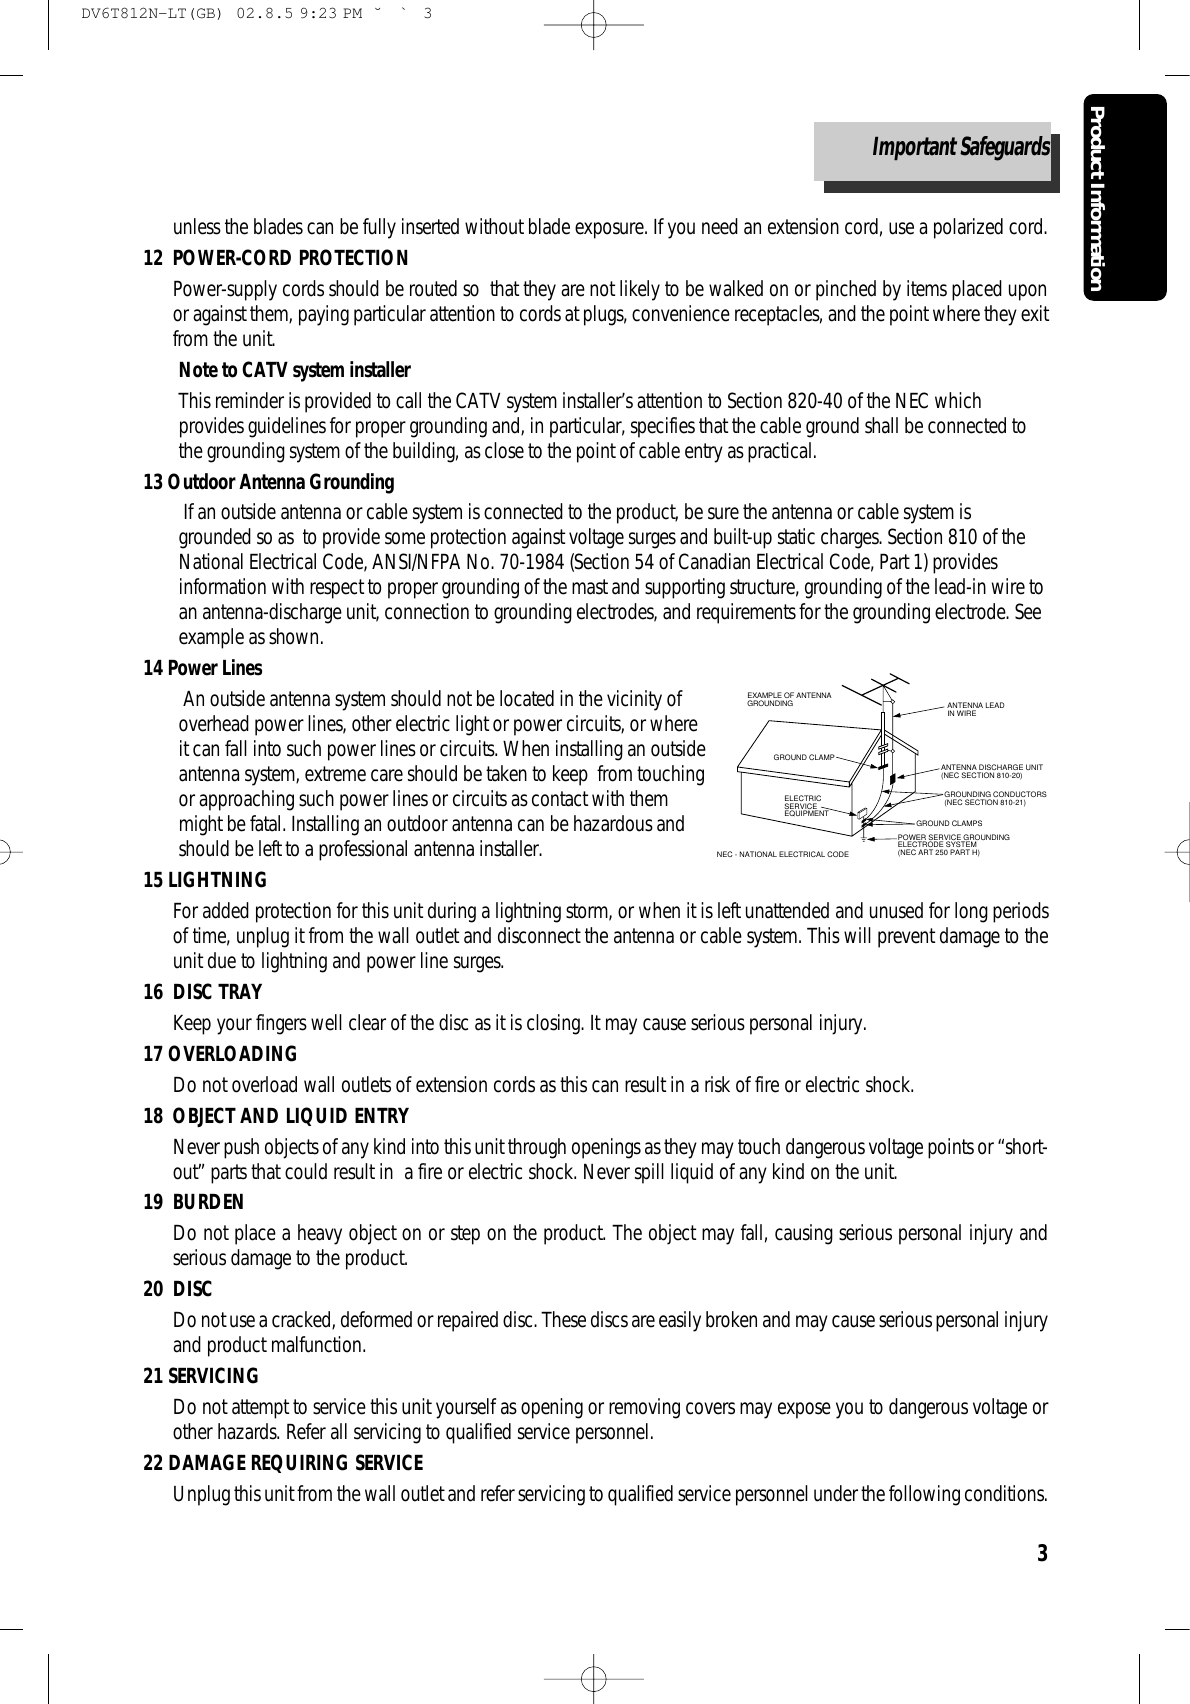
PDF
Info
Views
User Manual
Discussion / Help
Navigation
![STOPSELECTQUICK COPYPOWER- CHANNEL +EJECTVIDEO AUDIO RL REC DVDVHSREW PLAY/PAUSE FF OPEN/CLOSEDV6T812NDV6T512N [Hi-Fi] [MONO]DVD-VIDEO PLAYEROwner’s Manual◆In the initial settings, exclusive channel forDVD/Video is set to CH 3. Set the TVchannel to CH3 before using it. ◆Region code of DVD/Video player for homeis 1 or ALL. In inserting a disc with otherregion code, it does not operate. Please onlyuse a disc with region code 1 or ALL. ◆is a ‘Prohibition’ mark. If this mark isdisplayed in operating the product, pleasewait for a while, then use it. If "Prohibition" mark continues to bedisplayed in pressing a button after that, itmeans the button does not function in thecurrently played disc.◆Press a product button on the REMOTEthen use the product. • DVD operation : [DVD] button • Video operation : [VCR] button DV6T812N-LT(GB) 02.8.5 9:23 PM ˘`A](https://usermanual.wiki/WINIA-Electronics/7NF0010/User-Guide-263222-Page-1.png)

![Product Information5Advantages of This Product Are ..... • DVD, VCD, CD, CD-R(MP3), CD-RW, VHS, S-VHS playback function • DVD one-touch record function • Watching DVD for recording broadcast • Integrated REMOTE (VCR, DVD) • Ultra power savings : less than 3W for stand-bymode • VISS function • Multiplex sound playback/record • High Sound Quality of 6 head Hi-Fi • One Touch timer Recording (OTR) • MP3 file playback function (CD-R disc havingrecords of MP3 files) • Various video type-supported (AUTO, NTSC andPAL) • GUI (Graphical User Interface) OSD (On ScreenDisplay) By using the [DISPLAY] button on the remote control,information on the DVD/VCD/CD player and disc, canbe displayed on the TV screen. • Screensaver function (DVD)• 3D sound (3D sound effect using 2 speakers) • High bit / high sampling with 27MHz / 10bitvideo encoder This unit has 27MHz / 10bit capability, that enables thefaithful reproduction of fine images. • High bit / high sampling with 96KHz / 24bitaudio D/A converter With this 96KHz / 24bit linear Pulse Code Modulatedsignals, which constitute the highest specifications inthe DVD standards, you can enjoy faithfullyreproduced sound in all of its various modes. Tosupport 96KHz sampling / 24bit sound, the shapingnoise of this multi-level digital sigma type of D/Aconverter is kept flat up to 44KHz, thus preventing theimportant audio signals from being affected. • Coaxial, Optical digital output (PCM, DolbyDigital, dts) You can enjoy high-level digital audio by connectingwith amp embedded with Dolby Digital / dts decoder. • Built-in Dolby Digital decoder (DVD)• Analog audio 2-channels output for DOWNMIX(x1) • Composite video out (x1)• S-Video out (x1) • Slow Forward / reverse (DVD) playback • Fast Forward / reverse playback • Search of title, chapter, and time in DVD disc, andsearch of track and time in VCD and CD• Various TV aspect (DVD)4:3 for Pan and Scan, 4:3 for Letter Box, and 16:9 forWide • Repeat playback (title and chapter for DVD,track and disc for VCD/CD) • Bookmark function (DVD)Playback position can be made to remember up to 3positions for speedy search. • Selective Play (DVD/VCD/CD)You can select and play the desired title / chapter ofDVD and track of Video CD/CD in STOP mode. • 3 languages OSD (On Screen Display) function(DVD)You can select and display OSD in 3 languages.(English, French, Spanish) • Parental Lock function (DVD) This function can prevent playback of software thatmay be unsuitable for children. • Multi Audio function (DVD) The audio soundtrack can be heard in up to 8languages. In the case of SVCD or CVD, it depends onthe disc. (The number of audio languages depends onthe software.) • Multi Subtitle function (DVD)The subtitle can be seen in up to 32 languages. In thecase of SVCD or CVD, it depends on the disc. (Thenumber of subtitle languages depends on the software.) • Multi Angle function (DVD)This function allows you to choose the viewing angleof scenes which were shot from a number of differentangles. (The number of angles depends on thesoftware.) • Screen zoom function (DVD/VCD)• Thumbnail view function (in VCD withinactivated PBC) DV6T812N-LT(GB) 02.8.5 9:23 PM ˘`5](https://usermanual.wiki/WINIA-Electronics/7NF0010/User-Guide-263222-Page-6.png)
![11Product InformationRemote ControlREPEATOPEN/CLOSEDISPLAYTITLE/PBCMENUPR +PR -OUTPUTPREV.RECPROGRAMCLK/CNTSPEED/ANGLETRACKINGTV/VCRMARKSEARCHSYSTEMPLAY/PAUSE NEXTZOOM AUDIO SUBTITLESETUPCLEAR/3DENTEROKVCRDVD6@#!$%^&*()123457890“‘+=QqWwEeR![DVD] MENU button@POWER button #[DVD] TITLE /PBC button $[DVD] OPEN/CLOSE button, [VCR] EJECT button%[DVD, VCR] MOVE/SELECT in OSD, [VCR] ChannelUp/Down button ^SETUP button &[DVD] REPEAT Playback button *[DVD] ZOOM button ([DVD] PREVIOUS button (move into a previouschapter or track) )REVERSE SEARCH button 1[VCR] PROGRAM button2[DVD, VCR] CLOCK/COUNTER button 3[DVD] ANGLE, [VCR] Record SPEED button 4[VCR] Record button 5[DVD, VCR] NUMBER button , [VCR] TRACKING -/+button 6VCR SELECT button 7DVD SELECT button 8[DVD, VCR] OSD DISPLAY button9OUTPUT Selection button0ENTER/OK button“CLEAR/3D button ‘[DVD] SUBTITLE Select button +[DVD] AUDIO LANGUAGE Select, [VCR] AUDIOSelect button =[DVD] NEXT button (Move into a next chapter ortrack) , [VCR] Frame Advance button in pause mode QPLAY/PAUSE button qFORWARD SEARCH button WSTOP button w[DVD] Chapter/Title/Time SEARCH button E[DVD] BOOKMARK button e[DVD, VCR] TV/VCR button R[DVD] SYSTEM button (Select Auto/NTSC/PAL) Press the power [ ] button of the remote for about 8seconds. No buttons of front panel and remote can beoperated now and Lock indicator (“ ”) will bedisplayed on window display. To release child lock,press the power [ ] button of the remote control forabout 8 seconds.Child Lock!!!DV6T812N-LT(GB) 02.8.5 9:23 PM ˘`11](https://usermanual.wiki/WINIA-Electronics/7NF0010/User-Guide-263222-Page-12.png)

![13InstallationConnecting with Cable BoxHow to connect INPUT 1 INOUT ANT ININPUT 2Rear Panel of TVConverter BoxA/B SwitchSPLITTER (Not supported)Cable AntennaRANT.INRF OUTLOUT INAUDIOVIDEORear Panel of DVD-VIDEOAUDIO/VIDEO CABLERF CABLERF CABLERF CABLERF CABLEOUTOUTINIf your cable system onlyrequires you to use a converterbox for some channels (i.e., pay-TV channels), follow thesesteps: Find the primary incoming RFcable. Plug this cable into a splitter(available at your local electronicsstore.) Connect one RF cable betweenone OUT terminal on the splitter and■You should install a distributor additionally. How to watch general broadcasting with recording CATV11Set Channel Select switch of Converter Box to CH 3 or 4 as same as video exclusive channel. Press [SET] button in[VCR] operation to set video exclusive channel in “CHANNEL SET” screen. 22Press channel button of Converter Box to select channel to be recorded. In this case, if you want to watch CATV tobe recorded, press [TV/INPUT] button of TV to select “Out(VCR)”. 33Press [REC] button in DVD-Video. 44To watch general broadcasting, press channel button in TV to select the desired channel.the IN terminal on the converter box. Connect another RF cable between the other OUT terminal on the splitter and the A-IN terminal on an A/B switch(available at your local electronics store.) Connect a third RF cable between the OUT terminal on the converter boxand the B-IN terminal on the A/B switch. Connect a RF cable between the OUT terminal on the A/B switch and the ANT. IN on your DVD-VIDEO.When the A/B switch is in the B position, use the converter box to change channels ; when the A/B switch is in the Aposition, use the DVD-VIDEO to change channels.• For some types of TV, you should press [TV/INPUT] button in TV REMOTE and convert from Out 1( VCR 1) or Out 2(VCR2) mode to Broadcasting Channel mode to change TV channel. • Change channel selection of CATV receiver in recording, contents of recording is changed. DV6T812N-LT(GB) 02.8.5 9:23 PM ˘`13](https://usermanual.wiki/WINIA-Electronics/7NF0010/User-Guide-263222-Page-14.png)
![Installation15How to Copy(Edit) Tape with Other VCR or Camcorder11Turn on DVD-Video. 22Press [OUTPUT] button of remote control and adjust DVD-Video to display “External Input 1” or “External Input2” in TV screen. 33Press [PLAY] button in Camcorder or playback video. 44Press [REC] button in DVD-Video if you want to record contents of camcorder or playback video. 55Press [Pause] button in DVD-Video when unnecessary or undesired scene is displayed in recording. (Caution) Recording is released automatically after 5 minutes since pressing [PAUSE] button. Press [REC] buttonif you want to record again. How to Playback Chapter Photographed by Camcorder 11Turn DVD-Video on. 22Press [OUTPUT] button of remote control and adjust DVD-Video to display “External Input 1” or “External Input2” in TV screen. 33Insert tape in camcorder and playback it. DV6T812N-LT(GB) 02.8.5 9:23 PM ˘`15](https://usermanual.wiki/WINIA-Electronics/7NF0010/User-Guide-263222-Page-16.png)
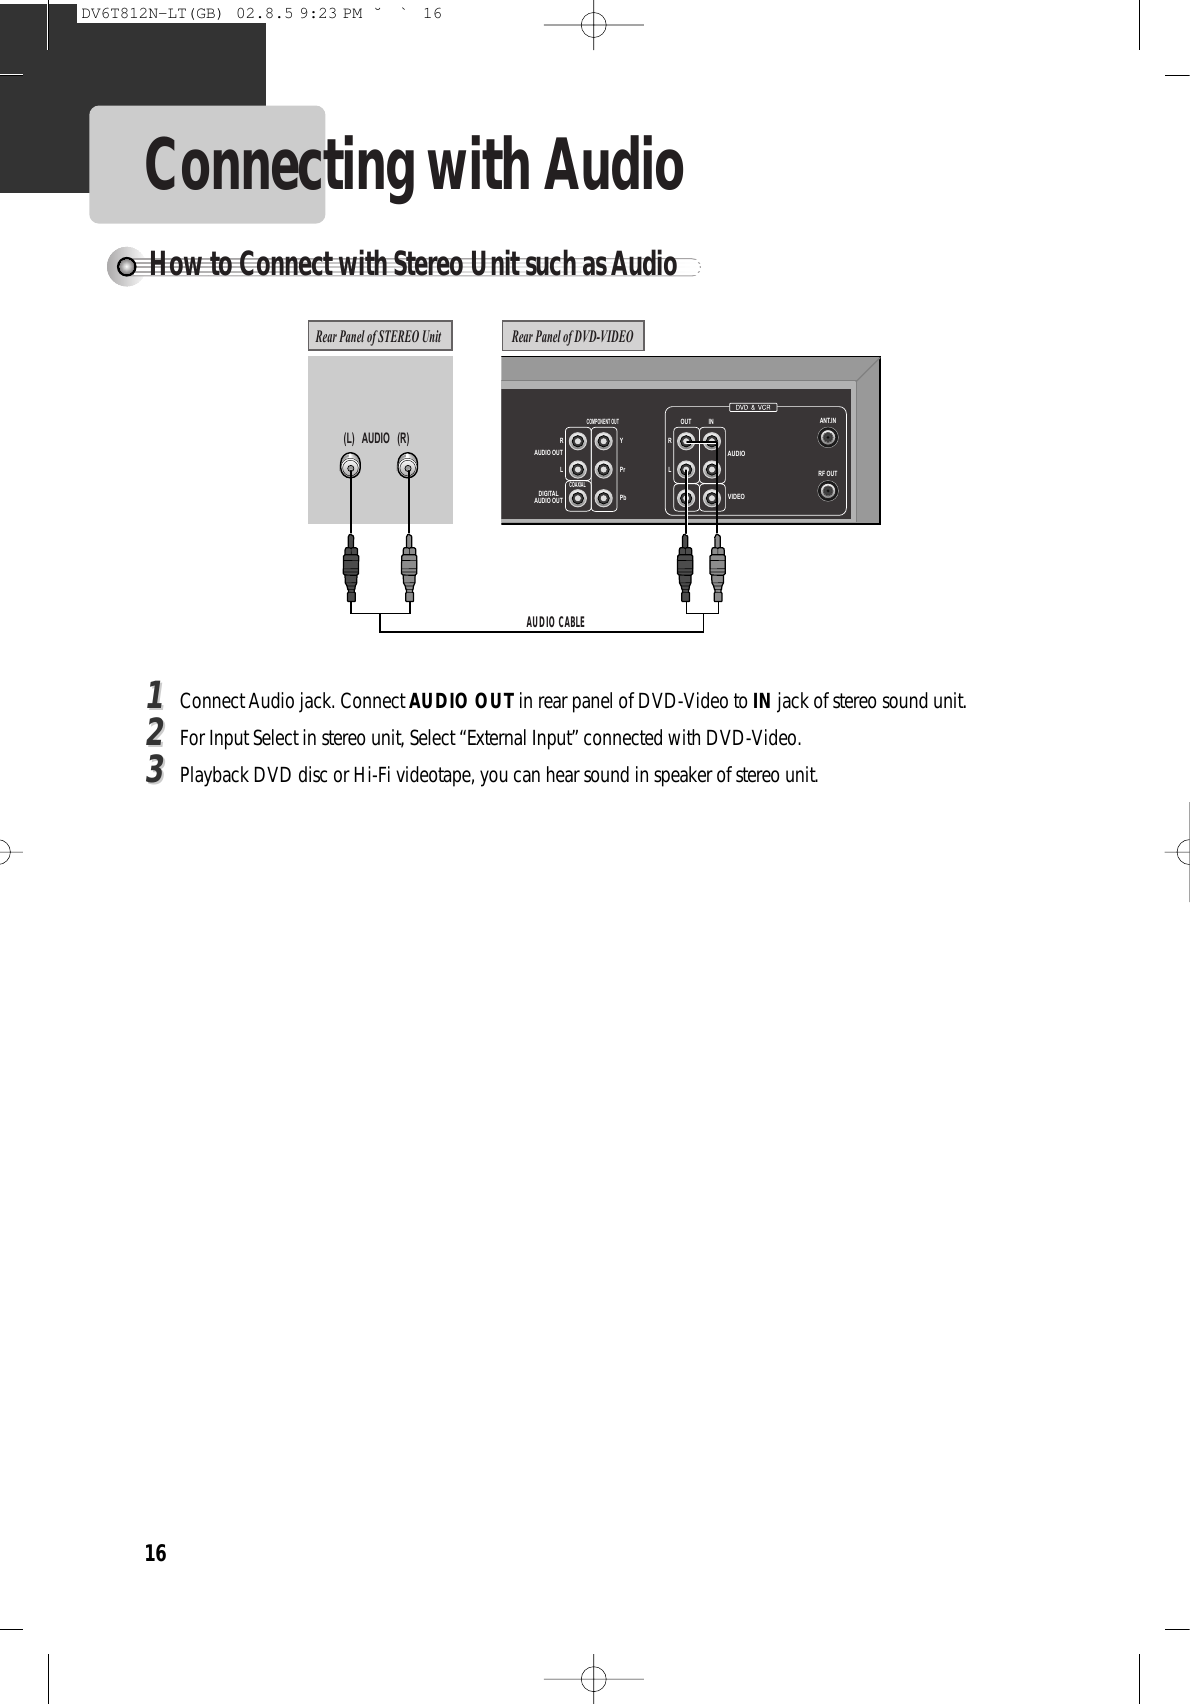
![Installation17Connecting TV with Component Jack, Amp with Digital Audio Out JackHow to Connect RANT.INRF OUTLOUT INAUDIOVIDEORCOAXIALLYPrPbAUDIO OUTDIGITALAUDIO OUTCOMPONENT OUTRear Panel of DVD-VIDEOCOMPONENT INAmplifier of Dolby Digital Rear Panel of TVCONNECTING CABLE (NOT SUPPORTED)11Select COMPONENT IN to connect to TV. 22Select COAXIAL to connect to amp of Dolby Digital. ** If you want to know about “Dolby Digital”, please refer to [About DVD] in68p.33If screen is broken in connecting COMPONENT OUT to Pr, Pb, Y of TVCOMPONENT IN jack , connect to Cr, Cb, Y. ■Use in S-VIDEO or COMPONENT In jack attached in TV or amp supporting Dolby Digital.Manufactured under license from Dolby Laboratories.“Dolby”, “Pro Logic”, and the double-D symbol are trademarks of Dolby Laboratories.MOVE: SELECT:ENTER EXIT:SETUPVVIIDDEEOOAUDIO OTHERSTV ASPECT 4:3 LBTV TYPE NTSCVIDEO OUT S-VIDEOLANGUAGECOMPONENT✔S-VIDEODV6T812N-LT(GB) 02.8.5 9:23 PM ˘`17](https://usermanual.wiki/WINIA-Electronics/7NF0010/User-Guide-263222-Page-18.png)
![18Clock SetPress [SETUP] button.Press [ENTER] button to select CLOCK SET.Select Time and Date Set with [ENTER]button in CLOCK SET screen.■Set TV to CH 4 (or 3). ■Press [VCR] button on remote control to change into VCR Mode and follow theprocedure below. Set the current date and time with [ , , ,] button or [NUMBER] button. For DATE SET, follow the order of Month / Day /Year ; for TIME SET, follow the order ofHour/Minute in CLOCK SET screen. If CLOCK SET is completed, press[ENTER/OK] button.112233SETUPCLOCK SETTIMER RECORDINGSCHANNEL SETFUNCTIONSLANGUAGE SELECTMove: Select:End: SETUP ENTERCLOCK SETTime and Date SetAuto DST : ONTIME AND DATE SETTIME AND DATE SETMove: Select:End: SETUP ENTERMove: Input:End: SETUPMove: Input:End: SETUPTime - - : - -(hh:mm)Date - - / - - / 20 - -Time 11 : 01 AMDate 05 / 25 / 2002 (Sat)(mm/dd/yy)DV6T812N-LT(GB) 02.8.5 9:23 PM ˘`18](https://usermanual.wiki/WINIA-Electronics/7NF0010/User-Guide-263222-Page-19.png)
![Basic Operation19Output Select STOPSELECTQUICK COPYPOWER- CHANNEL +EJECTVIDEO AUDIO RL REC DVDVHSREW PLAY/PAUSE FF OPEN/CLOSETo Select VCRPress [VCR] button.If VCR mode is correctly selected, VCR on the operation display window is lighted. Then, REMOTE button works as VCR function. Press the [VCR] button, then it becomes to the VCR OPERATION mode.To Select Watch Modes or External InputPress [OUTPUT] button.Whenever you press [OUTPUT] button, DVD, VCR PLAYBACK,BROADCASTING RECEPTION and EXTERNAL INPUT is selected inorder and the DISPLAY of DVD and VCR will be changed accordingly. Timer Program SettingPress [PROGRAM] button.You can set the Timer Program. Before timer program setting, clock should be set correctly (see page 24)and video mode should be selected. (See screen #3 in page 36)To Select DVDREPEATOPEN/CLOSEDISPLAYTITLE/PBCMENUPR +PR -OUTPUTPREV.RECPROGRAMCLK/CNTSPEED/ANGLETRACKINGTV/VCRMARKSEARCHSYSTEMPLAY/PAUSE NEXTZOOM AUDIO SUBTITLESETUPCLEAR/3DENTEROKVCRDVDVCRDVDOUTPUT SELECT PROGRAMDVDSTOPSELECTQUICK COPYPOWER- CHANNEL +EJECTVIDEO AUDIO RL REC DVDVHSREW PLAY/PAUSE FF OPEN/CLOSEPress [DVD] button. If DVD mode is correctly selected, DVD on the operation display window is lighted. Then, REMOTE button works as DVD function. Press the [DVD] button, then the mode of DVD-Video Player becomes to the OPERATION mode.DV6T812N-LT(GB) 02.8.5 9:23 PM ˘`19](https://usermanual.wiki/WINIA-Electronics/7NF0010/User-Guide-263222-Page-20.png)
![20DVD Playback Press [ ] button to power on.Press [DVD] button of REMOTE to change into DVD mode.Press [OPEN/CLOSE] button to open the disc tray. Place a disc firmly on the disc tray, making its label look upward. Insert the disc and press [OPEN/CLOSE] button to close the tray.The disc tray is closed and after checking the disc’s condition, Playback or Stopfunction starts to operate. 112233To playback it, press [PLAY/PAUSE] button. • In the case of DVD,DVD menus and titles are displayed on TV screen. • In the case of S-VCD and VCD2.0the menus are displayed on TV screen and it isconverted into PBC(Playback Back Control) mode. • In the case of CD, VCD1.1 and MP3, the disc plays in order of its track numbers. 44To stop it, press [ ] button.For pause, press [PLAY/PAUSE] button in playbackmode. If you press this button once more, it starts playbackagain.55Press [OPEN/CLOSE] button to remove thedisc.66REPEATOPEN/CLOSEDISPLAYTITLE/PBCMENUPR +PR -OUTPUTPREV.RECPROGRAMCLK/CNTSPEED/ANGLETRACKINGTV/VCRMARKSEARCHSYSTEMPLAY/PAUSE NEXTZOOM AUDIO SUBTITLESETUPCLEAR/3DENTEROKVCRDVDOPEN/CLOSEPLAYBACK/PAUSESTOPPOWER STOPSELECTQUICK COPYPOWER- CHANNEL +EJECTVIDEO AUDIO RL REC DVDVHSREW PLAY/PAUSE FF OPEN/CLOSEDV6T812N-LT(GB) 02.8.5 9:23 PM ˘`20](https://usermanual.wiki/WINIA-Electronics/7NF0010/User-Guide-263222-Page-21.png)
![21Basic OperationVarious Playback Methods■If you want fast playback,press [ ] button in Playback mode. You can watch fast playing screen.Every time you press the button, play speed changes in the below ordersx 2 x 4 x 8 x 20 PLAY x 2...■If you want fast reverse playback,press [ ] button in Playback mode. You can watch fast reverse screen.Every time you press the button, reverse play speed changes in the below ordersx 2 x 4 x 8 x 20 PLAY x 2...**This reverse playback can be unavailable for certain DVD. Unavailable for MP3. ■If you want slow playback,press [ ] button in Pause mode. You can watch the desired screen in the slow forward playback. Every time you press the button, slow play speed changes in the below orders.1/2 1/4 1/8 1/2 ....■If you want slow reverse playback,press [ ] button in Pause mode. You can watch the desired screen in the slow reverse playback. Every time you press the button, slow reverse-play speed changes in the below orders.1/2 1/4 1/8 1/2 .... ** For the case of Video CD, this reverse slow playback function is unavailable. The mark will appear.■If you want still picture, press [PAUSE] button in Playback mode. You can watch the desired screen in Pause status.DV6T812N-LT(GB) 02.8.5 9:24 PM ˘`21](https://usermanual.wiki/WINIA-Electronics/7NF0010/User-Guide-263222-Page-22.png)
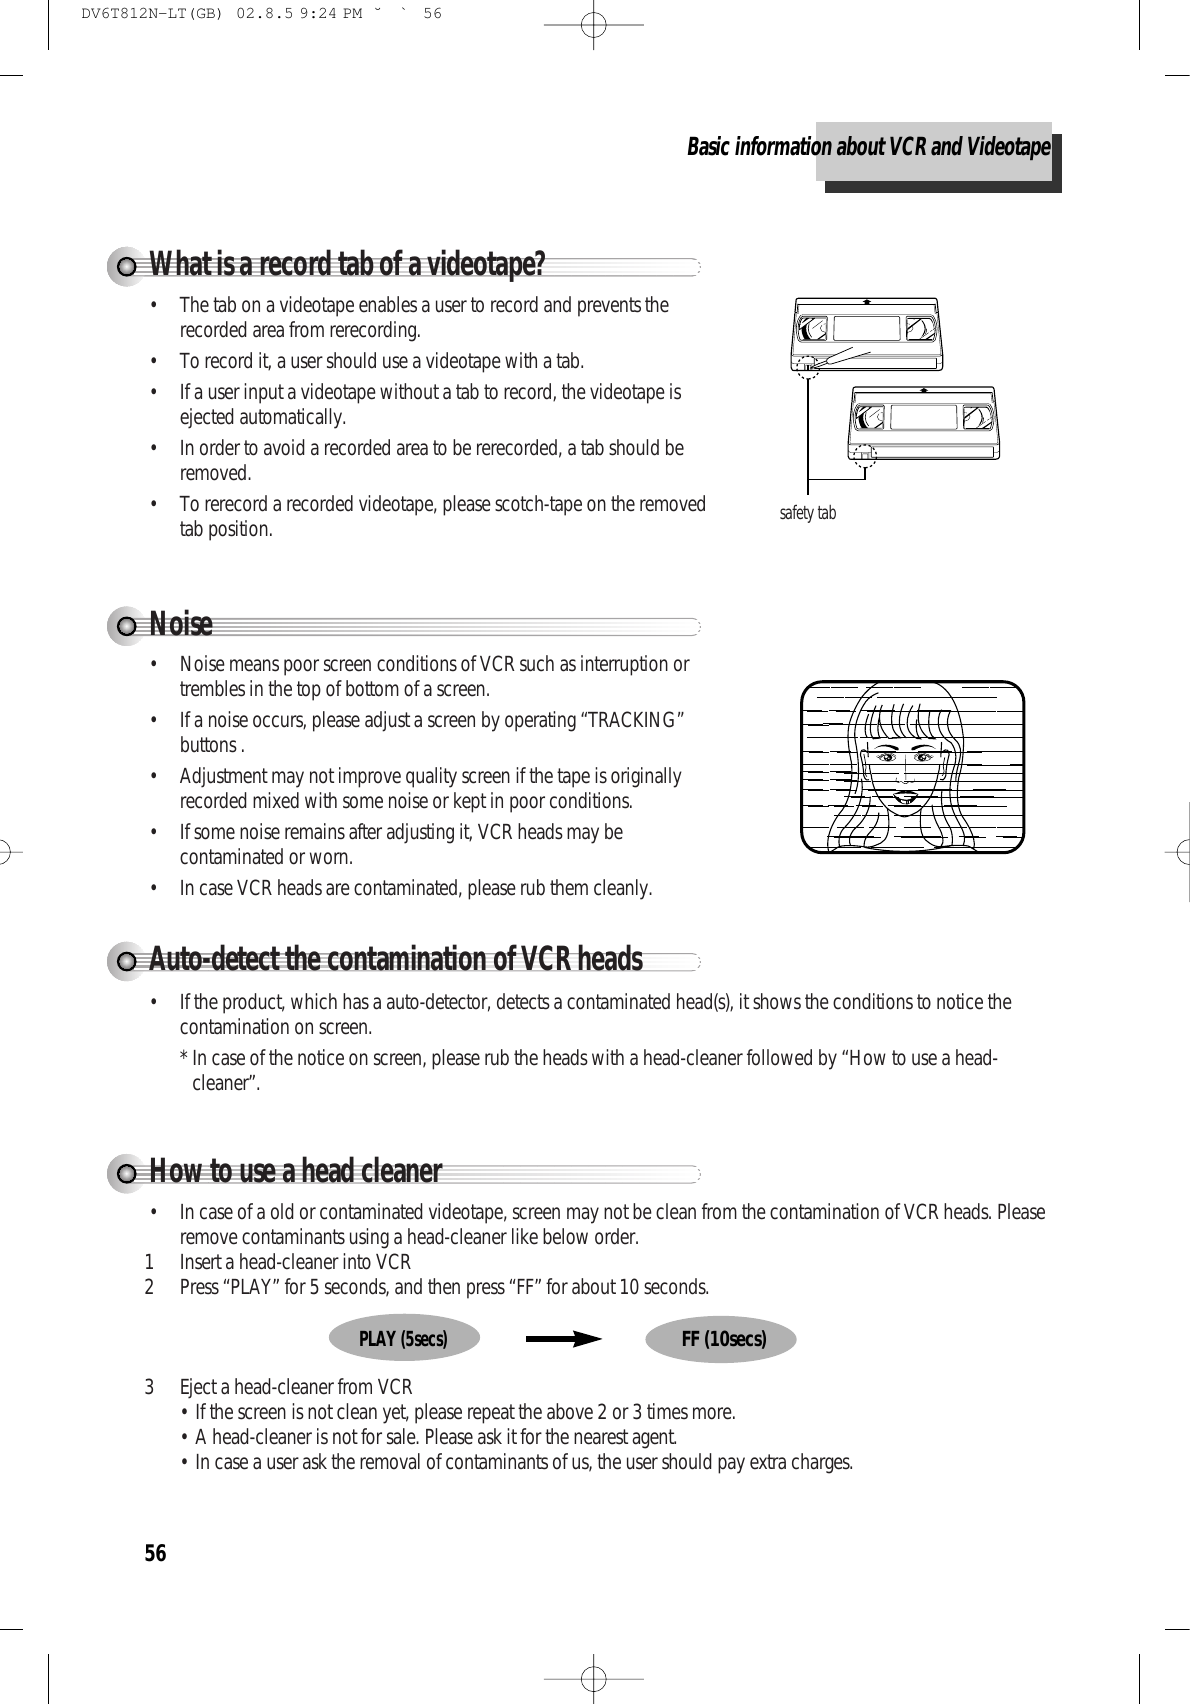
![22VCR Playback Press [ ] button to power on.Press [VCR] button of remote control to change into VCR mode.Insert the desiredtape.If you want to playback it, press [PLAY/PAUSE] button.When the operational status is flickering or poor, adjust it with [TRACKING +/-]button. 112233To stop it, press [ ] button. For pause, press [PLAY/PAUSE] button in playbackmode. If you press this button once more, it starts playbackagain. 44To playback forward fast or to rewind it, press[ ] or [ ] button, respectively.55Press [EJECT] button in the front part or[OPEN/CLOSE] button on remote control toremove the tape. 66REPEATOPEN/CLOSEDISPLAYTITLE/PBCMENUPR +PR -OUTPUTPREV.RECPROGRAMCLK/CNTSPEED/ANGLETRACKINGTV/VCRMARKSEARCHSYSTEMPLAY/PAUSE NEXTZOOM AUDIO SUBTITLESETUPCLEAR/3DENTEROKVCRDVDREWIND PLAYBACK/PAUSE FAST FORWARDSTOPPOWER STOPSELECTQUICK COPYPOWER- CHANNEL +EJECTVIDEO AUDIO RL REC DVDVHSREW PLAY/PAUSE FF OPEN/CLOSE• If the product, which has a auto-detector, detects a contaminated head(s), it showsthe conditions to notice the contamination on screen.* In case of the notice on screen, please rub the heads with a head-cleaner followedby “How to use a head-cleaner”. (70P)DV6T812N-LT(GB) 02.8.5 9:24 PM ˘`22](https://usermanual.wiki/WINIA-Electronics/7NF0010/User-Guide-263222-Page-23.png)
![23Basic OperationTo Adjust DisplayVarious Playback Methods■If you want fast forward playback,press [ ] button in Playback mode. You can watch fast playing screen.■If you want fast reverse playback,press [ ] button in Playback mode. You can watch fast rewinding screen.■If you want Still picture, press [PLAY/PAUSE] in Playback mode. You can watch the desired screen in pause status.■If you want slow-motion playback,press [ ] or [ ] button in Pause mode. You can watch the desired screen in the slow forward or slow reverseplayback. * NOTE: VCR doesn’t have Slow Reverse Playback function.■If you want to watch a series of screens one by one, (FRAME ADVANCE)press [NEXT ] button in Pause mode. Each time you press this button, the picture advances one frame.This product includes automatic Tracking function and enables users to enjoy clear picture without an additional operation.Provided that the following problems can be solved by the manual adjustment, which improves display quality. (Duringautomatic display adjustment, “Adjusting Display” are displayed on TV screen.)- If the screen is poor in Playback mode, - If noises occur in the upper or lower partof screen in slow playback mode, - If paused picture vibrates up and down.Use [TRACKING +/-] buttons of remote controlto adjust the display suitable for watching.TRACKINGSYSTEMVCR Playback DV6T812N-LT(GB) 02.8.5 9:24 PM ˘`23](https://usermanual.wiki/WINIA-Electronics/7NF0010/User-Guide-263222-Page-24.png)
![24RecordingPress [ ] button to power on.• Press [VCR] button of remote control to change into VCR mode. • Power on TV and select Ch 3, or press [INPUT] button of TV set to selectExternal Input mode. Insert a recordable tape.Insert a tape with recording tab. With [CHANNEL], [NUMBER] and [OUTPUT] buttons, select the desiredbroadcasting channel or external input unit to record. 112233Select the desired speed (SP or SLP) with[SPEED] button. 44Press [REC] button.Then, it starts recording. 55If you want to pause recording, press [PAUSE]button.After pressing [PAUSE] button, if the pause statuscontinues for five minutes, the recording is releasedautomatically.66To exit recording, press [STOP] button. 77REPEATOPEN/CLOSEDISPLAYTITLE/PBCMENUPR +PR -OUTPUTPREV.RECPROGRAMCLK/CNTSPEED/ANGLETRACKINGTV/VCRMARKSEARCHSYSTEMPLAY/PAUSE NEXTZOOM AUDIO SUBTITLESETUPCLEAR/3DENTEROKVCRDVDPLAYBACK/PAUSENUMBERSTOPREC SPEEDOUTPUT SELECTPOWERCHANNELVCRRECTo Record With VCRDV6T812N-LT(GB) 02.8.5 9:24 PM ˘`24](https://usermanual.wiki/WINIA-Electronics/7NF0010/User-Guide-263222-Page-25.png)
![25VCR OperationThis product incorporates copyright protection technology that is protected by method claims of certain U.S patentsand other intellectual property rights owned by Macrovision Corporation and other rights owners. Use of this copyright protection technology must be authorized by Macrovision Corporation, and is intended forhome and other limited viewing uses only unless otherwise authorized by Macrovision Corporation. Reverseengineering or disassembly is prohibited.To Copy From DVD To VideotapeTo Enjoy Another TV Channel or DVD during recordingOne Touch timer Recording (OTR)When your urgent business happens suddenly in watching TV or you want to record the current TV program forthe desired time, follow the procedures below. To copy just withbuttons of remotecontrol, after playingDVD, press [VCR]button and then [REC]button.Recording11First, follow the steps 1 to 4 in “Recording With VCR”. 22Press [REC] button as much as you want. See the “Recording Times Table” below.Button Press Times ....... Operational StatusOnce ............................. continuous recording until you press STOP button Twice ............................ recording for thirty minutes from current time 3 (times)......................... recording for one hour 4 .................................... recording for one hour and thirty minutes 5 .................................... recording for two hours 6 .................................... recording for two hours and thirty minutes 7 .................................... recording for three hours 8 .................................... recording for three hours and thirty minutes 9 .................................... recording for four hours 10 ................................. returning to the status of Once Press33To stop Recording mode, press [STOP] button more than 8 seconds. 11If you want to watch another TV channel during recording with video, press [TV/VCR]button.It is available of changing into and watching another TV channel.22If you want to playback DVD during recording with video, insert a DVD disc.Place the desired DVD disc on DVD tray, press [DVD] button to convert OUTPUT intoDVD mode and press [PLAY] button. Then, you can watch DVD.11Insert the desired DVD disc. When it is a DVD disc with copy protect function, you can’t copy it. Insert a recordable tape. 22Press [QUICK COPY] button on the front panel.DVD plays and VCR starts recording. 33To exit copy, press [VCR] button and then [ ] button.If not, DVD plays again and video continues to copy.DV6T812N-LT(GB) 02.8.5 9:24 PM ˘`25](https://usermanual.wiki/WINIA-Electronics/7NF0010/User-Guide-263222-Page-26.png)
![26Memorizing TV ChannelsPress [SETUP] button.Press [ ] button to move into CHANNELSET, and then select CHANNEL SET with [ENTER]button. ■Set TV to Ch 3. ■Prior to the setting, press [VCR] button of your REMOTE to change into VCR mode.Select “AUTO CHANNEL SEARCH”. Press [ENTER] button in CHANNEL SET windowto select AUTO CHANNEL SEARCH. Select “Detect Automatically”. Press [ENTER] button in AUTO CHANNELSEARCH window to detect the channelautomatically.Channel number changes successively from 01 to125, while only broadcasting channels arememorized automatically. When memory processis completed, the lowest number’s one ofmemorized channels is displayed.Please, check the memorized channels.To check the memorized channels, press [PR+/-] button on remote control. 112233To Memorize Automatically ChannelsSETUPCLOCK SETTIMER RECORDINGSCHANNEL SETFUNCTIONSLANGUAGE SELECTAUTO CHANNEL SEARCHWhat type of signal are you using?Cable TVAntennaDetect AutomaticallyAUTO CHANNEL SEARCHNow scanning channel 11Move: Select:End: SETUP ENTERMove: Select:End: SETUP ENTEREnd: SETUPCHANNEL SETAuto Channel SearchAdd/Remove ChannelsSignal Type: CABLECable Box SetupChannel Change: CH3Move: Select:End: SETUP ENTERDV6T812N-LT(GB) 02.8.5 9:24 PM ˘`26](https://usermanual.wiki/WINIA-Electronics/7NF0010/User-Guide-263222-Page-27.png)
![27VCR OperationTo Delete Channels Manually After memorizing automatically channels, when the same broadcasting is memorized in more than two channels,or you want to delete badly displayed channels, follow the procedures below.Press [SETUP] button and select “CHANNEL SET”.Select “Add/Remove Channels”. 11Select the desired channel and delete it.Press [NUMBER] button of remote control to selectthe desired channel to delete. When [CLEAR] button is pressed, “ADDED” underthe channel number converts into “REMOVED”. 22Check the deleted channel.To check the deleted channel, press [PR+/-] button on remote control. 33ADD/REMOVE CHANNELSChannel 02is now REMOVED.Add:Input: End: SETUPTo Memorize Channels Manually When the desired broadcasting finished or you want to add unmemorized channels owing to poor signals to thememory, follow the procedures below.Press [SETUP] button and select “CHANNEL SET”.Select “Add/Remove Channels”. Move into “Add/Remove Channels” with[ ] button and then, select the desired item with[ENTER] button.1122Select the desired channel and memorizeit. Press [NUMBER] button of remote control to selectthe desired channel to memorize. When [>] button is pressed, “REMOVED” underchannel number converts into “ADDED”.33Check the memorized channel.To check the memorized channel, press [PR+/-] button on remote control. 44CHANNEL SETAuto Channel SearchAdd/Remove ChannelsSignal Type: CABLECable Box SetupChannel Change: CH3Move: Select:End: SETUP ENTERADD/REMOVE CHANNELSChannel 02is now ADDED.Remove:Input: End: SETUPMemorizing TV ChannelsDV6T812N-LT(GB) 02.8.5 9:24 PM ˘`27](https://usermanual.wiki/WINIA-Electronics/7NF0010/User-Guide-263222-Page-28.png)
![28Selecting cable or antenna viewingYou must set the viewing mode for your VCR, choosingeither CABLE (cable system connection) or ANTENNA(antenna connection). To set the viewing mode:Press [ENTER] to toggle the setting between CABLE andANTENNA in CHANNEL SET screen. When the desired viewing mode is displayed, press[SETUP] twice to exit.CHANNEL SETAuto Channel SearchAdd/Remove ChannelsSignal Type: CABLECable Box SetupChannel Change: CH3Move: Select:End: SETUP ENTERMemorizing TV ChannelsTo Set Cable BoxTo Set Output Channel Press [SETUP] button and select “CHANNELSET” .Select “Channel Change”. By pressing [ENTER] button, set the exclusive channel forvideo on the desired one of CH3 or CH4.Press [SETUP] button and select “CHANNEL SET”.Select “Cable Box Setup”. Move into Cable box setup with [ ]button and then, select the desired item with[ENTER] button. 1122Select “Cable Box Channel”. Press the channel number which matches to theoutput of the Cable Box to connect between CableBox and this unit.33CABLE BOX SETUPOn what channel do youwant to receive fromthe cable box?- -CHANNEL SETAuto Channel SearchAdd/Remove ChannelsSignal Type: CABLECable Box SetupChannel Change: CH3Move: Select:End: SETUP ENTERCHANNEL SETAuto Channel SearchAdd/Remove ChannelsSignal Type: CABLECable Box SetupChannel Change: CH3Move: Select:End: SETUP ENTERInput:Video: End: SETUPOUTPUTDV6T812N-LT(GB) 02.8.5 9:24 PM ˘`28](https://usermanual.wiki/WINIA-Electronics/7NF0010/User-Guide-263222-Page-29.png)
![29VCR OperationTimer RecordingsTIMER RECORDINGSPress [SETUP] button and select “TIMERRECORDINGS”.Move into “TIMER RECORDINGS” with[ ] and then, select the desired one with[ENTER] button.Select “Make a New Program”. Press [ENTER] button to select “Make a newProgram”. 1122Select “Timer Recording method”. Move into desired recording type with [ ]and then, select the desired one with [ENTER]button. For Timer Recording method details, see “VariousTIMER REC” in the next page. 33Select “a broadcasting to record”.Select the desired broadcasting channel with[NUMBER] buttons. **If Converter Box and video are connected toVideo/Audio terminal, set “EXTERNAL INPUT”on TIMER REC CH by using “OUTPUT” button. 44Set “the date and time to record”. Select the date, start time and end time to recordwith [NUMBER] buttons.55■Power on TV.■Make sure that current time is set correctly. ■Insert a recordable tape with recording tab. ■Prior to the setting, press [VCR] button to change to VCR mode. When moves into “Cable”, select one of “Cable”/”Antenna” with [ ] or[ ] button. SETUPCLOCK SETTIMER RECORDINGSCHANNEL SETFUNCTIONSLANGUAGE SELECTTIMER RECORDINGSMake a New ProgramReview/Cancel ProgramsPROGRAM1 (ONE TIME)How often do you wantto record program?One TimeDaily (Sun-Sat)Weekdays (Mon-Fri)Weekly (Once a Week)Channel 0 4 CableStart Date - - / - - Start Time - - : - - AMEnd Time - - : - - AMTape Speed SPPROGRAM1 (ONE TIME)Channel 104 CableStart Date - - / - - Start Time - - : - - AMEnd Time - - : - - AMTape Speed SPMove: Select:End: SETUP ENTERMove: Select:End: SETUP ENTERMove: Select:End: SETUP ENTERMove: Input:Video: End: SETUPOUTPUTMove: Input:Video: End: SETUPOUTPUTDV6T812N-LT(GB) 02.8.5 9:24 PM ˘`29](https://usermanual.wiki/WINIA-Electronics/7NF0010/User-Guide-263222-Page-30.png)
![30Set proper “RECORDING SPEED”. Select one of SP/SLP with [ ] or [ ] button. For more information on recording speed, see“Types of Recording Speed” in the page 39. 66Press [SETUP] button to complete thesetting. “Program # has been saved. For programrecording, insert a cassette....” message isdisplayed. TIMER RECORDINGS indicator, is displayed inthe operation display window. On the reserved time, TIMER RECORDINGS startsto operate.77To Confirm or Cancel TIMER RECORDINGSSelect “Review/Cancel Programs”. 11Confirm reservation-recording details in turn with[ ] button and then, press [CLEAR] button onthe position of the detail(s) to delete. 22PROGRAM1 (ONE TIME)Channel 104 CableStart Date 06 / 04 Start Time 10 : 10 AMEnd Time 11 : 10 AMTape Speed SPPROGRAM1 (ONE TIME)Channel 104 CableStart Date 06 / 04 Start Time 10 : 10 AMEnd Time 11 : 10 AMTape Speed SPPROGRAM 1 (ONE TIME)Channel 104 CableStart Date 06 / 04 Start Time 10 : 10 AMEnd Time 11 : 10 AMTape Speed SPPROGRAM 1 has been saved.For program recording,insert a cassette.To leave your cable boxon and tuned to presetchannel.TIMER RECORDINGSMake a New ProgramReview/Cancel ProgramsMove: Input:Video: End: SETUPOUTPUTMove: Input:Video: End: SETUPOUTPUTMove: Select:End: SETUP ENTERCancel: Move:End: SETUPCLEARIf a recordabletape is notinserted in Stop modeunder Power ON,“Waiting for TIMERRECORDINGS. Insert arecordable tape”message is displayed inthe center of screen, forall changes or outputconversions incurredduring TIMERRECORDINGS SET. Timer RecordingsDV6T812N-LT(GB) 02.8.5 9:24 PM ˘`30](https://usermanual.wiki/WINIA-Electronics/7NF0010/User-Guide-263222-Page-31.png)
![31VCR OperationUsing video cassettesBefore you play or record on a video cassette tape, be certain to read this information on the proper care and use ofvideo cassettes.Only use video cassettes that bear the VHS mark: .There are four types of video cassettes: T-60, T-90, T-120, and T-160. The amount you can record on a tape isdependent upon the tape speed at which you record. The table below lists the recording time(hours:minutes) for eachtape type according to recording speed.Tape Type SP Mode (Standard Play) EP Mode (Extended Play) T-60 1:00 3:00T-90 1:30 4:30T-120 2:00 6:00T-160 2:40 8:00Protecting video cassettes from accidental erasureCassettes have a safety tab to prevent erasure. Break off the safety tab with a screw driver. If you wish torecord on a cassette without a safety tab, cover the hole with cellophane tape. Inserting video cassettesFirmly insert the cassette into the cassette compartment with the label up. An inverted cassette cannot be inserted. Removing video cassettesPress [EJECT] on the front panel and the VCR will eject the tape. Pull the cassette out gently.• Audio-visual material may include works of copyright which must not be recorded without authorization of the copyrightowner.•If you insert a video cassette without a safety tab into the unit : After setting the timer recording program, “ ” will blinkon the display panel in the power off mode and the unit will automatically eject the cassette. In the power on mode, theunit will playback automatically.•If you insert a video cassette with a safety tab into the unit : After setting the timer recording program,the unit will bestand-by mode in power off mode.• Do not attempt to pull out the video cassette once the unit begins to load the video cassette. • Do not insert fingers or any foreign object beyond the door flaps of the cassette compartment; this could lead to injury orequipment damage.• Do not attempt to insert a video cassette if the unit in unplugged. Various TIMER RECORDINGSOne Time : It is available of TIMER RECORDINGS at the desired specified time. Daily : Once you set TIMER RECORDINGS of the desired program telecasted at the same time day after day, it isavailable of daily recordings. It is available of TIMER RECORDINGS from Sunday to Saturday. Weekday : It is similar to Daily TIMER RECORDINGS, but this TIMER RECORDINGS is available from Monday toFriday. Weekly : Once you select one day of the week, it is available of TIMER RECORDINGS in the same day weekly. Timer RecordingsDV6T812N-LT(GB) 02.8.5 9:24 PM ˘`31](https://usermanual.wiki/WINIA-Electronics/7NF0010/User-Guide-263222-Page-32.png)
![32Watching and Recording Cable TVTo Watch and Record Promptly Cable TVPower on converter and then, set a channel to watch or to record. Power on DVD-video and then, set the channel of DVD-video to theconverter-connected channel (one of CH03/04/EXTERNAL INPUT). Power on TV and then, set the video-connected channel (one ofCH03/04/VCR). Simultaneous Recording and Watching At this time, CH selected by the converter is displayed on TV screen.Simultaneously, press [REC] button of DVD-Video to record the CH selected by theconverter, and press [REC] button more than two times to set on One Touch timerRecording (OTR).1122TIMER RECORDINGS of Cable TV Reserve VCR. According to TIMER REC procedures, select TIMER RECORDINGS SET window andcomplete the settings. At this time, the video channel should be input in CH3 (orCH4, EXTERNAL INPUT) of the converter-connected channel. Enter date and timeof the cable program for TIMER RECORDINGS.Adjust Converter. Set converter to the cable TV channel to record. e.g.) To record CH48, Display CH48 with CONVERTER CHANNEL SELECT button. If there is TIMER REC function of converter, it is available of reservation. Complete Reservation. If you power on converter, video powers on automatically and starts recording at thereserved time. **Home watching cable TV is unavailable of simultaneous recording function (whilerecording NBC program, watching CNN program). (Owing to mechanical featuresof converter, it is unavailable of simultaneous reception of two channels.)112233DV6T812N-LT(GB) 02.8.5 9:24 PM ˘`32](https://usermanual.wiki/WINIA-Electronics/7NF0010/User-Guide-263222-Page-33.png)
![33VCR OperationUsing advanced featuresPlay the tape automaticallyThis feature allows the VCR to automatically start playing when you insert a tape with the safety tab removed.Press [SETUP] button and select“FUNCTIONS”.Move into “FUNCTIONS” with [ ] andthen, select the desired one with [ENTER] button.Press [ENTER] to switch between ONand OFF.- Select ON if you want a tape with its safetytab removed to start playing automaticallywhen the tape is inserted.- Select OFF if you do not want a tape with itssafety tab removed to start playingautomatically. 1122SETUPCLOCK SETTIMER RECORDINGSCHANNEL SETFUNCTIONSLANGUAGE SELECTFUNCTIONSAuto Play: ONAuto TV/VCR: ONIndex SearchGo-To SearchMove: Select:End: SETUP ENTERMove: Select:End: SETUP ENTERSwitch the VCR to TV or VCR mode automaticallyThis feature controls whether the TV/VCR switch changes automatically to the VCR mode when the VCR is turned on.Press [SETUP] button and select “FUNCTIONS”.Move into “FUNCTIONS” with [ ] and then, select the desired one with[ENTER] button.Press [ENTER] to switch between ONand OFF.- Select ON if you want the VCR to switch tothe VCR mode when the VCR is turned on ora cassette is inserted. This only applies if youconnect the ANT.IN and RF OUT jacks ofyour VCR and TV and watch your VCR onchannel 3 of your TV.- Select OFF if you want the VCR to remain inthe TV mode. This is useful if you watch yourVCR on the TV’s video input and you don’twant your antenna/cable signal interrupted bythe VCR. 2211FUNCTIONSAuto Play: ONAuto TV/VCR: ONIndex SearchGo-To SearchMove: Select:End: SETUP ENTERDV6T812N-LT(GB) 02.8.5 9:24 PM ˘`33](https://usermanual.wiki/WINIA-Electronics/7NF0010/User-Guide-263222-Page-34.png)
![34Press [SETUP] button and select “FUNCTIONS”.11Select “Index Search”.22■When you record a programs, the VCR places an index mark at the start of the recording.To search for an index mark: FUNCTIONSAuto Play: ONAuto TV/VCR: ONIndex SearchGo-To SearchMove: Select:End: SETUP ENTERIf you want to search through a certain number ofindex marks, press two number buttons to enterthe number of marks you want to search. PressCLEAR on the remote to correct an entry.orPress REW to search backward or FF to searchforward. The VCR will locate your index mark andbegin playback. If you did not enter a specificindex number, the VCR will locate the next indexmark and begin playback. Press STOP to stopindex searching. 33INDEX SEARCHPress REW or FFto begin searchingorEnter a specificindex number- -End: SETUP• If tworecordingsoverlap, the indexmark for the secondprogram will beerased. Therefore,when you use theindex feature to findthe second program,the VCR will skipover it. • If you recordmultiple programs inone recordingsession, the VCR willonly find the indexmark that was placedon the video cassettetape when therecording sessionbegan.Searching a cassette tape for programs (indexing)Press [SETUP] button and select “FUNCTIONS”.11Select “Go-To Search”.22■You can mark a segment of the video cassette with the tape counter that will help youeasily locate the segment later. FUNCTIONSAuto Play: ONAuto TV/VCR: ONIndex SearchGo-To SearchMove: Select:End: SETUP ENTERThe tape counter is displayed on the screen. Inputthe tape counter you want to go and press REW orFF, the VCR will search for the time counter youwant.33GO-TO SEARCHCurrent tape counter is2 : 17 : 18Press REW or FFto go to - : - - : 00End: SETUPSome indexmarks that maybe missed by the VCR :• A mark too close toyour location on thetape.• The mark at thebeginning of arecorded segment offive minutes or less.• The first index markon the tape when youstart at the beginning ofthe tape.Searching with the tape counter (go- to search)Using advanced featuresDV6T812N-LT(GB) 02.8.5 9:24 PM ˘`34](https://usermanual.wiki/WINIA-Electronics/7NF0010/User-Guide-263222-Page-35.png)
![35VCR Operation11Use PLAY, REW,or FF to reach the point on the tape that you would like to mark as0:00:00.22Press [DISPLAY] button to display the tape counter on the screen.33Press [CLEAR] button to reset the tape counter to 0:00:00.44You can continue to play the tape or perform other functions with the VCR.Marking a tape for zero searchDisplay (O.S.D)11Press [DISPLAY] button to display the tape counter, clock and status mode on the TVscreen..22And, by one more pressing [DISPLAY] button before disappearing the OSD from thescreen, only the tape counter will remain on the screen.Press [SETUP] button and select “CLOCK SET”.Move into “Auto DST” with [ ] .11Press [ENTER] to switch between ONand OFF.- Select ON if you want the VCR’s clock toautomatically adjust for daylight-saving time. - Select OFF if you do not want the VCR’sclock to adjust for daylight-saving time. 22SPRING Forward ; Fall Backward In the Spring, daylight-saving time begins on the first Sunday in April. Because the clockautomatically changes from 2:00 AM to 3:00 AM (forward one hour), remember to include the extrahour for timer recording falling within this time frame. In the Autumn, daylight-saving time ends on the last Sunday in October. The VCR clock automatically changes from 2:00 AM to 1:00 AM (back one hour). Therefore, it canaffect your recording length.Daylight-Saving TimeCLOCK SETTime and Date SetAuto DST : ONMove: Select:End: SETUP ENTERUsing advanced featuresDV6T812N-LT(GB) 02.8.5 9:24 PM ˘`35](https://usermanual.wiki/WINIA-Electronics/7NF0010/User-Guide-263222-Page-36.png)
![36Changing the on-screen menu languagePress [SETUP] button and select“LANGUAGE SELECT”.11Select the language among English,Spanish or French by pressing [ENTER]button.22You may select the language in which you would like the VCR’s menu to be displayed: English, Spanish, or French.LANGUAGE SELECTSelect a language.EnglishSpanishFrenchMove: Select:End: SETUP ENTERSETUPCLOCK SETTIMER RECORDINGSCHANNEL SETFUNCTIONSLANGUAGE SELECTMove: Select:End: SETUP ENTERUsing advanced featuresDV6T812N-LT(GB) 02.8.5 9:24 PM ˘`36](https://usermanual.wiki/WINIA-Electronics/7NF0010/User-Guide-263222-Page-37.png)
![37VCR OperationHi-Fi Stereo PlaybackPlaying a tape in Hi-Fi high-quality• “Hi-Fi” signal lights up in the top of a screen.• Pressing [AUDIO] button changes menus one by one.If there are some noises made in recording, please “Linear” to reduce them.Forced MonoRecording Stereo or Secondary Audio Programs (SAP)• In some cases, while receiving a stereo or SAP (Secondary Audio Programs), receiving condition may be poor,which may cause the stereo or SAP broadcasting to be interfered frequently or its volume to be uncontrollable. Justpressing [AUDIO] in stereo or SAP forces to fix the condition into mono sound.• To return it, you have two choices, pressing [AUDIO] button again or picking up the channel again.Recording Stereo Broadcast• Stereo : It separates sounds into dual signals and transfers them in order to achieve presence in a broadcastingstation.Hi-Fi LINEAR MIXSTEREO MONO SAP• Programs are broadcast in mono or stereo audio, or with a SAP.• Pressing [AUDIO] button changes STEREO, MONO, SAP one by one.• While recording in stereo signal, it is recorded in Hi-Fi.• SAP is available only in its service areas from stations.• The following guidelines will help you decide on the best method for recording programs. Choose:- Stereo reception for normal recording and to record broadcast stereo television.- Mono reception if the stereo signal is weak and sound is too “ noisy.”- SAP reception to record a second audio program. An example of a SAP is a program that is broadcast in English, but has aSpanish SAP.•You can only record stereo and SAPs if the program is a broadcast in stereo or with a SAP. Consult a television guide forprogram broadcast information.DV6T812N-LT(GB) 02.8.5 9:24 PM ˘`37](https://usermanual.wiki/WINIA-Electronics/7NF0010/User-Guide-263222-Page-38.png)
![38Playing a desired sceneTo skip scenes in a discTo move to next chapter (or track), press [ NEXT] button.The current chapter (or track) moves to the next chapter (or track).Press [ PREV] button. The current scene moves to the previous chapter (or track) or first scene of current chapter (ortrack).Directly moving to a desired title (DVD)Press the [TITLE] button.A list of the titles on the disc is displayed.Pressing the [TITLE] button again to resume playfrom the scene when the [TITLE] button wasfirst pressed.11Press the [ENTER] button or [PLAY] buttonafter pressing the [ ] button toselect the desired title.The selected title now starts playing.22Some movie discs may contain multiple titles. If the disc has a movie title menu recorded on it, the [TITLE] buttoncan be used to select the movie title. Details of operation may differ depending on the disc used.* Selecting a title may not be available on certain DVD discs.DV6T812N-LT(GB) 02.8.5 9:24 PM ˘`38](https://usermanual.wiki/WINIA-Electronics/7NF0010/User-Guide-263222-Page-39.png)
![39DVD OperationPlaying a programmed orderWhile STOP, press [PROGRAM] button.While the right figure is appearing, please inputdesired Title(T) and Chapter(C) number withNUMBER buttons.* In case of VCD and CD, please input TRACK Number.11After completing setting, press [ENTER]button after moving a cursor to “PlayProgram”.Then, titles and chapters (track) are played in theabove-programmed order.* To exit from Program mode, press the STOP button.22■Available only in STOP.Mode1 DVDProgramTitle - - Chapter --T C T C T C T C1 - - - - 4 - - - - 7 - - - - 10 - - - -2 - - - - 5 - - - - 8 - - - - 11 - - - -3 - - - - 6 - - - - 9 - - - - 12 - - - -Clear ALL Play ProgramMode1 DVDProgramTitle - - Chapter --T C T C T C T C1 01 05 4 - - - - 7 - - - - 10 - - - -2 01 08 5 - - - - 8 - - - - 11 - - - -3 01 12 6 - - - - 9 - - - - 12 - - - -Clear ALL Play ProgramRandom PlaybackWhile STOP, press [PROGRAM] button twice.With the right picture appearing, please press [ENTER] button.Regardless of titles or track numbers, it plays in random.* To exit from Shuffle mode, press the STOP button.Mode2 DVDRandomPlaying a desired sceneDV6T812N-LT(GB) 02.8.5 9:24 PM ˘`39](https://usermanual.wiki/WINIA-Electronics/7NF0010/User-Guide-263222-Page-40.png)
![40Repeating a defined period from A to B (DVD, VCD, CD)You may repeat a defined period from A to B.A MP3 disc maynot be repeated from Ato B.At the point where you want to start therepeat playback, press [REPEAT] button.The right figure appears and repeat playback startposition (A) is set.11REPEAT A-At the point where you want to end therepeat playback, press [REPEAT] buttonagain.The repeat playback end position (B) is set and adefined period from A to B is playback repeatedly.22To exit from repeat playback mode, press[REPEAT] button. It enters into Normal Playback mode.33REPEAT A-BREPEAT OFFSearching DVD with a title number, a chapter number or a timeIf you want to search with a title andchapter number, press [SEARCH] buttonone time.It shows total title numbers , chapter numbers andtimes.Please enter the new title and chapter number to besearched using the [NUMBER] buttons.11In completing entering, please press[ENTER] button.PLAY starts from the selected position.33TITLE - - - CHAPTER - - -TIME - - : - - : - -If you want to search with a time, press[SEARCH] button twice.Please enter the new time to be searched using the[NUMBER] buttons.222:00:181-2TT1-8CC2:00:181-2TT1-8CCPlaying a desired sceneDV6T812N-LT(GB) 02.8.5 9:24 PM ˘`40](https://usermanual.wiki/WINIA-Electronics/7NF0010/User-Guide-263222-Page-41.png)
![41DVD OperationSearching VCD and CD with a track number or timeIf you want to search with a tracknumber, press [SEARCH] button onetime. In case of PBC OFF, the screen like the right figureappears.Please enter the new track numbers to be searchedusing the [NUMBER] button.* If it is PBC ON, above search screen doesn’t appear.11In completing entering, please press[ENTER].PLAY starts from the selected position.33TRACK - - -If you want to search with a time, press[SEARCH] button twice. In case of PBC OFF, the screen like the right figureappears.It shows current track’s time and the whole disc’shours.Please enter the new time to be searched using the[NUMBER] button.* If it is PBC OFF, only the track’s time appears.22TRACK TIME - - -DISK TIME - - -LR OFFVCD00:45/30:351-2TTLR OFFVCD00:45/30:351-2TTPlaying a desired sceneDV6T812N-LT(GB) 02.8.5 9:24 PM ˘`41](https://usermanual.wiki/WINIA-Electronics/7NF0010/User-Guide-263222-Page-42.png)
![42Confirming the current PLAY mode on screenConfirming the current DVD disc modeConfirming the current VCD, CD disc modeWhile in playing, press [DISPLAY]button.It shows the disc type, current title, current chapterand time elapsed.11Press [DISPLAY] button again.It shows the DVD disc logo, subtitle selected, audioselected, dolby digital logo, repeat playback modeand current angle.22While in playing, press [DISPLAY]button.It shows the disc logo, current track, subtitle selected,audio selected, repeat playback mode, time elapsedand equalizer bar.* In case of CD,subtitle and equalizer bar indicator will notappear.11To exit from Display mode, press[DISPLAY] button again.22To exit from Display mode, press[DISPLAY] button again.33DIENG2CH/3 OFFENG/3 1/1LR OFF12:00:181-2TT1-8CCVCD00:45/30:351-2TTDV6T812N-LT(GB) 02.8.5 9:24 PM ˘`42](https://usermanual.wiki/WINIA-Electronics/7NF0010/User-Guide-263222-Page-43.png)
![43DVD OperationConfirming the current MP3 disc modeConfirming the current PLAY mode on screenWhile in playing, press [DISPLAY]button.It shows the MP3 File information in disc, thedirectory, MP3 File name and directory list.With [ ] buttons, you can move thecursor to directory or number of MP3 Music File. Togo to desired directory or to playback MP3 File, press[ENTER] key.* The information of MP3 File means the disc type, currenttrack, the amount of MP3 File, repeat playback mode,time elapsed and equalizer bar.11At the desired directory position, press[ENTER] button.It shows the track list.22To exit from Display mode, press[DISPLAY] button again.3300:45/30:351/517 128KTTOFFDIR_1DIR_3DIR_4DIR_5DIR_200:45/30:351/517 128KTTOFF...TRACK_3TRACK_4TRACK_1\ - - - - - - - - - - - - - - 1.MP3\ - - - - -TRACK_2DV6T812N-LT(GB) 02.8.5 9:24 PM ˘`43](https://usermanual.wiki/WINIA-Electronics/7NF0010/User-Guide-263222-Page-44.png)
![44Selecting an audio languageSelecting an AUDIO language, SUBTITLE language and 3D AUDIOThe user may select an audio language and subtitle language if a disc includes Multi-language.Keep pressing [AUDIO] button till the user’spreferred language appears.If DVD disc includes audio information, every time the userpresses [AUDIO] button, English (ENG), French (FRE),Spanish (SPA) and others appear one by one.Selecting a subtitle languageKeep pressing [SUBTITLE] button till the user’spreferred language appears.If a DVD disc includes subtitle information, every timethe user presses [SUBTITLE] button, English (ENG),French (FRE), Spanish (SPA) and others appear one byone.A certain discmay not support audioselect or subtitle select.DIENG2CH/3 OFFENG/3 1/1DIFRE3CH/3 OFFENG/3 1/1DISPA1CH/3 OFFENG/3 1/1DIENG2CH/3 OFFENG/3 1/1DIENG2CH/3 OFFFRE/3 1/1DIENG2CH/3 OFFSPA/3 1/1Selecting 3D AudioPlease press [3D] button.If the right figure appears, move the cursor with[ ] buttons.The user may select a “Sound fields” among Standard,Theater, Amphitheater, Live, Concert, Church, Wide, Hall orStadium.Also, select a “Graphics equalizer” among Standard, Classic,Rock, Jazz, Pop or User.* When setting graphics equalizer, sound fields changes to“Standard” automatically.■Sound Fields and Graphics Equalizer can be set.This 3Dfunction isoperational onlywhen the AudioOutput is set to theAnalog orSPDIF/PCM.Movie+8dB- 8dBSound fields StandardGraphics equalizer StandardDV6T812N-LT(GB) 02.8.5 9:24 PM ˘`44](https://usermanual.wiki/WINIA-Electronics/7NF0010/User-Guide-263222-Page-45.png)
![45DVD OperationSelecting ZOOM and Multi AngleUsing a zoom functionThe user can enlarge the current screen about 1.3, 1.5 or 2.0 times.Keep pressing [ZOOM] button till thepreferred zoom appears.Every time the user presses [ZOOM] button, a zoommagnification changes 1.3 times (X1.3) 1.5 times (X1.5)2.0 times (X2.0) OFF 1.3 times (X1.3) ...one by one.A base point to be enlarged is centre and the point can bechanged with the operation of [ ] button.Different AngleIf a disc includes multi angle information, the user can watch a screen in multi angles. The function is limited to aDVD disc supporting multi angle information.Keep pressing [ANGLE] button till thepreferred angle appears.Every time the user presses [ANGLE] button, an angle degreeschanges in a consecutive order.When “TVASPECT” item is set to“4:3 PS” in setupscreen, or with certaindiscs, 2 times Zoommay not functionproperly.DIENG2CH/3 OFFENG/3 1/2DIENG2CH/3 OFFENG/3 2/22DV6T812N-LT(GB) 02.8.5 9:24 PM ˘`45](https://usermanual.wiki/WINIA-Electronics/7NF0010/User-Guide-263222-Page-46.png)
![46Memorising a scene, Displaying menus in a discTo display menus in a discIf a disc includes menus, the user may use them.Press [MENU] button. • In case of a DVD disc, it shows menus in the disc. Also they are differentaccording to discs• If it is a VCD2.0, select PBC ON mode by pressing [TITLE/PBC] button.* CD and VCD1.1 do not support the function.11If it is a DVD disc, move a cursor to a relative item with arrow buttons of[ ] button and select one with [ENTER] button or [PLAY] button.If it is a VCD 2.0 disc, it shows menus in the disc by pressing [ENTER] button.22To memorise a sceneOnce memorising a scene, the user may watch it anytime.While playing, press [MARK] button.The right figure appears.Then press [ENTER] button and the current scene ismemorised in “A”.11If you want to memorise anotherpreferred scene, press [>] button.The right figure appears.Then press [ENTER] button and the current scene ismemorized in “B”.** The user may memorise “C” continuously with the samemethod.22To playback a memorised scene, press[MARK] button.Memorised bookmark appears on screen.33“BOOKMARK”function during thedisc playback of SVCDor VCD2.0 is onlyavailable in “PBC OFF”mode. Select “PBCOFF” mode bypressing [TITLE/PBC]button.2:00:181-2TT1-8CCBookmarkA --:--:-- B --:--:-- C --:--:--2:00:181-2TT1-8CCBookmarkA 01:30:10 B --:--:-- C --:--:--2:00:181-2TT1-8CCBookmarkA 01:30:10 B 01:40:00 C --:--:--DV6T812N-LT(GB) 02.8.5 9:24 PM ˘`46](https://usermanual.wiki/WINIA-Electronics/7NF0010/User-Guide-263222-Page-47.png)
![47DVD Operation Setup47LANGUAGE Setup■Before setting it, you should change into DVD mode by pressing [DVD] button on remotecontrol.While STOP or RESUME STOP, press[SETUP] button.11Selecting a OSD LANGUAGE.Please select a language to be displayed on DVDscreen.** “OSD” means “On Screen Display”.22Selecting AUDIO LANGUAGE.Set it as the preferred audio language. In case theaudio language is set and recorded in the DISC, itis automatically played in the set language inevery playing. For example, English is set andrecorded as audio language in the DISC, it isplayed in English. 33Selecting SUBTITLE LANGUAGE.Please set it as the preferred language. In case thesubtitle language is set and recorded in the DISC, itis automatically played in the set language inevery playing. For example, English is set andrecorded as subtitle language in the DISC, it isplayed in English.44Selecting DISC MENU LANGUAGE.Please set it as the preferred DISC MENUlanguage. In case the DISC MENU language is setand recorded in the DISC, it is automaticallyplayed in the set language in every playing. Forexample, English is set and recorded as a DISCMENU language in the DISC, it is played inEnglish.55A user can set OSD language, Audio, Subtitle and Disc Menu.In case a discdoes not includesetting languagesinformation, theselected language doesnot appear.MOVE: SELECT:ENTER EXIT:SETUPVIDEO AUDIO OTHERSOSD LANGUAGE ENGLISHAUDIO ENGLISHSUBTITLE ENGLISHDISC MENU ENGLISHLANGUAGEMOVE: SELECT:ENTER EXIT:SETUPVIDEO AUDIO OTHERSOSD LANGUAGEAUDIOSUBTITLEDISC MENULLAANNGGUUAAGGEE✔ENGLISHFRENCHSPANISHPORTUGUESEMOVE: SELECT:ENTER EXIT:SETUPVIDEO AUDIO OTHERSOSD LANGUAGE ENGLISHAUDIOSUBTITLEDISC MENULLAANNGGUUAAGGEE✔ENGLISHFRENCHSPANISHPORTUGUESECHINESEJAPANESEMOVE: SELECT:ENTER EXIT:SETUPVIDEO AUDIO OTHERSOSD LANGUAGE ENGLISHAUDIO ENGLISHSUBTITLEDISC MENULLAANNGGUUAAGGEE✔ENGLISHFRENCHSPANISHPORTUGUESECHINESEJAPANESEMOVE: SELECT:ENTER EXIT:SETUPVIDEO AUDIO OTHERSOSD LANGUAGE ENGLISHAUDIO ENGLISHSUBTITLE ENGLISHDISC MENULLAANNGGUUAAGGEE✔ENGLISHFRENCHSPANISHPORTUGUESECHINESEJAPANESEDV6T812N-LT(GB) 02.8.5 9:24 PM ˘`47](https://usermanual.wiki/WINIA-Electronics/7NF0010/User-Guide-263222-Page-48.png)
![48VIDEO Setup■Before setting it, you should change into DVD mode by pressing [DVD] button on remotecontrol.While STOP or RESUME STOP, press[SETUP] button.Selecting TV ASPECT.If a user selects “4:3 PS”, the user can watch only acenter of the original scene of “16:9”.If a user selects “4:3 LB”, the user can watch theoriginal scene of “16:9”, but the top and bottom ofthe screen look black color.If a disc size is originally recorded in 4:3, a usercannot watch it in a wide screen though a user setsa size as “16:9 WIDE”.2211Selecting TV TYPE.A user may select a TV TYPE.A user may select a type among NTSC, PAL orAUTO. For example, NTSC type is used in NorthAmerica.33A user can set up a connected TV condition and screen. Selecting VIDEO OUT.A user may select a VIDEO OUT betweenCOMPONENT and S-VIDEO.44MOVE: SELECT:ENTER EXIT:SETUPAUDIO OTHERSTV ASPECT 4:3 LBTV TYPE NTSCVIDEO OUT S-VIDEOLANGUAGE VIDEOMOVE: SELECT:ENTER EXIT:SETUPVVIIDDEEOOAUDIO OTHERSTV ASPECT 4:3 LBTV TYPE NTSCVIDEO OUT S-VIDEOLANGUAGE✔4:3 LB4:3 PS16:9 WIDEMOVE: SELECT:ENTER EXIT:SETUPVVIIDDEEOOAUDIO OTHERSTV ASPECT 4:3 LBTV TYPE NTSCVIDEO OUT S-VIDEOLANGUAGEAUTO✔NTSCPALMOVE: SELECT:ENTER EXIT:SETUPVVIIDDEEOOAUDIO OTHERSTV ASPECT 4:3 LBTV TYPE NTSCVIDEO OUT S-VIDEOLANGUAGECOMPONENT✔S-VIDEODV6T812N-LT(GB) 02.8.5 9:24 PM ˘`48](https://usermanual.wiki/WINIA-Electronics/7NF0010/User-Guide-263222-Page-49.png)
![49SetupAUDIO Setup■Before setting it, you should change status into DVD by pressing [DVD] button on theremote control.Select a DIGITAL OUTPUT.You can set following 2 values of digital output;•BITSTREAM: The same signal as audio signalrecorded in disc goes to digital audio outputterminal.•LPCM: Decoded audio signal goes to digitaloutput terminal.22Select a Front L/R Speaker Type.Set ...33A user may select audio menu according to a user’s speaker set.While STOP or Resume STOP, press[SETUP] button.11MOVE: SELECT:ENTER EXIT:SETUPOTHERSDIGITAL OUTPUT BITSTREAMSPEAKER SETUPFRONT L/R TYPE SMALLLANGUAGE VIDEOMOVE: SELECT:ENTER EXIT:SETUPVIDEO AAUUDDIIOOOTHERSDIGITAL OUTPUT BITSTREAMSPEAKER SETUPFRONT L/R TYPE SMALLLANGUAGE✔BITSTREAMLPCMMOVE: SELECT:ENTER EXIT:SETUPVIDEO AAUUDDIIOOOTHERSDIGITAL OUTPUT BITSTREAMSPEAKER SETUPFRONT L/R TYPE SMALLLANGUAGE✔LARGESMALLAUDIODV6T812N-LT(GB) 02.8.5 9:24 PM ˘`49](https://usermanual.wiki/WINIA-Electronics/7NF0010/User-Guide-263222-Page-50.png)
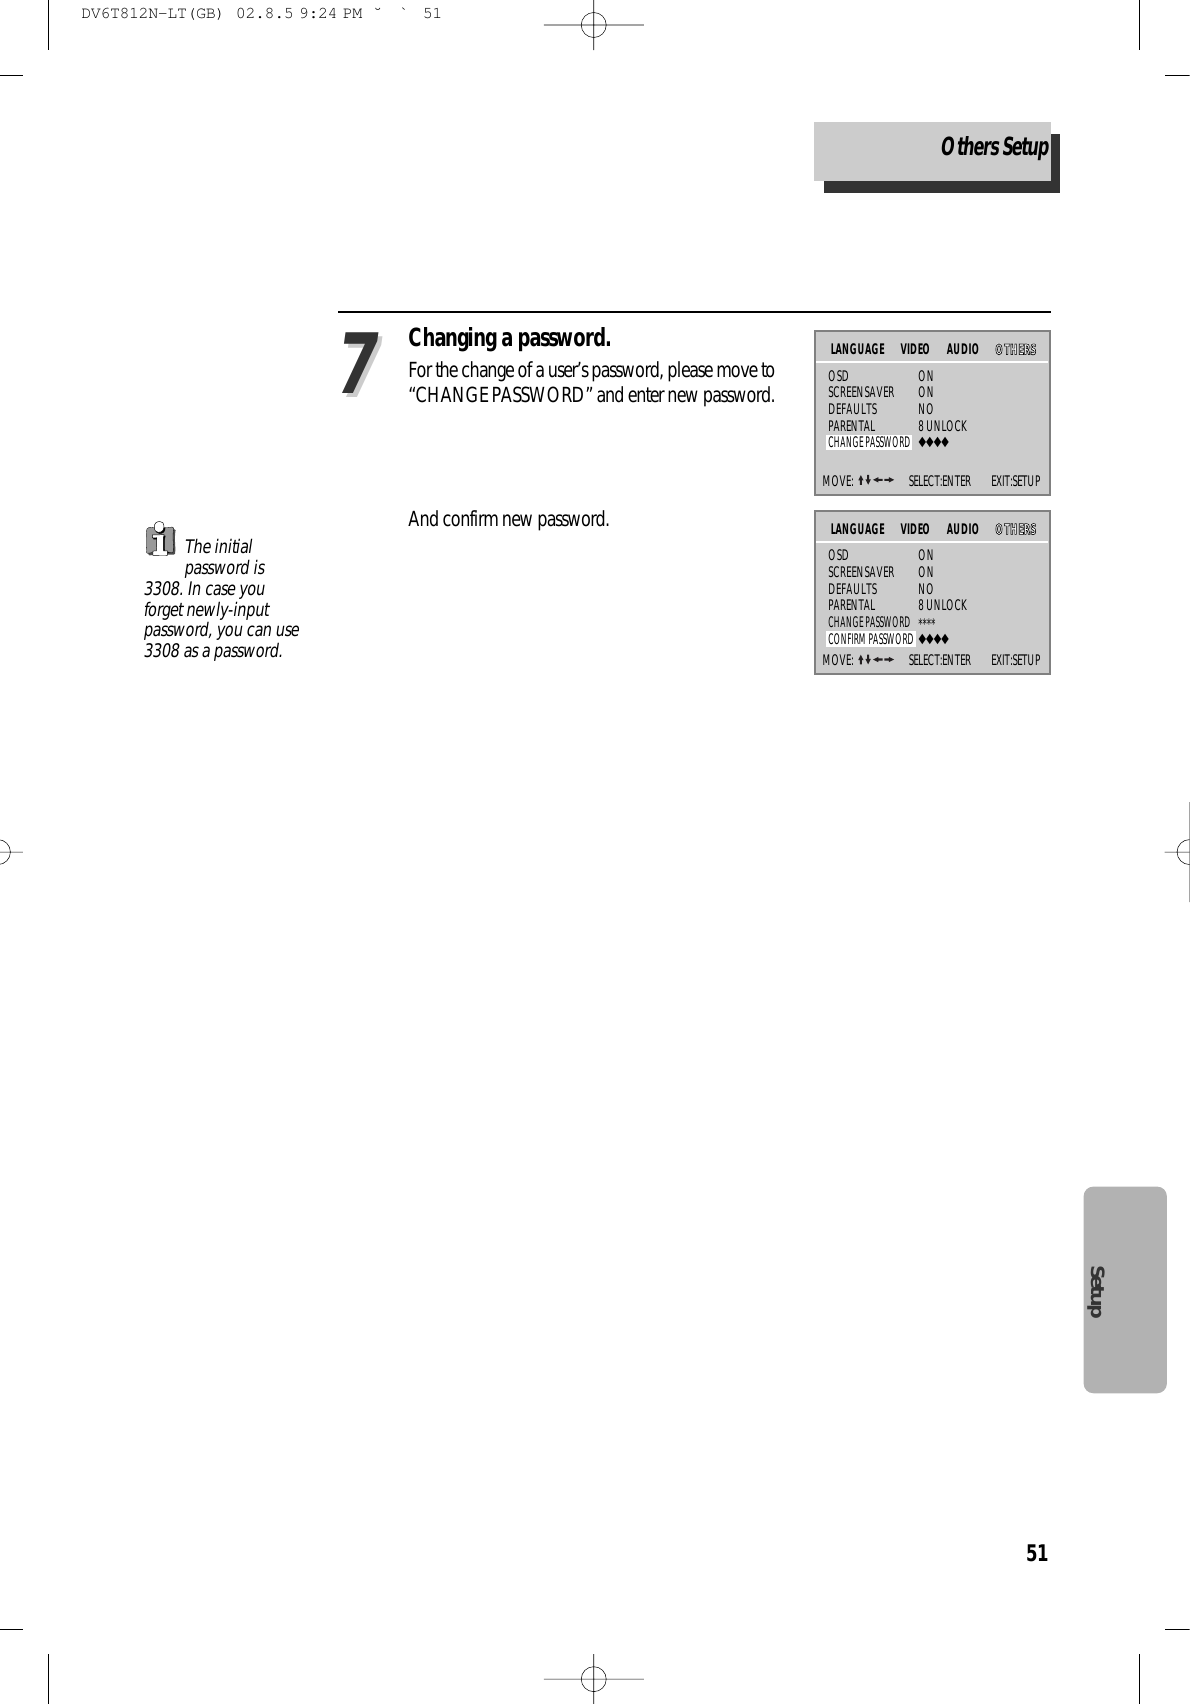
![50Others Setup■Before setting it, you should change into DVD mode by pressing [DVD] button on remotecontrol.Select character display window.Select "ON" to make OSD(On Screen Display)language displayed in screen.22Select screensaver.If bright scenes continue to be displayed in screen,TV can be damaged. Set the screensaver to "ON",the screensaver functions automatically and DVDlogo moves continuously if the resume stop, stop,open status is maintained for about 5 minutes.33Select defaults.If you select defaults, every function set returns toFACTORY Defaults except PARENTAL.44Entering a password.Input password display appears.Enter a user’s password by pressing 4 [Digit] buttons.55Select PARENTAL.Press [ENTER] button to set the selecteditem .It consists of 8 levels of parental control, violence,sexual scene, strong sexual scene and others to protectchildren from watching those scenes.66While STOP or RESUME STOP, press[SETUP] button.11“Parental Lock”activates only ifyou set a password andthe unit goes into Lockstatus. When the dischas no parentalfunction even if thedisc for adult only,Parental Lock doesn’tactivate.MOVE: SELECT:ENTER EXIT:SETUPOSD ONSCREENSAVER ONDEFAULTS NOPARENTAL OFFLANGUAGE VIDEOMOVE: SELECT:ENTER EXIT:SETUPVIDEO AUDIO OOTTHHEERRSSOSD ONSCREENSAVER ONDEFAULTS NOPARENTAL OFFLANGUAGE✔ONOFFMOVE: SELECT:ENTER EXIT:SETUPVIDEO AUDIO OOTTHHEERRSSOSD ONSCREENSAVER ONDEFAULTS NOPARENTAL OFFLANGUAGE✔ONOFFMOVE: SELECT:ENTER EXIT:SETUPVIDEO AUDIO OOTTHHEERRSSOSD ONSCREENSAVER ONDEFAULTS NOPARENTAL OFFLANGUAGE✔NORESETMOVE: SELECT:ENTER EXIT:SETUPVIDEO AUDIO OOTTHHEERRSSOSD ONSCREENSAVER ONDEFAULTS NOINPUT PASSWORD ◆◆◆◆LANGUAGEMOVE: SELECT:ENTER EXIT:SETUPVIDEO AUDIO OOTTHHEERRSSOSD ONSCREENSAVER ONDEFAULTS NOPARENTAL OFFCHANGE PASSWORD◆◆◆◆LANGUAGEAUDIO OTHERS✔OFF1 KIDS2 G3 PG4 PG-135 PG-RDV6T812N-LT(GB) 02.8.5 9:24 PM ˘`50](https://usermanual.wiki/WINIA-Electronics/7NF0010/User-Guide-263222-Page-51.png)

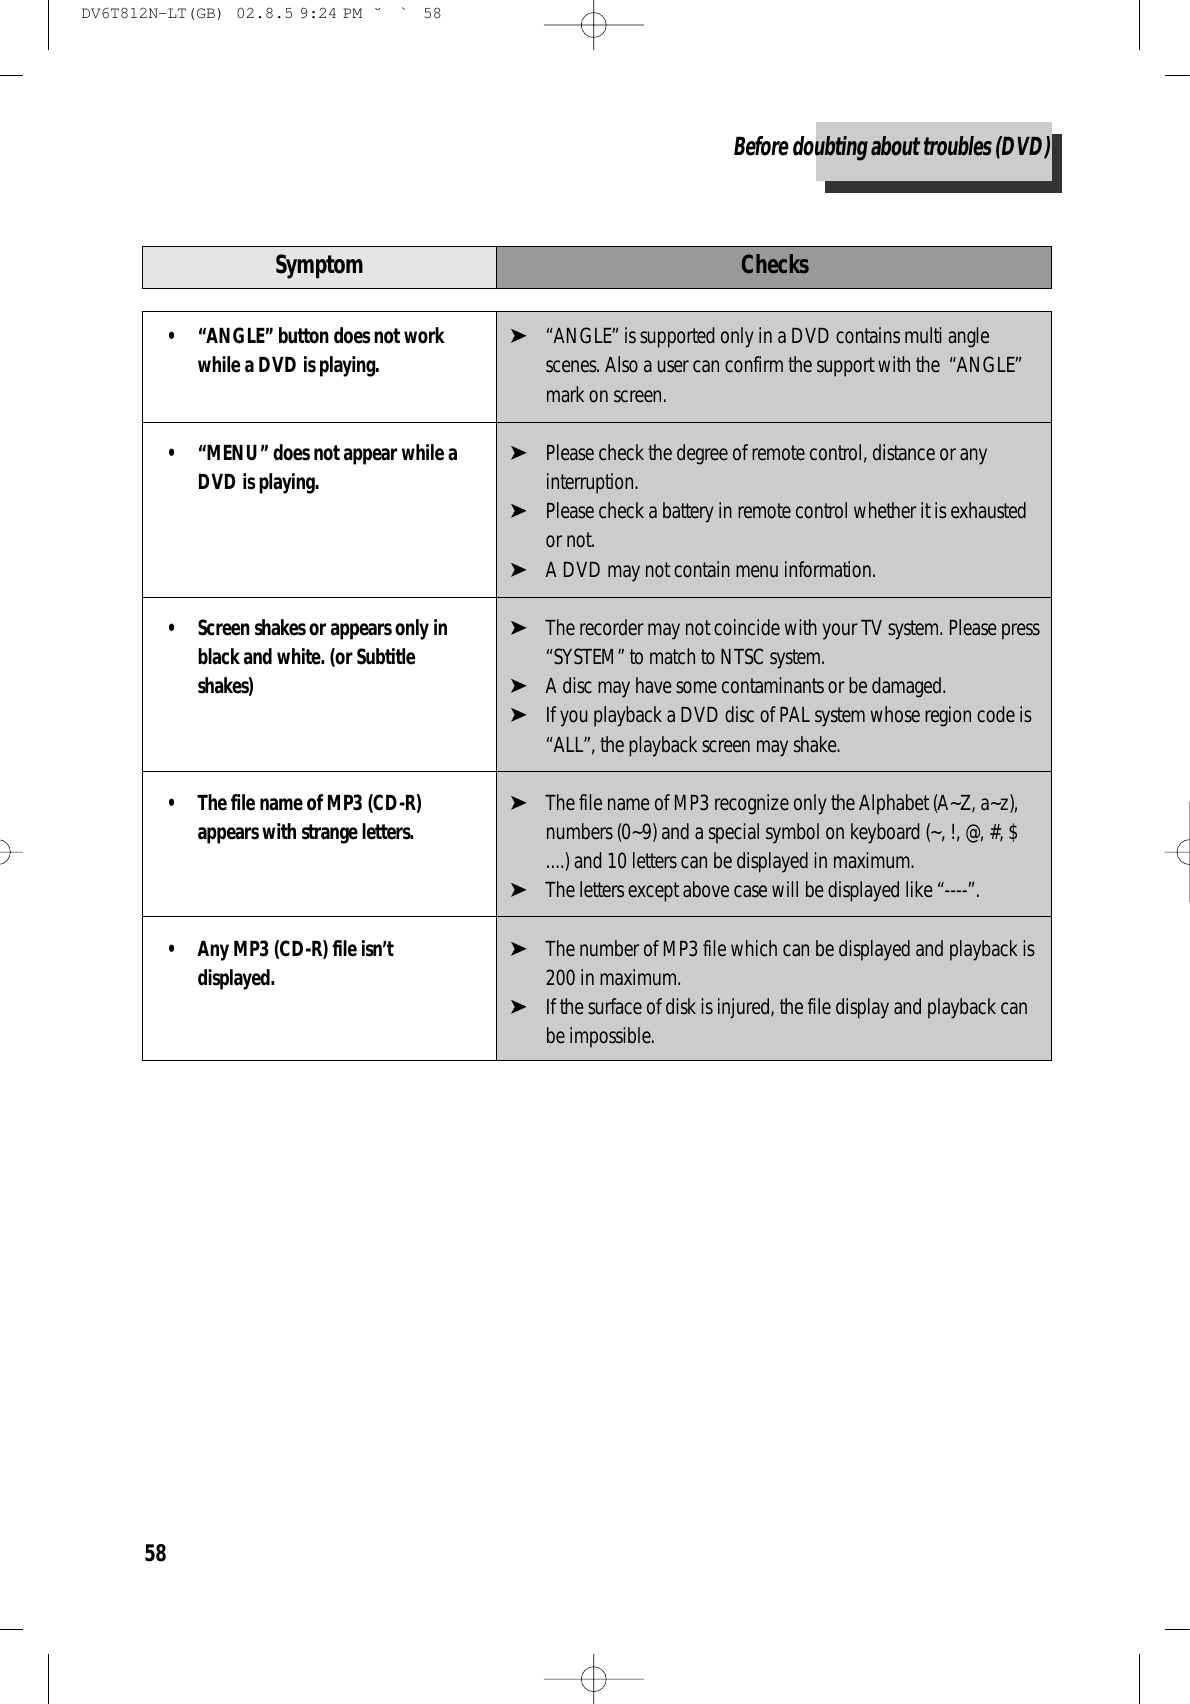
![57The othersBefore doubting about troubles (DVD)• The recorder does not play.• No sound comes through.• A disc is playing but screen doesnot appear or poor screen appears.• Sound is irregular• REMOTE does not work.• Dolby Digital sound does not work• “AUDIO” or “SUBTITLE” buttondoes not work.ChecksSymptom➤If a DVD is from overseas, it may not be played. Please check a DVD’sregion code whether it has the relative region code 1 or All.➤Please check whether a DVD is inserted in a right direction.➤If it is a CD-ROM for PC or DVD-ROM, it does not work.➤Play mode may be “SLOW” or “PAUSE”(In abnormal speed play,no sound comes through)➤Did you connect the parts in right way?➤Please check the operative condition of TV or amplifier.➤From SETUP, please check “AUDIO” items.➤Did you turn on your TV sets?➤Did you connect the parts in right way?➤The play may be in “PAUSE”.➤A disc may have some contaminants or be damaged.➤A disc may be bad one.➤Please check the connection with Dolby Digital amplifier.➤Please check the plugs are connected with one another tightly.➤Some contaminants may be remained in connection terminal.➤Please check the degree of remote control, distance or anyinterruption.➤Battery may be weak or exhausted.➤When you operate DVD, use it by pressing [DVD] button.➤Dolby Digital sound can be worked in the Dolby Digitalamplifier only.➤Please check “Dolby Digital ” mark on your DVD.➤In case of playing it through digital output, while pressing“STOP”, please check whether “DIGITAL OUTPUT” is“BITSTREAM” by pressing “SETUP”.➤Please check the connection is correct.➤If a DVD does not include language information, it does notsupport the function.DV6T812N-LT(GB) 02.8.5 9:24 PM ˘`57](https://usermanual.wiki/WINIA-Electronics/7NF0010/User-Guide-263222-Page-58.png)
![59The othersBefore doubting about troubles (VCR)• “Power On” does not work.• It does not work even in “PowerOn”.ChecksSymptom■Power➤Please check whether a power plug is inserted in an electric outlet.➤Please check whether a videotape is inserted in.➤Try to insert a plug again.• A channel on video and a playscreen does not appear.• Noise (screen noise) appears onscreen.■Screen and noise➤Please check your antenna’s connection.➤TV channel should be fixed on video channel (3 or 4).➤Please check your antenna’s signal whether it may be weak. Incase of its weakness, please use a frequency amplifier connectedwith the device.➤Press “TV/VCR” and then let “VCR” is displayed on the displaypanel.➤While in no use of VCR, was it turned on?➤While in recording a program, do you watch another channel?➤Select TV by pressing [TV/VCR] button on remote control.• A videotape is not inputted in.• On inputting a videotape, the tapeis re-ejected.• A videotape is not ejected.■Input and ejection➤Please check whether a power plug is inserted in an electric outlet.➤Please check whether a videotape is in.➤Please check whether a videotape is inserted in a right direction(a side of transparent window should be on the upside)➤Have you inputted a videotape again just after the tape wasejected? Please try it again after fully ejecting it.➤When a videotape forces to be ejected, the tape may not beinputted. In the case, please pull out an outlet, and then push thetape smoothly.➤That’s why a safe mode to protect a videotape is operatedautomatically. Please pull out the tape and input it again.➤In case the product is used for a long time, a videotape may not beejected for a film inside may be stretched. In the case, please pull out apower plug for about 10mins and then press “EJECT” button.DV6T812N-LT(GB) 02.8.5 9:25 PM ˘`59](https://usermanual.wiki/WINIA-Electronics/7NF0010/User-Guide-263222-Page-60.png)
![60• Noise appears on screen afterrecording.• While in playing, noise appears.• Sound and screen are irregular.• Sound comes out but screen doesnot appear.• Screen is irregular and stripes appears.• "Screen Error" message is displayedin a screen.• While recording and playing, thetop of screen extremely waves.ChecksSymptom➤While in playing a videotape, there may happen some noise orblot in the part of the beginning of a videotape or resuming“PAUSE”, which are not breakdown.➤Please press “TRACKING” for better screen. Videotape may bepoor. Try to change it to another one.➤Please use a head-cleaner to clean VCR heads. VCR heads maybe contaminated.➤Since VCR Play signals are not stable like a TV signals, screenmay be unstable or curved while in playing. To fix the problem,please horizontal adjustment.• A screen is not clear.• A screen at pause is trembling orslow screen is not clear.■Play➤In case videotape is the one recorded by other products or oldone, stripe may appear on the screen.➤Try to adjust the screen by [TRACKING+/-] button➤Try to use a head-cleaner.➤Try to use a head-cleaner.➤Try to adjust the screen by [TRACKING+/-] button.■Recording• Recording a TV program isimpossible.➤For recording, you should use videotape with a tab.➤Please check whether a channel is fixed on video. If not, youhave to turn it into “TV” by pressing “OUTPUT” button.➤Please check whether the timer recording info is right.➤Are RF cables inputted antenna connection terminal correctly?➤Does a CH number selected in display section appear?➤Please check a tab on a tape whether it is broken or not. (If it wasbroken, please scotch-tape it)Before doubting about troubles (VCR)DV6T812N-LT(GB) 02.8.5 9:25 PM ˘`60](https://usermanual.wiki/WINIA-Electronics/7NF0010/User-Guide-263222-Page-61.png)
![61The others• Recording a TV program isimpossible.• Once pressing “REC”, a videotapeis ejected automatically.• Timer recording of Cable TV doesnot work.• In spite of pressing “CHANNEL”, achannel can not be set.• While duplicating, screen is notclean and distorted.➤Check whether a tape attached with a recording tap is inserted.➤Check whether the screen is displayed in VCR Only Channel.Press [OUTPUT] button in this remote controller to adjust in"General Broadcast" condition.➤Is the rounded line (RF cable) connected in "ANT.IN" terminal?➤Is the selected channel number shown in Display?➤Is a tab of cassette tape broken? (Please cover a tab hole withcellophane adhesive tape (Scotch tape).)➤Please check whether the clock is right.➤Does the display on your video show “ ” (Ready to timerrecording)? Please make it out.➤Please check whether the timer recording info is right.➤Please check a tab on a tape whether it is broke or not. (If it wasbroken, please scotch-tape it)➤Was a cable data output code connected correctly?➤Were a converter manufacturer setup and output channel right?➤Did you enter a password? (Please cancel it.)➤Did you turn off your player? (Please turn it on.)➤You may not memorize channels.➤Please check your channel setting or press a number button.➤Some tapes or discs distributed in the market for lending is set toprevent copy in manufacturing. These tapes cannot beduplicated in a good condition.ChecksSymptom• remote control does not work.• Buttons on remote control do notwork.■REMOTE➤Battery may be weak or exhausted.➤A receiver of remote control may be different with a sender.➤In case a videotape is positioned in the beginning, “VISS REW”and “REW” do not work.➤In case a videotape is positioned in the end, “FF”, “VISS FF”,“PLAY” and “REC” do not work.➤Please check whether another button is pressed.Before doubting about troubles (VCR)DV6T812N-LT(GB) 02.8.5 9:25 PM ˘`61](https://usermanual.wiki/WINIA-Electronics/7NF0010/User-Guide-263222-Page-62.png)