WINIA Electronics 7NF0013 VCR With DVD Player User Manual DC B8CB1N PS VE3 0
Dongbu Daewoo Electronics Corporation VCR With DVD Player DC B8CB1N PS VE3 0
UserManual.wiki
>
WINIA Electronics
>
7NF0013 User Manual
User Manual
Navigation menu
Upload a User Manual
Namespaces
Wiki Guide
HTML
PDF
Info
Views
User Manual
Discussion / Help
Navigation
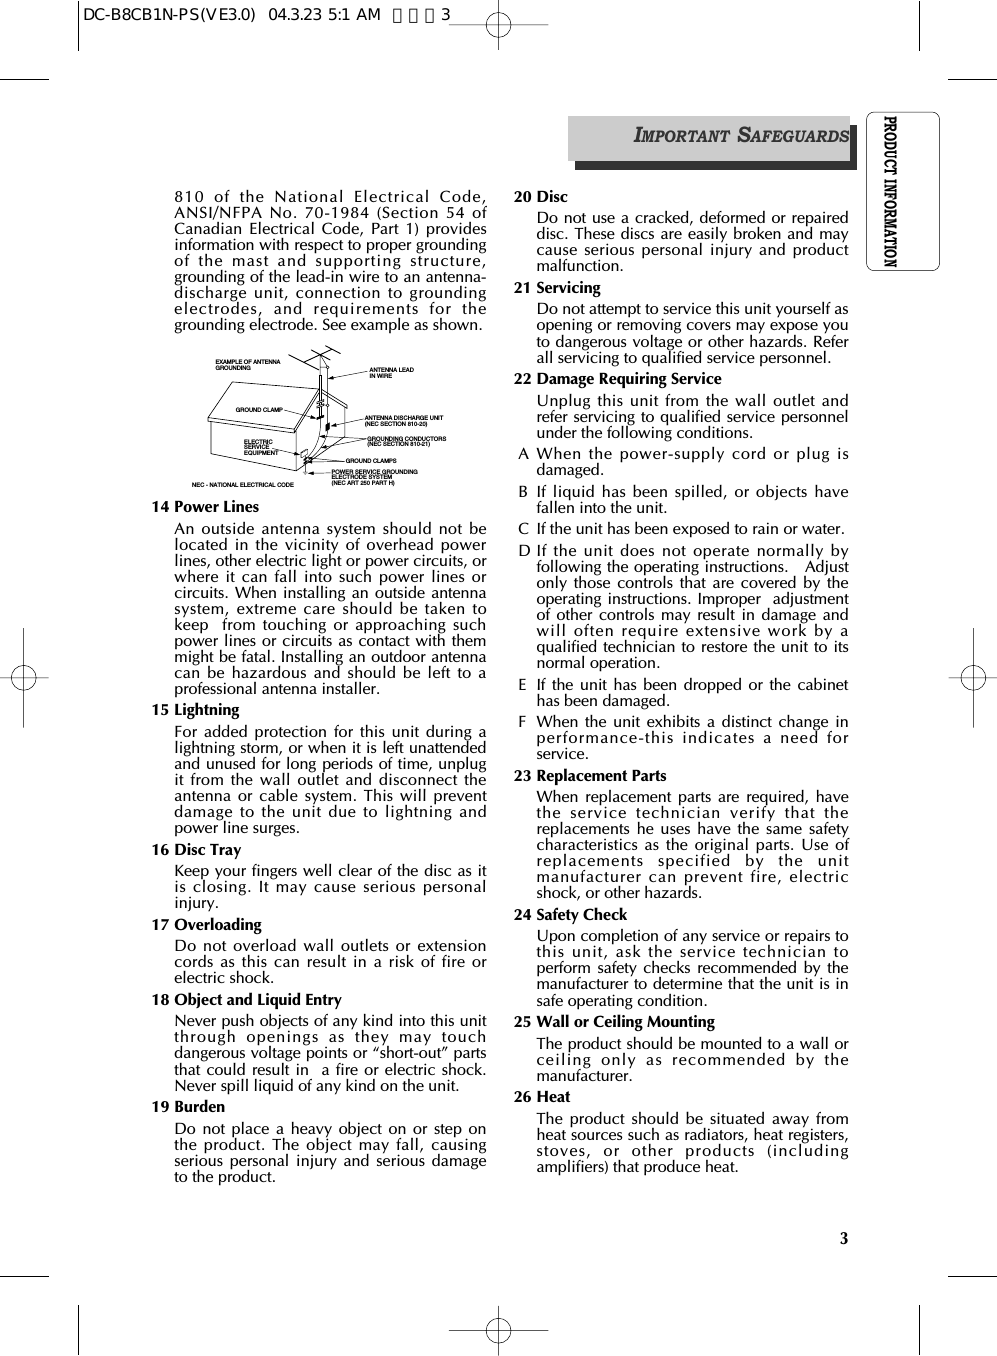


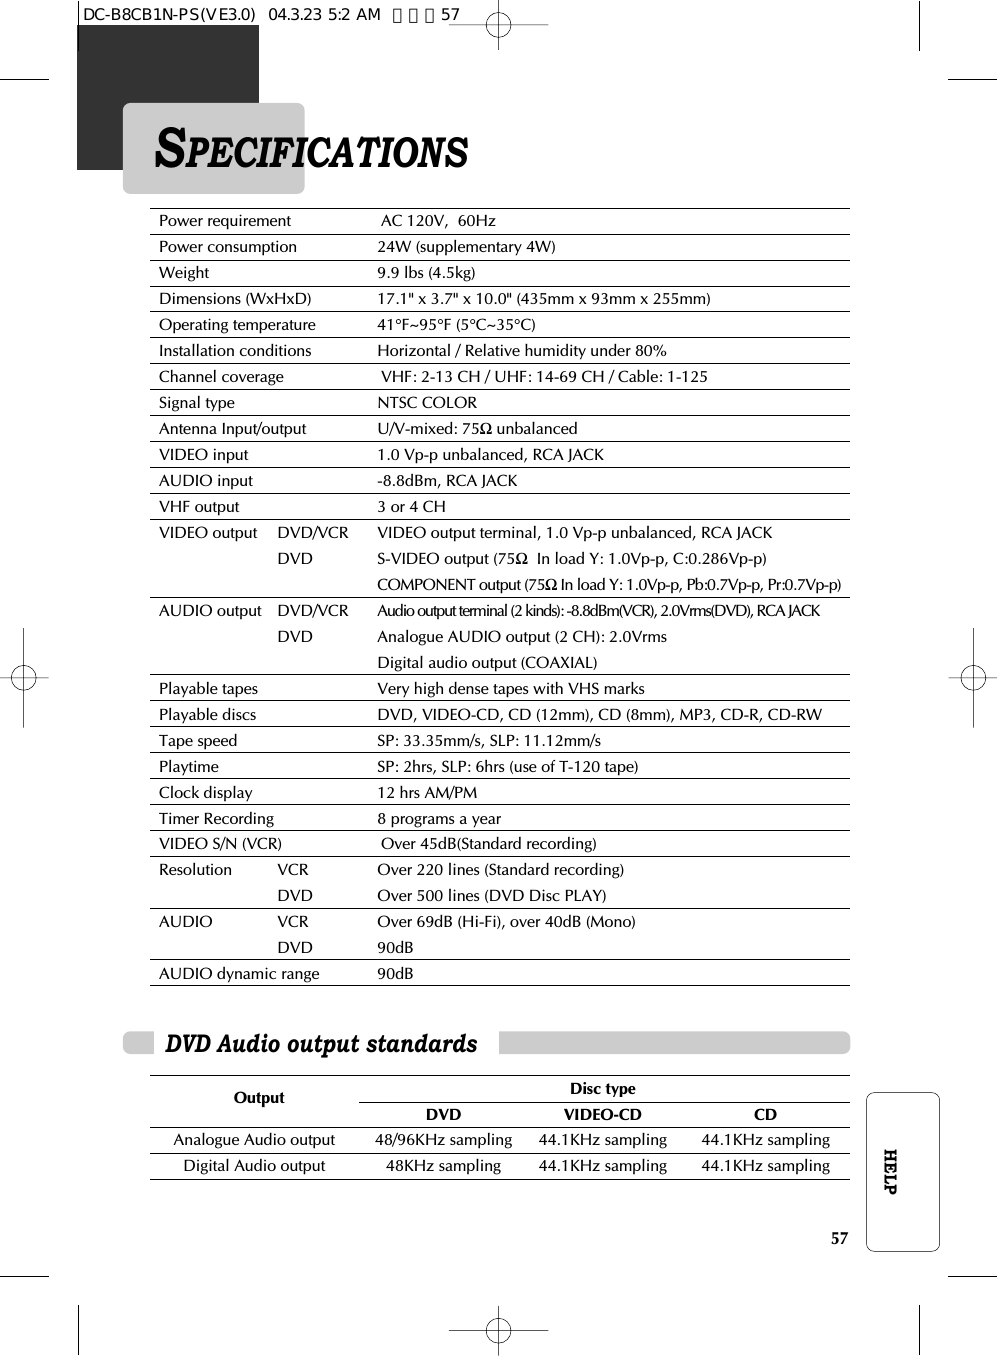
![10REMOTE CONTROLSwitches the DVD+VCR on or off.[DVD] Opens/closes the disc tray, [VCR] Ejects a tapeChanges to VCR mode.Changes to DVD mode.Selects the devices connected to the Audio/Video sockets(AV1, AV2, VCR, DVD).Number entry[VCR] Manually reduces of streaks or picture "jitter".[DVD] Activates Progressive Scan, [VCR] Number 100Navigate through the menus., [VCR] Channel Up/DownbuttonConfirms a menu selection.[DVD] Removes any menu or display from the screen.[VCR] Resets the time counter to 0:00:00. Also clears on-screen menu item entries when setting the time anddate or timer recordings.[DVD, VCR] Shows the status displays.[DVD, VCR] Displays or exits the SETUP menu.[DVD] Displays the title menu when playing a DVD.Activates PBC mode when playing a VCD.[DVD] Accesses the disc menu during play (if there is one).[DVD] Selects a desired language for the subtitle.[DVD] Selects a desired language for the audio[DVD] Activates Chapter/Title/Time SEARCH[DVD] Access the Zoom functionDC-B8CB1N-PS(VE3.0) 04.3.23 5:1 AM 페이지10](https://usermanual.wiki/WINIA-Electronics/7NF0013/User-Guide-421157-Page-11.png)
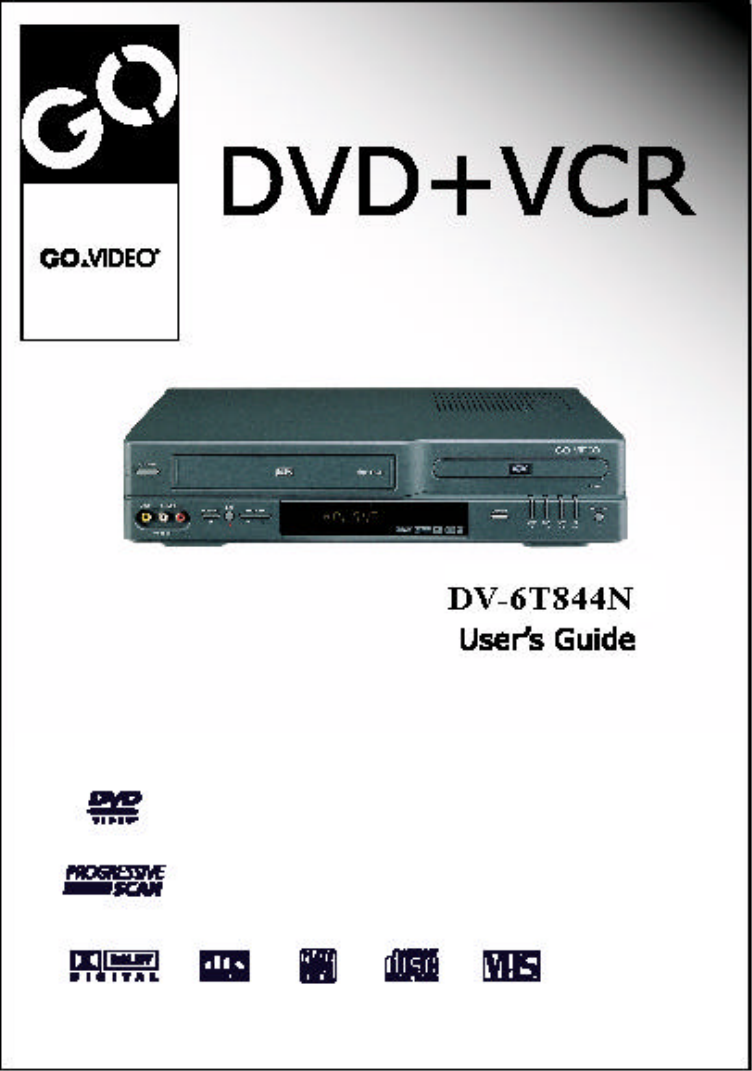
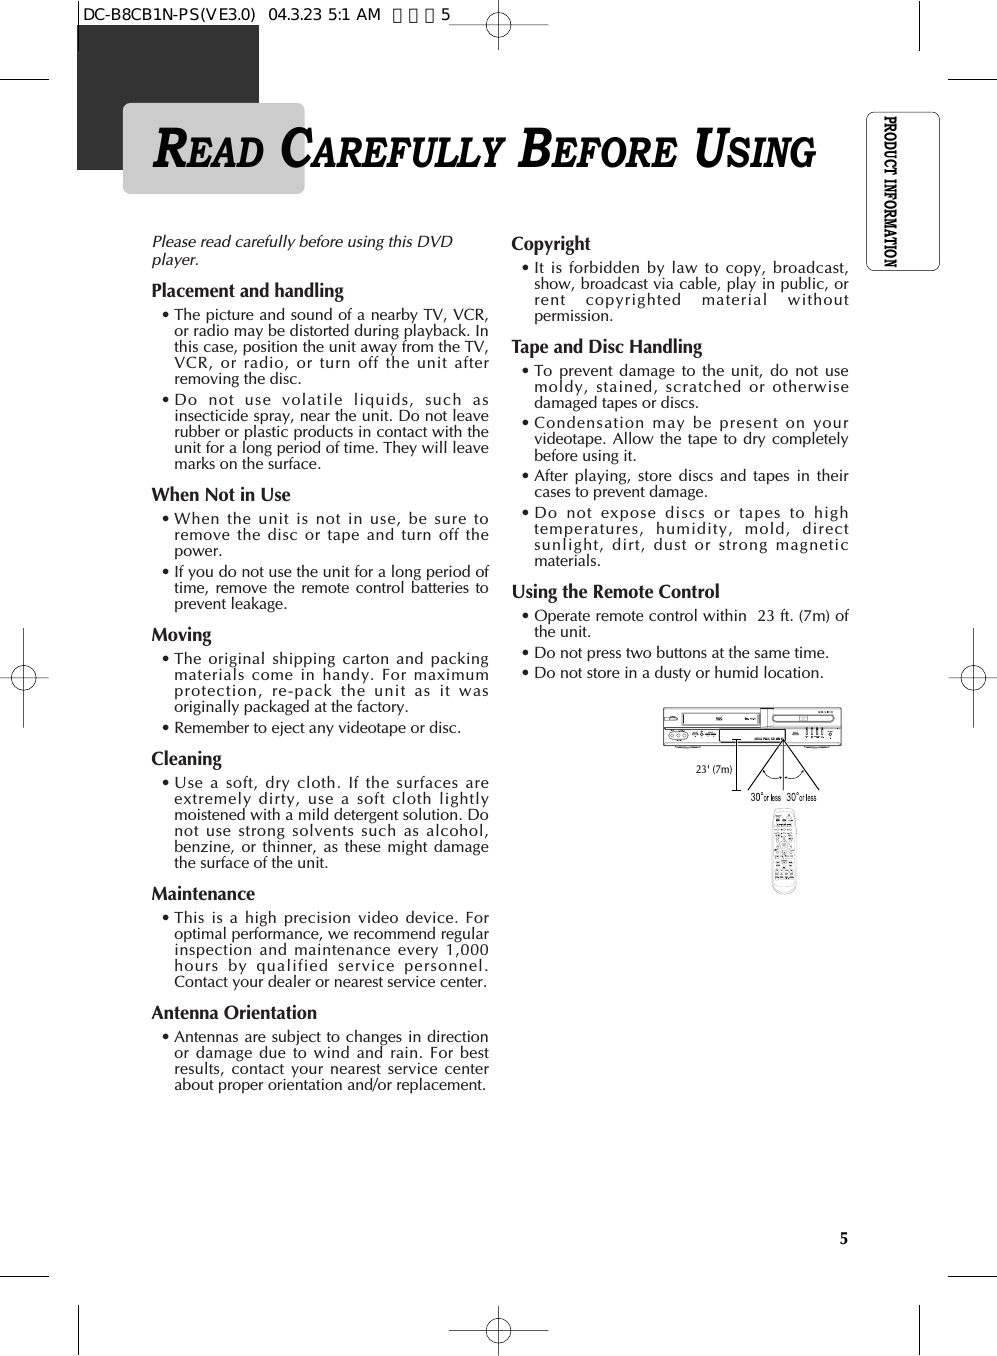
![11PRODUCT INFORMATIONPress the power [√] button on the remote control for about 8 seconds. All front paneland remote control buttons are now locked, and the Lock indicator (“ ”) will bedisplayed on window display. To release child lock, press the power [√] button againfor about 8 seconds.Child Lock!!!Starts playing a disc or a tape.Pauses playback or recording modes.Starts fast reverse, reverses accelerated play or reversesslow motionStarts fast forward, forward accelerated play or forwardslow motionStops play, accelerated search, slow motion or recording.[VCR] Starts record mode on tapes with the safety tab intact.Press this repeatedly to set a recording duration for OTR.[VCR] Overrides the default recording speed (either SP orSLP).[DVD] Skips back to previous chapter or track in playbackmode, Back step in pause mode[DVD] Skips forward to next chapter or track in playbackmode, advances one frame in pause mode , [VCR] Advances one frame in pause mode [DVD] Allows selection of a section and will play itrepeatedly.[DVD] Repeats a Title, Chapter, Disc, One, Directory orRandom playback.[DVD, VCR] Switches between TV and VCR[DVD] Selects virtual 3D sound effect between VSR (VirtualSurround mode) and EST (Enhanced Stereo mode)[DVD] Stores bookmarks in memory to be viewed (listenedto) again[DVD] Accesses multiple camera angles if any were addedto the disc when it was created.[VCR] Commercial Skip skips forward 30 seconds[VCR] Replays previous 15 seconds[VCR] Go to Last Channel button [VCR] TIMER RECORDING button, [DVD] PROGRAMPlayback buttonREMOTE CONTROLDC-B8CB1N-PS(VE3.0) 04.3.23 5:1 AM 페이지11](https://usermanual.wiki/WINIA-Electronics/7NF0013/User-Guide-421157-Page-12.png)

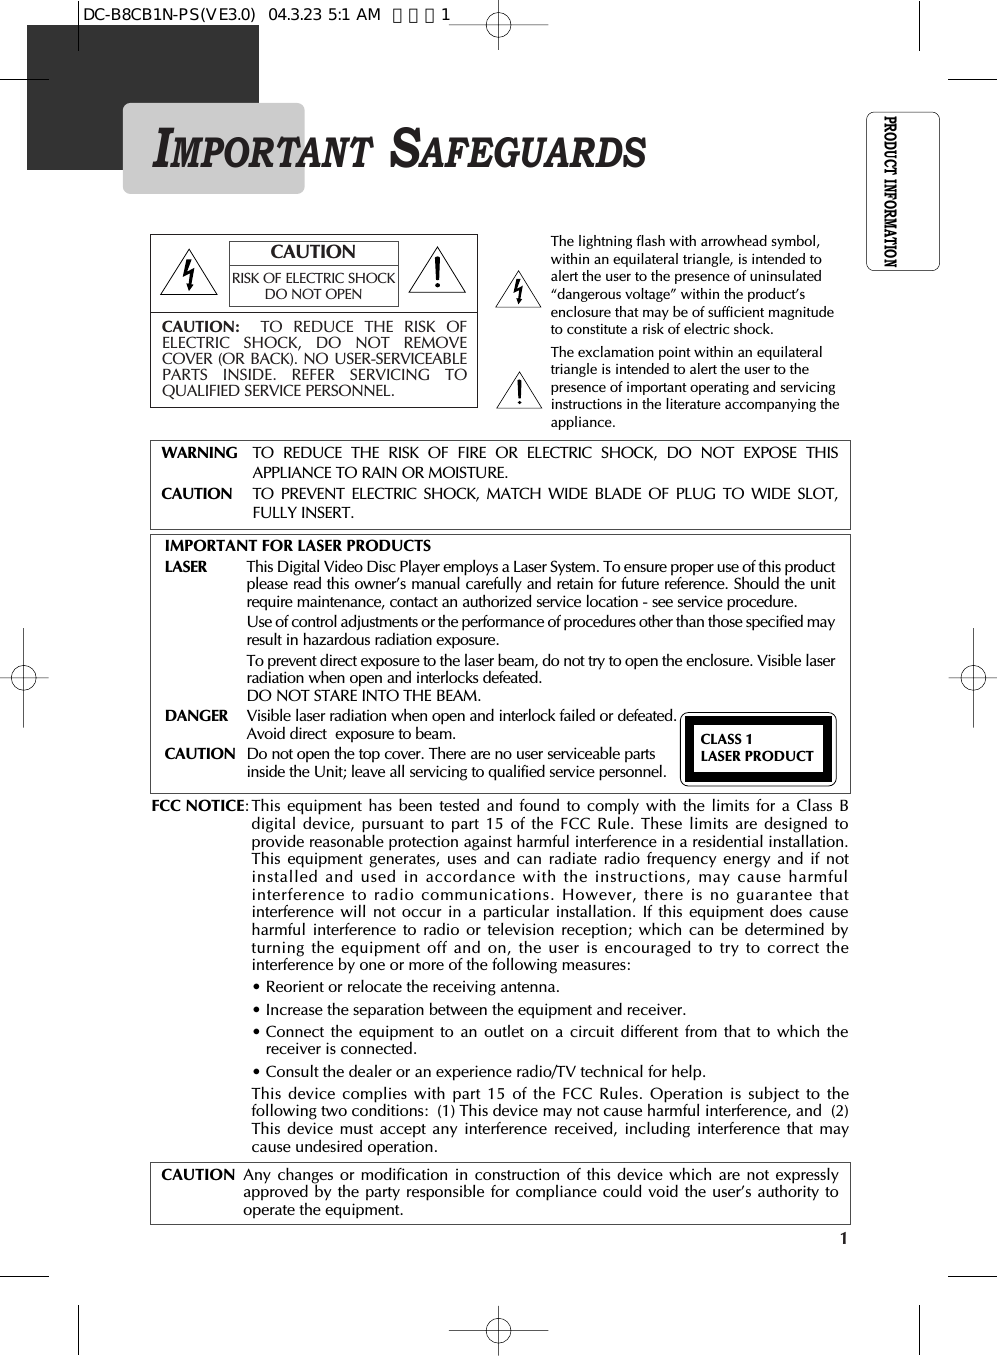
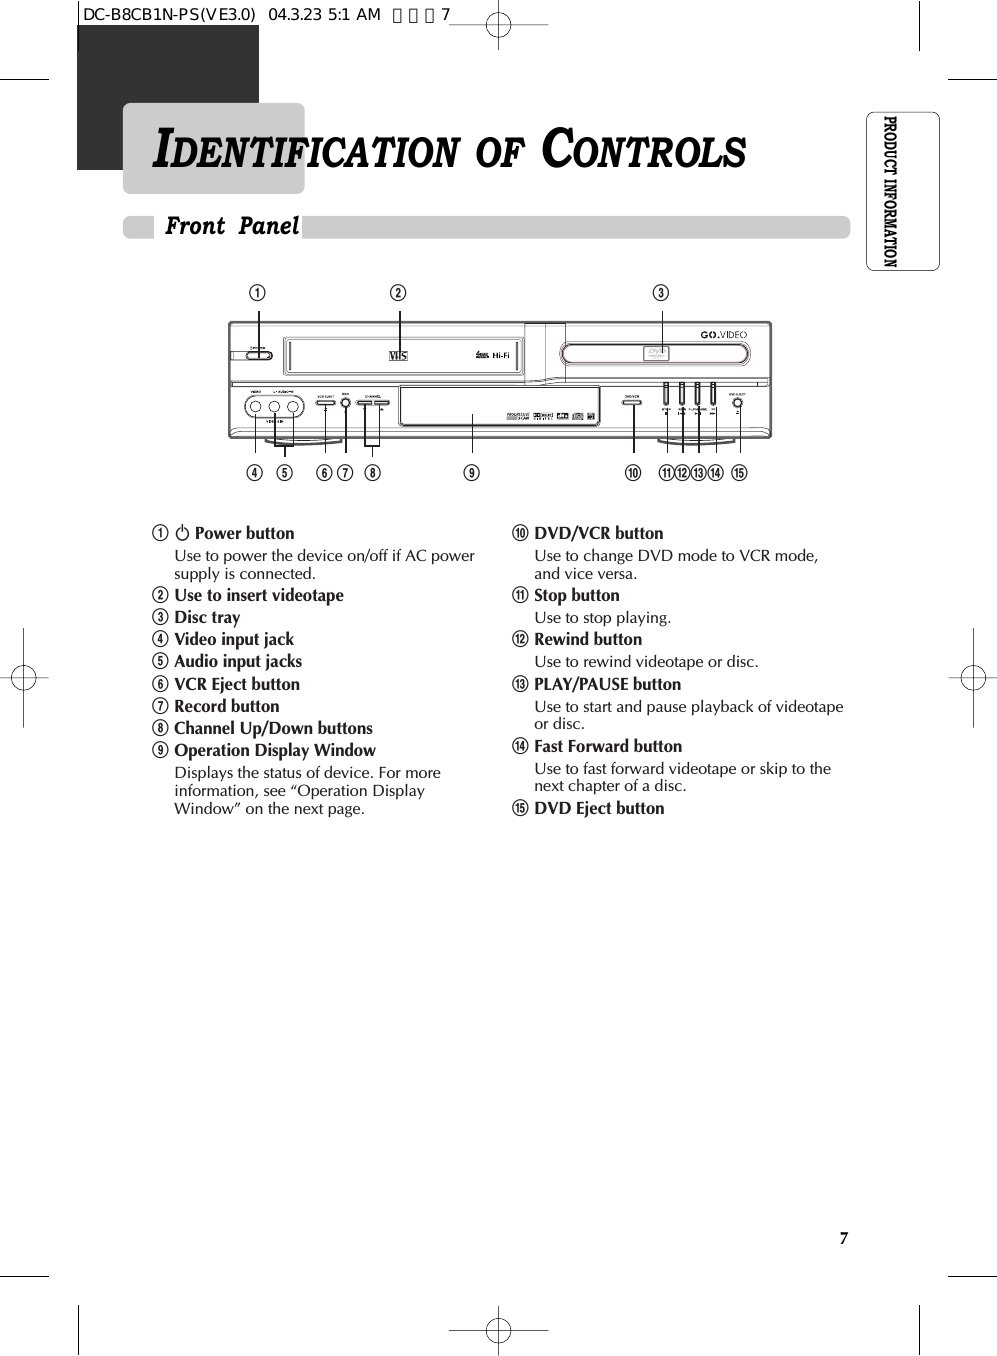
![13INSTALLATIONCONNECTING A CABLE BOXHow to connect INPUT 1 INOUT ANT ININPUT 2DVD + VCRRLVIDEOOUTVIDEO 1ININ(FROM ANT.)OUT(TO TV)RFAUDIOVIDEOOUTOUTINHow to watch regular TV and record Cable TV1Set the Channel Select switch of the cable Box to CH 3. If Channel 3 is used by a TV station, youmust change it to Channel 4. See "To Set Output Channel" on page 23.2Select the channel to be recorded on the Cable Box. If you want to watch the show that isrecording, press [TV/INPUT] button on your TV to select “Out (VCR)”. 3Press the [REC] button on the DVD+VCR. 4To watch regular TV while you record from cable, select the desired channel on your TV.Because of the nature of cable boxes, you cannot watch one Cable TV channel and recordanother at the same time.jack on the DVD+VCR to the IN or ANT jack on the rear of the TV.1. Find the RF cable that goes into your cable box. Unplug it from the cable box and plug it into anRF splitter (available at your local electronics store.)2. Connect an RF cable between one OUT terminal on the splitter and the IN terminal on the cablebox.3. Connect another RF cable between the other OUT terminal on the splitter and the A-IN terminalon an A/B switch (available at your local electronics store.)4. Connect a third RF cable between the OUT terminal on the cable box and the B-IN terminal onthe A/B switch.5. Connect an RF cable between the OUT terminal on the A/B switch and the ANT. IN jack on yourDVD+VCR.When the A/B switch is set to B, use the cable box control to change channels. When the A/B switchis set to A, use the DVD+VCR remote to change channels.Rear Panel of DVD+VCRCable Box Rear Panel of TVRF CableAUDIO/VIDEO CableRF CableRF CableA/B SwitchSplitter (Not supplied)Cable OutletRF CableIf your cable systemprovides all your channels(i.e., pay-TV channels), followthese steps: connect an RFCable from the OUT jack of theCable Box to the IN jack on theDVD+VCR unit. Then connectanother RF cable from the OUTDC-B8CB1N-PS(VE3.0) 04.3.23 5:1 AM 페이지13](https://usermanual.wiki/WINIA-Electronics/7NF0013/User-Guide-421157-Page-14.png)
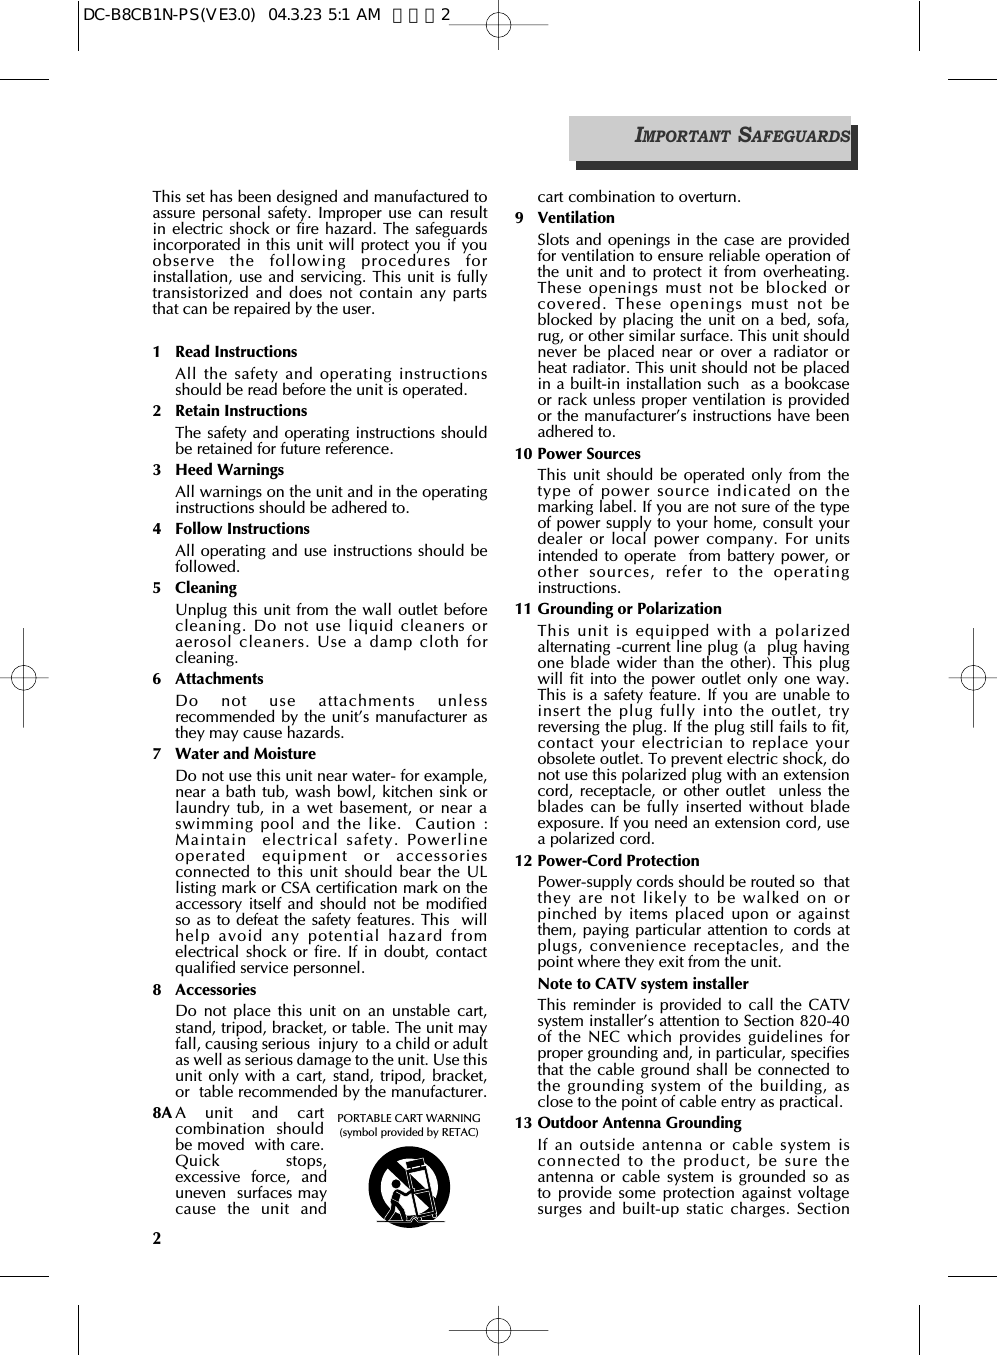
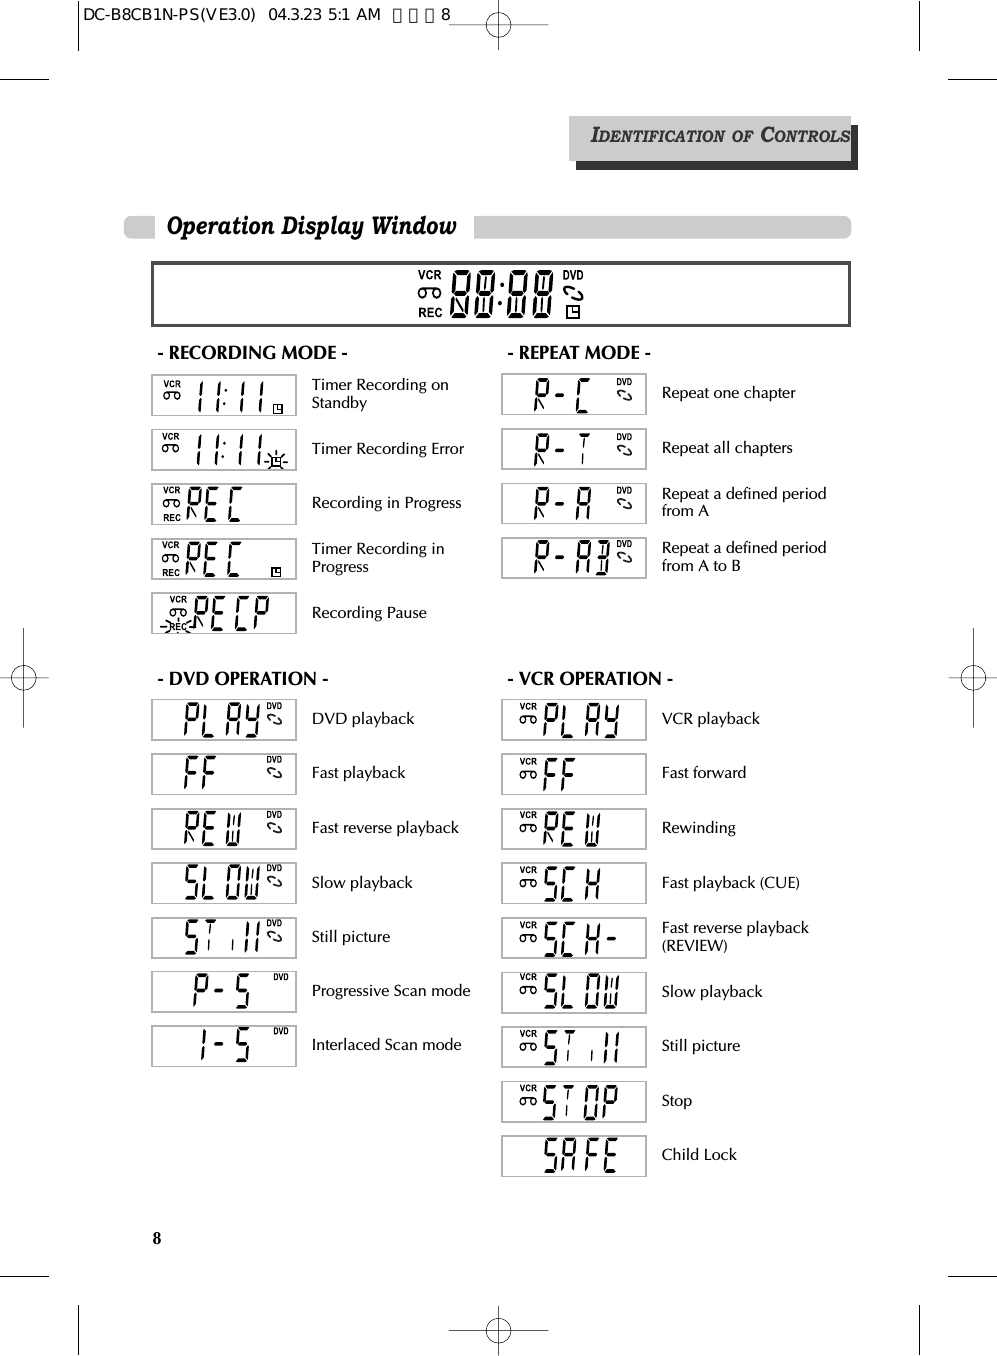
![14CONNECTING OTHER VIDEO EQUIPMENTHow to Connect AUDIOVIDEOANT INPUTA/V OUTPUTCAUTIONCAUTION: TO REDUCE THE RISK OF ELECTRIC SHOCK.DO NOT REMOVE COVER (OR BACK).NO USER SERVICEABLE PARTS INSIDE.REFER SERVICING TO QUALIFIED SERVICE PRESONNEL.RISK OF ELECTRIC SHOCKDO NOT OPEN201816 14 12 10 86 4 3211917 15 13 11 9 7 5 3 1DVD ONLY DVD + VCRAUDIOOUTRLRLYPrPbDIGITALAUDIO OUTCOAXIALCOMPONENTVIDEO OUTVIDEOOUTVIDEO 1ININ(FROM ANT.)OUT(TO TV)RFS-VIDEO OUTAUDIOVIDEOHow to Copy (Edit) Tape with Other Video Equipment1Connect audio/video cables from the Audio/Video Out jack on your other video equipment tothe Audio/Video In jack on rear panel (or front panel) of DVD+VCR.2Connect an RF cable from the “ANT. IN” jack on a TV or satellite receiver to the “RF.OUT” jackon the DVD+VCR.3To record other video equipment with the DVD+VCR, insert a tape with the record safety tabintact into DVD+VCR and follow the instructions for recording on page 24.1Turn on the DVD+VCR. 2Press [TV VIEW] and set the DVD+VCR to display “External Input 1” or “External Input 2” on TVscreen. 3Press [PLAY] on the other video equipment. 4Press [REC] on the DVD+VCR when you want to record from the other video equipment. 5Press [Pause] on the DVD+VCR to prevent recording a scene you do not want. (Caution) Recording is stopped automatically after 5 minutes in Pause mode. Press the [REC]button again if you want to resume recording.Playback VCR,Camcorder,Satellite Receiver .........RF CableAUDIO/VIDEO Cable■You can connect a wide variety of audio/video equipment to your DVD+VCR, including anadditional VCR, Laser Disc Player, DVD Player, Camcorder, Satellite Receiver, or Video Game.Because these devices use all of connections, they are described together.DC-B8CB1N-PS(VE3.0) 04.3.23 5:1 AM 페이지14](https://usermanual.wiki/WINIA-Electronics/7NF0013/User-Guide-421157-Page-15.png)
![17INSTALLATIONPress the [DVD] button. "DVD" lights on the operation display window and all remote control buttons control the DVDplayer.To Select VCRPress the [VCR] button."VCR" lights on the operation display window and all remote control buttons control the VCR.To Watch TV or External InputPress the [TV VIEW] button.The unit will cycle through VCR PLAYBACK ➝BROADCASTING RECEPTION ➝EXTERNALINPUT.Stop when you see the viewing mode you want.To Select DVDOUTPUT SELECTBASIC OPERATIONDC-B8CB1N-PS(VE3.0) 04.3.23 5:1 AM 페이지17](https://usermanual.wiki/WINIA-Electronics/7NF0013/User-Guide-421157-Page-18.png)
![18DVD PLAYBACKPress [√] to turn on the unit.Press [DVD] to select DVD mode.Press [OPEN/CLOSE] to open the disc tray. Press [OPEN/CLOSE] to close the tray.The disc tray is closed and many discs will start playbackautomatically.12Place your disc in the center of the disctray, with the label facing upward.34To start playback, press [PLAY]. • In the case of DVD,DVD menus and titles are often displayed on screen. • In the case of S-VCD and VCD2.0:The disc menus are displayed on screen and are converted intoPBC (Playback Back Control) mode. • In the case of CD, VCD1.1 and MP3:The disc plays in order of its track numbers. 5To stop playback, press [ ].To pause, press [PLAY] during playback. Press [PLAY] again to resume playback.6Press [OPEN/CLOSE] to open the disc tray.7Remove the disc, and press [OPEN/CLOSE] to close the tray.8Various Playback Methods■For fast (or reverse) playback, press [√√] (or [œœ ]) in Playback mode.* Unavailable during MP3 playback and with certain DVDs.■For slow (or reverse) playback, press [√√] (or [œœ ]) in Pause mode. * Not available during VCD playback. The mark will appear.■For still picture, press [PLAY] in Playback mode. •If you do not close thetray, it will be closedautomatically in 5minutes to protect itfrom damage.•Some CD-R, CD-RW(MP3, AUDIO CD)may not play due todisparities inproducing medium(PC, CD-Recorder),media type, and/ordisc format.DC-B8CB1N-PS(VE3.0) 04.3.23 5:2 AM 페이지18](https://usermanual.wiki/WINIA-Electronics/7NF0013/User-Guide-421157-Page-19.png)
![BASIC OPERATION19Which discs you can useDVD Video (Digital Versatile Disc)DVD-R (DVD-Recordable)DVD-RW (DVD-Rewritable)Audio CD (Compact Disc Digital Audio)Video CD (format 1.0/1.1./2.0)Super Video CDCD-R (CD recordable) Audio/ MP3 contentsCD-RW (CD rewritable) Audio/ MP3 contentsRegional codeIf the region number described on the DVD disc does not correspond tothe Region number of this player, the player will not play this disc.1ALLSelecting an audio language■You may select an audio language if a disc includes multiple languages.■You may select an subtitle language if a disc includes multiple languages.Certain discsmay not supportaudio selection.Certain discsmay not supportsubtitle selection.For more detailed information, go to “ABOUT DVD” page in “HELP” chapter .Selecting a subtitle languageThings to know before DVD playbackKeep pressing [AUDIO] until your preferredlanguage appears in playback mode.If the DVD disc includes audio information, every time you press [AUDIO],English (ENG), French (FRE), Spanish (SPA), etc. appear one by one.Keep pressing [SUBTITLE] until your preferredlanguage appears in playback mode.If the DVD disc includes subtitle information, every time you press[SUBTITLE], English (ENG), French (FRE), Spanish (SPA), ... and OFF appearone by one.ENG 01/01ENG 01/03DVD PLAYBACKDC-B8CB1N-PS(VE3.0) 04.3.23 5:2 AM 페이지19](https://usermanual.wiki/WINIA-Electronics/7NF0013/User-Guide-421157-Page-20.png)
![20Press [√] to turn on the DVD/VCR.Press [VCR] to select VCR mode.Insert the desired tape.To start playback, press [PLAY].If the picture is flickering or poor quality, adjust it with the [TRACKING+/–] buttons. 123To stop playback, press [ ]. To pause playback, press [PLAY]. Press [PLAY] again to resume playback.4Press [VCR EJECT] on the unit or [OPEN/CLOSE] on theremote control to eject the tape. 5Various Playback Methods■For fast forward (or reverse) playback, press [√√] (or [œœ ]) in Playbackmode.■For Still picture, pause the playback, then press [PLAY/PAUSE] in Playbackmode.■For slow-motion playback, pause the playback, then press [√√] in Pausemode. * NOTE: The VCR does not have Slow Reverse Playback.■For Frame Advance, press [∞] in Pause mode. Each time you press thisbutton, the picture advances one frame.If the VCR detectscontaminatedhead(s), it shows anon-screen messageto bring this to yourattention.* If you see thismessage, clean thevideo heads with acommercial head-cleaner.To Adjust DisplayThis product includes automatic Tracking so you can enjoy a clear picturewithout additional operation. However:- If the screen is poor in Playback mode, - If noises occur in the upper or lower part of the screen in slow playbackmode, - If paused picture vibrates up and down.Then try using the [TRACKING +/–] buttons to adjust the display manually.VCR PLAYBACKDC-B8CB1N-PS(VE3.0) 04.3.23 5:2 AM 페이지20](https://usermanual.wiki/WINIA-Electronics/7NF0013/User-Guide-421157-Page-21.png)
![21BASIC OPERATIONCLOCK SETPress [SETUP].Press [ENTER] to select “CLOCK SET”.“Time and Date Set” is already selected.Press [ENTER]to set the time and date.Set the current date and time bypressing [<, >, ^, v] keys or pressingthe [0-9] keys. For DATE SET, follow the order of Month /Day / Year ; for TIME SET, follow the orderof Hour / Minute. If the input box blinks rapidly, you haveentered an invalid number. Enter a zero asthe first number for hours or monthsbetween 1 and 9.When CLOCK SET is complete, press[SETUP] twice to return to the mainSetup menu or three times to returnto VCR mode.3Press [VCR] on the remote control to select VCR mode .2Set the TV to CH 3 (or 4).145SETUPCLOCK SETTIMER RECORDINGSCHANNEL SETFUNCTIONSLANGUAGE SELECTMove: Select:End: SETUPENTERCLOCK SETTime and Date SetAuto Clock Set : ONTIME AND DATE SETTIME AND DATE SETMove: Select:End: SETUPENTERMove: Input:End: SETUPMove: Input:End: SETUPTime - - : - -(hh:mm)Date - - / - - / 20 - -Time 11 : 01 AMDate 05 / 22 / 2004 (Sat)(mm/dd/yy)DC-B8CB1N-PS(VE3.0) 04.3.23 5:2 AM 페이지21](https://usermanual.wiki/WINIA-Electronics/7NF0013/User-Guide-421157-Page-22.png)
![22To Memorize Channels Manually ■To add or remove channels manually:Press [VCR], then press [SETUP] andselect “CHANNEL SET”.Select “Add/Remove Channels”. 1Select the desired channel andmemorize it. Use the [0-9] buttons to select the desiredchannel. When [>] is pressed, “REMOVED” underthe channel number changes to “ADDED”.2Check the memorized channel.To check the memorized channel, press [CH+/–] on the remotecontrol. 3ADD/REMOVE CHANNELSChannel 02is now ADDED.MEMORIZING TV CHANNELSPress [VCR], then press [SETUP].Press [v] to move the to “CHANNELSET”, and then press [ENTER]. Select “Auto Channel Search”. Press [ENTER] to select “AUTO CHANNELSEARCH”. Select “Detect Automatically”. Press [ENTER] to detect the channelautomatically.The DVD+VCR searches for all availablechannels. When this process is complete,the lowest channel found is displayed.Check memorized channels.To check the memorized channels, press [CH+/–] on the remotecontrol. 123To Automatically Memorize ChannelsSETUPCLOCK SETTIMER RECORDINGSCHANNEL SETFUNCTIONSLANGUAGE SELECTAUTO CHANNEL SEARCHWhat type of signal are you using?Cable TVAntennaDetect AutomaticallyAUTO CHANNEL SEARCHNow scanning channel 11CHANNEL SETAuto Channel SearchAdd/Remove ChannelsSignal Type: CABLECable Box SetupChannel Change: CH3CHANNEL SETAuto Channel SearchAdd/Remove ChannelsSignal Type: CABLECable Box SetupChannel Change: CH3■Memorizing channels allows you to use the CH+/- button without seeing empty channels. Youcan manually delete channels you do not want to watch.DC-B8CB1N-PS(VE3.0) 04.3.23 5:2 AM 페이지22](https://usermanual.wiki/WINIA-Electronics/7NF0013/User-Guide-421157-Page-23.png)
![23VCR OPERATIONTo Delete Channels Manually ■To delete memorized channels:■This feature is useful if your cable signal goes out because it allows you to switch to a regularantenna for alternate television reception.■This feature is useful if your cable signal goes out. It allows you to switch to a regular antenna foralternate television reception.■Use this option to change the VCR ’s output channel.The default is channel 3.1Press [VCR], then press [SETUP] and select“CHANNEL SET”. Select “Add/RemoveChannels”. ADD/REMOVE CHANNELSChannel 02is now REMOVED.MEMORIZING TV CHANNELSSelecting cable or antenna viewingTo set the signal type:Press [ENTER] to toggle the setting between CABLEand ANTENNA in the CHANNEL SET screen. When the desired signal type is displayed, press[SETUP] twice to exit.CHANNEL SETAuto Channel SearchAdd/Remove ChannelsSignal Type: CABLECable Box SetupChannel Change: CH3To Set Cable BoxTo Set Output Channel Press [VCR], then press [SETUP] and select“CHANNEL SET”. Select “ChannelChange”. Press [ENTER] to set the RF Output channel toCH3 or CH4.Press [VCR], then press [SETUP] andselect “CHANNEL SET”.Select “Cable Box Setup”. 1Select “Cable Box Channel”. Enter the channel number which matchesto the output of the Cable Box.2CABLE BOX SETUPOn what channel doesthe VCR receive signals from the cable box?(usually 3, 4 or video)- -CHANNEL SETAuto Channel SearchAdd/Remove ChannelsSignal Type: CABLECable Box SetupChannel Change: CH3CHANNEL SETAuto Channel SearchAdd/Remove ChannelsSignal Type: CABLECable Box SetupChannel Change: CH32Select the desired channel and delete it.Use the [0-9] buttons to select the desired channel to delete. When [<] is pressed, “ADDED” under the channel number changes to“REMOVED”. 3To check the deleted channel, press [CH+/–] on the remote control. DC-B8CB1N-PS(VE3.0) 04.3.23 5:2 AM 페이지23](https://usermanual.wiki/WINIA-Electronics/7NF0013/User-Guide-421157-Page-24.png)
![24To Watch Another TV Channel or DVD while recording1If you want to watch another TV channel during recording, press[TV/VCR].Select the desired channel by using the TV's remote control or channelbuttons. If you use the DVD/VCR buttons to change channels, you willrecord the channel you are watching.2If you want to playback a DVD during recording, insert a DVDdisc.Place the desired DVD disc on DVD tray, press [DVD] to change OUTPUTto DVD mode and press [PLAY].RECORDINGPress [√] to turn on the DVD/VCR.• Press [VCR] to select VCR mode. • Turn on the TV and select Ch 3, or press [INPUT] on your TV toselect External Input mode. Insert a recordable tape.Insert a tape with recording tab. With [CHANNEL], [0-9] and [TV VIEW] buttons, select thedesired channel or external input to record. 123To Record With VCRSelect the desired speed (SP or SLP) with the [SPEED] button. 4Press the [REC] button.The unit starts recording. 5If you want to pause recording, press [PLAY].After pressing [PLAY], if the unit is left in Pause mode for five minutes,the recording is stopped automatically.6To exit recording, press [STOP]. 7DC-B8CB1N-PS(VE3.0) 04.3.23 5:2 AM 페이지24](https://usermanual.wiki/WINIA-Electronics/7NF0013/User-Guide-421157-Page-25.png)
![25VCR OPERATIONThis product incorporates copyright protection technology that is protected by method claims ofcertain U.S. patents and other intellectual property rights owned by Macrovision Corporation andother rights owners. Use of this copyright protection technology must be authorized by Macrovision Corporation, andis intended for home and other limited viewing uses only unless otherwise authorized byMacrovision Corporation. Reverse engineering or disassembly is prohibited.To Record From DVD To Videotape during DVD playbackOne Touch Recording (OTR)■To record the current TV program at the touch of a button, follow the procedures below. RECORDING1First, follow steps 1 to 4 under “To Record With VCR” on page 24. 2Press [REC] repeatedly to set the desired recording time:Once .......... continuous recording until you press [STOP] Twice ......... record for 30 mins from current time 3 (times) ...... record for 1 hour . .. .10 ............... record for 5 hours 11 ............... record for 6 hours 12 ............... record for 7 hours 13 ............... record for 8 hours 14 ............... record for 9 hours 15 ............... Return to normal (continuous) recording3To stop Recording, press [STOP]. 1Press [DVD] to select DVD mode.Insert the desired DVD disc. You cannot record copy-protected DVD discs.Insert a recordable tape into the VCR. 2Press [PLAY] to start the DVD playback and press [REC] to startthe VCR recording.3To exit copy, press [ ].Recording stops automatically when DVD playback is finished or recordedtape reaches the end.Video recorded in PROGRESSIVE SCAN mode will playback abnormally. Firstchange PROGRESSIVE to INTERLACED mode in the SCAN MODE screen, thenrecord from DVD to videotape. (refer to pages 44, 47)DC-B8CB1N-PS(VE3.0) 04.3.23 5:2 AM 페이지25](https://usermanual.wiki/WINIA-Electronics/7NF0013/User-Guide-421157-Page-26.png)
![26TIMER RECORDINGTimer RecordingPress [SETUP] and select “TIMERRECORDINGS”.Move to “TIMER RECORDINGS”with [v] and press [ENTER].Select “Make a New Program”. Press [ENTER] to select “Make a NewProgram”. 5Turn on the TV.1Make sure the current time is set correctly (see page 21 forinstructions on setting the clock). 2Insert a recordable tape with recording tab. 3Press [VCR] to select VCR mode. 46Set How Often to Record. Move to desired recording type with[v] and press [ENTER]. For details, see “Types of TimerRecordings” on page 28. 7Select a Show to Record.Select the desired channel with [0-9]. **If Converter Box and DVD+VCR areconnected with an audio/video cable,select “EXTERNAL INPUT” as the TIMERREC CH with the [TV VIEW] button. 8When moves to “Cable”, select either “Cable” or “Antenna” with[v] or [^]. SETUPCLOCK SETTIMER RECORDINGSCHANNEL SETFUNCTIONSLANGUAGE SELECTTIMER RECORDINGSMake a New ProgramReview/Cancel ProgramsPROGRAM1 (ONE TIME)How often do you wantto record program?One TimeDaily (Sun-Sat)Weekdays (Mon-Fri)Weekly (Once a Week)Channel 0 4 CableStart Date - - / - - Start Time - - : - - AMEnd Time - - : - - AMTape Speed SPMove: Select:End: SETUPENTERMove: Select:End: SETUPENTERMove: Select:End: SETUPENTERMove: Input:Video: End: SETUPTVviewDC-B8CB1N-PS(VE3.0) 04.3.23 5:2 AM 페이지26](https://usermanual.wiki/WINIA-Electronics/7NF0013/User-Guide-421157-Page-27.png)
![27VCR OPERATIONSet "Tape Speed". Select either SP, SLP or Auto with [v] or[^]. For more information on recording speed,see “Using video cassette” on page 28. 10Press [SETUP] to complete the TimerRecording. “Program # has been saved. For programrecording, insert a cassette....” message isdisplayed. TIMER RECORDING indicator, isdisplayed on the operation displaywindow. At the scheduled time, the TimerRecording will begin.11To Confirm or Cancel TIMER RECORDINGSRepeat steps 1-6 of "TimerRecording".Select “Review/Cancel Programs”. 1Confirm Timer Recording details with [v]and press [CLEAR] to delete specificdetails.2PROGRAM1 (ONE TIME)Channel 104 CableStart Date 06 / 04 Start Time 10 : 10 AMEnd Time 11 : 10 AMTape Speed SPPROGRAM1 (ONE TIME)Channel 104 CableStart Date 06 / 04 Start Time 10 : 10 AMEnd Time 11 : 10 AMTape Speed SPPROGRAM 1 (ONE TIME)Channel 104 CableStart Date 06 / 04 Start Time 10 : 10 AMEnd Time 11 : 10 AMTape Speed SPPROGRAM 1 has been saved.For program recording,insert a cassette.End: SETUPTIMER RECORDINGSMake a New ProgramReview/Cancel ProgramsMove: Input:Video: End: SETUPTVviewMove: Input:Video: End: SETUPTVviewMove: Select:End: SETUPENTERMove: Cancel:End: Change: ENTERSETUPCLEARIf the unit is notready (e.g., arecordable tape is notinserted, the tape iscurrently playing orthe unit is poweredoff), an error messagewill appear onscreen.TIMER RECORDINGSet Date and Time to Record. Select the date, start time and end time torecord using [0-9].9PROGRAM1 (ONE TIME)Channel 104 CableStart Date - - / - - Start Time - - : - - AMEnd Time - - : - - AMTape Speed SPMove: Input:Video: End: SETUPTVviewDC-B8CB1N-PS(VE3.0) 04.3.23 5:2 AM 페이지27](https://usermanual.wiki/WINIA-Electronics/7NF0013/User-Guide-421157-Page-28.png)
![28Using Video CassettesBefore you play or record on a video cassette tape, please read this information on the proper careand use of video cassettes.Use only video cassettes that bear the VHS mark: $.There are four types of video cassettes: T-60, T-90, T-120, and T-160. The amount you can recordon a tape is dependent upon the tape speed at which you record. The table below lists the recordingtime (hours:minutes) for each tape type according to recording speed.Tape Type SP Mode (Standard Play) SLP Mode (Extended Play) T-60 1:00 3:00T-90 1:30 4:30T-120 2:00 6:00T-160 2:40 8:00Protecting video cassettes from accidental erasureCassettes have a safety tab to prevent erasure. Break off the safety tab with a screwdriver. If you wish to record on a cassette without a safety tab, cover the hole withcellophane tape. If you insert a video cassette without a safety tab into the unit aftersetting the timer recording program, “( ) ” will blink on the display panel in the poweroff mode and the unit will automatically eject the cassette. In the power on mode, the unit willplayback automatically.If you insert a video cassette with a safety tab into the unit after setting the timer recording program,the unit will be in stand-by mode.Inserting video cassettesFirmly insert the cassette into the cassette compartment with the label up. An inverted cassettecannot be inserted. Do not attempt to insert a video cassette if the unit is unplugged. Do not insertfingers or any foreign object beyond the door flaps of the cassette compartment; this could lead toinjury or equipment damage.Removing video cassettesPress [VCR EJECT] on the front panel and the VCR will eject the tape. Pull the cassette out gently. Donot attempt to pull out the video cassette after the unit begins to load the video cassette. Let it finishloading, then press [EJECT] to eject it.• Audio-visual material may include works of copyright which must not be recorded without authorization of thecopyright owner.Types of Timer RecordingsOne Time: A single Timer Recording on a specific date and time. Daily : A Timer Recording that will record at the same time every day. Weekday : A Timer Recording that will record at the same time Monday through Friday. Weekly : A Timer Recording that will record once a week on the selected day and time.TIMER RECORDINGTimer Program SettingPress [PROGRAM] in VCR mode.This is a shortcut to view the Timer Recording menu. Before setting a Timer Recording, the clock should be set correctly and VCRmode should be selected.DC-B8CB1N-PS(VE3.0) 04.3.23 5:2 AM 페이지28](https://usermanual.wiki/WINIA-Electronics/7NF0013/User-Guide-421157-Page-29.png)
![29VCR OPERATIONWATCHING AND RECORDING CABLE TVTo Watch and Record Cable TVTurn on the cable box and then set a channel to watch or to record. Turn on the DVD+VCR and then set the DVD+VCR channelconnected to the converter (CH03/04/EXTERNAL INPUT). Power on TV and then set the channel connected to the DVD+VCR(CH03/04/VCR). Recording while Watching With the setup described above, the channel selected by the converteris displayed on screen. Press [REC] on the DVD+VCR to record thechannel selected by the converter, or press [REC] repeatedly to set OneTouch Recording (OTR) (see page 25).12TIMER RECORDINGS from Cable TV Program VCR. Follow the instructions on page 26 for setting a Timer Recording. Setthe DVD+VCR to the channel input from the converter box (CH3, CH4or EXTERNAL INPUT). Enter date and time of the cable program in theTimer Recording menu.Set Channel on Converter Box. Set converter to the cable TV channel you wish to record. for example to record CH48, Display CH48 with CONVERTER CHANNEL SELECT button. Complete Timer Recording. If you leave the cable box turned on, the DVD+VCR powers onautomatically and starts recording at the programmed time. 123■Because of the nature of converter boxes, you cannot watch one Cable TV channel and recordanother at the same time.DC-B8CB1N-PS(VE3.0) 04.3.23 5:2 AM 페이지29](https://usermanual.wiki/WINIA-Electronics/7NF0013/User-Guide-421157-Page-30.png)
![30USING ADVANCED VCR FEATURESAuto Playback■With Auto Play turned on (the factory default setting), the DVD+VCR player automatically startsplayback when you insert a tape with its safety tab removed.Press [SETUP] and select“FUNCTIONS”.Move to “FUNCTIONS” with [v] andpress [ENTER].Press [ENTER] to switch betweenON and OFF.- Select ON if you want a tape with itssafety tab removed to start playingautomatically when the tape isinserted.- Select OFF if you do not want a tapewith its safety tab removed to startplaying automatically. 12SETUPCLOCK SETTIMER RECORDINGSCHANNEL SETFUNCTIONSLANGUAGE SELECTFUNCTIONSAuto Play: ONAuto TV/VCR: ONIndex SearchGo-To SearchSet Auto RepeatMove: Select:End: SETUPENTERMove: Select:End: SETUPENTERSwitch the VCR to TV or VCR mode automatically■Auto TV/VCR Controls whether the DVD/VCR’s TV/VCR setting changes automatically to VCR-viewing mode when turned on.Press [VCR] to enter VCR mode. Press [SETUP] and select“FUNCTIONS”.Move to “FUNCTIONS” with [v] and press [ENTER].Press [ENTER] to switch between ONand OFF.- Select ON if you want the VCR to switchto the VCR mode when the VCR isturned on or a cassette is inserted. Thisonly applies if you connect the ANT.INand RF OUT jacks of your VCR and TVand watch your VCR on channel 3 of your TV.- Select OFF if you want the VCR to remain in TV mode. This isuseful if you watch your VCR on the TV’s video input and you don’twant your antenna/cable signal interrupted by the VCR. 21FUNCTIONSAuto Play: ONAuto TV/VCR: ONIndex SearchGo-To SearchSet Auto RepeatMove: Select:End: SETUPENTERDC-B8CB1N-PS(VE3.0) 04.3.23 5:2 AM 페이지30](https://usermanual.wiki/WINIA-Electronics/7NF0013/User-Guide-421157-Page-31.png)
![31VCR OPERATIONPress [SETUP] and select“FUNCTIONS”.Select “Index Search”.1■When you record a program, the VCR places an index mark at the start of the recording. Tosearch for an index mark: FUNCTIONSIf you want to scan through a certain numberof index marks, use the number buttons toenter the number of marks you want tosearch. Press [CLEAR] on the remote tocorrect an entry.orPress [REW] to search backward or [FF] tosearch forward. The VCR will locate your index mark and beginplayback. If you did not enter a specific index number, the VCR willlocate the next index mark and begin playback. Press [STOP] to stopindex searching. 2INDEX SEARCHPress REW or FFto begin searchingorEnter a specificindex number- -End: SETUP• If two recordings overlap, the index mark for the second program will be erased.Therefore, when you use the index feature to find the second program, the VCR willskip over it. • If you record multiple programs in one recording session, the VCR will only find theindex mark that was placed on the video cassette tape when the recording session began.Some index marks that may be missed by the VCR :• A mark too close to your location on the tape.• The mark at the beginning of a recorded segment of five minutes or less.• The first index mark on the tape when you start at the beginning of the tape.Searching a cassette tape for programs (indexing)Press [SETUP] and select“FUNCTIONS”.Select “Go-To Search”.1■The tape counter helps you locate segments by their position on the tape. The counter is in hours,minutes and seconds.FUNCTIONSAuto Play: ONAuto TV/VCR: ONIndex SearchGo-To SearchSet Auto RepeatThe tape counter is displayed on thescreen. Use the [0-9] keys to enter the tapecounter you want to find and press [REW]or [FF]. The VCR will search for the timecounter you specified.2GO-TO SEARCHCurrent tape counter is2 : 17 : 18Press REW or FFto go to - : - - : 00Searching with the tape counter (Go-To Search)USINGADVANCEDVCR FEATURESAuto Play: ONAuto TV/VCR: ONIndex SearchGo-To SearchSet Auto RepeatDC-B8CB1N-PS(VE3.0) 04.3.23 5:2 AM 페이지31](https://usermanual.wiki/WINIA-Electronics/7NF0013/User-Guide-421157-Page-32.png)
![32Changing the setup menu languagePress [SETUP] button and select“LANGUAGE SELECT”.1Set the language to English, Spanishor French and [ENTER].2■You can set the language for VCR Setup menus to English, Spanish, or French.■Auto Clock Set automatically adjusts the DVD/VCR clock for Daylight Savings Time (DST) every springand fall. The Auto Clock Set is ON by default. If you live in an area that does not use Daylight SavingsTime, turn this feature OFF.LANGUAGE SELECTSelect a language.EnglishSpanishFrenchSETUPCLOCK SETTIMER RECORDINGSCHANNEL SETFUNCTIONSLANGUAGE SELECTPress [VCR], then press [SETUP] and select “CLOCK SET”.Move into “Auto Clock Set” with [v] .1Press [ENTER] to switch betweenON and OFF.- Select ON if you want the VCR’s clockto adjust automatically for DST- Select OFF if you do not want the clockto automatically adjust for DST2Auto Clock SetCLOCK SETTime and Date SetAuto Clock Set : ONMove: Select:End: SETUPENTERUSINGADVANCEDVCR FEATURESPress [SETUP] and select“FUNCTIONS”.Select “Set Auto Repeat”.1■You can set the DVD/VCR to play the same segment of a tape over and over in a repeating loop.FUNCTIONSAuto Play: ONAuto TV/VCR: ONIndex SearchGo-To SearchSet Auto RepeatSet Auto RepeatThe Set Auto Repeat menu will ask for aloop end time to be specified.To turn off Set Auto Repeat,press the[CLEAR] button.2AUTO REPEATSet the length of timeyou want the tape toplay in a repeating loopLoop from 0:00 to - : - -(h:mm)Cancel:End: SETUPCLEARDC-B8CB1N-PS(VE3.0) 04.3.23 5:2 AM 페이지32](https://usermanual.wiki/WINIA-Electronics/7NF0013/User-Guide-421157-Page-33.png)
![33VCR OPERATIONOn-Screen Display (O.S.D)1Press [DISPLAY] to display the tape counter, clock and status mode onthe TV screen.2Press [DISPLAY] again to view just the tape counter.REPLAY functionReplays the previous 15 seconds of videotape.LAST CHANNEL functionReturns to the previous TV channel which was being watched.SKIP functionSkips 30 seconds forward on a videotape, which may be used to skipcommercials.1Use PLAY, REW, or FF to locate the point on the tape you would like tomark as 0:00:00. Pause the tape at this point.2Press [DISPLAY] to display the tape counter on the screen.3Press [CLEAR] to reset the tape counter to 0:00:00.4You can continue to play the tape or perform other functions with the VCR.Marking a tape for zero searchUSINGADVANCEDVCR FEATURESDC-B8CB1N-PS(VE3.0) 04.3.23 5:2 AM 페이지33](https://usermanual.wiki/WINIA-Electronics/7NF0013/User-Guide-421157-Page-34.png)
![34HI-FISTEREO PLAYBACKPlaying a tape in Hi-Fi high-quality• “Hi-Fi” appears at the top of the screen.• Pressing [AUDIO] changes the audio track as follows:If there is noise in the recording, please select “Linear” to reduce it.Forced MonoRecording Stereo or Secondary Audio Programs (SAP)• In some cases reception is poor when receiving stereo or SAP (Secondary Audio Program) audiosignals. Press [AUDIO] to improve this poor audio quality by changing to mono sound.• Press [AUDIO] again or change the channel to resume normal stereo or SAP sound.Hi-Fi LINEAR MIXSTEREO MONO SAP• You can only record stereo and SAPs if the program is broadcast in stereo or with an SAP.Consult a television guide for specific broadcast information.• Programs are broadcast in mono, stereo, or SAP.• Press [AUDIO] to select STEREO, MONO, SAP in the following order:• Television programs broadcast in stereo will be recorded in Hi-Fi.• The following guidelines will help you decide on the best method for recording programs. Choose:- Stereo reception for normal recording and to record broadcast stereo television.- Mono reception if the stereo signal is weak and sound is too “noisy.”- SAP reception to record a second audio program. An example of an SAP is a program that is broadcast in English,but has a Spanish SAP.DC-B8CB1N-PS(VE3.0) 04.3.23 5:2 AM 페이지34](https://usermanual.wiki/WINIA-Electronics/7NF0013/User-Guide-421157-Page-35.png)
![35VCR OPERATIONPLAYING A DESIRED SCENETo skip scenes on a discTo skip to the next chapter (or track), press [ √√❚].The current chapter (or track) skips to the next chapter (or track).To skip to the previous chapter (or track), press [❚œœ ]. The current scene skips to the previous chapter (or track) or to the first sceneof the current chapter (or track).Press [TITLE] or [MENU].A list of the titles on the disc is displayed.In the case of VCD discs, menu screenswill appear only if a disc has PBCfunction and PBC ON is activated.1Press [ENTER] or [PLAY] afterpressing [ < > ^ v ] to select thedesired title.The selected title starts playing.2■Some movie discs contain multiple titles. If the disc has a title menu, the [TITLE] button can beused to select the desired title. Details of operation will differ depending on the disc used.* Selecting a title may not be available on certain DVD discs.DVD, VCD, VCD2.0, CD, MP3DVDJumping directly to a desired titleDVD OPERATIONDC-B8CB1N-PS(VE3.0) 04.3.23 5:2 AM 페이지35](https://usermanual.wiki/WINIA-Electronics/7NF0013/User-Guide-421157-Page-36.png)
![PLAYING A DESIRED SCENE36Repeating chapters, titles, and tracksDVD, VCD, CD, MP3• CHAPTER : Current chapter will play repeatedly.• TITLE : Current title will play repeatedly.• TRACK : Current track will play repeatedly.• DISC : Current disc will play repeatedly.• REPEAT ONE : Current file will play repeatedly.• REPEAT ALL : All files on the disc will play repeatedly.• RANDOM : Tracks on the disc will play in random order.• OFF : Repeat playback will be cancelled.- DVD -CHAPTERTITLEOFF➝➝➝- VCD -TRACKDISCOFF➝➝➝- CD/MP3 -REPEAT ONEREPEAT ALLRANDOM➝➝➝➝In playback mode, pressing [REPEAT] more than once changes therepeat action as follows:DVD, VCD, CDRepeating a defined period from A to B■You may use the [A-B] button to select a period to repeat.A MP3 disc maynot be repeatedfrom A to B.At the point where you want to start therepeat playback, press [A-B].Point A is set. You may use the Fast Forward,Reverse playback and scene or chapter selectionkeys to move to the point where you want therepeat to end.1At the point where you want to end therepeat playback, press [A-B] again.Point B is set and the segment from A to B willplay repeatedly.2To exit repeat playback mode, press [A-B]. Normal playback will resume.3A-A-BOFFDC-B8CB1N-PS(VE3.0) 04.3.23 5:2 AM 페이지36](https://usermanual.wiki/WINIA-Electronics/7NF0013/User-Guide-421157-Page-37.png)
![37DVD OPERATIONPLAYING A DESIRED SCENESearching a DVD by Title, Chapter or TimeDVDVCDSearching VCD by Track or TimeIf you want to search for a title number,press [SEARCH] once.The current and total number of titles aredisplayed. Use the [0-9] buttons to enter thedesired title number.1If you want to search for a time, press[SEARCH] three times.Use the [0-9] buttons to enter the desired time.3When finished, press [ENTER]. Playback will start from the selected position.4If you want to search for a chapter number,press [SEARCH] twice.The current and total number of chapters aredisplayed. Use the [0-9] buttons to enter thedesired chapter number.2001/003➟total title➟current title001/023➟total chapter➟current chapter01:03:20➟total timeTo search for a track number, press[SEARCH] once. If PBC is OFF, the screen shows the current andtotal number of tracks. Use the [0-9] buttons toenter the desired track.1When finished, press [ENTER]. Playback will start from the selected position.3To search for a track time, press [SEARCH]twice. If PBC is OFF, the screen shows total time. Use the[0-9] buttons to enter the desired time.2* If PBC is ON, entering the track number converts PBC to OFF mode automatically.001/013➟total track ➟current track 01:03:20➟total timeDC-B8CB1N-PS(VE3.0) 04.3.23 5:2 AM 페이지37](https://usermanual.wiki/WINIA-Electronics/7NF0013/User-Guide-421157-Page-38.png)
![38PLAYING A DESIRED SCENEDVDStoring bookmarks in memory to be viewed (listened to) again■Storing a bookmark in the DVD memory is similar to marking your page in a book. It allows youto quickly return to any point on the disc. Marks are not permanent. They are erased from theDVD memory when you eject the disc or power off the DVD.Storing a marker in the memory.Press [BOOKMARK] during play and press[ENTER] at the starting point to be viewed(listened to) again.1Recalling/Clearing a markerPress [BOOKMARK] during playback. Press [< >] to select the markerto be recalled/cleared.Press [PLAY] to recall a marker. Or press [CLEAR] to clear a marker.Play resumes from the point corresponding to the selected marker, orthe selected marker is cleared.2---------DC-B8CB1N-PS(VE3.0) 04.3.23 5:2 AM 페이지38](https://usermanual.wiki/WINIA-Electronics/7NF0013/User-Guide-421157-Page-39.png)
![39DVD OPERATIONCONFIRMING CURRENT PLAY MODEWhile in Play mode, press [DISPLAY].The current disc mode is displayed. If you want to change the mode, select the item with [^] or [v] and enter the new settingswith the [0-9], [<] or [>] buttons.. When finished with each change, press [ENTER].To exit Display mode, press [DISPLAY] again.➟current title / total title➟current chapter / total chapter➟time elapsed➟subtitle selected / current subtitle / total subtitle➟audio language selected / current / total audio language➟repeat playback mode➟current angle / total angleConfirming the current disc mode➟current track / total track➟time elapsed➟repeat playback mode➟PBC mode➟current audio language / total audio language➟current track / total track number➟time elapsed➟repeat playback mode➟PBC mode➟current track / total track number➟time elapsed, repeat playback mode- DVD disc -- SVCD disc -- VCD disc -- CD, MP3, JPEG disc -001/003001/02300:01:03ENG 01/01ENG 01/03OFF01/01001/00300:01:03OFFONENG 01/03001/00300:01:03OFFONMUSIC■000/000 0:00:00 / 0:00:00\PROGRAMLISTmax 6SKYwinamp_ _ _ __ _ __ _ _ _ __ _ __ _ _ _ _DC-B8CB1N-PS(VE3.0) 04.3.23 5:2 AM 페이지39](https://usermanual.wiki/WINIA-Electronics/7NF0013/User-Guide-421157-Page-40.png)
![Using the zoom functionDVD, VCD, CDSelecting 3D AudioDVD, VCDDVDViewing Different AnglesPress [3D].Every time you press [3D], the 3D sound togglesbetween 3D ON ➝3D OFF.■You can enjoy a virtual 3D sound effect from 2-channel sources.■You can enlarge the current screen 2 or 4 times.Keep pressing [ZOOM] until the preferred level of magnificationappears.Each you press [ZOOM], the zoom magnification changes 2 times (X2) ➝4times (X4) ➝OFF ➝2 times (X2) ➝...The default zoom position is the center of the screen. You can move this pointusing [ < > ^ v ].In the case ofSVCD andVCD, only 2 timesZoom is available.■If a disc includes multiple angles, you can watch the same scene from different perspectives. Thefunction is limited to DVD discs supporting multi-angle information.Keep pressing [ANGLE] until thepreferred angle appears.Every time you press [ANGLE], the anglechanges in consecutive order.x2x401/01ON40ZOOM, MULTI ANGLE AND 3D AUDIOOFFDC-B8CB1N-PS(VE3.0) 04.3.23 5:2 AM 페이지40](https://usermanual.wiki/WINIA-Electronics/7NF0013/User-Guide-421157-Page-41.png)
![41DVD OPERATIONPlaying a disc containing MP3 filesMP3ABOUT MP3, JPEG DISCS■This unit will play MP3 files recorded on CD-R and CD-RW discs.Press [OPEN/CLOSE] to open the disc tray. Place a disc with MP3 files on the disc tray with the label side up. Press [OPEN/CLOSE] to close the disc tray.The DVD+VCR will load the disc and display the directory structure.1The followingscreen appears.2Select the desired folder.Move the cursor to the desiredfolder by pressing [< > ^v ] andpress [ENTER] to confirm.3MUSIC■000/000 0:00:00 / 0:00:00\PROGRAMLISTmax 6SKYwinamp_ _ _ __ _ __ _ _ _ __ _ __ _ _ _ _Select the file to listen to.Move the cursor to the file youwant to listen to (or view) bypressing [< > ^v ].Press [PLAY] to startplayback. The selected file will play.Press [■ ] to stop playback. 4Repeat playback mode.Every time you press [REPEAT],repeat playback mode changes asfollows: REPEAT ONE ➝ REPEATALL ➝ RANDOM ➝ ➝ ...Or select by pressing [> v] andpress [ENTER].The selected file or folder will beplayback repeatedly.5MUSIC■000/000 0:00:00 / 0:00:00\PROGRAMLISTmax 6SKYwinamp_ _ _ __ _ __ _ _ _ __ _ __ _ _ _ _MUSIC > MP3√001/018 0:00:34 / 0:03:59\max 6\01(musicfamily.i.am) Smooth-PROGRAMLIST_ _1. 01(musicfamily.i2. 02(musicfamily.i3. 03(musicfamily.i4. 04(musicfamily.i5. 05(musicfamily.i6. 06(musicfamily.i7. 07(musicfamily.iMUSIC > MP3√001/018 0:00:34 / 0:03:59 REPEAT ONE\max 6\01(musicfamily.i.am) Smooth-PROGRAMLIST_ _1. 01(musicfamily.i2. 02(musicfamily.i3. 03(musicfamily.i4. 04(musicfamily.i5. 05(musicfamily.i6. 06(musicfamily.i7. 07(musicfamily.iDC-B8CB1N-PS(VE3.0) 04.3.23 5:2 AM 페이지41](https://usermanual.wiki/WINIA-Electronics/7NF0013/User-Guide-421157-Page-42.png)
![42The ability of this unit to read MP3 discs is dependent on the following:• The Bit Rate must be within 64-256 kbps.• The maximum number of directories should not exceed 32.• The maximum depth level of directories should not exceed 4.• If a file is recorded with a variable bit rate (VBR) (Example : 54~256kbps) distortion mayoccur during playback.• File names should be 8 or fewer letters and/or numbers, and must incorporate the “MP3”file extension. EXAMPLE: ********. MP3 where each *is a letter or number.• Use only letters and/ or numbers in file names. If you use special characters, the file and/ orfolder names may not be displayed correctly on the on-screen display.Caution• Avoid using CD-RW (Rewritable) discs. They may not play back correctly.• The CD-R should be written using the ‘disc at once’ method.• Only discs made with ISO 9660 formatting can be played.ABOUT MP3, JPEG DISCSYou can program playback.Select the file or folder in LISTfolder. Then press [PROGRAM].The selected file or folder will gointo PROGRAM folder.Press [PLAY] in PROGRAMfolder. To move all the files selected inLIST folder to PROGRAM folder,select and press [ENTER].If you want to delete all the files in the PROGRAM folder, select by pressing [> v]and press [ENTER].If you want to delete one file from the programmed playback, select it and then press[CLEAR] button. This does not remove the file from the disc.6MUSIC > MP3√001/018 0:00:34 / 0:03:59 REPEAT ONE\max 6\02(musicfamily.i.am) Lager TLIST_ _1. 01(musicfamily.i2. 02(musicfamily.i3. 03(musicfamily.i4. 04(musicfamily.i5. 05(musicfamily.i6. 06(musicfamily.i7. 07(musicfamily.iPROGRAM6. 06(musicfamily.i2. 02(musicfamily.i5. 05(musicfamily.iDC-B8CB1N-PS(VE3.0) 04.3.23 5:2 AM 페이지42](https://usermanual.wiki/WINIA-Electronics/7NF0013/User-Guide-421157-Page-43.png)
![43DVD OPERATIONPlaying a disc containing JPEG (PHOTO) filesJPEG■This unit will play JPEG files recorded on CD-R and CD-RW discs. It will also play JPEG filesrecorded on DVD, DVD-R, DVD-RW, and DVD+RW.Select the desired folder.Move the cursor to the desiredfolder by pressing [^ v] and press[ENTER] to confirm.1Slideshow Delay Time set.Select “ Slideshow & DelayTime” function. Then press[ENTER] to adjust the slideshowdelay time from 0FF to 10minutes.2Start the slideshow of file.If you press [PLAY] when a JPEGimage is selected instead of[ENTER], a slideshow will beginautomatically starting from theselected image.• To stop the slideshow, press [STOP].To turn left, press [<].To turn right, press [>].3Combination Play set.Select “ Combination Play”function. Select the folder in LIST folder.Then press [ENTER] or [PLAY] toenter into the playback of totalfiles.A combination play willbegin.• Playback order in Audio/Video : Thefirst file in the first folder ➝The last filein the last folder412/134 œ:90°√:90°§ ∞ √/»■CLEAR:HIDE■ ■ ■ ■ ■ABOUT MP3, JPEG DISCSTo skip to next screen (or file), press [∞].To skip to previous screen (or file), press [§].PICTURE > JPG■000/000 0:00:00 / 0:00:00\LISTDESKTOPPHOTOTEMPORARTRASHPREVIEWPICTURE > JPG■000/000 0:00:00 / 0:00:00\PHOTO\320\BAK001.JPGLIST__1. BAK0012. BAK0023. BAK0034. BAK0045. BAK0056. BAK0067. BAK007PREVIEWPICTURE > JPG■000/000 0:00:00 / 0:00:00\PHOTO\320\BAK001.JPGLIST__1. BAK0012. BAK0023. BAK0034. BAK0045. BAK0056. BAK0067. BAK007PREVIEWDC-B8CB1N-PS(VE3.0) 04.3.23 5:2 AM 페이지43](https://usermanual.wiki/WINIA-Electronics/7NF0013/User-Guide-421157-Page-44.png)
![44DISPLAYING DISC MENUSPress [TITLE] or [MENU]. • The disc menu is displayed. These menus vary by disc. (“Return”will appear on the OSD with VCD2.0.)• If it is a VCD2.0, select PBC ON mode by pressing [TITLE].* CD and VCD1.1 do not have menus.1Move the cursor to the desired menu item with [ < > ^v ] and select with[ENTER] or [PLAY].2To display disc menusDVD, VCD2.0PROGRESSIVE SCAN MODEWhile DISC STOP, press [P.SCAN].Each time you press [P.SCAN], SCAN MODE changes as follows:INTERLACED ➝PROGRESSIVE ➝INTERLACED ➝ PROGRESSIVE.* If SCAN MODE is set to “INTERLACED”, connect Y/Pb/Pr on the DVD+VCR to theINTERLACED input on your TV.If SCAN MODE is set to “PROGRESSIVE”, connect Y/Pb/Pr on the DVD+VCR to thePROGRESSIVE SCAN input on your TV.Selecting SCAN MODEDVDDC-B8CB1N-PS(VE3.0) 04.3.23 5:2 AM 페이지44](https://usermanual.wiki/WINIA-Electronics/7NF0013/User-Guide-421157-Page-45.png)
![45DVD OPERATIONDVD LANGUAGE SETUPSelecting an OSD language.Select a OSD language to be displayed onDVD menus with [ENTER]. 2Selecting an AUDIO language.Set your preferred audio language with[ENTER]. If the audio language is set andrecorded on the DISC, it is automaticallyplayed in the set language every time it isplayed. OTHERS - - - - : Another language can beselected. You can input 4-digit languagecode.Refer to the language codes on next page. Press[CLEAR] if an incorrect language code is entered.3Selecting a SUBTITLE language.Set your preferred subtitle with [ENTER]. Ifthe subtitle language is set and recordedon the DISC, it is automatically played inthe set language every time it is played. OTHERS - - - - : Another language can beselected. You can input 4-digit languagecode. Refer to the language codes on next page. Press[CLEAR] if an incorrect language code is entered.4■You can set your preferred language for disc menus, audio soundtracks and subtitles.While in Stop mode, press[SETUP].1If a disc doesnot includelanguage information,the selected languagewill not appear.OSDAUDIOSUBTITLEDISC MENUENGLISHAUTOOFFAUTOOSDAUDIOSUBTITLEDISC MENUENGLISH ✓FRENCHSPANISHOSDAUDIOSUBTITLEDISC MENUENGLISHFRENCHSPANISHGERMANITALIANDUTCHPORTUGUESEAUTO ✓OSDAUDIOSUBTITLEDISC MENUOSDAUDIOSUBTITLEDISC MENUENGLISHFRENCHSPANISHGERMANITALIANDUTCHPORTUGUESEOFF ✓OSDAUDIOSUBTITLEDISC MENUFRENCHSPANISHGERMANITALIANDUTCHPORTUGUESEAUTO ✓OTHERS - - - -FRENCHSPANISHGERMANITALIANDUTCHPORTUGUESEOFF ✓OTHERS - - - -DVD FEATURE SETUPDC-B8CB1N-PS(VE3.0) 04.3.23 5:2 AM 페이지45](https://usermanual.wiki/WINIA-Electronics/7NF0013/User-Guide-421157-Page-46.png)
![46Selecting a DISC MENU language.Set your preferred DISC MENU languagewith [ENTER]. If the DISC MENU languageis set and recorded on the DISC, it isautomatically played in the set languageevery time it is played. OTHERS - - - - : Another language can beselected. You can input 4-digit languagecode. Refer to the language codes. Press [CLEAR] if anincorrect language code is entered.5OSDAUDIOSUBTITLEDISC MENUENGLISHFRENCHSPANISHGERMANITALIANDUTCHPORTUGUESEAUTO ✓OSDAUDIOSUBTITLEDISC MENUFRENCHSPANISHGERMANITALIANDUTCHPORTUGUESEAUTO ✓OTHERS - - - -DVD LANGUAGE SETUPTable of Language and Their AbbreviationsEnter the appropriate code number for the initial settings “AUDIO”, “SUBTITLE” and/or“DISC MENU”.Code Language Code Language Code Language Code Language Code Language6565 Afar 6983 Spanish 7473 Yiddish 7789 Burmese 8385 Sundanese6566 Abkhazian 6984 Estonian 7487 Javanese 7865 Nauru 8386 Swedish6570 Afrikaans 6985 Basque 7565 Georgian 7869 Nepali 8387 Swahili6577 Ameharic 7065 Persian 7575 Kazakh 7876 Dutch 8465 Tamil6582 Arabic 7073 Finnish 7576 Greenlandic 7879 Norwegian 8469 Telugu6583 Assamese 7074 Fiji 7577 Cambodian 7982 Oriya 8471 Tajik6588 Aymara 7079 Faroese 7578 Kannada 8065 Panjabi 8472 Thai6590 Azerbaijani 7082 French 7579 Korean 8076 Polish 8473 Tigrinya6665 Bashkir 7089 Frisian 7583 Kashmiri 8083 Pashto, Pushto 8475 Turkmen6669 Byelorussian 7165 Irish 7585 Kurdish 8084 Portuguese 8476 Tagalog6671 Bulgarian 7168 Scots Gaelic 7589 Kirghiz 8185 Quechua 8479 Tonga6672 Bihari 7176 Galician 7665 Latin 8277 Rhaeto-Romance 8482 Turkish6678 Bengali;Bangla 7178 Guarani 7678 Lingala 8279 Romanian 8484 Tatar6679 Tibetan 7185 Gujarati 7679 Laothian 8285 Russian 8487 Twi6682 Breton 7265 Hausa 7684 Lithuanian 8365 Sansrit 8575 Ukrainian6765 Catalan 7273 Hindi 7686 Latvian, Lettish 8368 Sindhi 8582 Urdu6779 Corsican 7282 Croatian 7771 Malagasy 8372 Serbo-Croatian 8590 Uzbek6783 Czech 7285 Hungarian 7773 Maori 8373 Singhalese 8673 Vietnamese6789 Welsh 7289 Armenian 7775 Macedonian 8375 Slovak 8679 Volapük6865 Danish 7365 Interlingua 7776 Malayalam 8376 Slovenian 8779 Wolof6869 German 7378 Indonesian 7778 Mongolian 8377 Samoan 8872 Xhosa6890 Bhutani 7383 Icelandic 7779 Moldavian 8378 Shona 8979 Yoruba6976 Greek 7384 Italian 7782 Marathi 8379 Somali 9072 Chinese6978 English 7387 Hebrew 7783 Malay 8381 Albanian 9085 Zulu6979 Esperanto 7465 Japanese 7784 Maltese 8382 SerbianDC-B8CB1N-PS(VE3.0) 04.3.23 5:2 AM 페이지46](https://usermanual.wiki/WINIA-Electronics/7NF0013/User-Guide-421157-Page-47.png)
![47DVD FEATURE SETUPVIDEO SETUPSelecting TV ASPECT.If you select “4:3 LB”, you can watch theoriginal widescreen movie, but black barswill appear above and below the picture.If you select “4:3 PS”, the picture will fillthe screen but the sides of the movie willbe cropped.If a disc size was recorded in 4:3, youcannot watch it in wide screen even if TV ASPECT is set to “16:9WIDE”.2■To set the DVD+VCR to match the capabilities of your TV:Selecting VIDEO OUT.You may set VIDEO OUT to S-VIDEO orCOMPONENT.* If VIDEO OUT is set to S-VIDEO, you cannot setSCAN MODE. If VIDEO OUT is set toCOMPONENT, you can set SCAN MODE.3Selecting SCAN MODE.You may set SCAN MODE toINTERLACED or PROGRESSIVE.* If SCAN MODE is set to “INTERLACED”, connectY/Pb/Pr on the DVD+VCR to the INTERLACEDinput on your TV.If SCAN MODE is set to “PROGRESSIVE”, connect Y/Pb/Pr on the DVD+VCR to thePROGRESSIVE SCAN input on your TV.4While in Stop mode, press[SETUP].1TV ASPECTVIDEO OUTSCAN MODE4:3 LBCOMPONENTINTERLACEDTV ASPECTVIDEO OUTSCAN MODE4:3 LB✓4:3 PS16:9 WIDETV ASPECTVIDEO OUTSCAN MODES-VIDEOCOMPONENT✓TV ASPECTVIDEO OUTSCAN MODE INTERLACED ✓PROGRESSIVEDC-B8CB1N-PS(VE3.0) 04.3.23 5:2 AM 페이지47](https://usermanual.wiki/WINIA-Electronics/7NF0013/User-Guide-421157-Page-48.png)
![Selecting DIGITAL OUT.Set audio output to coaxial or optical. Youcan set the outgoing digital signal toBITSTREAM or LPCM:•BITSTREAM : The raw audio signalrecorded on the disc goes to the digitalaudio output.•LPCM : The decoded audio signal goes to the digital audiooutput.2■To set the DVD+VCR to match the capabilities of your audio system:While in Stop mode, press[SETUP].1Select a Dynamic RangeYou can set the Dynamic Range asfollows:•Off : You can hear the sound as it wasoriginally recorded on the disc.•Full : You can hear loud sounds softerand soft sounds louder.348DIGITAL OUTDYNAMICRANGEBITSTREAMOFFDIGITAL OUTDYNAMIC RANGEBITSTREAM✓LPCMDIGITAL OUTDYNAMIC RANGEFULL3/42/41/4OFF ✓AUDIO SETUPDC-B8CB1N-PS(VE3.0) 04.3.23 5:2 AM 페이지48](https://usermanual.wiki/WINIA-Electronics/7NF0013/User-Guide-421157-Page-49.png)
![49DVD FEATURE SETUPRestoring DEFAULTS.If you press [ENTER] when the cursorhighlights RESET, “Are you sure?” messagewill appear. Confirm with [OK].This feature resets every function to itsoriginal Factory Defaults except theParental Control settings.Selecting SCREEN SAVER.To protect your TV from possible damagefrom bright scenes over long periods oftime, you can turn on the built-inscreensaver. When set to "ON", thescreensaver functions automaticallywhenever the unit is left in Stop for 5minutes.OTHERS SETUPSelecting OSD.Select "ON" to have the OSD (On ScreenDisplays) shown on the screen.2While in Stop mode, press[SETUP].1OSDSCREEN SAVERAutoPlayDEFAULTSPARENTALPASSWORDONONONRESET8 ADULTOSDSCREEN SAVERAutoPlayDEFAULTSPARENTALPASSWORDON ✓OFFOSDSCREEN SAVERAutoPlayDEFAULTSPARENTALPASSWORDON ✓OFFOSDSCREEN SAVERAutoPlayDEFAULTSPARENTALPASSWORDRESET3Selecting Autoplay.It skips ads and trailers and starts themovie.OSDSCREEN SAVERAutoPlayDEFAULTSPARENTALPASSWORDON ✓OFF45Are you sure?OK CANCELDC-B8CB1N-PS(VE3.0) 04.3.23 5:2 AM 페이지49](https://usermanual.wiki/WINIA-Electronics/7NF0013/User-Guide-421157-Page-50.png)
![Changing a password.To change your password, move the cursorto “PASSWORD” and press [>].Enter your current password.Then enter a new password and press[ENTER].Confirm the new password by typing itagain.Now your password is changed.50OSDSCREEN SAVERAutoPlayDEFAULTSPARENTALPASSWORDINPUT PASSWORD- - - -OK CANCELOSDSCREEN SAVERAutoPlayDEFAULTSPARENTALPASSWORDINPUT PASSWORD- - - -OSDSCREEN SAVERAutoPlayDEFAULTSPARENTALPASSWORDCONFIRM PASSWORD- - - -OSDSCREEN SAVERAutoPlayDEFAULTSPARENTALPASSWORDCHANGE OKOTHERS SETUP•If the password iswrong, “WRONGPASSWORD”appears instead of“CHANGEPASSWORD”.•The initial Passwordis “3308”. If youforget your newpassword, you mayinput this number.7Selecting PARENTAL.Press [>] when the cursor highlightsPARENTAL.When “INPUT PASSWORD” appears onthe screen, enter your password. Andconfirm with [OK].Change Parental Rating level.After you have entered the correctpassword, you can change the PARENTALrating by pressing [^v]. Confirm yourchoice by pressing [ENTER].These 8 levels of parental control protectchildren from watching violence, sexualscenes and other objectionable material.OSDSCREEN SAVERAutoPlayDEFAULTSPARENTALPASSWORD1 KIDS2 G3 PG4 PG-135 PG-R6 R7 NC-178 ADULT ✓OSDSCREEN SAVERAutoPlayDEFAULTSPARENTALPASSWORD1 KIDS2 G3 PG4 PG-135 PG-R6 R7 NC-178 ADULT ✓6INPUT PASSWORD- - - -OK CANCELDC-B8CB1N-PS(VE3.0) 04.3.23 5:2 AM 페이지50](https://usermanual.wiki/WINIA-Electronics/7NF0013/User-Guide-421157-Page-51.png)
![53HELPHow to use a head cleaner• If you use an old or contaminated videotape, the picture may not be clear due to contaminationof the VCR heads. Remove contaminants using a head-cleaner as described below.1 Insert a head-cleaner tape into the VCR.2 Press [PLAY] for 5 seconds, and then press [FF] for about 10 seconds.3 Eject the head-cleaner from the VCR.• If the picture is still not clear, repeat the above 2 or 3 more times.PLAY (5 secs)FF (10 secs)ABOUT VCR AND VIDEOTAPEWhat is dew condensation symptom?• If a VCR is moved from a cool place to a warm and damp place or to a place facing a direct coolair flow from an air-conditioner... condensation may form on the VCR heads.If condensation occurs, 1 First, turn the unit on for one or two hours before using it.2 Do not use when condensation is present because it may damage the VCR or videotape.VCR TermsAFT Automatic fine tuning, a circuit that automatically adjusts TV reception to optimumcondition.CABLE Cable television.Index Search A feature of this VCR that automatically records an index mark each time recordingbegins. It helps you locate a particular segment of the tape quickly and easily.SLP Super Long Play, an intermediate tape recording speed that combines most of thepicture/audio quality obtainable at the standard recording speed with some of thetape economy of Extended Play.OSD On-screen display of information pertinent to the features of the VCR.OTR One-touch recording, a feature that allows you to record the program you’rewatching by pressing the REC key. Each press of the key increases the recording timeby 30 minutes, up to four hours.RF Radio frequency, the composite audio/video signal supplied to a TV receiver (orother video component) by an antenna or cable system.Safety tab The plastic tab at the back of a video tape cassette which, when removed, preventsaccidental erasure of a recording.SP Standard play, the recording speed to use when the best picture quality is of primeimportance (and when total recording time is not).DC-B8CB1N-PS(VE3.0) 04.3.23 5:2 AM 페이지53](https://usermanual.wiki/WINIA-Electronics/7NF0013/User-Guide-421157-Page-54.png)
![54TROUBLESHOOTING (DVD)•The player does not play.•No sound.•A disc is playing but screen doesnot appear or poor screen appears.•Sound is irregular.•Remote control does not work.•Dolby Digital sound does notwork•[AUDIO] or [SUBTITLE] buttondoes not work.•[ANGLE] button does not workwhile a DVD is playing.•“MENU” does not appear while aDVD is playing.•Screen shakes or appears only inblack and white. (or Subtitlesshake)•The file name of MP3 (CD-R)appears with strange letters.•Any MP3 (CD-R) file isn’tdisplayed.ChecksSymptom➤If a DVD is from overseas, it may not play. Make sure theDVD’s region code is 1 or All.➤Make sure the DVD is inserted in the right direction.➤If it is a CD-ROM for a PC or DVD-ROM, it will not play.➤Play mode may be slow or paused. (In variable speed play, nosound comes through)➤Check audio connections.➤Make sure TV and amplifier are working correctly.➤Check "AUDIO" items in the SETUP menu.➤Did you turn on your TV?➤Check video connections.➤The player may be paused.➤The disc may have some contaminants or be damaged.➤The disc may be defective.➤Check the connection with Dolby Digital amplifier.➤Make sure plugs are securely connected.➤Some contaminants may be present in connection terminal.➤To operate DVD, first press the [DVD] button.➤Unplug the power plug and plug it again.➤Make sure you are within 23 feet (7 meters) of the unit, andthat there are no obstacles between the remote and the frontpanel.➤Battery may be weak or dead.➤Dolby Digital sound works only with a Dolby Digital amplifier.➤Make sure there is a "Dolby Digital" mark on the DVD.➤If using the digital output, press [STOP], then press [SETUP]and make sure "DIGITAL OUTPUT" is set to "BITSTREAM".➤Make sure all components are connected correctly.➤If a DVD does not include language information, thesefunctions are not supported.➤“ANGLE” is supported only if the DVD contains multi anglescenes. ➤Make sure you are within 23 feet (7 meters) of the unit, andthat there are no obstacles between the remote and the frontpanel.➤Battery may be weak or dead.➤A DVD may not contain menu information.➤A disc may have some contaminants or be damaged.➤If you playback a PAL DVD disc with region code "ALL", theplayback screen may shake.➤The unit only recognizes MP3 file names with letters, numbersand special symbols. The maximum length is 10 characters.➤Unrecognized characters will be displayed as “----”.➤If the surface of the disk is damaged, file display and playbackis not possible.DC-B8CB1N-PS(VE3.0) 04.3.23 5:2 AM 페이지54](https://usermanual.wiki/WINIA-Electronics/7NF0013/User-Guide-421157-Page-55.png)
![55HELPChecksSymptomTROUBLESHOOTING (VCR)•“Power On” does not work.•Unit does not work even in“Power On”.•A videotape will not insert.•On inserting a videotape, the tapeis re-ejected.•A videotape is not ejected.•A channel on video and a playscreen does not appear.•Noise (screen noise) appears onscreen.•Noise appears on screen afterrecording.•While in Play mode noise appears.•Sound and picture are irregular.•Sound comes on but picture doesnot appear.•Screen is irregular and stripesappear.•"Screen Error" message is displayedon screen.•While recording and playing, thetop of screen waves.•A screen is not clear.➤Make sure the power plug is inserted in an electric outlet.➤Make sure a videotape is inserted.➤Press [VCR] on the remote control or press DVD/VCR on thefront panel of the unit.➤Unplug the unit and plug it in again.➤Make sure a power plug is inserted in an electric outlet.➤Make sure a videotape is not already inserted.➤Make sure the videotape is inserted in the right direction (theside with the transparent window should be on the top)➤Have you inserted the videotape again just after the tape wasejected? Try it again after fully ejecting it.➤When a videotape jams on insertion the tape may not beinserted correctly. Remove the tape and then reinsert it gently.➤This is a safety feature to protect your videotape. Please pullout the tape and insert it again.➤If the product is not used for a long time, a videotape may notbe ejected because the tape inside may be stretched. In thiscase, unplug the unit for about 10 minutes, plug it in again,then press [EJECT].➤Check your antenna’s connection.➤TV channel should be set to video channel (3 or 4).➤Check if your antenna’s signal is weak. If so, connect afrequency amplifier to the device.➤Press [TV/VCR] until “VCR” is displayed on the display panel.➤VCR is not playing and is tuned to a weak TV channel.➤Select TV by pressing [TV/VCR] on remote control.➤While playing a videotape, there may be some noise at thebeginning of the tape or when resuming playback after pausingthe tape, which is normal.➤Press [TRACKING] for better picture quality. Videotape may bepoor. Try playing another one to decide if the problem is thetape of the VCR.➤Use a head-cleaner to clean the VCR heads. VCR heads maybe contaminated.➤Because VCR Play signals are not stable like a TV signals, thescreen may be unstable or curved while playing. To fix theproblem, adjust the horizontal adjustment on the TV.➤If the videotape is old or was recorded on another modelbands may appear on the screen.➤Try using the [TRACKING+/–] buttons.➤Try using a head-cleaner.DC-B8CB1N-PS(VE3.0) 04.3.23 5:2 AM 페이지55](https://usermanual.wiki/WINIA-Electronics/7NF0013/User-Guide-421157-Page-56.png)
![56ChecksSymptomTROUBLESHOOTING (VCR)•A screen in Pause mode is shakingor slow playback is not clear.•The unit will not record a TVprogram.•When [REC] is pressed, thevideotape is immediately ejected.•Timer recording from Cable TVdoes not work.•In spite of pressing [CH+/-], achannel can not be set.•Screen is distorted while playing acopy of a tape.•Remote control does not work.•Rewind and FF Buttons on remotecontrol do not work.•VISS index search does not work.•Cable broadcasting can not beselected.➤Try using a head-cleaner.➤Try using the [TRACKING+/–] buttons.➤Check whether the desired channel is visible on the screen. Ifnot, press [TV VIEW] to view the TV.➤Check whether the timer recording settings are right.➤Are RF cables connected to the antenna connection correctly?➤Does a channel number appear on the display?➤Check the record safety tab on the videotape.➤Is the RF cable connected to the "ANT.IN" terminal?➤Make sure the clock is set correctly.➤Does the display show “≈” (Ready for timer recording)? ➤Make sure the timer recording settings are right.➤Check the record safety tab on the videotape.➤Was the cable data output code set correctly?➤Is the cable box setup and output channel set correctly? Referto its user manual for instructions.➤Did you enter a password? (Please cancel it.)➤Did you turn off your player? (Please turn it on.)➤The selected channel cannot be stored.➤Please check your channel settings or press a number button.➤Some rental tapes or discs are set to prevent copying inmanufacturing. These tapes cannot be duplicated in goodcondition.➤Battery may be weak or dead.➤Make sure you are within 23 feet (7 meters) of the unit, andthat there are no obstacles between the remote and the frontpanel.➤If a videotape is completely rewound, “VISS REW” and “REW”do not work.➤If a videotape has been played completely the end, “FF”, “VISSFF”, “PLAY” and “REC” do not work.➤Are you playing a tape that was not recorded in this recorder?➤You may have started recording while the VCR was paused.Please start recording from Stop mode.➤Select “CABLE” not “NETWORK” in the “CHANNEL SETTING”menu.DC-B8CB1N-PS(VE3.0) 04.3.23 5:2 AM 페이지56](https://usermanual.wiki/WINIA-Electronics/7NF0013/User-Guide-421157-Page-57.png)