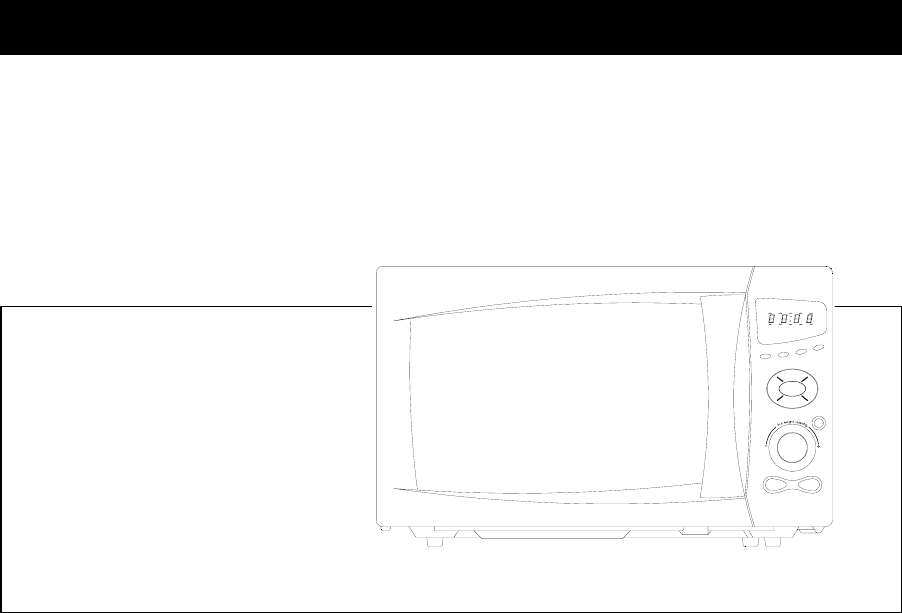
WINIA Electronics 7NF13MO1000 Microwave Oven User Manual USERS MANUAL
Dongbu Daewoo Electronics Corporation Microwave Oven USERS MANUAL
Contents
- 1. USERS MANUAL
- 2. Users manual
USERS MANUAL
MICROWAVE OVEN
OPERATING
INSTRUCTIONS
Before operating this oven, please read these instructions completely.
Potato
Grill Defrost
Popcorn
Stop/Clear
t
Speedy Cook
Start/
Auto Cook
Weight
More
Power
Timer
Kitchen Clock
1
Timer
Kitchen no/cups
Lock
2Grill
Less
lboz
Time
KOG-133K

Table of contents
1. precautions
2. important
3. installation
4. specification
5. features diagram
6. control panel
7. operation
8. controls
setting the power levels
about the time feature
setting the clock
child lock and power save mode
grill cooking
kitchen timer
auto cook
defrost
speedy cook
popcorn
potato
more/less
sequence programming
9. before you call for service
10. Questions and answer

PRECAUTION TO AVOID POSSIBLE EXPOSURE
TO EXCESSIVE MICROWAVE ENERGY
(a). Do not attempt to operate this oven with the door open since open-door operation can result in
harmful exposure to microwave energy. It is important not to defeat or tamper with the safety
interlocks.
(b). Do not place any object between the oven front face and the door or allow soil or cleaner residue to
accumulate on the sealing surfaces
(c). Do not operate the oven of it is damaged.
It is particularly important that the oven door close properly and that there is no damage to the
following:
(1) door (bent),
(2) hinges and latches (broken or loosened),
(3) door seals and sealing surfaces.
(d). The oven should not be adjusted or repaired by anyone except properly qualified service personnel.
IMPORTANT SAFETY INSTRUCTIONS
When using electrical appliances, basic safety precautions should be followed, including the
following:
WARNING-To reduce the risk of burns, electric shock, fire, injury to persons or exposure to
excessive microwave energy:
1 Read all instruction before using the appliance.
2 Install or locate this appliance only in accordance with the provided installation
instructions.
3 Some products such as whole eggs and sealed containers-for example, closed glass jars
may explode and should not be heated in this oven.
4 Use this appliance only for its intended use as described in this manual. Do not use
corrosive chemicals or vapors in this appliance. This type of oven is specifically designed
to heat, cook, or dry food. It is not designed for industrial or laboratory use.
5 As with any appliance, close supervision is necessary when used by children.

6 Do not operate this appliance if it has a damaged cord or plug, if it is not working properly,
or of it has been damaged or dropped.
7 This appliance should be serviced only by qualified service personnel.
Contact nearest authorized service facility for examination, repair of adjustment.
10 Do not cover or block any openings on the appliance.
11 Do not store this appliance outdoors. Do not use this product near water for example, near
a kitchen sink, in wet basement, or near a swimming pool, and the like.
12 Do not immerse cord or plug in water.
13 Keep cord away from heated surfaces.
14 Do not let cord hang over edge of table or counter.
15 Either:
a) When cleaning surfaces of door and oven that comes together on closing the door,
use only mild, non-abrasive soaps or detergents applied with a sponge or soft cloth,
or
b) When separate cleaning instructions are provided, See door surface cleaning
instructions on (specific page or section to be included).
16 To reduce the risk of fire in the oven cavity:
a) Do not overcook food. Carefully attend appliance if paper, plastic, or other com-
bustible materials are placed inside the oven to facilitate cooking.
b) Remove wire twist-ties from paper or plastic bag before placing bag in oven.
c) If materials inside the oven should ignite, keep oven door closed, turn oven off, and
disconnect the power cord, or shut off power at the fuse or circuit breaker panel.
d) Do not use the cavity for storage purposes.
Do not leave paper products, cooking utensils, or food in the cavity when not in use.
17 Do not use this microwave oven to heat corrosive chemicals (for example, sulfides and chlorides).
Vapours from such corrosive chemicals may interact with the contact and springs of the safety
interlock switches there by rendering them inoperable.
18 Keep the wave guide cover clean at all times.
Wipe the oven interior with a soft damp cloth after each use. If you leave grease or fat
anywhere in the cavity it may overheat, smoke or even catch fire when next using the
oven.
19 Never heat oil or fat for deep frying as you cannot control the temperature and doing so may lead to
overt heating and fire.
20.
ARCING

If you see arcing, press STOP / CLEAR pad and correct the problem.
Arcing is the microwave term for sparks in the oven. Arcing is caused by:
■Metal or foil touching the side of the oven.
■Foil not molded to food(upturned edges act like antennas).
■Metal, such as twist-ties, poultry pins, or gold rimmed dishes, in the microwave.
■Recycled paper towels containing small metal pieces being used in the microwave.
INSTALLATION
1 Examine the oven after unpacking
Check for damage such as a mis-aligned door, broken door or a dent in the cavity. If any
damage is visible, DO NOT INSTALL, and notify your dealer immediately.
2 Level, flat location
Install the microwave oven on a level, flat surface.
3 Ventilation
Do not block air vents. If they are blocked during operation, the oven may overheat and
eventually cause a failure. For proper ventilation, allow 3 inches of space between oven
top, side, rear and adjacent surfaces
4 Away from radio and TV sets
Poor television reception and radio interference may result the oven is located close to a
TV, radio, antenna, etc. Place the oven as far from them as possible.
5 Away from heating appliances and water taps
Keep the oven away from heat, steam or splashing liquids. These things can adversely
affect oven wiring and contacts.
6 Power supply
This microwave oven requires a power supply of approximately 15 Amperes, 120 Volts,
60Hz and a grounded outlet. A short power cord is provided to reduce the risk of the user
becoming entangled in or tripping over a longer cord. Longer cord sets or extension cords
are available and may be may be used if card id exercised.
If an extension cord is used, the marked electrical rating of the cord should be at least as
great as the electrical rating of the oven. The extension cord must be a grounding type 3-
wire cord. The longer cord should g e arranged so it does not drape over the tabletop or
counter where children can pull on it or trip over it.
7. after placing the food in a suitable container, open the oven door and put it on the glass tray.
The glass tray must always be in place during cooking.
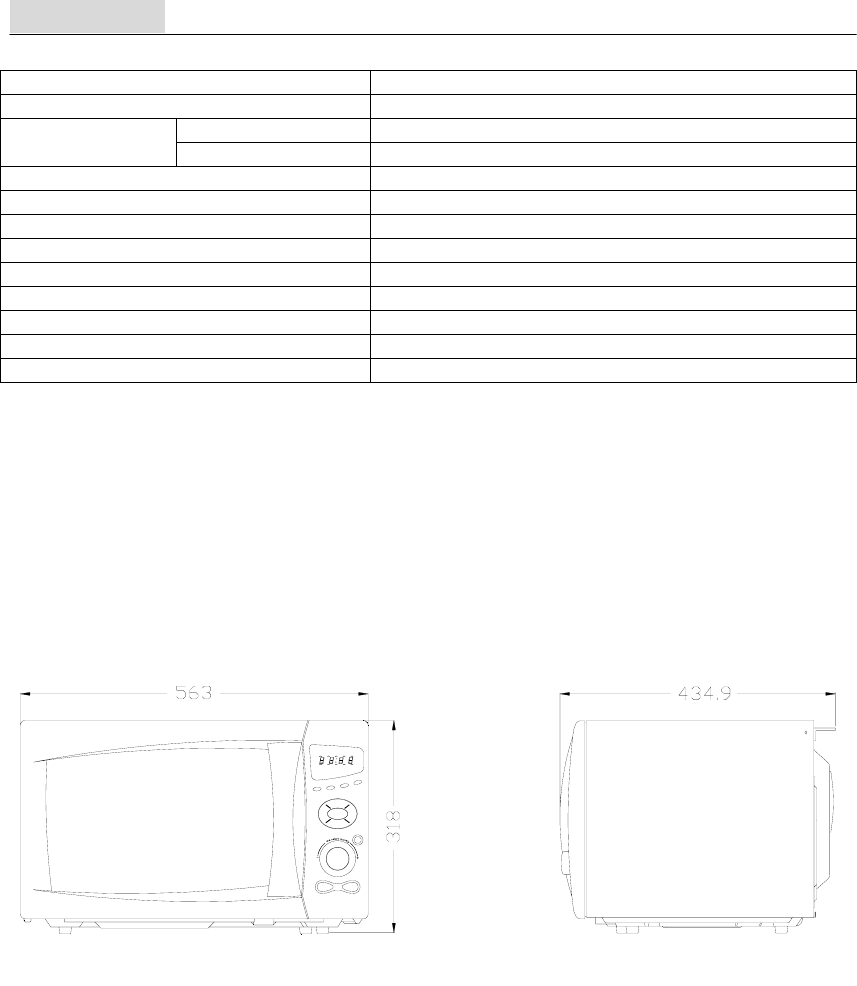
Specification
MODEL KOG-133K
POWER SUPPLY 120V/60Hz, SINGLE PHASE WITH EARTHING
MICROWAVE 1400 WPOWER
CONSUMPTION GRILL 1150 W
MICROWAVE ENERGY OUTPUT 1000 W
MICROWAVE FREQUENCY 2450 MHz
OUTSIDE DIMENSIONS(WxHxD) 563 x 318 x 434.9 mm (22.1 x 12.5 x 17.1 in.)
CAVITY DIMENSIONS(WxHxD) 380 x 246 x 386 mm (14.9 x 9.7 x 15.2 in.)
NET WEIGHT APPROX. 18 kg (39.7 lbs)
TIMER 99min.(M/W), 30min.(GRILL)
FUNCTION SELECTIONS MICROWAVE, GRILL
POWER SELECTIONS 10 LEVELS
CAVITY VOLUME 1.3 Cu. Ft
*Specifications are subject to change without notice.
Potato
Grill Defrost
Popcorn
Stop/Clear
t
Speedy Cook
Start/
Auto Cook
Weight
More
Power
Timer
Kitchen Clock
1
Timer
Kitchen no/cups
Lock
2Grill
Less
lb
oz
Time
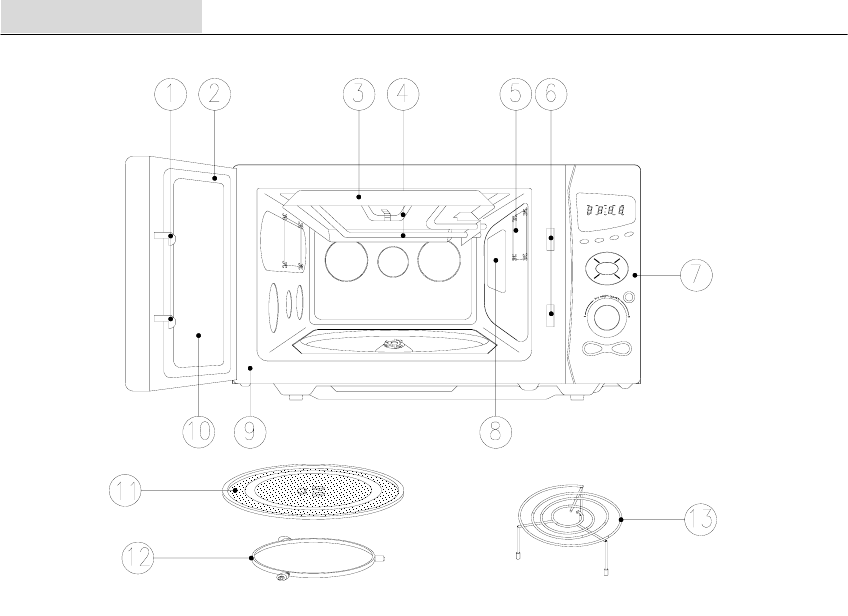
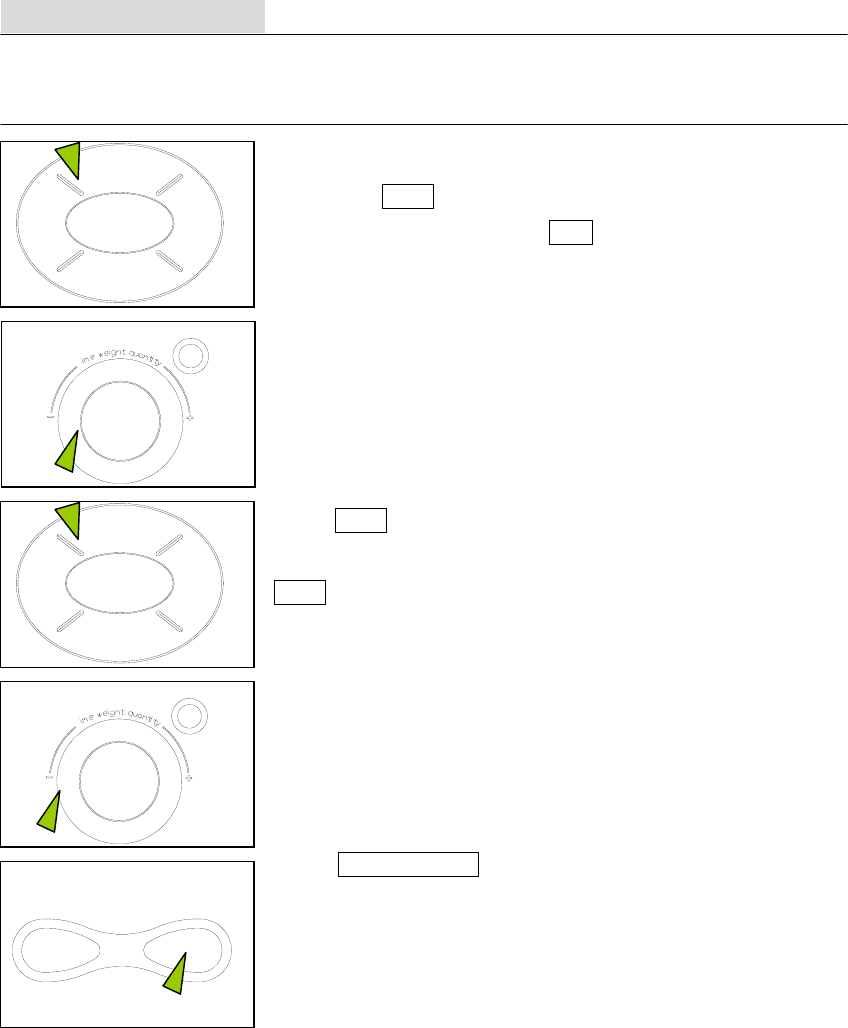
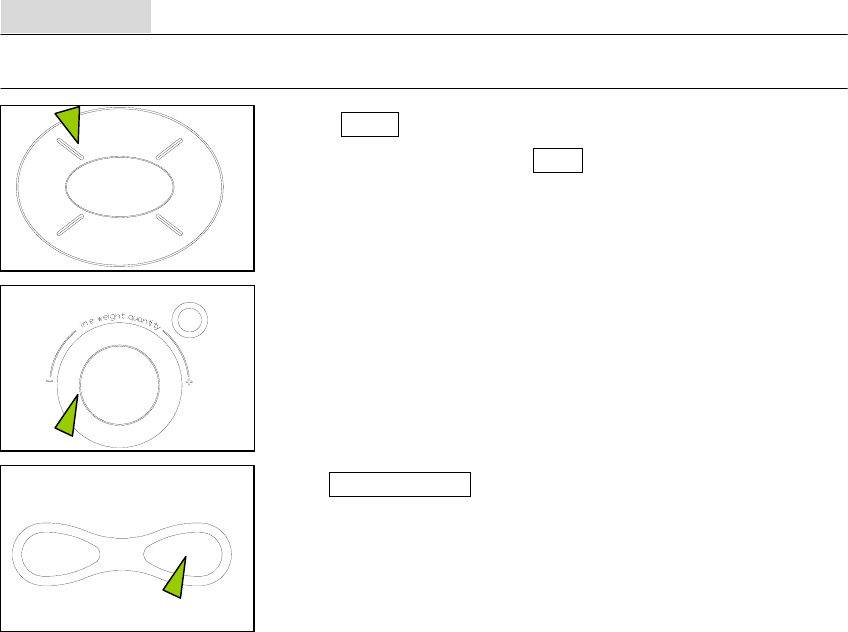
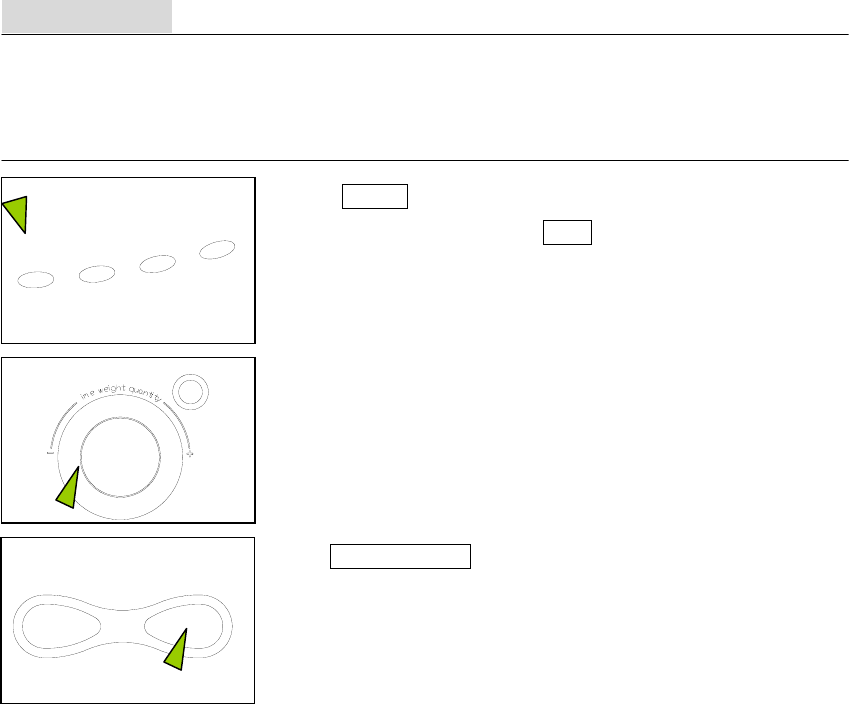
Features diagram
1. DOOR LATCH – When the door is closed it will automatically lock shut. If the door is opened while
the oven is operating, the magnetron will automatically shut off.
2. DOOR SEAL – Door seal maintains the microwave within the oven cavity and prevents microwave
leakage.
3. REFLECTOR – Reflects heat from heat element and insulates top plate from heat.
4. HEATING ELEMENT – Turns on when grill cooking selected.
5. OVEN LAMP – Automatically turns on during oven operating.
6. SAFETY INTERLOCK SYSTEM – Prevents the oven from operating while the door is opend.
7. CONTROL PANEL
8. SPATTER SHIELD – Protects the microwave outlet from splashes of cooking foods.
9. OVEN FRONT PLATE
10. DOOR SCREEN – Allows viewing of food. Microwave cannot pass through perforations in screen.
11. GLASS COOKING TRAY – Made of special heat resistant glass. The tray must always be in proper
position before operating. Do not cook food directly on the tray
12. ROLLER GUIDE – Supports the glass cooking tray.
13. METAL RACK
Defrost
Grill Potato
Popcorn
Stop/Clear
t
Start/
Speedy Cook
Auto Cook
Power
Grill
no/cups
Kitchen
Timer Clock
Kitchen
Timer Lock
21
More
Less
lb
oz
TimeWeight

Kitchen
Timer Clock
Less
More
Defrost
Auto Cook
Popcorn
Grill
Power
Stop/Clear Speedy Cook
Start/
t
Kitchen
Timer
M/W
Grill
Defrost
Weight Time12
Lock no/cups oz lb
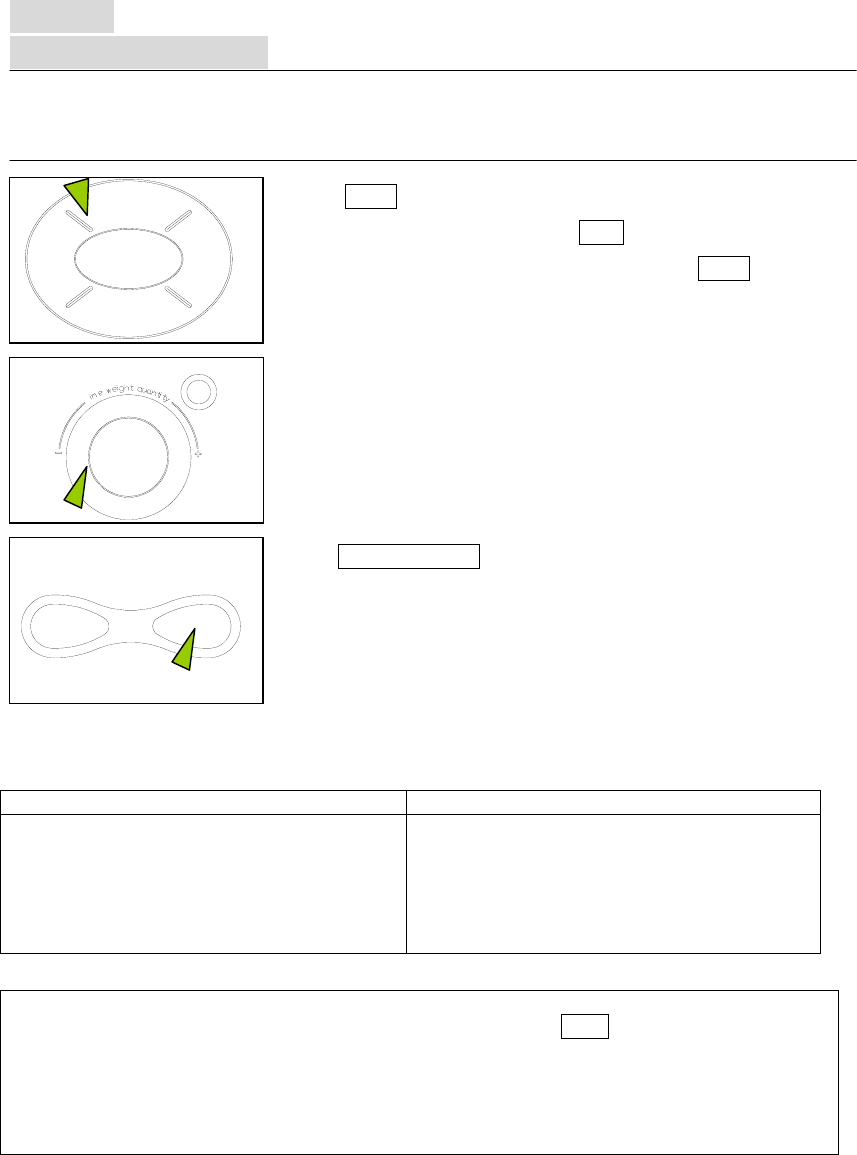
Potato
Display : Cooking time,power level,indicators and
1
present time are displayed
Less : Used to remove time from cooking2
More : Used to add time to cooking
3
Power : Used to set power level6
Potato : Used to cook potato
9
Auto cook : Used to cook or reheat
11
Start/Speedy cook : Used to start a programmed,
14
also for speedy start(each press adds 30
seconds microwave cooking time)
Clock : Used to set clock
4
Kitchen timer : Used as a minute timer,
5
delay cooking, hold setting after cooking
Grill : Used to select grill
7
Defrost : Used to defrost foods
8
Popcorn : Used to cook popcorn10
Dial knob : Used to set time, weight
12 and quantity
Stop/Clear : Used to stop the oven operation
13 or to delete the cooking data
KOG- 133K0A
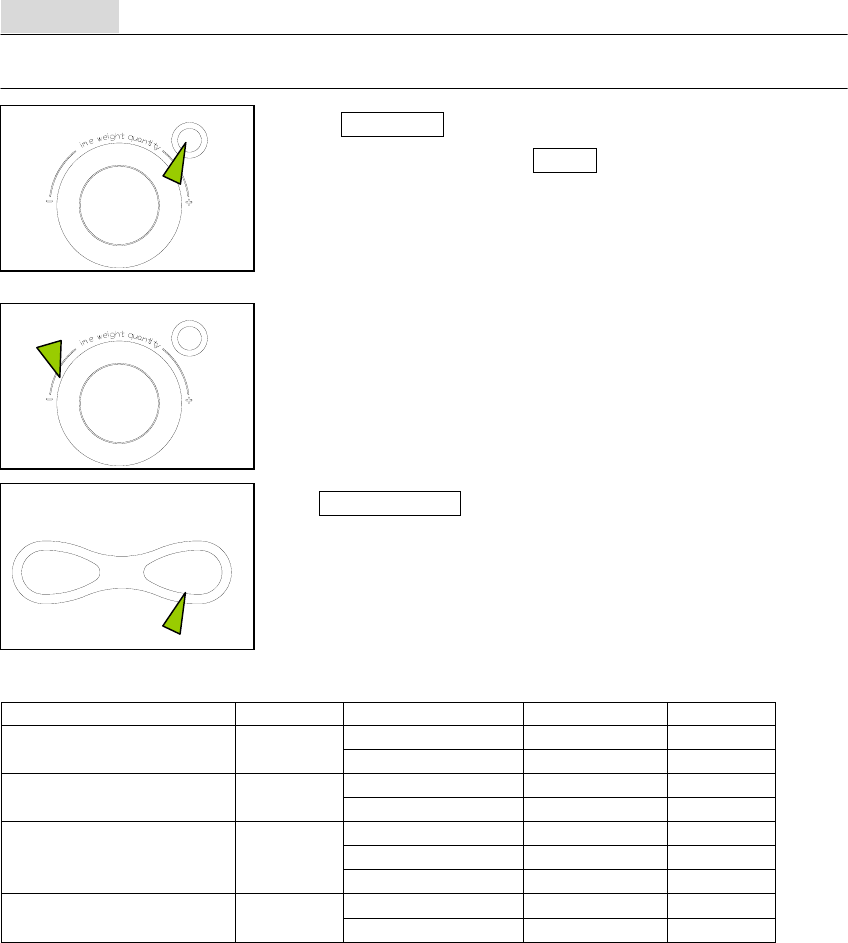
Control panel

Operation
1. To stop the oven while the oven is operating
press stop/clear button.
You can restart the oven by touching start/speedy cook button.
Press stop/clear once more to erase all instruction.
You must enter in new instruction.
2. open the door.
You can restart the oven by closing the door and press start/speedy cook button.
3. each time a button is pressed, a beep will sound to acknowledge the touch.
Sto
p/
Clear S
p
eed
y
Cook
Start
/
Auto Cook
t
Defrost
Popcorn
Grill
Power
Potato
Controls
Changing power levels
How to change the power level:
The power level may be changed before setting the cooking time.
1.Press power button.
The m/w1 indicator lights and : 0 is displayed.
Select the appropriate power level by pressing the power button
again until the corresponding percentage is displayed.
2.Turn the dial knob to set the cooking time.
Time can be set up to 99minutes.
3.press start/speedy cook button.
The oven light comes on and the turn table starts rotating.
Cooking starts and the time in the display will count down.
Power level table :
Power level percentage output Power level percentage output
p-HI 100% 1000w
p-90 90% 900w
p-80 80% 800w
p-70 70% 700W
p-60 60% 600w
p-50 50% 500w
p-40 40% 400w
p-30 30% 300w
p-20 20% 200W
p-10 10% 100w
p-00 0% 0w
Note:
1.when the operation is finished the oven beeps three times, : 0 or clock appears in the
display, the rotating plate stops turning and the oven light turn off.
The oven will continue to beep every 1 minutes until the any button is pressed, or the door is opened.
2.the oven displays the set cooking time in 10seconds steps ( up to 5minutes cooking time), in
30second steps(up to 10 minutes cooking time),in 1minutes steps(up to 99minutes cooking time).
Auto Cook
t
Defrost
Popcorn
Grill
Power
Potato
Sto
p/
Clear S
p
eed
y
Cook
Start
/
Auto Cook
t
Defrost
Popcorn
Grill
Power
Potato
About the time features
Lets you change power levels automatically during cooking.
Here’s how to do it:
1.change the power level if you don’t want full power for
cook1.(Press power button. Select a desired power level HI,9 ~ 0)
the m/w1 indicator lights and : 0 is displayed.
2.Turn the dial knob to set the first cooking time.
Time can be set up to 99minutes.
3.press power button again.
change the power level if you don’t want full power for cook2.(Press
power button. Select a desired power level HI,9 ~ 0)
the m/w1 indicator disappear and m/w2 indicator lights.
4.Turn the dial knob to set the second cooking time.
Time can be set up to 99minutes.
5.press start/speedy cook button.
The oven light comes on and the turn table starts rotating.
Cooking starts and the time in the display will count down.
At the end of cook1, cook2 counts down.
Kitchen
Timer Clock
Less
More
Kitchen
Timer Clock
Less
More
Auto Cook
t
Auto Cook
t
Kitchen
Timer Clock
Less
More
Setting the clock
When your oven is plugged in for the first time or when power resumes after a power interruption, the
display will flash : 0
Your oven has multiple( 12hr /24hr ) clock system. To set the clock follow under procedure.
1.Press clock button once.(example : to set 5:30
The display will be 12H shows.
2. Press clock button once more, 24H shows in display.
This is the 24hour clock system. If you want 12hour clock system ,
omit this step.
3.Turn the dial knob to set the hour number 5: .
the hour number starts blinking, the colon will right.
4.press clock button. 5:00 shows in display.
The minute number starts blinking, the colon and hour number will
light.
5.turn the dial knob until 5:30 in the display window.
6.press clock button. The colon starts blinking.
If you selected 12hour clock system, this digital clock allows you to
set from 1:00 to 12:59.
If you selected 24hour clock system, this digital clock allows you to set
from 0:00 to 23:59.
Kitchen
Timer Clock
Less
More
Stop/Clear Speedy Cook
Start/
Stop/Clear Speedy Cook
Start/
Stop/Clear Speedy Cook
Start/
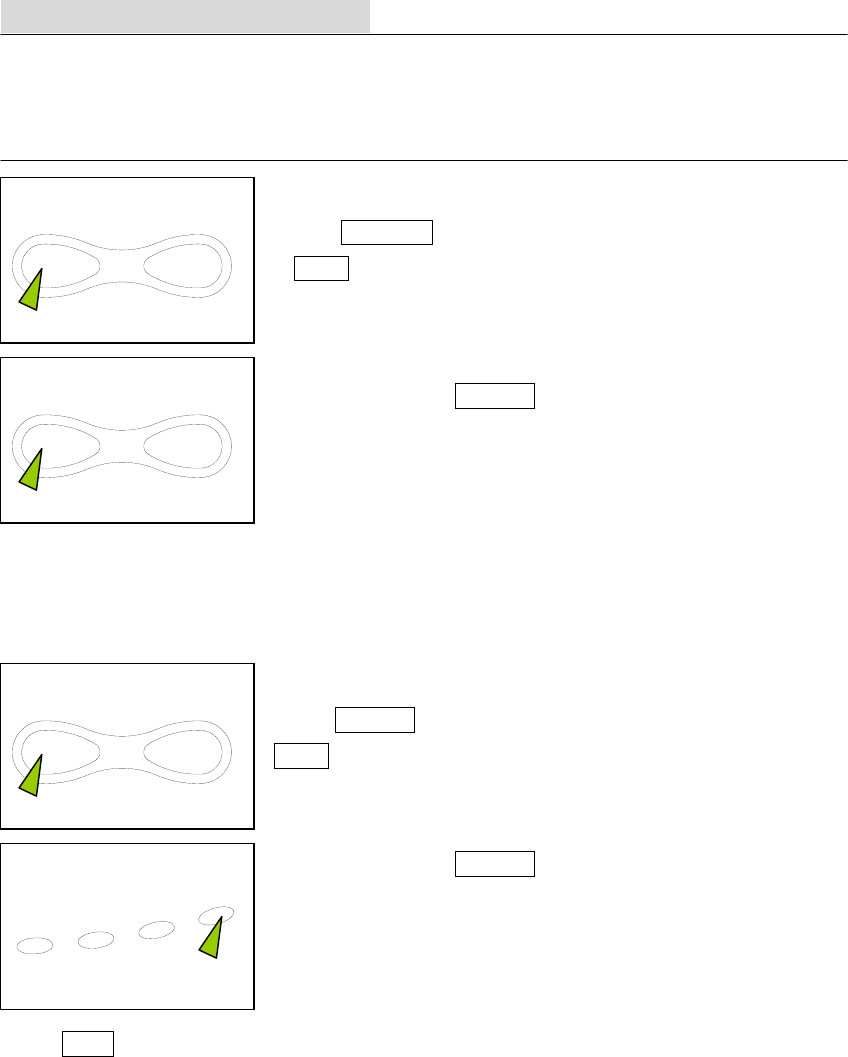
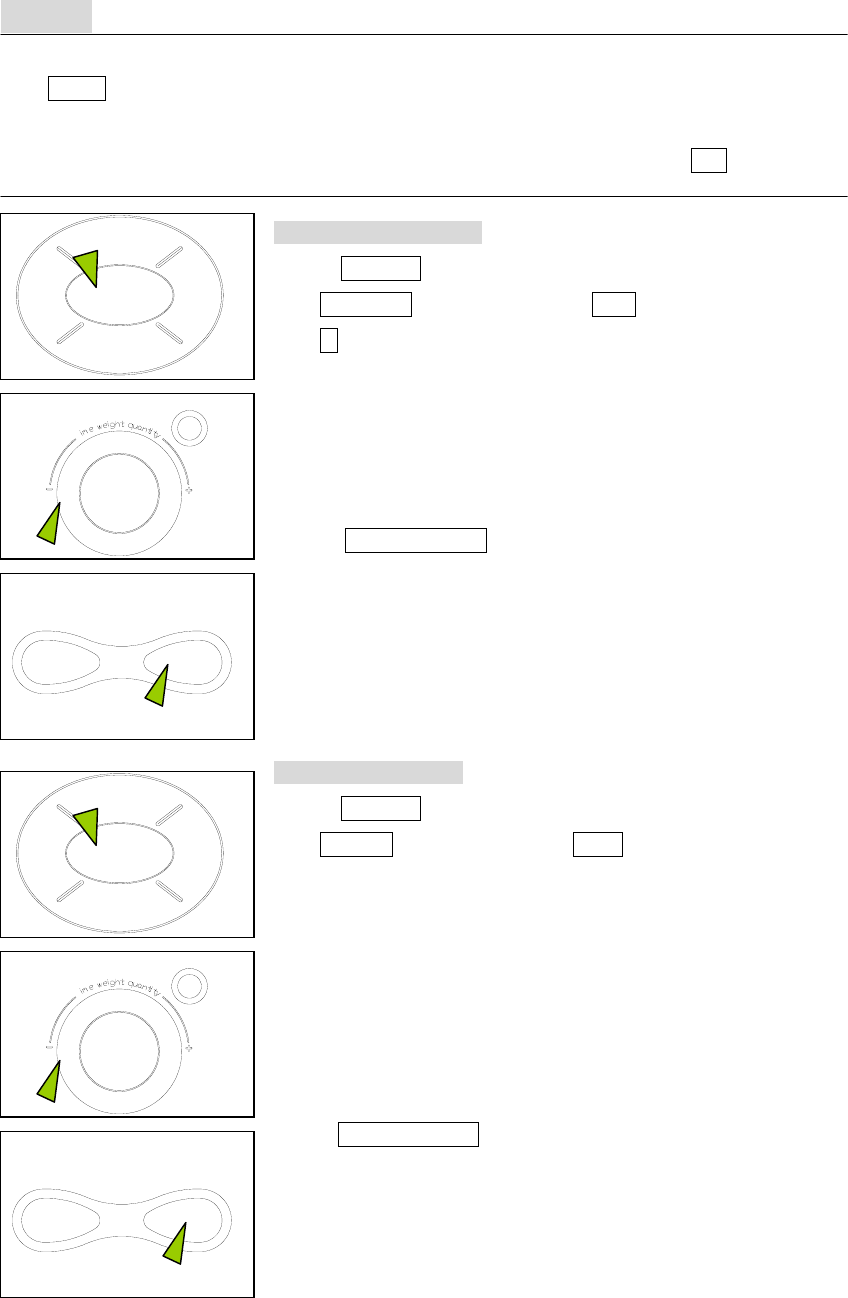
Child lock and Power save mode
Child lock : the child lock prevents the oven from being used.
For example because children could hurt themselves on hot liquids etc.
Power save mode : this function is used for saving energy.
To set child lock
1.Press stop/clear button.
: 0 or clock appears in the display.
2. Press and then hold stop/clear button for 3 second.
The display will lock indicator lights.
Now the oven cannot be operated.
3. to cancel child lock simply repeat procedure2.
The oven will beep and lock indicator disappears.
The oven is again available for normal use.
To set power save mode
1.press stop/clear button.
: 0 or clock appears in the display.
2. Press and then hold stop/clear button for 3 second.
The display will turn off and a beep sounds.
To operate the oven on power save mode, press any key or turn the
knob.
Then : 0
or clock will be shown and the operation of all function key will be same as in the normal
mode. but if there is no operation within 10 seconds in clear mode or while manipulating the key, all the
contents of display will disappear.
3. to cancel power save simply repeat setting procedure.
The power save mode will be canceled and a beep sounds.
The oven is again available for normal use.
Sto
p/
Clear S
p
eed
y
Cook
Start
/
Auto Cook
t
Defrost
Popcorn
Grill
Power
Potato
Grill cooking
The grill enables you to heat and brown food quickly, without using microwaves.
1.Press grill button.
The grill indicator lights and : 0 is displayed.
2.Turn the dial knob to set the cooking time.
Time can be set up to 99minutes.
3.press start/speedy cook button.
The oven light comes on and the turn table starts rotating.
Cooking starts and the time in the display will count down.
Kitchen
Timer Clock
Less
More
Sto
p/
Clear S
p
eed
y
Cook
Start
/
Auto Cook
t
Kitchen Timer
This feature operates as a minute timer. During operation there is no microwave energy.
In addition to its function as a timer for programmed, you can use the timer for timing where no
microwave cooking is involved.
1.Press timer button.
The timer indicator lights and : 0 is displayed.
2.Turn the dial knob to set the timer time.
Time can be set up to 99minutes.
3.press start/speedy cook button.
The oven light and turn table are no operating.
Only, the time in the display will count down .
Auto Cook
t
Sto
p/
Clear S
p
eed
y
Cook
Start
/
Auto Cook
t
Auto cook
The auto cook feature automatically sets the cooking times and power levels for a variety of foods..
1.Press auto cook button.
The grill indicator lights and AC-1 is displayed.
Select the menu by pressing the auto cook button until the required
menu is displayed.
refer to auto cook menu chart below for further details.
2.Turn the dial knob to set the quantity .
refer to auto cook menu chart below for further details.
The oz or cup indicator lights
3.press start/speedy cook button.
The oven light comes on and the turn table starts rotating.
Cooking starts and the time in the display will count down.
* Auto cook menu chart *
Menu display Quantity Cook time remark
12oz / 350g 2:301.DINNER PLATE AC-1
15oz / 450g 3:00
12oz / 350g 2:302.SOUP AC-2
15oz / 450g 3:00
1cup 1:10
2cup 2:20
3.BEVERAGE AC-3
3cup 3:30
7oz / 200g 2:304.FRESH VEGETABLE AC-4
14oz / 400g 4:40
Sto
p/
Clear S
p
eed
y
Cook
Start
/
Auto Cook
t
Defrost
Popcorn
Grill
Power
Potato
Sto
p/
Clear S
p
eed
y
Cook
Start
/
Auto Cook
t
Defrost
Popcorn
Grill
Power
Potato
Defrost
The defrost auto/time feature gives you two ways to defrost frozen foods.
Press defrost once for weight defrost or twice for time defrost.
During the defrosting process the oven will beep to remind you to check the food.
The oven will beep, open the door, turn the frozen food over and close the door, press start button.
To set the weight defrost :
1.Press defrost button.
The weight def. indicator lights and 0.0 is displayed.
The lb indicator will be start blinking.
2.Turn the dial knob to set the weight.
Weight can be set up from 0.5lb to 6.5lb.
The weight will change in 0.5lb increments or decrements.
3.press start/speedy cook button.
The oven light comes on and the turn table starts rotating.
Cooking starts and the time in the display will count down.
The weight defrost sets the defrosting times and power levels by
automatically once you have entered in the weight of the food.
To set the time defrost :
1.Press defrost button twice.
The time def. indicator lights and : 0 is displayed.
2.Turn the dial knob to set the defrosting time.
Time can be set up to 99minutes.
3.press start/speedy cook button.
The oven light comes on and the turn table starts rotating.
Cooking starts and the time in the display will count down.

Defrost
Popcorn
Grill
Power
Potato
Sto
p/
Clear S
p
eed
y
Cook
Start
/
Defrost
Popcorn
Grill
Power
Potato
Speedy cook
The speedy cook function allows the oven to being cooking immediately on full power .
The speedy cook button has been pre-programmed to increase in increments of 30 seconds up to
a maximum time of 5 minutes.
1.Press start/speedy cook button.
The oven will be :30 is displayed.
And the oven will start immediately. No need to press start button
The oven light comes on and the turn table starts rotating.
and the time in the display will count down in seconds.
popcorn
Place the package of popcorn in the center of the turntable.
1.Press popcorn button.
The oven will be 3.5 is displayed and oz indicator will be lights.
After the 1.5seconds, the display changed into cooking time of
quantity and The oven light comes on and the turn table starts rotating
and the time in the display will count down in seconds.
No need to press start button
Potato
To increase quantity press potato button within 1.5 seconds, until number in display is same as desired
quantity to cook.
1.Press potato button.
The oven will be 1 is displayed and no indicator will be lights.
After the 1.5seconds, the display changed into cooking time of
quantity and The oven light comes on and the turn table starts rotating
and the time in the display will count down in seconds.
No need to press start button
* Potato *
1no : press potato once.
2no : press potato twice within 1.5 seconds.
Kitchen
Timer Clock
Less
More
3on : press potato three within 1.5 seconds.
More / Less
The more and less buttons allow you to cook food a little more or less than the pre-set automatic
programmed.
During cooking, it is possible to alter the cooking time using more or less button to decrease or increase
the cooking time in multiples of 1 minute or 10 seconds.
Overall cooking time can be increased to a maximum of 99 minutes.
Note :
More and Less buttons can increase or decrease the cooking time in multiples of 1 minute
when cooking with timer, power(m/w1, m/w2).
More and Less buttons can increase or decrease the cooking time in multiples of 10 seconds
when cooking with popcorn, potato, auto cook.
Sequence programming
The can programmed a maximum of three sequences, this facility offers the advantage of continued,
uninterrupted oven operation.
How to set a sequence of basic programmed (example):
1. input the defrost weight or time. (stage 1)
press defrost button Î turn the dial knob
2. input the power level and cooking time.(stage 2)
press power button Î turn the dial knob
3. input the power level and cooking time.(stage 3)
press power button Î turn the dial knob
4. press start button.
stage1 Î(beep)Î stage2 Î(beep)Î stage3
Note :
Popcorn, potato, auto-cook, speedy-cook cannot be programmed as the sequence programming.
Defrost cannot be programmed as the stage2 and stage3.
Only, Defrost can be programmed as the first sequence.
Sequence programming of GRILL can be the M/W1 Î GRILL only
Before you call for service
Befer to following checklist, you may prevent an unnecessary service call.
* the oven doesn’t work;
1. check that the power cord is securely plugged in.
2. check that the door firmly closed.
3. check that the cooking time is set.
4. check for a blown circuit fuse or tripped main circuit breaker in your house.
* sparking in the cavity;
1, check that utensils are metal containers or dishes with metal trim.
2. check that metal skewers touch the interior walls.
If there is still a problem, contact the service station.

Questions and answer
● Q : Why do eggs sometimes pop ?
A : When baking or poaching eggs, the yolk may pop due to steam build-up inside the yolk
membrane. To prevent this, simply pierce the yolk with a toothpick before cooking. Never
cook eggs without piercing their shells.
● Q : Why this standing time recommended after the cooking operation has been completed?
A : Standing time is very important.
With microwave cooking, the heat is in the food, not in the oven. Many foods build up
enough internal heat to allow the cooking process to continue, even after the food is
removed from the oven. Standing time for joints of meat, large vegetables and cakes is to
allow the inside to cook completely, without overcooking the outside.
● Q : What does “standing time” mean?
A : “Standing time” means that food should be removed from the oven and covered for
additional time to allow it to finish cooking. This frees the oven for other cooking.
● Q : Why does my oven not always cook as fast as the microwave cooking guide says?
A : Check your cooking guide again, to make sure you’ve followed directions exactly ; and to
see what might cause variations in cooking time. Cooking guide times and heat settings
are suggestions, to help prevent over-cooking… the most common problem in getting
used to a microwave oven.
Variations in the size, shape and weights and dimensions could require longer cooking
Time. Use your own judgement along with the cooking guide suggestions to check
whether the food has been properly cooked just as you would do with a conventional
cooker
● Q : Will the microwave oven be damaged if it operates while empty?
A :Yes. Never run it empty.
● Q : Can I operate my microwave oven without the turntable or turn the turntable over to hold
a large dish?
A : No. If you remove or turn over the turntable, you will get poor cooking results. Dishes
used in your oven must fit on the turntable.
● Q : Is it normal for the turntable to turn in either direction?
A : Yes. The turntable rotates clockwise or counterclockwise, depending on the rotation of
the motor when the cooking cycle begins.
● Q : Can I pop popcorn in my microwave oven? How do I get the best results?
A : Yes. Pop packaged microwave popcorn following manufacture’s guidelines or use the
preset POPCORN pad. Do not use regular paper bags. Use the “listening test” by
stopping the oven as soon as the popping slows to a “pop” every 1 or 2 seconds. Do not
repop unpopped kernels. Do not pop popcorn in glass cookware.