WINIA Electronics 7NF17MO1100 MICROWAVE OVEN User Manual
Dongbu Daewoo Electronics Corporation MICROWAVE OVEN
UserManual.wiki
>
WINIA Electronics
>
7NF17MO1100 User Manual
User manual
Navigation menu
Upload a User Manual
Namespaces
Wiki Guide
HTML
PDF
Info
Views
User Manual
Discussion / Help
Navigation

![CONTROL 10Time-of-Day Clock • After plugging in the oven or after a poweroutage, the Display will scoll “TOUCH CLOCKPAD TO ENTER TIME OF DAY”. Touch theCANCEL/OFF Pad and set the clock followingthe directions above.• The “time-of-day” clock is a 12 hour clock.• If set, the time of day will always be displayedwhen no other cooking function is being used.• The time of day returns to the current time whenthe oven turns off.Basic Instructions1. Touch the CLOCK Pad. “LOCK ENTER TIME”will be displayed.2. Set the time of day by touching the appropriatenumbers. The selected time appears and“PRESS CLOCK AGAIN” will be displayed.3. Touch the CLOCK Pad again. The colon willflash.Cook Time/Power Level • Start with the shortest recommended time andadd more time as needed.• Check the food as it cooks.• The oven door can be opened any time duringoperation. It will automatically stop andmaintain the time setting until the door is closedand the START Pad is touched again.• If the START Pad is touched and the oven doesnot operate, check the area between the door anddoor seal for obstructions. The oven will not startuntil the door is completely closed.Seal for obstructions. The oven will not start untilthe door is completely closed.• Note: Full power is automatic. If you wish to usea different power level, touch the POWER Padbefore touching START Pad. “POWER LEVEl ISHI [10] TOUCH 1-9 FOR NEW POWER LEVEL---PRESS START” will be displayed. Enter thepower level desired by touching the appropriatenumber pad. The selected power level and“PRESS START” will be displayed.Basic Instructions1. Touch the COOK TIME Pad. “ENTERCOOKING TIME” will be displayed.2. Enter the cooking time by using the numberpads. For example, for 5 minutes touch number5, 0, 0.The selected time and “PRESS START” will bedisplayed.3. Touch the START Pad. “COOK TIME” andselected time wil be displayed.• The cooking time will appear in the DisplayWindow.• The oven will start cooking and timecountdown will begin.• The oven will stop automatically when thetime is done and beep three times.• When the cook time ends, “END COOK”appears in the Display.](https://usermanual.wiki/WINIA-Electronics/7NF17MO1100/User-Guide-302899-Page-11.png)
![11Power Level Cooking GuideThe power levels on your microwave oven can becompared to the surface units on a range. HIGH(power level 10) or full power is the fastest way tocook and gives you 100% power.Each power level gives you microwave energy fora certain percent of time, for example, power level7 is microwave energy 70% of the time. Most ofyour cooking will be done on HIGH (Power Level10). A lower setting will cook more evenly andwith less attention given to stirring or rotating thefood. Some foods may have better flavor, texture orappearance if one of the lower settings is used. Youmay wish to use a lower power level when cookingfoods that have a tendency to boil over, such asscalloped potatoes. Cooking times will increase asthe power level decreases.Power LevelHigh 10Medium 7Medium 5Low 3Warm 1Best UsesFish, bacon, vegetables,boiling liquidsGentle cooking of meatand poultry, bakingcasseroles and reheatingSlow cooking andtenderizing for stews andless tender cuts of meat.Defrosting, simmering,delicate sauces.Keeping food warmwithout overcooking,softening butter.Two Stage CookingThis feature lets you program two sequentialoperaions such as defrosting and cooking or cooking using two different power levels. It automaticallychanges power settings and cooking time.• Three beeps signal the end of cooking. “ENDCOOK” appears in the Display.• The audible beep between stages can serve as areminder to add foods or ingredients.* Skip steps 3 and 4 or 7 and 8 if full power is desired.Basic Instructions1. Touch the COOK TIME Pad. “ENTER COOKINGTIME” will be displayed.2. Touch the appropriate number pads to enter thecooking time. The selected time and “PRESSSTART” will be displayed.3. Touch the POWER Pad.* “POWER LEVEl ISHI[10]. TOUCH 1-9 FOR NEW POWER LEVEL--PRESS START” will be displayed.4. Touch the number pad for the power level youdesire.*The selected power level and “PRESS START”will be displayed.5. Touch the COOK TIME Pad again. “ENTERSECOND COOKING TIME” will be displayed.6. Touch the appropriate number pads to enter thecooking time for the second stage of cooking. Theselected time and “PRESS START” will be displayed.7. Touch the POWER Pad.* “POWER LEVEL ISHI[10]. TOUCH 1-9 FOR NEW POWR LEVELPRESS START” will be displayed.8. Touch the number pad for the power level you desire.*The selected power level and “PRESS START”will be displayed.9. Touch the START Pad.](https://usermanual.wiki/WINIA-Electronics/7NF17MO1100/User-Guide-302899-Page-12.png)
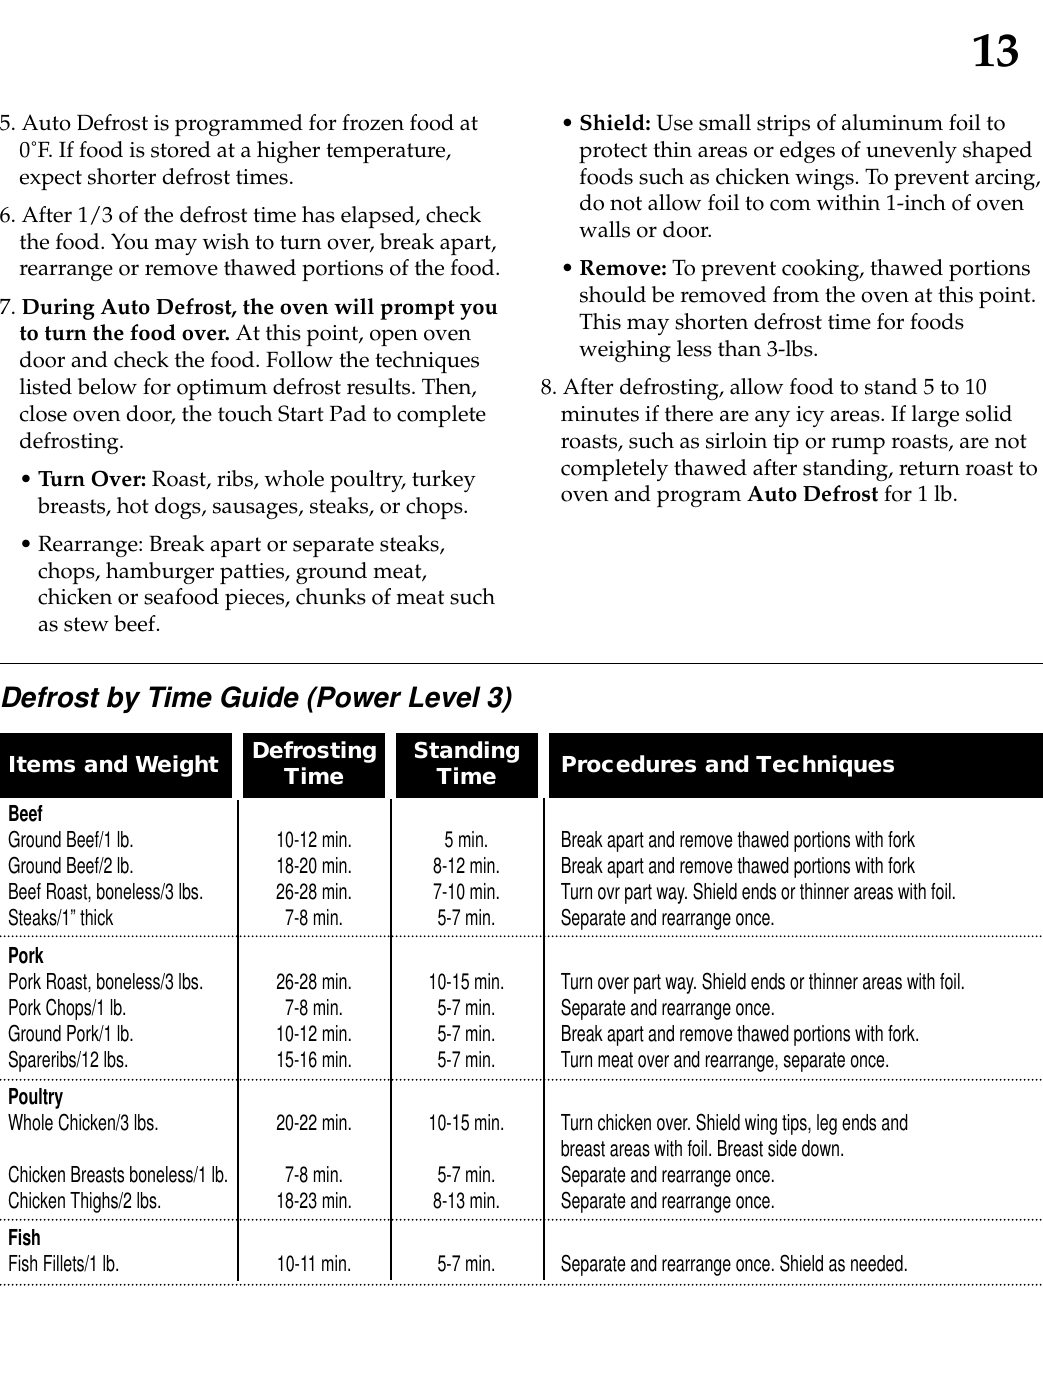
![12Auto DefrostUse the defrost setting for defrosting meats,poultry and fish from .5 pounds to 6.5 pounds.* Enter the weight in pounds and tenths of a pound.See Conversion Chart below.• During defrosting, the oven will beep a series ofshort beeps to signal that the food needs to beturned or rearranged. “TURN FOOD OVER” willbe displayed. Oven will continue operating iffood is not turned or rearranged. Three beepssignal the end of defrosting. “END DEFROST”appears in the Display.Conversion ChartBasic Instructions1. • Touch the AUTO DEFROST Pad once formeat. “MEAT DEFROST ENTER FOODWEIGHT IN LBS” will be displayed.• Touch the AUTO DEFROST Pad twice forpoultry. “POULTRY DEFROST ENTERFOOD WEIGHT IN LBS” will be displayed.• Touch the AUTO DEFOST Pad three timesfor fish. “FISH DEFROST ENTER FOODWEIGHT IN LBS” will be displayed.2. Touch number pads to enter the weight.* Thedefrosting time and power levels areautomatically calculated.3. Touch the START Pad. “DEFROST TIME” andtime appear in the Display.’If weight is inounces-1 to 2-oz.3 to 4-oz.5-oz.6 to 7-oz.8-oz.9 to 10-oz.11 to 12-oz.13-oz.14 to 15-oz.then weight is convertedto tenths-of-a-pound.0.10.20.30.40.50.60.70.80.9Defrosting by TimeGeneral Defrosting Tips1. Do not defrost covered meat. Covering mightallow cooking to take place. Always removeouter wrap and tray. Place food on a microwave-safe rack in a dish. During defrost, juicesaccumulate in dish and may become hot enoughto cook the food. Elevating meat off of the dishwill prevent the bottom and sides frombeginning to cook.2. Begin defrosting whole poultry breast-side-down. Begin defrosting roasts fat-side down.3. The shape of the package alters the defrostingtime. Shallow rectangular shapes defrost morequickly than a deep block.4. Auto Defrost is programmed for specificweights. Defrost results will be affected if youenter an incorrect weight.Basic Instructions1. Touch the COOK TIME Pad. “ENTERCOOKING TIME” will be displayed.2. Enter the defrosting time desired.3. Touch the POWER Pad. “POWER LEVEL ISHI[10]” will be displayed.4. Touch NUMBER “3” Pad. “PL-30 PRESSSTART” will be displayed.5. Touch the START Pad.• Three short beeps indicate an incorrect entry.• See defrosting tips for both Auto and Time Defrost.](https://usermanual.wiki/WINIA-Electronics/7NF17MO1100/User-Guide-302899-Page-13.png)