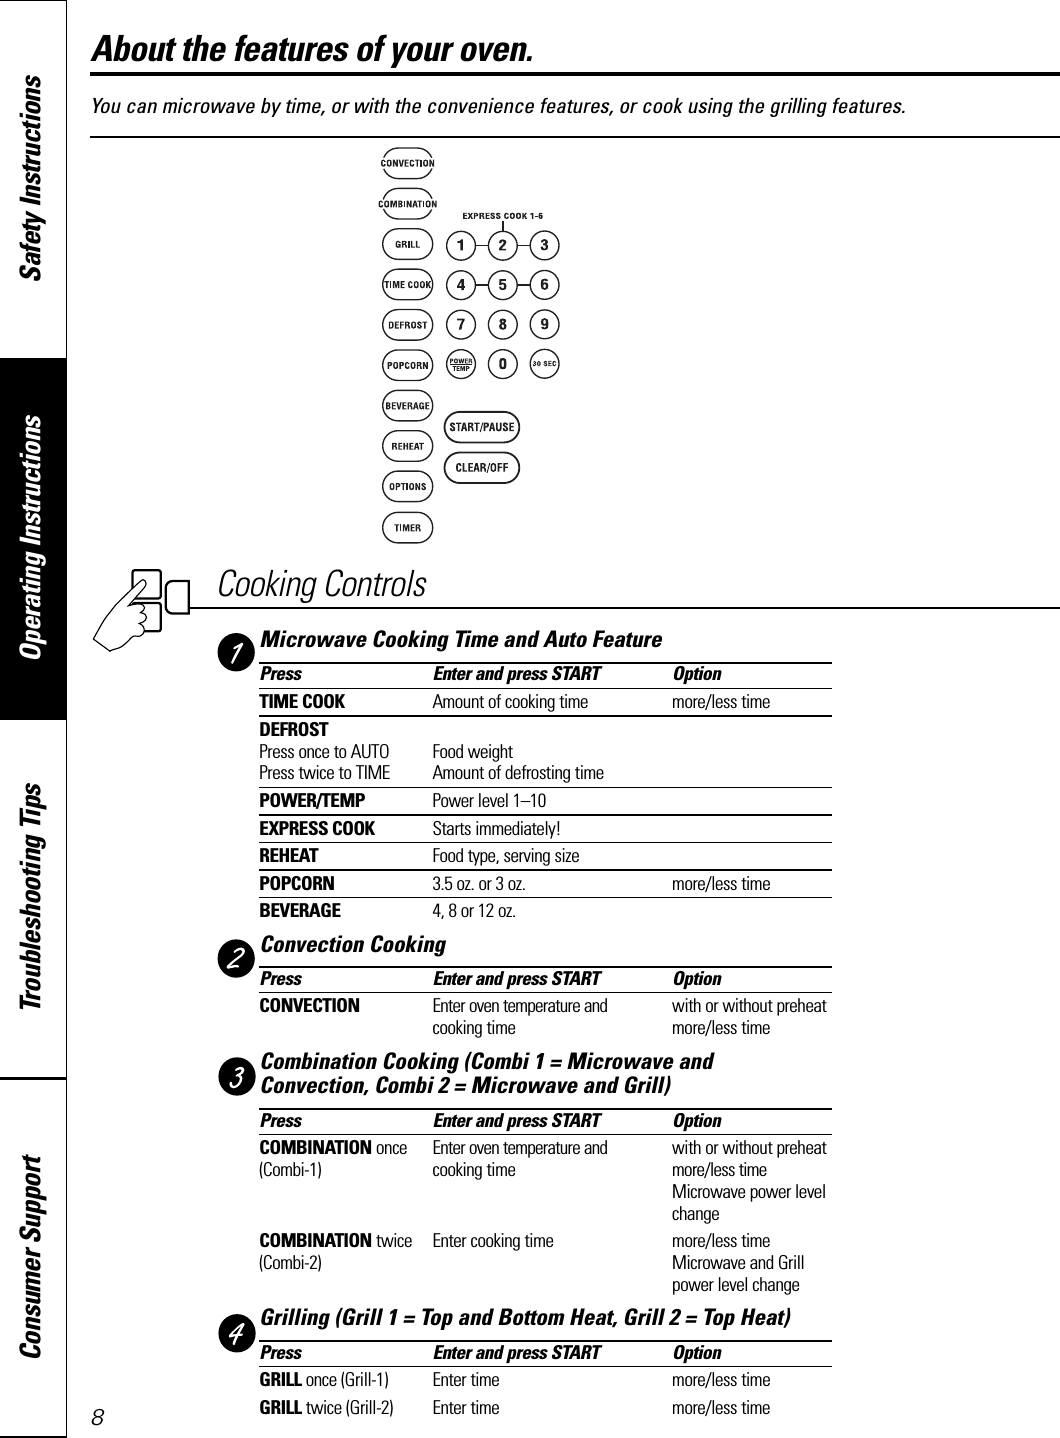
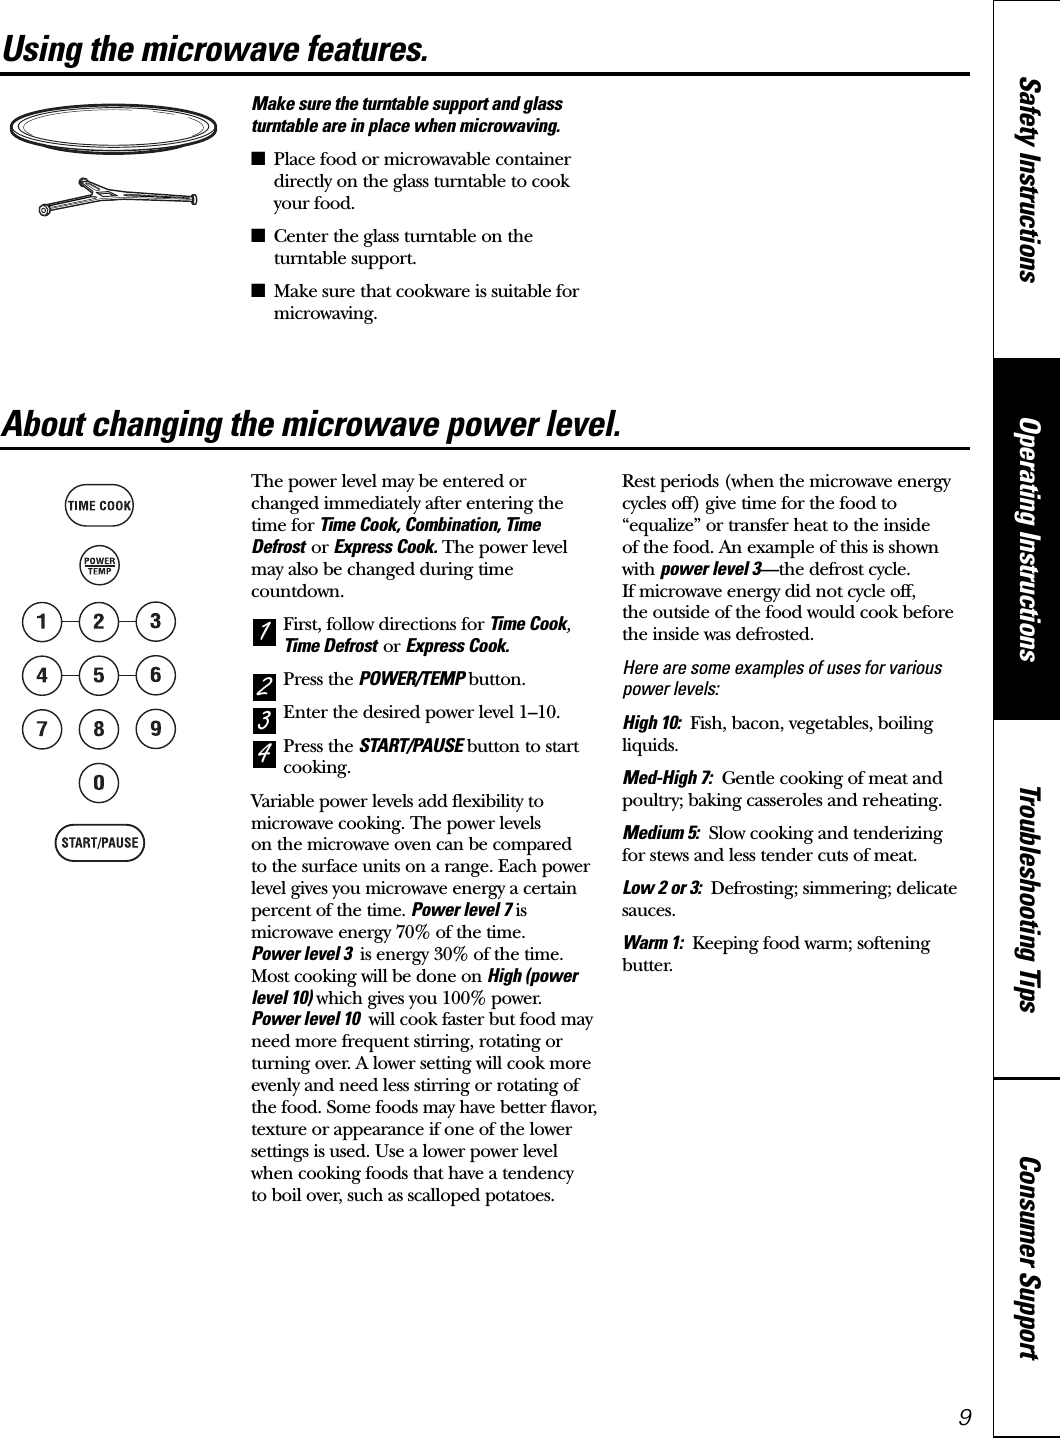
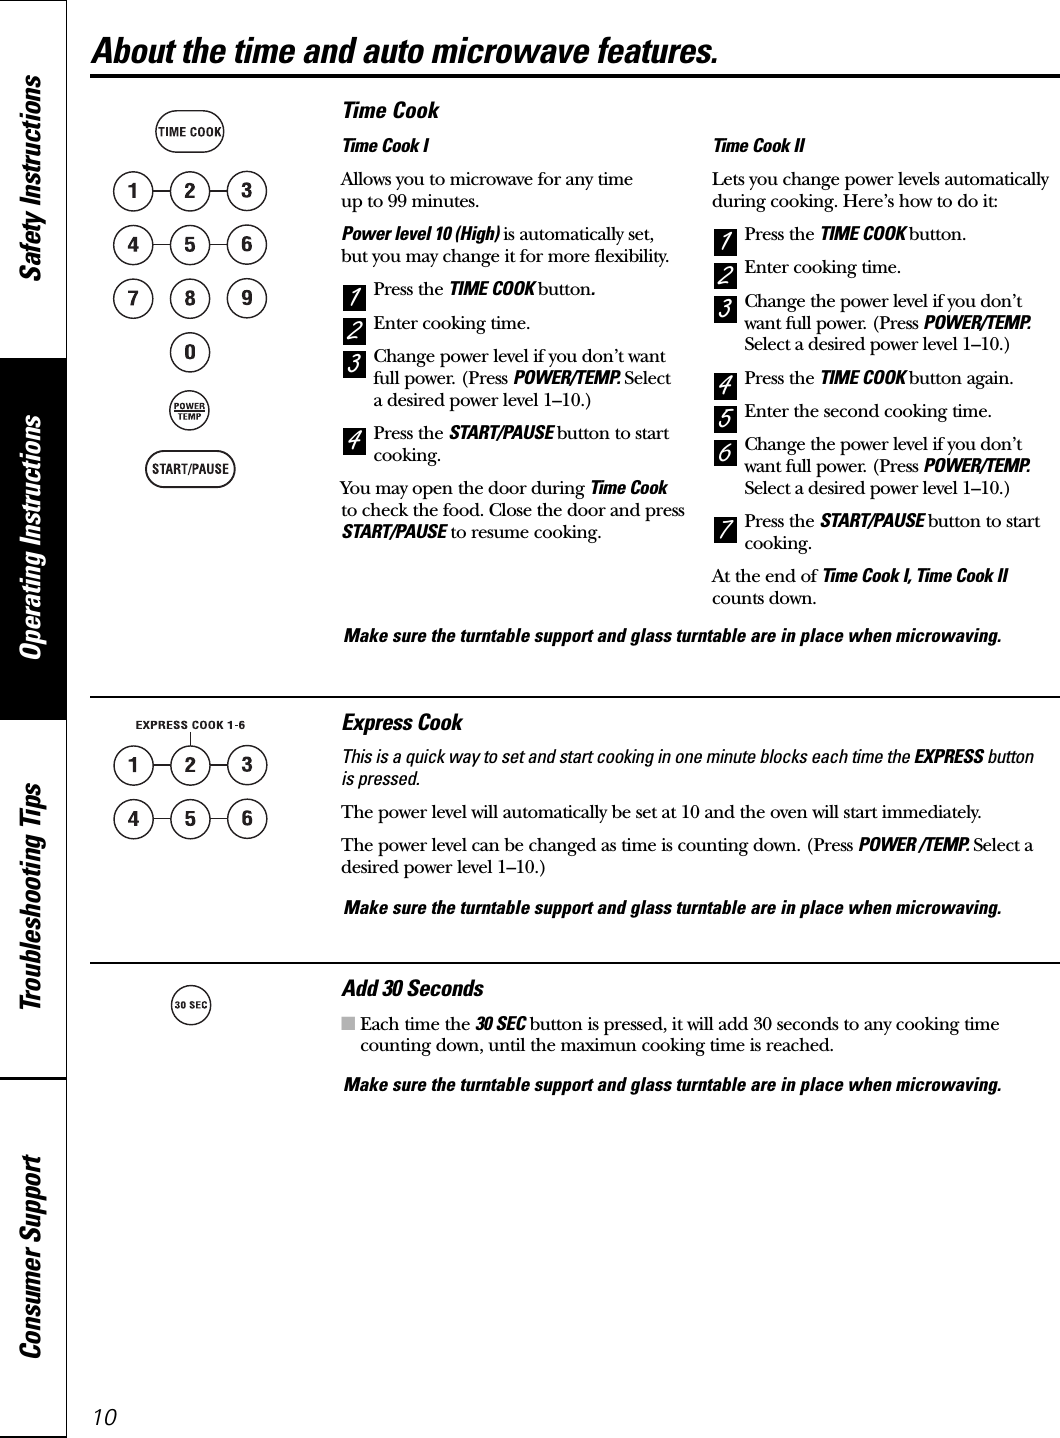
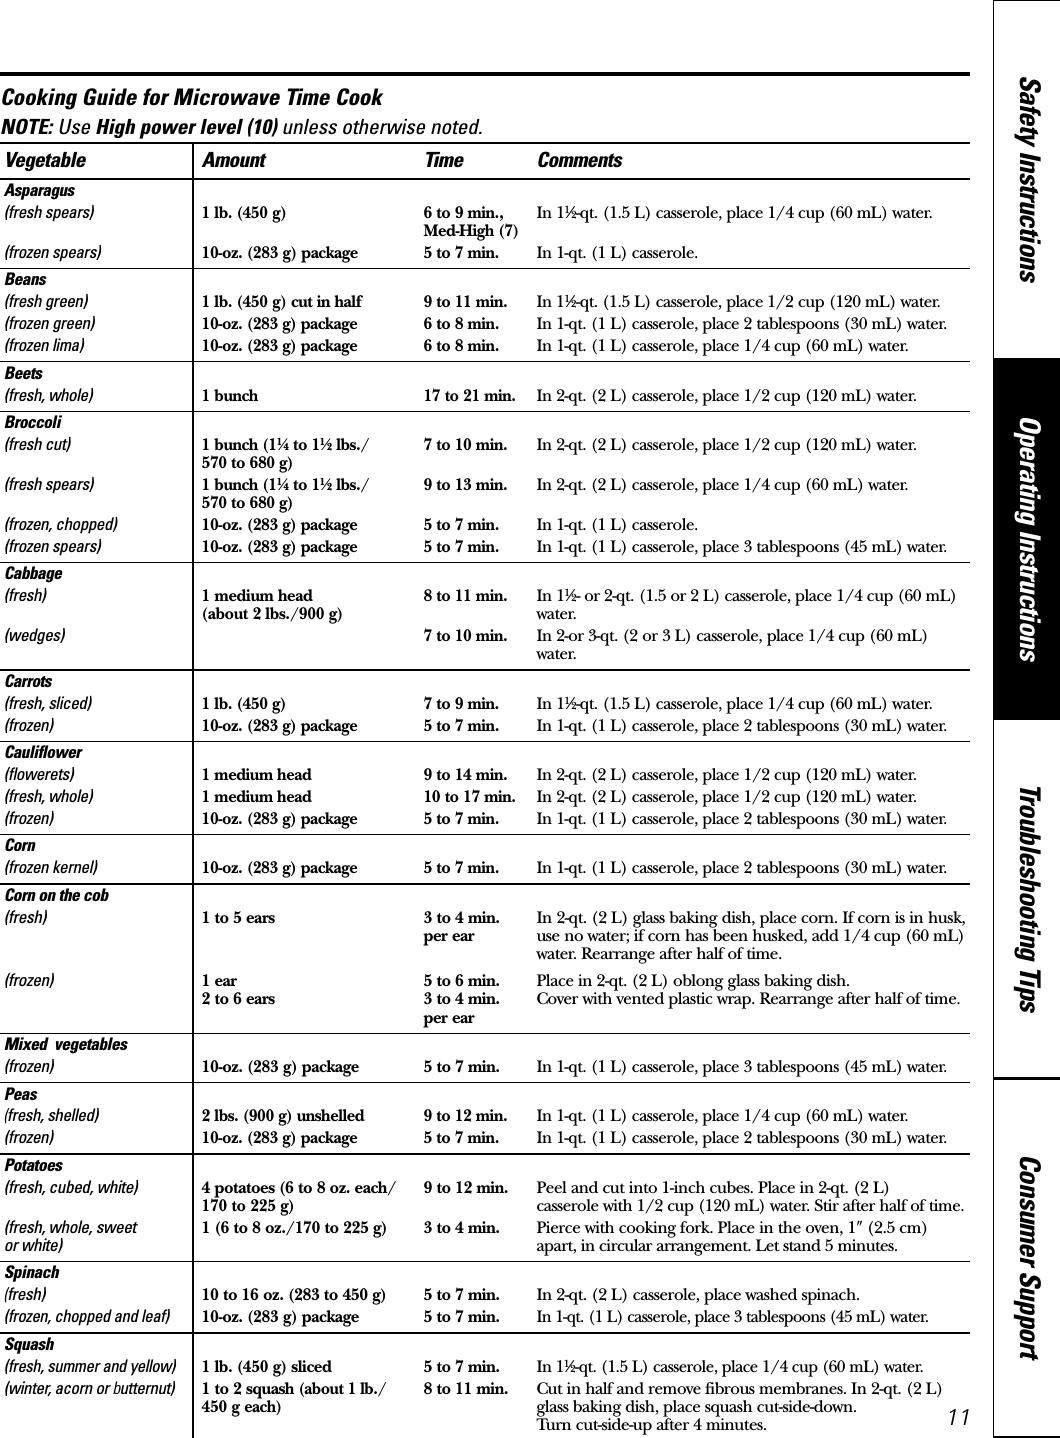
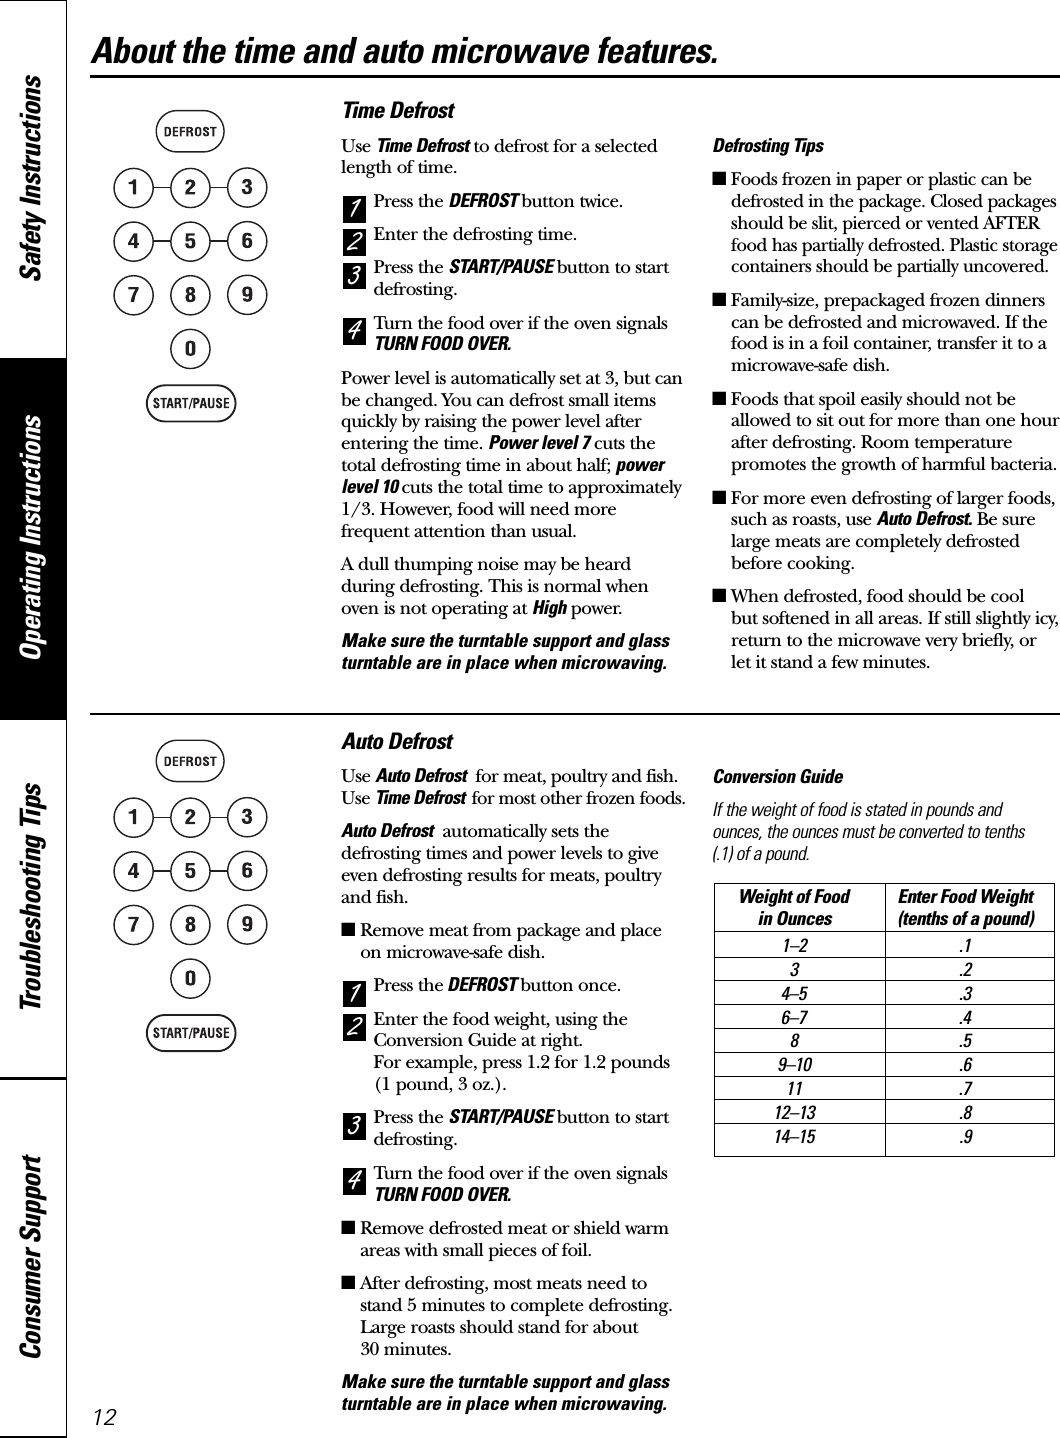
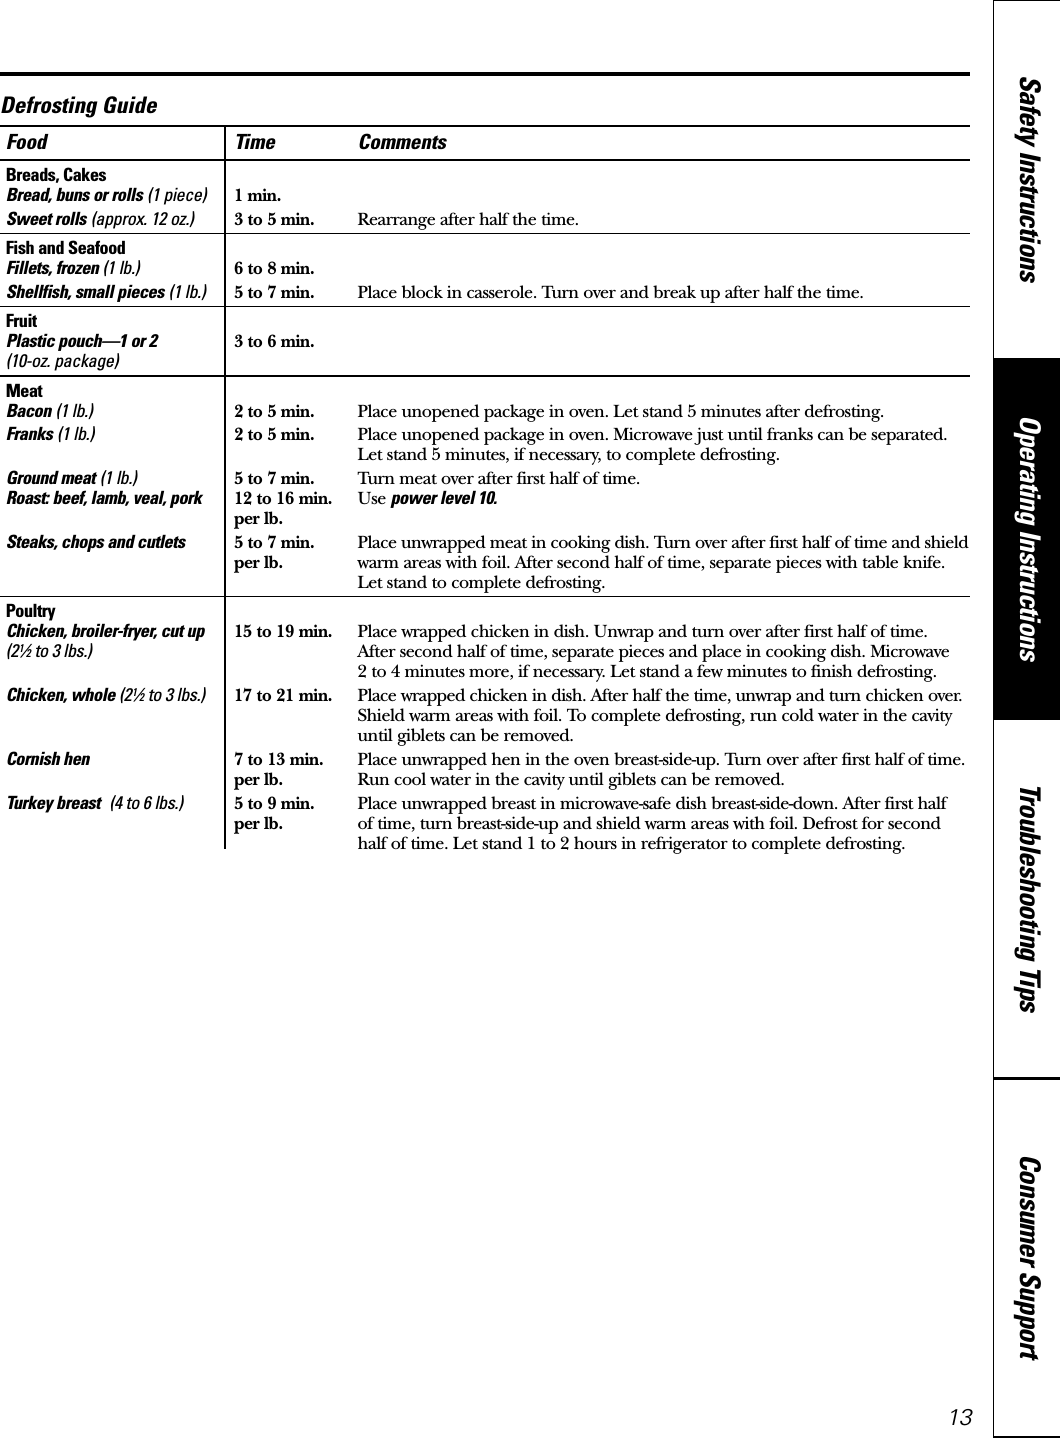
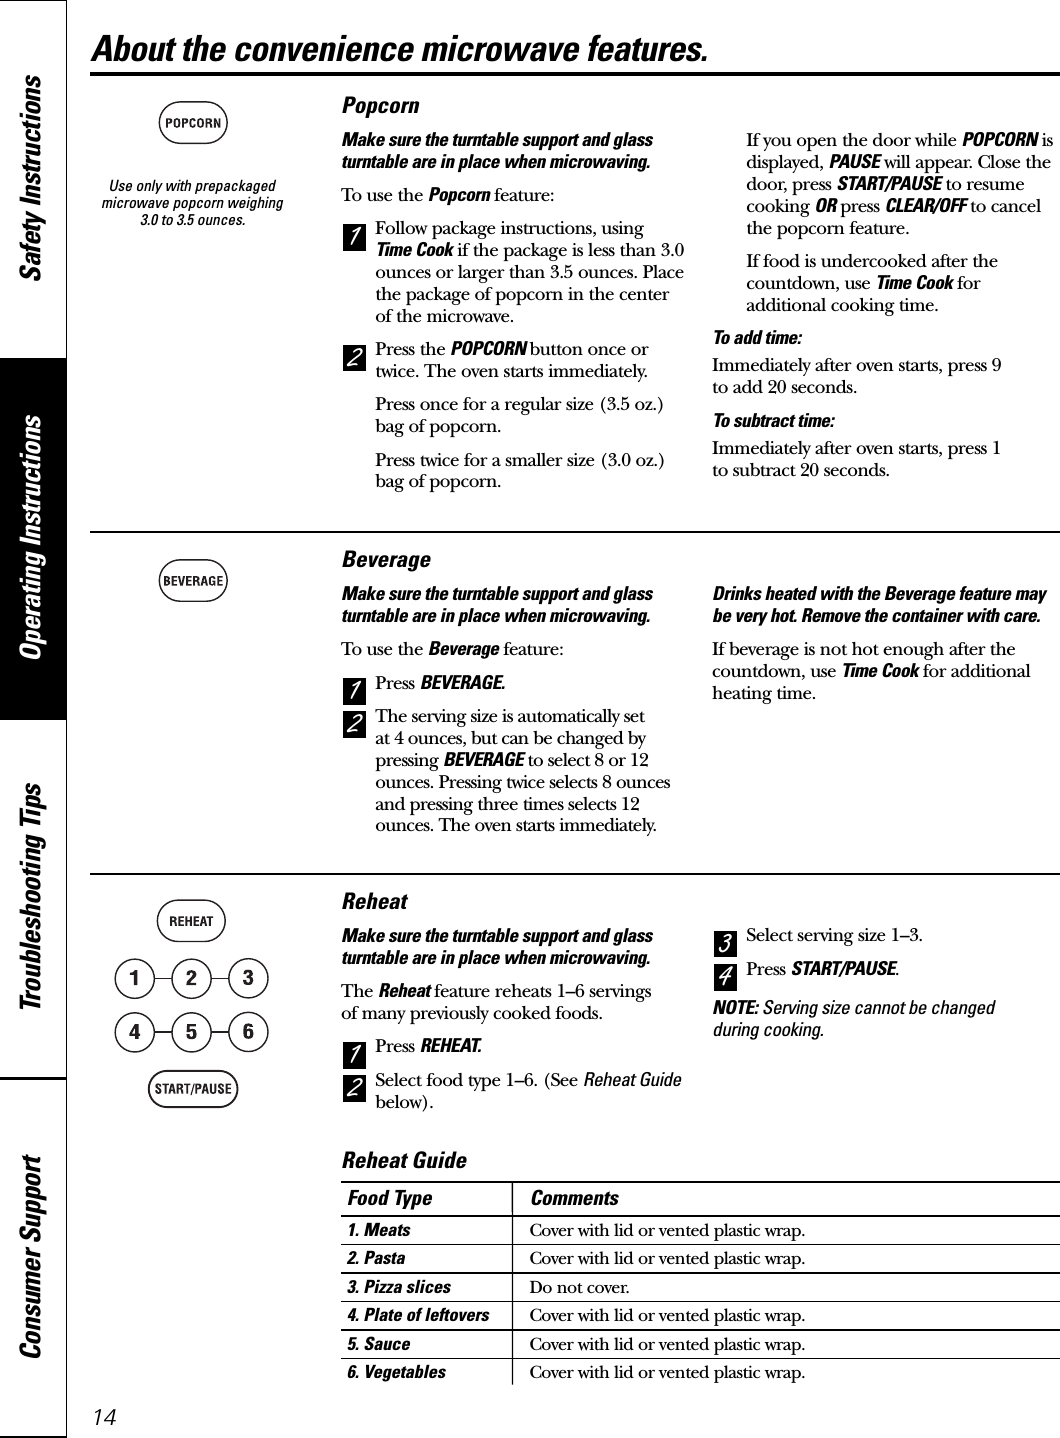
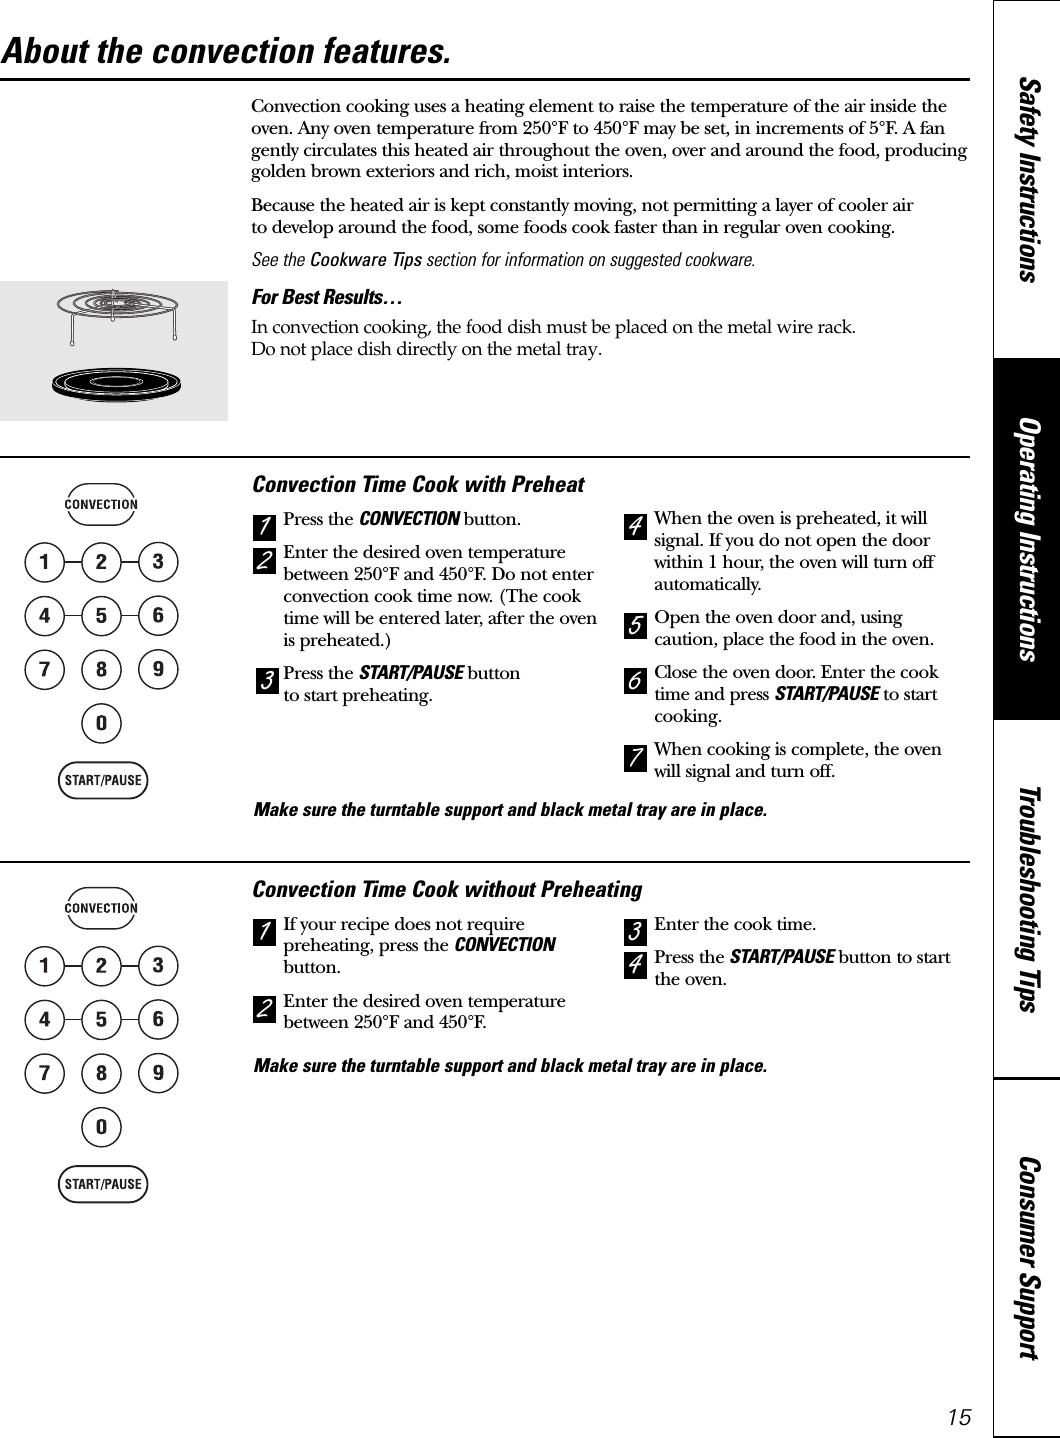
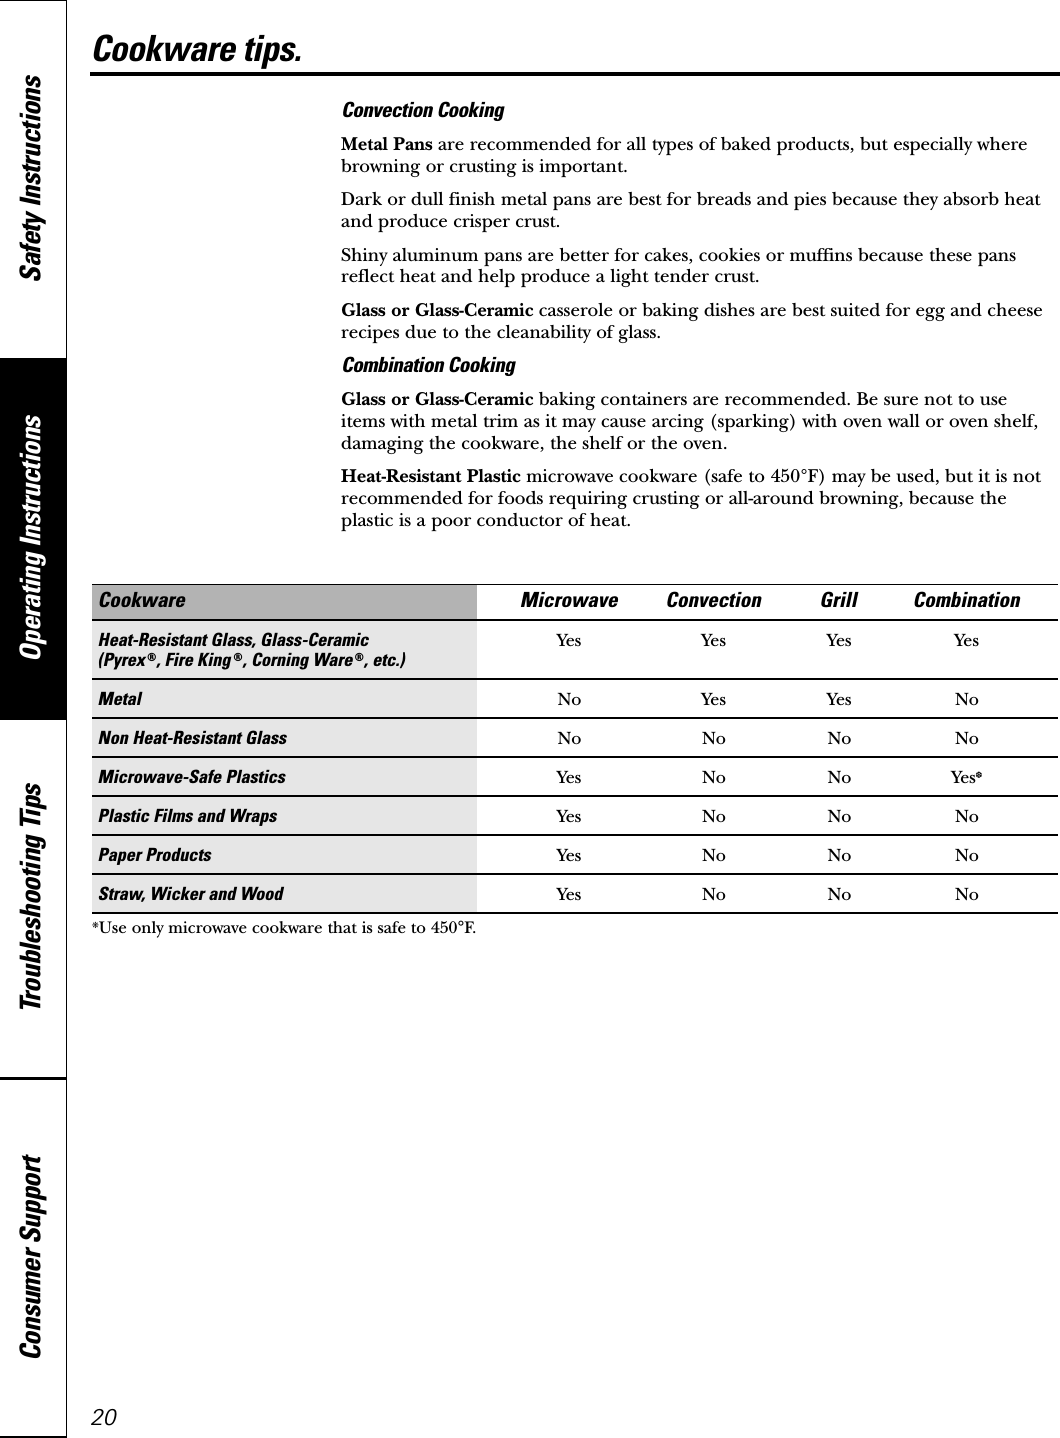
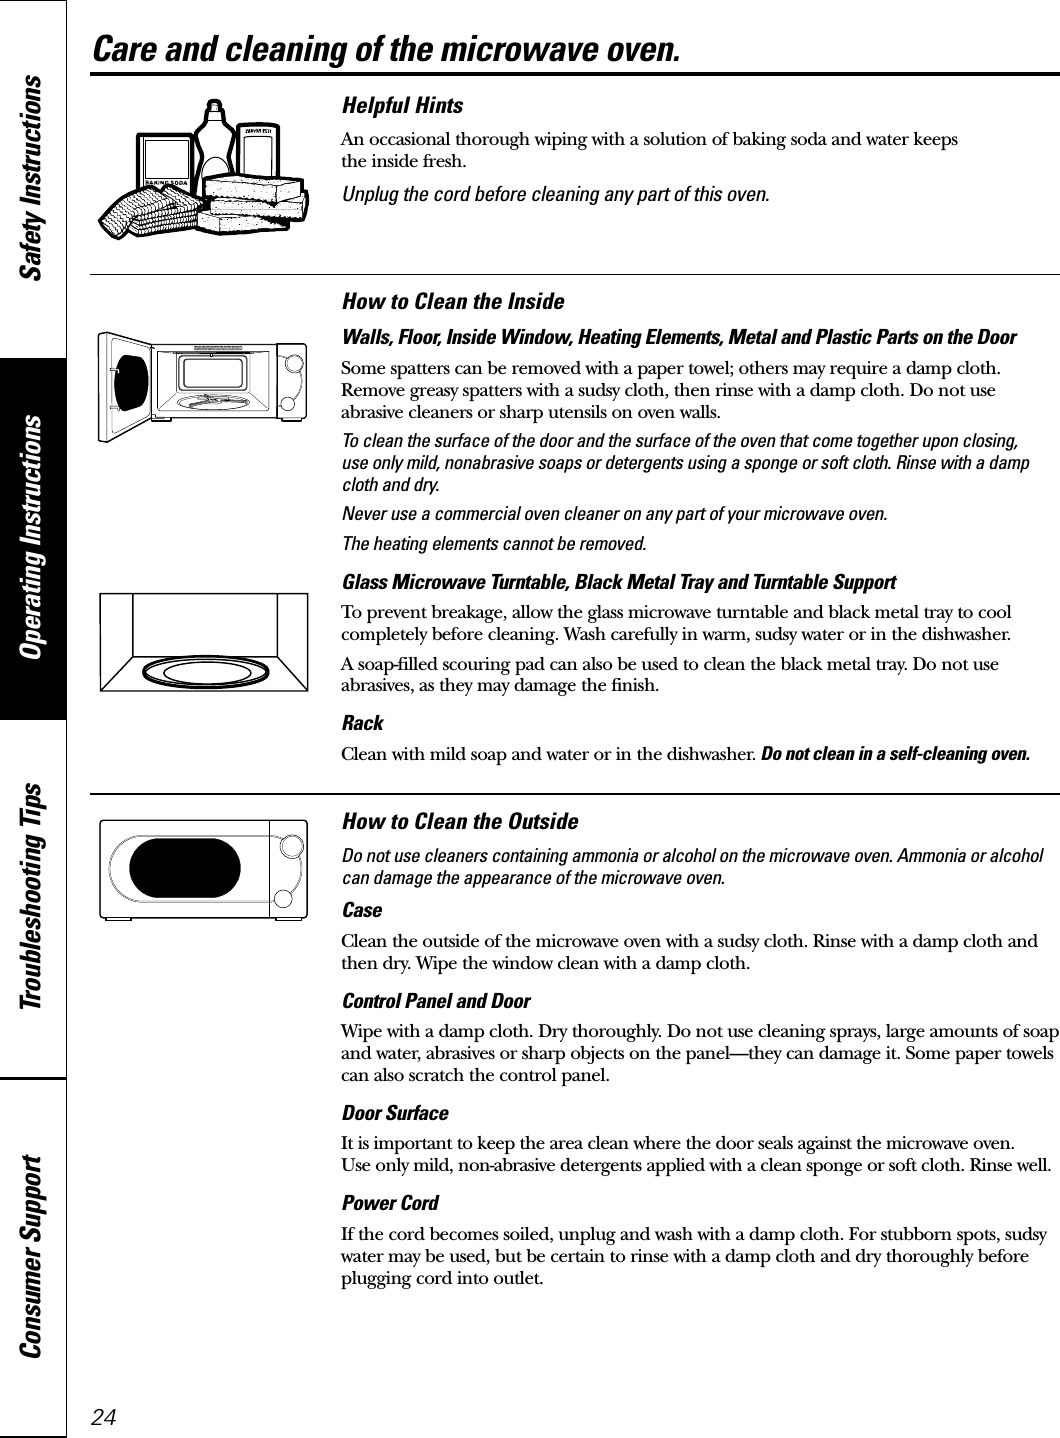
WINIA Electronics 7NF1MMO110N Microwave Oven User Manual 3184 RevEng JES1290

Dongbu Daewoo Electronics Corporation Microwave Oven 3184 RevEng JES1290

user manual

Before operating this oven, please read these instructions completely.OPERATING INSTRUCTIONS& COOK BOOKMICROWAVE OVENKOR-1N1A9ANRU04Q4[EDNRF04P8[E
Microwave Oven350A4502P449 49-40429  07-04 JR   JES1290Owner’s Manualwww.GEAppliances.caSafety Information  . . . . . . . . .2–6Operating InstructionsBest Cooking Methods  . . . . . . . .19Combination 1 Features . . . . . . .16Combination 2 Features . . . . . . .17Convection Features . . . . . . . . . .15Convenience Features  . . . . . . . .14Cookware Tips  . . . . . . . . . . . . . .20Grill Feature  . . . . . . . . . . . . . . . .18Microwave Terms  . . . . . . . . . . . .23Other Features  . . . . . . . . . . .21, 22Oven Features . . . . . . . . . . . . . .7, 8Power Levels  . . . . . . . . . . . . . . . . .9Timed Features  . . . . . . . . . . .10–13Care and Cleaning . . . . . . . . . .24Troubleshooting Tips . . . . . . . .25Things That Are Normal  . . . . . .25Consumer SupportWarranty  . . . . . . . . . . . . . . . . . . .29Consumer Support  . . .Back CoverWrite the model and serial numbers here:Model # __________________Serial # __________________You can find them on a labelinside the oven.with Convection and Grill
Operating Instructions Safety InstructionsConsumer Support Troubleshooting TipsIMPORTANT SAFETY INSTRUCTIONS. READ ALL INSTRUCTIONS BEFORE USING.IMPORTANT SAFETY INSTRUCTIONS.When using electrical appliances basic safety precautions should be followed, including the following. Use this appliance only for its intended purpose as described in this Owner’s Manual.■Read and follow the specific precautions in thePrecautions to Avoid Possible Exposure to ExcessiveMicrowave Energy section above.■This appliance must be grounded. Connect only to a properly grounded outlet. See the GroundingInstructions section on page 5.■Install or locate this appliance only in accordance with the provided installation instructions.■This oven must be located at least 3 ft. above floor level.■Be certain to place the front surface of the door 3wor more back from the countertop edge to avoidaccidental tipping of the appliance in normal usage.■Do not mount this appliance over a sink. ■Do not mount the microwave oven over or near anyportion of a heating or cooking appliance.■Do not store anything directly on top of the microwaveoven surface when the microwave oven is in operation.■Do not operate this appliance if it has a damaged power cord or plug, if it is not working properly or if it has been damaged or dropped. If the power cord is damaged, it must be replaced by General ElectricService or an authorized service agent using a powercord available from General Electric.■Do not cover or block any openings on the appliance.■Use this appliance only for its intended use as describedin this manual. Do not use corrosive chemicals or vaporsin this appliance. This microwave oven is specificallydesigned to heat, dry or cook food, and is not intendedfor laboratory or industrial use.■This microwave oven is not approved or tested formarine use.■Do not store this appliance outdoors. Do not use thisproduct near water—for example, in a wet basement,near a swimming pool, near a sink or in similar locations.■Keep power cord away from heated surfaces.■Do not immerse power cord or plug in water.■Do not let power cord hang over edge of table orcounter. ■To reduce the risk of fire in the oven cavity:— Do not overcook food. Carefully attend appliance whenpaper, plastic or other combustible materials are placedinside the oven while cooking.— Remove wire twist-ties and metal handles from paper orplastic containers before placing them in the oven.— Do not use the oven for storage purposes. Do not leavepaper products, cooking utensils or food in the ovenwhen not in use.— If materials inside the oven ignite, keep the oven doorclosed, turn the oven off and disconnect the powercord, or shut off power at the fuse or circuit breakerpanel. If the door is opened, the fire may spread.■See door surface cleaning instructions in the Care and cleaning of the microwave oven sectionof this manual.■This appliance must only be serviced by qualified servicepersonnel. Contact nearest authorized service facility forexamination, repair or adjustment.■As with any appliance, close supervision is necessarywhen used by children.SAVE THESE INSTRUCTIONSWARNING! For your safety, the information in this manual must be followed to minimize the riskof fire or explosion, electric shock, or to prevent property damage, personal injury, or loss of life.(a) Do Not Attempt to operate this oven with the dooropen since open-door operation can result in harmfulexposure to microwave energy. It is important not todefeat or tamper with the safety interlocks.( b) Do Not Place any object between the oven front faceand the door or allow soil or cleaner residue toaccumulate on sealing surfaces.(c) Do Not Operate the oven if it is damaged. It isparticularly important that the oven door closeproperly and that there is no damage to the:(1) door (bent),(2) hinges and latches (broken or loosened),(3) door seals and sealing surfaces.(d) The Oven Should Not be adjusted or repaired byanyone except properly qualified service personnel.PRECAUTIONS TO AVOID POSSIBLE EXPOSURE TO EXCESSIVE MICROWAVE ENERGY2
Consumer SupportTroubleshooting TipsOperating InstructionsSafety Instructionswww.GEAppliances.caARCINGIf you see arcing, press CLEAR/OFF and correct the problem.Arcing is the microwave term for sparks in the oven.Arcing is caused by:■The metal shelf installed incorrectly so it touchesthe microwave wall.■Metal or foil touching the side of the oven.■Foil not molded to food (upturned edges act like antennas).■Metal, such as twist-ties, poultry pins or gold-rimmed dishes, in the microwave.■Recycled paper towels containing small metalpieces being used in the microwave.FOODS■When microwaving, place all foods andcontainers on the glass microwave turntable.■SUPERHEATED WATERLiquids, such as water, coffee or tea are able to be overheated beyond the boiling point withoutappearing to be boiling. Visible bubbling or boilingwhen the container is removed from the microwaveoven is not always present. THIS COULD RESULT IN VERY HOT LIQUIDS SUDDENLY BOILING OVERWHEN THE CONTAINER IS DISTURBED OR ASPOON OR OTHER UTENSIL IS INSERTED INTO THE LIQUID.To reduce the risk of injury to persons:— Do not overheat the liquid.— Stir the liquid both before and halfway throughheating it.— Do not use straight-sided containers with narrow necks.— After heating, allow the container to stand in the microwave oven for a short time beforeremoving the container.— Use extreme care when inserting a spoon orother utensil into the container.■Do not pop popcorn in your microwave ovenunless in a special microwave popcorn accessoryor unless you use popcorn labeled for use inmicrowave ovens.■Some products such as whole eggs and sealedcontainers—for example, closed jars—are able to explode and should not be heated in thismicrowave oven. Such use of the microwave oven could result in injury.■Do not boil eggs in a microwave oven. Pressurewill build up inside egg yolk and will cause it to burst, possibly resulting in injury.■Operating the microwave with no food inside formore than a minute or two may cause damage tothe oven and could start a fire. It increases theheat around the magnetron and can shorten thelife of the oven.■Foods with unbroken outer “skin” such aspotatoes, hot dogs, sausages, tomatoes, apples,chicken livers and other giblets, and egg yolksshould be pierced to allow steam to escape during cooking.■Avoid heating baby food in glass jars, even with the lid off. Make sure all infant food isthoroughly cooked. Stir food to distribute theheat evenly. Be careful to prevent scalding whenwarming formula. The container may feel coolerthan the formula really is. Always test the formulabefore feeding the baby.■Don’t defrost frozen beverages in narrow-neckedbottles (especially carbonated beverages). Even ifthe container is opened, pressure can build up.This can cause the container to burst, possiblyresulting in injury.■Hot foods and steam can cause burns. Be carefulwhen opening any containers of hot food,including popcorn bags, cooking pouches andboxes. To prevent possible injury, direct steamaway from hands and face.■Do not overcook potatoes. They could dehydrateand catch fire, causing damage to your oven.■Cook meat and poultry thoroughly—meat to at least an INTERNAL temperature of 160°F andpoultry to at least an INTERNAL temperature of 180°F. Cooking to these temperatures usuallyprotects against foodborne illness.■Foods cooked in liquids (such as pasta) may tend to boil more rapidly than foods containingless moisture. Should this occur, refer to the Care and cleaning of the microwave oven sectionfor instructions on how to clean the inside of the oven.WARNING!3
4Operating Instructions Safety InstructionsConsumer Support Troubleshooting TipsIMPORTANT SAFETY INSTRUCTIONS. READ ALL INSTRUCTIONS BEFORE USING.MICROWAVE-SAFE COOKWAREMake sure to use suitable cookware duringmicrowave cooking. Most glass casseroles, cookingdishes, measuring cups, custard cups, pottery orchina dinnerware which does not have metallic trimor glaze with a metallic sheen can be used. Somecookware is labeled “suitable for microwaving.”■Place food or microwavable container directly on the glass turntable to cook your food.■Use of the black metal tray during microwavecooking will result in inferior cookingperformance.■If you are not sure if a dish is microwave-safe, use this test: Place in the oven both the dish youare testing and a glass measuring cup filled with 1 cup of water—set the measuring cup either in or next to the dish. Microwave 30–45 seconds at high. If the dish heats, it should not be used for microwaving. If the dish remains cool and only the water in the cup heats, then the dish is microwave-safe.■Oversized food or oversized metal cookwareshould not be used in a microwave/convectionoven because they increase the risk of electricshock and could cause a fire.■Sometimes the oven floor, turntable and wallscan become too hot to touch. Be carefultouching the floor, turntable and walls duringand after cooking.■If you use a meat thermometer while cooking,make sure it is safe for use in microwave ovens.■Do not use recycled paper products. Recycledpaper towels, napkins and waxed paper cancontain metal flecks which may cause arcing or ignite. Paper products containing nylon or nylon filaments should be avoided, as theymay also ignite. ■Some styrofoam trays (like those that meat is packaged on) have a thin strip of metalembedded in the bottom. When microwaved, the metal can burn the floor of the oven or ignite a paper towel.■Do not use the microwave to dry newspapers.■Not all plastic wrap is suitable for use inmicrowave ovens. Check the package for proper use.■Do not use paper products when themicrowave/convection oven is operated in theconvection or combination mode.■Paper towels, waxed paper and plastic wrap can be used to cover dishes in order to retainmoisture and prevent spattering. Be sure to vent plastic wrap so steam can escape.■Cookware may become hot because of heattransferred from the heated food. Pot holdersmay be needed to handle the cookware.■“Boilable” cooking pouches and tightly closedplastic bags should be slit, pierced or vented asdirected by package. If they are not, plastic couldburst during or immediately after cooking,possibly resulting in injury. Also, plastic storagecontainers should be at least partially uncoveredbecause they form a tight seal. When cookingwith containers tightly covered with plastic wrap,remove covering carefully and direct steam awayfrom hands and face.■Use foil only as directed in this guide. TV dinnersmay be microwaved in foil trays less than 3/4whigh; remove the top foil cover and return thetray to the box. When using foil in the microwaveoven, keep the foil at least 1waway from the sidesof the oven.■Plastic cookware—Plastic cookware designed formicrowave cooking is very useful, but should beused carefully. Even microwave-safe plastic maynot be as tolerant of overcooking conditions as are glass or ceramic materials, and may soften orchar if subjected to short periods of overcooking.In longer exposures to overcooking, the foodand cookware could ignite. ■Use of the shelf accessory:— Remove the shelf from the oven when not in use.— Use pot holders when handling the shelf andcookware. They may be hot.— Be sure that the shelf is positioned properlyinside the oven to prevent product damage.— Do not cover the shelf or any part of the ovenwith metal foil. This will cause overheating of themicrowave/convection oven.Follow these guidelines: Use microwave-safe plastics only and usethem in strict compliance with the cookwaremanufacturer’s recommendations. Do not microwave empty containers. Do not permit children to use plasticcookware without complete supervision.321WARNING!
Consumer SupportTroubleshooting TipsOperating InstructionsSafety Instructions5GROUNDING INSTRUCTIONSThis appliance must be grounded. In the event ofan electrical short circuit, grounding reduces therisk of electric shock by providing an escape wire for the electric current. This appliance is equipped with a power cordhaving a grounding wire with a grounding plug.The plug must be plugged into an outlet that isproperly installed and grounded.Consult a qualified electrician or service technicianif the grounding instructions are not completelyunderstood, or if doubt exists as to whether theappliance is properly grounded.If the outlet is a standard 2-prong wall outlet, it is your personal responsibility and obligation to have it replaced with a properly grounded 3-prong wall outlet.Do not under any circumstances cut or remove the third (ground) prong from the power cord.We do not recommend using an extension cordwith this appliance. If the power cord is too short,have a qualified electrician or service technicianinstall an outlet near the appliance. (See EXTENSION CORDS section.)For best operation, plug this appliance into its own electrical outlet to prevent flickering of lights,blowing of fuse or tripping of circuit breaker.WARNING: Improper use of the grounding plug can result in a risk of electric shock.www.GEAppliances.caGRILLING, CONVECTION & COMBINATION SAFETY■Use the black metal tray when grilling,convection or combination cooking. Use the trayin the same way you would use a shallow bakingpan or baking tray. Place food, oven-safecookware or the rack directly on the black metaltray when cooking.■Use of the glass turntable when grilling,convection or combination cooking will result in inferior cooking performance.■Do not cover the black metal tray with metal foilin combination mode. This will cause arcing inthe oven.■Any non-metal, oven-safe dish can be used whencombination cooking in the oven. Any oven-safedish can be used when grilling or convectioncooking.■The oven and door will get hot when grilling,convection or combination cooking.■Cookware will become hot when grilling,convection or combination cooking. Pot holdersor oven mitts will be needed to handle thecookware.■Do not use paper towels or coverings, containersor cooking/roasting bags made of foil or otherreflective material, plastic, wax or paper whengrilling, convection or combination cooking.■Do not place food directly against the top orbottom heating elements.■Use of the rack:— For convection two level baking only.— Place dish directly on the rack.— Remove the rack from the oven when not in use.— Use pot holders or oven mitts when handling the rack. It may be hot.— Be sure that the rack is positioned properly inside the oven to prevent product damage.— Do not cover the rack or any part of the ovenwith metal foil. This will cause overheating of the oven.■During and after use, do not touch, or letclothing, pot holders or other flammablematerials contact the top heating element orguard. These surfaces may be hot enough to burn even though they are dark in color. Allow sufficient time for cooling first.■Remove cookware completely from the ovenbefore turning food.
6Operating Instructions Safety InstructionsConsumer Support Troubleshooting TipsEXTENSION CORDSA short power supply cord is provided to reduce the risks resulting from becoming entangled in or trippingover a longer cord.Extension cords may be used if you are careful in using them.If an extension cord is used—The marked electrical rating of the extension cord should be at least as great as the electrical rating of the appliance;The extension cord must be a grounding-type 3-wire cord and it must be plugged into a 3-slot outlet;The extension cord should be arranged so that it will not drape over the countertop or tabletop whereit can be pulled on by children or tripped over unintentionally.If you use an extension cord, the interior light may flicker and the blower sound may vary when themicrowave oven is on. Cooking times may be longer, too.321READ AND FOLLOW THIS SAFETY INFORMATION CAREFULLY.SAVE THESE INSTRUCTIONSIMPORTANT SAFETY INSTRUCTIONS. READ ALL INSTRUCTIONS BEFORE USING.
7Consumer SupportTroubleshooting TipsOperating InstructionsSafety InstructionsThroughout this manual, features and appearance may vary from your model.1000 WattsFeatures of the OvenDoor LatchesWindow with Metal ShieldScreen allows cooking to be viewed whilekeeping microwaves confined in the oven.Control Panel and DisplayGlass TurntableCenter the tray on the turntable support whenusing the microwave features. Place food ormicrowave-safe cookware directly on the glassturntable.Black Metal Tray Put food or appropriate cookware directly onthe black metal tray and place on the turntablesupport when using grilling, convection orcombination features.Removable Turntable Support The turntable support must be in place whenusing the oven.NOTE: Rating plate is located on the front of themicrowave, behind the door. Oven vent(s) and oven lightare located on the inside walls of the microwave oven.Heating Elements Allows you to cook frozen convenience foods,brown already cooked foods quickly on top or grill foods on the top and bottom.RackUsed for convection baking.Center the rack on the black metal tray. (Do not use when microwave or combinationcooking.)About the features of your oven. www.GEAppliances.ca1100 Watts
8Operating Instructions Safety InstructionsConsumer Support Troubleshooting TipsYou can microwave by time, or with the convenience features, or cook using the grilling features.About the features of your oven.Cooking ControlsMicrowave Cooking Time and Auto FeaturePress Enter and press START OptionTIME COOK Amount of cooking time more/less timeDEFROSTPress once to AUTO Food weightPress twice to TIME Amount of defrosting timePOWER/TEMP Power level 1–10EXPRESS COOK Starts immediately!REHEAT Food type, serving sizePOPCORN 3.5 oz. or 3 oz. more/less timeBEVERAGE 4, 8 or 12 oz.Convection CookingPress Enter and press START OptionCONVECTION Enter oven temperature and  with or without preheatcooking time  more/less timeCombination Cooking (Combi 1 = Microwave and Convection, Combi 2 = Microwave and Grill)Press Enter and press START OptionCOMBINATION once Enter oven temperature and  with or without preheat(Combi-1) cooking time  more/less timeMicrowave power level changeCOMBINATION twice Enter cooking time more/less time(Combi-2) Microwave and Grill power level changeGrilling (Grill 1 = Top and Bottom Heat, Grill 2 = Top Heat)Press Enter and press START OptionGRILL once (Grill-1) Enter time more/less timeGRILL twice (Grill-2) Enter time more/less time
Consumer SupportTroubleshooting TipsOperating InstructionsSafety Instructions9Using the microwave features. www.GEAppliances.caMake sure the turntable support and glassturntable are in place when microwaving.■Place food or microwavable containerdirectly on the glass turntable to cookyour food.■Center the glass turntable on theturntable support.■Make sure that cookware is suitable formicrowaving.The power level may be entered or changed immediately after entering thetime for Time Cook, Combination, TimeDefrost or Express Cook. The power levelmay also be changed during timecountdown.First, follow directions for Time Cook,Time Defrost or Express Cook.Press the POWER/TEMP button.Enter the desired power level 1–10.Press the START/PAUSE button to startcooking.Variable power levels add flexibility tomicrowave cooking. The power levels on the microwave oven can be compared to the surface units on a range. Each powerlevel gives you microwave energy a certainpercent of the time. Power level 7 ismicrowave energy 70% of the time. Power level 3  is energy 30% of the time.Most cooking will be done on High (powerlevel 10) which gives you 100% power. Power level 10 will cook faster but food mayneed more frequent stirring, rotating orturning over. A lower setting will cook moreevenly and need less stirring or rotating ofthe food. Some foods may have better flavor,texture or appearance if one of the lowersettings is used. Use a lower power levelwhen cooking foods that have a tendency to boil over, such as scalloped potatoes.Rest periods (when the microwave energycycles off) give time for the food to“equalize” or transfer heat to the inside of the food. An example of this is shownwith power level 3—the defrost cycle. If microwave energy did not cycle off, the outside of the food would cook beforethe inside was defrosted.Here are some examples of uses for variouspower levels:High 10: Fish, bacon, vegetables, boilingliquids.Med-High 7: Gentle cooking of meat andpoultry; baking casseroles and reheating.Medium 5: Slow cooking and tenderizing for stews and less tender cuts of meat.Low 2 or 3: Defrosting; simmering; delicatesauces.Warm 1: Keeping food warm; softeningbutter.4321About changing the microwave power level.
Operating Instructions Safety InstructionsConsumer Support Troubleshooting Tips10Time CookTime Cook IAllows you to microwave for any time up to 99 minutes.Power level 10 (High) is automatically set, but you may change it for more flexibility. Press the TIME COOK button.Enter cooking time.Change power level if you don’t wantfull power. (Press POWER/TEMP. Selecta desired power level 1–10.)Press the START/PAUSE button to startcooking.You may open the door during Time Cookto check the food. Close the door and pressSTART/PAUSE to resume cooking.Time Cook IILets you change power levels automaticallyduring cooking. Here’s how to do it:Press the TIME COOK button.Enter cooking time.Change the power level if you don’twant full power. (Press POWER/TEMP.Select a desired power level 1–10.)Press the TIME COOK button again.Enter the second cooking time.Change the power level if you don’twant full power. (Press POWER/TEMP.Select a desired power level 1–10.)Press the START/PAUSE button to startcooking.At the end of Time Cook I, Time Cook IIcounts down.76543214321Express CookThis is a quick way to set and start cooking in one minute blocks each time the EXPRESS buttonis pressed.The power level will automatically be set at 10 and the oven will start immediately.The power level can be changed as time is counting down. (Press POWER /TEMP. Select adesired power level 1–10.)Add 30 Seconds■Each time the 30 SEC button is pressed, it will add 30 seconds to any cooking timecounting down, until the maximun cooking time is reached.About the time and auto microwave features.Make sure the turntable support and glass turntable are in place when microwaving.Make sure the turntable support and glass turntable are in place when microwaving.Make sure the turntable support and glass turntable are in place when microwaving.
Consumer SupportTroubleshooting TipsOperating InstructionsSafety Instructions11Vegetable Amount Time CommentsAsparagus(fresh spears) 1 lb. (450 g)6 to 9 min., In 11⁄2-qt. (1.5 L) casserole, place 1/4 cup (60 mL) water.Med-High (7)(frozen spears) 10-oz. (283 g)package 5 to 7 min. In 1-qt. (1 L) casserole.Beans(fresh green) 1 lb. (450 g)cut in half 9 to 11 min.In 11⁄2-qt. (1.5 L) casserole, place 1/2 cup (120 mL) water.(frozen green) 10-oz. (283 g) package 6 to 8 min. In 1-qt. (1 L) casserole, place 2 tablespoons (30 mL) water.(frozen lima) 10-oz. (283 g) package 6 to 8 min. In 1-qt. (1 L) casserole, place 1/4 cup (60 mL) water.Beets(fresh, whole) 1 bunch 17 to 21 min. In 2-qt. (2 L) casserole, place 1/2 cup (120 mL) water.Broccoli(fresh cut) 1 bunch (11⁄4to 11⁄2lbs./ 7 to 10 min. In 2-qt. (2 L) casserole, place 1/2 cup (120 mL) water.570 to 680 g)(fresh spears) 1 bunch (11⁄4to 11⁄2lbs./ 9 to 13 min. In 2-qt. (2 L) casserole, place 1/4 cup (60 mL) water.570 to 680 g)(frozen, chopped) 10-oz. (283 g) package 5 to 7 min. In 1-qt. (1 L) casserole.(frozen spears) 10-oz. (283 g) package 5 to 7 min. In 1-qt. (1 L) casserole, place 3 tablespoons (45 mL) water.Cabbage(fresh) 1 medium head  8 to 11 min. In 11⁄2- or 2-qt. (1.5 or 2 L) casserole, place 1/4 cup (60 mL)(about 2 lbs./900 g) water.(wedges) 7 to 10 min. In 2-or 3-qt. (2 or 3 L) casserole, place 1/4 cup (60 mL) water.Carrots(fresh, sliced) 1 lb. (450 g) 7 to 9 min. In 11⁄2-qt. (1.5 L) casserole, place 1/4 cup (60 mL) water.(frozen) 10-oz. (283 g) package 5 to 7 min. In 1-qt. (1 L) casserole, place 2 tablespoons (30 mL) water.Cauliflower(flowerets) 1 medium head 9 to 14 min. In 2-qt. (2 L) casserole, place 1/2 cup (120 mL) water.(fresh, whole) 1 medium head 10 to 17 min. In 2-qt. (2 L) casserole, place 1/2 cup (120 mL) water.(frozen) 10-oz. (283 g) package 5 to 7 min. In 1-qt. (1 L) casserole, place 2 tablespoons (30 mL) water.Corn(frozen kernel) 10-oz. (283 g) package 5 to 7 min. In 1-qt. (1 L) casserole, place 2 tablespoons (30 mL) water.Corn on the cob(fresh) 1 to 5 ears 3 to 4 min. In 2-qt. (2 L) glass baking dish, place corn. If corn is in husk,per ear use no water; if corn has been husked, add 1/4 cup (60 mL)water. Rearrange after half of time.(frozen) 1 ear 5 to 6 min. Place in 2-qt. (2 L) oblong glass baking dish.2 to 6 ears 3 to 4 min. Cover with vented plastic wrap. Rearrange after half of time.per ear Mixed  vegetables(frozen) 10-oz.(283 g)package 5 to 7 min.In 1-qt. (1 L) casserole, place 3 tablespoons (45 mL) water.Peas(fresh, shelled) 2 lbs. (900 g) unshelled 9 to 12 min. In 1-qt. (1 L) casserole, place 1/4 cup (60 mL) water.(frozen) 10-oz. (283 g) package 5 to 7 min. In 1-qt. (1 L) casserole, place 2 tablespoons (30 mL) water.Potatoes(fresh, cubed, white) 4 potatoes (6 to 8 oz. each/ 9 to 12 min. Peel and cut into 1-inch cubes. Place in 2-qt. (2 L)170 to 225 g)casserole with 1/2 cup (120 mL) water. Stir after half of time.(fresh, whole, sweet  1 (6 to 8 oz./170 to 225 g) 3 to 4 min. Pierce with cooking fork. Place in the oven, 1w(2.5 cm)or white) apart, in circular arrangement. Let stand 5 minutes.Spinach(fresh) 10 to 16 oz. (283 to 450 g) 5 to 7 min. In 2-qt. (2 L) casserole, place washed spinach.(frozen, chopped and leaf) 10-oz.(283 g)package 5 to 7 min.In 1-qt. (1 L) casserole, place 3 tablespoons (45 mL) water.Squash(fresh, summer and yellow)1 lb. (450 g)sliced 5 to 7 min.In 11⁄2-qt. (1.5 L) casserole, place 1/4 cup (60 mL) water.(winter, acorn or butternut)1 to 2 squash (about 1 lb./8 to 11 min. Cut in half and remove fibrous membranes. In 2-qt. (2 L)450 g each)glass baking dish, place squash cut-side-down.Turn cut-side-up after 4 minutes. Cooking Guide for Microwave Time CookNOTE: Use High power level (10) unless otherwise noted.www.GEAppliances.ca
Operating Instructions Safety InstructionsConsumer Support Troubleshooting Tips12Time DefrostUse Time Defrost to defrost for a selectedlength of time. Press the DEFROST button twice.Enter the defrosting time.Press the START/PAUSE button to startdefrosting.Turn the food over if the oven signalsTURN FOOD OVER.Power level is automatically set at 3, but canbe changed. You can defrost small itemsquickly by raising the power level afterentering the time. Power level 7 cuts thetotal defrosting time in about half; powerlevel 10 cuts the total time to approximately1/3. However, food will need morefrequent attention than usual.A dull thumping noise may be heardduring defrosting. This is normal whenoven is not operating at High power.Make sure the turntable support and glassturntable are in place when microwaving.Defrosting Tips■Foods frozen in paper or plastic can bedefrosted in the package. Closed packagesshould be slit, pierced or vented AFTERfood has partially defrosted. Plastic storagecontainers should be partially uncovered.■Family-size, prepackaged frozen dinnerscan be defrosted and microwaved. If thefood is in a foil container, transfer it to amicrowave-safe dish.■Foods that spoil easily should not beallowed to sit out for more than one hourafter defrosting. Room temperaturepromotes the growth of harmful bacteria.■For more even defrosting of larger foods,such as roasts, use Auto Defrost. Be surelarge meats are completely defrostedbefore cooking.■When defrosted, food should be cool but softened in all areas. If still slightly icy,return to the microwave very briefly, orlet it stand a few minutes.4321About the time and auto microwave features.Auto DefrostUse Auto Defrost for meat, poultry and fish.Use Time Defrost for most other frozen foods.Auto Defrost automatically sets thedefrosting times and power levels to giveeven defrosting results for meats, poultryand fish.■Remove meat from package and place on microwave-safe dish.Press the DEFROST button once.Enter the food weight, using theConversion Guide at right. For example, press 1.2 for 1.2 pounds (1 pound, 3 oz.).Press the START/PAUSE button to startdefrosting.Turn the food over if the oven signalsTURN FOOD OVER.■Remove defrosted meat or shield warmareas with small pieces of foil.■After defrosting, most meats need tostand 5 minutes to complete defrosting.Large roasts should stand for about 30 minutes.Make sure the turntable support and glassturntable are in place when microwaving.Conversion GuideIf the weight of food is stated in pounds and ounces, the ounces must be converted to tenths (.1) of a pound.Weight of Food  Enter Food Weightin Ounces (tenths of a pound)1–2 .13.24–5 .36–7 .48.59–10 .611 .712–13 .814–15 .94321
Consumer SupportTroubleshooting TipsOperating InstructionsSafety Instructions13Food Time CommentsBreads, CakesBread, buns or rolls (1 piece) 1 min.Sweet rolls (approx. 12 oz.) 3 to 5 min. Rearrange after half the time.Fish and SeafoodFillets, frozen (1 lb.) 6 to 8 min.Shellfish, small pieces (1 lb.) 5 to 7 min. Place block in casserole. Turn over and break up after half the time.FruitPlastic pouch—1 or 2 3 to 6 min.(10-oz. package)MeatBacon (1 lb.) 2 to 5 min. Place unopened package in oven. Let stand 5 minutes after defrosting. Franks (1 lb.) 2 to 5 min. Place unopened package in oven. Microwave just until franks can be separated. Let stand 5 minutes, if necessary, to complete defrosting.Ground meat (1 lb.) 5 to 7 min. Turn meat over after first half of time.Roast: beef, lamb, veal, pork 12 to 16 min. Use power level 10.per lb.Steaks, chops and cutlets 5 to 7 min.  Place unwrapped meat in cooking dish. Turn over after first half of time and shieldper lb. warm areas with foil. After second half of time, separate pieces with table knife.Let stand to complete defrosting.PoultryChicken, broiler-fryer, cut up 15 to 19 min. Place wrapped chicken in dish. Unwrap and turn over after first half of time.(21⁄2to 3 lbs.) After second half of time, separate pieces and place in cooking dish. Microwave 2 to 4 minutes more, if necessary. Let stand a few minutes to finish defrosting.Chicken, whole (21⁄2to 3 lbs.) 17 to 21 min. Place wrapped chicken in dish. After half the time, unwrap and turn chicken over. Shield warm areas with foil. To complete defrosting, run cold water in the cavity until giblets can be removed.Cornish hen 7 to 13 min. Place unwrapped hen in the oven breast-side-up. Turn over after first half of time. per lb. Run cool water in the cavity until giblets can be removed.Turkey breast (4 to 6 lbs.) 5 to 9 min.  Place unwrapped breast in microwave-safe dish breast-side-down. After first half per lb. of time, turn breast-side-up and shield warm areas with foil. Defrost for second half of time. Let stand 1 to 2 hours in refrigerator to complete defrosting.Defrosting Guidewww.GEAppliances.ca
Use only with prepackagedmicrowave popcorn weighing 3.0 to 3.5 ounces.Operating Instructions Safety InstructionsConsumer Support Troubleshooting Tips14About the convenience microwave features.PopcornMake sure the turntable support and glassturntable are in place when microwaving.To use the Popcorn feature:Follow package instructions, using Time Cook if the package is less than 3.0ounces or larger than 3.5 ounces. Placethe package of popcorn in the centerof the microwave.Press the POPCORN button once ortwice. The oven starts immediately.Press once for a regular size (3.5 oz.)bag of popcorn.Press twice for a smaller size (3.0 oz.)bag of popcorn.If you open the door while POPCORN isdisplayed, PAUSE will appear. Close thedoor, press START/PAUSE to resumecooking OR press CLEAR/OFF to cancelthe popcorn feature.If food is undercooked after thecountdown, use Time Cook foradditional cooking time.To add time:Immediately after oven starts, press 9 to add 20 seconds.To subtract time:Immediately after oven starts, press 1 to subtract 20 seconds.21BeverageMake sure the turntable support and glassturntable are in place when microwaving.To use the Beverage feature:Press BEVERAGE.The serving size is automatically set at 4 ounces, but can be changed bypressing BEVERAGE to select 8 or 12ounces. Pressing twice selects 8 ouncesand pressing three times selects 12ounces. The oven starts immediately.Drinks heated with the Beverage feature maybe very hot. Remove the container with care.If beverage is not hot enough after thecountdown, use Time Cook for additionalheating time.21ReheatMake sure the turntable support and glassturntable are in place when microwaving.The Reheat feature reheats 1–6 servings of many previously cooked foods.Press REHEAT.Select food type 1–6. (See Reheat Guidebelow).Select serving size 1–3.Press START/PAUSE.NOTE: Serving size cannot be changed during cooking.4321Food Type Comments1. Meats Cover with lid or vented plastic wrap.2. Pasta Cover with lid or vented plastic wrap.3. Pizza slices Do not cover.4. Plate of leftovers Cover with lid or vented plastic wrap.5. Sauce Cover with lid or vented plastic wrap.6. Vegetables Cover with lid or vented plastic wrap.Reheat Guide
Consumer SupportTroubleshooting TipsOperating InstructionsSafety Instructions15Convection cooking uses a heating element to raise the temperature of the air inside theoven. Any oven temperature from 250°F to 450°F may be set, in increments of 5°F. A fangently circulates this heated air throughout the oven, over and around the food, producinggolden brown exteriors and rich, moist interiors. Because the heated air is kept constantly moving, not permitting a layer of cooler air to develop around the food, some foods cook faster than in regular oven cooking.See the Cookware Tips section for information on suggested cookware.For Best Results…In convection cooking, the food dish must be placed on the metal wire rack.Do not place dish directly on the metal tray.Convection Time Cook with PreheatPress the CONVECTION button.Enter the desired oven temperaturebetween 250°F and 450°F. Do not enterconvection cook time now. (The cooktime will be entered later, after the ovenis preheated.)Press the START/PAUSE buttonto start preheating.When the oven is preheated, it willsignal. If you do not open the doorwithin 1 hour, the oven will turn offautomatically.Open the oven door and, usingcaution, place the food in the oven.Close the oven door. Enter the cooktime and press START/PAUSE to startcooking.When cooking is complete, the ovenwill signal and turn off.7654213Convection Time Cook without PreheatingIf your recipe does not requirepreheating, press the CONVECTIONbutton.Enter the desired oven temperaturebetween 250°F and 450°F.Enter the cook time.Press the START/PAUSE button to startthe oven.4321About the convection features. www.GEAppliances.caMake sure the turntable support and black metal tray are in place.Make sure the turntable support and black metal tray are in place.
Operating Instructions Safety InstructionsConsumer Support Troubleshooting TipsCombination 1 Cooking offers the best features of microwave energy and convection cooking.Microwaves cook food fast and convection circulation of heated air browns foodsbeautifully. Any oven temperature from 250°F to 450°F may be set, in increments of 5°F.CAUTION: When using the combination features, remember that the oven,door and dishes will be very hot!Combination 1 Time Cooking without PreheatIf your recipe does not requirepreheating, press the COMBINATIONbutton.Enter the desired oven temperaturebetween 250°F and 450°F.Enter the cook time.Press the START/PAUSE buttonto start the oven.NOTE:■Some recipes call for preheating.■Check the Cookware Tips section forcorrect cookware when CombinationCooking.■Do not use metal cookware whenCombination Cooking.■Place meat on a trivet in a glass dish tocollect juices and prevent spattering. Forfoods that are too tall to fit in the oven,you can leave out the trivet.■For best roasting and browning results,whole roasts should be cooked in a glassdish placed directly on the oven shelf.3214Combination 1 Time Cooking with PreheatPress the COMBINATION button.COMBI-1 will be displayed.Enter the desired oven temperaturebetween 250°F and 450°F. Do not entercombination cook time now. (The cooktime will be entered later, after the ovenis preheated.)Press the START/PAUSE button to startpreheating.When the oven is preheated, it will signal.If you do not open the door within 1 hour,the oven will turn off automatically.Open the oven door and, usingcaution, place the food in the oven.Close the oven door. Enter the cooktime. Enter whole minutes. Press theSTART/PAUSE button to start cooking.When cooking is complete, the ovenwill signal and turn off.7654213Using the combination 1 (microwave and convection) features.16■Cookware will become hot. Oven mittswill be needed to handle the cookware.■Place food or oven-safe cookware directlyon the black metal tray when cooking.■Make sure food is cooked all the waythrough before browning.■Use the black metal tray in the same wayyou would use a shallow baking pan orbaking tray.■In addition to the cookware provided,you can use non-metal casserole dishes,pie plates and other heat-safe cookware.Place them directly on the black metaltray.■Be sure to select a size that will rotateeasily.■Place the black metal tray directly on theturntable support.■Do not use cookware or coverings madeof paper, plastic or foil when using thecombination features.See the Cookware Tips section for informationon suggested cookware.Make sure the turntable support and black metal tray are in place.Make sure the turntable support and black metal tray are in place.
17Using the combination 2 (microwave and grill) features. www.GEAppliances.caMake sure the turntable support and blackmetal tray are in place when using theCombination 2 feature.The grilling features use a combination of microwave and heat from the top andbottom elements to cook food evenlythroughout.CAUTION: When using thecombination features, remember that the oven,door and dishes will be very hot!■Cookware will become hot. Oven mittswill be needed to handle the cookware.■Place food and oven-safe cookwaredirectly on the black metal tray whencooking.■Use the black metal tray in the same wayyou would use a shallow baking pan orbaking tray.■In addition to the cookware provided,you can use non-metal casserole dishes,pie plates and other heat-safe cookware.Place them directly on the black metaltray.■Be sure to select a size that will rotateeasily.■Place the black metal tray directly on theturntable support.■Do not use cookware or coverings madeof paper, plastic or foil when using thecombination features.Setting a Combination 2 (Microwave and Grill) ProgramMake sure the turntable support and blackmetal tray are in place when using theCombination 2 feature.Press COMBINATION twice to selectCombi-2.Enter the desired cooking time. Enterwhole minutes.Change the power level for bothMicrowave and Grill. Microwave is setto PL-4 and can be adjusted from 1–4.Grill is set at Grill-1, but can bechanged to Grill-2. (Press POWER/TEMPto select desired power level for eachfeature.)Press START/PAUSE.When the oven stops, use oven mitts tocarefully remove the dish or black metal tray. It may be very hot.During and after use, do not touch, or letclothing, pot holders or other flammablematerials contact the cooking elements. These surfaces may be hot enough to burneven though they are dark in color. Allowsufficient time for cooling first.Remove cookware completely from the ovenbefore turning food.4321Consumer SupportTroubleshooting TipsOperating InstructionsSafety Instructions
Using the grill feature.Make sure the turntable support and blackmetal tray are in place when grilling.The grilling features use direct heat fromthe top and bottom elements to cook freshand frozen foods.CAUTION: When using thegrilling features, remember that the oven, door and dishes will be very hot!■Cookware will become hot. Oven mittswill be needed to handle the cookware.■Place food or oven-safe cookware directlyon the black metal tray when cooking.■Use the black metal tray in the same wayyou would use a shallow baking pan orbaking tray.■In addition to the cookware provided,you can use non-metal casserole dishes,pie plates and other heat-safe cookware.Place them directly on the black metaltray.■Be sure to select a size that will rotateeasily.■Place the black metal tray directly on theturntable support.■Do not use cookware or coverings madeof paper, plastic or foil when using thegrilling features.Setting a Grilling ProgramMake sure the turntable support and blackmetal tray are in place when grilling.Press GRILL one time. GRILL-1 will bedisplayed. This cooking mode grillsfoods using top and bottom heaters.Enter grilling time in whole minutes.Press START/PAUSE.ORPress GRILL two times. GRILL-2 willbe displayed. This cooking mode grillsfoods using only the top-heatingelement.Enter grilling time in whole minutes.Press START/PAUSE.When the oven stops, use oven mitts tocarefully remove the dish or black metal tray. It may be very hot.During and after use, do not touch, or letclothing, pot holders or other flammablematerials contact the cooking elements. These surfaces may be hot enough to burneven though they are dark in color. Allowsufficient time for cooling first.Remove cookware completely from the ovenbefore turning food.32132118Operating Instructions Safety InstructionsConsumer Support Troubleshooting Tips
19Best cooking methods. www.GEAppliances.caCookingFood Type Serving Size Time Options/CommentsBoneless Chicken Breasts 2 large (6–7 oz. each) 20 min. Sprinkle with seasoning. Turn over after 13 min.Boneless Pork Chops 2 (4–5 oz. each) 16 min. Sprinkle with seasoning. Turn over after 8 min.Rib Eye Steaks (Medium) 2 (3/4wthick) 15 min. Sprinkle with seasoning. Turn over after 12 min.Strip Steaks (Medium) 2 (1/2w–3/4wthick) 17 min. Sprinkle with seasoning. Turn over after 12 min.Filet Mignon (Medium) 2 (1–11⁄4wthick) 19 min. Sprinkle with seasoning. Turn over after 12 min.Hamburger Patties 2 (4 oz. each) 15 min. Sprinkle with seasoning. Turn over after 10 min.Salmon Filets 2 (5–6 oz. each) 13 min.Shrimp 1/2 lb. 9 min.Pizza (Frozen), Regular Crust 12wpizza 19 min.Pizza (Frozen), Rising Crust 12wpizza 25 min.Pizza (Frozen), Deep Dish Singles 2 pizzas 20 min.Grilled Cheese Sandwich 2 sandwiches 10 min. Turn over after 7 min.Use this chart as a guide to cooking common foods.GRILL 1 (Uses both the Top and Bottom Heaters)CookingFood Type Serving Size Time Options/CommentsCheese Sticks (Frozen) 2 servings (4 sticks) 11 min. Place food in star pattern on tray.GRILL 2 (Uses the Top Heater Only)CookingFood Type Serving Size Time Options/CommentsBaked Potatoes 8–10 oz. each 30 min. Preheat oven to 400°F; use default Microwave PL4.Whole Chicken 3.5–4 lbs. 55 min. Preheat oven to 375°F; use default Microwave PL4.COMBI 1 (Uses both Microwave Power and Convection Heat)CookingFood Type Serving Size Time Options/CommentsFish Sticks (Frozen) 2 servings (12 fish sticks) 5 min. Use Microwave PL3, Grill 1; place food in star pattern.Chicken Nuggets (Frozen) 2 servings (10 nuggets) 3 min. Use Microwave PL4, Grill 1.Crinkle-cut Fries (Frozen) 2 servings 10 min. Use Microwave PL3, Grill 1.Potato Nuggets (Frozen) 2 servings (18 nuggets) 8 min. Use Microwave PL3, Grill 1.Burritos (Frozen) 2 burritos 9 min. Use Microwave PL2, Grill 1.Bagel Bites (Frozen) 8 pieces  4 min. Use Microwave PL3, Grill 1.COMBI 2 (Uses both Microwave Power and Grill Heaters)Consumer SupportTroubleshooting TipsOperating InstructionsSafety Instructions
Cookware tips.20Operating Instructions Safety InstructionsConsumer Support Troubleshooting TipsConvection CookingMetal Pans are recommended for all types of baked products, but especially wherebrowning or crusting is important.Dark or dull finish metal pans are best for breads and pies because they absorb heatand produce crisper crust.Shiny aluminum pans are better for cakes, cookies or muffins because these pansreflect heat and help produce a light tender crust.Glass or Glass-Ceramic casserole or baking dishes are best suited for egg and cheeserecipes due to the cleanability of glass.Combination CookingGlass or Glass-Ceramic baking containers are recommended. Be sure not to use items with metal trim as it may cause arcing (sparking) with oven wall or oven shelf,damaging the cookware, the shelf or the oven.Heat-Resistant Plastic microwave cookware (safe to 450°F) may be used, but it is notrecommended for foods requiring crusting or all-around browning, because theplastic is a poor conductor of heat.Cookware Microwave Convection Grill CombinationHeat-Resistant Glass, Glass-Ceramic  Yes Yes Yes Yes(Pyrex ®, Fire King ®, Corning Ware ®, etc.)Metal No Yes Yes NoNon Heat-Resistant Glass No No No NoMicrowave-Safe Plastics Yes No No Yes❆Plastic Films and Wraps Yes No No NoPaper Products Yes No No NoStraw, Wicker and Wood Yes No No No❊Use only microwave cookware that is safe to 450°F.
About the other features. www.GEAppliances.caClockPress to enter the time of day.Press OPTIONS.Enter 2 to select Clock Set.Set the time.Press OPTIONS to set the clock.4321Cooking Complete ReminderTo remind you that you have food in theoven, the oven will display FOOD IS READYand beep once a minute until you eitheropen the oven door or press CLEAR/OFF.Start/PauseIn addition to starting many functions,START/PAUSE allows you to stop cookingwithout opening the door or clearing the display. Press START/PAUSE to restart the oven.Child Lock-OutYou may lock the control panel to preventthe microwave oven from being accidentally started or used by children.To lock or unlock the controls, press andhold CLEAR/OFF for about 3 seconds. Whenthe control panel is locked, LOCKED will bedisplayed briefly. While locked, Lwill be inthe display.TimerTimer operates as a minute timer when theoven is not operating.Press TIMER.Enter the time.Press TIMER.When time is up, the oven will signal.Press TIMER to cancel the timer.NOTE: The Timer indicator will be lit while thetimer is operating.321Consumer SupportTroubleshooting TipsOperating InstructionsSafety Instructions21
Operating Instructions Safety InstructionsConsumer Support Troubleshooting Tips22About the other features.Beeper VolumeThe beeper sound level can be adjusted.Press OPTIONS.Enter 1 to select Beeper Volume.Select the volume. 0 = Mute, 1 = Low, 2 = Norm, 3 = LoudNOTE: The MUTE indicator will be lit when thebutton beep is turned OFF.321Display On/OffTo turn the clock display on or off:Press OPTIONS.Enter 3 to select DISPLAY ON/OFF.Select one of the following: 1 = ON or 0 = OFF321Display SpeedThe scroll speed of the display can bechanged.Press OPTIONS.Enter 4 to select Display Speed.Select one of the following: 1 = SLOW, 2 = MSLOW, 3 = NORM, 4 = MFAST, 5 = FAST321Clear/OffPress the CLEAR/OFF button to stop andcancel cooking at any time.
23Microwave terms. www.GEAppliances.caTerm DefinitionArcing Arcing is the microwave term for sparks in the oven. Arcing is caused by:■the metal shelf being installed incorrectly and touching the microwave walls.■metal or foil touching the side of the oven.■foil that is not molded to food (upturned edges act like antennas).■metal such as twist-ties, poultry pins, gold-rimmed dishes.■recycled paper towels containing small metal pieces.Covering Covers hold in moisture, allow for more even heating and reduce cooking time. Venting plastic wrap or covering with wax paper allows excess steam to escape.Shielding In a regular oven, you shield chicken breasts or baked foods to prevent over-browning. When microwaving, you use small strips of foil to shield thin parts, such as the tips of wings and legs on poultry, which would cook before larger parts.Standing Time When you cook with regular ovens, foods such as roasts or cakes are allowed to stand to finish cooking orto set. Standing time is especially important in microwave cooking. Note that a microwaved cake is notplaced on a cooling rack.Venting After covering a dish with plastic wrap, you vent the plastic wrap by turning back one corner so excesssteam can escape.Consumer SupportTroubleshooting TipsOperating InstructionsSafety Instructions
24Care and cleaning of the microwave oven.Helpful HintsAn occasional thorough wiping with a solution of baking soda and water keeps the inside fresh.Unplug the cord before cleaning any part of this oven.How to Clean the InsideWalls, Floor, Inside Window, Heating Elements, Metal and Plastic Parts on the DoorSome spatters can be removed with a paper towel; others may require a damp cloth.Remove greasy spatters with a sudsy cloth, then rinse with a damp cloth. Do not use abrasive cleaners or sharp utensils on oven walls. To clean the surface of the door and the surface of the oven that come together upon closing, use only mild, nonabrasive soaps or detergents using a sponge or soft cloth. Rinse with a dampcloth and dry.Never use a commercial oven cleaner on any part of your microwave oven.The heating elements cannot be removed.Glass Microwave Turntable, Black Metal Tray and Turntable Support To prevent breakage, allow the glass microwave turntable and black metal tray to coolcompletely before cleaning. Wash carefully in warm, sudsy water or in the dishwasher.A soap-filled scouring pad can also be used to clean the black metal tray. Do not useabrasives, as they may damage the finish.RackClean with mild soap and water or in the dishwasher. Do not clean in a self-cleaning oven.How to Clean the OutsideDo not use cleaners containing ammonia or alcohol on the microwave oven. Ammonia or alcoholcan damage the appearance of the microwave oven.CaseClean the outside of the microwave oven with a sudsy cloth. Rinse with a damp cloth andthen dry. Wipe the window clean with a damp cloth. Control Panel and DoorWipe with a damp cloth. Dry thoroughly. Do not use cleaning sprays, large amounts of soapand water, abrasives or sharp objects on the panel—they can damage it. Some paper towelscan also scratch the control panel.Door SurfaceIt is important to keep the area clean where the door seals against the microwave oven. Use only mild, non-abrasive detergents applied with a clean sponge or soft cloth. Rinse well.Power CordIf the cord becomes soiled, unplug and wash with a damp cloth. For stubborn spots, sudsywater may be used, but be certain to rinse with a damp cloth and dry thoroughly beforeplugging cord into outlet.Operating Instructions Safety InstructionsConsumer Support Troubleshooting Tips
Problem Possible Causes What To DoOven will not start A fuse in your home may be  •Replace fuse or reset circuit breaker.blown or the circuit breaker tripped.Power surge. •Unplug the microwave oven, then plug it back in.Plug not fully inserted into   •Make sure the 3-prong plug on the oven is fully inserted wall outlet. into wall outlet.Door not securely closed. •Open the door and close securely.Control panel lighted,  Door not securely closed. •Open the door and close securely.yet oven will not start START/PAUSE not pressed after  •Press START/PAUSE.entering cooking selection.Another selection entered  •Press CLEAR/OFF.already in oven and CLEAR/OFFnot pressed to cancel it.Food weight not entered after  •Make sure you have entered food weight after selecting selecting AUTO DEFROST. AUTO DEFROST.Microwave oven controls  The control has been locked.  •Press and hold CLEAR/OFF for about 3 seconds to unlockwill not work (When the control panel is  the control.locked, Lwill be in the display.)25Troubleshooting tips. www.GEAppliances.caThings That Are Normal With Your Microwave Oven■Steam or vapor escaping from around the door.■Light reflection around door or outer case.■Dimming oven light and change in the blower sound at power levels other than high.■Dull thumping sound while oven isoperating.■TV/radio interference might be noticedwhile using the microwave. Similar to the interference caused by other smallappliances, it does not indicate aproblem with the microwave. Plug themicrowave into a different electricalcircuit, move the radio or TV as far awayfrom the microwave as possible, or checkthe position and signal of the TV/radioantenna.Consumer SupportTroubleshooting TipsOperating InstructionsSafety Instructions

Navigation menu