WINIA Electronics 7NFCMW700 Web Monitor User Manual MW 700 NO BRAND
Dongbu Daewoo Electronics Corporation Web Monitor MW 700 NO BRAND
Contents
- 1. Users Manual MW700 Web Monitor pages 1 thru 11
- 2. Users Manual for MW700 Web Monitor pages 12 thru 24
Users Manual MW700 Web Monitor pages 1 thru 11

USER’S GUIDE
USER’S GUIDE
W
Web Monitor
eb Monitor
Model No : MW-700
1. Read all of these instructions.
2. Save these instructions for later use.
3. Unplug this monitor from the
wall outlet before cleaning. Do not
use liquid cleaners or aerosol clean-
ers. Use a damp cloth for cleaning.
4. Do not use attachments not rec-
ommended by the monitor manufacturer as they
may cause hazards.
5. Do not use this monitor near water, e.g., near a
bathtub, washbowl, kitchen sink, or laundry tub,
in a wet basement, or near a swimming pool, etc.
6. Do not place this monitor on an
unstable cart, stand, or table. The
monitor may fall, causing serious
injury to a child or adult, and seri-
ous damage to the appliance.
7. Slots and openings in the cabi-
net and the back or bottom are pro-
vided for ventilation, to ensure
reliable operation of the monitor,
and to protect it from overheating.
These openings must not be
blocked or covered. The openings should never
be blocked by placing the monitor on a bed, sofa,
rug, or other similar surface. This monitor should
never be placed near or over a radiator or heat
register. This monitor should not be placed in a
built-in installation such as a bookcase unless
proper ventilation is provided.
8. This monitor should be operated
only from the type of power source
indicated on the marking label. If
you are not sure of the power sup-
plied to your home, consult your
monitor dealer or local power com-
pany.
9. This monitor is equipped with a
3-wire grounding-type plug, That
is, a plug having a third (ground-
ing) pin. This plug will only fit into
a grounding-type power outlet.
This is a safety feature. If you are unable to
insert the plug into the outlet, contact your elec-
trician to replace your obsolete outlet. Do not
defeat the purpose of the grounding-type plug.
10. Do not allow anything to rest
on the power cord. Do not locate
this monitor where the cord will be
abused by people walking on it.
11. Follow all warnings and
instructions marked on the monitor.
IMPORTANT SAFEGUARDS
12. For added protection for this
monitor during a lightning storm,
or when it is left unattended and
unused for long periods of time,
unplug it from the wall outlet. This
will prevent damage to the monitor and/or the
computer due to lightning and power line surges.
13. Do not overload wall outlets and extension
cords as this can result in fire or electric shock.
14. Never push objects of any kind into this mon-
itor through cabinet slots, as they may touch dan-
gerous voltage points or short out parts that could
result in a fire or electric shock. Never spill liq-
uid of any kind on the monitor.
15. Do not attempt to service this
monitor yourself, as opening or
removing covers may expose you
to dangerous voltages or other haz-
ards. Refer all servicing to quali-
fied service personnel.
16. Unplug this monitor from the wall outlet and
refer servicing to qualified service personnel
under the following conditions:
a. When the power cord or plug is damaged or
frayed.
b. If liquid has been spilled into the monitor.
c. If the monitor has been exposed to rain or
water.
d. If the monitor does not operate normally by
following the operating instructions. Adjust only
those controls that are covered by the operating
instructions, as improper adjustment of other
controls may result in damage and will often
require extensive work by a qualified technician
to restore normal operation.
e. If the monitor has been dropped or the cabinet
has been damaged.
f. When the monitor exhibits a distinct change in
performance, this indicates a need for service.
17. When replacement parts are
required be sure the service techni-
cian has used replacement parts
specified by the manufacturer that
have the same characteristics as the
original part. Unauthorized substitutions may
result in fire, electric shock, or other hazards.
18. Upon completion of any service or repairs to
this monitor, ask the service technician to per-
form routine safety checks to determine that the
monitor is safe to operate.
FEDERAL COMMUNICATIONS COMMISSION
RADIO FREQUENCY INTERFERENCE STATEMENT
NOTE : This equipment has been tested and found to comply with the limits
for a Class B digital device, pursuant to Part 15 of the FCC Rules. These
limits are designed to provide reasonable protection against harmful interfer-
ence in a residential installation. This equipment generates, uses and can
radiate radio frequency energy and, if not installed and used in accordance
with the instructions, may cause harmful interference to radio communica-
tions. However, there is no guarantee that interference will not occur in a
particular installation. If this equipment does cause harmful interference to
radio or television reception, which can be determined by turning the equip-
ment off and on, the user is encouraged to try to correct the interference by
one or more of the following measures :
- Reorient or relocate the receiving antenna.
- Increase the separation between the equipment and receiver.
- Connect the equipment to an outlet on a circuit different from that to
which the receiver is connected.
- Consult the dealer or an experienced radio or TV technician for help.
CAUTION : Any changes or modifications not expressly approved by the
party responsible for compliance could void the user’s authority
to operate the equipment.
CANADIAN NOTICE
AVIS CANADIEN
This Class B digital apparatus meets all requirements of the Canadian
Interference-Causing Equipment Regulations.
Cet appareil numérique de la Class B respecte toutes les exigences du
Règlement sur le matériel brouilleur du Canada.

Bitte lesen Sie alle diese Informationen, bevor Sie das Gerät in Betrieb
nehmen! Lesen Sie sich außerdem die Bedienungsanleitung komplett und
sorgfältig durch, da nur in diesem Fall eine problemlose Inbetriebnahme
erwartet werden kann.
•Achten Sie darauf, daß das Gerät nur in eine 230V Schuko-Steckdose
eingesteckt wird.
•Die Steckdose sollte jederzeit frei zugänglich sein um bei einem evtl.
auftretenden Notfall das Gerät schnell vom Netz zu trennen.
•Achten Sie desweiteren darauf, daß die Netzanschlußleitung nicht mech-
anisch beansprucht oder sonstwie beschädigt wird.
•Offnen Sie das Gerät niemals! Im Inneren befinden sich Teile mit
gefährlicher Spannung.
•Bevor Sie das Gerät reinigen, ziehen Sie bitte den Netzstecker aus der
Steckdose. Säubern Sie dann das Gerät mit einem feuchten (keinesfalls
tropfnassen) Lappen.
•Die in diesem Gerät entstehende Röntgenstrahlung ist ausreichend
abgeschirmt (Ortsdosisleistung in 0.1m Abstand weniger als 1.0µ Sv/h).
Beschleunigungsspannung maximal 29kV.
•Stellen Sie das Gerät an einem ergonomisch günstigen Ort auf und sor-
gen Sie dafür, daß der Monitor mit nach ISO 9241 -3, -7, -8 geprüfter
Peripherie betrieben wird, da nur unter diesen Umständen ein optimaler
ergonomischer Betrieb des Gerätes sichergestellt ist.
Falls Sie dennoch Fragen haben, auf die die Bedienungsanleitung keine hin-
reichende Antwort geben kann, so kontaktieren Sie bitte den nächsten
Fachhändler.
Maschinenlärminformationsverordnung 3. GSGV, 18.01 1991:
Der arbeitsplatzbezogene Schalldruckpegel beträgt 70 dB (A) oder
wenigergemäß ISO 7779.
WICHTIGE INFORMATIONEN
DECLARATION OF CONFORMITY
We, Manufacturer / Importer
DAEWOO ELECTRONICS CO., Ltd
541, 5-Ga , Namdaemoon-Ro , Jung-Gu , Seoul , Korea
declare under our sole responsibility that the product,
Web monitor
MW-700
to which this declaration relates is in conformity with
the following standard(s) or other normative document(s)
Safety : EN 60950/1992/A1:1993/A2:1993/
A3:1995/A4:1997
EMC : EN 55022/8.1994/A1:1995/A2:1997
EN 50082-1/1992
EN 61000 -3-2,3/1995
following the provisions of 89/336 EEC-EMC Directive
and the provisions of 73/23 EEC-Low Voltage Directive.
Handed over by : S.Lee, Director.
Display Business Division
2001, Seoul Signature:
S.Lee, Director.
Display Business Division.
DAEWOO ELECTRONICS Co., Ltd

1. Product features..............................................................................................1
2. Getting started................................................................................................2
3. Installing the tilt/swivel stand........................................................................3
4. Connecting to the peripherals .......................................................................4
5. Terminal installation wizard
- Starting terminal installation wizard..................................................................5
- User’s license .....................................................................................................5
- Setting IP address...............................................................................................6
- Setting monitor resolution and frequency..........................................................8
- Choosing the web-browser.................................................................................9
- Finishing terminal installation wizard..............................................................11
6. Connection Manager
- Starting connection manager............................................................................12
- Adding new connection ...................................................................................13
- RDP connection wizard ...................................................................................14
- ICA connection wizard ....................................................................................17
- Changing connection........................................................................................23
- Deleting connection .........................................................................................24
7. Terminal Setting
- Starting terminal setting...................................................................................25
- Product information .........................................................................................25
- Keyboard..........................................................................................................26
- Screen and volume...........................................................................................26
- Network............................................................................................................28
- System..............................................................................................................29
- Web setting.......................................................................................................32
- Terminal security..............................................................................................33
8.
Operation & Adjustment
...........................................................................35
9. Specifications ................................................................................................37
10.
Troubleshooting
.........................................................................................39
CONTENTS
Emission Characteristics Tested by SEMKO
A sample of this type has been tested and has shown compliance with the
guidelines in the swedish document MPR II.
This product is also designed for IT power system with phase to phase volt-
age of 230V.
The power cord is used as a main disconnect device. Disconnect the power
cord before servicing. The outlet must be installed near the monitor and
must be easily accessible.
The appliance is not intended for use by young children or infirm persons
without supervision ;
Young children should be supervised to ensure that they do not play with
the appliance.

21
1. PRODUCT FEATURES
This manual explains how to correctly install, operate, and get the best
performance from your monitor. Please read this user’s guide carefully before
installing your monitor, then keep it near your monitor for quick reference.
First, please check that the contents of the box corresponds with the
following checklist :
•Web monitor
•Web monitor stand
•Power cord
•Keyboard
•Mouse
•User’s Guide
•Warranty Card (optional)
If any item is missing or damaged, please contact your dealer. Please keep the
box and packing materials so that you may properly store or transport your
monitor.
2. GETTING STARTED
This product is a new type of Thin Client that is used in conjunction with
Windows NT4.0 Terminal Server Edition or Windows 2000 server. Installation
of application programs, execution, data processing and storage are all
implemented in the server, whereas the terminal is in charge of efficient data
exchange with the server, screen display, and inputs by keyboard and mouse.
Each user can execute application programs in a separate and protected realm.
Each user can establish his/her own environment. Furthermore, this product is
showing a new direction: it has a built-in web-browser, Windows media
player, and Internet Explorer.
1.
Saving work space using All-in one type.
2.
Just a few seconds for booting and simplicity for using.
3.
Perfect security of data and no more infection from virus hazard due to
execution and management of all programs by server.
4.
No more need to upgrade software and hardware
(Reducing maintenance cost up to 40% on the basis of 3 years. ).
5.
2 times longer lifecycle compared with PC.
6.
Simultaneous support to local and terminal mode.
7.
Powerful network performance by server based computing.
8.
Saving up to 60% electricity consumption contrasted with PC.
9.
Outstanding performance and customer-attractive design.
43
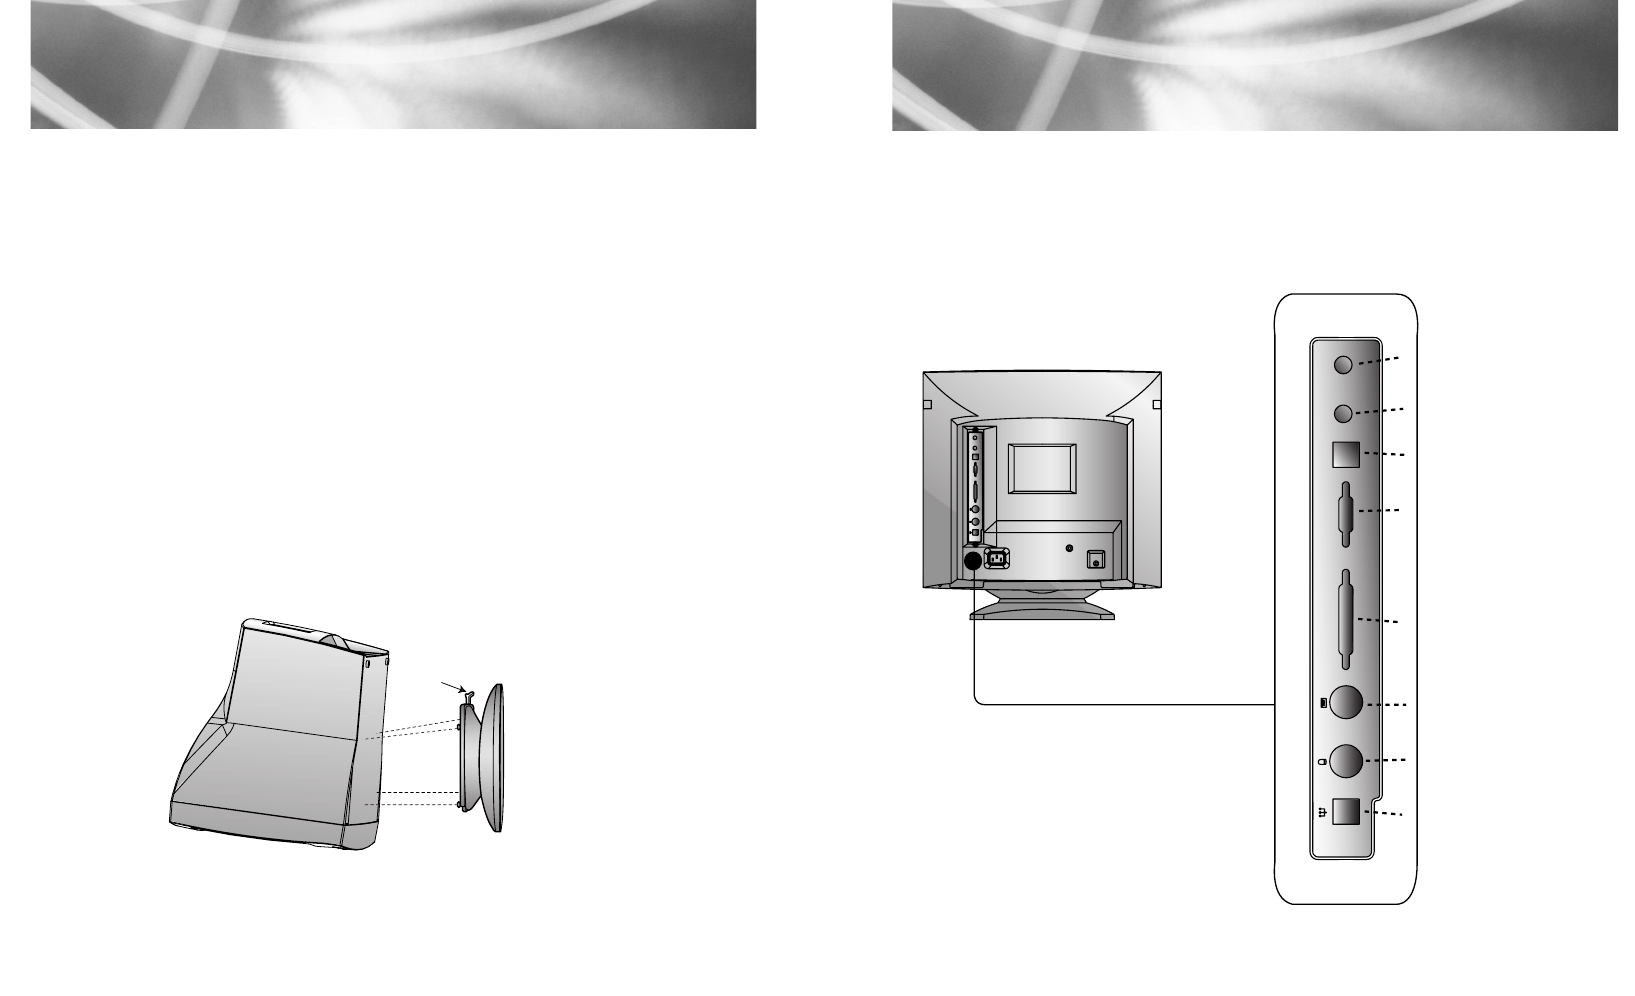
4. CONNECTING TO THE PERIPHERALS
Speaker port
Microphone port
USB port
Serial port
Printer port
Keyboard port
Mouse port
Ethernet connector
3. INSTALLING THE TILT/SWIVEL STAND
Latch
If you want to remove the tilt/swivel stand on the monitor, press the latch and
pull the tilt/swivel stand toward the back of the monitor. Lift the stand to
separate.
1. Ensure that the power is off to the monitor.
2. Set the monitor face down with the underside facing you. Please be careful
not to scratch the monitor screen.
3. Align the four hooks on the stand with the guide holes on the bottom
chassis of the monitor.
4. Insert the hooks into the guide holes.
5. Slide the tilt/swivel stand toward the front of the monitor until the latch
locks in position.
6. Turn the monitor and the stand upright.
65
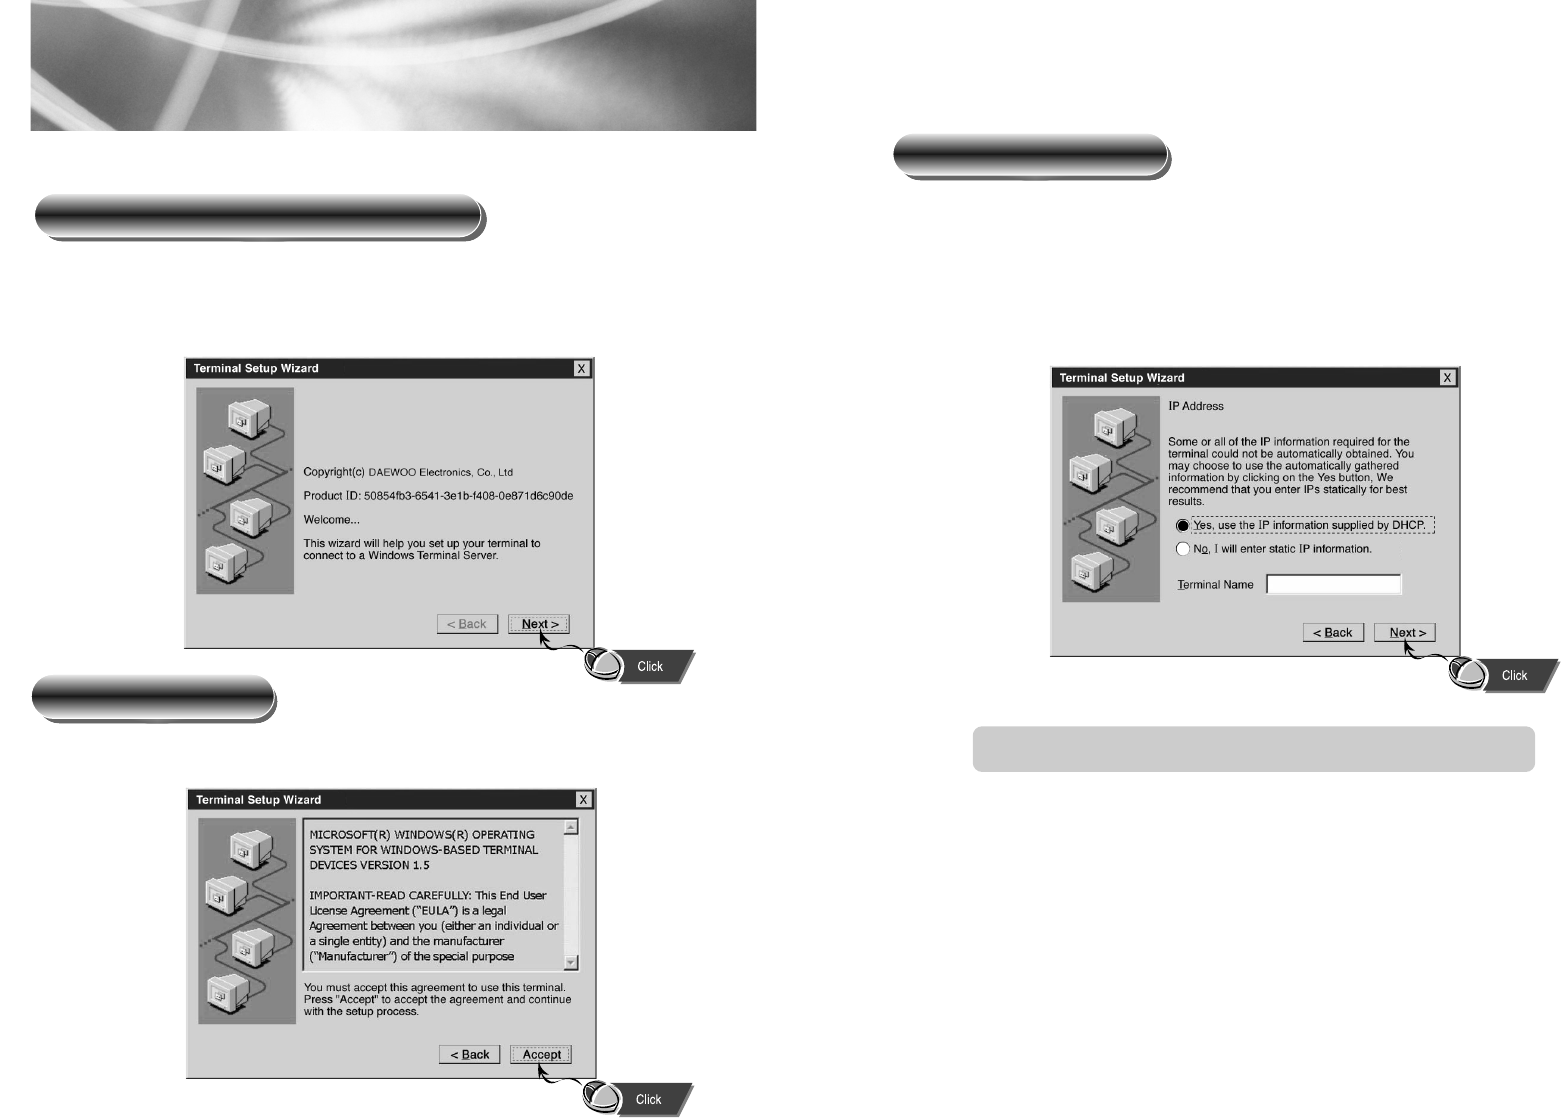
The IP address to be used by the terminal is automatically assigned if the automatic
IP address setup function is chosen.
This step is about specifying the IP address necessary for the use of the terminal.
Using Automatic Setup Function
Setting IP address
After Setup, when the power is on, terminal installation wizard begins as follows.
Users can set the environment necessary for the use of this terminal from the
terminal installation wizard.
5. TERMINAL INSTALLATION WIZARD
This step involves the conditions of software license and the user’s agreement.
User’s license
Starting terminal installaion wizard
DHCP : Dynamic Host Configuration Protocol
87
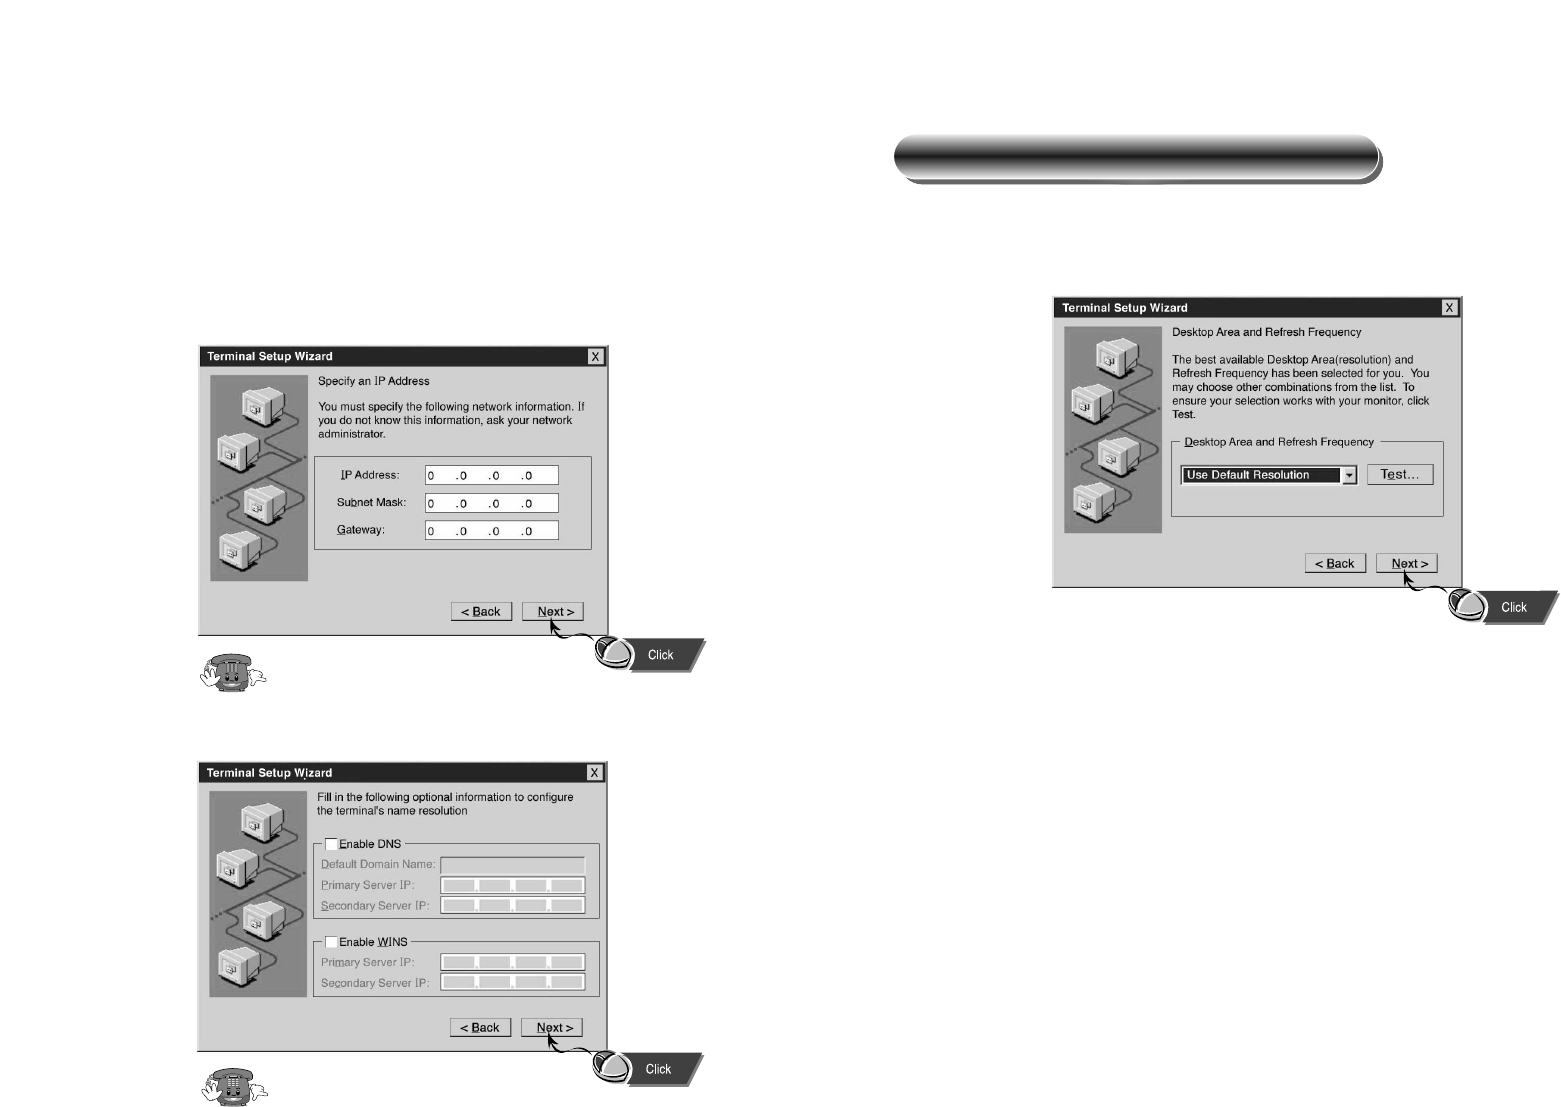
In this section, the user sets up the resolution and frequency of the monitor connected
to the terminal.
Setting monitor resolution and frequency
This section should be setup properly by asking the Network Manager.
Because “Terminal Name” is a proper name to be identified by the network,
preferably a meaningful name must be assigned.
The user himself/herself types the IP address and relevant information.
Assigning the IP address
This screen is about the method used by the network to identify the name.
Ask the Network manager.
Ask the Network manager.
109
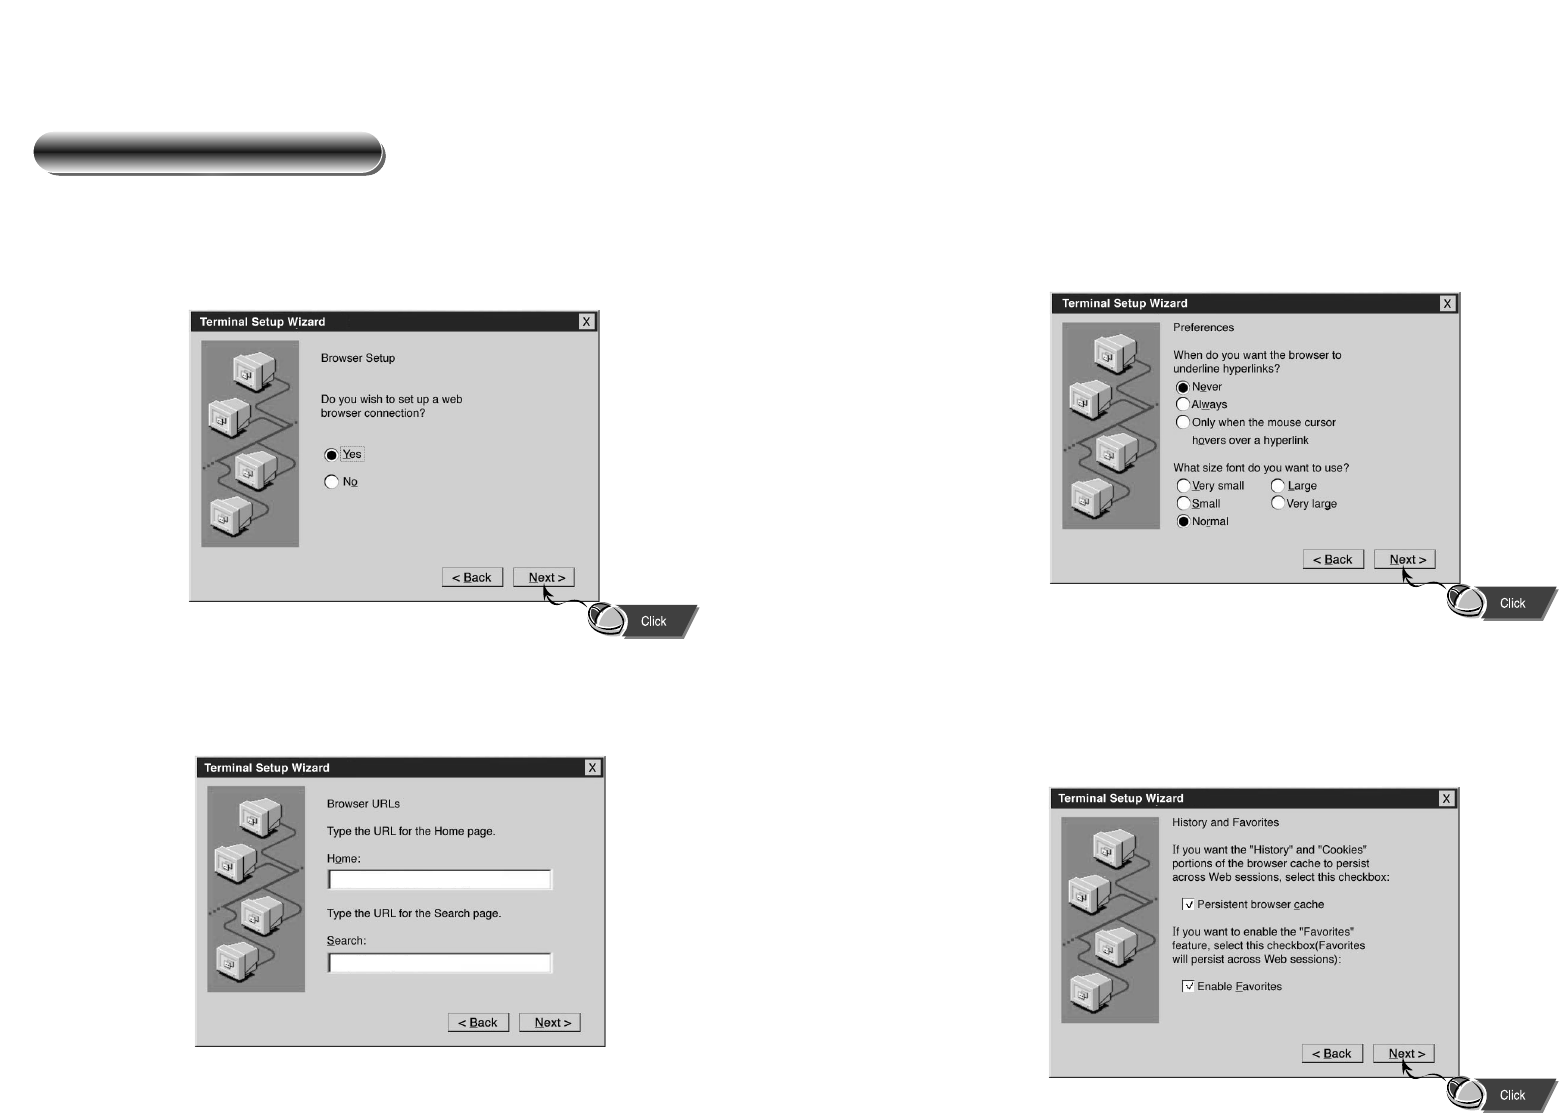
Advanced Setting for the web-browser
In this section, the user chooses the method to indicate hyperlink and the size of the
default font.
Cache and bookmark settings
In this section, the user can decide whether he/she will use the cache option to speed
up the opening of a previously visited page and the bookmark option to facilitate
connection to frequently visited web sites.
In this section, the built-in web-browser is set up. To use default setting, please click
“No.” To customize setting, please click “Yes.”
Setting URL (Uniform Resource Locators)
In this section, the home page and default search page of the web-browser are
chosen.
Choosing the web-browser
1211
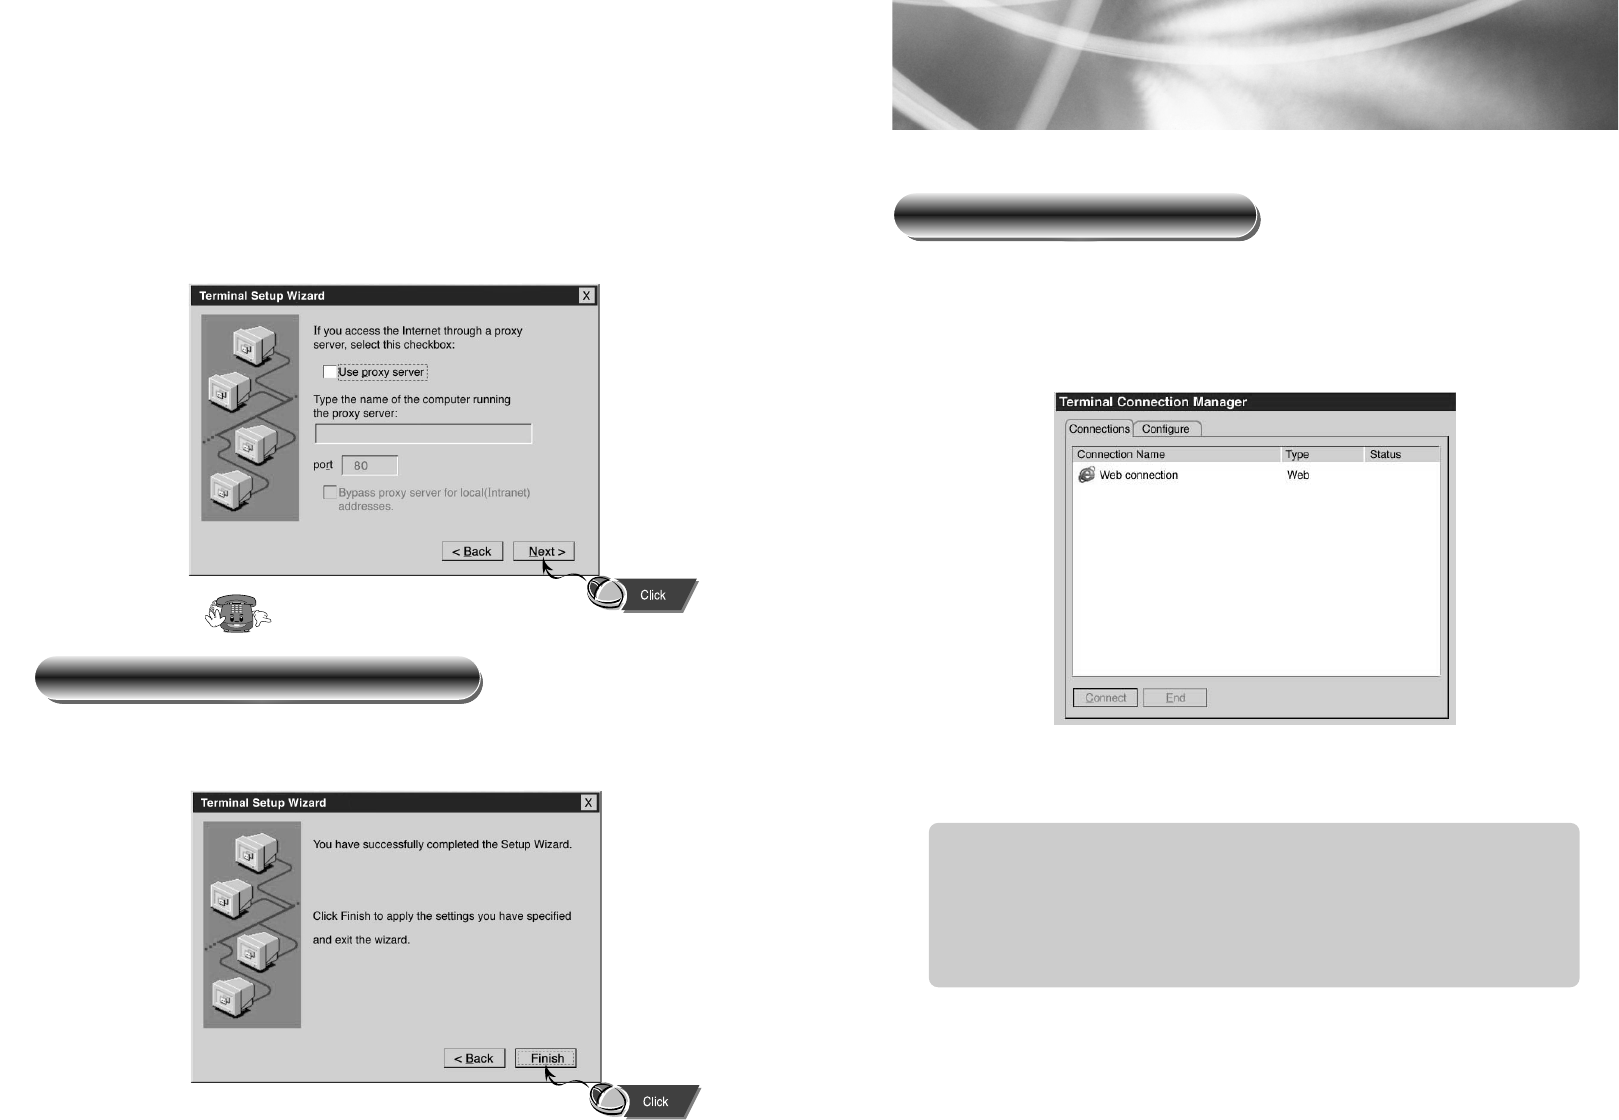
When the terminal is on, in most cases, connection manager screen such as the
following appears. Connection manager largely performs two functions:
(1) choosing server/service to be used by “Connections” tab and (2) choosing
various items regarding connection by “Configure” tab.
There are three types of connections.
WEB : Internet connection through the built-in web-browser.
RDP (Microsoft Remote Desktop Client Protocol) :
Connection to terminal server/service through Microsoft’s RDP client.
ICA (Citrix Independent Computing Architecture Protocol) :
Connection to Metaframe through Citrix’s ICA client.
For details on connection, please ask server/service manager or client developer
company.
Starting connection manager
Proxy server setting
In this section, settings for network using proxy server are set.
By clicking the “Finish” button, Terminal Installation Wizard ends. To apply the
setting chosen, the terminal must be re-started.
Finishing Terminal installation Wizard
Ask the Network manager.
6.CONNECTION MANAGER