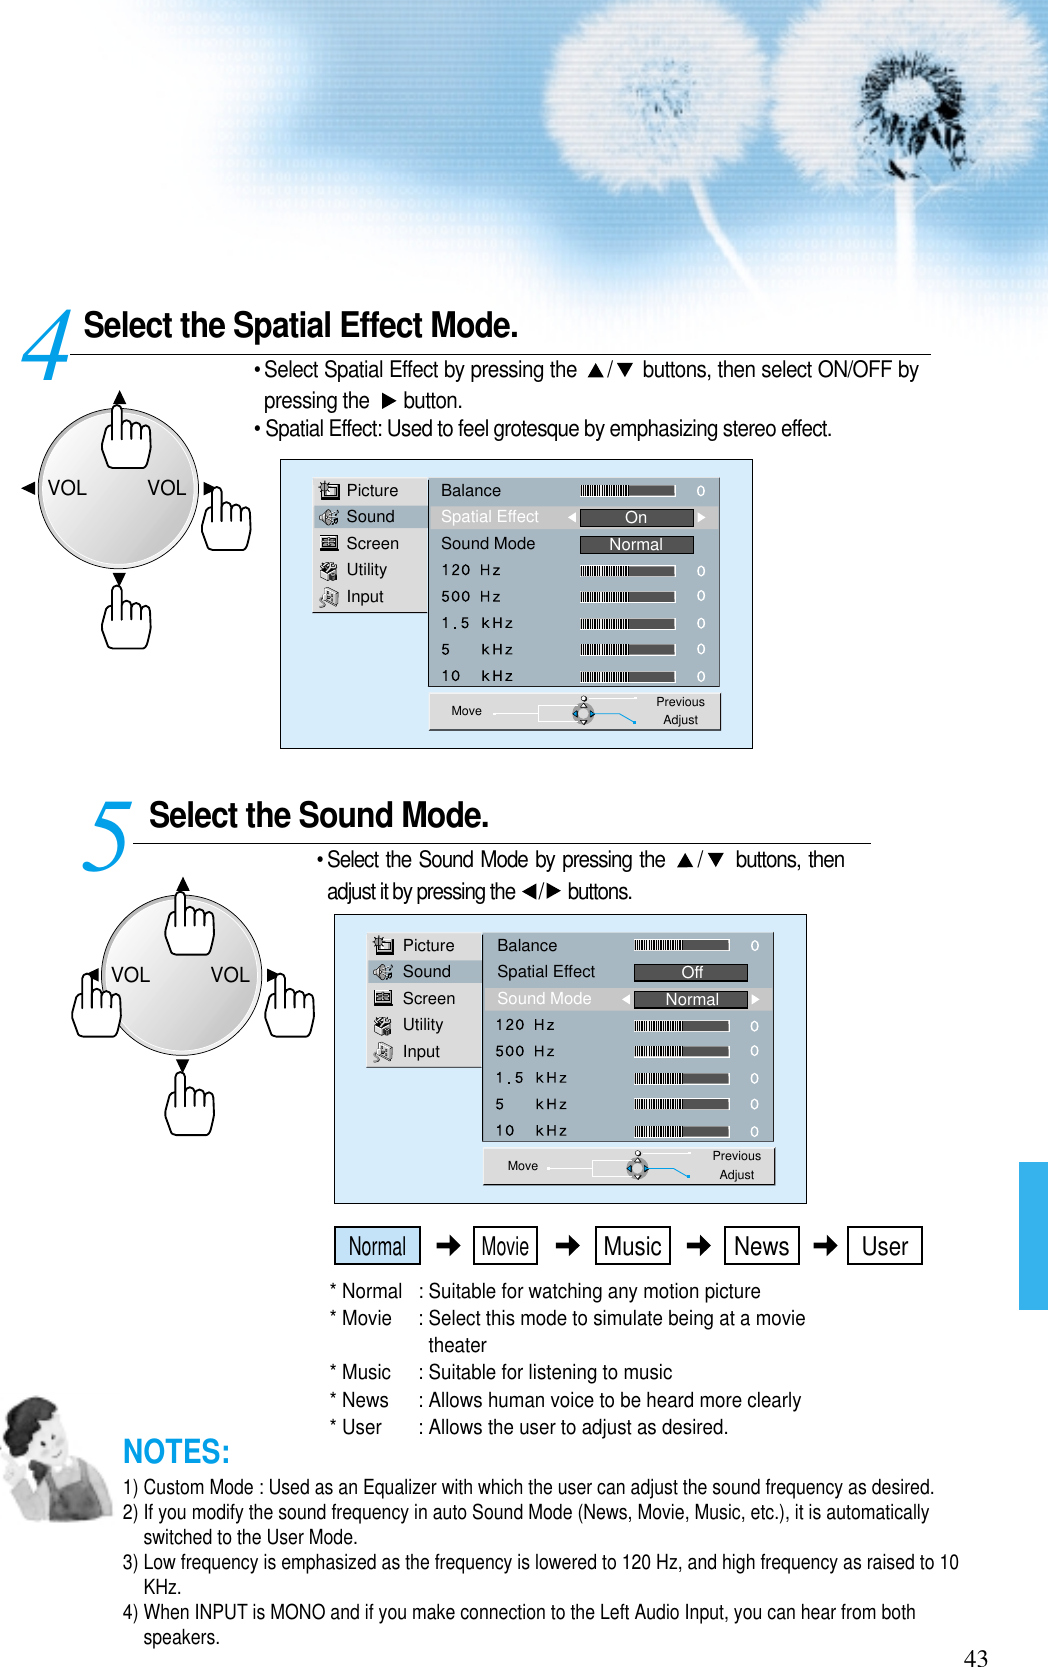
WINIA Electronics DSP4224LV 42" PDP ( Plasma Display Panel ) User Manual
Dongbu Daewoo Electronics Corporation 42" PDP ( Plasma Display Panel )
UserManual.wiki
>
WINIA Electronics
>
DSP4224LV User Manual
User Manual
Navigation menu
Upload a User Manual
Namespaces
Wiki Guide
HTML
PDF
Info
Views
User Manual
Discussion / Help
Navigation


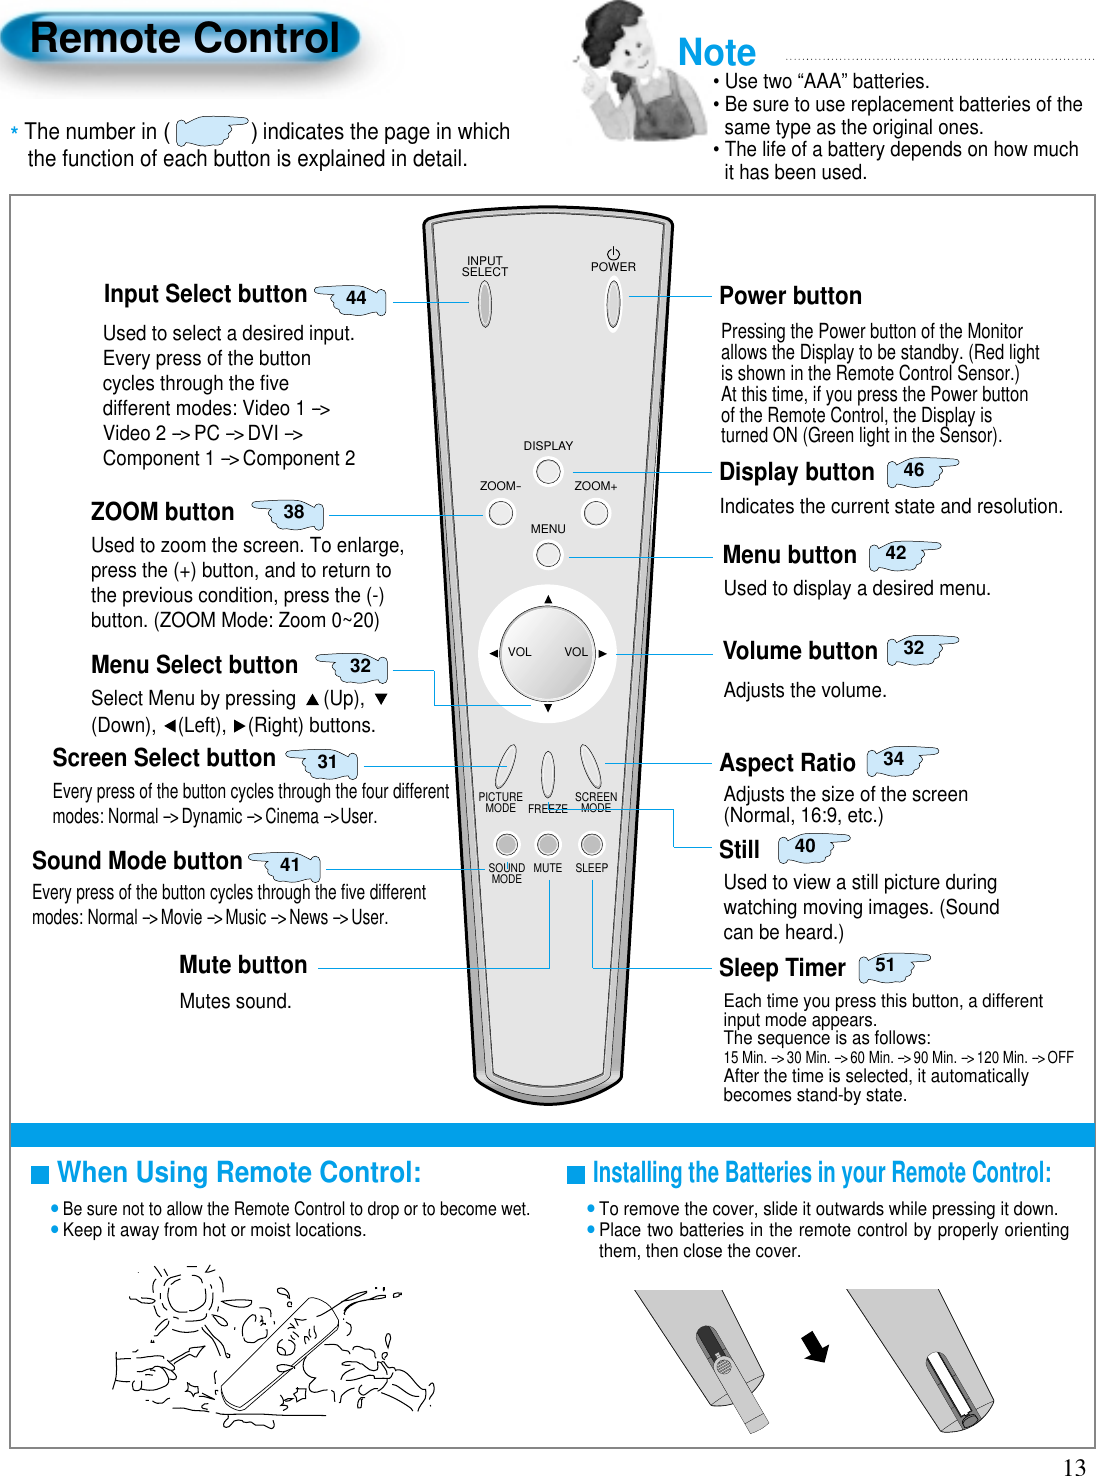
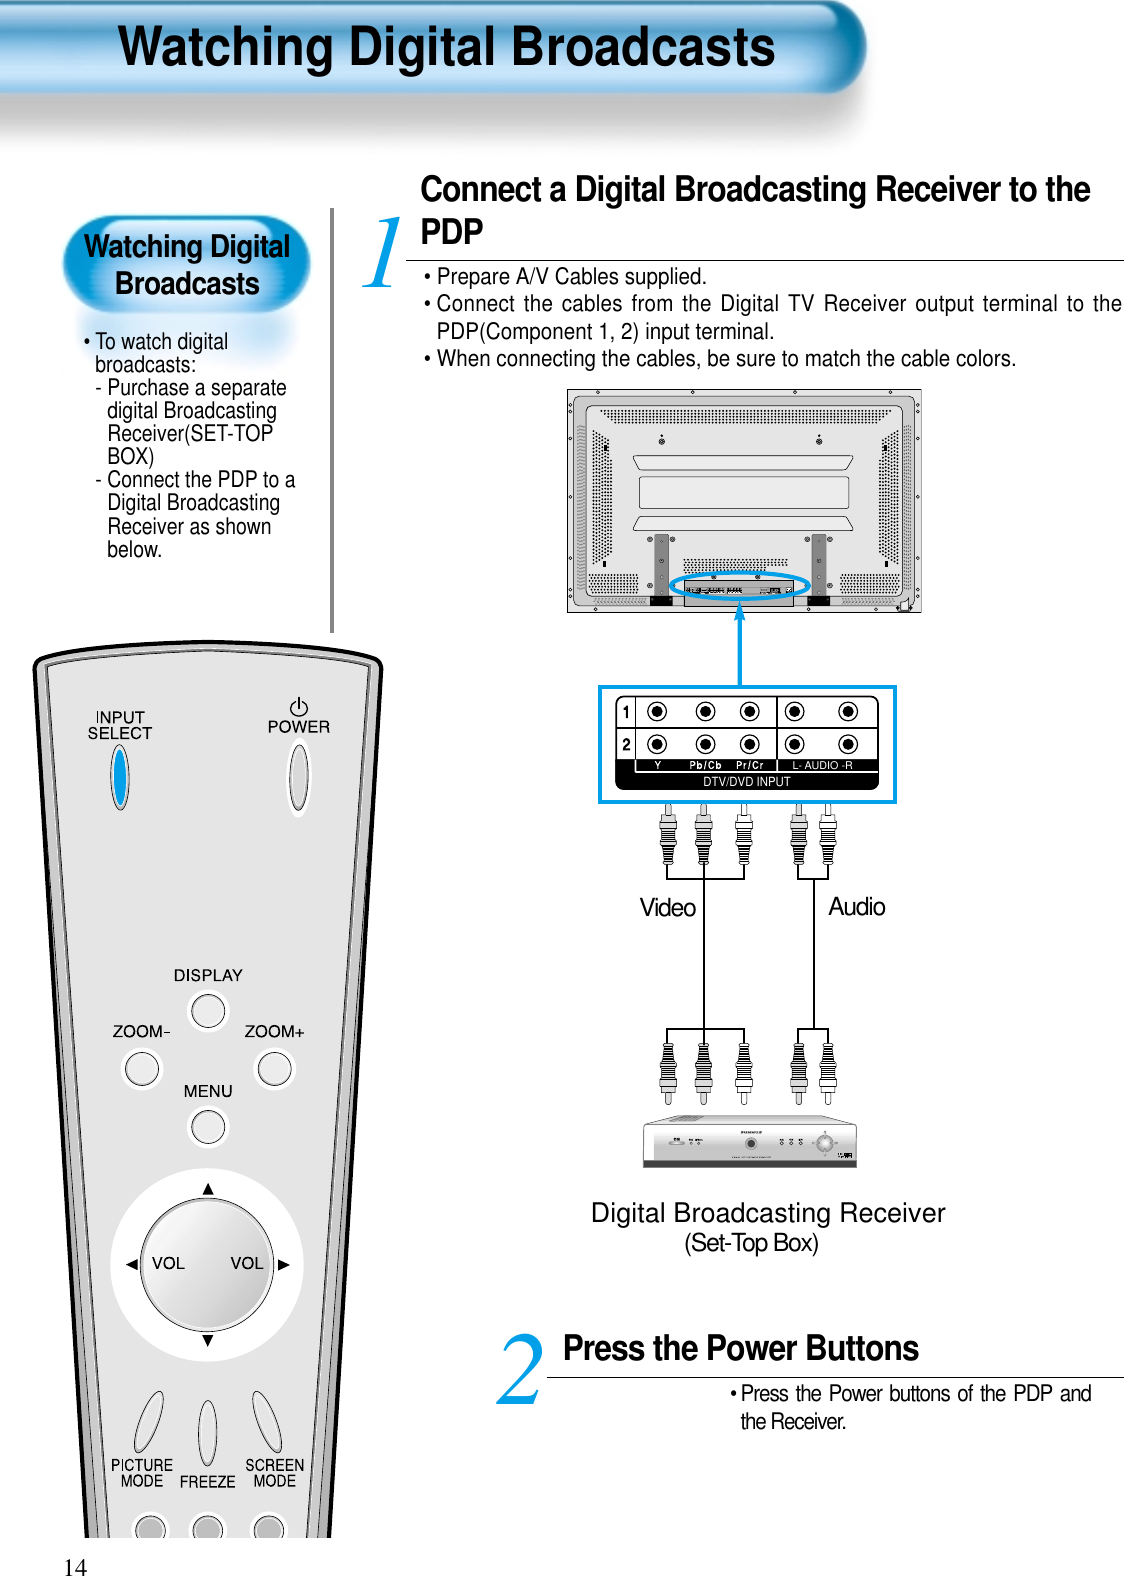
![15Input SelectINPUTSELECT• Select [Component 1 or Component 2] bypressing the INPUT SELECT button of theRemote Control or the PDP unit.• Each time you press the INPUT SELECTbutton, different input modes appear. Thesequence is as follows: Component 1 -->Component 2 --> Video 1 --> Video 2 --> PC--> DVI. Select a Desired Channel and Function• Select a desired channel and function byusing the Remote Control of DigitalBroadcasting Receiver.34NOTES:1) You can select INPUT SELECT while you are using OSD(Menu).Sequence: [Menu] --> [Input] --> [Component 1 or 2 (DTV/DVD)]2) Digital Broadcasting signals available: 1080i, 720p, 480p.3) Antenna Connection:Apartment : Check if community antenna receives digital broadcasts.Private Houses: Set the indoor/outdoor UHF antenna to the directionof the digital broadcasting transmitting company.4) For detailed connection method, refer to the Owner’s Manual of DigitalBroadcasting Receiver.5) What is a component? : Signal with which brightness and color signalsare separated, producing a sharp screen.6) If the Digital Broadcasting Receiver has PC Output terminal or DVIOutput terminal, connect to ‘PC INPUT’ or ‘DVI INPUT’ at the backpanel of the PDP.When watching the PDP by PC or DVI Input, some undesired signalsmay be seen at the top and bottom area of the screen. In this case,select [Menu] --> [Screen] --> [Vertical Size] to adjust.Component1PCDVIComponent2Video1Video2](https://usermanual.wiki/WINIA-Electronics/DSP4224LV/User-Guide-381113-Page-15.png)
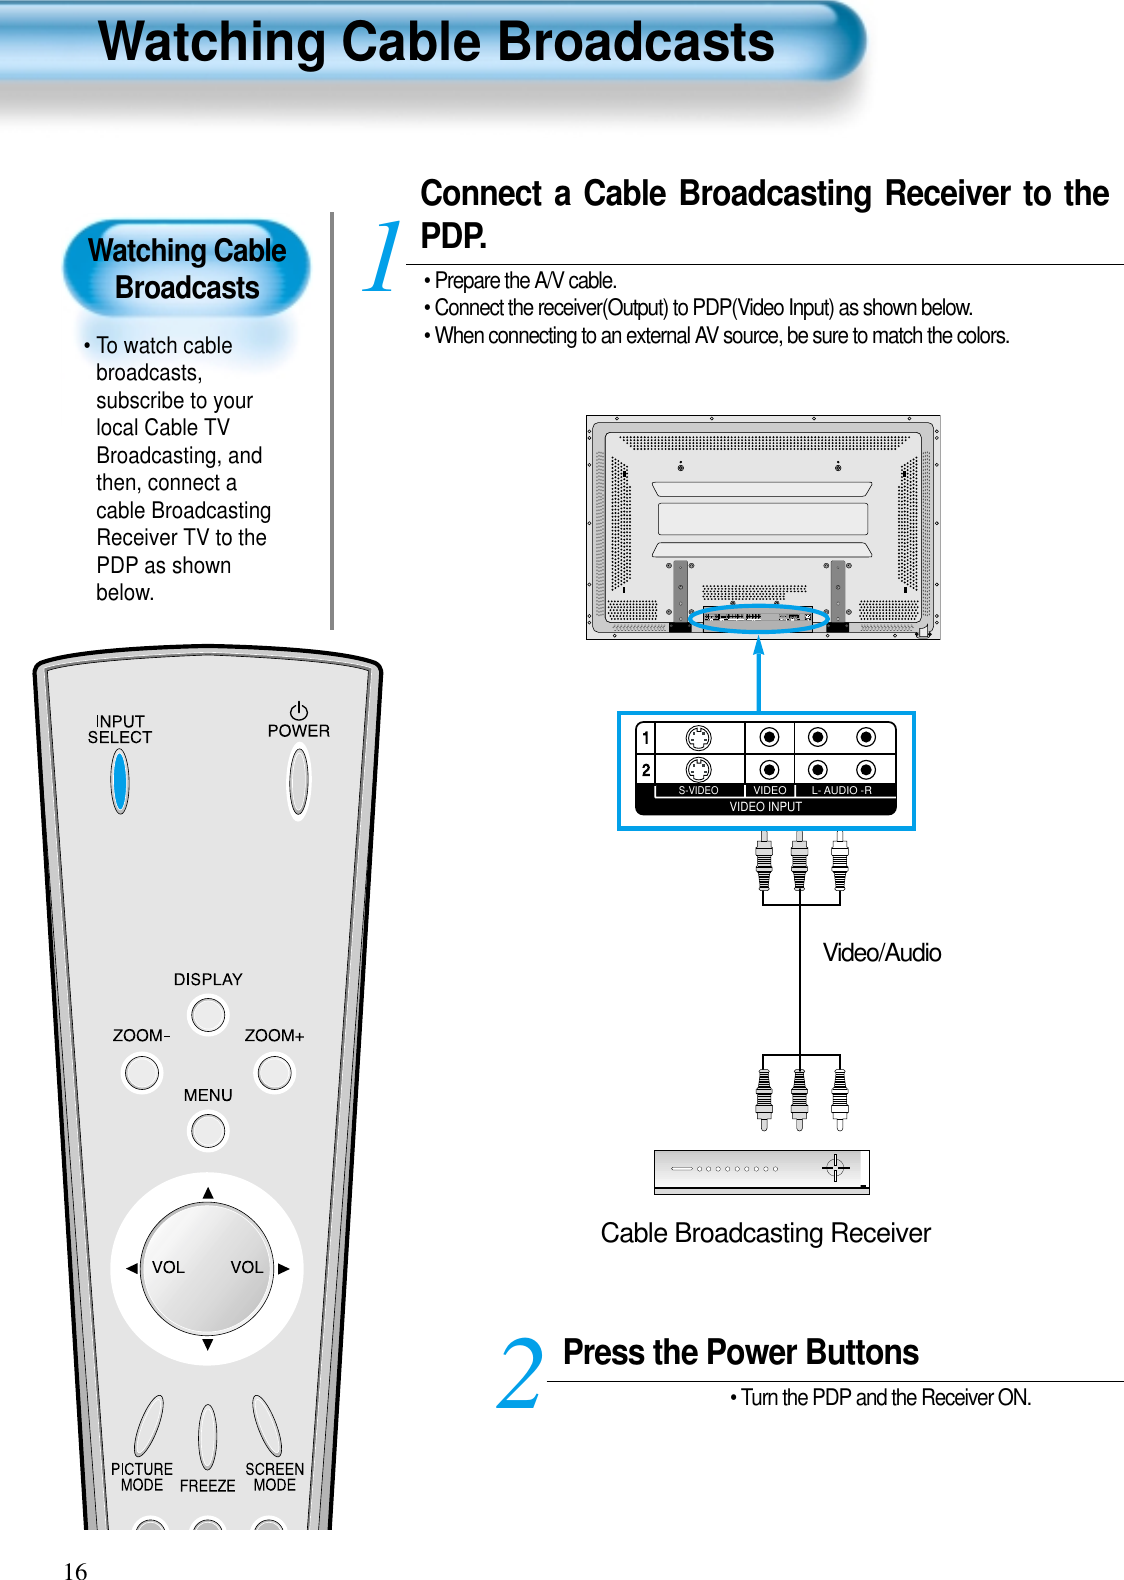
![17Input SelectINPUTSELECT• Select [Video 1 or Video 2] by pressingthe INPUT SELECT button of the RemoteControl or the PDP unit.• Each time you press the INPUT SELECTbutton, different input modes appear. Thesequence is as follows: Video 1 --> Video2 --> PC --> DVI --> Component 1 -->Component 2. Select a Desired Channel and Function• Select a desired channel and function byusing the Remote Control of the CableBroadcasting Receiver.34NOTES:1) If your local cable company re-transmits digital broadcasts,you may watch normal broadcasts and digital broadcastssimultaneously. For detailed information, refer to your localcable company.Video1 Video2 PCComponent1 DVIComponent2](https://usermanual.wiki/WINIA-Electronics/DSP4224LV/User-Guide-381113-Page-17.png)
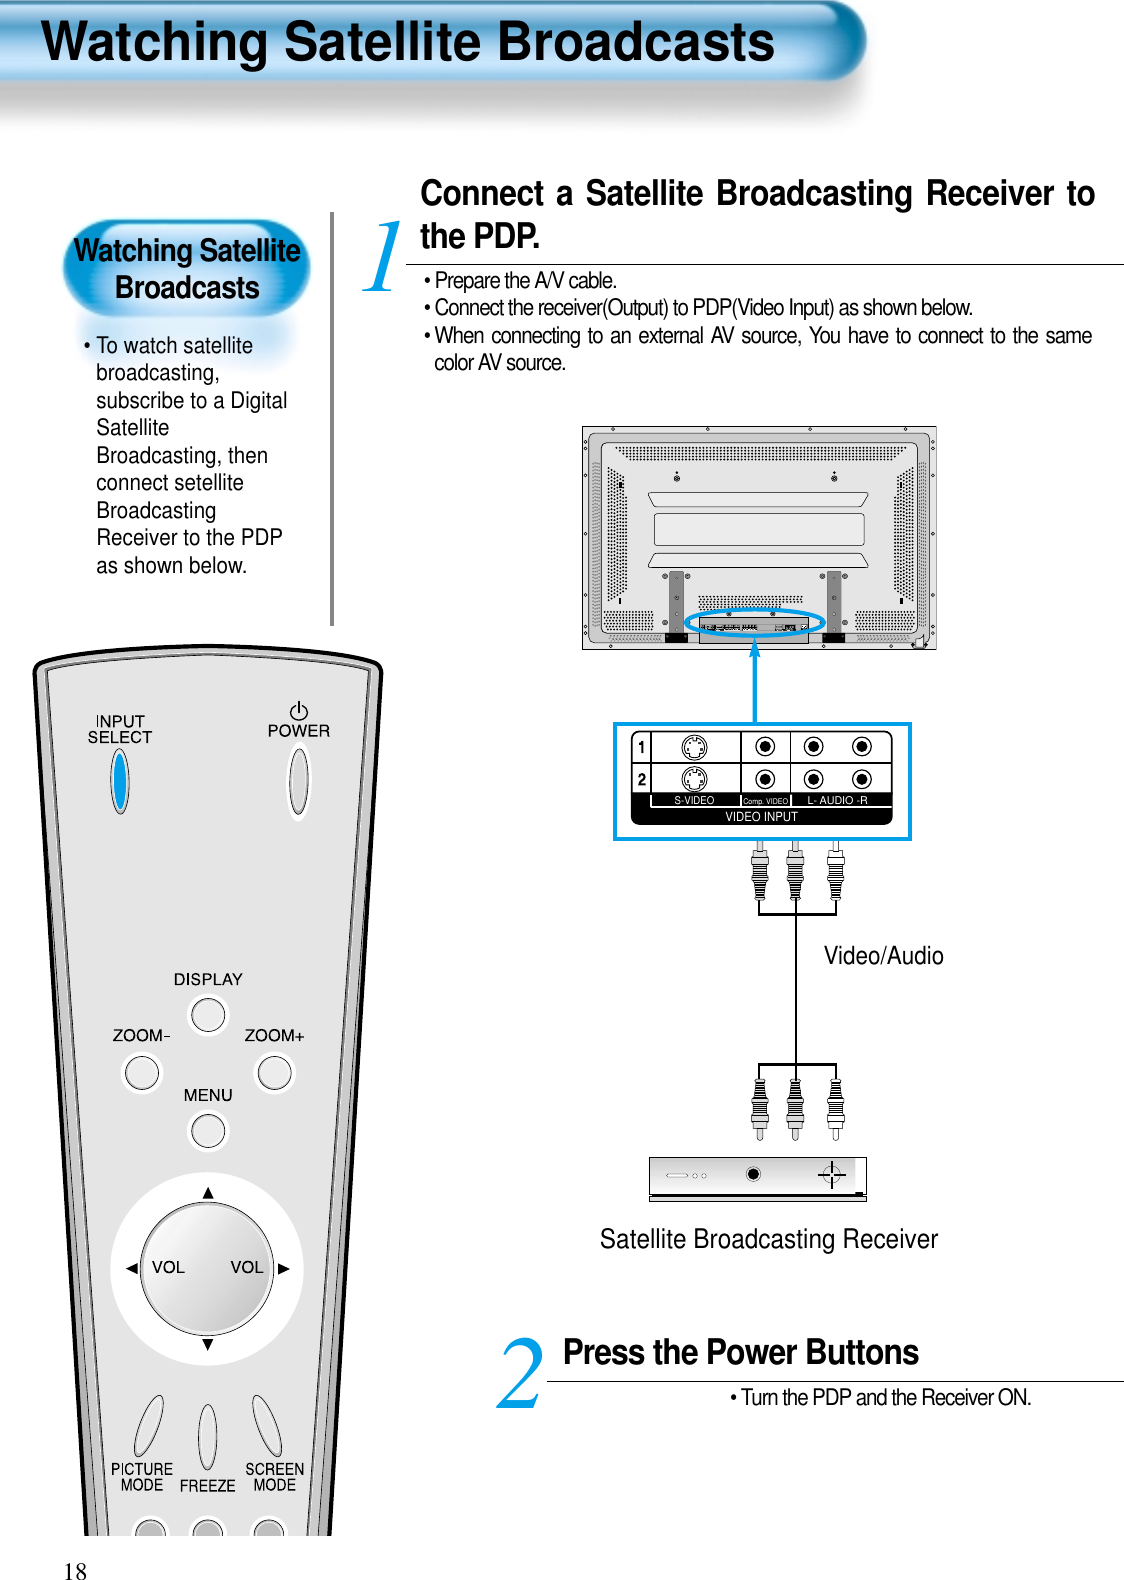
![19Input SelectINPUTSELECT• Select [Video 1 or Video 2] by pressingthe INPUT SELECT button of theRemote Control or PDP unit.• Each time you press INPUT SELECTbutton, a different input mode appears.The sequence is as follows: Video 1 -->Video 2 --> PC --> DVI --> Component 1 -->Component 2. Select a Desired Channel and Function• Select a desired channel and function byusing the Remote Control of the SatelliteBroadcasting Receiver.34Video1 Video2 PCComponent1 DVIComponent2](https://usermanual.wiki/WINIA-Electronics/DSP4224LV/User-Guide-381113-Page-19.png)
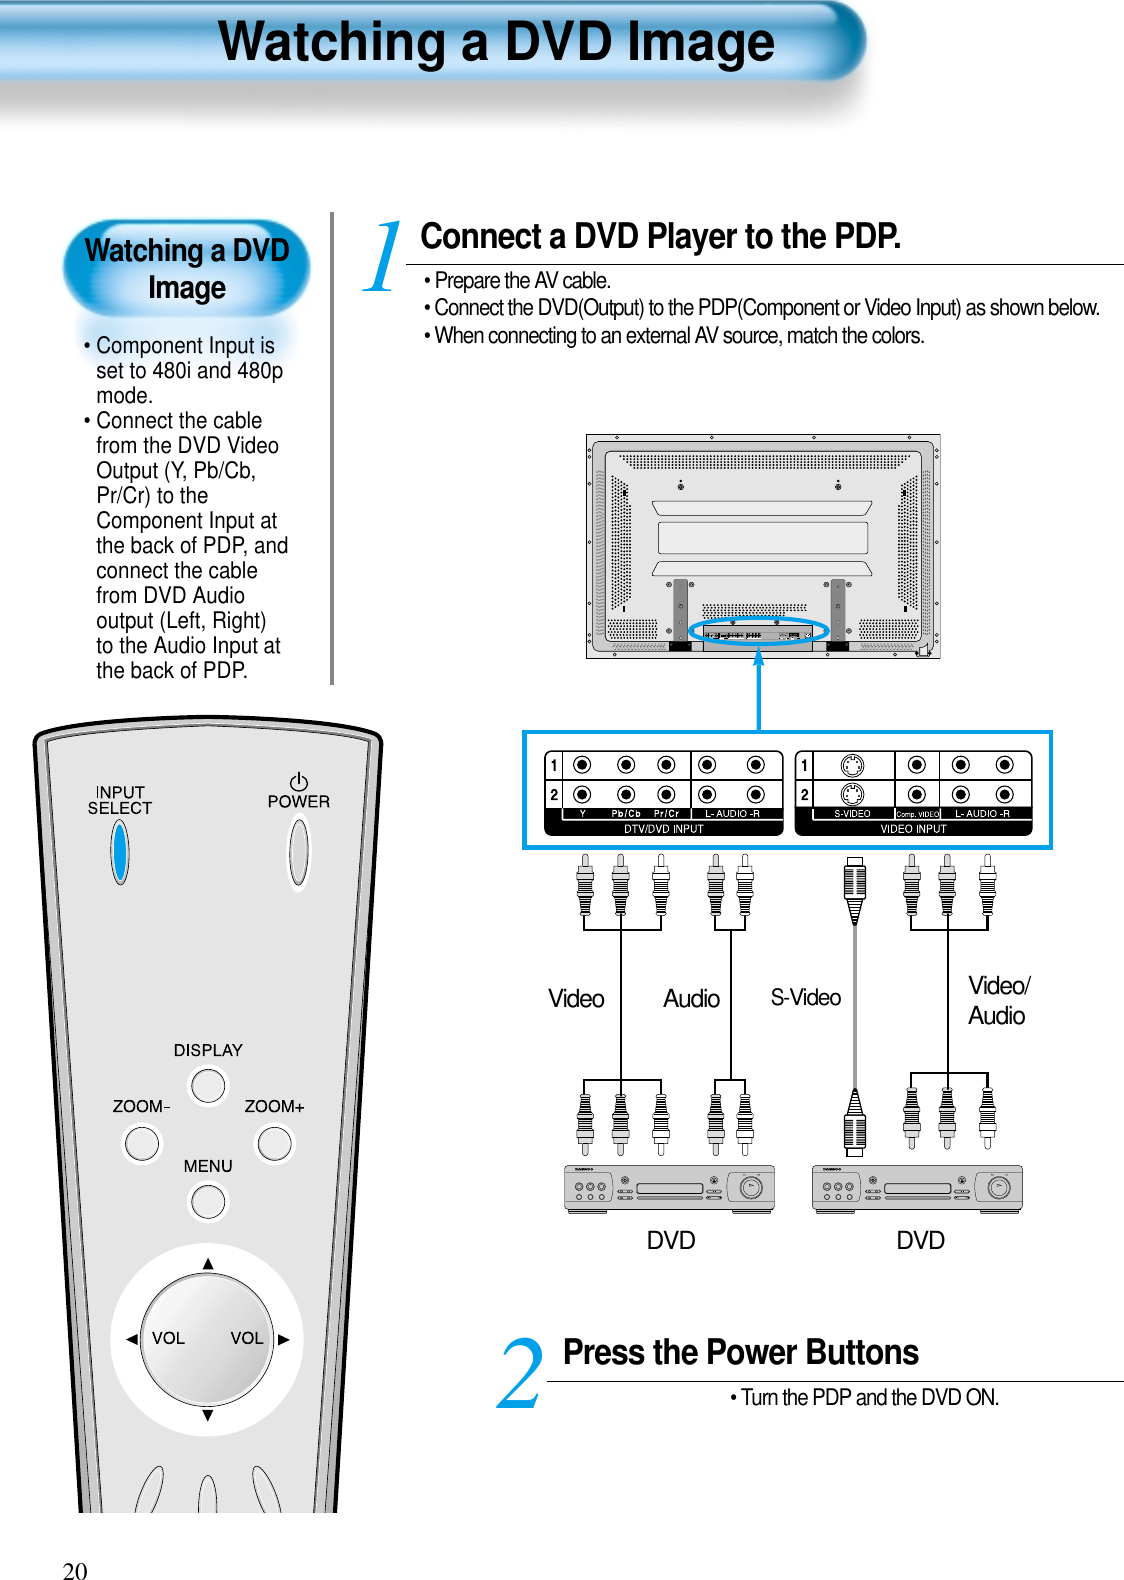
![21Input SelectINPUTSELECT• Select [Component 1 or Component 2,Video1, Video2] by pressing the INPUTSELECT button of the Remote Control orthe PDP unit.• Each time you press the INPUT SELECTbutton, a different input mode appears. Thesequence is as follows: Component 1 -->Component 2 --> Video 1 --> Video 2 --> PC--> DVI. Select a Desired Title and Function• Select a desired title and function byusing the Remote Control of the DVD.34NOTES:1) Y/Cb/Cr, which stands for DVD Player’s Output Terminal, canalso be written as Y/B-Y/R-Y, Y/Pb/Pr depending on the kindsof DVD devices.2) The way of connecting the DVD to the PDP is as follows:Y <---> Y Cb <---> Pb, B-Y, Cr <---> Pr, R-Y3) The DVD output can be made by Video, S-Video and/orComponent Video depending on the DVD devices. There arevarious output modes, so be sure to check when to purchase it. 4) When connecting S-Video and Video simultaneously, only S-Video will be displayed on the screen. Component1PCDVIComponent2Video1Video2](https://usermanual.wiki/WINIA-Electronics/DSP4224LV/User-Guide-381113-Page-21.png)
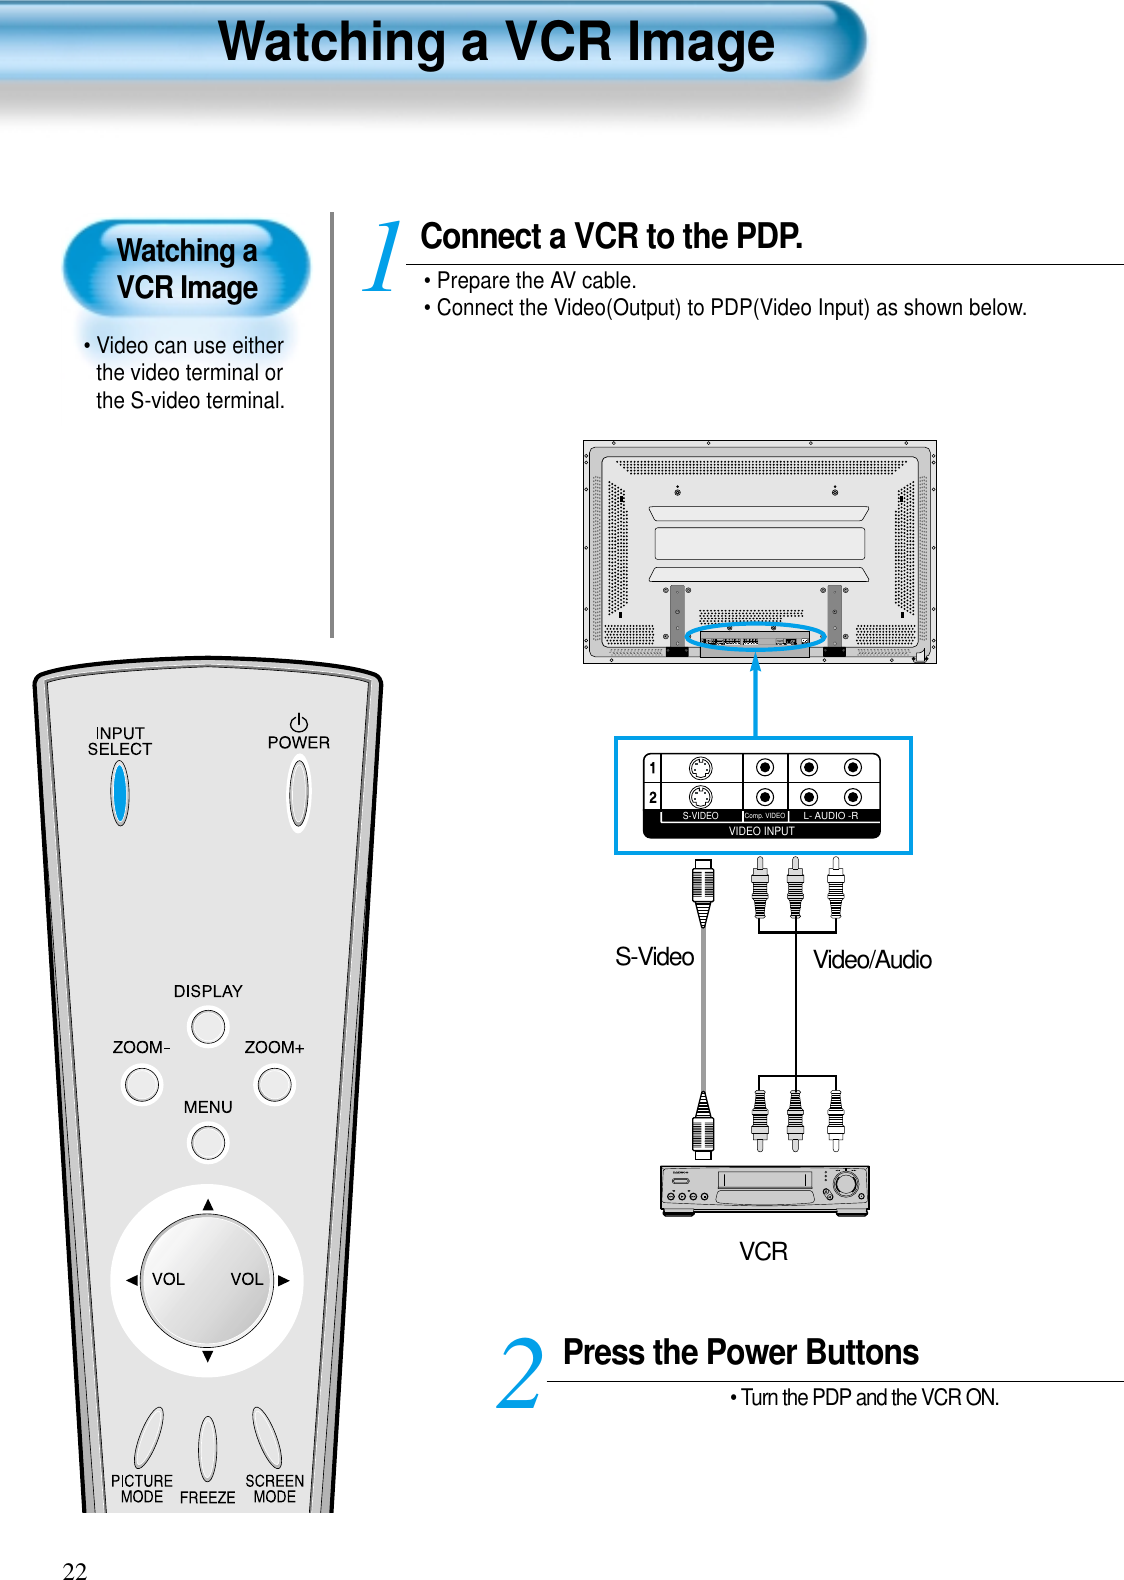
![23Input SelectINPUTSELECT• Select [Video 1 or Video 2] by pressingthe INPUT SELECT button of RemoteControl or PDP unit.• Each time you press the INPUTSELECT button, a different input modeappears. The sequence is as follows:Video 1 --> Video 2 --> PC --> DVI -->Component 1 --> Component 2. Select a Desired Title and Function• Select a desired title and function byusing the Remote Control of theVCR.34NOTES:1) When connecting a Video, the S-Video terminal provides abetter image than the Video terminal.2) When connecting to the Video terminal, connect 3 color AVcables (video, left audio, right audio) to the PDP; for the S-Video terminal, connect the Audio terminal (Left, Right) in thesame way, and connect the Video terminal by the S-Videocable (sold separately).3) When connecting the Video terminal and the S-Videosimultaneously, the S-Video terminal is selected. This can bechecked by the [Display] button of the Remote Control.Video1 Video2 PCComponent1 DVIComponent2](https://usermanual.wiki/WINIA-Electronics/DSP4224LV/User-Guide-381113-Page-23.png)
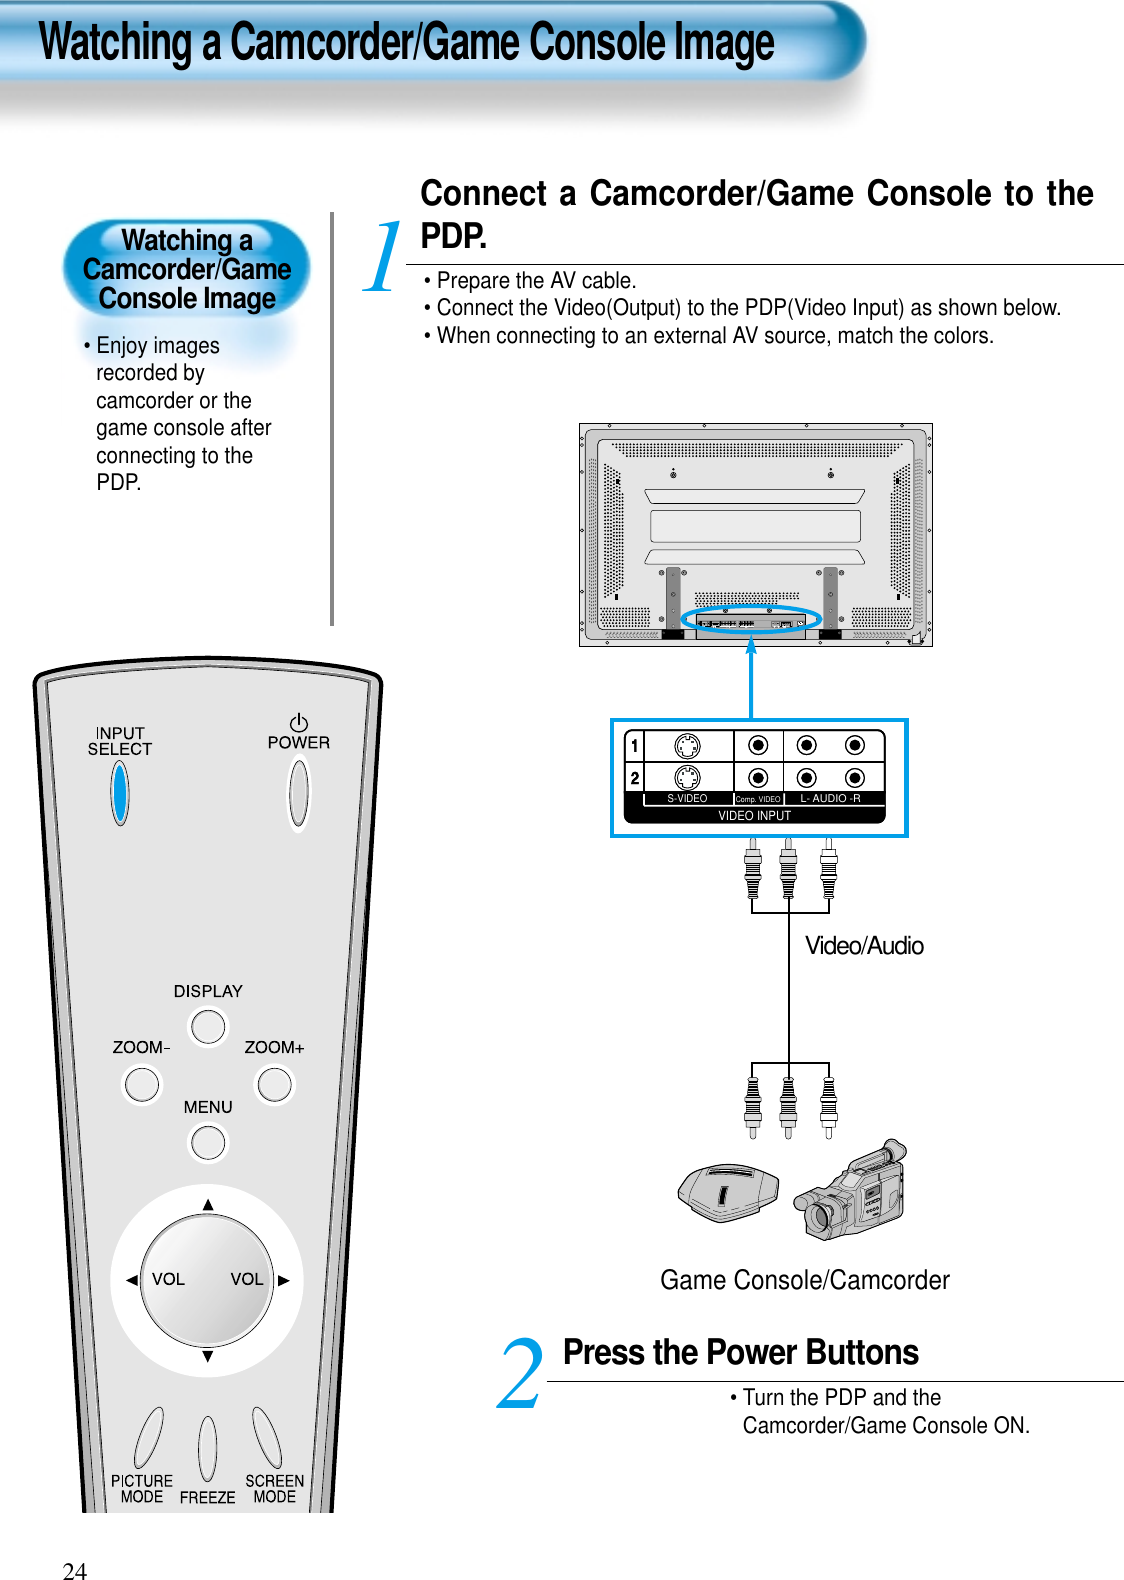
![25Input SelectINPUTSELECT• Select [Video 1 or Video 2] bypressing the INPUT SELECT buttonof the Remote Control or the PDPunit.• Each time you press the INPUTSELECT button, a different inputmode appears. The sequence is asfollows: Video 1 --> Video 2 --> PC -->DVI --> Component 1 --> Component 2. Select Function• Select the Function by using theRemote Control of Camcorder orGame Console.34NOTES:1) When connecting a Video, the S-Video terminal provides abetter image than the Video terminal.2) When connecting to the Video terminal, connect 3 color AVcables (video, left audio, right audio) to the PDP; for the S-Video terminal, connect the Audio terminal (Left, Right) in thesame way, and connect the Video terminal by S-Videocable(sold separately).3) When connecting a component, refer to “Wattching a DVDImage” on page 20-21.Video1 Video2 PCComponent1 DVIComponent2](https://usermanual.wiki/WINIA-Electronics/DSP4224LV/User-Guide-381113-Page-25.png)
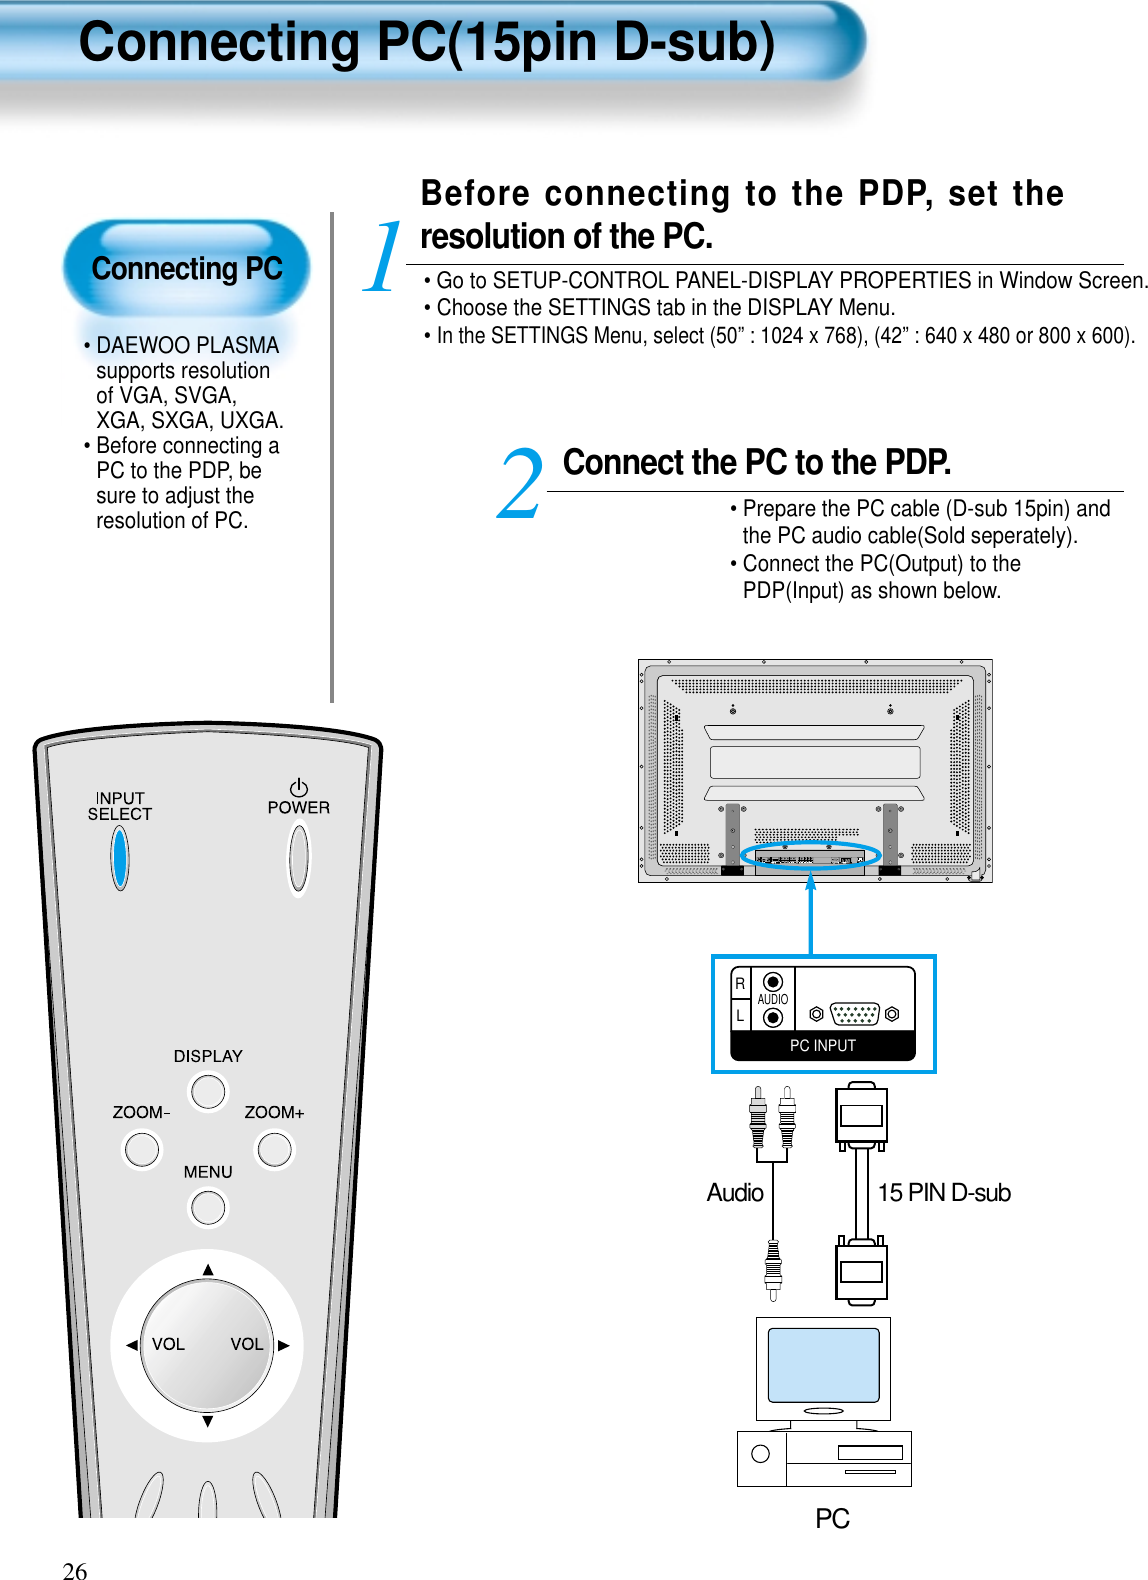
![27Input SelectINPUTSELECT• Select [PC] by pressing the INPUTSELECT button of the Remote Control orPDP unit.• Each time you press the INPUT SELECTbutton, a different input mode appears. Thesequence is as follows: PC --> DVI --> Component 1 -->Component 2 -->Video 1 -->Video 2. Enjoy Dynamic Ultra Screen Monitor byUsing PC’s Keyboard or Mouse.45Press the Power button.• Turn on the PDP and the PC.3NOTES:1) The resolution of the PC monitor is best at {50” : 1024 x 768(XGA)}, {42” : 640 x 480 (VGA)}.2) If there is a [Vertical Frequency]setting menu in the [Display]Menu of the PC, adjust the frequency to 60Hz.3) If the PC resolution is too high, it may be hard to read letters.Select a suitable resolution.PCComponent1DVIComponent2Video1Video2](https://usermanual.wiki/WINIA-Electronics/DSP4224LV/User-Guide-381113-Page-27.png)
![29Input SelectINPUTSELECT• Select [DVI] by pressing the INPUTSELECT button of the Remote Control orPDP unit.• Each time you press the INPUT SELECTbutton, a different input mode appears. Thesequence is as follows: DVI --> Component 1 --> Component 2 -->Video 1 --> Video 2 --> PC. Enjoy Dynamic Ultra Screen Monitor byUsing PC’s Keyboard or Mouse.45Press the Power button.• Turn on the PDP and the PC.3NOTES:1) The resolution of the PC monitor is best at {50” : 1024 x 768(XGA)}, {42” : 640 x 480 (VGA)}.2) If there is a [Vertical Frequency]setting menu in the [Display]Menu of the PC, adjust the frequency to 60Hz.3) If the PC resolution is too high, it may be hard to read letters.Select a suitable resolution.4) DVI input port receive only Digital Signal.5) Depending on the graphic card when plug & unplug the DVIconnection the screen may not display correctly.Restart the computer if this happens.DVIComponent2Component1Video1Video2PC](https://usermanual.wiki/WINIA-Electronics/DSP4224LV/User-Guide-381113-Page-29.png)
![Selecting PictureMode• Select the Picture modesthat are appropriately setdepending on the kindsof pictures, and enjoythem.Selecting Picture ModePICTUREMODE• Press the [PICTURE MODE] on theRemote Control.• Pressing the [PICTURE MODE] first timewill display the current PICTURE MODE.Each Press of the Button Will SelectOne of Four Picture Modes.• Each time you press the button, adifferent Picture mode appears. Thesequence used is as follows:* Normal : For a highly defined image in a normally brightroom* Dynamic: For a clear-cut image emphasizing high contrastfor sports viewing* Cinema: For a movie* User: Allows the user to customize settings as desired. Menu on the Screen Will Disappear.• After selecting a desired Picture mode, themenu on the screen will disappear. • Normal, Dynamic, and Cinema Modes arefactory preset values.If you want to customize the Picture modes,refer to the following page.3 12Selecting Picture Mode31NOTES:1) Normal, Dynamic, and Cinema Modes are factory preset values.2) When adjusting sub-menus while you are in Normal, Dynamic,and Cinema Modes, the Picture Mode will be automaticallyconverted to User Mode, and the adjustments will be made.3) Pressing of the [Initialize] button in the [Utility] Menu will allowfor the Brightness, Contrast, etc. to return to the factory presetvalues.PICTUREMODEINPUTSELECT POWERDISPLAYZOOM-PICTUREMODE SCREENMODEFREEZEMUTESOUNDMODE SLEEPZOOM+MENUVOL VOLNormal DynamicCinema User](https://usermanual.wiki/WINIA-Electronics/DSP4224LV/User-Guide-381113-Page-31.png)
![CustomizingPicture• You can adjust thecolor tone andbrightness to yourpreference.Customizing Picture32INPUTSELECT POWERDISPLAYZOOM-PICTUREMODE SCREENMODEFREEZEMUTESOUNDMODE SLEEPZOOM+MENUVOL VOLPress the / Button.• After selecting [Picture] by the / buttons, press the button that will display the following. Select the Custom Mode.• Select [User] by the / buttons.3 Press the MENU Button.• The MENU shown below will display on the screen. 12PictureSoundScreenUtilityInputModeBrightnessContrastColorTintSharpnessColor Temp.NormalNormalMove PreviousAdjustPictureSoundScreenUtilityInputModeBrightnessContrastColorTintSharpnessColor Temp.UserNormalMove PreviousAdjustMENUPictureSoundScreenUtilityInputModeBrightnessContrastColorTintSharpnessColor Temp.NormalNormalMove PreviousSelectVOLVOLVOLVOL](https://usermanual.wiki/WINIA-Electronics/DSP4224LV/User-Guide-381113-Page-32.png)
![Select User Mode AdjustmentsPicture Condition Adjustments• Press the / buttons to adjust the picture at yourpreference.45PictureSoundScreenUtilityInputModeBrightnessContrastColorTintSharpnessColor Temp.UserNormalMove PreviousAdjustPictureSoundScreenUtilityInputModeBrightnessContrastColorTintSharpnessColor Temp.UserNormalMove PreviousAdjust33• While you are in [Picture Mode – User], press the / buttons toselect a specific adjustment item.NOTES:1) While you are in the PC or DVI INPUT mode, you can onlyadjust brightness, contrast, sharpness and color temperature.2) When you adjust Brightness, Contrast, Color, Tint in DTVmode or adjust Brightness, Contrast in PC or DVI mode, thepicture is adjusted finely.3) The adjusted values are memorized in each mode seperately.4) The Tint control is used only when the input signal is NTSCIf input signal is NTSC, Tint control is displayed in picturemenu. 5) The Sharpness Menu adjusts the picture sharpness.6) Adjusting the Color Temperature makes the mood warm orcold.VOLVOLVOLVOL](https://usermanual.wiki/WINIA-Electronics/DSP4224LV/User-Guide-381113-Page-33.png)
![Adjusting Screen Size• You can adjustscreen size oraspect ratio asdesired.Adjusting Screen Size34INPUTSELECT POWERDISPLAYZOOM-PICTUREMODE SCREENMODEFREEZEMUTESOUNDMODE SLEEPZOOM+MENUVOL VOLPress the SCREEN MODE Button.• Each time you press the SCREEN MODE button on theRemote Control, a different SCREEN MODE appears. Thesequence used is as follows:• The MENU shown below will display on the screen.1SCREENMODEEnlarge LBSNormal16:9PanoramaEnlarge LBNOTES:1) When the INPUT SIGNAL is DTV [in Component 1 orComponent 2], only the aspect ratios of 16:9 and 4:3(Normal)will be applied by Input signal.Etc) If input signal is 16:9, PDP displays in 16:9 mode.2) The digital broadcasting (720p, 1080i) is fixed at the aspectratio of 16:9.3) Displaying a picture in a normal mode (4:3) for a long timemay cause phosphor of the PDP to be burned. So avoiddisplaying a picture in 4:3 screen size for a long time.4) 16:9 : Theater-like 16:9 picture formatsPanorama : 16:9 picture formats with panorama effectNormal : Displays pictures of original picture size.Enlarge LB : Enlarges the screen as to fill the black part ofup and down.Enlarge LBS : Enlarges the screen, and shifts up as to seethe subtitles in case you are watching videowith subtitles.](https://usermanual.wiki/WINIA-Electronics/DSP4224LV/User-Guide-381113-Page-34.png)
![35Press the MENU Button.• Press the [MENU] button on the Remote Control.Select “Screen”.• Press the Channel / buttons to select “Screen.” Select the Screen Size.• Press the Volume / buttons to select “Screen Size”.3 12Adjusting fromMENU ScreenPictureSoundScreenUtilityInputModeBrightnessContrastColorTintSharpnessColor Temp.NormalNormalMove PreviousSelectPictureSoundScreenUtilityInputMode NormalMove PreviousSelectPictureSoundScreenUtilityInputMode Enlarge LBMove PreviousAdjustMENUVOLVOLVOLVOL• Available Screen ModeInput Available ModePC,DVI NoneComponent 16:9, Normal(480p or above)Video 1 16:9, Video 2 PanoramaComponent Normal(480i)Enlarge LBEnlarge LBS](https://usermanual.wiki/WINIA-Electronics/DSP4224LV/User-Guide-381113-Page-35.png)
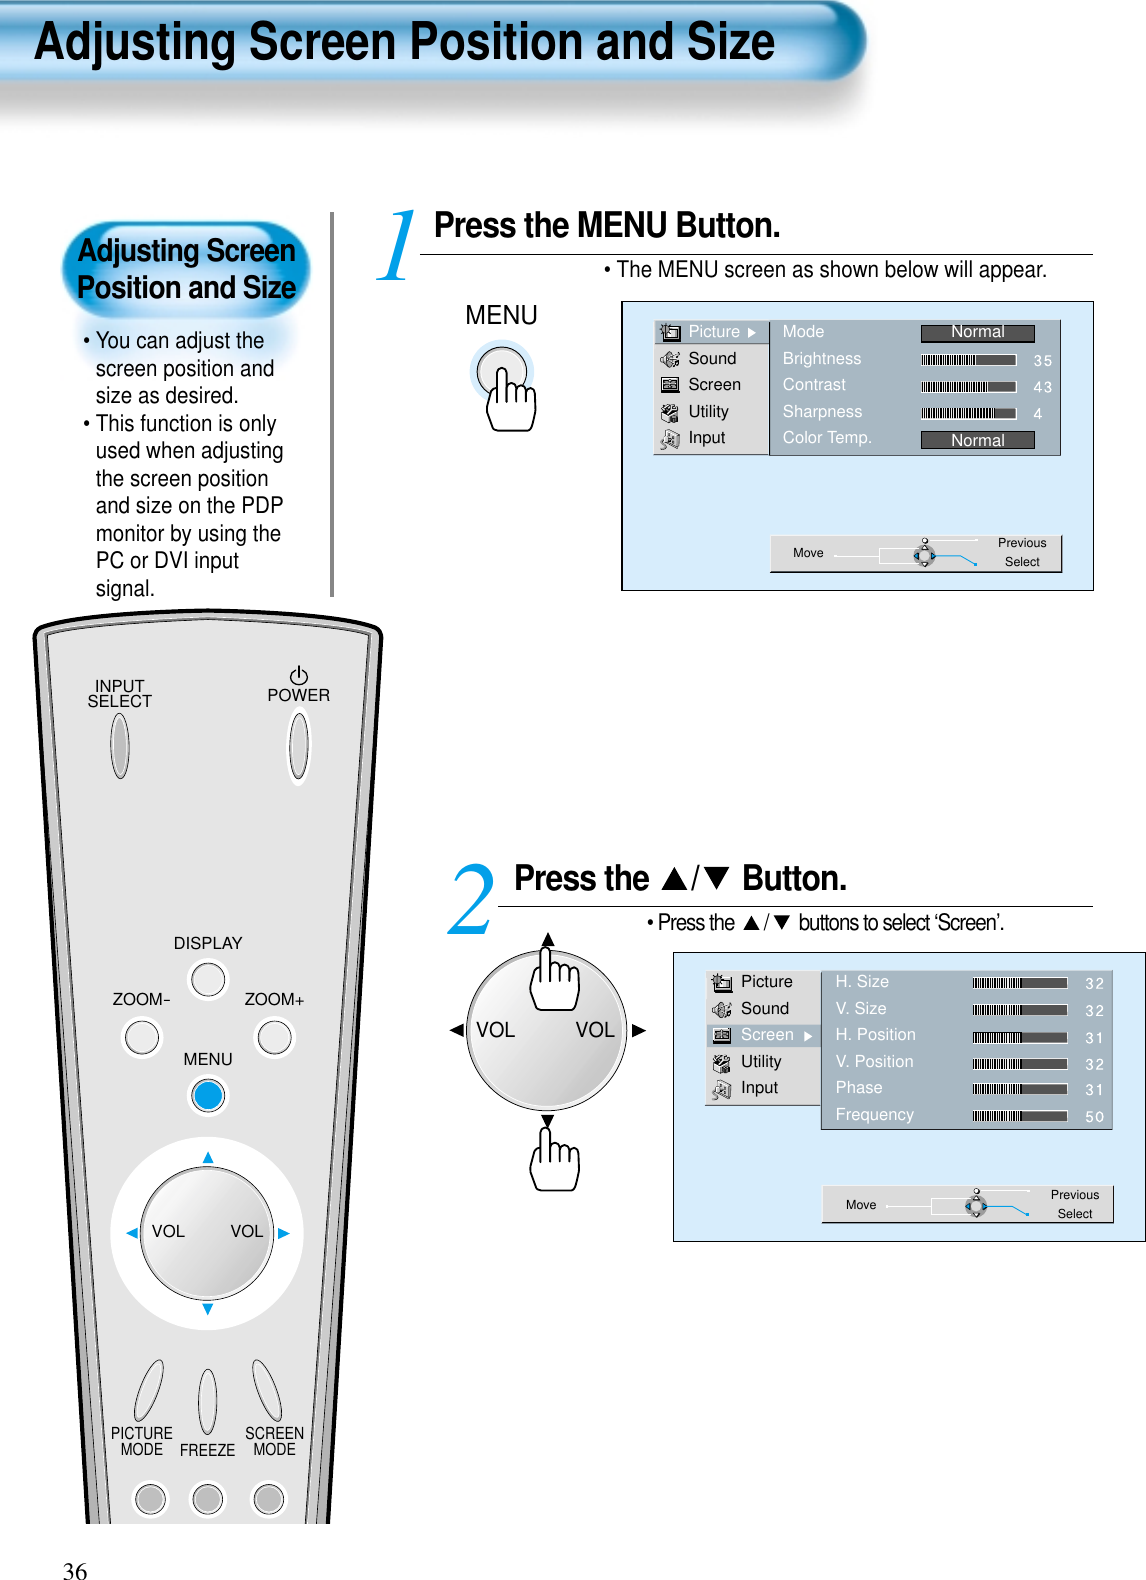
![37Press the Volume / Buttons.• Press the Volume / buttons to select “Screen”.• While you are in ‘Screen’ mode, press theor button to select a desired item, andthen, adjust the value by pressing the or .3 PictureSoundScreenUtilityInputH. SizeV. SizeH. PositionV. PositionPhaseFrequencyMove PreviousAdjustNOTES:1) Horizontal/Vertical size and position values can be adjusted only inthe [PC] or [DVI] input mode.2) H. Size: As the value increases, the screen width increases3) V. Size: As the value increases, the screen height increases.4) H. Position: Increasing value moves screen to the right.As the value increases, the screen moves to the right.5) V. Position: Increasing value moves screen up.As the value increases, the screen mores up.6) Phase: When there are zitter or blurring in image, adjust this value.7) Frequency: When there are zitter or blurring in image, adjust thisvalue.VOLVOL](https://usermanual.wiki/WINIA-Electronics/DSP4224LV/User-Guide-381113-Page-37.png)
![INPUTSELECT POWERDISPLAYZOOM-PICTUREMODE SCREENMODEFREEZEMUTESOUNDMODE SLEEPZOOM+MENUVOL VOLPress the ‘ZOOM+’ Button.• Press the ‘ZOOM+’ button to show currently selectedscreen size.• Each time you press the ‘ZOOM+’ button, the screen sizewill increase stepwise in 0 ~ 20 scale.• To reduce the screen size, press the [ZOOM-] button.138Enlarging Screen Size • You can viewenlarged size of thescreen with thisfunctionEnlarging Screen SizeZoom Level 0ZOOM+Zoom Level 0Zoom Level 5Zoom Level 10Zoom Level 15Zoom Level 20](https://usermanual.wiki/WINIA-Electronics/DSP4224LV/User-Guide-381113-Page-38.png)
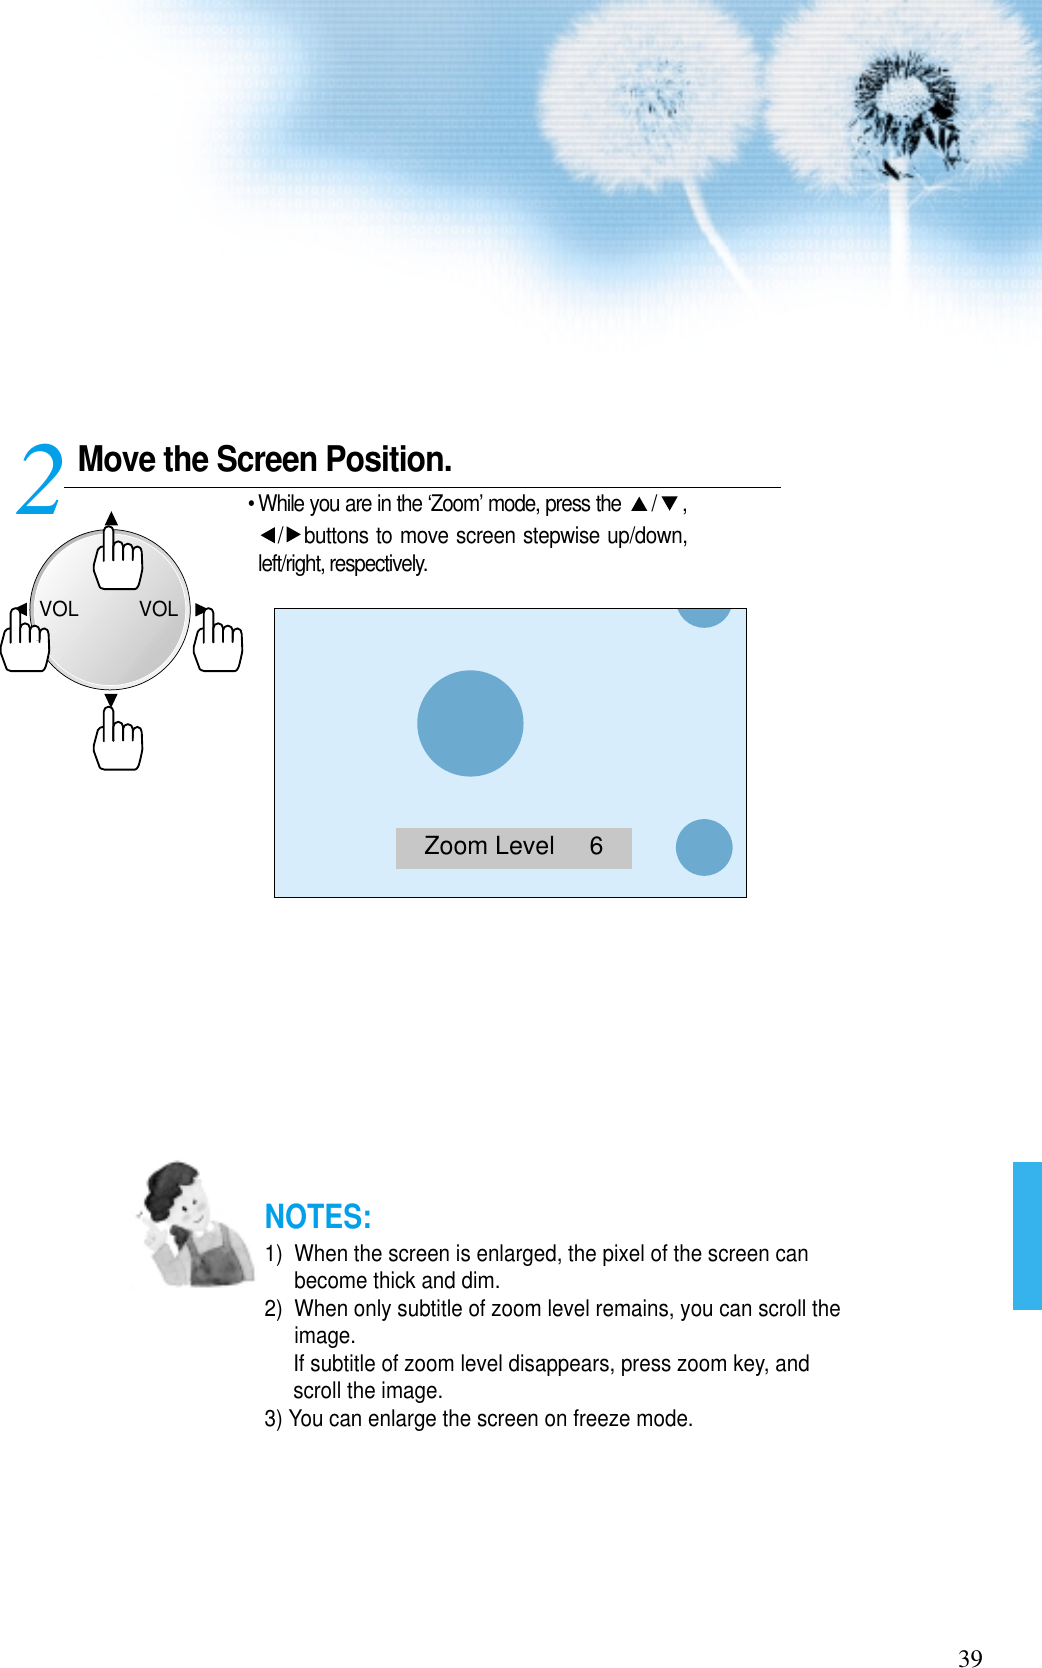
![INPUTSELECT POWERDISPLAYZOOM-PICTUREMODE SCREENMODEFREEZEMUTESOUNDMODE SLEEPZOOM+MENUVOL VOLPress the ‘FREEZE’ Button.• If you wish to freeze a picture, press the ‘FREEZE’ button.You can still hear the sound.• Press FREEZE button to cancel the ‘FREEZE’ function. • To view the enlarged images, press the [ZOOM+] button.1FREEZE40Watching a Still Image• You can view stillimages temporarilywith this function.However, displayingthe same imagessuch as still imagesfor a long time maycause image sticking.Watching a Still ImageNOTES:1) Displaying the same images such as still images for a longtime may cause image sticking (after-image lagging). 2) In this case, such “image sticking” may become lessnoticeable if moving images are later displayed for a longtime.3) However, an image sticking may become a permanent one,damaging the Plasma Display; therefore, avoid displayingthe same images for a long time.4) Use the function [ISM], while displaying still images for a longperiod of time to minimize this effect.FreezeZoom Level 7Move the Screen Position.• While you are in ‘FREEZE’ mode, press the / , / buttons to move screen stepwise up/down andleft/right.2VOLVOL](https://usermanual.wiki/WINIA-Electronics/DSP4224LV/User-Guide-381113-Page-40.png)
![Adjusting AutoSound Mode• Enjoy various soundmodes by selectingyour favorite SoundMode depending onthe kinds of movingpictures. Adjusting Auto Sound Mode41INPUTSELECT POWERDISPLAYZOOM-PICTUREMODE SCREENMODEFREEZEMUTESOUNDMODE SLEEPZOOM+MENUVOL VOLSelect SOUND Mode.SOUNDMODE• Press the [SOUND MODE] on theRemote Control. • Press of the [SOUND MODE] for thefirst time will display the currentSOUND MODE.Every Press of the Button Changes Modes.SOUNDMODE• Each time you press the button, adifferent sound mode appears. The sequence used is as follows:* Normal : Suitable for watching any motion picture * Movie : Select this mode to simulate being at a movie theater* Music : Ideal for listening to music * News : Allows human voice to be heard more clearly* User : Allows the user to adjust as desired. MENU will Disappear.• After selecting a desired SOUND Mode,on-screen menu will disappear in about2~3 seconds. • Normal, Movie, Music, News Modes arefactory preset values.If you want to customize the sound modesat your preference, refer to the followingpage.3 12Normal MovieMusic UserNews](https://usermanual.wiki/WINIA-Electronics/DSP4224LV/User-Guide-381113-Page-41.png)
![CustomizingSound Mode• This feature allowsthe user at adjust athis preference. Customizing Sound Mode42Press the / Button. • Select [Sound] by the / buttons, then press the button to display the following.Select SOUND BALANCE. • Select [Sound Balance] by the / buttons, thenadjust it.• Sound balance is best at ‘0’.• Sound Balance: Adjusts sound balance of left and rightspeaker. 3 Press the MENU Button.• The MENU Screen as below will be displayed. 12PictureSoundScreenUtilityInputBalanceSpatial EffectSound ModeOffNormalMove PreviousSelectPictureSoundScreenUtilityInputBalanceSpatial EffectSound ModeOffNormalMove PreviousAdjustMENUPictureSoundScreenUtilityInputModeBrightnessContrastColorTintSharpnessColor Temp.NormalNormalMove PreviousSelectINPUTSELECT POWERDISPLAYZOOM-PICTUREMODE SCREENMODEFREEZEMUTESOUNDMODE SLEEPZOOM+MENUVOL VOLVOLVOLVOLVOL](https://usermanual.wiki/WINIA-Electronics/DSP4224LV/User-Guide-381113-Page-42.png)
![INPUT SIGNAL• Used to selectINPUT signal ofexternal deviceconnected to thePDP.Selecting INPUT SIGNAL44Press the INPUT SELECT Button.INPUTSELECT• Press the [INPUT SELECT] button on the RemoteControl or the PDP Display to select desired inputsignal.• Each time you press the [input select] button, a different screenmode appears. The sequence used is as follows:COMPONENT 1 --> COMPONENT 2 --> VIDEO 1 --> VIDEO 2--> PC --> DVI1NOTES:1) If an external device is not connected or INPUT signal is notapplied, Warning Message (“No Signal”) would be displayed.2) In this case, check if external device is connected and/orterminal connection is properly done.INPUTSELECT POWERDISPLAYZOOM-PICTUREMODE SCREENMODEFREEZEMUTESOUNDMODE SLEEPZOOM+MENUVOL VOLPCComponent1PCDVIComponent2Video1Video2](https://usermanual.wiki/WINIA-Electronics/DSP4224LV/User-Guide-381113-Page-44.png)
![45Press the MENU Button.MENU• Press the [MENU] button on the Remote Control. 1Adjusting from theMENU ScreenSelect Input. • Select [Input] by the / button.Select Input Signal. • Select [Input Signal] by the / buttons, thenpress the button.3 2PictureSoundScreenUtilityInputModeBrightnessContrastColorTintSharpnessColor Temp.NormalNormalMove PreviousSelectPictureSoundScreenUtilityInputPCDVIComponent 1 (DTV/DVD)Component 2 (DTV/DVD)Video 1Video 2Move PreviousSelectPictureSoundScreenUtilityInputPCDVIComponent 1 (DTV/DVD)Component 2 (DTV/DVD)Video 1Video 2Move PreviousSelectVOLVOLVOLVOL](https://usermanual.wiki/WINIA-Electronics/DSP4224LV/User-Guide-381113-Page-45.png)
![Checking the Current Input Signal• Used to check theINPUT signal mode,resolution,frequency, etc. of thecurrent screen.Checking the Current Input Signal46Press the DISPLAY Button.DISPLAY• Press the [DISPLAY] button on the Remote Control.11. If you watch Digital Broadcasts:Displays which input terminal is used, and indicates the input signal mode.Indicates the horizontal and vertical resolution of the current INPUT signal.Indicates the frequency of the current INPUT signal.INPUTSELECT POWERDISPLAYZOOM-PICTUREMODE SCREENMODEFREEZEMUTESOUNDMODE SLEEPZOOM+MENUVOL VOLComponent 11920 x 108060 HzComponent 11920 x 108060 Hz2. If you watch DVD image:Displays which input terminal is used, and indicates the signal mode.Indicates the mode and frequency of the current INPUT signal.Component 2YUV 60 Hz3. If you watch VCR image:Displays which input terminal is used, and indicates the signal mode.Indicates the mode and frequency of the current INPUT signal.Video 1NTSC 60 HzNOTES:1) DAEWOO PLASMA can receive NTSC, PAL, SECAM, etc.2) “1920 x 1080” displayed in the INPUT signal does not indicatethe resolution of the monitor, but the signal that is sent byDigital Broadcasting Receiver.](https://usermanual.wiki/WINIA-Electronics/DSP4224LV/User-Guide-381113-Page-46.png)
![SelectingLanguages• Used to selecttransparency of thebackground screenand language usedin MENU. Press the MENU Button.MENU• The MENU screen will be displayed as below.Press the / Button. • Select [Utility] by the / button. Select the menu Background Screen.• Select the MENU [Background Screen] by pressing the button.• Every press of the button while you are in the[BackgroundScreen] would switch between Trarslucent/Opaque.3 12Selecting MENU Background Screen and Language4747PictureSoundScreenUtilityInputModeBrightnessContrastColorTintSharpnessColor Temp.NormalNormalMove PreviousSelectPictureSoundScreenUtilityInputBackgroundLanguageInitializeISMOpaqueEnglishPress keyPress keyMove PreviousAdjustPictureSoundScreenUtilityInputBackgroundLanguageInitializeISMOpaqueEnglishPress keyPress keyMove PreviousSelectVOLVOLVOLVOL](https://usermanual.wiki/WINIA-Electronics/DSP4224LV/User-Guide-381113-Page-47.png)
![INPUTSELECT POWERDISPLAYZOOM-ZOOM+MENUVOL VOLBack toInitialization• You can restore thevalues of theadjustment/settingmade in the MENUto factory settings.Selecting MENU Background Screen and LanguagesSelect MENU LANGUAGE SELECT by the /Button.• Select LANGUAGE by the / button.• Every press of the button while you are in the[LANGUAGE] mode would cycle through the differentlanguages.INITIALIZATION will Start.• Select [INITIALIZATION] by the / buttons, thenpress the button to start initialization.45PictureSoundScreenUtilityInputBackgroundLanguageInitializeISMOpaqueEnglishPress keyPress keyMove PreviousAdjust48PictureSoundScreenUtilityInputBackgroundLanguageInitializeISMOpaqueEnglishPress keyPress keyMove PreviousAdjustWhen [INITIALIZATION] is completed: 1) When [INITIALIZATION] is completed, those values that have beenset in the User Mode of [SCREEN MODE] and [SOUND MODE] willbe returned to the factory preset values.2) When you try to initialize, be advised that you should think it over.3) The items in the [SCREEN] Menu in PC or DVI INPUT are alsoinitialized (i.e., H. Size, V. Size, H. Position, V. Position, Phase,Frequency, etc.)4) Language, volume, OSD background, input mode are not initialized.VOLVOLVOLVOLNOTES:*When Power is turned ON first time, ‘SELECTLANGAUGE’ Mode will be displayed, then, select adesired language by button. (Displayed only once)](https://usermanual.wiki/WINIA-Electronics/DSP4224LV/User-Guide-381113-Page-48.png)
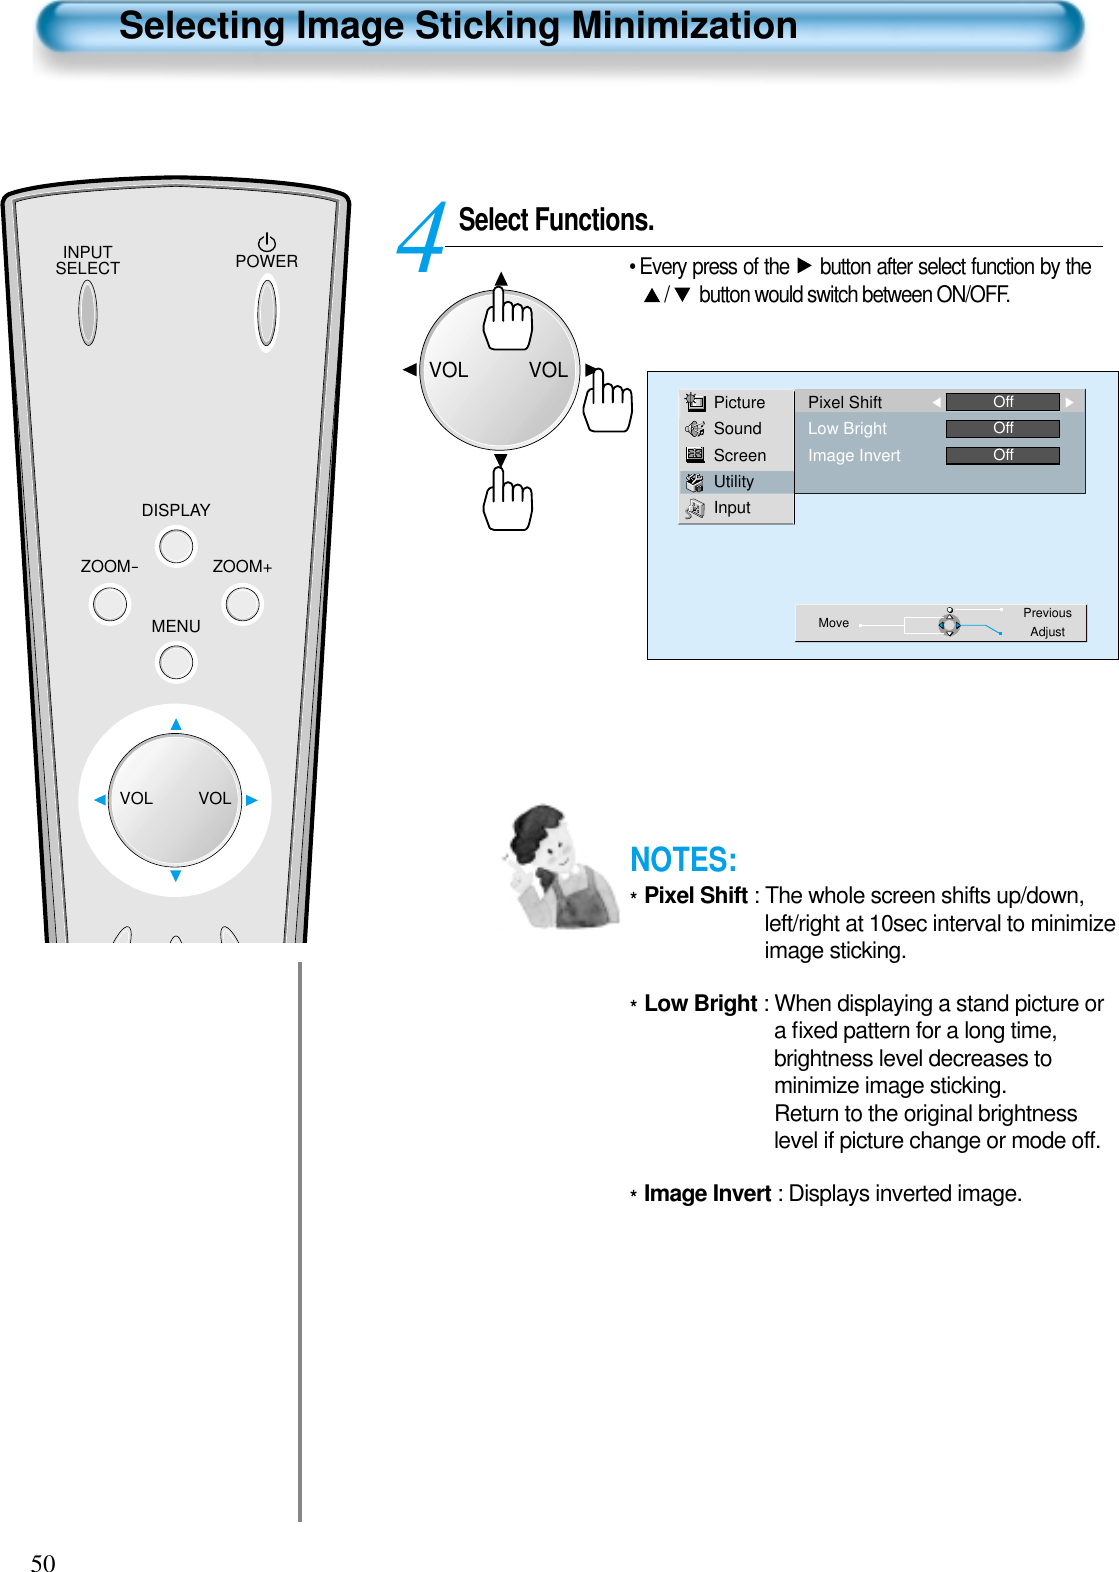
![49ISM• Image stickingminimization.• Displaying a stillimage like PC inputfor a long timecauses part imagesticking in the panel • The ISM functionminimize this effect.Press the MENU Button.MENU• The MENU screen will be displayed as below.Press the / Button. • Select [Utility] by the / button. Select the MENU ISM SCREEN.• Select the MENU [ISM] by pressing the /button.• Press of the button while you are in the ISM.3 12Selecting Image Sticking MinimizationPictureSoundScreenUtilityInputModeBrightnessContrastColorTintSharpnessColor Temp.NormalNormalMove PreviousSelectPictureSoundScreenUtilityInputBackgroundLanguageInitializeISMOpaqueEnglishPress keyPress keyMove PreviousAdjustPictureSoundScreenUtilityInputBackgroundLanguageInitializeISMOpaqueEnglishPress keyPress keyMove PreviousSelectVOLVOLVOLVOL](https://usermanual.wiki/WINIA-Electronics/DSP4224LV/User-Guide-381113-Page-49.png)
![Setting Sleep Timer• SLEEP TIMER turnsthe Monitor off aftera preset time.Press the SLEEP Button.SLEEP• Press the [SLEEP] button on the Remote Control.• Pressing the [SLEEP] button first time will display thecurrent setting for SLEEP TIMER.• To cancel the SLEEP TIMER, press the [SLEEP] button toselect ‘OFF’.1Setting Sleep Timer51INPUTSELECT POWERDISPLAYZOOM-PICTUREMODE SCREENMODEFREEZEMUTESOUNDMODE SLEEPZOOM+MENUVOL VOLNOTES:1) On-screen information disappears if you do nottake any action for about two seconds afterpressing the SLEEP button.2) If you turn the Monitor off after setting SLEEP, thesetting is erased.Sleep Timer offSleep Timer offSleep Timer 15 MinutesSleep Timer 30 MinutesSleep Timer 120 MinutesSleep Timer 90 MinutesSleep Timer 60 Minutes](https://usermanual.wiki/WINIA-Electronics/DSP4224LV/User-Guide-381113-Page-51.png)