WINSONIC ELECTRIC CD95BT CD Player User Manual 9100MP3 instruction manual
Winsonic Electric Limited CD Player 9100MP3 instruction manual
User Manual

1
CD PLAYER
CD95BT
OPERATING INSTRUCTIONS
BEFORE OPERATION THIS PRODUCT, READ, UNDERSTAND, AND FOLLOW THESE
INSTRUCTIONS.

2
Be sure to save this booklet for future reference.
SAFETY INSTRUCTIONS
WARNING : TO REDUCE THE RISK OF FIRE OR ELECTRIC SHOCK, DO NOT EXPOSE THE APPLIANCE
TO RAIN OR MOISTURE.
SAFETY INSTRUCTIONS
1. Read instructions - All the safety and operating instructions should be read before the
appliance is operated.
2. Retain instructions - The safety and operating instructions should be retained for future
reference.
3. Head Warnings - All warnings and cautions on the appliance and in the operating
instructions should be adhered to.
4. Follow instructions - All operating and use instructions should be followed.
5. Water and Moisture - The appliance should not be used near water, e.g. near a bathtub,
washbowl, kitchen sink, laundry tub, in a wet basement, or near a swimming pool or the
like.
6. Ventilation - The appliance should be situated so that its location or position does not
interfere with its proper ventilation. For example, the appliance should not be situated on
a bed, sofa, rug or similar surface that may block the ventilation openings, or placed in a
built-in installation, such as a bookcase or cabinet, that may impede the flow of air
through the ventilation openings.
3
7. Heat - The appliance should be situated away from neat sources such as radiators, heat
registers, stoves, or other appliances (including amplifiers) that produce heat..
8. Power Sources - The product should be operated only with the type of power supply
indicated on the marking label.
9. Grounding Polarization - This product may be equipped with a polarized alternating
current line plug (a plug having one blade wider than the other). This plug will fit into the
power outlet only one way this is a safety feature.
10. Power-Cord Protection - Power supply cords should be routed so that they are not likely
to be walked on or pinched by items placed upon or against them, paying particular
attention to cords at plugs, convenience receptacles, and the point where they exit from
the appliance.
11. Nonuse periods - The power cord of the appliance should be unplugged from the outlet
when left when left unused for a long period of time.
12. Object and Liquid Entry - Care should be taken so that objects do not fall and liquids are
not spilled into the product case through product openings.
13. Damage Requiring Service - Unplug this product from the wall outlet and take it to
qualified service personnel under the following conditions.
a) When the power-supply cord or plug is damaged.
b) If liquid has been spilled into, or objects have fallen into the product.
c) If the product has been exposed to rain or water.
d) If the product does not operate when used according to the operating instructions.
e) If the product has been dropped or damaged in any way.
14. Servicing - The user should not attempt to service the product beyond that described in
the operating instruction. All servicing should be referred to qualified service personnel.
CAUTION
Invisible laser radiation will be emitted when the product is
open and interlocks are defeated. Do not defeat the safety
interlocks.
USE OF CONTROLS, ADJUSTMENTS, OR PERFORMANCE
PROCEDURE HEREIN MAY RESULT IN HAZARDOUS
RADIATION EXPOSURE.
4
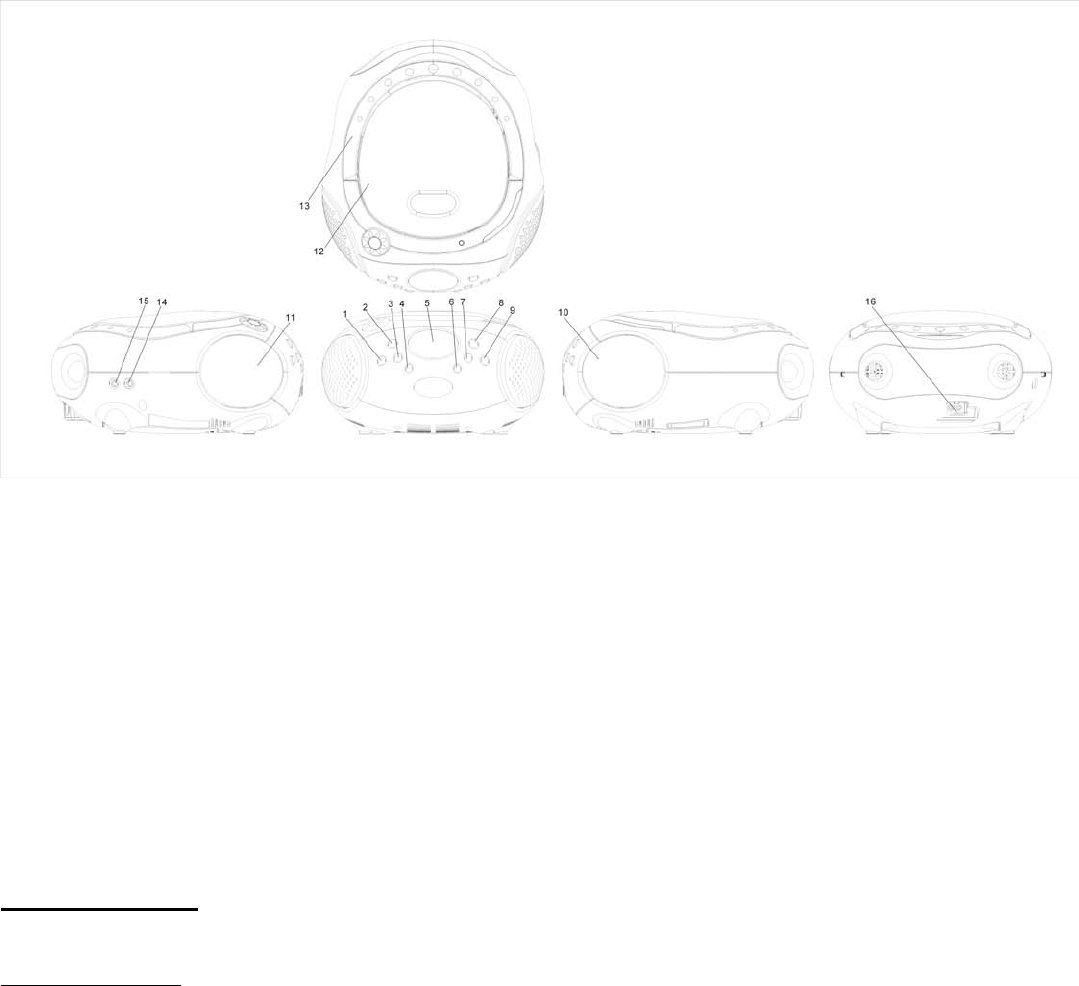
LOCATIONS OF CONTROLS
1. REWIND
2. PLAYMODE PROG/MEM
3. FAST FORWARD
4. PLAY/PAUSE/ MEMORY DOWN
5. LCD DISPLAY
6. STOP/ MEMORY UP
7. VOLUME -
8. STANDBY/FUNCTION
9. VOLUME +
10. SPEAKER 1
11. SPEAKER 2
12. CD DOOR OPEN
13. HANDLE
14. AUX JACK
15. PHONE JACK
16. ADAPTOR JACK
POWER SUPPLY
Operate by DC
Batteries (not included)
Open the battery compartment and insert eight batteries, UM-2 or C-cells, (preferably
Alkaline) with the correct polarity as indicated by the "+" and "–" symbols inside the
compartment.
Incorrect use of batteries can cause electrolyte leakage and will corrode the compartment
or cause the batteries to burst. Therefore:
• Do not mix battery types: e.g. alkaline with carbon zinc. Only use batteries of the same type
for the set.
• When inserting new batteries, do not try to mix old batteries with the new ones.
• Remove the batteries if the set is not to be used for a long time.

5
Unit power supply (mains AC 120V/60Hz)
1. Check if the power voltage, as shown on the type plate located on the bottom of the set,
corresponds to your local AC power supply.
2. Connect the power cord to the AC MAINS inlet and the wall outlet. The power supply is
now connected and ready for use.
3. To switch off completely, unplug the power cord from the wall outlet.
Basic Function
Switching power STANDBY to save energy
1. Press and Hold the STANDBY FUNCTION button to turn off the Unit.
2. The display will show nothing and it indicates that the Device is off.
3. Whether you are using mains or battery supply, to avoid unnecessary energy consumption
always adjust the source selector to STANDBY.
General operation
1. To select your sound source adjust the source STANDBY/AUX/RADIO/CD MP3/BLUETOOTH
2. Adjust the sound with the VOLUME -, VOLUME + Button
3. To switch off the set, adjust the source selector to STANDBY position.
RADIO OPERATION
Radio reception
1. Slide the STANDBY/AUX/RADIO/CD MP3 selector to AM or FM
2. Use the FAST FORWARD BUTTON and the REWIND BUTTON to adjust the radio frequency–
3. Use the Vo
NOTE: If FM is selected, Display will show FM on screen. This goes the same with AM.
4. When you have finished listening, slide the STANDBY/AUX/RADIO/CD MP3 selector to the
STANDBY position to turn off the unit.
For better reception
- For FM, pull out the soft antenna. Let the Atenna reach a further open area for better
reception.
Radio Preset
The tracks on the disc can be programmed to play in any order (up to 20) tracks can be
programmed).
1. Press the F.FWD or REW buttons to select the frequency to be preset.
2. Press the PROG button while in stop mode. Program number ‘P01” will flash and shown in
the display.
3. Press the PROG button again, The current radio frequency is now stored into memory, and
the program number changes to “P02”, waiting for your next selection.
4. Repeat steps 1 to 3 to program additional tracks.
5. After programming is finished, press the MEMORY DOWN or MEMORY UP button to
navigate between preset stations.

6
CD Disc Section
Playing a Disc
1. Open the CD door.
2. Hold the disc with the label side facing up and press it onto the spindle until it clicks into
place
3. Slide the Function Switch to the “CD” position. The disc will rotate for a few Seconds, the
total number of tracks will be indicate on the LED display. Adjust the volume as desired.
4. Press PLAY/PAUSE to start playing.
5. Press the PLAY/PAUSE again to stop playing temporarily. The PLAY indicator will begin to
flash. Resume normal play by pressing the PLAY/PAUSE button again.
6. To stop playback, press the STOP button .The total number of tracks will be shown on the
display.
TRACK SEARCH
Press the F.FWD button to skip to the next track on the disc.
Press the REW button skip to previous track.
FORWARD/REVESE SEARCH
Press and hold the F.FWD or REW button during play to scan the disc at high speed.
When the desired section of the disc is found, release the Button and normal play will resume.
F.FWD -------------------Forward
REW --------------------Backward
Press and hold the F.FWD button while playing to scan the current track forward at high
speed.
Press and hold the REW button while playing to scan the current track backward at high
speed.
PROGRAM PLAY
The tracks on the disc can be programmed to play in any order (up to 20) tracks can be
programmed).
1. Press the PROG button while in stop mode. Program number ‘P01” will flash and shown in
the display.
2. Press the F.FWD or REW buttons to select the first track to be programmed.
3. Press the PROG button, The first track number is now stored into memory, and the program
number changes to “P02”, waiting for your next selection.
4. Repeat steps 2 and 3 to program additional tracks.
5. After programming is finished , press the Play/Pause button, and program play begins from
the first programmed track. The player stops automatically after all programmed tracks
have been played.
Single track repeat
Press the PLAYMODE PROG/MEM button once during play. The “REP” sign will be displayed.
Press the F.FWD or REW button to select a track to repeat.

7
This track will then play repeatedly until you press the STOP button.
All track repeat
Press PLAYMODE PROG/MEM button twice, the “REP ALL” sign will be displayed.
All tracks will keep playing in sequence and repeat until you press the STOP button.
Random Function
Press PLAYMODE PROG/MEM button third time, the “RAND” sign will be displayed. All the
tracks will play randomly.
To resume, press PLAYMODE PROG/MEM button again, the “RAND” sign will disappear.
HEADPHONE JACK
The unit is equipped with a HEADPHONE JACK for private listening . Simply plug any 3.5 mm
plug type stereo headphone into the HEADPHONE JACK. With the headphone connected
the speaker in the unit will be automatically disconnected.
AUX INPUT JACK
1. In any mode, plug in the Aux Cable and connect the other end to an Audio Playing
Device.
2. The device will enter Aux mode. Play Start from your Audio Playing Device, for instruction
on how to play from your Audio Playing Device, please refer to your Audio Playing
Device’s menu.
BLUETOOTH
1. Press the STANDBY FUNCTION button and switch to Bluetooth Mode. The “bLUE” sign and
the Bluetooth Logo will be displayed.
2. Use your Bluetooth Compatible Device (BCD) and find CDB320 to pair up with. For
instructions on how to pair up with your BCD, please refer to your BCD’s manual.
3. Once connected, you can play Audio files from your BCD, or press the PLAY/PAUSE button
to start playing the most recently played Audio file from your BCD.
4. Use the REWIND or FORWARD button to move between songs.
5. Use the Volume – or Volume + button to adjust the volume.
6. Use the Play/Pause button to play or pause the playing audio file.
7. To end the Bluetooth Function, simply Press the STANDBY FUNCTION button or disconnect
the connection from your BCD, for instructions on how to disconnect with your BCD,
please refer to your BCD’s manual.
CONDENSATION
Condensation occurs:
When the unit is brought from the outdoors into a warm room, or if it is in a cold room
which is heated quickly.
In the summer, if the unit is moved suddenly from an air-conditioned room or car to a hot
8
or humid location.
Should condensation occur, the product may not operate property. When the product is
exposed to temperature extremes, wait for 1-2 hours(to allow the internal parts to adjust
to the surrounding temperature) before use.
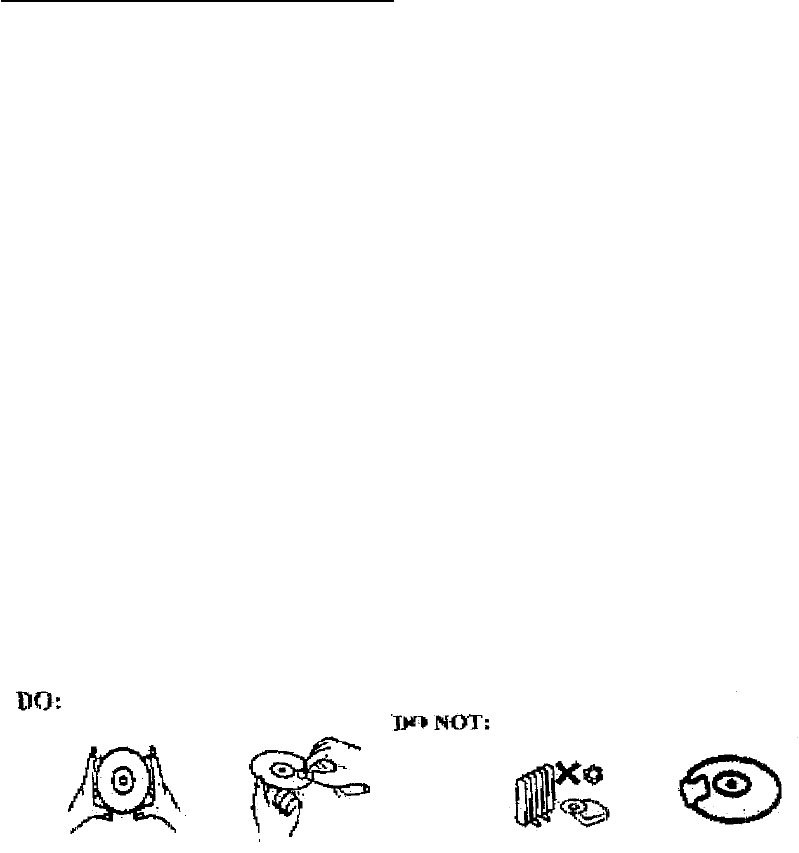
HANDLING A COMPACT DISC
Always protect a disc against scratches, soil, dust, etc. If a disc is treated with reasonable
care, wiping off the disc with a soft cloth should retain its original sound quality. Discs should
be retained in their original case during periods of non-use.
Handle a disc only by its edges. Do not touch the surface or rainbow-colored side of the
disc.
Handle a disc as shown in the two illustrations indicated.
Use a soft cloth to wipe a disc clean. Do not use benzene, thinner, or other chemical
cleaners to clean the disc as damage may result. A disc should always be wiped in a
straight line from its center to its edge. Never wipe a disc in a circular motion.
Do not expose a disc to direct sunlight, high humidity, or high temperatures for extended
periods of time. Do not place the disc on other equipment or near any heat source.
Dust on the pickup lens can lead to erratic operation and interruption of the sound during
play. To clean the pickup lens, open the disc compartment and blow the dust off. Using a
camera lens blower(available at most camera stores)
Note: Do not touch the surface of the lens. Do not allow any liquids on the inside of the
product.
To clean the CD player cabinet, use a soft and damp cloth to wire off the exterior
surface.
Never use benzol, benzene, or other strong chemical cleaners, as these could damage
the finish.
FCC Statement:
This device complies with part 15 of the FCC rules. Operation is subject to the following two conditions: (1) this
device may not cause harmful interference, and (2) this device must accept any interference received,
including interference that may cause undesired operation.
NOTE: The manufacturer is not responsible for any radio or TV interference caused by unauthorized
modifications or changes to this equipment. Such modifications or changes could void the user’s authority to
operate the equipment.
NOTE: This equipment has been tested and found to comply with the limits for a Class B digital device,
pursuant to part 15 of the FCC Rules. These limits are designed to provide reasonable protection against
9
harmful interference in a residential installation. This equipment generates uses and can radiate radio
frequency energy and, if not installed and used in accordance with the instructions, may cause harmful
interference to radio communications. However, there is no guarantee that interference will not occur in a
particular installation. If this equipment does cause harmful interference to radio or television reception,
which can be determined by turning the equipment off and on, the user is encouraged to try to correct the
interference by one or more of the following measures:
‐ Reorient or relocate the receiving antenna.
‐ Increase the separation between the equipment and receiver.
‐Connect the equipment into an outlet on a circuit different from that to which the receiver is connected.
‐Consult the dealer or an experienced radio/TV technician for help.