WOOSIM SYSTEMS WSP-I350 THERMAL PRINTER User Manual
Woosim System Inc. THERMAL PRINTER
UserManual.wiki
>
WOOSIM SYSTEMS
>
WSP I350 User Manual
user manual
Navigation menu
Upload a User Manual
Namespaces
Wiki Guide
HTML
PDF
Info
Views
User Manual
Discussion / Help
Navigation
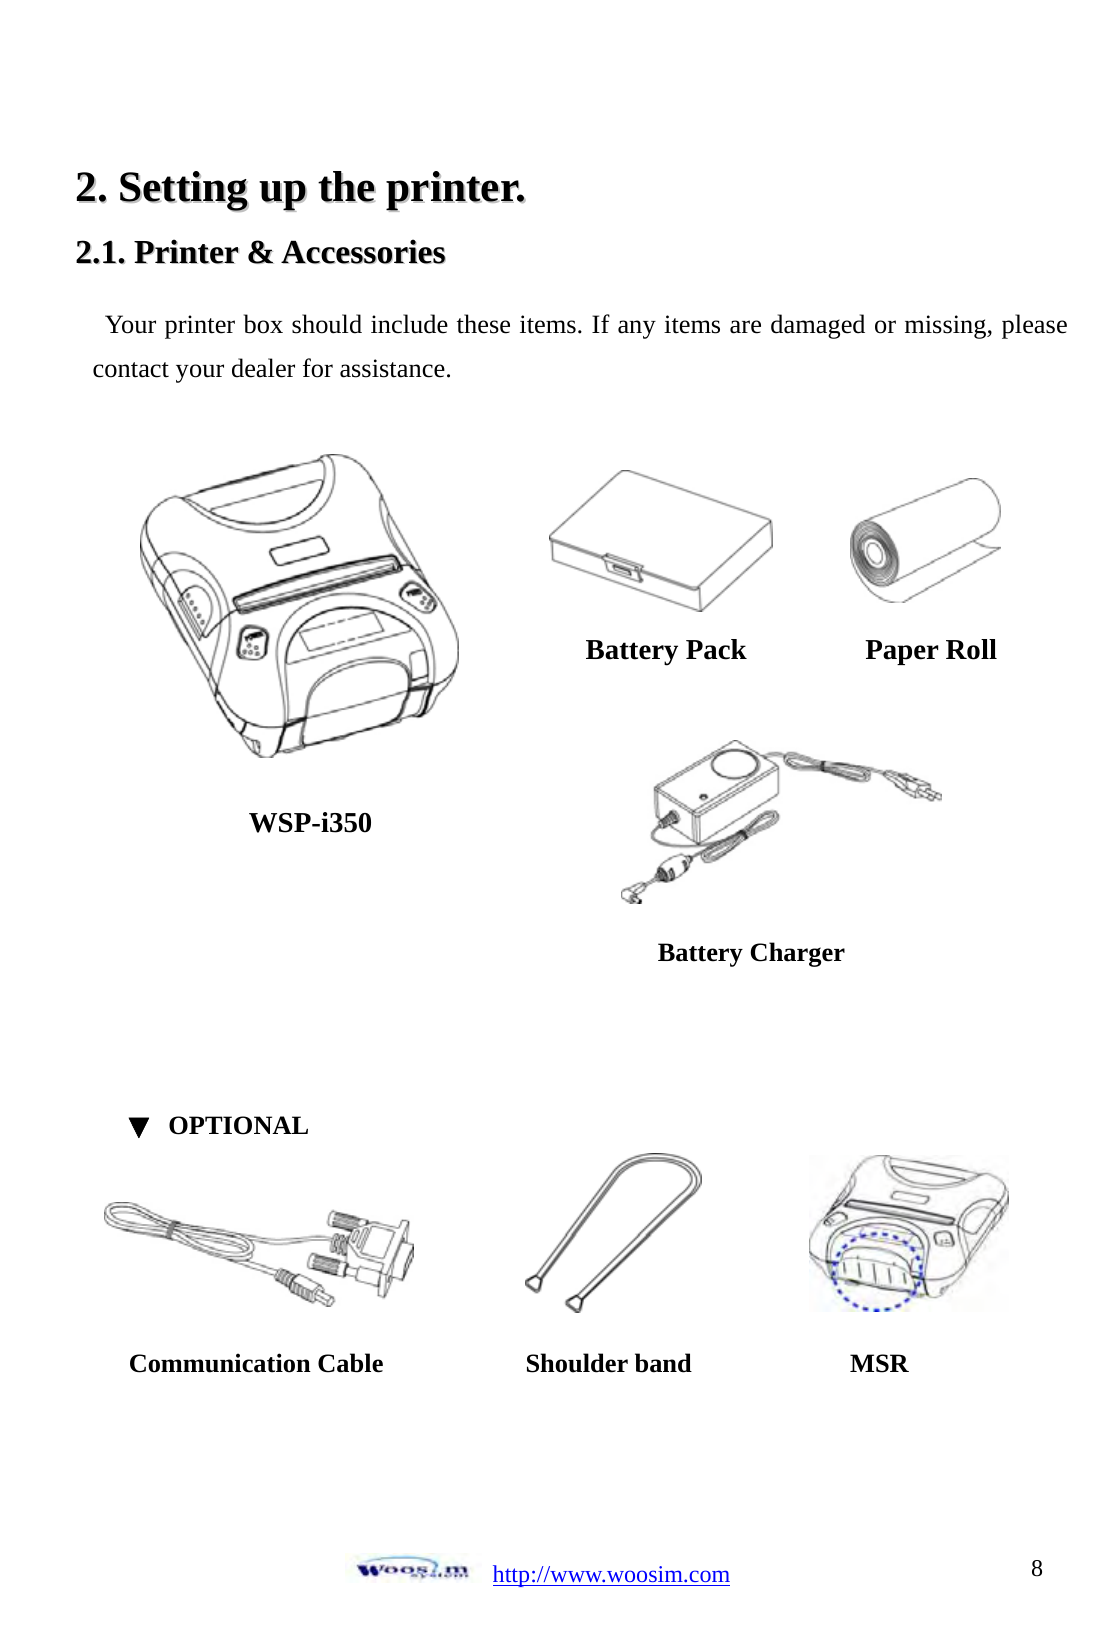
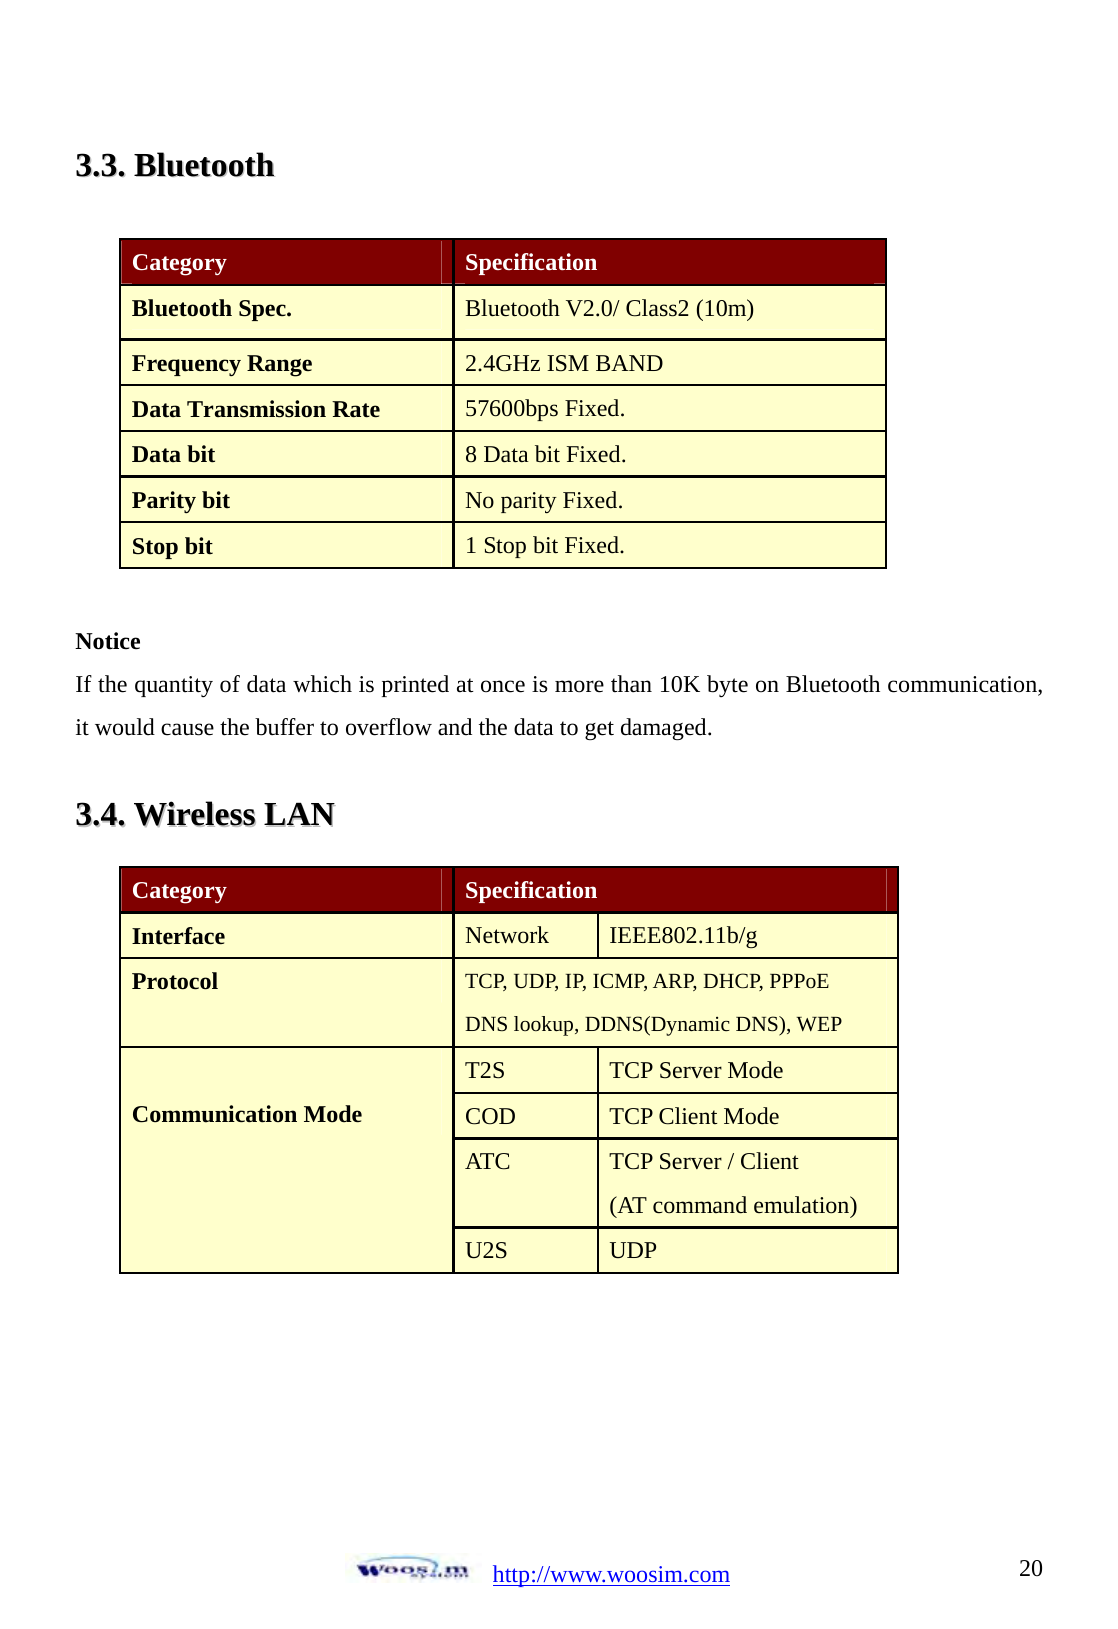
![http://www.woosim.com 711..33.. SSppeecciiffiiccaattiioonnss.. Item Specifications Print method Direct thermal line printing Characters per line 64cpl (MAX) Character size Eng. : 9×24dots, 12×24dots Kor. : 16×24dots, [24×24dots] Optional Characters Simplified/Traditional Chinese, Arabic, Cyrillic, Russian, Tukish, Greek, Japanese, Persian, Latin9 and Others upon request. Resolution 203dpi, 8dots/mm Print width 3-inch (72mm, 576dots) Print speed 60mm / sec (MAX) Dimension 120×130.5×58.3 mm Weight 520g (Including battery & roll paper) Interface UART(RS-232C or TTL), IrDA Ver1.1, Bluetooth Ver 2.0 Wireless LAN interface(IEEE802.11b/g) Paper roll Thermal roll paper (80mm wide, 50ø) Barcodes 1-dimension : Code128, EAN 128, Code39, I2/5, Code93 UPC, EAN, KAN,JAN, CODABAR 2-dimension : PDF417, QR Code, DATA Matrix H/W Spec. MCU : 32bits RISC, FLASH : 4Mbytes, RAM : 8Mbytes Receive buffer size 1M bytes MSR ISO 7810 / 7811 / 7812 1&2 or 2&3 Track Reading LCD 128×32 Dots FSTN (Blue LED Backlight) Battery Rechargeable 7.4V DC Battery duration 1 hour continuous printing Battery charger Input (100~250V AC, 50~60Hz) Output(8.4VDC/0.8A), 4hours full charge time Environment conditions Temperature -10°C ~ 50°C (operating) -20°C ~ 60°C (storage) Humidity 30% - 80% (operating) 10% - 90% (storage) MCBF(Mean Cycle Between Failure) Mechanical 37,000,000 lines Head Approximately 50 Km](https://usermanual.wiki/WOOSIM-SYSTEMS/WSP-I350/User-Guide-1217779-Page-7.png)
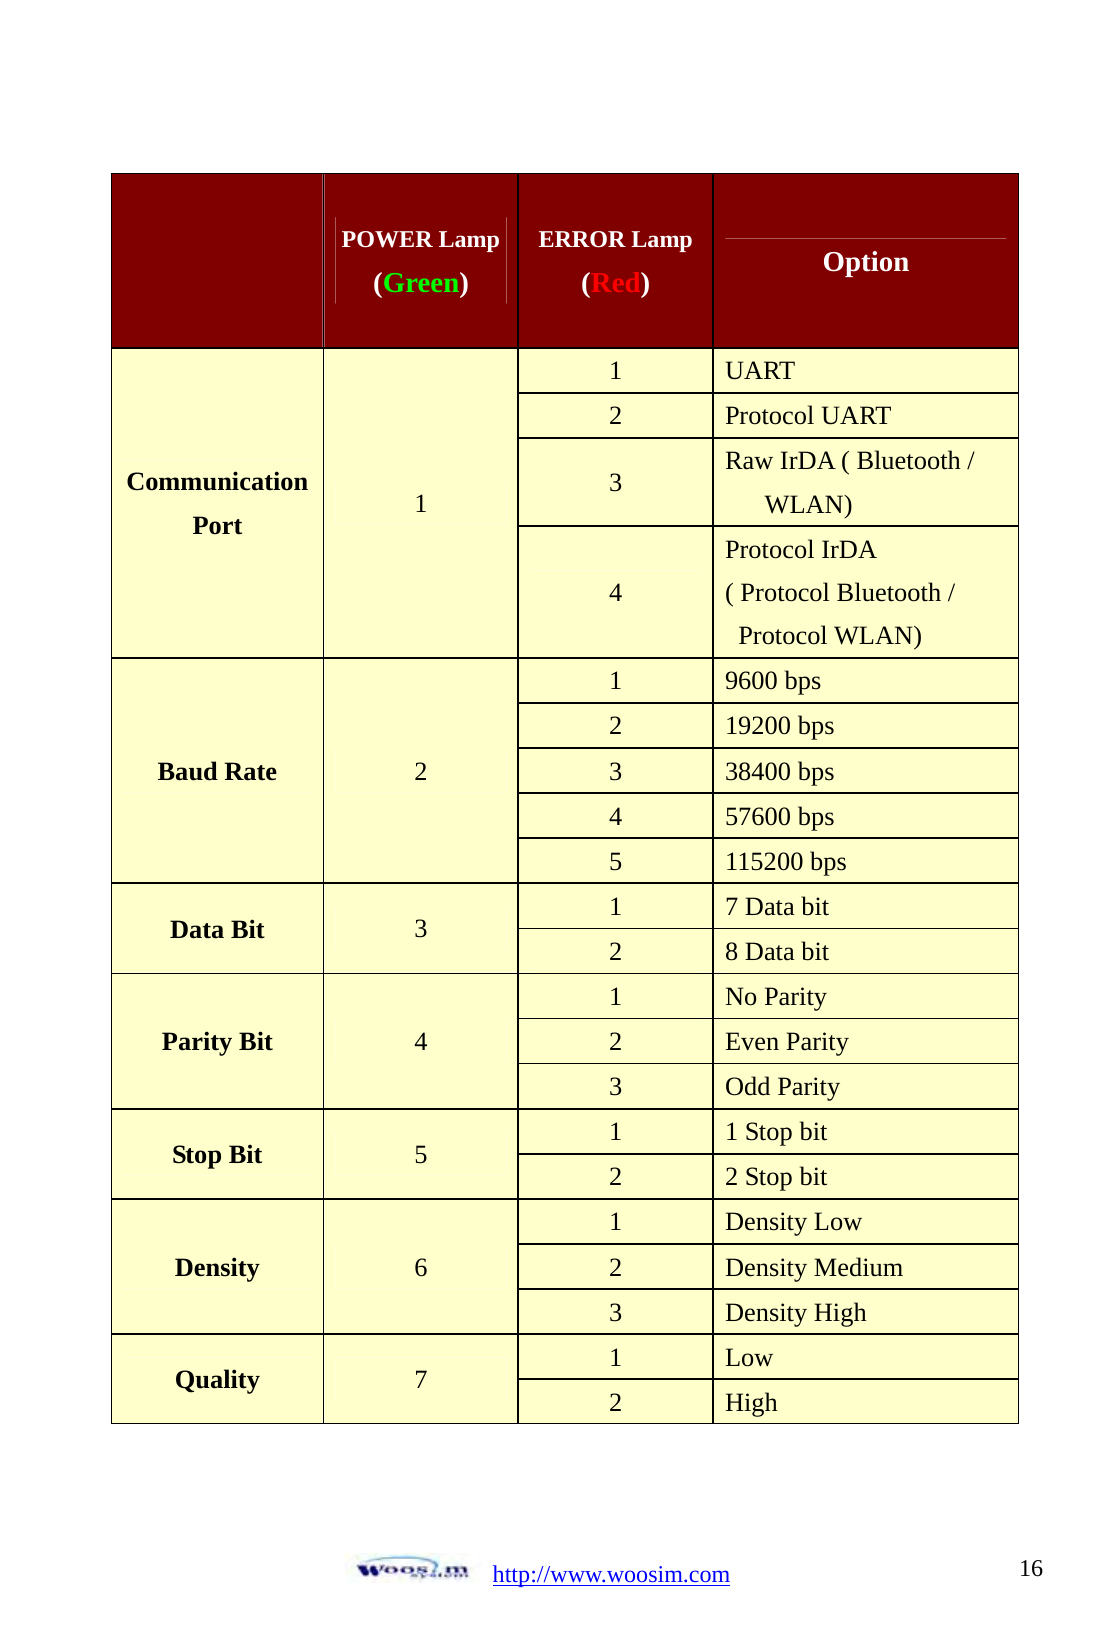
![http://www.woosim.com 1422..55.. SSeett ooppeerraattiioonn mmooddee.. 1. Change the mode and option using the mode Code (Table1). z POWER button : changing Printer MODE status. z FEED button : changing OPTION status. 2. [Example] The defaults of the printer are : UART/ 9600 BPS/8 DATA BIT/ NO Parity/1 STOP BIT/ Density LOW If a user wants to modify the defaults with Bluetooth/38400 BPS/7 DATA BIT/Even Parity/2 STOP BIT/Density HIGH X After pressing the POWER and the FEED button simultaneously, if the ERROR lamp 5 turn signals POWER button is converted with MODE functions → You will see present COMMUNICATION mode in the LCD. → Press the POWER Button two times. (The interface mode has set to Bluetooth mode.) X Press FEED button one time. → You will see present BAUD RATE mode in the LCD. → Press POWER Button 2 times. (The baud rate has set to 38,400 bps) X Press FEED button one time. → You will see present DATA BIT mode in the LCD. → Press POWER Button one time. (The data bit has set to 7 data bit.) X Press FEED button one time. → You will see present PARITY BIT mode in the LCD. → Press POWER Button 2 times. (The parity bit has set to even parity bit.)](https://usermanual.wiki/WOOSIM-SYSTEMS/WSP-I350/User-Guide-1217779-Page-14.png)
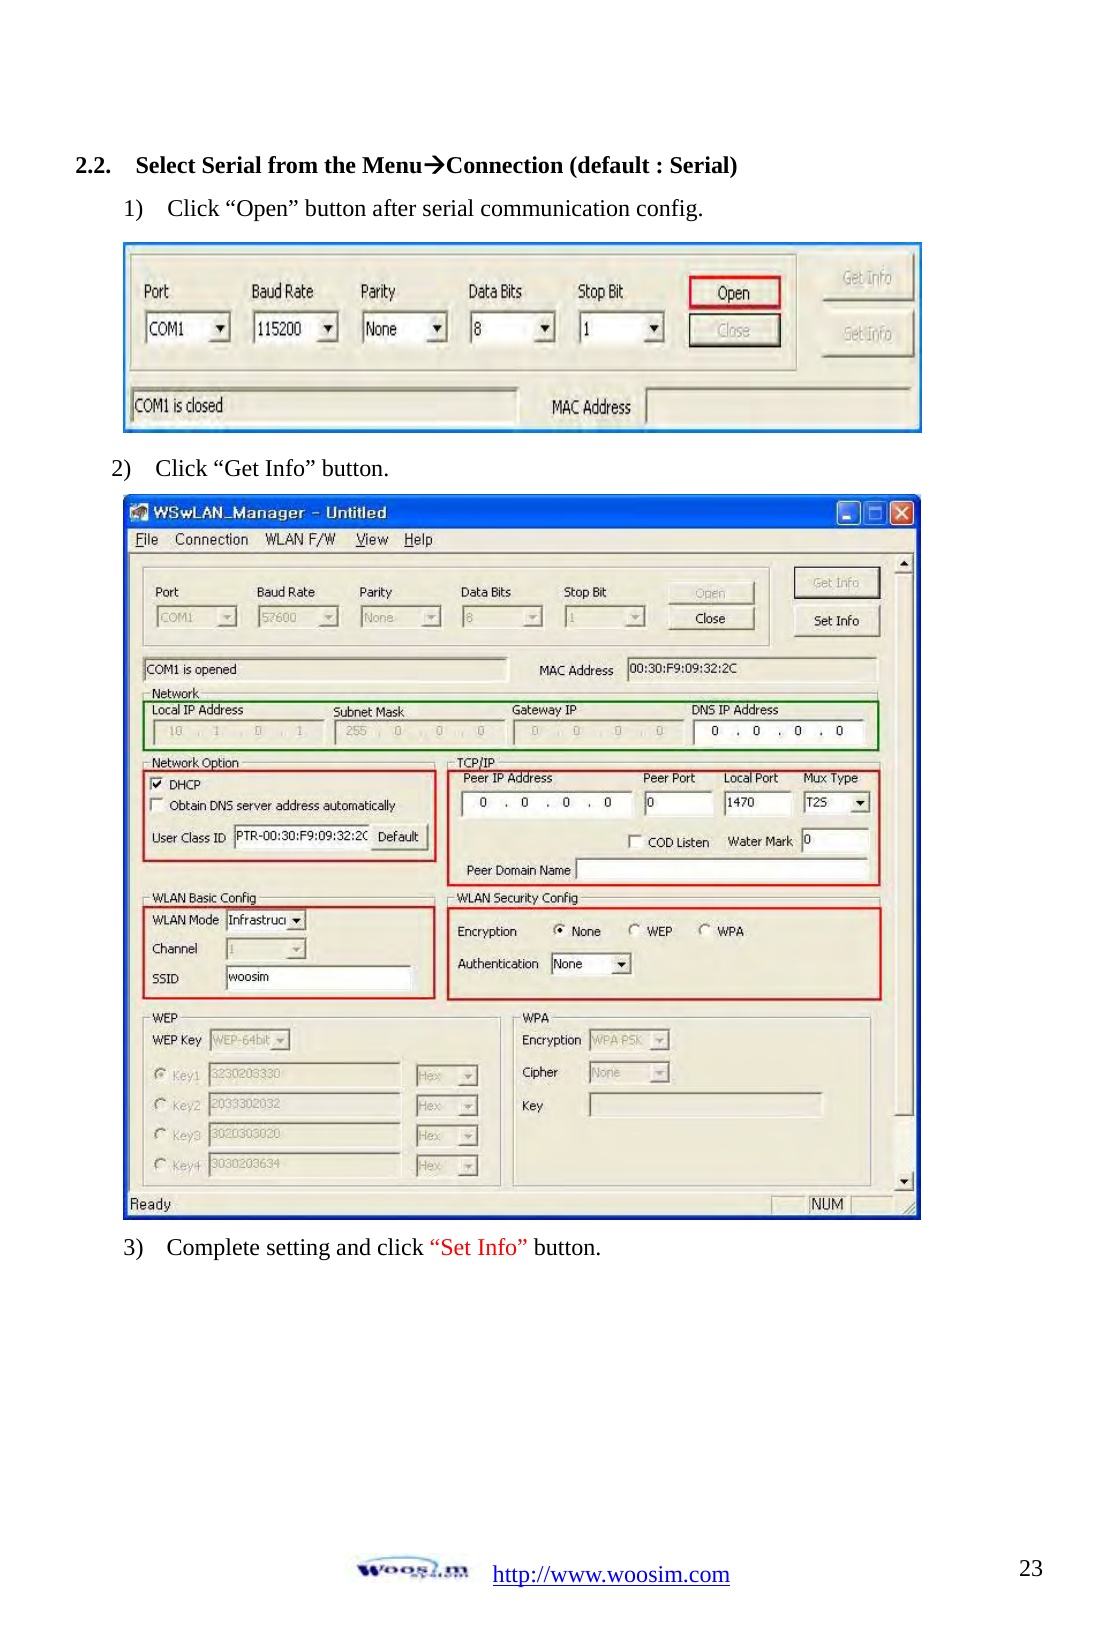
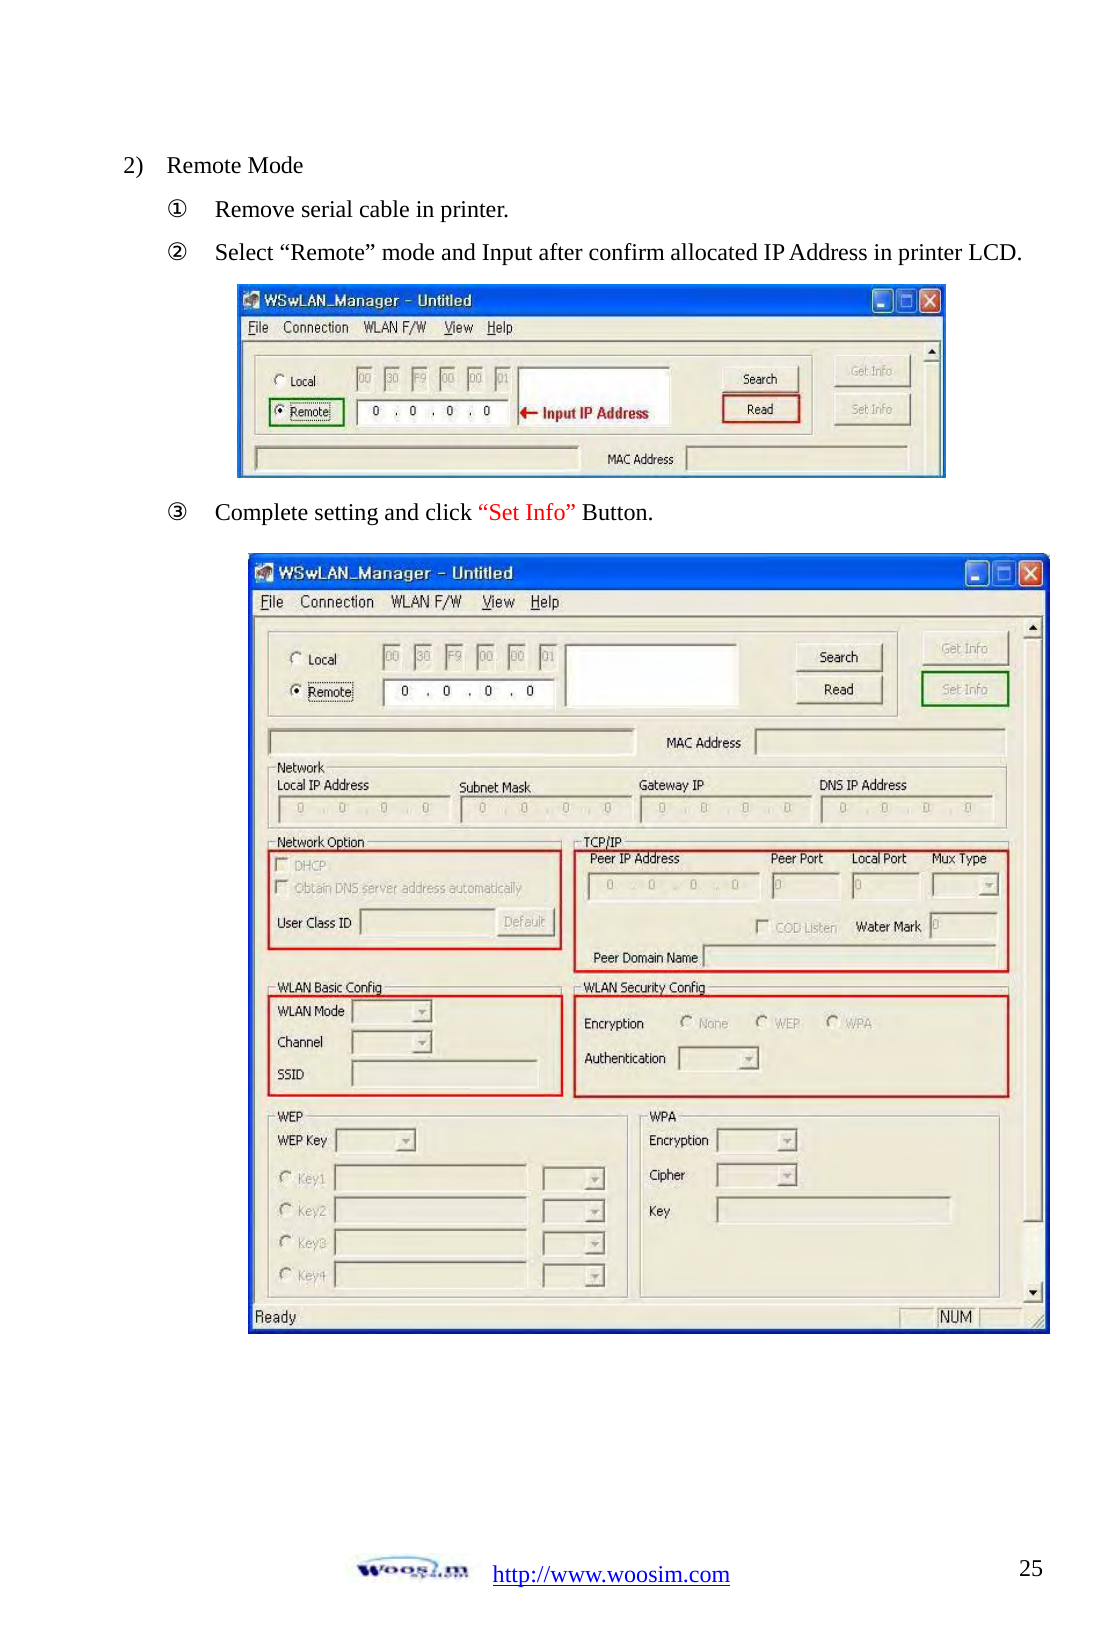
![http://www.woosim.com 2233..44..11 wwLLAANN SSEETTTTIINNGG 1. wLAN Manager Program summary wLAN Manager is a utility program, which configures i-350 equipment settings wireless LAN. 2. wLAN Manager program function 2.1. The selection of the wLAN Manager Program operating mode You can select wLAN Manager program operating mode using [LOCAL] or [REMOTE] and Serial. Following is the screen shot of WSwLAN_Manager which is just launched.](https://usermanual.wiki/WOOSIM-SYSTEMS/WSP-I350/User-Guide-1217779-Page-22.png)
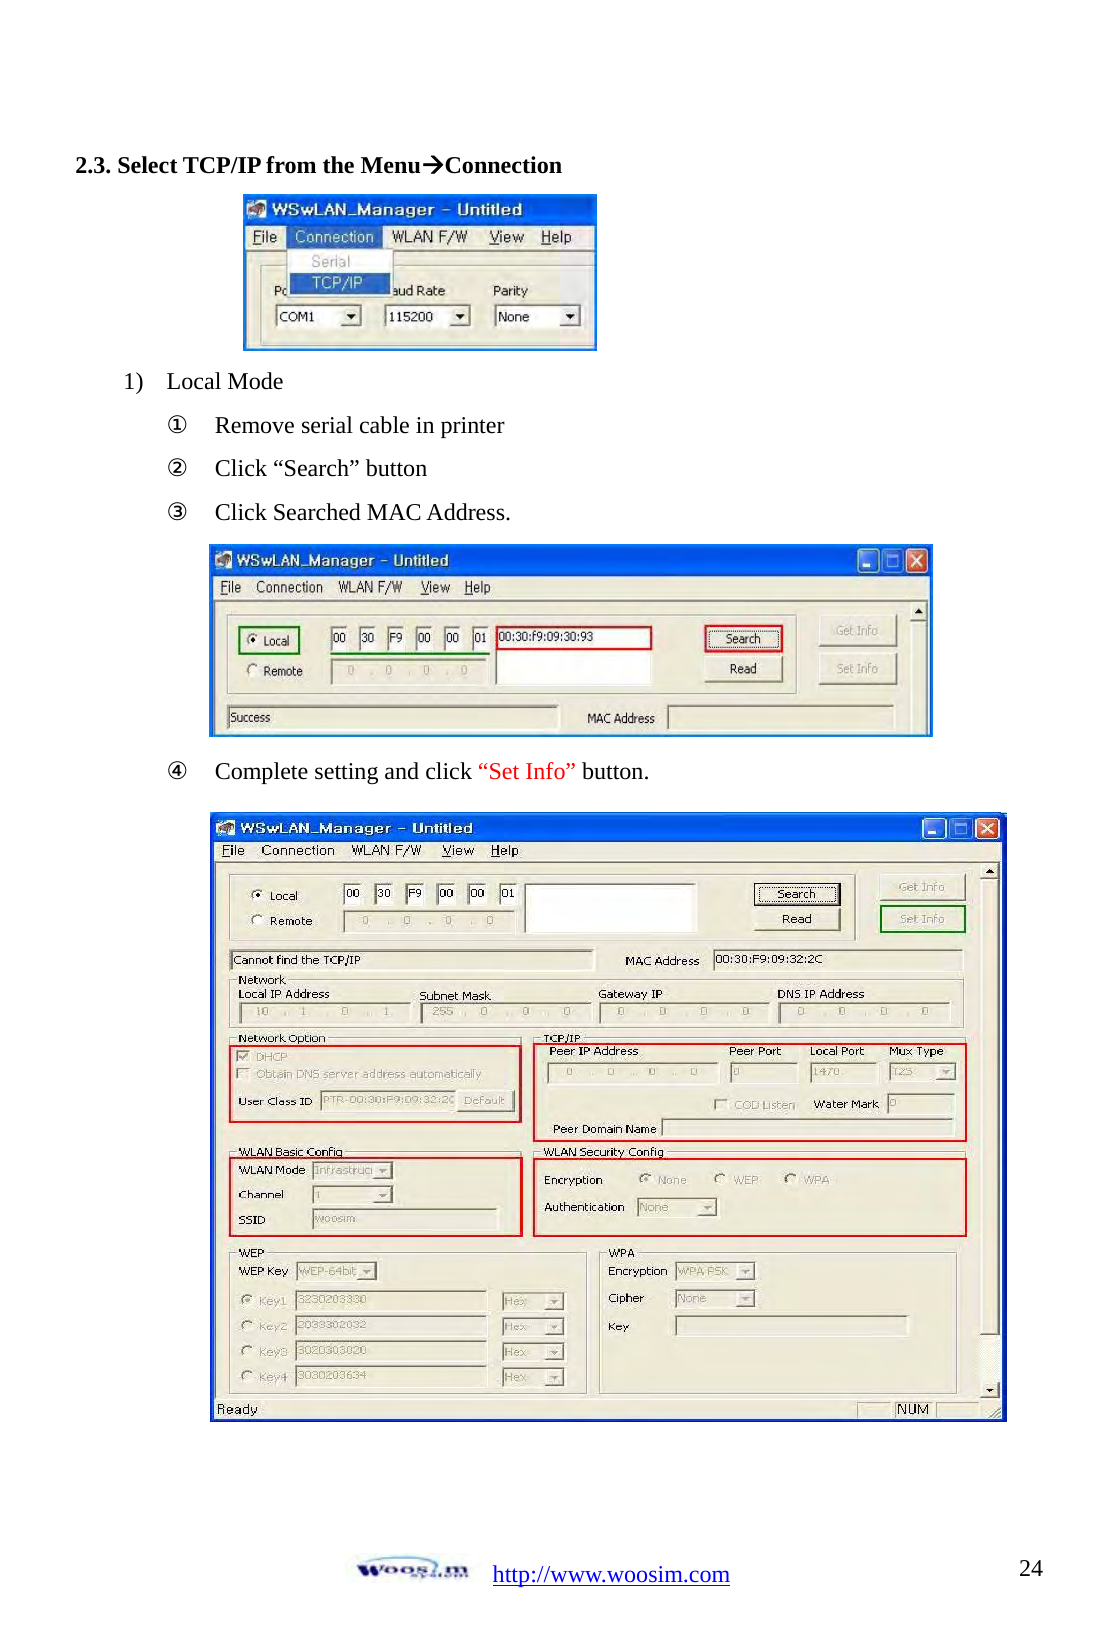

![http://www.woosim.com 272) Network Group Network Local IP Address i350 IP address Subnet Mask Subnet Mask Gateway IP address Gateway’s IP address DHCP Decide whether to receive i350 IP address via DHCP Obtion DNS server address automatically If i350 IP address is set a dynamic IP(DHCP), it will automatically receive DNS server address. If this check box is not activated, the IP address designated in the [DNS IP Address] will be used as the DNS server address. User Class ID Set User Class ID ( DHCP option77 ) Default Format : Ptr-<Mac Address>](https://usermanual.wiki/WOOSIM-SYSTEMS/WSP-I350/User-Guide-1217779-Page-27.png)

![http://www.woosim.com 29 ③ WPA. X Note - WPA-PSK : Input more than minimum 8 byte. 2.5. Setting WEP key. Check the settings of AP to connect to (authenticate method – open, shared key; key length – 64 bits, 128 bits and key index). 1) Click the [WEP] menu 2) Select an Authentication method – [Open System] / [Shared Key] 3) Select a WEP key length – [64 Bits] / [128 bits] 4) Select a key index to use – [Key1] / [Key2] / [Key3] / [Key4] 5) Select key format to input – [HEX] / [ASCII] 6) Input the Key. 7) The following is an example.](https://usermanual.wiki/WOOSIM-SYSTEMS/WSP-I350/User-Guide-1217779-Page-29.png)