Wacom Co DTK2241 LCD Tablet User Manual DTH2242 DTK2241 QSG E indb
Wacom Co Ltd LCD Tablet DTH2242 DTK2241 QSG E indb
UserManual.wiki
>
Wacom Co
>
DTK2241 User Manual
user manual
Navigation menu
Upload a User Manual
Namespaces
Wiki Guide
HTML
PDF
Info
Views
User Manual
Discussion / Help
Navigation
![Federal Communication Commission Interference Statement This equipment has been tested and found to comply with the limits for a Class B digital device, pursuant to Part 15 of the FCC Rules. These limits are designed to provide reasonable protection against harmful interference in a residential installation. This equipment generates, uses and can radiate radio frequency energy and, if not installed and used in accordance with the instructions, may cause harmful interference to radio communications. However, there is no guarantee that interference will not occur in a particular installation. If this equipment does cause harmful interference to radio or television reception, which can be determined by turning the equipment off and on, the user is encouraged to try to correct the interference by one or more of the following measures: Reorient or relocate the receiving antenna. Increase the separation between the equipment and receiver. Connect the equipment into an outlet on a circuit different from that to which the receiver is connected. Consult the dealer or an experienced radio/TV technician for help. Any changes or modifications not expressly approved by the party responsible for compliance could void the user's authority to operate this equipment. This device complies with Part 15 of the FCC Rules. Operation is subject to the following two conditions: (1) This device may not cause harmful interference, and (2) this device must accept any interference received, including interference that may cause undesired operation. This device and its antenna(s) must not be co-located or operating in conjunction with any other antenna or transmitter. This device complies with Industry Canada licence-exempt RSS standard(s). Operation is subject to the following two conditions: (1) this device may not cause interference, and (2) this device must accept any interference, including interference that may cause undesired operation of the device. This Class [B] digital apparatus complies with Canadian ICES-003. ](https://usermanual.wiki/Wacom-Co/DTK2241/User-Guide-1913573-Page-2.png)


![6TC軟體安裝請儲存您的工作文檔並關閉所有開啟的應用程式。1插入液晶數位板的安裝CD。如未自動顯示軟體安裝程式選單,請按兩下光碟中的[安裝]圖示。如果您的電腦沒有 CD/DVD 光碟機,請從 www.wacom.com 下載液晶數位板的軟體。2按一下[安裝數位板驅動]並依照提示操作。按一下對話方塊中的「重要產品資訊」來檢視液晶數位板的「重要產品資訊」指南。其中包含產品安全預防措施、規格及其他重要資訊。安裝驅動程式軟體時,會將「使用者手冊」下載至您的電腦。DTH2242_DTK2241_QSG_E.indb 6DTH2242_DTK2241_QSG_E.indb 6 2012/11/21 14:47:212012/11/21 14:47:21](https://usermanual.wiki/Wacom-Co/DTK2241/User-Guide-1913573-Page-37.png)
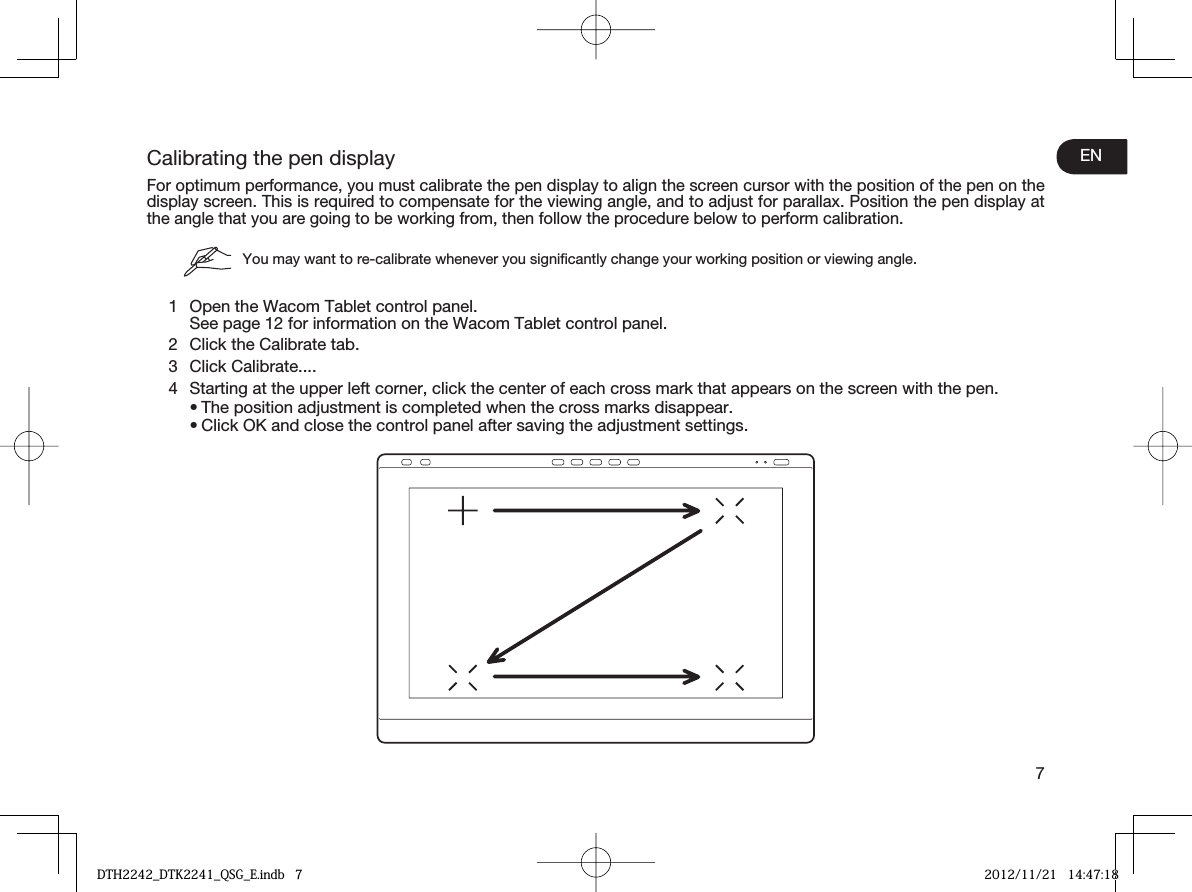
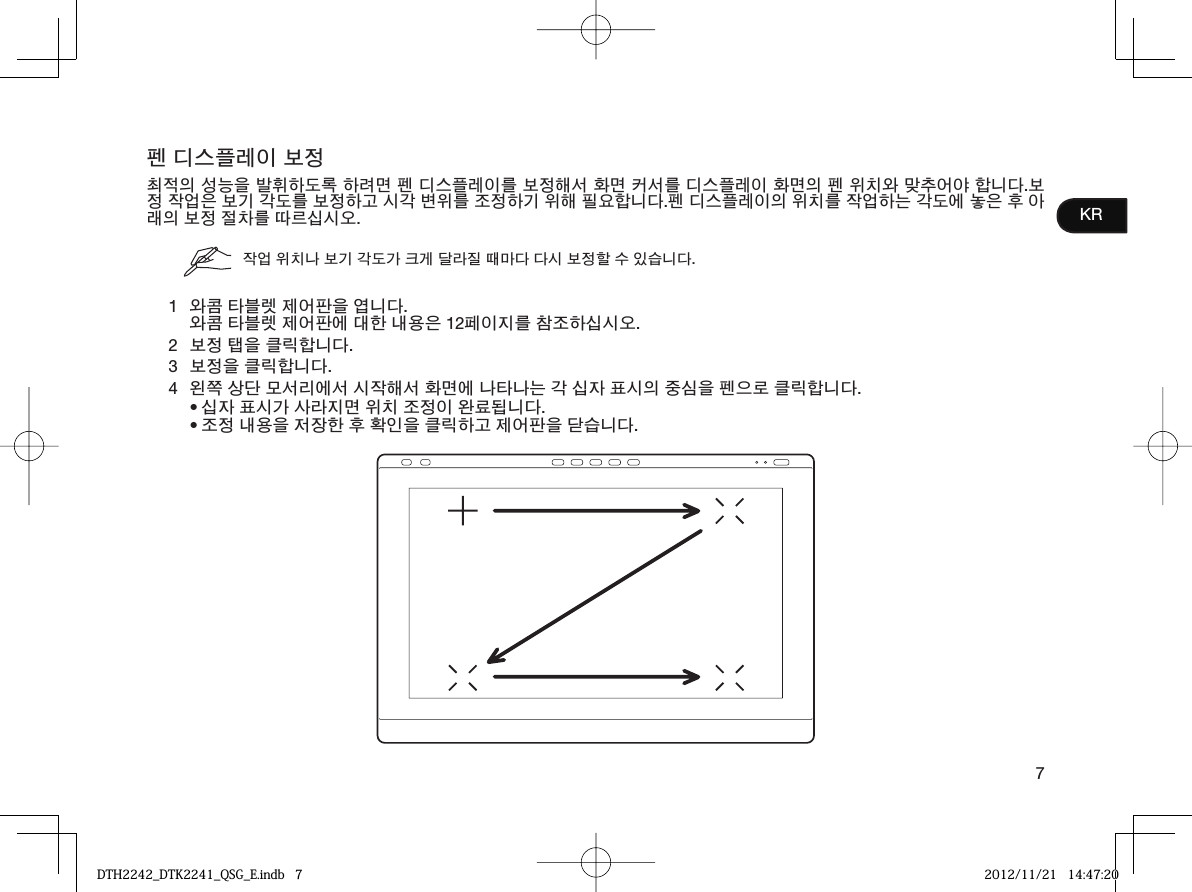
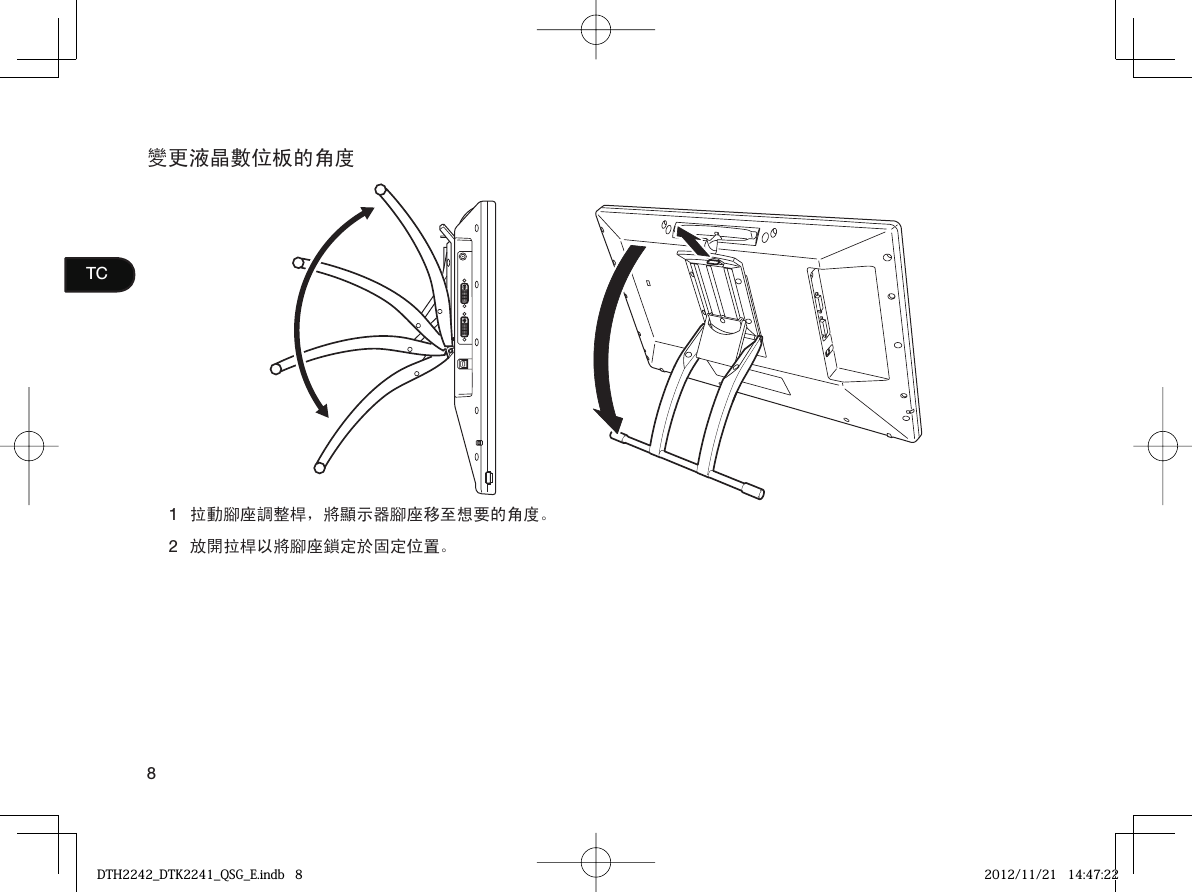
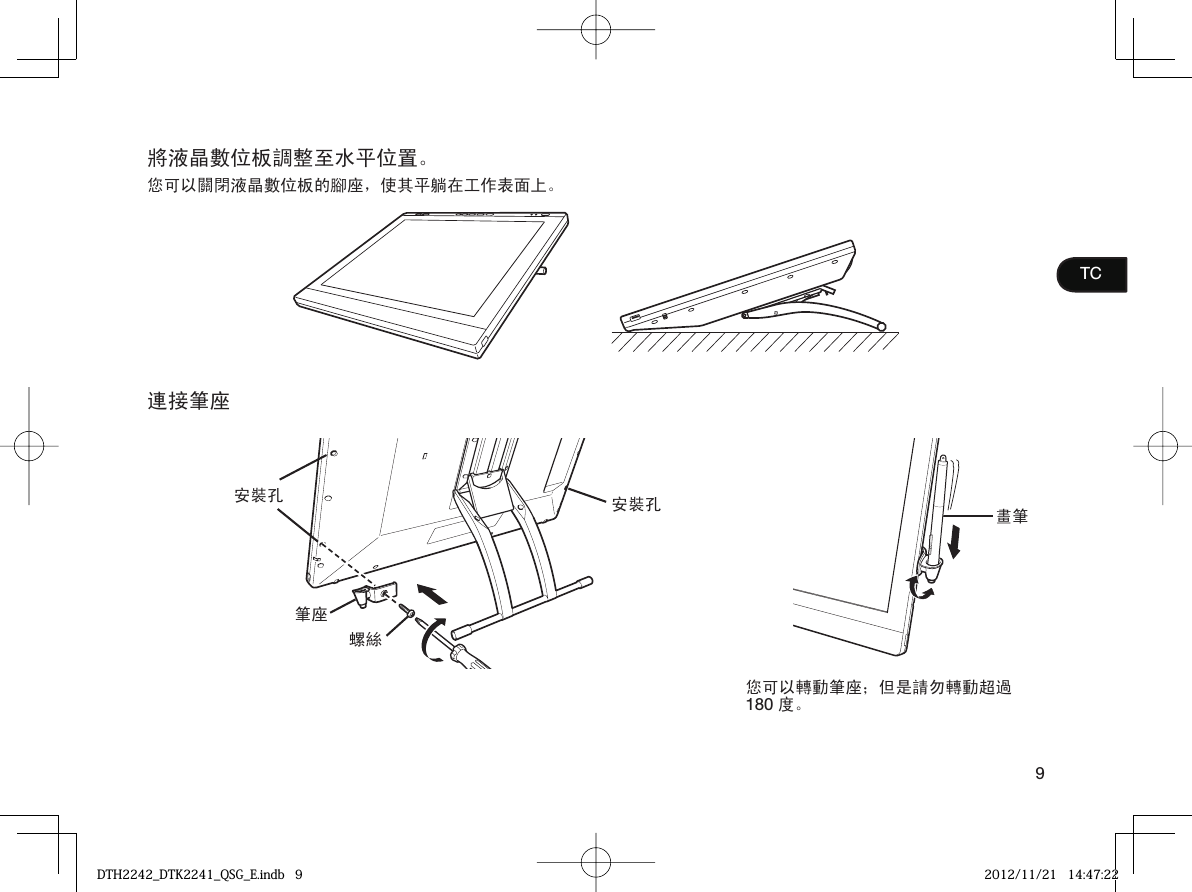
![7TC校正液晶數位板為了獲得最佳效能,您必須校正液晶數位板,讓螢幕游標與顯示器螢幕上的數位筆位置對齊。若要調整檢視角度和視差,就必須進行此動作。將液晶數位板以您要工作的角度放置,然後依照以下程序執行校準。當您明顯變更您的工作位置或檢視角度時,可能需要重新校準。1開啟 Wacom 數位板控制台。有關 Wacom 數位板控制台的資訊,請參閱第 12 頁。2按一下[校正]標籤。3按一下[校正... ]。4從左上角開始,用畫筆按一下顯示在螢幕上的每一個十字線中心。當十字線消失時,即表示位置調整完成。儲存調整設定之後,按一下[確定]並關閉控制台。••DTH2242_DTK2241_QSG_E.indb 7DTH2242_DTK2241_QSG_E.indb 7 2012/11/21 14:47:212012/11/21 14:47:21](https://usermanual.wiki/Wacom-Co/DTK2241/User-Guide-1913573-Page-38.png)
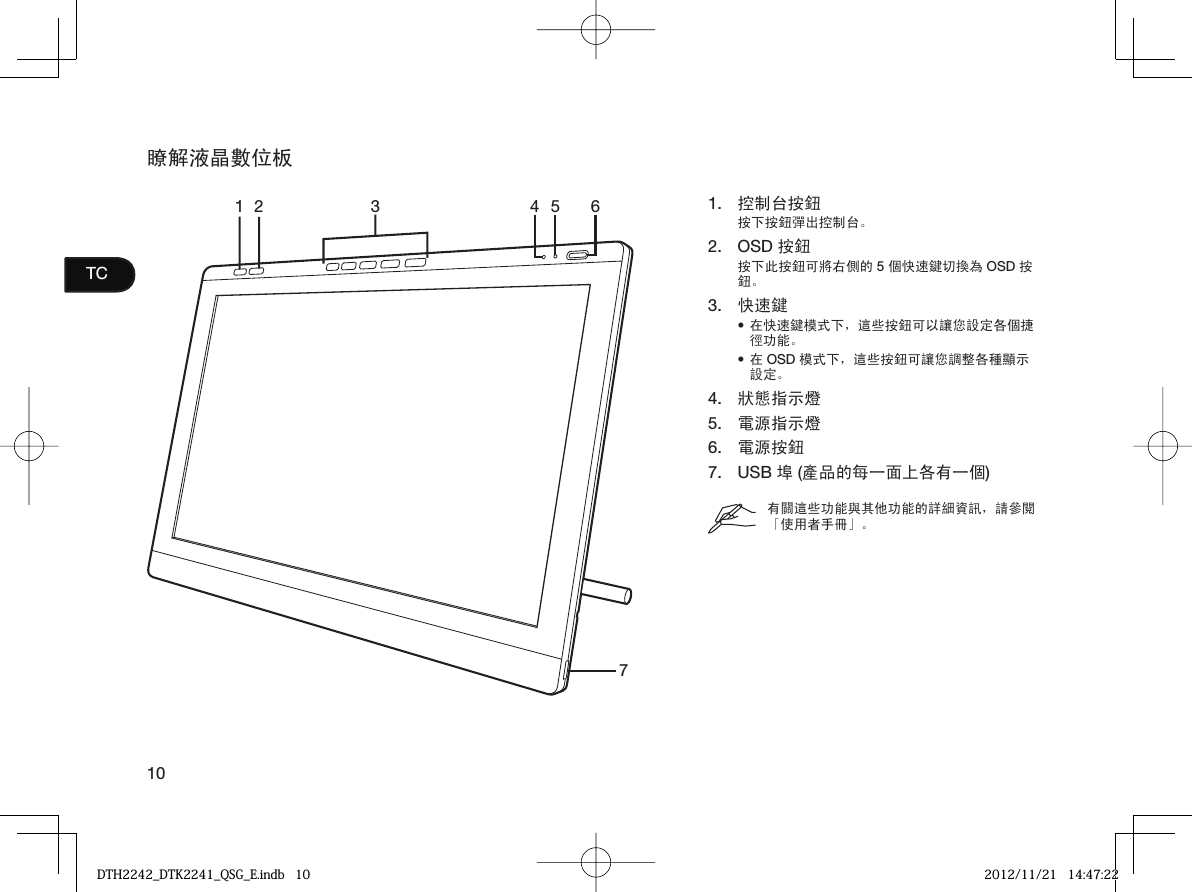
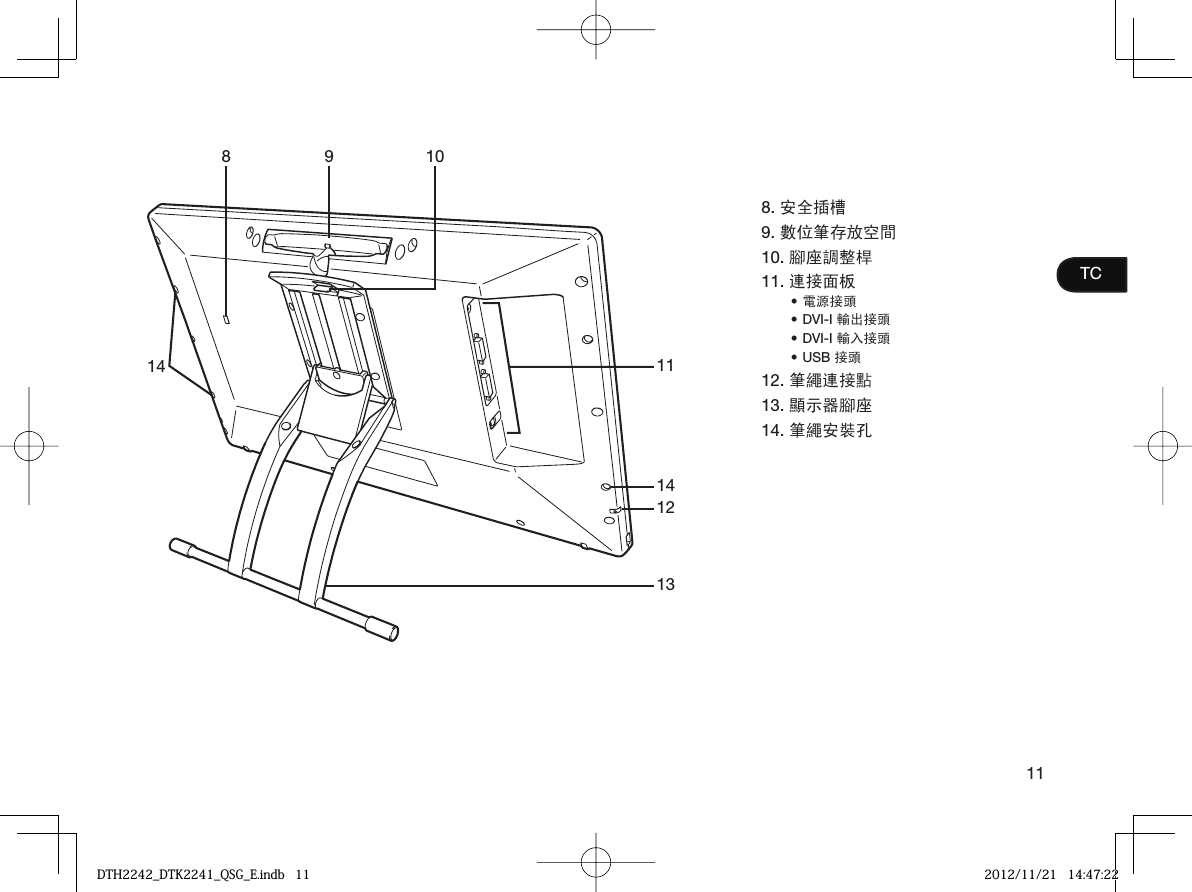
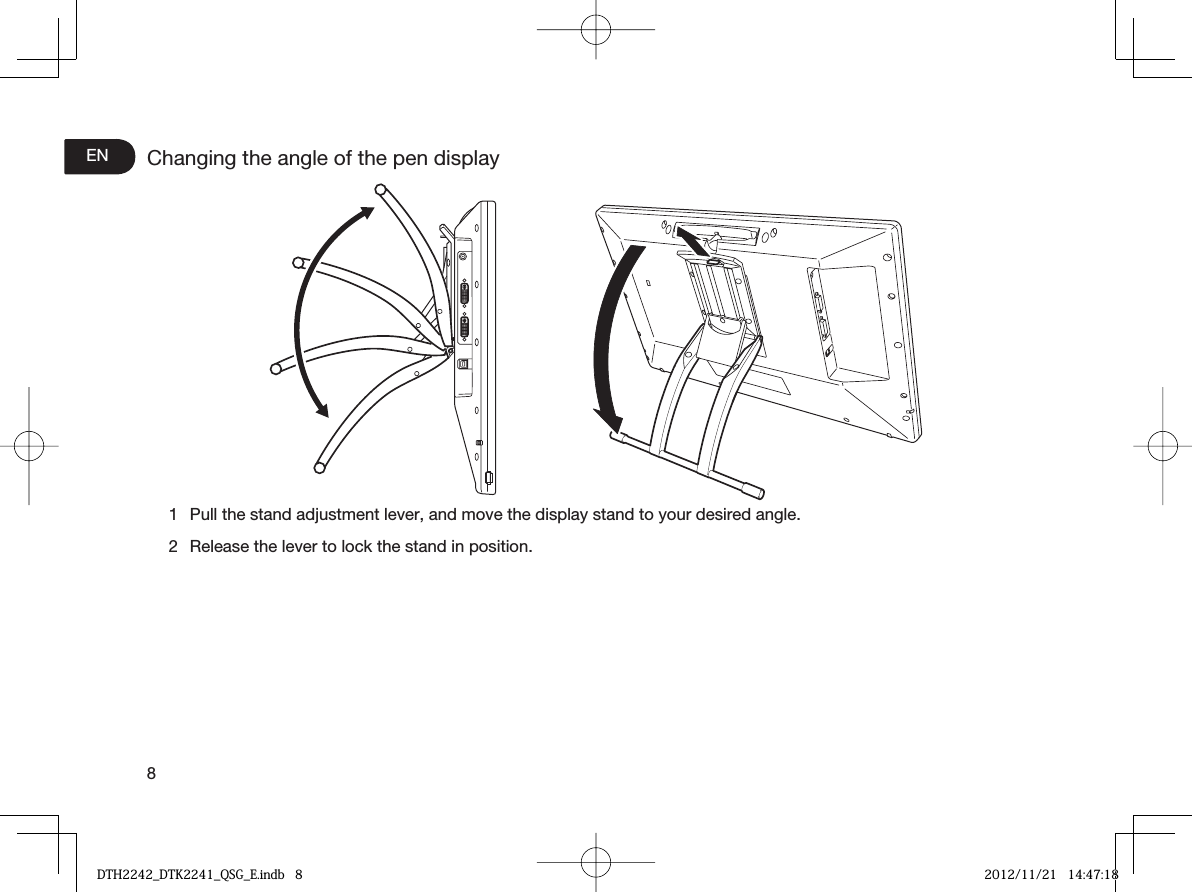
![12TC自訂液晶數位板若要開啟 Wacom 數位板控制台,請按下[設定]按鈕(請參閱第 10 頁)。目前液晶數位板設定的圖表會顯示在螢幕上。按一下設定可使用 Wacom 數位板控制台進行變更。您也可以依照以下程序執行:Windows 7/Vista/XP - 按一下[開始]> [所有程式] > [Wacom 數位板] > [Wacom 數位板內容]。Windows 8 - [開始]畫面 > [Wacom 數位板內容 (並排) ]。Mac - 開啟[系統設定] > [Wacom 數位板]如需瞭解如何自訂快速鍵與輻射式選單以增加生產力,請參閱「使用者手冊」。使用觸控方式來控制液晶數位板 只有 DTH-2242 提供多點觸控功能。多點觸控功能可讓您只使用指尖便可在液晶數位板螢幕上與電腦互動。如需瞭解如何使用觸控方式控制液晶數位板,請參閱「使用者手冊」。您也可以從 www.wacom.com 下載「Wacom 手勢指南」。註冊液晶數位板並獲得其他好處當您安裝驅動程式時,您將有機會註冊液晶數位板。在某些地區,您必須註冊,才能獲得其他可能不時提供的優惠。支援選項有關最新資訊與軟體驅動程式更新,請造訪 www.wacom.com、查閱「使用者手冊」,或聯絡「客服部門」,網址為 www.wacom.com/productsupport。DTH2242_DTK2241_QSG_E.indb 12DTH2242_DTK2241_QSG_E.indb 12 2012/11/21 14:47:222012/11/21 14:47:22](https://usermanual.wiki/Wacom-Co/DTK2241/User-Guide-1913573-Page-43.png)
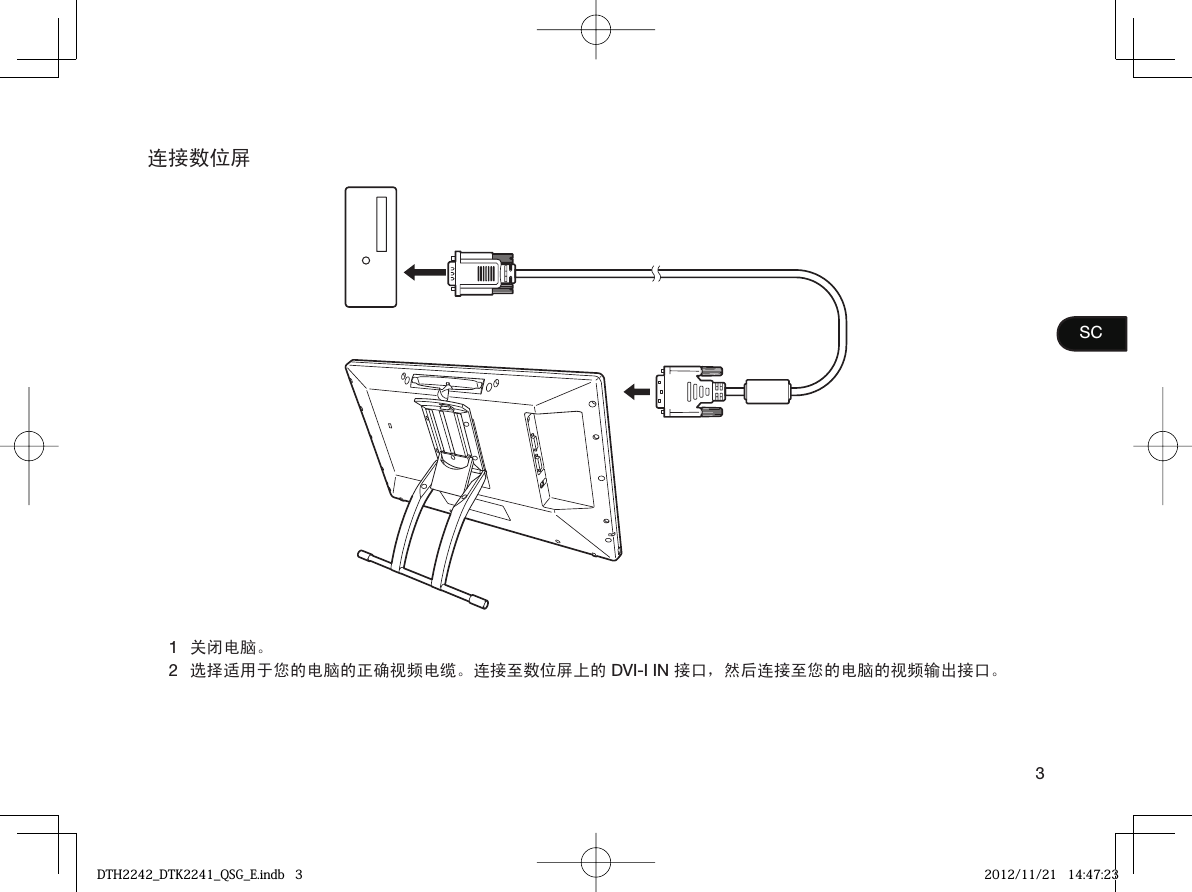
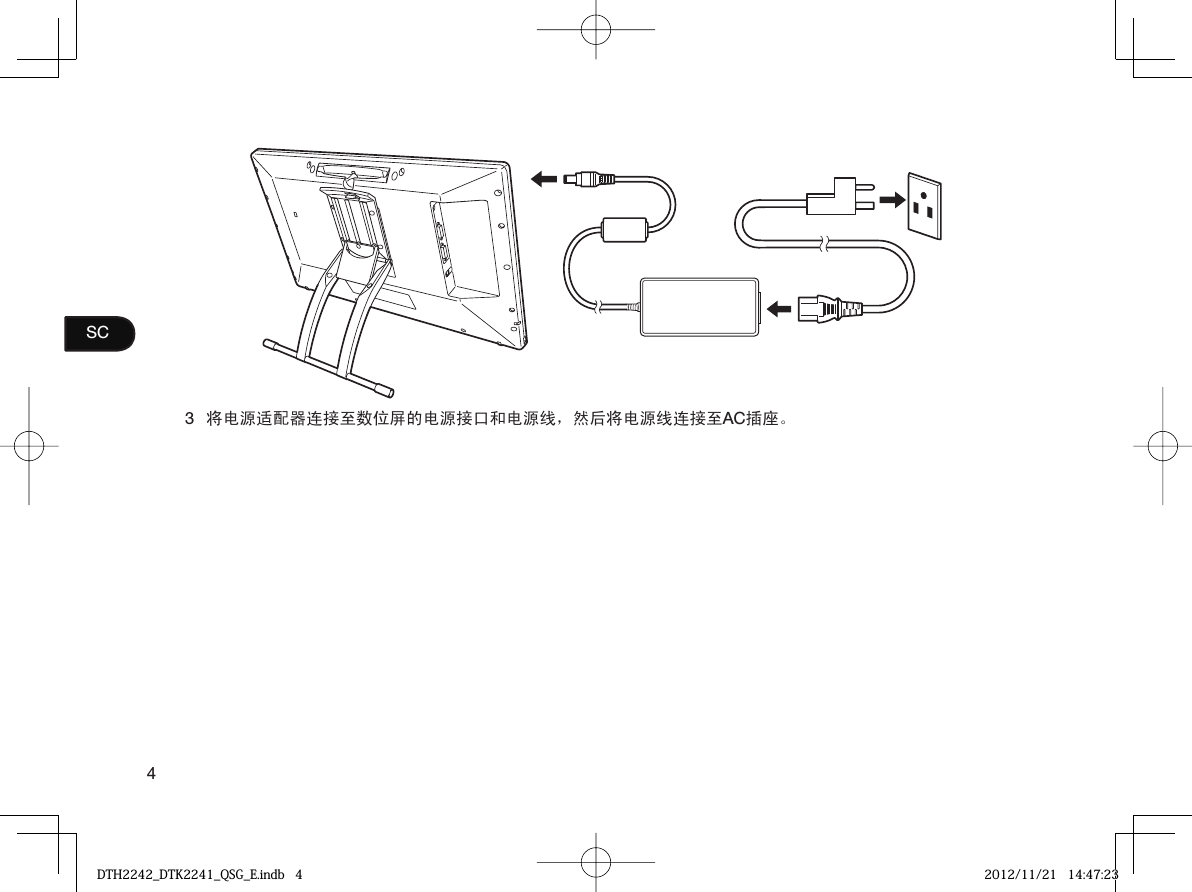
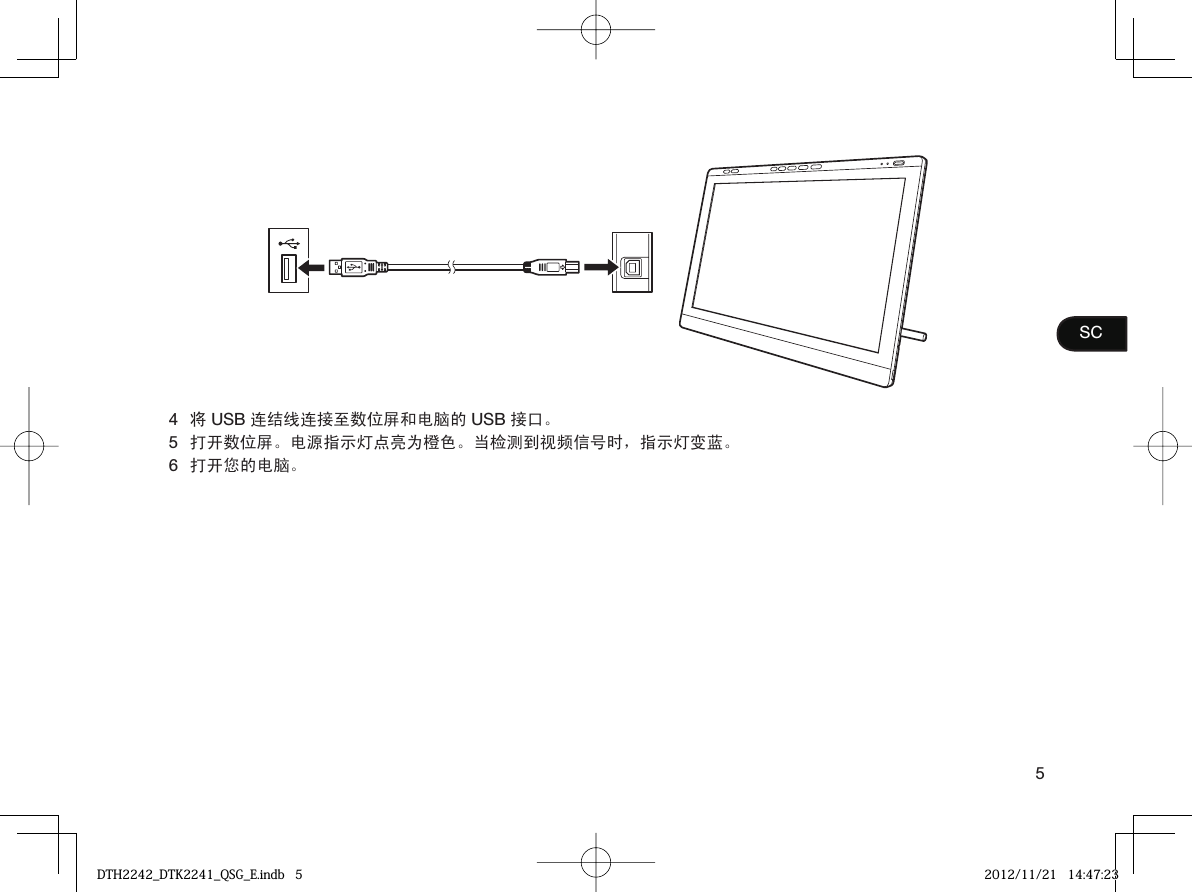
![6SC软件安装保存作业并关闭所有打开的应用程序。1插入数位屏的安装光盘。如果没有自动显示软件安装程序菜单,请双击光盘上的[安装]图标。如果您的电脑没有 CD/DVD 驱动器,则请从 www.wacom.com 下载数位屏的软件。2点击[安装数位板]并按照提示操作。点击对话框中的“重要产品信息”菜单查看数位屏的“重要产品信息”指南,包括产品安全注意事项、规格和其它重要信息。安装驱动程序软件时,《用户手册》将被自动下载到您的电脑中。DTH2242_DTK2241_QSG_E.indb 6DTH2242_DTK2241_QSG_E.indb 6 2012/11/21 14:47:232012/11/21 14:47:23](https://usermanual.wiki/Wacom-Co/DTK2241/User-Guide-1913573-Page-51.png)
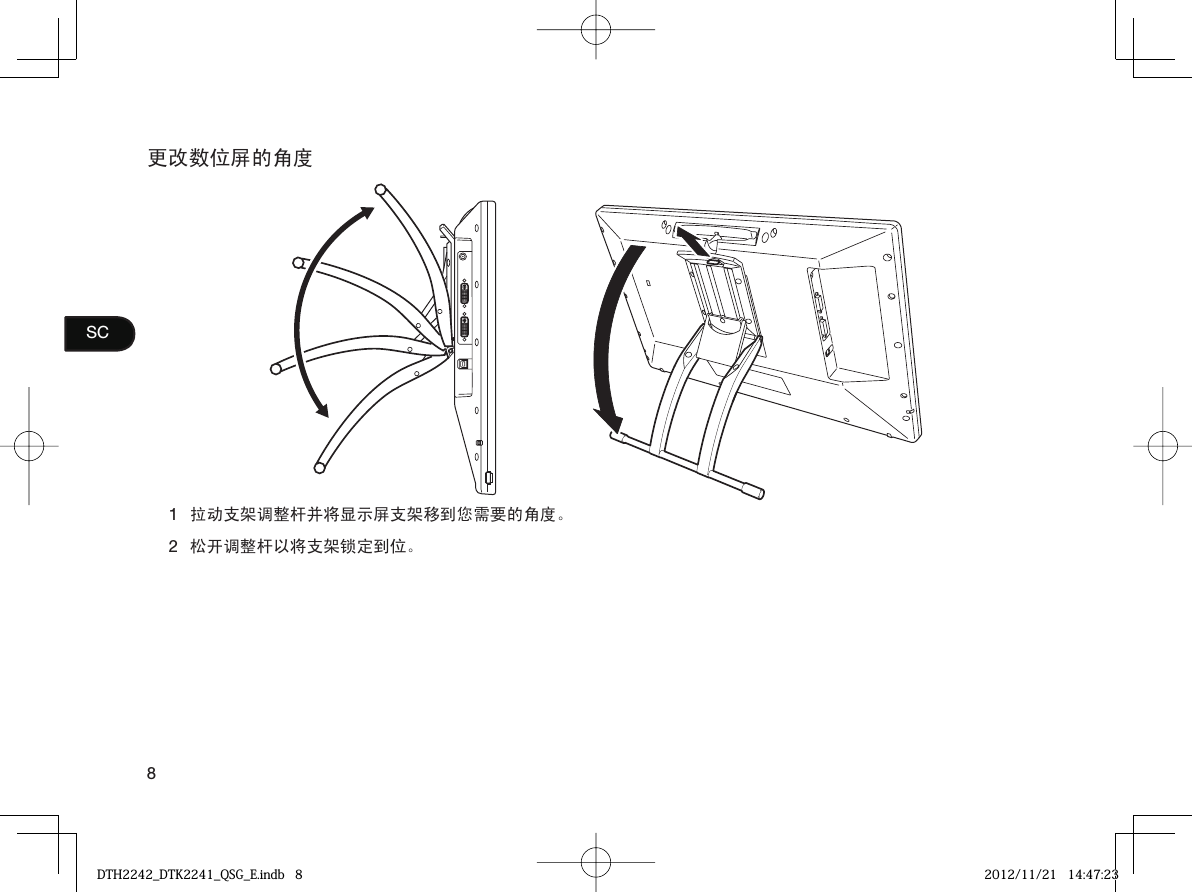
![7SC校正数位屏为了达到最佳性能,必须校正数位屏才能将屏幕光标与显示屏幕上笔的位置对准。补偿观看角度及调节色差需要此项校正。将数位屏置于您工作的角度,然后遵循下面的校正程序操作。当您的工作位置或视角改变较大时,可能需要重新校准。1打开 Wacom 数位板的控制面板。请参见第 12 页 Wacom 数位板控制面板的信息。2点击[校正]选项卡。3点击[校准…. ].4从左上角开始,用笔点击屏幕上显示的每个十字准线的中心。当十字准线消失时,表示位置调整完成。保存调整设置之后,点击[OK]并关闭控制面板。••DTH2242_DTK2241_QSG_E.indb 7DTH2242_DTK2241_QSG_E.indb 7 2012/11/21 14:47:232012/11/21 14:47:23](https://usermanual.wiki/Wacom-Co/DTK2241/User-Guide-1913573-Page-52.png)
![12SC自定义数位屏要打开 Wacom 数位板控制面板,请按[设置]按钮(参见第 10 页)。您的显示屏上显示目前数位屏设置的图形。使用 Wacom 数位板控制面板点击设置进行更改。您也可以遵循下面的程序操作:Windows 7/Vista/XP – 点击[开始]> [所有程序]>[Wacom 数位板]> [Wacom 数位板属性]。Windows 8 – [开始]屏幕> [Wacom 数位板属性(并列)]。Mac – 打开[系统预置]>[Wacom 数位板]。请参见《用户手册》了解如何自定义ExpressKeys和径向菜单以提高您的工作效率。使用数位屏触控功能 仅有 DTH-2242 才提供多点触控功能。采用多点触控功能,您能够只使用指尖在数位屏屏幕上操作,以与电脑互动。请参见您的《用户手册》了解数位屏触控功能的信息。您也可以从 www.wacom.com 下载《Wacom 手势指南》。注册数位屏并获取其他优惠安装驱动器时,可注册数位屏。在某些地区,必须注册才能获取其他不时变更的优惠。支持选项有关最新信息和软件驱动器更新情况,请访问 www.wacom.com,或者检查《用户手册》,或者访问 www.wacom.com/productsupport 联系客户服务部。DTH2242_DTK2241_QSG_E.indb 12DTH2242_DTK2241_QSG_E.indb 12 2012/11/21 14:47:242012/11/21 14:47:24](https://usermanual.wiki/Wacom-Co/DTK2241/User-Guide-1913573-Page-57.png)