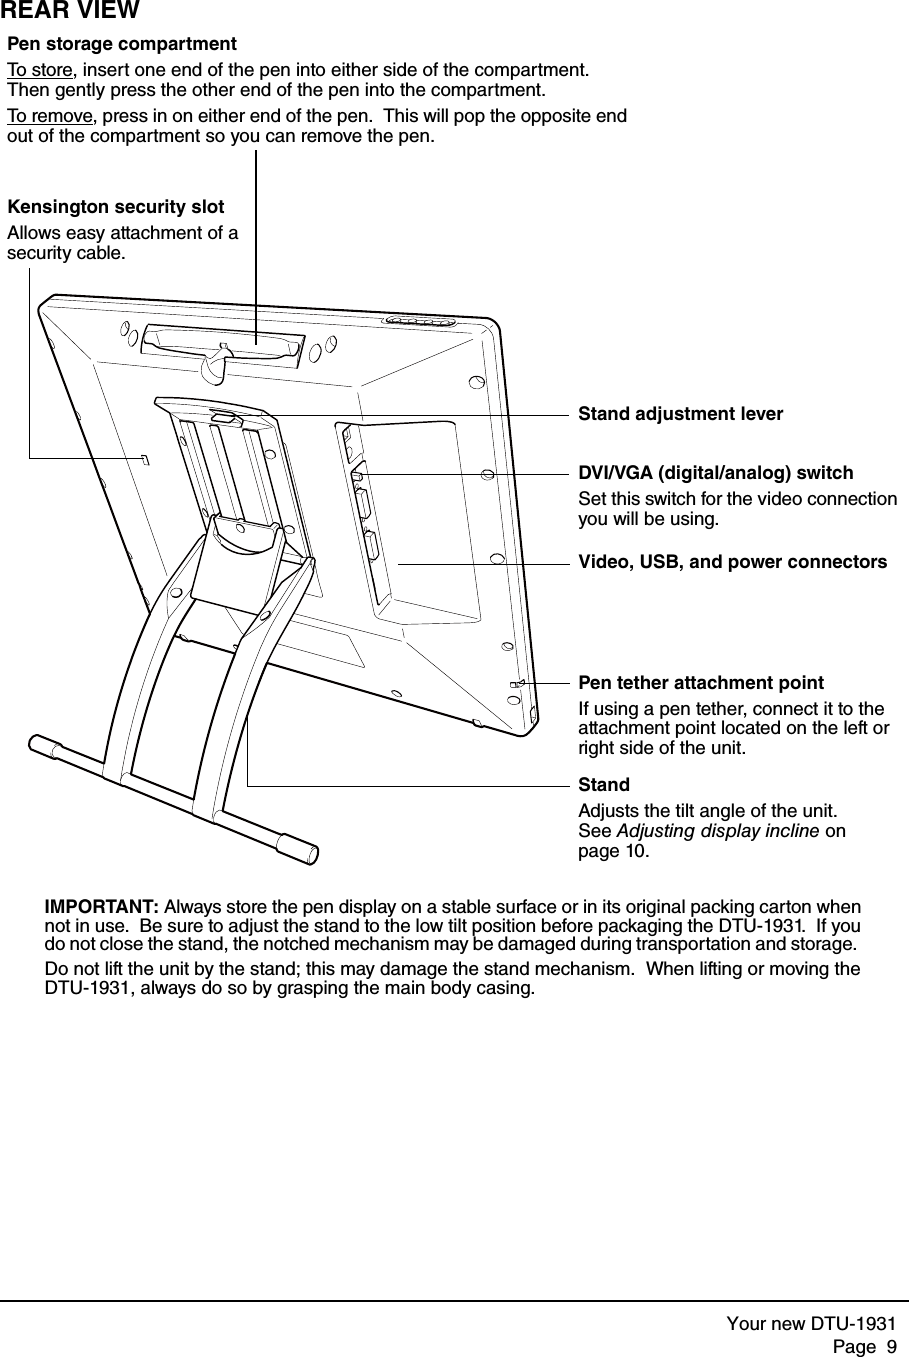
Wacom Co DTU1931 LCD TABLET User Manual

Wacom Co Ltd LCD TABLET

manual

Installation Guide & User’s Manual설치 및 사용 설명서安裝指南及使用手冊安装指南及用户手册
Installation Guide & User’s Manual
DTU-1931AInstallation Guide & User’s ManualVersion 1.0, June 20, 2008Copyright © Wacom Co., Ltd., 2008All rights reserved.  No part of this manual may be reproduced except for your express personal use.  Wacom reserves the right to revise this publication without obligation to provide notification of such changes.  Wacom does its best to provide current and accurate information in this manual.  However, Wacom reserves the right to change any specifications and product configurations at its discretion, without prior notice and without obligation to include such changes in this manual.The above date indicates the date when the Wacom Pen Display Installation Guide & User’s Manual was prepared by Wacom.  However, the date of release to the users of the “Manual” is simultaneous with the introduction into the market of the applicable Wacom product.DuoSwitch is a trademark, and Wacom is a registered trademark of Wacom Co., Ltd.Microsoft, Windows, and Vista are either registered trademarks or trademarks of Microsoft Corporation in the United States and/or other countries.  Apple, the Apple logo, and Macintosh are trademarks of Apple Computer, Inc., registered in the U.S. and other countries.Any additional company and product names mentioned in this documentation may be trademarked and/or registered as trademarks.  Mention of third-party products is for informational purposes only and constitutes neither an endorsement nor a recommendation.  Wacom assumes no responsibility with regard to the performance or use of these products.
Introduction and overviewPage  1INTRODUCTION AND OVERVIEWThe Wacom® DTU-1931 pen display combines the benefits of a Liquid Crystal Display (LCD) with the control, comfort, and productivity of Wacom’s cordless, battery-free pen technology.  This gives you a direct pen-on-screen interface for your computer.The basic components of the DTU-1931 include a Wacom pen tablet internally mounted behind a 19.0" diagonal TFT color display, and a Wacom pen.The display and tablet sensor function as an integrated output and input device.  The display supports resolutions up to 1280 x 1024 pixels at 16.7 million colors.  The tablet sensor reports pen coordinates, pressure, and switch information.The DTU-1931 also comes equipped with a video pass-thru (DVI-I OUT) port, enabling you to simultaneously connect a monitor or projector to the pen display.This manual describes how to install and use your DTU-1931.The computer treats the DTU-1931 pen display as two separate devices (the display and the pen tablet).  Therefore, the installation process is completed in two stages:•First install the DTU-1931 as a display.•Then install the DTU-1931 as a pen tablet.Both stages require hardware and software installations and adjustments.  Please follow all instructions carefully.IMPORTANT: You MUST install the Wacom pen tablet driver software for correct pen-on-screen functionality.To learn about using the Wacom Tablet control panel to customize your pen display tablet and pen settings on Windows or Macintosh computers, see Customizing on page 22.The following information is not included with this product: information about your specific computer hardware or operating system, or information about your application software.  Your best source for this information is the set of manuals and discs that came with your hardware, operating system, or application.Wacom’s philosophy is to continually improve all of its products.  As a result, engineering changes and improvements are made from time to time.  Therefore, some changes, modifications, and improvements may not be covered in this manual.
PrecautionsPage  2PRECAUTIONSTo ensure the safe usage of your product, be sure to follow all instructions, cautions, and warnings found within this manual.  Failure to do so could cause the loss of data or damage to your computer.  Failure to do so could also void your warranty, in which case Wacom shall have no responsibility to repair or replace the product.PHYSICAL LOCATIONENVIRONMENTWARNING This symbol indicates an item that, if disregarded, may lead to loss of human life or serious injury.CAUTION This symbol indicates an item that, if disregarded, may lead to human injury or damage to personal property.WARNING This symbol indicates an item that, if disregarded, may lead to loss of human life or serious injury.Exercise due care and diligence whenever engaging in a described action.WARNING Do not use the DTU-1931 pen display in a facility control system that requires extremely high reliability; it may cause other electronic devices to malfunction, or other devices may cause the pen display to malfunction.  Where use is prohibited, power off the DTU-1931 to prevent the possibility of it causing other electronic devices to malfunction.  Wacom does not accept any liability for direct or consequential damages.  For details, please refer to your Warranty located at the end of this guide.Temperature and humidity• Operating temperature and humidity: 5° to 35°C, 20 to 80% RH• Storage temperature and humidity: -20° to 60°C, 20 to 90% RHCAUTION Do not use or store the pen display where:• Temperature changes are severe or exceed specifications (e.g., outdoors or inside a vehicle).• The pen display and pen are exposed to direct sunlight or heat from an appliance, or are exposed to water or any other kind of liquid.CAUTION Do not use the pen display in a dusty environment; this may damage the unit.
PrecautionsPage  3USAGEHANDLINGWARNING Only use the power adapter that came with the DTU-1931.  If a different type of power adapter is used, the DTU-1931 will not work properly or may be damaged.  Using a different type of power adapter also has the potential to result in fire.  Use of a different power adapter will void your warranty.CAUTION Be sure to use a grounded power source when applying power to the DTU-1931.CAUTION Do not connect or disconnect the video or power cables while the DTU-1931 or your computer are turned on; this may damage the display or computer video card.  In this case, Wacom shall have no responsibility to repair or replace the product.CAUTION This product is for use with a VGA or DVI video card; using an inappropriate video card may damage the DTU-1931.CAUTION Do not block the rear panel ventilation holes; this may overheat and damage the unit.When not using the DTU-1931 for long periods of time, unplug the power adapter from the AC outlet.WARNING High Voltage.  Do not open or disassemble the DTU-1931 pen display.  There is a risk of electrical shock when the casing is open.  This will also void your warranty and Wacom shall have no responsibility to repair or replace the product.WARNING If the LCD screen has been damaged, DO NOT touch any liquid that may be leaking from it; this liquid is an irritant.  In case of contact with skin, eyes, or mouth, rinse immediately with running water for at least 15 minutes or more.  If contact is made with the eyes or mouth, also consult a physician.WARNING – LAMP(S) INSIDE THIS PRODUCT CONTAIN MERCURY AND MUST BE RECYCLED OR DISPOSED OF ACCORDING TO REGULATIONS IN YOUR COUNTRY OR REGION.The DTU-1931 pen display has a backlight which contains mercury (Hg).  Be sure to dispose of properly, and to manage any disposal of this unit in accordance with your local ordinances and laws.WARNING Prevent children from swallowing the pen tip or side switch.  The pen tip or side switch may accidentally be pulled out if children are biting on them.CAUTION Do not disassemble the pen.  This may cause the device to malfunction.  In this case, Wacom shall have no responsibility to repair or replace the product.CAUTION Do not scratch the display screen.  Avoid placing sharp objects on the display screen surface.CAUTION When adjusting the tilt angle of the pen display, be careful to avoid catching your finger in the gap of the movable portion of the stand.CAUTION Do not lift the DTU-1931 by the stand; this may damage the stand mechanism.  When lifting or moving the pen display, always do so by grasping the main body casing.CAUTION Avoid intensive shock or vibration to the DTU-1931 or the pen.  Hitting or dropping the pen display may damage the display screen or other components.Hg
PrecautionsPage  4CAUTION Do not put heavy articles on the pen display or push against it with a strong force; this may damage the display screen or bend the stand.CAUTION Do not place heavy articles on the DTU-1931 cabling, repeatedly bend the cables sharply, or apply heavy stress to the cable connectors; this may damage the unit or cabling.CAUTION If the pen tip becomes sharp or angular, it may damage the coating on the display screen.  Replace the pen tip if necessary.CAUTION Do not use any organic solvent (e.g., alcohol) or even mild detergent to clean the display screen.  Use of these cleaners can damage the coating on the screen.  Please note that damage of this kind is not covered by the manufacturer’s warranty.• Before cleaning, always disconnect your product from the AC power source.• To clean the display screen, use an anti-static cloth or a slightly damp cloth.  When cleaning, apply only a light amount of pressure to the display screen and do not make the surface wet. • To clean the pen display casing or pen, use a soft cloth with mild detergent (such as dish washing liquid) diluted with water.CAUTION Do not expose the DTU-1931 to high voltage electrostatic discharges or to a build-up of an electrostatic charge on the LCD screen.  This may result in a temporary discoloration and blotching of the display.  If discolorations occur, leave the display on and the discolorations should disappear within a few hours.Reuse, recycling and recovery.  You are urged to recycle this product when replacing it with a newer product or when it has outlived its useful life by bringing it to an appropriate collection point for recyclable materials in your community or region. By doing this, you can help improve the environment of your community as well as minimize the potential negative effects created, should any hazardous substance that may possibly be present within waste material reach the environment during the disposal process.Within the European Union, users are required not to dispose of Waste Electrical and Electronic Equipment (WEEE) as unsorted municipal waste, according to the Directive 2002/96/EC of the European Parliament and of the Council of 27 January 2003, or the corresponding local laws of the Member States. Products for which this is applicable will be marked with the WEEE symbol shown at the beginning of this note unless this is not feasible because of the size or the function of the product. Wacom products are subject to the Directive 2002/96/EC and therefore you should always collect them separately and bring them to the appropriate collection point in your community or region.Wacom pen display products comply with the European Union RoHS Directive 2002/95/EC (RoHS Directive).
PrecautionsPage  5CONTENTSIntroduction and overview  . . . . . . . . . . . . . . . . . . . . . . . . . . . . . . . . . . . . . . . . .1Precautions  . . . . . . . . . . . . . . . . . . . . . . . . . . . . . . . . . . . . . . . . . . . . . . . . . . . . .2Physical location   . . . . . . . . . . . . . . . . . . . . . . . . . . . . . . . . . . . . . . . . . . . . . .2Environment . . . . . . . . . . . . . . . . . . . . . . . . . . . . . . . . . . . . . . . . . . . . . . . . . .2Usage   . . . . . . . . . . . . . . . . . . . . . . . . . . . . . . . . . . . . . . . . . . . . . . . . . . . . . .3Handling . . . . . . . . . . . . . . . . . . . . . . . . . . . . . . . . . . . . . . . . . . . . . . . . . . . . .3Your new DTU-1931 . . . . . . . . . . . . . . . . . . . . . . . . . . . . . . . . . . . . . . . . . . . . . . .7Package contents   . . . . . . . . . . . . . . . . . . . . . . . . . . . . . . . . . . . . . . . . . . . . .7Pen display components  . . . . . . . . . . . . . . . . . . . . . . . . . . . . . . . . . . . . . . . .8Front view  . . . . . . . . . . . . . . . . . . . . . . . . . . . . . . . . . . . . . . . . . . . . . . . .8Rear View  . . . . . . . . . . . . . . . . . . . . . . . . . . . . . . . . . . . . . . . . . . . . . . . .9Adjusting display incline . . . . . . . . . . . . . . . . . . . . . . . . . . . . . . . . . . . . . . . .10Installation  . . . . . . . . . . . . . . . . . . . . . . . . . . . . . . . . . . . . . . . . . . . . . . . . . . . . . 11System requirements . . . . . . . . . . . . . . . . . . . . . . . . . . . . . . . . . . . . . . . . . .11Step 1: LCD monitor installation   . . . . . . . . . . . . . . . . . . . . . . . . . . . . . . . . .12LCD monitor cabling diagram  . . . . . . . . . . . . . . . . . . . . . . . . . . . . . . . .13Step 2: Pen tablet installation   . . . . . . . . . . . . . . . . . . . . . . . . . . . . . . . . . . .16USB cable installation . . . . . . . . . . . . . . . . . . . . . . . . . . . . . . . . . . . . . .16Pen tablet cabling diagram  . . . . . . . . . . . . . . . . . . . . . . . . . . . . . . . . . .16Software installation  . . . . . . . . . . . . . . . . . . . . . . . . . . . . . . . . . . . . . . .17Working with your DTU-1931  . . . . . . . . . . . . . . . . . . . . . . . . . . . . . . . . . . . . . .18Setting up your work area  . . . . . . . . . . . . . . . . . . . . . . . . . . . . . . . . . . . . . .18Using the pen . . . . . . . . . . . . . . . . . . . . . . . . . . . . . . . . . . . . . . . . . . . . . . . .19Pen components . . . . . . . . . . . . . . . . . . . . . . . . . . . . . . . . . . . . . . . . . .19Basic pen operations   . . . . . . . . . . . . . . . . . . . . . . . . . . . . . . . . . . . . . .20How to use the Tablet Buttons . . . . . . . . . . . . . . . . . . . . . . . . . . . . . . . . . . .21Component Functions   . . . . . . . . . . . . . . . . . . . . . . . . . . . . . . . . . . . . .21Customizing   . . . . . . . . . . . . . . . . . . . . . . . . . . . . . . . . . . . . . . . . . . . . . . . . . . .22Opening the control panel  . . . . . . . . . . . . . . . . . . . . . . . . . . . . . . . . . . . . . .22Learning more  . . . . . . . . . . . . . . . . . . . . . . . . . . . . . . . . . . . . . . . . . . . . . . .22Customization basics . . . . . . . . . . . . . . . . . . . . . . . . . . . . . . . . . . . . . . . . . .23Calibrating the DTU-1931 . . . . . . . . . . . . . . . . . . . . . . . . . . . . . . . . . . .24Adjusting the display  . . . . . . . . . . . . . . . . . . . . . . . . . . . . . . . . . . . . . . . . . .25Factory presets, auto-sync, and user settings  . . . . . . . . . . . . . . . . . . .25On Screen Display (OSD) settings  . . . . . . . . . . . . . . . . . . . . . . . . . . . .25Adjusting pitch and phase (VGA only)  . . . . . . . . . . . . . . . . . . . . . . . . .28Power saving   . . . . . . . . . . . . . . . . . . . . . . . . . . . . . . . . . . . . . . . . . . . .28Troubleshooting   . . . . . . . . . . . . . . . . . . . . . . . . . . . . . . . . . . . . . . . . . . . . . . . .29Testing the DTU-1931  . . . . . . . . . . . . . . . . . . . . . . . . . . . . . . . . . . . . . . . . .29Testing your pen   . . . . . . . . . . . . . . . . . . . . . . . . . . . . . . . . . . . . . . . . . . . . .31Display troubleshooting  . . . . . . . . . . . . . . . . . . . . . . . . . . . . . . . . . . . . . . . .32General display problems . . . . . . . . . . . . . . . . . . . . . . . . . . . . . . . . . . .32VGA problems   . . . . . . . . . . . . . . . . . . . . . . . . . . . . . . . . . . . . . . . . . . .33Pen tablet troubleshooting  . . . . . . . . . . . . . . . . . . . . . . . . . . . . . . . . . . . . . .34General problems  . . . . . . . . . . . . . . . . . . . . . . . . . . . . . . . . . . . . . . . . .34Windows-specific problems   . . . . . . . . . . . . . . . . . . . . . . . . . . . . . . . . .37Macintosh-specific problems   . . . . . . . . . . . . . . . . . . . . . . . . . . . . . . . .38
PrecautionsPage  6Technical support options . . . . . . . . . . . . . . . . . . . . . . . . . . . . . . . . . . . . . . 39Obtaining driver downloads   . . . . . . . . . . . . . . . . . . . . . . . . . . . . . . . . . . . . 40Appendix   . . . . . . . . . . . . . . . . . . . . . . . . . . . . . . . . . . . . . . . . . . . . . . . . . . . . . 41Caring for the DTU-1931   . . . . . . . . . . . . . . . . . . . . . . . . . . . . . . . . . . . . . . 41Cleaning   . . . . . . . . . . . . . . . . . . . . . . . . . . . . . . . . . . . . . . . . . . . . . . . 41Replacing the pen tip . . . . . . . . . . . . . . . . . . . . . . . . . . . . . . . . . . . . . . 41Using an alternate mount or stand  . . . . . . . . . . . . . . . . . . . . . . . . . . . . . . . 42Pen and digital ink capabilities in Windows Vista  . . . . . . . . . . . . . . . . . . . . 43About the Windows Vista Tablet PC Input Panel   . . . . . . . . . . . . . . . . 44Uninstalling the DTU-1931  . . . . . . . . . . . . . . . . . . . . . . . . . . . . . . . . . . . . . 45Product specifications . . . . . . . . . . . . . . . . . . . . . . . . . . . . . . . . . . . . . . . . . 46General specifications  . . . . . . . . . . . . . . . . . . . . . . . . . . . . . . . . . . . . . 46Display . . . . . . . . . . . . . . . . . . . . . . . . . . . . . . . . . . . . . . . . . . . . . . . . . 46Pen tablet   . . . . . . . . . . . . . . . . . . . . . . . . . . . . . . . . . . . . . . . . . . . . . . 46Power adapter  . . . . . . . . . . . . . . . . . . . . . . . . . . . . . . . . . . . . . . . . . . . 47Pen (Model UP-817E)  . . . . . . . . . . . . . . . . . . . . . . . . . . . . . . . . . . . . . 47Ordering parts and accessories  . . . . . . . . . . . . . . . . . . . . . . . . . . . . . . . . . 47Radio and television interference  . . . . . . . . . . . . . . . . . . . . . . . . . . . . . . . . 48Federal Communications Commission (FCC) statement   . . . . . . . . . . 48Industry Canada (IC) statement   . . . . . . . . . . . . . . . . . . . . . . . . . . . . . 49CE declaration (applicable to the Europe) . . . . . . . . . . . . . . . . . . . . . . 50Warranty for Asia Pacific (excluding Japan, China and Hong Kong)  . . . . . 50
Your new DTU-1931Page  7YOUR NEW DTU-1931PACKAGE CONTENTSCarefully unpack all items and place them on a stable desktop or work surface.  Verify the contents are complete.Notes: Images not shown to scale.  Some product configurations may come with different pens having no side switches or eraser.  Some configurations may include additional CDs or DVDs containing application software.  To install these applications, review the instructions that came with those CDs or DVDs.  Retain the package box for use when storing or shipping the DTU-1931.lDTU-1931 pen displayPower adapters and regional cables / plugsPen with replacement nibs and nib removal toolUSB cableInstallation Guide & User’s Manual (this manual)Wacom Pen Tablet Driver CD(contains the driver software)Bundled Software CDPen tetherDVI to DVI cableAnalog RGB cable
Your new DTU-1931Page  8PEN DISPLAY COMPONENTSFamiliarize yourself with the many features and components of your product.FRONT VIEWOn Screen Display (OSD) controlsThese controls enable you to adjust a variety of display settings.  See Adjusting the display on page 25.Status LEDLights blue when the pen is in the active area of the pen display tablet and the pen tip is pressed.  The USB cable must also be plugged into an active USB port before the LED will light.Power switchTurns power to the unit on or off.Power LEDLights blue when power has been supplied to the DTU-1931 and a video signal is present.Glows orange when no video signal is detected by the DTU-1931.  (e.g., Your computer is turned off, starting up, or has entered a power management mode in which video signals are not sent.)Use the integrated USB ports (one located on each side of the unit) to connect a USB device (e.g., a USB Flash Drive or a USB remote controller).Be sure to fully install the DTU-1931 hardware and software before connecting any other devices to the unit.
Your new DTU-1931Page  9REAR VIEWKensington security slotAllows easy attachment of a security cable.Pen storage compartmentTo store, insert one end of the pen into either side of the compartment.  Then gently press the other end of the pen into the compartment.To  r e m o v e , press in on either end of the pen.  This will pop the opposite end out of the compartment so you can remove the pen.Stand adjustment leverDVI/VGA (digital/analog) switchSet this switch for the video connection you will be using.Video, USB, and power connectorsStandAdjusts the tilt angle of the unit.  See Adjusting display incline on page 10.Pen tether attachment pointIf using a pen tether, connect it to the attachment point located on the left or right side of the unit.IMPORTANT: Always store the pen display on a stable surface or in its original packing carton when not in use.  Be sure to adjust the stand to the low tilt position before packaging the DTU-1931.  If you do not close the stand, the notched mechanism may be damaged during transportation and storage.  Do not lift the unit by the stand; this may damage the stand mechanism.  When lifting or moving the DTU-1931, always do so by grasping the main body casing.
Your new DTU-1931Page  10ADJUSTING DISPLAY INCLINE•To open the display stand, pull up on the adjustment lever and swing the stand out to the desired incline.  Release the lever to lock the stand in place.•To close the stand, pull up on the adjustment lever and gently move the stand back into the closed position until the latch catches.  Release the lever to lock the stand in place.CAUTIONBe careful to avoid catching your finger in the gap of the movable portion of the stand.
InstallationPage  11INSTALLATIONSYSTEM REQUIREMENTSBefore installing the DTU-1931, make sure your computer meets the following minimum system requirements:•PC.  Windows Vista™, Vista X64, XP, or XP x64.  VGA or DVI video connector, available USB port, and CD-ROM drive.•Macintosh.  OS X, v10.3.9 or greater.  VGA or DVI video connector, available USB port, and CD-ROM drive.  ADC connectors require an ADC to DVI adapter, not included.The DTU-1931 supports both analog (VGA) and digital (DVI) video signals.  If updating your video card, complete the video card hardware and software installation before connecting the DTU-1931.  If you have another display that is compatible with your video card, you can connect that display to the card in order to verify the video card is operating correctly.Although you can quickly connect the DTU-1931 to either a VGA or DVI video card, connecting to a DVI video card generally results in optimum performance.Notes: Depending on the capabilities of your video card and operating system, you may be able to set up the DTU-1931 as a mirrored, extended, or independent display.  Refer to your video card documentation for more information on its capabilities.When you are working with more than one monitor, the DTU-1931 will map to the monitors based upon how your system is configured.  By default, if you are in mirror mode, the pen tablet will map to the entire space on each  monitor.  See your hardware and operating system documentation for details on configuring your computer and operating system for use with multiple monitors.A display toggle function is available for use with multiple monitor systems.  This enables you to toggle the screen cursor between the DTU-1931 pen display and your other monitors.  For more information, see the electronic Software User’s Manual.The DTU-1931 can be used alone or with another display.  You may connect a second device, such as a monitor or LCD projector, to the DTU-1931 DVI-I OUT port.  When using this port, the second device will mirror the image on the DTU-1931.  Complete the DTU-1931 installation before connecting a projection device to the unit.There are two primary steps to the installation process:•Step 1: LCD monitor installation•Step 2: Pen tablet installationBe sure to follow ALL instructions carefully.
InstallationPage  12STEP 1: LCD MONITOR INSTALLATIONIn this step, the DTU-1931 is installed as a monitor on your system.IMPORTANT: Do not connect the USB data cable until instructed to do so.•Turn off your computer.Caution: Never connect or disconnect the video or power cables while your computer or DTU-1931 are powered on – this can damage the display or video card.•If your computer has only one video connector, you will need to unplug your previous monitor or add a second video card.  Determine if your computer has an analog (VGA) or digital (DVI) connector and set the DVI/VGA switch for the video connection you are using.  See  – A –  in the connection diagram on page 13.•Making sure to tighten the thumbscrews on the connectors, follow the instructions below for your video connector.  See  – B –.  •Connect the power adapter to the DTU-1931.  See  – C –  on the next page.•Then connect the adapter’s power cable and plug the adapter into an AC outlet.  See  – D –.•Turn on the DTU-1931.  The power LED will light orange.For DVI operation, connect the DTU-1931 DVI to DVI video cable between the DVI IN connector located on the pen display unit and the DVI-D or DVI-I connector on your video card.For VGA operation, connect the DTU-1931analog RGB video cable between the DVI IN connector located on the pen display unit and the VGA connector on your video card.If connecting to an Apple ADC or mini-VGA connection, you will need to obtain an appropriate adapter.  Adapters can be purchased at various retail outlets.For ADC operation, plug one end of the DTU-1931 DVI to DVI video cable into the ADC to DVI adapter. Then connect the other end of the DTU-1931 cable to the DVI IN connector on the pen display unit.  Next connect the ADC adapter end to the ADC connector on your video card.For an Apple mini-VGA connector, plug the VGA end of the DTU-1931 analog RGB cable into the mini-VGA port adapter. Then connect the DVI end of the DTU-1931 cable to the DVI IN connector on the pen display unit.  Next connect the mini-VGA port end to the mini-VGA port on your video card.DVI-I connectorDVI-D connectorVGA connectorApple ADC connectorMini-VGA port
InstallationPage  13LCD MONITOR CABLING DIAGRAMCAUTIONMake sure your video card has a VGA or DVI connector, and that you correctly set the DVI/VGA switch for the video connector you are using.Do not attach the USB data cable until instructed to do so.– A –DVI/VGA switchUse the DVI-I OUT port to connect a second device, such as a projector or monitor, that mirrors the pen display.Fully install the DTU-1931 hardware and software before connecting a projection device to the unit.– B –Analog RGB cableorDVI to DVI cableVGA or DVI video cardDVI INRear panel of computer– C –DC inputTo AC outletPower adapter– D –CAUTIONDo not connect or disconnect the video or power cables while the DTU-1931 or your computer are turned on – this can damage the display or computer video card.Use only the power adapter that came with the DTU-1931; use of an improper power adapter may damage the unit.Make sure that the display refresh rate does not exceed 75 Hz.Analog (VGA)Digital (DVI)
InstallationPage  14•Next, turn on your computer.For Windows systems: The DTU-1931 will automatically install as a default monitor.  If you want the DTU-1931 to be identified as a DTU-1931 display and if you want to install the color calibration profile for the DTU-1931, follow the instructions below to update the display driver:For Macintosh systems, a DTU-1931 color profile will be added to your computer’s color management system during the tablet software installation process.  To activate this color profile for use with the pen display, you may need to select the DTU-1931 profile in the system’s ColorSync Utility control panel.  For details, see the color management information in your operating system and application documentation.1. Open the CONTROL PANEL folder.•For Windows Vista, under APPEARANCE and PERSONALIZATION select ADJUST SCREEN RESOLUTION.•For Windows XP, open the DISPLAY PROPERTIES control panel and select the SETTINGS tab.Note: If you have more than one monitor and you need help in determining which display corresponds to the DTU-1931, click the IDENTIFY MONITORS button.  Select the display number corresponding to the DTU-1931.2. Click the ADVANCED SETTINGS... button.3. Select the MONITOR tab and click the PROPERTIES button.4. Select the DRIVER tab and click the UPDATE DRIVER... button.  An update driver dialog or Wizard will appear.5. Insert the Wacom Pen Tablet Driver CD.  If the Wacom Tablet installation menu displays, close it.Windows Vista:•Select the option BROWSE MY COMPUTER FOR DRIVER SOFTWARE.•Enter the drive letter for the Wacom Pen Tablet Driver CD and click NEXT.•After the installation is complete, close any open control panel windows.Windows XP:•The Wizard will ask if Windows can search for software.  Choose NO, NOT THIS TIME and click NEXT.•Select the option INSTALL FROM A LIST OR SPECIFIC LOCATION (ADVANCED), and click NEXT.•Select the option DON’T SEARCH. I WILL CHOOSE THE DRIVER TO INSTALL and click NEXT.•Select the DTU-1931 pen display option and then click the HAVE DISK... button.  Enter the letter of your CD-ROM drive (e.g., E:\), and click OK.•Follow the prompts to continue.  (If the HARDWARE INSTALLATION dialog box displays, click CONTINUE ANYWAY to accept the driver.)  After the installation is complete, click the FINISH button and close any open control panel windows.
InstallationPage  15•As necessary, configure the display control panel settings for the proper size and color resolution.  The maximum (native) resolution of the DTU-1931 is 1280 x 1024 pixels.  The display size and color resolution may be constrained by the capabilities of your video card.  See the video card manufacturer’s documentation for details.Windows: If you are using the DTU-1931 as a secondary display, you may first need to enable the DTU-1931 in your Display Properties control panel.•To fine-tune the display, refer to Adjusting the display, beginning on page 25.  If using analog (VGA) mode, see also Adjusting pitch and phase (VGA only) on page 28.•After the LCD monitor portion of the DTU-1931 is working to your satisfaction, move on to Step 2: Pen tablet installation to install the pen tablet portion of the DTU-1931.•For troubleshooting tips, see page 29.Notes: Each DTU-1931 LCD panel is produced under very stringent quality standards.  Production techniques cannot guarantee an absolutely perfect TFT display, and some panels may exhibit a certain number of pixels that show an incorrect color.  See the specifications on page 46 for more information.If an image has fine striping (such as screen stripes), it may appear to flicker or display a moiré pattern.Do not apply excessive pressure on the display surface, it may cause the appearance of a moiré or pooling pattern.  If this occurs, use less pressure on the display screen when working with the pen.When a still image is displayed for a long period of time, an after-image may remain for a short time.  To prevent this, Wacom recommends using a screen saver or other power management feature.IMPORTANT: To extend the life of the backlight, set your computer’s power management to turn off the display when it is not in use for extended periods of time.
InstallationPage  16STEP 2: PEN TABLET INSTALLATIONUSB CABLE INSTALLATIONPlug the square end of the USB cable into the DTU-1931 port labeled USB.  Plug the other end into an available USB port on your computer or on a USB hub attached to your computer.  See  – E –  in the diagram below.Next, move on to the Software installation on page 17.PEN TABLET CABLING DIAGRAM– E –To USB portYour computerUSB port
InstallationPage  17SOFTWARE INSTALLATIONIMPORTANT: You MUST install the Wacom pen tablet driver software for correct pen-on-screen functionality.To install the tablet software:•Save your work and close all open applications.  Temporarily disable any virus protection programs.•Insert the Wacom Pen Tablet Driver CD into your computer’s CD-ROM drive.  If the software installer menu does not automatically display, double-click on the Install icon located on the CD.•Click on the INSTALL TABLET link and follow the prompts to install the driver software.•Reactivate your virus protection program.•After completing the software installation, make sure you can use your pen on the DTU-1931 display to move the screen cursor.When you place the pen tip on the display screen, the screen cursor should immediately jump to a corresponding position approximately beneath the pen tip.  Lift the pen tip and place it on the display screen surface in a different location – the screen cursor should again jump to the new position.  This is known as absolute positioning, and enables you to position the screen cursor without having to drag your pen across the display screen surface.•Be sure to check the Read Me file for updated information.  If you have trouble installing the DTU-1931, see the Troubleshooting section beginning on page 29.Notes:Driver installation automatically activates the new pen input functions available within Microsoft Windows Vista and Office 2007 (except for Windows Vista Home Basic).  Visit the Wacom web site at www.wacom-asia.com/vista for additional information on using your Wacom pen in Windows Vista.User-specific preferences are supported.  After logging in, each user can customize their personal settings in the Wacom Tablet control panel.  Switching to another user will automatically load the settings for that user.To uninstall the tablet driver, see Uninstalling the DTU-1931 on page 45.If the pen display tablet does not respond properly or you lose cursor control, the tablet preferences may be corrupted.  You can delete the current preference settings and return the tablet to its factory default condition.  On a Windows system, run the TABLET PREFERENCE FILE UTILITY.  Access the utility by clicking on the Windows START icon and selecting ALL PROGRAMS.  Then select WACOM TABLET and TABLET PREFERENCE FILE UTILITY.Next, adjust the pen display tablet calibration to precisely align the screen cursor to the pen tip.  See Calibrating the DTU-1931 on page 24.
Working with your DTU-1931Page  18WORKING WITH YOUR DTU-1931As you work with the DTU-1931 pen display you can rest your hand lightly on the display screen, just as if it were a drawing board or sheet of paper.Because the DTU-1931 surface will be a little higher than your desk, consider adjusting the height of your desk or chair to assure comfortable use of the device.SETTING UP YOUR WORK AREATo minimize fatigue, organize your work area so you can work comfortably.  Position your DTU-1931, the pen, and your keyboard for easy access without unnecessary reaching.  The pen display and any other displays should be positioned so you can view them comfortably with a minimum of eyestrain.•Take short breaks between tasks to stretch and relax your muscles.•Use a gentle grip when working with the pen.•Alternate tasks throughout the day.•Maintain a good posture at all times.  Minimize awkward postures and repetitive movements that cause discomfort.•Change your position if you feel any discomfort due to your work position.Note: Wacom makes no representation, promise or guarantee that Wacom products will cure or prevent, in whole or in part, mouse-induced repetitive stress symptoms, injuries or conditions.  Individual results may vary.  Always obtain competent medical advice to determine the most appropriate treatment for your specific situation.Tips:Be careful that you do not pull the cables out of their connections by accidentally moving the DTU-1931 too far from the computer.The pen tether can be used to ensure your pen stays with your pen display tablet.  Simply loop one end of the tether through the tether hole located on the pen (if so equipped), and the other end of the tether through the tether connection point located on the left or right side of the tablet.The DTU-1931 can also be mounted to articulated arms or other third-party stands meeting the VESA 100 specification for display stands.  For details, see Using an alternate mount or stand on page 42.
Working with your DTU-1931Page  19USING THE PENThe pen is cordless, battery-free, and senses the amount of pressure you apply to the tip.  Hold the pen like you would a normal pen or pencil.  As you work with the DTU-1931, you can rest your hand lightly on the display screen, just as if it were a drawing board or sheet of paper.  You can tilt the pen in any way that feels most comfortable for drawing.PEN COMPONENTSIMPORTANT: Use only the pen that came with your DTU-1931 pen display.  Other pens may not function properly.  Also, the DTU-1931 pen tip is specifically designed for use with the DTU-1931 pen display – the tips on other pens could damage the protective coating on the pen display screen.For information on customizing the pen settings, see Customizing on page 22.Eraser: When equipped and the eraser is brought within 5 mm (0.2 inch) of the display, the tablet reports the pen location.  Pressure information is reported as you press down on the eraser.  By default, the eraser function is set to ERASE.Some non-eraser pens may be configured with a pen tether connection point.DuoSwitch (side switch): When equipped, make sure the programmable switch is in a convenient location where you can toggle it with your thumb or forefinger but not accidentally press it while writing or drawing.  You can use the switch whenever the pen tip is within 5 mm (0.2 inch) of the display screen surface; you do not need to touch the pen tip to the display surface.  Toggle the switch in either direction to activate the button functions.By default, the upper switch is set to DOUBLE CLICK and the lower switch is set to RIGHT CLICK.Pen tip (replaceable nib): The pen is activated as soon as it is brought within 5 mm (0.2 inch) of the pen display screen.  This allows you to position the screen cursor without touching the pen tip to the display screen.  When pressure is applied to the pen tip, the pen simulates a primary mouse button click.  The tip click pressure can be adjusted in the Wacom Tablet control panel.Notes: When the pen is not in use, place it in the pen storage compartment, or lay it flat on your desk.  To maintain the sensitivity of your pen, do not store the pen in a container where it will rest on its tip.Some product configurations may come with a pen that has no DuoSwitch or eraser.  In that case, you can ignore all explanations within this guide regarding the side switch or eraser.
Working with your DTU-1931Page  20BASIC PEN OPERATIONSPointing and selecting: Move the pen slightly above the DTU-1931 display screen to position the screen cursor; you do not need to touch the display surface.  The cursor jumps to the location where you place the pen.  Press the pen tip on the display screen to make a selection.Note: You must calibrate the pen display tablet to correctly align the screen cursor with the pen tip.  (See Calibrating the DTU-1931 on page 24.)  If the screen cursor does not jump to a position close to the pen tip when you place the pen on the display screen, then the pen tablet driver may not be installed or is not loading.  Install the pen tablet driver software if necessary.  Otherwise, see Troubleshooting, beginning on page 29.Clicking: Tap the display screen once with the pen tip, or touch the pen to the display screen with enough pressure to register a click.Windows tip:  To make navigating with the pen easier, configure Windows to select when the pen is over an icon and to launch the icon with a single click.  To turn on this feature, first open a folder.For Windows Vista, From the ORGANIZE pull-down menu choose FOLDER AND SEARCH OPTIONS.  From the GENERAL tab select SINGLE-CLICK TO OPEN AN ITEM (POINT TO SELECT).For Windows XP, from the TOOLS pull-down menu choose FOLDER OPTIONS....  From the GENERAL tab select SINGLE-CLICK TO OPEN AN ITEM (POINT TO SELECT).Double-clicking: Press the upper side switch, or quickly tap the display screen twice in the same place with the pen tip.  Double-clicking is easier when the pen is perpendicular to the tablet screen.  See the electronic Software User’s Manual for information on fine-tuning the double-click area.Dragging: Select an object, then slide the pen tip across the display screen to move the object.Using the side switch: The pen may be equipped with a DuoSwitch.  This switch has two programmable functions that can be selected by rocking the switch in either direction.  You can use the DuoSwitch whenever the pen tip is within 5 mm (0.2 inch) of the display screen surface; you do not need to touch the pen tip to the display surface in order to use the switch.  By default, the upper switch is set to DOUBLE CLICK, and the lower switch is set to RIGHT CLICK.Drawing and writing with pressure sensitivity: The pen responds to the nuance and inflection of your hand movements, enabling you to create natural-looking pen and brush strokes within applications that support this feature.  To draw and write with pressure, select a pressure-sensitive tool from your application’s tool palette.  As you work on the screen surface, use various amounts of downward pressure on the tip of the pen.  Press lightly for thin lines or softer color.  Press harder for thick lines or dense color.Erasing: In supporting applications, the pen’s eraser works like the eraser on a pencil.  In text applications, use the eraser to select text, then lift the eraser from the tablet to delete the text.
Working with your DTU-1931Page  21HOW TO USE THE TABLET BUTTONSThe tablet buttons increase your work efficiency by making navigating through documents and websites quick and simple.IMPORTANT: The tablet buttons can be used in Windows-based PCs. To use the tablet buttons, install the button driver to your PC.COMPONENT FUNCTIONSNO Name Function1 Left mouse button Works like the left mouse button.2 Right mouse button Works like the right mouse button.3 Scroll up button Scrolls the window up.4 Scroll down button Scrolls the window down.5 Ctrl button Works like the Ctrl button on the keyboard.342551
CustomizingPage  22CUSTOMIZINGAfter you master the basics of using your pen on the DTU-1931 pen display, you may want to customize the way the pen works.  The Wacom Tablet control panel makes it easy to customize the DTU-1931 and pen.OPENING THE CONTROL PANELTo open the control panel, use the DTU-1931 pen on the pen display tablet:Windows.  Click on the Windows START button and choose ALL PROGRAMS.  Then select WACOM TABLET and choose the WACOM TABLET PROPERTIES option.Macintosh.  Open SYSTEM PREFERENCES from either the Dock, the Apple menu, or from the APPLICATIONS folder.  Then click on the WACOM TABLET icon.After opening the control panel, see Customization basics on page 23.Note: User-specific preferences are supported.  After logging in, each user can customize their personal settings in the Wacom Tablet control panel.  Switching to another user will automatically load the settings for that user.LEARNING MORESee the electronic Software User’s Manual for detailed information on customizing the DTU-1931.To view the manual, open the Wacom Tablet control panel and click on the HELP button.To read the Software User’s Manual before installing the pen display, first insert the Wacom Pen Tablet Driver CD into your computer’s CD-ROM drive.  When the software menu appears, select the USER’S MANUAL option.You will need Adobe Reader or another .pdf viewer to view the manual.
CustomizingPage  23CUSTOMIZATION BASICSThis manual only covers the basics of customizing the DTU-1931.  For detailed information see the electronic Software User’s Manual.Use the Wacom Tablet control panel to customize your product.  When you open the control panel, an icon for the pen is displayed in the TOOL list and the appropriate tabs are displayed.  To customize the pen, make your changes to the tab controls.  Experiment with different settings to find what works best for you.  Any changes you make will take effect immediately, but you can always click DEFAULT to return to the factory settings.Note: Application-specific settings are for advanced users.  This topic is covered in the Software User’s Manual.The upper portion of the control panel displays icons representing your TABLET, TOOL, and APPLICATIONs with custom tool settings.Tabs display customizable settings for the selected TOOL.Displays a dialog box containing information about the pen display tablet and tablet software, including an option to access the DIAGNOSTICS dialog box.Displays advanced options.Closes the control panel.Choose PEN to customize your pen settings.Choose FUNCTIONS to customize the Radial Menu settings.  For information on working with the Radial Menu, see the Software User’s Manual.Resets the selected tab to its default settings.Displays the electronic Software User’s Manual.
CustomizingPage  24CALIBRATING THE DTU-1931You must calibrate the pen display tablet in order to align the screen cursor with the position of the pen on the display screen.  This is required to adjust for parallax caused by the display screen cover glass and coating.  Set the DTU-1931 in its working position, then follow the procedure below.IMPORTANT: When using a VGA connection, make sure the display is properly adjusted before calibrating the tablet.  See Adjusting pitch and phase (VGA only) on page 28, and Adjusting the display beginning on page 25.• In the Wacom Tablet control panel, select the PEN from the TOOL list and then select the CALIBRATE tab.• If you are working with multiple monitors, select the MONITOR corresponding to the DTU-1931 display.  (Only monitors that are set to one of the resolutions supported by the DTU-1931 will appear in the list.)• Click on the CALIBRATE... button to activate the calibration screen.• Hold the pen and position your head as you normally do when working with the pen display.  Use the pen tip to click on the center of the crosshairs in the upper-left corner.• Then click on the center of the crosshairs that are displayed in the lower-right corner.• Test the alignment by positioning the pen at a few different points on the display.  Click OK to accept the calibration.  Click TRY AGAIN to recalibrate.Be sure to read the directions in the calibration screen for detailed instructions and additional options.  The calibration setting applies to all applications.Note: If more than one pen display tablet is installed on your system, be sure to select the unit you are working with from the control panel’s TABLET list.CrosshairsAdjustment pattern for pitch and phase.  See Adjusting pitch and phase (VGA only) on page 28 for details.Tip: If you prefer to see the screen cursor slightly offset from the actual position of the pen tip, calibrate by clicking on a spot showing that offset from the crosshairs.  For example, to have the screen cursor appear 1/10th of an inch above and to the left of the pen tip, calibrate by clicking on a spot 1/10th of an inch below and to the right of the crosshairs.
CustomizingPage  25ADJUSTING THE DISPLAYFACTORY PRESETS, AUTO-SYNC, AND USER SETTINGSFactory presets: For optimal display quality, set your video card to the DTU-1931’s native resolution of 1280 x 1024 pixels (SXGA).  See page 46 for signal specifications.Auto-sync: The DTU-1931 automatically synchronizes to the incoming signal.  The auto-sync function sets the horizontal and vertical screen position, as well as pitch and phase.  Auto-sync will function when the horizontal frequency is between 30 to 80 kHz, and the vertical frequency is between 50 to 75 Hz.If the DTU-1931 does not automatically synchronize with the incoming signal, you can use the OSD AUTO ADJUST option to initiate display synchronization.  Further screen display adjustments can be manually made using the OSD controls.Color calibration: Changing the color, color temperature, contrast, brightness, or backlight from their default settings will invalidate the ICC color profile that was included on the driver CD.ON SCREEN DISPLAY (OSD) SETTINGSThe OSD function enables you to optimize a variety of display settings at the touch of a button.  Make adjustments using the OSD controls located on the upper left edge of the unit.Note: After changing a setting, the OSD menu will automatically close after a few moments of inactivity.  You can also press the MENU button to close the OSD menu.  All settings are automatically saved when the OSD menu closes and will be used the next time the unit receives a similar video signal.  This is applicable to all display modes.  If you make changes to the display appearance and cannot return to the original settings, use the RESET option to return the DTU-1931 to its original factory defaults.1.   M ENU buttonPress to open or exit the OSD menu.2.  Selection buttonsUse these buttons to select an option.  When the option you want to adjust is highlighted, press the ENTER button.  The current settings and adjustment sub-menu for that option will appear.  Note that some settings may not be available when in DVI mode.Use the  +  or  –  buttons to select and adjust the option settings.  (Press the  +  button to increase a selected item value.  Press the  –  button to decrease it.)After making changes, press the ENTER button to save.See the following pages for a detailed description of menu options.ENTER buttonActivates the selected OSD menu option. –   +
CustomizingPage  26When you open the On Screen Display, the menu options are displayed.LANGUAGE menu options allow you to choose the language in which the OSD menu will be displayed.OSD POSITION menu options include:•VERTICAL.  Adjusts the vertical position of the OSD menu window.•HORIZONTAL.  Adjusts the horizontal position of the OSD menu window.•TRANSPARENCY.  Changes the opaqueness of the OSD menu background.DISPLAY menu options include:•BRIGHTNESS.  Increases or decreases the image brightness.•CONTRAST.  Increases or decreases image contrast.  Note that changes in contrast may affect color accuracy.•BACKLIGHT.  Increases or decreases the backlight brightness level.COLOR menu options include:• 5000K, 6500K, 9300K.  Enables you to adjust the pen display color temperature, in degrees Kelvin.•DIRECT displays the colors directly from the video card without any adjustment.•CUSTOM enables you to independently adjust the RED, GREEN, and BLUE display colors.Note: Any manual changes you make to the color settings will invalidate the DTU-1931 color profile.
CustomizingPage  27SCALING menu options include:•FULL.  Resizes the image to fill the whole screen.•ASPECT.  Resizes the image to fill as much of the screen as possible while maintaining the correct aspect ratio.• 1:1.  Displays the image at the actual resolution.OTHER menu options include:•PHASE.  (VGA only.)  Synchronizes the signal timing of the pen display to that of your graphics card.  Use this adjustment when you experience an unstable or flickering image, or horizontal distortion lines.•PITCH.  (VGA only.)  Changes the display data frequency to match that of your graphics card.  Use this adjustment when you experience an unstable or flickering image, or vertical distortion lines.•VERTICAL.  (VGA only.)  Changes the vertical position of the image.  To automatically adjust, use the AUTO ADJUST option.•HORIZONTAL.  (VGA only.)  Changes the horizontal position of the image.  To automatically adjust, use the AUTO ADJUST option.•AUTO ADJUST.  (VGA only.)  Choose this function to automatically optimize the display screen image.RESET returns the display parameters of the current mode to their factory default settings.EXIT dismisses the OSD without making changes.
CustomizingPage  28ADJUSTING PITCH AND PHASE (VGA ONLY)Some computers and video cards may not allow the auto-sync function to fully work when the DTU-1931 is first connected.  If some portion of text appears blurred, use the AUTO ADJUST option to automatically synchronize to the incoming signal (see the description about auto-sync on page 25).  If the image is still blurred, adjust pitch and phase by following the procedure below.  For optimum display quality, set your video card to the DTU-1931’s native resolution of 1280 x 1024.POWER SAVINGThe DTU-1931 conforms to VESA and ENERGY STAR® power saving guidelines.When using the DTU-1931 with a Display Power Management Signaling (DPMS) compliant computer or video card, the display will automatically comply with the below power saving parameters.  When these power-saving functions are in effect, the screen display is darker than usual.* Depending on the specifications and settings of your computer and video card, the power light may only change to orange when in standby and suspend modes.Computer mode H-sync V-sync Video Power consumption Power lampPower ON Yes Yes Active 37W, max. BlueStandby mode No Yes Blanked 2W, max. Blue/Orange*Suspend mode Yes No Blanked 2W, max. Blue/Orange*OFF mode No No Blanked 1W, max. Orange• In the Wacom Tablet control panel, select the CALIBRATE tab.• If you are working with multiple displays, be sure the display corresponding to the DTU-1931 is selected in the MONITOR menu.• Click on the CALIBRATE... button to activate the calibration screen.• Using the OSD controls, open the OSD menu and select the PITCH option.  Then adjust the pitch level so that the pattern of fine vertical stripes displays evenly.  (For details on changing the OSD settings, see On Screen Display (OSD) settings on page 25.)• In the OSD menu, select the PHASE option.  Adjust the phase level so that the adjustment pattern shows clearly.• After completing these adjustments, press the ENTER and MENU buttons to exit the OSD menu.• Click on the CANCEL button or press ESC to exit the calibration screen.Adjustment pattern for pitch and phase.
TroubleshootingPage  29TROUBLESHOOTINGMost of the time your pen display tablet will work flawlessly.  But if you are having trouble, Wacom recommends you do the following:1. If the Wacom tablet driver failed to load properly, first perform the recommended action in any error message that may appear on your screen.  If that does not solve the problem, review the troubleshooting procedures in this chapter.2. If the DTU-1931 does not function properly, refer to the troubleshooting sections on the following pages.  See also Display troubleshooting on page 32, or look in the Pen tablet troubleshooting on page 34.  Your problem may be described there and you can try the solution offered.3. Open the Wacom pen display Read Me file for any information updates.4. If you are having a compatibility conflict between the DTU-1931 and a new hardware or software product, see Obtaining driver downloads on page 40 for information on downloading an updated software driver.  Wacom periodically updates the software driver to maintain compatibility with new products.5. Check the FAQs (Frequently Asked Questions) on the Wacom web site for your region.6. If you have tried the suggestions in this guide and still cannot resolve the problem, then contact Wacom for Technical Support.  See the Technical support options on page 39 and the Read Me file for information on where to obtain support for your region.TESTING THE DTU-19311. If the DTU-1931 power LED does not light, check the following:•First verify that the green light on the power adapter is on.  If the light is not on, check that the power cable is properly connected to the power adapter and to an active AC outlet.•Check that the power adapter cable is securely connected to the DTU-1931 and that the DTU-1931 power switch is turned on.  The DTU-1931 power LED will glow orange or blue whenever the DTU-1931 is on.IMPORTANT: Use only the AC adapter that came with your pen display.  Other adapters may cause damage to your product.2. If there is no display:•Make sure that your computer is turned on.  The power LED will light blue when the proper video signal is received.  It will glow orange if there is no video signal or if the computer is in a power saving mode.•Verify that the DTU-1931 is connected to an active VGA or DVI connector and that the DVI/VGA switch is set to the correct video setting.•Check that your video card has been properly installed and is functional.  If you have another display that is compatible with your video card, you can connect that display to the card in order to verify that the video card is operating correctly.
TroubleshootingPage  303. Verify that the tablet and pen are working:•Press the pen tip against the display and verify that the status LED lights blue.•If the LED does not light, verify that the DTU-1931’s USB cable is plugged into an active USB port.  If the DTU-1931 is plugged into a USB hub, try plugging it directly into the USB port on your computer.•Be sure that the USB port to which you are connecting has not been disabled.  It may be necessary to check your system BIOS setting to verify that you have connected the DTU-1931 to an active USB port.•The status LED will light blue when the DTU-1931 is registered as a USB device and the pen tip is pressed against the display.4. Check the pen.  If you cannot make a selection on the display screen with the pen:•Test the pen by pressing the pen tip or eraser (when equipped) against the surface of the pen display tablet.  The tablet status LED should light blue.•Now, without applying pressure to the pen tip but keeping the pen within 5 mm (0.2 inch) of the pen display tablet surface, press the side switch (when equipped).  The status LED should again light blue.•If the status LED does not light blue for these tests, be sure you are using the correct pen that came with your DTU-1931.•See Testing your pen on page 31 for detailed information.If you are still having problems, you may have a defective pen or pen display.
TroubleshootingPage  31TESTING YOUR PENIf the pen does not work as you expect, it is a good idea to first check the assigned functions or reset the pen to its default conditions.  A quick way to reset a pen to its default settings is to remove it from the TOOL list by clicking on the list’s [ – ] button.  After the pen has been removed, place it back onto the display screen surface and the pen will be re-added to the TOOL list with its default settings.Open the Wacom Tablet control panel and click on the ABOUT button.  In the dialog box that appears, click on the DIAGNOSE... button to open the DIAGNOSTICS dialog box.  The DIAGNOSTICS dialog box displays dynamic information about the pen display tablet and pen.  This information is used when testing the pen display tablet and your pen.If more than one pen display unit is connected to your system, be sure to select the unit for which you are testing in the TABLET INFO column.Note: When testing your pen buttons, if a button is set to RADIAL MENU or OPEN/RUN..., that function will occur when the button is pressed.  In this case you may want to change that button’s function before testing.1. While observing the POINTING DEVICE INFO column, bring your pen within 5 mm (0.2 inch) of the display screen.  A value for PROXIMITY, the DEVICE NAME, and DEVICE TYPE should be displayed.2. Move your tool along the tablet surface.  The X and Y DATA values should change to reflect the tool position.3. Test your pen switches.  The DTU-1931 status LED should light blue each time you click with the pen tip, press the side switch, or press the pen’s eraser to the display screen.•Press on the display screen surface with the pen tip – the SWITCHES state and PRESSURE value should change.  (PRESSURE should change from approximately 0% with no pressure applied to approximately 100% when full pressure is applied.)•Next, press the side switch (when equipped) without pressing the tip to the tablet – the SWITCHES state should change.  Do this for both positions of the DuoSwitch.•Press the pen eraser (when equipped) to the display screen – the SWITCHES state and PRESSURE value should change.  (PRESSURE should change from approximately 0% with no pressure applied to approximately 100% when full pressure is applied.)4. When you are done, click on the CLOSE button to exit the dialog box.Tip = 1, DuoSwitch (lower position) = 2, DuoSwitch (upper position) = 3, Eraser = 1
TroubleshootingPage  32DISPLAY TROUBLESHOOTINGIf you encounter problems with the DTU-1931 display, refer to the following tables; your problem may be described here and you can try the solution offered.  For additional information about color issues, see the documentation that came with your operating system or applications.GENERAL DISPLAY PROBLEMSNo display.  The power LED is off. •Verify that the AC power cable is connected, and that the DTU-1931 power switch is turned on.No display.  The power LED is lit blue. •Check the contrast, brightness, and backlight controls.  Adjust as necessary.  Or, open the OSD menu and select the RESET option.The power LED is lit orange.A ‘no signal go to power save’ message appears briefly on your display screen.•Your computer may be in a power management mode.  Touch the pen tip to the display screen, move the mouse, or depress any key on your keyboard.•Turn off both your computer and the DTU-1931 pen display tablet.  Check the video cable for bent or broken connector pins.  Then properly connect the video cable and turn on the DTU-1931 and your computer.•Verify that the DVI/VGA switch is properly set.  Restart your computer after changing the position of the switch.•Verify that the video card is properly installed.A ‘cable disconnect go to power save’  message appears briefly on your display screen.•Check that your computer is turned on.•Verify that you are using the video cable that came with the DTU-1931.•Check that the DTU-1931 video cable is fully connected.•Turn off both your computer and the DTU-1931 pen display.  Check the video cable and any video adapters for bent or broken connector pins.  Then properly connect the video cable and any necessary adapters.An ‘out of range’ message appears briefly on your display screen.•The input signal frequency is incorrectly set or not compatible with the DTU-1931.  Set the refresh rate (vertical frequency) between 50 and 75 Hz.  If your video card driver supports adjustment of the horizontal frequency, make sure it is set to some value between 30 and 80 kHz.  On a single monitor system you will need to connect a different display to change the refresh rate.•The resolution is set too high (1280 x 1024, maximum).•The refresh rate is set too high (75 Hz maximum).•Set the display properties to detect plug and play monitors.A ‘set refresh range’ message appears briefly on your display screen.•The maximum refresh rate is 75 Hz.  Set the refresh rate (vertical frequency) to some value between 50 and 75 Hz.
TroubleshootingPage  33VGA PROBLEMSThe image appears multiple times on the display.•Do not extend the video cable.  Do not use an input selector switch box.When a still image is displayed for a long period of time without refreshing the screen, an after-image remains for a short period of time.•Use a screen saver or other power management feature.Color quality is inaccurate. •Open the OSD menu and select the RESET option.•Be sure the DTU-1931 color profile has been installed and is selected as the profile for use with your operating system and applications.•Any changes to the contrast setting should be made in small increments as changes in contrast may affect color accuracy.The color white does not display as white. •Be sure the DTU-1931 color profile has been installed and is selected as the profile for use with your operating system and applications.•Verify that the display is operating at the factory default settings.  If that is not sufficient, then adjust color as necessary.  For details on color management, refer to your operating system and application documentation.•Verify that the video cable and connector are fully connected.The display ripples or flickers. •Open the OSD menu and select the AUTO ADJUST option.  Then, if necessary, manually adjust pitch and phase.•Verify that the display adapter or video card matches the specifications for the DTU-1931.•Adjust the refresh rate in the Display Properties control panel.The display is not clear.  Text or other portions of the screen appear blurred.•Set the display resolution of your video card to 1280 x 1024.•Turn off the DTU-1931, then turn it back on.•Open the OSD menu and select the AUTO ADJUST option.  If necessary, manually adjust the brightness, pitch, and phase settings.The display and LCD panel are not lined up.  The display size is not correct.•Open the OSD menu and select the AUTO ADJUST option.•As necessary, adjust pitch and phase, and horizontal and vertical position.  Note that some video cards may not show the display in proper sizing.The display ripples or shows a moiré pattern.  The display color is not even.•Open the OSD menu and select the AUTO ADJUST option.  If this does not solve the problem, select the RESET option to set the display back to the factory default settings.•As necessary, adjust pitch and phase.
TroubleshootingPage  34PEN TABLET TROUBLESHOOTINGIf you encounter problems with the DTU-1931 pen display tablet, see the following tables.  Your problem may be described here, and you can try the solution offered.  Be sure you refer to the DTU-1931 Read Me file for the latest information.For additional information, visit Wacom’s web site at http://www.wacom-asia.com/support.GENERAL PROBLEMSThe computer does not have an available USB port.Check if there is an available USB port on a USB hub.  If not available you will need to add a USB hub or USB card.A USB device plugged into one of the pen display’s integrated USB ports does not function.1. Make sure the pen display itself is properly connected to a working USB port on your computer.2. Then be sure the pen display is powered on and that the power LED lights blue.  The DTU-1931 contains a powered USB hub and the integrated USB ports will not work when the power is off.3. If the USB device does not work, try plugging it into a USB port directly on your computer.4. If your USB device is still not functioning properly, please contact the manufacturer for that particular device.The pen display power LED is off.Make sure the pen display power switch is turned on.Check that the AC power adapter is plugged into both the pen display and an active power outlet.Use only the power adapter that came with the pen display; other adapters may cause damage to your product.The pen works only in mouse mode, and does not draw or write with pressure sensitivity.The tablet driver software was not installed or did not load properly.Make sure the tablet driver software is installed and functioning.Install the pen tablet driver software in accordance with the instructions found in the Installation section of this guide.The pen does not draw or write with pressure sensitivity.Some applications require that you turn on the pressure capabilities within the application or selected tool before the pen will respond as a pressure-sensitive tool.Verify also that your application supports pressure sensitivity.Clicking is difficult. Open the Wacom Tablet control panel and go to the PEN tab.  Try using a lighter TIP FEEL.The pen selects everything or will not stop drawing.Open the Wacom Tablet control panel and go to the PEN tab.  Move the TIP FEEL slider toward FIRM or select DETAILS... and increase the CLICK THRESHOLD setting.  If this does not help, see Testing your pen on page 31.
TroubleshootingPage  35Double-clicking is difficult.Be sure you are quickly tapping the display screen twice in the same place on the pen display tablet’s active area.  Wacom recommends using the side switch to double-click.Open the Wacom Tablet control panel and go to the PEN tab.  Try increasing the TIP DOUBLE CLICK DISTANCE or using a lighter TIP FEEL.Windows: Try setting your system to launch programs with a single click.  See Basic pen operations on page 20.The eraser (when equipped) selects everything or will not stop erasing.Open the Wacom Tablet control panel and go to the ERASER tab.  Move the ERASER FEEL slider toward FIRM, or select the DETAILS... button and increase the CLICK THRESHOLD setting.  If this does not help, see Testing your pen on page 31.You notice a delay at the beginning of pen or inking strokes.Open the Wacom Tablet control panel and go to the PEN tab.  Try decreasing the TIP DOUBLE CLICK DISTANCE.  If that does not work, try dragging the TIP DOUBLE CLICK DISTANCE slider to the OFF position in order to turn off double-click assist.You have to press hard with the pen when clicking, drawing, or writing.Open the Wacom Tablet control panel and go to the PEN tab.  Move the TIP FEEL slider toward SOFT, or select the DETAILS... button and decrease the SENSITIVITY and CLICK THRESHOLD settings.The pen tip does not function.Be sure you are using the pen that originally came with your DTU-1931.  Other pens may not function properly on the pen display.Check the control panel’s PEN tab and verify that a CLICK function is assigned to the pen tip.Make sure the status LED lights blue when the tip is pressed.  If the LED does not light, verify that the USB cable is plugged into an active port on your computer or on a USB hub.If the LED still does not light, you may have defective hardware (see Troubleshooting on page 29).The pen tip and screen cursor do not properly line up.Open the Wacom Tablet control panel and select the CALIBRATE tab.  Continue with Calibrating the DTU-1931 on page 24.Changing the function settings for the pen has no effect.Make sure you change the settings for the pen and application that you are using.  See the electronic Software User’s Manual for details on working with application-specific settings.
TroubleshootingPage  36The pen side switch does not work.Be sure you are using the pen that originally came with your DTU-1931.  Other pens may not function properly on the pen display.Be sure to press the side switch when the pen tip is within 5 mm (0.2 inch) of the pen display’s active area – do this without pressing down on the pen tip.In the Wacom Tablet control panel, verify that the side switch is set to the proper function you are expecting to occur for the application and tool you are using.Check also the SIDE SWITCH MODE.  If CLICK & TAP is selected, you will need to first press the side switch then touch the pen tip to the tablet surface in order to perform a click function.Make sure the status LED lights blue when you press the side switch.  If not, verify that the USB cable is plugged into an active USB port on your computer or on a USB hub; the LED will not light if the USB cable is not plugged into an active port.If the LED does not light, you may have defective hardware (see Troubleshooting on page 29).The screen cursor moves but it does not jump to the pen tip location when the pen is placed on the display screen, and it does not follow the pen tip when the pen is moved across the display.Make sure the Wacom tablet driver has loaded properly by opening the Wacom Tablet control panel.  If the driver did not load you will see an error message.  If an error message appears, reboot your computer.  If the problem persists, refer to the Installation instructions and reinstall the Wacom tablet software.  (For Macintosh, you must restart your computer after installing the Wacom tablet driver for proper tablet operation.)If you have customized the side switch on your pen to toggle between pen mode and mouse mode, make sure that your pen display is operating in pen mode.When using the pen display tablet on a multiple monitor system, you cannot use the pen to control the other monitor(s).Set a pen button to DISPLAY TOGGLE, and then press that button to cycle between pen control for the DTU-1931 and your other displays.  See the electronic Software User’s Manual for details on working with DISPLAY TOGGLE.You can also use your pen to control the other monitors in mouse mode.  To use mouse mode, first set the pen’s DuoSwitch to MODE TOGGLE....  Then use the switch to toggle between pen mode and mouse mode.The line you are drawing does not line up with the location of the screen cursor.To function properly, some applications require that the pen is set to pen mode.  Make sure the pen has not been toggled to mouse mode.If the pen is set to pen mode and the problem still exists, then you may have a corrupted preferences file.  Follow the instructions in the next tip to create a new preferences file.
TroubleshootingPage  37WINDOWS-SPECIFIC PROBLEMSYou suspect the pen tablet preferences may be corrupted, or want to make certain that all settings are at their factory defaults.Delete the pen tablet preferences as follows:Windows:  Click the START icon and select ALL PROGRAMS.  Then select WACOM TABLET and TABLET PREFERENCE FILE UTILITY.  In the dialog box that appears, click on the REMOVE MY PREFERENCE FILE button to delete the preferences for the current user.  To delete preferences for multiple users, click on the REMOVE ALL PREFERENCE FILES button.  Note that administrator rights are required to delete preferences for all users.  Relaunch any currently open tablet-aware applications that you may be running.Macintosh: For a single user, delete the tablet preferences by first choosing your HOME folder from the GO menu.  Then open your home LIBRARY folder.  Within your home LIBRARY folder, open the PREFERENCES folder and delete the com.wacom.wacomtablet.prefs file.  Log out, then log back in.  When the tablet driver loads it will create a new preferences file with the factory defaults.For multiple users, delete all tablet preferences by first opening the main APPLICATIONS folder.  Then open the WACOM TABLET folder and run the REMOVE WACOM TABLET utility.  When the utility starts, click on the REMOVE ALL PREFERENCE FILES button.  The tablet driver will be restarted, creating new preferences files with the factory defaults.Recalibrate the tablet.Note: Do not manually remove the WACOM TABLET.PREFPANE file from the main LIBRARY PREFERENCEPANES folder.  This file is only to be removed when uninstalling the tablet software driver, and then only when using the REMOVE WACOM TABLET utility.The computer does not go to sleep.When you are not using the pen, remove it from the pen display surface or the pen display will continue to send data, keeping the computer awake.The screen cursor jumps back when using your regular mouse or trackball.When the pen is not in use, place it in the pen storage compartment, or at some location near the pen display – but not on the display.  Leaving your pen on the display may interfere with screen cursor positioning when using other input devices.The screen cursor moves erratically or jumps around on the display screen when another tablet is connected to your computer.The tablet portion of the DTU-1931 emits electromagnetic waves at a certain frequency.  If another tablet is too closely placed to the DTU-1931 it may interfere with screen cursor positioning.  If this occurs, move the tablet further away from the DTU-1931.After changing right- and left-handed settings in the computer’s mouse control panel, the pen tip no longer functions properly.Restart Windows for your Wacom tool settings to be correctly recognized.
TroubleshootingPage  38MACINTOSH-SPECIFIC PROBLEMSAt startup, a dialog box appears telling you that either the driver failed to load or the tablet preferences have not yet been created.The pen display tablet was not detected at startup.  Make sure the USB interface cable is securely connected to an active USB port on your computer or to a USB hub.  Make sure that the pen display power LED is on.  If this does not correct the problem, see Troubleshooting on page 29.From the GO menu, select the UTILITIES folder and launch the SYSTEM PROFILER.  Select USB from the HARDWARE section of the CONTENTS list.  A Wacom USB pen display model should be listed.  If a pen display model is not listed, check the pen display’s USB cable connection or try plugging the pen display into a different USB port.If you are still having problems, go to the UTILITIES folder, open the DISK UTILITY program, and run REPAIR DISK PERMISSIONS from the FIRST AID tab.  If this does not help, contact Wacom for Technical Support.  See Technical support options on page 39.Inkwell does not work correctly with the pen display.There may be a problem with the Inkwell preferences.  Remove the damaged preference files as follows.  They will be recreated when you enable handwriting recognition.1. Open the System Preferences pane, choose SHOW ALL and select INK.  Then turn off handwriting recognition.2. From the GO menu, choose your HOME.  Open the LIBRARY and PREFERENCES folders.  Remove the following preferences:•com.apple.ink.framework.plist•com.apple.ink.inkpad.plist•com.apple.ink.inkpad.sketch3. Go back to SYSTEM PREFERENCES and INK, and then enable handwriting recognition.4. Test the Inkwell function using your Wacom pen display tablet and pen.5. If this procedure does not resolve your problem with Inkwell, contact Apple Support for further assistance.  Wacom is not the software manufacturer for Inkwell and we are limited in our abilities to support a third party software application.
TroubleshootingPage  39TECHNICAL SUPPORT OPTIONSIf you have a problem with your DTU-1931 pen display, first check the appropriate Installation section in this guide to make sure the unit is installed correctly.  Then review the Troubleshooting procedures.If you cannot find the answer in this guide, you may find updated information about your problem in the appropriate Read Me file for your platform (located on the Wacom Pen Tablet Driver CD).  You can also check the product FAQs (Frequently Asked Questions) on the Wacom web site for your region.If you have an Internet connection you can download the latest software drivers from the Wacom web site for your region.  See Obtaining driver downloads on page 40.If you cannot solve the problem and you think your Wacom product is not working properly, contact the Wacom support staff for the area where your product was purchased.  See the Wacom tablet Read Me file, located on the Wacom Pen Tablet Driver CD, for contact information.When you call, you should be at your computer with the following information available:•This manual.•Pen display serial number.  (Look at the label on the back of the unit.)•Driver version number.  (See the Wacom Pen Tablet Driver CD or click on the Wacom Tablet control panel About button.)•The make and model of your computer, and operating system version number.•The make, model, and connection type of your video card.•A list of peripheral devices attached to your computer.•The software application and version you were using when the problem occurred.•The exact wording of any error message that appeared on your screen.•What happened and what you were doing when the problem occurred.•How you tried to solve the problem.
TroubleshootingPage  40OBTAINING DRIVER DOWNLOADSWacom periodically updates the pen tablet software driver to maintain compatibility with new products.  If you are having a compatibility problem between your DTU-1931 pen display and a new hardware or software product, it may be helpful to download a new Wacom tablet software driver (when available) from the Internet.USA, Canada, Central and South AmericaEurope, Middle East and AfricaJapanAsia Pacific (English)ChinaKoreaTaiwanWorldwide Web: http://www.wacom.com/productsupport Driver downloads.Worldwide Web: http://www.wacom.eu Software updates.Anonymous FTP Site: ftp://ftp.wacom.eu/pub/ Software updates.Worldwide Web: http://tablet.wacom.co.jp Software updates.  (Japanese)Worldwide Web: http://www.wacom-asia.com Software updates.  (English)Worldwide Web: http://www.wacom.com.cn Software updates.(Simplified Chinese)Worldwide Web: http://www.wacomkorea.com Software updates.  (Korean)Worldwide Web: http://www.wacom.com.tw Software updates.  (Traditional Chinese)
AppendixPage  41APPENDIXCARING FOR THE DTU-1931Keep the pen and the DTU-1931 LCD screen surface clean.  Dust and dirt particles can stick to the pen and cause excessive wear to the display screen surface.  Regular cleaning will help prolong the life of your LCD screen surface and pen.  Keep the DTU-1931 and pen in a clean, dry place and avoid extremes in temperature.  Room temperature is best.  The DTU-1931 and pen are not made to come apart.  Taking apart the product will void your warranty.IMPORTANT: Take care to never spill liquids onto the pen display or pen.  Be especially careful of getting the display, or pen buttons and tip wet – they contain sensitive electronic parts that will fail if liquids enter them.CLEANINGTo clean the DTU-1931 casing or the pen, use a soft, damp cloth; you can also dampen the cloth using a very mild soap diluted with water.  Do not use paint thinner, benzine, alcohol, or other solvents to clean the unit casing or pen.To clean the display screen, use an anti-static cloth or a slightly damp cloth.  When cleaning, apply only a light amount of pressure to the display screen and do not make the surface wet.  Do not use detergent to clean the display screen; this may damage the coating on the screen.  Please note that damage of this kind is not covered by the manufacturer’s warranty.REPLACING THE PEN TIPThe pen tip (nib) will wear with normal use.  Excessive pressure will cause it to wear sooner.  A worn nib may damage the coating on the DTU-1931 display screen.  To avoid this, periodic tip replacement is recommended.When the nib gets too short or develops a sharp edge, you can replace it with one of the extra nibs that came with the pen.IMPORTANT: When not in use, place the pen in the pen storage compartment, or lay it flat on your desk.  To maintain the sensitivity of your pen, do not store the tool in a container where it will rest on its tip.To remove the old nib:Clasp it with a Wacom nib removal tool, pair of tweezers, needle-nosed pliers, or similar instrument and pull the old nib straight out of the pen.To insert a new nib:Slide it straight into the barrel of the pen.  Firmly push the nib until it stops.  The new nib will slide into the correct position.WARNINGPrevent children from swallowing the pen nib or side switch.  The pen nib or side switch may accidentally be pulled out if children are biting on them.Replace the pen nib when it gets too short – less than 1 mm (0.04 inch).
AppendixPage  42USING AN ALTERNATE MOUNT OR STANDIf you will be using the DTU-1931 in an installation that requires the use of an alternate mounting platform, you can remove the adjustable stand from the unit and mount the pen display onto any mount arm or stand conforming to the VESA 100 mm standard.Mounting screws that are 4 mm wide with a 0.7 mm pitch (M4 Regular), with a screw clearance depth of 15 mm are required.  Exceeding the clearance depth of 15 mm will damage the pen display internal components.To remove the adjustable stand and attach the pen display to a different mounting platform:1. Turn off your computer and power off the DTU-1931.  Then disconnect all cables from between the unit and your computer.2. Protect the display screen surface by spreading a soft cloth onto a flat table and placing the DTU-1931 face down on the cloth. 3. Remove the four screws and lift the adjustable stand assembly away from the body of the unit.4. Using the appropriate screws for your mounting platform, firmly attach the DTU-1931 to the alternate mounting platform.5. Refer to the Installation instructions, beginning on page 11, and reattach the cabling.CAUTIONWhen attaching the DTU-1931 onto an alternate mounting platform, be sure to follow all instructions in the documentation supplied by the platform manufacturer.  If improperly installed, the unit could fall, resulting in damage to the unit or physical injury.
AppendixPage  43PEN AND DIGITAL INK CAPABILITIES IN WINDOWS VISTAMicrosoft Windows Vista provides extensive support for pen* and touch input.  When using the DTU-1931 with a computer running Windows Vista, your experience is enhanced by powerful note taking, handwriting recognition, fast navigation, and other digital inking options designed to give you quick, intuitive results with the Wacom pen.•Note taking.  Use your Wacom pen to jot notes and capture quick sketches in Windows Journal.  Journal simulates a physical notebook, but with the advantages of digital note taking – you can choose from a variety of pen, marker, and highlighter tools.  Journal also includes a powerful search engine that can even locate your handwritten content.•Handwriting recognition.  Because Windows Vista includes powerful handwriting recognition capabilities, you can use your Wacom pen to quickly enter handwritten information anywhere the computer accepts typed input.  You can convert your handwritten content to typed text at any time.•Gestures.  Use your Wacom pen to make simple gestural movements on the pen display to trigger customizable actions for navigation, editing, and other functions.  To customize your gestures, select the FLICKS tab in the PEN AND INPUT DEVICES control panel.•Digital Ink in Microsoft Office 2007.  Use your Wacom pen to full advantage with the enhanced digital mark-up and inking tools available in Microsoft Office 2007 applications running on Windows Vista.  Found on the REVIEW tab within applicable applications, these tools provide a consistent set of inking options.  For quick access, you can add specific inking tools to the Quick Access Toolbar located at the top of each application.Note that the following workarounds in the pen tablet driver improve drawing performance in Vista:•The Vista Pen Flicks and ‘press-and-hold-to-right-click’ features are disabled in graphics applications using the Wintab API.•There is no pressure sensitivity in Journal and other Vista Ink features when both the Flicks and ‘press-and-hold-to-right-click’ features are disabled in the Vista PEN AND INPUT DEVICES control panel.* Pen features supported in all versions of Windows Vista except Vista Home Basic.
AppendixPage  44ABOUT THE WINDOWS VISTA TABLET PC INPUT PANELThe Input Panel enables you to use handwriting or an on-screen keyboard to directly enter text with your Wacom pen.  There are different ways to launch the Input Panel:•Click on the Input Panel icon which appears when you move the screen cursor into a text entry area.•Click on the Input Panel tab, located by default on the left edge of the display screen.•Click on the Tablet PC Input Panel icon located on the Windows taskbar.  If the icon is not visible, right-click on the taskbar, select TOOLBARS, and TABLET PC INPUT PANEL.To customize the Input Panel:1. First open the Input Panel and then click on TOOLS in the menu bar.2. Select OPTIONS to open the Input Panel Options dialog box.3. Customize the Input Panel settings for the way you like to work.To learn more about using your Wacom pen in Microsoft Windows Vista and Office 2007, study the documentation that came with your system and Microsoft Office applications.  Be sure to take advantage of the Windows Vista training tools, including the Tablet PC tutorial, available from Microsoft.You can visit also the Wacom web site at www.wacom-asia.com/vista for additional information on working with your Wacom pen in Windows Vista.
AppendixPage  45UNINSTALLING THE DTU-1931Follow the appropriate procedure below to remove the Wacom tablet software and the DTU-1931 from your system.IMPORTANT: When you remove the Wacom tablet software from your system, your Wacom tablet will no longer operate with full tablet functionality but will continue to function as a mouse device.Windows: 1. Click on the Windows START button and open the CONTROL PANEL.2. In the CONTROL PANEL window for•Windows Vista: click on UNINSTALL A PROGRAM.  In the dialog box that appears, choose the WACOM TABLET option and click on the UNINSTALL button.•Windows XP or XP x64: select ADD OR REMOVE PROGRAMS.  In the ADD OR REMOVE PROGRAMS window, choose WACOM TABLET and click on the REMOVE button.3. Follow the prompts to remove the tablet driver.  (If prompted, enter your administrator login name and password.)4. When the driver has been removed, shut down your system, power off your computer, and turn off the DTU-1931.  When your computer and the DTU-1931 are off, disconnect the DTU-1931 from your computer.Macintosh: 1. Fr o m  t h e  G O menu, choose APPLICATIONS and open the WACOM TABLET folder.2. Double-click on the REMOVE WACOM TABLET icon and select the REMOVE TABLET SOFTWARE button.  Enter your administrator login name and password.3. After the removal is completed, click OK.4. Shut down your computer and turn off the DTU-1931.  When your computer and the DTU-1931 are off, disconnect the DTU-1931 from your computer.
AppendixPage  46PRODUCT SPECIFICATIONSGENERAL SPECIFICATIONSDISPLAYPEN TABLETPhysical dimensions (W x D x H) 452.0 x 398.0 x 55.5 mm (17.8 x 15.7 x 2.2 in), excluding standWeight 7.05 kg (15.5 lb), including standInput voltage 12 VDCPower consumption 37W or lessOperating temperature and humidity 5° to 35° C, 20 to 80% RH (non-condensing)Storage temperature and humidity -20° to 60° C, 20 to 90% RH (non-condensing)(maximum storage humidity is 38% at a temperature of 60° C, and maximum storage temperature is 42° C at a humidity of 90%)Certification and compliance FCC part 15 class B & Subpart C, Industry Canada Class B, CE, VCCI Class B, EDID 1.3, C-tick, BSMI, MIC, CCC, GOST-R, CB, J-MOSS, The European Union RoHS Directive 2002/95/EC, Chinese RoHS, Korean RoHSDisplay a-Si TFT active matrix LCDScreen size 19.0 in, diagonalResolution 1280 x 1024 (SXGA), 1024 x 768 pixels (XGA), 800 x 600 pixels (SVGA), 640 x 480 pixels (VGA) Synchronization range 50 to 75 Hz vertical, 30 to 80 kHz horizontalPixel pitch 0.294 x 0.294 mm (0.012 x 0.012 in)Color depth 16.7 millionLuminance 270 cd/m2 (typical)Contrast ratio 1300:1, typicalPlug and Play DDC2B, DDC/CI, and other DVI standardsLCD quality Each DTU-1931 LCD panel is produced under very stringent quality standards.  Production techniques cannot guarantee an absolutely perfect TFT display.  Wacom does not allow any pixel to be always white or always black.  A small number of pixels (4 or less) are allowed to show a wrong color for some parts of the color spectrum.  This does not mean the display is defective.Reading technology Electromagnetic resonance methodActive area 378.3 x 303.1 mm (14.91 x 11.94 in)Resolution 0.01 mm/point (2540 lpi)Accuracy ±0.5 mm (±0.02 in), averageReading height 5 mm (0.2 in)Maximum report rate 133 points/sec.Pressure levels 512 levelsCommunication interface USB v2.0Integrated USB hub USB v2.0Powered hub with two external ports, 500 mA per port
AppendixPage  47POWER ADAPTERPEN (MODEL UP-817E)ORDERING PARTS AND ACCESSORIESTo purchase parts and accessories, please contact local Wacom offices or distributors: www.wacom-asia.com/support/contact.Input voltage 100  to 240 VAC, 50/60 HzOutput voltage 12 VDC, 5.0 A (max)Pressure levels 512Pen tip travel 0.2 mm (0.008 in) or lessPhysical dimensions (L x D) 147.5 x 12.5 mm (5.81 x 0.49 in)Weight 12 g (0.42 oz), approximatelySide switch type Rocker switch
AppendixPage  49INDUSTRY CANADA (IC) STATEMENT15.21You are cautioned that changes or modifications not expressly approved by the part responsible for compliance could void the user’s authority to operate the equipment.15.105(b)This equipment has been tested and found to comply with the limits for a Class B digital device, pursuant to part 15 of the IC rules. These limits are designed to provide reasonable protection against harmful interference in a residential installation. This equipment generates, uses and can radiate radio frequency energy and, if not installed and used in accordance with the instructions, may cause harmful interference to radio communications. However, there is no guarantee that interference will not occur in a particular installation. If this equipment does cause harmful interference to radio or television reception, which can be determined by turning the equipment off and on, the user is encouraged to try to correct the interference by one or more of the following measures:• Reorient or relocate the receiving antenna.• Increase the separation between the equipment and receiver.• Connect the equipment into an outlet on a circuit different from that to which the receiver is connected.• Consult the dealer or an experienced radio/TV technician for help.Operation is subject to the following two conditions:1) this device may not cause interference and2) this device must accept any interference, including interference that may cause undesired operation of the device.
AppendixPage  50CE DECLARATION (APPLICABLE TO THE EUROPE)The DTU-1931 pen display has been tested and found to comply to the following harmonized European Norms:Based on the results of these tests, Wacom declares that the above mentioned device conforms to the EMC Directive 2004/108/EC.The device must be installed and operated always in strict accordance to the instructions given in this manual.  Any changes or modifications to this product that were not specifically authorized by Wacom will invalidate this declaration.WARRANTY FOR ASIA PACIFIC (EXCLUDING JAPAN, CHINA AND HONG KONG*)Wacom Co., Ltd. warrants the product, to the original consumer purchaser, including the main unit and accessories such as the AC adapter and cables, to be free from defects in materials and workmanship under normal use and service for a period of one (1) year, from the date of original retail purchase, as evidenced by a copy of the receipt (proof of purchase) and registration with Wacom online within 30 days of purchase.The Software is licensed “as is.” Wacom makes no warranty with respect to its quality or performance. Wacom cannot guarantee you uninterrupted service or the correction of any errors. Wacom also makes no warranty for consumable items such as pen nibs, etc.Upon discovery of a defect in the product, except in the software, within the warranty period, the warranty holder should contact the original place of purchase to obtain instructions for returning the product for repair or replacement. Wacom and its partners are not obligated to reimburse unauthorized prepaid shipment. To read the full warranty statement for this product, please visit: www.wacom-asia.com/technical/warrantyThis Limited Warranty is governed by the laws of Japan and is subject to change without prior notice. Warranty Service in Asia Pacific:Please contact your local distributor or Wacom office for warranty service and repair. www.wacom-asia.com/support/contact--------------------------------(*For warranty info in China and Hong Kong, please see the warranty included with this product or contact Wacom China: www.wacom.com.cn)EN55022: 1998+A1:2000+A2:2003  Class B EN61000-3-2: 2006EN61000-3-3: 1995+A1:2001+A2:2005EN55024: 1998+A1:2001+A2:2003 IEC61000-4-2: 1995+A1:1998+A2:2000IEC61000-4-3: 2006 IEC61000-4-4: 2004IEC61000-4-5: 2005 IEC61000-4-6: 2003IEC61000-4-11: 2004

Navigation menu