Wacom Co PTH650 Pen Tablet, Pen & Touch Tablet User Manual Cobra Intuos Manual FrameMakerV7x
Wacom Co Ltd Pen Tablet, Pen & Touch Tablet Cobra Intuos Manual FrameMakerV7x
Wacom Co >
Contents
- 1. User manual 1 of 4
- 2. User manual 2 of 4
- 3. User manual 3 of 4
- 4. User manual 4 of 4
User manual 2 of 4
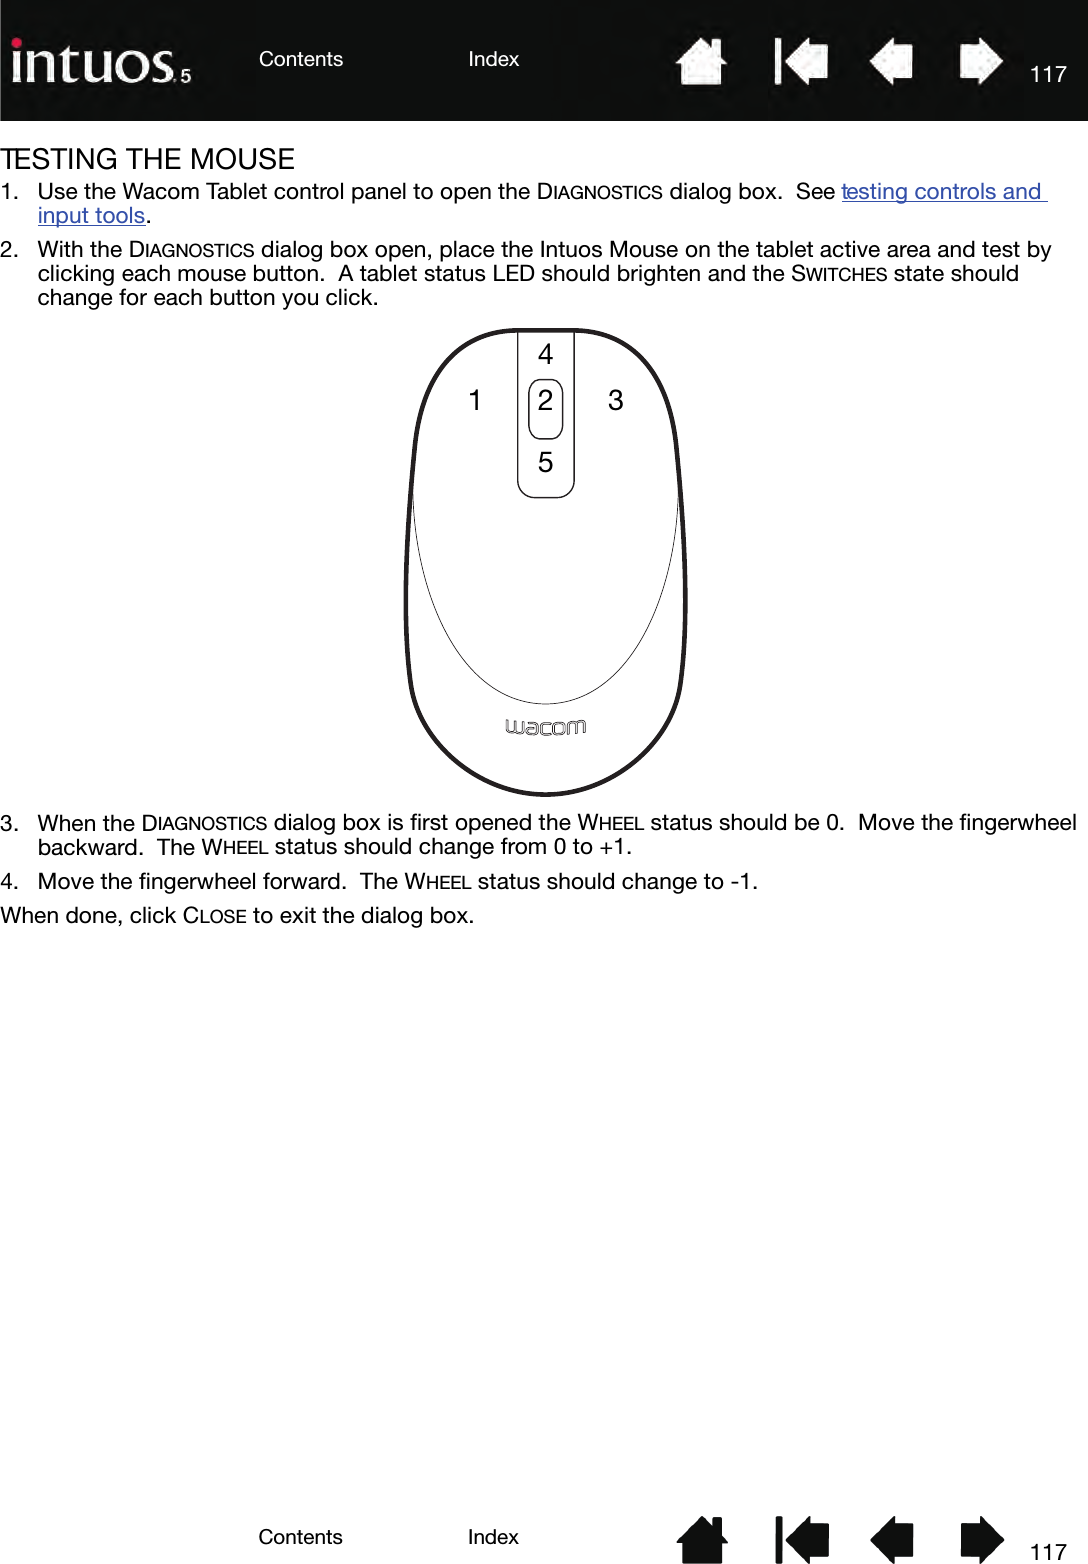
![91IndexContents91IndexContentsTESTING CONTROLS AND INPUT TOOLSIf your input tools or tablet controls do not work as you expect, it is a good idea to first check the assigned functions or reset them to their default conditions. You will also want to do this if you have a touch-sensitive tablet model and encounter problems with touch.A quick way to return a tool to its default condition is to remove it from the control panel TOOL list. Do this by selecting the tool and clicking on the TOOL list [ – ] button. After the tool has been removed, place it back onto the tablet surface. The tool will be added back to the TOOL list with its default settings.• Open the Wacom Tablet control panel and click on the ABOUT button. In the dialog box that appears, click DIAGNOSE.... The DIAGNOSTICS dialog box shows dynamic information about the tablet, your input tool(s), and appropriate information for touch-sensitive tablets.• If more than one tablet is connected to your system, in the TABLET INFO column select the unit for which you are testing.• Use the information shown in the DIAGNOSTICS dialog box when testing your tablet and input tools.Note: If a tool button is set to RADIAL MENU or OPEN/RUN..., that function will occur when the button is pressed. In this case you may want to change the button function before testing.Testing the ExpressKeysTes ti n g th e Tou c h R i ngTes ti n g a pe nTes ti n g t o uc hTes ti n g t h e m o u s e](https://usermanual.wiki/Wacom-Co/PTH650.User-manual-2-of-4/User-Guide-1599325-Page-4.png)
![111IndexContents111IndexContentsINSTALLING MULTIPLE TABLETSAny tablet that has been detected on your system will appear as an icon within the Wacom Tablet control panel TABLET list.To add a new tablet, connect it to your computer. The system will automatically find the tablet and initialize it. An icon for the tablet will then appear in the control panel.Important: When installing additional tablets on Windows systems, the eraser function may not work in some applications when using the additional tablet(s). The eraser function will continue to work correctly using the first tablet that was added to the control panel.To remove one of multiple tablets from the driver, select the tablet to be removed and click on the [ – ] button next to the TABLET list. • A tablet must be attached to the computer before it can be deleted from the control panel list.• You will need to restart your computer before you can again add the tablet to the driver.Select a tablet icon for which to customize tool and application settings.• The control panel will not launch unless a supported tablet is connected to the computer.• Settings can only be viewed or changed for an attached tablet.](https://usermanual.wiki/Wacom-Co/PTH650.User-manual-2-of-4/User-Guide-1599325-Page-24.png)