Wahoo Fitness WF105 Stages power User Manual ump001
Wahoo Fitness LLC Stages power ump001
User Manual_20130207_v1 - Exhibit-E-User_Manual


Stages Cycling™ LLC
www.stagescycling.com
Info@stagescycling.com
1-800-778-7218
Oces:
Sales, Accounting and Administrative: 1732 NW Quimby, Ste 250, Portland, OR 97209
Design, Manufacturing and Tech. Support: 3090 Sterling Cir, Ste 102, Boulder, CO 80301
Specications
t #BUUFSZ$3oTFSWJDFMJGFBQQSPYJNBUFMZIPVST
t 8JSFMFTTUSBOTNJTTJPO()["/5BOE#MVFUPPUI¥4NBSU
t "DDVSBDZPGNFBTVSFEQPXFS
t 8FJHIUBEETPOMZHUPXFJHIUPGMFGUDSBOLBSN
t 1PXFSNFBTVSFNFOUSBOHFXBUUTo
t $BEFODFSBOHF31.
t 8BUFSSFTJTUBODFSBUJOH*19
This product is ANT+ cer d and complies with the following spe d
ANT+ Device Pro :

Training with a power meter is the best way to guarantee improvements in your functional threshold power, overall tness
and of course speed. We all want to ride faster with less eort and using a power meter will help you to determine your
strengths and weaknesses, create the proper training zones and easily understand your progress. As the co-author of
“Training and Racing with a Power Meter”, I have written extensively on the subject of power training and coached some of
the best riders in the world to greater success using the principles of power training. Training with your new power meter
puts you in charge of the training stress that you need to create in order to help you adapt, get stronger and ultimately
achieve your cycling dream goals.
Hunter Allen
Founder-Peaks Coaching Group
Co-developer- TrainingPeaks WKO+ power analysis software
Co-author- Training and Racing with a Power meter.
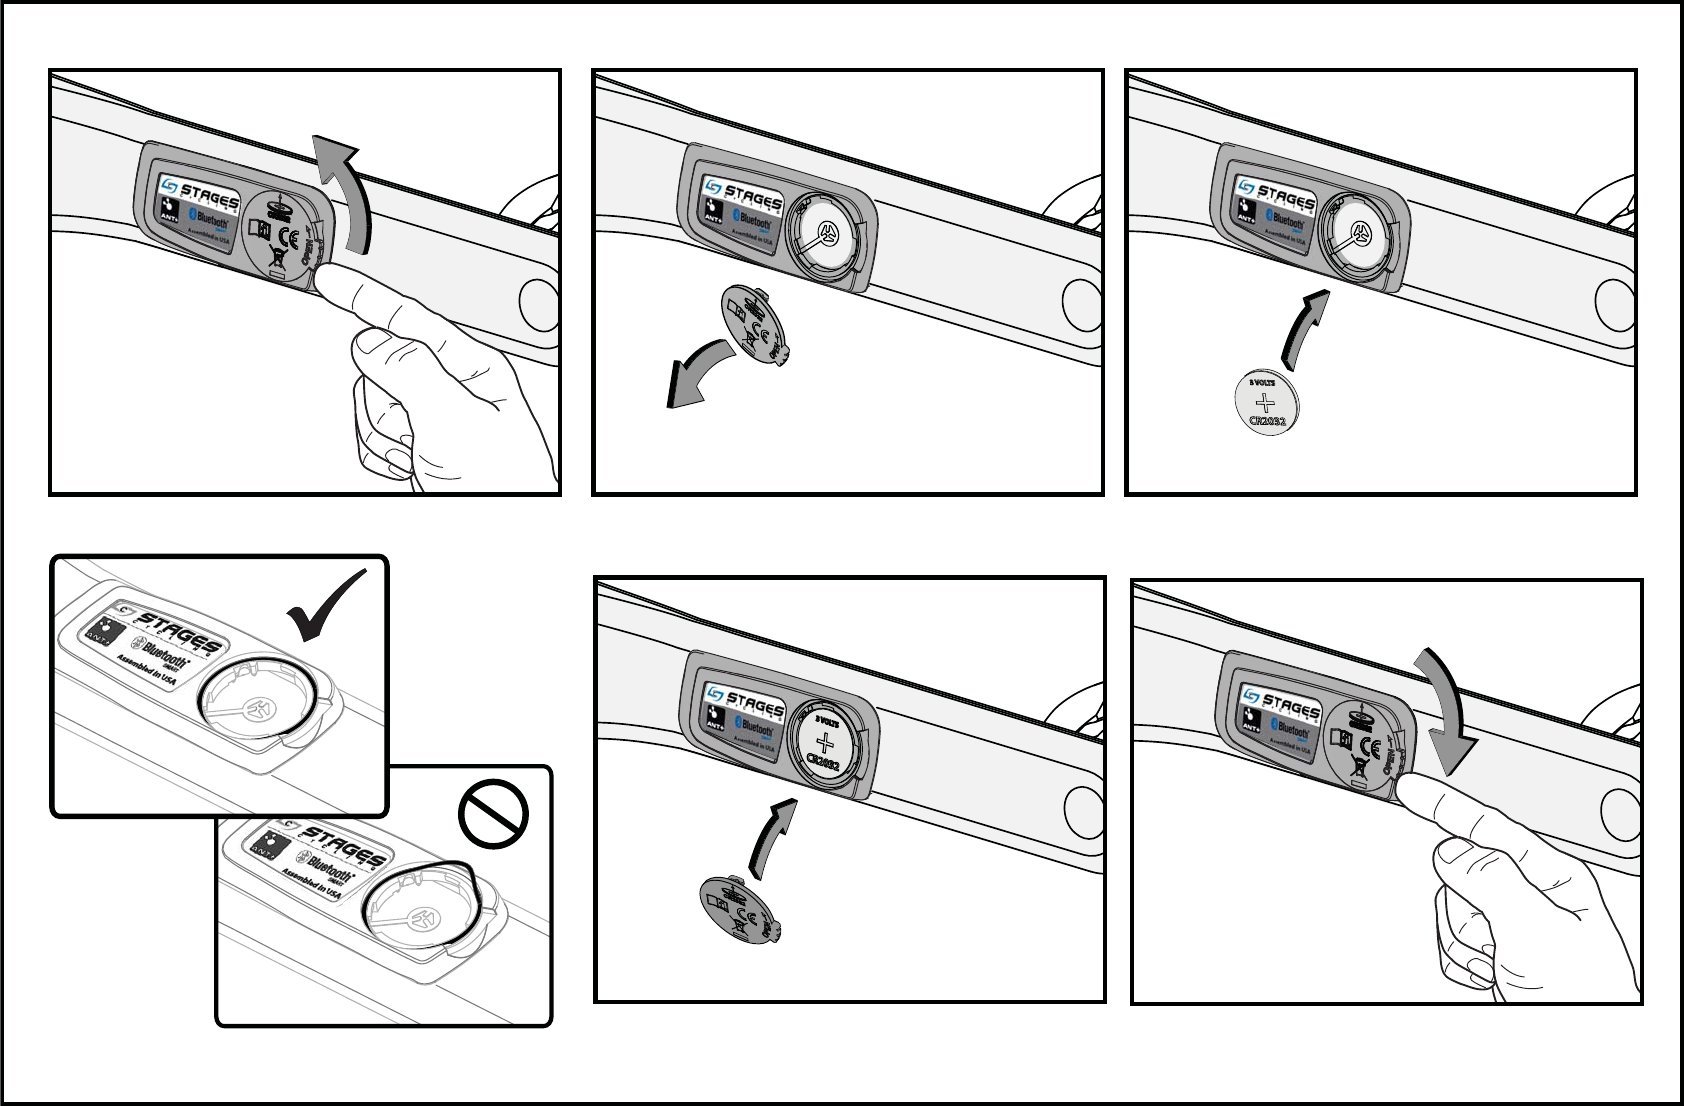
Fig 1 Fig 2 Fig 3
Fig 4 Fig 5 Fig 6
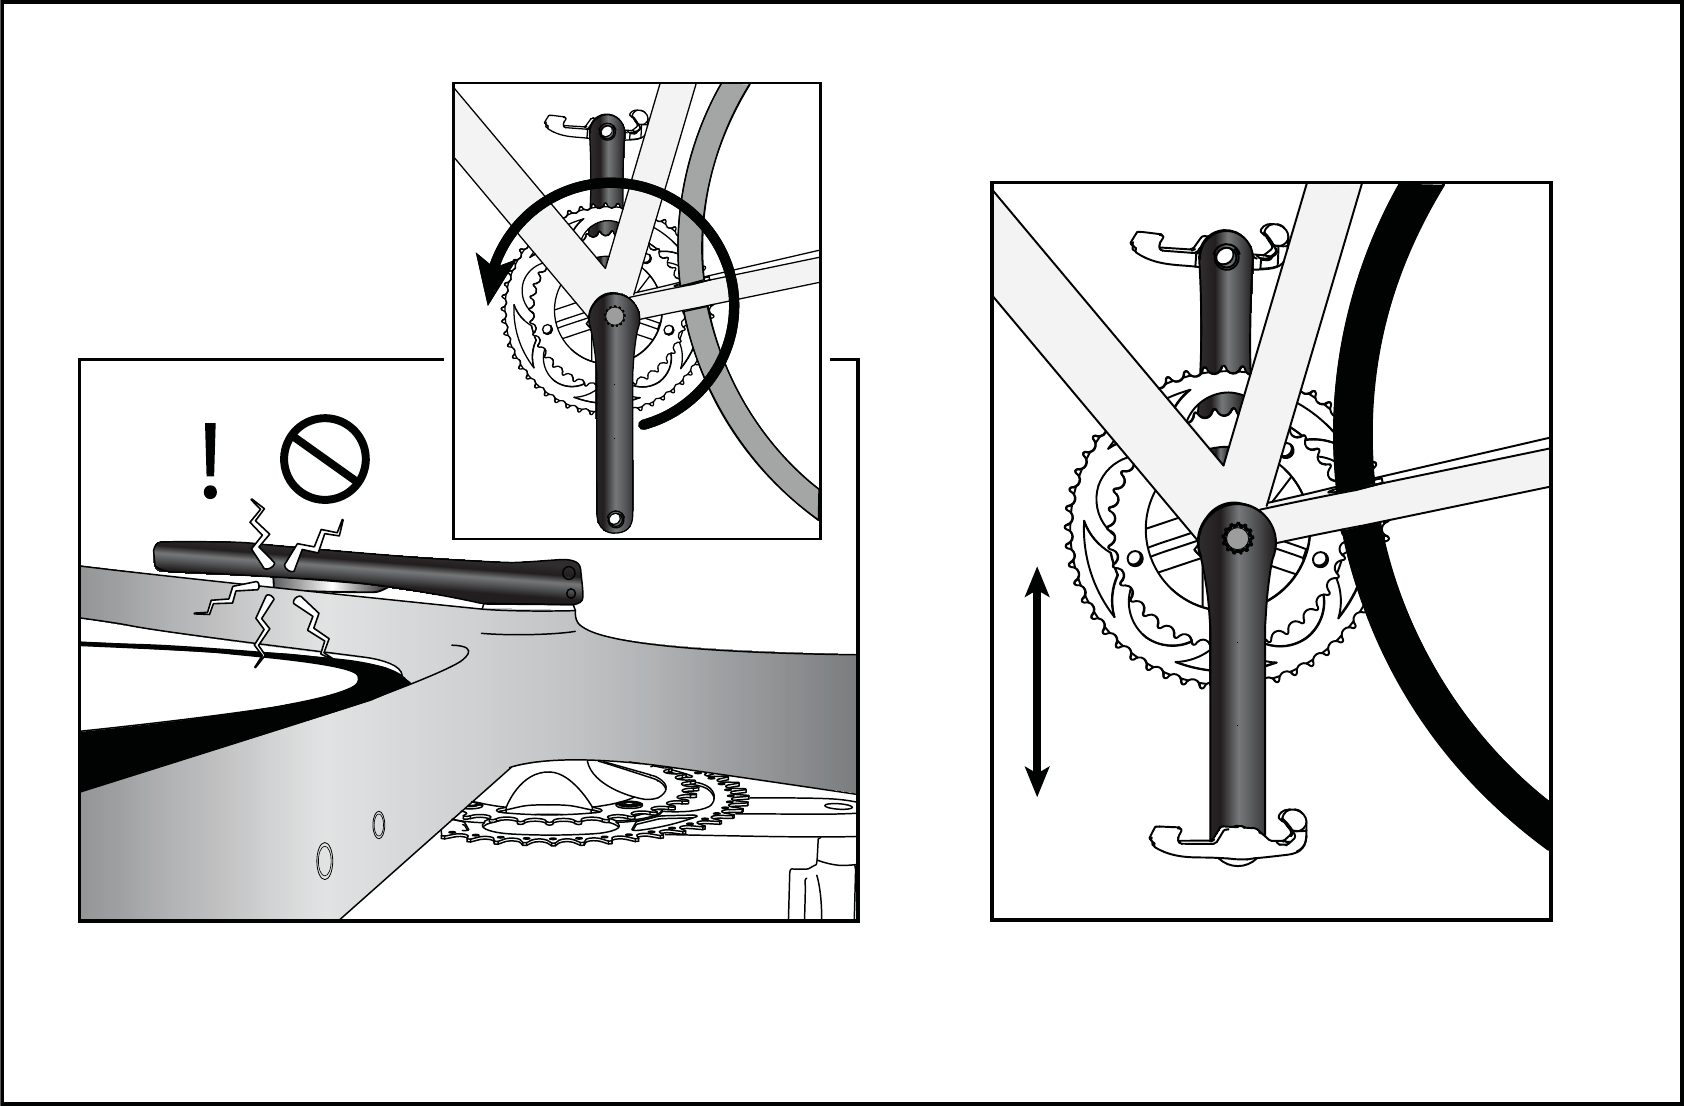
fig 7 fig 8

Water resistance notice
The Stages™ power meter is designed to provide excellent water resistance and tested to resist water ingress to the IPX8
standard (2 meters depth for 30min). This provides outstanding water resistance for cycling conditions on-road and o,
including stream crossing and heavy rain. Please keep in mind this is an electronic device not a submarine; as such, there are
limits to the water resistance.
Do not subject the power meter to direct spray from a high pressure sprayer. Water exiting a sprayer can reach
hundreds and sometime thousands of pounds of pressure per square inch. This may be equivalent to the pressure
found at ocean depths of 1000 feet or more! It is possible for water to be forced past the o-ring seal under these
conditions and damage to the electronics may occur.
Battery installation or replacement
1. The power meter uses a CR2032 battery that can be installed or replaced by hand without the need for additional
tools.
2. Referencing FIG 1 and 2; rotate the battery cover in the counter clockwise direction to release the cover.
Do not attempt to use any tools to force or pry the battery cover open.
3. Place the new CR2032 battery into the battery receptacle with the “+” side facing out. It is critical that the battery is
inserted in this orientation.
4. Before installing the battery cover take care to ensure the water seal o-ring is seated properly in its groove as
illustrated in FIG 4.
5. Replace the battery coveras illustrated in FIG 5.
6. Once the battery cover has been properly inserted and even with the surface of the power meter, use your nger to
rmly rotate the cover back to the locked position as illustrated in FIG 6.
7. The service life of the CR2032 battery is approximately 200 hours of use. When the battery voltage is low a message
will be sent to the display indicating the low battery condition.
Not all ANT+ or Bluetooth Smart display units will display the low battery warning message.

Power meter (crank arm) installation
IMPORTANT NOTICE: to insure power meter compatibility with the frame and components, please follow
these steps carefully and in the specic order. Do not install the pedals until compatibility of the power meter
has been conrmed.
1. Attach the left crank arm to the bike following the instructions provided by the crank arm manufacturer and
supplied with your power meter. Links to crank manufacture’s installation instructions may be found at the Stages
Cycling website: http://www.stagescycling.com/support-general-instruction
2. Carefully and fully install the crank arm onto the bike but DO NOT ATTACH THE PEDAL AT THIS TIME.
3. Carefully and slowly rotate the crank 1 full revolution to ensure there is no contact between the power
meter sensor housing and any part of the frame or other components as illustrated in FIG 7.
4. If there is interference between the power meter and the frame or other components, contact your retailer for
technical assistance. Contact Stages Cycling If the power was purchased from our on-line store.
5. If no interference is found you may continue with the nal installation of pedals according to the pedal
manufacturer’s instructions.
Power meter wireless communication
The power meter is compatible with a wide range of display devices that utilize the ANT+ or Bluetooth Smart (4.0) wireless
communication systems. Many leading brands of bicycle computers utilize the ANT+ “prole” for power measurement and
can be used to display the power (Watts) and cadence (RPM) measured by the power meter and sent wirelessly to the
computer. Bluetooth Smart is a popular wireless communication system included with many of the latest mobile phones.
Utilizing Bluetooth Smart, a mobile phone running a compatible App can be used to display the power (Watts) and
cadence (RPM) data within the App.
The power meter can only communicate through either ANT+ or Bluetooth Smart but NOT both at the same time.
Which type of communication is used depends on the type of display unit the power meter is paired with.

Pairing the power meter
The power meter must be connected or “paired” to the cycle computer or mobile device (collectively referred to as display
units) according to the display manufacturer’s instructions. Each power meter has a unique ANT+ device ID and a unique
Bluetooth ID. During the pairing process the applicable device ID is recorded by the display and will be used to communicate
with the corresponding power meter. The ANT+ ID number is printed on the back of the power meter and also supplied with
the documentation. The Bluetooth ID is recognized and displayed by the Bluetooth device during the pairing process. Both
the ANT+ and Bluetooth IDs are permanently assigned to the power meter and are not aected by changing the power
meter battery. Once paired to the power meter, ride data (Watts and RPM) will be transmitted from the power meter to the
display unit. Other important functions such as resetting the power meter’s zero oset will also be enabled through the
display unit.
ANT+: Ensure the power meter has a fully charged CR2032 battery properly installed. Rotate the crank arm one time to
ensure the power meter is awake and ready to communicate. Follow the ANT+ device manufacturer’s instructions for pairing
a power meter to the display unit. The procedures may vary between manufacturers.
Bluetooth Smart: Ensure the power meter has a fully charged CR2032 battery properly installed. Rotate the crank arm one
time to ensure the power meter is awake and ready to communicate. Follow the Bluetooth Smart Ready (4.0) device
manufacturer’s instructions for pairing a power meter to the display unit. The procedures may vary between manufacturers.

Zero oset
The zero oset is an important feature of the power meter that resets the zero oset value for the power meter sensors. There
are physical and environmental conditions that may aect the zero oset value and there are methods both manual and
automatic that will adjust this value to accommodate for the changing physical and environmental condition. The zero oset
of the power meter is essentially the sensor reading or values measured when the power meter has no pedaling load (torque)
applied. The act of resetting the zero oset causes the power meter to measure the value at zero load and then records this
value as the baseline for power measurement. Loads applied while pedaling will then be measured as torque and used by
the sensor to determine power in Watts. The zero oset value can be aected by the installation of the crank arm and the
tightening of the securing hardware. The torque applied to the securing hardware can impart some strain into the crank
material that is easily accounted for by manually resetting the zero oset. Any time the power meter is removed from the
bike and reinstalled the zero oset should be reset.
Ambient temperature shifts can also aect the zero oset to some extent. To ensure maximum accuracy it is advisable to
manually rest the zero oset before each ride. The power meter utilizes automatic temperature sensors to compensate for
temperature changes that take place during the ride. This is done automatically while you ride and you need not take any
further steps to “zero” the sensor during the ride.
How to reset the zero oset
Resetting the zero oset is a function controlled by the cycle computer or mobile device (display units) paired to the power
meter. Please note that some device manufacturers refer to the step of resetting the zero oset as “calibration”. When paired
to a compatible ANT+ cycle computer or Bluetooth Smart mobile device, the power meter and display units are in two-way
communication. The display unit can send a command to the power meter to reset the zero oset value and in some cases
the resulting zero oset value will be sent back from the power meter to the display unit and be shown on the screen. The
display units will also indicate if the procedure was successful or failed.

Before attempting to reset the zero oset value of the power meter, ensure that a fully charged battery is in use. Rotate the
power meter one revolution to ensure the power meter is awake and ready to communicate.
The left crank arm with power meter MUST be positioned straight down (6 o’clock position) and ensure there is no load on
the pedals and the bike is stable. See FIG 8 for a visual reference. If the left crank arm is not straight down the reset procedure
for zero oset will fail.
Although the process for resetting the zero oset will vary depending on the display manufacturer, it should roughly follow
these general step; however, consult your display unit’s manual for specic steps:
1. Ensure the power meter has been paired to the device and is sending data.
2. Position the crank straight down (6 o’clock position) FG 8, and the bike is stable
3. Access the settings function of the wireless display.
4. Select the power sensor (many times the power sensor is located within a “BIKE” setting).
5. Select the “CALIBRATE” or “Zero” function.
6. Resetting the zero oset will begin and take only a few seconds to complete.
7. Upon completion the display will show a message indicating success or failure of the procedure.
Error Codes
An error code may be displayed if resetting the zero oset fails. Please note the possible error codes below and corrective
action that should be taken. Please note that not all display units will display the error code message.
Code #s Corrective Action
1,2,4,16 Simply attempt zero reset again. If code remains after several attempts please contact
Stages Cycling – Technical Support.
32 Power meter crank not in proper position (straight down) see FIG 8.

Before attempting to reset the zero oset value of the power meter, ensure that a fully charged battery is in use. Rotate the
power meter one revolution to ensure the power meter is awake and ready to communicate.
The left crank arm with power meter MUST be positioned straight down (6 o’clock position) and ensure there is no load on
the pedals and the bike is stable. See FIG 8 for a visual reference. If the left crank arm is not straight down the reset procedure
for zero oset will fail.
Although the process for resetting the zero oset will vary depending on the display manufacturer, it should roughly follow
these general step; however, consult your display unit’s manual for specic steps:
1. Ensure the power meter has been paired to the device and is sending data.
2. Position the crank straight down (6 o’clock position) FG 8, and the bike is stable
3. Access the settings function of the wireless display.
4. Select the power sensor (many times the power sensor is located within a “BIKE” setting).
5. Select the “CALIBRATE” or “Zero” function.
6. Resetting the zero oset will begin and take only a few seconds to complete.
7. Upon completion the display will show a message indicating success or failure of the procedure.
Error Codes
An error code may be displayed if resetting the zero oset fails. Please note the possible error codes below and corrective
action that should be taken.
Code #s Corrective Action
1,2,4,16 Simply attempt zero reset again. If code remains after several attempts please contact
Stages Cycling – Technical Support.
32 Power meter crank not in proper position (straight down) see FIG 8.

Firmware
Firmware is the programming that operates the power meter’s computer. The power meter has been designed to allow
over-the-air (OTA) rmware updates. Updated rmware may be developed and released by Stages Cycling to provide added
or improved functionality. Firmware updates may be sent to the power meter by way of the Stages Cycling Utility App for
Apple® iOS devices using a Bluetooth Smart compatible (BLE 4.0) model such as the iPhone® 4s, 5 or newer and iPad® 3, Mini
or newer. At the time of printing, Android™ Apps supporting Bluetooth OTA updates of the power meter rmware are not yet
available; however, these may be developed and released at a later date. Please check our website at:
www.stagescycling.com/support-rmware-update for links to the available utility Apps hosted in the App stores as well
as instructions on how to utilize the App for rmware update and other procedures.

Troubleshooting
If no power (watts) or cadence (RPM) signal is being received by your compatible display unit when ridding the bike, please
conrm the following items:
1. Conrm that a fully charged CR2032 battery is properly installed in the power meter according to the reference FIGs 1-5
of this manual.
2. Ensure that the power meter has been successfully paired to the display unit being used according the manufacturer’s
specic instructions.
3. For further assistance with Troubleshooting, FAQs, videos and useful tips, please visit our website
at: www.stagescycling.com/support
Maintenance and cleaning
The only items of the power meter that can be serviced by the owner are the battery, battery cover and o-ring. No other items
are serviceable and no attempt should be made to adjust or alter any other items.
When cleaning the power meter use only water dampened cloth to wipe o dirt and debris. Never use any harsh cleaning
chemicals that may damage the plastic housing. Inspect the battery compartment to ensure the batter contact is clean of any
corrosion.
Never directly spray the power meter or battery door with high pressure water. The water pressure from sprayers can
reach thousands of pounds per square inch and may force water past the o-ring damaging the power meter
electronics.

Warranty procedures
Complete warranty details are available in our Important Product Details document and at our website FAQ page:
http://www.stagescycling.com/support
The Stages power meter is considered to be the entire left crank arm, not just the electronics and housing mounted to the
crank arm. As such customers are instructed to contact their retailer or Stages Cycling directly for all warranty claims related
to the left crank arm power meter. Do not contact the crank arm manufacturer for warranty concerns regarding the left arm
as they are not in a position to provide service for this product once the power meter electronics have been permanently
integrated.
To pursue a warranty claim please contact the retailer that sold the power meter. If the power meter was purchased directly
from Stages Cycling please contact us directly via email or phone:
Info@stagescycling.com
1-800-778-7218 (M-F 8am-5pm PST)
In all cases a Return Authorization Number (RA#) must be issued by Stages Cycling before any product is returned for
warranty inspections and service.
The Stages Power™ device may be protected by USA or foreign patents or patents pending.
This document may contain trademarks or registered trademarks of Stages Cycling LLC as represented by the use of ™ and ®
respectively.
ANT+™ is a trademark of Dynastream Innovations Inc.
Bluetooth® is a registered trademark of Bluetooth SIG, Inc
Apple®, iPhone®, iPad® are registered trademarks of Apple Inc.
Android™ is a trademark of Google Inc.
Copyright ©Stages Cycling LLC, 2013

^ƚĂŐĞƐLJĐůŝŶŐΡ
/ŵƉŽƌƚĂŶƚWƌŽĚƵĐƚ/ŶĨŽƌŵĂƚŝŽŶ
ŽŶƚĂĐƚ/ŶĨŽƌŵĂƚŝŽŶ͗
^ƚĂŐĞƐLJĐůŝŶŐ>>
ϭϳϯϮEtYƵŝŵďLJ
^ƵŝƚĞϮϱϬ
WŽƌƚůĂŶĚ͕KZϵϳϮϬϵ
ǁǁǁ͘ƐƚĂŐĞƐĐLJĐůŝŶŐ͘ĐŽŵ
ŝŶĨŽΛƐƚĂŐĞƐĐLJĐůŝŶŐ͘ĐŽŵ
ĂůŝĨŽƌŶŝĂWƌŽƉŽƐŝƚŝŽŶϲϱ
dŚĞĞŶĐůŽƐĞĚŚĂƌĚǁĂƌĞĂŶĚŝƚƐƉĂĐŬĂŐŝŶŐĐŽŶƚĂŝŶĐŚĞŵŝĐĂůƐƚŚĞ^ƚĂƚĞŽĨĂůŝĨŽƌŶŝĂŚĂƐĨŽƵŶĚƚŽĐĂƵƐĞ
ĐĂŶĐĞƌ͕ďŝƌƚŚĚĞĨĞĐƚƐŽƌƌĞƉƌŽĚƵĐƚŝǀĞŚĂƌŵ͘
ZŽ,^
^ƚĂŐĞƐLJĐůŝŶŐĐĞƌƚŝĨŝĞƐƚŚĂƚƚŚŝƐƉƌŽĚƵĐƚĂŶĚŝƚƐƉĂĐŬĂŐŝŶŐĂƌĞŝŶĐŽŵƉůŝĂŶĐĞǁŝƚŚƵƌŽƉĞĂŶhŶŝŽŶ
ŝƌĞĐƚŝǀĞϮϬϬϮͬϵϱͬŽŶƚŚĞZĞƐƚƌŝĐƚŝŽŶŽĨƚŚĞhƐĞŽĨĞƌƚĂŝŶ,ĂnjĂƌĚŽƵƐ^ƵďƐƚĂŶĐĞƐŝŶůĞĐƚƌŝĐĂůĂŶĚ
ůĞĐƚƌŽŶŝĐƐƋƵŝƉŵĞŶƚ͕ĐŽŵŵŽŶůLJŬŶŽǁŶĂƐZŽ,^͘
&ZƵůĞƐWĂƌƚϭϱ
dŚĞĞŶĐůŽƐĞĚŚĂƌĚǁĂƌĞĚĞǀŝĐĞĐŽŵƉůŝĞƐǁŝƚŚƉĂƌƚϭϱŽĨƚŚĞ&ZƵůĞƐ͘KƉĞƌĂƚŝŽŶŝƐƐƵďũĞĐƚƚŽƚŚĞ
ĨŽůůŽǁŝŶŐƚǁŽĐŽŶĚŝƚŝŽŶƐ͗;ϭͿdŚŝƐĚĞǀŝĐĞŵĂLJŶŽƚĐĂƵƐĞŚĂƌŵĨƵůŝŶƚĞƌĨĞƌĞŶĐĞĂŶĚ;ϮͿŝƚŵƵƐƚĂĐĐĞƉƚĂŶLJ
ŝŶƚĞƌĨĞƌĞŶĐĞƌĞĐĞŝǀĞĚ͕ŝŶĐůƵĚŝŶŐŝŶƚĞƌĨĞƌĞŶĐĞƚŚĂƚŵĂLJĐĂƵƐĞƵŶĚĞƐŝƌĞĚŽƉĞƌĂƚŝŽŶ͘
&ŽŵƉůŝĂŶĐĞ^ƚĂƚĞŵĞŶƚ͗
dŚŝƐĞƋƵŝƉŵĞŶƚŚĂƐďĞĞŶƚĞƐƚĞĚĂŶĚĨŽƵŶĚƚŽĐŽŵƉůLJǁŝƚŚůŝŵŝƚƐĨŽƌĂůĂƐƐĚŝŐŝƚĂůĚĞǀŝĐĞ͕ƉƵƌƐƵĂŶƚƚŽ
WĂƌƚϭϱŽĨƚŚĞ&ƌƵůĞƐ͘dŚĞƐĞůŝŵŝƚƐĂƌĞĚĞƐŝŐŶĞĚƚŽƉƌŽǀŝĚĞƌĞĂƐŽŶĂďůĞƉƌŽƚĞĐƚŝŽŶĂŐĂŝŶƐƚŚĂƌŵĨƵů
ŝŶƚĞƌĨĞƌĞŶĐĞŝŶƌĞƐŝĚĞŶƚŝĂůŝŶƐƚĂůůĂƚŝŽŶƐ͘dŚŝƐĞƋƵŝƉŵĞŶƚŐĞŶĞƌĂƚĞƐ͕ƵƐĞƐ͕ĂŶĚĐĂŶƌĂĚŝĂƚĞƌĂĚŝŽĨƌĞƋƵĞŶĐLJ
ĞŶĞƌŐLJ͕ĂŶĚŝĨŶŽƚŝŶƐƚĂůůĞĚĂŶĚƵƐĞĚŝŶĂĐĐŽƌĚĂŶĐĞǁŝƚŚƚŚĞŝŶƐƚƌƵĐƚŝŽŶƐ͕ŵĂLJĐĂƵƐĞŚĂƌŵĨƵů
ŝŶƚĞƌĨĞƌĞŶĐĞƚŽƌĂĚŝŽĐŽŵŵƵŶŝĐĂƚŝŽŶƐ͘,ŽǁĞǀĞƌ͕ƚŚĞƌĞŝƐŶŽŐƵĂƌĂŶƚĞĞƚŚĂƚŝŶƚĞƌĨĞƌĞŶĐĞǁŝůůŶŽƚŽĐĐƵƌ
ŝŶĂƉĂƌƚŝĐƵůĂƌŝŶƐƚĂůůĂƚŝŽŶ͘/ĨƚŚŝƐĞƋƵŝƉŵĞŶƚĚŽĞƐĐĂƵƐĞŝŶƚĞƌĨĞƌĞŶĐĞƚŽƌĂĚŝŽŽƌƚĞůĞǀŝƐŝŽŶĞƋƵŝƉŵĞŶƚ
ƌĞĐĞƉƚŝŽŶ͕ǁŚŝĐŚĐĂŶďĞĚĞƚĞƌŵŝŶĞĚďLJƚƵƌŶŝŶŐƚŚĞĞƋƵŝƉŵĞŶƚŽĨĨĂŶĚŽŶ͕ƚŚĞƵƐĞƌŝƐĞŶĐŽƵƌĂŐĞĚƚŽƚƌLJ
ƚŽĐŽƌƌĞĐƚƚŚĞŝŶƚĞƌĨĞƌĞŶĐĞďLJŽŶĞŽƌŵŽƌĞŽĨƚŚĞĨŽůůŽǁŝŶŐŵĞĂƐƵƌĞƐ͗
•ZĞŽƌŝĞŶƚŽƌƌĞůŽĐĂƚĞƚŚĞƌĞĐĞŝǀŝŶŐĂŶƚĞŶŶĂ
•/ŶĐƌĞĂƐĞƚŚĞƐĞƉĂƌĂƚŝŽŶďĞƚǁĞĞŶƚŚĞĞƋƵŝƉŵĞŶƚĂŶĚƌĞĐĞŝǀĞƌ
•ŽŶŶĞĐƚƚŚĞĞƋƵŝƉŵĞŶƚŝŶƚŽĂŶŽƵƚůĞƚŽŶĂĐŝƌĐƵŝƚĚŝĨĨĞƌĞŶƚĨƌŽŵƚŚĂƚƚŽǁŚŝĐŚƚŚĞƌĞĐĞŝǀĞƌŝƐ
ĐŽŶŶĞĐƚĞĚ͘
•ŽŶƐƵůƚƚŚĞĚĞĂůĞƌŽƌĂŶĞdžƉĞƌŝĞŶĐĞĚƌĂĚŝŽͬdsƚĞĐŚŶŝĐŝĂŶĨŽƌŚĞůƉ
dŽĂƐƐƵƌĞĐŽŶƚŝŶƵĞĚĐŽŵƉůŝĂŶĐĞ͕ĂŶLJĐŚĂŶŐĞƐŽƌŵŽĚŝĨŝĐĂƚŝŽŶƐŶŽƚĞdžƉƌĞƐƐůLJĂƉƉƌŽǀĞĚďLJƚŚĞƉĂƌƚLJ
ƌĞƐƉŽŶƐŝďůĞĨŽƌĐŽŵƉůŝĂŶĐĞĐŽƵůĚǀŽŝĚƚŚĞƵƐĞƌ͛ƐĂƵƚŚŽƌŝƚLJƚŽŽƉĞƌĂƚĞƚŚŝƐĞƋƵŝƉŵĞŶƚ͘;džĂŵƉůĞͲƵƐĞ
ŽŶůLJƐŚŝĞůĚĞĚŝŶƚĞƌĨĂĐĞĐĂďůĞƐǁŚĞŶĐŽŶŶĞĐƚŝŶŐƚŽĂĐŽŵƉƵƚĞƌŽƌƉĞƌŝƉŚĞƌĂůĚĞǀŝĐĞƐͿ͘
ĂƵƚŝŽŶ͊dŚĞŵĂŶƵĨĂĐƚƵƌĞƌŝƐŶŽƚƌĞƐƉŽŶƐŝďůĞĨŽƌĂŶLJƌĂĚŝŽŽƌdsŝŶƚĞƌĨĞƌĞŶĐĞĐĂƵƐĞĚďLJƵŶĂƵƚŚŽƌŝnjĞĚ
ŵŽĚŝĨŝĐĂƚŝŽŶƐƚŽƚŚŝƐĞƋƵŝƉŵĞŶƚ͘^ƵĐŚŵŽĚŝĨŝĐĂƚŝŽŶƐĐŽƵůĚǀŽŝĚƚŚĞƵƐĞƌƐĂƵƚŚŽƌŝƚLJƚŽŽƉĞƌĂƚĞƚŚĞ
ĞƋƵŝƉŵĞŶƚ͘
/^ƚĂƚĞŵĞŶƚ
dŚŝƐĚĞǀŝĐĞĐŽŵƉůŝĞƐǁŝƚŚ/ŶĚƵƐƚƌLJĂŶĂĚĂůŝĐĞŶƐĞͲĞdžĞŵƉƚZ^^ƐƚĂŶĚĂƌĚ;ƐͿ͘KƉĞƌĂƚŝŽŶŝƐƐƵďũĞĐƚƚŽƚŚĞ
ĨŽůůŽǁŝŶŐƚǁŽĐŽŶĚŝƚŝŽŶƐ͗;ϭͿƚŚŝƐĚĞǀŝĐĞŵĂLJŶŽƚĐĂƵƐĞŝŶƚĞƌĨĞƌĞŶĐĞ͕ĂŶĚ;ϮͿƚŚŝƐĚĞǀŝĐĞŵƵƐƚĂĐĐĞƉƚĂŶLJ
ŝŶƚĞƌĨĞƌĞŶĐĞ͕ŝŶĐůƵĚŝŶŐŝŶƚĞƌĨĞƌĞŶĐĞƚŚĂƚŵĂLJĐĂƵƐĞƵŶĚĞƐŝƌĞĚŽƉĞƌĂƚŝŽŶŽĨƚŚĞĚĞǀŝĐĞ͘dŚĞĚĞǀŝĐĞŵĞĞƚƐ
ƚŚĞĞdžĞŵƉƚŝŽŶĨƌŽŵƚŚĞƌŽƵƚŝŶĞĞǀĂůƵĂƚŝŽŶůŝŵŝƚƐŝŶƐĞĐƚŝŽŶϮ͘ϱŽĨZ^^ϭϬϯĂŶĚƵƐĞƌƐĐĂŶŽďƚĂŝŶ
ĂŶĂĚŝĂŶŝŶĨŽƌŵĂƚŝŽŶŽŶZ&ĞdžƉŽƐƵƌĞĂŶĚĐŽŵƉůŝĂŶĐĞ
>ĞƉƌĠƐĞŶƚĂƉƉĂƌĞŝůĞƐƚĐŽŶĨŽƌŵĞͺĂƵdžEZͺĚΖ/ŶĚƵƐƚƌŝĞĂŶĂĚĂĂƉƉůŝĐĂďůĞƐĂƵdžĂƉƉĂƌĞŝůƐƌĂĚŝŽĞdžĞŵƉƚƐ
ĚĞůŝĐĞŶĐĞ͘>͛ĞdžƉůŽŝƚĂƚŝŽŶĞƐƚĂƵƚŽƌŝƐĠĞĂƵdžĚĞƵdžĐŽŶĚŝƚŝŽŶƐƐƵŝǀĂŶƚĞƐ͗;ϭͿů͛ĂƉƉĂƌĞŝůŶĞĚŽŝƚƉĂƐƉƌŽĚƵŝƌĞ
ĚĞďƌŽƵŝůůĂŐĞ͕Ğƚ;ϮͿů͛ƵƚŝůŝƐĂƚĞƵƌĚĞů͛ĂƉƉĂƌĞŝůĚŽŝƚĂĐĐĞƉƚĞƌƚŽƵƚďƌŽƵŝůůĂŐĞƌĂĚŝŽĠůĞĐƚƌŝƋƵĞƐƵďŝ͕ŵġŵĞƐŝ
ůĞďƌŽƵŝůůĂŐĞĞƐƚƐƵƐĐĞƉƚŝďůĞĚ͛ĞŶĐŽŵƉƌŽŵĞƚƚƌĞůĞĨŽŶĐƚŝŽŶŶĞŵĞŶƚ͘>ĞĚŝƐƉŽƐŝƚŝĨƌĞŶĐŽŶƚƌĞůΖĞdžĞŵƉƚŝŽŶ
ĚĞƐůŝŵŝƚĞƐͺĐŽƵƌĂŶƚĞƐĚ͛ĠǀĂůƵĂƚŝŽŶĚĂŶƐůĂƐĞĐƚŝŽŶϮ͘ϱĚĞZ^^ϭϬϮĞƚůĞƐƵƚŝůŝƐĂƚĞƵƌƐƉĞƵǀĞŶƚŽďƚĞŶŝƌ
ů͛ŝŶĨŽƌŵĂƚŝŽŶĐĂŶĂĚŝĞŶŶĞƐƵƌůΖĞdžƉŽƐŝƚŝŽŶĞƚůĂĐŽŶĨŽƌŵŝƚĠĚĞƌĨ͘
ƐƚĂƚĞŵĞŶƚ㧦
ƵƌŽƉĞʹhĞĐůĂƌĂƚŝŽŶŽĨŽŶĨŽƌŵŝƚLJdŚŝƐĚĞǀŝĐĞĐŽŵƉůŝĞƐǁŝƚŚƚŚĞĞƐƐĞŶƚŝĂůƌĞƋƵŝƌĞŵĞŶƚƐŽĨƚŚĞ
ZΘddŝƌĞĐƚŝǀĞϭϵϵϵͬϱͬ͘dŚĞĨŽůůŽǁŝŶŐƚĞƐƚŵĞƚŚŽĚƐŚĂǀĞďĞĞŶĂƉƉůŝĞĚŝŶŽƌĚĞƌƚŽƉƌŽǀĞ
ƉƌĞƐƵŵƉƚŝŽŶŽĨĐŽŶĨŽƌŵŝƚLJǁŝƚŚƚŚĞĞƐƐĞŶƚŝĂůƌĞƋƵŝƌĞŵĞŶƚƐŽĨƚŚĞZΘddŝƌĞĐƚŝǀĞϭϵϵϵͬϱͬ͗
EϲϬϵϱϬͲϭ͗ϮϬϬϲнϭϮ͗ϮϬϭϭ
EϱϱϬϮϮнEϱϱϬϮϰ;ϮϬϭϬͿ
EϯϬϭϰϴϵͲϭsϭ͘ϴ͘ϭ;ϮϬϬϴͲϬϰͿ
EϯϬϭϰϴϵͲϯsϭ͘ϰ͘ϭ;ϮϬϬϮͲϬϴͿ
EϯϬϬϰϰϬͲϮsϭ͘ϯ͘ϭ;ϮϬϬϵͲϬϯͿ
dŚŝƐĚĞǀŝĐĞŝƐĂϮ͘ϰ',njǁŝĚĞďĂŶĚƚƌĂŶƐŵŝƐƐŝŽŶƐLJƐƚĞŵ;ƚƌĂŶƐĐĞŝǀĞƌͿ͕ŝŶƚĞŶĚĞĚĨŽƌƵƐĞŝŶĂůůhŵĞŵďĞƌ
ƐƚĂƚĞƐĂŶĚ&dĐŽƵŶƚƌŝĞƐ͕ĞdžĐĞƉƚŝŶ&ƌĂŶĐĞĂŶĚ/ƚĂůLJǁŚĞƌĞƌĞƐƚƌŝĐƚŝǀĞƵƐĞĂƉƉůŝĞƐ͘/Ŷ/ƚĂůLJƚŚĞĞŶĚͲƵƐĞƌ
ƐŚŽƵůĚĂƉƉůLJĨŽƌĂůŝĐĞŶƐĞĂƚƚŚĞŶĂƚŝŽŶĂůƐƉĞĐƚƌƵŵĂƵƚŚŽƌŝƚŝĞƐŝŶŽƌĚĞƌƚŽŽďƚĂŝŶĂƵƚŚŽƌŝnjĂƚŝŽŶƚŽƵƐĞ
ƚŚĞĚĞǀŝĐĞĨŽƌƐĞƚƚŝŶŐƵƉŽƵƚĚŽŽƌƌĂĚŝŽůŝŶŬƐĂŶĚͬŽƌĨŽƌƐƵƉƉůLJŝŶŐƉƵďůŝĐĂĐĐĞƐƐƚŽƚĞůĞĐŽŵŵƵŶŝĐĂƚŝŽŶƐ
ĂŶĚͬŽƌŶĞƚǁŽƌŬƐĞƌǀŝĐĞƐ͘dŚŝƐĚĞǀŝĐĞŵĂLJŶŽƚďĞƵƐĞĚĨŽƌƐĞƚƚŝŶŐƵƉŽƵƚĚŽŽƌƌĂĚŝŽůŝŶŬƐŝŶ&ƌĂŶĐĞĂŶĚŝŶ
ƐŽŵĞĂƌĞĂƐƚŚĞZ&ŽƵƚƉƵƚƉŽǁĞƌŵĂLJďĞůŝŵŝƚĞĚƚŽϭϬŵt/ZWŝŶƚŚĞĨƌĞƋƵĞŶĐLJƌĂŶŐĞŽĨϮϰϱϰʹϮϰϴϯ͘ϱ
D,nj͘&ŽƌĚĞƚĂŝůĞĚŝŶĨŽƌŵĂƚŝŽŶƚŚĞĞŶĚͲƵƐĞƌƐŚŽƵůĚĐŽŶƚĂĐƚƚŚĞŶĂƚŝŽŶĂůƐƉĞĐƚƌƵŵĂƵƚŚŽƌŝƚLJŝŶ&ƌĂŶĐĞ͘
,ĞƌĞďLJ͕^ƚĂŐĞƐLJĐůŝŶŐĚĞĐůĂƌĞƐƚŚĂƚƚŚĞƐĞƉƌŽĚƵĐƚƐĂƌĞŝŶĐŽŵƉůŝĂŶĐĞǁŝƚŚƚŚĞĞƐƐĞŶƚŝĂůƌĞƋƵŝƌĞŵĞŶƚƐ
ĂŶĚŽƚŚĞƌƌĞůĞǀĂŶƚƉƌŽǀŝƐŝŽŶƐŽĨŝƌĞĐƚŝǀĞϭϵϵϵͬϱͬ͘
^d'^z>/E'>>;ϭͿKŶĞzĞĂƌ>ŝŵŝƚĞĚtĂƌƌĂŶƚLJ
,KtKE^hDZ>tZ>d^dKd,/^tZZEdz
d,/^tZZEdz'/s^zKh^W/&/>'>Z/',d^͕EzKhDz,sKd,ZZ/',d^d,dsZz&ZKD^dd
dK^dd;KZzKhEdZzKZWZKs/EͿ͘Kd,Zd,E^WZD/ddz>t͕^d'^z>/E'K^EKd
y>h͕>/D/dKZ^h^WEKd,ZZ/',d^zKhDz,s͘&KZ&h>>hEZ^dE/E'K&zKhZZ/',d^zKh
^,Kh>KE^h>dd,>t^K&zKhZKhEdZz͕WZKs/EKZ^dd͘
tZZEdz>/D/dd/KE^d,dDz&&dKE^hDZ>t
dKd,ydEdWZD/ddz>t͕d,/^tZZEdzEd,ZD/^^d&KZd,Zy>h^/sE/E>/h
K&>>Kd,ZtZZEd/^͕ZD/^EKE/d/KE^͕t,d,ZKZ>͕tZ/ddE͕^ddhdKZz͕yWZ^^KZ
/DW>/͘^d'^z>/E'/^>/D^>>^ddhdKZzE/DW>/tZZEd/^͕/E>h/E't/d,Khd
>/D/dd/KE͕tZZEd/^K&DZ,Ed/>/dzE&/dE^^&KZWZd/h>ZWhZWK^EtZZEd/^
'/E^d,/EKZ>dEd&d^͕dKd,ydEdWZD/ddz>t͘/E^K&Z^^h,tZZEd/^
EEKd/^>/D͕^d'^z>/E'>/D/d^d,hZd/KEEZD/^K&^h,tZZEd/^dKd,
hZd/KEK&d,/^yWZ^^tZZEdzE͕d^d'^z>/E'Ζ^KWd/KE͕d,ZW/ZKZZW>DEd
^Zs/^^Z/>Kt͘/EEKsEdt/>>d,s>hK&d,tZZEdzWZKs/yd,
KZ/'/E>WhZ,^WZ/͘^KD^dd^;KhEdZ/^EWZKs/E^ͿKEKd>>Kt>/D/dd/KE^KE,Kt
>KE'E/DW>/tZZEdz;KZKE/d/KEͿDz>^d͕^Kd,>/D/dd/KE^Z/KsDzEKd
WW>zdKzKh͘
t,d/^KsZzd,/^tZZEdz͍
^ƚĂŐĞƐLJĐůŝŶŐǁĂƌƌĂŶƚƐƚŚĞ^ƚĂŐĞƐLJĐůŝŶŐͲďƌĂŶĚĞĚŚĂƌĚǁĂƌĞƉƌŽĚƵĐƚĂŶĚĂĐĐĞƐƐŽƌŝĞƐĐŽŶƚĂŝŶĞĚŝŶƚŚĞŽƌŝŐŝŶĂů
ƉĂĐŬĂŐŝŶŐ;Η^ƚĂŐĞƐLJĐůŝŶŐWƌŽĚƵĐƚΗͿĂŐĂŝŶƐƚĚĞĨĞĐƚƐŝŶŵĂƚĞƌŝĂůƐĂŶĚǁŽƌŬŵĂŶƐŚŝƉǁŚĞŶƵƐĞĚŶŽƌŵĂůůLJŝŶ
ĂĐĐŽƌĚĂŶĐĞǁŝƚŚ^ƚĂŐĞƐLJĐůŝŶŐΖƐƉƵďůŝƐŚĞĚŐƵŝĚĞůŝŶĞƐĨŽƌĂƉĞƌŝŽĚŽĨKE;ϭͿzZĨƌŽŵƚŚĞĚĂƚĞŽĨŽƌŝŐŝŶĂůƌĞƚĂŝů
ƉƵƌĐŚĂƐĞďLJƚŚĞĞŶĚͲƵƐĞƌƉƵƌĐŚĂƐĞƌ;ΗtĂƌƌĂŶƚLJWĞƌŝŽĚΗͿ͘dŚŝƐǁĂƌƌĂŶƚLJŽŶůLJĂƉƉůŝĞƐƚŽƚŚĞŽƌŝŐŝŶĂůŽǁŶĞƌĂŶĚŝƐ
ŶŽƚƚƌĂŶƐĨĞƌĂďůĞ͘
t,d/^EKdKsZzd,/^tZZEdz͍
dŚŝƐǁĂƌƌĂŶƚLJĂƉƉůŝĞƐƚŽ^ƚĂŐĞƐLJĐůŝŶŐďƌĂŶĚĞĚƉƌŽĚƵĐƚƐŝŶĐůƵĚŝŶŐďƵƚŶŽƚůŝŵŝƚĞĚƚŽĐƌĂŶŬĂƌŵƐǁŚĞŶƉĂĐŬĂŐĞĚ
ŽƌƐŽůĚǁŝƚŚ^ƚĂŐĞƐLJĐůŝŶŐŚĂƌĚǁĂƌĞ͘DĂŶƵĨĂĐƚƵƌĞƌƐ͕ƐƵƉƉůŝĞƌƐ͕ŽƌƉƵďůŝƐŚĞƌƐ͕ŽƚŚĞƌƚŚĂŶ^ƚĂŐĞƐLJĐůŝŶŐ͕ŵĂLJ
ƉƌŽǀŝĚĞƚŚĞŝƌŽǁŶǁĂƌƌĂŶƚŝĞƐƚŽLJŽƵďƵƚ^ƚĂŐĞƐLJĐůŝŶŐ͕ŝŶƐŽĨĂƌĂƐƉĞƌŵŝƚƚĞĚďLJůĂǁ͕ƉƌŽǀŝĚĞƐƚŚĞŝƌƉƌŽĚƵĐƚƐΗ^
/^Η͘^ƚĂŐĞƐLJĐůŝŶŐĚŽĞƐŶŽƚǁĂƌƌĂŶƚƚŚĂƚƚŚĞŽƉĞƌĂƚŝŽŶŽĨƚŚĞ^ƚĂŐĞƐLJĐůŝŶŐWƌŽĚƵĐƚǁŝůůďĞƵŶŝŶƚĞƌƌƵƉƚĞĚŽƌ
ĞƌƌŽƌͲĨƌĞĞ͘^ƚĂŐĞƐLJĐůŝŶŐŝƐŶŽƚƌĞƐƉŽŶƐŝďůĞĨŽƌĚĂŵĂŐĞĂƌŝƐŝŶŐĨƌŽŵĨĂŝůƵƌĞƚŽĨŽůůŽǁŝŶƐƚƌƵĐƚŝŽŶƐƌĞůĂƚŝŶŐƚŽƚŚĞ
^ƚĂŐĞƐLJĐůŝŶŐWƌŽĚƵĐƚΖƐƵƐĞ͘^ƚĂŐĞƐLJĐůŝŶŐΖƐƉƵďůŝƐŚĞĚŐƵŝĚĞůŝŶĞƐŝŶĐůƵĚĞďƵƚĂƌĞŶŽƚůŝŵŝƚĞĚƚŽŝŶĨŽƌŵĂƚŝŽŶ
ĐŽŶƚĂŝŶĞĚŝŶƚĞĐŚŶŝĐĂůƐƉĞĐŝĨŝĐĂƚŝŽŶƐ͕ƵƐĞƌŵĂŶƵĂůƐĂŶĚƐĞƌǀŝĐĞĐŽŵŵƵŶŝĐĂƚŝŽŶƐ͘
dŚŝƐǁĂƌƌĂŶƚLJĚŽĞƐŶŽƚĂƉƉůLJ͗;ĂͿƚŽĐŽŶƐƵŵĂďůĞƉĂƌƚƐ͕ƐƵĐŚĂƐďĂƚƚĞƌŝĞƐŽƌƉƌŽƚĞĐƚŝǀĞĐŽĂƚŝŶŐƐƚŚĂƚĂƌĞĚĞƐŝŐŶĞĚ
ƚŽĚŝŵŝŶŝƐŚŽǀĞƌƚŝŵĞ͕ƵŶůĞƐƐĨĂŝůƵƌĞŚĂƐŽĐĐƵƌƌĞĚĚƵĞƚŽĂĚĞĨĞĐƚŝŶŵĂƚĞƌŝĂůƐŽƌǁŽƌŬŵĂŶƐŚŝƉ͖;ďͿƚŽĐŽƐŵĞƚŝĐ
ĚĂŵĂŐĞ͕ŝŶĐůƵĚŝŶŐďƵƚŶŽƚůŝŵŝƚĞĚƚŽƐĐƌĂƚĐŚĞƐĂŶĚĚĞŶƚƐ͖;ĐͿƚŽĚĂŵĂŐĞĐĂƵƐĞĚďLJƵƐĞǁŝƚŚĂŶŽƚŚĞƌƉƌŽĚƵĐƚ͖;ĚͿ
ƚŽĚĂŵĂŐĞĐĂƵƐĞĚďLJĂĐĐŝĚĞŶƚ͕ŝŵƉĂĐƚ͕ĂďƵƐĞ͕ŵŝƐƵƐĞ͕ĨŝƌĞ͕ĞĂƌƚŚƋƵĂŬĞŽƌŽƚŚĞƌĞdžƚĞƌŶĂůĐĂƵƐĞ͖;ĞͿƚŽĚĂŵĂŐĞ
ĐĂƵƐĞĚďLJŽƉĞƌĂƚŝŶŐƚŚĞ^ƚĂŐĞƐLJĐůŝŶŐWƌŽĚƵĐƚŽƵƚƐŝĚĞ^ƚĂŐĞƐLJĐůŝŶŐΖƐƉƵďůŝƐŚĞĚŐƵŝĚĞůŝŶĞƐ͖;ĨͿƚŽĚĂŵĂŐĞ
ĐĂƵƐĞĚďLJƐĞƌǀŝĐĞ͕ŵŽĚŝĨŝĐĂƚŝŽŶƐŽƌĂůƚĞƌĂƚŝŽŶƐƉĞƌĨŽƌŵĞĚďLJĂŶLJŽŶĞŽƚŚĞƌƚŚĂŶ^ƚĂŐĞƐLJĐůŝŶŐŽƌĂŶĂƵƚŚŽƌŝnjĞĚ
^ƚĂŐĞƐLJĐůŝŶŐ^ĞƌǀŝĐĞWƌŽǀŝĚĞƌ;ŚͿƚŽĚĞĨĞĐƚƐĐĂƵƐĞĚďLJŶŽƌŵĂůǁĞĂƌĂŶĚƚĞĂƌŽƌŽƚŚĞƌǁŝƐĞĚƵĞƚŽƚŚĞŶŽƌŵĂů
ĂŐŝŶŐŽĨƚŚĞ^ƚĂŐĞƐLJĐůŝŶŐWƌŽĚƵĐƚ͕Žƌ;ŝͿŝĨĂŶLJƐĞƌŝĂůŶƵŵďĞƌŚĂƐďĞĞŶƌĞŵŽǀĞĚŽƌĚĞĨĂĐĞĚĨƌŽŵƚŚĞ^ƚĂŐĞƐ
LJĐůŝŶŐWƌŽĚƵĐƚ͘
/DWKZdEdZ^dZ/d/KE
^ƚĂŐĞƐLJĐůŝŶŐŵĂLJƌĞƐƚƌŝĐƚǁĂƌƌĂŶƚLJƐĞƌǀŝĐĞƚŽƚŚĞĐŽƵŶƚƌLJǁŚĞƌĞ^ƚĂŐĞƐLJĐůŝŶŐŽƌŝƚƐƵƚŚŽƌŝnjĞĚŝƐƚƌŝďƵƚŽƌƐ
ŽƌŝŐŝŶĂůůLJƐŽůĚƚŚĞ^ƚĂŐĞƐLJĐůŝŶŐWƌŽĚƵĐƚ͘