Wahoo Fitness WF110 KICKR SNAP User Manual revised
Wahoo Fitness LLC KICKR SNAP Users Manual revised
Users Manual(revised)

QUICK START GUIDE
QUICK START GUIDE ENGLISH
Thank you for purchasing the Wahoo Fitness KICKR SNAP PowerTrainer
Learn More: For instructional videos, compatible apps, FAQs and more, please visit: www.wahoofitness.com
Please contact us with questions at:
Wahoo Fitness
90 W. Wieuca Rd. NE, Suite 110
Atlanta, GA 30342 United States
Email: support@wahoofitness.com
CAUTION
• Before beginning or modifying any exercise program, please consult your physician.
• Do not put hands or objects near moving parts of the KICKR SNAP or bicycle.
• The KICKR SNAP may become hot to the touch when used for extended periods of time.
• Do not attempt to dismount the bicycle while the KICKR SNAP or bicycle wheel is in motion.
• Keep children and pets away from the KICKR SNAP while in use.
• Only use the KICKR SNAP on a stable and level surface.
• Use caution when standing while riding on the KICKR SNAP.
• Keep the KICKR SNAP away from water.
• Do not apply rear brake to stop the KICKR SNAP or tire and/or bike damage may occur.
1.
1.
UNPACKING
In the box you will find your (1) KICKR SNAP PowerTrainer, (2)
AC power adapter, and (3) quick release skewer. Remove your
KICKR SNAP and accessories from the box. Be sure to save the
protective packaging for transportation and storage.
PREPARING KICKR SNAP
1. Place your KICKR SNAP on a stable, level surface and fully
extend the legs.
2. Use the included AC power adapter to connect the KICKR
SNAP to an electrical outlet.
CAUTION: Check that your trainer is stable before every ride.
1.
1.
2.
2.
3.
PREPARING YOUR BICYCLE
1. Remove your existing quick release skewer from the rear
wheel of the bicycle and install the quick release skewer
included with the KICKR SNAP. The quick release skewer
lever should be installed on the non-drive side of the bicycle.
2. Inflate the bicycle’s rear tire to the manufacturer’s
recommended tire pressure.
CAUTION: Failure to use the included quick release skewer
may result in damage and injury.
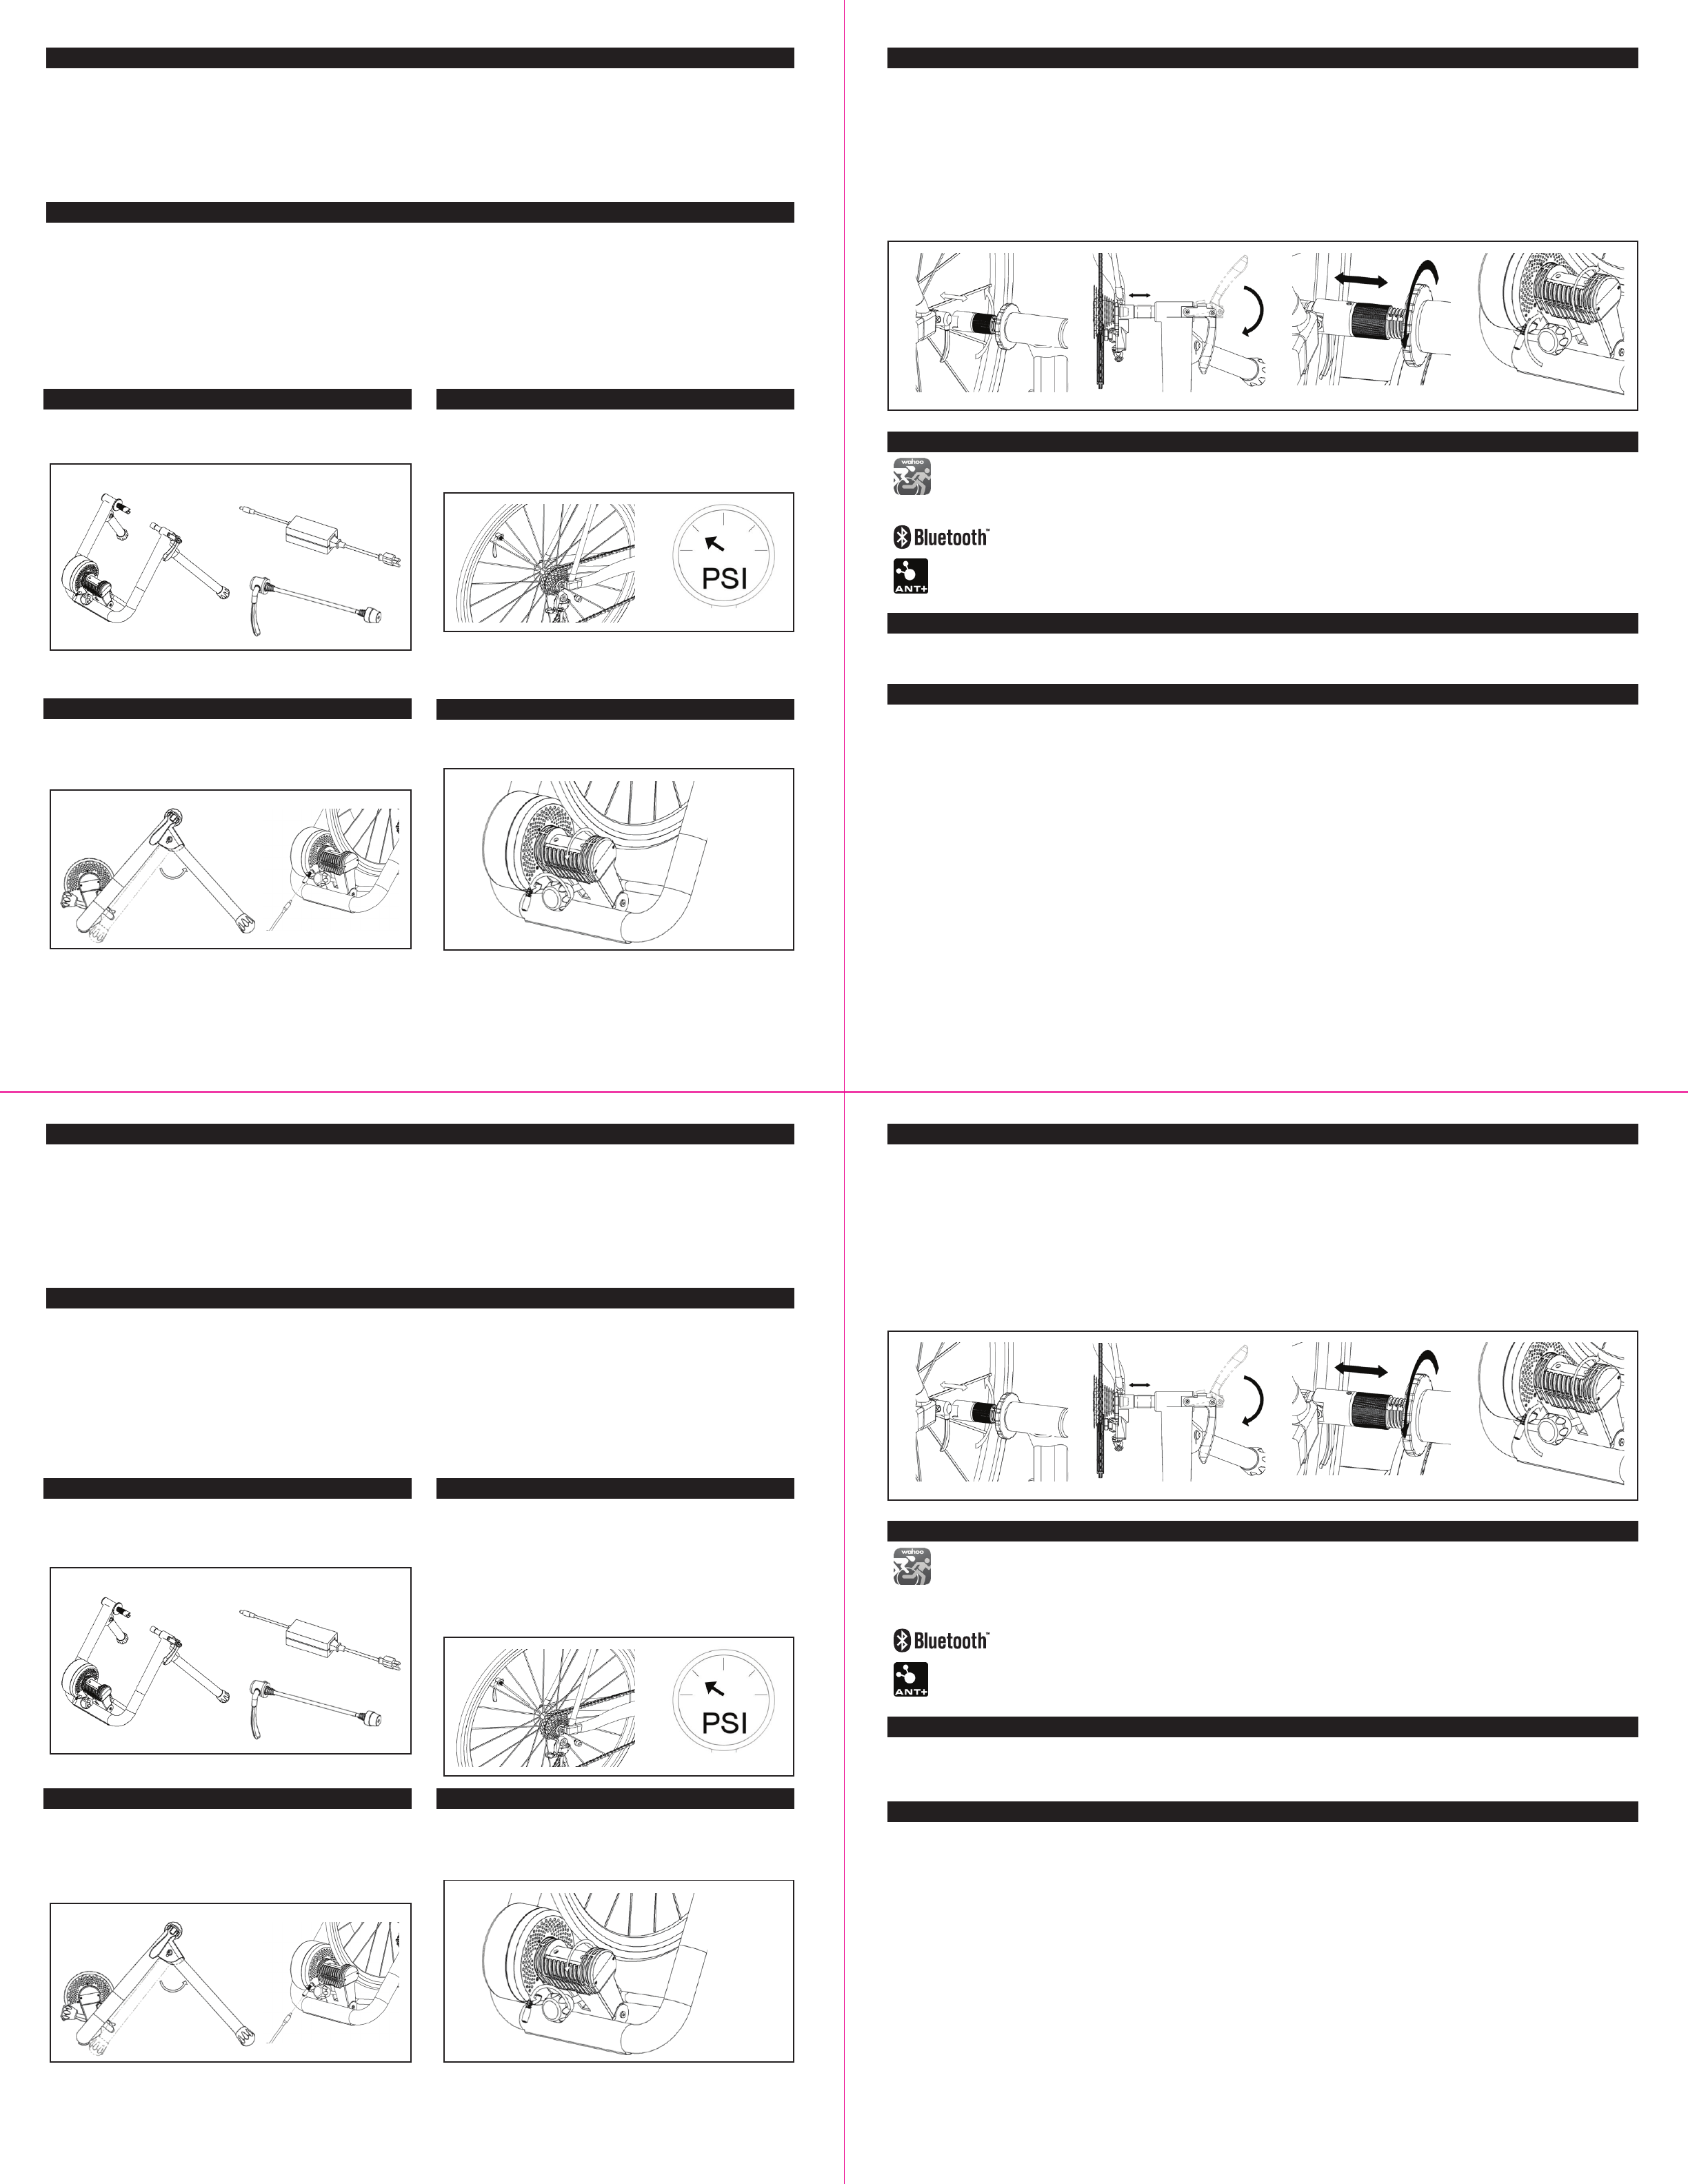
ATTACHING YOUR BICYCLE TO THE KICKR SNAP
1. Begin by loosening the roller to provide space to allow
proper alignment of the KICKR SNAP’s clamping mechanism
with the bicycle’s quick release skewer. In addition, open the
blue handle to open the clamping mechanism.
2.
Web: www.wahoofitness.com
Telephone: 1-877-978-1112
Phone Hours: Monday – Friday
(10am - 5pm US Eastern Time Zone)
ATTACHING YOUR BICYCLE TO THE KICKR SNAP cont’d
2. Place your bike between the KICKR SNAP’s clamping mechanism and align the non-drive side quick release skewer lever with the
KICKR SNAP’s non-drive side clamp.
3. Close the KICKR SNAP’s clamping mechanism by pulling the blue clamp lock handle down. The clamping mechanism should fully
engage the end of the skewer when the blue clamp handle is located at approximately the 4 o’clock position.
The bicycle should be secured in the clamp and the bicycle’s tire is centered on the roller.
4. If the blue clamp handle feels too difficult to close, adjust the non-drive side screw away from the bike and try again. If upon closing
the blue clamp handle, the bicycle is not clamped securely, adjust the non-drive side clamp towards the bike and try again.
Once the bicycle is properly secured, adjust the non-drive side lock ring to lock the bicycle in the trainer clamp.
CAUTION: Do not over-tighten to prevent damage.
5. Tighten the roller against the bicycle’s tire to prevent tire slip. To set the correct roller tension against the tire, use your hand
to hold the flywheel stationary and attempt to rotate the bicycle wheel with your other hand. The correct tension is set when
the bicycle tire does not slide or slip. The tire should not slip during use. If you experience slip during use, increase the tension
on the tire.
2. 3. 4. 5.
COMMUNICATING WITH YOUR KICKR SNAP
Download the Wahoo Fitness app for your Apple iOS or Android device.
The Wahoo Fitness app is available for free download for your Apple and Android device. The Wahoo Fitness app allows
you to test the connection to and control the resistance of your KICKR SNAP during workouts.
The KICKR SNAP is capable of wirelessly connecting to your device via ANT+™ and Bluetooth® 4.0 (Bluetooth Smart) technology.
The connection process depends on the device, application and wireless technology you are using.
Bluetooth 4.0: Available in Apple devices (iPhone4s and newer, and iPad 3rd generation and newer), Android
devices with Bluetooth 4.0 using Android version 4.3 or newer, and some computers.
ANT+: Apple iOS devices capable of using the Wahoo Fitness ANT+ Key (sold separately, available at www.wahoofitness.
com). The Wahoo Fitness ANT+ Key is compatible with Apple devices with the 30-pin connector or devices with the
Lightning connector by using a Lightning to 30-pin adapter. Computers are capable of connecting via ANT+ by using
an ANT+ USB adapter. See www.thisisant.com for compatible ANT+ devices.
PERFORM A CALIBRATION SPINDOWN
The KICKR SNAP measures the rider’s power output. To obtain the most accurate power measurement, a calibration spindown
should be performed at the beginning of every ride.
Download the Wahoo Fitness app and perform a calibration spindown.
FOR BEST RESULTS
• Perform a calibration spindown at the beginning of every ride.
• Use a slick tire with the KICKR SNAP.
• Avoid use of knobby tires. Knobby tires will create excessive noise and vibration.
• Use tires with a hard compound to decrease tread wear and extend tread life.
快速安装指南 - CHINESE
感谢您购买Wahoo Fitness KICKR SNAP力量训练器
了解更多: 要查看教学视频、兼容应用、常见问题解答等,请访问: www.wahootness.com
如有问题,请与我们联系:
Wahoo Fitness
90 W. Wieuca Rd. NE, Suite 110
Atlanta, GA 30342 United States
邮箱: support@wahootness.com
注意事项
• 在开始或修改任何锻炼计划前,请咨询医师。
• 勿将手或物体靠近KICKR SNAP或自行车运转部位。
• KICKR SNAP较长时间使用会发热,故请勿用手触及。
• 当KICKR SNAP或自行车车轮在运转时请勿试图卸装自行车。
• 使用期间让儿童和宠物远离KICKR SNAP。
• 仅在稳定、水平的表面上使用KICKR SNAP。
• 在KICKR SNAP上骑行时站立要小心。
• 让KICKR SNAP远离水源。
• 勿使用后刹来停止KICKR SNAP,否则轮胎和/或自行车可能损坏。
1.
1.
1.
1.
开箱
包装箱内所含物品:(1) KICKR SNAP力量训练器,(2)AC电源适配器,及
(3) 快拆杆。从箱内取出您的KICKR SNAP和配件。务必保留运输和存储
用的保护性包装。
准备KICKR SNAP
1.将您的KICKR SNAP放在一个稳定、水平的表面上,充分展开支脚。
2. 使用附带的AC电源适配器将KICKR SNAP接到一个插座上。
注意: 每次骑乘前请检查训练器是否稳定。
1.
1.
1.
1.
2.
2.
2.
2.
3.
3.
准备您的自行车
1. 从自行车后轮取下现有快拆杆,然后装上KICKR SNAP随附的快拆
杆。快拆杆应安装在自行车非驱动侧。
2. 将自行车后胎充气至厂家推荐胎压。
警告: 未使用随附快拆杆可能会导致损伤。
将您的自行车连接到KICKR SNAP上
1. 首先松开滚轮,提供空间将KICKR SNAP的夹钳机构与自行车的快
拆杆正确对齐。此外,打开蓝把手开启夹钳机构。
2.
2.
将您的自行车连接到KICKR SNAP上
2. 将自行车放于KICKR SNAP夹钳机构之间,对齐非驱动侧快拆杆和KICKR SNAP的非驱动侧夹钳。
3. 下拉蓝色夹钳锁把手闭合KICKR SNAP的夹钳机构。当蓝色夹钳把手大概位于4点钟位置时,夹钳机构应该与快拆杆末端完全结合。自行车应该固
定在夹钳中,自行车轮胎应在滚轮中间。
4. 如果感觉蓝夹钳太难关上,可将非驱动侧快拆杆向自行车外调并重试。在闭合了蓝色夹钳把手后,如果自行车未夹稳,则将非驱动侧夹钳向自行车
内调并重试。
警告: 不要过度上紧以避免损坏。
在正确固定好自行车后,调整非驱动侧锁环将自行车锁在训练器夹钳中。
5. 调紧滚轮与自行车车胎的接触以防止轮胎打滑。要设置滚轮对轮胎的正确张度,用手扶稳飞轮固定装置,然后用另一只手转动自行车车轮。当自行
车不滑时即设置了正确的张度。使用期间轮胎不应打滑。若在使用时遇到打滑,请增加对轮胎的张力
2.
2.
3.
3.
4.
4.
5.
5.
与你的KICKR SNAP通信
下载Wahoo Fitness或Wahoo Fitness Utility应用到您的Apple iOS或Android设备上。
Wahoo Fitness和WahooFitness Utility应用可免费下载到您的Apple和Android设备上。Wahoo Fitness应用可让您在锻炼期间控制您的
KICKR SNAP的阻力。Wahoo Utility应用可让您测试到KICKR SNAP的连接。
KICKR SNAP可通过ANT+™和蓝牙® 4.0(BluetoothSmart)技术无线连接您的设备。连接过程取决于所使用的具体设备、应用程序及无线技术。
蓝牙4.0: 可在Apple设备(iPhone4s及以上,iPad 3代及以上)、运行Android版本4.3及以上的带蓝牙4.0的Android设备及一些电
脑上使用。
ANT+: Apple iOS设备可以使用Wahoo Fitness ANT+ Key (在www.wahootness.com单独有售),Wahoo Fitness ANT+ Key兼容30针接
口的Apple设备或使用Lightning到30针适配器的Lightning接口的设备。电脑可以使用一个ANT+ USB适配器通过ANT+进行连接。可参见
www.thisisant.com查看兼容的ANT+设备。
执行一次校准消旋
KICKR SNAP可测量骑车者的功率输出。为了获得最准确的功率测量,应该在每次骑车练习前执行一次校准消旋。
下载Wahoo Fitness或Wahoo Fitness Utility应用并执行一次校准消旋。
为了获得最佳结果
• 在每次骑车练习前执行一次校准消旋。
• 针对KICKR SNAP使用无花纹轮胎。
• 避免使用有凸起花纹块的轮胎。凸起花纹块轮胎会产生过多的噪音和振动。
• 使用硬胎以降低胎纹磨损并延长车胎寿命。
网站: www.wahootness.com
电话: 1-877-978-1112
工作时间: 周一至周五 (美国东部时区上午10点至下午5点)
Federal Communication Commission Interference Statement
This equipment has been tested and found to comply with the limits for a Class B
digital device, pursuant to Part 15 of the FCC Rules. These limits are designed to
provide reasonable protection against harmful interference in a residential installation.
This equipment generates, uses and can radiate radio frequency energy and, if not
installed and used in accordance with the instructions, may cause harmful interference
to radio communications. However, there is no guarantee that interference will not
occur in a particular installation. If this equipment does cause harmful interference to
radio or television reception, which can be determined by turning the equipment off
and on, the user is encouraged to try to correct the interference by one of the
following measures:
. Reorient or relocate the receiving antenna.
. Increase the separation between the equipment and receiver.
. Connect the equipment into an outlet on a circuit different from that to which the
receiver is connected.
. Consult the dealer or an experienced radio/TV technician for help.
FCC Caution: To assure continued compliance, any changes or modifications not
expressly approved by the party responsible for compliance could void the user's
authority to operate this equipment. (Example - use only shielded interface cables
when connecting to computer or peripheral devices).
Radiation Exposure Statement
This equipment complies with FCC RF and IC RSS-102 radiation exposure limits set forth
for an uncontrolled environment. This equipment should be installed and operated with a
minimum distance of 0.5 (for FCC) / 1 (for IC) centimeters between the radiator and your
body. This transmitter must not be co-located or operating in conjunction with any other
antenna or transmitter. The antennas used for this transmitter must be installed to provide
a separation distance of at least 0.5 (for FCC) / 1 (for IC) cm from all persons and must
not be co-located or operating in conjunction with any other antenna or transmitter.
Cet équipement est conforme aux CNR-102 d'Industrie Canada. Cet équipement doit être
installé et utilisé avec une distance minimale de 1 centimètres entre le radiateur et votre
corps. Cet émetteur ne doit pas être co-localisées ou opérant en conjonction avec autre
antenne ou émetteur. Les antennes utilisées pour cet émetteur doivent être installés et
fournir une distance de séparation d'au moins 1 centimètre de toute personne et doit pas
être co-située ni fonctionner en conjonction avec une autre antenne ou émetteur.
This device complies with Part 15 of the FCC Rules and with RSS-247 of the Industry
Canada Rules. Operation is subject to the following two conditions:
(1) This device may not cause harmful interference, and (2) This device must accept
any interference received, including interference that may cause undesired operation.
Le présent appareil est conforme aux CNR d'Industrie Canada applicables aux appareils
radio exempts de licence. L'exploitation est autorisée aux deux conditions suivantes : (1)
l'appareil ne doit pas produire de brouillage, et (2) l'utilisateur de l'appareil doit accepter
tout brouillage radioélectrique subi, même si le brouillage est susceptible d'en
compromettre le fonctionnement.