Wahoo Fitness WF122 KICKR CLIMB User Manual
Wahoo Fitness LLC KICKR CLIMB
User Manual

wahoofitness.com Rev 1
QUICK START GUIDE
1
Thank you for purchasing the Wahoo
KICKR CLIMB!
FOR LATEST NEWS, SUPPORT, AND FIRMWARE UPDATES BE SURE TO REGISTER
YOUR PRODUCT USING THE WAHOO FITNESS APP
LEARN MORE:
For instructional videos, compatible apps, FAQs, and support requests please
visit: www.wahoofitness.com/support
PLEASE CONTACT US WITH
QUESTIONS OR CONCERNS AT:
Wahoo Fitness
90 W. Wieuca Rd NE
Suite 110
Atlanta, GA 30342 United States
TELEPHONE:
United States: 1-877-978-1112
Germany: +49-30-568-373827
United Kingdom: +44-800-808-5773
Phone Hours: Monday - Friday
10am-7pm Eastern Time Zone
SCALE 0.750
(2)
(3) (5)(4) (6)
2x 2x2x 2x
(1)
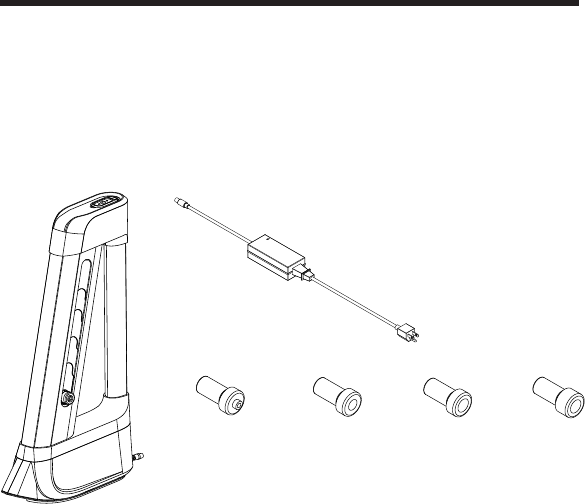
INSIDE THE BOX
(1) KICKR CLIMB with Built-In Remote
(2) AC Power Adapter
(3) Adapter A - Quick Release Adapters
(4) Adapter B - 12mm x 100mm
Thru Axle Adapters
(5) Adapter C - 15mm x 100mm
Thru Axle Adapters
(6) Adapter D - 15mm x 110mm
Thru Axle Adapters

2
• Before beginning or modifying any
exercise program please consult
your physician.
• Do not put hands or objects near
moving parts of the KICKR CLIMB.
• The KICKR CLIMB may become hot
to the touch when used for extended
periods of time.
• Do not attempt to dismount the
bicycle while the KICKR CLIMB is in
motion.
• Keep children and pets away from
the KICKR CLIMB while in use.
• Only use the KICKR CLIMB on a stable
and level surface
• Use caution standing while pedaling
on the KICKR CLIMB.
• Keep the KICKR CLIMB away
from water.
• Only use the power supply that
comes with the KICKR CLIMB.
• Check to make sure the bicycle is
properly secured to the KICKR CLIMB
before every ride.
• Only use the KICKR CLIMB with an
approved trainer.
• Wahoo Fitness is not responsible
for any damage that may occur
due to improper installation. Read
installation instructions completely.
CAUTION!
KICKR CLIMB SETUP
Step 1: Insert the correct adapters for your bike, as shown below.
Quick Release
Use Adapter A
15mm x 100mm Thru Axle
Use Adapter C
12mm x 100mm Thru Axle
Use Adapter B
15mm x 110mm Thru Axle
Use Adapter D
3
P
KICKR CLIMB SETUP continued
CAUTION! To avoid damaging your bicycle, use the KICKR CLIMB only on approved Wahoo
Trainers. For a full list of approved trainers please visit www.wahoofitness.com/support.
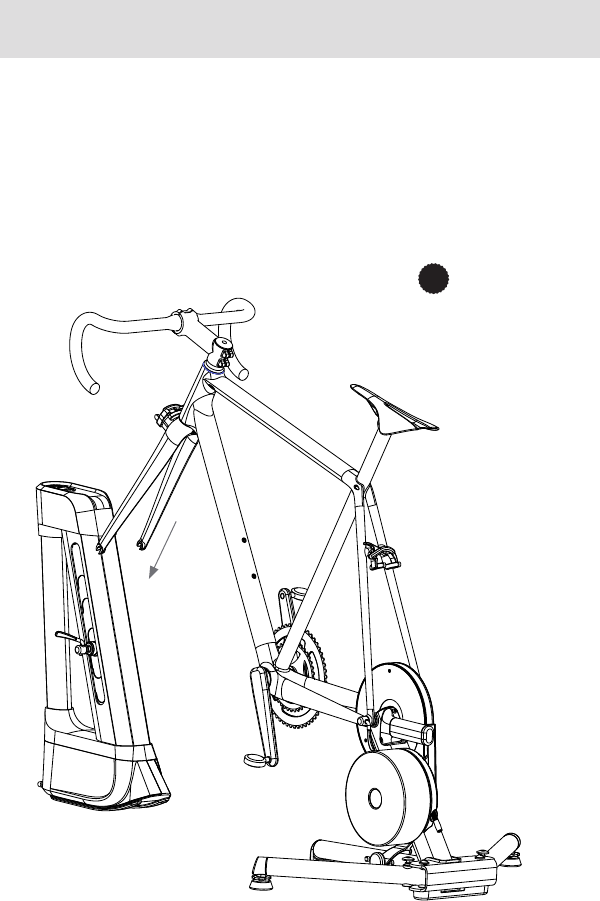
Step 2: Install your bike on an approved trainer (see trainer’s quick start guide for
setup instructions)
Step 3: Remove your bicycle’s front wheel and center the KICKR CLIMB just in front
of the fork.
Step 4: Attach Your Bicycle (Quick Release Skewers)
Use the quick release skewer included with your bicycle. Insert the quick release
skewer (1) into the KICKR CLIMB, then lower your fork (2) and fully seat the fork’s
dropouts on the quick release skewer. Tighten the quick release acorn nut and clamp
the lever closed, securing your bike to the mount.
(1)
(2)
PROTIP:
The quick release
lever is “open”
when it curves
away from the
bicycle frame.
The lever is
“closed” when it
curves towards
the bicycle frame.
Closing the lever
should require
enough force to
leave an imprint
on your hand.
4
KICKR CLIMB SETUP continued
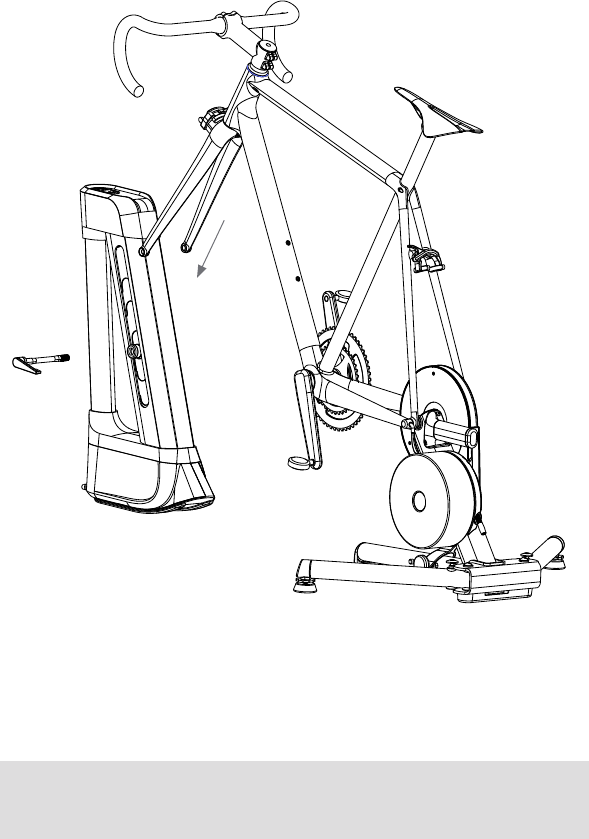
Step 4: Attach Your Bicycle (Thru Axle)
Use the thru axle included with your bicycle. Lower your front fork (3) to align the
dropouts with the hole in the center of the thru axle adapters (inserted in Step 1).
Finish mounting by reinserting the thru axle (4) through the fork and adapters,
tightening securely.
Step 5: Once your bicycle is secured to the KICKR CLIMB, ensure the unit is properly
level by carefully lifting it off the ground by your bicycle’s handlebars. The KICKR
CLIMB’s weighted base will hang and rock, eventually resting in the ideal vertical
position. When the unit is stable, gently set it back on the ground. Then plug in the
KICKR CLIMB with the included power adapter. Always use the KICKR CLIMB on
level ground.
CAUTION! Improper installation or setup can result in bodily injury or damage
to your bike. If you are unsure about proper installation please contact us at
www.wahoofitness.com/support
(4)
(3)
5
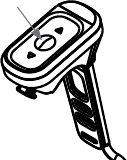
PAIRING THE KICKR CLIMB
Step 1: Ensure KICKR CLIMB and Wahoo Trainer are powered on.
Step 2: Hold down the middle mode button (5) on the KICKR
CLIMB remote until the center LED flashes rapidly
Step 3: Hold the remote next to the Wahoo Trainer until the
center LED flashes twice slowly.
Step 4: The KICKR CLIMB is now paired with your Wahoo
Trainer and will directly receive grade changes when used
with compatible apps or cycling computers.
KICKR CLIMB MODES
The KICKR CLIMB has two modes: Lock and Unlock. Use the middle mode button (5)
to toggle between modes.
Lock Mode: Use the remote’s manual controls for direct tilt control. While the lock LED
is illuminated, external soware will not move the KICKR CLIMB.
Unlock Mode: The KICKR CLIMB reacts to grade changes from external soware like
Zwi and TrainerRoad, or from your ELEMNT or ELEMNT BOLT GPS cycling computer. If
the remote is used to change the grade manually in Unlock Mode, the KICKR CLIMB will
automatically switch to Lock Mode.
COMPLETE YOUR SETUP USING THE WAHOO FITNESS APP
Download: Download the Wahoo Fitness App for free from the Apple App Store or from
the Android Google Play Store.
Setup: Follow the in-app setup guide to complete your profile.
Register: Only available when paired with a Wahoo Trainer connected to the Wahoo
Fitness App. The app will prompt for registration after the initial pairing.
Firmware Updates: Only available when paired with a Wahoo Trainer connected to the
Wahoo Fitness App. The app will check for firmware updates and send them directly to
the KICKR CLIMB via Bluetooth.
(5)
FCC STATEMENT:
This device complies with Part 15 of the FCC Rules. Operation is subject to the following two
conditions:
(1) This device may not cause harmful interference, and
(2) This device must accept any interference received, including interference that may cause
undesired operation.
Warning: Changes or modifications not expressly approved by the party responsible for
compliance could void the user's authority to operate the equipment.
NOTE: This equipment has been tested and found to comply with the limits for a Class B digital
device, pursuant to Part 15 of the FCC Rules. These limits are designed to provide reasonable
protection against harmful interference in a residential installation.
This equipment generates uses and can radiate radio frequency energy and, if not installed
and used in accordance with the instructions, may cause harmful interference to radio
communications. However, there is no guarantee that interference will not occur in a particular
installation. If this equipment does cause harmful interference to radio or television reception,
which can be determined by turning the equipment off and on, the user is encouraged to try to
correct the interference by one or more of the following measures:
Reorient or relocate the receiving antenna.
Increase the separation between the equipment and receiver.
Connect the equipment into an outlet on a circuit different from that to which the receiver is
connected.
Consult the dealer or an experienced radio/TV technician for help.
RF warning statement:
The device has been evaluated to meet general RF exposure requirement. The device can be
used in portable exposure condition without restriction.
Industry Canada Statement:
This device complies with RSS of the Industry Canada Rules. Operation is subject to the
following two conditions: 1) this device may not cause interference and 2) this device must
accept any interference, including interference that may cause undesired operation of the
device.
IC Radiation Exposure Statement: This equipment complies with IC radiation exposure limits
set forth for an uncontrolled environment.
Avis d’Industrie Canada
Cet appareil est conforme à la norme CNR des règlements d’Industrie Canada. Son
fonctionnement est sujet aux deux conditions suivantes:
1) Cet appareil ne doit pas provoquer d’interférences et
2) Cet appareil doit accepter toutes les interférences, y compris celles pouvant entraîner son
dysfonctionnement.
Avis d’Industrie Canada sur l’exposition aux Rayonnements: Cet appareil est conforme aux limites
d’exposition aux rayonnements d’Industrie Canada pour un environnement non contrôlé.
6
[BLANK]