Wanlida Group LF-61001 Wireless TV With TFT-LCD User Manual Rev1
Wanlida Group Co., Ltd. Wireless TV With TFT-LCD Rev1
UserManual.wiki
>
Wanlida Group
>
LF 61001 User Manual
User Manual
Navigation menu
Upload a User Manual
Namespaces
Wiki Guide
HTML
PDF
Info
Views
User Manual
Discussion / Help
Navigation


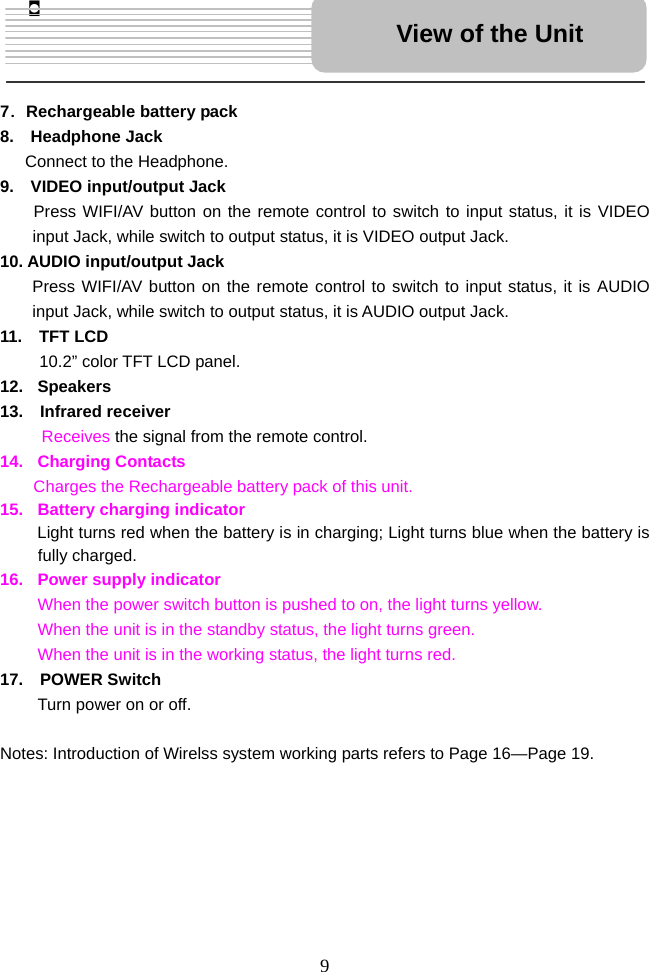
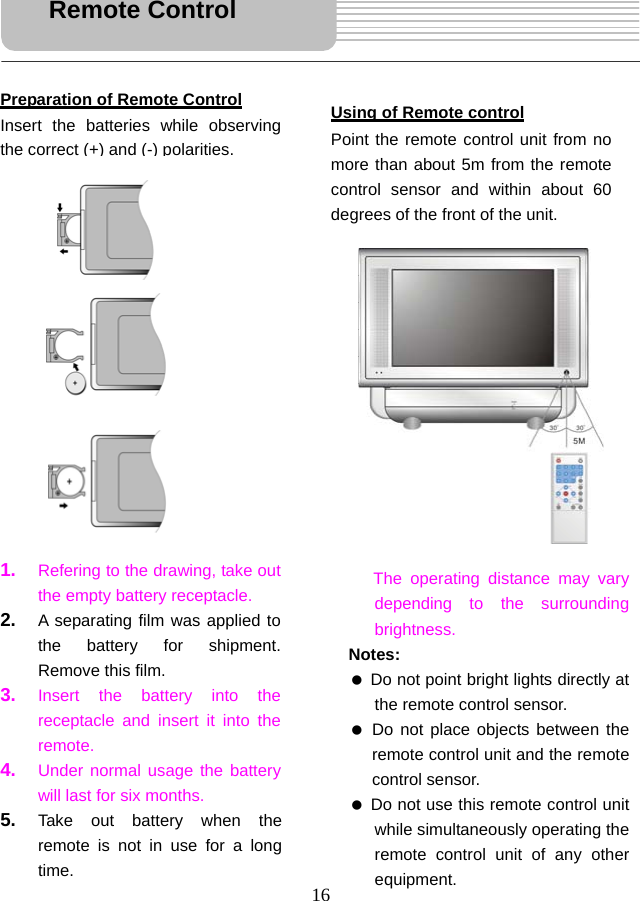
![15 Remote Control Drawing 1. [POWER] Power/standby button. 2. [0-9] Under TV mode, press to select TV channel. 3. [-/--/+100 ] Under TV mode, press this button to show channels above 100. 4. [CH+/ CH- ] Press to select TV channels forward or backward. 5.[VOL+/VOL- ] Adjust the speaker volume, or change the panel mode (brightness, contrast and color). 6. [OK] Press to confirm function selection. 7. [DISP] In the TV mode, Press to display the wireless channel number. 8. [MUTE] Turn the speaker output on/off . 9.[LAST] Return to the TV channel last viewed. 10. [INPUT] Displays the transmitter source: W-AV1, W-AV2, W-SV, TV. 11. [WIFI/AV] Switches between input and output status of the reciever of the unit. 12. [MODE] Adjust the brightness, contrast and color using the VOL/ VOLbuttons on the front panel. 13. [WIFI MENU] Press to enter wireless function setup. Remote Control](https://usermanual.wiki/Wanlida-Group/LF-61001/User-Guide-714290-Page-15.png)
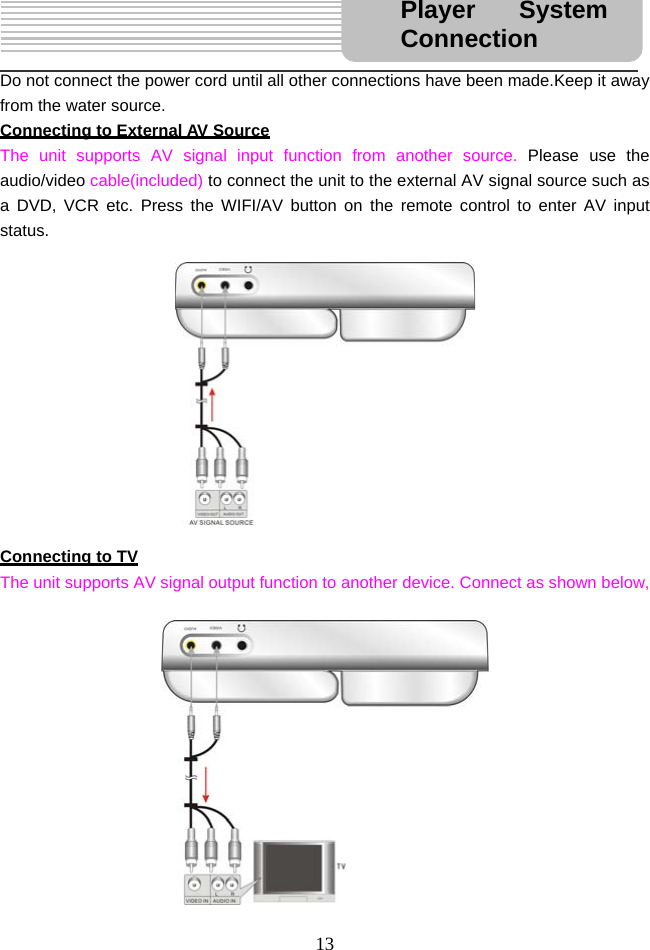
![- 18 - The base station of the unit possesses multi-audio and video input jack (TV, W-AV1, W-AV2, W-SV), and it can be connected to an external signal source. Changing the signal source can be accomplished by using the panel button on the unit or remote control . Switching Audio and Video Signal • Panel button mode: Press the “INPUT/ENT ” button to switch among TV, W-AV1, W-AV2, W-SV • Remote control mode: Press the "INPUT" button to switch among TV, W-AV1, W-AV2, W-SV. Switching Wireless channel You can switch the wireless channel easily. • Panel button mode: Under the AV or TV status, press the Menu button, The screen will display [WIRELESS CHANNEL XXX] , press the CH/ button to search a wireless channel forward or backward, The screen will display [WIRELESS CHANNEL YYY], press the INPUT/ENT button to confirm,The Wireless channel is changed. • Remote control mode: Under the AV or TV status, press the WIFI MENU button, The screen will display [WIRELESS CHANNEL XXX] item, then press the CH+, or CH- button to search a wireless channel forward or backward, The screen will display [WIRELESS CHANNEL YYY] item, press the ENT button to confirm. The Wireless channel is changed. (XXX-----current wireless channel, YYY------ changed wireless channel). Notes: When wireless channel is switched to [WIRELESS CHANNEL AUTO] item, press the INPUT/ENT button on the panel or ENT button on the remote control to scan a clean wireless channel automatically. When abnormal signal phenomenon appearing, user can avoid the signal interruption through switching the wireless channel. Using the Wireless System](https://usermanual.wiki/Wanlida-Group/LF-61001/User-Guide-714290-Page-18.png)
![- 19 - TUNER AUTO SCAN Operation During first operation or when the TV is moved to another area,you need to realized the tuner's auto scanning. It will take several minutes to complete scanning. After the scanning, the TV channel will be located in the first TV channel which has TV signal, displaying the program and channel number. • Panel button mode: Under the TV status, press the Menu button continuously,The screen will display [TUNER AUTO SCAN OFF], press the CH/ button to select [TUNER AUTO SCAN NTSC AIR] or [TUNER AUTO SCAN NTSC HRC] or [TUNER AUTO SCAN NTSC IRC] or [TUNER AUTO SCAN NTSC STD], press the INPUT/ENT button to start the automatic tuner scanning. • Remote control mode: Under the TV status, press the WIFI menu button, The screen will display [TUNER AUTO SCAN OFF] item, then press the CH+, or CH- button to select [TUNER AUTO SCAN NTSC AIR], [TUNER AUTO SCAN NTSC HRC], [TUNER AUTO SCAN NTSC IRC], [TUNER AUTO SCAN NTSC STD] item, press the ENT button to start the automatic channel scanning. BITRATE Operation Bitrate setup is helpful for image quality and transmission distance. High bitrate: image is more clear suitable for near distance viewing. Low bitrate: the wireless transmission distance is further, suitable for far distance viewing. Please set the bitrate to low, If the quality of image transmision is bad. • Panel button mode: Under TV status, press the Menu button continuously,The screen will display [MPEG BITRATE HIGH ] item, then press the CH/ button, the screen will display [MPEG BITRATE HIGH], [BITRATE MID], [MPEG BITRATE LOW]. Press the INPUT/ENT button to confirm. • Remote control mode: Under TV status, press the WIFI menu button, The screen will display [MPEG BITRATE HIGH] item, then press the CH+ or CH- button, the screen will display [MPEG BITRATE HIGH], [BITRATE MID], [MPEG BITRATE LOW]. Press ENT button to confirm. Using the Wireless System](https://usermanual.wiki/Wanlida-Group/LF-61001/User-Guide-714290-Page-19.png)
![- 20 - Selecting the Language You can select language through the operation: • Panel button mode: Under TV status, press the Menu button continuously,The screen will display [OPERATE LANGUAGE English] item, then press the CH/ button to select [OPERATE LANGUAGE French], [OPERATE LANGUAGE Spanish] item, press the INPUT/ENT button to start the transmitter scanning. • Remote control mode: Under TV status, press the WIFI menu button continuously, The screen will display [OPERATE LANGUAGE English] item, then press the CH+, or CH- button to select [OPERATE LANGUAGE French], [OPERATE LANGUAGE Spanish] item, press the ENT button to start the transmitter scanning. Scanning for the transmitter signal You can rescan the transmitter through the following operation: • Panel button mode: Under TV status, press the Menu button continuously,The screen will display [SCAN TRANSMITTER OFF], press the CH/ button to select [SCAN TRANSMITTER ON], press the INPUT/ENT button to start the transmitter scanning. • Remote control mode: Under TV status, press the WIFI menu button continuously, The screen will display [SCAN TRANSMITTER OFF] item, then press the CH+, or CH- button to select [SCAN TRANSMITTER ON] item, press the ENT button to start the transmitter scanning. Notes: The operation will takes take some time. the screen display “System Initiation…”, after several seconds, the system accomplishs the auto scanning. The unit will find all transmitter signals within range. The user may change the connection. Display Screen Setup • Panel button mode: Under AV or TV status, press the MODE button continuously to select brightness, contrast, hue. then press the VOLor VOL button to adjust brightness, contrast, hue. • Remote control mode: Under AV or TV status, press the MODE button continuously to select brightness, contrast, hue. then press the VOL+ or VOL- button to adjust brightness, contrast, hue. Output/Input Switching Operation • Remote control mode: Press the WIFI/AV button on the remote control to enter the AV input or AV output status. Using the Wireless System](https://usermanual.wiki/Wanlida-Group/LF-61001/User-Guide-714290-Page-20.png)