Wasp Barcode Technologies WRS100SBR Wireless Ring Scanner User Manual MT500L QG revN 2017 08 28
Wasp Barcode Technologies Wireless Ring Scanner MT500L QG revN 2017 08 28
Users Manual
Wireless Ring Barcode Scanner Quick Guide (Rev2)
P/N: 8012-0066001
Wireless Ring
Scanner
Quick Guide
For full user’s manual, please contact
your local distributor.
FCC WARNING STATEMENT
This equipment has been tested and found to comply with the limits for a Class B digital
device, pursuant to Part 15 of the FCC Rules. These limits are designed to provide
reasonable protection against harmful interference in a residential installation.
This equipment generates, uses and can radiate radio frequency energy and, if not
installed and used in accordance with the instructions, may cause harmful interference to
radio communications. However, there is no guarantee that interference will not occur in a
particular installation. If this equipment does cause harmful interference to radio or
television reception, which can be determined by turning the equipment off and on, the
user is encouraged to try to correct the interference by one of the following measures:
• Reorient or relocate the receiving antenna.
•Increase the separation between the equipment and receiver.
•Connect the equipment into an outlet on a circuit different from that to which the
receiver is connected.
•Consult the dealer or an experienced radio/TV technician for help.
This equipment complies with FCC radiation exposure limits set forth for an uncontrolled
environment. End users must follow the specific operating instructions for satisfying RF
exposure compliance. To maintain compliance with FCC exposure compliance requirement,
please follow operation instruction as documented in this manual. Any changes or
modifications not expressly approved by the party responsible for compliance could void
the user's authority to operate the equipment. This device complies with Part 15 of the FCC
Rules. Operation is subject to the following two conditions:
(1) This device may not cause harmful interference, and (2) this device must accept any
interference received, including interference that may cause undesired operation.
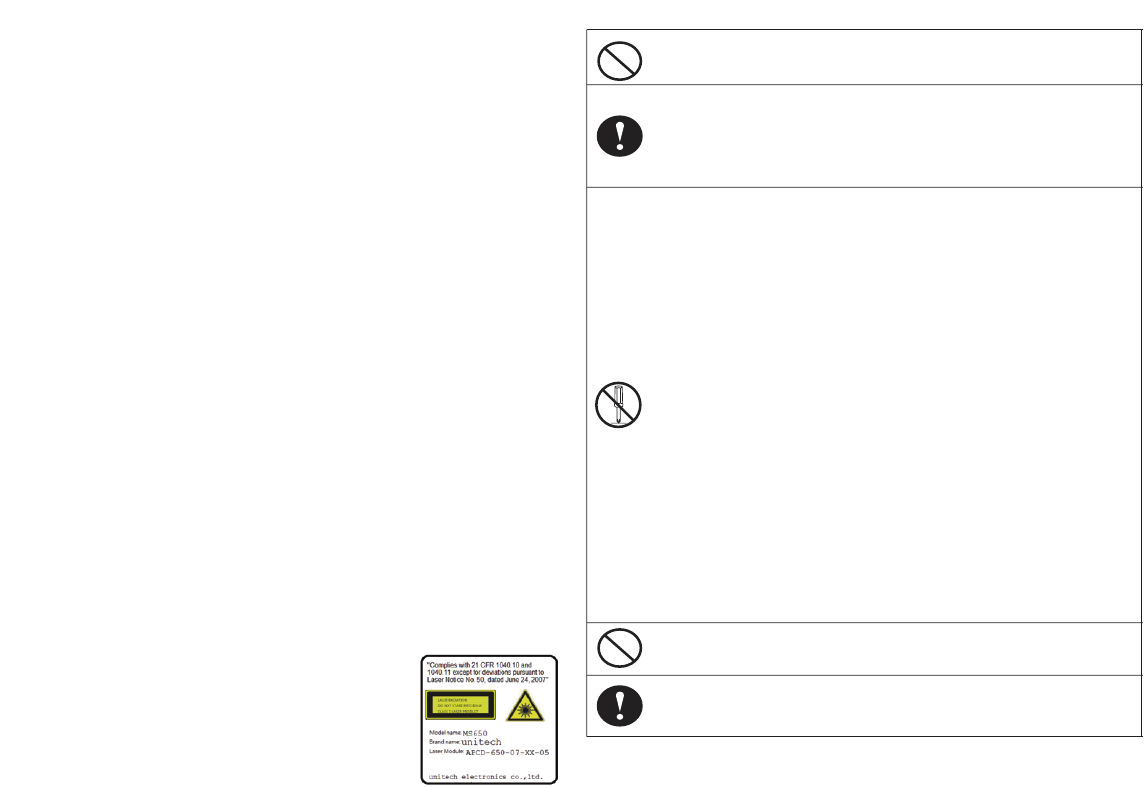
LASER DEVICES
Complies with 21CFR1040.10 and 1040.11 except for deviations pursuant to Laser
Notice No. 50, dated June 24, 2007.
EN60825-1: 2007
IEC60825-1 (Ed. 2.0)
-1 -
1. Take any metals into contact with the terminals in connectors.
2. Use the scanner where any inflammable gases.
If following condition occur, immediately power off the host computer,
disconnect the interface cable, and contact your nearest dealer.
1. Smoke, abnormal odors or noises come from the scanner.
2. Drop the scanner so as to affect the operation or damage its housing.
Do Not
Do not do behavior below.
1. Put the scanner in places excessively high temperatures such as expose
under direct sunlight.
2. Use the scanner in extremely humid area or drastic temperature
changes.
3. Place the scanner in oily smoke or steam environment such as cooking
range.
4. Be covered or wrapped up the scanner in bad-ventilated area such as
under cloth or blanket.
5. Insert or drop foreign materials or water into scanning window or vents.
6. Using the scanner while hand is wet or damp.
7. Use the scanner with anti-slip gloves containing plasticizer and
chemicals or organic solvents such as benzene, thinner, insecticide etc
to clean the housing. Otherwise, it could not result fire and electrical
shock but housing may be broken and injured.
8. Scratch or modify the scanner and bend, twist, pull or heat its interface
cable.
9. Put heavy objects on interface cable.
Do not stare the light source from the scanning window or do not point the
scanning window at other people’s eyes or eyesight may be damaged
by direct exposure under the light.
Do not put the scanner on an unstable or inclined plane.
The scanner may drop, creating injuries.
Once the interface cable is damaged such as exposed or broken copper
wires, stop using immediately and contact your dealer. Otherwise, it could
result fire or electrical shock.
WARNING AND CAUTION
-2 -

- 3 -
INTRODUCTION
SPECIFICATIONS
Sensor Linear Image Sensor
Resolution 4mil/ 0.1mm
Indicator LED, Buzzer
PCS 30
Housing Plastic(PC+ABS)
Profile BT HID, USB HID, USB VCP, Memory
Battery Life 6000 scans (1 scan/ 5 sec)
Charge Time 2.5 hours (fully charged)
Radio Bluetooth 4.1 (Class2)
Coverage 10M/33ft. (line of sight)
Symbologies All major 1D barcodes incl. GS1 Databar
- 4 -
BEEPER INDICATION
LED INDICATION
Off
Flashing Blue
One Green Flash
Flashing Red
Solid Red
Standby or Power off
Disconnected or Discoverable
Good Read
Low power
Charging
Single beep Good read
Single short beep The scanner reads a Code39 of
ASCII in configuration procedure
Two beeps i. Wireless connection
ii. The scanner successfully reads
a configuration barcode
Four beeps (Hi-Lo-Hi-Lo) Out of range/Poor connection
Five beeps Low power
Three beeps Wireless disconnection
Three short beeps i. The scanner reads a barcode
while disconnected.
ii. The scanner reads an unexpected
barcode during configuration
procedure. (scan [ABORT] to abort
and start over)
iii. Memory Full
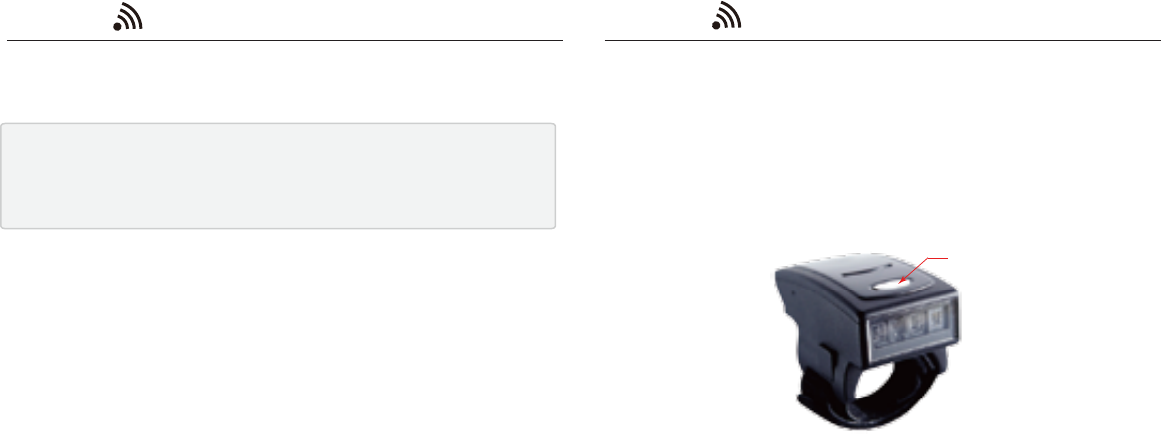
LED Indicator Micro USB port
(with Protective Cover)
Touch-Activated
Trigger Button
Function Button
Exit Window
Restart Button
(insert pin into the hole)
Velcro Strap
- 5 - - 6 -
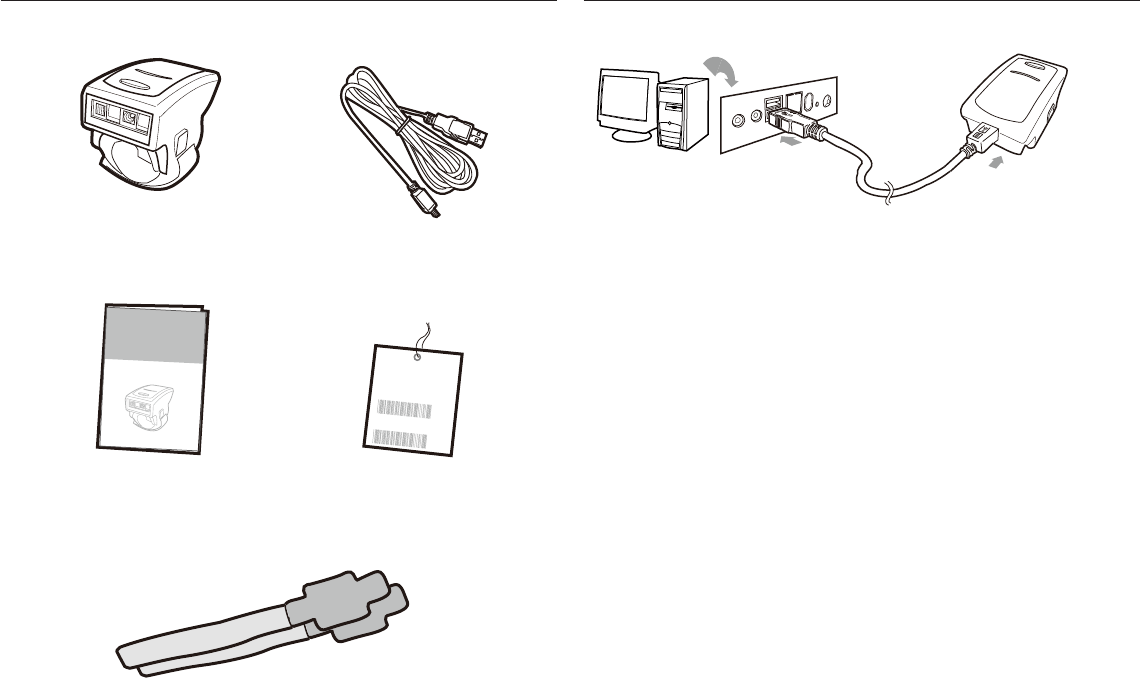
OUT OF THE BOX
Spare Velcro Strap
USB Charger Cable
Wireless Ring
Barcode Scanner
Quick Guide
1
2
Wireless Ring
Barcode Scanner
Quick Guide
Laser Brightness
Configuration Card
CHARGING THE BATTERY
1. Flip open the micro USB port on the scanner.
2. Insert the micro USB connector into the port on the
scanner and USB A connector into a USB port on
the host PC.
3. Keep charging until the red LED indicator turns off.
Scanner
Micro USB
USB A
Host
Toensureeyesafety,bydefault
Laserlineisset tobedimwhichis
classifiedasClass1Laserby
InternaonalStandardIEC60825-1.
Althoughwedon’trecommend,youcan
set theLaserlinetobebrightby
scanningbelowconfiguraonbarcode:
Bright
Youcanset itbacktobedimbyscanning
belowconfiguraonbarcode:
Dim
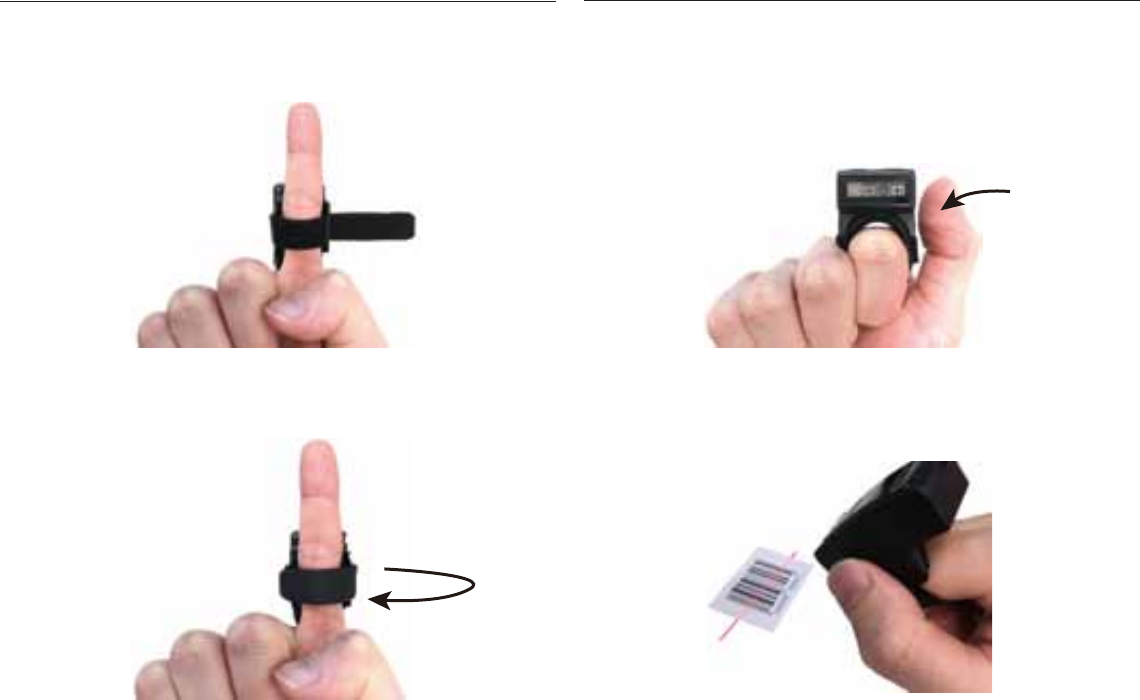
STEP 1 - GETTING STARTED
- 7 - - 8 -
1. Pull open the long end and insert your index finger
through the loop.
2. Adjust and attach the long end for a comfortable fit.
3. Clench your fist and use your thumb to tap the
touch-activated trigger button. A gentle touch
on the button will work; there is no need to press
with force.
4. Aim at the barcode you wish to scan.

1. If either your hand or the Velcro strap is soaking wet, the Laser
beam may automatically light up without touch trigger. The scanner
can still work well in this condition but it will waste battery power,
so it is recommended to dry both your hand and the Velcro strap.
2. The following gloves have been tested to be working with the
touch-activated button: latex examination glove, antistatic glove,
white cotton glove (with or without latex coating), safety glove,
and rubber glove. However, it is still recommended to operate with
bare hand or thin glove to ensure the responsiveness of button.
3. Dont need to tighten Velcro strap too much. ust make the strap fit
your finger so that the scanner will not easily move while being
touched for trigger. We also suggest to release the strap from your
finger for 1 minute after 2 hours of continuous use if your finger
feels uncomfortable.
- 9 - - 10 -
Scan one of below configuration barcodes to determine your
interface:
STEP 3 - INTERFACE SELECTION
[ Recommended ]
. C006$
*.C006$*
USB VCP
. C008$
*.C008$*
USB HID
BT HID
. E043$
*.E043$*
Memory Mode
. C035$
*.c035$*
1. BT HID - Emulates a Bluetooth HID keyboard that transmits
barcode data to the host. (see page 11 - 12)
2. USB HID - Emulates a USB keyboard that transmits barcode
data to the host.
3. USB VCP - Emulates a USB virtual com device that transmits
barcode data to the host.
4. Memory - Emulates a USB mass storage device that saves
barcodes collected off-line. (see page 24 - 28)
. F064$
*.F064$*
. F065$
*.F065$*
. F066$
*.F066$*
Scan one of below configuration barcodes to determine which
touch-sensing button to enable according to your habit:
STEP 2 - BUTTON PREFERENCE
Right Button Only
Left Button Only
Both Buttons
[ For Left-handed User ]
[ For Right-handed User ]
ATTENTION
GETTING CONNECTED
BT - HID
- 11 - - 12 -
. E043$
BT - HID
*.E043$*
. F068$
iOS/MAC/WINDOWS
*.F068$*
. F067$
ANDROID
*.F067$*
Disconnect
1. Scan [Disconnect] to delete previous pairing record. Alternatively,
you may long-press the function button for 5 seconds until the
the scanner emit two beeps.
2. Scan [BT - HID]; the scanner will emit two beeps.
3. Scan either one of below barcodes according to your host system.
4. Select “Scanner XXXXXX” on the discovered device list of your Bluetooth.
(“” are the last 6 digits of MAC address which can also
be found on the product label)
5. The scanner will emit two beeps to verify the connection.
iOS
Android
To toggle iOS touch keyboard, please simply press the function button.
1. Enter “Settings”
2. Enter “Language & input”
3. In Keyboard & input window, tap “Default” to continue.
4. Turn off “Hardware - Physical keyboard”, and the Touch
Keyboard will function properly again.
SMARTPHONE/TABLET TOUCH KEYBOARD
Please follow below instruction to toggle touch keyboard
on smartphone/tablet.
. E031$
*.E031$*
BT - HID
Function Button

NUMERIC BARCODES
- 13 - - 14 -
1
*1*
2
*2*
3
*3*
4
*4*
5
*5*
6
*6*
7
*7*
8
*8*
9
*9*
0
*0*
Variable Timeout
No Timeout (Scanner Always On)
*.B030$*
. B030$
SET MINUTE
*.B029$*
. B029$
SET SECOND
*.B021$*
. B021$
DISABLE
TIMEOUT
The default timeout is 00 minute and 30 seconds.
For example, to set the timeout as 5 minutes 30 seconds:
1. Scan [Set Minute]
2. Scan [0] & [5] on page 14.
(Range: 00 ~ 60)
(Range: 00 ~ 60)
3. Scan [Set Minute]
4. Scan [Set Second]
5. Scan [3] & [0] on page 14.
6. Scan [Set Second]
The period of inactivity before auto power-off.
POWER OFF TIMEOUT
BT - HID
Warning! This will cause the battery to drain quickly.

- 15 - - 16 -
GENERAL SETTINGS ILLUMINATION PREFERENCE
BEEPER
. P023$
. A007$
. F012$
ABORT
CHECK
VERSION
BEEP OFF
. F018$
. A001$
DEFAULT
BEEP ON
LASER ALWAYS ON
LED AUTO-ADAPTIVE
LASER ALWAYS ON
LED ON AFTER 1 SEC
. F059$
*.F059$*
. F049$
*.F049$*
LASER ALWAYS ON
LED ALWAYS ON
. F048$
*.F048$*
LASER OFF
LED ALWAYS ON
. F046$
*.F046$*

- 17 - - 18 -
KEYBOARD LAYOUT
. C010$
ENGLISH
(USA)
. C018$
ENGLISH
(UK)
. C011$
GERMAN
. C012$
FRENCH
. C013$
SPANISH
. C014$
ITALIAN
. C009$
JAPAN
(106 key)
CANADIAN
(TRADITIONAL)
. C034$
NORWEGIAN
. C029$
SWEDISH
. C026$
PORTUGUESE
. C031$
CANADIAN
(FRENCH)
. C025$

HUNGARIAN
(101 KEY)
BRAZILIAN
(PORTUGUESE)
SLOVAK
SWISS
(FRENCH)
DUTCH
DANISH
BELGIAN
(AZERTY)
. C016$
SWISS
(GERMAN)
- 19 -
KEYBOARD LAYOUT
. C017$
CZECH
(QWERTY)
. C022$
CZECH
(QWERTZ)
HUNGARIAN
(QWERTZ)
. C021$
. C015$
ALT CODE
- 20 -
. C024$
. C023$
. C033$
. C032$
. C027$
. C028$
. C030$

- 21 - - 22 -
ENABLE SYMBOLOGIES
ENABLE
ALL CODE
. A002$
. K010$
CODE 32
. L010$
. N001$
. M010$
. L001$
UK PLESSEY
MSI
INDUSTRIAL
2 OF 5
MATRIX
2 OF 5
CODE 93
. L014$
. G010$
. N017$
. N032$
. N010$
. N026$
IATA
TELEPEN
GS1 DATABAR
GS1 DATABAR
LIMITED
GS1 DATABAR
EXPANDED

- 23 - - 24 -
TERMINATOR
LF
CR + LF
NONE
SPACE
TAB
. D012$
CR
. D011$
. D013$
. D010$
. D015$
. D014$
MEMORY MODE
After scanning the above barcode, the scanner will be able to collect barcode
data off-line. The barcode data will be stored in the format of:
< Date >, < Time >, < Barcode Data > < CR >
To retrieve stored data, please connect the scanner to the host with cable,
access removable storage device “MiniScan” from which you may open
or copy the file “BARCODE.txt” to your computer.
To delete ONE stored data, please scan below barcode. Alternatively, you
may press the function button once.
. R005$
*.R005$*
. C035$
*.c035$*
MEMORY MODE
DELETE LAST DATA
To delete ALL stored data, simply delete the file “BARCODE.txt” in the
removable storage device “MiniScan” until you hear two beeps.

- 25 - - 26 -
Example:
To change Data Format to
<Barcode Data>, <Date>, <Time>
1. Scan [
Data Format
]
2. Scan [4], [2], [3] on page 14.
3. Scan [
Data Format
]
The default Data Format is <Date>, <Time>,
<Barcode Data> only
below are all items available for display and their codes:
Default is comma ( , ) You may replace it with any alphanumeric
characters from the full ASCII table in Full Users Manual.
Example: To change Field Separator to Semicolon ( ; )
1. Scan [
Field Separator
]
2. Scan [ ; ] from the full ASCII table.
3. Scan [
Field Separator
]
. R010$
*.R010$*
FIELD SEPARATOR
(DELIMITER)
. R011$
*.R011$*
DATA FORMAT
2
4
Date
Barcode Data
Code Item Code Item
3 Time
Example: To set Date to 2017-08-01 (Year-Month-Day):
1. Scan [
Set Date
]
2. Scan [1], [7], [0], [8], [0], [1] on page 14.
3. Scan [
Set Date
]
Example: To set Time to 08:10:30 am (Hr:Min:Sec)
1. Scan [
Set Time
]
2. Scan [0], [8], [1], [0], [3], [0] on page 14.
3. Scan [
Set Time
]
. R006$
*.R006$*
SET DATE
. R007$
*.R007$*
SET TIME
* Full drain of battery may cause the Time and Date to stop.
To avoid this, please, please fully charge the scanner for
at least 1 hour before use.
MEMORY MODE DATE & TIME SETUP MEMORY MODE DATA FORMAT

- 27 - - 28 -
The default Date Format is DD/MM/YYYY (Code = 09), below
is full list of available formats and their setup codes:
Example:
To set Date Format to MM/DD/YY (Code =12)
1. Scan [
Date Format
]
2. Scan [1], [2] on page 14.
3. Scan [
Date Format
]
. R008$
*.R008$*
DATE FORMAT
01
02
03
04
05
06
07
08
DD-MM-YYYY
MM-DD-YYYY
DD-MM-YY
MM-DD-YY
YYYY-MM-DD
YY-MM-DD
DD-MM
MM-DD
Code Format Code Format
09
10
11
12
13
14
15
16
DD/MM/YYYY
MM/DD/YYYY
DD/MM/YY
MM/DD/YY
YYYY/MM/DD
YY/MM/DD
DD/MM
MM/DD
The default Time Format is HH:MM:SS (Code = 01), below
are available formats and their setup codes:
Example:
To set Time Format to HH:MM (Code = 02)
1. Scan [
Time Format
]
2. Scan [0], [2] on page 14
3. Scan [
Time Format
]
. R009$
*.R009$*
TIME FORMAT
01 HH:MM:SS
Code Format Code Format
02 HH:MM
MEMORY MODE DATE FORMAT MEMORY MODE TIME FORMAT
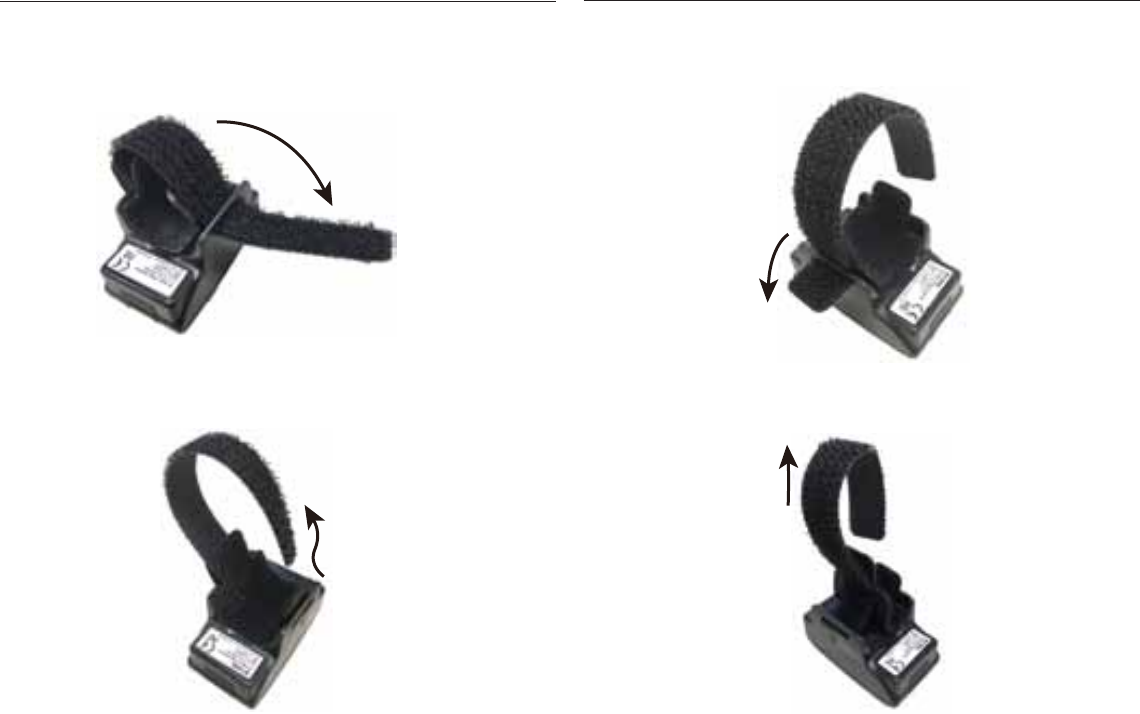
HOW TO REMOVE VELCRO STRAP
- 29 - - 30 -
2. Pull out the long end through the slot.
1. Pull open the long end. 3. Pull open the short end on the other side.
4. Remove the whole Velcro strap from the scanner by
pulling the long end.
- 31 - - 32 -
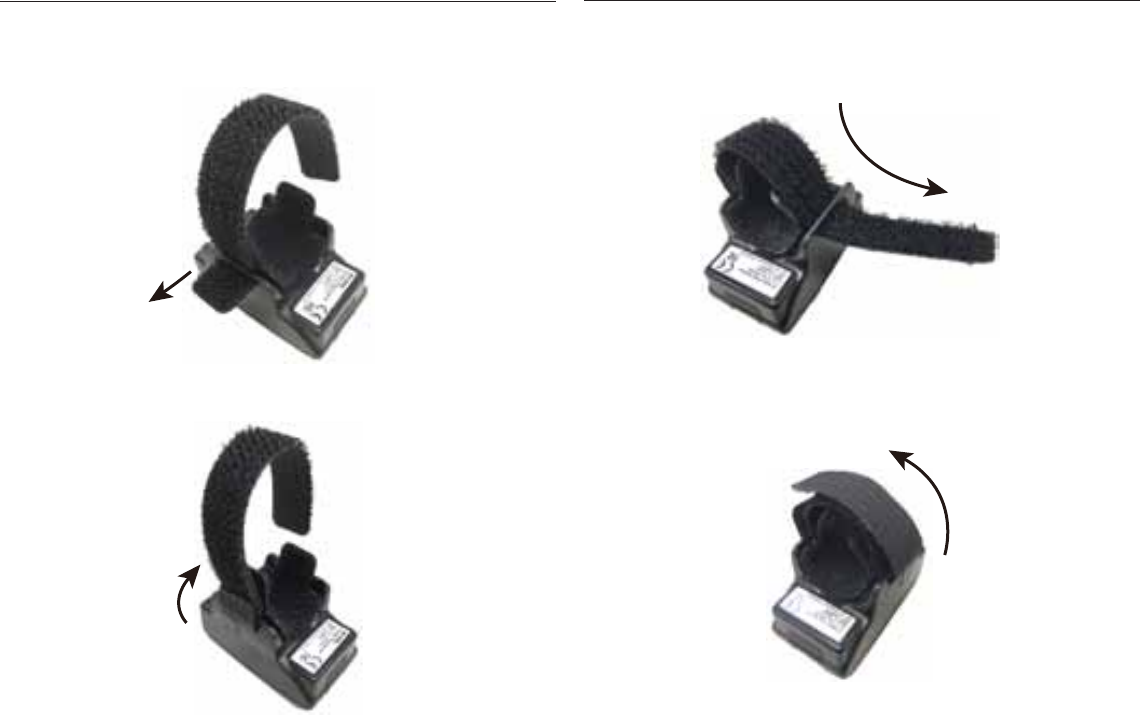
2. Attach the short end to the long end to close. 4. Attach the long end to itself to close.
HOW TO INSTALL VELCRO STRAP
1. Insert the short end through the slot, with Velcro side
facing upwards. 3. Insert the long end through the other slot, with Velcro
side facing upwards.

- 33 - - 34 -
TEST BARCODES
EAN
Code 128
12345678
Code 39
CODE-39 TEST
Interleaved 2 of 5
9876543210
7164154
942052
TROUBLESHOOTING
Q: Your Bluetooth is unable to detect the scanner.
A: (1) Make sure your Bluetooth is 4.0 or later version that supports BLE.
(2) Restart your Bluetooth or Host device and try again, following
the instruction on page 11.
(3) Make sure the scanner is in BT-HID mode (see page 10). If the
scanner is discoverable, its LED indicator will be flashing Blue.
(4) The scanner might be powered off. By default the scanner goes
to sleep after 30 seconds of inactivity. You can re-activate the
scanner by touching the scan button on both sides. Alternatively,
you may also increase the power off timeout (see page 13) so
that the scanner will stay awake longer.
Q: Your Bluetooth can detect the scanner, but it cannot pair with
the scanner successfully.
(1) Make sure your Bluetooth is 4.0 or later version that supports BLE.
(2) Restart your Bluetooth or Host device and try again, following
the instruction on page 11.
(3) Make sure to remove the scanner from the Bluetooth of host
device that has previously paired with the scanner.
(4) Follow the instruction on page 11 and try again.
A:
Q: The scanner does not read barcode instantly.
(1) Barcode print quality is too poor.
(2) The ambient light is too weak. If that’s the case, configure the
LED illumination to auto-adaptive or always on (see page 16)
A:
Q: The scanner does not output barcode data as expected.
(1) The keyboard layout of scanner does not match that of your
host device. Try configuring keyboard layout on page 17 - 20.
A: