Wasp Barcode Technologies WWS110SBR Barcode Reader User Manual MT110 rev4
Wasp Barcode Technologies Barcode Reader MT110 rev4
UserManual.wiki
>
Wasp Barcode Technologies
>
WWS110SBR User Manual
User manual
Navigation menu
Upload a User Manual
Namespaces
Wiki Guide
HTML
PDF
Info
Views
User Manual
Discussion / Help
Navigation
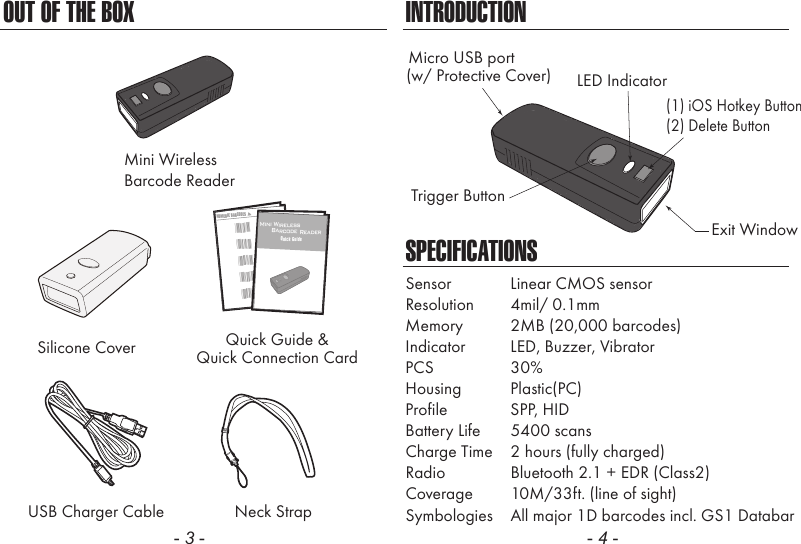
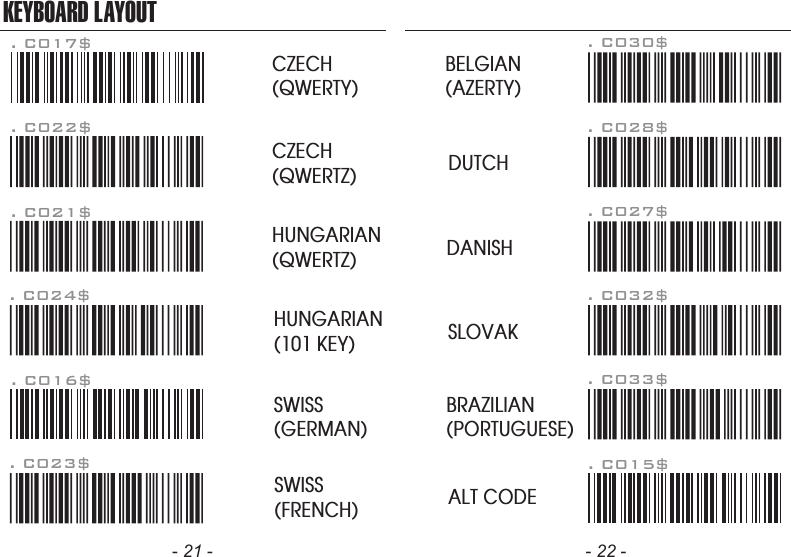
![CHARGING THE BATTERY1. Flip open the micro USB port on the scanner.2. Insert the micro USB connector into the port on the scanner and USB A connector into a USB port on the host PC.- 5 - - 6 -BEEPER INDICATIONLED INDICATIONSingle long beep Power upSingle beep Good readSingle short beep The scanner reads a Code39 of ASCII in configuration procedureTwo beeps i. Wireless connection ii. The scanner successfully reads a configuration barcodeTwo short beeps Good read (Batch mode/Memory mode)Four beeps (Hi-Lo-Hi-Lo) Out of range/Poor connectionFive beeps Low powerThree beeps Wireless disconnectionThree short beeps i. The scanner reads a barcodes while disconnected. ii. The scanner reads an unexpected barcode during configuration procedure. (scan [ABORT] to abort and start over)Several short beeps The scanner switches from one communication mode to anotherOffFlashing GreenGreen for 2 secFlashing RedSolid RedStandby or Power offDisconnected or DiscoverableGood ReadLow powerChargingScannerMicro USBUSB AHostGETTING STARTEDTo scan a barcode, make sure the aiming beam crossesevery bar and space of the barcode.](https://usermanual.wiki/Wasp-Barcode-Technologies/WWS110SBR/User-Guide-3702187-Page-4.png)
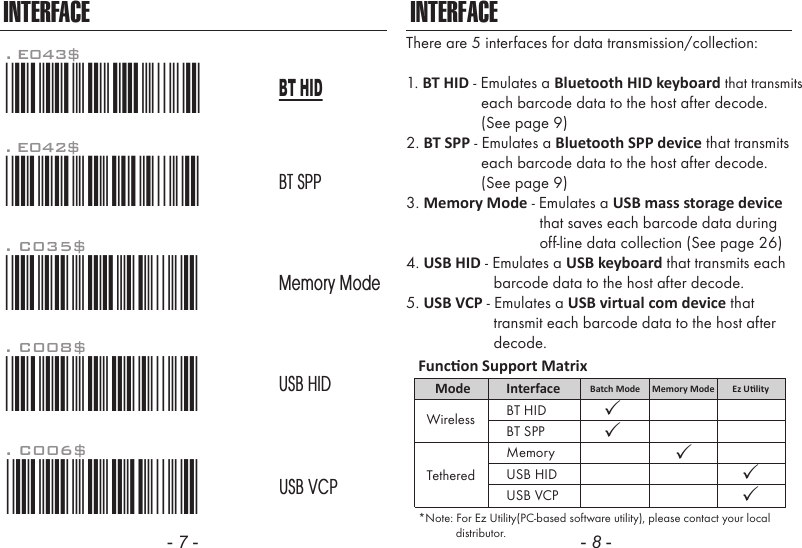
![GETTING CONNECTED PINCODE SETUP1. Press the trigger for 1 second to activate the scanner.2. Scan [DISCONNECT]3. Scan [BT mode - SPP]; the scanner will emit several beeps.4. Select “Wireless Scanner” from discovered device list. The default pincode is “1234”.5. Open serial communication software with com port (see Device Manager) properly set up.6. The scanner will beep twice to verify the connection.There are two modes of wireless communication:. E042$BT mode - SPPPincode Start*.E042$*. E032$*.E032$*. E033$*.E033$*. E043$BT mode - HID*.E043$*Disconnect. E031$*.E031$**$TX*$TX1. Press the trigger for 1 second to activate the scanner.2. Scan [DISCONNECT]3. Scan [BT mode - HID]; the scanner will emit several beeps.4. Select “Wireless Scanner” from discovered device list.5. The Bluetooth application may prompt you to scan a pincode(see PINCODE SETUP section) it generated.6. The scanner will beep twice to verify the connection.Scan numeric barcodes (see NUMERIC BARCODES sectionon the next pages) based on the pincode generatedby the Bluetooth application.STEP 1Pincode StopEnterSTEP 4STEP 3STEP 2[ Recommended ]- 9 - - 10 -](https://usermanual.wiki/Wasp-Barcode-Technologies/WWS110SBR/User-Guide-3702187-Page-6.png)
![SMARTPHONE/TABLET CONNECTIONTouch Keyboard - AndroidGetting Connected - iOS & AndroidTouch Keyboard - iOSSimply follow instruction in 5 can be skipped since iOS & Android will not require pin-codefor connection.,in which step[BT mode - HID] (page 9)To toggle iOS Touch Keyboard, please press this button.While connected with the scanner, the Touch Keyboard on theAndroid smartphone or tablet might disappear. To resolve thisissue, please change settings on Android device with below steps:1. Enter “Settings”2. Enter “Language & input”4. Turn off “Physical keyboard”, or Turn on “On-screen keyboard” and the Touch Keyboard will function properly again.iOS Hotkey Button3. Tap on “Default keyboard”- 13 - - 14 -. E053$. E054$DISABLEENABLEIn Batch Mode, data will be temporarily stored in memory buffer(2KB RAM) when the scanner is out of range or in poor connectionquality. Once the scanner gets back in range, the stored data willbe sent back to the host immediately, which will also be erased inmemory buffer at the same time.Batch Mode can only function in the following conditions:1. The scanner is connected to a host device via BT HID/SPP.2. The scanner is NOT in Memory Mode or USB HID/VCP Mode.BATCH MODE](https://usermanual.wiki/Wasp-Barcode-Technologies/WWS110SBR/User-Guide-3702187-Page-8.png)
![Variable TimeoutNo Timeout (Scanner Always On)POWER OFF TIMEOUT*.B030$*. B030$SET MINUTE*.B029$*. B029$SET SECOND*.B021$*. B021$DISABLETIMEOUTThe default timeout is 3 minutes 0 second.For example, to set the timeout as 5 minutes 30 seconds:1. Scan [Set Minute]2. Scan [0] & [5] on page 11 & 12.(Range: 00 ~ 60)(Range: 00 ~ 60)3. Scan [Set Minute]4. Scan [Set Second]5. Scan [3] & [0] on page 11 & 12.6. Scan [Set Second]The period of inactivity before auto power-off.- 15 - - 16 -Once enabled, a checksum will be added to the end of each datato conduct Xor calculation. For Bluetooth SPP & USB-VCP, the BCCis 1 byte. For Bluetooth HID, the BCC are 2 bytes.Example:The barcode data is “TEST” with terminator <CR><LF> 1. Bluetooth SPP & USB-VCP:Data Format = <T> + <E> + <S> + <T> + <CR> + <LF> + <BCC>.BCC = 54h ^ 45h ^ 53h ^ 54h ^ 0Dh ^ 0Ah = 11h2. Bluetooth HID:Data Format = <T> + <E> + <S> + <T> + <Enter> + <BCC>BCC = 54h ^ 45h ^ 53h ^ 54h ^ E7h = F1hHowever, since control character cannot be displayed inBluetooth HID, BCC will be converted into 2 bytes of characters.As a result, the data will be: TEST + <Enter> + F + 1BINARY CHECK CHARACTER. E030$*.e030$*. E029$*.e029$*DISABLEENABLE](https://usermanual.wiki/Wasp-Barcode-Technologies/WWS110SBR/User-Guide-3702187-Page-9.png)
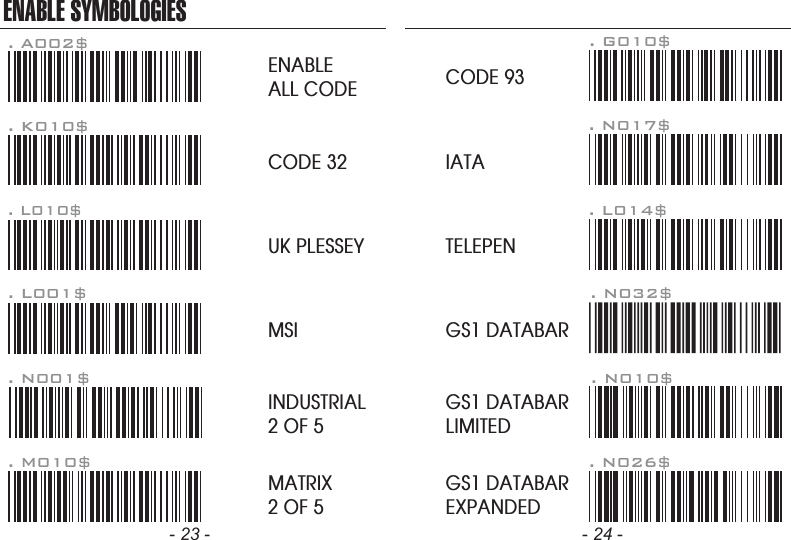
![MEMORY MODEDefault is comma ( , ) . You may replace it with any alphanumericcharacters from the full ASCII table in Full User’s Manual.Example: To change Field Separator to Semicolon ( ; )1. Scan [Field Separator]2. Scan [ ; ] from the full ASCII table.3. Scan [Field Separator]. R010$*.R010$*FIELD SEPARATORMEMORY MODEExample: To set Date to 2014-08-01 (Year-Month-Day):1. Scan [Set Date]2. Scan [1], [4], [0], [8], [0], [1] on page 11 & 12.3. Scan [Set Date]Example: To set Time to 08:10:30 am (Hr:Min:Sec)1. Scan [Set Time]2. Scan [0], [8], [1], [0], [3], [0] on page 11 & 12.3. Scan [Set Time]. R006$*.R006$*SET DATE. R007$*.R007$*SET TIME* To avoid Time and Date being reset to factory default due to running out of battery, please fully charge the scanner for at least 3 hours before use.- 27 - - 28 -Example: To change Data Format to <Barcode Data>, <Date>, <Time>1. Scan [Data Format]2. Scan [4], [2], [3] on page 11.3. Scan [Data Format]The default Data Format is <Date>, <Time>, <Barcode Data>below are items and their setup codes: . R011$*.R011$*DATA FORMAT2 DateCode Item Code Item34TimeBarcode Data](https://usermanual.wiki/Wasp-Barcode-Technologies/WWS110SBR/User-Guide-3702187-Page-15.png)
![The default Date Format is DD/MM/YYYY (Code = 09), belowis full list of available formats and their setup codes: Example: To set Date Format to MM/DD/YY (Code =12)1. Scan [Date Format]2. Scan [1], [2] on page 11.3. Scan [Date Format]. R008$*.R008$*DATE FORMATMEMORY MODE0102030405060708DD-MM-YYYYMM-DD-YYYYDD-MM-YYMM-DD-YYYYYY-MM-DDYY-MM-DDDD-MMMM-DDCode Format Code Format0910111213141516DD/MM/YYYYMM/DD/YYYYDD/MM/YYMM/DD/YYYYYY/MM/DDYY/MM/DDDD/MMMM/DDThe default Time Format is HH:MM:SS (Code = 01), below are available formats and their setup codes:Example: To set Time Format to HH:MM (Code = 02)1. Scan [Time Format]2. Scan [0], [2] on page 11 & 12.3. Scan [TimeFormat]. R009$*.R009$*TIME FORMATMEMORY MODE01 HH:MM:SSCode Format Code Format02 HH:MM- 29 - - 30 -](https://usermanual.wiki/Wasp-Barcode-Technologies/WWS110SBR/User-Guide-3702187-Page-16.png)