WatchGuard Technologies BF4S16E5W SOHO6 Wireless, BF4S16E5W User Manual SOHO 6 Wireless User Guide
WatchGuard Technologies, Inc. SOHO6 Wireless, BF4S16E5W SOHO 6 Wireless User Guide
Manual

WatchGuard®
Firebox® SOHO 6
Wireless
User Guide
SOHO 6 firmware version 6.2

ii WatchGuard Firebox SOHO 6 Wireless
Using this Guide
To use this guide you need to be familiar with your computer’s
operating system. If you have questions about navigating in your
computer’s environment, please refer to your system user manual.
The following conventions are used in this guide.
Convention Indication
Bold type Menu commands, dialog box options, Web page
options, Web page names. For example: “On the
System Information page, select Disabled.”
NOTE Important information, a helpful tip or additional
instructions.

User Guide iii
Abbreviations used in this user guide
3DES Triple Data Encryption Standard
DES Data Encryption Standard
DNS Domain Name Service
DHCP Dynamic Host Control Protocol
DSL Digital Subscriber Line
IP Internet Protocol
IPSec Internet Protocol Security
ISDN Integrated Services Digital Network
ISP Internet Service Provider
MAC Media Access Control
MUVPN Mobile User Virtual Private Network
NAT Network Address Translation
PPP Point-to-Point Protocol
PPPoE Point-to-Point Protocol over Ethernet
TCP Transfer Control Protocol
UDP User Datagram Protocol
URL Universal Resource Locator
VPN Virtual Private Network
WAN Wide Area Network
WSEP WatchGuard Security Event Processor

iv WatchGuard Firebox SOHO 6 Wireless
Certifications and Notices
FCC Certification
This appliance has been tested and found to comply with limits for
a Class A digital appliance, pursuant to Part 15 of the FCC Rules.
Operation is subject to the following two conditions:
•This appliance may not cause harmful interference.
•This appliance must accept any interference received,
including interference that may cause undesired operation.
IMPORANT NOTICE: Changes or modifications not expressly
approved by the party responsible for compliance could void the
user's authority to operate the equipment.
This equipment has been tested and found to comply with the
limits for a Class A digital device, pursuant to Part 15 of the FCC
Rules. These limits are designed to provide reasonable protection
against harmful interference when the equipment is operated in a
commercial environment. This equipment generates, uses, and can
radiate radio frequency energy and, if not installed and used in
accordance with the instruction manual, may cause harmful
interference to radio communications. Operation of this equipment
in a residential area is likely to cause harmful interference in which
case the user will be required to correct the interference at his own
expense.

User Guide v
CE Notice
The CE symbol on your WatchGuard Technologies equipment
indicates that it is in compliance with the Electromagnetic
Compatibility (EMC) directive and the Low Voltage Directive
(LVD) of the European Union (EU).
Industry Canada
This Class A digital apparatus meets all requirements of the
Canadian Interference-Causing Equipment Regulations.
Cet appareil numerique de la classe A respecte toutes les exigences
du Reglement sur le materiel broulleur du Canada.
CANADA RSS-210
The term “IC:” before the radio certification number only signifies
that Industry of Canada technical specifications were met.
Operation is subject to the following two conditions:
• This device may not cause interference.
• This device must accept any interference, including
interference that may cause undesired operation of the
device.

vi WatchGuard Firebox SOHO 6 Wireless
VCCI Notice Class A ITE
User Guide vii
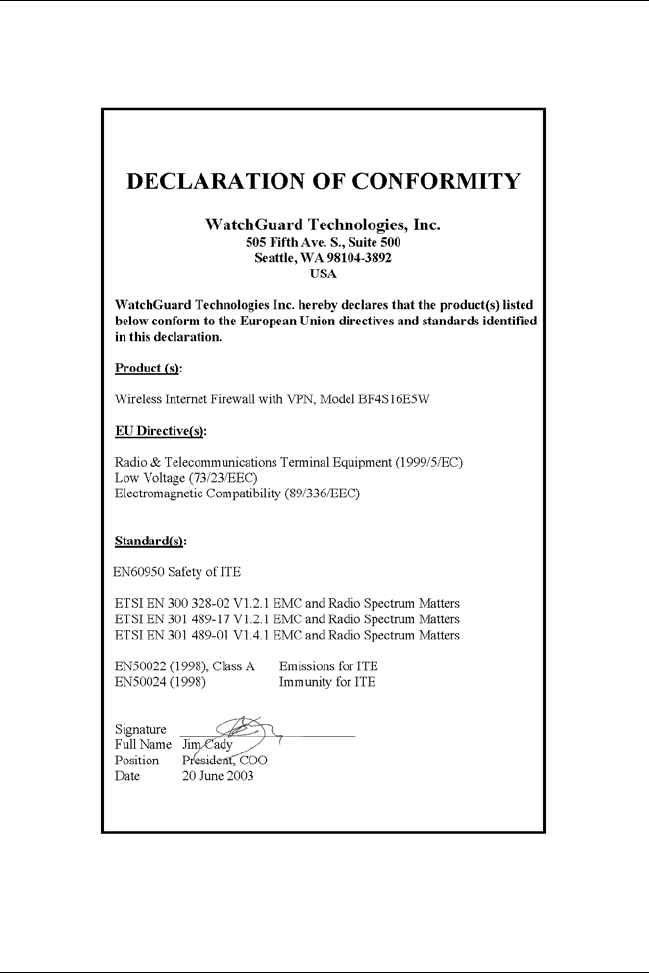
Declaration of Conformity

viii WatchGuard Firebox SOHO 6 Wireless
WATCHGUARD SOHO SOFTWARE
END-USER LICENSE AGREEMENT
WATCHGUARD SOHO SOFTWARE
END-USER LICENSE AGREEMENT
IMPORTANT - READ CAREFULLY BEFORE ACCESSING WATCHGUARD SOFTWARE
This WatchGuard SOHO Software End-User License Agreement
("EULA") is a legal agreement between you (either an individual or a single
entity) and WatchGuard Technologies, Inc. ("WATCHGUARD") for the
WATCHGUARD SOHO software product, which includes computer
software (whether installed separately on a computer workstation or on the WatchGuard hardware
product) and may include associated media, printed materials, and on-line
or electronic documentation, and any updates or modifications thereto, including those received
through the WatchGuard LiveSecurity service (or its equivalent) (the "SOFTWARE PRODUCT").
WATCHGUARD is willing
to license the SOFTWARE PRODUCT to you only on the condition that you
accept all of the terms contained in this EULA. Please read this EULA
carefully.
By installing or using the SOFTWARE PRODUCT you agree to be bound by
the terms of this EULA. If you do not agree to the terms of this EULA,
WATCHGUARD will not license the SOFTWARE PRODUCT to you, and you will
not have any rights in the SOFTWARE PRODUCT. In that case, promptly
return the SOFTWARE PRODUCT, along with proof of payment, to the
authorized dealer from whom you obtained the SOFTWARE PRODUCT for a full
refund of the price you paid.
1. Ownership and License.
The SOFTWARE PRODUCT is protected by copyright laws and international
copyright treaties, as well as other intellectual property laws and
treaties. This is a license agreement and NOT an agreement for sale.
All title and copyrights in and to the SOFTWARE PRODUCT (including but
not limited to any images, photographs, animations, video, audio, music,
text, and applets incorporated into the SOFTWARE PRODUCT), the accompanying
printed materials, and any copies of the SOFTWARE PRODUCT are owned by
WATCHGUARD or its licensors. Your rights to use the SOFTWARE PRODUCT are
as specified in this EULA, and WATCHGUARD retains all rights not expressly
granted to you in this EULA. Nothing in this EULA constitutes a waiver
of our rights under U.S. copyright law or any other law or treaty.
2. Permitted Uses.
You are granted the following rights to the SOFTWARE PRODUCT:
(A) You may use the SOFTWARE PRODUCT solely for the purpose of operating
the SOHO hardware product in accordance with the SOHO or user documentation.

User Guide ix
If you are accessing the SOFTWARE PRODUCT via a Web based installer program,
you are granted the following additional rights to the SOFTWARE PRODUCT:
(A) You may install and use the SOFTWARE PRODUCT on any computer with an associated
connection to the SOHO hardware product
in
accordance with the SOHO user documentation;
(B) You may install and use the SOFTWARE PRODUCT on more than one computer
at once without licensing an additional copy of the SOFTWARE PRODUCT for each
additional computer on which you want to use it, provided that each computer on which you install
the SOFTWARE PRODUCT has an associated connection to the same SOHO hardware product
; and
(C) You may make a single copy of the SOFTWARE PRODUCT for backup or
archival purposes only.
3. Prohibited Uses.
You may not, without express written permission from WATCHGUARD:
(A) Reverse engineer, disassemble or decompile the SOFTWARE PRODUCT;
(B) Use, copy, modify, merge or transfer copies of the SOFTWARE PRODUCT or
printed materials except as provided in this EULA;
(C) Use any backup or archival copy of the SOFTWARE PRODUCT (or allow someone
else to use such a copy) for any purpose other than to replace the original
copy in the event it is destroyed or becomes defective;
(D) Sublicense, lend, lease or rent the SOFTWARE PRODUCT; or
(E) Transfer this license to another party unless
(i) the transfer is permanent,
(ii) the third party recipient agrees to the terms of this EULA, and
(iii) you do not retain any copies of the SOFTWARE PRODUCT.
4. Limited Warranty.
WATCHGUARD makes the following limited warranties for a period of ninety (90)
days from the date you obtained the SOFTWARE PRODUCT from WATCHGUARD or an
authorized dealer;
(A) Media. The disks and documentation will be free from defects in materials
and workmanship under normal use. If the disks or documentation fail to
conform to this warranty, you may, as your sole and exclusive remedy,
obtain a replacement free of charge if you return the defective disk or
documentation to us with a dated proof of purchase; and
(B) SOFTWARE PRODUCT. The SOFTWARE PRODUCT will materially conform to the
documentation that accompanies it. If the SOFTWARE PRODUCT fails to
operate in accordance with this warranty, you may, as your sole and
exclusive remedy, return all of the SOFTWARE PRODUCT and the documentation
to the authorized dealer from whom you obtained it, along with a dated
proof of purchase, specifying the problems, and they will provide you
with a new version of the SOFTWARE PRODUCT or a full refund at their

x WatchGuard Firebox SOHO 6 Wireless
election.
Disclaimer and Release.
THE WARRANTIES, OBLIGATIONS AND LIABILITIES OF WATCHGUARD, AND
YOUR REMEDIES, SET FORTH IN PARAGRAPHS 4, 4(A) AND 4(B) ABOVE
ARE EXCLUSIVE AND IN SUBSTITUTION FOR, AND YOU HEREBY WAIVE,
DISCLAIM AND RELEASE ANY AND ALL OTHER WARRANTIES, OBLIGATIONS
AND LIABILITIES OF WATCHGUARD AND ITS LICENSORS AND ALL OTHER RIGHTS,
CLAIMS AND
REMEDIES YOU MAY HAVE AGAINST WATCHGUARD AND ITS LICENSORS, EXPRESS
OR IMPLIED,
ARISING BY LAW OR OTHERWISE, WITH RESPECT TO ANY NONCONFORMANCE
OR DEFECT IN THE SOFTWARE PRODUCT (INCLUDING, BUT NOT LIMITED
TO, ANY IMPLIED WARRANTY OF MERCHANTABILITY OR FITNESS FOR A
PARTICULAR PURPOSE, ANY IMPLIED WARRANTY ARISING FROM COURSE OF
PERFORMANCE, COURSE OF DEALING, OR USAGE OF TRADE, ANY WARRANTY
OF NONINFRINGEMENT, ANY WARRANTY THAT THIS SOFTWARE PRODUCT WILL
MEET YOUR REQUIREMENTS, ANY WARRANTY OF UNINTERRUPTED OR
ERROR-FREE OPERATION, ANY OBLIGATION, LIABILITY, RIGHT, CLAIM OR
REMEDY IN TORT, WHETHER OR NOT ARISING FROM THE NEGLIGENCE
(WHETHER ACTIVE, PASSIVE OR IMPUTED) OR FAULT OF WATCHGUARD AND
ANY OBLIGATION, LIABILITY, RIGHT, CLAIM OR REMEDY FOR LOSS OR
DAMAGE TO, OR CAUSED BY OR CONTRIBUTED TO BY, THE SOFTWARE
PRODUCT).
Limitation of Liability.
WATCHGUARD'S LIABILITY (WHETHER IN CONTRACT, TORT, OR OTHERWISE;
AND NOTWITHSTANDING ANY FAULT, NEGLIGENCE, STRICT LIABILITY OR
PRODUCT LIABILITY) WITH REGARD TO THE SOFTWARE PRODUCT WILL IN
NO EVENT EXCEED THE PURCHASE PRICE PAID BY YOU FOR SUCH PRODUCT. THIS
WILL BE TRUE EVEN IN THE EVENT OF THE FAILURE OF AN AGREED REMEDY.
IN NO EVENT WILL WATCHGUARD BE LIABLE TO YOU OR ANY THIRD PARTY,
WHETHER ARISING IN CONTRACT (INCLUDING WARRANTY), TORT
(INCLUDING ACTIVE, PASSIVE OR IMPUTED NEGLIGENCE AND STRICT
LIABILITY AND FAULT), FOR ANY INDIRECT, SPECIAL, INCIDENTAL, OR
CONSEQUENTIAL DAMAGES (INCLUDING WITHOUT LIMITATION LOSS OF
BUSINESS PROFITS, BUSINESS INTERRUPTION, OR LOSS OF BUSINESS
INFORMATION) ARISING OUT OF OR IN CONNECTION WITH THIS WARRANTY
OR THE USE OF OR INABILITY TO USE THE SOFTWARE PRODUCT, EVEN IF
WATCHGUARD HAS BEEN ADVISED OF THE POSSIBILITY OF SUCH DAMAGES. THIS
WILL BE TRUE EVEN IN THE EVENT OF THE FAILURE OF AN AGREED REMEDY.
5. United States Government Restricted Rights.
The enclosed SOFTWARE PRODUCT and documentation are provided with

User Guide xi
Restricted Rights. Use, duplication or disclosure by the U.S Government
or any agency or instrumentality thereof is subject to restrictions as
set forth in subdivision (c)(1)(ii) of the Rights in Technical Data and
Computer Software clause at DFARS 252.227-7013, or in subdivision (c)(1)
and (2) of the Commercial Computer Software -- Restricted Rights
Clause at 48 C.F.R. 52.227-19, as applicable. Manufacturer is WatchGuard
Technologies, Incorporated, 505 5th Ave. South, Suite 500,Seattle,
WA 98104.
6. Export Controls.
You agree not to directly or indirectly transfer the SOFTWARE PRODUCT or
documentation to any country to which such transfer would be prohibited
by the U.S. Export Administration Act and the regulations issued thereunder.
7. Termination.
This license and your right to use the SOFTWARE PRODUCT will automatically
terminate if you fail to comply with any provisions of this EULA, destroy
all copies of the SOFTWARE PRODUCT in your possession, or voluntarily return
the SOFTWARE PRODUCT to WATCHGUARD. Upon termination you will destroy all
copies of the SOFTWARE PRODUCT and documentation remaining in your control
or possession.
8. Miscellaneous Provisions. This EULA will be governed by and construed
in accordance with the substantive laws of Washington excluding the 1980
United National Convention on Contracts for the International Sale of Goods,
as amended. This is the entire EULA between us relating to the contents of
this package, and supersedes any prior purchase order, communications,
advertising or representations concerning the SOFTWARE PRODUCT
AND BY USING THE SOFTWARE PRODUCT YOU AGREE TO THESE TERMS. IF THE
SOFTWARE PRODUCT IS BEING USED BY AN ENTITY, THE INDIVIDUAL INDICATING
AGREEMENT TO THESE TERMS REPRESENTS AND WARRANTS THAT (A) SUCH
INDIVIDUAL IS DULY AUTHORIZED TO ACCEPT THIS EULA ON BEHALF OF THE ENTITY
AND TO BIND THE ENTITY TO THE TERMS OF THIS EULA; (B) THE ENTITY HAS THE
FULL POWER, CORPORATE OR OTHERWISE, TO ENTER INTO THIS EULA AND PERFORM
ITS OBLIGATIONS UNDER THIS EULA AND; (C) THIS EULA AND THE PERFORMANCE OF
THE ENTITY’S OBLIGATIONS UNDER THIS EULA DO NOT VIOLATE ANY THIRD-PARTY
AGREEMENT TO WHICH THE ENTITY IS A PARTY.
No change or modification of this EULA will be valid unless it is in
writing, and is signed by WATCHGUARD.

xii WatchGuard Firebox SOHO 6 Wireless
Notice to Users
Information in this guide is subject to change without notice. Companies, names, and data used in
examples herein are fictitious unless otherwise noted. No part of this guide may be reproduced or
transmitted in any form or by any means, electronic or mechanical, for any purpose, without the
express written permission of WatchGuard Technologies, Inc.
Copyright, Trademark, and Patent Information
Copyright© 1998 - 2002 WatchGuard Technologies, Inc. All rights reserved.
AppLock®, AppLock®/Web, Designing peace of mind®, Firebox®, Firebox® 1000, Firebox®
2500, Firebox® 4500, Firebox® II, Firebox® II Plus, Firebox® II FastVPN, Firebox® III,
Firebox® SOHO, Firebox® SOHO 6, Firebox® SOHO 6tc, Firebox® SOHO|tc, Firebox® V100,
Firebox® V80, Firebox® V60, Firebox® V10, LiveSecurity®, LockSolid®, RapidStream®,
RapidCore®, ServerLock®, WatchGuard®, WatchGuard® Technologies, Inc., DVCP™
technology, Enforcer/MUVPN™, FireChip™, HackAdmin™, HostWatch™, Make Security Your
Strength™, RapidCare™, SchoolMate™, ServiceWatch™, Smart Security. Simply Done.™,
Vcontroller™, VPNforce™ are either registered trademarks or trademarks of WatchGuard
Technologies, Inc. in the United States and/or other countries.
© Hi/fn, Inc. 1993, including one or more U.S. Patents: 4701745, 5016009, 5126739, and
5146221 and other patents pending.
Microsoft®, Internet Explorer®, Windows® 95, Windows® 98, Windows NT® and Windows®
2000 are either registered trademarks or trademarks of Microsoft Corporation in the United
States and/or other countries.
Netscape and Netscape Navigator are registered trademarks of Netscape Communications
Corporation in the United States and other countries.
RC2 Symmetric Block Cipher, RC4 Symmetric Stream Cipher, RC5 Symmetric Block Cipher,
BSAFE, TIPEM, RSA Public Key Cryptosystem, MD, MD2, MD4, and MD5 are either
trademarks or registered trademarks of RSA Data Security, Inc. Certain materials herein are
Copyright © 1992-1999 RSA Data Security, Inc. All rights reserved.
RealNetworks, RealAudio, and RealVideo are either a registered trademark or trademark of
RealNetworks, Inc. in the United States and/or other countries.
Java and all Jave-based marks are trademarks or registered trademarks of Sun Microsystems,
Inc. in the United States and other countries. All right reserved.
© 1995-1998 Eric Young (eay@cryptsoft). All rights reserved.
© 1998-2000 The OpenSSL Project. All rights reserved. Redistribution and use in source and
binary forms, with or without modification, are permitted provided that the following conditions
are met:

User Guide xiii
1. Redistributions of source code must retain the above copyright notice, this list of conditions and
the following disclaimer.
2. Redistributions in binary form must reproduce the above copyright notice, this list of conditions
and the following disclaimer in the documentation and/or other materials provided with the
distribution.
3. All advertising materials mentioning features or use of this software must display the following
acknowledgment: "This product includes software developed by the OpenSSL Project for use in the
OpenSSL Toolkit. (http://www.openssl.org/)"
4. The names "OpenSSL Toolkit" and "OpenSSL Project" must not be used to endorse or promote
products derived from this software without prior written permission. For written permission,
please contact openssl-core@openssl.org.
5. Products derived from this software may not be called "OpenSSL" nor may "OpenSSL" appear in
their names without prior written permission of the OpenSSL Project.
6. Redistributions of any form whatsoever must retain the following acknowledgment: "This
product includes software developed by the OpenSSL Project for use in the OpenSSL Toolkit (http:/
/www.openssl.org/)"
THIS SOFTWARE IS PROVIDED BY THE OpenSSL PROJECT ``AS IS'' AND ANY
EXPRESSED OR IMPLIED WARRANTIES, INCLUDING, BUT NOT LIMITED TO, THE
IMPLIED WARRANTIES OF MERCHANTABILITY AND FITNESS FOR A PARTICULAR
PURPOSE ARE DISCLAIMED. IN NO EVENT SHALL THE OpenSSL PROJECT OR ITS
CONTRIBUTORS BE LIABLE FOR ANY DIRECT, INDIRECT, INCIDENTAL, SPECIAL,
EXEMPLARY, OR CONSEQUENTIAL DAMAGES (INCLUDING, BUT NOT LIMITED TO,
PROCUREMENT OF SUBSTITUTE GOODS OR SERVICES; LOSS OF USE, DATA, OR
PROFITS; OR BUSINESS INTERRUPTION) HOWEVER CAUSED AND ON ANY THEORY OF
LIABILITY, WHETHER IN CONTRACT, STRICT LIABILITY, OR TORT (INCLUDING
NEGLIGENCE OR OTHERWISE) ARISING IN ANY WAY OUT OF THE USE OF THIS
SOFTWARE, EVEN IF ADVISED OF THE POSSIBILITY OF SUCH DAMAGE.
This product includes cryptographic software written by Eric Young
(eay@cryptsoft.com). This product includes software written by Tim
Hudson (tjh@cryptsoft.com).
© 1995-1998 Eric Young (eay@cryptsoft.com)
All rights reserved.
This package is an SSL implementation written by Eric Young (eay@cryptsoft.com).
The implementation was written so as to conform with Netscapes SSL.
This library is free for commercial and non-commercial use as long as the following conditions are
aheared to. The following conditions apply to all code found in this distribution, be it the RC4,
RSA, lhash, DES, etc., code; not just the SSL code. The SSL documentation included with this
distribution is covered by the same copyright terms except that the holder is Tim Hudson
(tjh@cryptsoft.com).
Copyright remains Eric Young's, and as such any Copyright notices in the code are not to be
removed. If this package is used in a product, Eric Young should be given attribution as the author
of the parts of the library used. This can be in the form of a textual message at program startup or
in documentation (online or textual) provided with the package. Redistribution and use in source

xiv WatchGuard Firebox SOHO 6 Wireless
and binary forms, with or without modification, are permitted provided that the following
conditions are met:
1. Redistributions of source code must retain the copyright notice, this list of conditions and the
following disclaimer.
2. Redistributions in binary form must reproduce the above copyright notice, this list of conditions
and the following disclaimer in the documentation and/or other materials provided with the
distribution.
3. All advertising materials mentioning features or use of this software must display the following
acknowledgement: "This product includes cryptographic software written by Eric Young
(eay@cryptsoft.com)" The word 'cryptographic' can be left out if the routines from the library
being used are not cryptographic related :-).
4. If you include any Windows specific code (or a derivative thereof) from the apps directory
(application code) you must include an acknowledgement: "This product includes software written
by Tim Hudson (tjh@cryptsoft.com)"
THIS SOFTWARE IS PROVIDED BY ERIC YOUNG ``AS IS'' AND ANY EXPRESS OR
IMPLIED WARRANTIES, INCLUDING, BUT NOT LIMITED TO, THE IMPLIED
WARRANTIES OF MERCHANTABILITY AND FITNESS FOR A PARTICULAR PURPOSE
ARE DISCLAIMED. IN NO EVENT SHALL THE AUTHOR OR CONTRIBUTORS BE LIABLE
FOR ANY DIRECT, INDIRECT, INCIDENTAL, SPECIAL, EXEMPLARY, OR
CONSEQUENTIAL DAMAGES (INCLUDING, BUT NOT LIMITED TO, PROCUREMENT OF
SUBSTITUTE GOODS OR SERVICES; LOSS OF USE, DATA, OR PROFITS; OR BUSINESS
INTERRUPTION) HOWEVER CAUSED AND ON ANY THEORY OF LIABILITY,
WHETHER IN CONTRACT, STRICT LIABILITY, OR TORT (INCLUDING NEGLIGENCE OR
OTHERWISE) ARISING IN ANY WAY OUT OF THE USE OF THIS SOFTWARE, EVEN IF
ADVISED OF THE POSSIBILITY OF SUCH DAMAGE.
The licence and distribution terms for any publicly available version or derivative of this code
cannot be changed. i.e. this code cannot simply be copied and put under another distribution
licence [including the GNU Public Licence.]
The mod_ssl package falls under the Open-Source Software label because it's distributed under a
BSD-style license. The detailed license information follows.
Copyright (c) 1998-2001 Ralf S. Engelschall. All rights reserved.
Redistribution and use in source and binary forms, with or without modification, are permitted
provided that the following conditions are met:
1. Redistributions of source code must retain the above copyright notice, this list of conditions and
the following disclaimer.
2. Redistributions in binary form must reproduce the above copyright notice, this list of conditions
and the following disclaimer in the documentation and/or other materials provided with the
distribution.
3. All advertising materials mentioning features or use of this software must display the following
acknowledgment:
"This product includes software developed by Ralf S. Engelschall <rse@engelschall.com> for use
in the mod_ssl project (http://www.modssl.org/)."

User Guide xv
4. The names "mod_ssl" must not be used to endorse or promote products derived from this
software without prior written permission. For written permission, please contact
rse@engelschall.com.
5. Products derived from this software may not be called "mod_ssl" nor may "mod_ssl" appear in
their names without prior written permission of Ralf S. Engelschall.
6. Redistributions of any form whatsoever must retain the following acknowledgment: "This
product includes software developed by Ralf S. Engelschall <rse@engelschall.com> for use in the
mod_ssl project (http://www.modssl.org/)."
THIS SOFTWARE IS PROVIDED BY RALF S. ENGELSCHALL ``AS IS'' AND ANY
EXPRESSED OR IMPLIED WARRANTIES, INCLUDING, BUT NOT LIMITED TO, THE
IMPLIED WARRANTIES OF MERCHANTABILITY AND FITNESS FOR A PARTICULAR
PURPOSE ARE DISCLAIMED. IN NO EVENT SHALL RALF S. ENGELSCHALL OR HIS
CONTRIBUTORS BE LIABLE FOR ANY DIRECT, INDIRECT, INCIDENTAL, SPECIAL,
EXEMPLARY, OR CONSEQUENTIAL DAMAGES (INCLUDING, BUT NOT LIMITED TO,
PROCUREMENT OF SUBSTITUTE GOODS OR SERVICES; LOSS OF USE, DATA, OR
PROFITS; OR BUSINESS INTERRUPTION) HOWEVER CAUSED AND ON ANY THEORY OF
LIABILITY, WHETHER IN CONTRACT, STRICT LIABILITY, OR TORT (INCLUDING
NEGLIGENCE OR OTHERWISE) ARISING IN ANY WAY OUT OF THE USE OF THIS
SOFTWARE, EVEN IF ADVISED OF THE POSSIBILITY OF SUCH DAMAGE.
The Apache Software License, Version 1.1
Copyright (c) 2000 The Apache Software Foundation. All rights reserved.
Redistribution and use in source and binary forms, with or without modification, are permitted
provided that the following conditions are met:
1. Redistributions of source code must retain the above copyright notice, this list of conditions and
the following disclaimer.
2. Redistributions in binary form must reproduce the above copyright notice, this list of conditions
and the following disclaimer in the documentation and/or other materials provided with the
distribution.
3. The end-user documentation included with the redistribution, if any, must include the following
acknowledgment:
"This product includes software developed by the Apache Software Foundation (http://
www.apache.org/)." Alternately, this acknowledgment may appear in the software itself, if and
wherever such third-party acknowledgments normally appear.
4. The names "Apache" and "Apache Software Foundation" must not be used to endorse or promote
products derived from this software without prior written permission. For written permission,
please contact apache@apache.org.

xvi WatchGuard Firebox SOHO 6 Wireless
5. Products derived from this software may not be called "Apache", nor may "Apache" appear in
their name, without prior written permission of the Apache Software Foundation.
THIS SOFTWARE IS PROVIDED ``AS IS'' AND ANY EXPRESSED OR IMPLIED
WARRANTIES, INCLUDING, BUT NOT LIMITED TO, THE IMPLIED WARRANTIES OF
MERCHANTABILITY AND FITNESS FOR A PARTICULAR PURPOSE ARE DISCLAIMED.
IN NO EVENT SHALL THE APACHE SOFTWARE FOUNDATION OR ITS CONTRIBUTORS BE
LIABLE FOR ANY DIRECT, INDIRECT, INCIDENTAL, SPECIAL, EXEMPLARY, OR
CONSEQUENTIAL DAMAGES (INCLUDING, BUT NOT LIMITED TO, PROCUREMENT OF
SUBSTITUTE GOODS OR SERVICES; LOSS OF USE, DATA, OR PROFITS; OR BUSINESS
INTERRUPTION) HOWEVER CAUSED AND ON ANY THEORY OF LIABILITY, WHETHER IN
CONTRACT, STRICT LIABILITY, OR TORT (INCLUDING NEGLIGENCE OR OTHERWISE)
ARISING IN ANY WAY OUT OF THE USE OF THIS SOFTWARE, EVEN IF ADVISED OF THE
POSSIBILITY OF SUCH DAMAGE.
This software consists of voluntary contributions made by many individuals on behalf of the
Apache Software Foundation. For more information on the Apache Software Foundation, please
see <http://www.apache.org/>.
Portions of this software are based upon public domain software originally written at the National
Center for Supercomputing Applications, University of Illinois, Urbana-Champaign.
All other trademarks or trade names mentioned herein, if any, are the property of their respective
owners.
Limited Hardware Warranty
This Limited Hardware Warranty (the “Warranty”) applies to the enclosed WatchGuard hardware
product (the “Product”), not including any associated software which is licensed pursuant to a
separate end-user license agreement and warranty. BY USING THE PRODUCT, YOU AGREE TO
THE TERMS HEREOF. If you do not agree to these terms, please return this package, along with
proof of purchase, to the authorized dealer from which you purchased it for a full refund.
WatchGuard Technologies, Inc. (”WatchGuard”) and you agree as follows:
1. Limited Warranty. WatchGuard warrants that upon delivery and for one (1) year thereafter (the
“Warranty Period”): (a) the Product will be free from material defects in materials and
workmanship, and (b) the Product, when properly installed and used for its intended purpose and
in its intended operating environment, will perform substantially in accordance with WatchGuard
applicable specifications.
This warranty does not apply to any Product that has been: (i) altered, repaired or modified by any
party other than WatchGuard; or (ii) damaged or destroyed by accidents, power spikes or similar
events or by any intentional, reckless or negligent acts or omissions of any party. You may have
additional warranties with respect to the Product from the manufacturers of Product components.
However, you agree not to look to WatchGuard for, and hereby release WatchGuard from any

User Guide xvii
liability for, performance of, enforcement of, or damages or other relief on account of, any such
warranties or any breach thereof.
2. Remedies. If any Product does not comply with the WatchGuard warranties set forth in Section
1 above, WatchGuard will, at its option, either (a) repair the Product, or (b) replace the Product;
provided, that you will be responsible for returning the Product to the place of purchase and for all
costs of shipping and handling. Repair or replacement of the Product shall not extend the
Warranty Period. Any Product, component, part or other item replaced by WatchGuard becomes
the property of WatchGuard . WatchGuard shall not be responsible for return of or damage to any
software, firmware, information or data contained in, stored on, or integrated with any returned
Products.
3. Disclaimer and Release. THE WARRANTIES, OBLIGATIONS AND LIABILITIES OF
WATCHGUARD, AND YOUR REMEDIES, SET FORTH IN PARAGRAPHS 1 AND 2 ABOVE
ARE EXCLUSIVE AND IN SUBSTITUTION FOR, AND YOU HEREBY WAIVE, DISCLAIM
AND RELEASE ANY AND ALL OTHER WARRANTIES, OBLIGATIONS AND LIABILITIES OF
WATCHGUARD AND ALL OTHER RIGHTS, CLAIMS AND REMEDIES YOU MAY HAVE
AGAINST WATCHGUARD, EXPRESS OR IMPLIED, ARISING BY LAW OR OTHERWISE,
WITH RESPECT TO ANY NONCONFORMANCE OR DEFECT IN THE PRODUCT
(INCLUDING, BUT NOT LIMITED TO, ANY IMPLIED WARRANTY OF MERCHANTABILITY
OR FITNESS FOR A PARTICULAR PURPOSE, ANY IMPLIED WARRANTY ARISING FROM
COURSE OF PERFORMANCE, COURSE OF DEALING, OR USAGE OF TRADE, ANY
WARRANTY OF NONINFRINGEMENT, ANY WARRANTY OF UNINTERRUPTED OR ERROR-
FREE OPERATION, ANY OBLIGATION, LIABILITY, RIGHT, CLAIM OR REMEDY IN TORT,
WHETHER OR NOT ARISING FROM THE NEGLIGENCE (WHETHER ACTIVE, PASSIVE OR
IMPUTED) OR FAULT OF WATCHGUARD OR FROM PRODUCT LIABILITY, STRICT
LIABILITY OR OTHER THEORY, AND ANY OBLIGATION, LIABILITY, RIGHT, CLAIM OR
REMEDY FOR LOSS OR DAMAGE TO, OR CAUSED BY OR CONTRIBUTED TO BY,THE
PRODUCT).
4. Limitation of Liability. WATCHGUARD TECHNOLOGIES’ LIABILITY (WHETHER ARISING
IN CONTRACT (INCLUDING WARRANTY), TORT (INCLUDING ACTIVE, PASSIVE OR
IMPUTED NEGLIGENCE AND STRICT LIABILITY AND FAULT) OR OTHER THEORY) WITH
REGARD TO ANY PRODUCT WILL IN NO EVENT EXCEED THE PURCHASE PRICE PAID
BY YOU FOR SUCH PRODUCT. THIS SHALL BE TRUE EVEN IN THE EVENT OF THE
FAILURE OF ANY AGREED REMEDY. IN NO EVENT WILL WATCHGUARD
TECHNOLOGIES BE LIABLE TO YOU OR ANY THIRD PARTY (WHETHER ARISING IN
CONTRACT (INCLUDING WARRANTY), TORT (INCLUDING ACTIVE, PASSIVE OR
IMPUTED NEGLIGENCE AND STRICT LIABILITY AND FAULT) OR OTHER THEORY) FOR
COST OF COVER OR FOR ANY INDIRECT, SPECIAL, INCIDENTAL, OR CONSEQUENTIAL
DAMAGES (INCLUDING WITHOUT LIMITATION LOSS OF PROFITS, BUSINESS, OR DATA)
ARISING OUT OF OR IN CONNECTION WITH THIS WARRANTY OR THE USE OF OR
INABILITY TO USE THE PRODUCT, EVEN IF WATCHGUARD TECHNOLOGIES HAS BEEN

xviii WatchGuard Firebox SOHO 6 Wireless
ADVISED OF THE POSSIBILITY OF SUCH DAMAGES. THIS SHALL BE TRUE EVEN IN
THE EVENT OF THE FAILURE OF ANY AGREED REMEDY.
5. Miscellaneous Provisions. This Warranty will be governed by the laws of the state of
Washington, U.S.A., without reference to its choice of law rules. The provisions of the 1980
United Nations Convention on Contracts for the International Sales of Goods, as amended, shall
not apply. You agree not to directly or indirectly transfer the Product or associated documentation
to any country to which such transfer would be prohibited by the U.S. Export laws and regulations.
If any provision of this Warranty is found to be invalid or unenforceable, then the remainder shall
have full force and effect and the invalid provision shall be modified or partially enforced to the
maximum extent permitted by law to effectuate the purpose of this Warranty. This is the entire
agreement between WatchGuard and you relating to the Product, and supersedes any prior
purchase order, communications, advertising or representations concerning the Product AND BY
USING THE PRODUCT YOU AGREE TO THESE TERMS. No change or modification of this
Agreement will be valid unless it is in writing, and is signed by WatchGuard.
Software Version Number: 6.2
Part No 1230-000

User Guide xvii
Contents
CHAPTER 1 Introduction ..................................................1
Package contents ......................................................2
How does a firewall work? ........................................2
How does information travel on the Internet? ..........4
How does the SOHO 6 Wireless process
information? ..........................................................5
How Does Wireless Networking Work? ....................5
SOHO 6 Wireless hardware description ...................6
CHAPTER 2 Installation ..................................................13
Before you Begin the Installation ............................14
Physically Connect to the SOHO 6 Wireless ...........21
Setting up the Wireless Network ............................26
Setting up the Wireless Access Point ......................27
Configuring the Wireless Card on your computer ..27

xviii WatchGuard Firebox SOHO 6 Wireless
CHAPTER 3 SOHO 6 Wireless basics ...........................29
SOHO 6 Wireless System Status page ...................29
Factory default settings ...........................................31
Register your SOHO 6 Wireless and activate the
LiveSecurity Service ............................................33
Reboot the SOHO 6 Wireless .................................34
CHAPTER 4 Configure the Network Interfaces ...........37
External Network Configuration .............................37
Configure the Trusted Network ..............................42
Configure the Optional Network for Wireless
Networking .........................................................46
Configure the Wireless Network .............................49
Configure static routes ............................................54
View network statistics ............................................55
Configure the dynamic DNS Service .......................56
CHAPTER 5 Administrative options ..............................59
The System Security page ......................................59
Set up VPN manager access ...................................63
Update the firmware ...............................................65
Activate the SOHO 6 Wireless upgrade options ....66
View the configuration file ......................................69
CHAPTER 6 Configure the Firewall Settings ................71
Firewall settings ......................................................71
Configure incoming and outgoing services ............71
Block external sites .................................................75
Firewall options .......................................................77

User Guide xix
Enable override MAC address for the external
network ...............................................................82
Create an Unrestricted Pass Through .....................82
CHAPTER 7 Configure logging .....................................85
View SOHO 6 Wireless log messages ....................86
Set up logging to a WatchGuard Security Event
Processor log host ..............................................87
Set up logging to a Syslog host ..............................88
Set the system time .................................................90
CHAPTER 8 SOHO 6 Wireless WebBlocker .................93
How WebBlocker works ..........................................93
Purchase and activate SOHO 6 Wireless
WebBlocker ........................................................95
Configure the SOHO 6 Wireless WebBlocker .........95
WebBlocker Categories ........................................101
CHAPTER 9 VPN—Virtual Private Networking ..........105
What You Need .....................................................106
Step-by-step instructions to configure a SOHO 6
Wireless VPN tunnel .........................................109
Frequently Asked Questions .................................110
Set Up multiple SOHO-SOHO VPN tunnels .........111
Configure split tunneling ......................................116
MUVPN Clients .....................................................117
View the VPN Statistics .........................................118

xx WatchGuard Firebox SOHO 6 Wireless
CHAPTER 10 MUVPN Clients ........................................119
Configure the SOHO 6 Wireless for
MUVPN Clients .................................................120
Prepare the Remote Computers for the MUVPN
Client ................................................................123
Install and Configure the MUVPN Client ..............137
Connect and Disconnect the MUVPN Client ........147
Monitor the MUVPN Client Connection ...............151
The ZoneAlarm Personal Firewall ..........................153
Use the MUVPN Client to Enforce your Corporate
Policy ................................................................157
Troubleshooting Tips ............................................167
CHAPTER 11 Support resources ...................................171
Troubleshooting tips .............................................171
Contact technical support .....................................180
Online documentation and FAQs .........................180
Special notices ......................................................180
Index ................................................................. 181
User Guide 1
CHAPTER 1 Introduction
This manual shows how to use your WatchGuard® Firebox®
SOHO 6 Wireless or SOHO 6tc Wireless security appliance for
secure access to the Internet.

2 WatchGuard Firebox SOHO 6 Wireless
The only difference between these two appliances is the VPN
feature. VPN is available as an upgrade option for the SOHO 6
Wireless. The SOHO 6tc Wireless includes the VPN upgrade
option.
The SOHO 6 Wireless provides security and wireless networking
when your computer is connected to the Internet with a high-
speed cable modem, DSL modem, leased line, or ISDN.
The newest installation and user information is available from the
WatchGuard Web site:
http://support.watchguard.com/sohoresources/
Package contents
Make sure that the package contains all of these items:
• SOHO 6 Wireless QuickStart Guide
• Wireless User Guide
• LiveSecurity Service® activation card
• Hardware Warranty card
• AC adapter (12 V, 1.2 A)
• Straight-through Ethernet cable
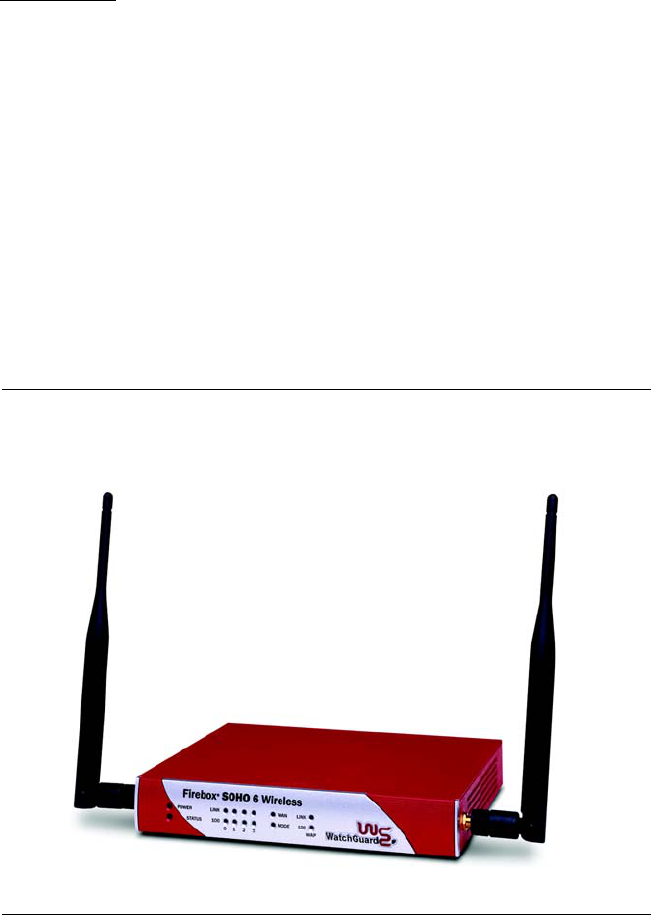
• SOHO 6 Wireless security appliance
• Two 5dBi detachable antennae
How does a firewall work?
The Internet connects your network to resources. Some examples
of resources are the World Wide Web, email and video/audio
User Guide 3
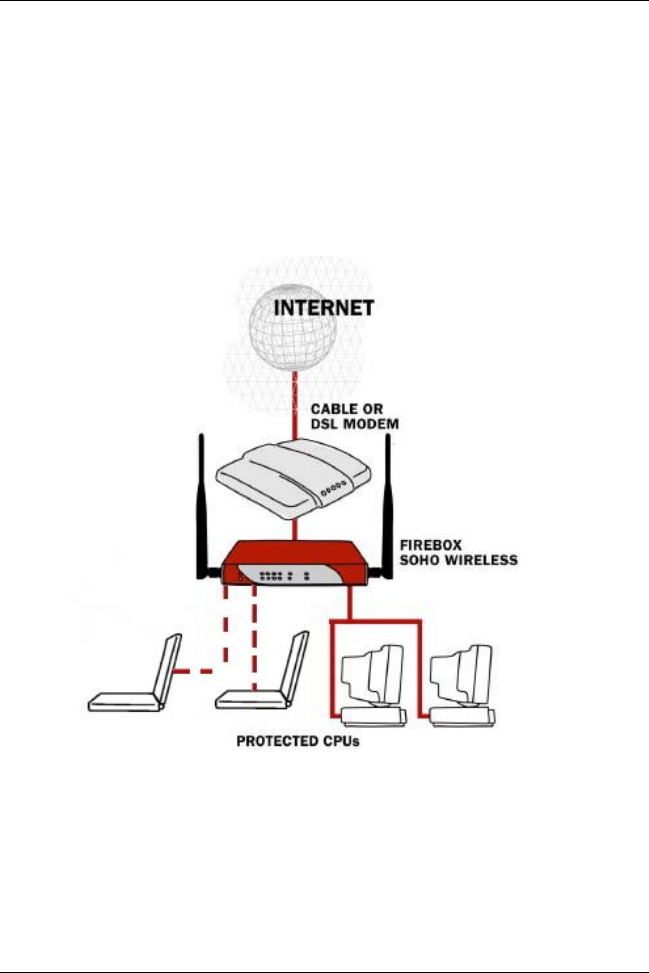
How does a firewall work?
conferencing. A connection to the Internet is dangerous to the
privacy and the security of your network. A firewall divides your
internal network from the Internet to reduce this danger. The
appliances on the trusted side of your SOHO 6 Wireless firewall
are protected. The illustration below shows how the SOHO 6
Wireless physically divides your trusted network from the
Internet.
The SOHO 6 Wireless controls all traffic between the external
network (the Internet) and the trusted network (your computers).
All suspicious traffic is stopped. The rules and policies that
identify the suspicious traffic are shown in “Configure incoming
and outgoing services” on page 71.

4 WatchGuard Firebox SOHO 6 Wireless
How does information travel on the Internet?
The data that is sent through the Internet is divided into packets.
To make sure that the packets are received at the destination,
information is added to the packets. The protocols for these tasks
are called TCP and IP. TCP disassembles and reassembles the data,
for example an email message or a program file. IP adds
information to the packets, which includes the destination and the
handling requirements.
IP addresses
An IP address identifies a computer on the Internet that sends and
receives packets. Each computer on the Internet has an address.
The SOHO 6 Wireless is also a computer and has an IP address.
When you configure a service behind a firewall, you must include
the trusted network IP address for the computer that supplies the
service.
A URL (Uniform Resource Locator) identifies each IP address on
the Internet. An example of a URL is:
http://www.watchguard.com/.
Protocols
A protocol defines how a packet is assembled and transmitted
through a network. The most frequently used protocols are TCP
and UDP (User Datagram Protocol). There are other IP protocols
that are less frequently used.
Port numbers
During the communication between computers, port numbers
identify which programs or applications are connected.

User Guide 5
How does the SOHO 6 Wireless process information?
How does the SOHO 6 Wireless process
information?
Services
A service is the group of protocols and port numbers for a
specified program or type of application. The standard
configuration of the SOHO 6 Wireless contains the correct settings
for many standard services.
Network Address Translation
All connections from the trusted network to the external network
through a SOHO 6 Wireless use dynamic NAT. Dynamic NAT
prevents that private IP addresses from your trusted network are
sent through the Internet.
The SOHO 6 Wireless replaces the private IP addresses with the
public IP address to protect the trusted network. Each packet sent
through the Internet contains IP address information. Packets sent
through the SOHO 6 Wireless with Dynamic NAT include only the
public IP address of the SOHO 6 Wireless and not the private IP
address of the computer in the trusted network. Because only the
IP address of the SOHO 6 Wireless is sent to the external network,
unauthorized access by the computers in the public network to the
computers in the trusted network is prevented.
How Does Wireless Networking Work?
Wireless networking creates a network by transmitting and
receiving data as radio-frequency signals between your computers
and the SOHO 6 Wireless using the 802.11b standard defined by

6 WatchGuard Firebox SOHO 6 Wireless
the Institute of Electrical and Electronics Engineers (IEEE) and is
part of a series of wireless standards.
Unless adequately protected, a wireless network is susceptible to
access from the outside by unauthorized users to compromise your
machine or simply to access a free Internet connection.
Increase your corporate network security by forcing users to
authenticate with a Mobile User VPN client, creating a secure
IPSec tunnel from the wireless computer to the SOHO 6 Wireless.
Separation of the trusted network from the optional network
further protects the connection from the wireless computer to the
SOHO 6 Wireless. For information on how to configure this, see
Chapter 11 “MUVPN Clients” on page 119.
SOHO 6 Wireless hardware description
The hardware of the SOHO 6 Wireless uses newer technology than
earlier SOHO models.
Faster Processor
The SOHO 6 Wireless has a new network processor that
runs at a speed of 150 MHz. Ethernet and encryption
technology are included.
Ethernet ports
The SOHO 6 Wireless has five 10/100 Base TX ports. The
Ethernet ports have the labels 0 through 3 and WAN.

User Guide 7
SOHO 6 Wireless hardware description
Wireless
Wireless operating range--indoors (these values are
approximations):
100 feet at 11 Mbps
165 feet at 5.5 Mbps
230 feet at 2 Mbps
300 feet at 1 Mbps
Understanding IEEE 802.11b Wireless
Communication
In general, transmitted RF power and signal bandwidth place an
upper limit on the rate that data can be transmitted over a wireless
link. The basic equation to determines the maximum data rate is:
Channel Capacity =
Channel Bandwidth x Log2(1 + Signal Strength/Noise Level
This equation says the maximum amount of data (bits/s) that can
be transmitted over a given channel depends on:
• The Channel Bandwidth: (22Mbits/s) for 802.11b
• The Signal Strength: (15dBm transmitted) for Soho6 Wireless
• The Noise Level: Depends on the channel environment and
the receiver design.
Data rate cannot exceed channel capacity. Channel capacity
depends on signal strength, noise, and transmitted power.

8 WatchGuard Firebox SOHO 6 Wireless
Noise Level (watts)
The more in-band RF noise there is the less data can be
transmitted over a given channel (wireless link). The noise
level is primarily due to three factors:
First, there is a minimum level of background noise due to
the ambient temperature of the channel (atmosphere) and
the bandwidth.
Second, the 802.11b receiver will have an innate noise level
due to its own components operating temperature.
Third, there are many unlicensed transmitters using the
same frequency bands as 802.11. Some of these are:
- Cordless phones,
- Other 802.11b devices operating on adjacent channels.
Note that only channels 1, 6, and11 are unique. All other
channels overlap because while the center frequencies
increment by 5MHz per channel, the bandwidths are
22MHz.
-Microwave ovens,
- Sodium type lighting systems (fusion lamps),
- Arc welders (broadband spark gap transmitters)
- Blue-Tooth transmitters. Note that a Blue-Tooth
transmitter operates at lower power levels and would
need to be near an 802.11b receiver to interfere with it.
- Industrial, Scientific, and Medical equipment can also use
these bands.
Signal Strength (watts)
The signal strength depends primarily on:
- How much RF signal power is transmitted

User Guide 9
SOHO 6 Wireless hardware description
- How much directional antenna gain there is at the
transmitter and receiver
- The signal attenuation (path-loss) between the transmitter
and receiver.
Path Loss:
The path-loss is directly proportional to line-of-site
distance between transmitter and receiver, and inversely
proportional to the wavelength of the transmitted signal.
The equation for Signal Loss is:
Loss = 20xLog10(4xpi x(Distance/Wavelength)).
- Wavelength = (speed-of-light/ frequency). This means
that the higher the frequency the shorter the wavelength
and the greater the path-loss will be for a given frequency.
- For an average office environment, a rule-of-thumb is that
line-of-sight signal loss will only pertain to about the first
20 feet and will then increase by about 30 dB per 100 feet,
due the effect of walls, and cubicles and widows, etc.
Second, the signals can arrive by different paths depending
on how many surfaces reflect the signal. This is called
multi-path. Many surfaces will reflect a signal at 2.4 GHz.
The problem is that some combinations of reflected signals
will result in cancellation at a given point, thus by moving a
receiver by as little as ½ wavelength, the signal could vary
by as much as 30dB. The effect is called fading due to
multi-path reflections.
The signal fading effect is highly dependent on antenna
position, so the SOHO 6 Wireless uses antenna receiver
diversity (2 antennas spaced more than ½ wavelength
apart) to reduce the effect of multi-path fading. On the
SOHO 6 Wireless the antenna receiving the stronger signal
is selected automatically.

10 WatchGuard Firebox SOHO 6 Wireless
NOTE
Laptop computers typically have one antenna, which is more susceptible
to signal fading depending on position. This can lead to a situation where
the SOHO 6 Wireless hears the laptop’s signal, but the laptop doesn’t
hear the access point.
Antenna Directional Gain:
Antenna Gain is the result of how directional the radiation
(transmit/receive signal strength) pattern is. The higher the
gain, then the more directional the antenna is.
The SOHO 6 Wireless ships with 5dBi antennas. This
means they have a maximum 5 dBi gain pattern
perpendicular to the antenna position. A laptop computer
antenna gain will vary but might be as low as -10dBi for
embedded wireless antennas.
Transmitted Power:
SOHO 6 Wireless transmits at 15dBm (0.032 watts), which
is compatible with US and European and other
requirements. In the USA 802.11b devices may transmit at
up to (1 watt) and up to (0.1 watt) in Europe. Allocated
channels vary for USA and Europe.
Signal strength is a function, both of how much power was
transmitted, and how much power was received. This is impacted
by the antenna gain at the transmitter and receiver as well as the
distance and the environment in between them. Due principally to
the effect of cluttered environment, signal loss increases faster in
an office building than it would for line-of-sight transmission.
Channel Bandwidth:
This varies with the type of modulation scheme. 802.11b devices
use CCK (11 Mbps, 5.5 Mbps), DQPSK (2 Mbps), and DBPSK
User Guide 11
SOHO 6 Wireless hardware description
(1Mbps). The factor that determines which modulation scheme is
used is the Packet Error Rate (PER). The modulation scheme
switches automatically to maintain the PER at or below 8% by
using slower data rates (different modulation schemes) as
necessary.
SOHO 6 Wireless front and rear views
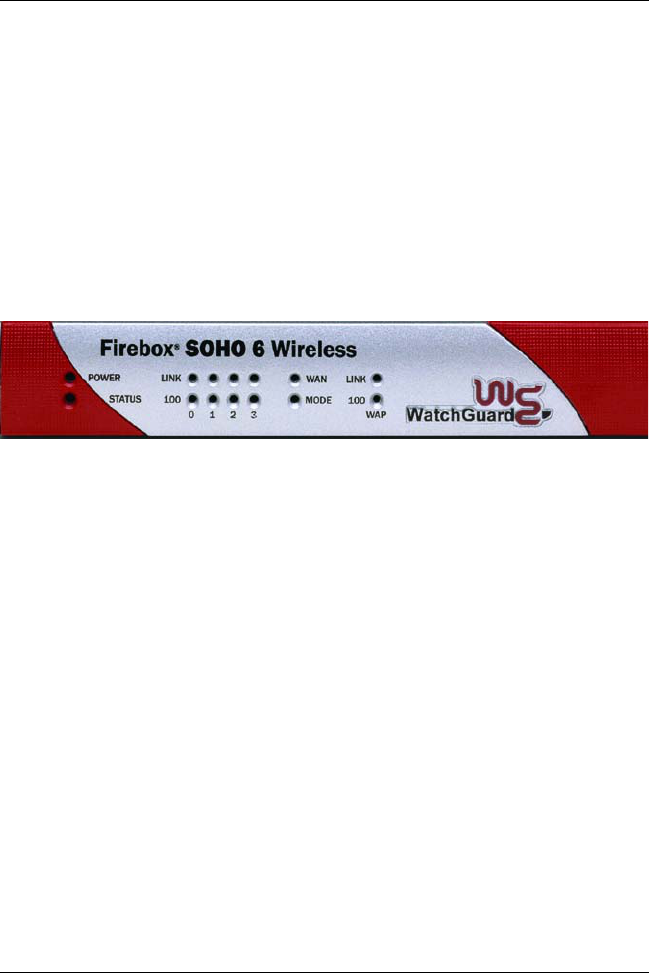
There are 14 indicator lights on the front panel of the SOHO 6
Wireless. The illustration below shows the front view.
PWR
PWR is lit while the SOHO 6 Wireless is connected to a
power supply.
Status
Status is lit while a management connection is in use.
Link
Link indicators are lit while there is an active physical
connection to the related Ethernet port. A link indicator
flashes when data flows through the Ethernet port.
100
The 100 indicator is lit when a port is in use at 100 Mb. The
100 indicator is not lit when a port is in use at 10 Mb.
12 WatchGuard Firebox SOHO 6 Wireless
WAN
WAN is lit while there is an active physical connection to
the WAN port. The indicator flashes when data flows
through the port.
Mode
Mode is lit while there is a connection to the Internet.
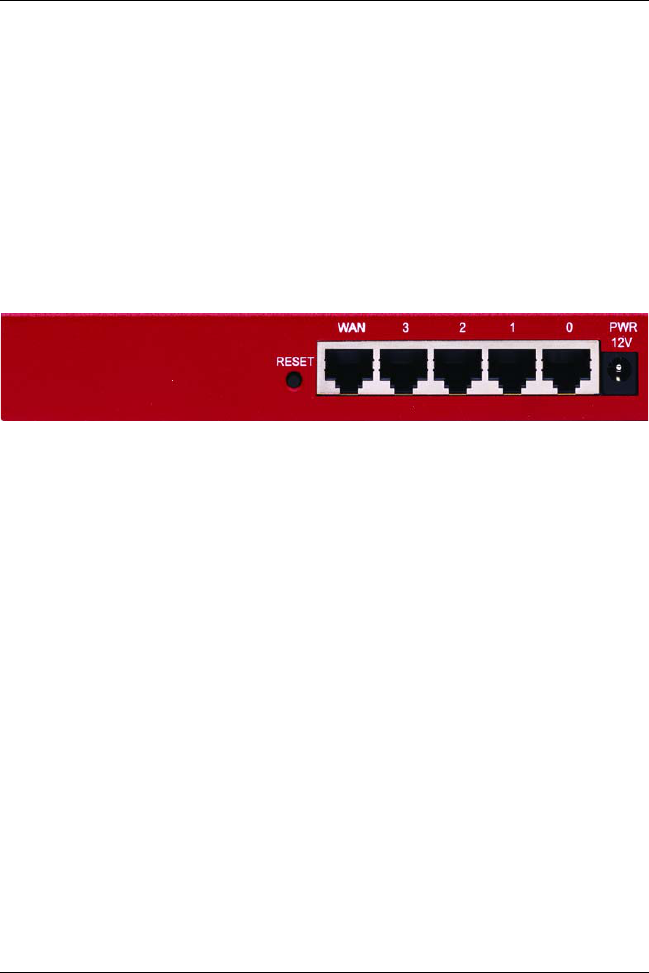
There are five Ethernet ports, a reset button, and a power input on
the rear of the SOHO 6 Wireless. The illustration below shows the
rear view.
RESET button
Push the reset button to reset to the SOHO 6 Wireless to the
factory default configuration. See “Reset the SOHO 6
Wireless to the factory default settings” on page 32 for
more information about this procedure.
WAN port
The WAN port is for the external interface.
Four numbered ports (0-3)
These Ethernet ports are for the trusted network
connections.
Power input
Connect the power input to a power supply using the 12
volt 1.2a AC adapter supplied with the SOHO 6 Wireless.

User Guide 13
CHAPTER 2 Installation
The SOHO 6 Wireless protects computers that are connected to it
by Ethernet cable or wireless connection. Follow the procedures in
this chapter to install the SOHO 6 Wireless and set up the wireless
network.
Because WatchGuard is concerned about the security of your
network, the wireless feature is turned off on the SOHO 6 Wireless
we ship you. This allows you to enable the wireless network after
you set up the desired security.
To install the SOHO 6 Wireless, you complete the following steps:
• Identify and record your TCP/IP settings.
• Disable the HTTP proxy setting of your Web browser.
•Enable your computer for DHCP.
• Make the physical connections between the SOHO 6
Wireless and your network.

14 WatchGuard Firebox SOHO 6 Wireless
To set up the wireless network, you complete the following steps:
• Set up the Wireless Network
• Set up the Wireless Access Point
• Configure the Wireless Card on your computer
See the SOHO 6 Wireless QuickStart Guide included with the
SOHO 6 Wireless for a summary of this information.
Before you Begin the Installation
Before you install the SOHO 6, Wireless, make sure you have:
• DSL/cable modem
• Firebox SOHO 6 Wireless with Ethernet cables and power
supply
• Computer connected by Ethernet cable to the Firebox SOHO
6 Wireless
• Computer with wireless card (for Wireless)
You also need to follow these steps:
1 Make sure there are a 10/100BaseT Ethernet card or an 802.11b
wireless networking card installed in your computer.
2 Make sure you have a functional Internet connection. If the
Internet connection is not functional, call your ISP. The Internet
connection must be a cable modem or DSL modem with a 10/
100BaseT port, an ISDN router, or a direct LAN connection.
3 Make sure there are two straight-through Ethernet network
cables with RJ-45 connectors available. Crossover cables, which
are often red or orange in color, are not satisfactory. The
SOHO 6 Wireless package includes one cable. Make sure that
the cables are of sufficient length to connect the modem or

User Guide 15
Before you Begin the Installation
router to the SOHO 6 Wireless and the SOHO 6 Wireless to
your computer.
4 Attach the two antennae supplied with the SOHO 6 Wireless.
NOTE
The SOHO 6 Wireless
must
be installed to provide a separation distance
of at least 20 centimeters from all persons and must not be collocated or
operating in conjunction with any other antenna or transmitter.
5 Call your ISP to determine the method of network address
assignment. The possible methods are static addressing, DHCP,
or PPPoE. This information is necessary during the installation
procedure. See “External Network Configuration” on page 37
for more information.
6 Make sure that the Web browser program installed on your
computer is Netscape Navigator (version 4.77 or higher) or
Internet Explorer (version 5.0 or higher).
7 Record the SOHO 6 Wireless serial number. The serial number
is found on the bottom of the appliance.
Examine and record the current TCP/IP settings
Examine the current TCP/IP settings of your computer, and record
the settings in the table below. Follow the instructions for the
operating system that is installed on your computer.
Microsoft Windows 2000 and Windows XP
1Click Start => Programs => Accessories => Command Prompt.
2 At the prompt, type ipconfig /all, then press Enter.
3 Record the TCP/IP settings in the table provided.
4Click Cancel.

16 WatchGuard Firebox SOHO 6 Wireless
Microsoft Windows NT
1Click Start => Programs => Command Prompt.
2 At the default prompt, type ipconfig /all, then press Enter.
3 Record the TCP/IP settings in the table provided.
4Click Cancel.
Microsoft Windows 95 or 98 or ME
1Click Start => Run.
2Type:
winipcfg.
3Click OK.
4 Select the “Ethernet Adapter”.
5 Record the TCP/IP settings in the table provided.
6Click Cancel.
Macintosh
1Click the Apple m e n u => Control Panels => TCP/IP.
2 Record the TCP/IP settings in the table provided.
3Close the window.
Other operating systems (Unix, Linux)
1 Consult your operating system guide to locate the TCP/IP
screen.
2 Record the TCP/IP settings in the chart provided.
3 Exit the TCP/IP configuration screen.

User Guide 17
Before you Begin the Installation
NOTE
If you must connect more than one computer to the trusted network
behind the SOHO 6 Wireless, determine the TCP/IP settings for each
computer.
Enable your computer for DHCP
To open the configuration pages for the SOHO 6 Wireless,
configure your computer to receive its IP address through DHCP.
See “Network addressing” on page 37 for more information about
network addressing and DHCP.
NOTE
These configuration instructions are for the Windows 2000® operating
system.
1Click Start => Settings => Control Panel.
The control panel window opens.
TCP/IP Setting Value
IP Address . . .
Subnet Mask
. . .
Default Gateway
. . .
DHCP Enabled Yes No
DNS Server(s) Primary
. . .
Secondary . . .
18 WatchGuard Firebox SOHO 6 Wireless
2 Double-click the Network & Dial-up Connections icon.
3 Double-click the connection you use to connect to the Internet.
The network connection dialog box opens.
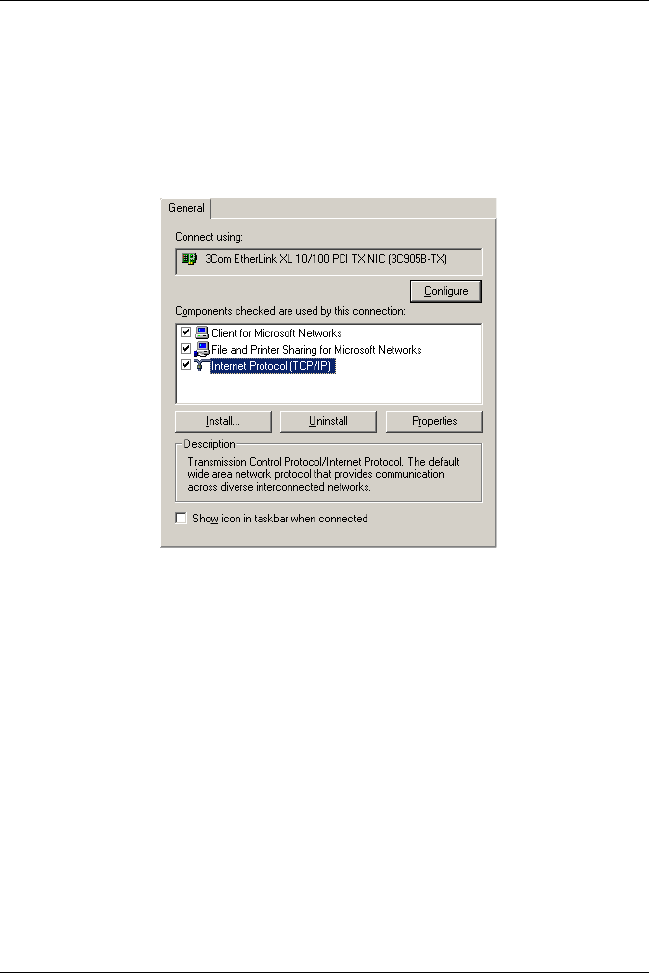
4Click Properties.
The network connection properties dialog box opens.
User Guide 19
Before you Begin the Installation
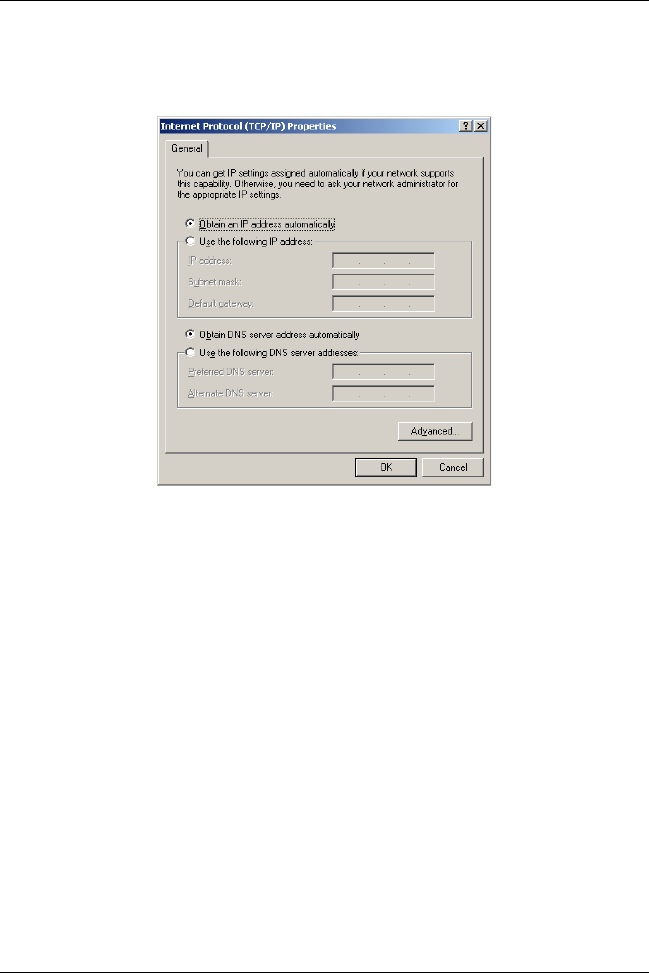
5 Double-click the Internet Protocol (TCP/IP) component.
The Internet Protocol (TCP/IP) Properties dialog box opens.
6 Click to select the obtain an IP address automatically
checkbox.
7 Click to select the Obtain DNS server address automatically
checkbox.
8Click OK to close the Internet Protocol (TCP/IP) Properties
dialog box.
9Click OK again to close the Network Connection Properties
dialog box.
Disable the HTTP proxy setting of your Web
browser
To configure a SOHO 6 Wireless, you must access the
configuration pages in the SOHO 6 Wireless with your browser. If

20 WatchGuard Firebox SOHO 6 Wireless
the HTTP proxy setting in your browser is enabled, you can not
open these pages to complete the configuration procedure.
If the HTTP proxy setting is enabled, the browser only sees Web
pages found on the Internet, and not pages in other locations. If the
HTTP proxy setting is disabled, you can open the configuration
pages in the SOHO 6 Wireless and Web pages on the Internet.
The instructions below show how to disable the HTTP proxy
setting in three browser applications. If a different browser is used,
use the help menus of the browser program to find the necessary
information.
Netscape 4.7
1 Open Netscape.
2Click Edit => Preferences.
The Preferences window opens.
3 A list of options is shown at the left side of the window. Click
the + symbol to the left of the Advanced option to expand the
list.
4Click Proxies.
5 Make sure the Direct Connection to the Internet option is
selected.
6Click OK to save the settings.
Netscape 6.x
1 Open Netscape.
2Click Edit => Preferences.
The Preferences window opens.
3 A list of options is shown at the left side of the window. Click
the arrow symbol to the left of the Advanced heading to
expand the list.

User Guide 21
Physically Connect to the SOHO 6 Wireless
4Click Proxies.
5 Make sure the Direct Connection to the Internet option is
selected.
6Click OK to save the settings.
Internet Explorer 5.0, 5.5, and 6.0
1 Open Internet Explorer.
2Click Tools => Internet Options.
The Internet Options window opens.
3Click the Advanced tab.
4 Scroll down the page to HTTP 1.1 Settings.
5 Disable all of the check boxes.
6Click OK to save the settings.
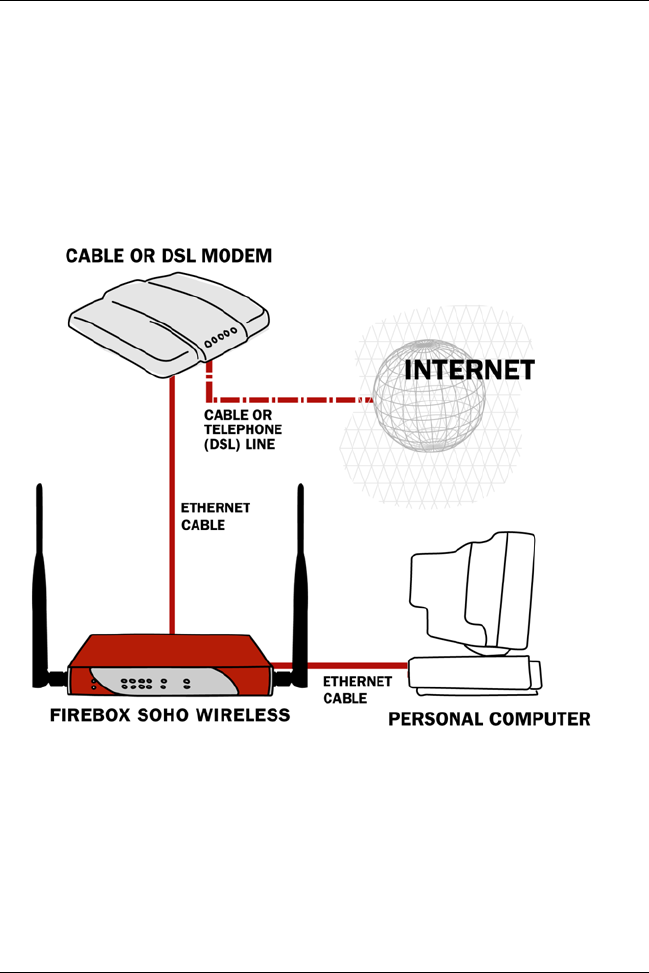
Physically Connect to the SOHO 6 Wireless
The SOHO 6 Wireless protects computers that are connected to it
by Ethernet cable or wireless connection. This section discusses
how to connect computers to the SOHO 6 Wireless by using
Ethernet cables.
The SOHO 6 Wireless protects one computer or a multi-computer
network and can also function as a hub to connect other
computers.
If you want to set up a wireless network, you still need to connect a
computer to the SOHO 6 using an Ethernet cable. You use this
connection to turn on the wireless network. For more information
on setting up a wireless network, see Figure , “Setting up the
Wireless Network,” on page 26.
22 WatchGuard Firebox SOHO 6 Wireless
Cabling the SOHO 6 Wireless for one to four
appliances
A maximum of four computers, printers, scanners, or other
network peripherals can connect directly to the SOHO 6 Wireless.
These connections use the four trusted network ports (0-3). To
connect a maximum of four appliances, use the SOHO 6 Wireless
as a network hub.
1 Shut down your computer.
2 If you connect to the Internet through a DSL modem or cable
modem, disconnect the power supply to this device.

User Guide 23
Physically Connect to the SOHO 6 Wireless
3 Disconnect the Ethernet cable that connects your DSL modem,
cable modem or other Internet connection to your computer.
Connect this cable to the WAN port on the SOHO 6 Wireless.
The SOHO 6 Wireless is connected directly to the modem or other Internet
connection.
4 Connect one end of the straight-through Ethernet cable
supplied with your SOHO 6 Wireless to a trusted network port
(0-3) on the SOHO 6 Wireless. Connect the other end to the
Ethernet port of your computer.
The SOHO 6 Wireless is connected to the Internet and your computer.
5 If you connect to the Internet through a DSL modem or cable
modem, reconnect the power supply to this device. The
indicator lights flash and then stop. The modem is ready for
use.
6 Attach the AC adapter to the SOHO 6 Wireless. Connect the AC
adapter to a power source.
7 Restart the computer.
See “Factory default settings” on page 31 for the factory default
configuration options. See “External Network Configuration” on
page 37 and “Configure the Trusted Network” on page 42 for
special configurations.
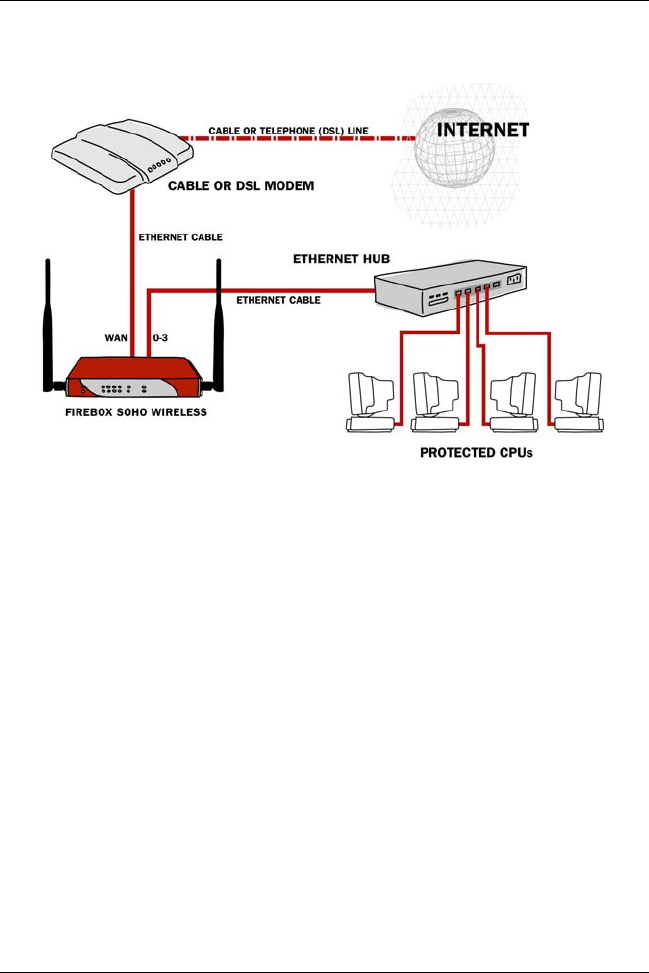
Cabling the SOHO 6 Wireless for more than four
appliances
Although the SOHO 6 Wireless has only four trusted network
ports (0-3), you can connect more than four appliances. Use one or
more network hubs to make more connections.
24 WatchGuard Firebox SOHO 6 Wireless
The base model SOHO 6 Wireless includes a ten-seat license. This
license allows a maximum of ten appliances on the trusted
network to connect to the Internet at the same time. There can be
more than ten appliances on the trusted network, but the SOHO 6
Wireless will only allow ten Internet connections. A seat is in use
when an appliance connects to the Internet and is free when the
connection is broken. License upgrades are available from the
WatchGuard Web site:
http://www.watchguard.com/sales/buyonline.asp
To connect more than four appliances to the SOHO 6 Wireless,
these items are necessary:
• an Ethernet hub;
• a straight-through Ethernet cable, with RJ-45 connectors, for
each computer;

User Guide 25
Physically Connect to the SOHO 6 Wireless
• a straight-through Ethernet cable to connect each hub to the
SOHO 6 Wireless.
1 Shut down your computer. If you connect to the Internet
through a DSL modem or cable modem, disconnect the power
supply from this device.
2 Disconnect the Ethernet cable that runs from your DSL
modem, cable modem or other Internet connection to your
computer. Connect the Ethernet cable to the WAN port on the
SOHO 6 Wireless.
The SOHO 6 Wireless is connected directly to the modem or other Internet
connection.
3 Connect one end of the straight-through Ethernet cable
supplied with your SOHO 6 Wireless to one of the trusted
network ports (0-3) on the SOHO 6 Wireless. Connect the other
end to the uplink port of the Ethernet hub.
The SOHO 6 Wireless is connected to the Internet and your Ethernet hub.
4 Connect an Ethernet cable between each of the computers and
an uplink port on the Ethernet hub.
5 If you connect to the Internet through a DSL modem or cable
modem, reconnect the power supply to this device. The
indicator lights flash and then stop. The modem is ready for
use.
6 Attach the AC adapter to the SOHO 6 Wireless. Connect the AC
adapter to a power supply.
7 Restart your computer.
See “Factory default settings” on page 31 for the factory default
configuration options. See “External Network Configuration” on
page 37 and “Configure the Trusted Network” on page 42 for
special configurations.

26 WatchGuard Firebox SOHO 6 Wireless
Setting up the Wireless Network
The SOHO 6 Wireless protects computers that are connected to it
by Ethernet cable or wireless connection. Because WatchGuard is
concerned about the security of your network, the wireless feature
is turned off on the SOHO 6 Wireless we ship you. This allows you
to enable the wireless network after you set up the desired
security.
Now that you have installed the SOHO 6 Wireless device, you can
set up the optional wireless network.
1 Type the IP address of the trusted network in your browser
window to connect to the System Status page of the SOHO 6
Wireless.
The default IP address is: http://192.168.111.1
2 From the navigation bar on the left side, select Network =>
Optional (802.11b).
The Optional Network Configuration page appears.
3 Select the Enable Optional Network checkbox to turn on the
wireless network.
4 Type the IP Address and Subnet Mask of the wireless network.
The default IP Address is 192.168.112.1. The default Subnet Mask is
255.255.255.0.
5 Select Enable DHCP Server on the Optional Network
checkbox.
6 Type the First address for DHCP server.
The default is 192.168.112.2.
For more information on the Optional Network Configuration
page, see “Configure the Optional Network for Wireless
Networking” on page 46.

User Guide 27
Setting up the Wireless Access Point
Setting up the Wireless Access Point
1 From the navigation bar on the left side, select Network =>
Wireless Configuration.
The Wireless Network Configuration page appears.
2 From the Encryption drop-down list, select Disabled.
3 From the Authentication drop-down, select Open System.
4 From Basic Settings, write down the number in the SSID text
box for later use.
The SSID is the wireless devices identification number, and it is used to
create the wireless connection. The default SSID is the 5 digit serial
number for your SOHO 6 Wireless device.
5Click Submit.
For more information on configuring the wireless network, see
“Configure the Wireless Network” on page 49.
Configuring the Wireless Card on your
computer
The following instructions are for the Windows XP operating
system. Refer to the WatchGuard SOHO 6 Wireless User Guide for
instruction on other operating systems.
1Click Start => Control Panel => Network Connections.
The Network Connections dialog box appears.
2 Double-click on the Wireless Network Connection.
The Wireless Network Connection dialog box appears.
3Click Advanced.
The Wireless Network Connection Properties dialog box appears with the
Wireless Networks tab selected.
4 In the Preferred networks section, click Add.
The Wireless Network Properties dialog box appears.

28 WatchGuard Firebox SOHO 6 Wireless
5 Type the SSID that you wrote down from the Wireless
Network Configuration page into the Network Name (SSID)
text box.
6Click OK to close the Wireless Network Properties dialog box.
7Click Refresh.
The operating system looks for all wireless connections and list them in the
Available Networks text box. Select the SSID of the wireless computer
that you configured to access the SOHO 6 Wireless.
8Click OK to enable the wireless connections.
The wireless network connection should now show that your wireless
network is active.
9 Set up the wireless computer to use DHCP. For information on
setting up DHCP, see Figure , “Enable your computer for
DHCP,” on page 17.
Your Windows operating system should automatically look for
the wireless connection, and if more than one wireless network
is found, a dialog box will appear listing all wireless devices in
the area. Select the wireless computer that you configured to
access the SOHO 6 Wireless device.
Your SOHO 6 Wireless is now protecting wired and wireless
computers from security hazards. To learn how to enhance your
security setting, see “Configure the Wireless Network” on page 49.

User Guide 29
CHAPTER 3 SOHO 6 Wireless
basics
The configuration of the SOHO 6 Wireless is made through Web
pages contained in the software of the SOHO 6 Wireless. You can
connect to these configuration page with your Web browser.
SOHO 6 Wireless System Status page
Type the IP address of the trusted network in your browser
window to connect to the System Status page of the SOHO 6
Wireless:
The default IP address is: http://192.168.111.1
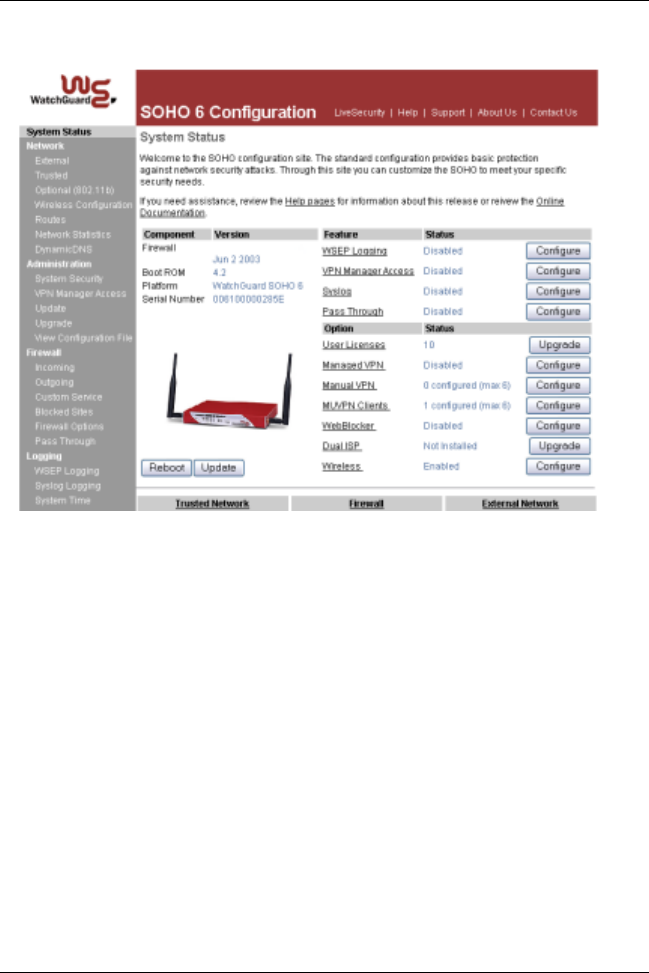
The System Status page opens.
30 WatchGuard Firebox SOHO 6 Wireless
The System Status page is the main configuration page of the
SOHO 6 Wireless. A display of information about the SOHO 6
Wireless configuration is shown. This information includes the
following:
• The firmware version
• The serial number of the appliance
• The status of the following SOHO 6 Wireless features:
- WSEP Logging
- VPN Manager Access
-Syslog
- Pass Through
• The status of the upgrade options;

User Guide 31
Factory default settings
• Configuration information for the trusted network and the
external network
• Configuration information for firewall settings (incoming
services and outgoing services)
• A reboot button to restart the SOHO 6 Wireless
NOTE
If the external network is configured to use the PPPoE protocol, the
System Status page displays a connect button or a disconnect button. Use
these buttons to start or terminate the PPPoE connection.
Factory default settings
The default network settings and configuration settings for the
SOHO 6 Wireless:
External network
The external network settings use DHCP.
Trusted network
The default IP address of the trusted interface is
192.168.111.1.
The IP addresses for the computers on the trusted network
are assigned through DHCP.
Firewall settings
All incoming services are blocked.
An outgoing service allows all outbound traffic.
All of the firewall options are disabled.
The DMZ pass-through is disabled.

32 WatchGuard Firebox SOHO 6 Wireless
System Security
The System Security is disabled. The system administrator
name and system administrator passphrase are not set. All
computers on the trusted network can access the
configuration pages.
SOHO 6 Wireless Remote Management is disabled.
VPN Manager Access is disabled.
The remote logging is not configured.
WebBlocker
The WebBlocker is disabled and the settings are not
configured.
Upgrade Options
The upgrade options are disabled until the license keys are
entered into the configuration page.
Reset the SOHO 6 Wireless to the factory default
settings
Reset the SOHO 6 Wireless to the factory default settings if it is not
possible to correct a configuration problem. A reset to the factory
default settings is required if the system security passphrase is
unknown or the firmware of the SOHO 6 Wireless is damaged by a
power interruption. Follow these steps to reset the SOHO 6
Wireless to the factory default settings:
1 Disconnect the power supply.
2 Press and hold the reset button.
3 Connect the power supply.
4 Continue holding the button until the red LED on the front of
the SOHO 6 Wireless goes on and then off.
5 Disconnect the power supply.

User Guide 33
Register your SOHO 6 Wireless and activate the LiveSecurity Service
6 Connect the power supply.
The PWR indicator is on and the reset is complete.
The base model SOHO 6 Wireless
The base model SOHO 6 Wireless includes a ten-seat license. This
license allows a maximum of ten computers on the trusted
network to connect to the Internet at the same time. There can be
more than ten computers on the trusted network, but the SOHO 6
Wireless will only allow ten Internet connections. See “Cabling the
SOHO 6 Wireless for more than four appliances” on page 23 for
additional information.
Register your SOHO 6 Wireless and activate
the LiveSecurity Service
After the SOHO 6 Wireless is installed and configured, register the
SOHO 6 Wireless and activate your LiveSecurity Service
subscription. LiveSecurity Service provides threat alert
notifications, security advice, free virus protection, software
updates, technical support by Web or telephone, and access to
online help resources and the WatchGuard user forum. A
subscription to the LiveSecurity Service is required to get the
license keys for the upgrades that you purchase.
You must have the serial number of your SOHO 6 Wireless to
register. The SOHO 6 Wireless serial number is located on the
bottom of the appliance. Record the serial number in the table
below:
Serial Number:

34 WatchGuard Firebox SOHO 6 Wireless
Register you SOHO 6 Wireless with the LiveSecurity Service at the
WatchGuard Web site:
http://www.watchguard.com/activate
NOTE
To activate the LiveSecurity Service, your browser must have JavaScript
enabled.
If you have a user profile on the WatchGuard Web site, enter your
user name and password. If you do not have a user profile on the
WatchGuard Web site, create a new account. Select your product
and follow the instructions for product activation.
Record your LiveSecurity Service user profile information in the
table below:
Keep this information confidential.
Reboot the SOHO 6 Wireless
To reboot a SOHO 6 Wireless located on the local network, use one
of these methods:
User name:
Password:

User Guide 35
Reboot the SOHO 6 Wireless
NOTE
The SOHO 6 Wireless requires 30 seconds to reboot. The Mode indicator
on the front of the SOHO 6 Wireless will go off and then come on.
1 Type the IP address of the trusted network in your browser
window to connect to the System Status page of the SOHO 6
Wireless:
The default IP address is: http://192.168.111.1
2Click Reboot.
or
2 Disconnect and reconnect the power supply.
To reboot a SOHO 6 Wireless located on a remote system, use one
of these methods:
NOTE
The remote SOHO 6 Wireless must be configured to allow incoming
HTTP (Web) or FTP traffic from the Internet. See “Configure incoming
and outgoing services” on page 71 for information about how to
configure a SOHO 6 Wireless to receive incoming traffic.
3 Type the external network IP address of the remote SOHO 6
Wireless in your browser window to connect to the System
Status page of the remote SOHO 6 Wireless.
4Click Reboot.
or
4 Send an FTP command to the remote SOHO 6 Wireless. Use an
FTP program to connect to the remote SOHO 6 Wireless, and
enter the command:
quote rebt

36 WatchGuard Firebox SOHO 6 Wireless

User Guide 37
CHAPTER 4 Configure the
Network Interfaces
External Network Configuration
When you configure the external network, you select the method
of communication between the SOHO 6 Wireless and the ISP.
Make this selection based on the method of network address
distribution in use by your ISP. The possible methods are static
addressing, DHCP, or PPPoE.
Network addressing
To connect to a TCP/IP network, each computer must have an IP
address. The assignment of IP addresses is dynamic or static.
• If the assignment is dynamic, the ISP assigns a different IP
address to a computer each time the computer connects to
the network. When the computer disconnects, the IP address
is made available to a different computer.

38 WatchGuard Firebox SOHO 6 Wireless
• If the assignment is static, all computers on the network have
a permanently assigned IP address. There are no computers
that have the same IP address.
Most ISPs make dynamic IP address assignments through DHCP
(Dynamic Host Configuration Protocol). When a computer
connects to the network, a DHCP server at the ISP assigns that
computer an IP address. The manual assignment of IP addresses is
not necessary with this system.
Some ISPs assign the IP addresses through PPPoE (Point-to-Point
Protocol over Ethernet). PPPoE emulates a standard dial-up
connection to provide some of the features of Ethernet and PPP.
This system allows the ISP to use the billing, authentication, and
security systems designed for dial-up, DSL modem and cable
modem service. When the SOHO 6 Wireless is configured to use
PPPoE, a button on the System Status page controls the connection
to the external network.
Your ISP can tell you how their system assigns the IP addresses.
Configure the SOHO 6 Wireless external network
for dynamic addressing
The default configuration sets the SOHO 6 Wireless to get the
external address information through DHCP. If your ISP supports
this method, the SOHO 6 Wireless gets IP address information
from the ISP when the SOHO 6 Wireless reboots and connects to
the Internet. The SOHO 6 Wireless does not require any additional
configuration.
Configure the SOHO 6 Wireless external network
for static addressing
If your ISP assigns static IP address, you must move the IP address
data from your computer to the SOHO 6 Wireless. This
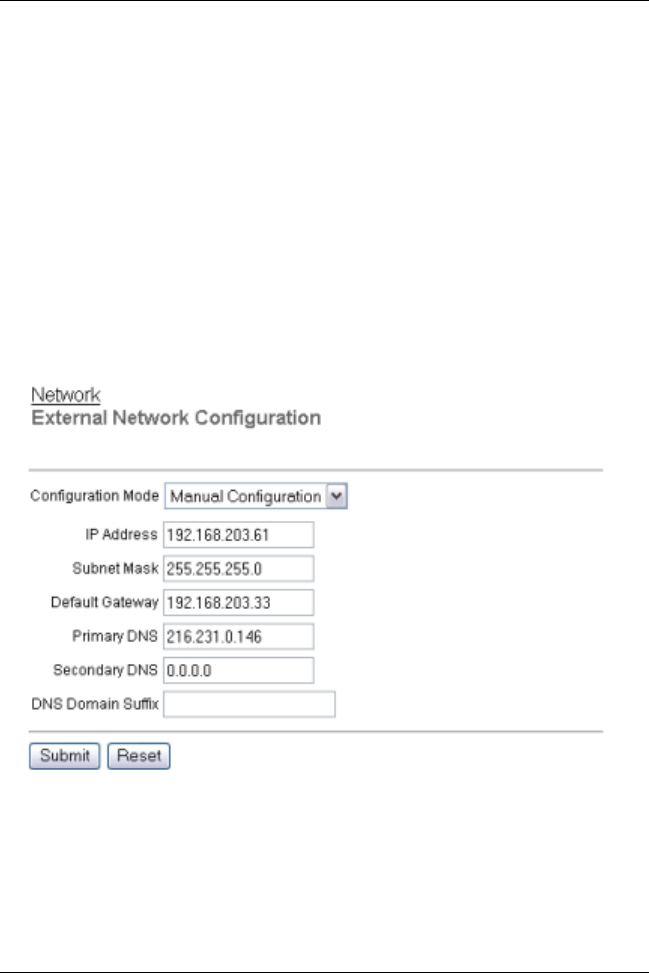
User Guide 39
External Network Configuration
configuration causes the ISP to communicate with the SOHO 6
Wireless and not your computer.
1 Type the IP address of the trusted network in your browser
window to connect to the System Status page of the SOHO 6
Wireless:
The default IP address is: http://192.168.111.1
2 From the navigation bar on the left side, select
Network => External.
The External Network configuration page opens.
3 From the Configuration Mode drop-down list, select
Manual Configuration.
The page refreshes.
4 Type the TCP/IP settings you recorded from your computer
during the installation process. Refer to the table, “Examine
and record the current TCP/IP settings” on page 15.

40 WatchGuard Firebox SOHO 6 Wireless
5Click Submit.
The configuration change is saved to the SOHO 6 Wireless.
Configure the SOHO 6 Wireless external network
for PPPoE
If your ISP assigns IP addresses through PPPoE, your PPPoE login
name and password are required to configure the SOHO 6
Wireless.
To configure the SOHO 6 Wireless for PPPoE:
1 Open your Web browser and click Stop.
Because the Internet connection is not configured, the browser can not
load your home page from the Internet. The browser can open the
configuration pages in the SOHO 6 Wireless.
2 Type the IP address of the trusted network in your browser
window to connect to the System Status page of the SOHO 6
Wireless:
The default IP address is: http://192.168.111.1
3 From the navigation bar on the left side, select
Network => External.
The External Network configuration page opens.
4 From the Configuration Mode drop-down list, select PPPoE
Client.
The page refreshes.
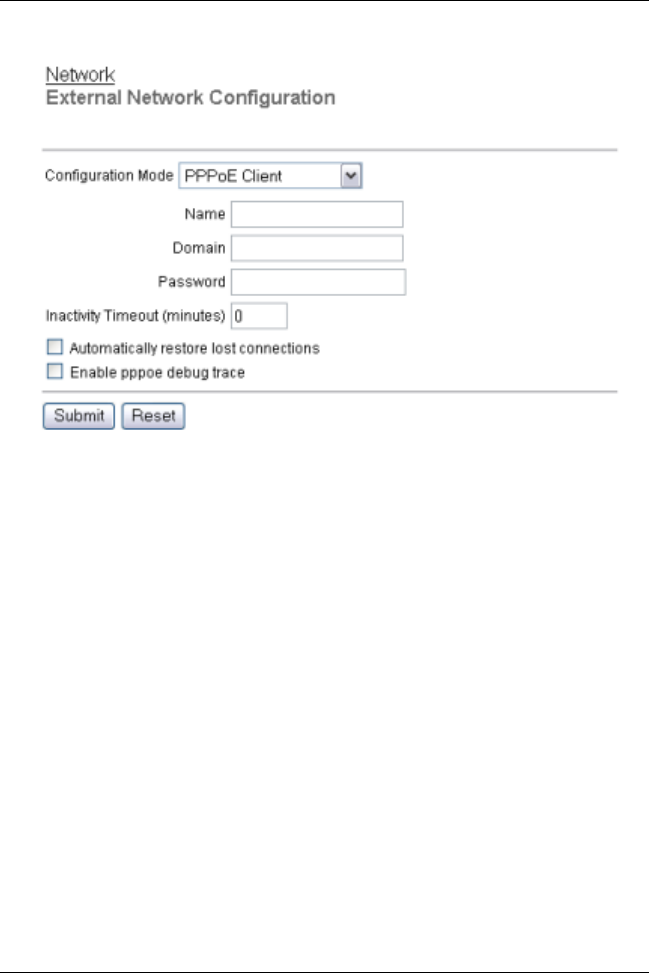
User Guide 41
External Network Configuration
5 Type the PPPoE login name and domain supplied by your ISP.
6 Type the PPPoE password supplied by your ISP.
7 Type the time delay before inactive TCP connections are
disconnected.
8Click Automatically restore lost connections.
This option keeps a constant flow of traffic between the SOHO 6 Wireless
and the PPPoE server. This option allows the SOHO 6 Wireless to keep the
PPPoE connection open during a period of frequent packet loss. If the flow
of traffic stops, the SOHO 6 Wireless reboots. A reboot frequently restores
the connection. The ISP sees this constant flow of traffic as a continuous
connection. The regulations and billing policy of the ISP determine if you
can use this option. Watchguard Technical Support uses this feature as a
solution to some problems.
9Click Enable PPPoE debug trace to activate PPPoE debug
trace.
10 Click Submit.
The configuration change is saved to the SOHO 6 Wireless.

42 WatchGuard Firebox SOHO 6 Wireless
Configure the Trusted Network
The DHCP Server option sets the SOHO 6 Wireless to assign IP
addresses to the computers on the trusted network. The SOHO 6
Wireless uses DHCP to make the assignments. When the SOHO 6
Wireless receives a request from a new computer on the trusted
network, the SOHO 6 Wireless assigns the computer an IP address.
If you use a DHCP server to assign IP addresses, enable the DHCP
Relay option. This option causes the SOHO 6 Wireless to forward
the DHCP request to the specified DHCP server.
Configure DHCP server and DHCP relay
To configure DHCP server:
1 Type the IP address of the trusted network in your browser
window to connect to the System Status page of the SOHO 6
Wireless:
The default IP address is: http://192.168.111.1
2 From the navigation bar on the left side, select
Network => Trusted.
The Trusted Network configuration page opens.

User Guide 43
Configure the Trusted Network
3 Type the IP address and the subnet mask in the applicable
fields.
4 Click to select the Enable DHCP Server on the Trusted
Network check box.
5 Type the first IP address that is available for the computers that
connect to the trusted network.
6 Type the WINS Server address, DNS Server primary address,
DNS Server secondary address, and DNS Domain server
suffix.
7Click Submit.
8 Reboot the SOHO 6 Wireless if necessary.

44 WatchGuard Firebox SOHO 6 Wireless
To configure the DHCP relay server:
1 From the Trusted Network configuration page, click the
Enable DHCP Relay checkbox.
2 Type the IP address of the DHCP relay server.
3Click Submit.
4 Reboot the SOHO 6 Wireless.
The SOHO 6 Wireless receives a DHCP request from a computer on
the trusted network. The request is sent from the SOHO 6 Wireless to
the remote DHCP server. The SOHO 6 Wireless receives the IP
address sent from the DHCP server. The IP address is sent from the
SOHO 6 Wireless to the computer that made the request. If the
SOHO 6 Wireless can not contact the remote DHCP server in less
than 30 seconds, the SOHO 6 Wireless uses its internal DHCP server
to respond to the computer on the trusted network.
Configure additional computers on the trusted
network
The SOHO 6 Wireless accepts the direct connection of a maximum
of four computers, printers, scanners, or other network
peripherals. The use of one or more 10BaseT Ethernet hubs with
RJ-45 connectors allows the connection of additional appliances.
Follow these steps to add a computer to the trusted network:
1 Make sure that the computer has an Ethernet card installed.
2 Shut down the computer.
3 Connect the computer to the network as shown in section
“Cabling the SOHO 6 Wireless for more than four appliances”
on page 23.
4 Restart the computer.
5 Set the computer to get its address through DHCP as shown in
section “Enable your computer for DHCP” on page 17.
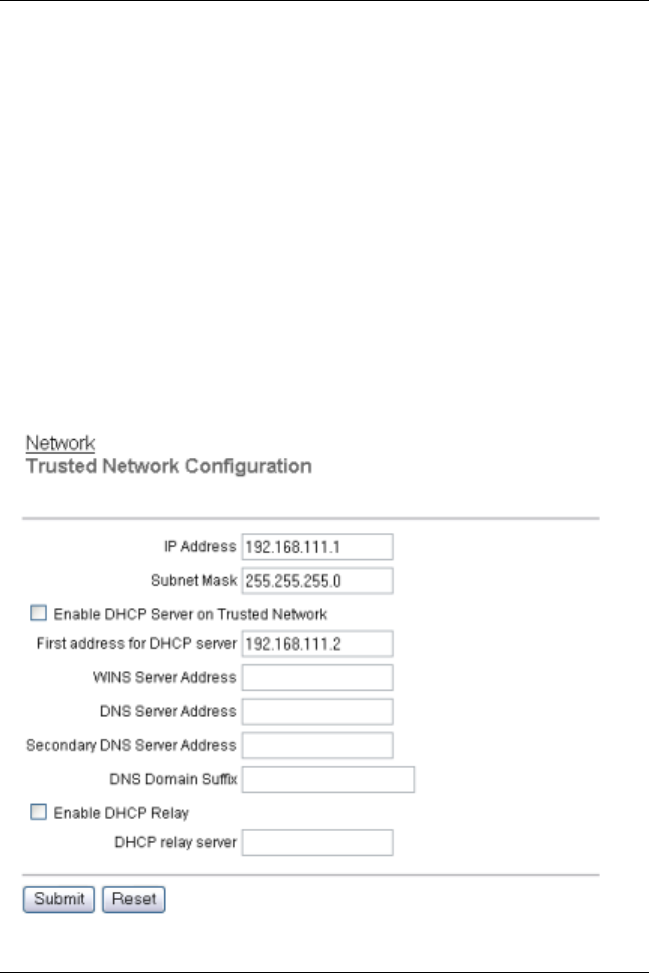
User Guide 45
Configure the Trusted Network
6 Shut down and restart the computer.
Configure the trusted network with static
addresses
To disable the SOHO 6 Wireless DHCP server and make static
address assignments, follow these steps:
1 Type the IP address of the trusted network in your browser
window to connect to the System Status page of the SOHO 6
Wireless:
The default IP address is: http://192.168.111.1
2 From the navigation bar on the left side, select
Network => Trusted.
The Trusted Network configuration page opens.

46 WatchGuard Firebox SOHO 6 Wireless
3 Type the IP address and the subnet mask in the applicable
fields.
4 Reset the Enable DHCP Server on the Trusted Network check
box.
5Click Submit
6 Reboot the SOHO 6 Wireless as necessary.
7 Configure the appliances on the trusted network with static
addresses.
Configure the Optional Network for Wireless
Networking
To turn on the wireless network, you must enable the optional
network.
Follow these instructions to complete the configuration:
1 Type the IP address of the trusted network in your browser
window to connect to the System Status page of the SOHO 6
Wireless:
The default IP address is: http://192.168.111.1
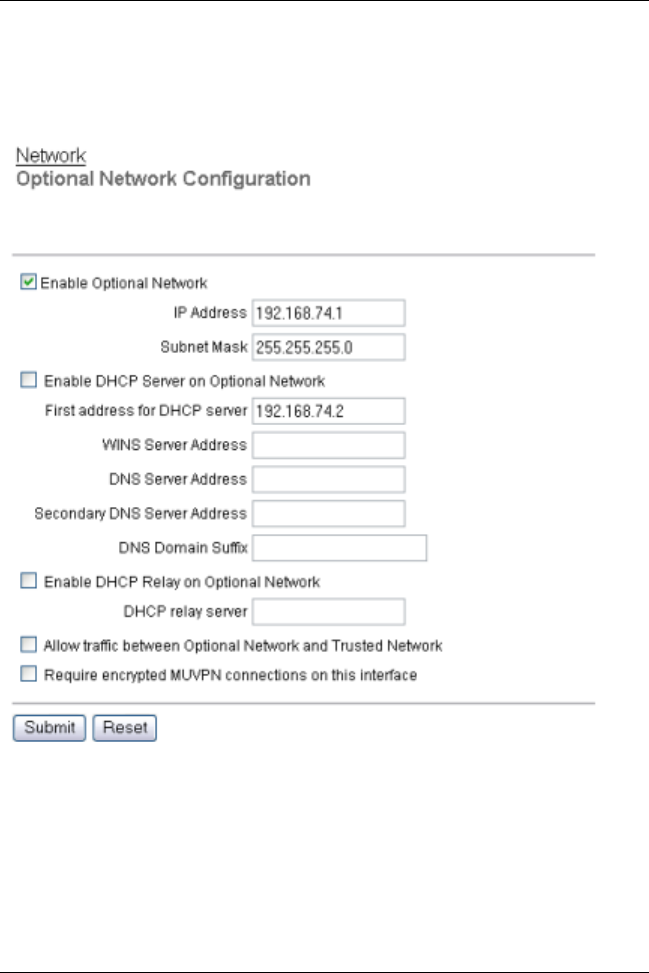
User Guide 47
Configure the Optional Network for Wireless Networking
2 From the navigation bar on the left side, select
Network => Optional (802.11b).
The Optional Network Configuration page opens.
3Click the Enable Optional Network checkbox.
To turn on the wireless network, you need to enable the optional network.
4 Type the IP address and subnet mask of the optional network.
The default IP Address is 192.168.112.1. The default Subnet Mask is
255.255.255.0.

48 WatchGuard Firebox SOHO 6 Wireless
5 Select Enable DHCP Server on the Optional Network
checkbox.
6 Type the First address for DHCP server.
The default is 192.168.112.2.
7 Type the WINS Server address, DNS Server primary address,
DNS Server secondary address, and DNS Domain server
suffix.
8 To enable the DHCP Relay on the optional network, click
Enable DHCP Relay checkbox and enter the IP address of the
DHCP relay server in the text box.
9 To allow traffic between the optional network and trusted
network, click the Allow traffic between Optional Network
and Trusted Network checkbox.
If you select this checkbox, all wireless devices that are connected to the
optional network can access the computers on your trusted network.
10 To require encrypted MUVPN connections through the
wireless interface, click to select the Requires Encrypted
MUVPN connections on this interface checkbox.
You may want to enable this feature after the initial connection between
your wireless computers and the SOHO 6 Wireless. This feature secures
your network from unauthorized users using your wireless network. If this
checkbox is enabled, only computer with the MUVPN software can access
your SOHO 6 Wireless network. You need to configure the MUVPN
software on the SOHO 6 Wireless device and wireless computer. For more
information on configuring MUVPN, see Chapter 11 “MUVPN Clients”
on page 119.
11 Click Submit.

User Guide 49
Configure the Wireless Network
Configure the Wireless Network
Once you turned on the wireless network by enabling the optional
network, you can set up the security setting for your wireless
connection.
Configure Security
The SOHO 6 Wireless uses the industry standard security protocol,
Wired Equivalent Privacy (WEP), specified by the IEEE standard
802.11b. WEP is designed to provide a wireless local area network
(WLAN) with a level of security and privacy comparable to that
usually expected of a wired local area network (LAN). A wired
LAN is generally protected by physical security, such as login
credentials, that are only effective for a controlled physical
environment, because the radio transmissions of a WLAN are not
bound by the walls containing the network. WEP achieves security
by encrypting the data transmitted over the WLAN. Data
encryption protects the vulnerable wireless connection between
computers and access points; once this measure has been taken,
other typical LAN security mechanisms such as password
protection, virtual private networks (VPNs), and authentication
can be used to ensure privacy.
Follow these instructions to set up wireless security:
1 Type the IP address of the trusted network in your browser
window to connect to the System Status page of the SOHO 6
Wireless:
The default IP address is: http://192.168.111.1
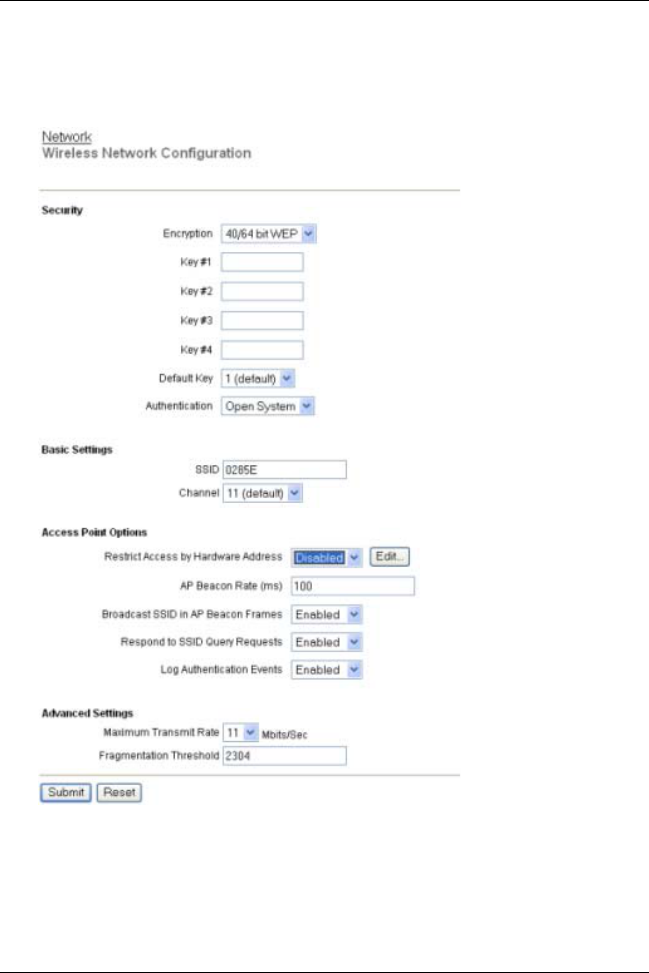
50 WatchGuard Firebox SOHO 6 Wireless
2 From the navigation bar on the left side, select Network =>
Wireless Configuration.
The Wireless Network Configuration page appears.
3From the Encryption drop-down list, select the level of
encryption you want applied to your wireless connections.
The options are Disabled, 40/64 bit WEP, and 128 bit WEP.

User Guide 51
Configure the Wireless Network
Disabled
The default is Disabled, and you should use this option for
the initial connection. Your wireless connection is not using
WEP when Disabled is selected.
40/64 bit WEP or128 bit WEP
Once you complete the initial connection between your
wireless computer and SOHO 6 Wireless, you can change
this option to add WEP. Select either 40/64 bit or128 bit
based on what the wireless card in your computer
supports.
4 If you are using WEP encryption, type a hexadecimal number
in the Key text boxes.
You can type up to four keys that the wireless network will use to connect.
If you have 40/64 bit WEP, the key can be up to 10 characters. If you have
128 bit WEP, the key can be up to 26 characters.
5 If you typed more than one key, select which key you want to
use as the default key from the Default Key drop-down list.
6 Select the Authentication mode you want to use for your
wireless network connection.
The options are Open System, Shared Key, and Both.
Open System
This option does not support shared keys. If you disable
encryption, this is the only option.
Shared Key
This option supports shared keys. If you enabled WEP, this
option is enabled.
Change the Basic Settings
The SSID is the SOHO 6 Wireless identification number, and it is
used to create the wireless connection with the wireless computers.

52 WatchGuard Firebox SOHO 6 Wireless
To change the SSID of the SOHO 6 Wireless:
• In the Basic Settings section, type a new identification in
SSID text box.
The default SSID is the 5 digit serial number for your SOHO 6 Wireless
device. The first four digits of the serial number are the product code and
are not part of the SSID. The next five digits after the product code are
the serial number. The remaining characters are an encoded hash for
security uses. The maximum identification length is 20 characters.
To change the Channel:
•From the Channel drop-down list, select the channel you
want to use in your wireless connection.
Restrict Access by Hardware Address
You can change the settings of how the SOHO 6 Wireless
communicates with your wireless computer and other settings.
1 If you want to restrict access to the SOHO 6 Wireless by the
computer hardware address, select Enabled in the Restrict
Access by Hardware Address drop-down list.
2Click Edit
The Allowed Hardware Addresses page appears.
3 Type the MAC Address of the computer you want to connect
to the SOHO 6 Wireless.
4Click Submit.
OR
1 If you do not want to restrict access to the SOHO 6 Wireless by
the computer hardware address, select Disabled.

User Guide 53
Configure the Wireless Network
Configure the Beacon Rate
1In the AP Beacon Rate text box, type the beacon rate in
milliseconds (100 through 10,000) that you want the SOHO 6
Wireless to use.
The beacon rate is the rate the SOHO 6 Wireless sends out broadcasts so
that the wireless computers can find it.
2 If you want the SOHO 6 Wireless to broadcast a beacon rate,
select Enabled from the Broadcast SSID in AP Beacon Frames.
If you do not want to broadcast the beacon rate, select
Disabled.
3 If you want the SOHO 6 Wireless to respond to request from
the wireless computers, select Enabled in the Respond to SSID
Query Requests. If you do not want the SOHO 6 Wireless to
respond, select Disabled.
The wireless computers send out query requests to find if there are any
wireless access points that it can connect to.
Log Authentication Events
If you want the SOHO 6 Wireless to log when a wireless computer
tries to access it, select Enabled. If you do not want to log
authentication events, select disabled.
Set Advanced Settings
‘You can change Maximum Transmit Rate and Fragmentation
Threshold.
• To change the Maximum Transmit Rate, select the rate per
Mbits per second from the Maximum Transmit Rate drop-
down list.
• To change the Fragmentation Threshold, type a value of 256
to 4096 in the Fragmentation Threshold text box.
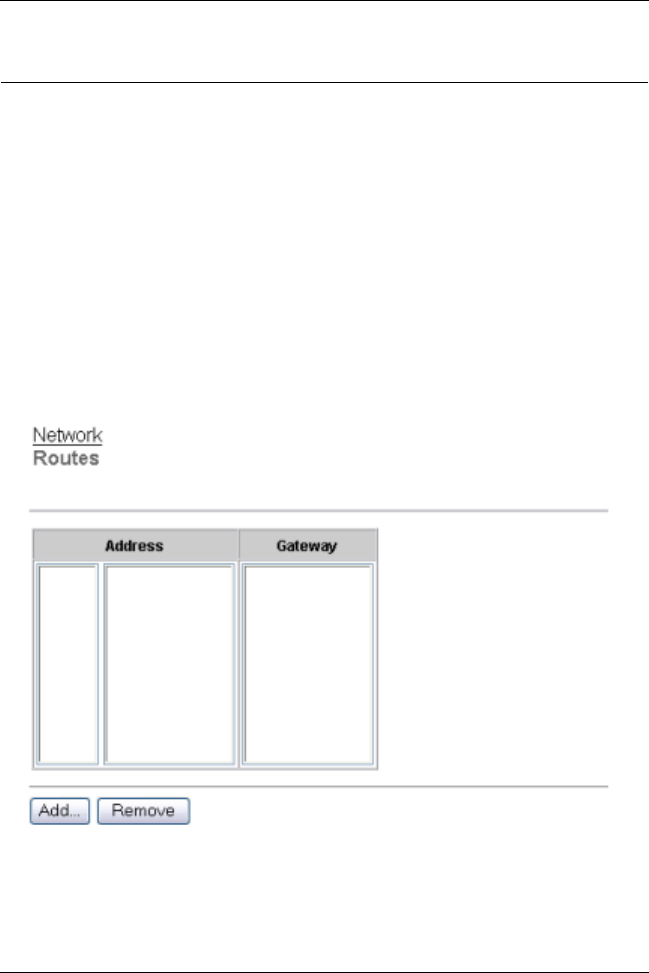
54 WatchGuard Firebox SOHO 6 Wireless
Configure static routes
To send the specified packets to different segments of the trusted
network connected through a router or switch, configure static
routes.
Follow these instructions to configure static routes:
1 Type the IP address of the trusted network in your browser
window to connect to the System Status page of the SOHO 6
Wireless:
The default IP address is: http://192.168.111.1
2 From the navigation bar on the left side, select
Network => Routes.
The Routes page opens.
3Click Add.
The Add Route page opens.
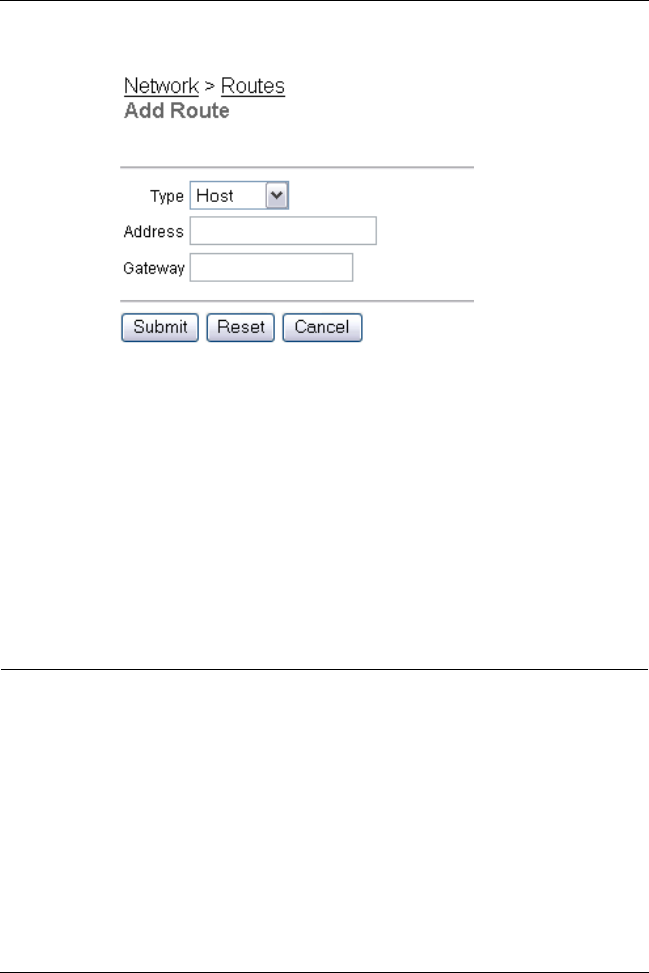
User Guide 55
View network statistics
4 From the Type drop-down list, select either Host or Network.
5 Type the IP address and the gateway of the route in the
applicable fields.
The gateway of the route is the local interface of the router.
6Click Submit.
To remove a route, select the route and click Remove.
View network statistics
The Network Statistics page gives information about network
performance. This page is useful during troubleshooting.
Follow these instructions to access the Network Statistics page:
1 Type the IP address of the trusted network in your browser
window to connect to the System Status page of the SOHO 6
Wireless:
The default IP address is: http://192.168.111.1
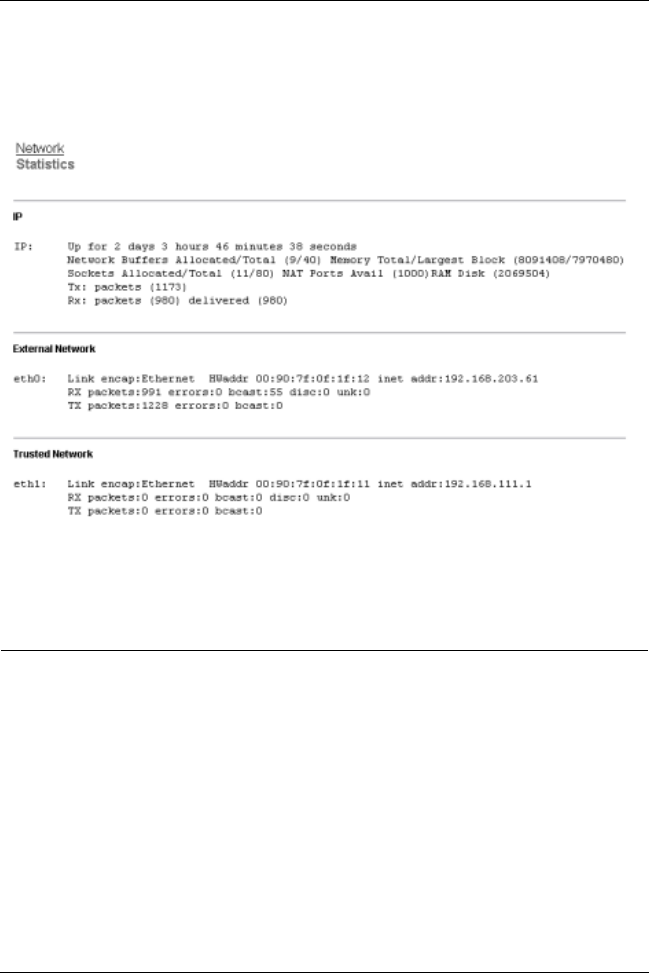
56 WatchGuard Firebox SOHO 6 Wireless
2 From the navigation bar on the left side, select
Network => Network Statistics.
The Network Statistics page opens.
Configure the dynamic DNS Service
This feature allows you to register the external IP address of the
SOHO 6 Wireless with the dynamic DNS (Domain Name Server)
service DynDNS.org. A dynamic DNS service makes sure that the
IP address attached to your domain name is changed when your
ISP assigns you a new IP address.
1 Type the IP address of the trusted network in your browser
window to connect to the System Status page of the SOHO 6
Wireless:
The default IP address is: http://192.168.111.1
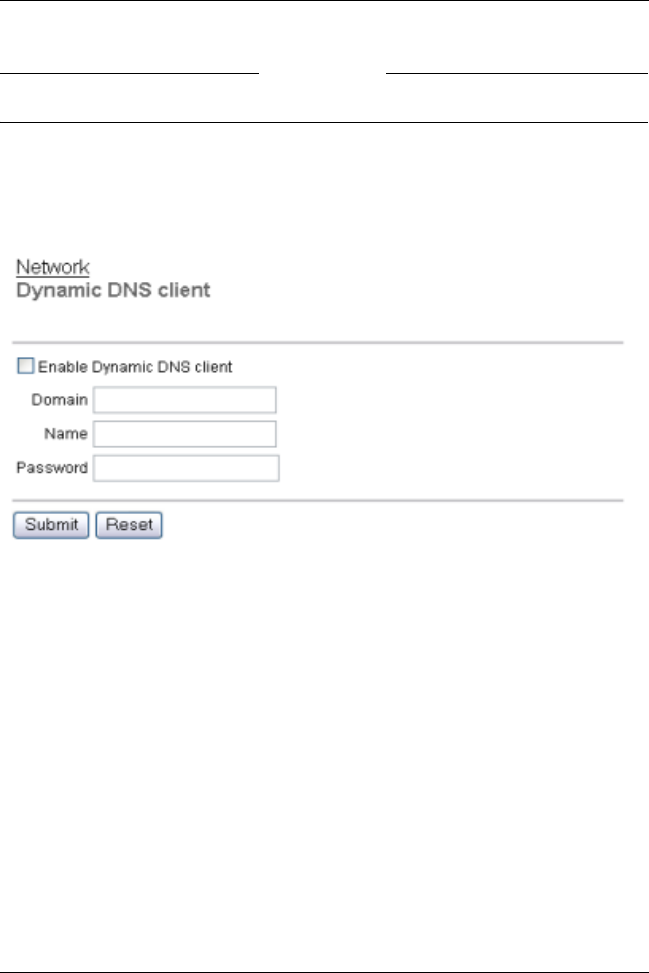
User Guide 57
Configure the dynamic DNS Service
NOTE
WatchGuard is not affiliated with dyndns.org.
2 From the navigation bar on the left side, select
Network => DynamicDNS.
The Dynamic DNS client page opens.
3 Select the Enable Dynamic DNS client checkbox.
4 Type the domain, name, and password in the applicable fields.
5Click Submit.

58 WatchGuard Firebox SOHO 6 Wireless

User Guide 59
CHAPTER 5 Administrative
options
Use the SOHO 6 Wireless Administration page to configure access
to the SOHO 6 Wireless. The System Security, SOHO 6 Wireless
Remote ManagementTM feature, and VPN Manager Access are
configured from the Administration page. The firmware updates,
upgrade activation, and display of the SOHO 6 Wireless
configuration file in a text format are done from the
Administration page.
The System Security page
The System Security page contains the settings that control access
to the configuration of the SOHO 6 Wireless. Set a system
administrator name and passphrase to limit access to the
configuration pages. Enable remote management to allow the
configuration of the SOHO 6 Wireless from the external network.

60 WatchGuard Firebox SOHO 6 Wireless
System security
A passphrase prevents access to the configuration of the SOHO 6
Wireless by an unauthorized user on the trusted network. The use
of a passphrase is important to the security of your network.
NOTE
Record the system administrator name and passphrase in a safe location.
When system security is enabled, the system administrator name and
passphrase are required to access the configuration pages. If the system
administrator name and passphrase are unknown, you must reset the
SOHO 6 Wireless to the factory default settings. See “Factory default
settings” on page 31 for additional information.
Change the System Administrator passphrase every month. Select
a combination of eight letters, numbers, and symbols. Do not use a
word. Use at least one special symbol, a number, and a mixture of
upper-case and lower-case letters for increased security.
Follow these instructions to enable system security:
1 Type the IP address of the trusted network in your browser
window to connect to the System Status page of the SOHO 6
Wireless:
The default IP address is: http://192.168.111.1
2 From the navigation bar on the left side, select
Administration => System Security.
The System Security page opens.
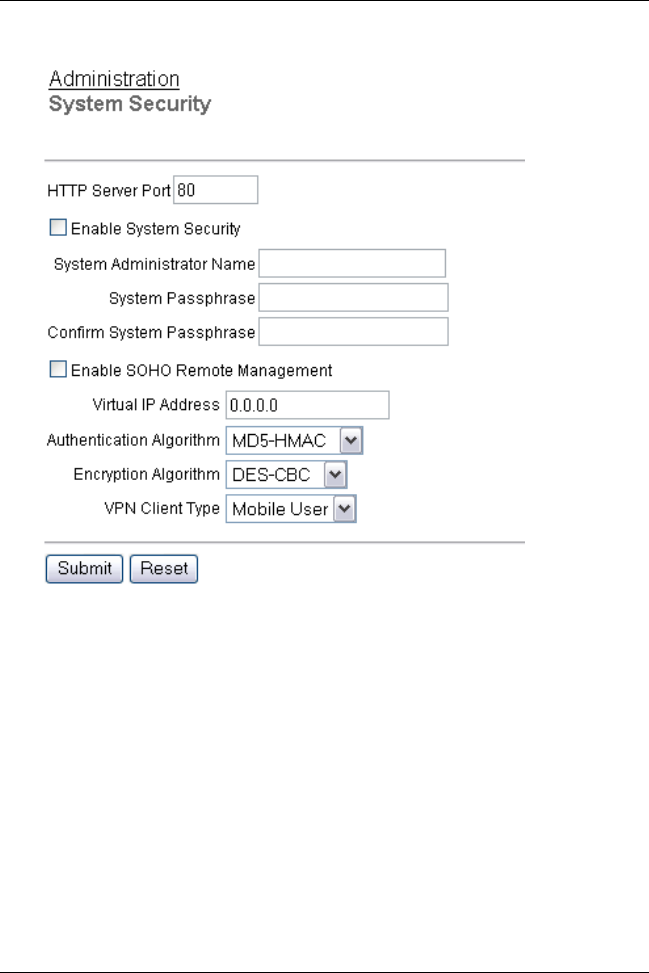
User Guide 61
The System Security page
3Verify that the HTTP Server Port is set to 80.
4 Click to select the Enable System Security check box.
5Type a System Administrator Passphrase and then type it
again to confirm.
6Click Submit.
SOHO 6 Wireless Remote Management
Both the SOHO 6 Wireless and SOHO 6tc Wireless come equipped
with the SOHO 6 Wireless Remote Management feature. This
feature uses the MUVPN client or Pocket PC to establish a secure

62 WatchGuard Firebox SOHO 6 Wireless
connection, using Internet Protocol Security (IPSec), over an
unsecured network from your remote computer in order to
remotely manage your SOHO 6 Wireless.
For example, the MUVPN client is installed and configured on
your computer. You then establish a standard Internet connection
and activate the MUVPN client. The MUVPN client creates an
encrypted tunnel to your SOHO 6 Wireless. You can now access
the SOHO 6 Wireless configuration pages without compromising
security. Another way to remotely manage your SOHO 6 Wireless,
is using a Pocket PC. First you establish a standard Internet
connection using your Pocket PC, and then you can access the
SOHO 6 Wireless configuration page.
1 First, follow the steps above to configure System Security.
2 Enable the checkbox labeled Enable SOHO 6 Wireless
Wireless Remote Management.
3 Type the Virtual IP address which will be used by the remote
management computer when connecting to the SOHO 6
Wireless in the appropriate field.
4In the Authentication Algorithm drop list, specify the
authentication: MD5-HMAC (128-bit authentication) or SHA1-
HMCA (160-bit authentication).
5In the Encryption Algorithm drop list, specify the type of
encryption: DES-CBC or 3DES-CBC.
6In the VPN Client Type drop list, specify the type of VPN
client: Mobile User (MUVPN) or Pocket PC.
7Click Submit.
8 Next, you must install and configure the MUVPN client on
your remote computer.
For this information, see Chapter 10, “MUVPN Clients” on page 119.
9 Once you have installed and configured the MUVPN client,
establish an Internet connection through either Dial-Up

User Guide 63
Set up VPN manager access
Networking or directly through a local area network (LAN) or
wide area network (WAN).
From the Windows desktop system tray:
10 Verify the MUVPN client status–it must be activated. If it is
not, right-click the icon and select Activate Security Policy.
For information on how to determine the status of the MUVPN icon, see
Chapter 11, “The Mobile User VPN client icon” on page 148.
Then, from the Windows desktop system tray:
11 Right-click the icon and select Connect.
The WatchGuard Mobile User Connect widow appears.
12 Click the Yes button.
13 Finally, enter the IP address of the external network in your
browser window to connect to the System Status page of the
SOHO 6 Wireless.
Set up VPN manager access
The VPN Manager Access page configures the SOHO 6 Wireless to
allow remote configuration of the SOHO 6 Wireless by the
WatchGuard VPN Manager software. The WatchGuard VPN
Manager software configures and manages VPN tunnels.
The VPN Manager software is a separate product and must run on
a WatchGuard Firebox II/III. Additional information about the
VPN Manager product is available on the WatchGuard Web site:
https://www.watchguard.com/products/vpnmanager.asp
Follow these instructions to configure VPN Manager access:
1 Type the IP address of the trusted network in your browser
window to connect to the System Status page of the SOHO 6
Wireless:
The default IP address is: http://192.168.111.1
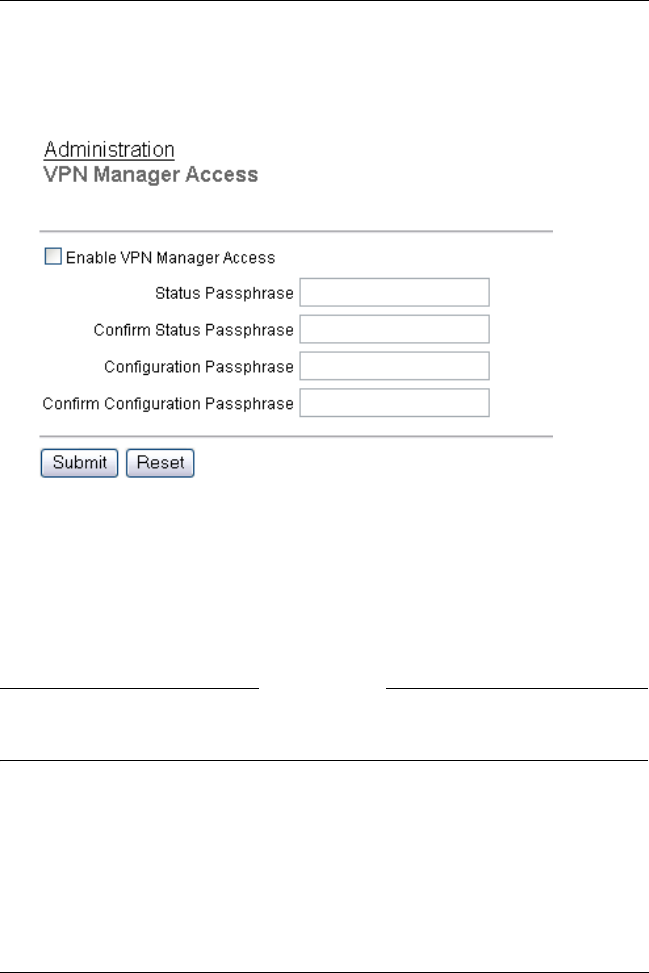
64 WatchGuard Firebox SOHO 6 Wireless
2 From the navigation bar on the left side, select
Administration => VPN Manager Access.
The VPN Manager Access page opens.
3 Select Enable VPN Manager Access.
4 Type the Status Passphrase.
5 Type the Status Passphrase again to confirm.
6 Type the Configuration Passphrase.
7 Type the Configuration Passphrase again to confirm.
NOTE
These passphrases must match the passphrases used in the VPN Manager
software or the connection will fail.
8Click Submit.

User Guide 65
Update the firmware
Update the firmware
Check regularly for SOHO 6 Wireless firmware updates on the
WatchGuard Web site:
http://support.watchguard.com/sohoresources/
Download the .exe or .wgd files that contain the firmware update.
The .exe file is an installer and the .wgd file is a binary file. The
.wgd file is an advanced installation method.
NOTE
The .exe file is not available for firmware previous to the 6.0 release.
To install the .exe file:
1 Save the .exe file to your computer.
2 Double-click the .exe file.
The installer will install the updated firmware.
To install the .wgd file:
1 Type the IP address of the trusted network in your browser
window to connect to the System Status page of the SOHO 6
Wireless:
The default IP address is: http://192.168.111.1
2Click Update.
NOTE
If you configure your SOHO 6 Wireless from a computer that does not use
the Windows operating system, for example Macintosh or Linux, you
must update your firmware with this procedure.
3 Read the End-User License Agreement. Then set the I accept
the above license agreement check box at the bottom of the
page.
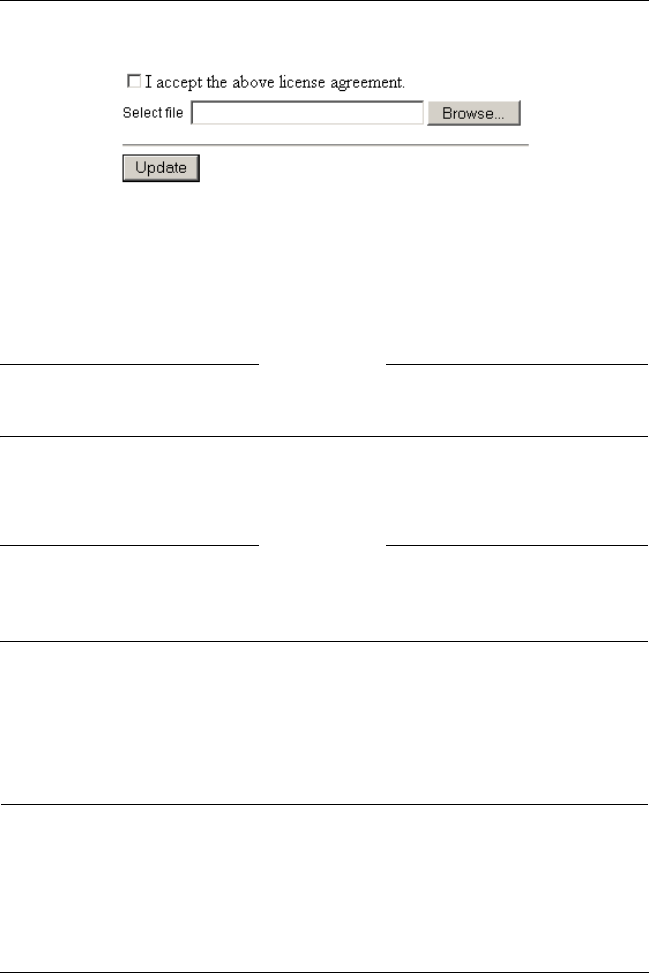
66 WatchGuard Firebox SOHO 6 Wireless
4 Type the location of the .wgd firmware files on your computer.
OR
4Click Browse and locate the .wgd firmware files on your
computer.
NOTE
Check your SOHO 6 Wireless firewall settings to make sure that your
firewall allows .wgd files.
5Click Update.
Follow the instructions provided by the update wizard.
NOTE
The update wizard requests a user name and password. Type the system
administrator name and passphrase configured on the System Security
page. The default values are “user” and “pass”.
Activate the SOHO 6 Wireless upgrade
options
Every SOHO 6 Wireless includes the software for all upgrade
options. To activate an upgrade option, you must enter a license
key in the configuration of the SOHO 6 Wireless. To receive a
license key, purchase and activate an upgrade option at the
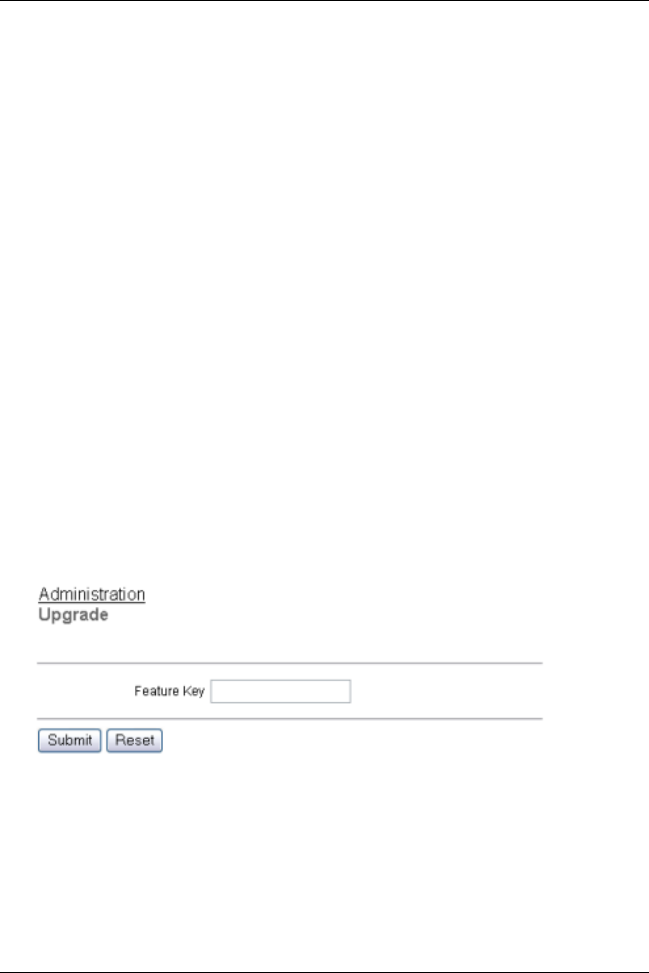
User Guide 67
Activate the SOHO 6 Wireless upgrade options
LiveSecurity Service Web site. See “Register your SOHO 6 Wireless
and activate the LiveSecurity Service” on page 33 for more
information.
Follow these steps to activate an upgrade option:
1 Go to the upgrade page of the WatchGuard Web site:
http://www.watchguard.com/upgrade
2 Type your User Name and Password.
3Click Log In.
4 Follow the instructions provided on the Web site to activate
your license key.
5 Copy the license key from the LiveSecurity Service Web site.
6 Type the IP address of the trusted network in your browser
window to connect to the System Status page of the SOHO 6
Wireless:
The default IP address is: http://192.168.111.1
7 From the navigation bar on the left side, select
Administration => Upgrade.
The Upgrade page opens.
8 Paste the license key in the applicable field.
9Click Submit.

68 WatchGuard Firebox SOHO 6 Wireless
Upgrade options
Seat licenses
A seat license upgrade allows more connections between
the trusted or optional network and the external network.
A wired connection goes to the trusted and the wireless
connection goes to the optional. For example, a 25-seat
license allows 25 wired or wireless connections instead of
the standard 10 connections.
IPSec Virtual Private Networking (VPN)
The VPN upgrade is necessary to configure virtual private
networking. The SOHO 6tc Wireless includes a VPN
upgrade license key. The SOHO 6 Wireless does not
include a VPN upgrade license key.
WebBlocker
The WebBlocker upgrade enables the Web filtering option.
MUVPN Client
The MUVPN Client upgrade allows remote users to
connect to the SOHO 6 Wireless through a secure (IPSec)
VPN tunnel. The MUVPN client creates an encrypted
tunnel to your trusted or optional network depending on if
it is a wired or wireless connection. A wired connection
goes to the trusted and the wireless connection goes to the
optional. If you have a wireless network, you can configure
the wireless network to require wireless computers to have
an encrypted MUVPN connection to access the SOHO 6
Wireless. The SOHO 6 Wireless includes several MUVPN
client licenses. You can add more MUVPN connections
with the MUVPN Client upgrade. For more information on
configuring a wireless network to require MUVPN
connections, see “Configure the Optional Network for
Wireless Networking” on page 46.

User Guide 69
View the configuration file
LiveSecurity Service subscription renewals
Purchase a LiveSecurity subscription renewal for a period
of one or two years from your reseller or the WatchGuard
online store. Go to the renew page of the WatchGuard Web
site to purchase or activate a subscription renewal:
http://www.watchguard.com/renew/
Follow the instructions on the Web site.
View the configuration file
The contents of the SOHO 6 Wireless configuration file is available
in text format from the View Configuration File page.
1 Type the IP address of the trusted network in your browser
window to connect to the System Status page of the SOHO 6
Wireless:
The default IP address is: http://192.168.111.1
2 From the navigation bar on the left side, select
Administration => View Configuration File.
The View Configuration File page opens.

70 WatchGuard Firebox SOHO 6 Wireless

User Guide 71
CHAPTER 6 Configure the
Firewall Settings
Firewall settings
The configuration settings of the SOHO 6 Wireless control the flow
of traffic between the trusted network and the external network.
The configuration you select depends on the types of risks that are
acceptable for the trusted network.
The SOHO 6 Wireless lists many standard services on the
configuration page. A service is the combination of protocol and
port numbers for a type of application or type of communication.
Configure incoming and outgoing services
The default configuration of the SOHO 6 Wireless prevents the
transmission of all packets from the external network to the trusted
network. Change the configuration to select the types of traffic that
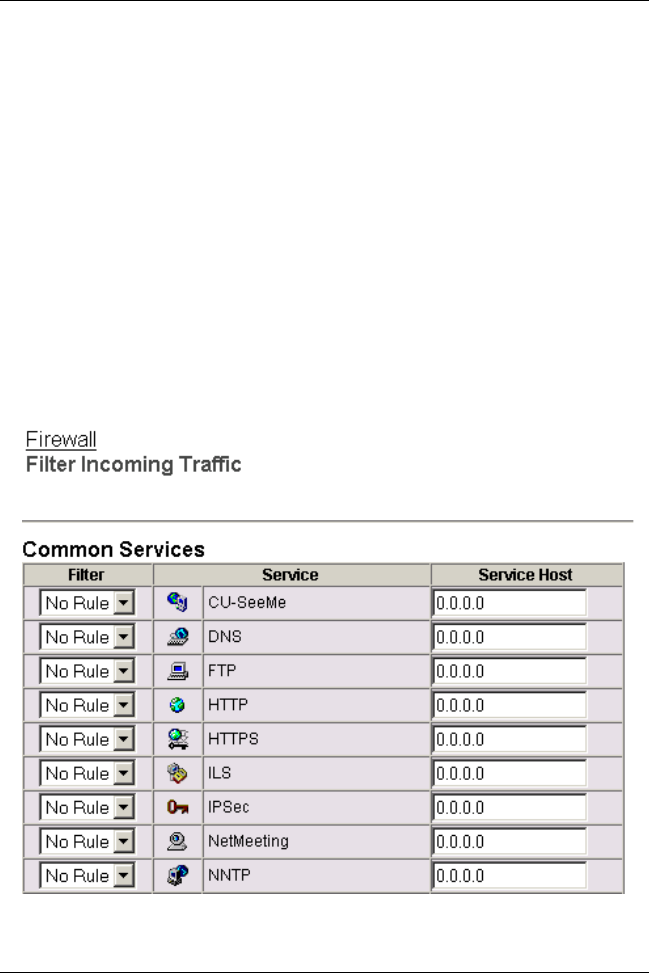
72 WatchGuard Firebox SOHO 6 Wireless
are permitted. For example, to operate a Web server behind the
SOHO 6 Wireless, add an incoming Web service.
Select carefully the number and the types of services that you add.
The added services decrease the security of your network.
Compare the value of access to each service against the security
risk caused by that service.
Common services
Follow these steps to change the configuration of the incoming
filters for common services:
1 From the navigation bar on the left side, select
Firewall => Incoming or Outgoing.
The Filter Incoming Traffic page opens.

User Guide 73
Configure incoming and outgoing services
2 Locate a pre-configured service, such as FTP, Web, or Telnet,
then select either Allow or Deny from the drop-down list.
The illustration shows the HTTP service configured to allow incoming
traffic.
3 Type the trusted network IP address of the computer to which
this rule applies.
The illustration shows the HTTP service configured to allow incoming
traffic to the computer with IP address 192.168.111.2.
4Click Submit.
Create a custom service
If you need to allow a service that is not listed in the common
services, configure a custom service based on a TCP port, a UDP
port, or a protocol.
Follow these steps to configure a custom service:
1 Type the IP address of the trusted network in your browser
window to connect to the System Status page of the SOHO 6
Wireless:
The default IP address is: http://192.168.111.1
2 From the navigation bar on the left side, select
Firewall => Custom Service.
The Custom Service page opens.
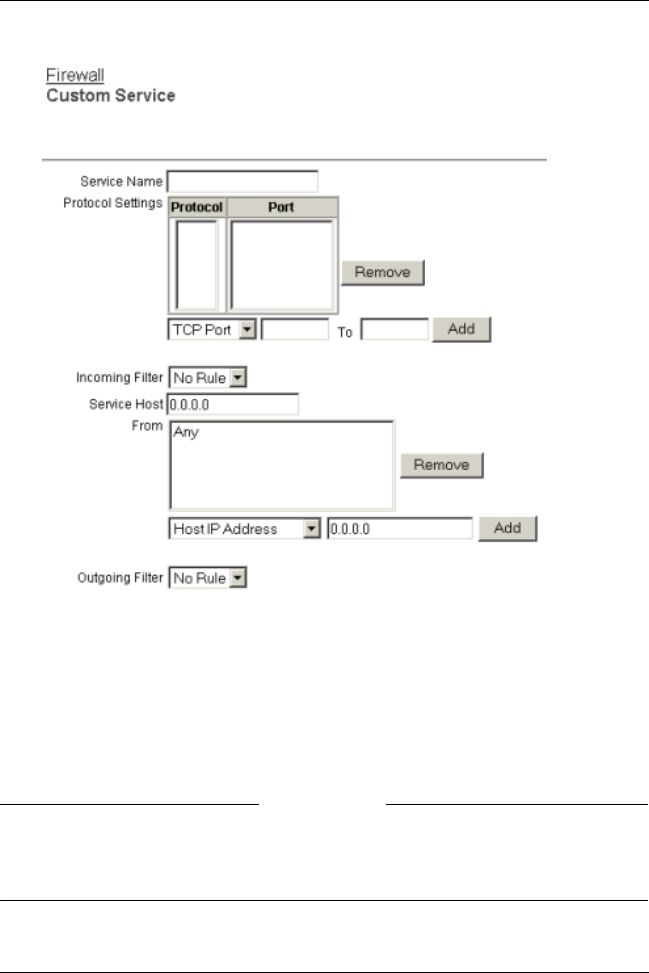
74 WatchGuard Firebox SOHO 6 Wireless
3 Type a name for the service in the Service name field.
4 Select TCP Port, UDP Port, or Protocol from the drop-down list
below the Protocol Settings.
The Custom Service page refreshes.
5 In the fields separated by the word To, enter the port number
or the range of port numbers, or enter the protocol number.
NOTE
For a TCP port or a UDP port, specify a port number. For a protocol,
specify a protocol number. You cannot specify a port number for a
protocol.

User Guide 75
Block external sites
6Click Add.
The following steps determine how the service is filtered.
7 Select Allow or Deny from the Incoming Filter and Outgoing
Filter drop-down lists.
8 Select Host IP Address, Network IP Address, or Host Range
from the drop-down list at the bottom of the page.
The Custom Service page refreshes.
9 Type a single host IP address, a network IP address, or the start
and end of a range of host IP addresses in the address field.
10 Click Add.
Repeat the previous three steps until all of the address information for this
custom service is set.
11 Click Submit.
Block external sites
The default configuration of the SOHO 6 Wireless:
• allows the transmission of all packets from the trusted
network to the external network;
• prevents the transmission of all packets from the external
network to the trusted network.
You can change the configuration to prevent access to specified
Internet sites. Follow these steps to configure the blocked sites:
1 From the navigation bar on the left side, select
Firewall => Blocked Sites.
The Blocked Sites page opens.

76 WatchGuard Firebox SOHO 6 Wireless
2 Select either Host IP Address, Network IP Address, or Host
Range from the drop-down list.
The Blocked Sites page refreshes.
3 Type a single host IP address, a network IP address, or the start
and end of a range of host IP addresses in the address field.
The illustration shows the selection Host IP Address and the IP address
207.68.172.246.
4Click Add.
The address information appears in the Blocked Sites field.
5Click Submit.
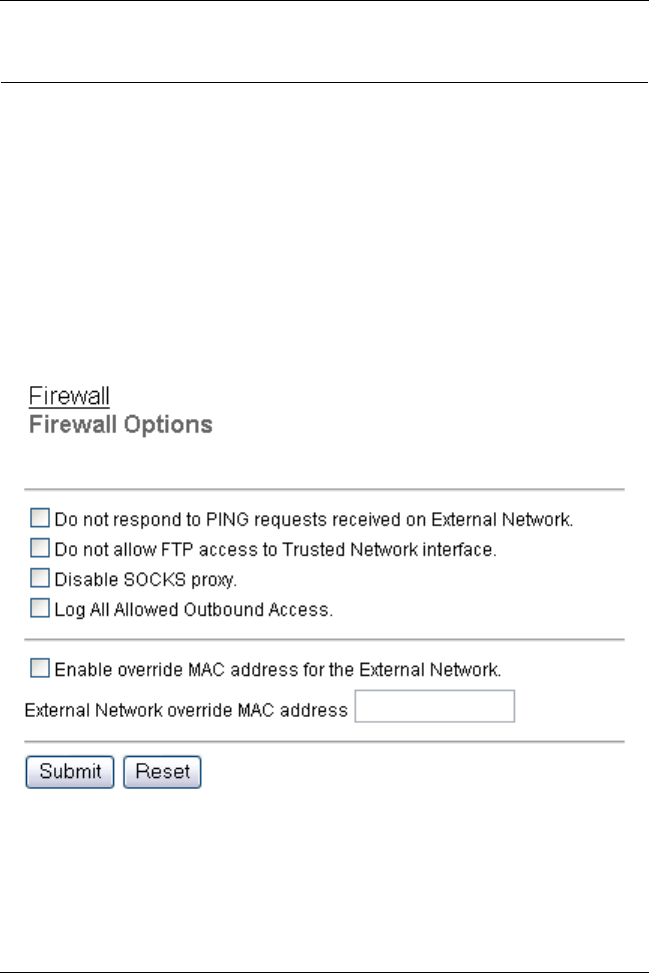
User Guide 77
Firewall options
Firewall options
The previous sections described how to allow or deny complete
classes of services. The Firewall Options page allows the
configuration of general security policies.
1 Type the IP address of the trusted network in your browser
window to connect to the System Status page of the SOHO 6
Wireless:
The default IP address is: http://192.168.111.1
2 From the navigation bar on the left side, select
Firewall => Firewall Options.
The Firewall Options page opens.

78 WatchGuard Firebox SOHO 6 Wireless
Ping requests received from the external network
You can configure the SOHO 6 Wireless to deny all ping packets
received on the external interface.
1 Set the Do not respond to PING requests received on External
Network check box.
2Click Submit.
Denying FTP access to the trusted network
interface
You can configure the SOHO 6 Wireless to prevent FTP access to
the computers on the trusted network by the computers on the
external network.
1Set Do not allow FTP access to Trusted Network check box.
2Click Submit.
SOCKS implementation for the SOHO 6 Wireless
The SOHO 6 Wireless functions as a SOCKS network proxy server.
An application that uses more than one socket connection and
implements the SOCKS version 5 protocol can communicate
through the SOHO 6 Wireless. SOCKS supplies a secure, two-way
communication channel between a computer on the external
network and a computer on the trusted network. To use a SOCKS-
compatible application, configure the application with the
necessary information about the SOHO 6 Wireless.
The SOHO 6 Wireless supports SOCKS version 5 only. The
SOHO 6 Wireless does not support authentication or DNS
(Domain Name System) resolution.

User Guide 79
Firewall options
NOTE
Configure the SOCKS-compatible application to connect to IP addresses
and not to domain names. Applications that can only reference domain
names are not compatible with the SOHO 6 Wireless.
Some SOCKS-compatible applications that function correctly when
used through the SOHO 6 Wireless are ICQ, IRC, and AOL
Messenger.
NOTE
When a computer in the trusted network uses a SOCKS-compatible
application, other users on the trusted network have free access to that
computer. Disable SOCKS on the SOHO 6 Wireless to prevent this
security risk. See “Disabling SOCKS on the SOHO 6 Wireless” on
page 81.
Configuring your SOCKS application
To allow a SOCKS-compatible application on a computer in the
trusted network to communicate with a computer on the external
network, configure the application as described below. To make
these settings, refer to the users guide for the application.
NOTE
The SOHO 6 Wireless uses port 1080 to communicate with a computer
that uses a SOCKS-compatible application. Make sure that port 1080 is
not in use by other applications on the computer.
• If there is a selection of protocols or SOCKS versions, select
SOCKS version 5.
• Select port 1080.

80 WatchGuard Firebox SOHO 6 Wireless
• Set the SOCKS proxy to the URL or IP address of the
SOHO 6 Wireless. The default IP address is: http://
192.168.111.1.

User Guide 81
Firewall options
Disabling SOCKS on the SOHO 6 Wireless
After a SOCKS-compatible application has connected through the
SOHO 6 Wireless, the SOCKS port stays open. After the
application terminates, the SOCKS port is available to anyone on
your trusted network. The following steps prevent this security
problem.
When the SOCKS-compatible application is not in use:
1Set the Disable SOCKS proxy check box.
This disables the SOCKS proxy feature of the SOHO 6 Wireless.
2Click Submit.
To use the SOCKS-compatible application:
1 Reset the Disable SOCKS proxy check box.
This enables the SOHO 6 Wireless SOCKS proxy server.
2Click Submit.
This disables the SOHO 6 Wireless SOCKS proxy server.
Logging all allowed outbound traffic
When in the default configuration, the SOHO 6 Wireless only
records unusual events. For example, all denied traffic is recorded
in the log file. You can change the configuration of the SOHO 6
Wireless to record all outbound traffic events.
NOTE
This option records an large number of log entries. WatchGuard
recommends that you use this option as a problem solving aid only.
Follow these steps to enable this option:
1 Select Log All Allowed Outbound Access.
2Click Submit.

82 WatchGuard Firebox SOHO 6 Wireless
Enable override MAC address for the external
network
If your ISP requires a MAC address, enable this option. The
SOHO 6 Wireless will use its own MAC address for the trusted
network. You can enter a new MAC address for use on the external
network.
Follow these steps to enable this option:
1Set the Enable override MAC address for the External
Network check box.
2 Type the new MAC address for the SOHO 6 Wireless external
network.
3Click Submit.
NOTE
If the MAC address for the external network field is cleared and the
SOHO 6 Wireless is rebooted, the SOHO 6 Wireless is reset to the
factory-default MAC address for the external network.
To prevent MAC address collisions, the SOHO 6 Wireless searches
the external network periodically for the override MAC address. If
the SOHO 6 Wireless finds a device that uses the same MAC
address, the SOHO 6 Wireless resets to the factory-default external
MAC address and reboots.
Create an Unrestricted Pass Through
The SOHO 6 Wireless can allow traffic to flow from the external
network to a computer on the trusted network that has a public IP
address.
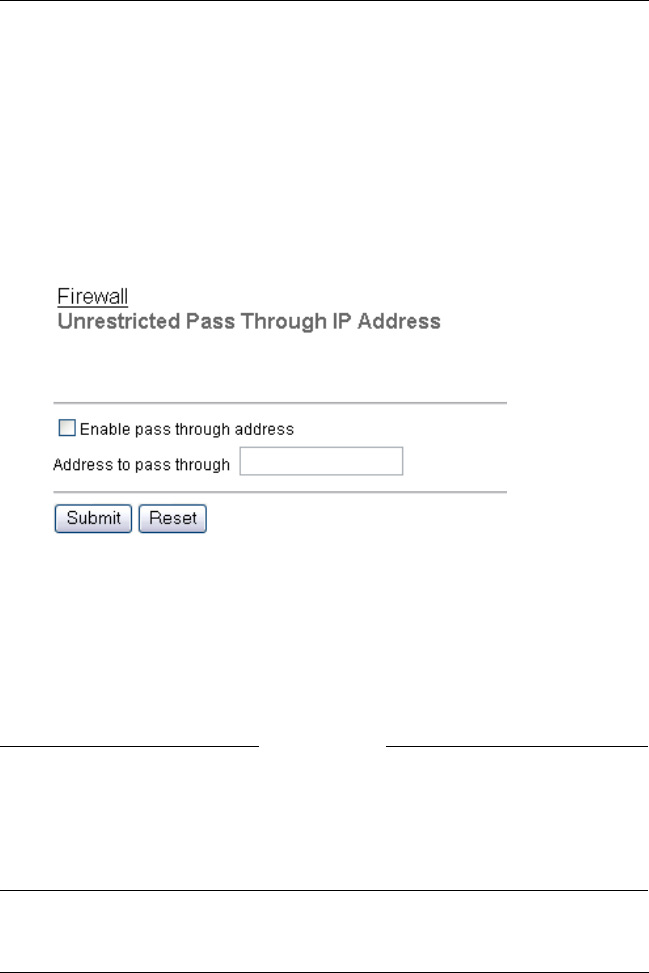
User Guide 83
Create an Unrestricted Pass Through
Follow these steps to configure a pass through:
1 Type the IP address of the trusted network in your browser
window to connect to the System Status page of the SOHO 6
Wireless:
The default IP address is: http://192.168.111.1
2 From the navigation bar on the left side, select
Firewall => Pass Through.
The Unrestricted Pass Through IP Address page opens.
3Set the Enable pass through address check box.
4 Type the IP address of the computer to connect to the pass
through. This must be a public IP address.
The illustration shows a pass through address of 206.253.208.103.
5Click Submit.
NOTE
A pass through connection decreases the security of the trusted network,
because the computer with the pass through connection is on the same
Ethernet segment as the trusted network. Do not use a pass through
connection unless the effect of the pass through connection on the security
of the trusted network is known.

84 WatchGuard Firebox SOHO 6 Wireless

User Guide 85
CHAPTER 7 Configure logging
The SOHO 6 Wireless logging feature records a log of the events
related to the security of the trusted network. Communication
with the WatchGuard WebBlocker database and incoming traffic
are examples of events that are recorded. The log records the
events that show possible security problems. A denied packet is
the most important type of event to log. A sequence of denied
packets can show that an unauthorized person tried to access your
network.
NOTE
The records in the SOHO 6 Wireless log are erased if the power supply is
disconnected.
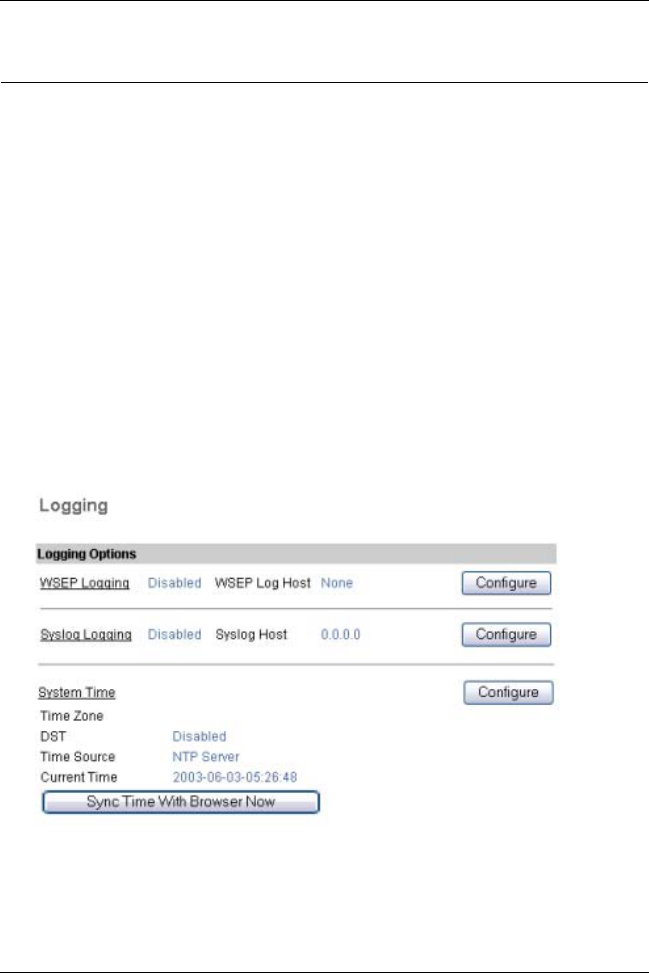
86 WatchGuard Firebox SOHO 6 Wireless
View SOHO 6 Wireless log messages
The SOHO 6 Wireless event log records a maximum of 150 log
messages. If a new entry is added when the event log is full, the
oldest log message is removed.
The log messages include the time synchronizations between the
SOHO 6 Wireless and the WatchGuard Time Server, packets
discarded because of a packet handling violation, duplicate
messages, return error messages, and IPSec messages.
The following procedure shows how to view the event log:
1 Type the IP address of the trusted network in your browser
window to connect to the System Status page of the SOHO 6
Wireless:
The default IP address is: http://192.168.111.1
2 From the navigation bar on the left side, select Logging.
The Logging page opens with the Event Log at the bottom of the page.

User Guide 87
Set up logging to a WatchGuard Security Event Processor log host
NOTE
The newest entry is shown at the top of the event log.
This option synchronizes the clock of the SOHO 6 Wireless to your
computer:
•Click Sync Time with Browser now.
The SOHO 6 Wireless synchronizes the time at startup.
Set up logging to a WatchGuard Security
Event Processor log host
The WSEP (WatchGuard Security Event Processor) is an
application that is available with the WatchGuard Firebox System
package used by a Firebox II/III. The WSEP application runs on a
computer that functions as the log host. The WSEP application
records log messages sent from the Firebox II/III. If you have a
Firebox II/III, configure the WSEP to accept the log messages from
your SOHO 6 Wireless. Then follow these instructions to send
your event logs to the WSEP.
1 Type the IP address of the trusted network in your browser
window to connect to the System Status page of the SOHO 6
Wireless:
The default IP address is: http://192.168.111.1
2 From the navigation bar on the left side, select
Logging => WSEP Logging.
The WatchGuard Security Event Processor page opens.

88 WatchGuard Firebox SOHO 6 Wireless
3 Select Enable WatchGuard Security Event Processor Logging.
4 Type the IP address of the WSEP server that is your log host in
the applicable field.
In the illustration, the IP address is 192.168.111.5.
5 Type a passphrase in the Log Encryption Key field.
6 Confirm the passphrase in the Confirm Key field.
7Click Submit.
NOTE
Use the same encryption key recorded in the WSEP application.
Set up logging to a Syslog host
This option sends the SOHO 6 Wireless log entries to a Syslog host.

User Guide 89
Set up logging to a Syslog host
Follow these steps to configure a Syslog Host:
1 Type the IP address of the trusted network in your browser
window to connect to the System Status page of the SOHO 6
Wireless:
The default IP address is: http://192.168.111.1
2 From the navigation bar on the left side, select
Logging => Syslog Logging.
The Syslog Logging page opens.
3Set the Enable syslog output check box.
4 Type the IP address of the Syslog server.
In the illustration, the IP address is 206.253.208.100.
5Click Submit.
This option includes the local time from your browser in the Syslog
messages:
• Select Include local time in Syslog message.
NOTE
Syslog traffic is not encrypted. Syslog messages that are sent through the
Internet decrease the security of the trusted network. Use a VPN tunnel
to increase the security of Syslog message traffic. If the Syslog messages
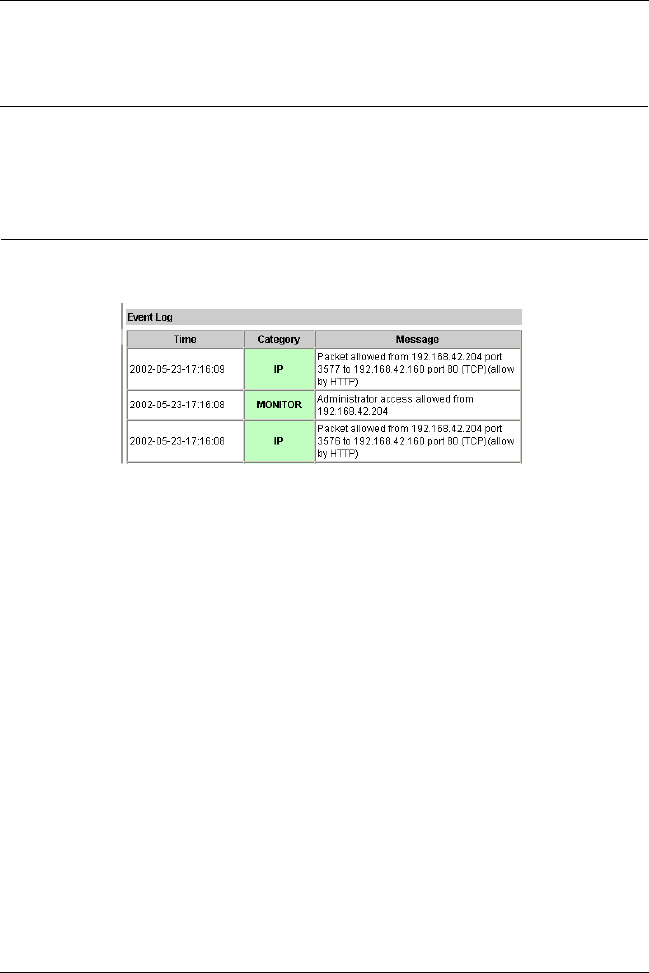
90 WatchGuard Firebox SOHO 6 Wireless
are sent through a VPN tunnel, the data is encrypted with IPSec
technology.
Set the system time
The SOHO 6 Wireless records the time of each log entry.
The time recorded in the log entries is from the SOHO 6 Wireless
system clock.
Follow these steps to set the system time:
1 Type the IP address of the trusted network in your browser
window to connect to the System Status page of the SOHO 6
Wireless:
The default IP address is: http://192.168.111.1
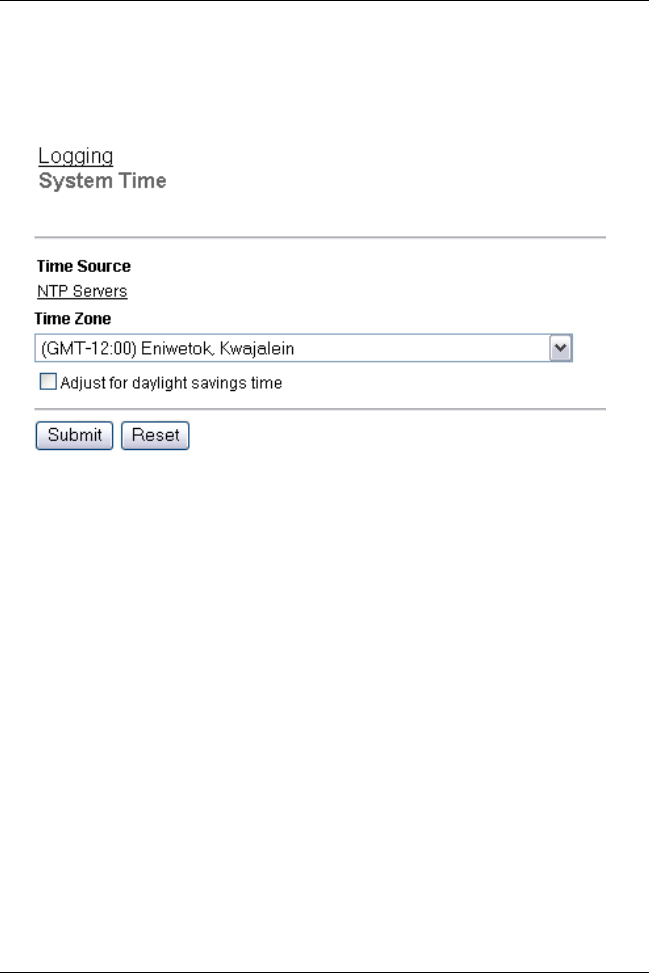
User Guide 91
Set the system time
2 From the navigation bar on the left side, select
Logging => System Time.
The System Time page opens.
This step synchronizes the system time with the WatchGuard Time
Server:
3 Select Get Time From WatchGuard Time Server.
This step synchronizes the system time with a TCP Port 37 Time
Server:
4 Select Get Time From TCP Port 37 Time Server at.
5 Type the IP address of the time server in the applicable field.
6Click
Submit.
This step sets the SOHO 6 Wireless to adjust for daylight savings
time:
•Set the Adjust for daylight savings time check box.
This step sets the current time zone of the SOHO 6 Wireless:
• Select a time zone from the drop-down list.

92 WatchGuard Firebox SOHO 6 Wireless
NOTE
The time zone selection is only used when the Get Time From
WatchGuard Time Server check box is selected.

User Guide 93
CHAPTER 8 SOHO 6 Wireless
WebBlocker
WebBlocker is an option for the SOHO 6 Wireless that allows the
system administrator to control which Web sites the users can
access.
How WebBlocker works
WebBlocker uses a database of Web site addresses, which is owned
and maintained by SurfControl. The database shows the type of
content found on thousands of Web sites. WatchGuard puts the
newest version of the SurfControl database on the WebBlocker
server at regular intervals.
The WebBlocker checks each Web site request by users in the
trusted network. The SOHO 6 Wireless sends to the database a
request for the type of content found on the Web site. The SOHO 6
Wireless uses the rules shown below to control the access to Web
sites:

94 WatchGuard Firebox SOHO 6 Wireless
Web site not in the WebBlocker database
If the Web site is not in the WatchGuard WebBlocker database, the
Web browser opens the page.
Web site in the WebBlocker database
If the site is in the WatchGuard WebBlocker database, the SOHO 6
Wireless examines the configuration to see if that type of site is
permitted. When the type of site is not permitted, the user is told
that the site is not available. If the type of site is permitted, the Web
browser opens the page.
WatchGuard WebBlocker database unavailable
If the WatchGuard WebBlocker database is not available, the user
is told that the Web site is not available. The database is not
available if the SOHO 6 Wireless can not connect to the
WatchGuard server.

User Guide 95
Purchase and activate SOHO 6 Wireless WebBlocker
WebBlocker users and groups
Groups
A group is a set of users on the trusted network.
Users
Users are persons that use the computers on the trusted
network.
Bypass the SOHO 6 Wireless WebBlocker
The SOHO 6 Wireless WebBlocker configuration page includes a
full access password field. Give this password to those users of the
trusted network allowed to bypass WebBlocker. When a site is
blocked, the user can supply the full access password to access the
Web site. After the user supplies the password, the user can access
all Web sites until the password expires or the browser is closed.
Purchase and activate SOHO 6 Wireless
WebBlocker
To use the WatchGuard SOHO 6 Wireless WebBlocker, you must
purchase and enable the WebBlocker upgrade license key. See
“Activate the SOHO 6 Wireless upgrade options” on page 66 for
information about upgrade license keys.
Configure the SOHO 6 Wireless WebBlocker
Use the SOHO 6 Wireless configuration pages to configure the
WebBlocker:
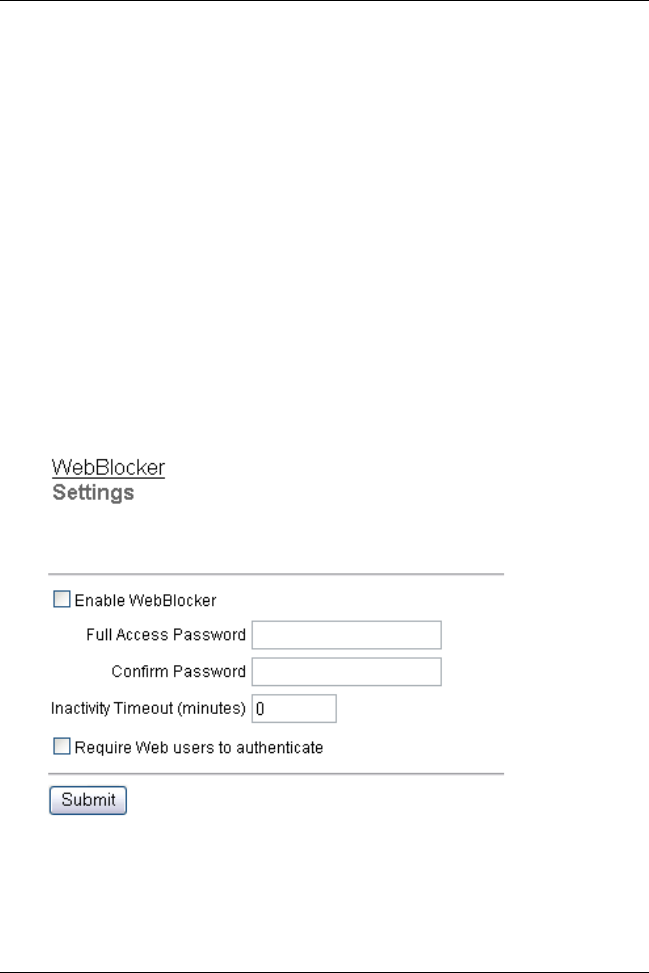
96 WatchGuard Firebox SOHO 6 Wireless
WebBlocker settings
Use the WebBlocker settings page to:
• activate the WebBlocker;
• set the full access password;
• set the inactivity timeout;
• require that your Web users authenticate.
1 Type the IP address of the trusted network in your browser
window to connect to the System Status page of the SOHO 6
Wireless:
The default IP address is: http://192.168.111.1
2 From the navigation bar on the left side, select
WebBlocker => Settings.
The WebBlocker Settings page opens.
3Set the Enable WebBlocking check box.

User Guide 97
Configure the SOHO 6 Wireless WebBlocker
4 Type the full access password.
The full access password allows a user to access all Web sites until the
password expires or the browser is closed.
5 Type the Inactivity Timeout in minutes.
The inactivity timeout disconnects Internet connections that are inactive
for the set number of minutes.
6 To set the WebBlocker to use groups and users, set the Require
Web users to authenticate check box.
7Click Submit to register your changes.
Create WebBlocker groups and users
Follow these instructions to create WebBlocker groups:
1 Type the IP address of the trusted network in your browser
window to connect to the System Status page of the SOHO 6
Wireless:
The default IP address is: http://192.168.111.1

98 WatchGuard Firebox SOHO 6 Wireless
2 From the navigation bar on the left side, select
WebBlocker => Groups.
The WebBlocker Groups page opens.
3Click New to create a group name and profile.
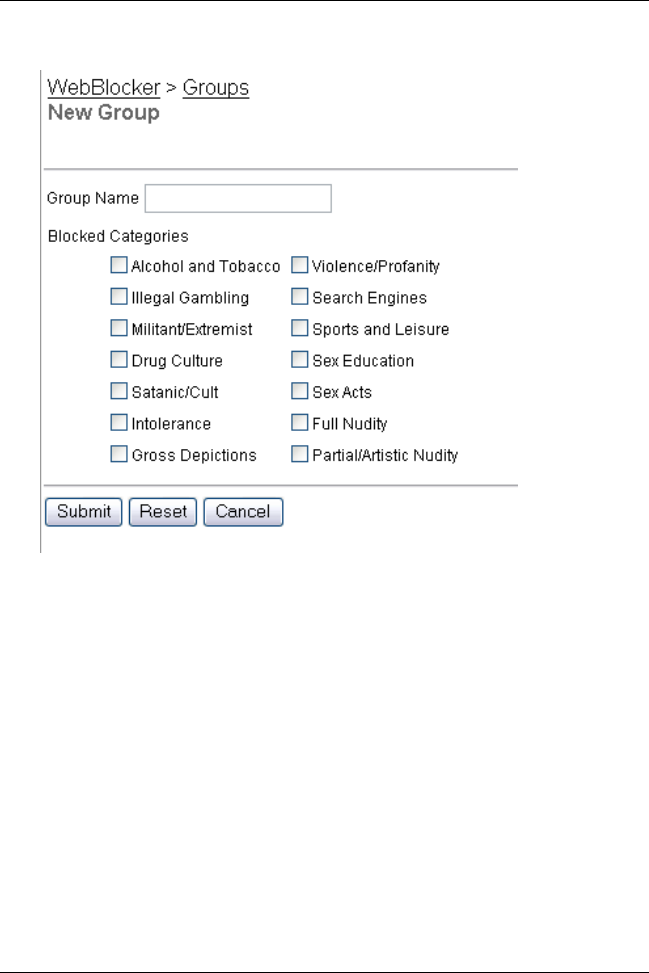
User Guide 99
Configure the SOHO 6 Wireless WebBlocker
4Define a Group Name and set the types of content to filter for
this group.
5Click Submit.
A new Groups page opens that shows the configuration changes.
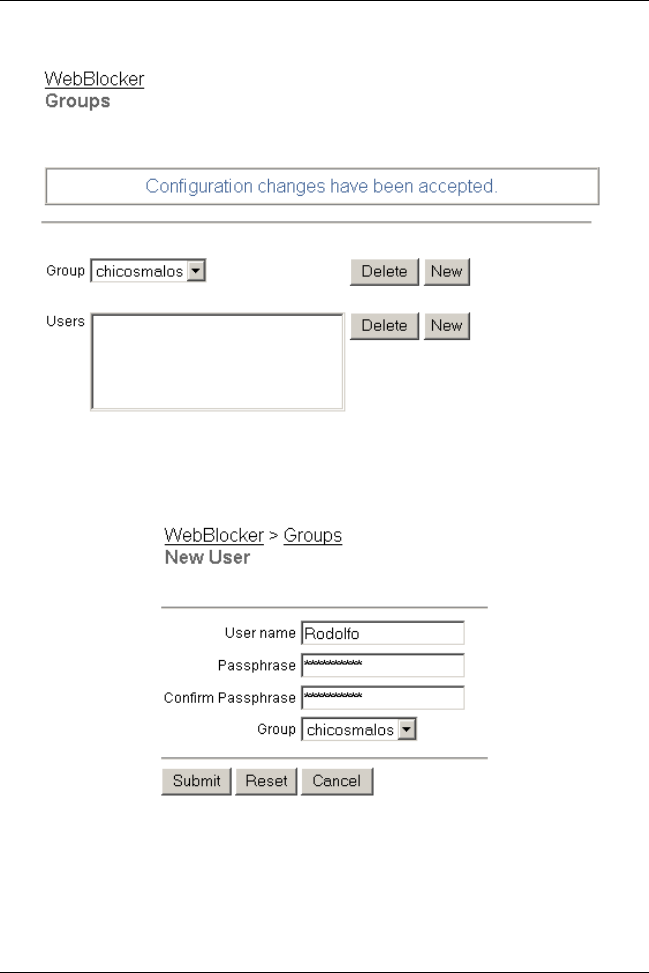
100 WatchGuard Firebox SOHO 6 Wireless
6 To the right of the Users field, click New.
The New User page opens.
7 Type a new user name and passphrase.
8 Confirm the passphrase.

User Guide 101
WebBlocker Categories
9Use the Group drop-down list to assign the new user to a given
group.
10 Click Submit.
NOTE
To remove a user or group, make a selection and click Delete.
WebBlocker Categories
The WebBlocker database contains the following 14 categories:
NOTE
A Web site is only added to a category if the contents of the Web Site
advocate the subject matter of the category. Web sites that provide
opinion or educational material about the subject matter of the category
are not included. For example, the drugs/drug culture category blocks
sites describing how to grow and use marijuana but does not block sites
discussing the historical use of marijuana.
Alcohol/tobacco
Pictures or text advocating the sale, consumption, or
production of alcoholic beverages and tobacco products.
Illegal Gambling
Pictures or text advocating materials or activities of a
dubious nature that may be illegal in any or all
jurisdictions, such as illegal business schemes, chain letters,
copyright infringement, computer hacking, phreaking
(using someone’s phone lines without permission), and
software piracy. Also includes text advocating gambling
relating to lotteries, casinos, betting, numbers games,

102 WatchGuard Firebox SOHO 6 Wireless
online sports, or financial betting, including non-monetary
dares.
Militant/extremist
Pictures or text advocating extremely aggressive or
combative behavior or advocacy of unlawful political
measures. Topic includes groups that advocate violence as
a means to achieve their goals. It also includes pages
devoted to “how to” information on the making of
weapons (for both lawful and unlawful reasons),
ammunition, and pyrotechnics.
Drug Culture
Pictures or text advocating the illegal use of drugs for
entertainment. This category includes substances that are
used for other than their primary purpose to alter the
individual’s state of mind, such as glue sniffing. This does
not include (that is, if selected these sites would not be
WebBlocked under this category) currently illegal drugs
legally prescribed for medicinal purposes (such as, drugs
used to treat glaucoma or cancer).
Satanic/cult
Pictures or text advocating devil worship, an affinity for
evil, wickedness, or the advocacy to join a cult. A cult is
defined as: a closed society that is headed by a single
individual where loyalty is demanded and leaving is
punishable.
Intolerance
Pictures or text advocating prejudice or discrimination
against any race, color, national origin, religion, disability
or handicap, gender, or sexual orientation. Any picture or
text that elevates one group over another. Also includes
intolerant jokes or slurs.

User Guide 103
WebBlocker Categories
Gross Depictions
Pictures or text describing anyone or anything that is either
crudely vulgar, grossly deficient in civility or behavior, or
shows scatological impropriety. Topic includes depictions
of maiming, bloody figures, and indecent depiction of
bodily functions.
Violence/profanity
Pictures or text exposing extreme cruelty or profanity.
Cruelty is defined as: physical or emotional acts against
any animal or person that are primarily intended to hurt or
inflict pain. Topic includes obscene words, phrases, and
profanity in either audio, text, or pictures.
Search Engines
Search engine sites such as AltaVista, InfoSeek, Yahoo!, and
WebCrawler.
Sports and Leisure
Pictures or text describing sporting events, sports figures,
or other entertainment activities.
Sex Education
Pictures or text advocating the proper use of
contraceptives. Topic includes sites devoted to the
explanation and description of condoms, oral
contraceptives, intrauterine appliances, and other types of
contraceptives. It also includes discussion sites devoted to
conversations with partners about sexually transmitted
diseases, pregnancy, and sexual boundaries. Not included
in this category are commercial sites selling sexual
paraphernalia (topics included under Sexual Acts).

104 WatchGuard Firebox SOHO 6 Wireless
Sexual Acts
Pictures or text exposing anyone or anything involved in
explicit sexual acts and/or lewd and lascivious behavior.
Topic includes masturbation, copulation, pedophilia, as
well as intimacy involving nude or partially nude people in
heterosexual, bisexual, lesbian, or homosexual encounters.
It also includes phone sex advertisements, dating services,
adult personals, and sites devoted to selling pornographic
CD-ROMs and videos.
Full Nudity
Pictures exposing any or all portions of human genitalia.
Topic does not include sites categorized as Partial/Artistic
Nudity containing partial nudity of a wholesome nature.
For example, it does not include Web sites for publications
such as National Geographic or Smithsonian magazine nor
sites hosted by museums such as the Guggenheim, the
Louvre, or the Museum of Modern Art.
Partial/artistic Nudity
Pictures exposing the female breast or full exposure of
either male or female buttocks except when exposing
genitalia which is handled under the Full Nudity category.
Topic does not include swimsuits, including thongs.

User Guide 105
CHAPTER 9 VPN—Virtual Private
Networking
This chapter tells how to use the VPN with IPSec upgrade option
of the WatchGuard SOHO 6 Wireless.
Why create a Virtual Private Network?
Use a VPN tunnel to make an inexpensive and secure connection
between the computers in two locations. Expensive, dedicated
point-to-point connections are not necessary for a VPN
connection. A VPN tunnel gives the security necessary to use the
public Internet for a private virtual connection between two
locations.

106 WatchGuard Firebox SOHO 6 Wireless
What You Need
• One WatchGuard SOHO 6 Wireless with VPN and one
IPSec-compatible appliance.
NOTE
IPSec-compatible appliances include the WatchGuard SOHO 6 Wireless,
the WatchGuard Firebox II/III, and the Firebox Vclass.
• The data from your ISP about the Internet connections for
each of the two IPSec-compatible appliances:
- Static IP address
- Primary DNS IP address (optional)
- A secondary DNS address (optional)
- Domain name (optional)
• The network addresses and subnet masks for the two trusted
networks. The default IP address for the SOHO 6 Wireless
trusted network is 192.168.111.0. The default subnet mask for
the SOHO 6 Wireless trusted network is 255.255.255.0.
NOTE
The trusted networks at the two ends of the VPN tunnel must have
different network addresses.
If the appliances that connect through the VPN tunnel are not
configured correctly, the VPN tunnel does not function.
WatchGuard recommends that you make a record of the
configuration information in the format shown below.

User Guide 107
What You Need
IP Address Table (example):
Item Description Assigned
By
External IP
Address
The IP address that identifies the IPSec-
compatible appliance to the Internet.
ISP
Site A: 207.168.55.2
Site B: 68.130.44.15
External
Subnet Mask The bitmask that shows which part of the IP
address identifies the local network. For
example, a class C address includes 256
addresses and has a netmask of 255.255.255.0.
ISP
Site A:
255.255.255.0
Site B:
255.255.255.0
Local Network
Address
An address used to identify a local network. A
local network address cannot be used as an
external IP address. WatchGuard recommends
that you use an address from one of the reserved
ranges:
10.0.0.0/8
172.16.0.0/12—255.240.0.0
192.168.0.0/16—255.255.0.0
Yo u
Site A:
192.168.111.0/24
Site B:
192.168.222.0/24
Shared Secret The shared secret is a passphrase used by two
IPSec-compatible appliances to encrypt and
decrypt the data that goes through the VPN
tunnel. The two appliances use the same
passphrase. If the appliances do not have the
same passphrase, they can not encrypt and
decrypt the data correctly.
Use a passphrase that contains numbers,
symbols, lowercase letters, and uppercase letters
for better security. For example, “Gu4c4mo!3”
is better than “guacamole”.
Yo u

108 WatchGuard Firebox SOHO 6 Wireless
Enable the VPN upgrade
To activate an upgrade option, you must enter a license key in the
configuration of the SOHO 6 Wireless. To receive a license key,
purchase and activate an upgrade option at the LiveSecurity
Service Web site.
To activate the VPN upgrade, these items are necessary:
• a SOHO 6 Wireless that is installed and configured;
• a connection to the Internet;
• a VPN upgrade license key.
Site A:
OurLittleSecret
Site B:
OurLittleSecret
Encryption
Method
DES uses 56-bit encryption. 3DES uses 168-bit
encryption. The 3DES encryption method gives
better security, but decreases the speed of
communication. The two IPSec-compatible
appliances must use the same encryption
method.
Yo u
Site A: 3DES
Site B: 3DES
Authentication The two IPSec-compatible appliances must use
the same authentication method. Yo u
Site A: MD5 (or
SHA1)
Site B: MD5 (or
SHA1)

User Guide 109
Step-by-step instructions to configure a SOHO 6 Wireless VPN tunnel
Step-by-step instructions to configure a
SOHO 6 Wireless VPN tunnel
Instructions that tell how to configure a VPN tunnel between a
SOHO 6 Wireless and another IPSec-compatible appliance are
available from the WatchGuard Web site:
https://support.watchguard.com/AdvancedFaqs/sointerop_main.asp
Special considerations
Think about these points before you configure your WatchGuard
SOHO 6 Wireless VPN network:
• You can connect a maximum of six SOHO 6 Wireless
appliances together in a star configuration. To configure
more than one VPN tunnel, a WatchGuard Firebox II/III
with the WatchGuard VPN Manager is necessary.
• The two appliances that make a VPN tunnel must each have
a static IP address. If an appliance has a dynamic IP address,
packets sent from the other end of the tunnel will not get to
their destination. See “Network addressing” on page 37 for
more information about dynamic IP addresses.
• The two appliances must use the same encryption method.
The alternatives are DES or 3DES. When two Microsoft
Windows NT® networks are connected, the two networks
must be in the same Microsoft Windows domain or be
trusted domains. This is a Microsoft Networking design
implementation and not a limitation of the SOHO 6 Wireless.

110 WatchGuard Firebox SOHO 6 Wireless
Frequently Asked Questions
Why do I need a static external address?
To make a VPN connection, each of the two appliances must know
the IP address of the other appliance. If the addresses are dynamic,
the addresses can change. A changed address prevents a
connection between the two appliances.
How do I get a static external IP address?
The external IP address for your computer or network is assigned
by your ISP. Many ISPs use dynamic IP addresses so that their
network is easier to configure and to make the connection of a Web
server to their network more difficult. Most ISPs supply a static IP
address as an optional service.
How do I troubleshoot the connection?
If you can ping the remote SOHO 6 Wireless and the computers on
the remote network, the VPN tunnel functions correctly. The
configuration of the network software or the applications are
possible causes of other problems.
Why is ping not working?
If you cannot ping the local network address of the remote
SOHO 6 Wireless, follow these steps to identify the problem:
1 Ping the external address of the remote SOHO 6 Wireless.
For example, at Site A, ping 68.130.44.15 (Site B). If the ping does not
come back, make sure the external network settings of Site B are correct.
If the settings are correct, make sure that the computers at Site B have
access to the Internet. If this procedure does not give a solution, speak to
a service person at your ISP.

User Guide 111
Set Up multiple SOHO-SOHO VPN tunnels
2 When you can ping the external address of each SOHO 6
Wireless, try to ping a local address in the remote network.
From Site A, ping 192.168.111.1. If the VPN tunnel functions correctly,
the remote SOHO 6 Wireless sends the ping back. If the ping does not
come back, make sure the local settings are correct. Make sure that the
local DHCP address ranges for the two networks connected by the VPN
tunnel do not use any of the same IP addresses. The two networks
connected by the tunnel
must not
use the same IP addresses.
How do I obtain a VPN upgrade license key?
You can purchase a license key for an upgrade from the
WatchGuard Web site:
http://www.watchguard.com/sales/buyonline.asp
How do I enable a VPN tunnel?
The instructions to help you enable a VPN tunnel are available
from the WatchGuard Web site:
https://support.watchguard.com/AdvancedFaqs/sointerop_main.asp
Set Up multiple SOHO-SOHO VPN tunnels
An administrator of a SOHO 6 Wireless can configure a maximum
of six VPN tunnels to other SOHO 6 Wireless devices. The VPN
Manager software can configure a larger number of SOHO 6
Wireless to SOHO 6 Wireless tunnels.
To define multiple VPN tunnels to other SOHO 6 Wireless
appliances:
1 Type the IP address of the trusted network in your browser
window to connect to the System Status page of the SOHO 6
Wireless:
The default IP address is: http://192.168.111.1
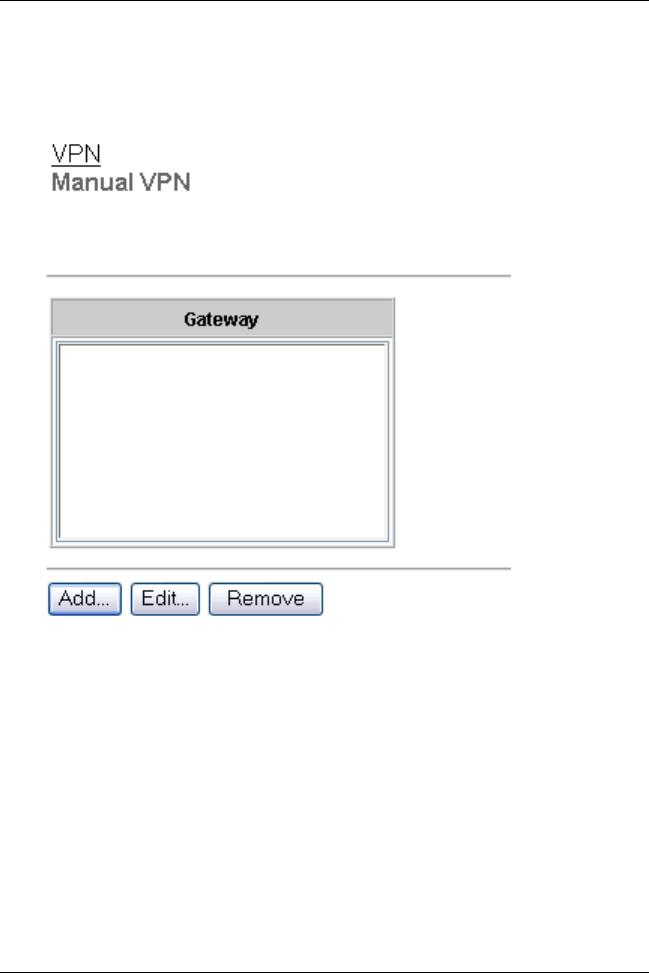
112 WatchGuard Firebox SOHO 6 Wireless
2 From the navigation bar on the left side, select
VPN => Manual VPN.
The Manual VPN page opens.
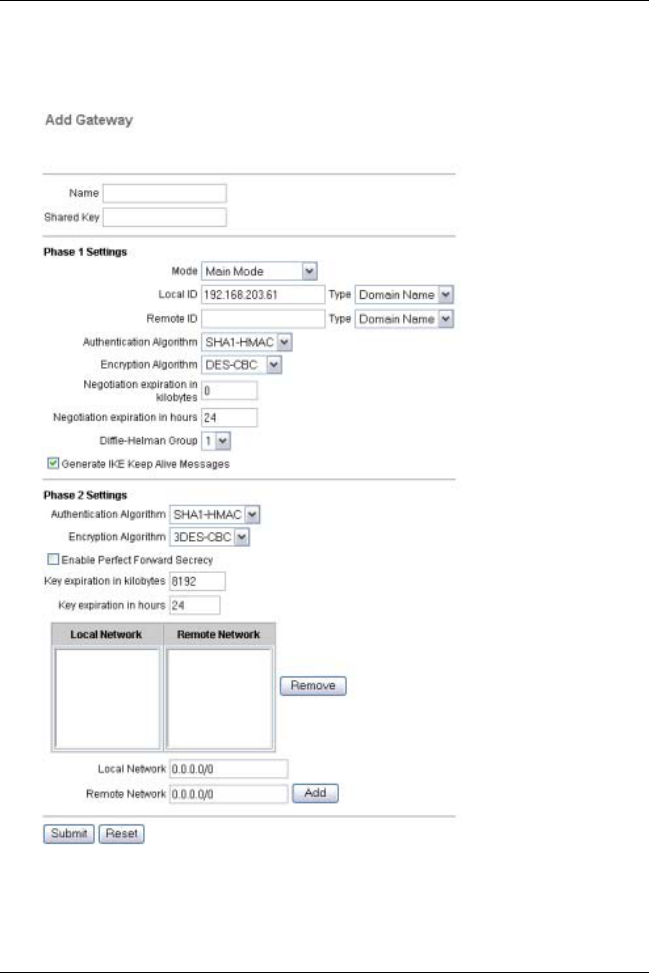
User Guide 113
Set Up multiple SOHO-SOHO VPN tunnels
3Click Add to set up the VPN tunnel.
The Add Gateway page opens.

114 WatchGuard Firebox SOHO 6 Wireless
4 Type the Name and Shared Secret for the SOHO 6 Wireless at
the remote end of the VPN tunnel.
The shared secret is a passphrase used by two IPSec-compatible
appliances to encrypt and decrypt the data that goes through the VPN
tunnel. The two appliances use the same passphrase. If the appliances do
not have the same passphrase, they can not encrypt and decrypt the data
correctly.
5 Use the default Phase 1 settings or change the settings as
necessary.
To modify Phase 1 settings, complete the following steps:
NOTE
The Phase 1 settings must be the same on both appliances.
6 Set the negotiation mode for Phase 1. The mode selections are
Main and Aggressive. If the external IP address is dynamic,
select Aggressive Mode. If the external IP address is static, use
either mode.
7Set the Local ID Type and the Remote ID Type. These must
match the settings used on the remote gateway.
-If you set Main Mode, the Local ID Type and the Remote
ID Type must contain IP addresses.
-If you set Aggressive Mode, the Remote ID Type may be
an IP Address or a domain name. If your external IP
address is static, the Local ID Type must be an IP address.
If your external IP address is dynamic, the Local ID Type
may be either a domain name or an IP address.
8In the Local ID and Remote ID fields, set the name of the local
network or the remote network. The default values are
“LocalID” and “RemoteID”. In the Type field, specify an IP
Address or domain name.
-If you set Main Mode, the Local ID Type and the Remote
ID Type must contain IP addresses.

User Guide 115
Set Up multiple SOHO-SOHO VPN tunnels
-If you set Aggressive Mode and have a static IP address,
the Local ID must be an IP Address and the Remote ID
can be either an IP address or a domain name.
-If you set Aggressive Mode and have a dynamic IP
address, the Local ID must be a domain name and the
Remote ID can be either an IP address or a domain name.
9In the Authentication Algorithm drop-down list, set the type
of authentication. The options are MD5-HMAC (128-bit
authentication) or SHA1-HMCA (160-bit authentication).
10 In the Encryption Algorithm drop-down list, set the type of
encryption. The options are DES-CBC or 3DES-CBC.
11 Set the number of kilobytes until negotiation expiration.
12 Set the number of hours until negotiation expiration.
13 In the Diffie-Hellman Group drop-down list, set the group
number. WatchGuard supports group 1 and group 2.
Diffie-Hellman is a mathematical technique used to securely negotiate
secret keys through a public network. Diffie-Hellman groups are
collections of parameters used to achieve this. Group 2 is more secure
than group 1, but more time is required to calculate group 2 secret keys.
14 Set the Generate IKE Keep Alive Messages check box to keep
the VPN tunnel open when there is no communication. Short
packets are sent across the VPN tunnel at regular intervals to
maintain the connection. If the tunnel connection closes, the
SOHO 6 Wireless does a rekey to open the tunnel again.
The Generate IKE Keep Alive Messages check box is set in the default
configuration.
Use the default Phase 2 settings, or change the Phase 2 settings as
shown below:
NOTE
Make sure that the Phase 2 settings are the same an both appliances.

116 WatchGuard Firebox SOHO 6 Wireless
15 Set the authentication in the Authentication Algorithm drop-
down list. The options are None (no authentication), MD5-
HMAC (128-bit authentication) or SHA1-HMCA (160-bit
authentication).
16 Set the type of encryption in the Encryption Algorithm drop-
down list. The options are None (no authentication), DES-CBC
or 3DES-CBC.
17 Click the Enable Perfect Forward Secrecy check box, if
necessary.
When this option is set, each new key that is negotiated is derived by a new
Diffie-Hellman exchange instead of from only one Diffie-Hellman
exchange. This option gives more security, but increases the time
necessary for the communication because of the additional exchange.
18 Set the number of kilobytes until key expiration.
19 Set the number of hours until key expiration.
20 Set the IP address of the local network and the remote network
that must use Phase 2 negotiation.
21 Click Submit.
Configure split tunneling
The split tunneling feature allows the system administrator to
direct all Internet traffic from the trusted network through the
VPN tunnel. Without split tunneling, only traffic directed to the
other end of the VPN tunnel is sent through the tunnel and the
traffic for other Internet addresses is sent directly to the Internet.
Split tunneling allows the control of access to Internet Web sites
from one location.

User Guide 117
MUVPN Clients
To set up split tunneling follow these steps:
1 Type the IP address of the trusted network in your browser
window to connect to the System Status page of the SOHO 6
Wireless:
The default IP address is: http://192.168.111.1
2 From the navigation bar on the left side, select
VPN => Manual VPN.
The Manual VPN page opens.
3Click Add.
The Add Gateway page opens.
4 Configure the gateway.
See Figure , “Set Up multiple SOHO-SOHO VPN tunnels,” on page 111
for information about the Add Gateway page.
5 Set the network IP address of the Local Network.
6 Set the IP address of the Remote Network.
7Click Submit.
MUVPN Clients
The MUVPN Clients allows remote users to connect to the SOHO 6
Wireless through a secure (IPSec) VPN tunnel. This option allows
remote users to connect to the SOHO 6 Wireless through an IPSec
VPN tunnel. The MUVPN client creates an encrypted tunnel,
protected behind a SOHO 6 Wireless, to your trusted or optional
network depending on if it is a wired or wireless connection. A
wired connection goes to the trusted and the wireless connection
goes to the optional.
If you have a wireless network, you can configure the wireless
network to require wireless computers to have an encrypted
MUVPN connection to access the SOHO 6 Wireless. The SOHO 6
Wireless includes several MUVPN client licenses. For more

118 WatchGuard Firebox SOHO 6 Wireless
information on configuring a wireless network to require MUVPN
connections, see “Configure the Optional Network for Wireless
Networking” on page 46.
View the VPN Statistics
The SOHO 6 Wireless has a configuration page that displays VPN
statistics. Use this page to monitor VPN traffic and to solve
problems with the VPN configuration.
To view the VPN Statistics page:
1 Type the IP address of the trusted network in your browser
window to connect to the System Status page of the SOHO 6
Wireless:
The default IP address is: http://192.168.111.1
2 From the navigation bar on the left side, select VPN => VPN
Statistics.
The VPN Statistics page opens.

User Guide 119
CHAPTER 10 MUVPN Clients
MUVPN clients uses Internet Protocol Security (IPSec) to establish
a secure connection over an unsecured network from a remote
computer to your protected network.
For example, the MUVPN client is installed on an employee’s
computer, on the road or working from home. The employee
establishes a standard Internet connection and activates the
MUVPN client. The MUVPN client then creates an encrypted
tunnel, protected behind a SOHO 6 Wireless, to your trusted or
optional network depending on if it is a wired or wireless
connection. A wired connection goes to the trusted and the
wireless connection goes to the optional. The MUVPN client
allows you to provide remote access to your internal networks
without compromising security.
If you have a wireless network, you can configure the wireless
network to require wireless computers to have an encrypted
MUVPN connection to access the SOHO 6 Wireless. The SOHO 6
Wireless includes several MUVPN client licenses. You can add

120 WatchGuard Firebox SOHO 6 Wireless
more MUVPN connections with the MUVPN Client upgrade. For
information about upgrading, see “Activate the SOHO 6 Wireless
upgrade options” on page 66.
ZoneAlarm®, a personal firewall software application, is included
as an optional feature with the MUVPN client to provide further
security for your end users.
The purpose of this chapter is to assist users of the SOHO 6
Wireless to set up the MUVPN client on an end-user’s remote
computer and to explain the features of the personal firewall.
Configure the SOHO 6 Wireless for MUVPN
Clients
Follow these steps to configure your SOHO 6 Wireless:
1 With your Web browser, go to the System Status page using the
Trusted IP address of the SOHO 6 Wireless.
The default trusted IP address is either 192.168.111.1 for a wired
computer and 192.168.112.1 for a wireless computer.
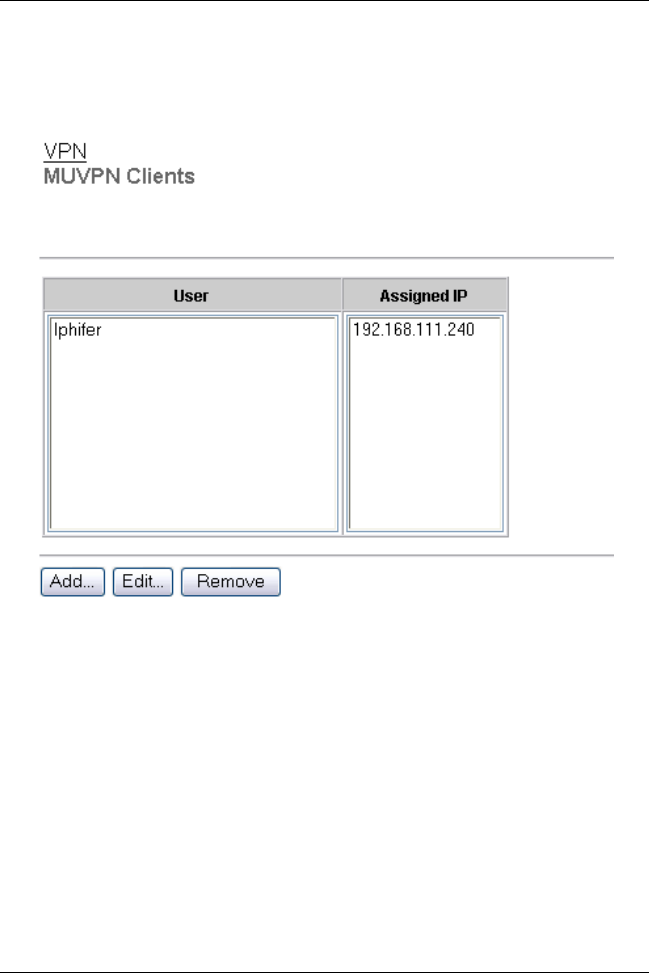
User Guide 121
Configure the SOHO 6 Wireless for MUVPN Clients
2 From the navigation bar on the right side, select VPN =>
MUVPN Clients.
The MUVPN Clients page appears.
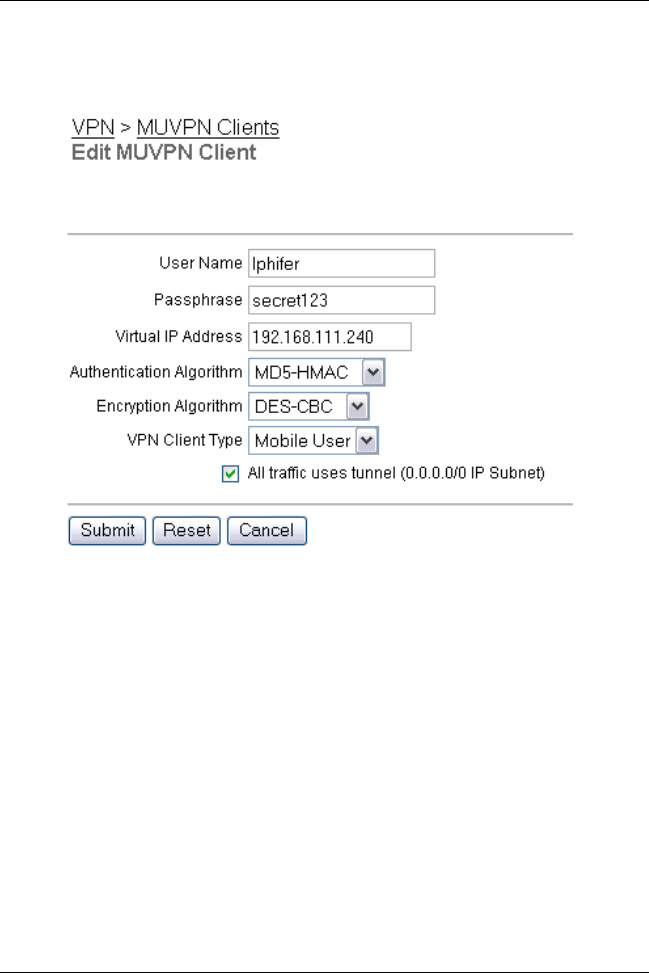
122 WatchGuard Firebox SOHO 6 Wireless
3Click the Add button.
The Edit MUVPN Client page appears.
4 Type a Username in the appropriate field.
This Username will be used as the E-mail Address when setting up the
MUVPN client.
5 Type a Passphrase in the appropriate field.
This passphrase will be used as the Pre-Shared Key when setting up the
MUVPN client.
6 Type the Virtual IP address which will be used by the MUVPN
computer when connecting to the SOHO 6 Wireless in the
appropriate field.
7 Select the Authentication Algorithm.
The options are MD5-HMAC and SHA1-HMAC.
8 Select the Encryption Algorithm.
The options are DES-CBC and 3DECS-CBC.

User Guide 123
Prepare the Remote Computers for the MUVPN Client
9From the VPN Client Type drop list, select Mobile User.
10 Enable the All traffic uses tunnel (0.0.0.0/0 Subnet) checkbox
to force all traffic from the MUVPN client to go through IPSec
tunnel.
11 Click the Submit button.
Prepare the Remote Computers for the
MUVPN Client
The MUVPN client is only compatible with the Windows
operating system. Every Windows system used as a MUVPN
remote computer must have the following system requirements.
System requirements
• PC-compatible computer with Pentium processor or
equivalent
• Compatible operating systems and minimum RAM:
- Microsoft Windows 98: 32 MB
- Microsoft Windows ME: 64 MB
- Microsoft Windows NT 4.0 Workstation: 32 MB
- Microsoft Windows 2000 Professional: 64 MB
- Microsoft Windows XP: 64 MB
• The latest service packs for each operating system are
recommended, but not necessarily required.
• 10 MB hard disk space
• Native Microsoft TCP/IP communications protocol
• Microsoft Internet Explorer 5.0 or later

124 WatchGuard Firebox SOHO 6 Wireless
• An Internet Service Provider account
• A Dial-Up or Broadband (DSL or Cable modem) Connection
Additionally, in order for Windows file and print sharing to occur
through the MUVPN client tunnel each Windows operating
system must have the proper components installed and configured
to use the remote WINS and DNS servers on the trusted and
optional networks behind the Firebox.
NOTE
You can not use the MUVPN client virtual adapter. Make sure this is
disabled.
Windows 98/ME operating system setup
The following networking components must be configured and
installed on a remote computer running Windows 98/ME in order
for the MUVPN client to function properly.
Configuring networking names
From the Windows desktop:
1 Select Start => Settings => Control Panel. Double-click the
Network icon.
The Network window appears.
2 Verify that the Client for Microsoft Networks is installed.
If Client for Microsoft Networks is not installed, you
must
install it. For
instructions, see the following section, “Installing the Client for Microsoft
Networks”.
3Click the Identification tab.
4 Type a name for the remote computer.
This
must
be a unique name on the remote network.
5 Type the domain name you are connecting to.
This should be the same as the Logon to Windows NT domain value.

User Guide 125
Prepare the Remote Computers for the MUVPN Client
6 Type a description for your computer (optional).
7Click OK. Click OK to close and save changes to the Network
control panel.
Click Cancel if you do not want to save any changes.
8 Reboot the machine.
Installing the Client for Microsoft Networks
From the Networks window:
1Click the Configuration tab. Click Add.
The Select Network Component Type window appears.
2 Select Client. Click Add.
The Select Network Client window appears.
3 Select Microsoft from the list on the left. Select Client for
Microsoft Networks from the list on the right. Click OK.
4 Select Client for Microsoft Networks.
5Click Properties.
6 Enable the Log on to Windows NT domain option.
7 In the Windows NT Domain field, type the domain name.
For example, your domains might be sales, office, and warehouse.
8 Enable the Logon and Restore Network Connections option.
Installing Dial-Up Networking
The Mobile User VPN Adapter, which supports L2TP, installs only
if Dial-up Networking is already installed on your computer. If
Dial-up Networking is not installed, follow these instructions.
From the Windows desktop:
1 Select Start => Settings => Control Panel. Double-click the Add/
Remove Programs icon.
The Add/Remove Properties window appears.

126 WatchGuard Firebox SOHO 6 Wireless
2Click the Windows Setup tab.
The Windows Setup dialog box appears and searches for installed
components.
3 Enable the Communications checkbox and click the OK
button.
The Copying Files dialog box appears and copies the necessary files.
4 The Dial-Up Networking Setup dialog box appears and
prompts you to restart the computer. Click the OK button.
The computer reboots.
Further, Windows 98 requires that the Dial-up Networking
component be updated with the 1.4 patch. Please see the Microsoft
Web site to receive this free update.
Configuring the WINS and DNS settings
You must configure the remote computer to use the WINS and
DNS servers of the trusted network behind the Firebox.
From the Windows desktop:
1 Select Start => Settings => Control Panel. Double-click the
Network icon.
The Network window appears.
2 Select the network component TCP/IP => Dial-Up Adapter,
then click the Properties button.
The TCP/IP Properties Information dialog box appears.
3Click the OK button.
4Click the DNS Configuration tab.
Verify that the Enable DNS option has been enabled.
5 Under the “DNS Server Search Order” heading, enter your
DNS server IP address, then click the Add button.
If you have multiple remote DNS servers repeat this step.

User Guide 127
Prepare the Remote Computers for the MUVPN Client
NOTE
You
must
list the DNS server on the Private network behind the Firebox
first.
6Click the WINS Configuration tab.
7Verify that the Enable WINS Resolution option has been
enabled.
8 Under the “WINS Server Search Order” heading, enter your
WINS server IP address, then click the Add button.
If you have multiple remote WINS servers repeat this step.
9Click the OK button to close the TCP/IP Properties window.
10 Click the OK button to close the Network window.
The System Settings Change dialog box appears.
11 Click the Yes button to restart the computer and implement the
changes.
Windows NT operating system setup
The following networking components must be installed and
configured on a remote computer running Windows NT in order
for the MUVPN client to function properly.
Installing Remote Access Services on Windows NT
The Mobile User VPN Adapter, which supports L2TP, installs only
if the Remote Access Services (RAS) network component is
already installed on the computer.
Follow the Windows desktop:
1 Select Start => Settings => Control Panel. Double-click the
Network icon.
2 Select the Services tab.

128 WatchGuard Firebox SOHO 6 Wireless
3Click the Add button.
4 Select Remote Access Services from the list, then click the OK
button.
5 Enter the path to the Windows NT install files or insert your
system installation CD, then click the OK button.
The Remote Access Setup dialog box appears.
6 Click the Yes button to add a RAS capable device and enable
you to add a modem.
7Click the Add button and complete the Install New Modem
wizard.
NOTE
If there is no modem installed, you can enable the Don't detect my
modem; I will select it from a list checkbox then add a Standard 28800
modem. Windows NT requires at least one RAS device such as a modem
if the RAS component is installed. If no modems are available, a dial-up
networking, serial cable between two computers can be selected.
8 Select the modem added in the last step in the Add RAS Device
dialog box, then click the OK button.
9Click the Continue button, then click the Close button.
10 Reboot your computer.
Configuring the WINS and DNS settings
You must configure the remote computer to use the WINS and
DNS servers of the trusted network behind the Firebox.
From the Windows desktop:
1 Select Start => Settings => Control Panel. Double-click the
Network icon.
The Network window appears.
2Click the Protocols tab.

User Guide 129
Prepare the Remote Computers for the MUVPN Client
3 Select the TCP/IP protocol and click the Properties button.
The Microsoft TCP/IP Properties window appears.
4Click the DNS tab.
5Click the Add button.
6 Type your DNS server IP address in the appropriate field.
If you have multiple remote DNS servers repeat the previous three steps.
NOTE
You
must
list the DNS server on the Private network behind the Firebox
first.
7Click the WINS Address tab.
8 Type your WINS server IP address in the appropriate field,
then click the OK button.
If you have multiple remote WINS servers repeat this step.
9Click the Close button to close the Network window.
The Network Settings Change dialog box appears.
10 Click the Yes button to restart the computer and implement the
changes.
Windows 2000 operating system setup
The following networking components must be installed and
configured on a remote computer running Windows 2000 in order
for the MUVPN client to function properly.
From the Windows desktop:
1 Select Start => Settings => Network and Dial-up Connections,
then select the Dial-up connection you use to access the
Internet.
The connection window appears.
2Click the Properties button.
3 Select the Networking tab.

130 WatchGuard Firebox SOHO 6 Wireless
4 Verify that the following components are present and enabled:
- Internet Protocol (TCP/IP)
- File and Printer Sharing for Microsoft Networks
- Client for Microsoft Networks
Install these components if they are not already present.
Installing the Internet Protocol (TCP/IP) network
component
From the Windows desktop:
1 Select Start => Settings => Network and Dial-up Connections,
then select the Dial-up connection you use to access the
Internet.
The connection window appears.
2Click the Properties button.
3 Select the Networking tab and then click the Install button.
The Select Network Component Type window appears.
4 Double click the Protocol network component.
The Select Network Protocol window appears.
5 Select the Internet Protocol (TCP/IP) Network Protocol and
then click the OK button.
Installing the File and Printer Sharing for Microsoft
Networks
From the Windows desktop:
1 Select Start => Settings => Network and Dial-up Connections,
then select the Dial-up connection you use to access the
Internet.
The connection window appears.
2Click the Properties button.

User Guide 131
Prepare the Remote Computers for the MUVPN Client
3 Select the Networking tab and then click the Install button.
The Select Network Component Type window appears.
4 Double click the Services network component.
The Select Network Service window appears.
5 Select the File and Printer Sharing for Microsoft Networks
Network Service and then click the OK button.
Installing the Client for Microsoft Networks
From the Windows desktop:
1 Select Start => Settings => Network and Dial-up Connections,
then select the Dial-up connection you use to access the
Internet.
The connection window appears.
2Click the Properties button.
3 Select the Networking tab and then click the Install button.
The Select Network Component Type window appears.
4Double click the Client network component.
The Select Network Protocol window appears.
5 Select the Client for Microsoft Networks Network Client and
then click the OK button.
6Click the Cancel button to close the Select Network
Component Type window.
7Click the OK button to preserve the installed components.
8Click the Cancel button to close the Dial-up connection
window.
Configuring the WINS and DNS settings
You must configure the remote computer to use the WINS and
DNS servers of the trusted network behind the Firebox.

132 WatchGuard Firebox SOHO 6 Wireless
From the Windows desktop:
1 Select Start => Settings => Network and Dial-up Connections,
then select the Dial-up connection you use to access the
Internet.
The connection window appears.
2Click the Properties button.
3Click the Networking tab.
4 Select the Internet Protocol (TCP/IP) component, then click the
Properties button.
The Internet Protocol (TCP/IP) Properties window appears.
5Click the Advanced button.
The Advanced TCP/IP Settings window appears.
6Click the DNS tab.
7 Under the “DNS server addresses, in order of use” heading,
click the Add button.
The TCP/IP DNS Server window appears.
8 Type your DNS server IP address in the appropriate field, then
click the Add button.
If you have multiple remote DNS servers repeat the last two steps.
NOTE
You
must
list the DNS server on the Private network behind the Firebox
first.
9 Enable the Append these DNS suffixes (in order) option.
10 Click the Add button.
The TCP/IP Domain Suffix window appears.
11 Type your Domain suffix in the appropriate field.
If you have multiple DNS suffixes repeat the last two steps.
12 Click the WINS tab.

User Guide 133
Prepare the Remote Computers for the MUVPN Client
13 Under the “WINS addresses, in order of use” heading, click the
Add button.
The TCP/IP WINS Server window appears.
14 Type your WINS server IP address in the appropriate field,
then click the Add button.
If you have multiple remote DNS servers repeat the last two steps.
15 Click the OK button to close the Advanced TCP/IP Settings
window.
16 Click the OK button to close the Internet Protocol (TCP/IP)
Properties window.
17 Click the OK button to close the next window.
18 Click the Cancel button again to close the Dial-up connection
window.
Windows XP operating system setup
The following networking components must be installed and
configured on a remote computer running Windows XP in order
for the MUVPN client to function properly.
From the Windows desktop:
1 Select Start => Control Panel => Network Connections, then
select the connection you use to access the Internet.
The connection window appears.
2Click the Properties button.
3 Select the Networking tab.
4 Verify that the following components are present and enabled:
- Internet Protocol (TCP/IP)
- File and Printer Sharing for Microsoft Networks
- Client for Microsoft Networks
Install these components if they are not already present.

134 WatchGuard Firebox SOHO 6 Wireless
Installing the Internet Protocol (TCP/IP) Network
Component
From the Windows desktop:
1 Select Start => Control => Network Connections, then select the
connection you use to access the Internet.
The connection window appears.
2Click the Properties button.
3 Select the Networking tab and then click the Install button.
The Select Network Component Type window appears.
4 Double click the Protocol network component.
The Select Network Protocol window appears.
5 Select the Internet Protocol (TCP/IP) Network Protocol and
then click the OK button.
Installing the File and Printer Sharing for Microsoft
Networks
From the Windows desktop:
1 Select Start => Control => Network Connections, then select the
connection you use to access the Internet.
The connection window appears.
2Click the Properties button.
3 Select the Networking tab and then click the Install button.
The Select Network Component Type window appears.
4 Double click the Services network component.
The Select Network Service window appears.
5 Select the File and Printer Sharing for Microsoft Networks
Network Service and then click the OK button.

User Guide 135
Prepare the Remote Computers for the MUVPN Client
Installing the Client for Microsoft Networks
From the Windows desktop:
1 Select Start => Control => Network Connections, then select the
connection you use to access the Internet.
The connection window appears.
2Click the Properties button.
3 Select the Networking tab and then click the Install button.
The Select Network Component Type window appears.
4Double click the Client network component.
The Select Network Protocol window appears.
5 Select the Client for Microsoft Networks Network Client and
then click the OK button.
6Click the Cancel button to close the Select Network
Component Type window.
7Click the OK button to preserve the installed components.
8Click the Cancel button to close the Dial-up connection
window.
Configuring the WINS and DNS settings
You must configure the remote computer to use the WINS and
DNS servers of the trusted network behind the Firebox.
From the Windows desktop:
1 Select Start => Control Panel => Network Connections, then
select the Dial-up connection you use to access the Internet.
The connection window appears.
2Click the Properties button.
3Click the Networking tab.
4 Select the Internet Protocol (TCP/IP) component, then click the
Properties button.
The Internet Protocol (TCP/IP) Properties window appears.

136 WatchGuard Firebox SOHO 6 Wireless
5Click the Advanced button.
The Advanced TCP/IP Settings window appears.
6Click the DNS tab.
7 Under the “DNS server addresses, in order of use” heading,
click the Add button.
The TCP/IP DNS Server window appears.
8 Type your DNS server IP address in the appropriate field, then
click the Add button.
If you have multiple remote DNS servers repeat the last two steps.
NOTE
You
must
list the DNS server on the Private network behind the Firebox
first.
9 Enable the Append these DNS suffixes (in order) option.
10 Click the Add button.
The TCP/IP Domain Suffix window appears.
11 Type your Domain suffix in the appropriate field.
If you have multiple DNS suffixes repeat the last two steps.
12 Click the WINS tab.
13 Under the “WINS addresses, in order of use” heading, click the
Add button.
The TCP/IP WINS Server window appears.
14 Type your WINS server IP address in the appropriate field,
then click the Add button.
If you have multiple remote WINS servers repeat the last two steps.
15 Click the OK button to close the Advanced TCP/IP Settings
window.
16 Click the OK button to close the Internet Protocol (TCP/IP)
Properties window.
17 Click the OK button to close the next window.

User Guide 137
Install and Configure the MUVPN Client
18 Click the Cancel button again to close the Dial-up connection
window.
Install and Configure the MUVPN Client
The MUVPN installation files are available at the WatchGuard
Web site:
http://www.watchguard.com/support
NOTE
In order to perform the installation process successfully, you
must
log
into the remote computer with local administrator rights.
Installing the MUVPN client
Follow these steps to install the client:
1 Copy the MUVPN installation file to the remote computer.
2 Double-click the MUVPN installation file.
If at any time during the installation process you inadvertently skip a step,
simply cancel the process and begin again.
3 The installation welcomes you to the InstallShield Wizard.
Click the Next button.
During the Setup Status portion of the install procedure, the InstallShield
may detect ReadOnly Files. If this occurs, click Ye s for each event in order
to continue the install.
4 The installation welcomes you again. Click the Next button.
The Software Licence Agreement appears.
5Click the Yes button to accept the terms of the License
Agreement and to continue with the installation.
The Setup Type window appears.

138 WatchGuard Firebox SOHO 6 Wireless
6 Select the type of setup. By default, Typical is enabled–this is
the setup recommended by WatchGuard. Click the Next
button.
7 If you are installing the client on a Windows 2000 host, the
InstallShield detects the native Windows 2000 L2TP
component. The client uses this component and does not need
to install its own. Click the OK button to continue with the
install.
The Select Components window appears.
8 Keep the default components and click the Next button.
The Start Copying Files window appears.
9Click the Next button to begin copying files.
A command prompt window appears while the dni_vapmp file is
installed—this is normal. When it is complete, the installation will
continue.
10 When the InstallShield Wizard is complete, click the Finish
button.
11 The InstallShield Wizard then searches for a User Profile file,
click the Next button as this step is not necessary.
An Information dialog box appears.
12 Click the OK button to continue with the installation.
13 The InstallShield Wizard has completed the install of the
SOHO 6 Wireless MUVPN client, verify that the option Yes, I
want to restart my computer now is enabled and click the
Finish button.
The computer reboots.
NOTE
The ZoneAlarm personal firewall may interfere with regular Local
network traffic preventing access to network resources. If the remote
computer is connected to the network after reboot, this may disrupt the
network logon process. If in doubt, log on to the computer locally the first
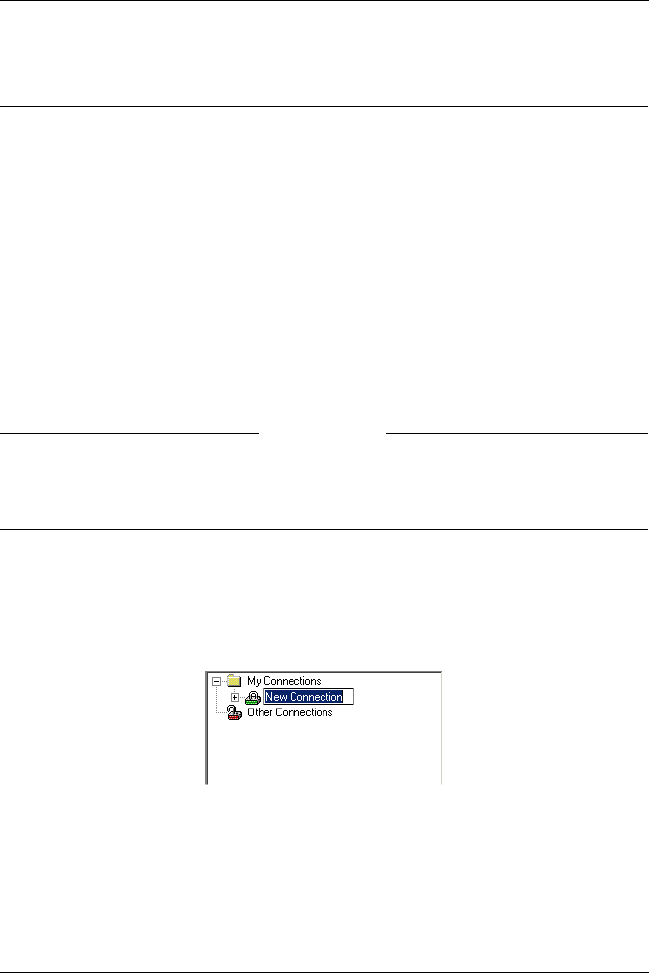
User Guide 139
Install and Configure the MUVPN Client
time after installation. For more information regarding ZoneAlarm, see
“The ZoneAlarm Personal Firewall” on page 153.
Configuring the MUVPN Client
Once you have restarted the machine, the WatchGuard Policy
Import dialog box appears. Click the Cancel button as this step is
not necessary.
From the Windows desktop system tray:
1 Right-click the MUVPN client icon and select Activate Security
Policy and then double-click the MUVPN client icon.
The Security Policy Editor dialog box appears.
NOTE
The ZoneAlarm personal firewall may immediately begin to display alerts
on your Windows desktop. For more information regarding ZoneAlarm
see “The ZoneAlarm Personal Firewall” on page 153.
2 Select Edit => Add => Connection.
A New Connection appears in the Network Security Policy field on the left
side and the and the Connection Security and Remote Party Identity and
Addressing settings appear on the right side.
3 Type a unique name for the new connection.
If this will be a unique policy for a specific user, enter a unique name to
help identify it. For example, you may want to include the actual name of
the end user.

140 WatchGuard Firebox SOHO 6 Wireless
4 Click to select the Secure option.
This is the default setting.
5 Click to select the Only Connect Manually checkbox.
6 Select the IP Subnet option from the ID Type drop list.
The Remote Part Identity and Addressing settings refresh to display the
appropriate fields.
7 Type the network IP Address of the Trusted Network behind
the SOHO 6 Wireless in the field labeled “Subnet”.
8 Type the Subnet Mask of the Trusted Network behind the
SOHO 6 Wireless in the field labeled “Mask”.
9 Select All from the Protocol drop list.
This is the default setting.
10 Click to select the Connect using checkbox and select Secure
Gateway Tunnel from the drop list.
11 Select IP Address from the ID Type drop list and then type the
IP address of the External interface in the available field.
Defining the My Identity settings
Follow these instructions to define the My Identity settings.
1From the Network Security Policy field, expand the new entry.
The My Identity and Security Policy entries appear.
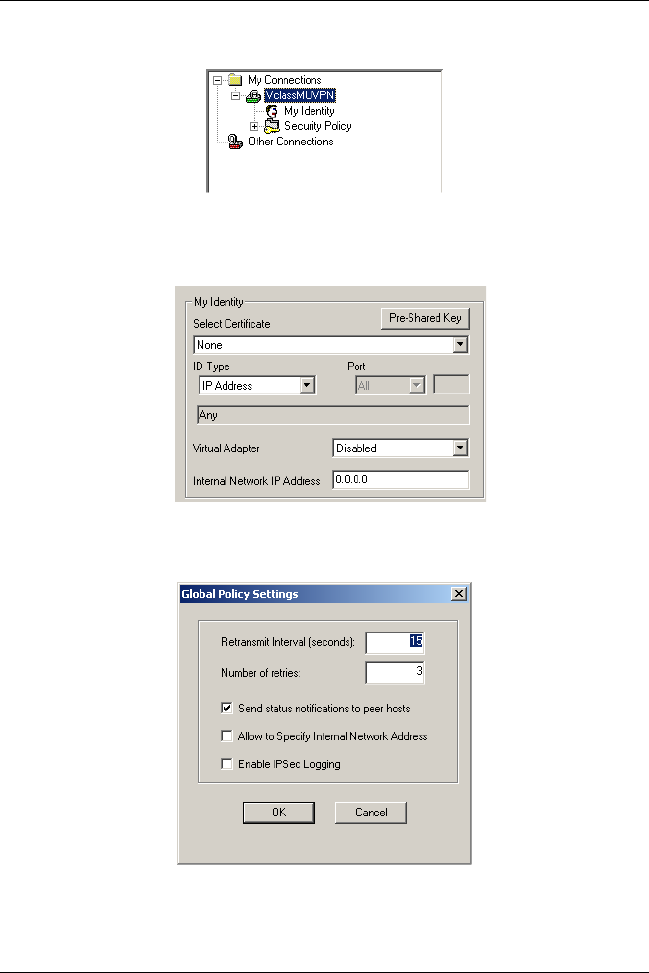
User Guide 141
Install and Configure the MUVPN Client
2 Select My Identity.
The My Identity and Internet Interface settings appear to the right.
3 Select Options => Global Policy Settings.
The Global Policy Settings dialog box appears.
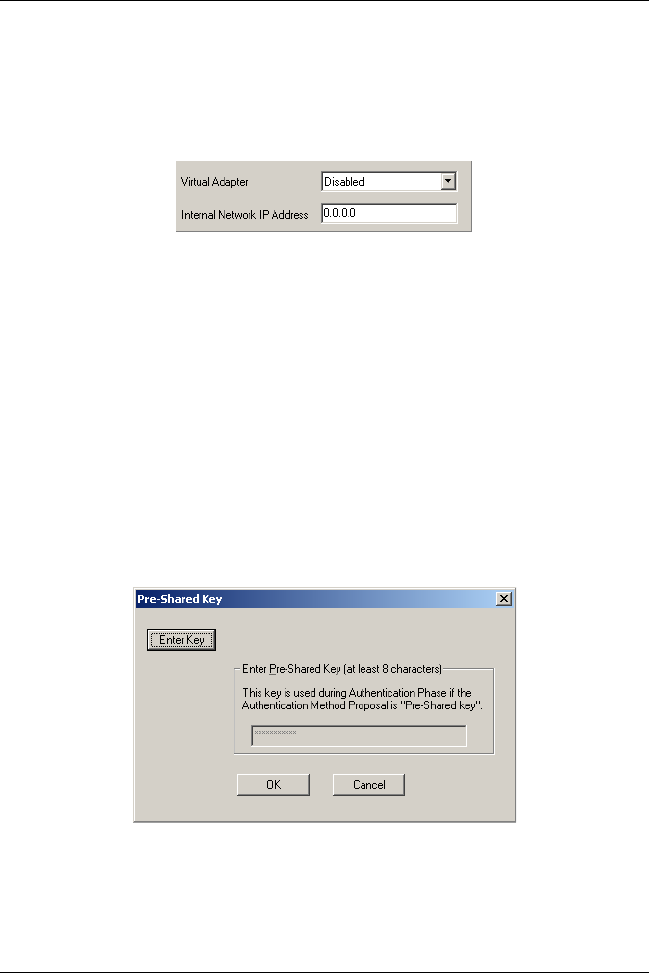
142 WatchGuard Firebox SOHO 6 Wireless
4 Click to select the Allow to Specify Internal Network Address
checkbox and then click OK.
The Internal Network IP Address field appears among the My Identity
settings.
5 Select None from the Select Certificate drop list.
6 Select E-mail Address from the ID Type drop list and then
enter the username defined on the SOHO 6 Wireless in the
available field.
7 Select Disabled from the Virtual Adapter drop list.
8Type 0.0.0.0 in the Internal Network IP Address field.
This value appears by default.
9 Select Any from the Name drop list.
This is the default setting.
10 Click Pre-Shared Key.
The Pre-Shared Key dialog box appears.
11 Click Enter Key.
The text entry field is activated.
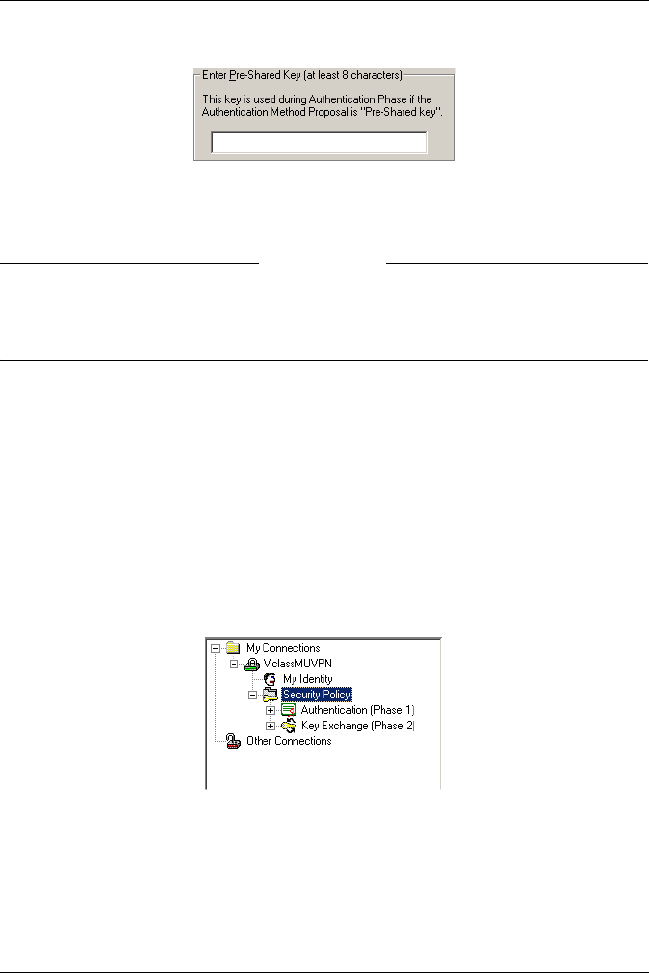
User Guide 143
Install and Configure the MUVPN Client
12 Type the exact text of the MUVPN client passphrase entered on
the SOHO 6 Wireless appliance and then click OK.
NOTE
Both the Pre-Shared Key and the E-mail Address,
must
exactly match the
System Passphrase and System Administrator Name configured on the
SOHO 6 Wireless or the connection will fail.
Defining Phase 1 and Phase 2 settings
Follow these instructions to define the phase 1 and phase 2
settings. Make certain that settings match exactly with those on the
Firebox SOHO 6 Wireless appliance.
1From the Network Security Policy field, expand Security
Policy.
Both Phase 1 and Phase 2 negotiations appear.
2Expand Authentication (Phase 1).
A Proposal entry appears.
3 Select Proposal 1.
The Authentication Method and Algorithms settings appear to the right.
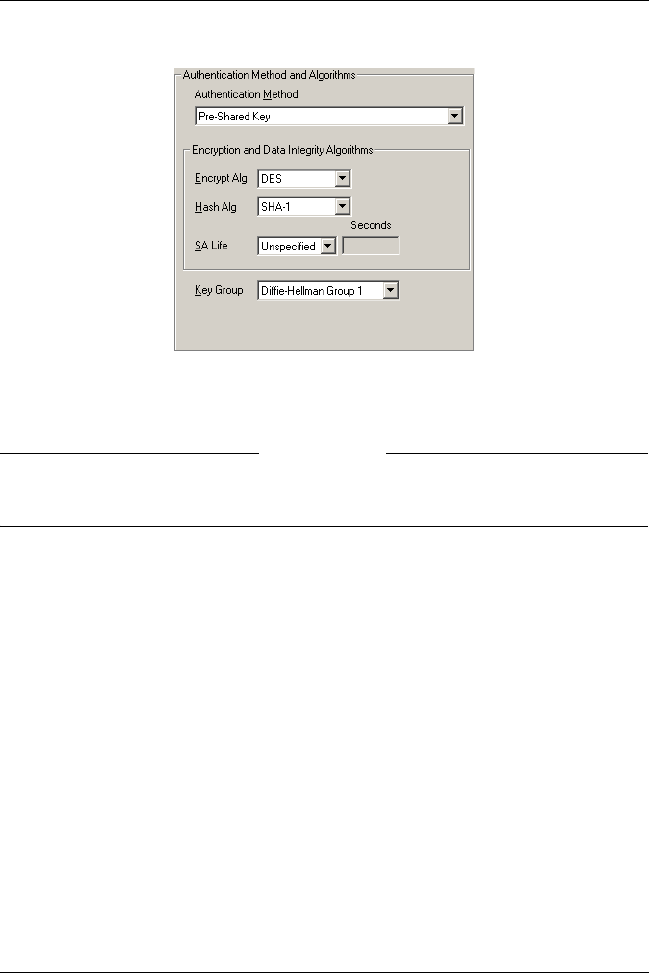
144 WatchGuard Firebox SOHO 6 Wireless
4 Select Pre-Shared Key from the Authentication Method drop
list.
NOTE
These values must match exactly those entered in the Firebox SOHO 6
Wireless appliance.
5 Select DES from the Encrypt Alg drop list and select SHA-1
from the Hash Alg drop list.
6 Select Unspecified from the SA Life drop list.
This is the default setting.
7 Select Diffie-Hellman Group 1 from the Key Group drop list.
8Expand Key Exchange (Phase 2).
A Proposal entry appears.
9 Select Proposal 1.
The IPSec Protocols settings appear to the right.
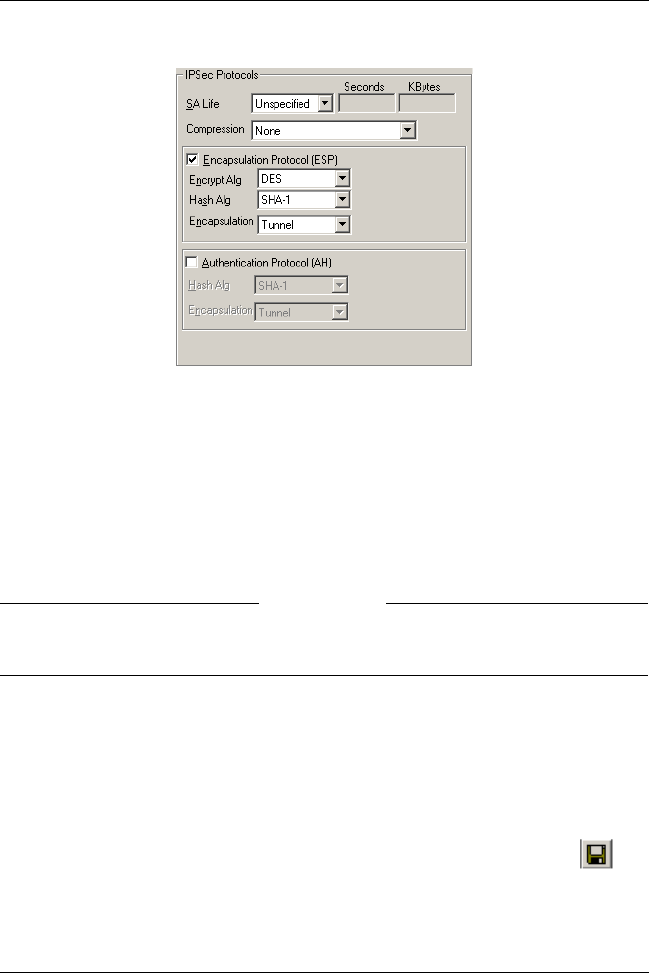
User Guide 145
Install and Configure the MUVPN Client
10 Select Both from the SA Life drop list and then type 86400 in
the Seconds field and 8192 in the KBytes field.
11 Select None from the Compression drop list.
This is the default setting. The SOHO 6 Wireless Firebox appliance does
not support compression.
12 Click to select the Encapsulation (ESP) checkbox and then
select a value for the Encrypt Alg and Hash Alg drop lists.
NOTE
These two setting
must
exactly match those on the SOHO 6 Wireless or
the connection will fail.
13 Select Tunnel from the Encapsulation drop list.
This is the default setting.
14 Verify that the Authentication Protocol (AH) checkbox is not
selected.
15 Once you have finished, select File => Save or click the
button.

146 WatchGuard Firebox SOHO 6 Wireless
Uninstall the MUVPN client
At some point, it may become necessary to completely uninstall
the MUVPN client. WatchGuard recommends a complete uninstall
using the Windows Add/Remove Programs tool.
First, disconnect all existing tunnels and dial-up connections and
reboot the remote computer. Then, from the Windows desktop:
1 Select Start => Settings => Control Panel.
The Control Panel window appears.
2 Double click the Add/Remove Programs icon.
The Add/Remove Programs window appears.
3 Select Mobile User VPN and click the Change/Remove button.
The InstallShield Wizard window appears.
4 Select Remove. Click the Next button.
The Confirm File Deletion dialog box appears.
5Click the OK button to completely remove all of the
components.
A command prompt window appears while the dni_vapmp file is
installed—this is normal. When it is complete, the installation will
continue.
The Uninstall Security Policy dialog box appears.
6Click the Yes button to delete the Security Policy Personal
Certificates and Private/Public Keys.
The InstallShield Wizard window appears.
7 Verify that the option Yes, I want to restart my computer now
is enabled and click Finish.
The computer will reboot.
NOTE
The ZoneAlarm personal firewall settings are preserved under the
following default directories.
Windows 98: c:\windows\internet logs\
Windows NT and 2000: c:\winnt\internet logs\
Windows XP: c:\windows\internet logs

User Guide 147
Connect and Disconnect the MUVPN Client
If you wish to disregard these settings, delete the contents.
8 When the computer has restarted, select Start => Programs.
9Right-click Mobile User VPN and select Delete to remove this
selection from your Start Menu.
Connect and Disconnect the MUVPN Client
The MUVPN client enables the remote computer to establish a
secure, encrypted connection to a protected network over the
Internet. To do this, you must first connect to the Internet and then
use the MUVPN client to connect to the protected network.
Connecting the MUVPN Client
1 First establish an Internet connection through either Dial-Up
Networking or directly through a local area network (LAN) or
wide area network (WAN).
From the Windows desktop system tray:
2 Verify the MUVPN client status–it must be activated. If it is
not, right-click the icon and select Activate Security Policy.
For information on how to determine the status of the MUVPN icon, see
the following section “The Mobile User VPN client icon”.
Then, from the Windows desktop:
3 Select Start => Programs => Mobile User VPN => Connect.
The WatchGuard Mobile User Connect widow appears.
4Click the Yes button.

148 WatchGuard Firebox SOHO 6 Wireless
The Mobile User VPN client icon
The Mobile User VPN icon exists in the Windows desktop system
tray and displays several different status images. The following
lists these images and provides a brief description of each.
Deactivated
The MUVPN Security Policy is deactivated or the Windows
operating system did not start a necessary Mobile User
VPN service properly and the remote computer must be
restarted (if this continues you may need to reinstall the
MUVPN client).
Activated
The MUVPN client is ready to establish a secure, MUVPN
tunnel connection.
Activated and Transmitting Unsecured Data
The MUVPN client is ready to establish a secure, MUVPN
tunnel connection. The red bar on the right of the icon
indicates that the client has begun transmitting unsecured
data.
Activated and Connected
The MUVPN client has established at least one secure,
MUVPN tunnel connection but is not transmitting data.
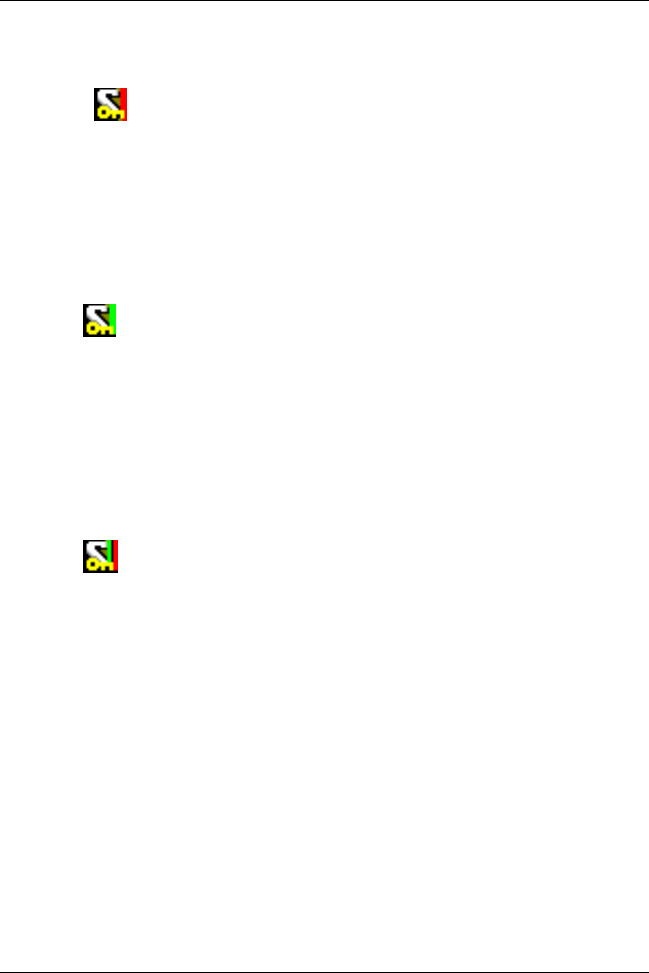
User Guide 149
Connect and Disconnect the MUVPN Client
Activated, Connected and Transmitting Unsecured Data
The MUVPN client has established at least one secure,
MUVPN tunnel connection. The red bar on the right of the
icon indicates that the client is transmitting only unsecured
data.
Activated, Connected and Transmitting Secured Data
The MUVPN client has established at least one secure,
MUVPN tunnel connection. The green bar on the right of
the icon indicates that the client is transmitting only
secured data.
Activated, Connected and Transmitting both Secure and
Unsecured Data
The MUVPN client has established at least one secure,
MUVPN tunnel connection. The red and green bars on the
right of the icon indicate that the client is transmitting both
secured and unsecured data.
Allowing the MUVPN client through the personal
firewall
There are a couple of programs associated with the MUVPN client,
which you must allow through the personal firewall in order to
establish the MUVPN tunnel:
• MuvpnConnect.exe
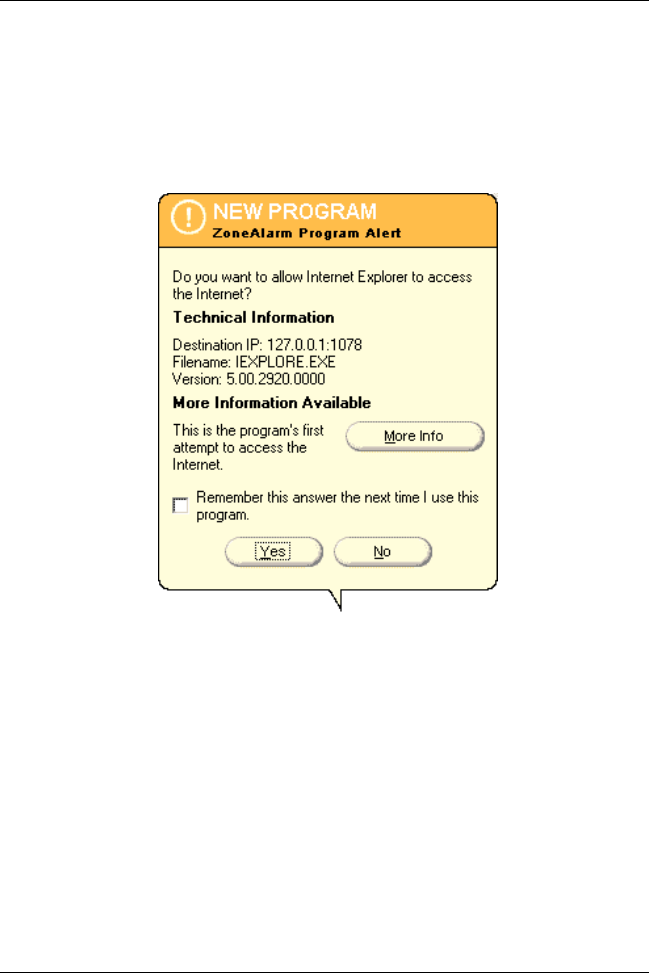
150 WatchGuard Firebox SOHO 6 Wireless
• IreIKE.exe
The personal firewall will detect the attempt of these programs to
access the Internet. The New Program alert dialog box appears
requesting access for the MuvpnConnect.exe program.
From the ZoneAlarm alert dialog box:
1 Enable the Remember this answer the next time I use this
program option and click the Yes button.
This enables ZoneAlarm to allow the MuvpnConnect.exe program through
each time you attempt to make a MUVPN connection.
The New Program alert dialog box appears requesting access for
the IreIKE.exe program.
2 Enable the Remember this answer the next time I use this
program option and click the Yes button.
This enables ZoneAlarm to allow the IreIKE.exe program through each
time you attempt to make a MUVPN connection.

User Guide 151
Monitor the MUVPN Client Connection
Disconnecting the MUVPN client
The MUVPN tunnel is independent of the Internet connection.
Close the MUVPN tunnels when the remote computer encounters
either of the following events.
- Loses the Internet connection
- No longer needs the MUVPN tunnel
From the Windows desktop system tray:
1Right-click the Mobile User VPN client icon.
2 Select Disconnect All.
The MUVPN Client closes all tunnels. This process does not affect your
connection to the Internet. You
must
disconnect from the Internet
separately.
3Right-click the Mobile User VPN client icon and select
Deactivate Security Policy.
The MUVPN icon displays a red slash to indicate a deactivated Security
Policy.
If you are using the ZoneAlarm personal firewall, deactivate this
as well.
From the Windows desktop system tray:
1Right-click the ZoneAlarm icon and select Shutdown
ZoneAlarm.
The ZoneAlarm dialog box appears.
2Click the Yes button when prompted to quit ZoneAlarm.
Monitor the MUVPN Client Connection
There are two tools that accompany the MUVPN client which can
be used to monitor your connection and diagnose problems that
may occur: the Log Viewer and the Connection Monitor.

152 WatchGuard Firebox SOHO 6 Wireless
The Log Viewer
The LogViewer displays the communications log, a diagnostic tool
that lists the negotiations that occur during the MUVPN client
connection.
From the Windows desktop system tray:
1Right-click the Mobile User VPN client icon.
2 Select Log Viewer.
The Log Viewer window appears.
The Connection Monitor
The Connection Monitor displays statistical and diagnostic
information for each active connection in the security policy. This
module shows the actual security policy settings and the security
association (SA) information established during Phase 1 IKE
negotiations and Phase 2 IPSec negotiations.
From the Windows desktop system tray:
1Right-click the Mobile User VPN client icon.
2 Select Connection Monitor.
The Connection Monitor window appears.
An icon appears to the left of the connection name:
• SA indicates that the connection has only a Phase 1 IKE SA.
This occurs when connecting to a secure gateway tunnel or
when a Phase 2 IPSec SA fails to establish or has not been
established yet.
• A key indicates that the connection has a Phase 2 IPSec SA,
or both a Phase 1 and Phase 2 SA.
• A key with a black line moving below it indicates that the
client is processing secure IP traffic for that connection.
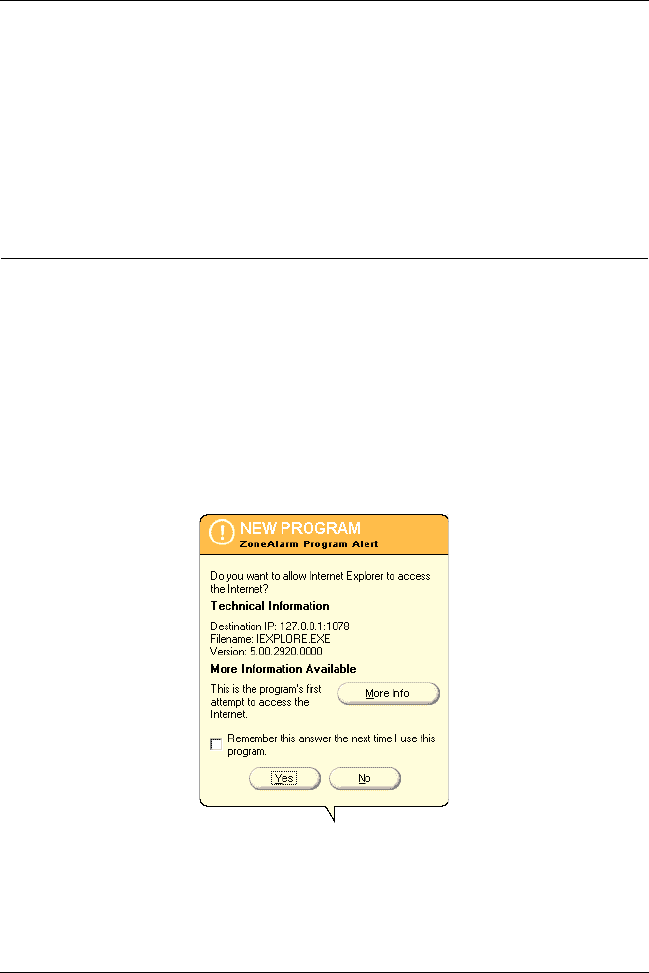
User Guide 153
The ZoneAlarm Personal Firewall
• When a single Phase 1 SA to a gateway protects multiple
Phase 2 SAs, there is a single Phase 1 connection with the SA
icon and individual Phase 2 connections with the key icon
displayed above that entry.
The ZoneAlarm Personal Firewall
A personal firewall is a barrier between your computer and the
outside world. The computer is most vulnerable at its doors, called
ports. Without ports, no connection to the Internet is possible.
ZoneAlarm protects these ports by following a simple rule: Block
all incoming and outgoing traffic unless you explicitly allow it for
trusted programs.
When using ZoneAlarm, you often see Program Alert dialog boxes
similar to the image below.
This alert appears whenever one of your programs attempts to
access the Internet or your local network. This powerful feature

154 WatchGuard Firebox SOHO 6 Wireless
means no information leaves your computer unless you give it
permission.
If you enable the “Remember the answer each time I use this
program” checkbox you will only have to answer this question
once for each program.
The ZoneAlarm personal firewall provides a brief tutorial of the
product immediately after installation of the MUVPN client.
Carefully read each step to familiarize yourself with the
application.
For more information on ZoneAlarm features and configuration,
please refer to the ZoneAlarm Help system. To access the Help
system, select Start => Programs => Zone Labs => ZoneAlarm Help.
Allowing Traffic through ZoneAlarm
When an application requires access through the ZoneAlarm
personal firewall, a Program Alert will be displayed on the
Windows desktop informing the user which particular program
needs access. Often, the program associated with the application is
not readily indicative of the application the user is attempting to
execute.
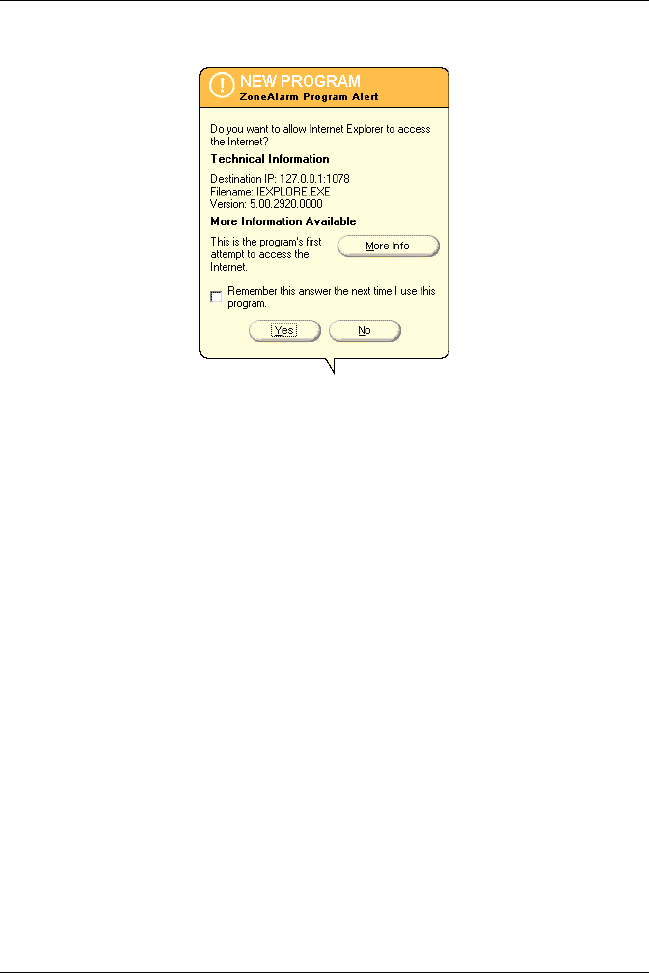
User Guide 155
The ZoneAlarm Personal Firewall
In the example above, the Internet Explorer Web browser
application has been launched and is attempting to access the users
home page. The program which actually needs to pass through
the firewall is “IEXPLORE.EXE”.
In order to allow this program access each time the application is
executed, enable the Remember the answer each time I use this
program checkbox.
Here is a list of a few essential programs which will need access
through the ZoneAlarm personal firewall in order to operate some
important applications.

156 WatchGuard Firebox SOHO 6 Wireless
Shutting Down ZoneAlarm
From the Windows desktop system tray:
1Right-click on the ZoneAlarm icon and select Shutdown
ZoneAlarm.
The ZoneAlarm dialog box appears.
2Click the Yes button when prompted to quit ZoneAlarm.
Uninstalling ZoneAlarm
From the Windows desktop:
1 Select Start => Programs => Zone Labs => Uninstall ZoneAlarm.
The Confirm Uninstall dialog box appears.
2Click the Yes button.
The ZoneLabs TrueVector service dialog box appears.
Programs Which
Must
Be Allowed
MUVPN client
IreIKE.exe
MuvpnConnect.exe
MUVPN Connection Monitor
CmonApp.exe
MUVPN Log Viewer
ViewLog.exe
Programs Which
May
be Allowed
MS Outlook
OUTLOOK.exe
MS Internet Explorer
IEXPLORE.exe
Netscape 6.1 netscp6.exe
Opera Web browser
Opera.exe
Standard Windows network applications
lsass.exe
services.exe
svchost.exe
winlogon.exe

User Guide 157
Use the MUVPN Client to Enforce your Corporate Policy
3Click the Yes button to continue with uninstalling the
TrueVector service and disable its Internet Security features.
The Select Uninstall Method window appears.
4Verify that Automatic is selected and then click the Next
button.
5Click the Finish button to perform the uninstall.
NOTE
The Remove Shared Component window may appear. During the initial
installation of ZoneAlarm, some files were installed that could be shared
by other programs on the system. Click the Ye s t o Al l button to
completely remove all of these files.
6 The Install window appears and prompts you to restart the
computer. Click the OK button to reboot your system.
Use the MUVPN Client to Enforce your
Corporate Policy
In order to require telecommuters to authenticate with a MUVPN
client and enforce your corporate security policies for these users,
you must configure the MUVPN Clients on the SOHO 6 Wireless
and configure a security policy on the MUVPN client.
Configuring the SOHO 6 Wireless
Follow these steps to configure your SOHO 6 Wireless:
1 With your Web browser, go to the System Status page using the
Trusted IP address of the SOHO 6 Wireless.
The default trusted IP address is either 192.168.111.1 for a wired
computer and 192.168.112.1 for a wireless computer.
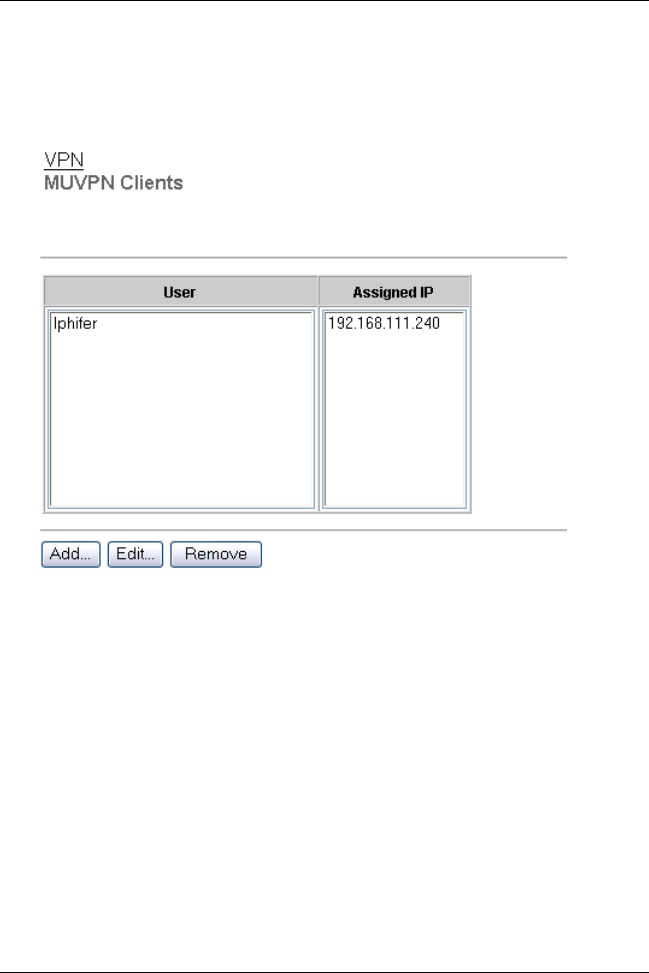
158 WatchGuard Firebox SOHO 6 Wireless
2 From the navigation bar on the right side, select VPN =>
MUVPN Clients.
The MUVPN Clients page appears.
3Click the Add button.
The Edit MUVPN Client page appears.
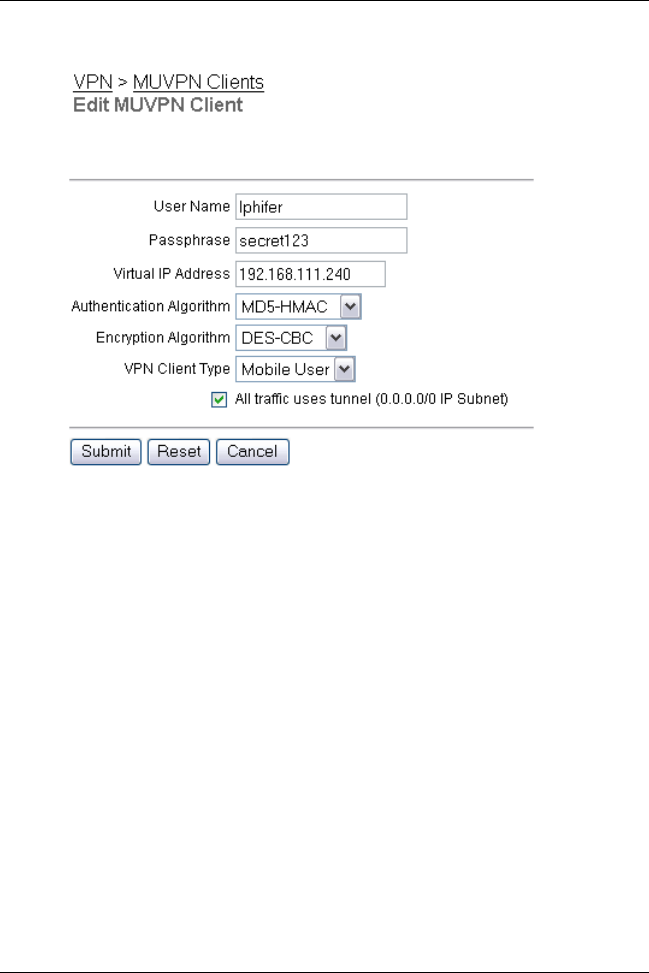
User Guide 159
Use the MUVPN Client to Enforce your Corporate Policy
4 Type a username in the Username field.
This Username will be used as the E-mail Address when setting up the
MUVPN client.
5 Type a passphrase in the Passphrase field.
This passphrase will be used as the Pre-Shared Key when setting up the
MUVPN client.
6 Type an unused IP address from the Trusted network, which
will be used by the MUVPN client computer when connecting
to the SOHO 6 Wireless in the Virtual IP Address field.
7 Select MD5-HMAC from the Authentication Algorithm drop
list.
8 Select DES-CBC from the Encryption Algorithm drop list.
9 Select Mobile User from the VPN Client Type drop list.
10 Click to select the All traffic uses tunnel (0.0.0.0/0 Subnet)
checkbox.

160 WatchGuard Firebox SOHO 6 Wireless
11 Click Submit.
The page refreshes and you are prompted to reboot the SOHO 6 Wireless
in order activate the changes.
12 Click Reboot.
13 Connect one end of a straight-through Ethernet cable into the
Ethernet port labeled OPT on the SOHO 6 Wireless. Connect
the other end into the uplink port of the hub.
14 Connect Ethernet cables to the uplink ports of the hub and to
the Ethernet ports of each of your computers.
Configuring the MUVPN client
Before configuring the MUVPN client, you must first install it on
your computer. For information on installing the client, see
Chapter 9 “Install and Configure the MUVPN Client” on page 137.
Follow these procedures to create a MUVPN security policy:
1 Right-click the MUVPN client icon and select Security Policy
Editor.
The Security Policy Editor dialog box appears.
2 Select Edit => Add => Connection.
A New Connection appears in the Network Security Policy field on the left
side and the and the Connection Security and Remote Party Identity and
Addressing settings appear on the right side.
3 Type a unique name for the new connection.
If this will be a unique policy for a specific user, enter a unique name to
help identify it. For example, you may want to include the actual name of
the end user.
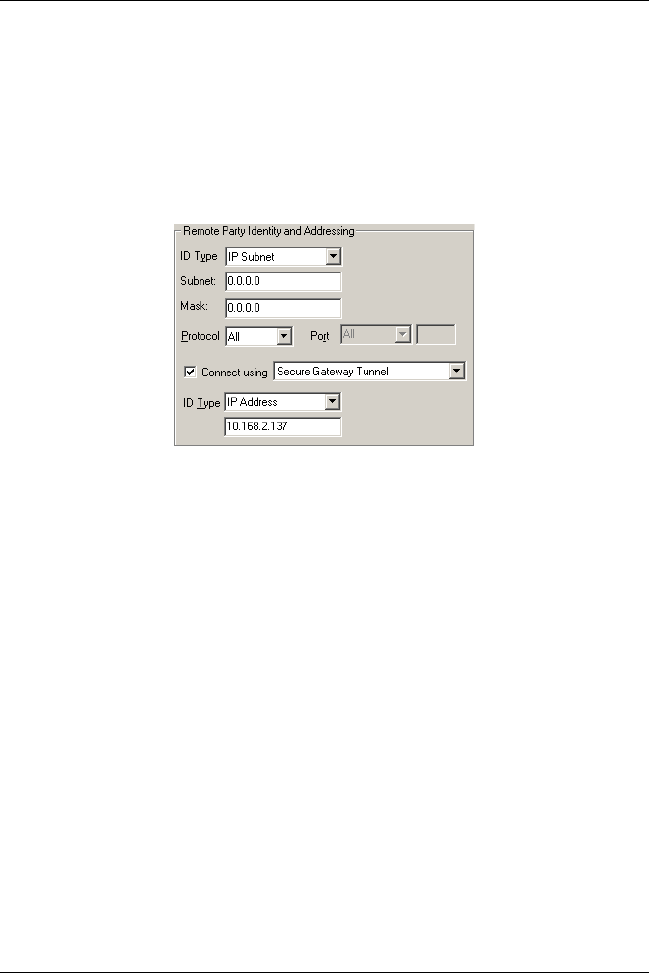
User Guide 161
Use the MUVPN Client to Enforce your Corporate Policy
4 Click to select the Secure option.
This is the default setting.
5 Click to select the Only Connect Manually checkbox.
6 Select the IP Subnet option from the ID Type drop list.
The Remote Part Identity and Addressing settings refresh to display the
appropriate fields.
7 Type 0.0.0.0 in both the Subnet and Mask fields.
These are the default values.
8 Select All from the Protocol drop list.
This is the default setting.
9 Click to select the Connect using checkbox and select Secure
Gateway Tunnel from the drop list.
10 Select IP Address from the ID Type drop list and then type the
IP address of the Optional interface in the available field.
Defining the Security Policy settings
Follow these instructions to define the Security Policy settings.
1From the Network Security Policy field, select Security Policy.
The Security Policy settings appear to the right.
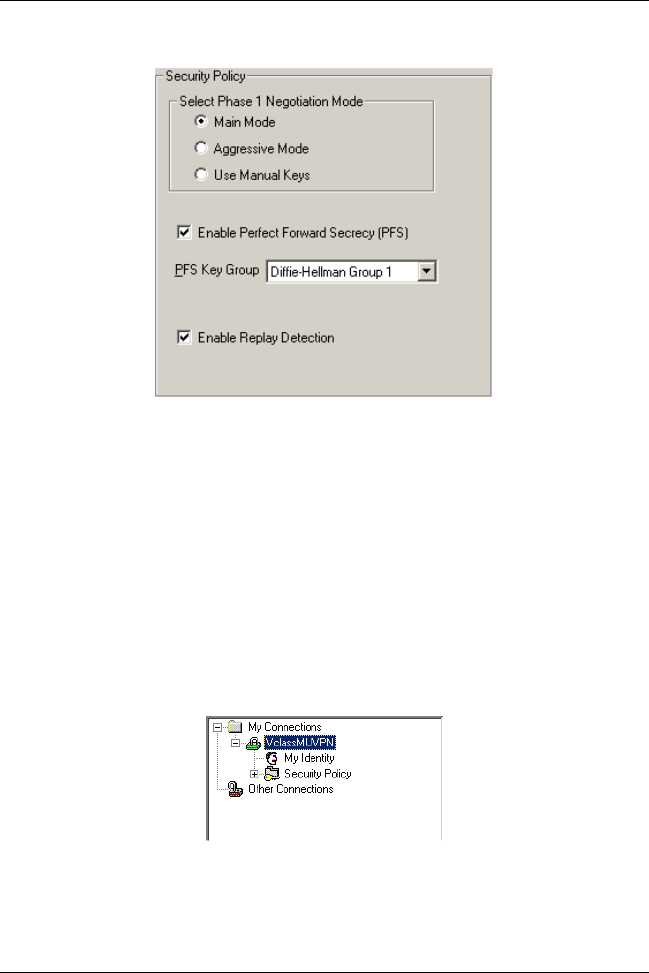
162 WatchGuard Firebox SOHO 6 Wireless
2 Click to select the Aggressive Mode option.
3Verify that the Enable Perfect Forward Secrecy (PFS) checkbox
is not selected.
4 Click to select the Enable Replay Detection checkbox.
Defining the My Identity settings
Follow these instructions to define the My Identity settings.
1From the Network Security Policy field, expand the new entry.
The My Identity and Security Policy entries appear.
2 Select My Identity.
The My Identity and Internet Interface settings appear to the right.
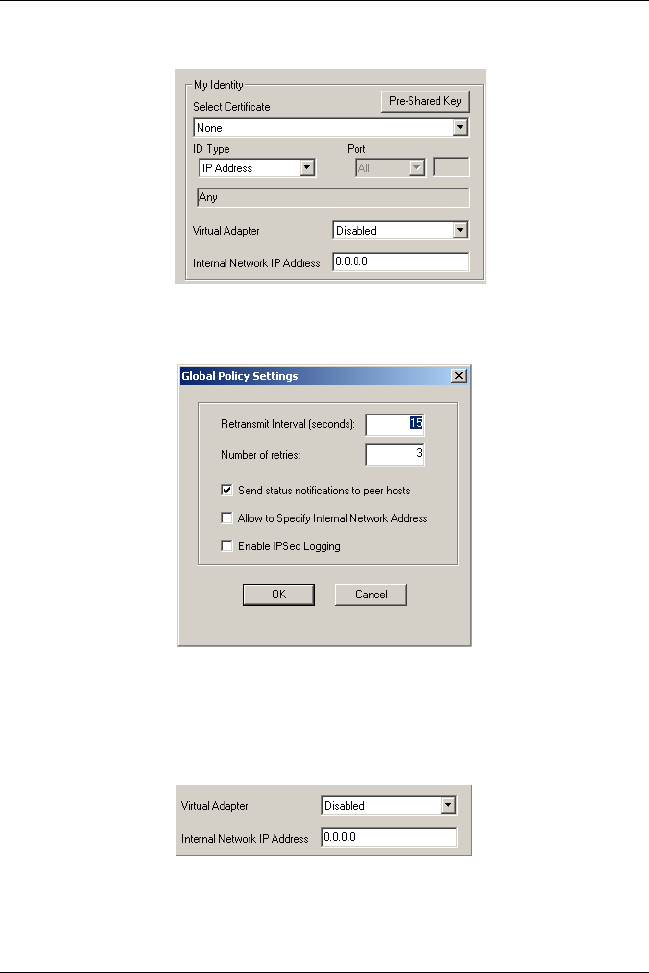
User Guide 163
Use the MUVPN Client to Enforce your Corporate Policy
3 Select Options => Global Policy Settings.
The Global Policy Settings dialog box appears.
4 Click to select the Allow to Specify Internal Network Address
checkbox and then click OK.
The Internal Network IP Address field appears among the My Identity
settings.
5 Select None from the Select Certificate drop list.
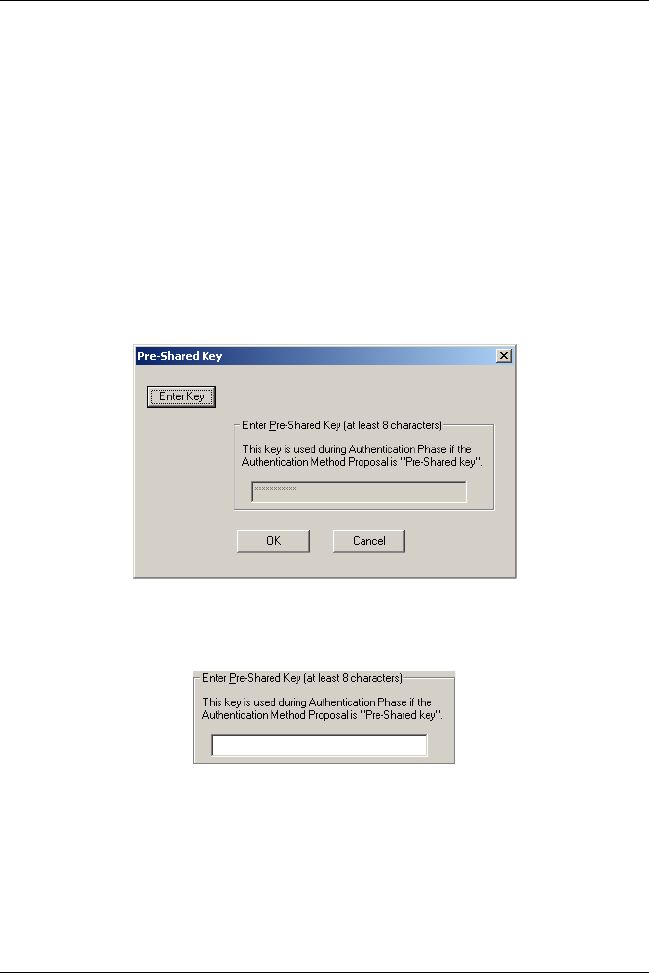
164 WatchGuard Firebox SOHO 6 Wireless
6 Select E-mail Address from the ID Type drop list and then
enter the username defined on the SOHO 6 Wireless in the
available field.
7 Select Disabled from the Virtual Adapter drop list.
8Type 0.0.0.0 in the Internal Network IP Address field.
This value appears by default.
9 Select Any from the Name drop list.
This is the default setting.
10 Click Pre-Shared Key.
The Pre-Shared Key dialog box appears.
11 Click Enter Key.
The text entry field is activated.
12 Type the exact text of the MUVPN client passphrase entered on
the Firebox SOHO 6 Wireless appliance and then click OK.
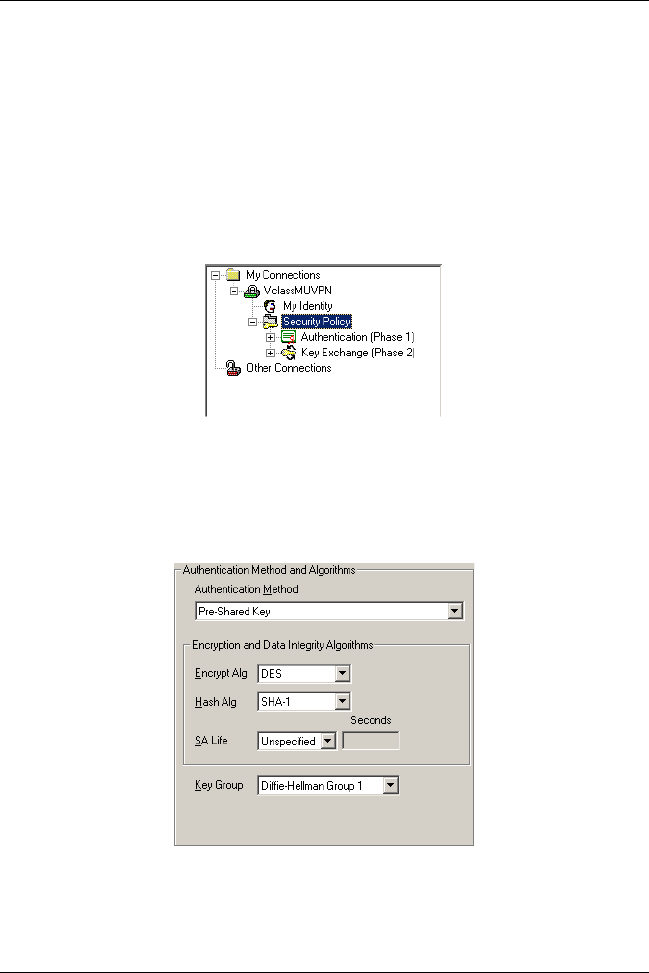
User Guide 165
Use the MUVPN Client to Enforce your Corporate Policy
Defining Phase 1 and Phase 2 settings
Follow these instructions to define the phase 1 and phase 2
settings. Make certain that settings match exactly with those on the
Firebox SOHO 6 Wireless appliance.
1From the Network Security Policy field, expand Security
Policy.
Both Phase 1 and Phase 2 negotiations appear.
2Expand Authentication (Phase 1).
A Proposal entry appears.
3 Select Proposal 1.
The Authentication Method and Algorithms settings appear to the right.
4 Select Pre-Shared Key from the Authentication Method drop
list.
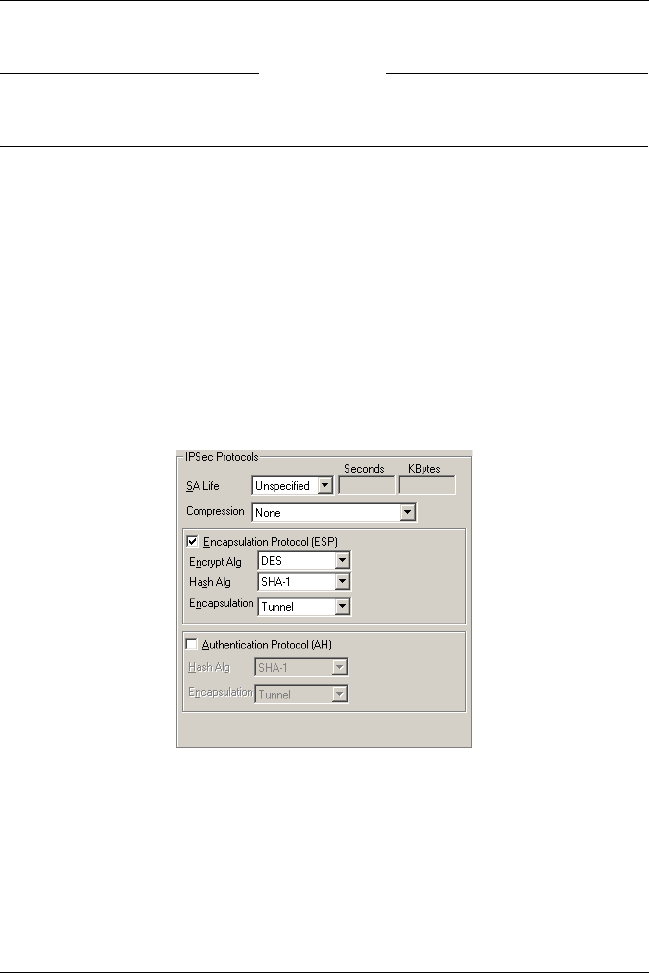
166 WatchGuard Firebox SOHO 6 Wireless
NOTE
These values must match exactly those entered in the Firebox SOHO 6
Wireless appliance.
5 Select DES from the Encrypt Alg drop list and select SHA-1
from the Hash Alg drop list.
6 Select Unspecified from the SA Life drop list.
This is the default setting.
7 Select Diffie-Hellman Group 1 from the Key Group drop list.
8Expand Key Exchange (Phase 2).
A Proposal entry appears.
9 Select Proposal 1.
The IPSec Protocols settings appear to the right.
10 Select Both from the SA Life drop list and then type 86400 in
the Seconds field and 8192 in the KBytes field.
11 Select None from the Compression drop list.
This is the default setting. The SOHO 6 Wireless appliance does not
support compression.

User Guide 167
Troubleshooting Tips
12 Click to select the Encapsulation (ESP) checkbox and then
select a value for the Encrypt Alg and Hash Alg drop lists.
13 Select DES from the Encrypt Alg drop list and select MD5
from the Hash Alg drop list.
14 Select Tunnel from the Encapsulation drop list.
This is the default setting.
15 Verify that the Authentication Protocol (AH) checkbox is not
selected.
16 Once you have finished, select File => Save or click the
button.
Troubleshooting Tips
WatchGuard maintains a knowledge base on our Web site,
including an In-Depth FAQ section on configuring and using the
MUVPN client. This is available at:
www.watchguard.com/support
A few of the most common issues found in installing, configuring,
and using the MUVPN client are described below.
My computer is hung up just after installing the
MUVPN client...
This is most likely due to either the ZoneAlarm personal firewall
application interfering with regular Local network traffic or it is
because the MUVPN client is active and is unsuccessfully
attempting to create VPN tunnels.
When the MUVPN client is not in use, ZoneAlarm should be
shutdown and the client deactivated.

168 WatchGuard Firebox SOHO 6 Wireless
From the Windows desktop system tray:
1 First, reboot your computer.
2 Right-click on the Mobile User VPN client icon.
3 Select Disconnect All.
The MUVPN client closes all VPN tunnels.
4 Right-click on the Mobile User VPN client icon and select
Deactivate Security Policy.
The MUVPN icon will display a red slash to indicate that the Security
Policy has been deactivated.
5 Right-click on the ZoneAlarm icon and select Shutdown
ZoneAlarm.
The ZoneAlarm dialog box appears.
6Click the Yes button when prompted to quit ZoneAlarm.
I have to enter my network log in information
even when I’m not connected to the network...
When you start your computer, you are prompted to enter your
Windows network user name, password and domain. It is very
important that you enter this information correctly, just as you
would if you were at the office connected to the network.
Windows stores the information for use by network adapters and
networked applications. Later, when you connect to your ISP and
start the MUVPN client, your computer uses the stored user name,
password, and domain to connect to the company network.
I am not prompted for my user name and
password when I turn my computer on...
This is most likely due to the ZoneAlarm personal firewall
application. This program is very good at what it does: keeping
your computer secure from unauthorized incoming or outgoing
traffic. Unfortunately, it may block your computer from

User Guide 169
Troubleshooting Tips
broadcasting its network information thereby preventing the
machine from sending the necessary login information. You
should be certain to shut down ZoneAlarm each time you
disconnect the MUVPN connection.
Is the Mobile User VPN tunnel working?
The Mobile User VPN client icon, which appears in the Windows
desktop system tray once it has been launched, will display a key
within the icon once the client has connected.
To test the connection, ping a computer on your company network.
• Select Start => Run. Type ping and the IP address of a
computer on your company network.
My mapped drives have a red X through them...
Windows 98/ME, NT, and 2000 verifies and maps networks drives
automatically when the computer starts. Because there is no way
for you to establish a remote session with the company network
before the computer actually starts, drive mapping fails during the
boot process and a red X appears on the drive icon. Establish a
MUVPN tunnel and open the network drive. The red X should
disappear.
How do I map a network drive?
Due to a Windows operating system limitation, mapped network
drives disappear when you work remotely. To remap a network
drive from the Windows desktop:
1Right-click on Network Neighborhood.
2 Select Map Network Drive.
The Map Network Drive dialog box appears.

170 WatchGuard Firebox SOHO 6 Wireless
3 Use the drop list to select a drive letter.
Either use the drop list or type a network drive path.
4Click OK.
The mapped drive appears in the My Computer window. Even if
you enable the “Reconnect at Logon” checkbox, the mapped drive
will not appear the next time you start your computer unless it is
physically connected to the network.
I sometimes get prompted for a password when I
am browsing the company network...
Due to a Windows networking limitation, remote user virtual
private networking products only allow access to a single network
domain. If your company is large enough to require subnetting
(multiple networks connected together), you will only be able to
browse your own domain. Attempts to access other domains will
result in a password prompt. Unfortunately, even providing the
correct information will not open these additional networks.
It takes a really long time to shut down the
computer after using Mobile User VPN...
If you open and browse a mapped network drive during a MUVPN
session, the Windows operating system waits for a signal from the
network before it times out and completes the shut down cycle.
I lost the connection to my ISP, and now I can’t
use the company network...
If you lose Internet connection long enough, MUVPN also loses the
secure tunnel. Follow the steps to close the tunnel. Then connect to
the Internet and restart the MUVPN client.

User Guide 171
CHAPTER 11 Support resources
Troubleshooting tips
If you have problems during the installation and the configuration
of your SOHO 6 Wireless, refer to this information.
General
What do the PWR, Status, and Mode lights signify on the
SOHO 6 Wireless?
When the PWR light is lit, the SOHO 6 Wireless is connected to a
power source. When the Status light is lit, there is a management
connection to the SOHO 6 Wireless. When the MODE light is lit,
the SOHO 6 Wireless is operational.
If the PWR light blinks:
The SOHO 6 Wireless is running from its backup flash
memory. You can connect to the SOHO 6 Wireless from a

172 WatchGuard Firebox SOHO 6 Wireless
computer attached to one of the four Ethernet ports (labeled 0-
3) to configure the SOHO 6 Wireless.
If the Mode light is blinks:
There SOHO 6 Wireless can not connect to the external
network. Possible causes of this problem include:
• The SOHO 6 Wireless did not receive an IP address for the
external interface from the DHCP server.
• The WAN port is not connected to another appliance.
• The connection to the external interface is defective.
• The appliance to which the external interface of the SOHO 6
Wireless is connected is not operating correctly.
How do I register my SOHO 6 Wireless with the
LiveSecurity Service?
See “Register your SOHO 6 Wireless and activate the LiveSecurity
Service” on page 33.
How do I restart my SOHO 6 Wireless?
See “Reboot the SOHO 6 Wireless” on page 34.
How do I reset my System Security password, if I forgot or
lost it?
See “Factory default settings” on page 31.
How does the seat limitation on the SOHO 6 Wireless
work?
See “Cabling the SOHO 6 Wireless for more than four appliances”
on page 23.

User Guide 173
Troubleshooting tips
What is a SOHO 6 Wireless feature key?
See “Activate the SOHO 6 Wireless upgrade options” on page 66.
I can't get a certain SOHO 6 Wireless feature to work with
a DSL modem.
Some DSL routers implement NAT firewalls. An external network
connection through an appliance that supplies NAT causes
problems with WebBlocker and the performance of IPSec. When a
SOHO 6 Wireless connects to the external network through a DSL
router, set the DSL router to operate as a bridge only.
How do I install and configure the SOHO 6 Wireless using a
Macintosh (or other) operating system?
The installation instructions for the Macintosh and other operating
systems are available from the WatchGuard Web site:
https://support.watchguard.com/sohoresources/
How do I know whether the cables are connected correctly
to my SOHO 6 Wireless?
The front panel of the SOHO 6 Wireless has fourteen indicators.
The WAN indicator shows if the SOHO 6 Wireless is connected to
the modem. If this indicator is not lit, the SOHO 6 Wireless is not
connected to the modem.
• Make sure that the cable is connected from the SOHO 6
Wireless to the modem.
• Make sure the Internet connection is active.
The link indicators (0-3) are for the four Ethernet ports of the
trusted network. These indicators show if the SOHO 6 Wireless is
wired to a computer or hub. If the indicators are not lit, the
SOHO 6 Wireless is not wired to the computer or hub. Make sure

174 WatchGuard Firebox SOHO 6 Wireless
that the cable is connected and the computer or hub is connected to
a power supply.
I can connect to the Configuration Settings page; why can’t
I browse the Internet?
If you can connect to the configuration page, but not the Internet,
there is a problem with the connection from the SOHO 6 Wireless
to the Internet.
• Make sure the cable modem or DSL modem is connected to
the SOHO 6 Wireless and the power supply.
• Make sure the link light on the modem and the WAN
indicator on the SOHO 6 Wireless are lit.
Speak with your ISP if the problem is not corrected.
How can I see the MAC address of my SOHO 6 Wireless?
1 Type the IP address of the trusted network in your browser
window to connect to the System Status page of the SOHO 6
Wireless:
The default IP address is: http://192.168.111.1
2 At the bottom of the System Status page, the External network
header is shown on the right side. The MAC address or
addresses are shown.
Record these addresses before you call Technical Support.
What is the default trusted IP address?
The default trusted IP address is either 192.168.111.1 for a wired
computer and 192.168.112.1 for a wireless computer.

User Guide 175
Troubleshooting tips
Configuration
Where are the SOHO 6 Wireless settings stored?
The configuration parameters are stored in memory of the SOHO 6
Wireless.
How do I set up DHCP on the trusted network of the
SOHO 6 Wireless?
1 Make sure your computer is configured to use DHCP. See
“Enable your computer for DHCP” on page 17 for additional
information.
2 Type the IP address of the trusted network in your browser
window to connect to the System Status page of the SOHO 6
Wireless:
The default IP address is: http://192.168.111.1
3 From the navigation bar on the left side, select
Network => Trusted.
4Set the Enable DHCP Server check box.
5Click Submit.
How do I change to a static, trusted IP address?
To use a static IP address, select a network IP range and subnet
mask for the trusted network.
The network IP ranges and subnet masks in the table below are
reserved for private networks in compliance with RFC 1918.
Replace the Xs in the network IP address with a number between 1
and 254. The subnet mask does not need to be changed.
Network IP range Subnet mask
10.x.x.x 255.0.0.0

176 WatchGuard Firebox SOHO 6 Wireless
To change to a static, trusted IP address, follow these steps:
1 Type the IP address of the trusted network in your browser
window to connect to the System Status page of the SOHO 6
Wireless:
The default IP address is: http://192.168.111.1
2 From the navigation bar on the left side, select
Network => Trusted.
3 Reset the Enable DHCP Server check box.
4Click Submit.
5 Type the information.
6Click Submit.
How do I set up and disable WebBlocker?
1 Type the IP address of the trusted network in your browser
window to connect to the System Status page of the SOHO 6
Wireless:
The default IP address is: http://192.168.111.1
2 From the navigation bar on the left side, select
WebBlocker => Settings.
The WebBlocker Settings page opens.
3Set the Enable WebBlocker check box.
4 Set a full access password.
5 Set the number of minutes for the inactivity timeout.
To disable WebBlocker, reset Enable WebBlocker check box.
172.16.x.x 255.240.0.0
192.168.x.x 255.255.0.0

User Guide 177
Troubleshooting tips
How do I allow incoming services such as POP3, Telnet, and
Web (HTTP)?
1 Type the IP address of the trusted network in your browser
window to connect to the System Status page of the SOHO 6
Wireless:
The default IP address is: http://192.168.111.1
2 From the navigation bar on the left side, select
Firewall => Incoming.
The Filter Incoming Traffic page opens.
3 Select the pre-configured service to allow.
4 Select Allow from the drop list.
5 Type the trusted network IP address of the computer hosting
the service.
6Click Submit.
How do I allow incoming IP, or uncommon TCP and UDP
protocols?
Record the IP address of the computer that is to receive the
incoming data and the number of the new IP protocol. Follow
these steps:
1 Type the IP address of the trusted network in your browser
window to connect to the System Status page of the SOHO 6
Wireless:
The default IP address is: http://192.168.111.1
2 From the navigation bar on the left side, select
Firewall => Custom Service.
The Custom Service page opens.
3 Beneath the Protocol Settings fields, select TCP Port, UDP Port
or Protocol from the drop-down list.
The Custom Service page refreshes.
4 Type a name for the service.

178 WatchGuard Firebox SOHO 6 Wireless
5 Type the new protocol number in the Protocol field.
6Click Submit.
7 From the navigation bar on the left side, select
Firewall => Incoming.
The Firewall Incoming Traffic page opens.
8 At the bottom of the page, locate the new service under the
Custom Service list and select Allow from the drop-down list.
9 Type the IP address of the computer that is to receive the
incoming data in the Service Host field.
10 Click Submit.
VPN Management
See “What You Need” on page 106.
Make sure that the two appliances use the same encryption
method.
Make sure that the two appliances use the same authentication
method.
How do I set up my SOHO 6 Wireless for VPN Manager
Access?
This requires the add-on product, WatchGuard VPN Manager
software, which is purchased separately and used with the
WatchGuard Firebox System software. Purchase the VPN Manager
through the WatchGuard Web site:
https://www.watchguard.com/products/vpnmanager.asp
For more information on how to allow VPN Manager access to a
SOHO 6 Wireless, see the WatchGuard Firebox VPN Guide.

User Guide 179
Troubleshooting tips
How do I set up VPN to a SOHO 6 Wireless?
Information about how to configure a VPN tunnel between a
SOHO 6 Wireless and another IPSec compliant appliance is
available from the WatchGuard Web site:
https://support.watchguard.com/AdvancedFaqs/sointerop_main.asp
1 Log in to the site.
2 Download the file you need.
3 Follow the instructions to configure your VPN tunnel.

180 WatchGuard Firebox SOHO 6 Wireless
Contact technical support
Online documentation and FAQs
Documentation in PDF format, tutorials, and FAQs are available on
the WatchGuard Web Site:
https://support.watchguard.com/AdvancedFaqs/
Special notices
• The online help system is not yet available on the
WatchGuard Web site. Click on the Help link at the top of the
System Status page to connect to the WatchGuard Product
Documentation page, which has links to more information
sources.
(877) 232-3531 United States end-user support
(206) 521-8375 United States authorized reseller support
(360) 482-1083 International support

User Guide 181
Index
Numerics
100 indicator 11
A
Add Route page 54
appliances
defined 22
B
blocked sites
configuring 75
Blocked Sites page 75
browsers, supported 15
C
cables
correct setup 173
included in package 2
required 14
configuration file, viewing 30
custom incoming services, creating 73
Custom Service page 73, 177
D
default factory settings 31–32
DHCP
described 38
setting up on Trusted Network 175
DNS service, dynamic 56
DSL modems, and SOHO 6 173
Dynamic DNS client page 57
dynamic DNS service,
configuring 56–57
Dynamic Host Configuration Protocol.
See DHCP
dynamic IP addresses
configuring for 38
described 37
E
events
described 85
External Network
denying ping packets received
on 78
F
File and Printer Sharing for Microsoft
Networks
and Windows XP 134
Filter Traffic page 72
Firewall Incoming Traffic page 178
Firewall Options page 77
firmware
updating 65
viewing version of 30
FTP access, denying to the Trusted
interface 78
G
Groups page 99
H
hardware description 6
HTTP proxy settings, disabling 19

Index
182 WatchGuard Firebox SOHO 6 Wireless
I
incoming service, creating custom 73
indicators
100 11
link 11
Mode 12
WAN 12
installation
cabling 22
determining TCP/IP settings 15
disabling TCP/IP proxy
settings 19
items required for 14
Internet
how information travels on 4
problems browsing 174
Internet Protocol (TCP/IP) Network
Component
and Windows XP 134
IP addresses
described 4
disguising 5
dynamic 37
in networks 37
maintaining table of 107
L
license keys 32, 33
lights
100 11
link 11
MODE 171
Mode 12
power 11
PWR 171
Status 11, 171, 172
WAN 12
link indicator 11
LiveSecurity Service
registering with 33
renewing subscription 69
log host, setting WSEP 87
log messages
contents of 86
viewing 86
logging
to a WSEP host 87
to Syslog host 88
Logging page 86
M
MAC address of SOHO 6 174
Macintosh operating system 173
Mode indicator 12
MODE light 171
MUVPN clients option 117
N
NAT 5
Network Address Translation (NAT) 5
Network Statistics page 56
network statistics, viewing 55
New User page 100
numbered ports 12
P
pages
Add Route 54
Blocked Sites 75
Custom Service 73, 177
Dynamic DNS client 57
Filter Traffic 72
Firewall Incoming Traffic 178
Firewall Options 77
Groups 99
Logging 86
Network Statistics 56
New User 100
Routes 47, 54
SOHO 6 Administration 59
Syslog Logging 89
System Security 59, 60

User Guide 183
System Status 29, 35, 39, 40, 42,
45, 46, 49, 54, 55, 56, 60, 63, 65,
67, 69, 73, 77, 83, 86, 87, 89, 90,
96, 97, 111, 117, 118, 174, 175,
176, 177
System Time 91
Unrestricted Pass Through IP
Address 83
Upgrade 67
View Configuration File 69
VPN Manager Access 64
VPN Statistics 118
WatchGuard Security Event
Processor 87
WebBlocker Groups 98
WebBlocker Settings 96
Pass Through feature 83
passphrase 60
passphrases
described 60
ping packets, denying all 78
Point-to-Point Protocol over Ethernet.
See PPPoE
ports
numbered 12
numbers 4
trusted network 12
WAN 12
power input 12
PPPoE
configuring for 40
described 38
protocols
allowing incoming 177
described 4
PWR light 11, 171
R
rebooting 34
rebooting on remote system 35
registration 33
remote management 61
resetting to factory default 32
Routes page 47, 54
routes, configure static 54
S
seat licenses, upgrade 68
seat limitation 24
serial number, location 15
serial number, viewing 30
services
allowing incoming 177
creating custom 73–75
creating custom incoming 73
described 5, 71
services, add standard 72
sites
blocking 75
SOCKS
configuring application 79
configuring for SOHO 6 78
described 78
disabling 81
SOHO 6 34, 35
and DSL modems 173
and Macintosh operating
system 173
and SOCKS 78
configuring access to 59
configuring for dynamic
addresses 38
configuring for PPPoE 40
configuring for static
addressing 38
configuring VPN tunnel with 109
connecting to 29
default factory settings 31
described 2
front view 11
function of 1
hardware 6
installing 13–25
MAC address of 174
MUVPN clients option 117
package contents 2
ports 6, 12
rear view 12
registering 33

Index
184 WatchGuard Firebox SOHO 6 Wireless
resetting to factory default 32
setting up VPNs between 179
troubleshooting 179
viewing log messages for 86
SOHO 6 Administration page 59
SOHO remote management 61
Split Tunneling 116
static IP addresses
and VPNs 110
obtaining 110
static IP addressing, configuring
for 38
static routes
configure 54
Status light 11, 171, 172
Syslog Logging page 89
system requirements 123
System Security page 59, 60
System Status page 29, 35, 39, 40, 42,
45, 46, 49, 54, 55, 56, 60, 63, 65,
67, 69, 73, 77, 83, 86, 87, 89, 90,
96, 97, 111, 117, 118, 174, 175,
176, 177
System Time page 91
system time, setting 90
T
TCP/IP settings, determining 15–16
technical support 180
time, setting 90
traffic
crearing unrestricted pass
through 82
logging all outbound 81
troubleshooting 171–180
Trusted Network
configuring additional computers
on 44
denying FTP access to 78
Trusted Network Configuration
page 42, 45
U
Unrestricted Pass Through IP Address
page 83
Update Wizard 66
upgrade
seat license 24
upgrade license keys
types of 68
Upgrade page 67
upgrading
VPNs 68
V
View Configuration File page 69
VPN Manager
described 63
purchasing 178
setting up access to 63–64
setting up SOHO 6 for 178
VPN Manager Access page 64
VPN Statistics page 118
VPN upgrade
enable 108
obtaining 111
VPNs
and SOHO 6, SOHO 6 tc 2
and static IP addresses 110
between two SOHO 6s 179
configuring with SOHO 6 109
described 105
enabling tunnels 111
encryption for 109
license key for 68
requirements for 106
special considerations for 109
troubleshooting connections 110
viewing statistics 118
W
WAN indicator 12

User Guide 185
WAN port 12
WatchGuard Security Event
Processor 87
WatchGuard Security Event
Processor page 87
WebBlocker
activating 96
categories 101–104
configuring 95
creating users and groups for 97
database 93
described 93
enabling and disabling 176
purchasing and activating 95
users and groups 95
WebBlocker Groups page 98
WebBlocker Settings page 96
WebBlocker upgrade, purchasing 95
WebBlocker, license key for 68
Windows XP
installing File and Printer Sharing
for Microsoft Networks on 134
installing Internet Protocol (TCP/
IP) Network Component
on 134
WSEP 87

Index
186 WatchGuard Firebox SOHO 6 Wireless