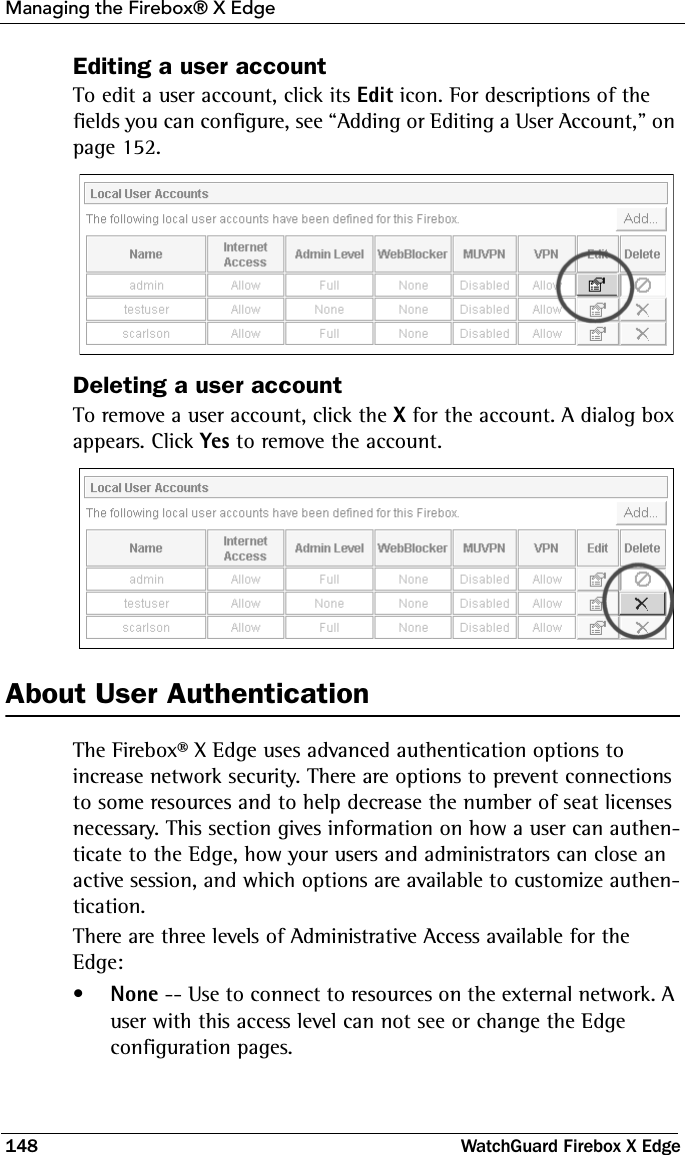
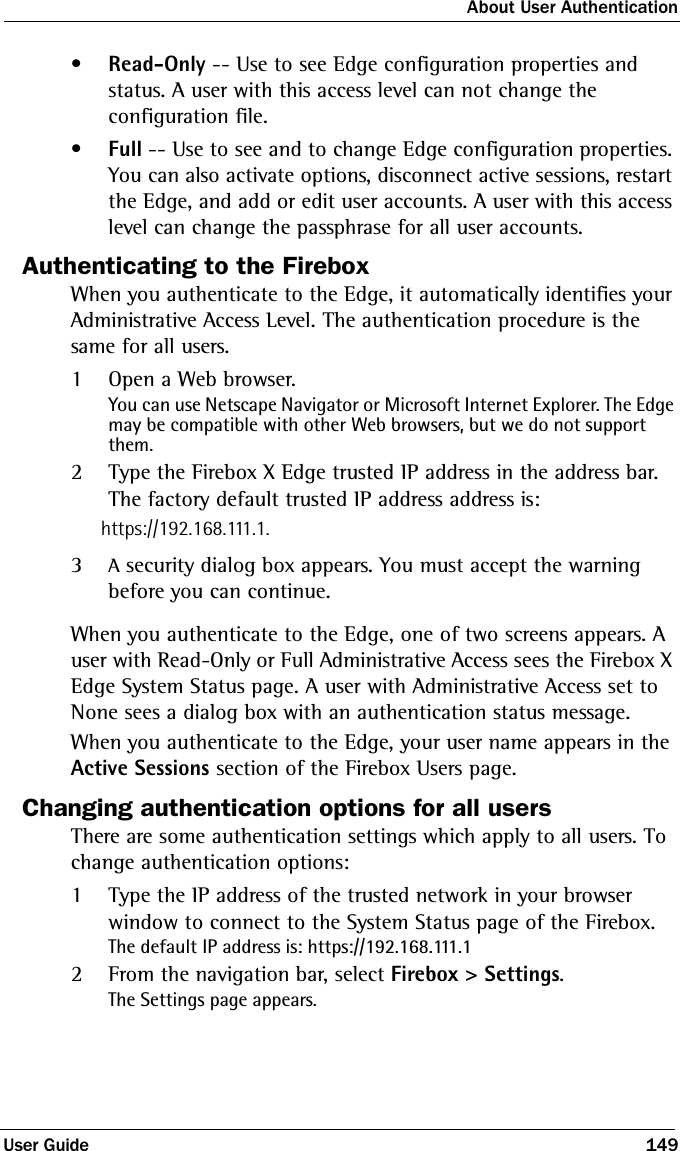
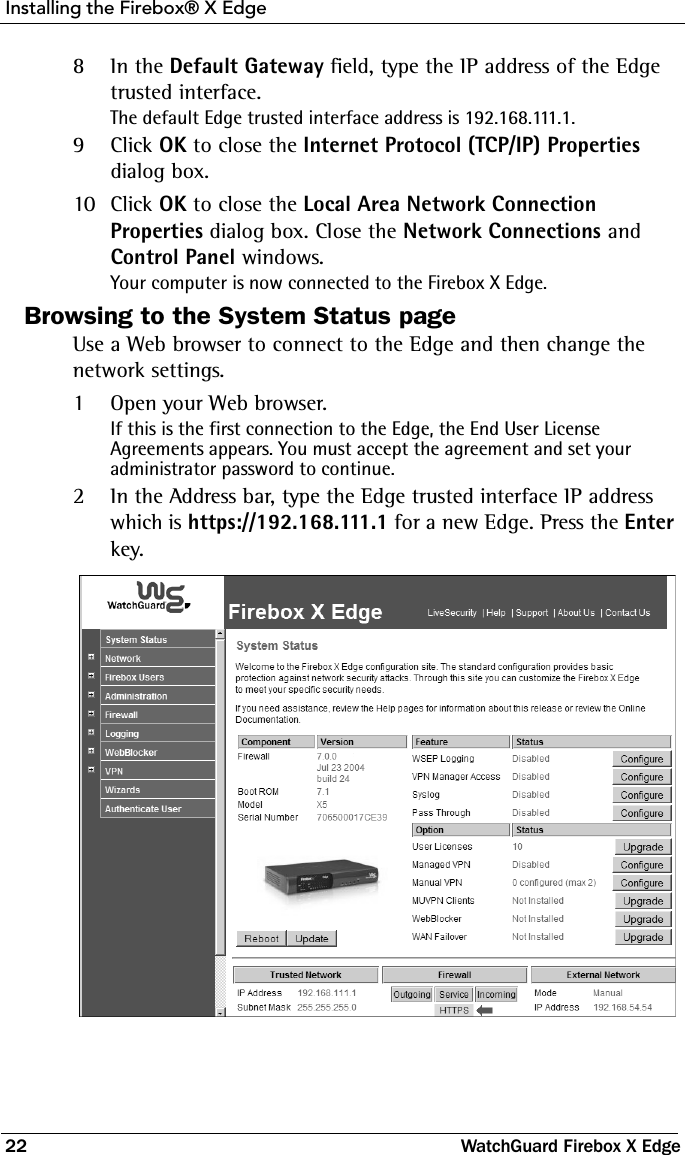
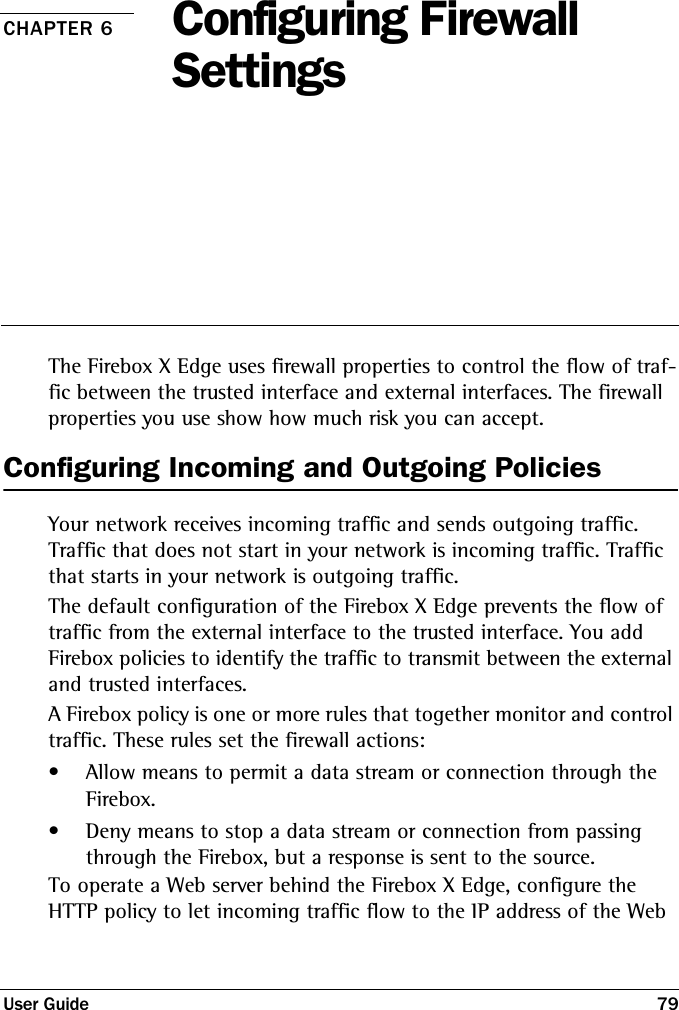
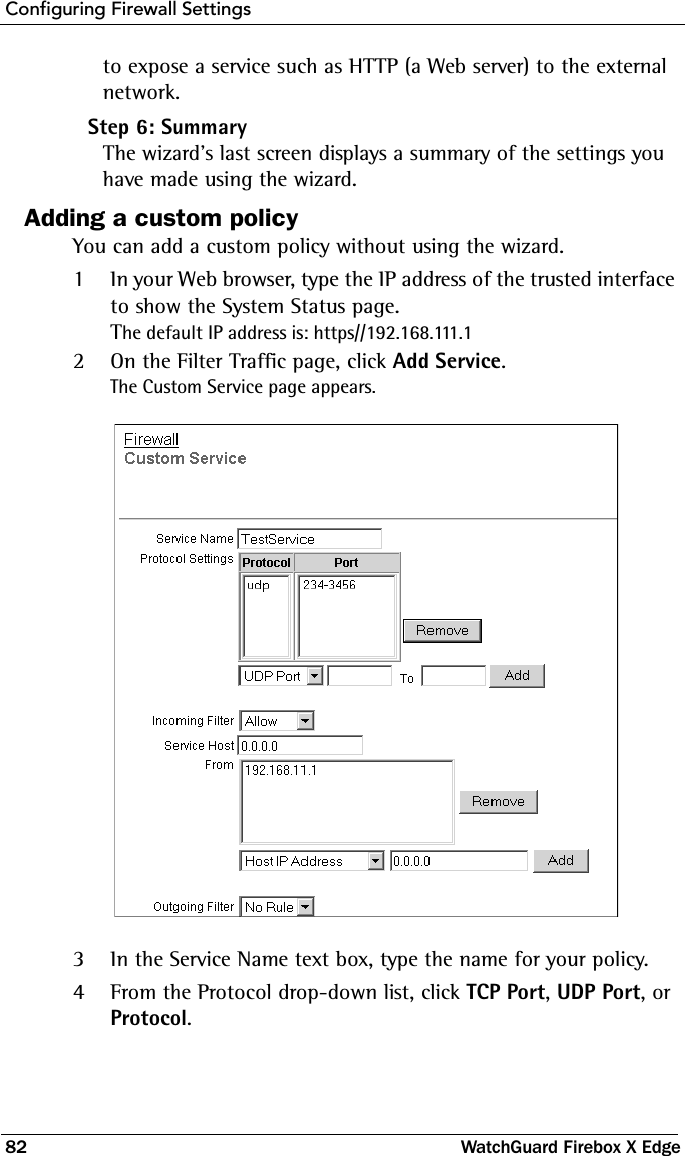
WatchGuard Technologies MF16S32E9W Firebox X Edge User Manual WatchGuard Firebox X Edge User Guide
WatchGuard Technologies, Inc. Firebox X Edge WatchGuard Firebox X Edge User Guide
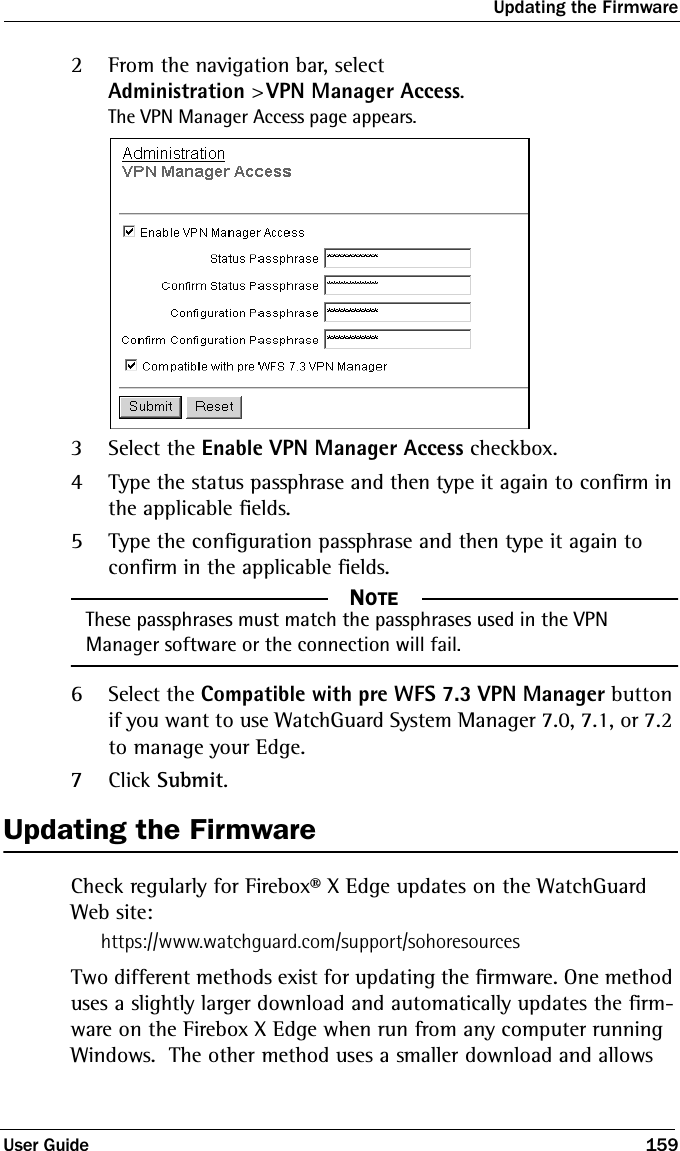
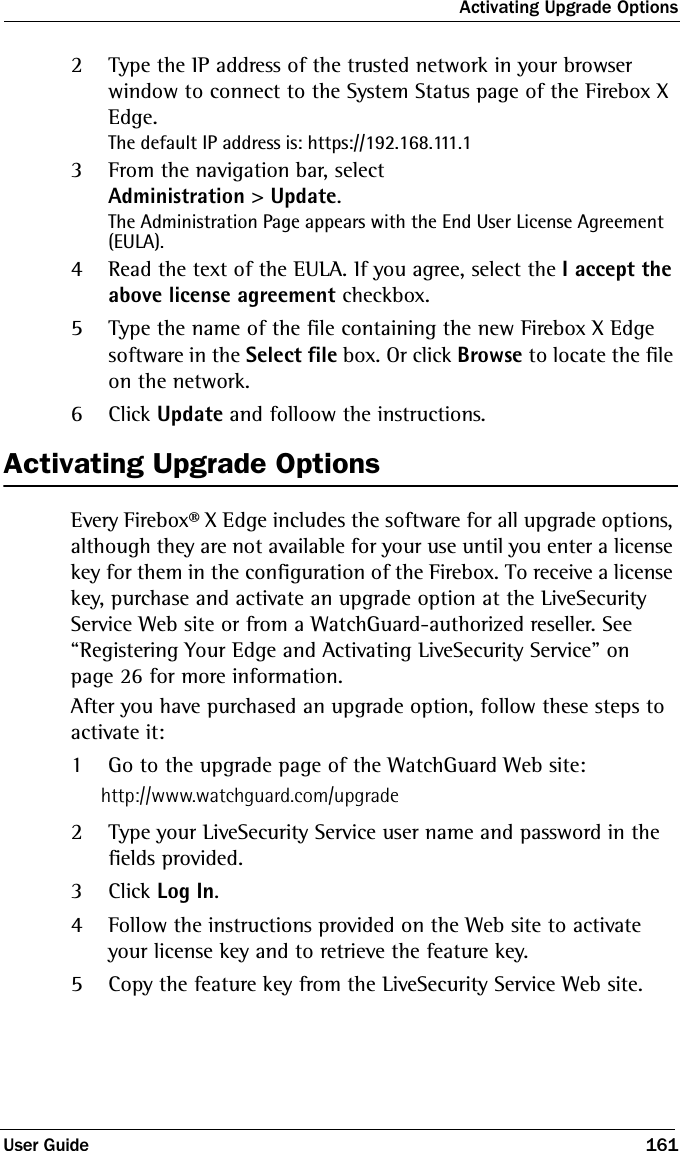
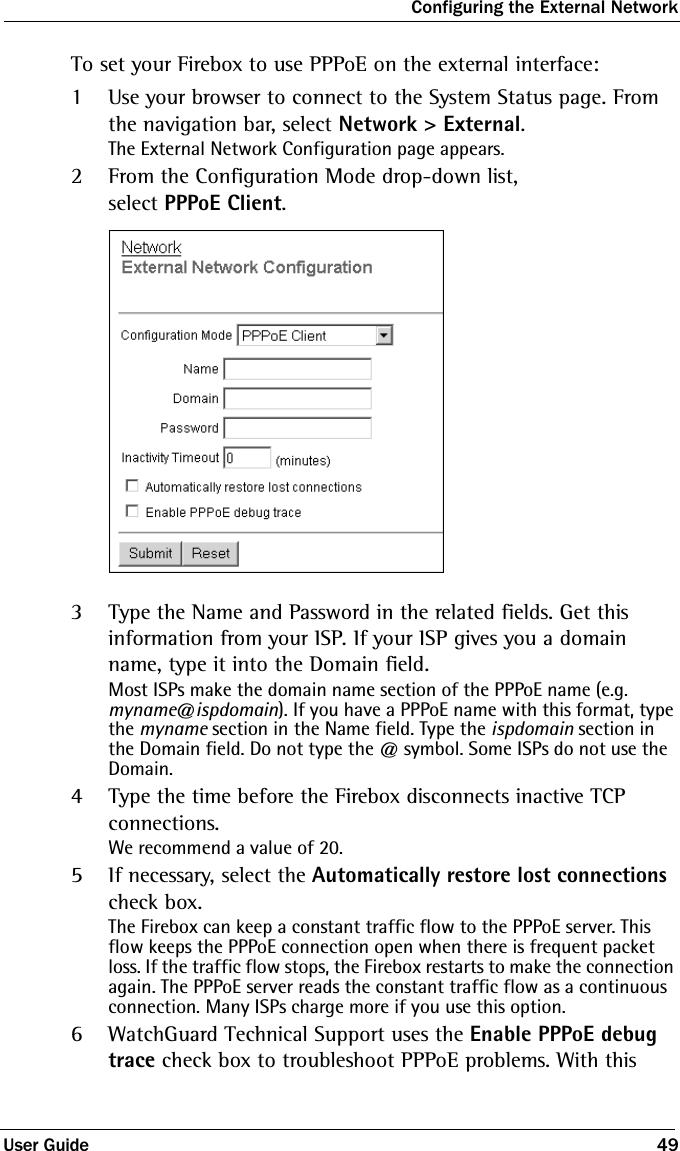
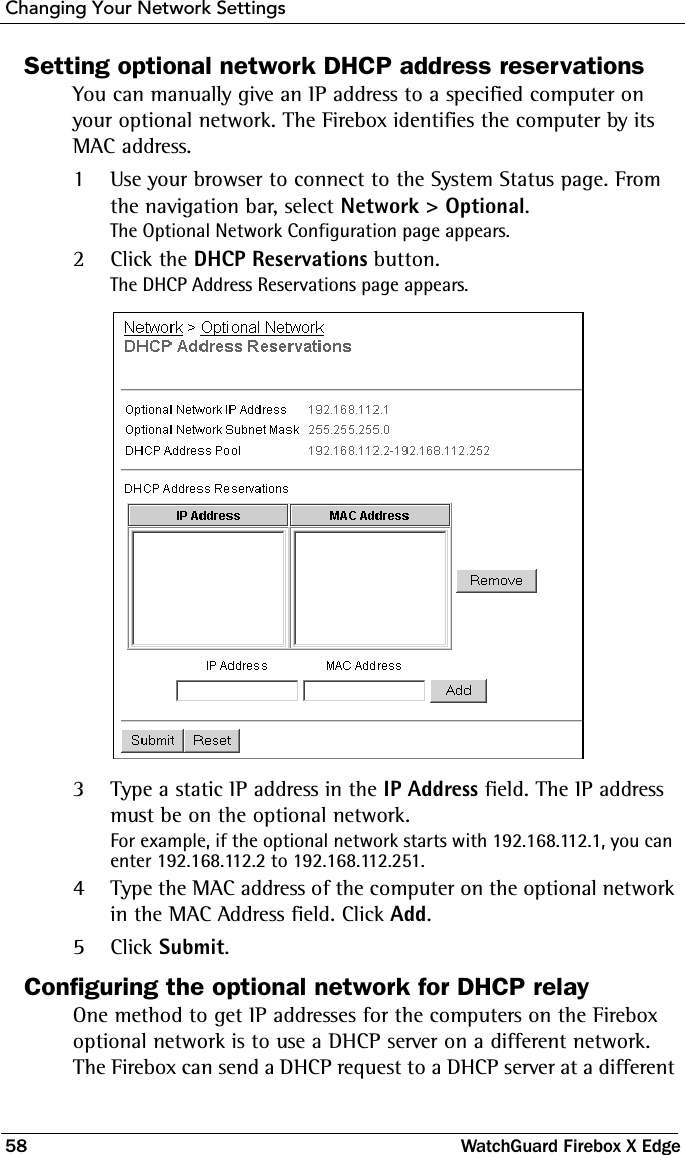
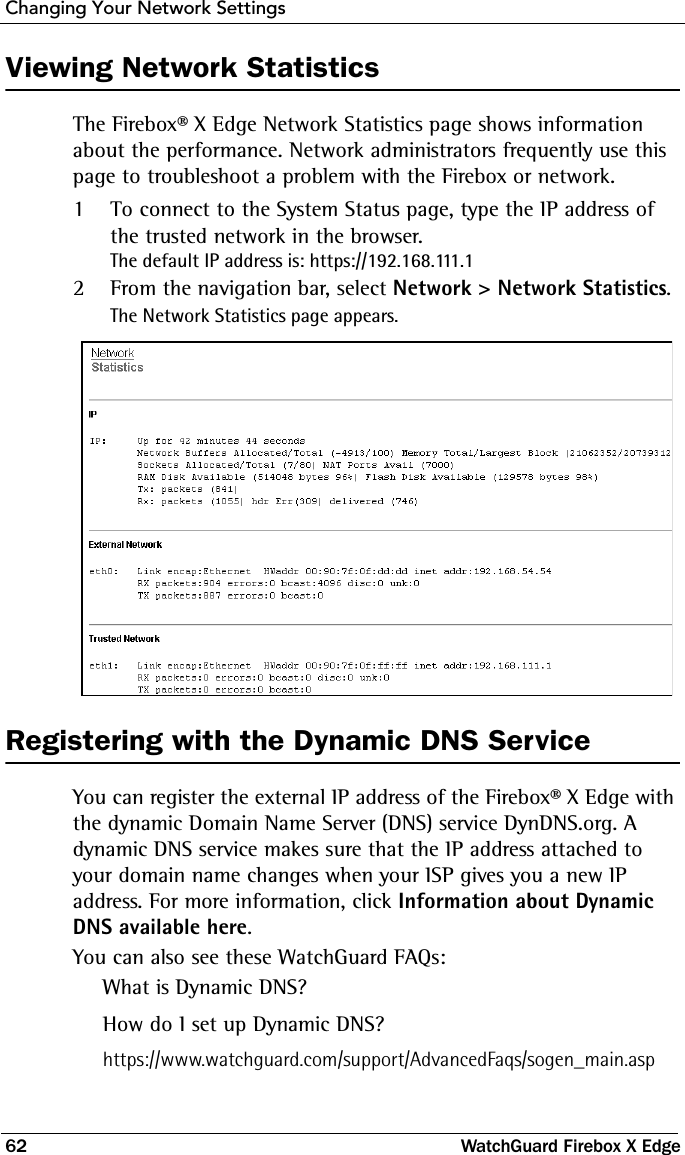
UserManual.wiki
>
WatchGuard Technologies
>
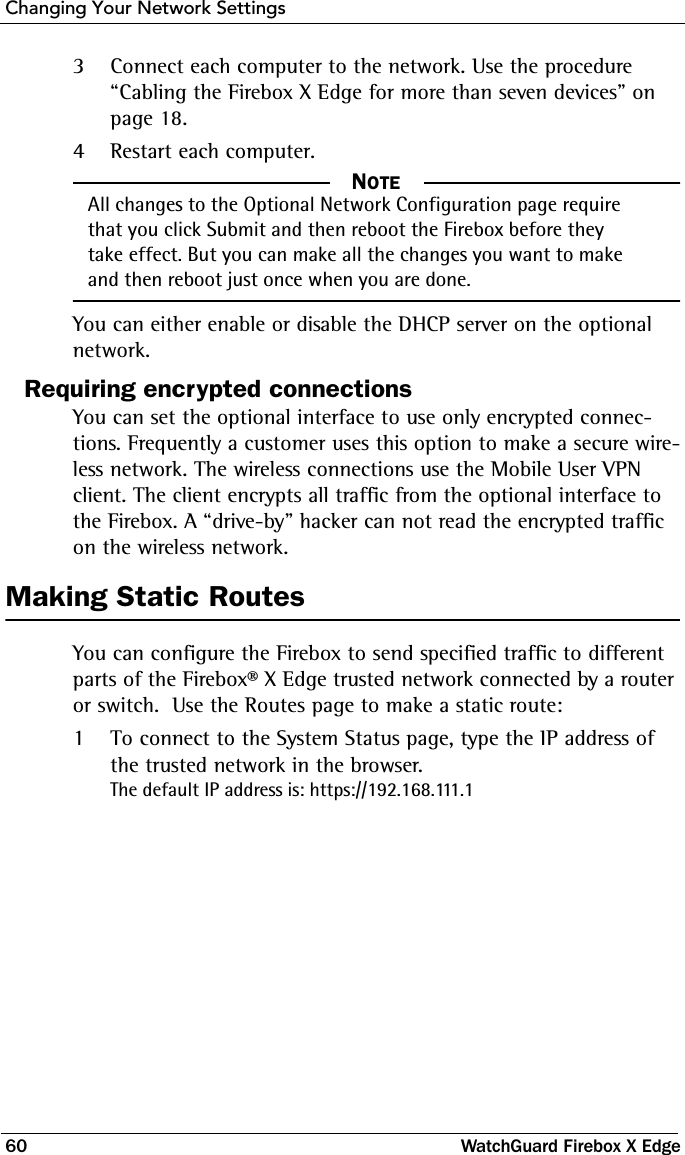
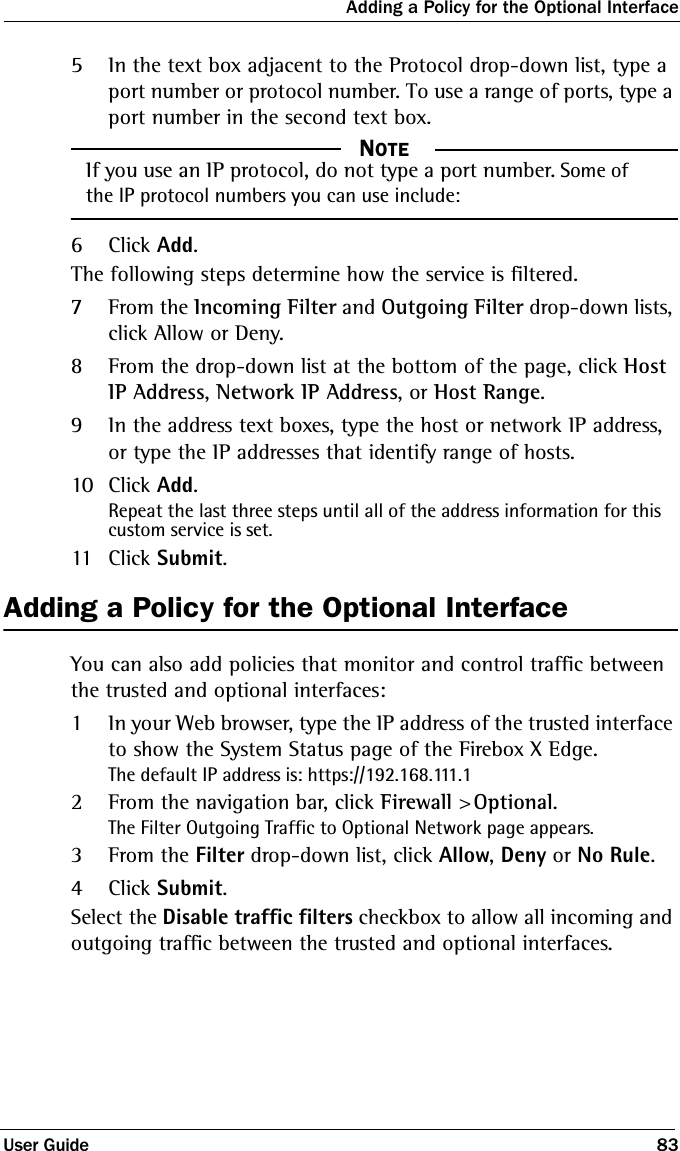
MF16S32E9W User Manual
Users Manual
Navigation menu
Upload a User Manual
Namespaces
Wiki Guide
HTML
PDF
Info
Views
User Manual
Discussion / Help
Navigation
![Copyright, Trademark, and Patent InformationUser Guide ix 1. Redistributions of source code must retain the copyright notice, this list of conditions and the following disclaimer. 2. Redistributions in binary form must reproduce the above copyright notice, this list of conditions and the following disclaimer in the documentation and/or other materials provided with the distribution. 3. All advertising materials mentioning features or use of this software must display the following acknowledgement: "This product includes cryptographic software written by Eric Young (eay@cryptsoft.com)" The word 'cryptographic' can be left out if the routines from the library being used are not cryptographic related.4. If you include any Windows specific code (or a derivative thereof) from the apps directory (application code) you must include an acknowledgement: "This product includes software written by Tim Hudson (tjh@cryptsoft.com)"THIS SOFTWARE IS PROVIDED BY ERIC YOUNG ``AS IS'' AND ANY EXPRESS OR IMPLIED WARRANTIES, INCLUDING, BUT NOT LIMITED TO, THE IMPLIED WARRANTIES OF MERCHANTABILITY AND FITNESS FOR A PARTICULAR PURPOSE ARE DISCLAIMED. IN NO EVENT SHALL THE AUTHOR OR CONTRIBUTORS BE LIABLE FOR ANY DIRECT, INDIRECT, INCIDENTAL, SPECIAL, EXEMPLARY, OR CONSEQUENTIAL DAMAGES (INCLUDING, BUT NOT LIMITED TO, PROCUREMENT OF SUBSTITUTE GOODS OR SERVICES; LOSS OF USE, DATA, OR PROFITS; OR BUSINESS INTERRUPTION) HOWEVER CAUSED AND ON ANY THEORY OF LIABILITY, WHETHER IN CONTRACT, STRICT LIABILITY, OR TORT (INCLUDING NEGLIGENCE OR OTHERWISE) ARISING IN ANY WAY OUT OF THE USE OF THIS SOFTWARE, EVEN IF ADVISED OF THE POSSIBILITY OF SUCH DAMAGE.The license and distribution terms for any publicly available version or derivative of this code cannot be changed. i.e. this code cannot simply be copied and put under another distribution license [including the GNU Public License.]The mod_ssl package falls under the Open-Source Software label because it's distributed under a BSD-style license. The detailed license information follows.Copyright (c) 1998-2003 Ralf S. Engelschall. All rights reserved.Redistribution and use in source and binary forms, with or without modification, are permitted provided that the following conditions are met:1. Redistributions of source code must retain the above copyright notice, this list of conditions and the following disclaimer. 2. Redistributions in binary form must reproduce the above copyright notice, this list of conditions and the following disclaimer in the documentation and/or other materials provided with the distribution.3. All advertising materials mentioning features or use of this software must display the following acknowledgment:This product includes software developed by Ralf S. Engelschall <rse@engelschall.com> for use in the mod_ssl project (http://www.modssl.org/)."4. The names "mod_ssl" must not be used to endorse or promote products derived from this software without prior written permission. For written permission, please contact rse@engelschall.com.5. Products derived from this software may not be called "mod_ssl" nor may "mod_ssl" appear in their names without prior written permission of Ralf S. Engelschall.6. Redistributions of any form whatsoever must retain the following acknowledgment: "This product includes software developed by Ralf S. Engelschall <rse@engelschall.com> for use in the mod_ssl project (http://www.modssl.org/)."THIS SOFTWARE IS PROVIDED BY RALF S. ENGELSCHALL ``AS IS'' AND ANY EXPRESSED OR IMPLIED WARRANTIES, INCLUDING, BUT NOT LIMITED TO, THE IMPLIED WARRANTIES OF MERCHANTABILITY AND FITNESS FOR A PARTICULAR PURPOSE ARE DISCLAIMED. IN NO EVENT SHALL RALF S. ENGELSCHALL OR HIS CONTRIBUTORS BE LIABLE FOR ANY DIRECT, INDIRECT, INCIDENTAL, SPECIAL, EXEMPLARY, OR CONSEQUENTIAL DAMAGES (INCLUDING, BUT NOT LIMITED TO, PROCUREMENT OF SUBSTITUTE GOODS OR SERVICES; LOSS OF USE, DATA, OR PROFITS; OR BUSINESS INTERRUPTION) HOWEVER CAUSED AND ON ANY](https://usermanual.wiki/WatchGuard-Technologies/MF16S32E9W/User-Guide-478877-Page-9.png)
![Copyright, Trademark, and Patent InformationUser Guide xi1. This software is distributed in the hope that it will be useful, but WITHOUT ANY WARRANTY; without even the implied warranty of MERCHANTABILITY or FITNESS FOR A PARTICULAR PURPOSE.2. The origin of this software must not be misrepresented, either by explicit claim or by omission. In practice, this means that if you use PCRE in software that you distribute to others, commercially or otherwise, you must put a sentence like this:Regular expression support is provided by the PCRE library package, which is open source software, written by Philip Hazel, and copyright by the University of Cambridge, England.somewhere reasonably visible in your documentation and in any relevant files or online help data or similar. A reference to the ftp site for the source, that is, to: ftp://ftp.csx.cam.ac.uk/pub/software/programming/pcre/should also be given in the documentation. However, this condition is not intended to apply to whole chains of software. If package A includes PCRE, it must acknowledge it, but if package B is software that includes package A, the condition is not imposed on package B (unless it uses PCRE independently).3. Altered versions must be plainly marked as such, and must not be misrepresented as being the original software.4. If PCRE is embedded in any software that is released under the GNU General Purpose License (GPL), or Lesser General Purpose License (LGPL), then the terms of that license shall supersede any condition above with which it is incompatible.The documentation for PCRE, supplied in the "doc" directory, is distributed under the same terms as the software itself.PLEASE NOTE: Some components of the WatchGuard WFS software incorporate source code covered under the GNU Lesser General Public License (LGPL). To obtain the source code covered under the LGPL, please contact WatchGuard Technical Support at: 877.232.3531 in the United States and Canada+1.360.482.1083 from all other countries This source code is free to download. There is a $35 charge to ship the CD.This product includes software covered by the LGPL.GNU LESSER GENERAL PUBLIC LICENSEVersion 2.1, February 1999Copyright (C) 1991, 1999 Free Software Foundation, Inc.59 Temple Place, Suite 330, Boston, MA 02111-1307 USAEveryone is permitted to copy and distribute verbatim copies of this license document, but changing it is not allowed.[This is the first released version of the Lesser GPL. It also counts as the successor of the GNU Library Public License, version 2, hence the version number 2.1.]PreambleThe licenses for most software are designed to take away your freedom to share and change it. By contrast, the GNU General Public Licenses are intended to guarantee your freedom to share and change free software--to make sure the software is free for all its users.This license, the Lesser General Public License, applies to some specially designated software packages--typically libraries--of the Free Software Foundation and other authors who decide to use it. You can use it](https://usermanual.wiki/WatchGuard-Technologies/MF16S32E9W/User-Guide-478877-Page-11.png)


![Configuring the External InterfaceUser Guide 23Configuring the External InterfaceYour Internet Service Provider (ISP) uses DHCP, PPPoE, or static IP addressing to identify your computer on their network. After you connect the Edge, you must configure the external interface with the information from your ISP.Setting the Edge to use DHCPA new Edge uses DHCP to get an IP address for the external inter-face. If your ISP uses DHCP addressing to identify your computer on their network, it is not necessary to make a configuration change unless the ISP gives you a DHCP ID or name. If necessary, use this procedure to set the DHCP ID or name:1Open your Web browser. Browse to the System Status page at https://192.168.111.1.Type the URL in the Address bar of your browser and press the [Enter] key.2From the navigation bar on the left side, click the + symbol to the left of Network. Click External.3Use the Configuration mode drop-down list to select DHCP Client.4In the Optional DHCP Identifier field, type the DHCP name or ID you got from your ISP.5Click Submit.](https://usermanual.wiki/WatchGuard-Technologies/MF16S32E9W/User-Guide-478877-Page-51.png)
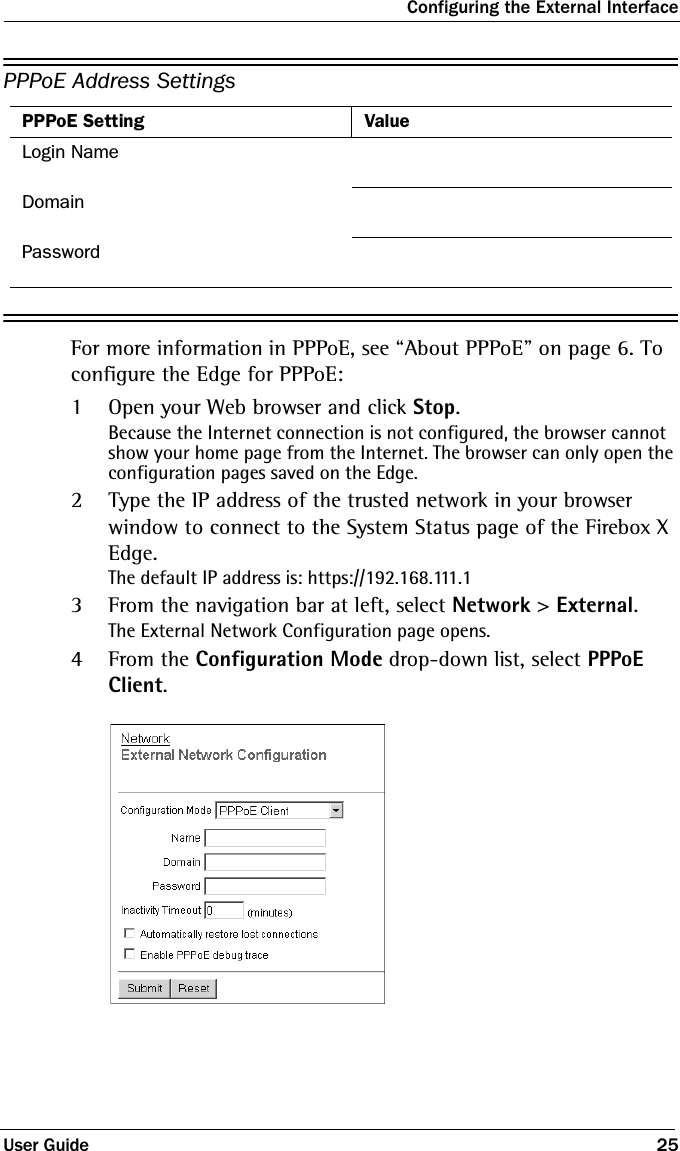
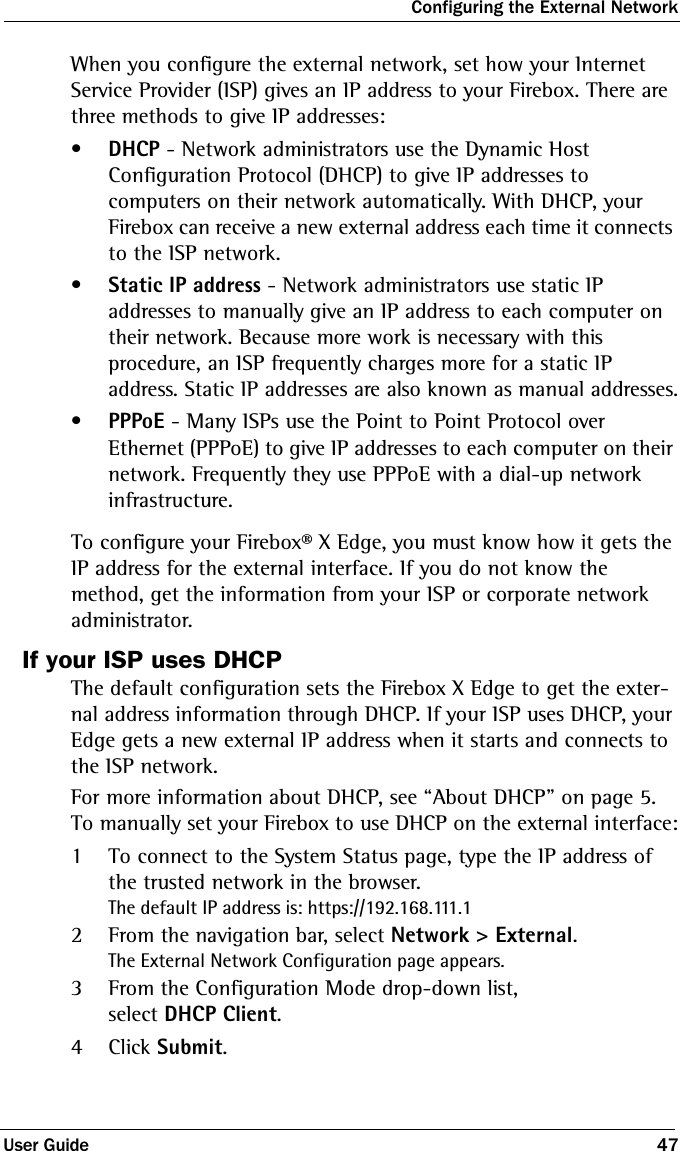
![Installing the Firebox® X Edge24 WatchGuard Firebox X EdgeSetting a Static IP AddressIf your ISP uses static IP addressing, you must set the Edge external interface address. Use the information in the Your TCP/IP Properties Table on page 14 to do this procedure.1Open your Web browser. Browse to the System Status page at https://192.168.111.1.Type the URL in the Address bar of your browser and press the [Enter] key.2From the navigation bar on the left side, click the plus sign (+) to the left of Network. Click External.3Use the Configuration mode drop-down list to select Manual Configuration.4Type the IP address, subnet mask, and default gateway.5Type the IP addresses of the primary and secondary DNS servers.6Type the DNS domain suffix.7Click Submit. Entering PPPoE settingsMany ISPs use Point to Point Protocol over Ethernet (PPPoE) because it is easy to merge with dial-up infrastructure. If your ISP uses PPPoE to give IP addresses, you must get more setup informa-tion.](https://usermanual.wiki/WatchGuard-Technologies/MF16S32E9W/User-Guide-478877-Page-52.png)


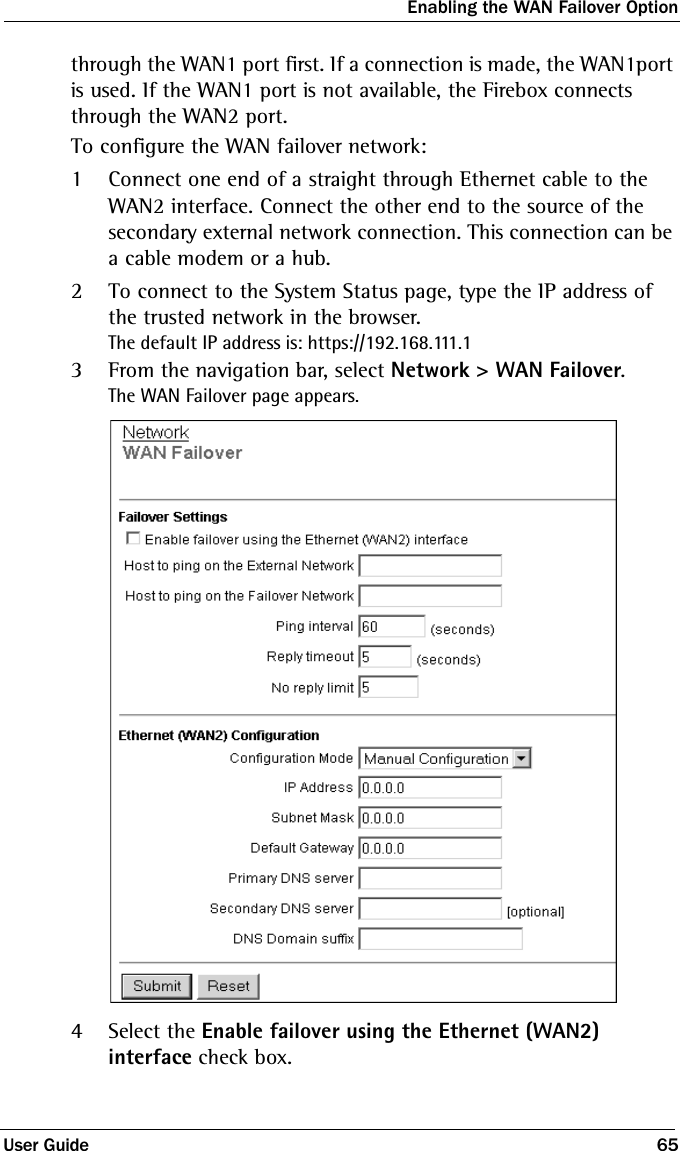
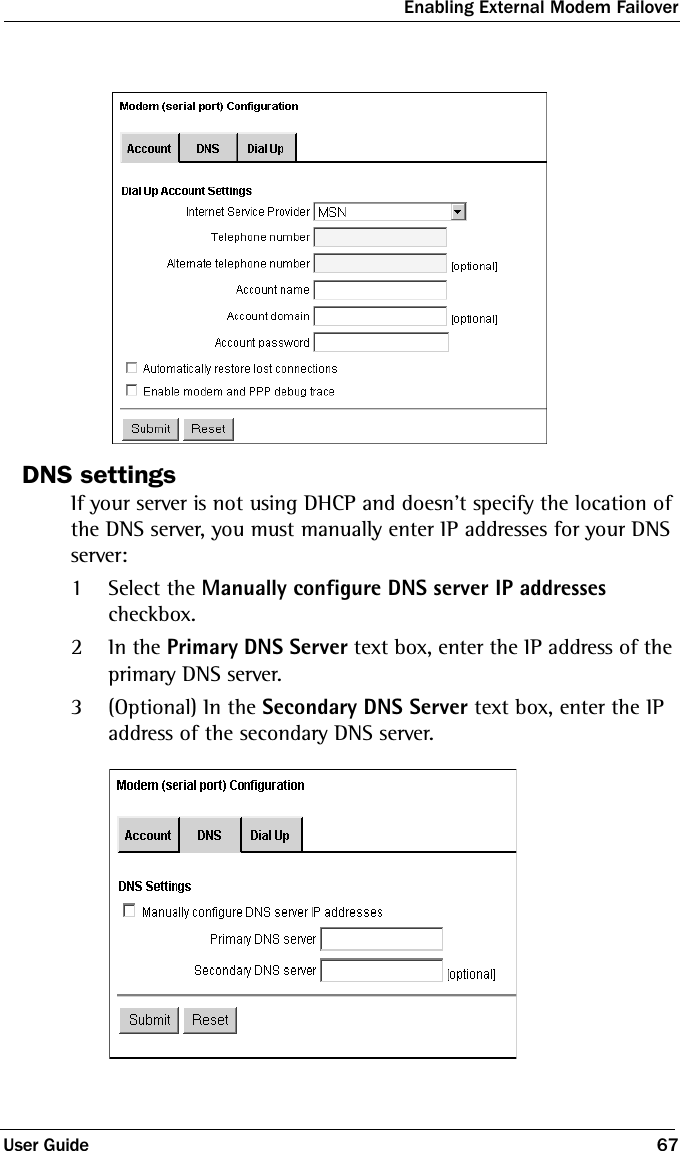
![Changing Your Network Settings66 WatchGuard Firebox X Edge5From the drop-down list, select the interface for the feature: Ethernet or modem (see the next section for additional information on using a modem).6Type the IP addresses of the hosts to ping for WAN1 and WAN2 interfaces in the applicable fields.7Type the number of seconds between pings and the number of seconds to wait for a reply in the applicable fields.8Type the limit number of pings before timeout in the applicable field.9Click Submit.Enabling External Modem FailoverUsing the Firebox X Edge, you can specify that upon failover the Edge can contact a remote secondary host for routing traffic by way of a modem. For a list of the types of modem supported, see [FAQ?]1From the drop-down list on the WAN Failover page, select Modem (serial port). 2Under Dial Up Account Settings, use the drop-down list to select your ISP. The following ISPs are supported: Standard PPP, AOL, AT&T Worldnet, CompuServe 4.0, EarthLink, MSN, and Qwest. 3Type the telephone number of your ISP. Optionally, you can also type an alternate telephone number.4Type the account name used by your ISP for your modem. 5(Optional) If you use the login to your account with a domain name (such as aol.com), enter it in Account Domain.6Enter the account password.7If you want to enable automatically restoring lost connections, select the corresponding checkbox.8If you want to enable modem and PPP debug trace, select the corresponding checkbox.](https://usermanual.wiki/WatchGuard-Technologies/MF16S32E9W/User-Guide-478877-Page-94.png)


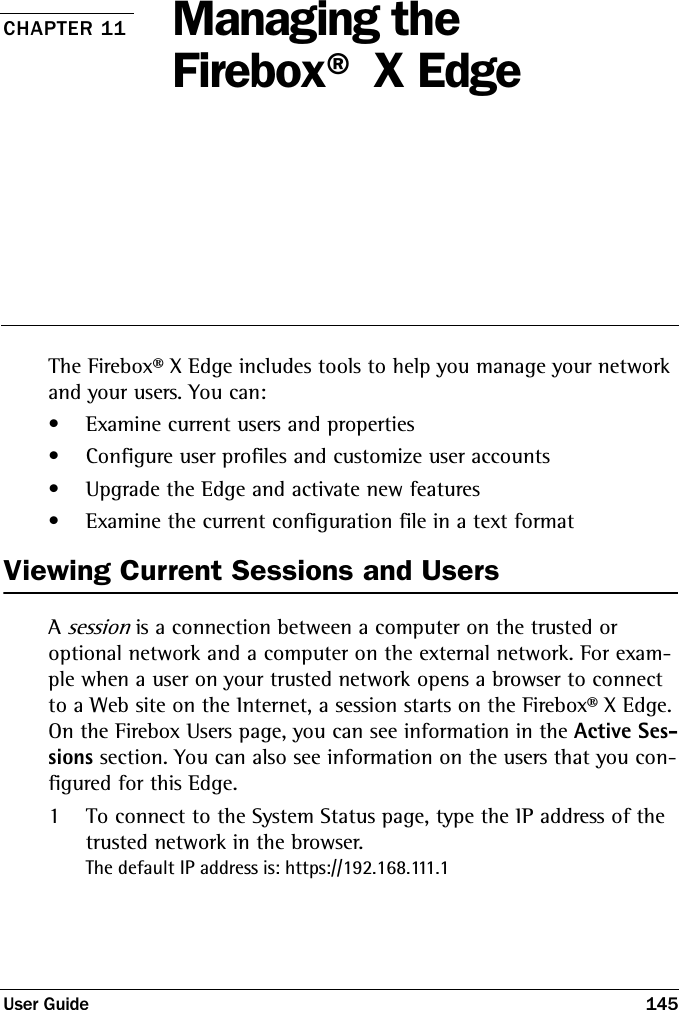
![Viewing Current Sessions and UsersUser Guide 147• The total length of time of the session• The time between the last packet and the session expiration. This is known as the idle time. If you set the idle time to 0 hours and 0 minutes, the Firebox does not disconnect the session.Closing a sessionTo disconnect an active session, click the X for the session. A dialog box appears. Click Yes to disconnect the session. To disconnect all active sessions, click Close All.• The user can log out manually by clicking the Logout button on [page]. If the user clicks this button, the Login Status box closes, and a warning dialog bog appears. The logout process is not complete until the user closes all open browsers. When a session closes, the seat license is available again for another user. For more information on seat licenses, see “About Seat Licenses” on page 156. Local User AccountsBelow Local User Accounts, you can see information on the users you configured to use this Edge:• Name -- The administrator account appears first in the list. Other users appear in alphanumeric sequence.• Admin Level -- You can set the user permissions to Full, None, or Read-only. For more information, see “Adding or Editing a User Account,” on page 152.• Options -- You can configure a user to use WebBlocker or MUVPN. For more information, see “Setting a WebBlocker profile for a user,” on page 154 and “Enabling MUVPN for a user,” on page 154.](https://usermanual.wiki/WatchGuard-Technologies/MF16S32E9W/User-Guide-478877-Page-175.png)