User Manual

WCPEn-2400-I Quick Start Guide
February 2012
Version 1.0

WCPEn 1.0 User Guide Page - 2 -
Contents
1. INTRODUCTION ............................................................................................................. - 4 -
1.1 KEY FEATURES ................................................................................................................... - 4 -
2. INSTALLATION .............................................................................................................. - 5 -
2.1 PACKAGE CONTENTS ............................................................................................................ - 5 -
2.2 PRODUCT LAYOUT ............................................................................................................... - 5 -
2.3 INSTALLATION AND SET-UP ................................................................................................... - 6 -
2.3.1 Installing the WCPEn-2400-I ....................................................................................... - 6 -
2.4 CONNECTING POWER AND DATA ............................................................................................. - 7 -
2.4.1 Accessing the WCPEn Management Interface .............................................................. - 7 -
3. CONFIGURING WCPEN .................................................................................................. - 8 -
3.1 GENERAL CONFIGURATION .................................................................................................... - 8 -
3.1.1 Setup ........................................................................................................................ - 8 -
3.1.2 Operation Mode ......................................................................................................... - 8 -
3.1.3 Specifying Wireless settings ...................................................................................... - 14 -
3.1.4 Security Settings ...................................................................................................... - 15 -
3.2 GENERAL ADMINISTRATION TASKS .......................................................................................... - 15 -
3.2.1 Firmware Upgrade ................................................................................................... - 15 -
3.2.2 Restoring Settings .................................................................................................... - 15 -
3.3 STATUS ............................................................................................................................ - 16 -
3.3.1 Checking System Setup ............................................................................................ - 16 -
3.4 CONFIGURATION ................................................................................................................ - 16 -
3.4.1 System Setup .......................................................................................................... - 16 -
3.4.2 IP Management ....................................................................................................... - 17 -
4. APPENDIX B: TROUBLESHOOTING .............................................................................. - 18 -
4.1 BASIC TROUBLESHOOTING .................................................................................................... - 18 -
4.2 LED DESCRIPTIONS ............................................................................................................ - 18 -

WCPEn 1.0 User Guide Page - 3 -
FCC Statement
Federal Communication Commission Interference Statement
This equipment has been tested and found to comply with the limits for a Class B digital device, pursuant to Part 15 of the FCC
Rules. These limits are designed to provide reasonable protection against harmful interference in a residential installation. This
equipment generates, uses and can radiate radio frequency energy and, if not installed and used in accordance with the
instructions, may cause harmful interference to radio communications. However, there is no guarantee that interference will not
occur in a particular installation. If this equipment does cause harmful interference to radio or television reception, which can be
determined by turning the equipment off and on, the user is encouraged to try to correct the interference by one of the following
measures:
● Reorient or relocate the receiving antenna.
● Increase the separation between the equipment and receiver.
● Connect the equipment into an outlet on a circuit different from that to which the receiver is connected.
● Consult the dealer or an experienced radio/TV technician for help.
FCC Caution: Any changes or modifications not expressly approved by the party
responsible for compliance could void the user’s authority to operate this equipment.
This device complies with Part 15 of the FCC Rules. Operation is subject to the following two conditions: (1) This device may not
cause harmful interference, and (2) this device must accept any interference received, including interference that may cause
undesired operation.
For product available in the USA/Canada market, only channel 1~11 can be operated. Selection of other channels is not possible.
This device and its antenna(s) must not be co-located or operation in conjunction with any other antenna or transmitter.
IMPORTANT NOTE:
FCC Radiation Exposure Statement:
This equipment complies with FCC radiation exposure limits set forth for an uncontrolled environment. This equipment should be
installed and operated with minimum distance 20cm between the radiator & your body.
Note: Wavion and its resellers or distributors are not liable for injury, damage or regulation violations associated with the installation
of outdoor units or antennas.
Copyright © Wavion Wireless Networks, an Alvarion Company, 2012

WCPEn 1.0 User Guide Page - 4 -
1. Introduction
This document describes how to set-up, configure and use the WCPEn-2400-I unit. The WCPEn-2400-I is
a 2x2 MIMO IEEE 802.11b/g/n wireless indoor CPE, which supports high throughput up to 300Mbps, as
well as supporting the unique dual-zone functionality that enables it to connect as a long-range wireless
through the WAN to the outdoor WBSn base station, and repeat the signal to the LAN.
1.1 Key Features
WCPEn-2400-I key features are presented below:
Wireless 802.11n technology
Two way Beamforming with 2x2 MIMO and 2 data-streams
Four operational modes
Data Rate up to 300Mbps
High Tx power
WMM & QoS
Desktop and Window mounting options kit
WCPEn 1.0 User Guide Page - 5 -
2. Installation
This document is intended to help you set up and configure the WCPEn-2400-I.
2.1 Package Contents
The following checklist covers all the procedures and equipment that you need to acquire and assemble,
prior to beginning the installation and configuration procedures. Ensure that you check this list carefully,
before beginning any of the procedures described later in this Guide.
1x WCPEn-2400-I unit
1x WCPEn-2400-I unit base
2x 4dBi antennas
Power adapter
Windows mounting kit
CD
2.2 Product Layout
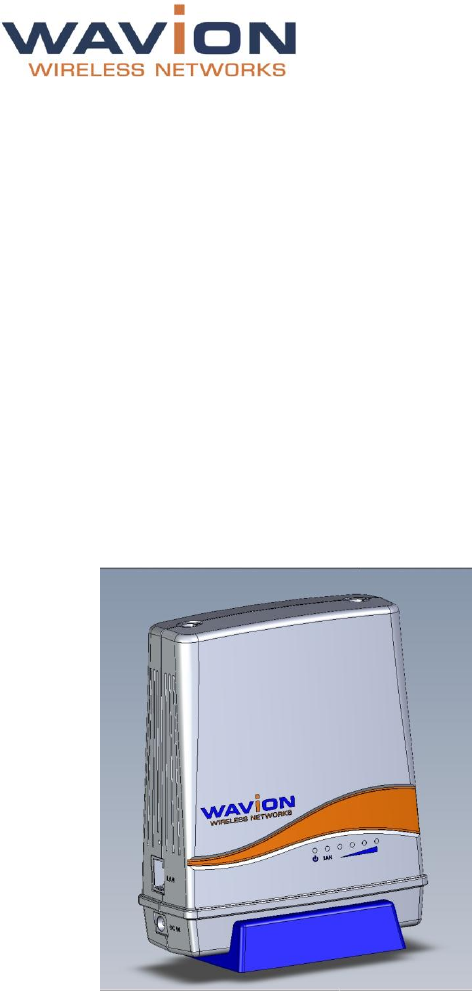
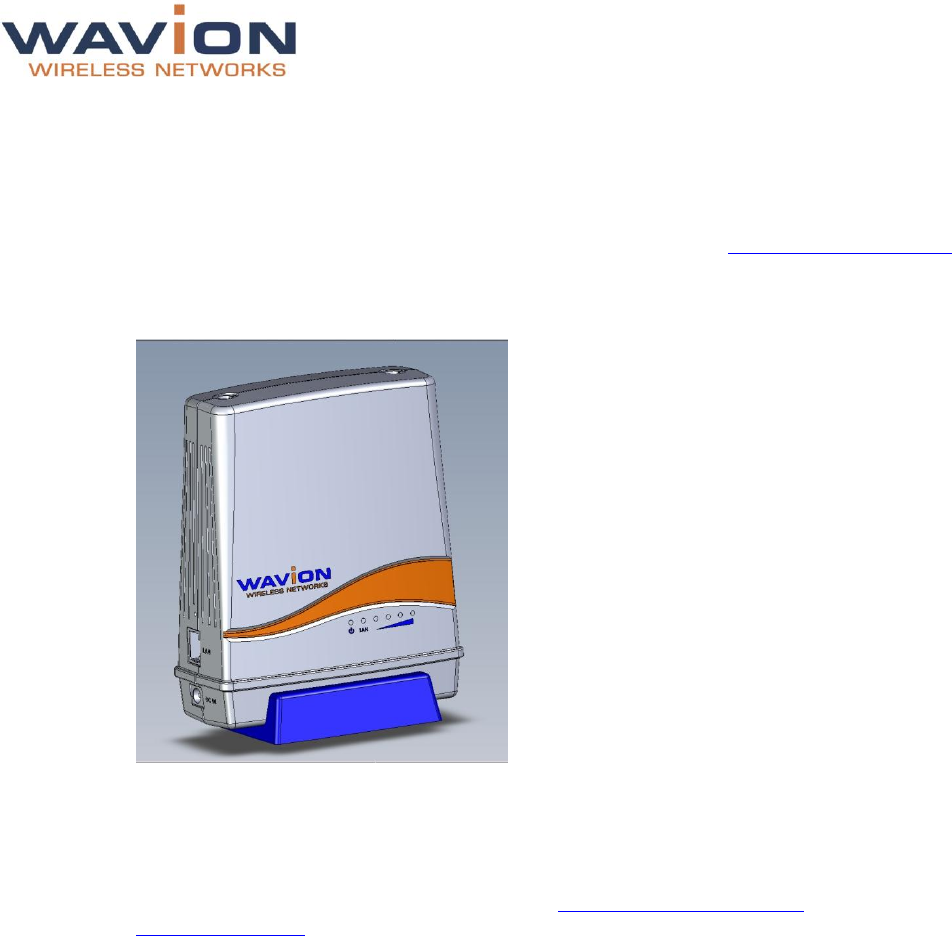
The image above represents the WCPEn-2400-I. The LAN and DC ports are located on the side of the
unit, and LEDs that indicate the Power, LAN and the signal strength are located on the front.
WCPEn 1.0 User Guide Page - 6 -
2.3 Installation and Set-up
The following section describes the installation and configuration procedures for the WCPEn-2400-I CPE.
2.3.1 Installing the WCPEn-2400-I
Prior to performing the procedures described in this section, ensure that you have read all the
information, and followed all instructions and safety precautions in the Pre-Installation Checklist.
WCPEn-2400-I setup
1. Insert the WCPEn-2400-I unit into the blue base stand.
2. Connect both antennas to the WCPE-2400-I unit.
3. Connect WCPEn-2400-I to a power source, using the power supply unit. The power LED switches on.
4. Connect WCPEn-2400-I to your PC, using a network cable. The LAN LED switches on.
The WCPEn-2400-I is now setup and ready to be used.
You should now proceed to the section entitled Connecting Power and Data, and after that go to
Basic Configuration in Chapter 3.
WCPEn 1.0 User Guide Page - 7 -
2.4 Connecting Power and Data
In order to manage the WCPEn-2400-I, your PC and the WCPEn-2400-I management IP should be on
the same sub-network. The WCPEn-2400-I management IP is: 192.168.1.2
The following procedure describes how to modify your PC IP address, for Windows XP operating
systems.
1. Click Start => Settings => Network Connections.
Note: On some computers, this is sometimes displayed as Start => Settings => Control Panel
=> Network Connections.
2. Right-click the Local Area Connection icon, and select Properties from the drop-down list displayed.
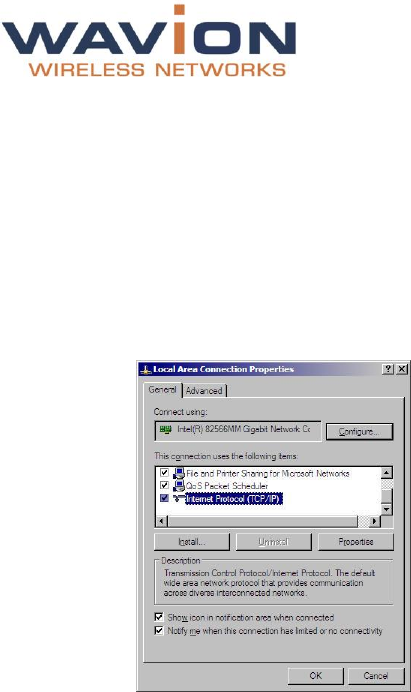
3. Select Internet Protocol (TCP/IP) and click Properties.
4. Select Use the following IP Address.
5. Enter 192.168.1.100 into the IP Local Area Connection Properties window.
2.4.1 Accessing the WCPEn Management Interface
The following procedure describes how to log in to the WCPEn-2400-I management interface, where you
can set up and configure the WCPEn-2400-I.
1. In an internet browser, enter http://192.168.1.2 in the URL navigation field, and click Enter.
Note: The following browsers are supported: Microsoft Internet Explorer, Chrome and Mozilla
Firefox.
2. A log-in screen is displayed.
Enter admin in the User Name field.
Enter admin in the password field.
3. Click Connect.
WCPEn 1.0 User Guide Page - 8 -
3. Configuring WCPEn
The WCPEn interface is comprised of three separate sections, which each relate to the key areas that you
will use.
The Status section enables you to check how the system is working, and whether the unit is
configured correctly.
The Configuration section enables you to configure the unit according to your requirements.
The Administration section enables comprehensive maintenance of the unit from the user’s point of
view, including specifying logs to be created, and creating and adding new users to the system.
3.1 General Configuration
Most of the default settings in the WCPEn-2400-I are pre-defined in order that you do not have to reset
them, or make any changes. However, certain elements require personalization, as described below.
3.1.1 Setup
This section describes how to change the default time setting, IP address and admin password.
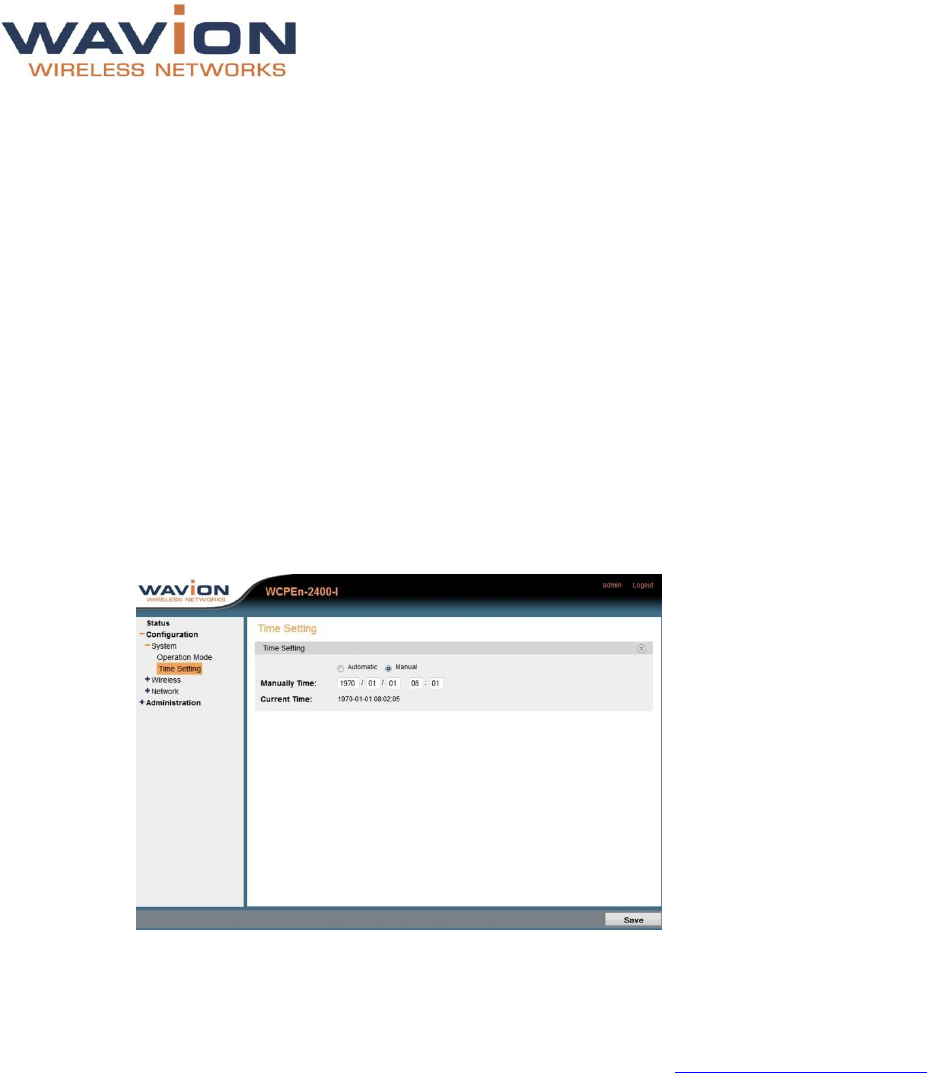
1. Navigate to Configuration => System => Time Settings to set a unified time of the unit,
according to your specific time zone.
2. Click Save.
3. Navigate to Configuration => Network => IP Address. Your default local IP address is
displayed.
4. You can change the default IP address to reflect your management IP address.
Note: For information about modifying your IP address, see Connecting Power and Data.
5. Navigate to Administration => Users, to change the admin default password.
3.1.2 Operation Mode
When configuring your WCPEn-2400-I, you need to specify an operational mode according to the system
set-up with which you are working. The following operation modes are available:
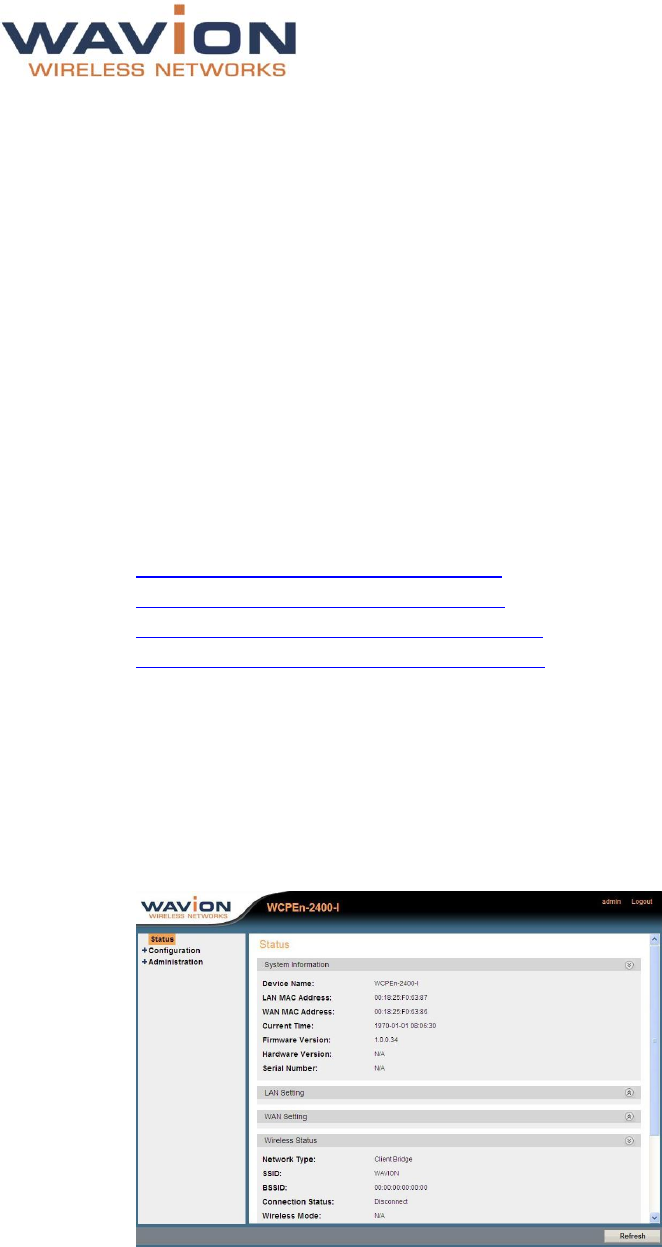
Client Bridge Operation Mode
The Client Bridge operation mode means that the wireless client interface is treated as a WAN port,
and the Ethernet ports are considered as LAN ports. When WCPEn-2400-I is in this mode, neither
Network Address Translation (NAT) nor routing functionality can be performed.
WCPEn 1.0 User Guide Page - 9 -
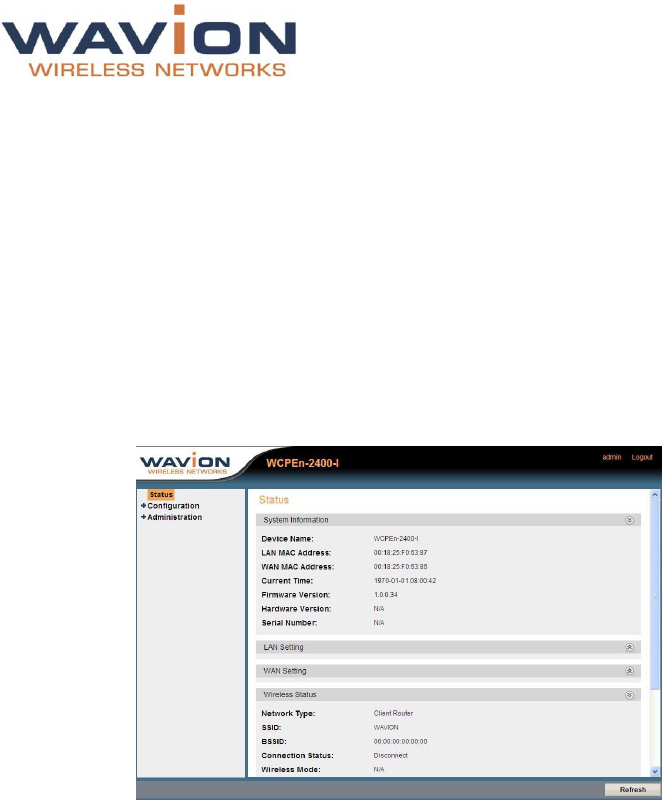
Client Router Operation Mode
The Client Router operation mode means that both the Network Address Translation (NAT) and the
IP address for the PC connected to the WCPEn-2400-I LAN port are provided by the DHCP server at
the gateway router, rather than by the unit.
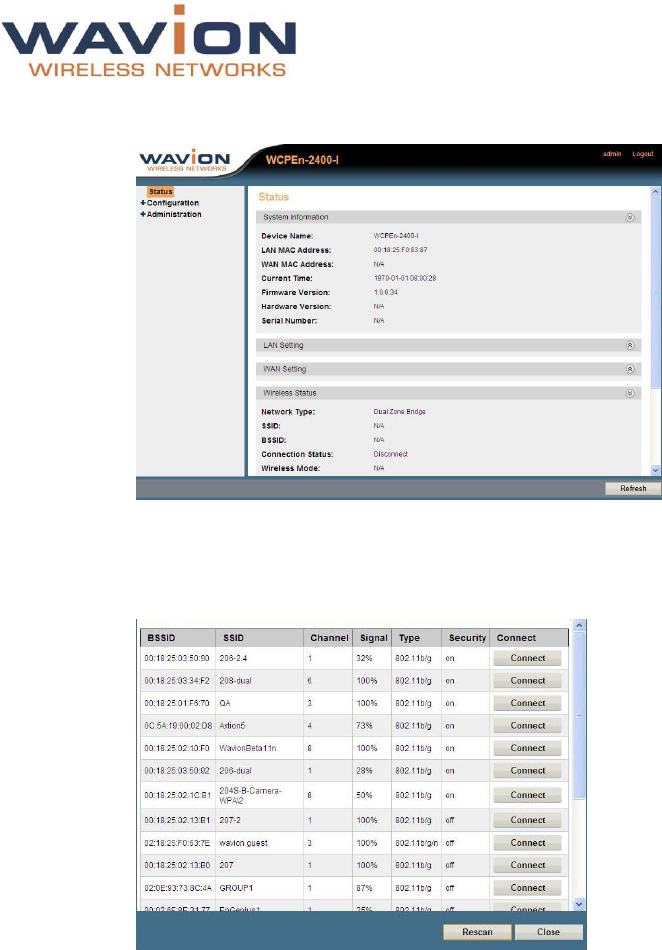
Dual Zone Bridge Operation Mode
In the Dual Zone operation modes, both LAN and WAN interfaces are wireless. The WCPEn-2400-I
works as a repeater between the two wireless interfaces.
In the Dual Zone Bridge operation mode, both the Network Address Translation (NAT) and the IP
address for the PC connected to the WCPEn-2400-I LAN port are provided by the DHCP server at the
gateway router, rather than by the unit.
Dual Zone Router Operation Mode
In the Dual Zone operation modes, both LAN and WAN interfaces are wireless. The WCPEn-2400-I
works as a repeater between the two wireless interfaces.
In Dual Zone Router operation mode, both the Network Address Translation (NAT) and the IP
address for the PC connected to the WCPEn-2400-I LAN port, are provided by the DHCP server on
the WCPEn-2400-I
Below please find the procedures describing how to configure according to the specific operation mode.
Configuring Client Bridge Operation Mode
Configuring Client Router Operation Mode
Configuring Dual Zone Bridge Operation Mode
Configuring Dual Zone Router Operation Mode
3.1.2.1 Configuring Client Bridge Operation Mode
1. Navigate to Configuration => System => Operation Mode, and select the Client Bridge
mode.
2. Click Save.
3. Following the prompt, restart your system.
Note: Once your system powers up again, you can check that the correct operation mode has been
activated, by navigating to Status => Wireless Status => Operation Mode, as shown below:
4. To configure the Wireless settings, navigate to Configuration => Wireless => Wireless
Setting=>Site Survey.
5. Click Scanning. A list of available access points is displayed
6. Select the required access point and click Connect.
WCPEn 1.0 User Guide Page - 10 -
Note: If indicated in the list of access points that security settings need to be configured, click
Security Settings:
a. Enter the SSID string of your home system.
b. Specify the security mode according to your system requirements. For more information, see
the Security, Authentication and Encryption Modes table.
3.1.2.2 Configuring Client Router Operation Mode
1. Navigate to Configuration => System => Operation Mode, and select the Client Router
mode.
2. Click Save.
3. Following the prompt, restart your system.
Note: Once your system powers up again, you can check that the correct operation mode has been
activated, by navigating to Status => Wireless Status => Operation Mode, as shown below:
4. Navigate to Configuration => Network => WAN Settings.
5. Select Dynamic IP (DHCP Client), and click Save.
6. To configure the Wireless settings, navigate to Configuration => Wireless => Wireless
Setting=>VAP1.
7. Click Scanning. A list of available access points is displayed
8. Select the required access point and click Connect.
Note: If indicated in the list of access points that security settings need to be configured, click
Security Settings:
a. Enter the SSID string of your home system.
b. Specify the security mode according to your system requirements. For more information, see
the Security, Authentication and Encryption Modes table.
3.1.2.3 Configuring Dual Zone Bridge Operation Mode
1. Navigate to Configuration => System => Operation Mode, and select the Dual Zone Bridge
mode.
2. Click Save.
3. Following the prompt, restart your system.
WCPEn 1.0 User Guide Page - 11 -
Note: Once your system powers up again, you can check that the correct operation mode has been
activated, by navigating to Status => Wireless Settings => Operation Mode, as shown below:
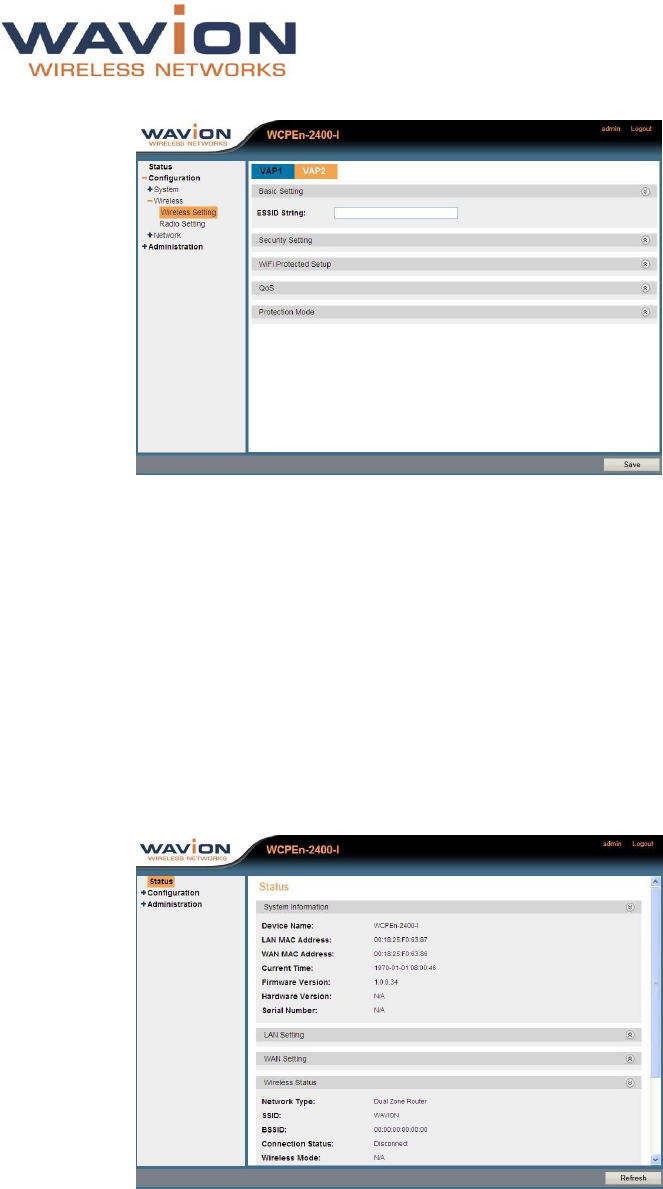
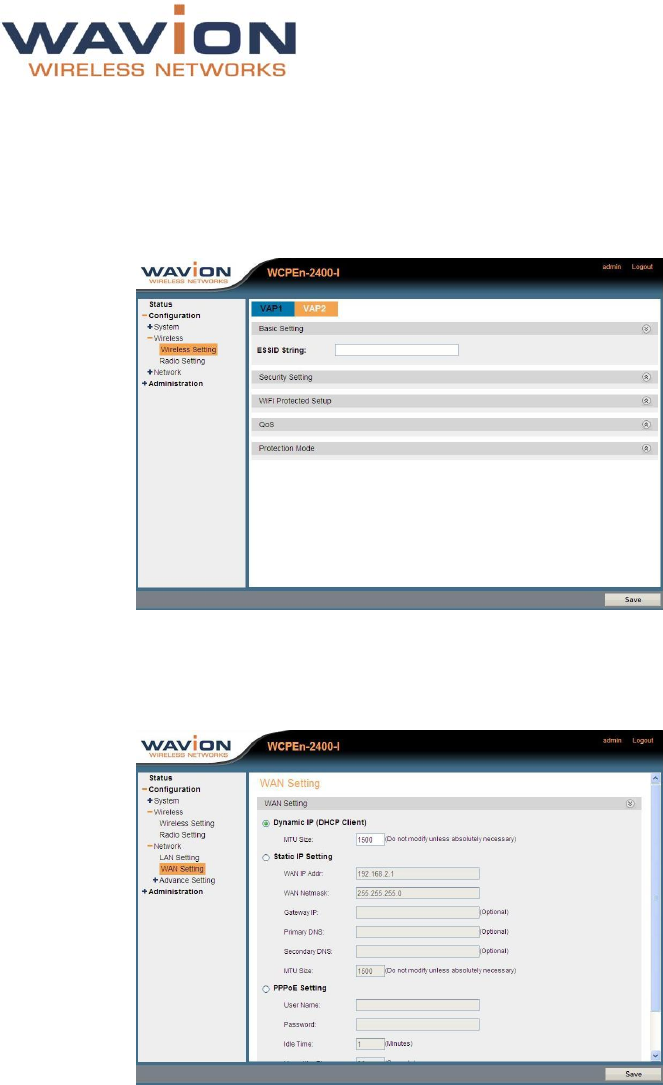
4. You must define two Virtual AP (VAPs) for Dual Zone Bridge Operation Mode. VAP1 is the VAP which
connects to the outdoor base station, and VAP 2 is the VAP signal to WCPEn-2400-I.
5. To specify the first VAP, navigate to Configuration => Wireless => Wireless Setting.
6. Click the VAP1 tab, and click Scanning. A list of available access points is displayed.
7. Select the required access point and click Connect.
Note: If indicated in the list of access points that security settings need to be configured, click
Security Settings:
a. Enter the SSID string of your home system.
b. Specify the security mode according to your system requirements. For more information, see the
Security, Authentication and Encryption Modes table.
WCPEn 1.0 User Guide Page - 12 -
8. Click the VAP2 tab.
9. Enter the SSID string of your home system.
10. Specify the security mode according to your system requirements. For more information, see the
Security, Authentication and Encryption Modes table.
11. Click Save.
3.1.2.4 Configuring Dual Zone Router Operation Mode
1. Navigate to Configuration => System => Operation Mode, and select the Dual Zone Router
mode.
2. Click Save.
3. Following the prompt, restart your system.
Note: Once your system powers up again, you can check that the correct operation mode has been
activated, by navigating to Basic Status => Wireless Settings => Operation Mode, as shown
below:
4. You must define two VAPs for Dual Zone Router operation mode. VAP1 is the VAP which connects to
the outdoor base station, and VAP 2 is the VAP signal to WCPEn-2400-I.
5. To specify the first VAP, navigate to Configuration => Wireless => Wireless Setting.
6. Click the VAP1 tab, and click Scanning. A list of available access points is displayed
7. Select the required access point and click Connect.
WCPEn 1.0 User Guide Page - 13 -
Note: If indicated in the list of access points that security settings need to be configured, click
Security Settings:
a. Enter the SSID string of your home system.
b. Specify the security mode according to your system requirements. For more information, see
the Security, Authentication and Encryption Modes table.
8. Click the VAP2 tab.
9. Enter the SSID string of your home system.
10. Specify the security mode according to your system requirements. For more information, see the
Security, Authentication and Encryption Modes table.
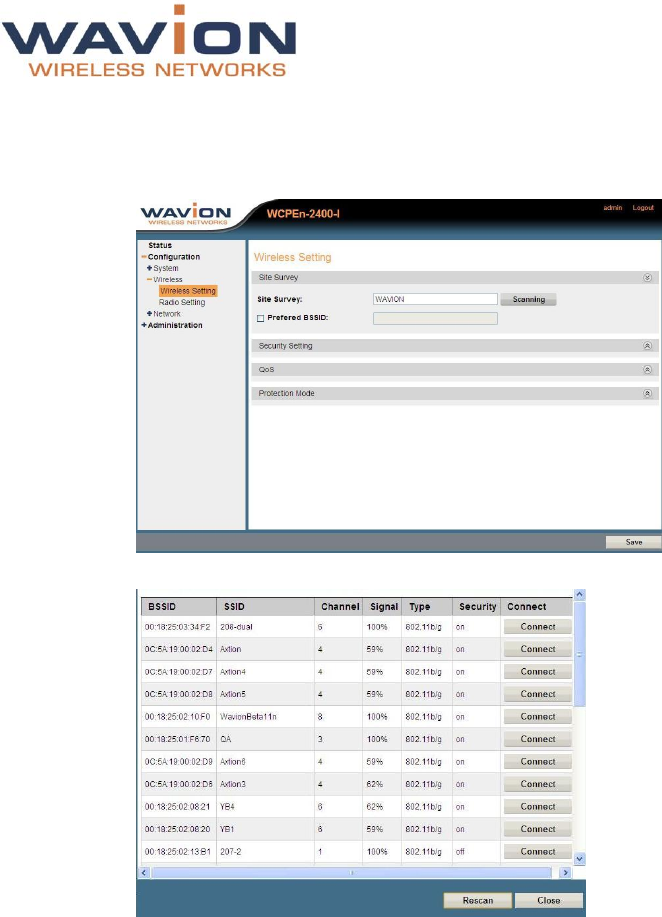
11. Navigate to Configuration => Network => WAN Setting.
12. Select Dynamic IP (DHCP Client), and click Save.
WCPEn 1.0 User Guide Page - 14 -
3.1.3 Specifying Wireless settings
To specify Wireless Settings
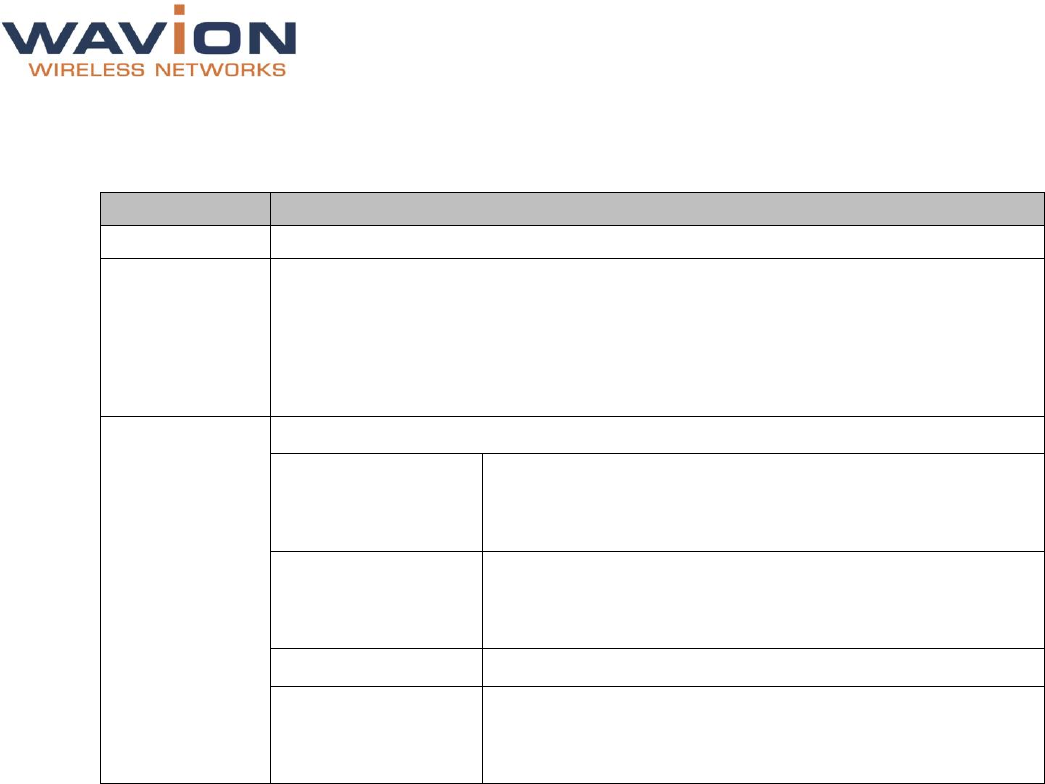
1. Navigate to Configuration => Wireless => Wireless Settings.
2. In Site Survey, click Scanning to locate and display a list of the available local WBSn base stations.
3. Click Connect on the Base Station to which you wish to connect, and click Close.
WCPEn 1.0 User Guide Page - 15 -
4. In Configuration => Wireless => Wireless Settings go to the Security Settings section, and
specify the security mode according to your system requirements (see the below table).
3.1.4 Security Settings
Security Mode
Values
Open
No security applied
WEP
Simple WEP security (64 or 128 bit hardware key)
Modes:
Open Key
Shared key
Indicate which key is primary – 4 options
WPA
Enhanced security for personal enterprise Available options:
MODE
WPA
WPA2
Auto
CYPHER
TKIP
CCMP
Auto
Pre-Shared Key
Enter a pre-shared key, required field. 8-63 characters.
Enterprise/Radius
support
AUTH Server
Port
Shared Secret
3.2 General Administration Tasks
The following procedures describe how to upgrade the current firmware, as well as how to restore
settings to the default or previously defined settings.
3.2.1 Firmware Upgrade
The firmware upgrade capability enables you to upgrade your system firmware, or to rollback to a
previously saved version.
1. In the WCPEn-2400-I management interface, navigate to Administration => Firmware Upgrade.
2. Browse to the location in which the upgrade file is located.
3. Click Upgrade.
3.2.2 Restoring Settings
You can back-up your current configuration settings, for example, for maintenance or troubleshooting
purposes. You can also use this backup to restore your system configuration settings to those previously
defined, in the event of a problem.
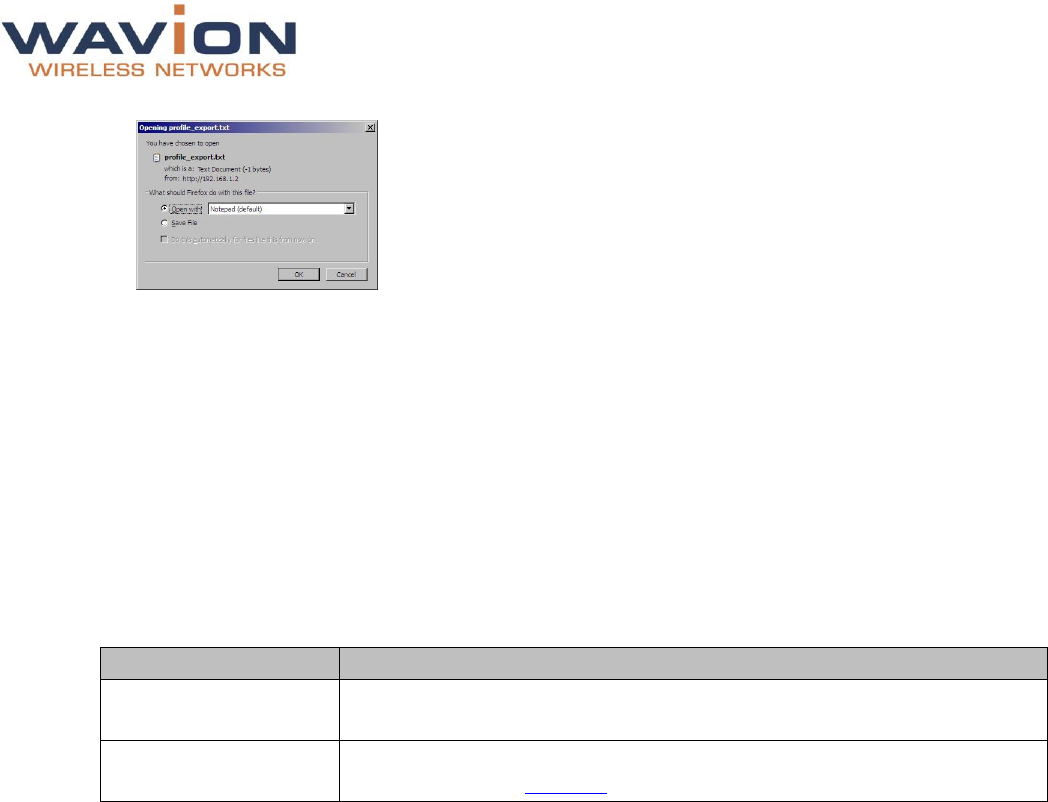
1. In the WCPEn-2400-I interface, navigate to Administration => Backup/Restore Settings.
2. To back up the configuration settings, click Backup.
WCPEn 1.0 User Guide Page - 16 -
3. A window is displayed, asking you if you wish to save or open your backup file.
4. Select Save File, and click OK.
5. To restore a system configuration setup from a previously saved backup file, click Browse in the
Restore File field, and navigate to the location where the this file was saved.
6. Select the file, and click Restore.
A message is displayed, advising you that the Restore is in process, and that you should refresh your
browser within two minutes.
3.3 Status
This section enables you to check how your system is working, and whether the WCPEn unit and
software/firmware is configured correctly.
3.3.1 Checking System Setup
Navigate to Status => System for an overall view of the system settings.
Parameter
Description and values
Time
Indicates the unified time of the unit, according to the NTP server, and your
specific time zone.
Software Versions
Displays the current software (firmware) version. For more information, see
the section entitled Firmware.
3.4 Configuration
3.4.1 System Setup
In the GUI, use the Configuration => System page to set up, configure and manage your IP. This
page displays basic static information on the system, including contact details, and IP addresses. Default
values and details are provided, which should be modified, by specifying parameter values according to
your network system and requirements.
WCPEn 1.0 User Guide Page - 17 -
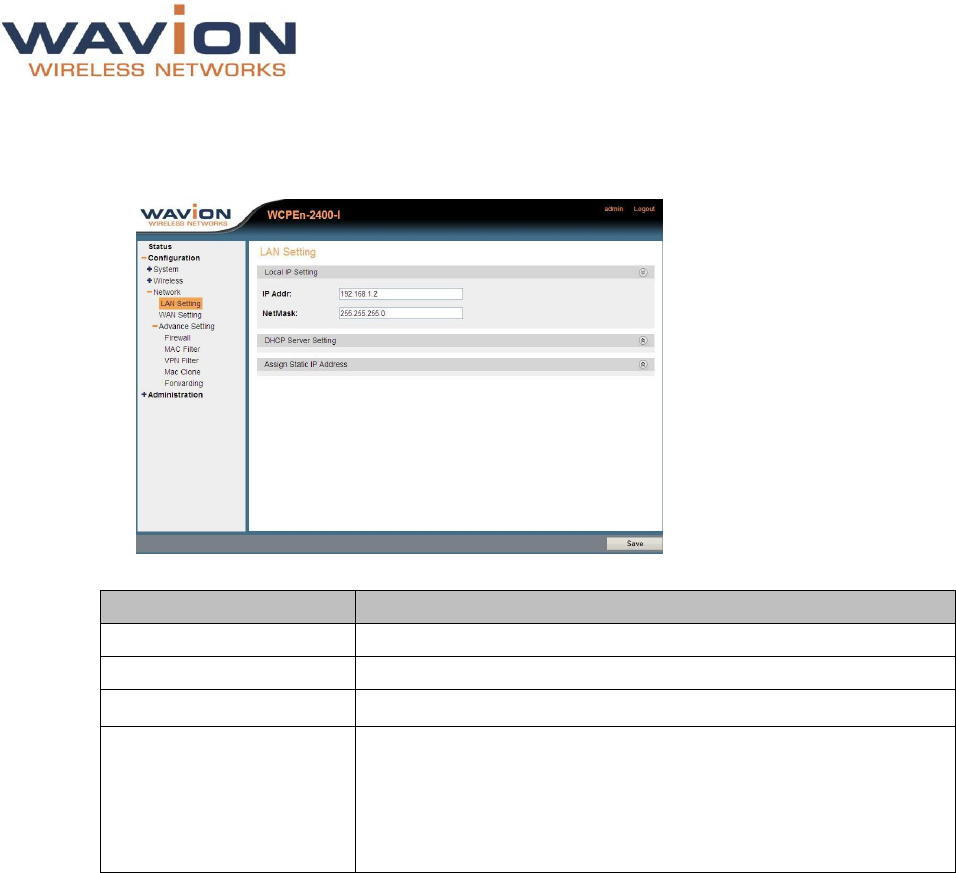
3.4.2 IP Management
To Configure a Management IP address
1. Navigate to Configuration => Network => LAN Setting.
2. Modify the IP address and NetMask values according to your local network specification, as required.
Parameter
Description
IP Address
Change the management IP address
Mask
Enter the required network mask
DHCP Server Setting
Disabled
Static IP Address Setting
Select Enable or Disable
If Enabled, you must specify values for the following fields:
IP Address
Mac Address
Static IP List – displays a list of available static IPs.

WCPEn 1.0 User Guide Page - 18 -
4. Appendix B: Troubleshooting
We hope your experience with the WCPEn-2400-I is as smooth as possible. In this section we provide tips
to solve some common problems.
4.1 Basic Troubleshooting
Problem
Solution
Default user and password
User: admin
Password: admin
Unable to Ping or HTTP the new unit
Check the Power
Is the CPE Operational? Check the LED, make sure it shows
green on the status
WCPEn-2400-I default IP Address is 192.168.1.2 /24 mask
Client unable to acquire an IP Address
from DHCP Server
Is the CPE Operational?
Check the DHCP Server. Use Static IP to test the DHCP
configuration
4.2 LED Descriptions
LED
Status
Description
Power LED
Off
On
CPE is powered off
CPE has finished the initialization and is powered
on
LAN LED
Off
On Blinking
Network cable is not connected
Network cable is connected
Ethernet Activity is happening
1st signal strange LED
Off
On
The CPE is not connected to any AP
The CPE has established a connection with the
AP
2nd signal strange
LED:
Off
On
Signal strange is less than 25%
Signal strange is 26%~50%
3rd signal strange LED
Off
On (Green)
Signal strange is less 50%
Signal strange is 51%~75%
4th signal strange LED
Off
On (Green)
When signal strange is less than 75%
When signal strange is 76%~100%
Reset button
All 5 LEDs are blinking when SW is reset (for any reason)