Wayne Dalton HAC010290842 HOME ACCESS CONTROLLER User Manual USERS MANUAL
Wayne Dalton Corporation HOME ACCESS CONTROLLER USERS MANUAL
USERS MANUAL

5015 B.U. Bowman Drive Buford, GA 30518 USA Voice: 770-831-8048 Fax: 770-831-8598
FCC Part 15 Subpart C Certification
Test Report
FCC ID: KJ8HAC010290842
FCC Rule Part: 15.231/15.249
ACS Report Number: 06-0050-15-XXX
Manufacturer: Wayne-Dalton Corp.
Trade name: Home Access Controller
Model: WDHA-12
Operator and Installation Guide
IMPORTANT NOTICE!
Read the enclosed instructions carefully before
programming the 3-Button Transmitter. Pay close
attention to all warnings and notes. This manual
should be retained for future reference.
Wireless Gateway
Model WDHA-12
Operating Instructions and Owner’s Manual
Package Content ................................................................................................................................................... 2
FCC and IC Statement ........................................................................................................................................... 2
Safety Information ................................................................................................................................................ 3
Activating Transmitter ........................................................................................................................................... 4
Programming Transmitter ..................................................................................................................................5-7
Table of contents
Open to Page 2
© Copyright 2006 Wayne-Dalton Corp. Part No. 0000000 New 2/22/06
Package Contents
2
You can reach us Toll Free 1-866-57CAR2U (1-866-572-2728) for Consumer Assistance
or online at WWW.LEARCAR2U.COM
FCC Regulatory Information:
NOTE: This equipment has been tested and found to comply with the limits for a Class B digital
device, pursuant to Part 15 of the FCC Rules. These limits are designed to provide reasonable
protection against harmful interference in a residential installation. This equipment generates,
uses, and can radiate radio frequency energy and, if not installed and used in accordance
with the instruction, may cause harmful interference to radio communications. However, there
is no guarantee that interference will not occur in a particular installation. If this equipment
does cause harmful interference to radio or television reception, which can be determined by
turning the equipment off and on, the user is encouraged to try and correct the interference by
one or more of the following measures: reorient or relocate the receiving antenna, increase
the separation between the equipment and receiver, connect the equipment into an outlet
on a circuit different from that to which the receiver is connected. Consult the dealer or an
experienced radio/TV technician for help.
IC Regulatory Information:
This Class B digital apparatus meets all requirements of the Canadian Interference Causing
Equipment Regulations. Operation is subject to the following two conditions: (1) this device may
not cause harmful interference, and (2) this device must accept any interference received, including
interference that may cause undesired operation of the device.
Cet appareillage numérique de la classe B répond a toutes les exigences de l’interférence
canadienne causant des règlements d’équipement. L’opération est sujette aux deux conditions
suivantes: (1) ce dispositif peut ne pas causer l’interférence nocive, et (2) ce dispositif doit
accepter n’importe quelle interférence reçue, y compris l’interférence qui peut causer l’opération
peu désirée.
WARNING: Changes or modications to this receiver not expressly approved by Wayne-Dalton
Corp. could void the user’s authority to operate this equipment.
FCC and IC Statement
Wireless
Gateway
Instruction
Manual
Denition of Symbol
3
You can reach us Toll Free 1-866-57CAR2U (1-866-572-2728) for Consumer Assistance
or online at WWW.LEARCAR2U.COM
Unfold to go to Page 4
Information
You can reach us Toll Free 1-866-57CAR2U (1-866-572-2728) for Consumer Assistance
or online at WWW.LEARCAR2U.COM
8
Programming
aa
PRELIMINARY
PRELIMINARY
Use the following procedure to
teach a hand held transmitter
button to a SCENE button. This
procedure also is used to reassign
a transmitter button to a different
SCENE button.
1. Press and Hold SCENE button you
wish to program, either Scene 1, 2
or 3.
The LED on the Wireless Gateway will
turn on immediately.
2. Press and hold the desired
Transmitter button.
3. Release the SCENE button.
The LED on the Wireless Gateway
will flash three (3) times quickly
to indicate the programming is
successful.
4. Release the transmitter button.
Use this procedure to teach a
Homelink button to a SCENE
button. This procedure can also be
used to reassign a homelink button
to a different SCENE button.
1. Place Wireless Gateway within 3
inches of the Homelink transceiver.
2. On the Wireless Gateway, Press
and Hold the SCENE button you wish
to program, either Scene 1, 2 or 3.
The LED on the Wireless Gateway will
turn on immediately.
3. Press and hold the desired
Homelink button. The Homelink LED
will flash slowly.
Continue to Hold the Wireless
Gateway within 3 inches of the
Homelink transceiver until the
successful completion of the
programming which is indicated by
rapid blinking of the Homelink LED or
if the Homelink LED turns off.
4. Release the SCENE button.
5. Press the Homelink button again
and the Wireless Gateway LED’s will
flash three (3) times indicating the
programming is successful.
Disconnect from SCENE
Programming to Homelink
Programming To Transmitter
Use this procedure to Disconnect a
hand-held transmitter or Homelink
transceiver from a Wireless Gate-
way SCENE button.
1. Press the DELETE button on the
Wireless Gateway.
All three (3) LED’s on the Wireless
Gateway will turn on.
2. Within five (5) seconds, press the
SCENE button you wish to disconnect
from on the Wireless Gateway.
The LED on the selected SCENE will
turn on until it is disconnected or there
is a 5 second timeout.
3. Within five (5) seconds, press the
Homelink or hand-held transmitter
button you wish to disconnect from the
Wireless Gateway.
The LED for the selected SCENE on the
Wireless Gateway will flash three (3)
times quickly to indicate a successful
disconnect.
Go to Programming on Page 8
4 5
Programming
You can reach us Toll Free 1-866-57CAR2U (1-866-572-2728) for Consumer Assistance
or online at WWW.LEARCAR2U.COM
6 7
Programming
Programming Programming
Programming to Transmitter Programming to Homelink
Add Z-Wave Module to Scene
Disconnect from SCENE
Use this procedure to add a
Z-Wave device to a SCENE button.
1. Perform this procedure while the
device is battery powered only. Do
not plug the Wireless Gateway into AC
power to program.
2. On the Wireless Gateway, Press
and Hold the SCENE button you wish
to program, either Scene 1, 2 or 3.
The LED on the Wireless Gateway will
turn on immediately.
3. Within 10 seconds, press and
release the OPERATE button on the
Z-Wave device you wish to add to a
SCENE.
The LED on the Wireless Gateway
will flash three (3) times quickly
to indicate the programming is
successful and then remain on as
long as the SCENE button is pressed.
Press the Operate button on the
Z-Wave module to set the dim level
or the ON/OFF state for relay type
devices.
4. Release the SCENE button.
The LED’s on the Wireless Gateway
will flash three (3) times indicating
the programming is successful.
Go to Programming on Page 8
4 5
Programming
You can reach us Toll Free 1-866-57CAR2U (1-866-572-2728) for Consumer Assistance
or online at WWW.LEARCAR2U.COM
6 7
Programming
Programming Programming
Activate Z-Wave SCENE Remove Z-Wave Module
from SCENE
Remove Z-wave module from
Network
Use the following procedure to
activate a previously programmed
SCENE.
1. Press and Hold SCENE button you
wish to program, either Scene 1, 2
or 3.
The LED on the Wireless Gateway will
turn on immediately.
2. Press and hold the desired
Transmitter button.
3. Release the SCENE button.
The LED on the Wireless Gateway
will flash three (3) times quickly
to indicate the programming is
successful.
4. Release the transmitter button.
Use the following procedure to
remove a single Z-Wave device
from a programmed SCENE.
1. Press and release the DELETE
button on the Wireless Gateway.
All three (3) LED’s on the Wireless
Gateway will turn on.
2. Within 5 seconds, press and hold
the SCENE button that is associated
with the device you want to remove.
The selected SCENE LED will stay lit
and the other two will turn off.
3. Press and Release the OPERATE
button of the Z-Wave device you wish
to remove.
The LED on the Wireless Gateway
will flash three (3) times quickly to
indicate the removal was successful.
4. Release the SCENE button on the
Wireless Gateway/
Use the following procedure to
teach a hand held transmitter
button to a SCENE button. This
procedure also is used to reassign
a transmitter button to a different
SCENE button.
1. Press and Hold SCENE button you
wish to program, either Scene 1, 2
or 3.
The LED on the Wireless Gateway will
turn on immediately.
2. Press and hold the desired
Transmitter button.
3. Release the SCENE button.
The LED on the Wireless Gateway
will flash three (3) times quickly
to indicate the programming is
successful.
4. Release the transmitter button.
PRELIMINARY
PRELIMINARY
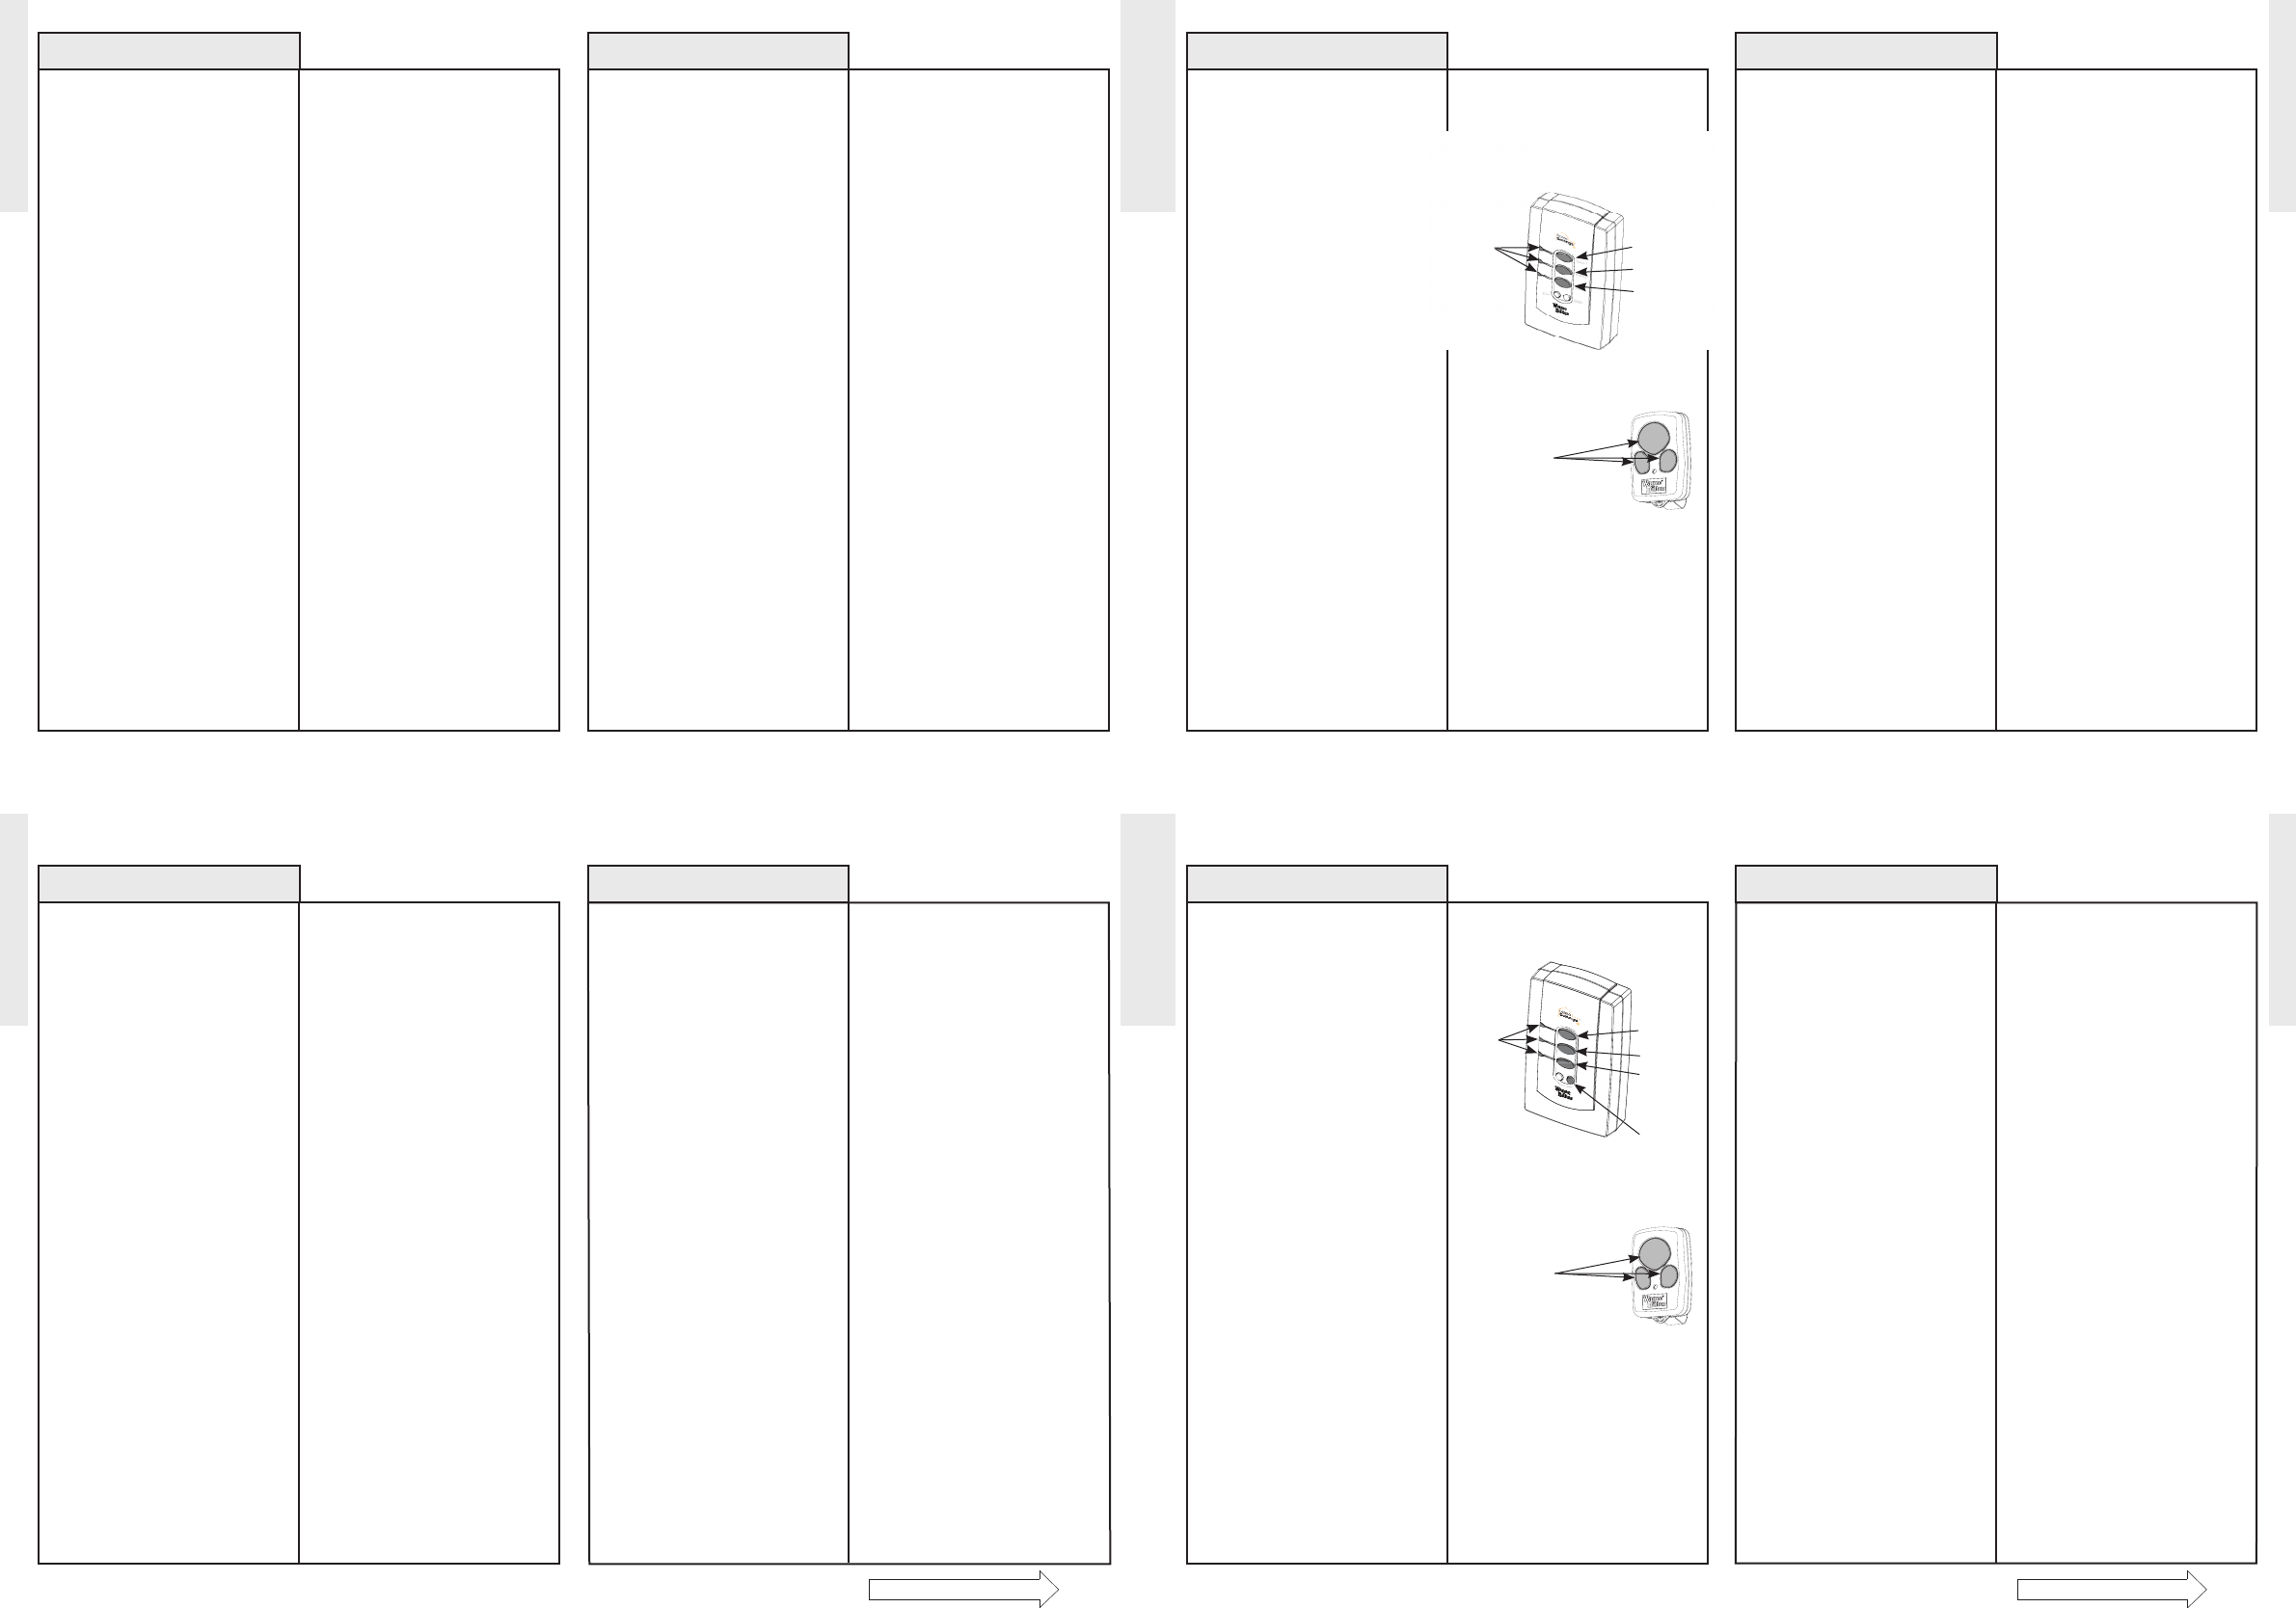
TRANSMITTER
BUTTONS
LED Scene 1
Scene 2
Scene 3
TRANSMITTER
BUTTONS
Scene 1
Scene 2
Scene 3
Delete
Copy
Use the following procedure to
clear the entire memory of a single
SCENE button. This will clear the
memory of the chosen scene of all
modules and transmitters.
1. Simultaneously press and hold the
DELETE and the SCENE button you
wish to clear the memory of, either
SCENE 1, 2, or 3.
After 10 seconds the LED on the
Wireless Gateway will flash three (3)
times quickly indicating the memory
was cleared.
2. Release the buttons.
Clearing Memory of a Scene
WIRELESS GATEWAY
TRANSMITTER
WIRELESS GATEWAY
TRANSMITTER
Delete
Scene 3
Scene 2
Scene 1
LED