Wearable Health Solutions 200910P MEDIPENDANT User Manual Manual Final 0809
Medical Alarm Concepts MEDIPENDANT Manual Final 0809
Users Manual

5215-CMilitiaHillRoad,PlymouthMeeting,PA 19462
www.MedicalAlarmConcepts.com
TM
Rev. Man01
08/09
MediPendant™
Model #MED01
OWNER’S MANUAL
Manufactured by
TM

Introduction to the MediPendant™ ................................................................... 2
Products Included In Your MediPendant™ Kit .................................................. 3
Product Features ...........................................................................................4-5
Installing Your MediPendant™ ........................................................................6-9
Testing Your MediPendant™ For The First Time ........................................ 10-11
Operating Your MediPendant™ ................................................................... 12-13
Wearing Your MediPendant™ ........................................................................... 14
In An Emergency ........................................................................................... 15
Battery Test ..................................................................................................... 16
System/Range Test ......................................................................................... 17
Installing/Replacing the Battery ................................................................... 18
Troubleshooting ............................................................................................. 19
General Warnings .......................................................................................... 20
Safety Precautions ......................................................................................... 21
Limited Warranty and Disclaimer ............................................................22-24
TABLE OF CONTENTS
OWNER’S MANUAL Model #MED01
MediPendant™
Please read this manual completely
and save it for future reference.
1
Customer Service Phone #: ________________________________

Thank you for choosing MediPendant™ - the ONLY medical alert device that
allows you to speak and listen directly through the pendant.
MediPendant™ was designed to give you the mobility and freedom to move in
and around your home without worry.
Each MediPendant™ has been carefully tested and inspected to meet the
highest quality standards. Simply press the button on your pendant to be
connected to an Emergency Medical Technician (EMT)-certified operator – 24
hours a day/7 days a week.
The easy-to-use features include:
• One-button activation – there is no keypad on the pendant or the base
station so the unit can ONLY call the emergency call center.
• Can be worn around the neck, clipped to your belt, or around your wrist.
• Battery provides up to six hours of talk time and up to one year of stand-
by time.
• MediPendant™ is water-resistant. While pendant may be worn in the bath
or shower, it should not be exposed to water for prolonged periods of
time.**
• Operates anywhere from 300 ft. to 600 ft. in and around your home.*†
• Easy installation – plugs easily into any standard power outlet and
telephone jack.
INTRODUCTION TO THE MediPendant™
MediPendant™
2
*Line of sight.
† Building structure and conditions may affect range.
**Base station should never be exposed to water.
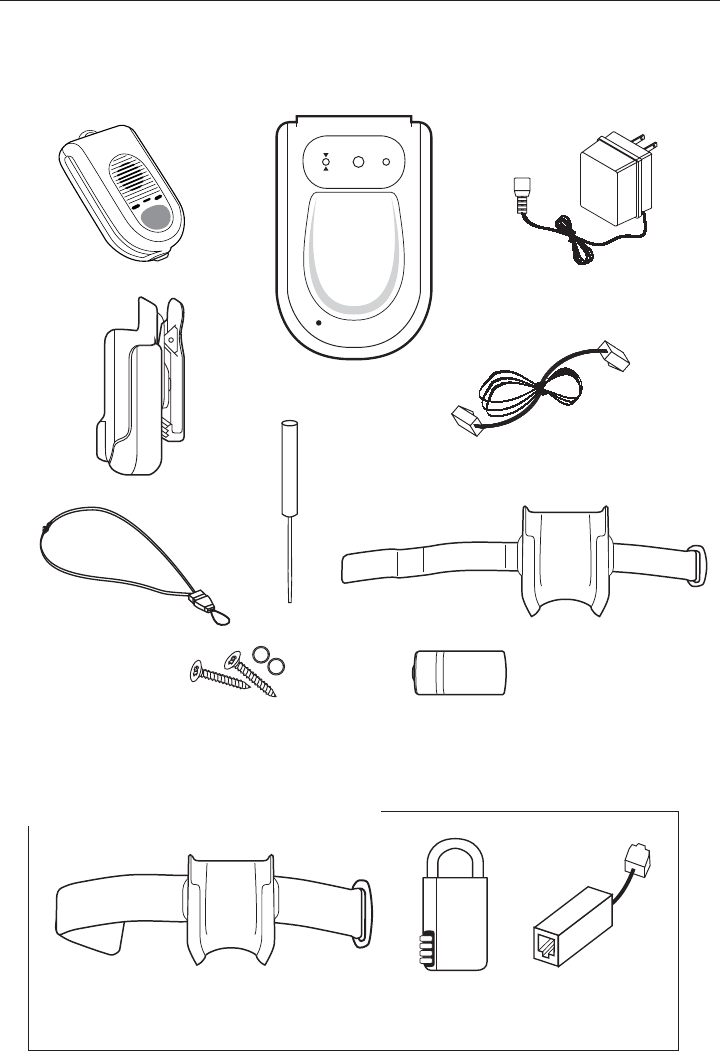
SET UP
SilentPOWER
On =
System in Use
Blinking =
Phone Line Trouble
AC/DC Adapter
(Power Cord)
Pendant
Base Station
Wrist Strap
OPTIONAL
Arm Band
6 ft.
Telephone Cord
Break Away
Neck Lanyard
Belt Clip
Screwdriver
PRODUCTS INCLUDED IN YOUR MediPendant™ KIT
OPTIONAL ACCESSORIES
OWNER’S MANUAL Model #MED01
3
Lithium Photo Battery 123
(1 Installed, 1 Extra Included)
BATTERY
Spare Screws
and O-Rings
OPTIONAL
Lock Box
OPTIONAL
DSL Filter
D
S
L
F
I
L
T
E
R
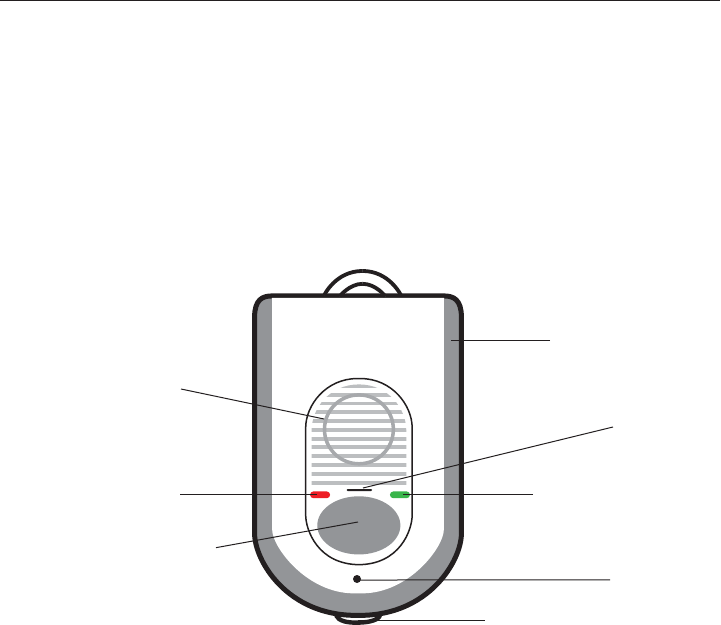
PRODUCT FEATURES
PENDANT
MediPendant™
Large, easy-to-find
emergency button
Protective
rubber edge
Water-resistant
Two-way
audio speaker
Battery/System Test
button
Ergonomically
designed
Range
indicator light
Battery
indicator light
Water
drainage
port
Full
duplex
mic
4
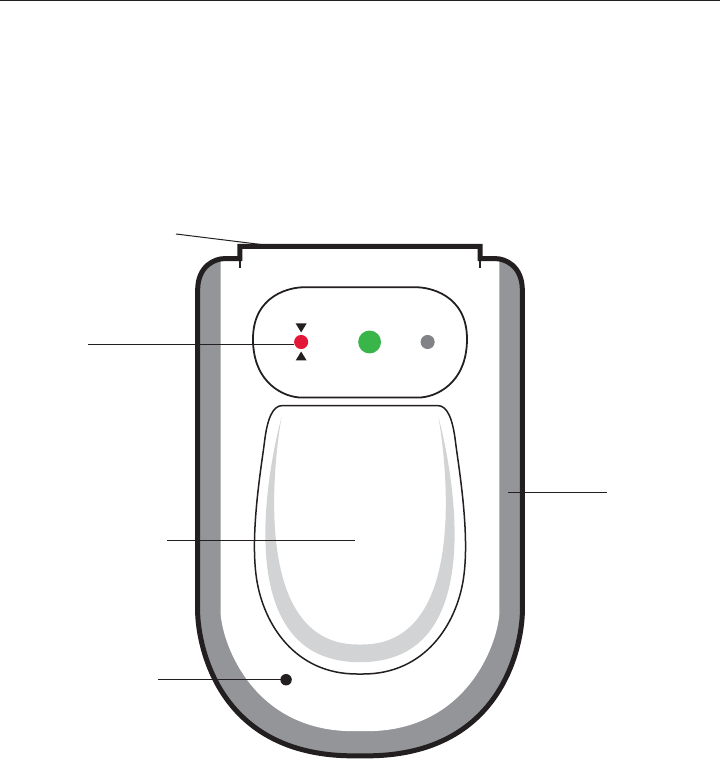
SET UP
SilentPOWER
On =
System in Use
Blinking =
Phone Line Trouble
BASE STATION
OWNER’S MANUAL Model #MED01
Easy to see
indicator
lights
Small size fits
almost anywhere
Speaker for
alert and
warning tones
Rubber base
won’t scratch
furniture
Cradle for
resting pendant
Easy to see
color-coded jacks
Back up battery
located inside
5
MediPendant™
6
Your MediPendant™ will operate using your existing telephone line and service.
No special features or services are required.
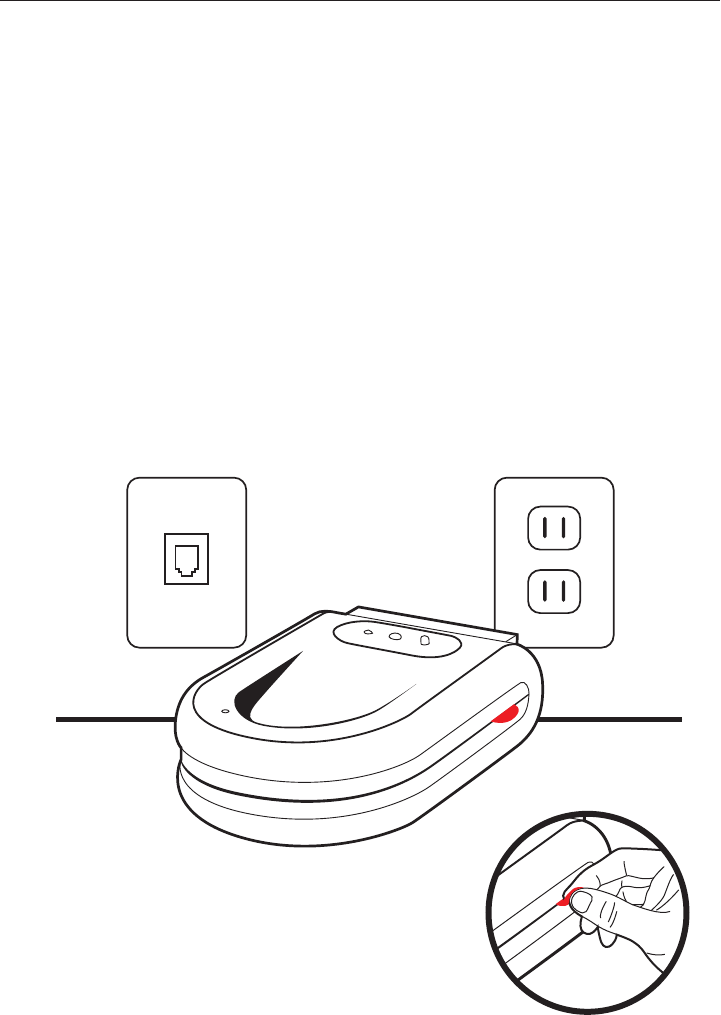
STEP 1
Place the MediPendant™ base station on a stable surface located near a
power outlet and an available phone jack. For best results, locate the base
station in an area away from household appliances which could present
electrical interference. See Figure 6A
If you are using more than one MediPendant™ system in your home, we
recommend that you place the base stations at least 15 ft. apart from
each other.
STEP 2
Grab RED TAB located on side of base
station and pull it straight out. Removing
tab activates back-up battery. See Figure 6B
Unit will beep continuously and the POWER
LED and PHONE LINE INDICATOR LED will
both flash RED until AC/DC adapter is
plugged in. See STEP 3.
INSTALLING YOUR MediPendant™
Figure 6A
Figure 6B
Phone Jack Power Outlet
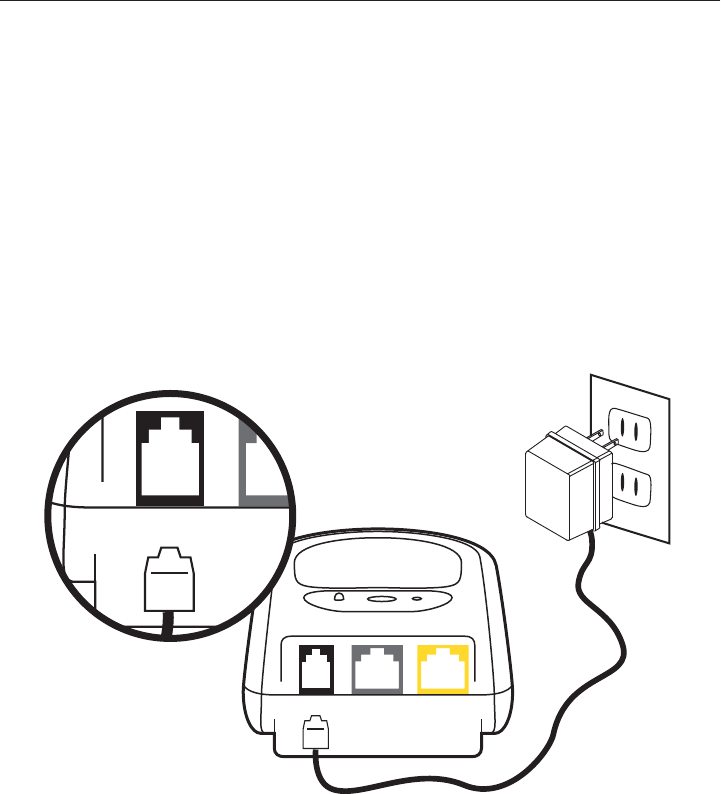
STEP 3
Connect the AC/DC Adapter into the BLACK plug in the back of the base
station marked DC. See Figure 7A
STEP 4
Connect the other end of the AC/DC Adapter into a standard power outlet.
See Figure 7B
Once plugged in, your base unit will continue to beep and the RED
PHONE LINE INDICATOR LED will continue to flash. The POWER LED will
change from flashing RED to solid GREEN.
NOTE: DO NOT PLUG THE AC/DC ADAPTER INTO A POWER OUTLET WHICH
IS CONTROLLED BY A WALL SWITCH. If the switch is accidently turned off,
the system will begin to beep indicating a loss of power.
NOTE: With loss of power, the POWER LED located in the center on the top
of the base station will illuminate and flash RED and the unit will beep.
OWNER’S MANUAL Model #MED01
7
DC EXTRA
PHONE JACK
PHONE LINE
IN FROM
WALL OUTLET
DC EXTRA TO
PHONE JACK
PHONE LINE
IN FROM
WALL OUTLET
STEP 3
STEP 4
AC/DC
Adapter
Figure 7A
Figure 7B

STEP 5
Plug the telephone cord (provided) into the jack on the back of the
base station marked PHONE LINE IN FROM WALL OUTLET. See Figure 8A
STEP 6
Plug the other end of the telephone cord into the telephone jack in the wall.
See Figure 8B
IF YOU ALREADY HAVE A TELEPHONE PLUGGED INTO THE TELEPHONE
JACK AT THE WALL:
Unplug the telephone cord from the telephone jack in the wall and plug it into
the GREY plug on the back of the base station marked EXTRA PHONE JACK.
Continue with STEP 5 and STEP 6.
If done properly, the RED PHONE LINE INDICATOR LED on the top of the
base station should not be illuminated and beeping should cease.
8
MediPendant™
STEP 5
STEP 6
Telephone
Cord
DC EXTRA
PHONE JACK
PHONE LINE
IN FROM
WALL OUTLET
DC EXTRA
PHONE JACK
PHONE LINE
IN FROM
WALL OUTLET
Figure 8A
Figure 8B
YELLOW
YELLOW

IF YOUR TELEPHONE SYSTEM IS VoIP:
Voice-over-Internet Protocol (VoIP) sends your calls over the Internet
instead of through the regular telephone system. MediPendant™ will work on
some VoIP systems; however, unlike traditional telephone services, some
VoIP service providers are not compatible with the MediPendant™ system.
(e.g. VONAGE, SKYPE) Please follow the steps on the previous pages to install
your system and test it immediately to determine if it is working properly.
NOTE: Medical Alarm Concepts makes no guarantee or warranty that the
MediPendant™ will work properly at the time of an emergency when using it
over a VoIP telephone service and strongly urges users to rely on a traditional
land line telephone service when using the MediPendant™.
IF YOUR TELEPHONE SYSTEM IS DSL:
If you use DSL service, you should already have a DSL filter
in place to use with the MediPendant™ system to ensure
maximum functionality. If not, a filter can be purchased at a
local hardware store, or by calling our toll free customer
service number. See Figure 9A
You are now ready to test your MediPendant™ system.
See TESTING YOUR MediPendant™ FOR THE FIRST TIME on page 10.
IF YOU ARE HAVING DIFFICULTY INSTALLING YOUR MediPendant™
SYSTEM, PLEASE CALL THE CUSTOMER SERVICE DEPARTMENT AT
OPTIONAL TELEPHONE CONFIGURATIONS
9
OWNER’S MANUAL Model #MED01
Figure 9A
D
S
L
F
I
L
T
E
R
(OPTIONAL ACCESSORY)
Phone #: _________________________________________________
10
MediPendant™
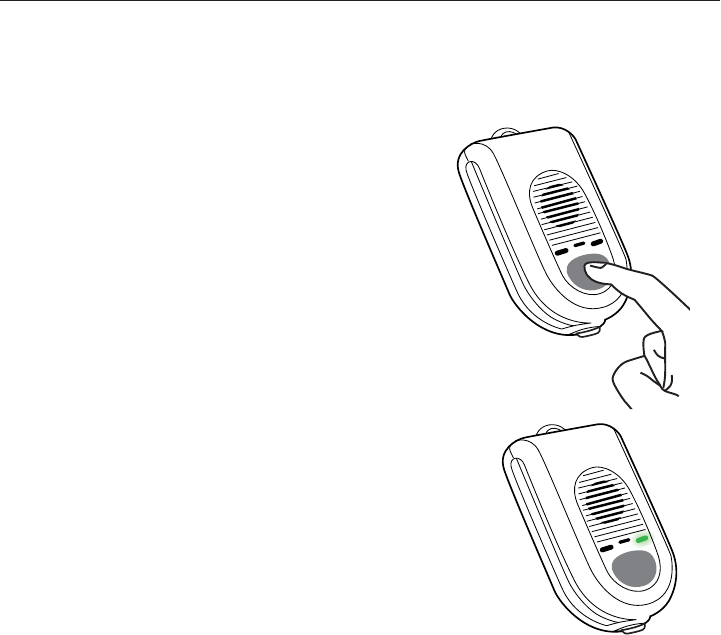
STEP 1
Press and hold the LARGE ROUND GREY
button for 3 seconds on the front of the
pendant.
See Figure 10A
STEP 2
You will hear the pendant say, “Your emer-
gency call is now being dialed, please
stand by.” It will say this multiple times.
The green light on the pendant will illumi-
nate indicating that it has been activated
and will remain illuminated during the
entire conversation with the emergency
operator.
See Figure 10B
STEP 4
When dialing sequence is completed, your pendant will again say, “Your
emergency call is now being dialed, please stand by.”
STEP 5
Soon after, there will be a brief period of silence. This means that your
pendant is talking to the monitoring center, and establishing communication.
STEP 3
You will then hear a dial tone, followed by a dialing sequence. This is an
indication that your pendant is attempting to call the monitoring center.
TESTING YOUR MediPendant™ FOR THE FIRST TIME
Figure 10A
Figure 10B

SET UP
SilentPOWER
On =
System in Use
Blinking =
Phone Line Trouble
11
OWNER’S MANUAL Model #MED01
STEP 6
Wait a few moments to hear the operator’s voice through the pendant
identifying themselves and asking you if everything is OK.
STEP 7
Identify yourself with the operator and tell him/her that you are simply
testing your system.
STEP 8
Follow the operator’s instructions to complete the test.
THE BASE STATION WILL EMIT A BEEP IN THE FOLLOWING SITUATIONS:
• AC power is lost – In this situation, the POWER indicator on the top of the
base station will flash RED
• Battery power is low – In this situation, the POWER indicator on the top
of the base station will flash RED
• Telephone line is disconnected – In this situation, the PHONE LINE indica-
tor on the top of the base station will flash RED, but the POWER indicator
will stay GREEN
NOTE: TO SILENCE ANY TONE FROM
THE BASE STATION, simply press the
Silent button on the top right corner
of the base station. See Figure 11A
NOTE:
The operating range of the
MediPendant™
depends on many factors.
It is designed to work in and outside of your home. When in use, the
pendant will emit a beep if you are out of range when talking to an operator.
Before using it is required that you perform the proper tests in order to
determine the unit’s operating ranges at the location(s) where it will be used
in and around your residence.
SET UP
Silent
POWER
Figure 11A
12
MediPendant™
PENDANT FUNCTIONS
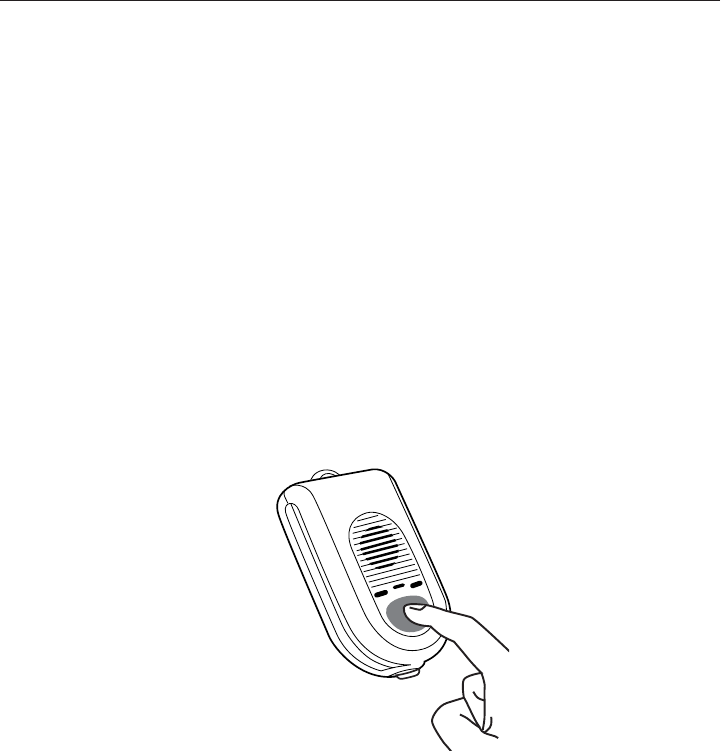
ACTIVATING YOUR SYSTEM:
The LARGE ROUND GREY BUTTON on the front of the pendant activates the
system and automatically dials the emergency call center. The button is
recessed to avoid accidental pressing. The emergency button must be
depressed for a minimum of 3 seconds to activate the unit.
See Figure 12A
Once connected, you can speak directly with the call center operator and
explain the nature of your emergency. If you press the button but are unable
to speak, the operator can still listen in for sounds of distress. If no
voices/sounds are detected, the operator will dispatch help.
NOTE: IF SOMEONE IS USING THE PHONE THAT IS CONNECTED TO YOUR
BASE STATION AND THE EMERGENCY BUTTON ON THE PENDANT IS
PRESSED, THE BASE STATION WILL AUTOMATICALLY END THE NORMAL
CALL AND TAKE THE LINE FOR THE EMERGENCY CALL RIGHT AWAY. THIS
IS CALLED LINE SEIZURE. IF SOMEONE IS USING A PHONE IN YOUR HOME
NOT CONNECTED TO YOUR BASE STATION, THE PENDANT CAN NOT CALL
OUT OR CONTACT THE CALL CENTER. THE PENDANT CAN ONLY INTER-
RUPT THE CALL ON THE PHONE CONNECTED TO THE BASE STATION.
OPERATING YOUR MediPendant™
Figure 12A

SET UP
SilentPOWER
On =
System in Use
Blinking =
Phone Line Trouble
13
OWNER’S MANUAL Model #MED01
BASE STATION FUNCTIONS
The base station has a back-up
battery that can provide emergency
power. When the base station is
plugged in properly, the POWER
indicator on the top of the base
station will remain illuminated
SOLID GREEN. See Figure 13A
When the battery in the base
station reaches minimum power
required for operation, the
POWER indicator on the top of
the base station will remain
illuminated SOLID RED, indicat-
ing that the system is no longer
operational until power is
restored. See Figure 13B
Once the power is restored and
the battery recharges, the RED
light goes out and changes back
to SOLID GREEN. See Figure 13A
In the event of a power outage, the POWER indicator on the top of the base
station will FLASH RED and the unit will beep, indicating the base station has
lost electrical power and is now functioning via the back-up battery. Press the
SILENT/SET UP button at the top of the base station to stop beeping.
See Figure 13B
SET UP
SilentPOWER
On =
System in Use
Blinking =
Phone Line Trouble
SET UP
SilentPOWER
On =
System in Use
Blinking =
Phone Line Trouble
SET UP
SilentPOWER
On =
System in Use
Blinking =
Phone Line Trouble
Figure 13A
Figure 13B
ALTHOUGH THE SYSTEM IS SUPERVISED AND CHECKS IN WITH THE CALL
CENTER, WE RECOMMEND THAT YOU VOLUNTARILY TEST YOUR SYSTEM
AT LEAST ONCE A WEEK TO ENSURE ITS FUNCTIONALITY.
14
MediPendant™
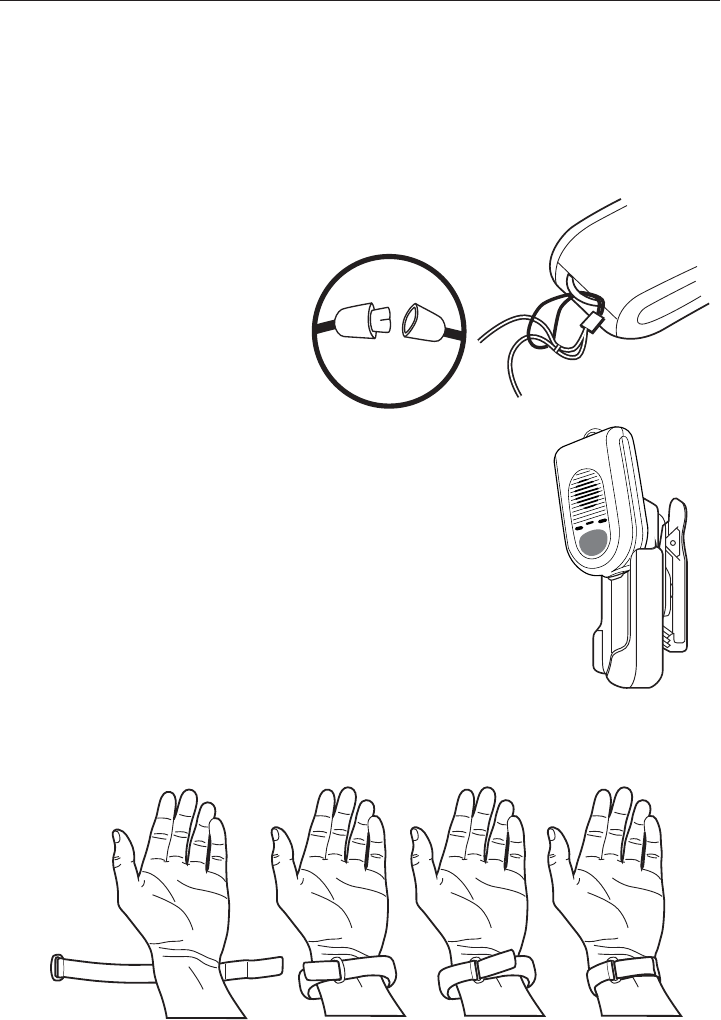
ATTACHING THE LANYARD TO YOUR MediPendant™
See Figure 14A
Our lanyard is designed
with a break-away safety
feature to help avoid
accidents. See Figure 14B
ATTACHING THE MediPendant™ TO THE BELT CLIP
See Figure 14C
Pendant slides down into holder which can
be clipped to belt or shirt.
When belt clip is attached, it can be rotated
90 degrees.
Bring strap through and back over loop to secure to wrist.
Slide pendant into clip attached to wrist strap.
ATTACHING THE WRIST STRAP See Figure 14D
WEARING YOUR MediPendant™
Your pendant should be worn at all times. You have the option of wearing it
around your neck, on a belt using the supplied clip, around your wrist, or
simply carried in your pocket.
Figure 14A
Figure 14D
Figure 14C
Figure 14B

15
OWNER’S MANUAL Model #MED01
In the event of an emergency, press the LARGE ROUND GREY BUTTON on the
front of the pendant for 3 seconds. See Figure 15A. When the emergency response
operator answers, speak in a normal voice and explain the nature of your emer-
gency. There is no need to put the pendant up to your ear unless you are having
trouble hearing. There is no need to hold the pendant up to your mouth. You will
be clearly heard, even if the pendant is an arm’s length away.
NOTE: IF YOU PRESS THE BUTTON BUT ARE UNABLE TO SPEAK, THE
OPERATOR CAN STILL LISTEN IN FOR SOUNDS OF DISTRESS. IF NO
VOICES/SOUNDS ARE DETECTED, THE OPERATOR WILL DISPATCH HELP.
AT THAT TIME, YOUR PENDANT WILL AUTOMATICALLY RESET AND GO
INTO A SLEEP MODE.
NOTE: IF THERE IS AN ACCIDENTAL, UNWANTED ACTIVATION, you will
still have the ability to speak directly into the pendant and inform the emer-
gency call center operator that there is no emergency.
NOTE: If you are connected to the emergency call center and your pendant
emits a beep during the call, it is an indicator that you are getting out of
range of the base station and should move closer.
IN AN EMERGENCY
Figure 15A

16
MediPendant™
The MediPendant™ has a BATTERY/SYSTEM TEST BUTTON on the bottom of
the pendant. It is used to check both the condition of the battery and to make
sure the unit is functioning properly. This test should only be performed
when your pendant is not being used in an actual emergency.
To test the battery status, press and release the BATTERY/SYSTEM TEST
BUTTON located on the bottom of the pendant. You will feel it click. It will
then announce the battery condition.
See Figure 16A
You will hear one of the following messages:
‘Battery is OK’
This indicates the battery condition is fine and there is no need to replace
it. The LED on the front of the pendant will illuminate RED for one second.
See Figure 16A
‘Replace battery soon’
This indicates the battery should be replaced within the next two weeks.
The LED on the front of the pendant will blink two times. See Figure 16A
‘Replace battery now’
Battery should be replaced immediately. The LED on the front of the
pendant will NOT illuminate at all. See INSTALLING/REPLACING THE
BATTERY on page 18.
NOTE: Battery should be tested often.
BATTERY TEST
Figure 16A

You can manually test your system at any time.
Simply press and hold the BATTERY/SYSTEM TEST
BUTTON on the bottom of the unit for three seconds.
See Figure 17A
The unit will first announce the battery status followed
by, "System check, please stand by.”
The pendant will turn on and send a test signal to the
base station to confirm all functions are working prop-
erly. This also confirms that the pendant is within
acceptable range of the base station.
When the test mode is active, the RED LED on the front of the pendant illumi-
nates for two seconds followed by an audio announcement confirming all
functions are okay.
You will hear one of the following messages:
‘System check all functions are OK’
Once it’s completed the pendant will return to standby mode and is ready
for use.
‘System test failed’
See TROUBLESHOOTING section on page 19. If problem persists, call
customer service immediately to determine the nature of the problem with
your system.
NOTE: DO NOT PRESS BATTERY/SYSTEM TEST BUTTON DURING AN EMER-
GENCY CALL OR THE PENDANT WILL HANG UP/DISCONNECT THE CALL.
NOTE: The operating range of the MediPendant™ depends on many factors. It
is designed to work in and outside of your home. Before using it is required
that you perform the proper tests in order to determine the unit’s operating
ranges at the location(s) where it will be used in and around your residence.
If you fail to properly test for the unit’s range in your residence, the system
may fail or otherwise become temporarily inoperable if the User strays
beyond the communication range between the pendant and base station. If
this occurs, the pendant will emit a beep during use indicating it is out of
range. In that case, the User may not receive the medical attention sought
and risks serious personal injury or death. It is the User’s sole responsibility
to determine how far from the base station in any particular residence the
pendant will operate.
SYSTEM/RANGE TEST
Figure 17A
17
OWNER’S MANUAL Model #MED01
18
MediPendant™
The pendant operates on one (1) lithium photo 123 battery. While your
pendant comes with one battery pre-installed, a second one is provided for
your convenience and should be stored in an easily accessible place. Lithium
photo 123 batteries are available at most drug and convenience stores – or
can be purchased through our toll-free customer service number. The
pendant allows up to 6 hours of talk time and under normal use, the battery
will last 6 to 12 months (depending on talk time).
NOTE: Screws for battery door are 2 different lengths. Please make sure
longer screws are at top of pendant and O-rings are properly installed.
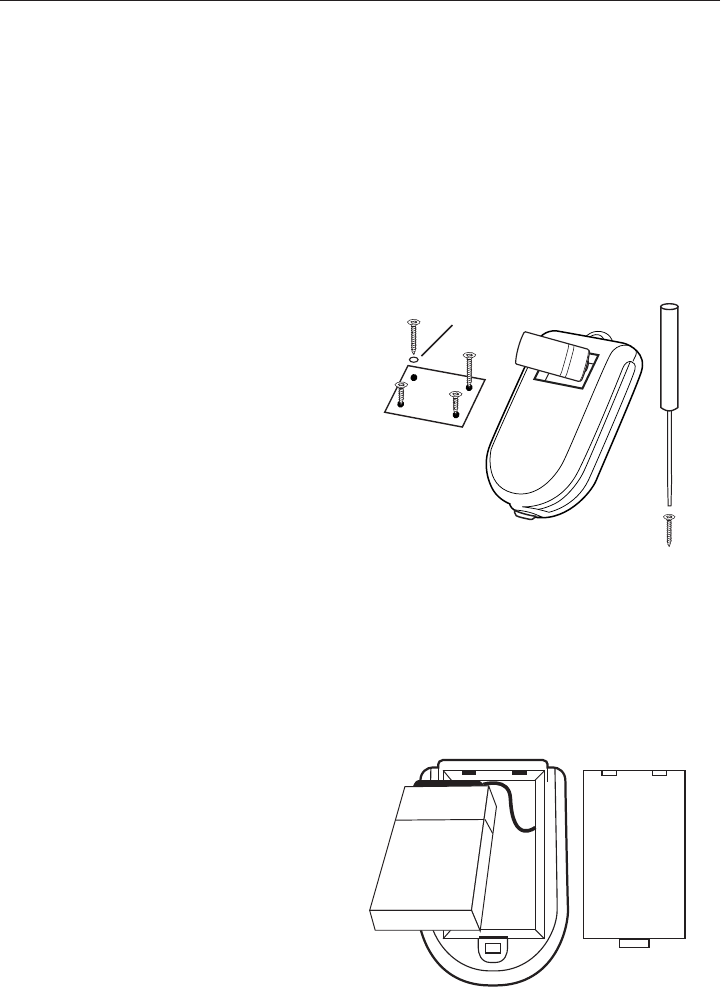
BASE STATION BATTERY INSTALLATION See Figure 18B
Your base station battery is pre-installed and should not have to be replaced.
If the battery does need to be replaced, follow the steps below.
INSTALLING/REPLACING THE BATTERY
PENDANT BATTERY INSTALLATION See Figure 18A
Base Station
Cover
Terminal
Clip
Figure 18B
STEP 1: Remove cover on back
of base station.
STEP 2: Unplug used battery
from terminal clips.
STEP 3: Install new battery to
terminal clips. Make certain
terminals line up properly to
avoid accidental damage.
STEP 4: Replace cover on back
of base station.
STEP 1: Remove cover on back
of pendant by removing screws
using supplied screwdriver.
STEP 2: Insert battery following
+ / – indication inside pendant.
STEP 3:
Slide screw through
O-ring, placing O-ring at top of
screw before fastening.
STEP 4: Replace cover on back
of pendant replacing screws.
Figure 18A
O-ring
Base
Station
Battery
BATTERY

QUESTION:
I’ve followed all of the installation instructions and my pendant still
doesn’t work. What can I do?
ANSWER:
Check the base station connections. Ensure the AC/DC adapter is plugged
into a live power outlet and also into the base station. The GREEN POWER
indicator on the top of the base station should be illuminated. If power outlet
is controlled by a wall switch, make sure that the switch is in the ON position.
See STEPS 2-4 of INSTALLING YOUR MediPendant™ on pages 6 and 7.
Confirm that the telephone line coming from the wall jack is plugged into the
base station in the YELLOW jack marked PHONE LINE IN FROM WALL OUTLET.
See STEP 5 of INSTALLING YOUR MediPendant™ on page 8.
Press and hold the BATTERY/SYSTEM TEST BUTTON on the bottom of
the pendant for 3 seconds. See Figure 17A on page 17. The unit should
announce battery status followed by, "System check, please stand by.”
The pendant will turn on and send a test signal to the base station to
confirm all functions are working properly. If nothing happens, the most
likely cause is that the battery is dead or has been installed improperly.
See INSTALLING/REPLACING THE BATTERY on page 18.
PENDANT/BASE STATION SYNCHRONIZATION
The pendant and the base station are connected by a wireless radio signal.
They need to be synchronized to work. All systems are synchronized prior to
shipment. However, in some cases, you may need to re-synchronize your
system. Press the button on the base station marked SILENT/SET UP for
three seconds. The RED PHONE LINE INDICATOR LED will illuminate. Press
and hold the LARGE GREY BUTTON on the pendant simultaneously with the
BATTERY/SYSTEM TEST BUTTON on the bottom of the pendant
for a few
moments until the green LED on the right side of the pendant blinks. Once
the pendant and the base unit are synchronized, the green LED on the
pendant and the red LED on the base station will go out and your pendant
will now be synchronized to the base station. If done properly, you will hear
the voice announcement, “System check. All systems are okay.”
19
OWNER’S MANUAL Model #MED01
TROUBLESHOOTING
IF YOU STILL HAVING DIFFICULTY WITH YOUR MediPendant™ SYSTEM,
PLEASE CALL THE CUSTOMER SERVICE DEPARTMENT AT
Phone #: _________________________________________________

20
MediPendant™
1 The MediPendant™ is designed ONLY for residential use with tone dialing systems.
There is no guarantee or assurance of any kind express or implied that it will work
on commercial telecommunication systems, VoIP (Voice Over Internet Protocol)
service, or any service other than POTS (Plain Old Telephone Service). Specifically,
the MediPendant™ is not designed to work with systems such as Vonage or Skype.
2 The MediPendant™ has a battery strength warning indicator light and test button
that allows the User to monitor the pendant’s battery life. It is the sole responsibil-
ity of the User to perform a test/check at least once a week of BOTH the pendant
and also the base station to ensure that the batteries and other functions/features
are working properly. See the Instructions for how to perform these tests.
3 Medical Alarm Concepts, LLC (hereinafter referred to as MAC) DOES NOT represent
that the MediPendant™ is waterproof. It is, however, water resistant. To reduce the
chance of damage to the unit, DO NOT over expose the pendant to prolonged water,
rain or moisture. The base unit IS NOT water resistant and must never get wet.
4 Based on its operating frequency, MediPendant™ should not interfere with pacemak-
ers or common household appliances.
GENERAL WARNINGS

21
OWNER’S MANUAL Model #MED01
The following instructions should be used with your MediPendant™ in order to reduce
the risk of ALL types of personal injury (including fire, shock, and electrical).
1 Carefully read and understand ALL instructions prior to using this product to
ensure you understand its operation.
2 Other than the battery compartment (as detailed in the instructions) the pendant
should NEVER be opened. Attempting to open/fix the pendant or the base unit for
any reason may cause permanent damage to the unit or prevent it from function-
ing properly, and will completely void its warranty.
3 The base unit MUST NOT be located near any source of water (kitchen sinks,
bathtubs, bathrooms, etc.) as electrical damage personal injury and property
damage could occur.
4 No other power source may be used for this product other than the one specifically
supplied by MAC. Use of any other power source will void all warranties, and could
also damage your unit and cause serious safety issues including personal injury,
property damage, and cause the unit to malfunction resulting in the failure to
obtain medical attention.
5 THIS PRODUCT MUST BE UNPLUGGED from an electrical outlet before attempting
to clean it. Please follow the instructions carefully to clean the base unit and
pendant. A damp, soft cloth can be used to clean/wipe down the unit if it becomes
dirty. No liquids or cleaners can be used for cleaning the pendant or base unit, or
their respective warranties will be voided.
6 If damage does occur to your unit, DO NOT attempt to repair it. Please return the
entire unit, postage paid, to your local dealer for warranty service or replacement
as stipulated in the warranty section of your owner’s manual.
7 Save these instructions for future reference.
SAFETY PRECAUTIONS

DISCLAIMER:
Installation of the unit is the sole responsibility of the User. MAC is not responsible
for misuse or improper installation of the unit. MAC is not responsible for the
misuse of the MediPendant™ or any of its related products. MAC cannot be respon-
sible for the type of phone line used or the reliability or quality of said phone
service with which its products are used. In addition, MAC is not responsible for the
use of other equipment that the User may from time to time connect to the same
phone line as the MediPendant™ or any other MAC product that may cause failure or
interfere with the normal operation and performance of MAC products.
TELEPHONE SERVICE AND ELECTRICAL SERVICES ARE
REQUIRED AND ARE USER’S RESPONSIBILITY:
User and Purchaser both understand and acknowledge that the MediPendant™ Unit
and base station require 110 Volt AC power and Phone Service.
Electrical outlets cannot be on a “hot switch” where they can be accidentally
turned off. It is User’s responsibility to provide electricity service in order for the
MediPendant™ to function.
The MediPendant™ product (including base station unit) requires and plugs into a
standard telephone jack and communicates over standard POTS (Plain Old
Telephone Service) lines using a two-way voice communication protocol. When
using a service such as DSL (Digital Subscriber Line), User must obtain and install
a DSL filter with the product. DSL Users should already have this adapter in their
home. If not, one can be obtained from most drug and convenience stores, or by
calling our toll free customer service number. VoIP (Voice Over Internet Protocol)
phone based systems are entirely different. The MediPendant™ may work on some
VoIP systems, but due to the inconsistencies and reliability in VoIP technology
MAC does not recommend the use of this service with your MediPendant™. To
determine if the equipment will work with your VoIP service provider it must be
tested prior to use. MAC makes no guarantee or warranty that the MediPendant™
will properly work at the time of an emergency when using it over a VoIP
telephone service. MAC strongly urges users to rely only on a traditional landline
telephone service when using the MediPendant™.
MediPendant™ EQUIPMENT TESTING AND SERVICING:
Once installed, the MediPendant™ and any optional accessories provided by MAC to
the User are owned by MAC. Such MAC equipment is considered to be in the
User’s sole possession and control. It is the User’s exclusive responsibility to test
all functions and ensure the equipment is in good working condition. User or
purchaser is solely responsible for testing the MAC equipment as described in the
instruction manual. If warranty work is requested, they must do so in a quick and
timely manner.
22
MediPendant™
MAC’S LIMITED WARRANTY AND DISCLAIMER

OPERATING RANGE:
The operating range of the MediPendant™ depends on many factors. It is designed to
work in and outside of your home. Before using it is required that you perform the
proper tests in order to determine the unit’s operating ranges at the location(s)
where it will be used in and around your residence. If you fail to properly test for the
unit’s range in your residence, the system may fail or otherwise become temporar-
ily inoperable if the User strays beyond the communication range between the
pendant and base station. In that case, the User may not receive the medical
attention sought and risks serious personal injury or death. It is the User’s sole
responsibility to determine how far from the base station in any particular residence
the pendant will operate. Refer to the instruction manual to perform this test.
RESPONSE AND FUNCTIONALITY LIMITATIONS:
It is understood and accepted by both User and purchaser that any signals
transmitted, whether over phone lines, data lines, or any other mode of communi-
cation and related networks, is totally beyond MAC’s control. Such telecommuni-
cation systems and equipment are not owned, operated, maintained, leased and
are not controlled, inspected, or reviewed by MAC. MAC cannot and will not be
responsible for any injury, death or property damage that results from telecommu-
nication equipment not supplied by MAC that does not properly transmit or fails to
transmit proper signals from or through the unit’s base station to a call center
operator, a 911 center, friends or family members as programmed by the User.
Both purchaser and User acknowledge that MAC uses an independent, third party
call center to receive all emergency calls from the Unit and, moreover, MAC does
not directly provide response services for its MediPendant™ products and related
equipment. The equipment is specifically designed to communicate with
monitored call center operators. MAC is not responsible for the performance of
and the response times of those operators, and is not responsible for the perfor-
mance of and response times of any emergency services dispatched by the
independent call center, including police, fire, and medical services.
MAC REPRESENTATIONS:
MAC neither warrants nor represents that the MediPendant™ system will prevent
any damage, injury, or loss to either person or property, or that the MediPendant™
unit will always provide the full protection for which it is intended/installed. Both
Purchaser and User fully understand and acknowledge that MAC is not an insurer,
and that User and Purchaser assume any and all risk of loss or injury to User’s
property or person. No representation or warranties express or implied are made
by MAC other than those expressed herein and MAC expressly disclaims any
warranty of fitness or merchantability for any particular use.
23
OWNER’S MANUAL Model #MED01

LIMITATION OF LIABILITY:
The MediPendant™ system and related equipment is not guaranteed to prevent any
loss or injury. This Limited liability and Warranty Disclaimer constitutes the terms of
sale and use of the MediPendant™ system and related products, and notwithstanding
the term of sale and or use of the product, should any liabilities arise on the part of
MAC as a result of any cause whatsoever, regardless of whether or not damage, loss,
or personal injury was caused by or contributed by MAC’s negligence to any degree
or failure to perform any obligation or strict products liability, such liability is limited
to an amount paid by the Purchaser for the product, or the sum of $200.00, which-
ever is greater. This is the total, exclusive liability of MAC under this agreement.
EXCLUSIVE REMEDY:
User’s or Purchaser’s exclusive remedy for MAC’s default hereunder is to require MAC
to either repair or replace, at MAC’s option, any equipment or related accessories that
are part of the system which is non-operational during the MAC warranty period.
ONE YEAR LIMITED WARRANTY:
MAC warrants to the original consumer/purchaser that its products shall be free of
defects in both material and workmanship under normal use and conditions for a
period of one (1) year from the date of original purchase. If the product is deemed to
be defective, MAC will at its option repair or replace said equipment. The warranty
shall constitute the sole liability of MAC concerning the MediPendant™. MAC
expressly disclaims all other warranties INCLUDING, WITHOUT LIMITATION, THE
WARRANTIES OF MERCHANTABILITY AND FITNESS FOR A PARTICULAR
PURPOSE. NO PERSON, FIRM, OR CORPORATION, IS AUTHORIZED TO ASSUME
FOR MAC OTHER LIABILITIES IN CONNECTION WITH THE SALE AND USE OF THE
MediPendant™. MAC and its employees, partners, distributors, or agents will have no
liability whatsoever for incidental or consequential damages or charges of any kind.
It is understood that some states do not allow the exclusion or limitation of inciden-
tal or consequential damages, so the above disclaimer may not apply to you.
The warranty is fully void if the product has been tampered with or appears to be
damaged in any way. If damages occur during a shipment, a claim must be filed
with the carrier and not with MAC. This warranty gives you specific legal rights; you
may also have other rights, which vary from state to state.
OUT OF WARRANTY REPAIRS:
If you are not the original owner of the equipment and the warranty period has
expired for the product, MAC will at its option either replace the product with a
similarly functioning one (not necessarily the exact same) refurbished product or
repair the original product and return it to the User/purchaser after payment of any
charges have been received and processed.
24
OWNER’S MANUAL Model #MED01
MediPendant™
FCC WARNING
This device complies with Part 15 of the FCC Rules. Operation is
subject to the following two conditions:
(1) this device may not cause harmful interference, and
(2) this device must accept any interference received, including interference that may cause
undesired operation.
This device must be installed to provide a separation distance of at least 2.5 cm from all persons
and must not be collocated or operating in conjunction with any other antenna or transmitter.
NOTE: The manufacturer is not responsible for and radio or TV interference caused by
unauthorized modifications to this equipment. Such modifications could void the user’s authority
to operate the equipment.

NOTES
IMPORTANT PHONE NUMBERS