WebCall World SERIALPHONE Internet Phone User Manual
WebCall World Co., Ltd. Internet Phone
User Manual
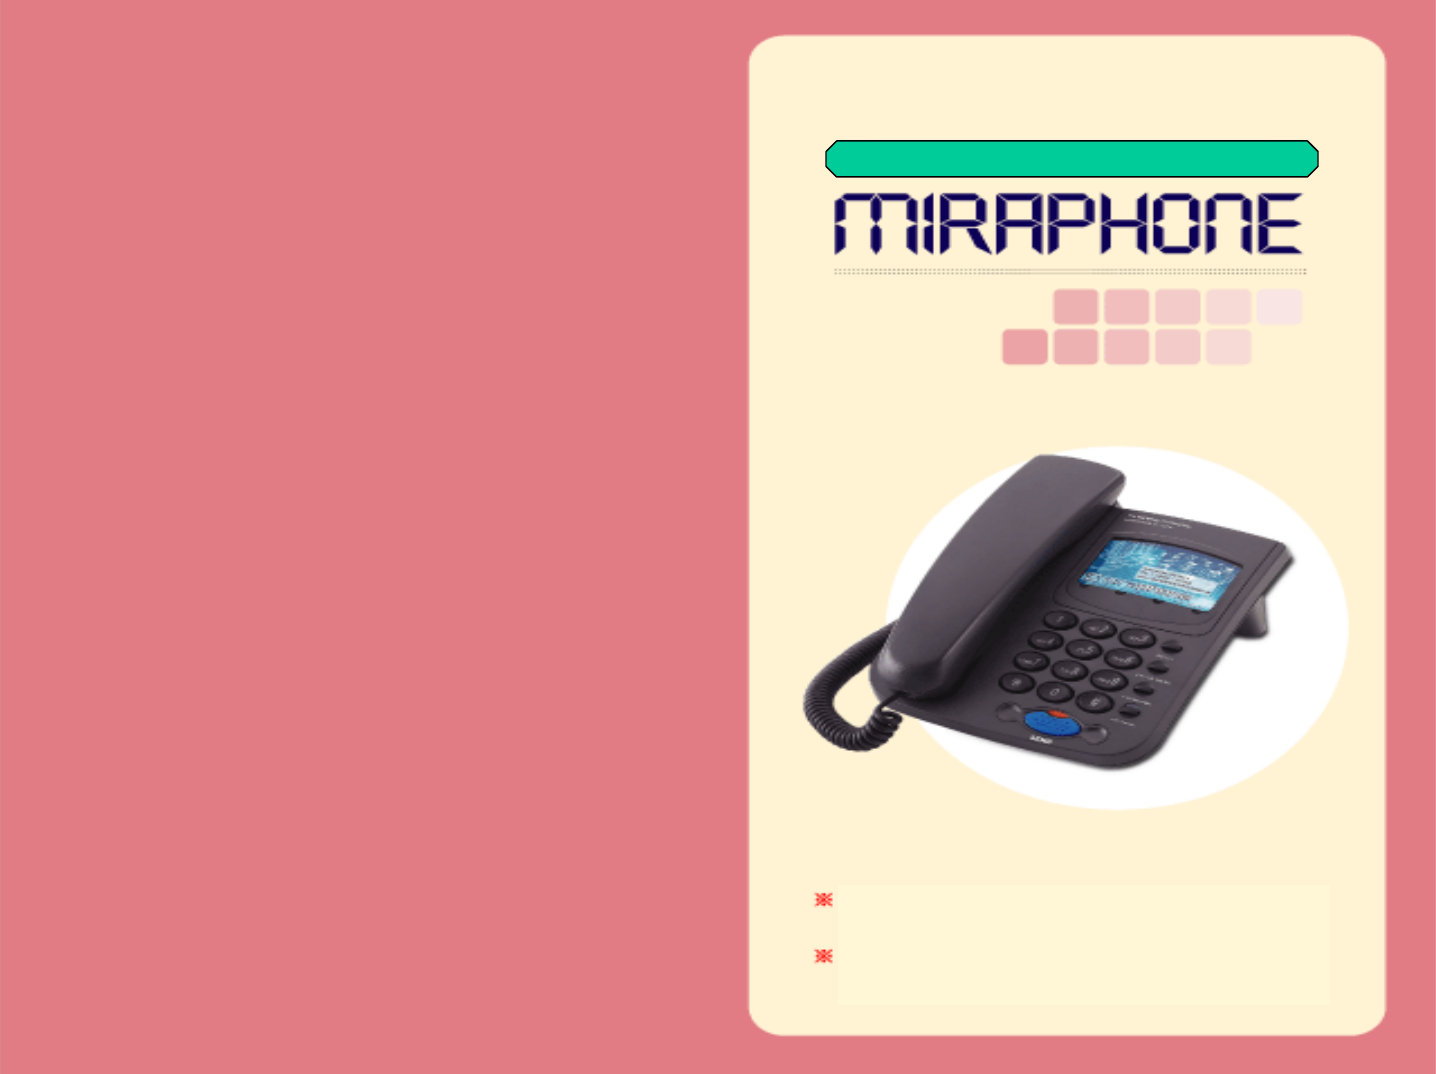
Quick & Easy Installation Internet Phone
Please read this manual before use.
The quality of voice of MiraPhone can be
affected by your internet environment.
<< CONTENTS >>
Hardware Requirements (p4)
Features (p4)
Attentions (p4)
MiraPhone Installation (p5~p6)
Using MiraPhone (p7~p10)
FAQ (p11~p12)
Warranty (p13)
Package Contents (p3)
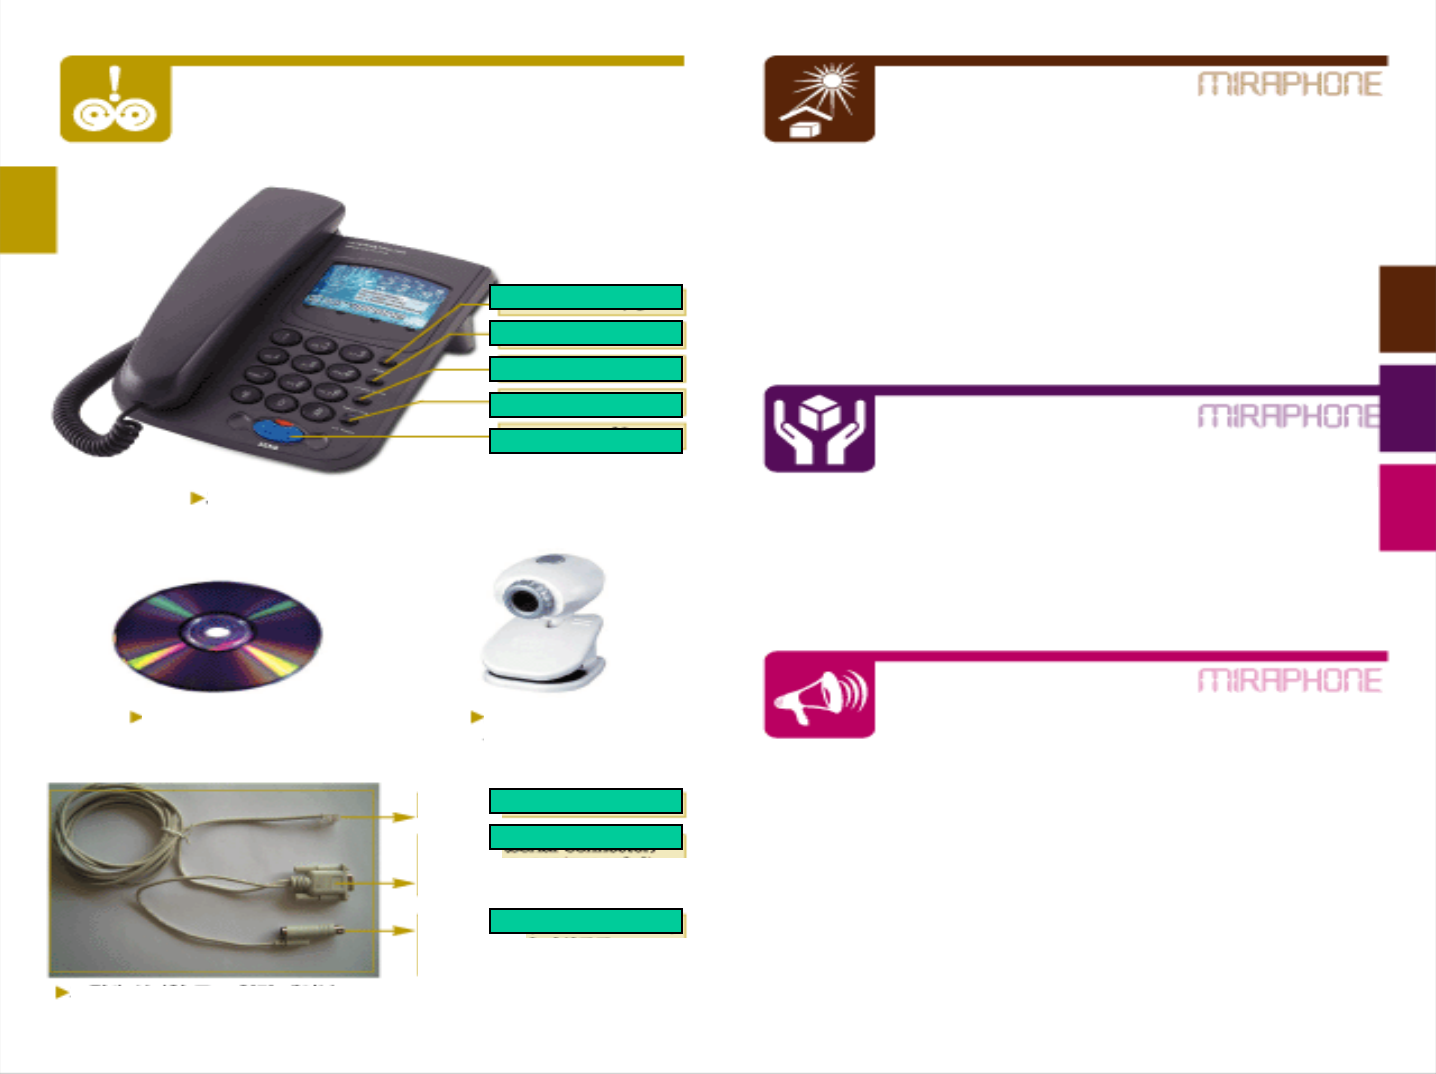
MiraPhone
Package Contents
Program CD PC camera
(not included)
Serial port connecter
Connect to RS-232 (COM port)
of your PC
Connect to PS/2 port
of your PC
- CPU: Pentium II, III or higher
- OS:Windows 98SE/ME/2000/XP
- RAM: 64MB or higher
- HDD: 10MB Free Hard Disk space
- Port: COM1 or COM2 enable
- Internet Connection: ADSL, xDSL, Cable, LAN, Dial-up modem
- Internet Speed: 45K byte (=36 Kbps) or faster
- Microsoft Internet Explorer 5.01 or higher
Hardware Requirements
Features
Attentions
- Easy to use just after login
- Excellent compatibility to other devices according to
H.323 international standard protocol
- Free calls between MiraPhones
- Useful functions : Phonebook/ Short key/ Redial/ On-Hook
- Please turn off your PC power before installation.
- MiraPhone will work when your PC is working properly.
- Keep your MiraPhone away from humidity or moisture.
- Do not drop MiraPhone. Rough handling can break internal circuit.
- Do not store MiraPhone in hot area. High temperatures can cause
a fire.
- Do not attempt to open MiraPhone. MiraPhone may get damage.
- Keep MiraPhone out of Water, Benzene, Alcohol, Thinner.
- Turn off your PC when MiraPhone makes noise, smell, smoke and
contact our service center.
- Do not use any other cables or connectors which are not provided.
Redial
Phone Book
Homepage
On Hook
Send
Phone Connector
Serial Connector
PS/2 Connector
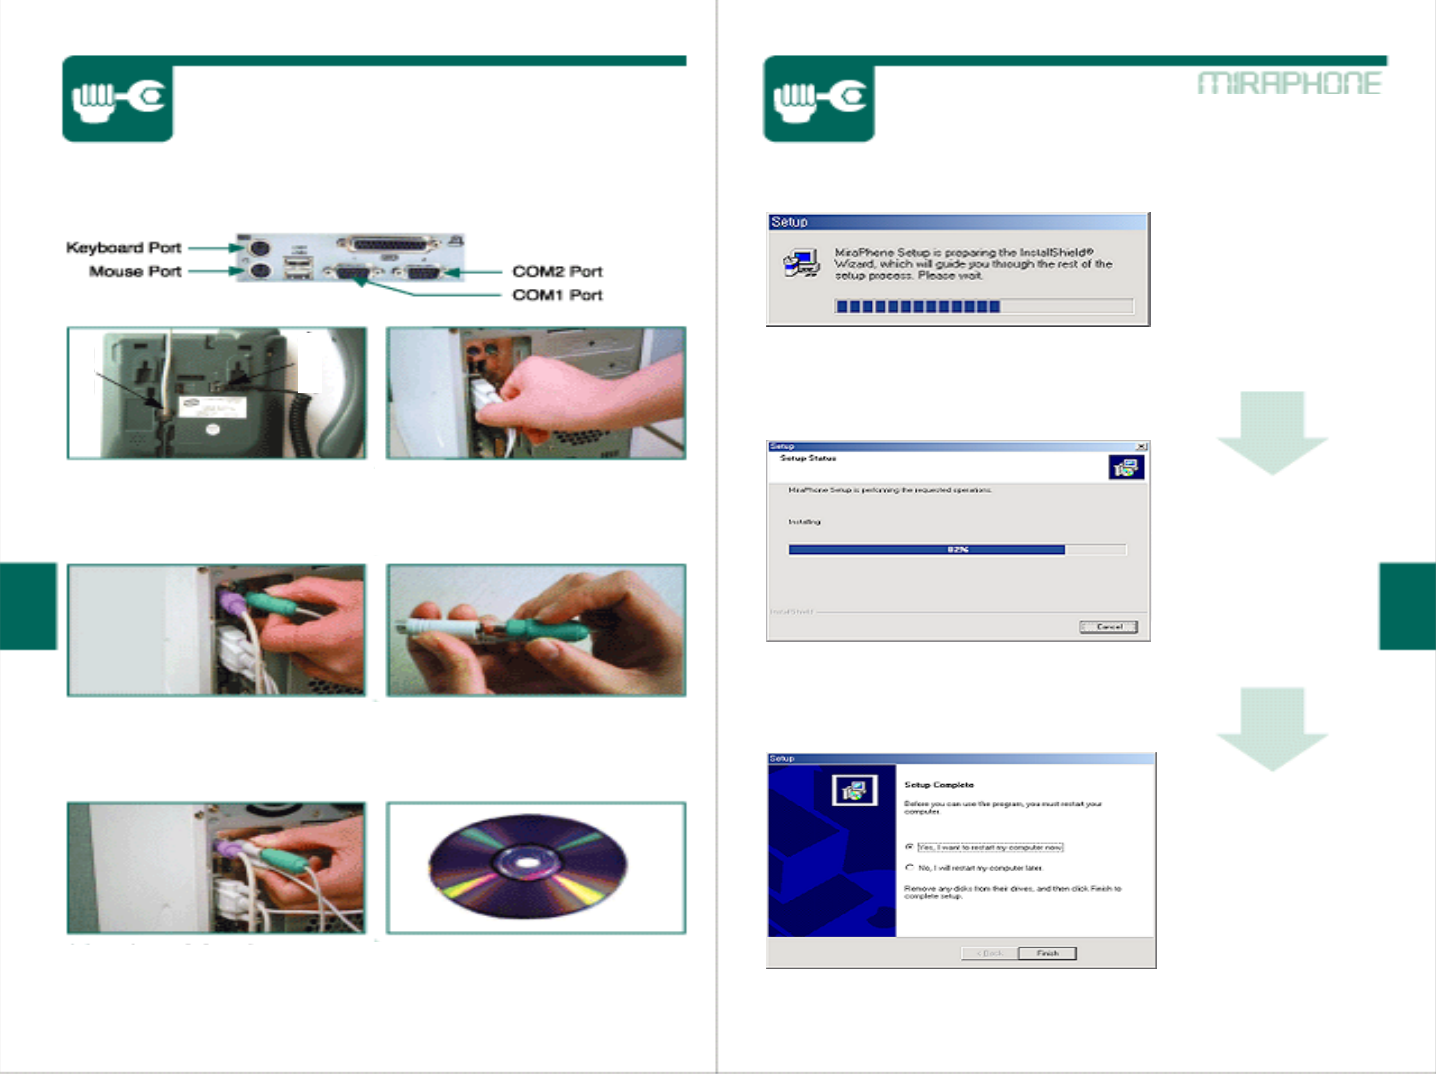
MiraPhone Installation [1] MiraPhone Installation [2]
Connect the phone jack
to MiraPhone. Connect serial cable to COM
port of your PC.
Pull out the port jack from
Mouse port or Key board port. Connect Mouse or Key board
Jack to the PS/2 connector.
Connect the PS/2 connector
To Mouse or Key board port. Put MiraPhone installation CD
and the program will be
automatically installed.
Installation is running.
Files are copied.
Installation is
completed. Click on
the button “Finish” and
MiraPhone will work.
<Computer Port Configuration>
Phone
Jack Receiver
Jack
Using MiraPhone [1] Using MiraPhone [2]
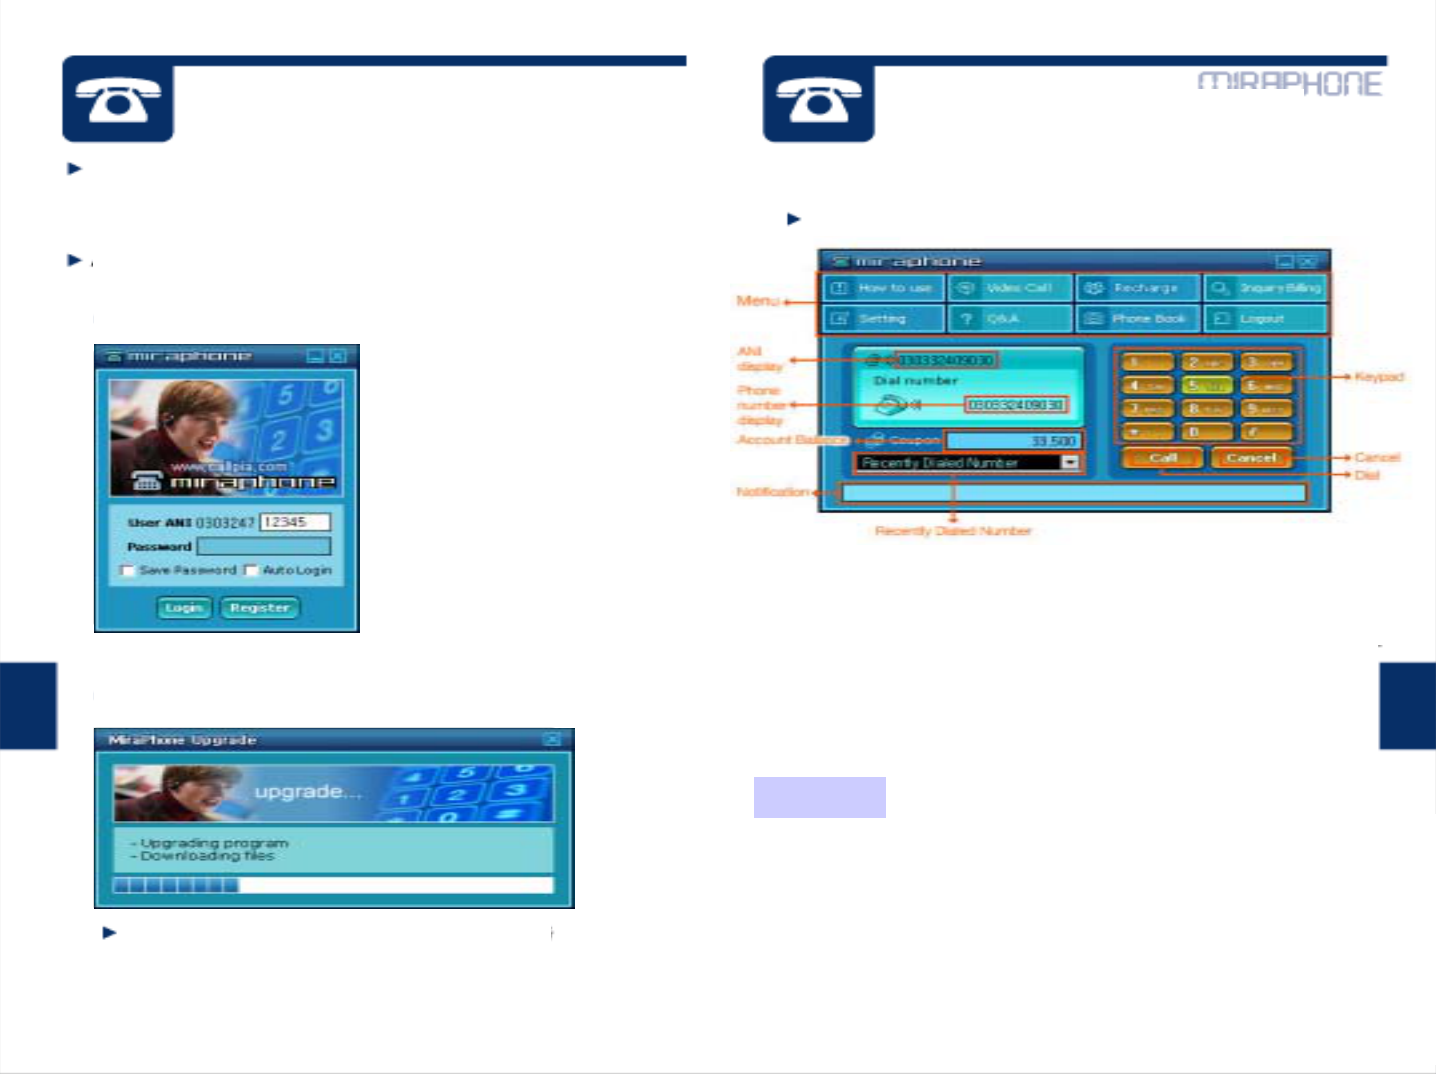
Please register first by clicking “Register” button if you are not
a MiraPhone service subscriber. You will get ANI number and
password after registration.
ANI number means your given number to use MiraPhone.
Once MiraPhone is executed,
a login screen is displayed.
Enter the ANI number and
password, and then click
on the “Login” button.
When login is successful, files are upgraded
from MiraPhone server.
When download is complete, dialer (MiraPhone.exe) runs.
Recently Dialed Number : Contains the most 10 recent numbers
dialed in the list. By double-clicking the phone numbers,
you can place calls.
Keypad : allows clicking on wanted number or symbols.
Call/Hangup : Click on this button to make a call or Hang up.
Cancel : Erase the phone numbers you entered.
How to use : Linked to a user’s guide web page for MiraPhone.
Video Call : A video screen appears with which video communications
is provided. (see next page)
Recharge : Linked to a recharge web page for MiraPhone.
Inquiry Billing : Linked to a web page where usage details can be checked.
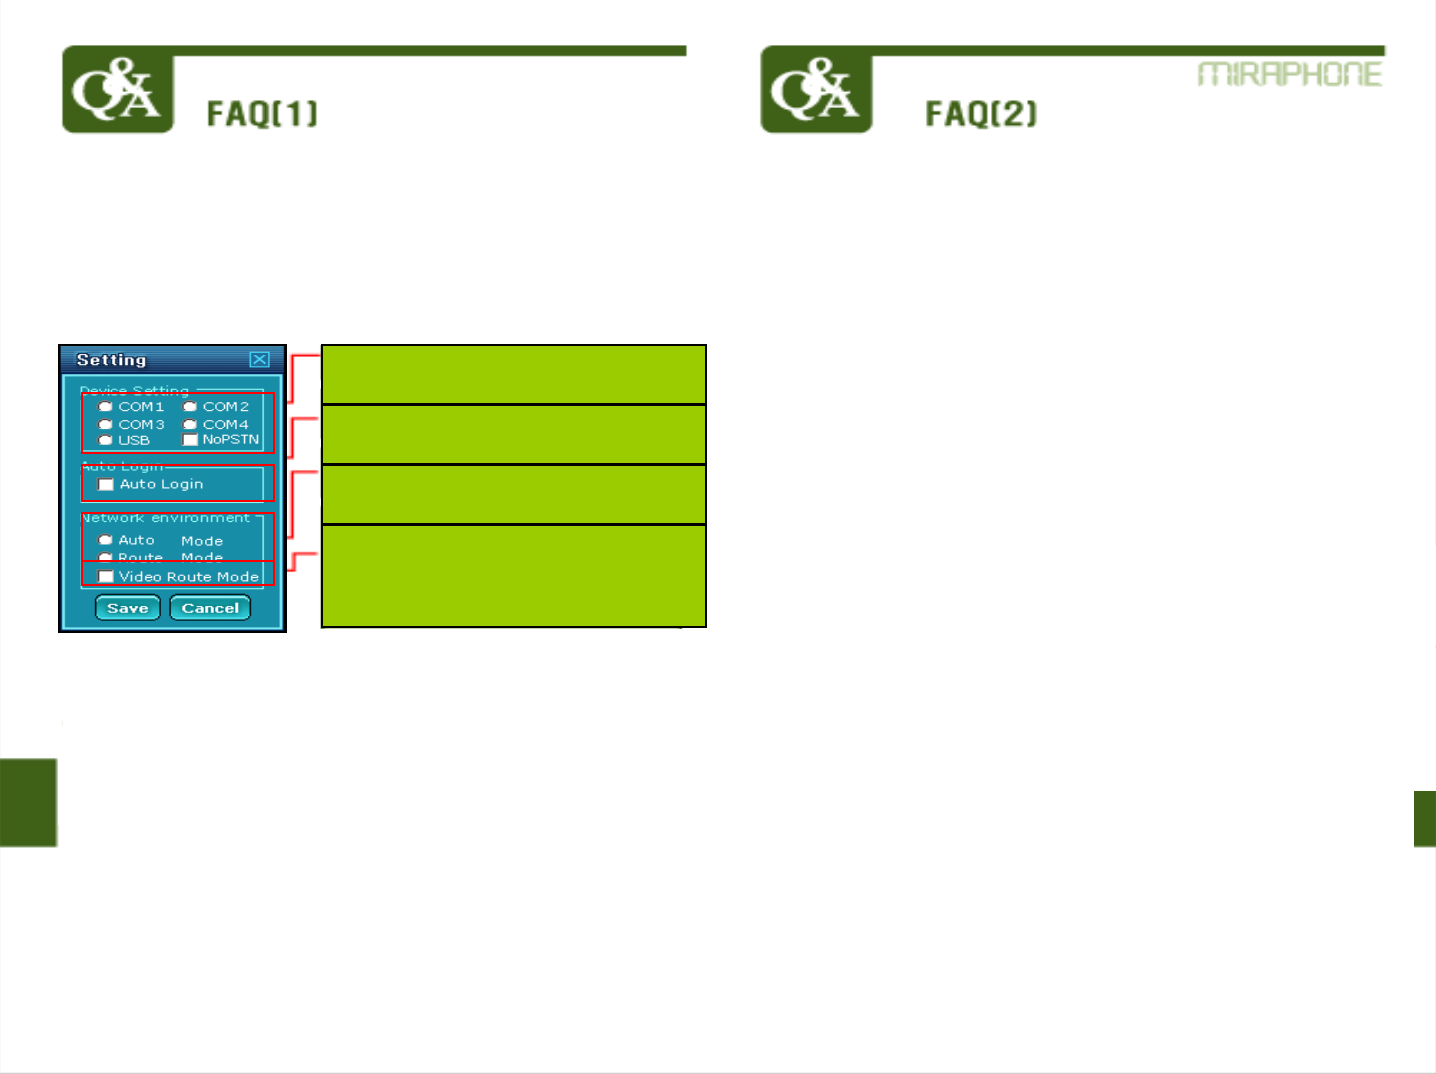
Setting : Setting window is displayed. (Refer to FAQ page for the details.)
Q&A : linked to service website’s Q&A board.
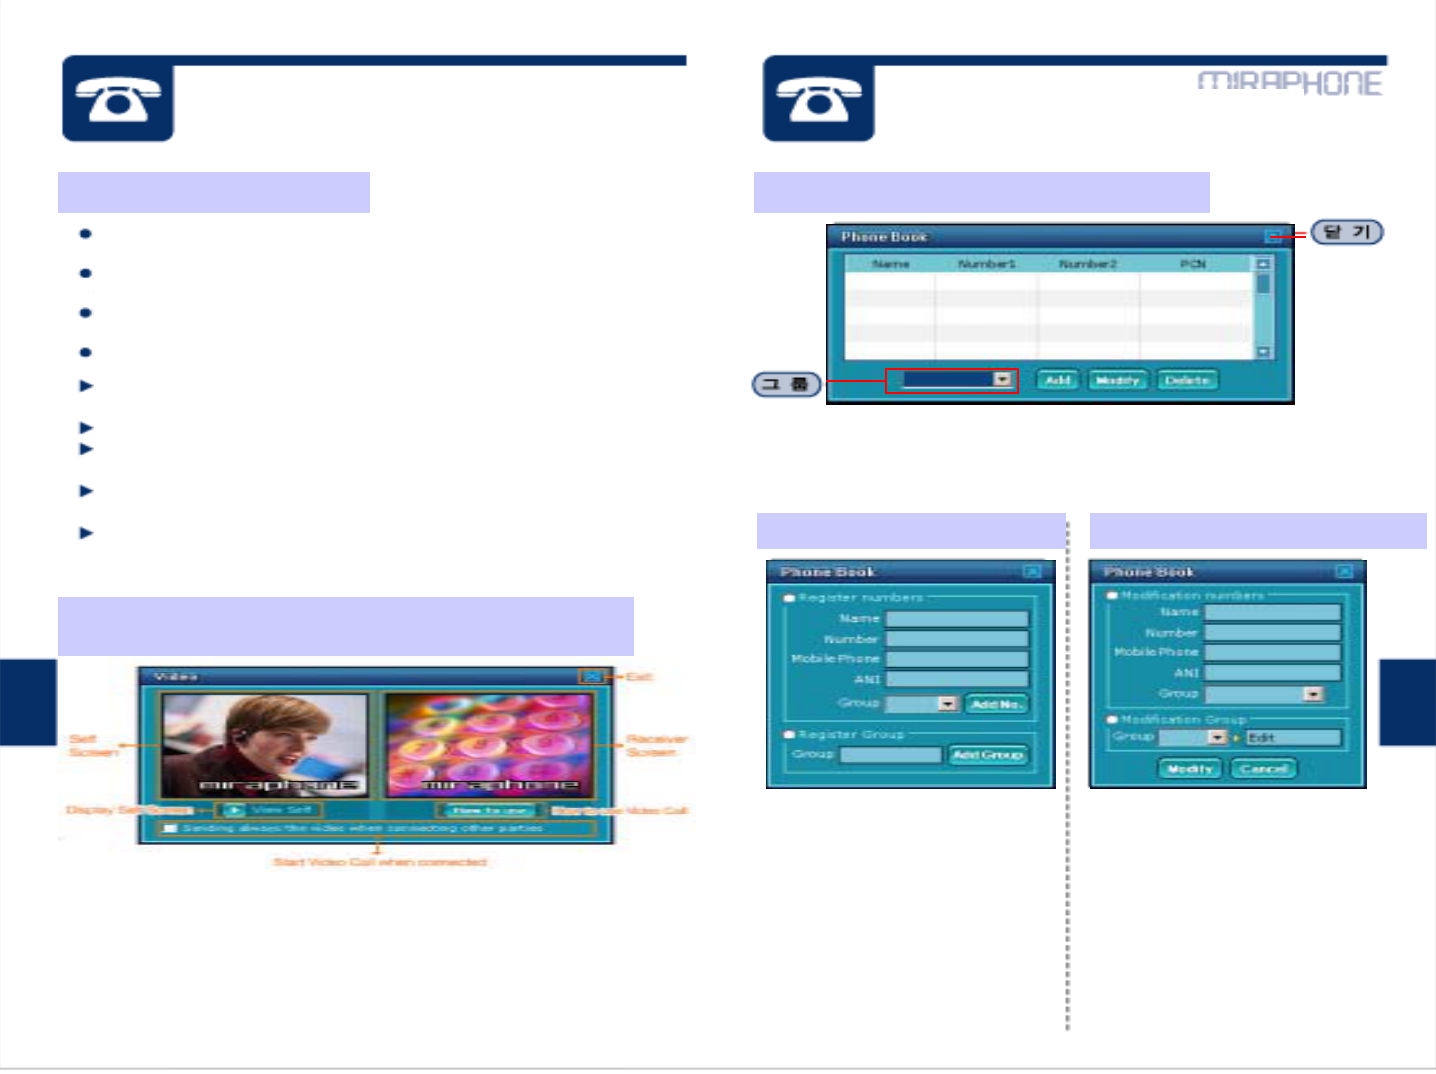
Phone Book : A phonebook screen is displayed in the bottom part of
the main screen.
Logout : The current ANI number is logged out and a new window
in which you can login appears.
<Login Screen>
<Update Screen>
<Main Dialer Screen>
ANI display : ANI number of a login user is displayed.
Phone number display : Phone number that is entered through
a keypad or a phone is displayed.
Account Balance : displays the left over amount.
<Menu>
Menu
Using MiraPhone [3] Using MiraPhone [4]
Pick up the MiraPhone receiver and then press SEND (or Call)
button after pressing the phone number to make a call.
You can also press numbers in your Key board or on the
keypad of the dialer in the screen using mouse.
You can make a call by pressing ON HOOK button without
picking up the receiver.
Press SEND button for redial.
Calling MiraPhone to MiraPhone : Enter the receiver’s ANI
number and click on Call (or press SEND) button.
Korea Domestic Call : Area code + phone number
(ex) 02-555-1234
Korea Domestic Mobile Call : Mobile Carrier Number + Phone
Number same from overseas (ex)011 123 1234
Overseas Call : Country Code + Area Code + Phone number
(ex) 81-123-555-4567
From your Phone book : Double-click on the number you put in
the phone book.
▶Sending always the video when connecting other parties :
if this option is checked, the Video Call screen appears
automatically when PC-to-PC connection is made.
▶View Self : When ‘Play’ button is clicked, your own video image
is displayed, and clicking on the stop button displays the default
screen.
▶How to use Video Call : This is linked to a web page that
contains manuals for video call use.
▶Group : a list of added groups are displayed.
▶Add : adds a user to Phone book
▶Modify : allows modifying a registered user’s information.
▶Delete : deletes a registered user from Phone book.
When “video Call” button is clicked on
(Only available for communications between MiraPhone terminals)
How to make a phone call When “Phone Book” button is clicked on
Group Registration
Input name of group you want
to create and click on “Add
Group” button.
Group Modify
Select group you want to
modify and create new name
for the group, and then click on
“Modify” button.
Phone number Registration
Input name, phone number,
mobile number, ANI number
and select group for them and
then click on “Add No.” button.
Phone number Modify
Modify name, phone number,
mobile number, ANI number
and select group for them and
then click on “Modify” button.
When click on “Add” button When click on “Modify” button
How do I know MiraPhone and its program are installed
normally?
If you hear “beep-” sound from the receiver after login, that means
MiraPhone and its program are installed properly.
If you see same message “Finding device wait”, what is wrong?
Make sure your MiraPhone is installed correctly. After checking if the
phone has no problem in the installation clicking on “Setting” button
and check COM1 to COM4 one by one until you can make a call.
If you cannot see any difference after checking in Setting, Serial/USB
port might be deleted in device manager of control panel of your PC
or serial port is checked “disable” in main board menu of your PC.
Please contact service center.
I cannot hear “beep-” sound after installing MiraPhone correctly.
The connection to serial port has problem. Make sure the connection.
If you see the same after connecting correctly please contact service
center.
Is it possible to make a call under VPN (or NAT) environment
using IP sharing machine?
Yes, you can use MiraPhone under VPN or Firewall.
Is it possible to use MiraPhone at different PC in different place?
Yes, you can use MiraPhone anywhere in the world as long as the PC
Is on line after installation. You are recommended to delete MiraPhone
Program after use for fear that other user could login and use MiraPhone
without your permission.
A message saying that “Billing server error” in the coupon box.
What is wrong?
The message doesn’t mean your coupon is used up. That is showed
because of disconnection between your PC and our Billing server
Temporarily. Please check if there is disconnection in your internet
after closing MiraPhone program and the internet connection has no
problem, try to use again MiraPhone program.
I cannot see MiraPhone program after login.
The installation has completed wrong. Please remove MiraPhone
program and install it again.
How can I use MiraPhone at another PC?
After deleting MiraPhone program at your PC and you have to install
the program at new PC again to use it.
How to delete MiraPhone program in your Windows:
Start->Setting ->Control panel ->Program Add/Remove->MiraPhone
->Remove.
When I use MiraPhone at different PC, how can I copy the phone
numbers in the Phone book?
Just login and you will see all the phone numbers in the phone book
at the different PC. Phone numbers are recorded in our Server.
When I use MiraPhone overseas county, how is the rate?
When you make a call from overseas (not Korea) to overseas, it will be
charged international rate. No matter which country you make a call to
or from, you will be charged according to our rate table. And Calls
between two MiraPhone terminals are free of charge.
My coupon is almost used up. Where can I get coupon more?
Please click on the ‘Recharge’ button.
Video transferring is not stable. How can I fix it?
A video PC camera should be installed on the computer prior to use.
Make sure the connection of PC camera to your PC. If you want to
see the other party’s face through the PC camera, you need to click
on the “Video Call” button. If you cannot see the other party’s face
or video transferring is not stable, there must be a problem in
internet speed. Please contact your internet service provider or our
service center.
Check at COM port or USB port you
are currently using.
Check here for automatic running of
MiraPhone when you login.
Check here when NAT environment
doesn’t help MiraPhone work.
Check here when the other party’s
video screen shows green color or
abnormally in NAT environment.This
option can cause low voice quality.
Thanks for your purchase our MiraPhone.
Our warranty on MiraPhone starts from when you purchase. However
if there is no date of purchase on the label of your MiraPhone, our
warranty on your Miraphne will start 30 days earlier from your first
login. For our full warranty, please check out the date of your
purchase.
Before use, please read below:
1. MiraPhone is passed Quality control by Quality Administration Law
and strict inspection.
2. According to our 1 year warranty policy, your MiraPhone will be
fixed out of charge within 1 year from your purchase as long as it is
used normally.
3. When MiraPhone device has trouble in its working, part exchange
or repair is possible.
4.We do charge for below:
- When MiraPhone gets damages or breakdown during delivery.
- When MiraPhone is remodeled or fixed not by our service center.
- When MiraPhone gets damages by natural disaster.
- When serial cable or jack is broken.
5.Keep this Warranty paper for after-sales service.
6.1 Warranty paper is issued for 1 MiraPhone.
7.This Warranty is valid only in Korea.
- dealing with your request: 1 day to 1 month will be taken for
your request.
- delivery fee: delivery fee to service center by us, delivery fee to
customer by customer.
8.Refund: When there is defect in MiraPhone device in 3 days after
purchase.
Warranty
Item | MiraPhoneItem MiraPhone
Warranty For 12months after the date of purchase( / /2003)
Cust-
omer
Name
Address
Caution : Any changes or modifications in construction
of this device, which are not expressly approved by the
party responsible for compliance, could void the user’s
authority to operate the equipment.
Note : This equipment has been tested and found to
comply with limits for Class B digital device, pursuant to
part 15 of the FCC Rules. These limits are designed to
provide reasonable protection against harmful interference
in a residential installation. This equipment generates,
uses and can radiated radio frequency energy and, if not
installed and used in accordance with the instructions,
may cause harmful interference to radio communications.
However, there is no guarantee that interference will not
occur in a particular installation. If this equipment does
cause harmful interference to radio or television reception,
which can be determined by turning the equipment off and
on, the user is encouraged to try to correct the interference
by one or more of the following measures :
- Reorient or relocate the receiving antenna.
- Increase the separation between the equipment and
receiver
- Connect the equipment into an outlet on a circuit
different from that to which the receiver is connected.
- Consult the dealer or an experienced radio/TV
technician for help.
FCC Compliance Statement