Weccan DRW358F60W 2.4 G RC Drone With Wi-Fi Camera (Remove Control Unit) User Manual Part 1a
Weccan Industrial Limited 2.4 G RC Drone With Wi-Fi Camera (Remove Control Unit) Part 1a
UserManual.wiki
>
Weccan
>
DRW358F60W User Manual
Users Manual
Navigation menu
Upload a User Manual
Namespaces
Wiki Guide
HTML
PDF
Info
Views
User Manual
Discussion / Help
Navigation

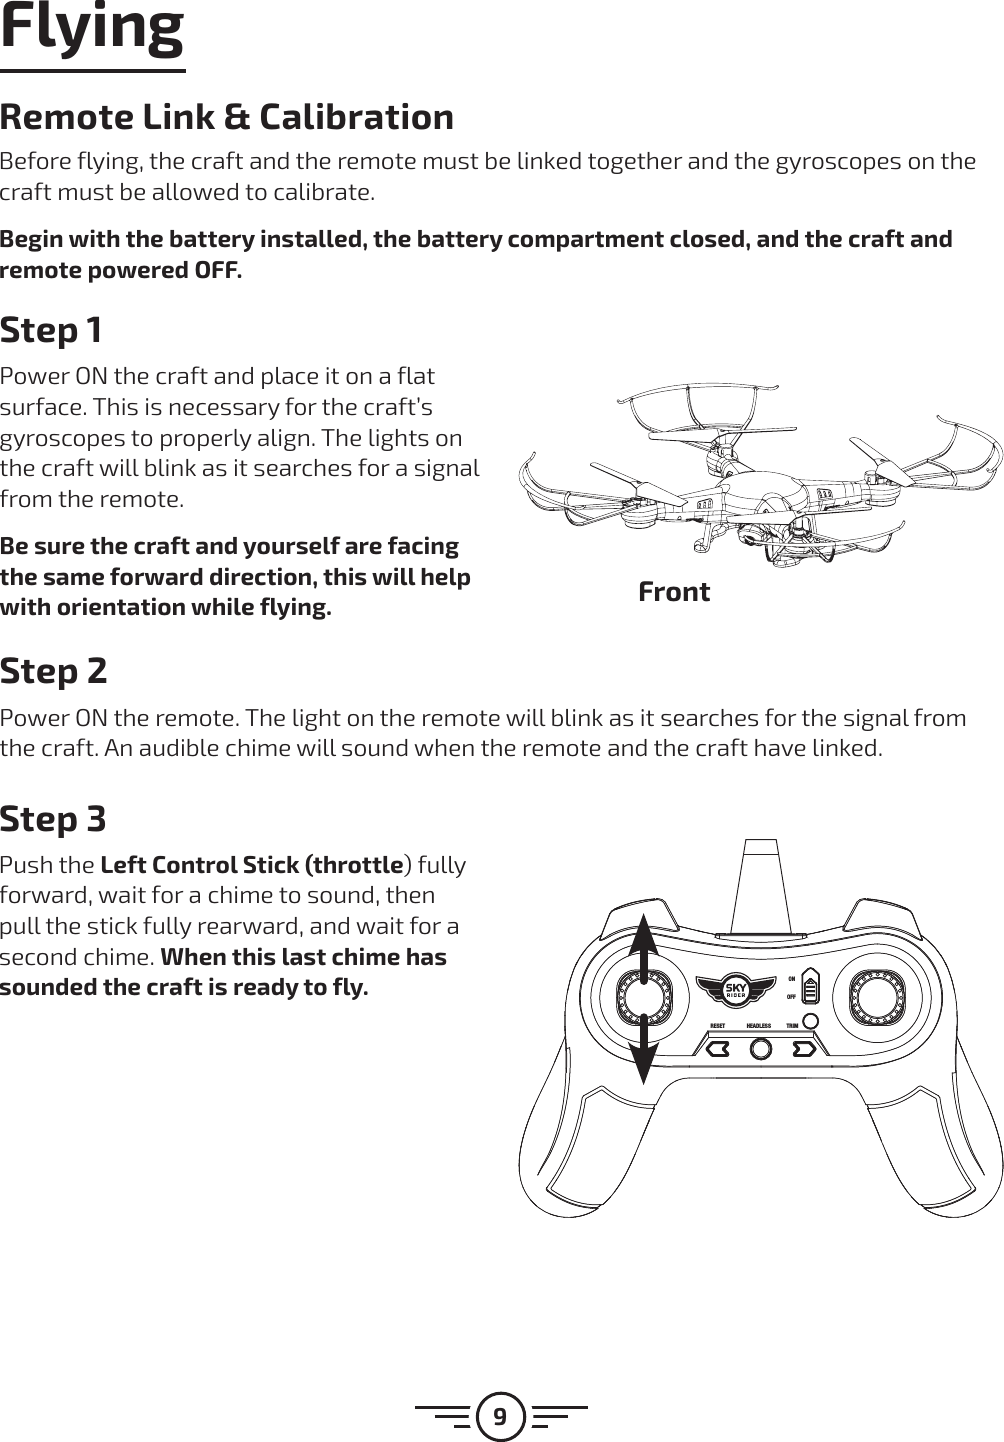
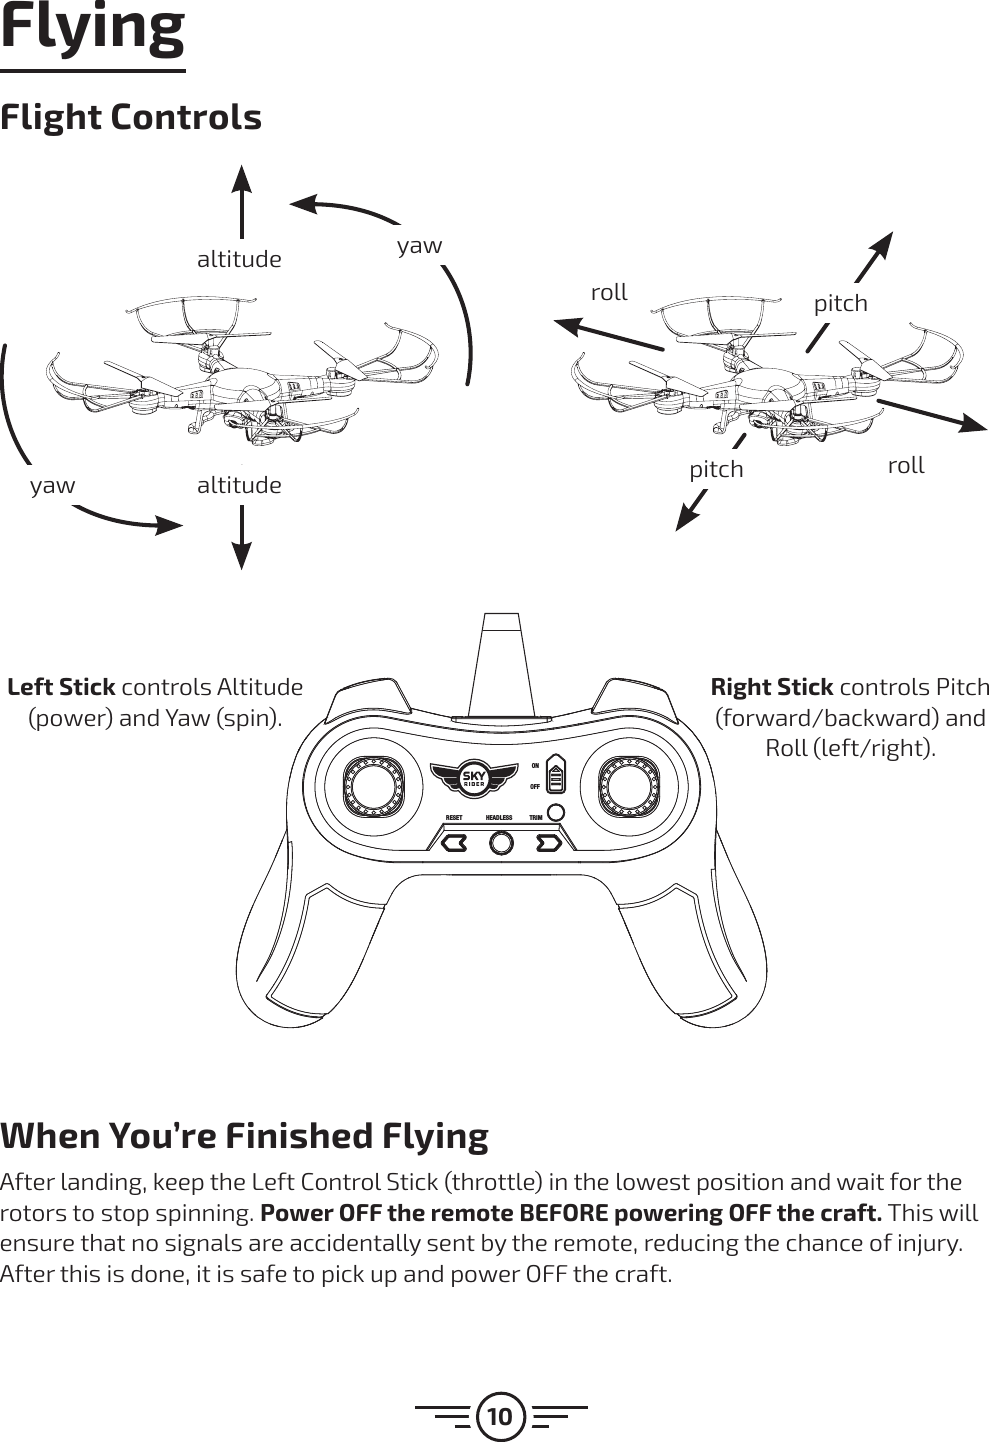
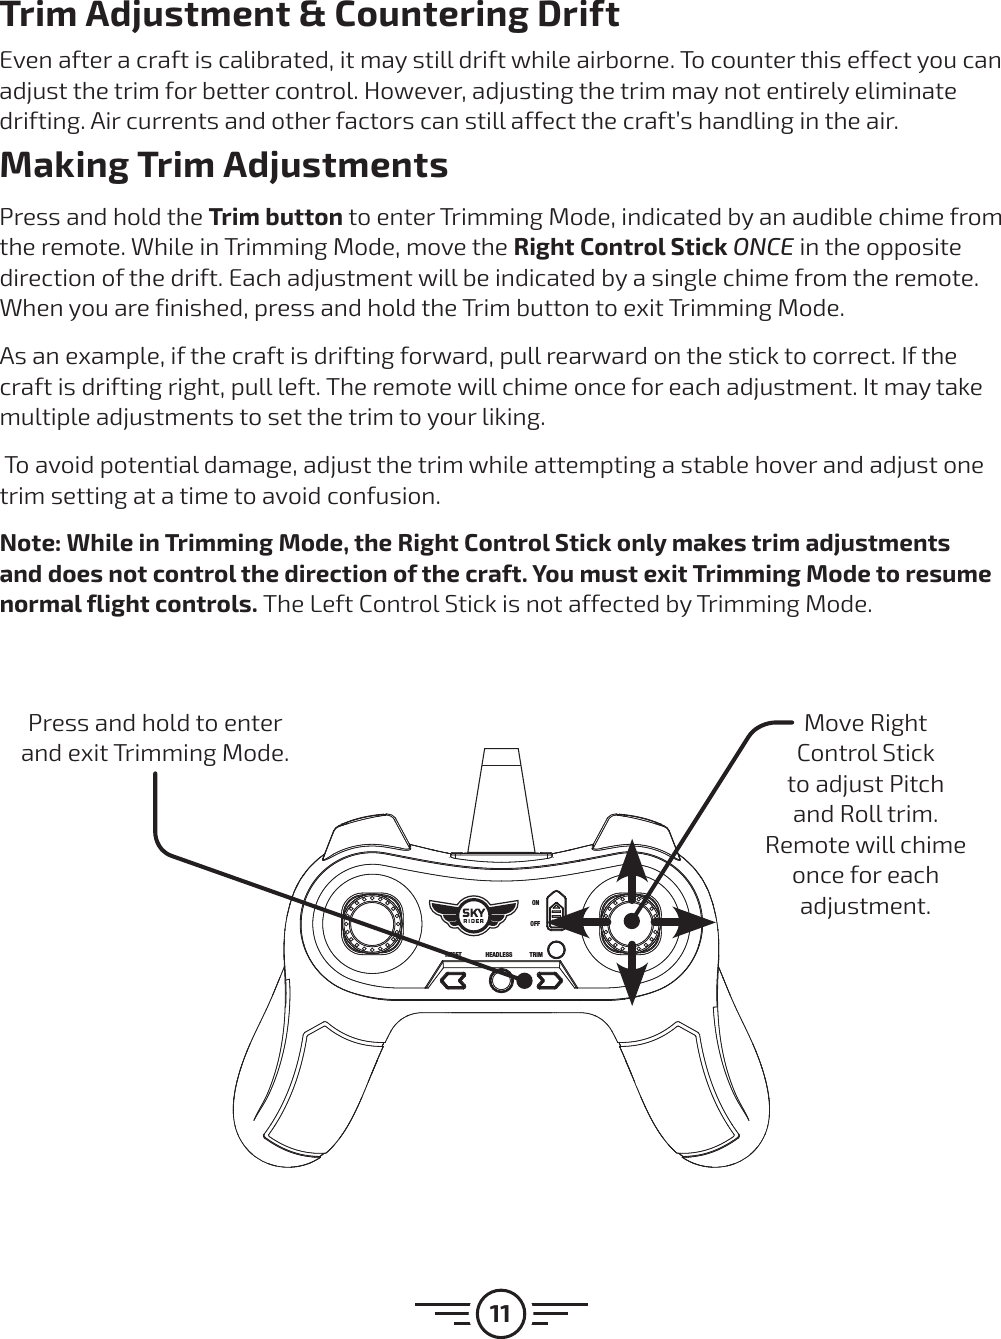
![Warnings & PrecautionsImportant Safety Instructions 5HDGDQGIROORZDOOLQVWUXFWLRQV .HHSWKHVHLQVWUXFWLRQVIRUIXWXUHUHIHUHQFH +HHGDOO:DUQLQJV ,QWHQGHGIRUFKLOGUHQDJHVDQGKLJKHU$GXOWVXSHUYLVLRQLVUHTXLUHG 2QO\XVHDWWDFKPHQWVDFFHVVRULHVVSHFL¿HGE\WKHPDQXIDFWXUHU %HIRUHÀ\LQJDOZD\VFKHFNWKHERG\URWRUVDQGEDWWHU\IRUDQ\GDPDJHRUREVWUXFWLRQV %DWWHU\VKRXOGEHIUHHIURPFUDFNVRUVZHOOLQJ .HHSWKHURWRUVFOHDURIDQ\REVWUXFWLRQVDQGERG\SDUWVWRDYRLGSRWHQWLDOGDPDJHDQGLQMXU\ 0DQXIDFWXUHUDQGGHDOHUDVVXPHQROLDELOLW\IRUDFFLGHQWDOGDPDJHVIURPLPSURSHUXVHRULQVWDOODWLRQRISDUWVRUIURPGDPDJHLQFXUUHGIURPZRUQRUEURNHQSDUWV 3LORWVDUHUHVSRQVLEOHIRUWKHLUDFWLRQVDQGDQ\GDPDJHFDXVHGIURPLPSURSHUXVH 3LORWVVKRXOGNHHSWKHFUDIWLQVLJKWDWDOOWLPHVGXULQJÀLJKW,I\RXORVHVLJKWRIWKHFUDIWDWDQ\WLPHSRZHUGRZQDQGFHDVHÀLJKWLPPHGLDWHO\ 2QO\À\LQODUJHRSHQDUHDVWKDWDUHIUHHIURPREVWDFOHVRUSRWHQWLDOKD]DUGVVXFKDVWUHHVSRZHUOLQHVFHLOLQJIDQVDQGWKHOLNH )O\LQJRYHUERGLHVRIZDWHULVQRWUHFRPPHQGHG )O\LQJDWQLJKWLVQRWUHFRPPHQGHG 1HYHUWU\WRUHWULHYHWKHFUDIWIURPDUHDV\RXFDQQRWVDIHO\UHDFKVXFKDVURRIWRSVRUWUHHV 1HYHUODXQFKWKHFUDIWIURP\RXUKDQG 1HYHUOHDYHWKHFUDIWXQDWWHQGHGZKLOHLWLVSRZHUHGRQRUZKLOHWKHEDWWHU\LVFKDUJLQJFCC Warnings $Q\&KDQJHVRUPRGL¿FDWLRQVQRWH[SUHVVO\DSSURYHGE\WKH SDUW\ UHVSRQVLEOH IRU FRPSOLDQFH FRXOG YRLG WKH XVHU¶VDXWKRULW\ WR RSHUDWH WKH HTXLSPHQW7KLV GHYLFH FRPSOLHV ZLWK SDUW RIWKH)&&5XOHV2SHUDWLRQ LV VXEMHFW WR WKH IROORZLQJ WZR FRQGLWLRQV 7KLV GHYLFH PD\ QRW FDXVH UKPDIXO LQWHUIHUHQFH DQG WKLV GHYLFH PXVW DFFHSW DQ\ LQWHUIHUHQFH UHFHLYHGLQFOXGLQJ LQWHUIHUHQFH WKDW PD\ FDXVH XQGHVLUHGRSHUDWLRQ1RWH 7KLV HTXLSPHQWKDVEHHQWHVWHGDQGIRXQGWRFRPSO\ ZLWK WKH OLPLWV IRU D &ODVV % GLJLWDO GHYLFHSXUVXDQW WR SDUW RI WKH )&& 5XOHV 7KHVH OLPLWV DUHGHVLJQHG WR SURYLGH UHDVRQDEOH SURWHFWLRQ DJDLQVW KDUPIXOLQWHUIHUHQFH LQ D UHVLGHQWLDO LQVWDOODWLRQ 7KLV HTXLSPHQWJHQHUDWHV XVHV DQG FDQ UDGLDWH UDGLR IUHTXHQF\ HQHUJ\DQGLIQRWLQVWDOOHGDQGXVHGLQDFFRUGDQFHZLWKWKHLQVWUXFWLRQV PD\ FDXVH KDUPIXO LQWHUIHUHQFH WR UDGLRFRPPXQLFDWLRQV +RZHYHU WKHUH LV QR JXDUDQWHH WKDWLQWHUIHUHQFHZLOOQRWRFFXULQDSDUWLFXODULQVWDOODWLRQ,IWKLV HTXLSPHQW GRHV FDXVH KDUPIXO LQWHUIHUHQFH WR UDGLRRU WHOHYLVLRQ UHFHSWLRQ ZKLFK FDQ EH GHWHUPLQHG E\WXUQLQJ WKH HTXLSPHQW RII DQG RQ WKH XVHU LV HQFRXUDJHGWR WU\ WR FRUUHFW WKH LQWHUIHUHQFH E\ RQH RU PRUH RI WKHIROORZLQJ PHDVXUHV 5HRULHQWRUUHORFDWHWKHUHFHLYLQJDQWHQQD ,QFUHDVHWKHVHSDUDWLRQEHWZHHQWKHHTXLSPHQWDQGUHFHLYHU &RQQHFWWKHHTXLSPHQWLQWRDQRXWOHWRQDFLUFXLWGLIIHUHQW IURP WKDW WR ZKLFK WKH UHFHLYHU LV FRQQHFWHG &RQVXOWWKHGHDOHURUDQH[SHULHQFHGUDGLR79WHFKQLFLDQ IRU KHOS 7KLVHTXLSPHQWFRPSOLHVZLWK)&&UDGLDWLRQH[SRVXUHOLPLWV VHW IRUWK IRU DQ XQFRQWUROOHG HQYLURQPHQW 7KLVDrone VKRXOG EH LQVWDOOHG DQG RSHUDWHG ZLWKPLQLPXP GLVWDQFH FP EHWZHHQ WKH UDGLDWRU \RXUERG\ 7KLV WUDQVPLWWHU PXVW QRW EH FRORFDWHG RURSHUDWLQJ LQ FRQMXQFWLRQ ZLWK DQ\ RWKHU DQWHQQD RUWUDQVPLWWHUAdditional Warnings & Precautions :$51,1*7RUHGXFHWKHULVNRI¿UHRUHOHFWULFVKRFN GR QRW H[SRVH WKLV DSSDUDWXV WR UDLQ PRLVWXUHGULSSLQJ RU VSODVKLQJ CAUTION 8VH RI FRQWUROV RU DGMXVWPHQWV RUSHUIRUPDQFHRISURFHGXUHVRWKHUWKDQWKRVHVSHFL¿HGPD\ UHVXOW LQ SHUVRQDO LQMXU\ :$51,1*&KDQJHVRUPRGL¿FDWLRQVWRWKLVXQLWQRW H[SUHVVO\ DSSURYHG E\ WKH SDUW\ UHVSRQVLEOH IRUFRPSOLDQFH FRXOG YRLG WKH XVHU¶V DXWKRULW\ WR RSHUDWHWKH HTXLSPHQW &$87,21'DQJHURIH[SORVLRQLIEDWWHU\LVLQFRUUHFWO\ UHSODFHG 5HSODFH RQO\ ZLWK WKH VDPHRUHTXLYDOHQW W\SH /LWKLXPEDWWHULHVOLNHDOOUHFKDUJHDEOHEDWWHULHVDUHUHF\FODEOH DQG VKRXOG EH UHF\FOHG RU GLVSRVHG RIDFFRUGLQJ WR VWDWH DQG ORFDO JXLGHOLQHV 7KH\ VKRXOGQHYHU EH GLVSRVHG RI LQ QRUPDO KRXVHKROG ZDVWHDQG WKH\ VKRXOG QHYHU EH LQFLQHUDWHG DV WKH\ PLJKWH[SORGH &RQWDFW \RXU ORFDO JRYHUQPHQW IRU GLVSRVDORU UHF\FOLQJ SUDFWLFHV LQ \RXU DUHD :$51,1*6KRFNKD]DUG'R1RW2SHQ %DWWHU\VKDOOQRWEHH[SRVHGWRH[FHVVLYHKHDWVXFKDVVXQVKLQH ¿UH RU WKH OLNH.HHS QHZ DQG XVHG EDWWHULHVDZD\IURPFKLOGUHQ,IWKH EDWWHU\ FRPSDUWPHQW GRHV QRW FORVH VHFXUHO\ VWRSXVLQJ WKH SURGXFW DQG NHHS LW DZD\ IURP FKLOGUHQ ,I\RXWKLQNEDWWHULHVPLJKWKDYHEHHQVZDOORZHGRUSODFHG LQVLGH DQ\ SDUW RI WKH ERG\ VHHN LPPHGLDWHPHGLFDO DWWHQWLRQ 'RQRWPL[ROGDQGQHZEDWWHULHV &RPSOHWHO\UHSODFHDOOROGEDWWHULHVZLWKQHZRQHV 'RQRWPL[DONDOLQHVWDQGDUGFDUERQ]LQFRUUHFKDUJHDEOH QLFDG QLPK HWF EDWWHULHV %DWWHULHVVKRXOGEHUHF\FOHGRUGLVSRVHGRIDVSHUVWDWH DQG ORFDO JXLGHOLQHV 7KLVSURGXFWPHHWVDQGFRPSOLHVZLWKDOO)HGHUDOUHJXODWLRQVWARNING:7KLVSURGXFWFDQH[SRVH\RXWRFKHPLFDOVLQFOXGLQJOHDGZKLFKLVNQRZQWRWKH6WDWHRI&DOLIRUQLDWRFDXVHFDQFHU)RUPRUHLQIRUPDWLRQJRWRZZZ3:DUQLQJVFDJRY](https://usermanual.wiki/Weccan/DRW358F60W/User-Guide-3497278-Page-2.png)