Weccan DRW618F51W 2.4G RC DRONE WITH WIFI CAMERA User Manual DRW618
Weccan Industrial Limited 2.4G RC DRONE WITH WIFI CAMERA DRW618
Weccan >
15_DRW618 UserMan r1
User’s Guide for Model DRW618 v2171-01
Griffon Pro
(3$%30/&8*5)8*'*$".&3"
Warnings & Precautions
Important Safety Instructions
5HDGDQGIROORZDOOLQVWUXFWLRQV
.HHSWKHVHLQVWUXFWLRQVIRUIXWXUHUHIHUHQFH
+HHGDOO:DUQLQJV
,QWHQGHGIRUFKLOGUHQDJHVDQGKLJKHU$GXOW
VXSHUYLVLRQLVUHTXLUHG
2QO\XVHDWWDFKPHQWVDFFHVVRULHVVSHFL¿HGE\WKH
PDQXIDFWXUHU
%HIRUHÀ\LQJDOZD\VFKHFNWKHERG\URWRUVDQG
EDWWHU\IRUDQ\GDPDJHRUREVWUXFWLRQV
%DWWHU\VKRXOGEHIUHHIURPFUDFNVRUVZHOOLQJ
.HHSWKHURWRUVFOHDURIDQ\REVWUXFWLRQVDQGERG\
SDUWVWRDYRLGSRWHQWLDOGDPDJHDQGLQMXU\
0DQXIDFWXUHUDQGGHDOHUDVVXPHQROLDELOLW\IRU
DFFLGHQWDOGDPDJHVIURPLPSURSHUXVHRULQVWDOODWLRQ
RISDUWVRUIURPGDPDJHLQFXUUHGIURPZRUQRU
EURNHQSDUWV
3LORWVDUHUHVSRQVLEOHIRUWKHLUDFWLRQVDQGDQ\
GDPDJHFDXVHGIURPLPSURSHUXVH
3LORWVVKRXOGNHHSWKHFUDIWLQVLJKWDWDOOWLPHV
GXULQJÀLJKW,I\RXORVHVLJKWRIWKHFUDIWDWDQ\WLPH
SRZHUGRZQDQGFHDVHÀLJKWLPPHGLDWHO\
2QO\À\LQODUJHRSHQDUHDVWKDWDUHIUHHIURP
REVWDFOHVRUSRWHQWLDOKD]DUGVVXFKDVWUHHVSRZHU
OLQHVFHLOLQJIDQVDQGWKHOLNH
)O\LQJRYHUERGLHVRIZDWHULVQRWUHFRPPHQGHG
)O\LQJDWQLJKWLVQRWUHFRPPHQGHG
1HYHUWU\WRUHWULHYHWKHFUDIWIURPDUHDV\RXFDQQRW
VDIHO\UHDFKVXFKDVURRIWRSVRUWUHHV
1HYHUODXQFKWKHFUDIWIURP\RXUKDQG
1HYHUOHDYHWKHFUDIWXQDWWHQGHGZKLOHLWLVSRZHUHG
RQRUZKLOHWKHEDWWHU\LVFKDUJLQJ
FCC Warnings
:DUQLQJ&KDQJHVRUPRGLILFDWLRQVWRWKLVXQLWQRW
H[SUHVVO\DSSURYHGE\WKHSDUW\UHVSRQVLEOHIRU
FRPSOLDQFHFRXOGYRLGWKHXVHU¶VDXWKRULW\WRRSHUDWHWKH
HTXLSPHQW
7KLVGHYLFHFRPSOLHVZLWK3DUWRIWKH)&&5XOHV
2SHUDWLRQLVVXEMHFWWRWKHIROORZLQJWZRFRQGLWLRQV
WKLVGHYLFHPD\QRWFDXVHKDUPIXOLQWHUIHUHQFHDQG
WKLVGHYLFHPXVWDFFHSWDQ\LQWHUIHUHQFHUHFHLYHG
LQFOXGLQJLQWHUIHUHQFHWKDWPD\FDXVHXQGHVLUHG
RSHUDWLRQ
127(7KLVHTXLSPHQWKDVEHHQWHVWHGDQGIRXQGWR
FRPSO\ZLWKWKHOLPLWVIRUD&ODVV%GLJLWDOGHYLFH
SXUVXDQWWR3DUWRIWKH)&&5XOHV7KHVHOLPLWVDUH
GHVLJQHGWRSURYLGHUHDVRQDEOHSURWHFWLRQDJDLQVWKDUPIXO
LQWHUIHUHQFHLQDUHVLGHQWLDOLQVWDOODWLRQ7KLVHTXLSPHQW
JHQHUDWHVXVHVDQGFDQUDGLDWHUDGLRIUHTXHQF\HQHUJ\
DQGLIQRWLQVWDOOHGDQGXVHGLQDFFRUGDQFHZLWKWKH
LQVWUXFWLRQVPD\FDXVHKDUPIXOLQWHUIHUHQFHWRUDGLR
FRPPXQLFDWLRQV+RZHYHUWKHUHLVQRJXDUDQWHHWKDW
LQWHUIHUHQFHZLOOQRWRFFXULQDSDUWLFXODULQVWDOODWLRQ,I
WKLVHTXLSPHQWGRHVFDXVHKDUPIXOLQWHUIHUHQFHWRUDGLR
RUWHOHYLVLRQUHFHSWLRQZKLFKFDQEHGHWHUPLQHGE\
WXUQLQJWKHHTXLSPHQWRIIDQGRQWKHXVHULVHQFRXUDJHG
WRWU\WRFRUUHFWWKHLQWHUIHUHQFHE\RQHRUPRUHRIWKH
IROORZLQJPHDVXUHV
5HRULHQWRUUHORFDWHWKHUHFHLYLQJDQWHQQD
,QFUHDVHWKHVHSDUDWLRQEHWZHHQWKHHTXLSPHQWDQG
UHFHLYHU
&RQQHFWWKHHTXLSPHQWLQWRDQRXWOHWRQDFLUFXLW
GLIIHUHQWIURPWKDWWRZKLFKWKHUHFHLYHULVFRQQHFWHG
&RQVXOWWKHGHDOHURUDQH[SHULHQFHGUDGLR79
WHFKQLFLDQIRUKHOS
7KLVGHYLFHFRPSOLHVZLWK)&&5)UDGLDWLRQ
H[SRVXUHOLPLWVVHWIRUWKIRUDQXQFRQWUROOHG
HQYLURQPHQW7KLVWUDQVPLWWHUPXVWQRWEHFRORFDWHG
RURSHUDWLQJLQFRQMXQFWLRQZLWKDQ\RWKHUDQWHQQDRU
WUDQVPLWWHU
IO\SDUW7KLVHTXLSPHQWVKRXOGEHLQVWDOOHGDQG
RSHUDWHGZLWKDPLQLPXPGLVWDQFHRIFPEHWZHHQ
WKHUDGLDWRU\RXUERG\7KLVWUDQVPLWWHUPXVWQRW
EHFRORFDWHGRURSHUDWLQJLQ
FRQMXQFWLRQZLWKDQ\RWKHUDQWHQQDRUWUDQVPLWWHU
Additional Warnings & Precautions
:$51,1*7RUHGXFHWKHULVNRI¿UHRUHOHFWULF
VKRFNGRQRWH[SRVHWKLVDSSDUDWXVWRUDLQPRLVWXUH
GULSSLQJRUVSODVKLQJ
CAUTION8VHRIFRQWUROVRUDGMXVWPHQWVRU
SHUIRUPDQFHRISURFHGXUHVRWKHUWKDQWKRVHVSHFL¿HG
PD\UHVXOWLQSHUVRQDOLQMXU\
:$51,1*&KDQJHVRUPRGL¿FDWLRQVWRWKLVXQLW
QRWH[SUHVVO\DSSURYHGE\WKHSDUW\UHVSRQVLEOHIRU
FRPSOLDQFHFRXOGYRLGWKHXVHU¶VDXWKRULW\WRRSHUDWH
WKHHTXLSPHQW
&$87,21'DQJHURIH[SORVLRQLIEDWWHU\LV
LQFRUUHFWO\UHSODFHG5HSODFHRQO\ZLWKWKHVDPHRU
HTXLYDOHQWW\SH
/LWKLXPEDWWHULHVOLNHDOOUHFKDUJHDEOHEDWWHULHVDUH
UHF\FODEOHDQGVKRXOGEHUHF\FOHGRUGLVSRVHGRI
DFFRUGLQJWRVWDWHDQGORFDOJXLGHOLQHV7KH\VKRXOG
QHYHUEHGLVSRVHGRILQQRUPDOKRXVHKROGZDVWH
DQGWKH\VKRXOGQHYHUEHLQFLQHUDWHGDVWKH\PLJKW
H[SORGH&RQWDFW\RXUORFDOJRYHUQPHQWIRUGLVSRVDO
RUUHF\FOLQJSUDFWLFHVLQ\RXUDUHD
:$51,1*6KRFNKD]DUG'R1RW2SHQ
%DWWHU\VKDOOQRWEHH[SRVHGWRH[FHVVLYHKHDWVXFKDV
VXQVKLQH¿UHRUWKHOLNH
.HHSQHZDQGXVHGEDWWHULHVDZD\IURPFKLOGUHQ,I
WKHEDWWHU\FRPSDUWPHQWGRHVQRWFORVHVHFXUHO\VWRS
XVLQJWKHSURGXFWDQGNHHSLWDZD\IURPFKLOGUHQ
,I\RXWKLQNEDWWHULHVPLJKWKDYHEHHQVZDOORZHGRU
SODFHGLQVLGHDQ\SDUWRIWKHERG\VHHNLPPHGLDWH
PHGLFDODWWHQWLRQ
'RQRWPL[ROGDQGQHZEDWWHULHV
&RPSOHWHO\UHSODFHDOOROGEDWWHULHVZLWKQHZRQHV
'RQRWPL[DONDOLQHVWDQGDUGFDUERQ]LQFRU
UHFKDUJHDEOHQLFDGQLPKHWFEDWWHULHV
%DWWHULHVVKRXOGEHUHF\FOHGRUGLVSRVHGRIDVSHU
VWDWHDQGORFDOJXLGHOLQHV

3
Table of Contents
Eagle 3 Pro Wi-Fi Drone
FAA Information: Flying Your Drone Under
the Special Rule for Model Aircraft – 4
Features – 4
Includes – 4
Diagram & Specifications – 5
Assembly
Rotor Guards – 6
Landing Struts – 6
Camera Adjustment – 6
Remote Control
Functions – 7
Battery Installation – 8
Charging the Battery
Information & Procedure – 9
Flying
Remote Link & Calibration – 10
Flight Controls – 11
Setting Trim & Countering Drift – 12
Gyroscope Recalibration – 13
Remote Trim Reset – 13
Tips for Safe Operation – 14
Speed Setting – 14
Headless Mode – 14
Flips – 15
Sky Rider Voyage App
Free Download – 16
Connect to Wi-Fi – 16
Settings Screen – 17
Sky Rider View App
Screen Controls – 18
Flight Controls – 19
Using the Remote & App Together – 20
Smartphone Holder – 20
3D Mode – 21
Parts & Repair
Parts Replacement – 22
Rotor Replacement – 22
Troubleshooting
Troubleshooting Guide – 23
Customer Support
Contact Information – 24
International Support – 24
Warranty – 24

4
Features
ű360° flips & tricks
ű6-axis gyroscope
űFree app for Wi-Fi flight, camera and
video capture
űAdjustable angle Wi-Fi camera:
480x640, 0.3MP resolution
ű3 speeds
űControl distance: up to 300 feet
űLED navigation lights
űOperating time: 15-17 minutes
űCharge time: approx. 150 minutes
Includes
űUSB charging cable
ű2.4GHz remote control: requires 6 AA
batteries (not included)
űRechargeable lithium polymer battery
ű4 Replacement rotors
ű4 Rotor guards and screws
űDetachable smartphone cradle with
attachment screw
űScrewdriver
űUser’s Guide
Eagle 3 Pro Wi-Fi Drone
FAA Information: Flying Your Drone Under the Special
Rule for Model Aircraft
To fly under the Special Rule for Model Aircraft you must:
űFly for hobby or recreation ONLY
űRegister your model aircraft
űFly within visual line-of-sight
űFollow community-based safety guidelines and fly within the programming of a
nationwide community-based organization
űFly a drone under 55 lbs. unless certified by a community-based organization
űNever fly near other aircraft
űNotify the airport and air traffic control tower prior to flying within 5 miles of an airport
űNever fly near emergency response efforts
You alone are responsible for safely and responsibly flying your drone. For more
information on FAA Rules and Guidelines for flying Unmanned Aerial Systems please visit:
http://www.faa.gov/uas/
5
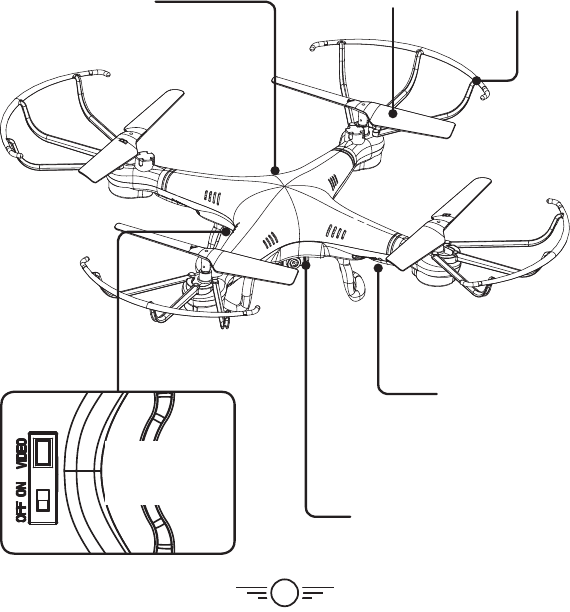
Diagram & Specifications
űDimensions: 320x320x85mm/12.5x12.5x3.3 in. (LWH)
űWeight: 294g/10.4 oz/0.65lb
Camera (underside)
Rotor Guard
Power Switch
located next to
the camera
Rotor
LED Lights
Blue LEDs indicate the
front of the craft.
Red LEDs indicate the rear
of the craft.
Battery Compartment
(rear)
6
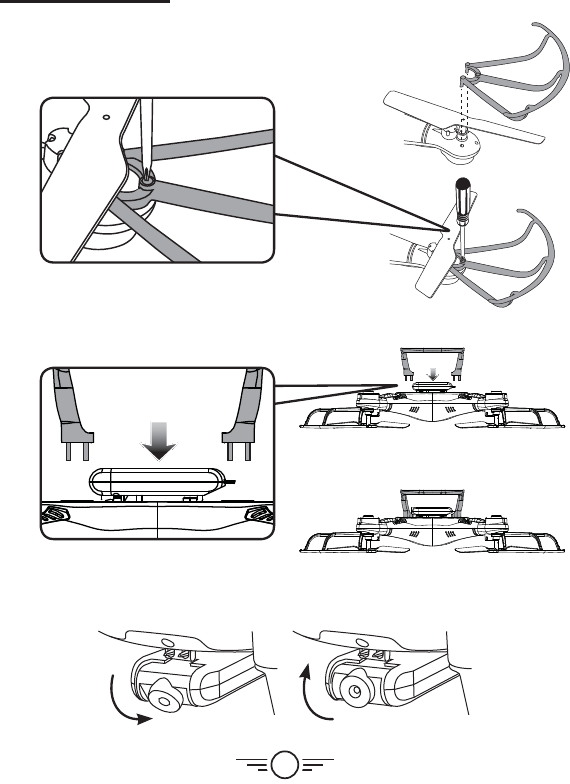
Camera Adjustment
Rotate the camera lens to change the viewing angle.
Assembly
Landing Struts
Place each landing strut on the underside of the craft as
shown and press firmly into place.
Rotor Guards
Attach each rotor guard as shown, then tighten with a
screw in the center location using the included screwdriver.
7
RESET
EM
STOP
ROLL ROLL
YAW YAW
PITCH
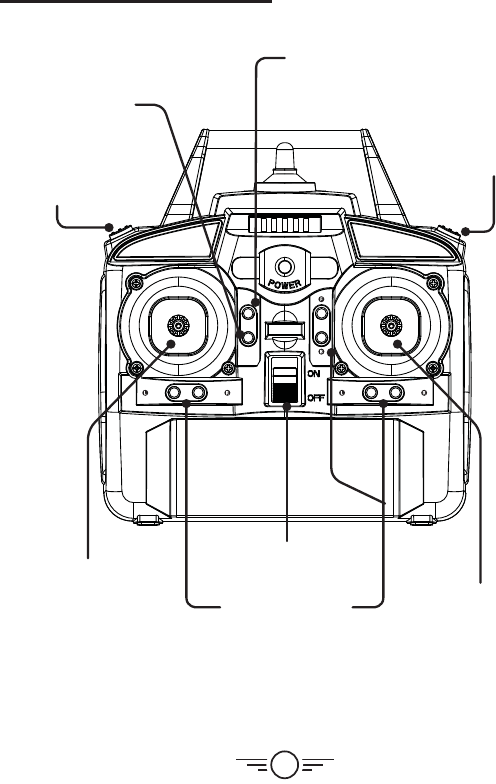
Trim Adjustment
Press to adjust Yaw, Pitch
and Roll trim.
Trim Reset
Press to reset trim
settings to default.
Left Control Stick
Increase Throttle:
push forward
Decrease Throttle:
push backward
Yaw/Spin:
push left or right
Press for Headless Mode.
Start/Landing
Press to start rotors.
Press to automatically
land the drone.
Speed Setting
Right Control Stick
Pitch:
push forward/backward
Roll/Bank:
push left/right
Press and push any
direction to do flips.
Emergency Stop
Press to quickly
stop the rotors
from turning.
Power Switch
Remote Control
Functions
8
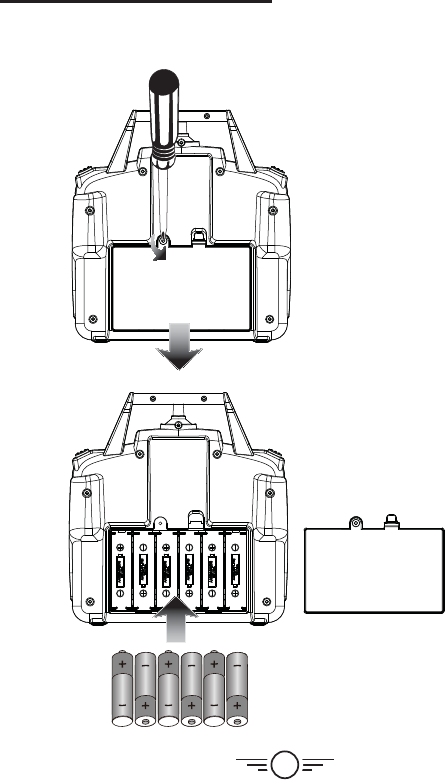
6 x AA
Batteries
6x AA
batteries
Battery Installation
Remote Control
9
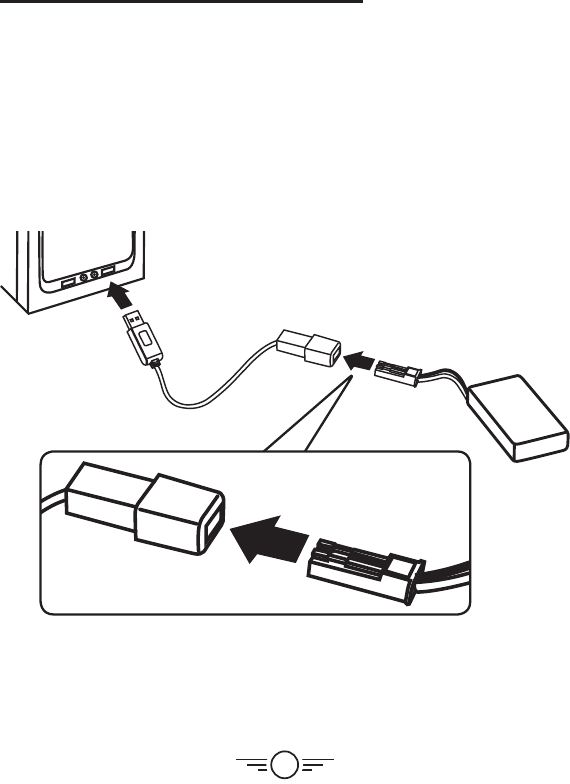
Charging the Battery
Information & Procedure
The craft’s battery must be charged before it can be flown. To avoid risk of injury or damage,
be sure the craft and remote control are both powered OFF and remove the battery
from the craft when charging. Charging time is approximately 150 minutes. Charge fully
before use for best performance.
Connect the USB charging cable (included) to the USB port of a powered ON computer or
USB power adapter (not included), then connect the charging plug to the battery plug.
While charging, the cable will display a red light.
When charging is complete, the light will turn OFF.
Be sure to correctly match the plug to the charging
port or damage may occur.
REMINDER: Do not charge overnight. Do not leave
unattended while charging.

10
Flying
Remote Link & Calibration
Before flying, the craft and the remote must be linked together and the gyroscopes on the
craft must be allowed to calibrate.
Begin with the battery installed, the battery compartment closed, and the craft and
remote powered OFF.
Step 1
Power ON the craft and place it on a flat surface. This is necessary for the craft’s
gyroscopes to properly align. The lights on the craft will blink as it searches for a signal
from the remote.
Be sure the craft and yourself are facing the same forward direction, this will help with
orientation while flying.
Step 2
Power ON the remote. The light on the remote will blink as it searches for the signal from
the craft. An audible chime will sound when the remote and the craft have linked.
Step 3
Push the Left Control Stick (throttle) fully forward, wait for a chime to sound, then pull
the stick fully rearward, and wait for a second chime. Now, calibrate the gyroscopes by
pulling down and inwards for 2-3 seconds. The LEDs on the craft will blink rapidly during
calibration. When the LEDs have turned solid, the craft is ready to fly.
Step 4
Press the Start/Landing button to start the rotors.
To take off, push up on the Left Control Stick. When you release the throttle, the craft will
hover in place.
To land, press the Start/Landing button. The craft will descend until it detects it has
landed and the rotors will stop.
To quickly stop the rotors, press the Emergency Stop button. This is an emergency action
to be used only in circumstances where the craft may cause damage or injury.
If you are finished flying, power OFF the remote BEFORE powering OFF the craft to
prevent any signals from being sent by the remote on accident.
11
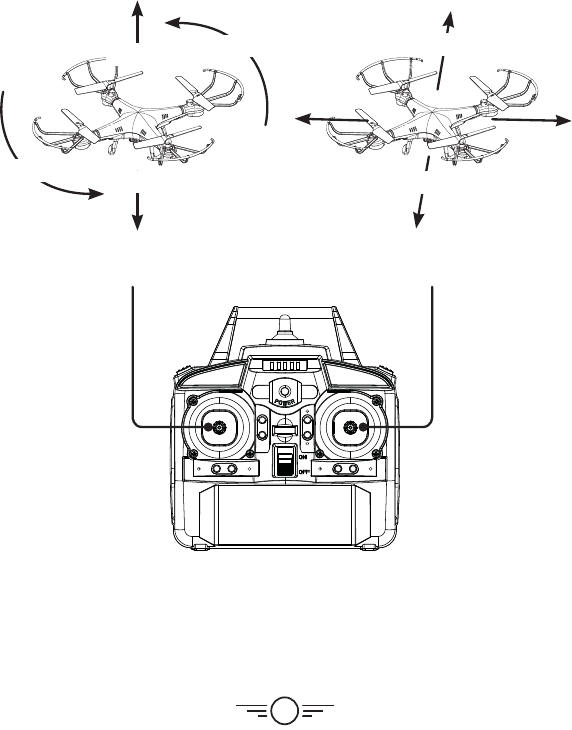
RESET
EM
STOP
ROLL ROLL
YAW YAW
PITCH
Altitude Pitch
Altitude Pitch
Yaw
Yaw
Right Stick controls Pitch (forward/
backward) and Roll (left/right).
Left Stick controls Altitude
(power) and Yaw (spin).
Flight Controls
Roll
Roll
12
RESET
EM
STOP
ROLL ROLL
YAW YAW
PITCH
RESET
EM
STOP
ROLL ROLL
YAW YAW
PITCH
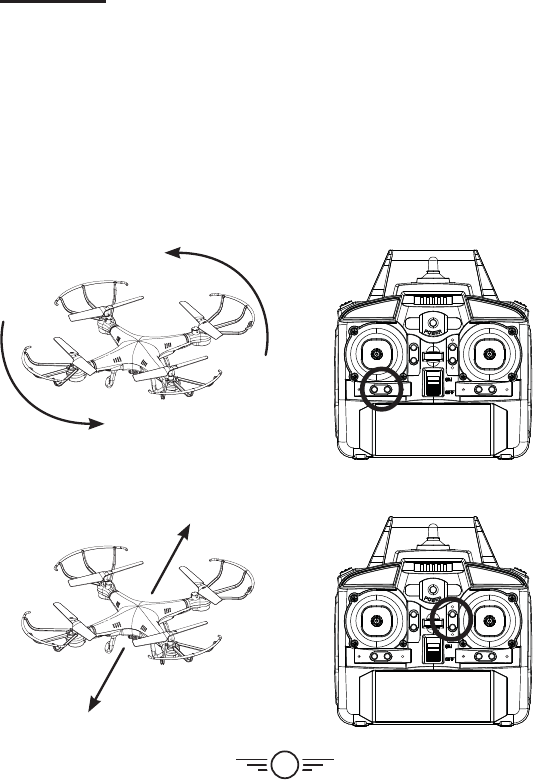
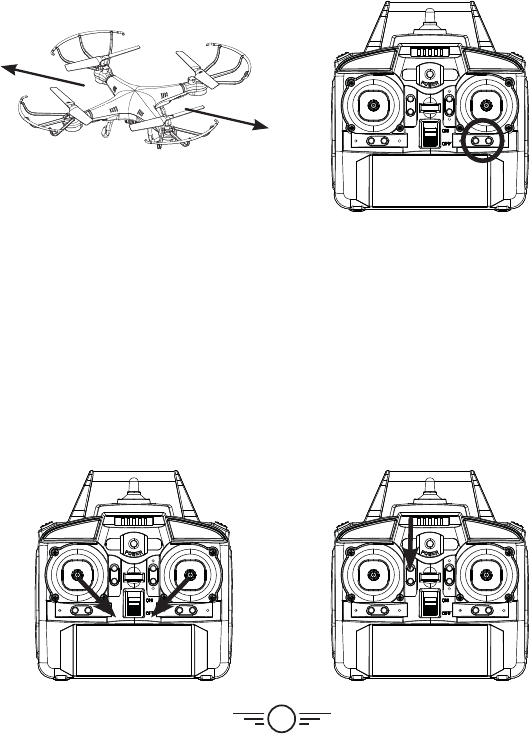
Flying
Setting Trim & Countering Drift
Even after the craft is calibrated, it may show a tendency to drift while airborne. Adjusting
the trim will help counter this effect and allow better control of the craft.
To avoid potential damage, adjust the trim while attempting a stable hover. Try to avoid
making any exaggerated movements with the flight controls and adjust one trim setting at
a time to avoid confusion.
Note: Adjusting the trim will help with drift but it will not entirely eliminate it. Air currents
and other factors may still cause slight drift while airborne. Adjusting the trim is meant to
correct distinct and obvious drift that makes the craft difficult to control.
Craft spins left or right. Adjust Yaw Trim.
Craft drifts forward or backward. Adjust Pitch Trim.
13
RESET
EM
STOP
ROLL ROLL
YAW YAW
PITCH
RESET
EM
STOP
ROLL ROLL
YAW YAW
PITCH
RESET
EM
STOP
ROLL ROLL
YAW YAW
PITCH
Gyroscope Recalibration
If the craft is having difficulty flying or is
behaving erratically, its gyroscopes may
need to be recalibrated. Do not attempt to
do this while flying, safely land the craft
first and place it on a flat surface.
Note: The craft and the remote should
already be linked together.
Pull down and inwards on both control
sticks for 2-3 seconds. When the LED lights
have stopped blinking and turn solid the
recalibration is complete and the craft is
ready to fly.
Remote Trim Reset
If you are still having difficulty flying, it may
help to reset the trim adjustments on the
remote. Do not attempt to do this while
flying, safely land the craft first.
Press the Reset button on the remote. The
remote will chime once to indicate that the
trim has been reset to default.
Craft drifts left or right. Adjust Roll Trim.

14
Tips for Safe Operation
űIt is recommended to only fly in large, open spaces that are free of obstacles like
power lines, trees, ceiling fans, etc.
űWhen flying indoors avoid walls and ceilings, as the craft may be drawn towards them
if closer than 2-3 feet.
űStand behind the craft when first taking off, so that you and the craft are facing the
same “forward” direction. This will help with orientation when the craft is airborne.
űNovice pilots should move the controls slowly and deliberately to get used to the
craft’s flying characteristics. Try using one control at a time.
űPractice basic flight operations like take off, hovering, and landing.
űIf you get into trouble or if anything obstructs the rotors, cut power immediately and
safely clear the obstruction. Check for possible damage before flying again.
Speed Setting
Press the Speed button on the remote to change the craft’s speed setting.
űLow: Provides smooth and predictable control of the craft. The remote will chime once
to indicate the low speed setting.
űMedium: The craft will move and respond faster to all control inputs. The remote will
chime twice to indicate the medium speed setting.
űHigh: Highest setting for maximum performance. The remote will chime three times to
indicate the high speed setting.
Headless Mode
Before using Headless Mode be sure you and the craft are facing the same “forward”
direction, otherwise the craft will not fly correctly. To activate Headless Mode, press the
Left Control Stick. The remote will chime slowly while Headless Mode is ON. Press the
button again to deactivate Headless Mode.
While Headless Mode is active the craft will fly in whatever direction the Right Control
Stick is moved, regardless of where the front of the craft is pointing. For example, if the
front of the craft was pointed straight ahead but is now pointed right 90°, when you push
forward on the stick the craft will fly forwards as if it was still pointed straight ahead. This
can be useful if you become disoriented while flying and cannot visually determine which
direction the craft is facing.
Flying
15
RESET
EM
STOP
ROLL ROLL
YAW YAW
PITCH
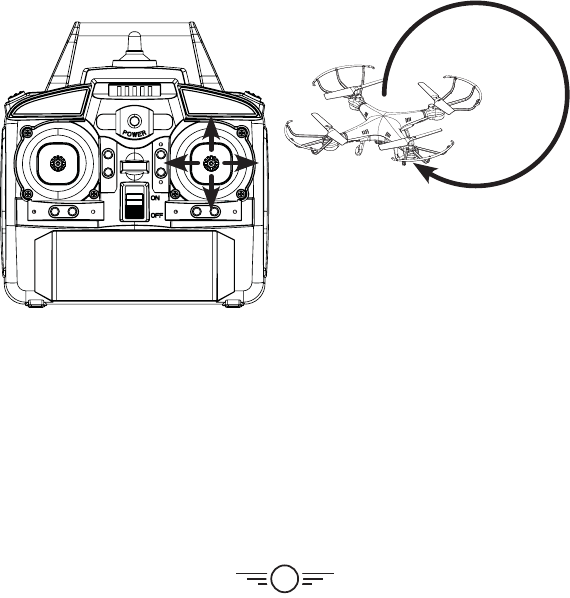
Flips
Before attempting a flip, be sure that there is ample clear space around the craft, ideally
9-10 ft. in all directions. It is not recommended to attempt to flip around or through any
obstacles, as this may result in unintended damage.
Press the Right Control Stick to activate Flip Mode, then move it in any direction and the
craft will perform a flip in the same direction.
Press the Right Control
Stick, then move it in any
direction to do a flip in
that same direction.
16
Sky Rider Voyage App
The Sky Rider Voyage app will allow you to fly the drone
and capture images and video displayed from the drone’s
camera to your smartphone’s screen. Connect your
smartphone to the craft’s Wi-Fi signal and start flying!
Free Download
Scan the appropriate QR code with your smartphone or search for
“Sky Rider Voyage” in the Apple App Store or Google Play Store.
Connect to Wi-Fi
NOTE: Wi-Fi control may be interrupted by interference from other
nearby Wi-Fi equipment.
Before beginning, make sure your phone’s Wi-Fi is enabled and the
craft is powered ON.
űFrom your smartphone, open the Wi-Fi settings menu, then
search for and select DRW618xxx to connect to the craft.
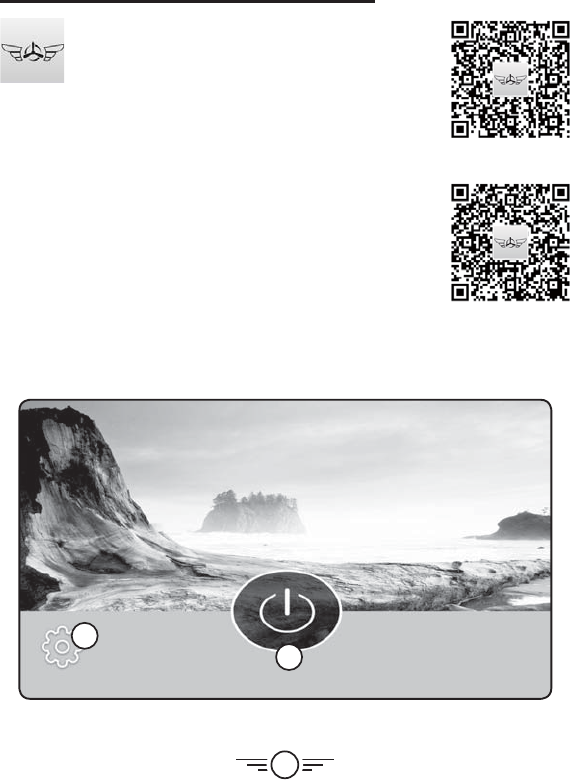
űOnce connected, open the app. You will see the Home Screen
(image below). From here you can adjust settings and start using the app.
1
2
1. App Settings 2. Start App
Android
Apple
17
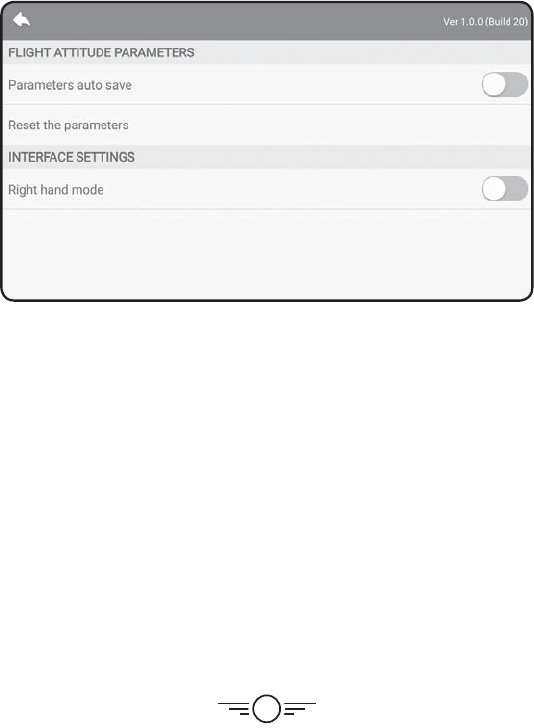
Settings Screen
Flight Attitude Parameters
Parameters Auto Save - Trim settings adjusted in the app will be saved for future flights.
Be sure to reset the parameters before flying a different craft with the app.
Reset Fine Tune Parameters - Reset trim settings to default.
Interface Settings
Right Hand Mode - Reverses the Left and Right flight controls on the screen.
18
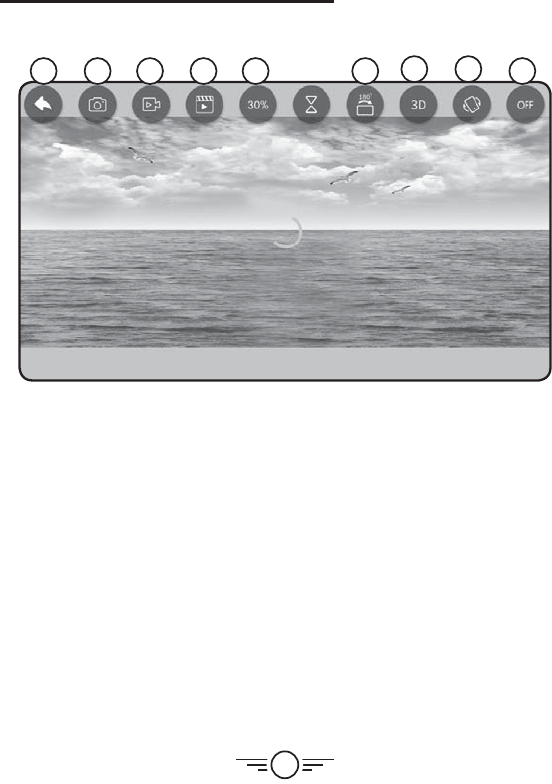
Sky Rider View App
Screen Controls
1 2 3 4 5 67 8 9
1. Back to Home Screen
2. Take Photo
3. Record Video
4. Photo/Video Gallery
5. Speed Setting
6. Flip Camera View 180°
7. 3D View (VR Mode)
8. Intuitive Mode
9. Flight Control On/Off
(see next page)
Intuitive Mode uses the G-Sensor in your phone to control the craft. Tilt the phone forward,
back, left and right to control the pitch and roll of the craft. Throttle and yaw are still
manually controlled from the Left Directional Control.
Camera & Video
Use the Photo and Video buttons to document your flight. Images and video are saved to
your phone and can be viewed later by pressing the Gallery button.
19
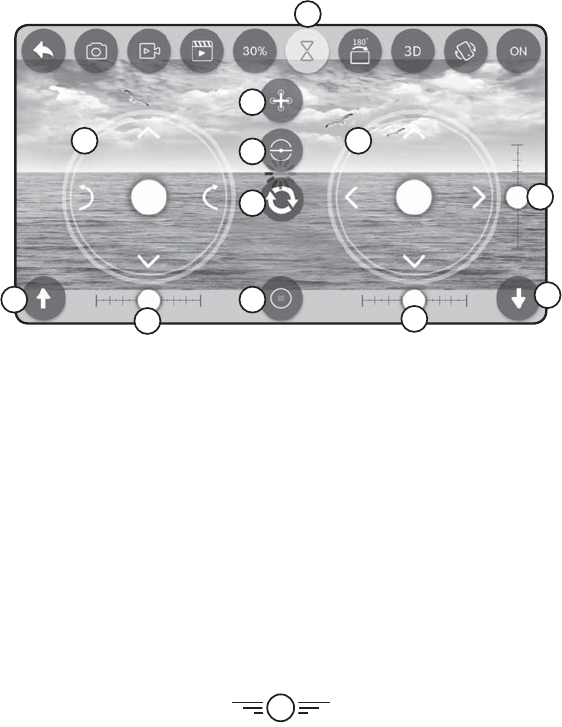
12
11
10
1. Throttle/Yaw Control
2. Pitch/Roll Control
3. Altitude Hold/Hover
Controls ON or OFF
4. Headless Mode
5. Gyro Calibration
6. Reset Trim
7. Take OFF
8. Yaw Trim
9. Emergency Stop
10. Roll Trim
11. Pitch Trim
12. Land
Flight Controls
1 2
3
4
5
6
7
8
9
Altitude Hold/Hover Controls
NOTE: The Griffon Pro drone must have the Altitude Hold/Hover control enabled to fly.
To take off, press the Take Off icon (7). The rotors will start and the craft will rise and then
hover in place. Use the regular flight controls to fly the drone.
To land, press the Land icon (12). The craft will descend until it detects it has landed and
the rotors will stop.
To quickly stop the rotors, press the Stop icon (9). This is regarded as an emergency
action to be used only in circumstances where the craft may cause damage or injury.
20
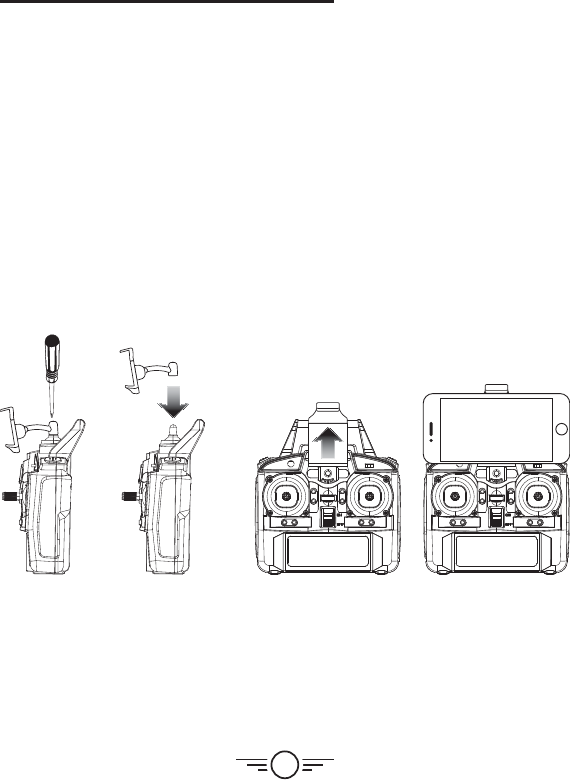
Smartphone Holder
Using the Remote & App Together
It can be easier to capture photos and video by using the remote to fly the drone and using
the app in a viewing only method. Use the app and the remote together by attaching the
smartphone holder (included) to the remote and placing your phone in the holder.
Follow the steps below to connect to the remote and the app in the proper sequence.
űFirst, connect the remote to the craft like normal. Connecting the remote first
overrides any control signals from the app.
űNext, use your phone to connect to the craft’s Wi-Fi. Open the app and go to the Flight
Screen. Leave the Flight Controls off for the best view from the drone’s camera.
űUse the controls on the remote to fly the craft while the Wi-Fi camera streams to
your phone.
űWhen you’re finished flying, power down the remote and craft like normal.
Sky Rider View App
Place the phone holder over the
post on top of the remote and
tighten it down using the included
screw and screwdriver.
The phone holder mechanism is
spring loaded. Pull upwards on the
holder and place your phone in it.
21
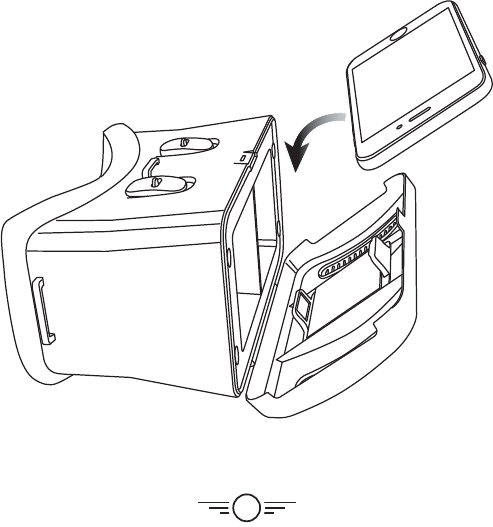
3D Mode
VR Mode splits the phone’s screen for use in a VR headset. Press the 3D button on the
screen to turn this feature ON or OFF. Use VR Mode to give a friend a fully immersive, point-
of-view flying adventure.
NOTE:
űOn screen flight controls are locked out in VR Mode. You must have the regular remote
connected in order to fly the craft.
űWe do not recommend flying the craft while wearing a headset. The craft’s
camera has a limited forward view and the headset will completely obscure the
user’s peripheral vision and situational awareness. Pilots assume all risk and are
responsible for any damage caused by improper use.
22
Parts & Repair
REMINDER: Pilots are responsible for any damage caused by improper use.
Parts Replacement
Standard parts such as extra batteries and remotes are available online for purchase when
in stock. However, any non-standard parts such as cameras, screws, bodies, etc. can be
ordered by placing an inquiry with our parts department at: partsinfo@dpiinc.com.
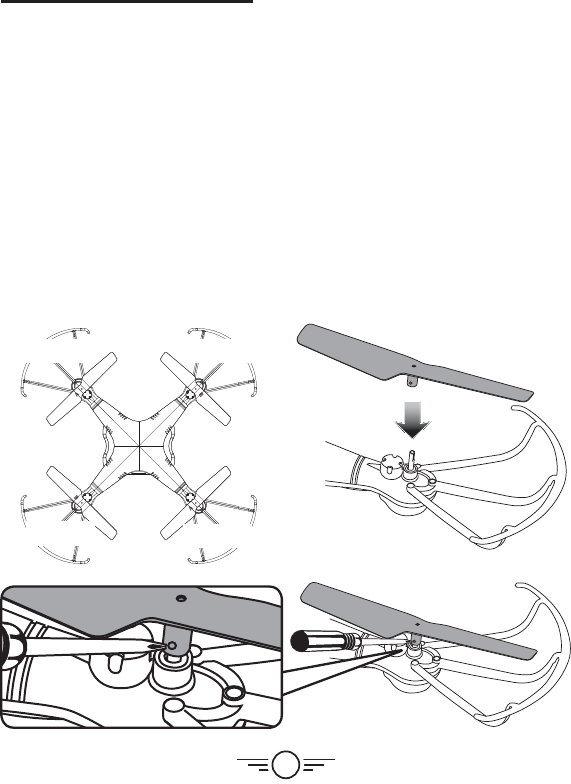
Rotor Replacement
The craft comes with replacement rotors if the originals are broken or badly damaged. Use
the included screwdriver to remove the rotor retaining screw that holds the rotor to the
motor shaft. Once the retaining screw is out, pull upwards on the rotor to remove it from
the motor shaft. Installation of the new rotor is the reverse of the removal process. Be sure
to tighten the rotor retaining screw firmly, but do not over tighten.
It is extremely important to use the correct rotor (A or B) for replacement. Using the
incorrect rotor will make the craft impossible to control. The marking can be found on the
rotor near the shaft.
Rotor A
Rotor B
Rotor BRotor A
23
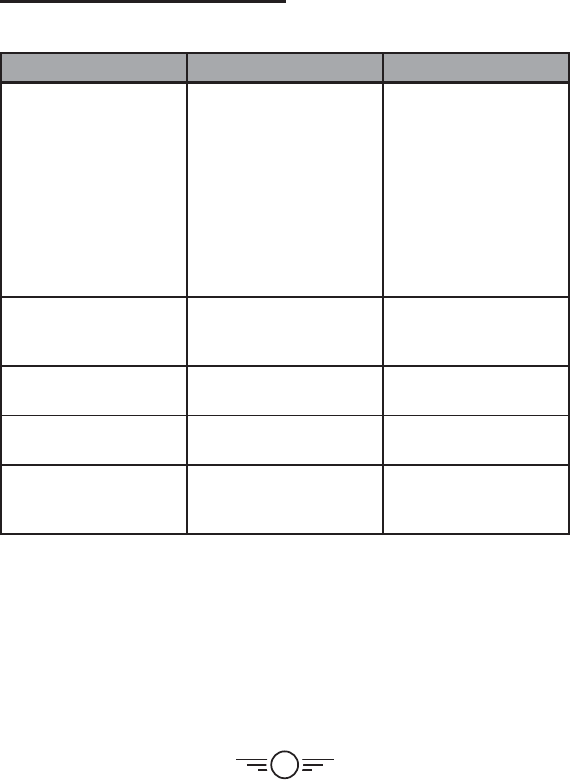
Troubleshooting Guide
Troubleshooting
PROBLEM POSSIBLE CAUSES SOLUTION
Craft does not
respond to controls.
űNo power to remote
or craft.
űPoor contact between
power plugs.
űCraft is out of range.
űCheck remote batteries,
replace if needed.
űCheck craft battery, be
sure it is fully charged.
űBe sure the power plugs
are firmly connected.
űBe sure the remote has
an unobstructed line of
sight to the craft.
űRemain within the
remote’s 300 ft. range.
Craft is difficult
to control or flies
erratically.
űGyroscopes may
be misaligned.
űPower OFF remote and
craft and reconnect
(see pg. 10).
Craft drifts
while in flight.
űTrim not set or needs
adjustment.
űAdjust trim settings
(see pg. 12).
Craft suffers from
mechanical trouble.
űDamage to body, rotors or
other major components.
űRepair or replace parts
as needed.
LED lights ON but
craft does not
respond to controls.
űLow battery power. űRecharge the battery.

24
International Support
To download this User’s Guide in English, Spanish, and French, or to get answers to
frequently asked questions, visit the support section at: www.gpx.com
Para descargar este Manual del Usuario en inglés, español y francés, o para obtener
respuestas a preguntas frecuentes, visite la sección de apoyo en: www.gpx.com
Pour télécharger ce guide de l’utilisateur en anglais, espagnol ou français, ou pour obtenir
des réponses à des questions fréquemment posées, consultez la rubrique d’assistance sur:
www.gpx.com
Contact Information
Website: www.gpx.com
Email Support: prodinfo@dpiinc.com
Email Parts: partsinfo@dpiinc.com
Phone Support: 1-888-999-4215
Warranty
See included 30 Day Warranty for warranty
information. Warranty and the most up-to-
date version of this User’s Guide can also be
found at: www.gpx.com
Protect for Today
Sustain for Tomorrow
Made
Green
Copyright © 2018 Digital Products International (DPI, Inc.) All other trademarks appearing
herein are the property of their respective owners. Specifications are subject to change
without notice.
Customer Support