Weed Eater 2510 Instruction Manual OM, 2500 SERIES, 2600 2003 02, BLOWERS
530087937 to the manual 961fbe3c-49c3-4c14-83a6-db6d7e9ef698
2015-01-05
: Weed-Eater Weed-Eater-2510-Instruction-Manual-204352 weed-eater-2510-instruction-manual-204352 weed-eater pdf
Open the PDF directly: View PDF ![]() .
.
Page Count: 9

2500 Series
2600 Series
RTrademark
DANGER:
Read and follow all Safety Rules and Operating Instructions before
using this product. Failure to do so can result in serious injury.
ADVERTENCIA:
Lea el manual de instrucciones y siga todas las advertencias e
instrucciones de seguridad. El no hacerlo puede resultar en lesiones
graves.
AVERTISSEMENT:
Veuillez lire le manuel d’instructions et bien respecter tous les
avertissements et toutes les instructions de sécurité. Tout défaut
de le faire pourrait entraîner des blessures graves.
Instruction Manual
Manual de Instrucciones
Manuel d’Instructions
ENGLISH ESPAÑOL FRANÇAIS
530087937 2/11/03
Please do not return unit to retailer.
Por favor, no devuelva el aparato al lugar de compra.
Veuillez ne pas retourner l’outil au détaillant.
1-800-554-6723
www.weedeater.com
FOR HOUSEHOLD USE ONLY
PARA USO CASERO SOLAMENTE
POUR UTILISATION À DES FINS
DOMESTIQUES SEULEMENT
Electrolux Home Products, Inc.
250 Bobby Jones Expressway
Augusta, GA 30907
Electrolux Canada Corporation
6150 McLaughlin Road
Mississauga, Ontario L5R 4C2
Copyright E2003 Electrolux Home Products, Inc.

2
SAFETY RULES
IMPORTANT WARNINGS AND
SAFETY INSTRUCTIONS
WARNING:
When using electric gardening appliances, basic safety precautions should always be
followed to reduce the risk of fire, electric shock, and serious injury. The warnings and
safety instructions in this manual must be followed to reduce the risk of fire, electric
shock, or injury, and to provide reasonable safety and efficiency in using this unit. The
operator is responsible for following the warnings and instructions in this manual and on
the unit. Read the entire instruction manual before assembling and using the unit! Re-
strict the use of this unit to persons who read, understand, and follow the warnings and
instructions in this manual and on the unit. Never allow children to use this unit. Close
attention is necessary when used near children.
OPERATOR SAFETY
DAlways wear safety glasses or similar eye
protection when operating, servicing, or
performing maintenance on your unit.
Wearing eye protection can help to pre-
vent rocks or debris from being blown or
ricocheting into eyes and face which can
result in blindness or serious injury.
DAlways wear a respirator or face mask
when working with the unit in dusty envi-
ronments.
DDress safely in long pants. Do not go
barefoot or wear short pants or sandals.
DDo not operate the unit when you are
tired, ill, upset, or if youare under the influ-
ence of alcohol, drugs, or medication.
DSecure hair so it is above shoulder length.
Keep loose hair, loose clothing, fingers,
and all other parts of the body away from
openings and moving parts. Hair, jewelry,
loose clothing, or clothing with loosely
hanging straps, ties, tassels, etc., can be
caught in moving parts.
ELECTRICAL SAFETY
WARNING: Avoid a dangerous
environment. To reduce the risk of electri-
cal shock, do not use in rain, in damp or
wet locations, or around swimming pools,
hot tubs, etc. Donot expose to snow, rain,
or water to avoid the possibility of electri-
cal shock. Do not handle extension cord
plug or unit with wet hands.
DUse only a voltage supply as shown on
the nameplate of the unit.
DAvoid dangerous situations. Do not use in
presence of flammable liquids or gases to
avoid creating a fire or explosion and/or
causing damage to unit.
DAvoid dangerous environments. Do not
use in unventilated areas or where dust or
explosive vapors can build up.
DTo reduce the risk of electrical shock, use
extension cords specifically marked as
suitable for outdoor appliances. The
electrical rating of the cord must be higher
than the rating of the unit. The cord must
be marked with the suffix “W-A” (in Cana-
da, “W”). Make sure your extension cord
is in good condition. Inspect extension
cord before use and replace if damaged.
An undersized extension cord will cause
a drop in line voltage resulting in loss of
power and overheating. If in doubt, use
the next heavier gauge. The smaller the
gauge number, the heavier the cord.
(NOTE: The correct size to be used de-
pending on the cord length is shown in
this manual).
DInspect the insulation and connectors on
the unit and extension cord before each
use. If there is any damage, do not use
until damage is repaired by your Autho-
rized Service Dealer. Do not pull or carry
by cord; do not use cord as a handle,
close a door on cord, or pull cord around
sharp edges or corners. Keep cord away
from heated surfaces. Do not unplug by
pulling on cord. To unplug, grasp the plug,
not the cord.
DTo reduce the possibility of the extension
cord disconnecting from the unit during
operation, tie cord to cord retainer and
connect to recessed plug as shown in this
manual.
DDon’t use the unit if the switch does not
turn the unit on and off properly. Have the
unit repaired by an Authorized Service
Dealer.
DKeep extension cord clear of operator
and obstacles at all times. Do not expose
cords to heat, oil, water, or sharp edges.
DAvoid any body contact with any
grounded conductor, such as metal
fences, or pipes, to avoid the possibility of

3
electric shock. Don’t handle plug or unit
with wet hands.
DDo not use with damaged cord or plug. If
unit is not working as it should, has been
dropped, damaged, left outdoors, or
dropped into water, return it to an Autho-
rized Service Dealer for repair.
DGround Fault Circuit Interrupter (GFCI)
protection should be provided on the cir-
cuit or outlet to be used for this unit. Re-
ceptacles are available having built-in
GFCI protection and may be used for this
measure of safety.
DKeep others including children, animals,
bystanders, and helpers a minimum of 30
feet (10 meters) away. Stop the motor im-
mediately if you are approached. Do not
allow the unit to be used as a toy.
DOUBLE INSULATION CONSTRUC-
TION
Your unit is double insulated to help pro-
tect against electric shock. Doubleinsula-
tion construction consists of two separate
“layers” of electrical insulation instead of
grounding.
Tools and appliances built with a double
insulation system are not intended to be
grounded. No grounding means is pro-
vided on this unit, nor should a means for
grounding be added to this unit. As a re-
sult, the extension cord used with your
unit can be plugged into any standard 120
volt electrical outlet.
Safety precautions must be observed when
operating any electrical tool. The double in-
sulation system only provides added pro-
tection against injury resulting from an inter-
nal electrical insulation failure.
WARNING: All electrical repairs to
this unit, including housing, switch, motor,
etc., must be diagnosed and repaired by
an Authorized Service Dealer. Replace-
ment parts for a double insulated
appliance must be identical to the parts
they replace. A double insulated
appliance is marked with the words
“DOUBLE INSULATION” or “DOUBLE INSU-
LATED.” The symbol (square within a
square) may also be marked on the ap-
pliance. Failure to have the unit repaired
by an Authorized Service Dealer can
cause the double insulation construction
to become ineffective and result in seri-
ous injury.
UNIT/MAINTENANCE SAFETY
DTurn off all controls and allow the motor to
stop before disconnecting the unit from
the power source.
DDisconnect the unit from the power
source when not in use. Do not leave the
unit when it is plugged into an outlet.
DDo not set the unit on any surface except
a clean, hard area while the unit is run-
ning. Debris such as gravel, sand, dust,
grass, etc., could be picked up by the air
intake and thrown out through the dis-
charge opening, damaging the unit, prop-
erty, or causing serious injury to bystand-
ers or operator.
DDo not overreach or use from unstable
surfaces such as ladders, trees, steep
slopes, rooftops, etc. Use extra care
when cleaning on stairways. Keep firm
footing and balance at all times. Keeps
hands out of tubes.
DInspect the entire unit before each use for
worn, loose, missing, or damaged parts.
Do not use until the unit is in proper work-
ing order.
DDisconnect unit from power source be-
fore servicing, cleaning, performing main-
tenance, or storing.
DThis unit is double insulated. See the
DOUBLE INSULATION CONSTRUCTION
section. Have all internal service per-
formed by qualified service repair person-
nel to avoid creating a hazard or voiding
your warranty.
DHave all maintenance other than the rec-
ommended procedures described in the
instruction manual performed by an au-
thorized service dealer.
DAlways see an authorized service dealer
to replace a damaged impeller. Parts that
are chipped, cracked, broken, or dam-
aged in any other way can fly apart and
cause serious injury. Replace damaged
parts before using the unit.
DNever place any object in the air intake
opening as this could restrict proper air
flow and cause damage to the unit.
DNever douse the unit with water or other
liquids or squirt with a water hose. Clean
with a damp sponge and mild soap. See
STORAGE.
DCheck air intake openings and tubes fre-
quently, always with the unit stopped and
power source disconnected. Keep vents
and tubes free from debris which can ac-
cumulate and restrict proper air flow.
DDo not burn,incinerate, or expose this
unit to extreme heat.
DStore the unit unplugged in a high, cool,
dry, indoor area out of the reach of chil-
dren.
DUse only recommended attachments
and replacement parts to avoid creating a
hazard and/or voiding your warranty.
DMaintain the unit according to recom-
mended procedures.
DUse only for jobs explained in this man-
ual.

4
BLOWER SAFETY
DUse only in daylight or in good artificial
light.
DInspect the area before using the unit.
Remove all debris and hard objects such
as rocks, glass, wire, etc., that can rico-
chet, be thrown, or otherwise cause injury
or damage during operation.
DAvoid accidental starting. Be sure the
switch is in the OFF position and keep
your hand and fingers away from the
switch while connecting the unit to the
power source or when carrying a unit
connected to the power source.
DNever run the unit without the proper
equipment attached. When used as a
blower, always install a blower tube. Use
only recommended attachments. Do not
use with any opening blocked, Keep free
from dust, lint, hair and anything that may
reduce air flow.
DTo avoid spreading fire, do not use blower
near leaf or brush fires, fireplaces, barbe-
cue pits, ashtrays, etc.
DNever place objects inside the blower
tubes; always direct the blowing debris
away from people, animals, glass, and
solid objects such as trees, automobiles,
walls,etc.Theforceofaircancause
rocks, dirt, or sticks to be thrown or to rico-
chet which can hurt people or animals,
break glass, or cause other damage.
DNever use for spreading chemicals,fertil-
izers, or any other substances which may
contain toxic materials.
VACUUM SAFETY (If applicable)
WARNING: Only use the Flex Vac
Kit FV1910 with model 2540 and 2560 only.
DO NOT use with any other models.
DStop the motor and disconnect the power
source before opening the air inlet door or
attempting to insert or remove the vacu-
um tubes. The motor must be stopped
and the impeller blades no longer turning
to avoid serious injury from the rotating
blades.
DHard objects can be thrown through the
collection bag or the housing and be-
come dangerous missiles which can
cause serious injury to operator or others.
DWhen using the vacuum attachment, the
unit is designed to pick up dry material
such as leaves, grass, small twigs, and
bits of paper. Do not vacuum stones,
gravel, metal, broken glass, etc., to avoid
severe damage to the impeller. To avoid
the possibility of electrical shock, do not
attempt to vacuum water or other liquids.
DNever run the unit without the proper
equipment attached. When used as a
vacuum, always install vacuum tubes
and collection bag assembly. Make sure
the collection bag assembly is completely
zipped when unit is running to avoid flying
debris. Use only recommended attach-
ments.
DAvoid situations which could set the col-
lection bag on fire. Do not vacuum dis-
carded matches, cigars, cigarettes, or
ash from fireplaces, barbecue pits, brush
piles, etc. To avoid spreading fire, do not
use blower near leaf or brush fires, fire-
places, barbecue pits, ashtrays, etc.
DAlways use collection bag shoulder strap
when vacuuming to avoid loss of control.
DCheck air intake openings, elbow tube,
and vacuum tubes frequently, always
with the unit stopped and the power
source disconnected. Keep vents and
tubes free of debris which can accumu-
late and restrict proper air flow. Do not
use with any opening blocked. Keep free
of dust, lint, hair and anything that may re-
duce air flow.
STANDARDS
This product is listed by Underwriter’s Lab-
oratories, Inc., in accordance with UL Stan-
dard 1017.
If situations occur which are not covered in
this manual, use care and good judgement.
If you need assistance, contact your Autho-
rized Service Dealer or call
1-800-554-6723. Failure to follow all Safety
Rules and Precautions can result in serious
injury.
SAVE THESE INSTRUCTIONS
ASSEMBLY
WARNING: Unplug the unit be-
fore opening the vacuum inlet cover or at-
tempting to insert or remove the inlet re-
strictor, blower tubes or vacuum tubes.
The motor must be stopped and the im-
peller blades no longer turning to avoid
serious injury from the rotating blades.
WARNING: If you receive your
unit assembled, check each step to in-
sure your unit is properly assembled and
all fasteners are secure. Follow all safety
information in the manual and on unit.
SA standard screwdriver is required for
assembly.

5
BLOWER ASSEMBLY
SInsert the blower tube into the blower
outlet.
STwist the blower tube clockwise until it is
firmly seated in the blower outlet.
STwist the nozzle into the end of the
blower tube until it is firmly seated.
Make sure the nozzle points upward.
Blower Tube Nozzle
Blower outlet
For Model 2695 only, the blower exten-
sion tube and nozzle are combined into
one component.
Blower Tube/Nozzle
VACUUM ASSEMBLY
(Some models)
OPEN THE LATCH
Insert a screwdriver in to the latch area on
the vacuum inlet cover. Gently tilt handle
of screwdriver toward the front of the
blower to release the latch. Pull up on the
vacuum inlet cover with your other hand.
Latch
Area
Impeller
Locking Tabs
REMOVE THE INLET RESTRICTOR
(Some models)
An inlet restrictor is used when operating
your unit as a blower. This restrictor is not
used during vacuum operation and must
be removed during vacuum assembly.
Once the cover is opened, look for the in-
let restrictor between the door and the im-
peller.
DRemove the inlet restrictor by rotating
counterclockwise (see illustration).
Keep this inlet restrictor for use when
using your unit as a blower later. With
the restrictor removed, the upper vacu-
um tube will twist onto the unit.
ATTACH VACUUM TUBES
SOn some units an arrow on the tube and
the unit will help you align the tube be-
fore twisting clockwise.
SSome units may include locking tabs.
These tabs guide and lock the tubes
into position.
Once the upper tube is secure on the unit,
and cannot be turned clockwise further,
the lower vacuum tube may be installed
onto the upper tube.
Arrow
Arrow
Lower
tube
Upper
tube
Not all unit will have arrows
ATTACH VACUUM BAG
Slide the vacuum bag over the blower
outlet as shown. Secure the bag to the
blower outlet by placing the strap through
the metal ring. Pull tight and fasten as
shown. Make sure the blower outlet is
pushed far into the bag before tightening
the strap. Some units may include elastic
on bag without metal ring.
Blower Outlet
Vacuum
Bag
Strap
Metal Ring
DCarefully loop the shoulder strap
through the buckle as shown.
First In
Last In
DPosition the unit on your right-hand
side, blower outlet and bag pointing to-
ward the rear. Hold the unit in an upright
position, and support the lower vacuum
tube on the ground.
6
DPlace the shoulder strap over your head
and onto your left shoulder.
DAdjust the strap to allow a free flow of air
from the blower. If the collection bag is
kinked, the unit will not operateproperly.
NOTE: The strap is designed to position
the collection bag on your shoulder without
kinks. The strap is not intended to support
the weight of the unit.
SELECT AN EXTENSION CORD
Use only a 120 A.C. voltage supply as
shown on the nameplate of the unit.
STo reduce the risk of electrical shock, this
equipment has a polarized plug (one
blade is wider than the other) and will re-
quire the use of a polarized extension
cord. The appliance plug will fit into a po-
larized extension cord only one way. If
the plug does not fit fully into the exten-
sion cord, reverse the plug. If the plug still
does not fit, obtain a correct polarized ex-
tension cord. A polarized extension cord
will require the use of a polarized wall out-
let. This plug will fit into the polarized wall
outlet only one way. If plug does not fit ful-
ly into the wall outlet, reverse the plug. If it
still does not fit, contact a qualified electri-
cian to install the proper wall outlet. Do
not change the equipment plug, exten-
sion cord receptacle, or extension cord
plug in any way.
The extension cord used to reach the pow-
er source must be:
DSpecifically marked as suitable for out-
door use. The cord must be marked with
the suffix “W-A” (in Canada “W”).
DHeavy enough to carry full current from
the power source to the unit. Otherwise,
loss of power and overheating can occur
causing damage to unit. Refer to table for
minimum wire gauge recommendations.
The cord must be marked with the proper
wire gauge. (Appropriate extension cords
are available.) Do not use multiple cords.
DIn good condition. Cord insulation must
be intact with no cracks or deterioration.
Plug connectors must be undamaged.
12
MINIMUM A.W.G. WIRE GAUGE
RECOMMENDATIONS
VOLTS 25 FT.
100 FT.
120 18
50 FT.
150 FT.
16
AMPS
7.5
14
12
120 16 1610 -- 12
14
MINIMUM A.W.G. WIRE GAUGE
RECOMMENDATIONS
VOLTS
120
AMPS
7.5
12010 -- 12
A.W.G. = American Wire Gauge
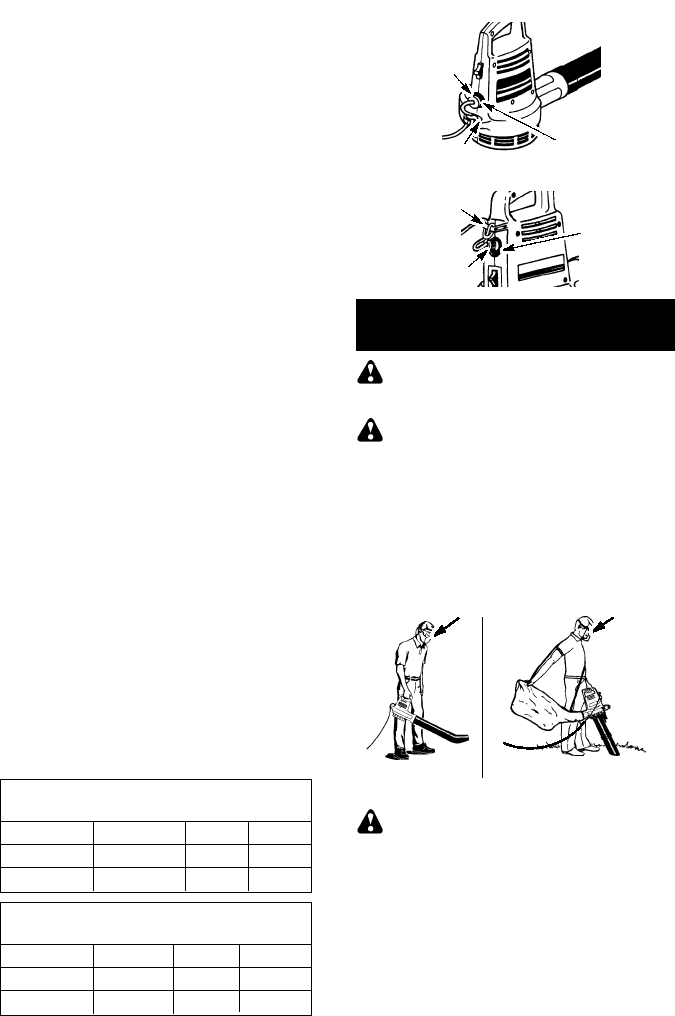
Secure the extension cord to the unit by
tying the cord onto the cord retainer. In-
sert the cord receptacle in to the recessed
plug.
MODELS 2510 & 2525
Cord Retainer
Cord
Receptacle
Recessed
Plug
on Unit
Cord Retainer
Cord
Receptacle
Recessed
Plug
on Unit
ALL OTHER MODELS
USING YOUR UNIT
WARNING: You MUST make sure
the tubes are secure before using the unit.
WARNING: Do not use the unit
without the tubes or collection bag prop-
erly attached to avoid flying debris and/or
impeller contact which can cause serious
injury. Always wear eye protection to pre-
vent rocks or debris from being blown or
ricocheting into the eyes and face which
can result in blindness or serious injury.
OPERATING POSITION
Eye Protection
Blower
Eye Protection
Vacuum
USING YOUR UNIT AS A BLOWER
WARNING: Inspect the area be-
fore using the unit. Remove all debris and
hard objects such as rocks, glass, wire,
etc., that canricochet, bethrown, orother-
wise cause injury or damage during op-
eration.
Use your unit as a blower for:
DSweeping debris or grass clippings from
driveways, sidewalks, patios, etc.
DBlowing grass clippings, straw, or leaves
into piles, or removing debris from cor-
ners, around joints, or between bricks.

7
Direct air flow by directing the blower tube/
nozzle down or to one side. Always work
away from solid objects such as walks,
large stones, vehicles, and fences.
Clean corners by starting in corners and
moving outward. This will help prevent an
accumulation of debris which could fly into
your face.
Be careful when working near plants. The
force of the air could damage tender plants.
USING YOUR UNIT AS A VACUUM
WARNING: Do not vacuum
stones, gravel, metal, broken glass, etc.,
to avoid severe damage to the impeller.
To avoid the possibility of electrical shock,
do not attempt to vacuum water or other
liquids.
Use your unit as a vacuum to pick up dry
material such as leaves, grass, small
twigs, and bits of paper.
DFor best results during vacuum use, op-
erate your unit at high speed.
DMove slowly back and forth over the
material as you vacuum. Avoid forcing
the unit into a pile of debris as this can
clog the unit.
DKeep the vacuum tube about an inch
above the ground for best results.
WARNING: If the unit becomes
clogged, stop the unit and unplug the ex-
tension cord. Wait until the impeller has
completely stopped turning, then remove
the vacuum tubes. Carefully reach into
the vacuum opening and clear out the
clogged debris.
MAINTENANCE
WARNING: Disconnect power
source before performing maintenance.
GENERAL RECOMMENDATIONS
The warranty on this unit does not cover
items that have been subjected to operator
abuse or negligence. To receive full value
from the warranty, the operator must main-
tain unit as instructed in this manual. Vari-
ous adjustments will need to be made peri-
odically to properly maintain your unit.
BEFORE EACH USE
CHECK FOR LOOSE FASTENERS
AND PARTS
SInlet Cover
SBlower Tube
SVacuum Tubes
SCollection Bag
CHECK FOR DAMAGED OR
WORN PARTS
Contact an authorized service dealer for
replacement of damaged or worn parts.
SON/OFF Switch -- Ensure switch functions
properly by moving the switch to the OFF
position. Make sure motor stops; then re-
start motor and continue.
SInlet Cover -- Discontinue use of unit if in-
let cover fails to latch properly or if it is
damaged in any way.
AFTER EACH USE
INSPECT AND CLEAN UNIT & LABELS
Stop unit and unplug extension cord.
SAfter each use, inspect complete unit for
loose or damaged parts. Clean the unit
using a damp cloth with a mild detergent.
SWipe off unit with a clean dry cloth.
CLEAN COLLECTION BAG
IMPORTANT: THE COLLECTION BAG
MUST BE PROPERLY EMPTIED.
DYou must properly empty and maintain
the collection bag to avoid deterioration
and obstruction of air flow.
DRemove the collection bag from the unit
and empty after each use. Do not store
bag without emptying the bag of all con-
tents (grass, leaves, etc.).
DWash the bag once a year. Remove the
bag from the blower and turn the bag in-
side out. Wash the bag with a water hose.
Allow the bag to hang and dry completely
before you reuse the bag.
SERVICE
HOW TO REMOVE AN OBJECT
FROM THE AIR INTAKE
WARNING: Stop the unit and dis-
connect from the power source before
opening the inlet cover. The motor must
be stopped and the impeller blades no
longer turning to avoid serious injury from
the rotating blades.
SWhile holding the inlet cover open, re-
move the vacuum tubes. The inlet cov-
er must be held open through all re-
maining steps.
SCarefully reach into the vacuum open-
ing and clear out the air intake area.
Clear all debris from impeller.
SInspect the impeller for cracks. If
cracked or damaged, do not use the
unit. Have parts replaced by your au-
thorized service dealer. Do not attempt
to replace them yourself.

8
STORAGE
WARNING: Perform the following
steps after each use:
SStop unit and disconnect from the power
source.
SAllow motor to cool before storing or
transporting.
SStore unit with all guards in place. Posi-
tion unit so that any sharp object cannot
accidentally cause injury.
SStore unit unplugged, well out of the
reach of children.
SEASONAL STORAGE
Prepare unit for storage at the end of the
season or if it will not be used for 30 days
or more.If your blower is to be stored for a
period of time:
SStop unit and disconnect from the power
source.
SClean the entire unit before lengthy stor-
age.
SOpen inlet cover and clean any dirt,
grass, or debris that has collected. In-
spect the blower and all tubes. Close and
make sure the cover is latched.
SClean air vents and air inlet of debris.
SStore your unit and extension cord in a
well ventilated area and covered, if pos-
sible, to prevent dust and dirt accumula-
tion. Do not cover withplastic. Plasticcan-
not breathe and may cause
condensation and eventual rust or corro-
sion.
SCheck entire unit for loose screws. Re-
place any damaged, worn, or broken
parts.
NEED ASSISTANCE?
Need Accessories or Assistance?
Call: 1-800-554-6723.
Need Service Parts?
Contact your dealer.
ACCESSORIES AVAILABLE
Safety Goggles Stock #952701506
Flex Vac Kit FV1910 #952701627 (used
only on model 2540 and 2560)
TROUBLESHOOTING TABLE
SYMPTOM CAUSE REMEDY
Unit fails to
operate. 1. Switch in the OFF position.
2. Extension cord discon--
nected.
3. Circuit breaker tripped, or
fuse blown.
4. Mechanical failure
1. Slide switch to ON position.
2. Reconnect extension cord.
3. Reset circuit breaker or
fuse.
4. Contact your authorized
service dealer.
Unit
vibrates
abnormally.
1. Mechanical failure 1. Contact your authorized
service dealer.
Impeller will
not turn free-
ly.
1. Debris in air intake area.
2. Mechanical failure. 1. Clean unit. Remove any
debris.
2. Contact your authorized
service dealer.
WARNING: Always stop unit and disconnect from the power source before
performing all of the recommended remedies below except remedies that re-
quire unit to be operating.

9
LIMITED WARRANTY
ELECTROLUX HOME PRODUCTS,
INC., warrants to the original purchaser
that each new Weed Eater brand electric
or cordless product is free from defects in
material and workmanship and agrees to
repair or replace under this warranty any
defective Weed Eater brand electric or
cordless product within two (2) years from
the original date of purchase.
If your Weed Eater brand electric or cord-
less product should fail within the limited
warranty period, return it, complete, pre-
paid, with proof of purchase, to the dealer
from whom it was purchased for repair or
replacement at the option of ELECTRO-
LUX HOME PRODUCTS, INC.
This warranty is not transferable and
does not cover damageor liability caused
by improper handling, improper mainte-
nance or the use of accessories and/or at-
tachments not specifically recommended
by ELECTROLUX HOME PRODUCTS,
INC., for this tool. Additionally, this war-
ranty does not cover parts that will wear
and require replacement with reasonable
use during the warranty period. This war-
ranty does not cover predelivery setup or
normal adjustments explained in the in-
struction manual.
THIS WARRANTY GIVES YOU SPE-
CIFIC LEGAL RIGHTS, AND YOU MAY
HAVE OTHER RIGHTS WHICH VARY
FROM STATE TO STATE.
NO CLAIMS FOR CONSEQUENTIAL
OR OTHER DAMAGES WILL BE AL-
LOWED, AND THERE ARE NO OTHER
EXPRESS WARRANTIES EXCEPT
THOSE EXPRESSLY STIPULATED
HEREIN.
SOME STATES DO NOT ALLOW LIMI-
TATIONS ON HOW LONG AN IMPLIED
WARRANTY LASTS OR THE EXCLU-
SION OR LIMITATIONS OF INCIDEN-
TAL OR CONSEQUENTIAL DAMAGES,
SO THE ABOVE LIMITATIONS OR EX-
CLUSION MAY NOT APPLY TO YOU.
The policy of ELECTROLUX HOME
PRODUCTS, INC., is to continuously im-
prove its products. Therefore, ELEC-
TROLUX HOME PRODUCTS, INC., re-
serves the right to change, modify, or
discontinue models, designs, specifica-
tions, and accessories of all products at
any time without notice or obligation to
any purchaser.
