WeiHeng Digital VNB11602IS Notebook User Manual Vulcan Venture II MUL 160512 OUTLINE
WeiHeng Digital Company Limited Notebook Vulcan Venture II MUL 160512 OUTLINE
UserManual
Notebook
VNB11602IS
This equipment has been tested and found to comply with the limits
for a Class B digital device, pursuant to part 15 of the FCC Rules.
These limits are designed to provide reasonable protection
against harmful interference in a residential installation.
This equipment generates, uses and can radiate radio frequency
energy and, if not installed and used in accordance with the
instructions, may cause harmful interference to radio communications.
However, there is no guarantee that interference will not occur
in a particular installation. If this equipment does cause harmful
interference to radio or television reception, which can be
determined by turning the equipment off and on, the user is
encouraged to try to correct the interference by one or more of
the following measures:
o Reorient or relocate the receiving antenna.
o Increase the separation between the equipment and receiver.
o Connect the equipment into an outlet on a circuit different
from that to which the receiver is connected.
o Consult the dealer or an experienced radio/TV technician
for help.
Caution: Any changes or modifcations to this device not explicitly
approved by manufacturer could void your authority to operate
this equipment.
This device complies with part 15 of the FCC Rules. Operation
is subject to the following two conditions: (1) This device
may not cause harmful interference, and (2) this device must accept
any interference received, including interference that may cause
undesired operation.
The device has been evaluated to meet general RF exposure
requirement. The device can be used in portable exposure
condition without restriction.


5CHGV[0QVKEG
1. Do not store the laptop in extreme hot, cold, dusty, dry, or humid environment.
2. Handle the laptop with care. The device can be damaged if dropped,
burned, punctured, or crushed, or if it comes in contact with liquid. Do not put
heavy object on laptop or damage it. Consider using a case or cover to protect
the device.
3. Do NOT attempt to open the laptop by yourself. Disassembling the device
may damage it or cause injury to you. We do NOT shoulder the responsibility
of data loss by unauthorized repairs or wrong operation. Please contact
Vulcan Electronics or an authorized service provider.
4. The storage capacity on the operating system will be smaller than the
storage specified. This is normal and standard as the software takes some
space.
5. Please note that the new battery is only able to achieve best performance after
two or three full charge and discharge cycles. During the first three full charge and
discharge cycles, please make sure to charging for at least 8-10 hours. After this,
the battery can be fully charged in about 4 cycles. This ensures that the lithium
battery will achieve its best performance in the future.
6. Please charge the battery under below situations:
-The battery icon show low battery level and requests charging
-Laptop power off automatically
-Operating but is unresponsive
Do NOT throw the device in municipal waste. The symbol of the crossed
out wheeled bin indicates that device should not be placed in municipal
waste. Check local regulations for disposal of electronic products.
The Laptop contains a lithium-polymer battery that is flammable. Do
NOT throw the laptop in fire. Do NOT short circuit the contacts.
ENGLISH
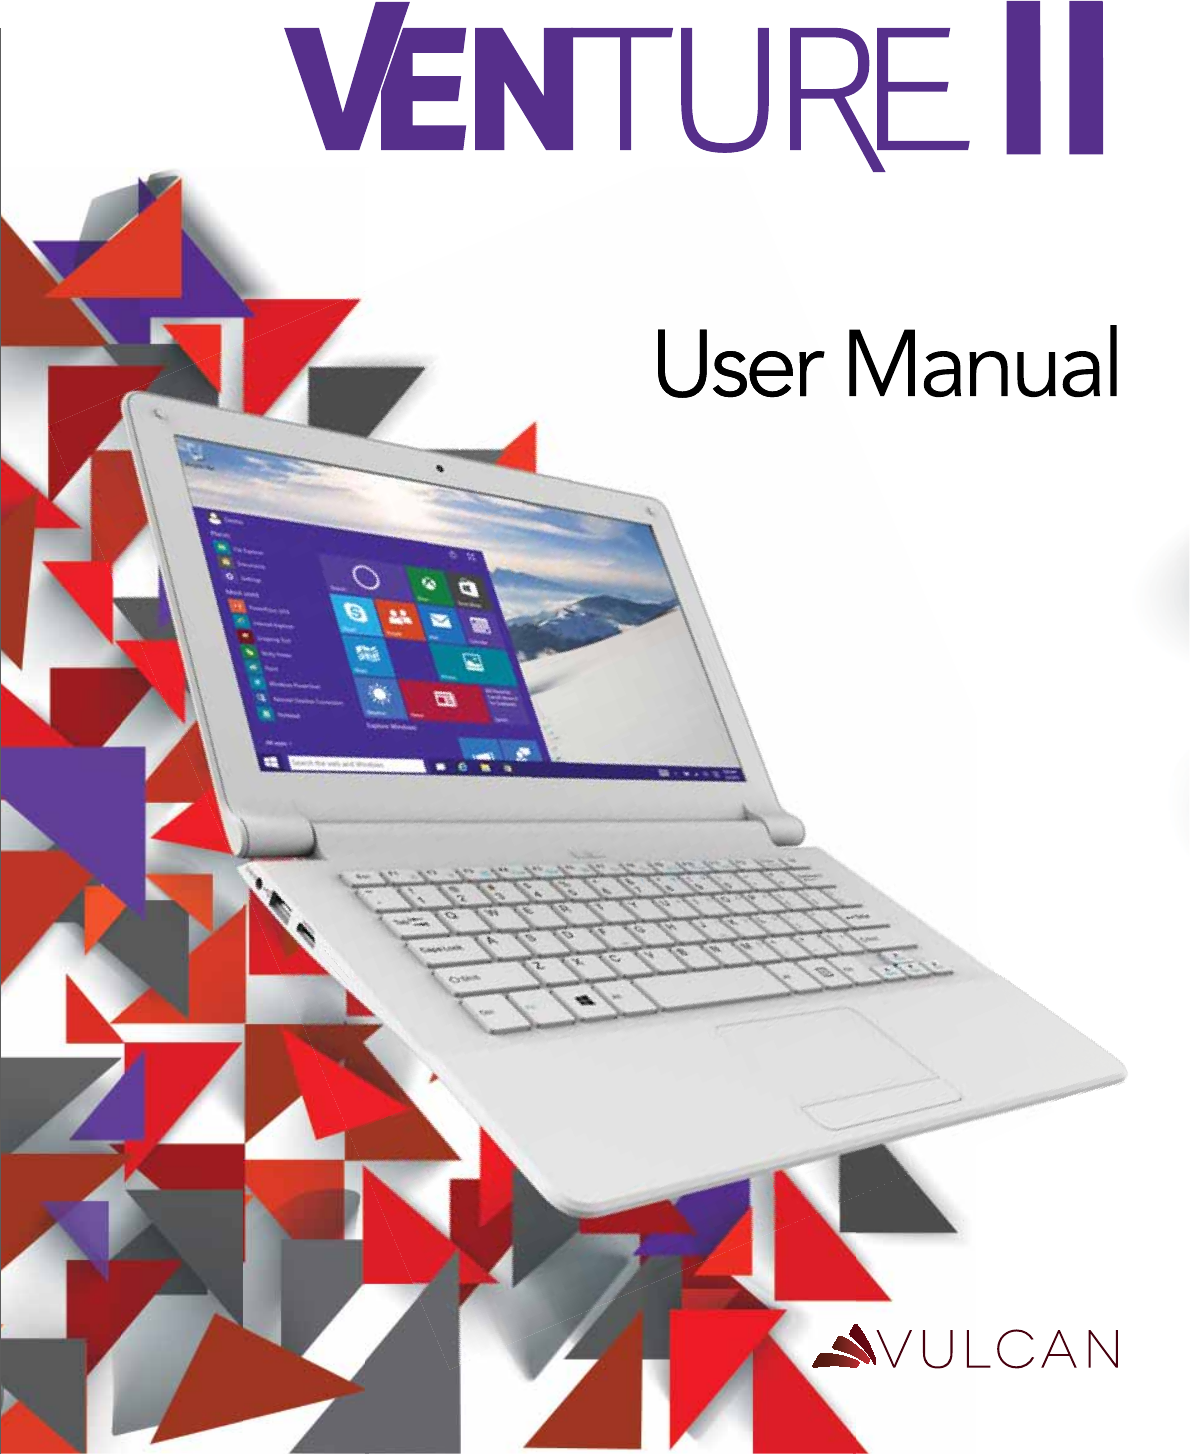
Appearance
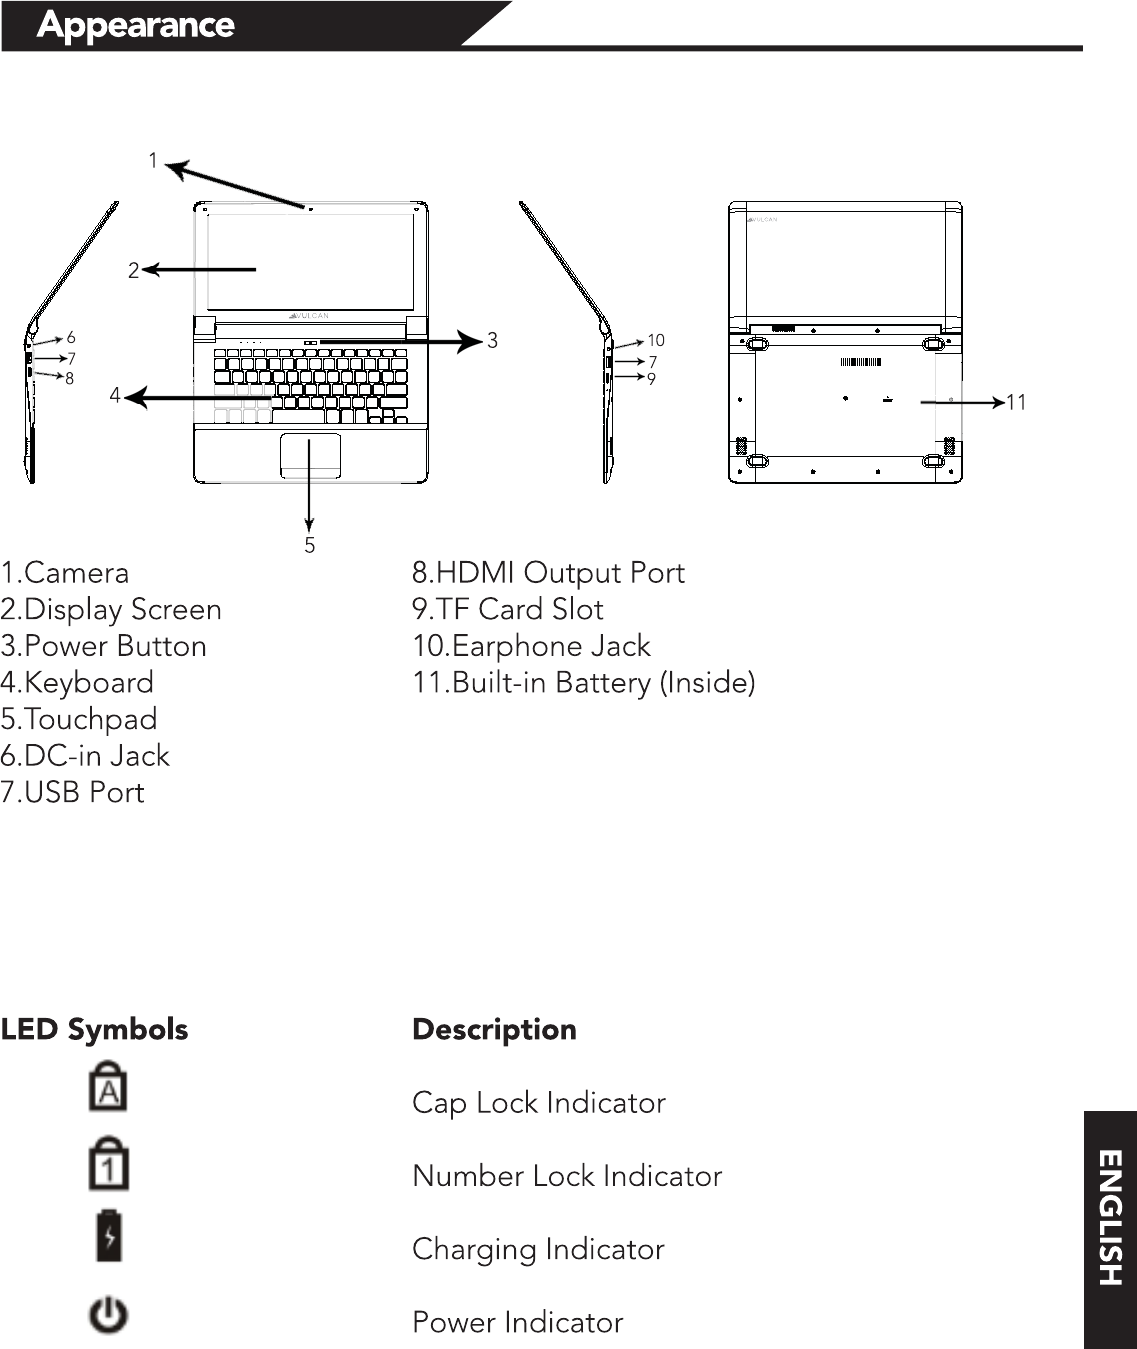
Using the Touchpad
The touchpad with its buttons is a pointing device that functions as an optional
mouse, which can perform navigation,scrolling and selection functions. The
components of the touchpad are described as follows.
No. Component (WPEVKQP
Touchpad Moves the pointer, selects or
activates items on the screen
Left Touchpad
Button
Equivalent to the left button
of a mouse button
Right Touchpad
Button
Equivalent to the Right button
of a mouse button
Do not use a pen, pencil, marker or any object on the touchpad.
Use only your fingertip.
To set the touchpad preferences in Windows 8.1, select
Settings > Control Panel > Hardware and Sound > Mouse
To use the touchpad as an mouse, press the left and right bottom button, which
provide the same click functions as an external mouse does. To move the
pointer, slide one finger with slight pressure across the TouchPad in the
direction you want the pointer to go.
ENGLISH

(WPEVKQP Left
Touchpad
Button
Right
Touchpad
Button
Touchpad
Select Click once Tap once--
Execute Click twice
quickly Tap twice
quickly
--
Drag Click once and
hold, then slide
your finger across
the touchpad to
drag.
Tap twice
quickly and hold,
then slide your
finger across
the touchpad to
drag.
--
Display
the
contextual
menu
-- Click once --
The touchpad is a pressure sensitive
device that requires proper care to
avoid damage
Do not rest heavy objects on the touchpad
or its buttons
Do not scratch the touchpad with
sharp-pointed objects or your
fingernails.
ENGLISH

6WTPVJG&GXKEG1P
To turn the Tablet On.
Press and hold the Power button.
6QVWTPVJG&GXKEG1HH
1.Press the power button to turn off. Press and hold to shut down.
2.Go to > Power > Shut Down to turn off the tablet.
Storage Card
TF/Micro SD™ cards are available in a wide range of capacities, varying from
128MB to 64GB. Install the TF/Micro SD™ card by inserting in the slot for the
TF/Micro SD™ card. Press gently again to remove.
Note:
When Micro USB port is connected to other devices, please remove USB cable
before turning off tablet.
Basic Operation
ENGLISH

Connect DeXices
#FFC$NWGVQQVJ&GXKEG
Here’s how to add (also call pair) bluetooth device with your device:
1. Turn on the bluetooth device and make it discoverable. To learn how to check
the info that came with your bluetooth device or the manufacturer’s website.
2. Go to , click Settings > Devices > Bluetooth > On
3. Make sure Bluetooth turned on, then wait while windows searches for
bluetooth devices.
4. Follow the onscreen instruction to finish pairing your device for your
accessory requires a pairing code, you’ll be prompted for it. If you don’t know
the code, check the info that came with your device on the manufacturer’s
website.
ENGLISH

ENGLISH
Account Setup
New account setup and sign in
A Microsoft account is the email address and password that you use to sign in
to services like Outlook.com, OneDrive, Windows Phone, and Xbox. If you use
an email address and password to sign in to these Microsoft services, then you
already have a Microsoft account. To switch from a local account to a Microsoft
account:
1. Go to , click Settings > Account > Your Account > Connect to a Microsoft
account.
2. Sign in to your Microsoft Account. If you do not have an account or more
than one person uses your device, you can create a new account to sign in and
personalize everything. Select Add a Microsoft Account and follow the
onscreen instruction.
To create a user account
To create another user, Go to , click Settings > Account > Family & other
users > Add Family or Add someone else to this PC. Follow the onscreen
instruction. You can setup the new account as an Administrator, Standard User,
or Child.
(COKN[5CHGV[
Family Safety is an integrated part of Windows, so it's easier than ever to keep
track of when and how your kids use the device.
6QUGVWRCPFOCPCIG(COKN[5CHGV[
Go to , click settings > Account > Family & other users > Add Family
> Add a minor. Follow the onscreen instruction. You can set limits on
exactly which websites, apps, and games they're allowed to use.

#EEQWPV5GVWREQPV
Unlock and sign in
Here’s how to unlock and sign in to your device:
1. Press a key, or press and release the Power button.
2. Dismiss the lock screen by swiping up from the bottom edge of the screen or
pressing a key.
3. If prompted, type the password for your account. If you want to sign in with a
different account, tap or click the Back button.
To create or change a password
1. Go to , click Settings >Account > Sign-In Options.
2. You have the choice of Password, Picture password, and PIN
2. Click Add and follow the onscreen instructions.
3. If you already have a password, click Change and follow the onscreen
instructions.
Choose when a password is required
You can choose when a password is required to sign in.
1. Go to , click Settings >Account > Sign-In Options.
2. Select your choice under Password Policy.
ENGLISH

This device has built-in Wi-Fi that you can use to connect to a wireless network.
If you don’t know your wireless network password, use the info below to find it.
(KPF[QWTRCUUYQTFQP[QWTJCTFYCTG
Some wireless router manufacturers set a default security key or password
which may be on the bottom of your router or in the router’s documentation.
Look for the following terms:
Security Key
Wireless Key
WPA Key
WPA2 Key
WEP Key
(KPF[QWTRCUUYQTFQPC9KPFQYU2%
If you have a computer running Windows that is connected to your wireless
network, you can find the password by doing the following:
9KPFQYU(KPF[QWTRCUUYQTF
Step 1: Go to , click Settings
Step 2: In the Find a setting box, enter “view network connections”, and in
the search results tap or click View network connections.
Step 3: In the Network Connections window, press and hold or right-click the
network name, and then tap or click Status.
Step 4: Tap or click the Wireless Properties button.
Step 5: Tap or click the Security tab, and tap or click the Show characters
check box.
Step 6: The password for the wireless network is displayed in the Network
security key field.
9KƂ
ENGLISH

Find and open apps Like the Start button in previous versions of Windows,
the Start screen is where you go to start apps. This can run two types of apps:
Windows Store apps—such as Music, Mail, and Weather.
Desktop apps—such as Notepad and Office . To find an app or program on
your device:
Apps view. Swipe up from the center of the Start screen (or click on the
lower-left of Start). A list of apps appears. Type an app name or scroll to see
all your apps.
Use Search. Open the Search charm, and type an app name like Skype or
Outlook.
If you don’t see the app or program you want, look in the Windows
Store.
You can also start desktop apps from the desktop. You can create shortcuts for
desktop apps or pin the desktop apps that you frequently use to the taskbar.
For info about this, see How to use the taskbar on Windows.com.
Apps and Programs
ł
ł
ł
ENGLISH

6TQWDNGUJQQVKPI
The following sections describe several common issues and solutions.
6JG&GXKEGKUWPCDNGVQUVCTVWR
If the device does not turn on when you press the power button, the
following suggestions may help you determine why the computer does
not start up:
ł
If the computer is plugged into an AC outlet, plug another electrical device
into the outlet to be sure that the outlet is providing adequate power.
NOTE:
Use only the AC adapter provided with the computer or one
approved by ConnectCe for this computer.
ł
If the computer is plugged into an external power source other than an AC
outlet, plug the device into an AC outlet using the AC adapter. Be sure
that the power cord and AC adapter connections are secure.
ENGLISH
6TQWDNGUJQQVKPI
If the device is turned on but is not responding to software or keyboard
commands, try the following emergency shutdown procedures, in the
sequence provided, until shutdown occurs:
CAUTION:
Emergency shutdown procedures result in the loss of
unsaved information.
ł
Hold the power button for at least 5 seconds.
ł
ł
6JGFGXKEGKUWPWUWCNN[YCTO
It is normal for the device to feel warm to the touch while it is in use.
If you suspect that the computer is overheating, allow the computer to
cool to room temperature.
WARNING!
To reduce the possibility of heat-related injuries or of
overheating the computer, do not place the device directly on your
lap. Use the device only on a hard, flat surface. Also, do not allow
the AC adapter to contact the skin or a soft surface, such as pillows
or rugs or clothing, during operation.
ENGLISH

6TQWDNGUJQQVKPI
+HVJGUETGGPKUDNCPMDWV[QWJCXGPQVVWTPGFQHHVJGEQORWVGTQPGQT
OQTGQHVJGUGUGVVKPIUOC[DGVJGECWUG
The device may be in the Sleep state. To exit Sleep, briefly press the power
button. Sleep is an energy-saving feature that turns off the display. Sleep can be
initiated by the system while the computer is on but is not in use, or when the
computer has reached a low battery level. To change these and other power
settings, right-click the Battery icon on the Windows desktop in the notification
area, at the far right of the taskbar, and then click Preferences.
5QHVYCTGKUHWPEVKQPKPICDPQTOCNN[
If the software is unresponsive or responds abnormally, restart the
computer by point/touch to the right side of the screen. When the charms
display, click Settings. Click the Power icon, and then click Shut down. If
you cannot restart the computer using this procedure, see the previous
section, The computer is on but not responding.
ENGLISH

6TQWDNGUJQQVKPI
(QNNQYVJGUGUWIIGUVKQPUKHCPGZVGTPCNFGXKEGFQGUPQVHWPEVKQPCUGZRGEVGF
ł
Turn on the device according to the manufacturer's instructions.
ł
Be sure that all device connections are secure.
ł
Be sure that the device is receiving electrical power.
ł
Be sure that the device, especially if it is older, is compatible with the operating system.
ł
Be sure that the correct drivers are installed and updated.
The wireless network connection is not working
If a wireless network connection is not working as expected, follow these suggestions:
ł
To enable or disable a wireless or wired network device, right-click the Network
Connection icon on the Windows desktop in the notification area, at the far right of the
taskbar. To enable devices, select the check box from the menu option. To disable the
device, clear the check box.
ł
Be sure that the wireless device is turned on.
ł
Be sure that the computer wireless antennas are free from obstructions.
ł
Be sure that the cable or DSL modem and its power cord are properly connected and
that the lights are on.
ł
Be sure that the wireless router or access point is properly connected to its power adapter
and to the cable or DSL modem, and that the lights are on.
ł
Disconnect and then reconnect all cables, and turn the power off and then back on.
ENGLISH

%NGCPKPI[QWTEQORWVGT
Cleaning products
Use the following products to safely clean and disinfect your device:
łDimethyl benzyl ammonium chloride 0.3 percent maximum
concentration (For example: germicidal disposable wipes. These wipes
come in a variety of brand names.)
łAlcohol-free glass cleaning fluid
łWater with mild soap solution
łDry microfiber cleaning cloth or a chamois (static-free cloth without oil)
łStatic-free cloth wipes
CAUTION:
#XQKd the following cleaning products:
Strong solvents, such as alcohol, acetone, ammonium chloride,
methylene chloride, and hydrocarbons, which can permanently
damage the surface of the computer.
Fibrous materials, such as paper towels, which can scratch the device.
Over time, dirt particles and cleaning agents can get trapped in the
scratches.
ENGLISH
Cleaning procedures
Follow the procedures in this section to safely clean your device.
WARNING! To prevent electric shock or damage to components
do not attempt to clean your computer while it is turned on:
Turn off the device.
Disconnect external power.
Disconnect all powered external devices.
CAUTION: Do not spray cleaning agents or liquids directly on any
device surface. Liquids dripped on the surface can permanently
damage internal components.
%NGCPKPIVJGFKURNC[
Gently wipe the display using a soft, lint-free cloth moistened with an
alcohol-free glass cleaner. Be sure that the display is dry before closing
the display.
%NGCPKPIVJGUKFGUCPFEQXGT
To clean and disinfect the sides and cover, use a soft microfiber cloth or
chamois moistened with one of the cleaning solutions listed previously
or use an acceptable germicidal disposable wipe.
NOTE:
ENGLISH

Vulcan Electronics
© 2016
All Rights Reserved
Bluetooth is a trademark owned by its proprietor and used by Vulcan Electronics under license. Intel and
Atom are trademarks of Intel Corporation in the U.S. and other countries. Microsoft and Windows are U.S.
registered trademarks of Microsoft Corporation.
The information contained herein is subject to change without notice. The only warranties for Vulcan
Electronics and services are set forth in the express warranty statements accompanying such products
and services.
Nothing herein should be construed as constituting an additional warranty. Vulcan Electronics shall not be
liable for technical or editorial errors or omissions contained herein.
Current Edition: 05/2016
La operación de este equipo está sujeta a las siguientes dos condiciones: (1) es posible
que este equipo o dispositivo no cause interferencia perjudicial y (2) este equipo o disposi-
tivo debe aceptar cualquier interferencia, incluyendo la que pueda causar su operación no
deseada.
#FXGTVGPEKCNota para uso en Mexico
Contact Us
Contact Us
Visit us at http://www.vulcanelectronics.com/
(QTUCNGUKPSWKT[759QTNFYKFG
Email: sales@vulcanelectronics.com
For technical support, please contact Vulcan Electronics.
U.S. and Worldwide
Toll Free Number: 1-855-280-3895
Monday - Friday 8:00 am - 5:00 pm PST
Email: support@vulcanelectronics.com
/GZKEQ5RCPKUJ
Toll Free Number: 1-800-635-5535
Monday - Friday 8:00 am - 5:00 pm PST
Email: soporte@vulcanelectronics.com