WestMicro Digital Technology I2 Watch User Manual Product Manual
Shenzhen WestMicro Digital Technology Co., Ltd Watch Product Manual
User manual

Shenzen West Micro Company Ltd.
33URGXFW0DQXDO
2
Disclaimers
This product manual is designed to illustrate the steps to set up and
connect the product, as well as its various functions.
x Before you start using the product, please read the entire product
manual to ensure proper usage and safety precautions are taken.
x Description is based on the default settings of the device.
x Images and screenshots may differ in appearance from the actual
product.
x Content may be different from the final product, but also may be
associated with the service provider or software provided by
different operators. Subject to change without notice.
x Available features and additional services may vary by device,
software, or service provider.
x Applications and their functions may vary by country, region, or
hardware specifications.
x The Company is not responsible for the performance problems or
incompatibility resulted from unauthorized modification of the
device or its operating system software. Attempt to customize
the operating system or application may result in an inoperable
equipment.
x The software, the sound source, wallpaper, images, and other
media provided in the device have been authorized for limited use
with this product only. Reusing of this data for other commercial
or non-commercial purposes is a violation of copyright law. The
3
Company is not responsible for the violation resulted from illegal
usage of these copyrighted materials; the user should take full
responsibility.
x The device may need update of the pre-installed application at
any time, without prior notice. If you have support questions
about the applications that came with the device, please contact
our service center. For user-installed applications, please contact
your service provider.
x Modifying the device's operating system or software installed
from unofficial sources, may result in equipment malfunction and
damage or loss of data. These actions violate our license
agreement, and will void your warranty.

4
Compatibility Notice
This equipment has been tested and found to comply with the limits for
a Class B digital device, pursuant to part 15 of the FCC Rules. These limits
are designed to provide reasonable protection against harmful
interference in a residential installation. This equipment generates, uses
and can radiate radio frequency energy and, if not installed and used in
accordance with the instructions, may cause harmful interference to
radio communications. However, there is no guarantee that interference
will not occur in a particular installation. If this equipment does cause
harmful interference to radio or television reception, which can be
determined by turning the equipment off and on, the user is encouraged
to try to correct the interference by one or more of the following
measures:
x Reorient or relocate the receiving antenna.
x Increase the separation between the equipment and receiver.
x Connect the equipment into an outlet on a circuit different from
that to which the receiver is connected.
x Consult the dealer or an experienced radio/TV technician for help.
Caution: Any changes or modifications to this device not explicitly
approved by manufacturer could void your authority to operate this
equipment.
This device complies with part 15 of the FCC Rules. Operation is subject
to the following two conditions: (1) This device may not cause harmful
Caution: Any changes or modifications not expressly approved by the
party responsible for compliance could void your authority to operate
the equipment.

5
interference, and (2) this device must accept any interference received,
including interference that may cause undesired operation.
This equipment complies with FCC RF radiation exposure limits set forth
for an uncontrolled environment. This device and its antenna must not
be located or operating in conjunction with any other antenna or
transmitter.
This device complies with Industry Canada licence-exempt RSS standard(s).
Operation is subjectto the following two conditions: (1) this device may not
cause interference, and (2) this devicemust accept any interference, including
interference that may cause undesired operation of thedevice.
Le présent appareil est conforme aux CNR d'Industrie Canada applicables aux
appareils radioexempts de licence. L'exploitation est autorisée aux deux
conditions suivantes : (1) l'appareil nedoit pas produire de brouillage, et (2)
l'utilisateur de l'appareil doit accepter tout brouillageradioélectrique subi, même
si le brouillage est susceptible d'en compromettre le fonctionnement.
6
Table of Contents
DISCLAIMERS ....................................................................................................................................... 2
COMPATIBILITY NOTICE ........................................................................................................................ 4
TABLE OF CONTENTS ............................................................................................................................ 6
CHARGING THE BATTERY ...................................................................................................................... 7
WARNING ........................................................................................................................................... 7
ATTENTION .......................................................................................................................................... 7
1. IN TR OD UCT ION ............................................................................................................................ 8
MAIN PAGE ......................................................................................................................................... 8
ATTENTION: ......................................................................................................................................... 8
DETAIL PAGE ........................................................................................................................................ 8
HEART RATE PAGE ................................................................................................................................. 9
STEPS PAGE ....................................................................................................................................... 10
SETTINGS MENU ................................................................................................................................. 10
2. EXERCISE MODE ......................................................................................................................... 11
3. SETTING THE ALARM.................................................................................................................. 12
4. USING BLUETOOTH .................................................................................................................... 14
5. USER PROFILE SETTINGS ............................................................................................................ 15
6. SYSTEM SETTINGS ...................................................................................................................... 17
TIME AND DATE SETTINGS ..................................................................................................................... 17
BEEP TONE SETTING ............................................................................................................................ 18
DISPLAY MODE SETTING ....................................................................................................................... 19
MEMORY FORMAT .............................................................................................................................. 20
PEDOMETER CALIBRATION ..................................................................................................................... 21
RESTORE FACTORY DEFAULTS .................................................................................................................. 22
7. HISTORY ..................................................................................................................................... 22
8. SENSOR SETTINGS ...................................................................................................................... 23
9. MODE SETTINGS ........................................................................................................................ 25
10. ABOUT PAGE .......................................................................................................................... 26
USING THE TOUCH BUTTONS ................................................................................................................. 26
BATTERY INDICATOR ............................................................................................................................. 26
BLUETOOTH ....................................................................................................................................... 27
EQUIPMENT BECOMES HOT TO THE TOUCH ................................................................................................ 27
11. MATERIALS AND ENVIRONMENT PROTECTION...................................................................... 28

7
Charging the battery
Before you use the device for the first time, use the USB cable to charge
the battery by connecting the device to a computer.
Warning
x Use only licensed battery and USB data cable. Unauthorized USB
data cables can cause batteries to explode or damage the device.
Attention
x When battery power is low, the battery icon shows empty.
x If the battery is completely discharged, when the charger is
connected, the device will not be immediately turned on. Let a
depleted battery to charge for a few minutes before switching on
the device.
8
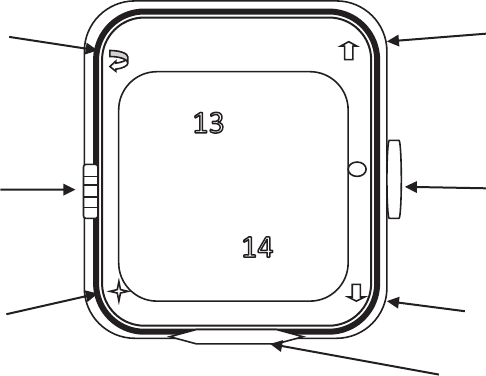
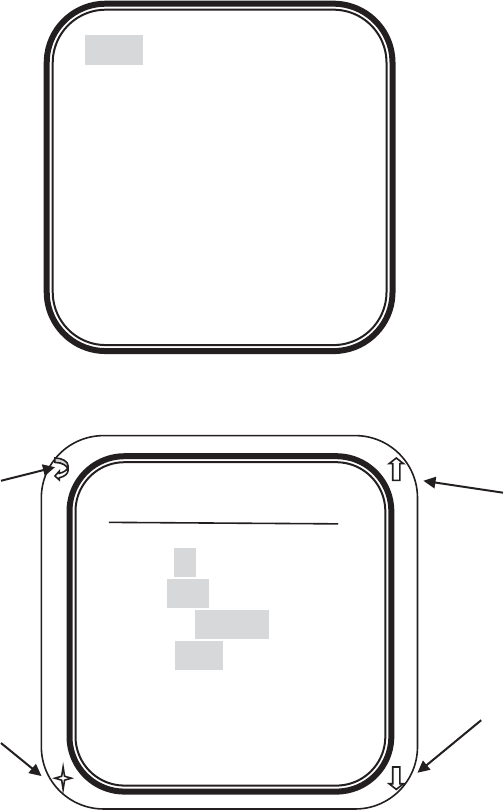
1. Introduction
Main Page
Main Page, standby mode (see Figure 1 below)
Back Touch Button Up Touch Button
USB connector Home Button
Select Touch Button Down Touch Button
Touch Sensor
Figure 1
When this interface is displayed, the system is in standby mode. In this
mode, all touch keys are inactive (or locked). You can use the Home
Button to enable (unlock) the system. Once unlocked, you will see the
Detail Page (Figure 2).
Attention:
x Do not use a screen protector. Otherwise it will cause the sensor
to malfunction.
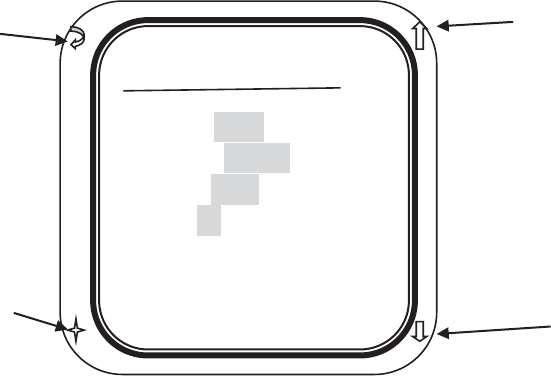
Detail Page
Press the Home button to enter the Detail page:
ihealthTRACK
MON,
NOV 18 2013
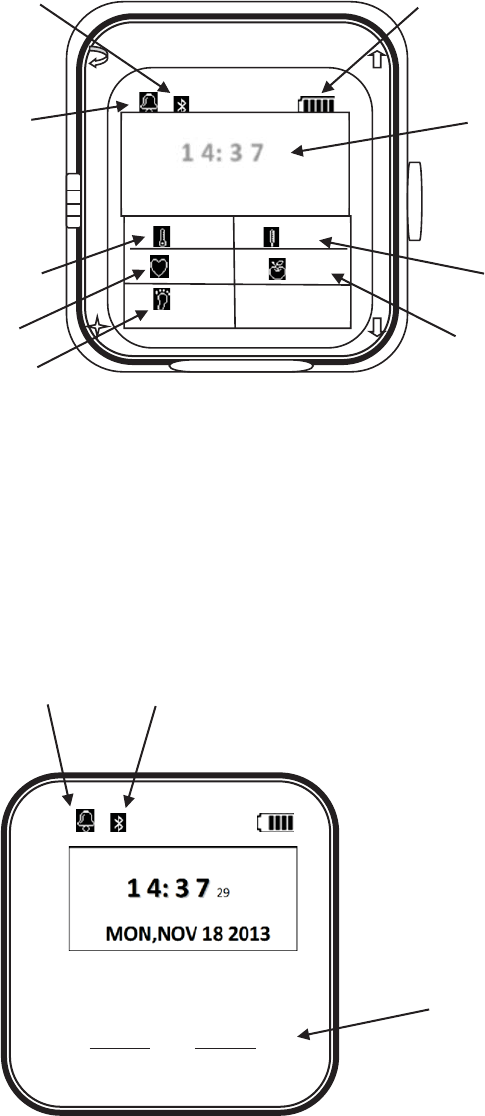
9
Bluetooth Indicator Battery Level Indicator
Alarm Indicator Time and Date
Ambient Temperature Body Temperature
Heart Rate Calories Burned
Steps
Figure 2
Heart Rate Page
Press the Home button again to enter the Heart Rate page (see Figure 3):
Alarm Indicator Bluetooth Indicator
Heart Rate Display
Figure 3
HealthTRACK
1 4: 3 7 29
MON,NOV 18 2013
21.3 27
123
456
10
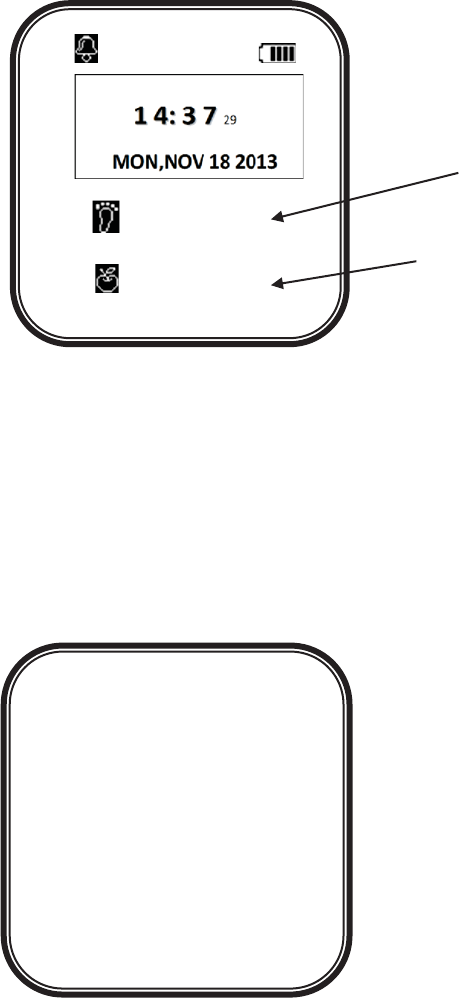
Steps Page
Press the Home button again to enter the Steps Page (see Figure 4):
Steps Display
Calories Burned Display
Figure 4
Settings Menu
Press the Home button again to enter the Settings Menu (see Figure 5):
Figure 5
1234567
987654321
Alarm
Bluetooth
User profile
Se
ttings
History
Sensors
Mode
Abo
ut
Exit
11
2. Exercise Mode
Use this mode to keep track of your steps and information about
exercise to manage your health.
To enter Exercise Mode, from any page press the Home button for three
seconds. You will heard a "beep" sound from the device, and the sensors
will start working (shown in Figure 6). After entering the Exercise Mode,
the device will record your health data from the various sensors.
Home Button Sensors
Figure 6
12
3. Setting the Alarm
Access and change the following settings to control the alarm.
From the Settings Menu, select "Alarm", then OK (See Figure 7), you will
see the information of Figure 8.
Figure 7
Back Touch Button Up Touch Button
Select Touch Button Down Touch Button
Figure 8
In this page, you can use the "Select Touch Button" to select the items
you want to change, and then use the "Up Touch Button" or "Down
Touch Button" to change the values. To save the settings, use the
Alarm
Bluetooth
User profile
Settings
History
Sensors
Mode
Abo
ut
Exit
Alarm
Enable: on
Mode: Daily
Weekday: 1234567
Time: 08:00
ሁsaveሂ ሁcancelሂ
UP/Dn: navigate
13
“Select Touch Button” to navigate the cursor to the ሁSaveሂ position,
then press the “Select Touch Button” to save and exit. You can also use
ሁCancelሂto ignore the selection and return to the previous page.

14
4. Using Bluetooth
Bluetooth can be used to wirelessly connect two devices in close
proximity. To activate Bluetooth, navigate to the Settings Menu, select
"Bluetooth" to navigate to the Bluetooth settings page. You can set the
Bluetooth radio to “Enable” or “Disable”. (See Figure 9 and Figure 10)
Figure 9
Figure 10
Alarm
Bluetooth
User profile
Settings
History
Sensors
Mode
Abo
ut
Exit
Bluetooth
Disable
ሁ
cancelሂ

15
5. User Profile Settings
Users can set basic profile information to enhance the data collection
and analysis of their health data during Exercise Mode.
In the Settings Menu, select "User Profile" to enter the "User Profile"
page. You can use the "Select Touch Button" to select the items you
want to change, and then use the "Up Touch Button" or "Down Touch
Button" to change the values. When the setting is complete, press the
ሁsaveሂ button to save and exit. You can also use theሁcancelሂ
button to discard the changes. (See Figure 11 and Figure 12)
Figure 11
Alarm
Bluetooth
User profile
Settings
History
Sensors
Mode
Abo
ut
Exit
16
Back Touch Button Up Touch Button
Select Touch Button
Down Touch Button
Figure 12
User profile
Gender:
Male
H
eight: 170cm
Weight:
70Kg
Age:
30
ሁsaveሂ ሁcancelሂ
UP/Dn: navigate

17
6. System Settings
Time and Date Settings
To change the Time and Date settings, enter the Settings Page (Figure 13)
Figure 13
From the Settings page, select Time & Date (Figure 14)
Figure 14
Select "Time & Date" to enter specific settings page. You can use "Select
Touch Button" to confirm the items you want to change, and then use
the "Up Touch Button" or "Down Touch Button" to change the setting
value. Select ሁsaveሂto save and exit. Selectሁcancelሂ to discard the
Alarm
Bluetooth
User profile
Settings
History
Sensors
Mode
Abou
t
Exit
Time & Date
Tones
Backlight
Disp
lay Mode
Memory Format
Step
calibration
F
actory default
Exit

18
changes. (See Figure 15)
Figure 15
Beep Tone Setting
You can use this setting to make adjustments to the Beep Tone. Select
Tones to enable or disable the Beep Tone.
Figure 16
Time & Date
Format:
24-hour
Date:
NOV 19, 2013
Time: 12:14
ሁsaveሂ ሁcancelሂ
UP/Dn: navigate
Time & Date
Tones
Backlight
Disp
lay Mode
Memory Format
Step
calibration
F
actory default
Exit

19
Figure 17
Display Mode Setting
You can change the Display Mode Setting using the Display Mode page.
Figure 18
Select Display Mode and you can switch between normal mode and
reverse mode.
Tones
Disable
ሁ
cancelሂ
Time & Date
Tones
Backlight
Disp
lay Mode
Memory Format
Step
calibration
F
actory default
Exit

20
Memory Format
Figure 19
To format the memory, select Memory Format from the Settings Menu.
See Figure 19. The screen will display the progress during formatting.
See Figure 20.
Figure 20
Time & Date
Tones
Backlight
Disp
lay Mode
Memory Format
Step
calibration
F
actory default
Exit
Memory
Format
ting…..
ሁ
cancelሂ

21
Pedometer calibration
You can calibrate the Pedometer using the Step Calibration setup screen.
(See Figure 21)
Figure 21
In the Step Calibration screen, you can enter the distance you want to use
for calibration. Just before you walk the selected distance, select “Start”
to start the calibration. When you finished walking the selected distance,
select “Finish” to complete the calibration. (See Figure 22)
Figure 22
Time & Date
Tones
Backlight
Disp
lay Mode
Memory Format
Step
calibration
F
actory default
Exit
Step calibration
Distance:
1800
ሁ
cancelሂ

22
Restore factory defaults
This setting allows the system to restore the product settings to the
default factory setting values. In the following figure page, click on
Factory default button to enter specific settings page, you can be related
to data recovery.
Figure 23
7. History
Use this page to see history information.
Time & Date
Tones
Backlight
Disp
lay Mode
Memory Format
Step
calibration
F
actory default
Exit
Alarm
Bluetooth
User profile
Settings
History
Sensors
Mode
Aboat
Exit

23
8. Sensor Settings
The sensors are responsible for detecting the various vital signal and
motion signal from the user. When the sensors are enabled, together
they collect information required to meet the transmission, processing,
storage, display and control requirements.
In the Settings Menu page, select Sensors to enter sensor specific
settings page.
Figure 24
Alarm
Bluetooth
User profile
Settings
History
Sensors
Mode
Abo
ut
Exit

24
You can use the "Select Touch Button" to choose the setting you want to
change, and then use the "Up Touch Button" or "Down Touch Button" to
change the setting value. Select ሁsaveሂto save and exit. Select
ሁcancelሂ to discard the changes. (See Figure 25).
Figure 25
Sensors
HRM: on
ECG: on
Amb
-Temp: on
Skin
-temp: on
Accel: on
ሁ ሂ ሁ lሂ

25
9. Mode Settings
You can alter the operating mode of the device using this settings page.
Select the Mode setting to enter the Mode page where you can choose
the different operating modes.
Figure 26
Alarm
Bluetooth
User profile
Settings
History
Sensors
Mode
Abo
ut
Exit

26
10. About Page
Use this setting page to configure the device and set the application
options.
Using the Touch Buttons
You should only use your figure to operate the touch buttons.
x Do not touch contact with other electronic devices. Electrostatic
discharges can cause the Touch Buttons to malfunction.
x To avoid damage to the Touch Buttons, do not use any sharp
objects to touch the Buttons or use fingertips to touch the Buttons
with excessive pressure.
x The device may not recognize the touch near edge of the Touch
Buttons. The edge of the device is not part of the Touch Buttons.
Battery Indicator
Below is a list of battery conditions indicated by the battery indicator:
Battery full, no need to charge.
Battery is somewhat depleted but is operational.
Battery is low on power, need to be recharged soon.
Battery is completely discharged, please recharge immediately.

27
Bluetooth
Below is a list of Bluetooth connection states indicated by the Bluetooth
indicator:
Bluetooth radio is turned on
Bluetooth connection is established
Equipment becomes hot to the touch
When using a power-intensive setting or if the device has being
operating for a long, the device may become hot. This is normal and
does not affect the device's lifespan or performance.

28
11. Materials and Environment Protection
List of products, toxic and hazardous substances or elements.
Part
Name
Toxic and hazardous substances or elements
/HDG
(Pb)
0HUFXU\
(Hg)
&DGPLXP
(Cd)
+H[DYDOHQW
FKURPLXP
(Cr
6+)
PBB
PBDE
Printed
circuit
board
x
o o
o o
o
Plastic
o
o o
o o
o
Metal
x
o o
o o
o
Battery
x
o o
o o
o
Accessories
x
o o
o o
o
O: Indicates that this toxic or hazardous substance contained in all the
homogeneous materials are below the SJ/T11363-2006 standard
limit requirement.
X: Indicates that this toxic or hazardous substance contained in all the
homogeneous materials are above the SJ/T11363-2006 stand limit
requirement.
The information provided in this form is based on data provided by
suppliers and our test results. In the current level of technology, all toxic
and hazardous substances or elements used are deemed to be at its
lowest level. The Company will continue its efforts through improved
technology to reduce the use of these substances and elements.

29
Shenzen West Micro Company Ltd.
Address: Tian Sha International Center
Block A, Suite 2106B (Mail Box: 518102)
Tao Yuan Road, Nanshan District
Shenzhen, China
The
environment protection period of this product is 20
year
s, as indicated by the logo shown to the left. The
environment
protection period of battery and other
replaceable parts
may differ from that indicated by the
product.
The environment protection
period is only in effect
under the normal usage conditions
described in the
"Environmental Protection Use Period"
specification of this
product.
30